Zone Schedules are created to ensure the client is within an Inclusion Zone during a specific timeframe. For example, in a curfew scenario, the client is required to be within the home zone, usually overnight. If the client is outside of the zone during the scheduled timeframe, it is considered a violation. By associating a schedule with the zone, an Inclusion Zone Violation event will be generated and displayed on the SCRAMNET GPS Dashboard, and notifications will be sent.
This article’s topics include:
Creating a Basic Curfew (Home Zone) Schedule
Once the zone is created, the next step is to associate a schedule with the zone.
Add a Home Zone Schedule
- From the Zones tab, select the Schedule button,
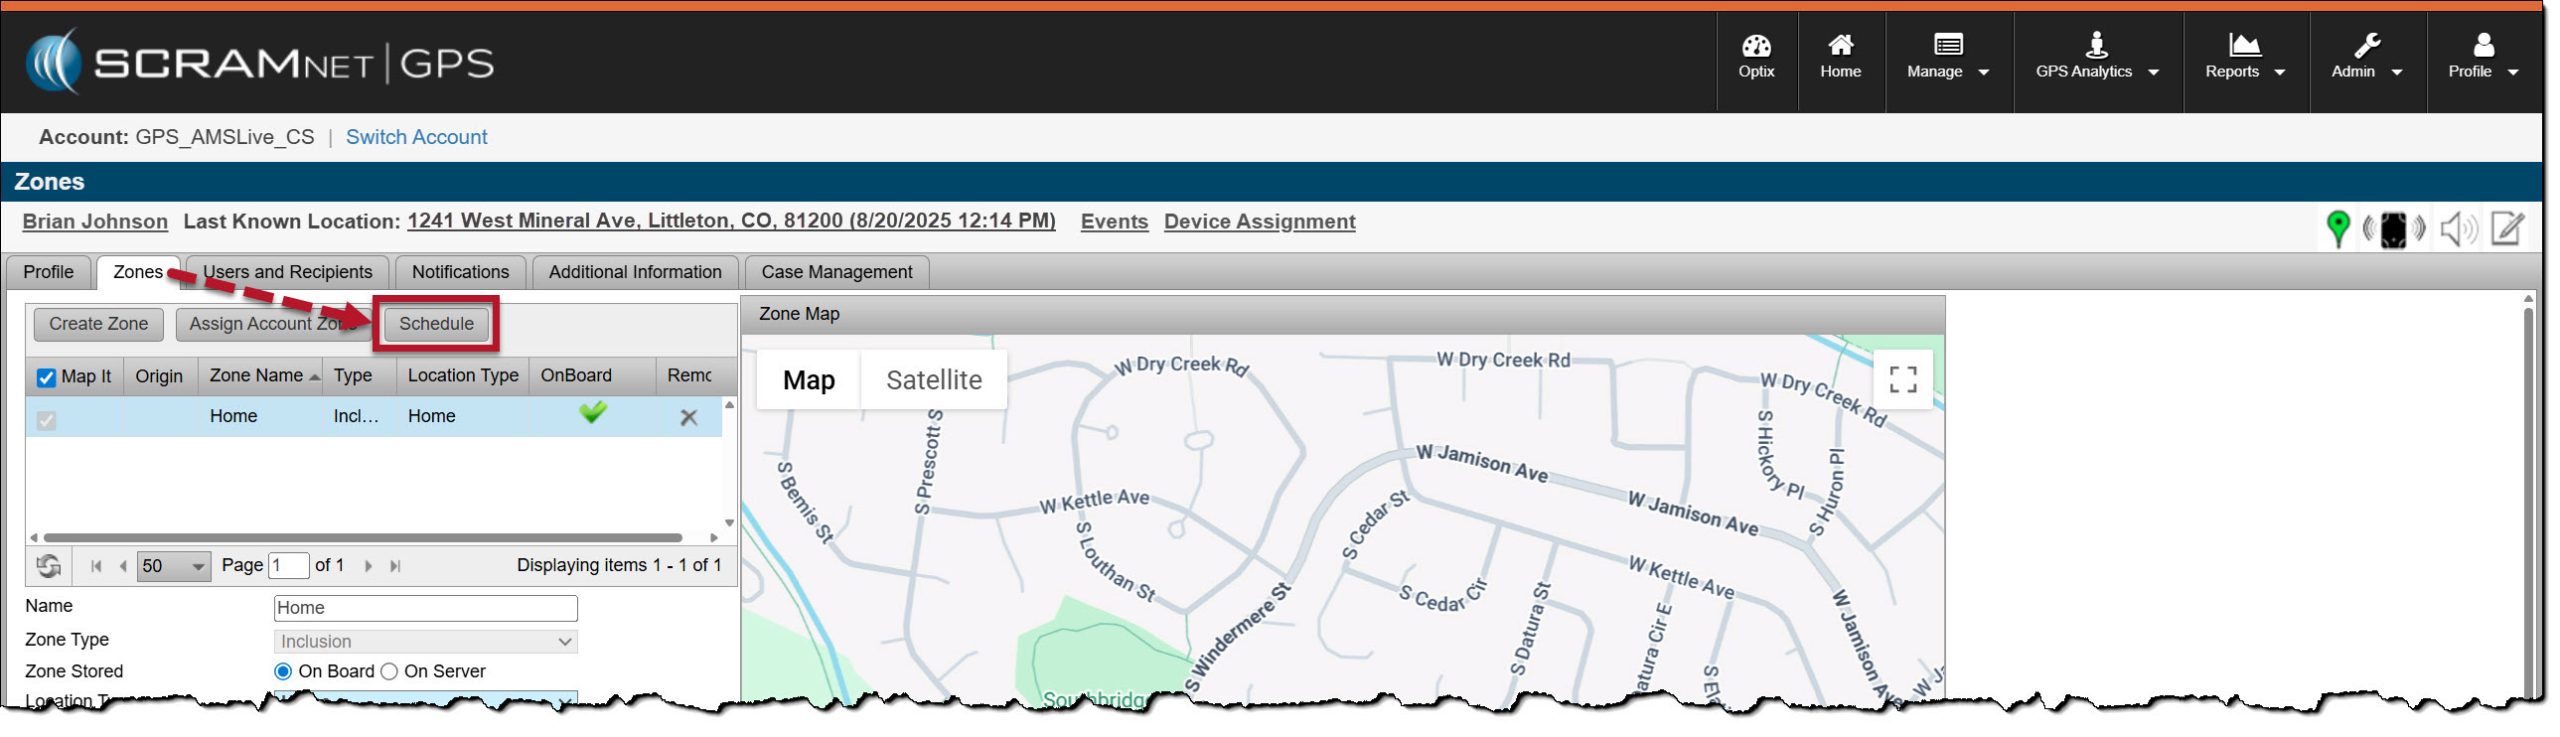
Client’s Zones Page – click to enlarge
or from the Profile Summary pop-up window, select the +Add hyperlink next to the Schedule heading.
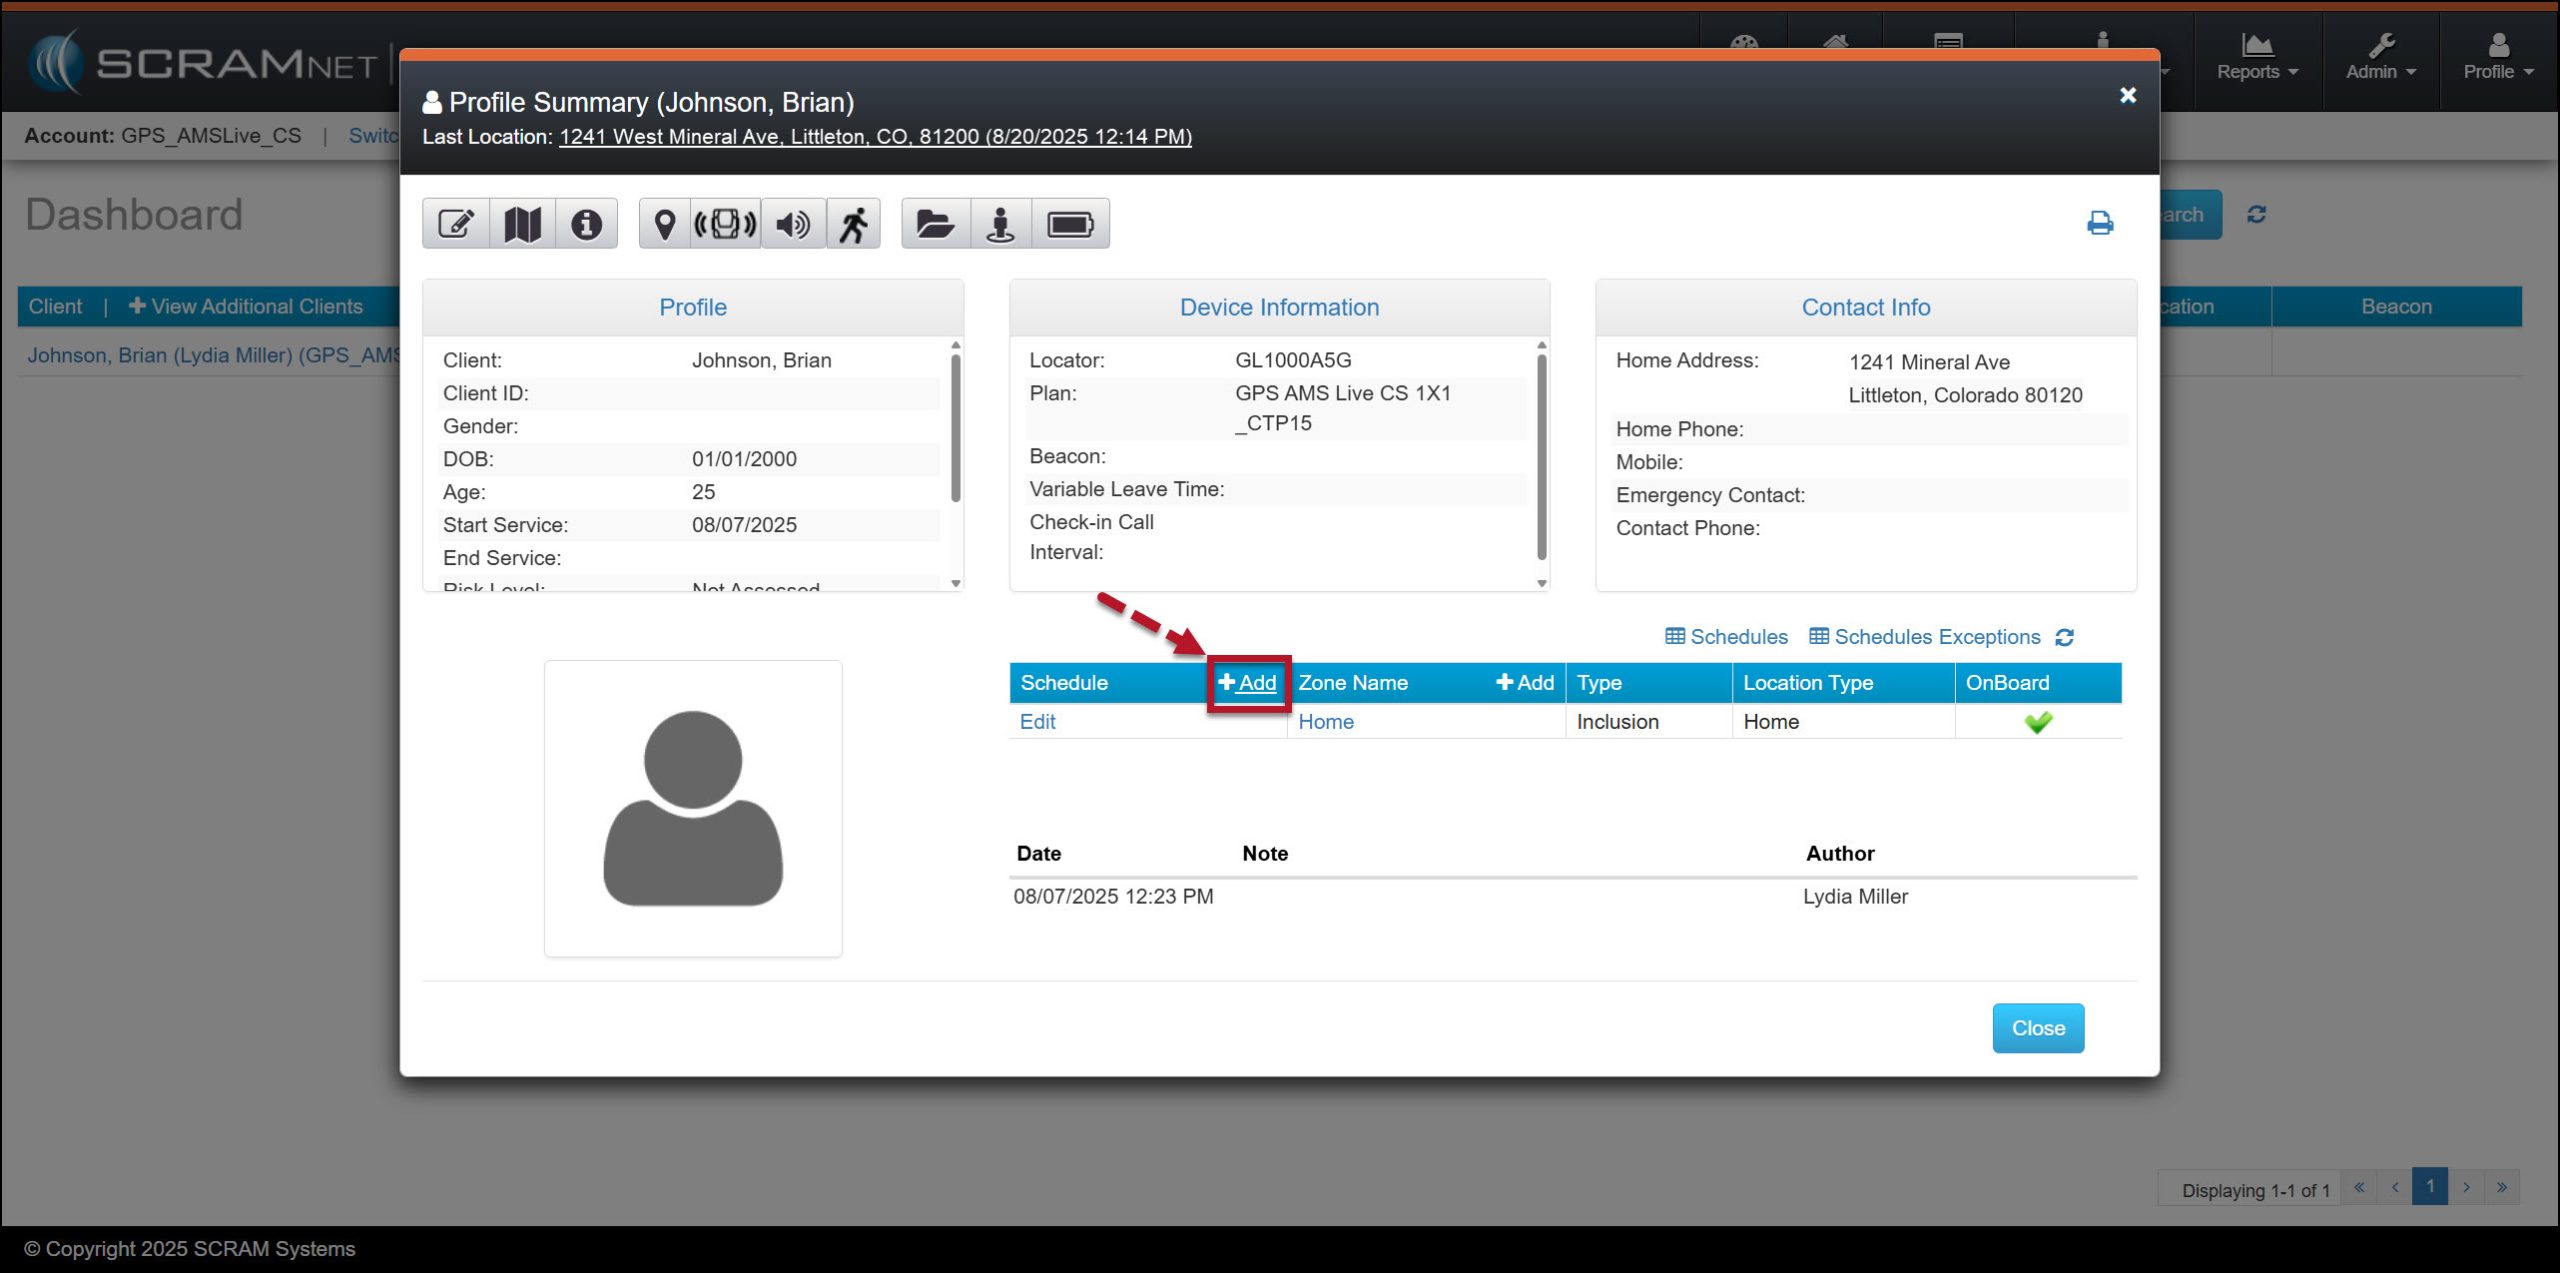
Client’s Profile Summary Pop-up Window – click to enlarge
- On the Zones and Schedule page: Left-click and drag with your mouse in the white area on the next future day of the week to open the Scheduled Details pop-up window.
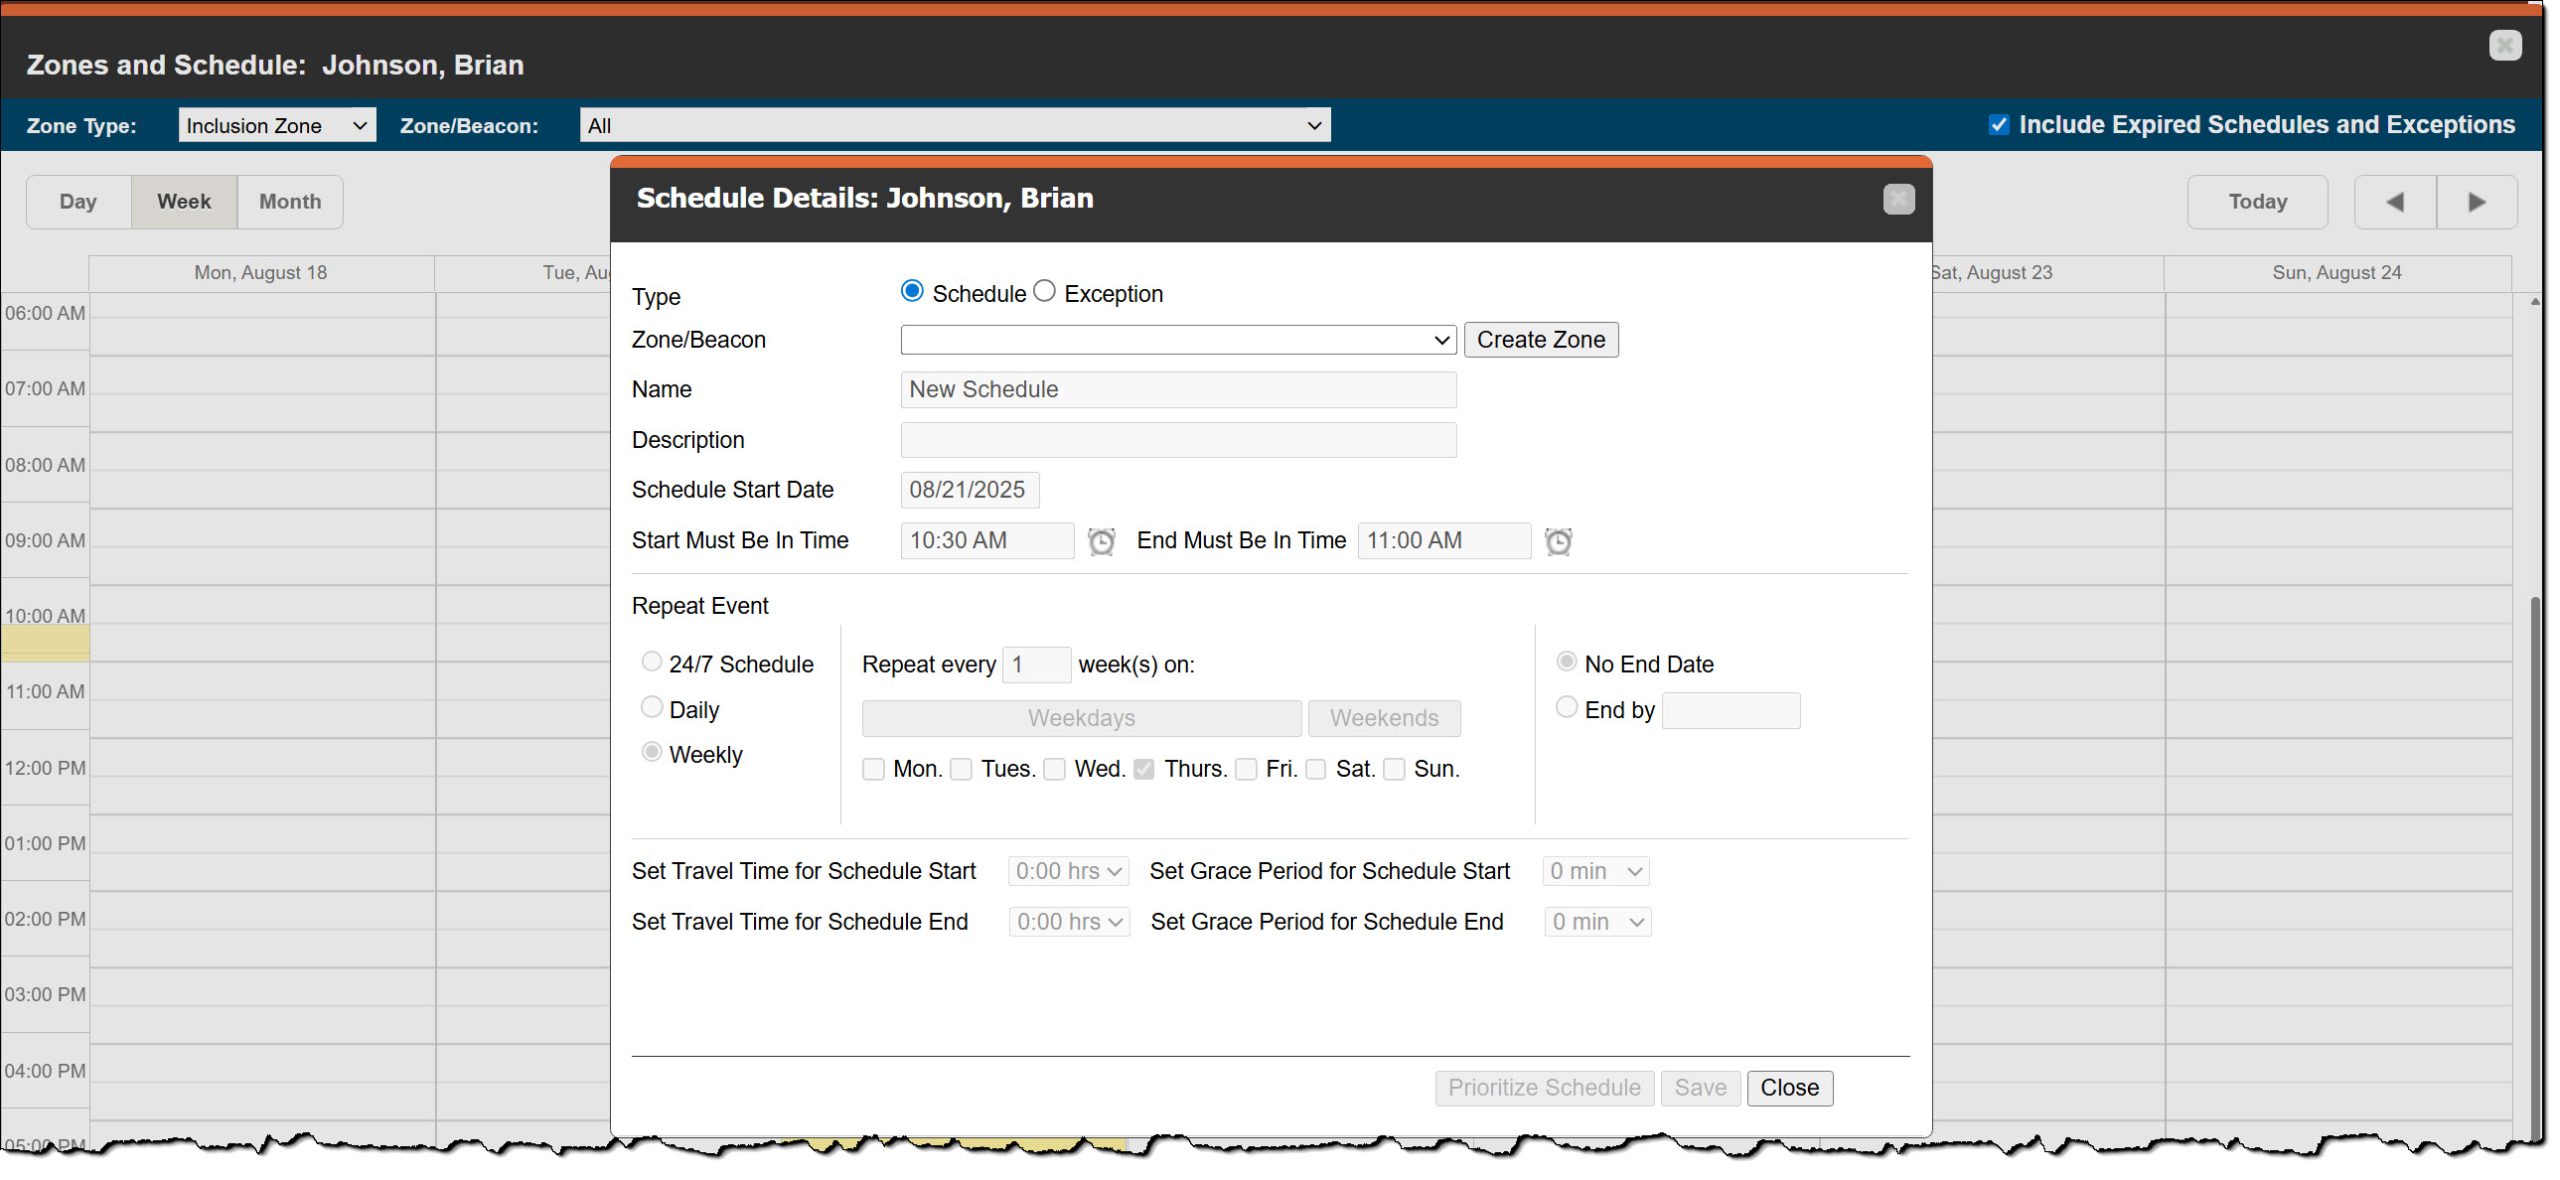
Schedule Details Pop-up Window – click to enlarge
On the Schedule Details pop-up window, enter the details for the schedule.
- Leave the Type selection at the default setting of Schedule, and then open the “Zone/Beacon” dropdown menu and select the Home (Inclusion)
- Optional – You may add a description.
- Enter the Schedule Start Date. For this example, the schedule will start tonight, so today’s date is selected.
Tip: You are not able to create a schedule that begins in the past.
- Enter the “Start Must Be in Time” by typing in the time or select the clock icon to choose the time from a list.
- Repeat this process in the “End Must Be in Time” field.
- In the Repeat Event section, select the appropriate radio buttons to meet the monitoring requirements. For our example, this curfew is a Daily requirement that repeats every weekday with no end date.
- In this scenario, no travel time is required.
- You may set a Grace Period for the start and end timeframe of the schedule. For example, if you set these fields to 10 minutes each, the client may enter the Home zone up to 10 minutes after the “Start must be in Time” to arrive home a little late, and may leave their Home zone up to 10 minutes before the “End Must Be in Time” to depart home early.
- Once all fields have been entered, select the Save button.
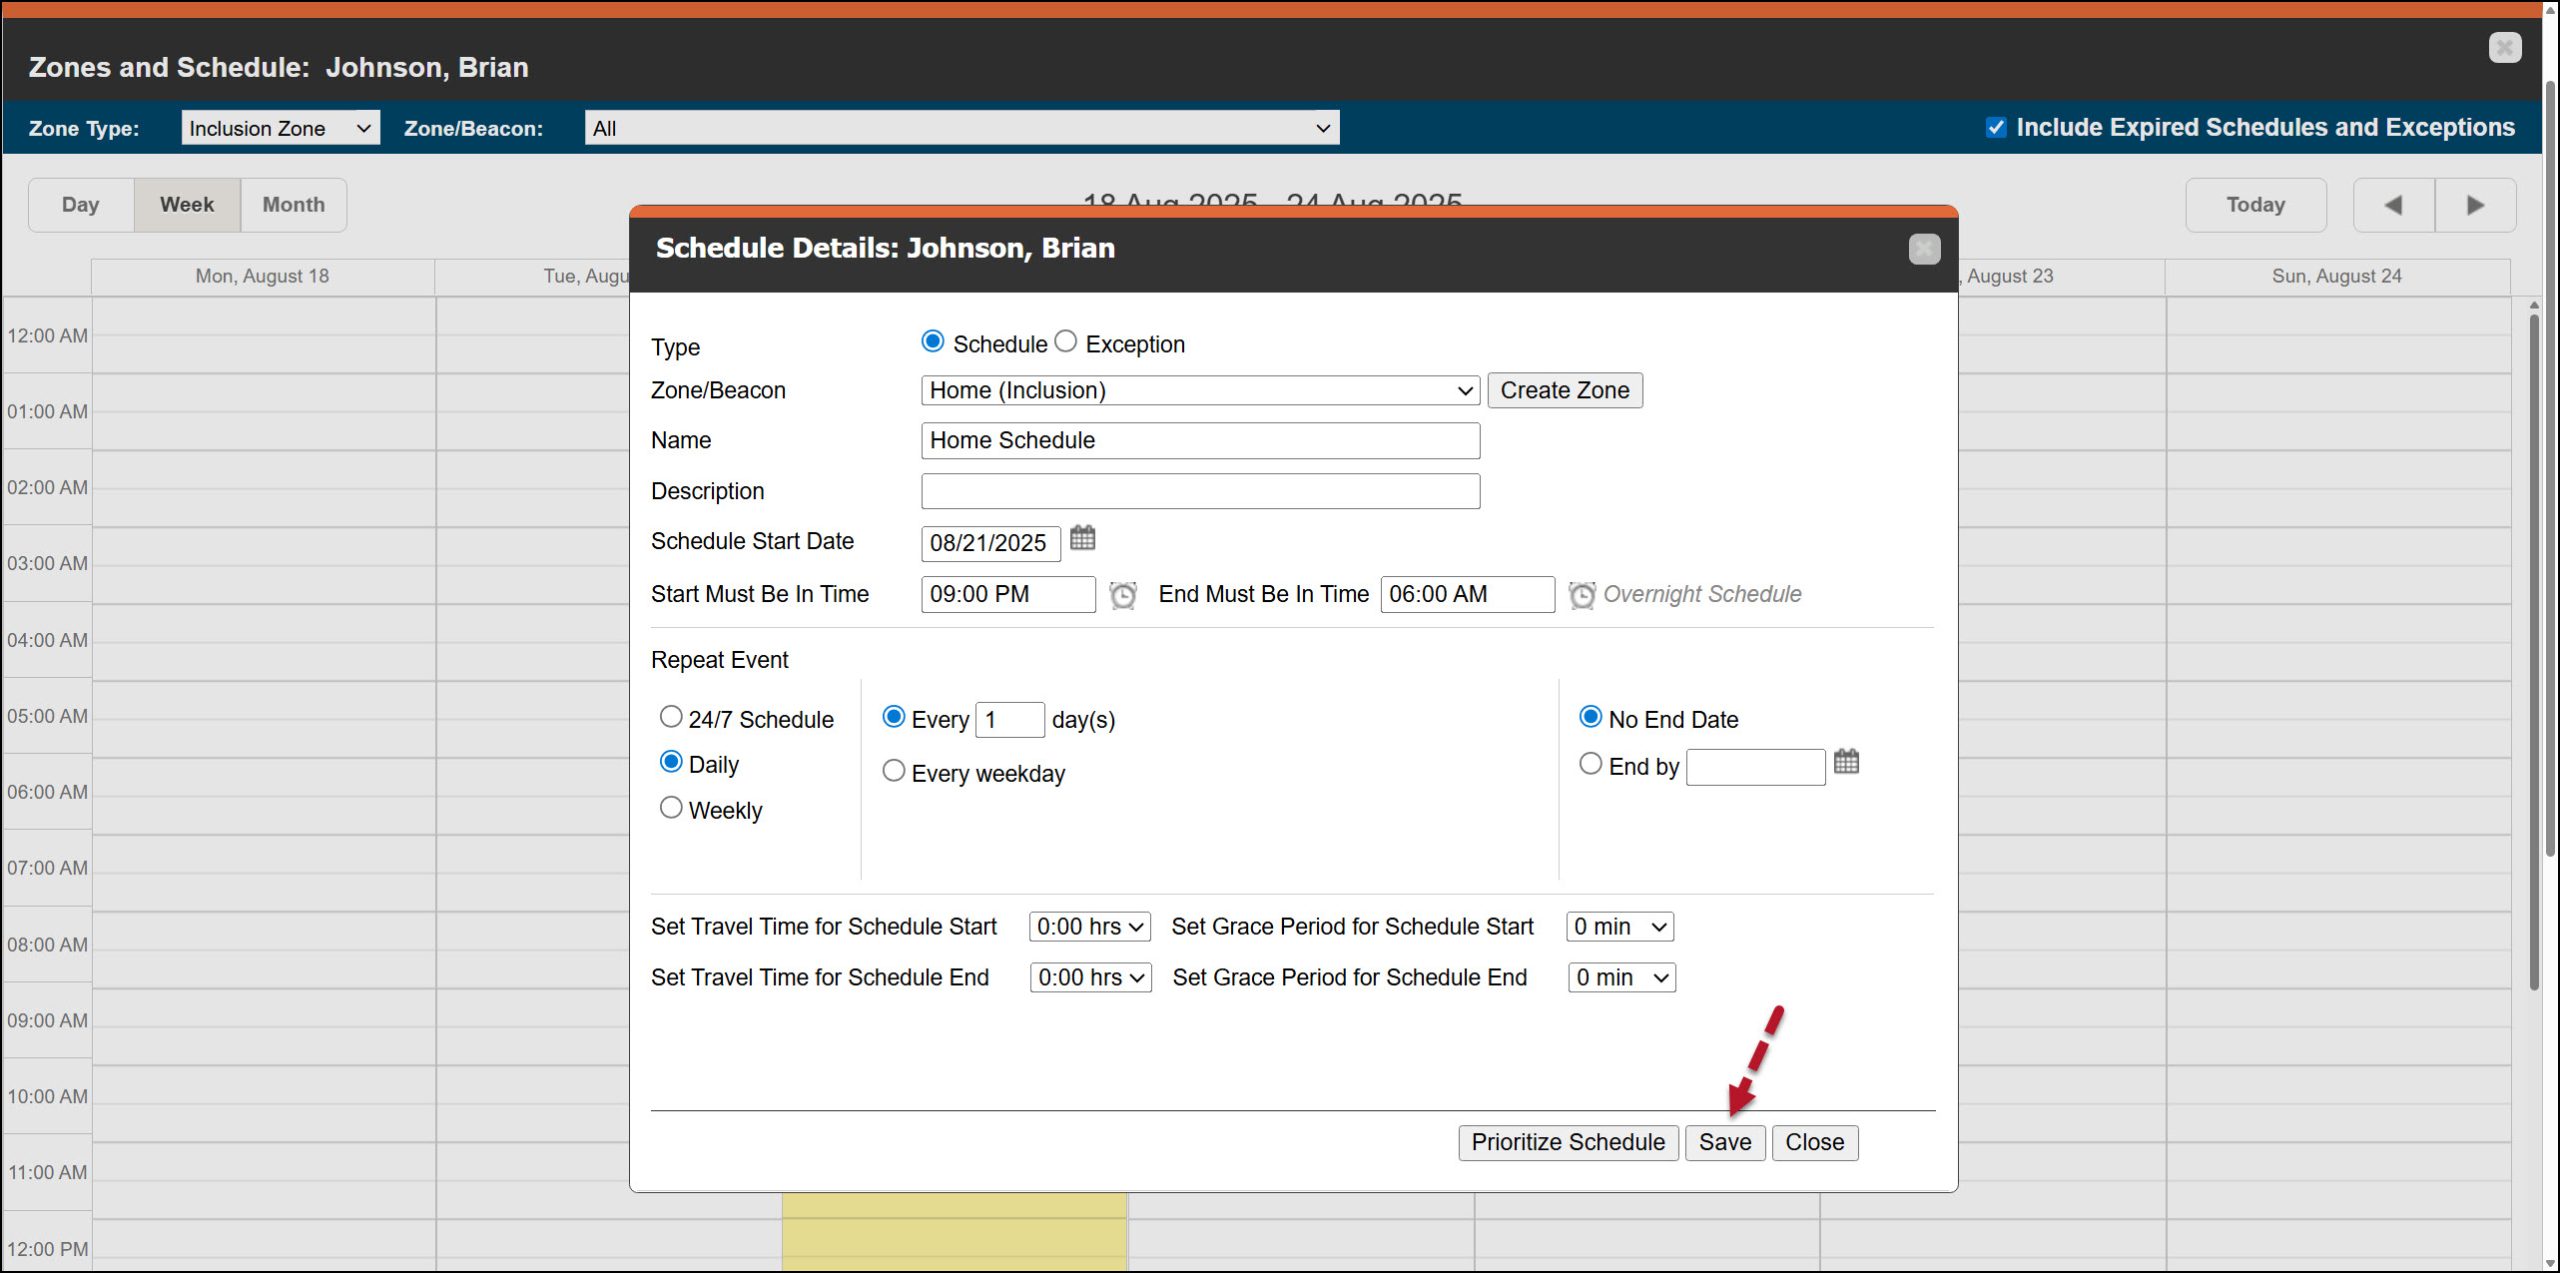
Schedule Details Pop-up Window With Entry Fields Completed – click to enlarge
- On the Save Changes pop-up window, acknowledge that you intended to create an overnight schedule by selecting the Yes button.
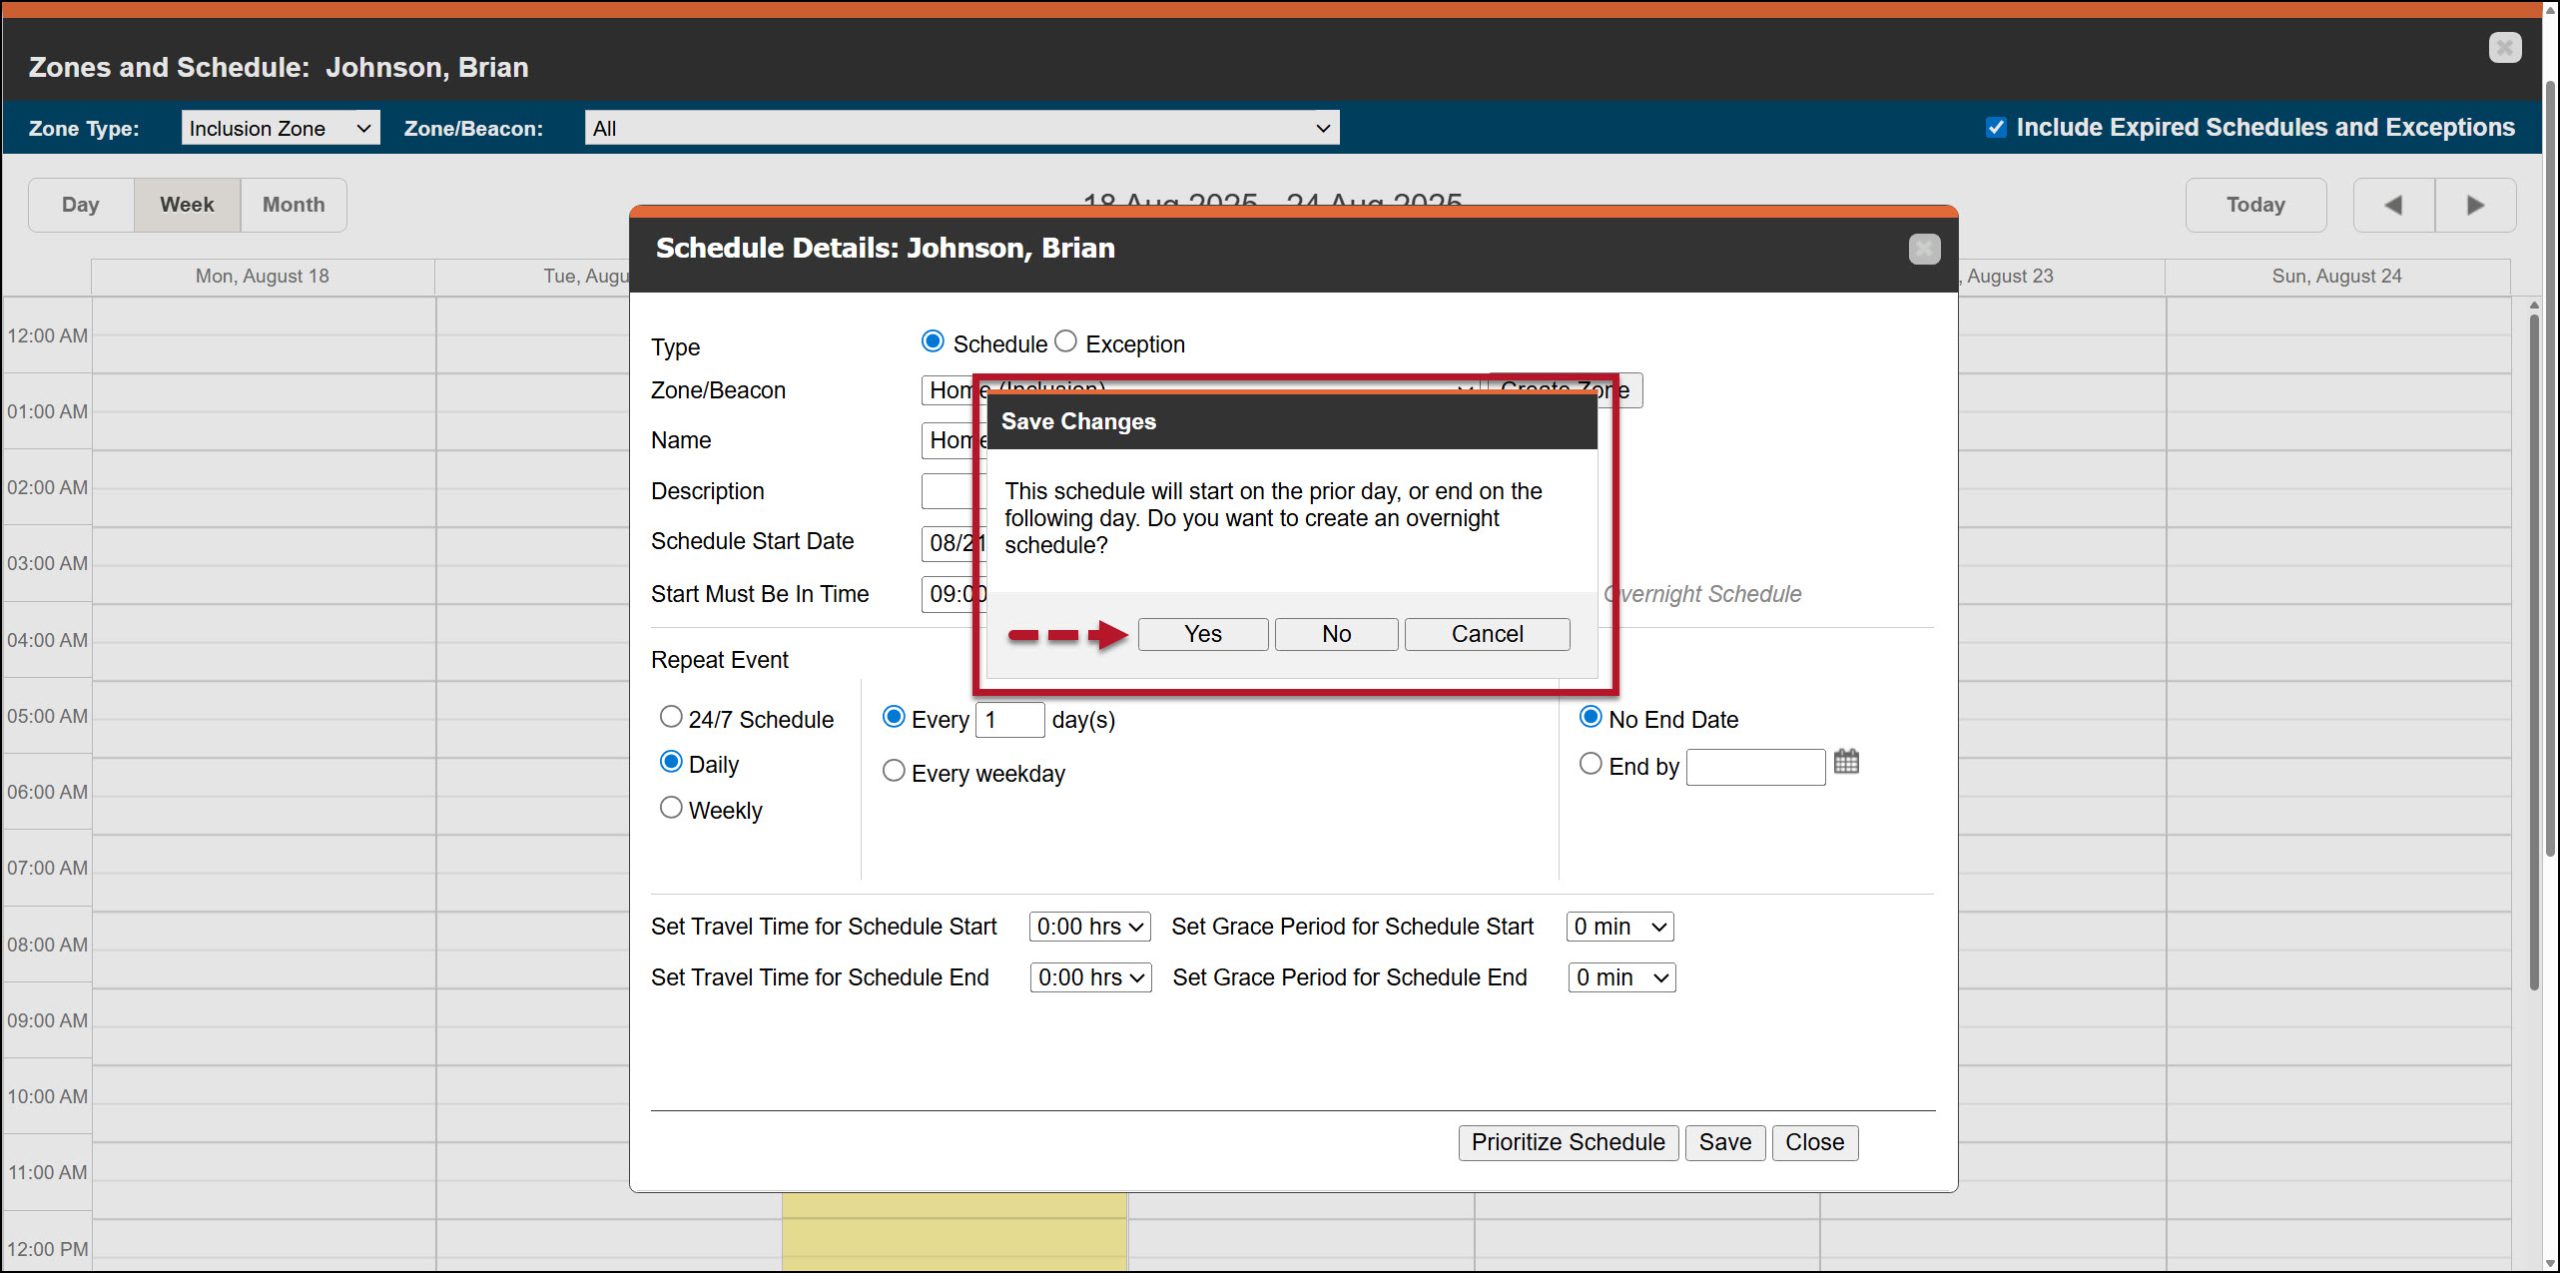
Overnight Acknowledgement Save Changes Pop-up Window – click to enlarge
Once saved, the schedule is displayed on the calendar.
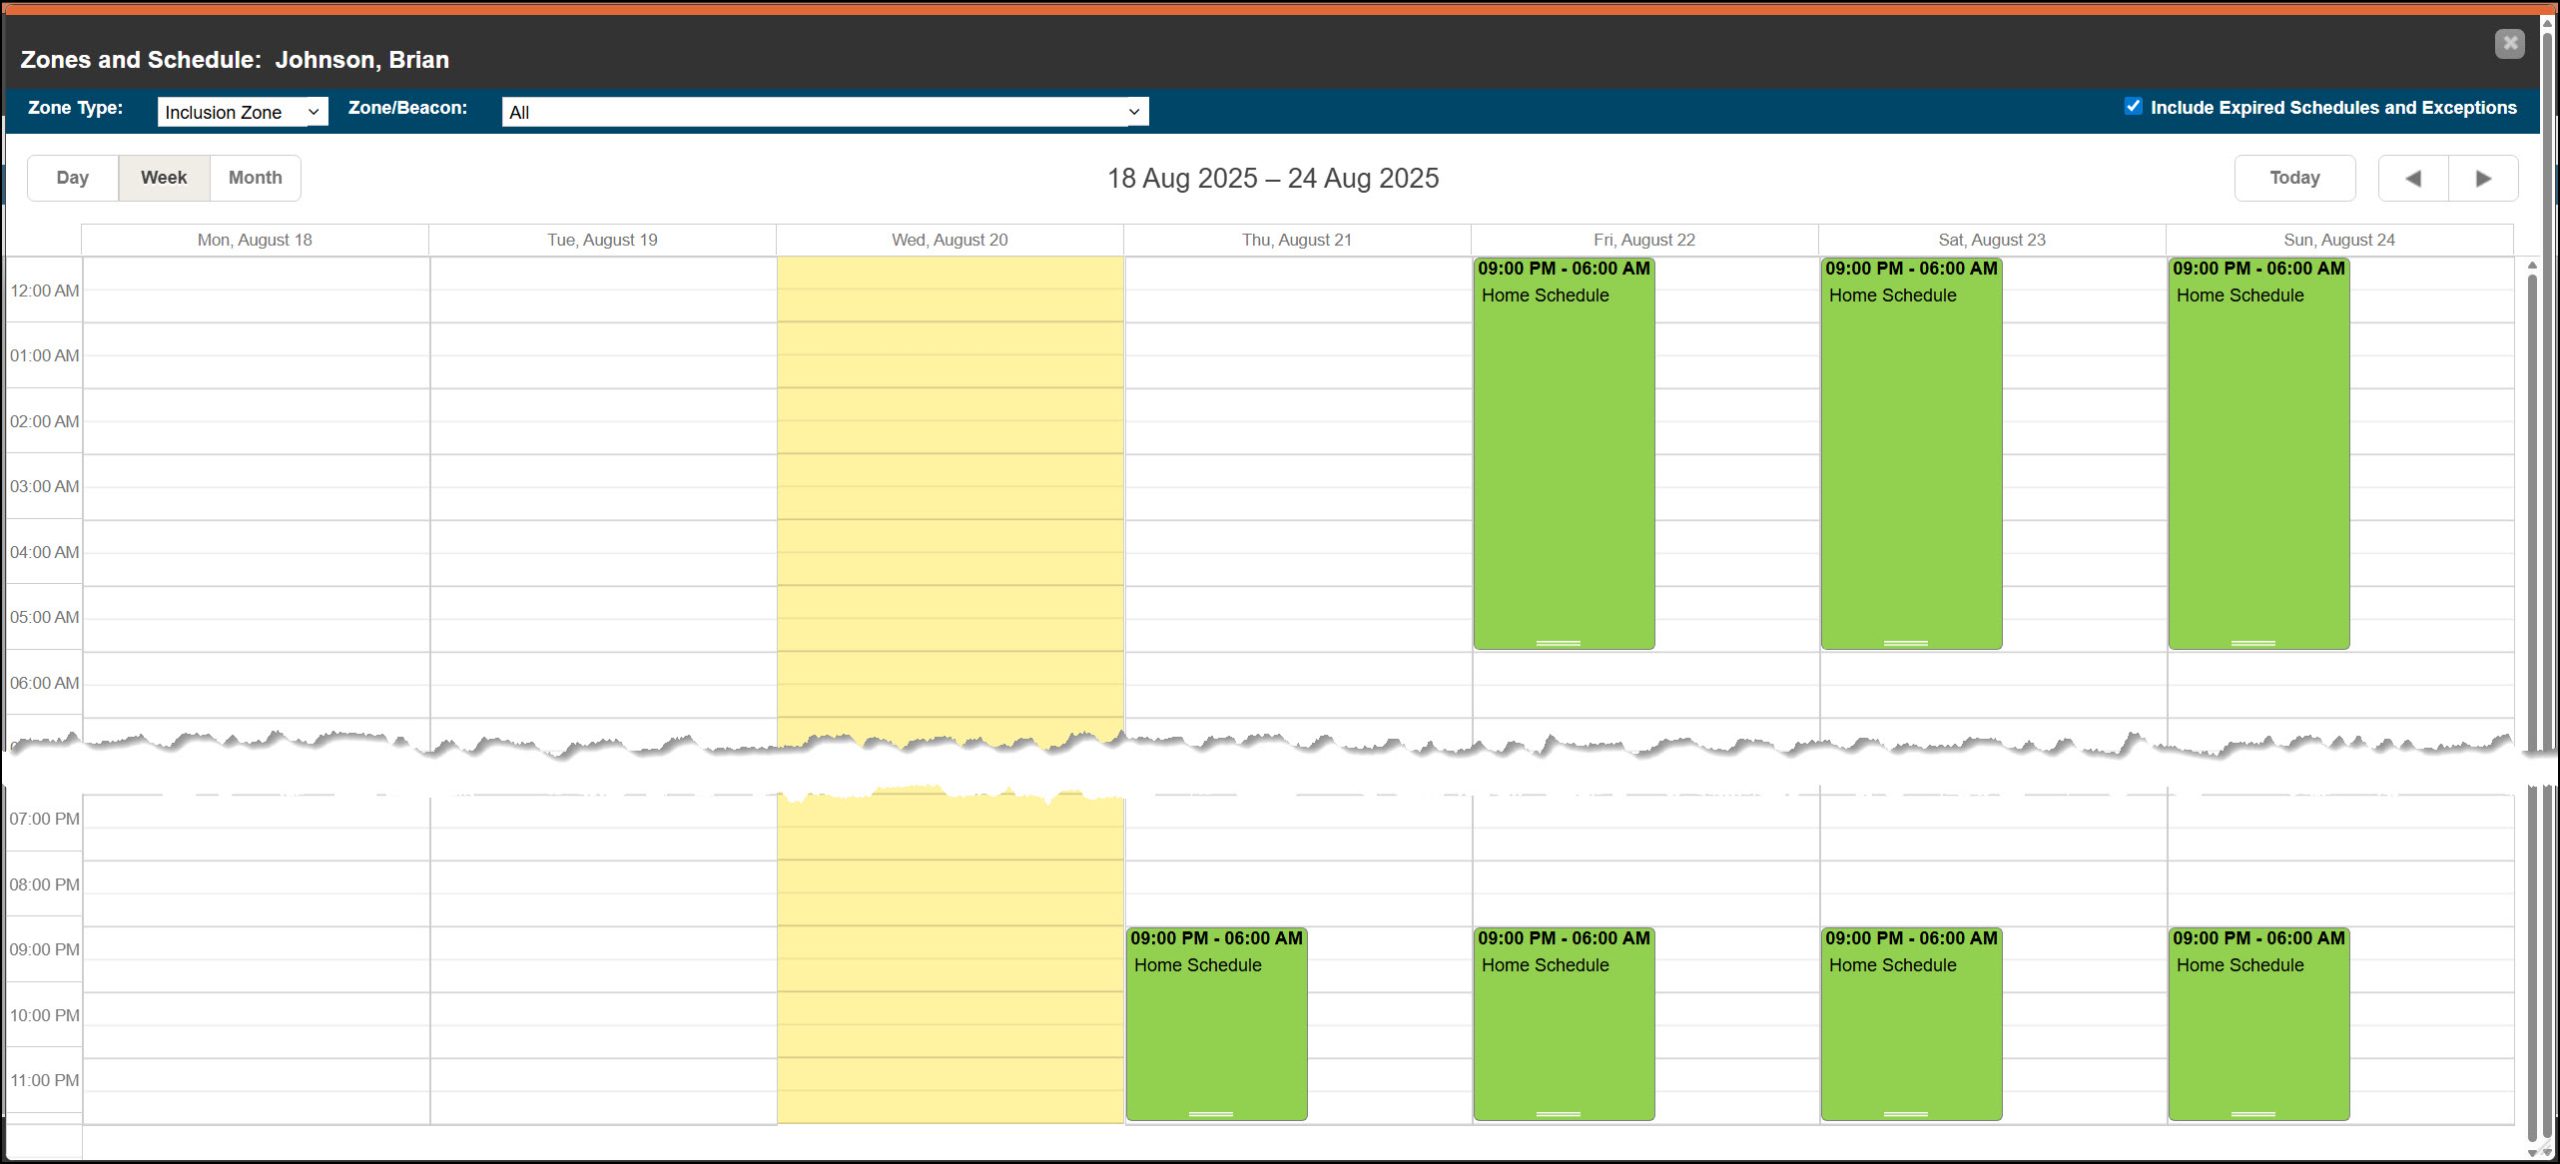
Zones and Schedule page with Overnight Schedule added – click to enlarge
Moving forward, the Dashboard “Zones” column will identify if the client is not within the Home zone during the established timeframe.
Add a Work or Additional Zone Schedule
When required, you may add additional zone schedules to the free space (white space) on the calendar. These zones are not overlapping zones. If you are creating an overlapping zone schedule, please visit the Advanced Zone Schedules article.
For example, let’s add a work schedule to the current curfew schedule.
- Left-click and drag with your mouse in the white area of the calendar on the client’s Zones and Schedule page to open the Scheduled Details pop-up window.
- On the Schedule Details pop-up window, enter the details for this schedule. This includes the zone selections, start date, and time frame.
- In the Repeat Event section, ensure that the Weekly radio button is selected and then select the appropriate days of the week. For our example, Monday – Friday is selected. If this is a typical schedule for the client, you may leave the No End Date radio button selected, or if this schedule is not repeated, you may select the End by radio button and enter the date the schedule ends.
- In this scenario, no travel time is required.
- You may set a Grace Period for the start and end timeframe of the schedule. For example, if you set these fields to 10 minutes each, the client may enter the Work zone up to 10 minutes after the “Start must be in Time” (arrive to work late) and leave their Work zone up to 10 minutes before the “End Must Be in Time” (depart from work early).
- Once all fields have been entered, select the Save button.
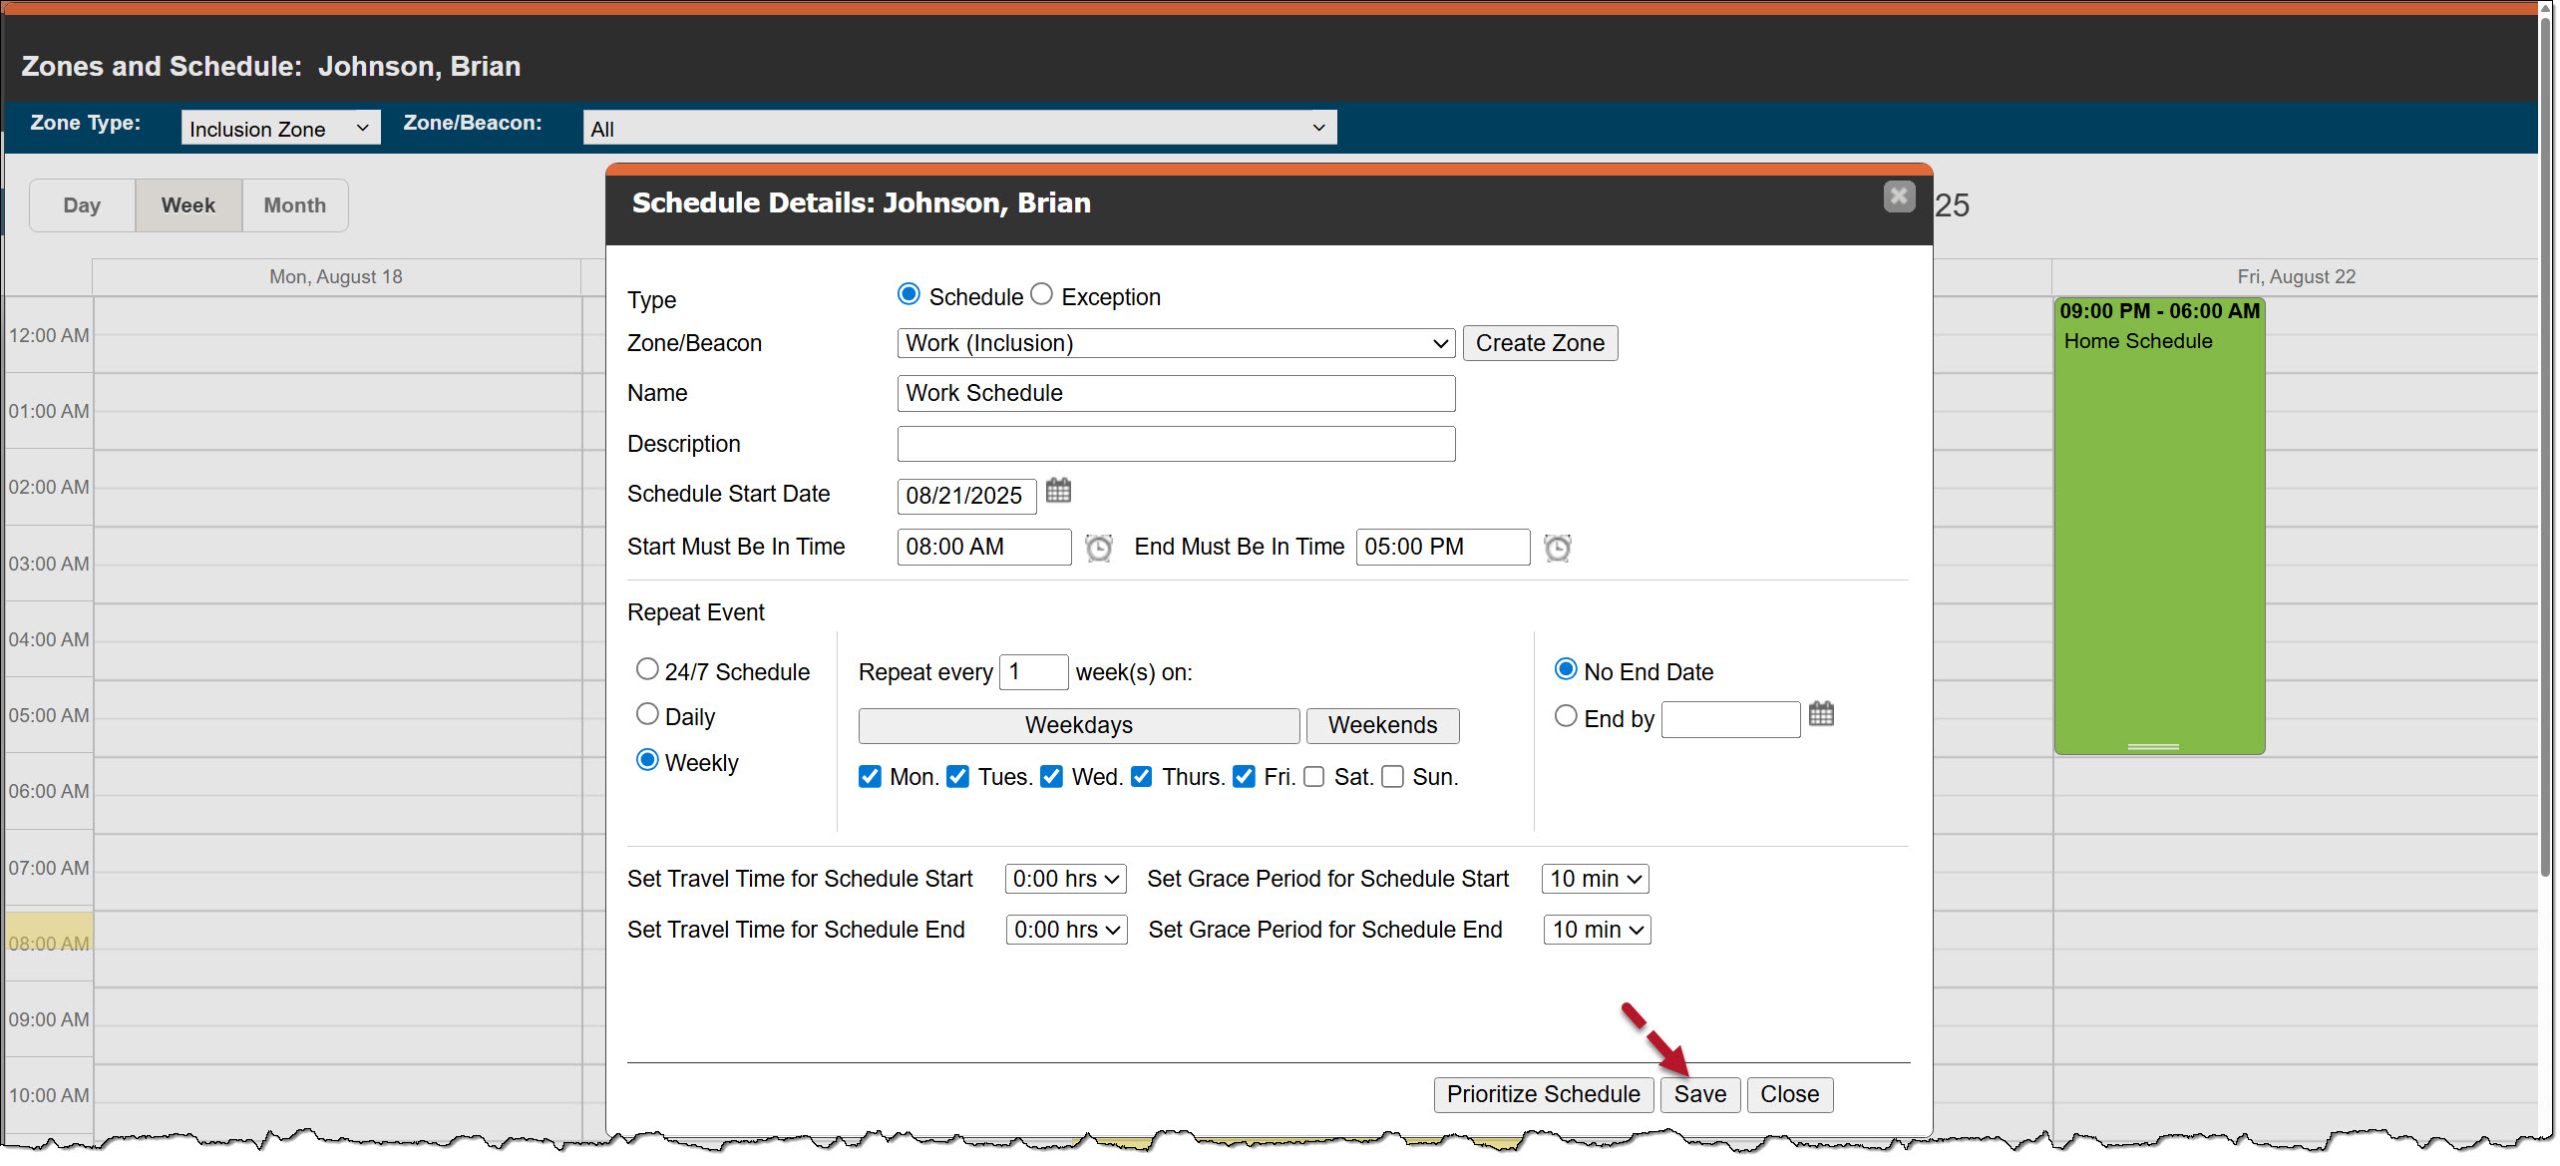
Schedule Details for Work Zone – click to enlarge
Once saved, the schedule is displayed on the calendar. Moving forward, the Dashboard “Zones” column will identify if the client is not within the Work zone during the established timeframe.
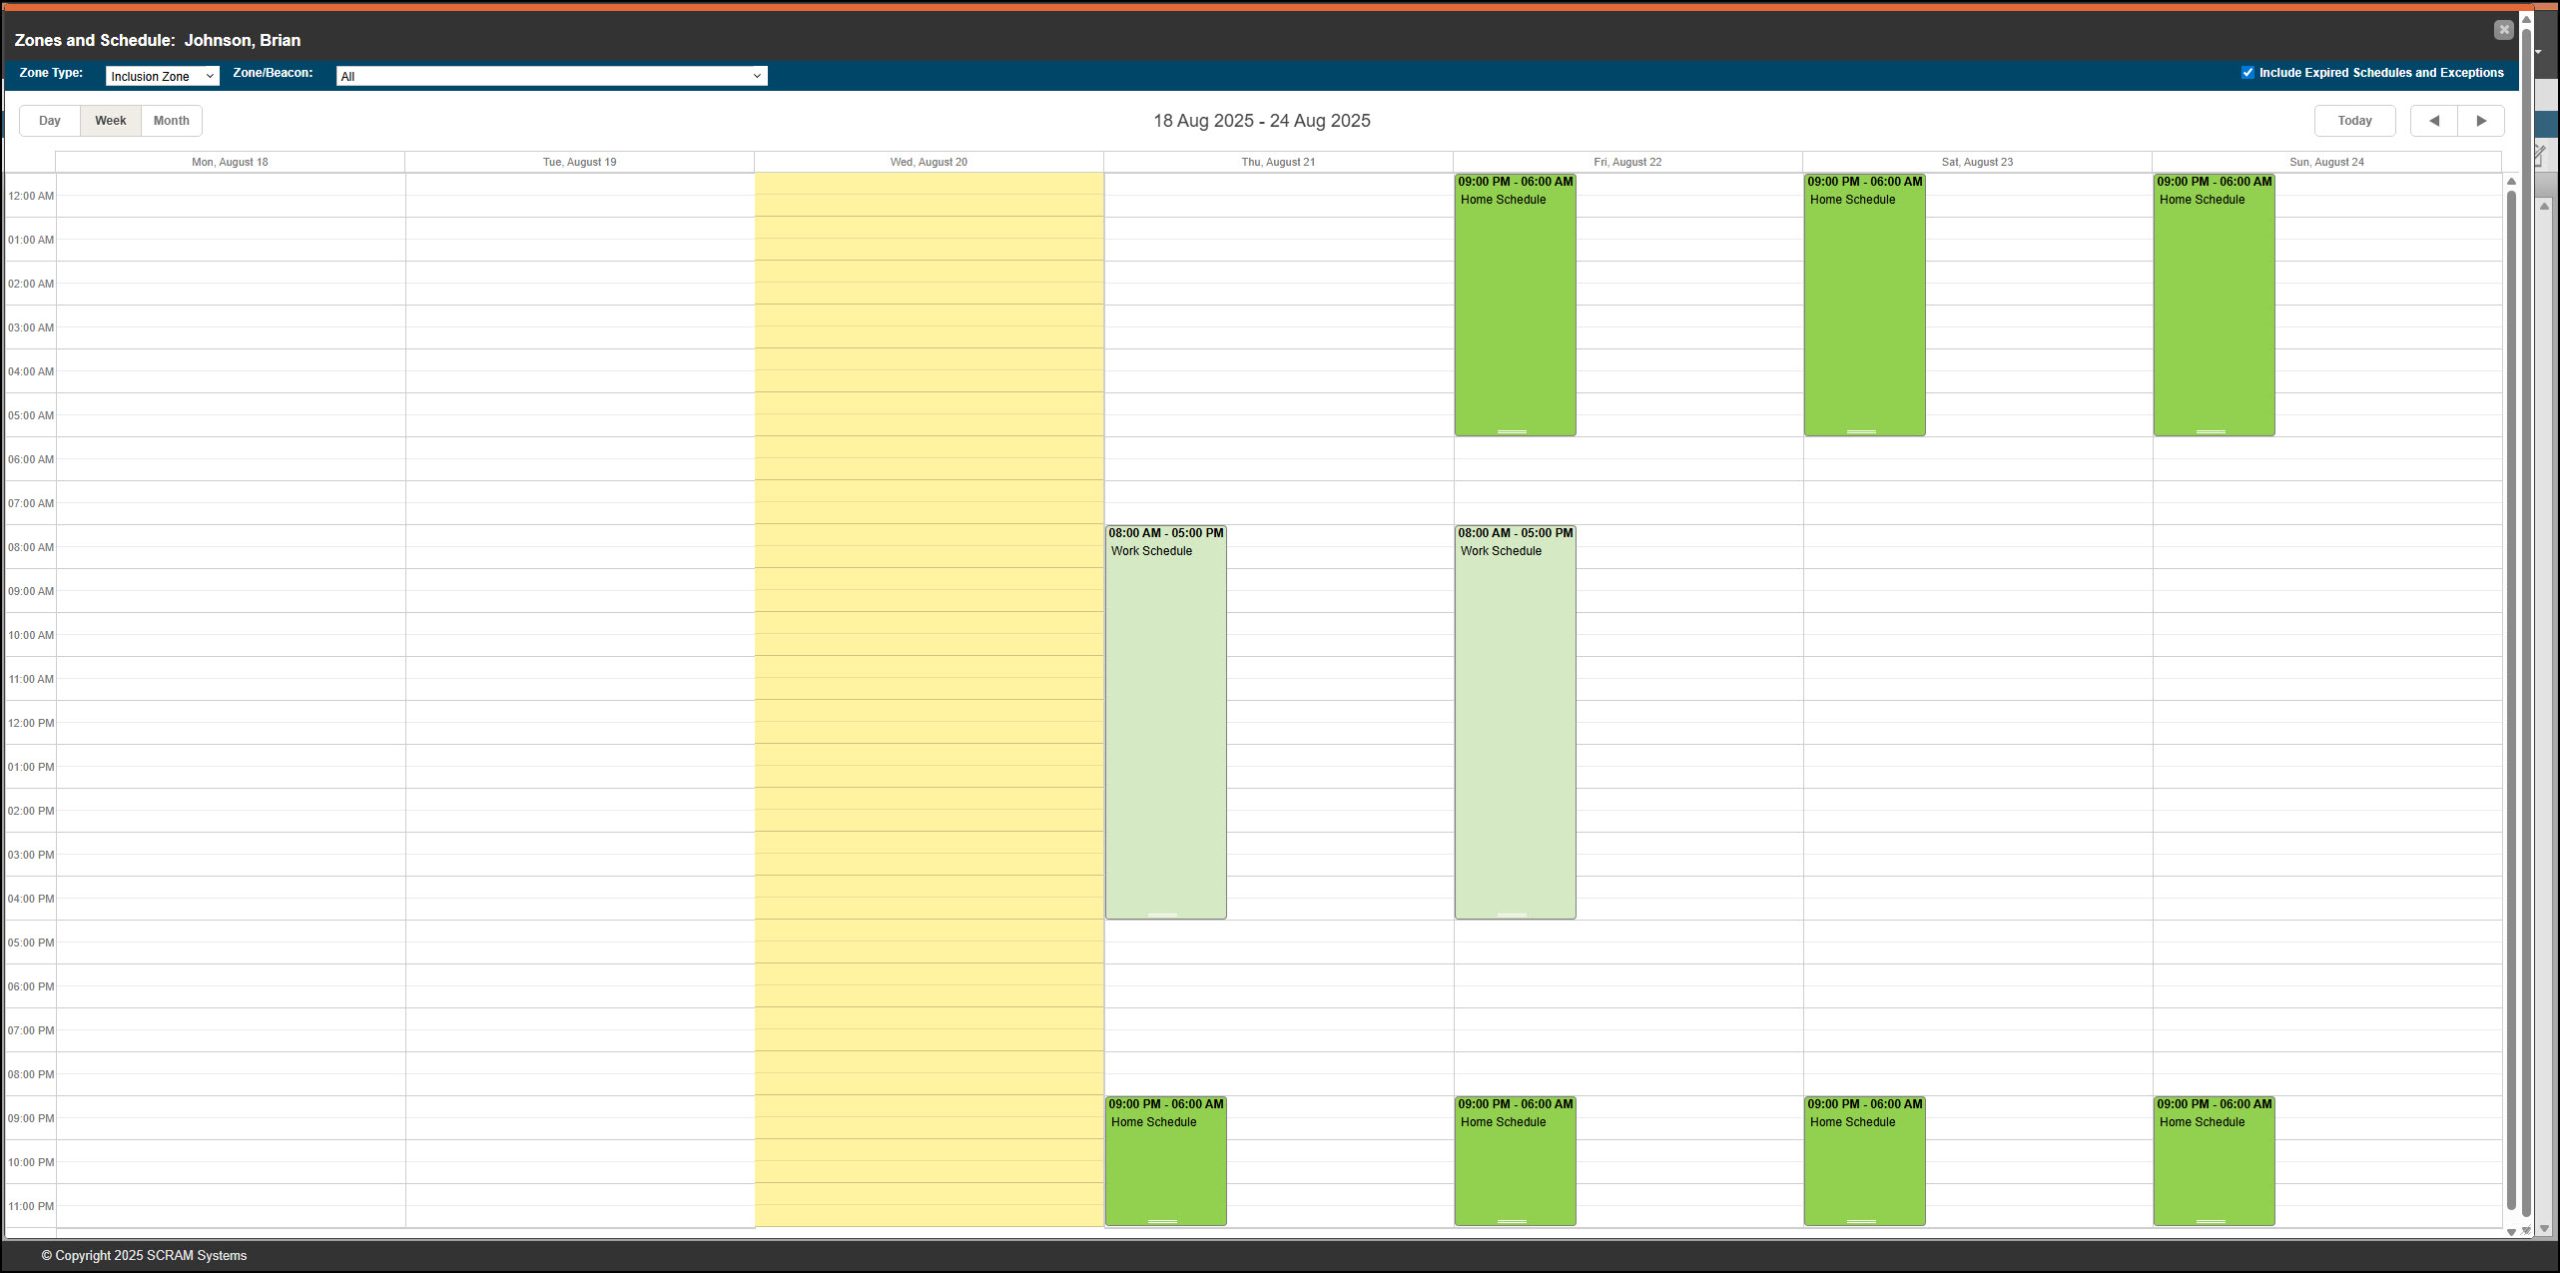
Zones and Schedule page with both an Overnight Schedule and Work Schedule Displayed – click to enlarge
Add an Exception to a Zone Schedule
There may be a scenario where the client is allowed to exit a zone schedule for a short time and is not required to be in a monitored zone. For example, during a work schedule, they are permitted to leave work for lunch or an appointment. In this case, you may create an exception during the zone schedule.
- Left-click and drag with your mouse in the white area of the calendar on the client’s Zones and Schedule page to open the Scheduled Details pop-up window.
- Select the Exception radio button.
- Open the Zone/Beacon dropdown menu and select the zone the exception falls within.
- Select the Date.
- Enter the “Allowed Out – Start Time” and “Allowed Out – End Time.” You may consider allowing for extra time at the start and end of the window to account for the client leaving a few minutes early or returning a few minutes late.
- Select the appropriate Recurrence Type radio button and then add Repeat Event details if applicable.
- In this case, no travel time is required.
- Select the Save button.
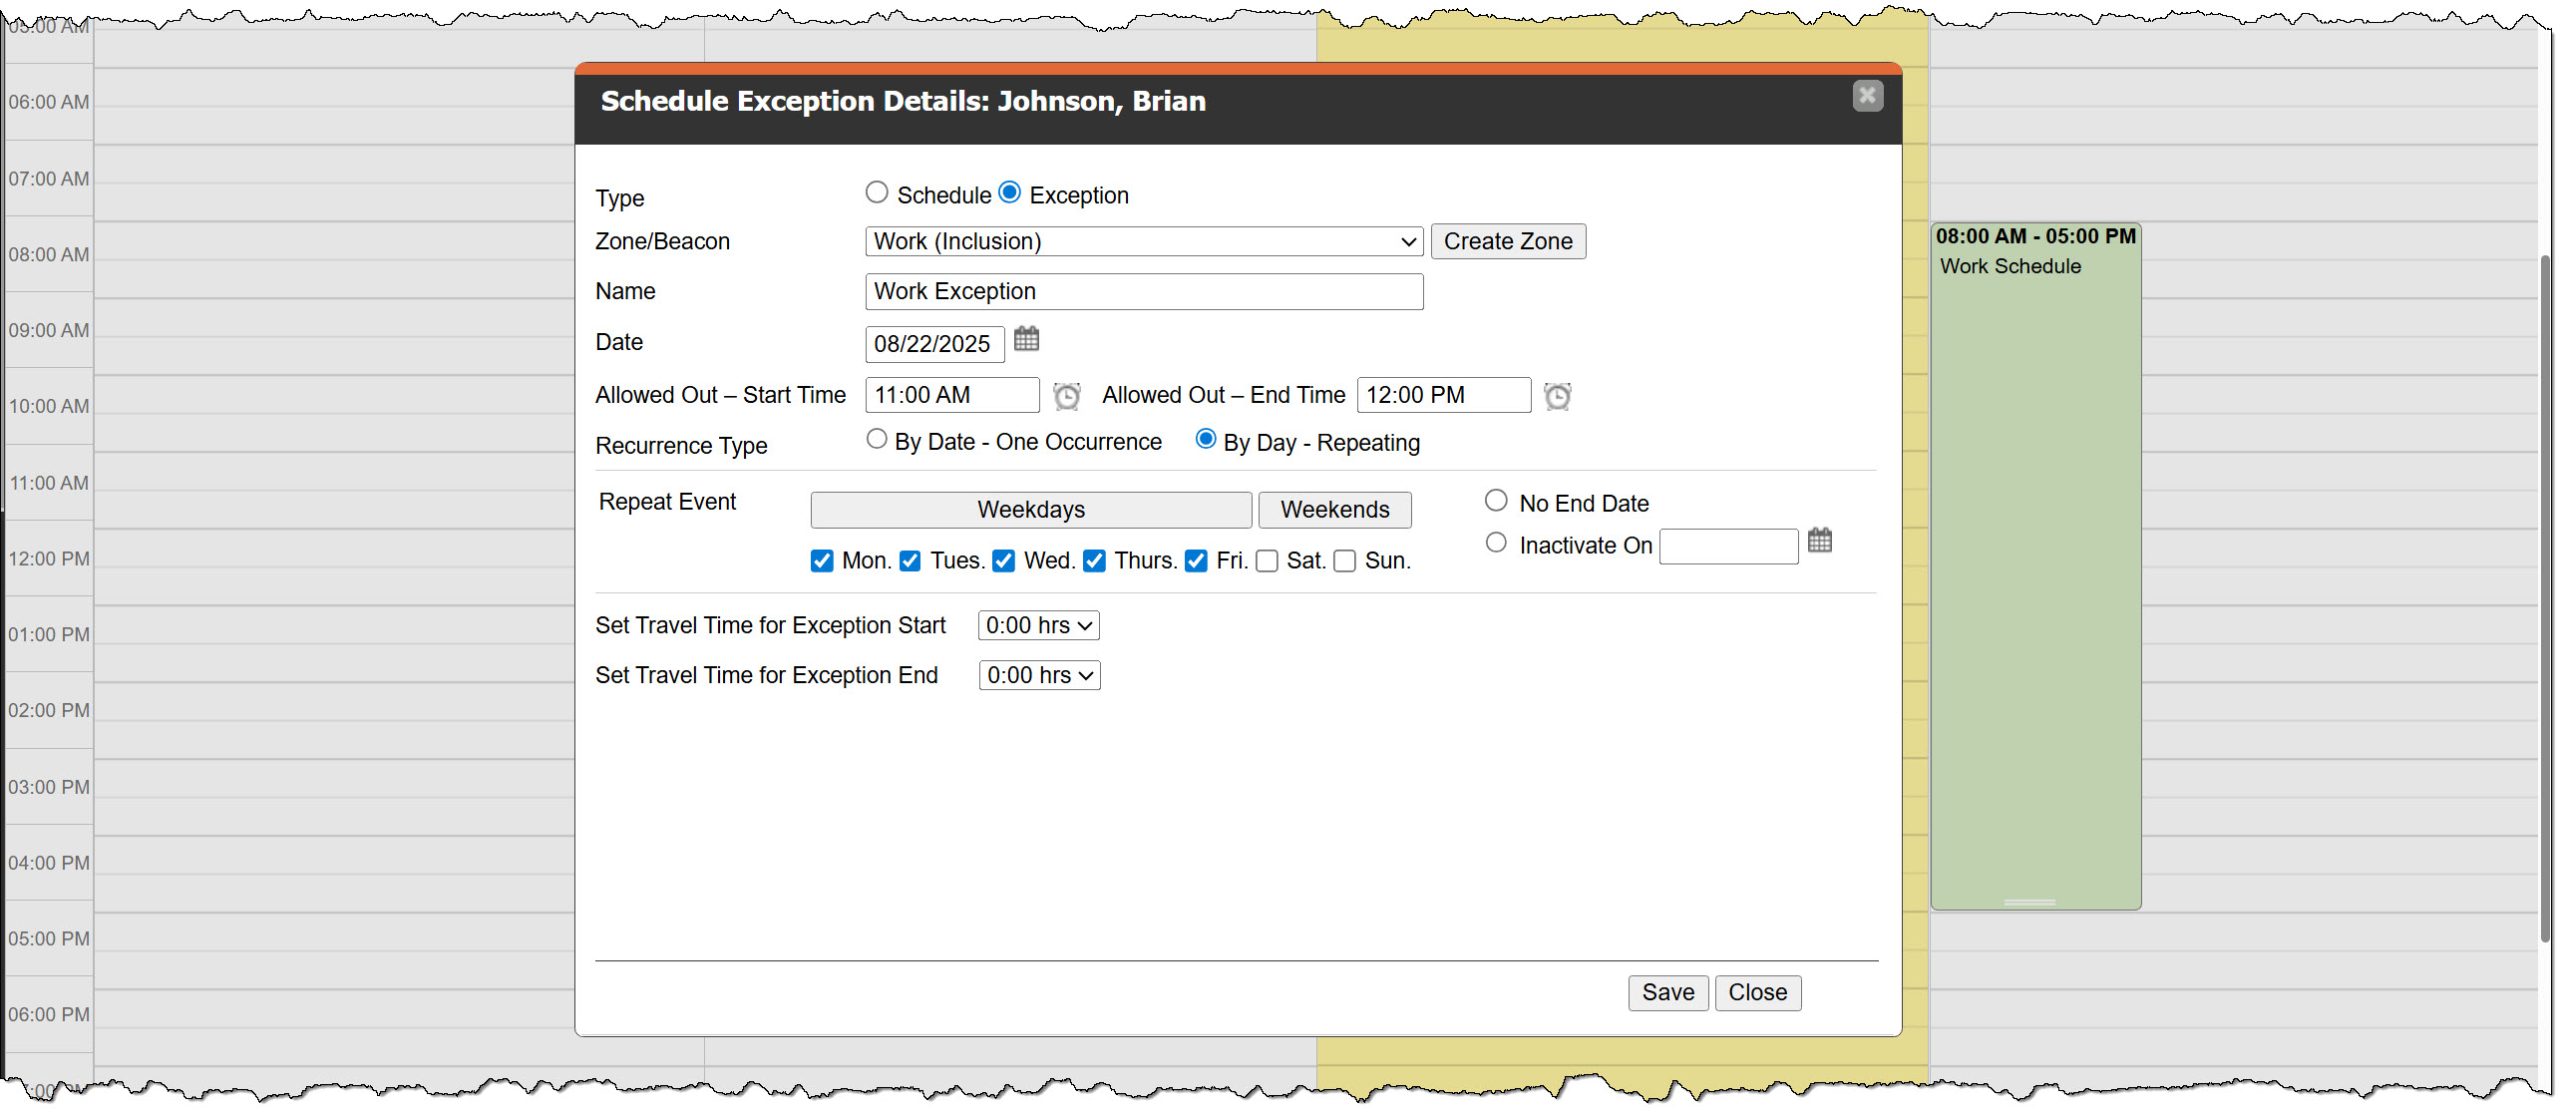
Schedule Exception Pop-up Window with Details Added – click to enlarge
The Exception Schedule is displayed on the client’s Zones and Schedule Calendar.
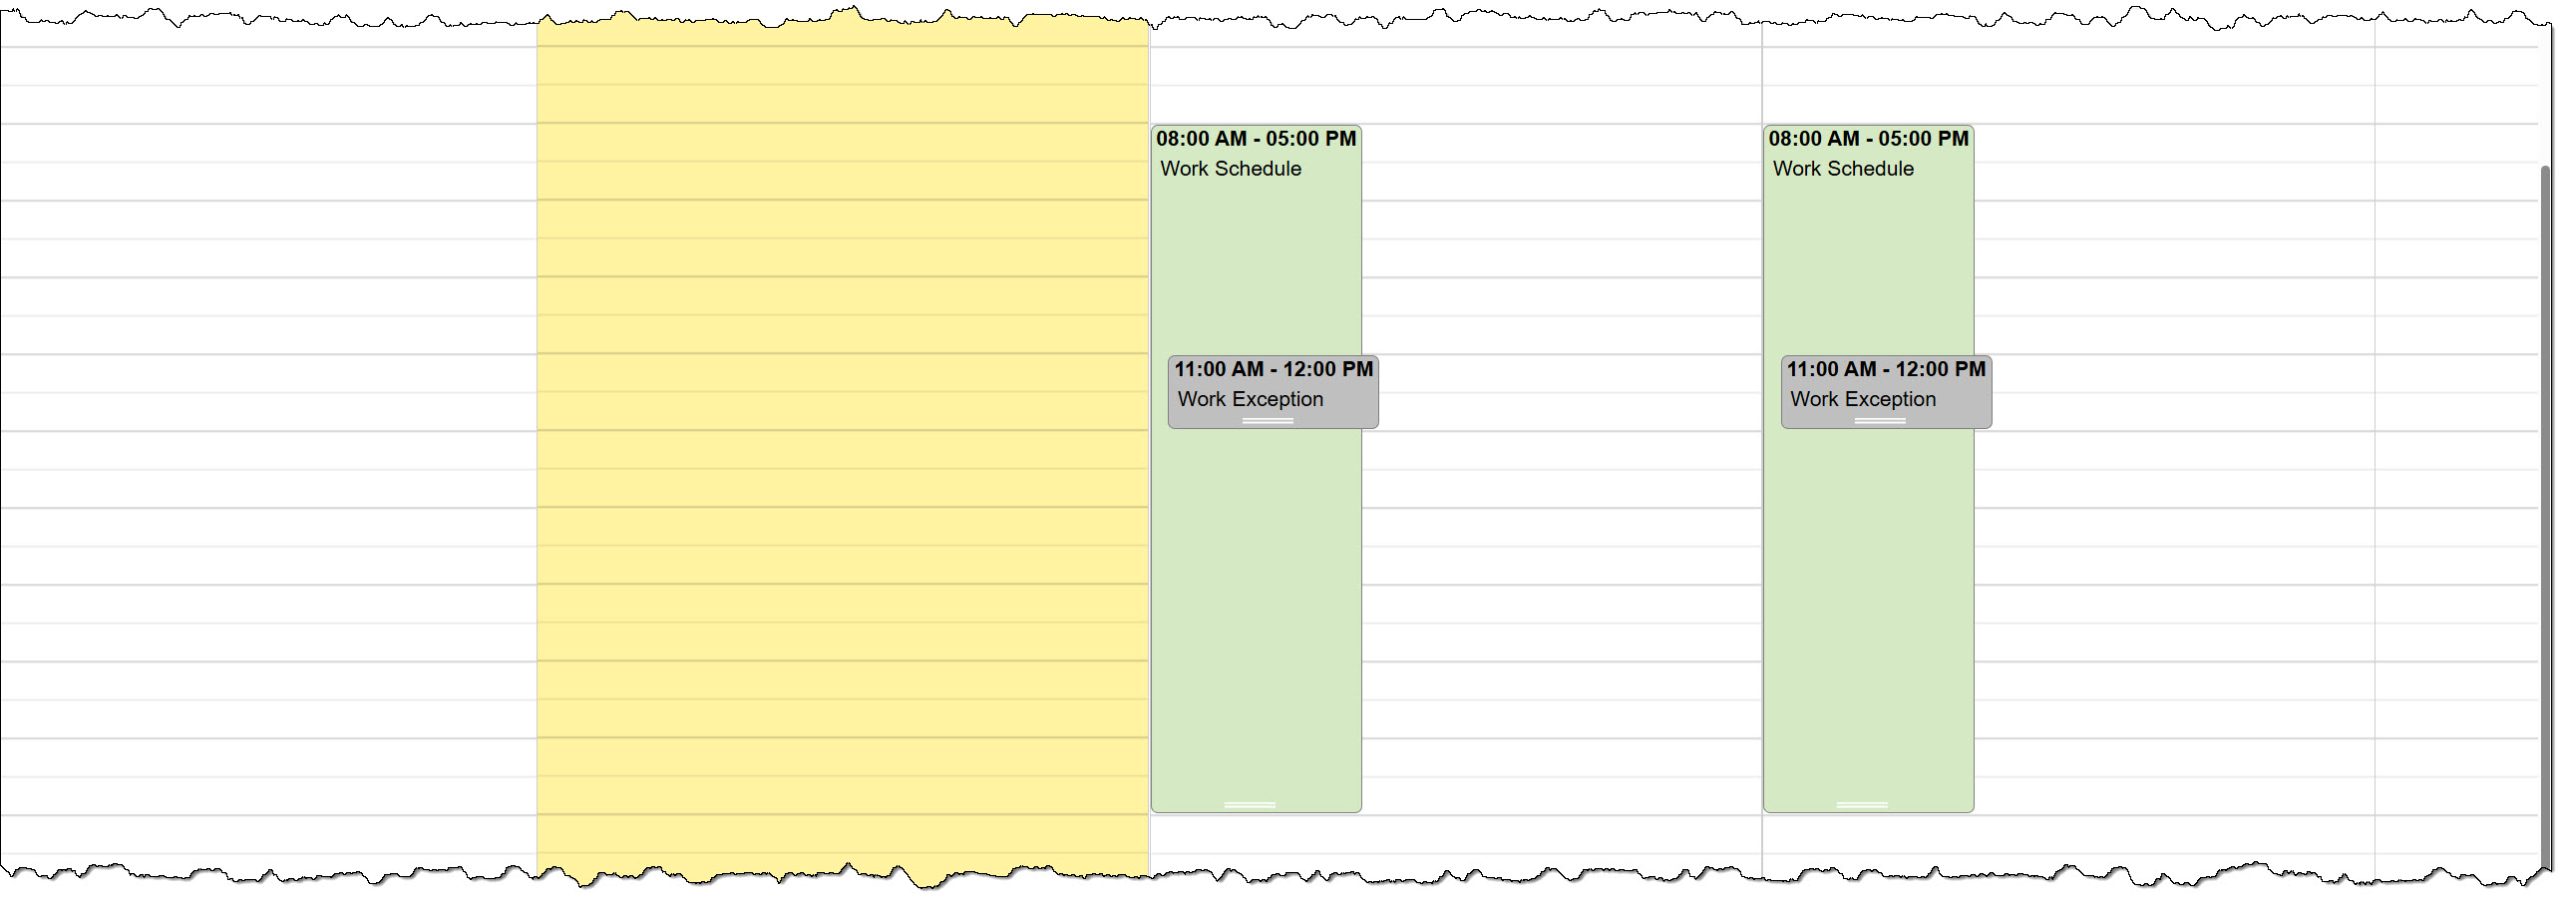
Zones and Schedule Calendar with Work Zone and Work Exception Schedule – click to enlarge
Moving forward, the client may exit the zone during the exception schedule without generating a non-compliant event on the Dashboard. Their location information is still being collected, but they are not required to be at a specific location.
When the Entry and Exit checkboxes are selected for the zone, and the client leaves and then returns during the exception period, this movement is recorded on the client’s Event log.
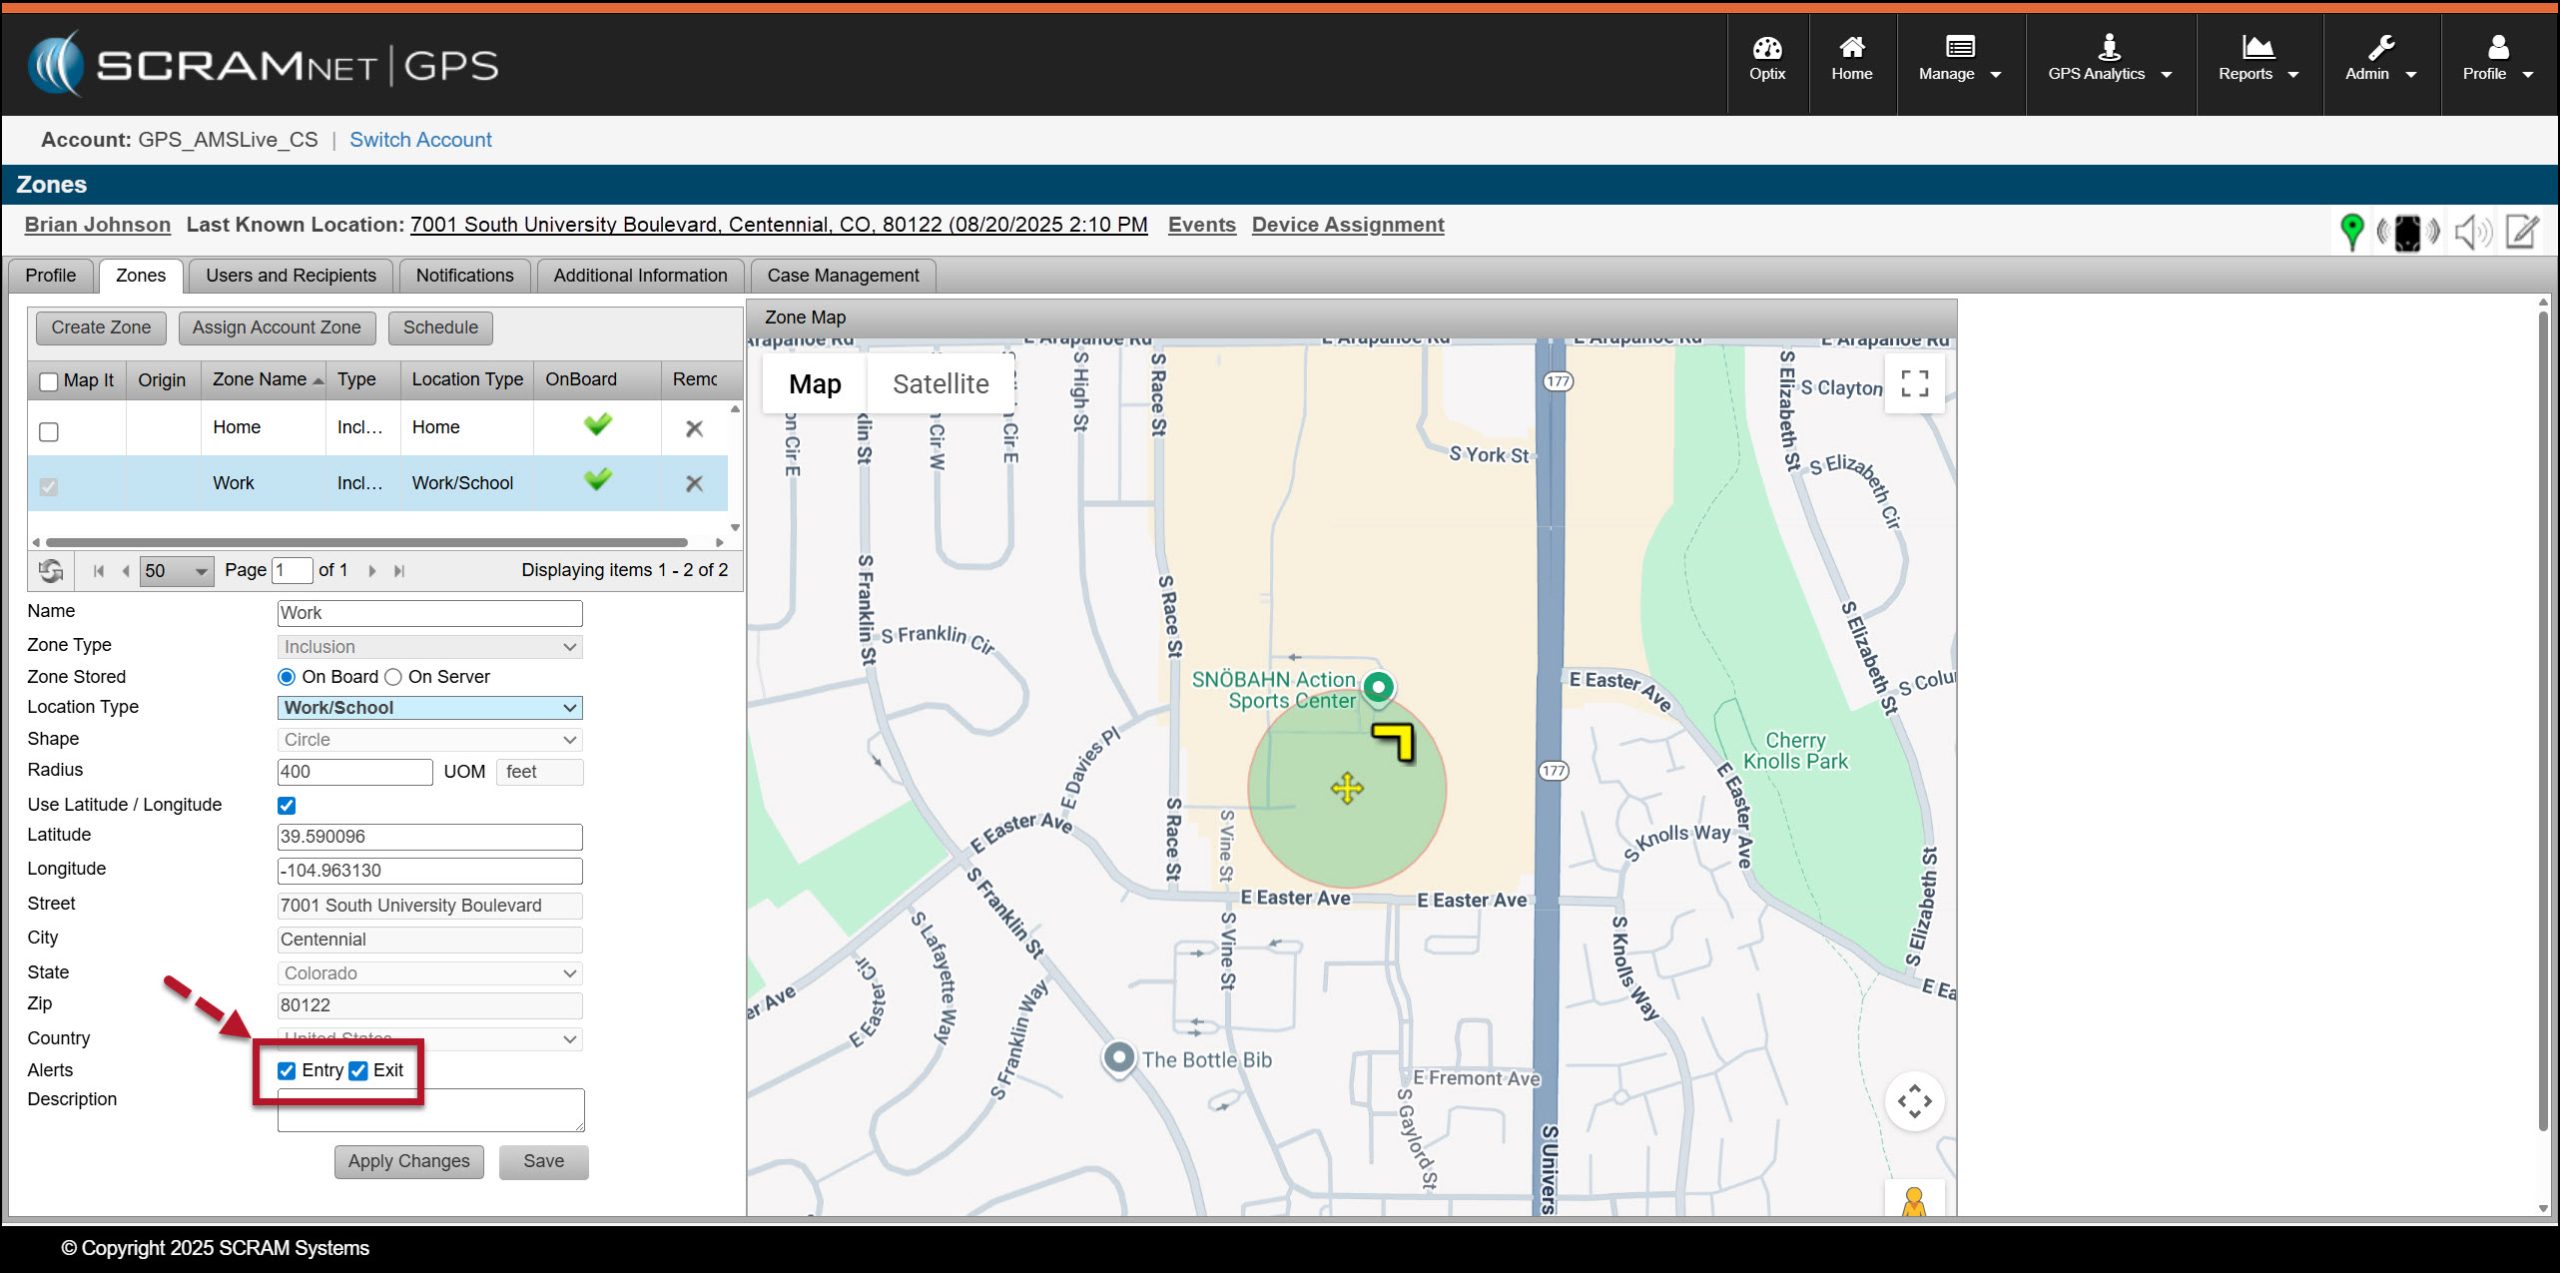
Client’s Zones page – Work zone with Entry and Exit Checkboxes Selected – click to enlarge
|