Once the client’s profile has been created in SCRAMNET GPS, and in most cases, after the SCRAM GPS Bracelet is successfully assigned and installed on the client’s leg, their location monitoring begins. Depending on the client’s monitoring requirements, there may be locations or “zones” the client must remain in or out of while on the program. In addition to zones, the client may have a timeframe or “schedule” they must adhere to for their monitoring requirements. In this section, we will focus on creating zones for client monitoring. After adding a zone to the client’s monitoring, a schedule may be applied to it.
Let’s start by listing the four (4) types of zones you may associate with the client’s monitoring program.
- Inclusion Zones are locations the client is required to remain within. These zones may be used for “curfew monitoring,” “home detention,” or other locations the client has permission to visit. These zones are displayed in green on the map.
- Exclusion Zones are locations the client is restricted from entering. These restricted locations may include a victim’s home, a school, or a park. These zones are displayed in red on the map.
- A Neutral Zone is a location you might consider a point of interest. These locations are neither required nor restricted to the client. Some examples of a Neutral Zone include specific areas of town, houses, or certain stores. These zones are displayed in a gray-blue color on the map.
- An Account Zone is a zone frequently used across your entire program – for example, your state, the courthouse, parks, or schools. Account Zones may be Inclusion, Exclusion, or Neutral Zones, and may be circular, square, or polygon shapes. Account Zones can only be saved as an On-Server Zone for the client. This type of zone is created and saved by an administrator of your program and configured on the Admin tab in SCRAMNET GPS.
Access the Zones Page
To add a zone, start by accessing the client’s Zones page: You may do this from the client’s Profile page by selecting the Zones tab.
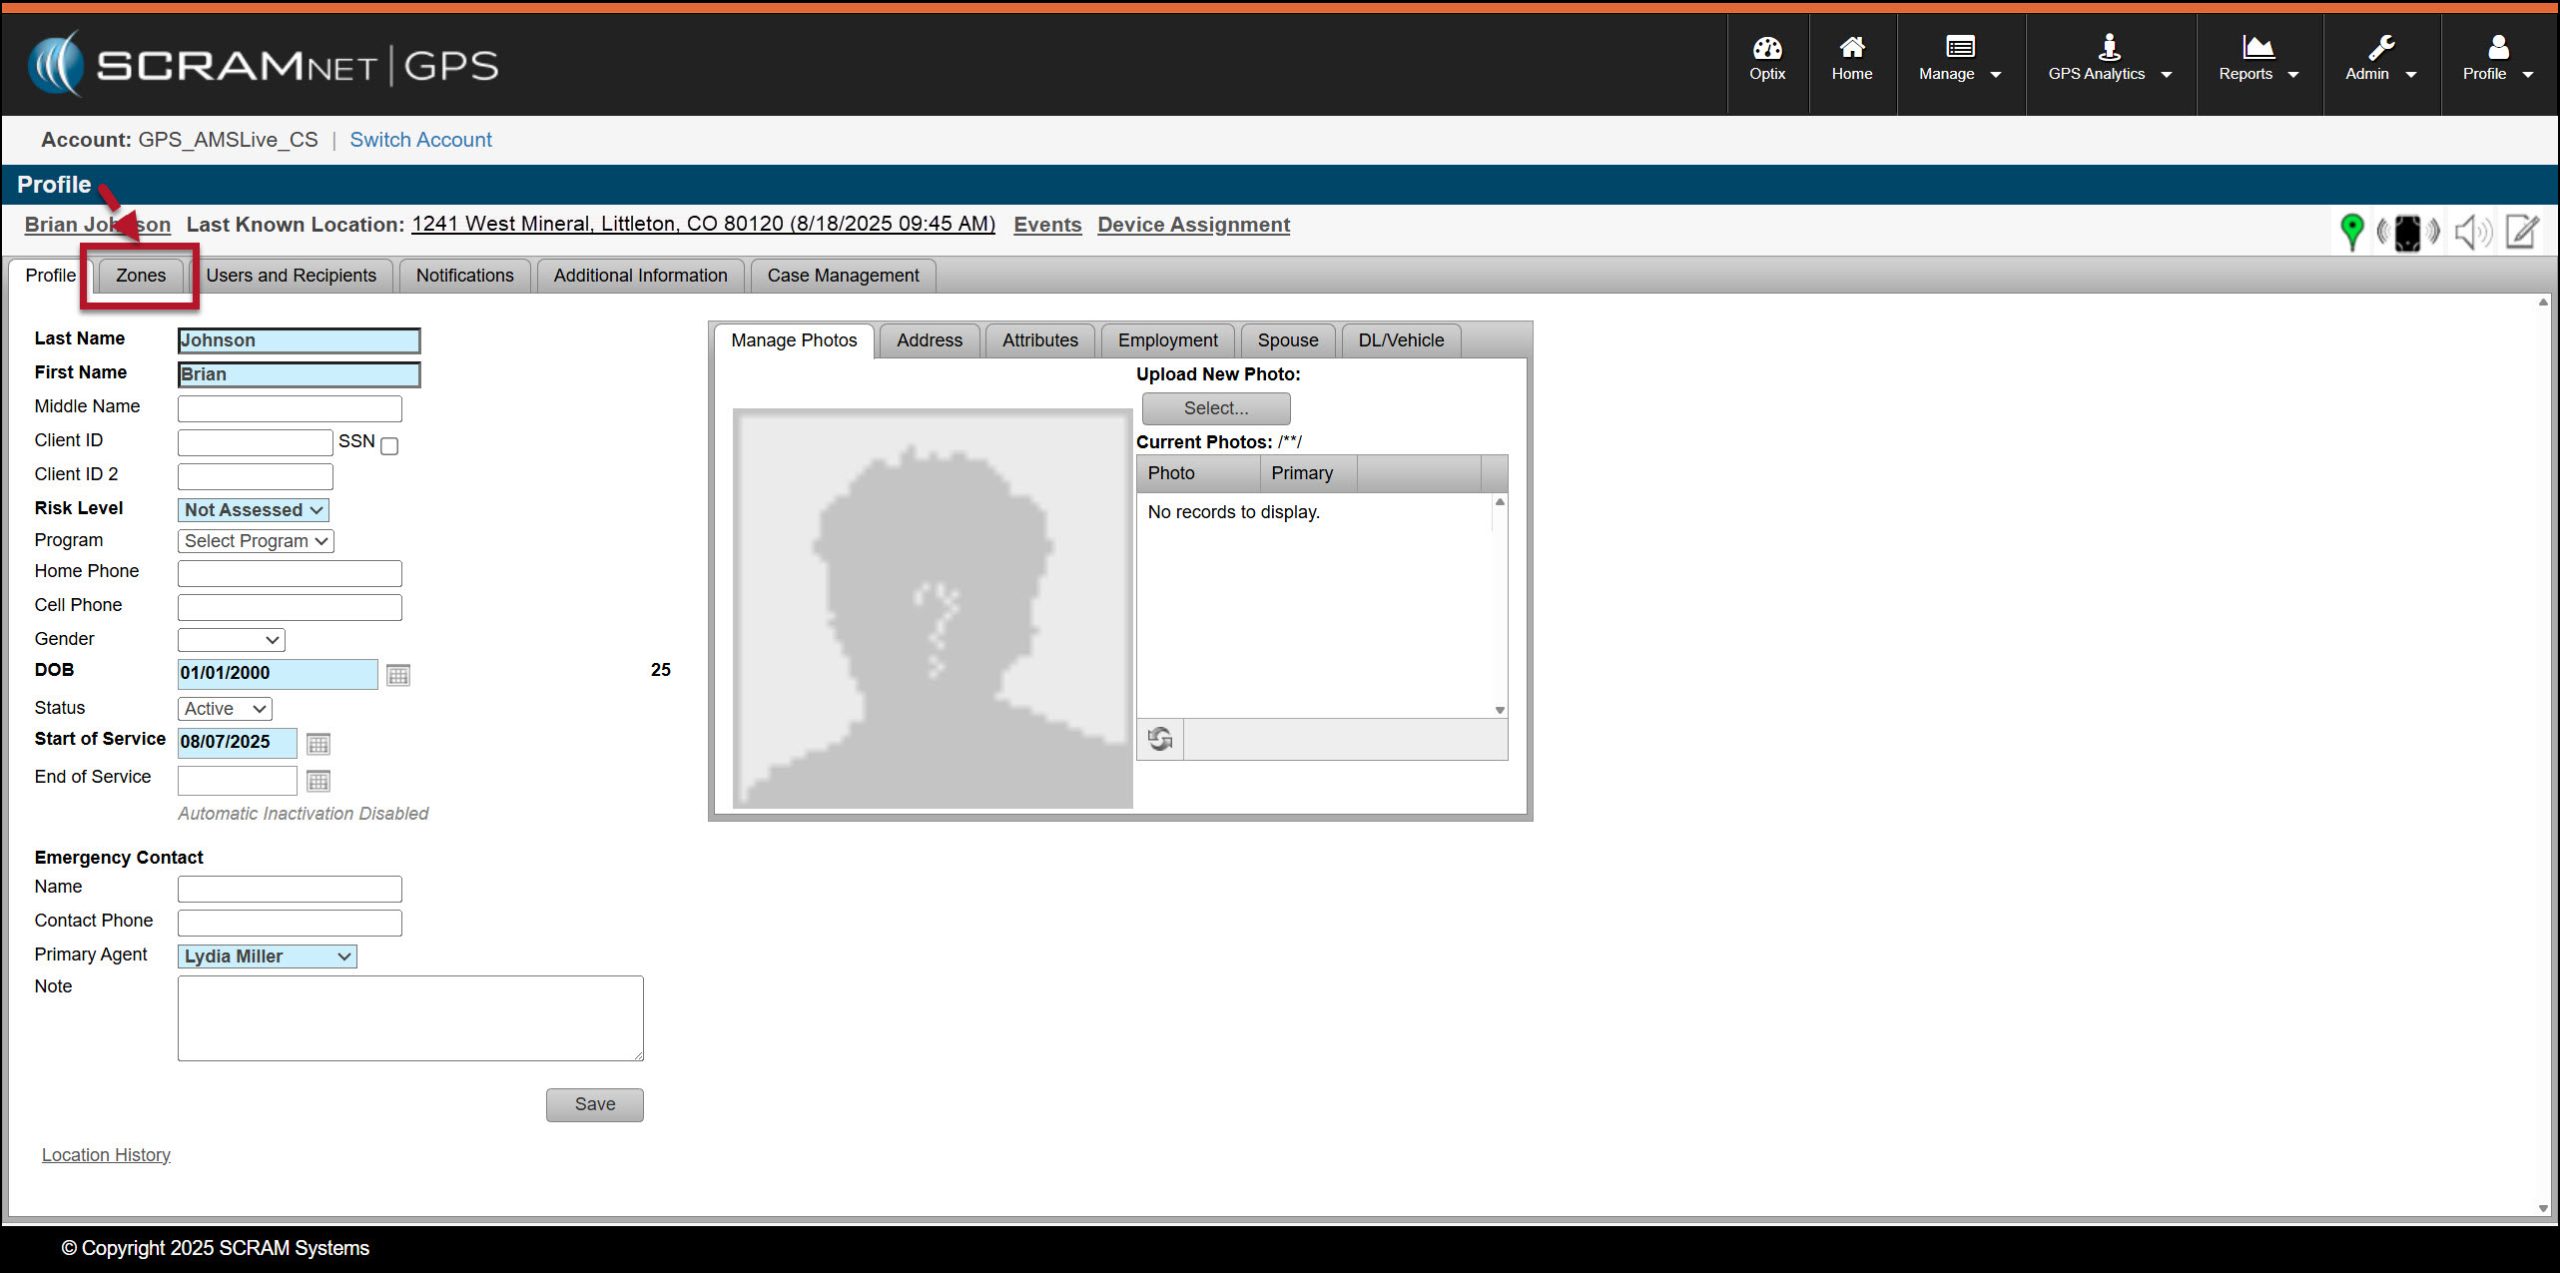
Client Profile page > Zones tab – click to enlarge
Or the Profile Summary pop-up window, and then selecting the +Add hyperlink next to the Zone Name heading in the table.
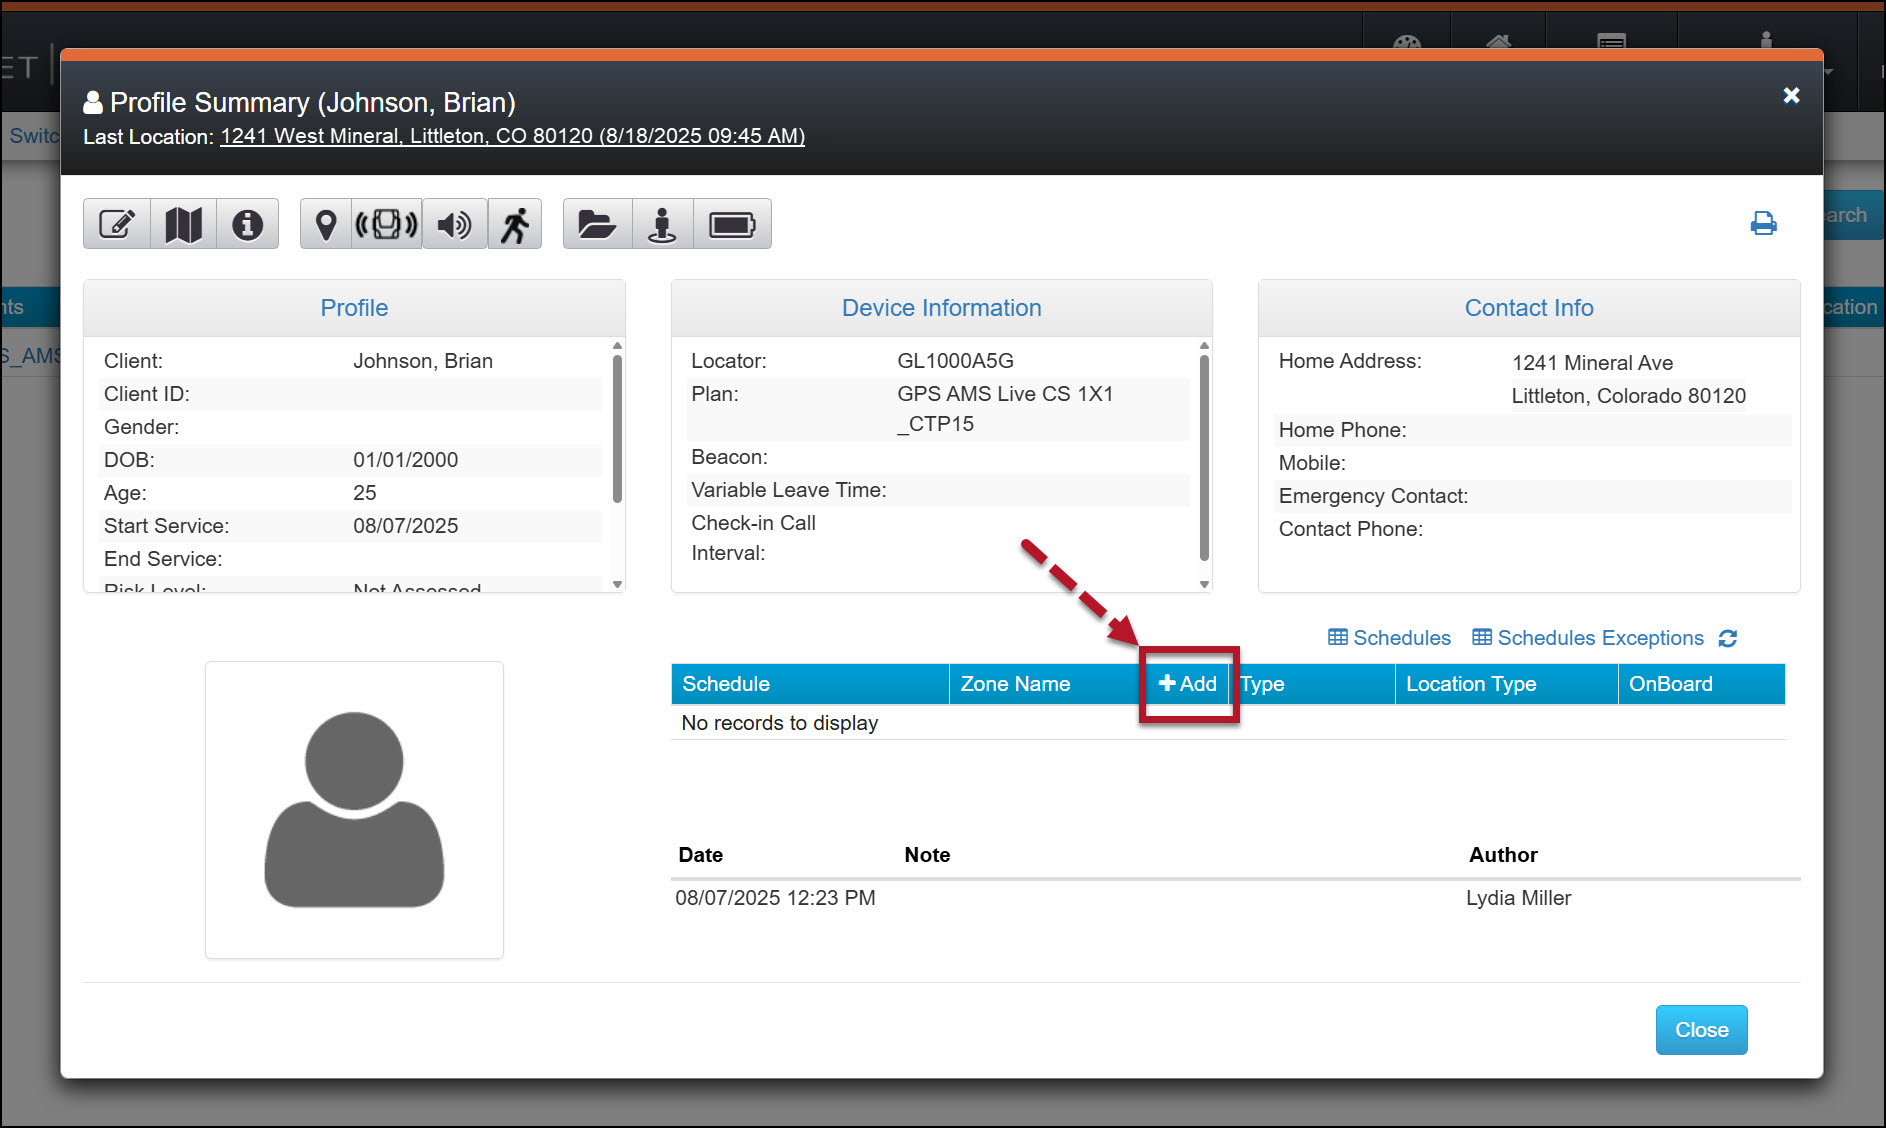
Profile Summary Pop-up > +Add hyperlink – click to enlarge
Add the Zone’s Details
On the Zones page, you will add the zone’s details and then visually verify the placement of the zone on the map.
- Create and enter a zone Name.
- Open the Zone Type dropdown menu and select the appropriate zone type of Inclusion, Exclusion, or Neutral.
- Select whether the zone will be stored “On Board” or “On Server.”
- On Board zones are saved on the GPS device and should be used whenever possible. When the bracelet enters or exits an On Board zone, the bracelet will communicate the event to the monitoring system. You may save two (2) On Board Inclusion Zones and eight (8) On Board Exclusion Zones to the standard GPS device. On Board zones can only be circular.
- On Server zones are stored on SCRAMNET GPS Events are generated by comparing the GPS location information from the bracelet to the zones and schedules saved in the system. You may create unlimited On Server zones, and they can be circular, square, or polygonal in shape.
| There is a difference in the number of On Board zones a SCRAM GPS 9 Plus bracelet can hold compared to a standard SCRAM GPS bracelet. A GPS 9 Plus bracelet can support any combination of inclusion and exclusion On Board zones up to 100 total zones. Additionally, these zones may be circular or rectangular. |
- When an “Inclusion” zone is selected, open the Location Type dropdown menu and select the appropriate option.
- Select the Shape of the zone based on the options available in the dropdown menu. The options available will depend on the “Zone Type” selected and whether the zone is stored “On board” or “On Server.”
- Set the Radius of the zone. You may enter the dimensions of the zone manually or click and drag the “handlebars” within the created zone on the map to change the size of the zone. WARNING: Do Not create a zone with a radius of 200 feet or smaller.
| Tip
When creating a Polygon zone, use your mouse and the crosshairs visible on the map to create the zone. With each placement of the crosshairs, a click of your mouse will create a continuous line from point to point. To “close” the shape, place the crosshairs over the starting point and click your mouse. |
- Enter the location information for the zone. You may accomplish this by entering the Latitude and Longitude coordinates or by entering a street address. Once entered, use the “crosshairs” located in the center of the zone and your mouse to move the zone to the precise location on the map.
- In the Alerts selection, SCRAM Systems recommends checking both the Entry and Exit When selected, an “event” will be generated each time the client’s bracelet enters or exits the zone. This is important for alert and reporting purposes. Whether or not a notification is sent is managed on the client’s Notifications page.
- Optional: You may add a description of the zone.
- When an Inclusion zone is selected, you have the option to create a 24/7 schedule by selecting the checkbox. This is helpful in scenarios where the client is on home detention. If needed, exceptions may be added on the client’s Schedule page.
- Once all fields are entered, select the Apply Changes button.
| Tip
Once you have established the zone, select the Satellite button on the map to verify the placement of the zone. Make any adjustments as needed. SCRAM Systems recommends that the crosshairs on the zone be positioned in the center of the zone’s location. After making any adjustments, select the Apply Changes button. |
- Once any adjustments have been made and the Apply Changes button has been selected, select the Save button.
At this time, the zone’s information is displayed with a spinning circle. Once saved, the spinning circle will update to a green checkmark.
| To add an Account Zone to the client, visit the Add an Account Zone article for step-by-step instructions. |
Examples of Created Zones
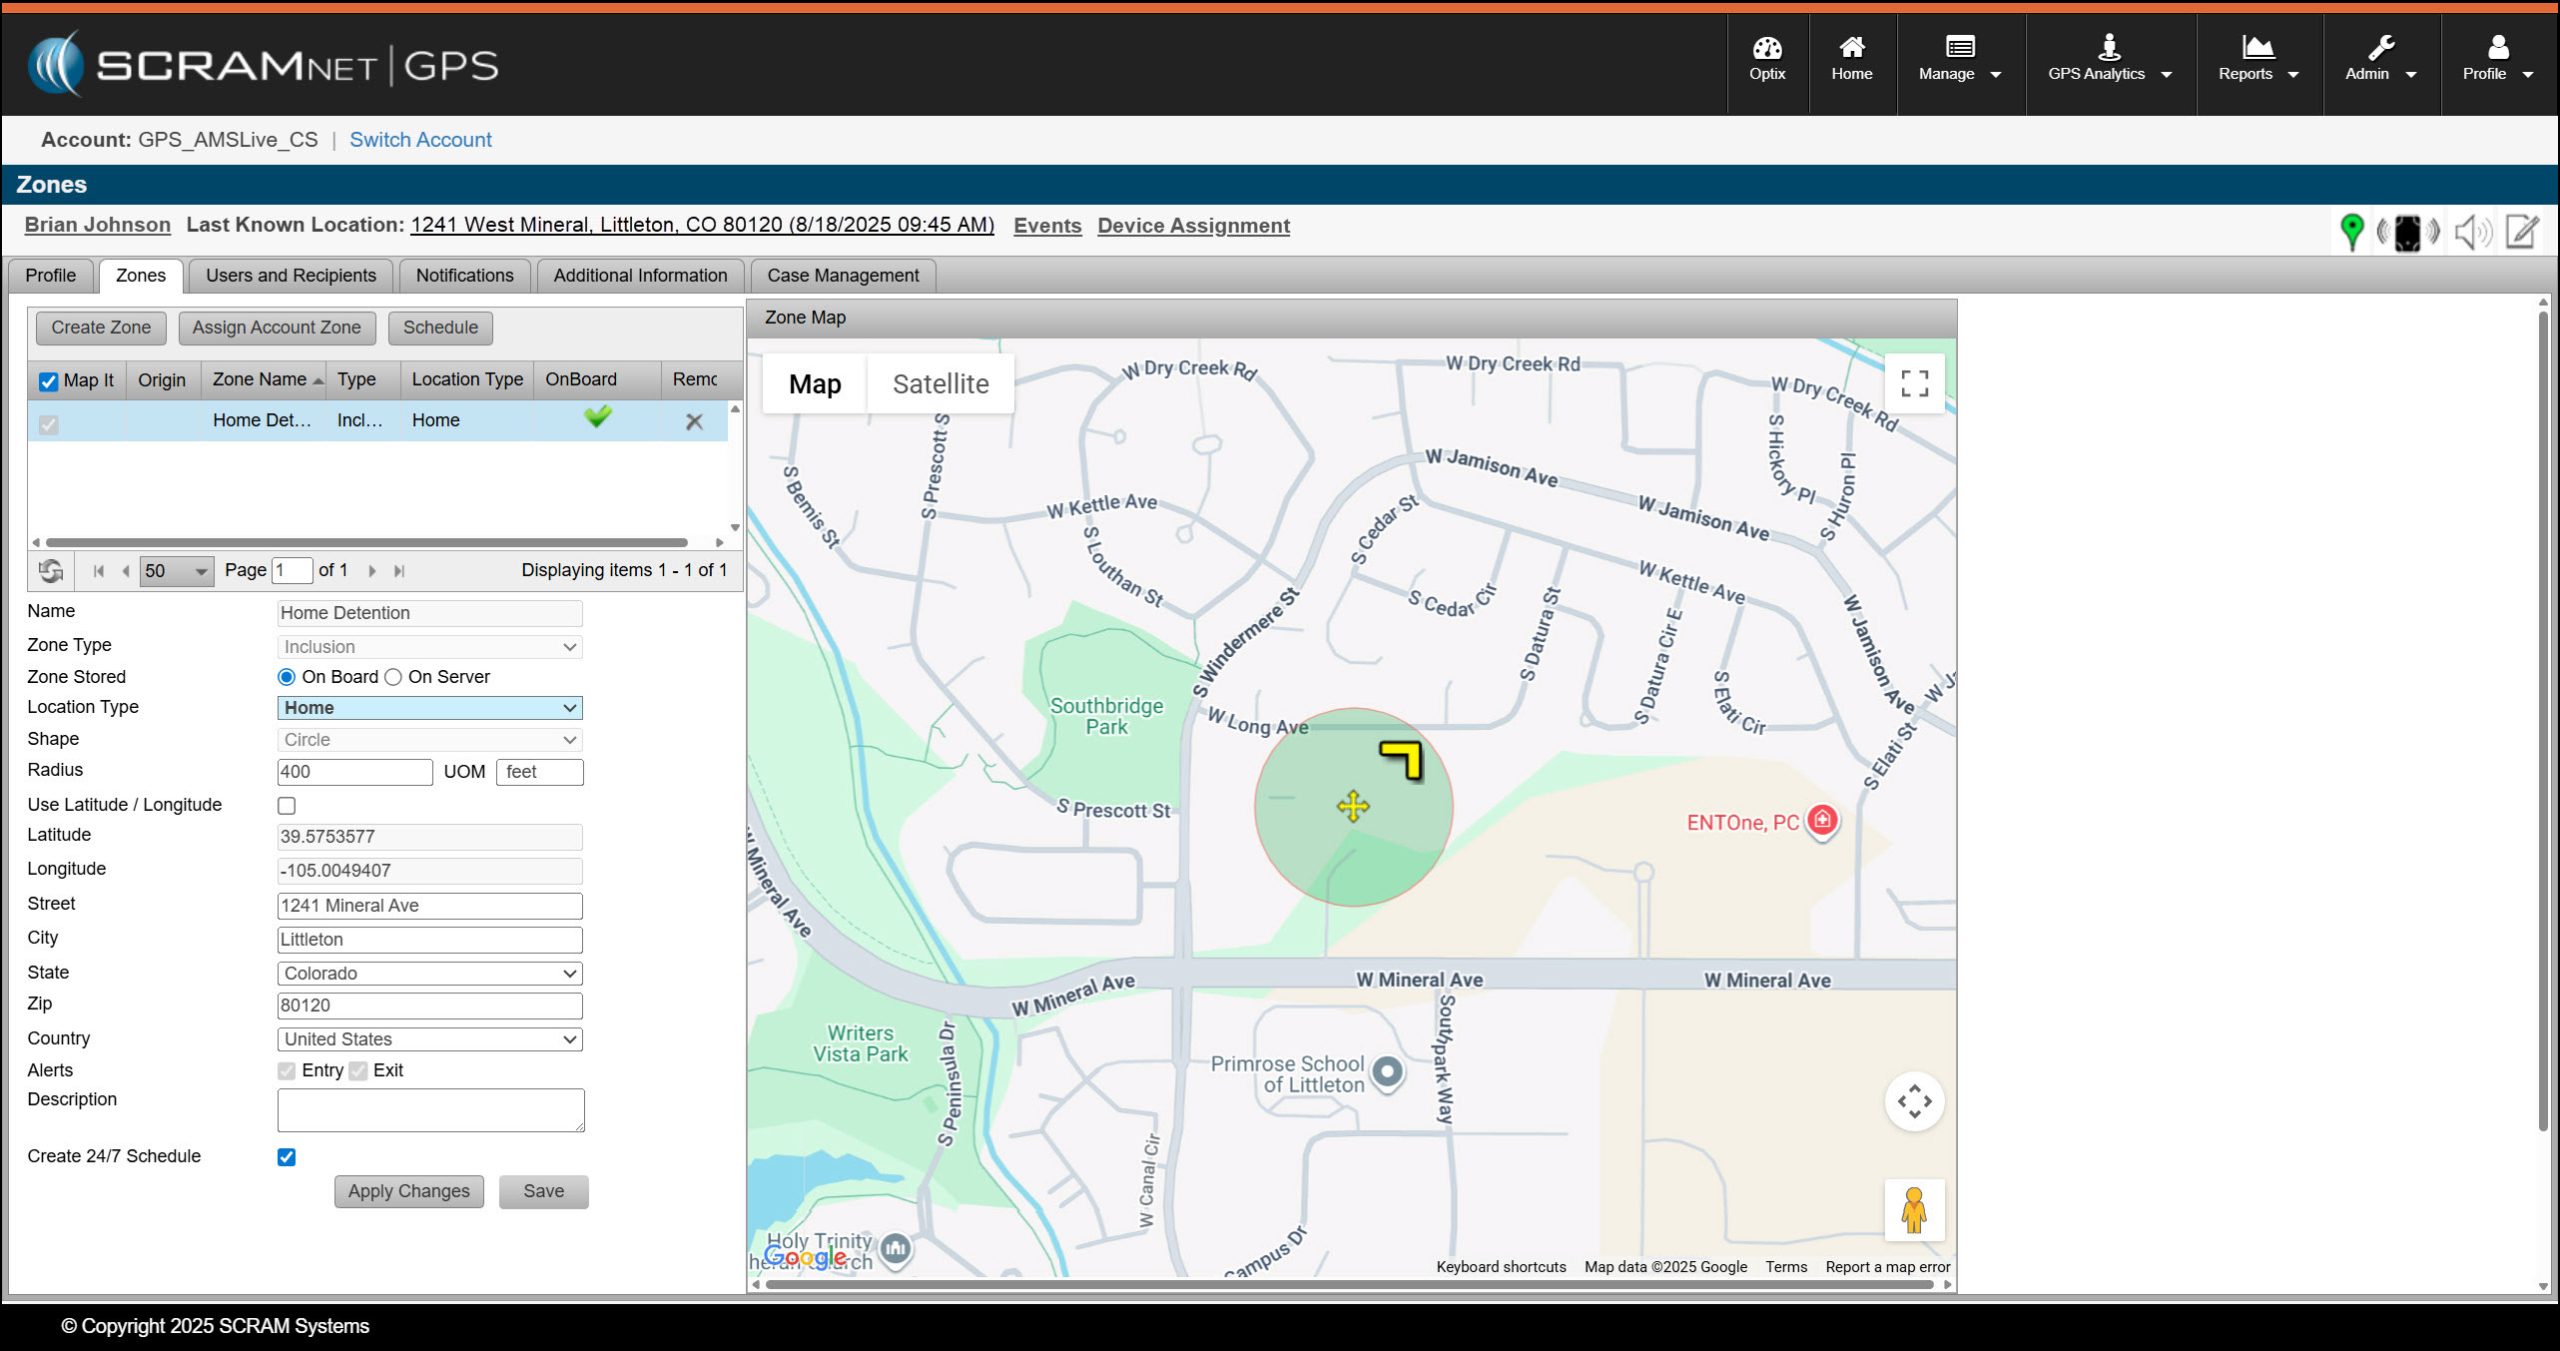
Home Detention Zone Saved On Board – click to enlarge

Home Zone Saved On Server– click to enlarge
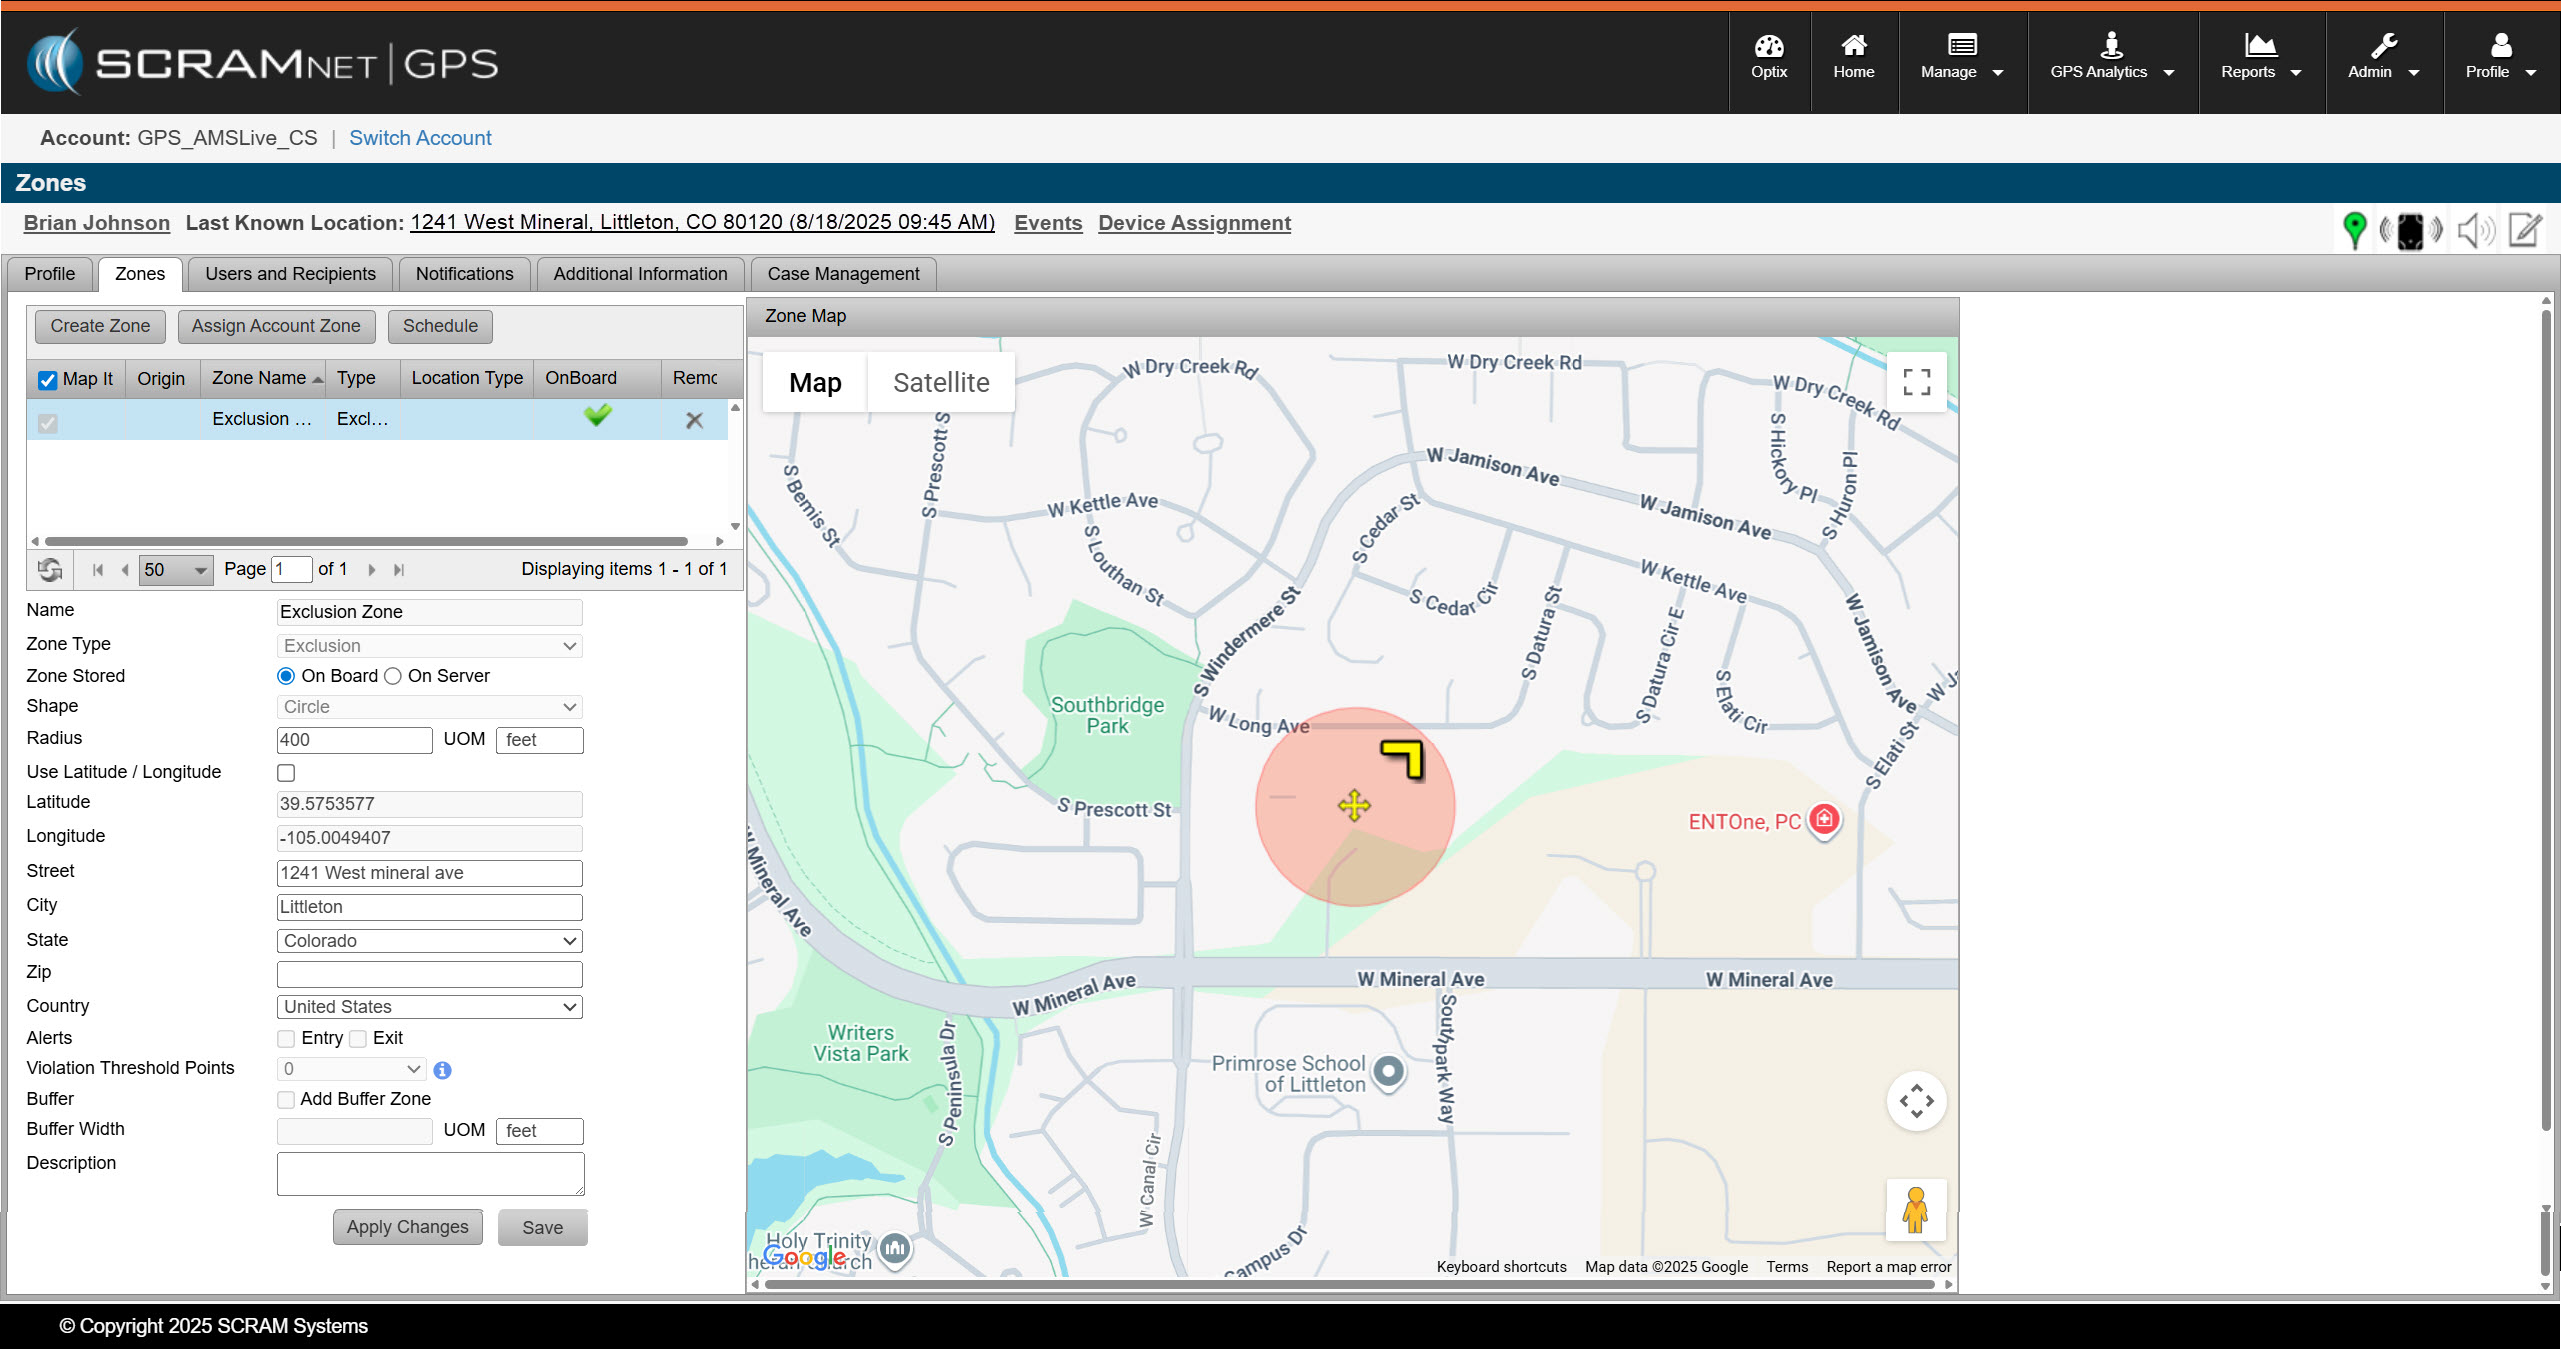
Exclusion Zone Saved On Board – click to enlarge