Depending on the client’s monitoring requirements, there may be specific Inclusion zones the client is required to always remain within. These Inclusion zones could be a home zone, city, county, or state. Additionally, there may be scenarios where the client has strict guidelines to follow when traveling between their Home zone and their Work zone, for example. SCRAMNET GPS supports these advanced overlapping Inclusion zone and scheduling scenarios.
This article’s topics include:
- Add a 24/7 Inclusion Zone Schedule
- Add an overlapping Inclusion Zone Schedule
- Prioritizing overlapping Inclusion Zones for event Notification
- Add an Exception to a 24/7 Inclusion Zone Schedule
Create a 24/7 Inclusion Zone Schedule
Once the zone is created, the next step is to associate a schedule with the zone.
Add a 24/7 Inclusion Zone Schedule
When creating a new zone, you have the option to automatically create a 24/7 Inclusion Zone by selecting the Create 24/7 Schedule checkbox.

Client’s Zones page Home Zone, Create 24/7 Schedule Checkbox selected – click to enlarge
Once saved, the Zones and Schedule page will reflect that 24/7 Inclusion Zone schedule.
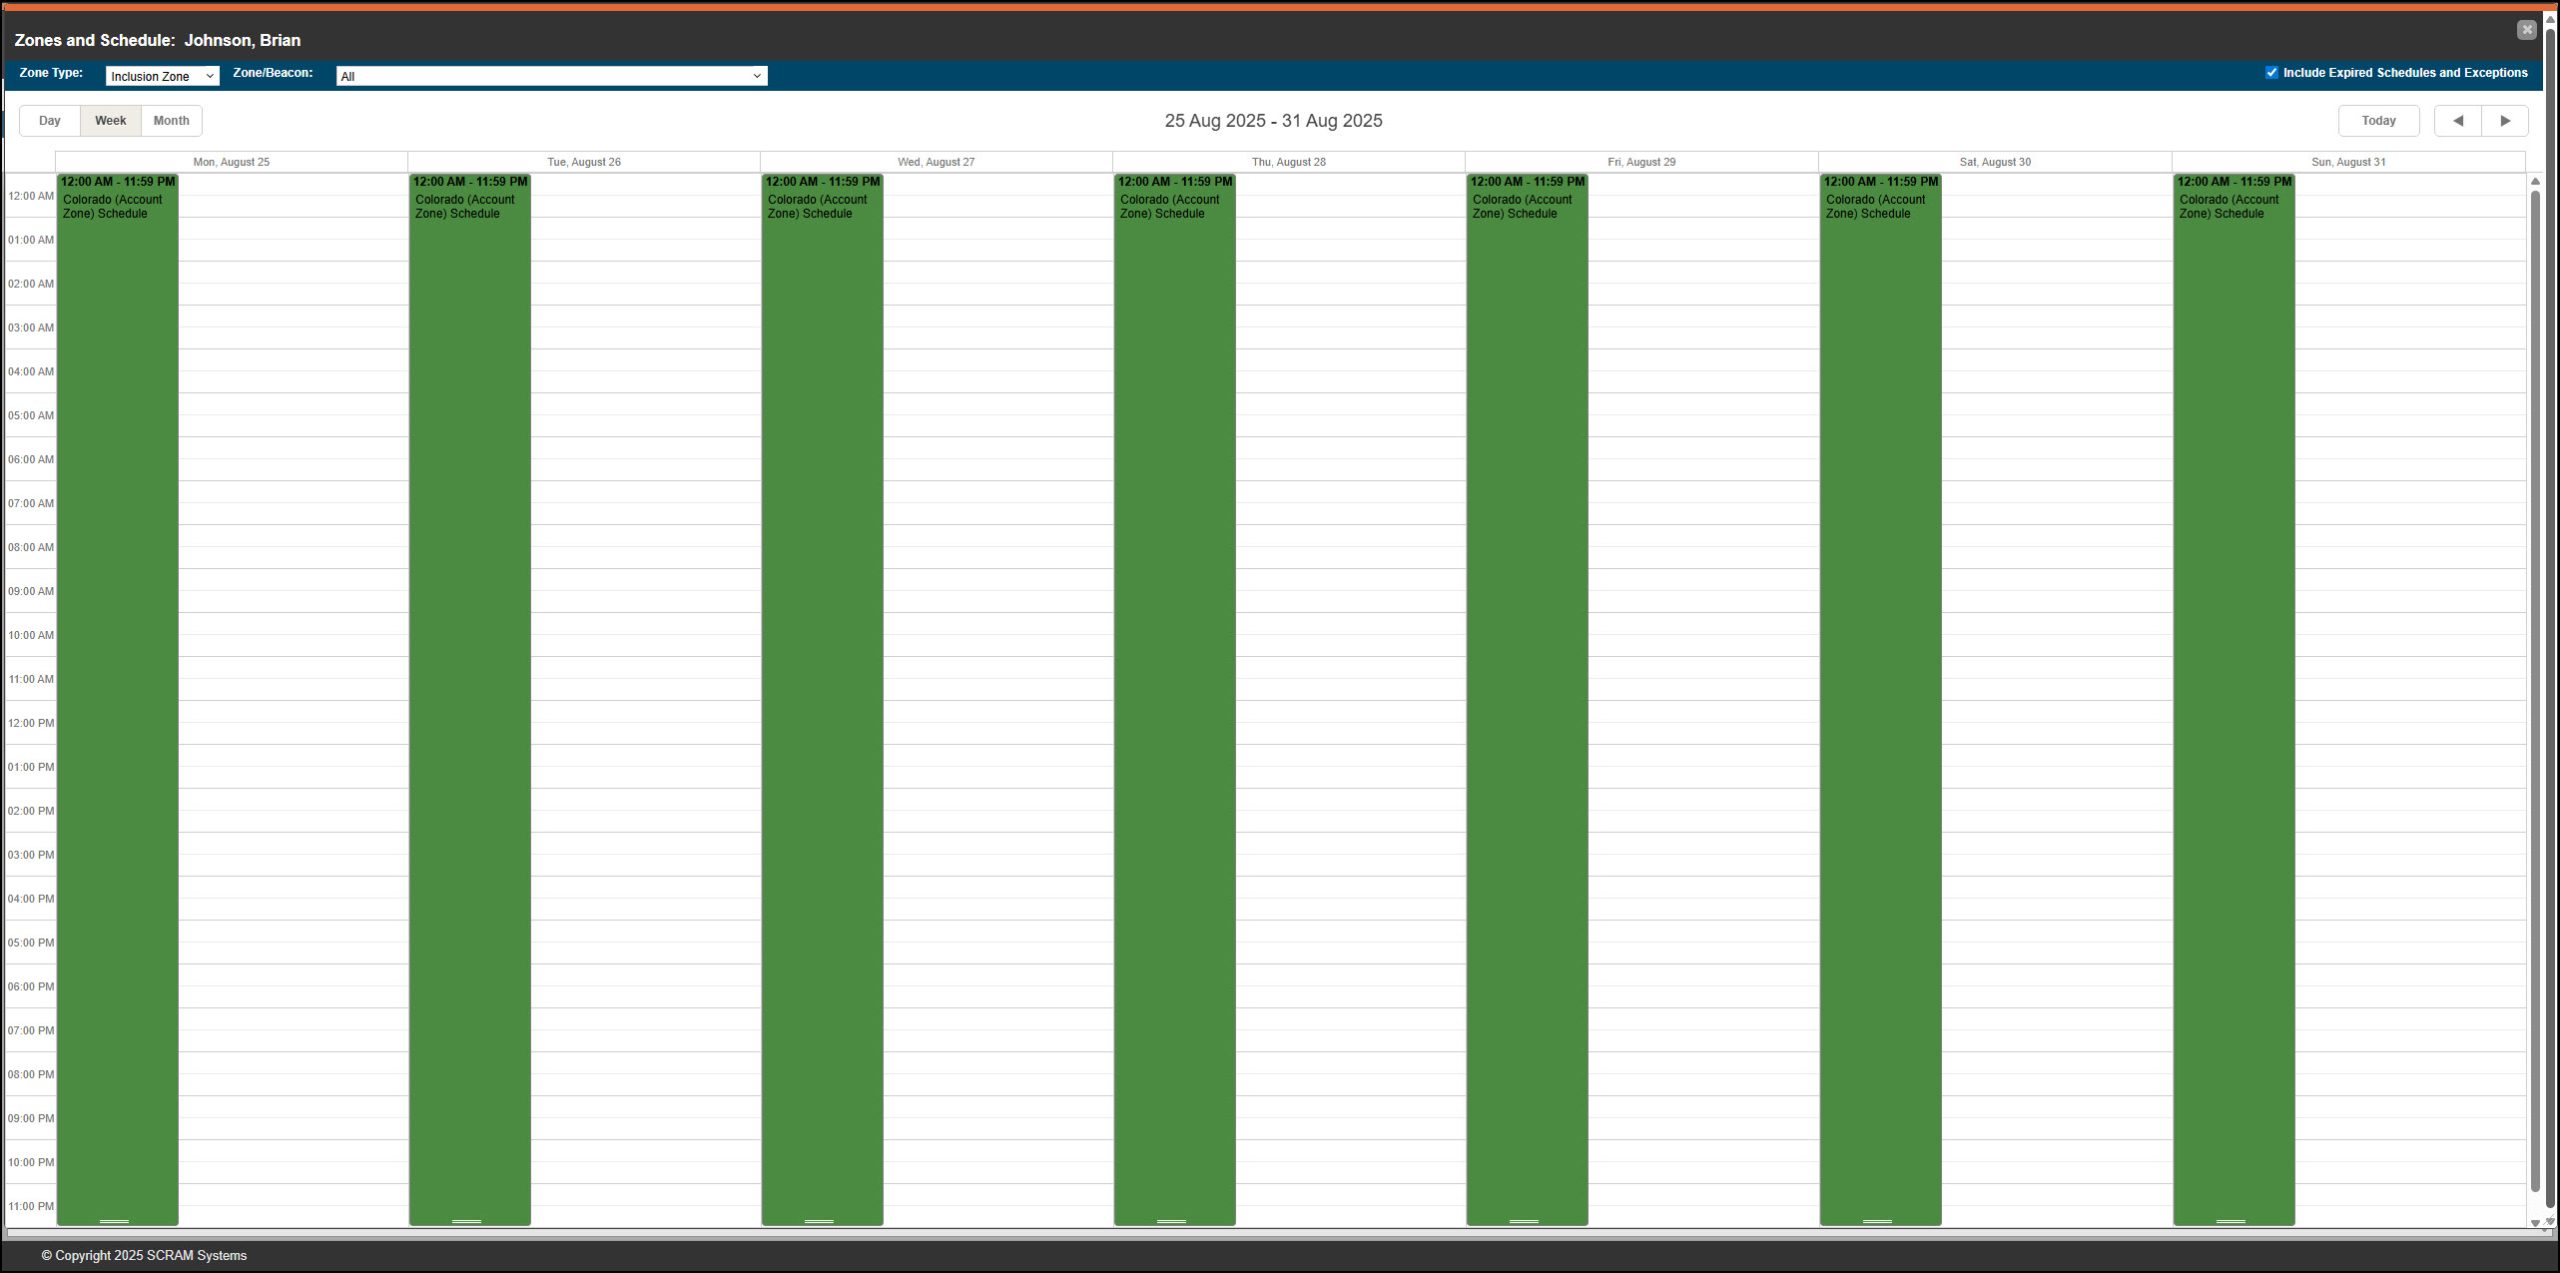
Zones and Schedule page with 24/7 Schedule for an Account Zone of Colorado Added – click to enlarge
You may also create a 24/7 Inclusion Zone Schedule by navigating to the Zones and Schedule page for the client.
Let’s add a 24/7 schedule to a zone that does not have the Create 24/7 Schedule option enabled. To do that:
- After creating and associating the zone with the client’s Zones page, select the Schedule button.
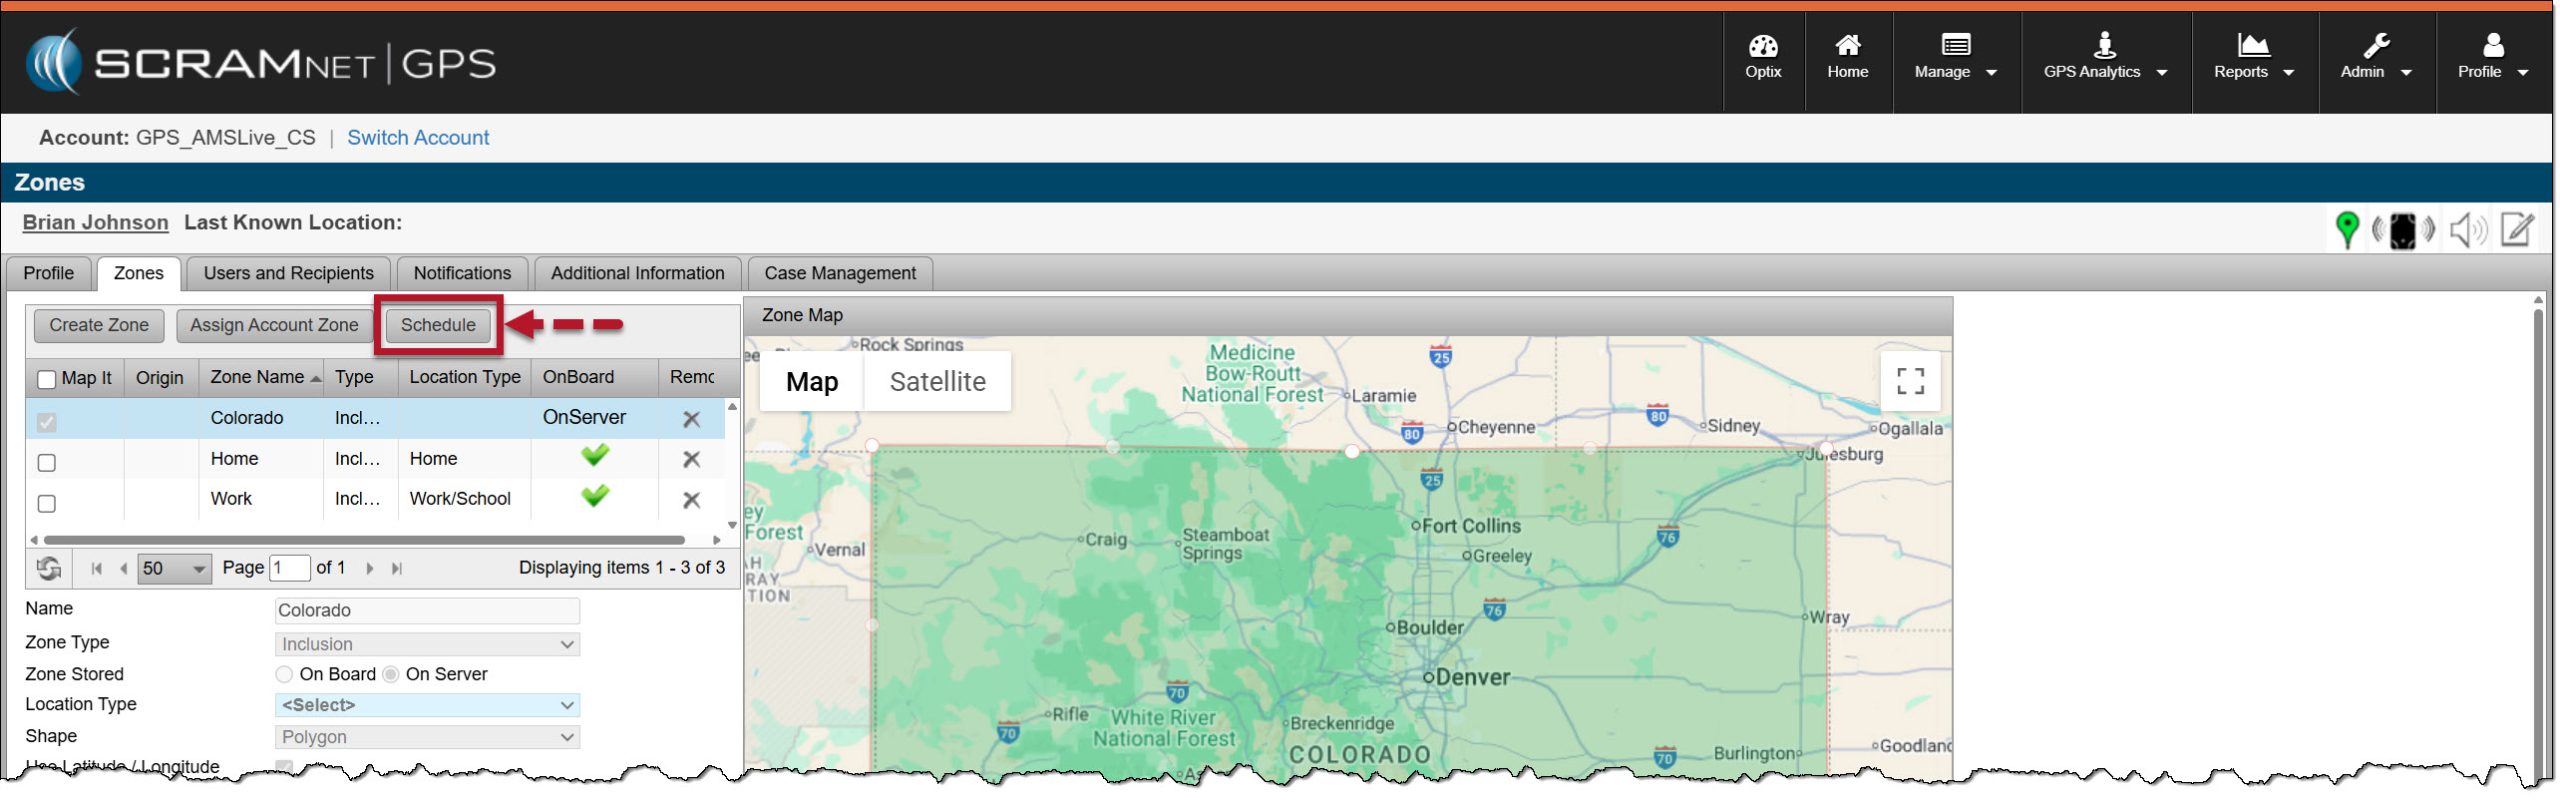
Client’s Zones page -Schedule Button Highlighted – click to enlarge
Or from the Profile Summary pop-up window, select the +Add hyperlink next to the Schedule heading.
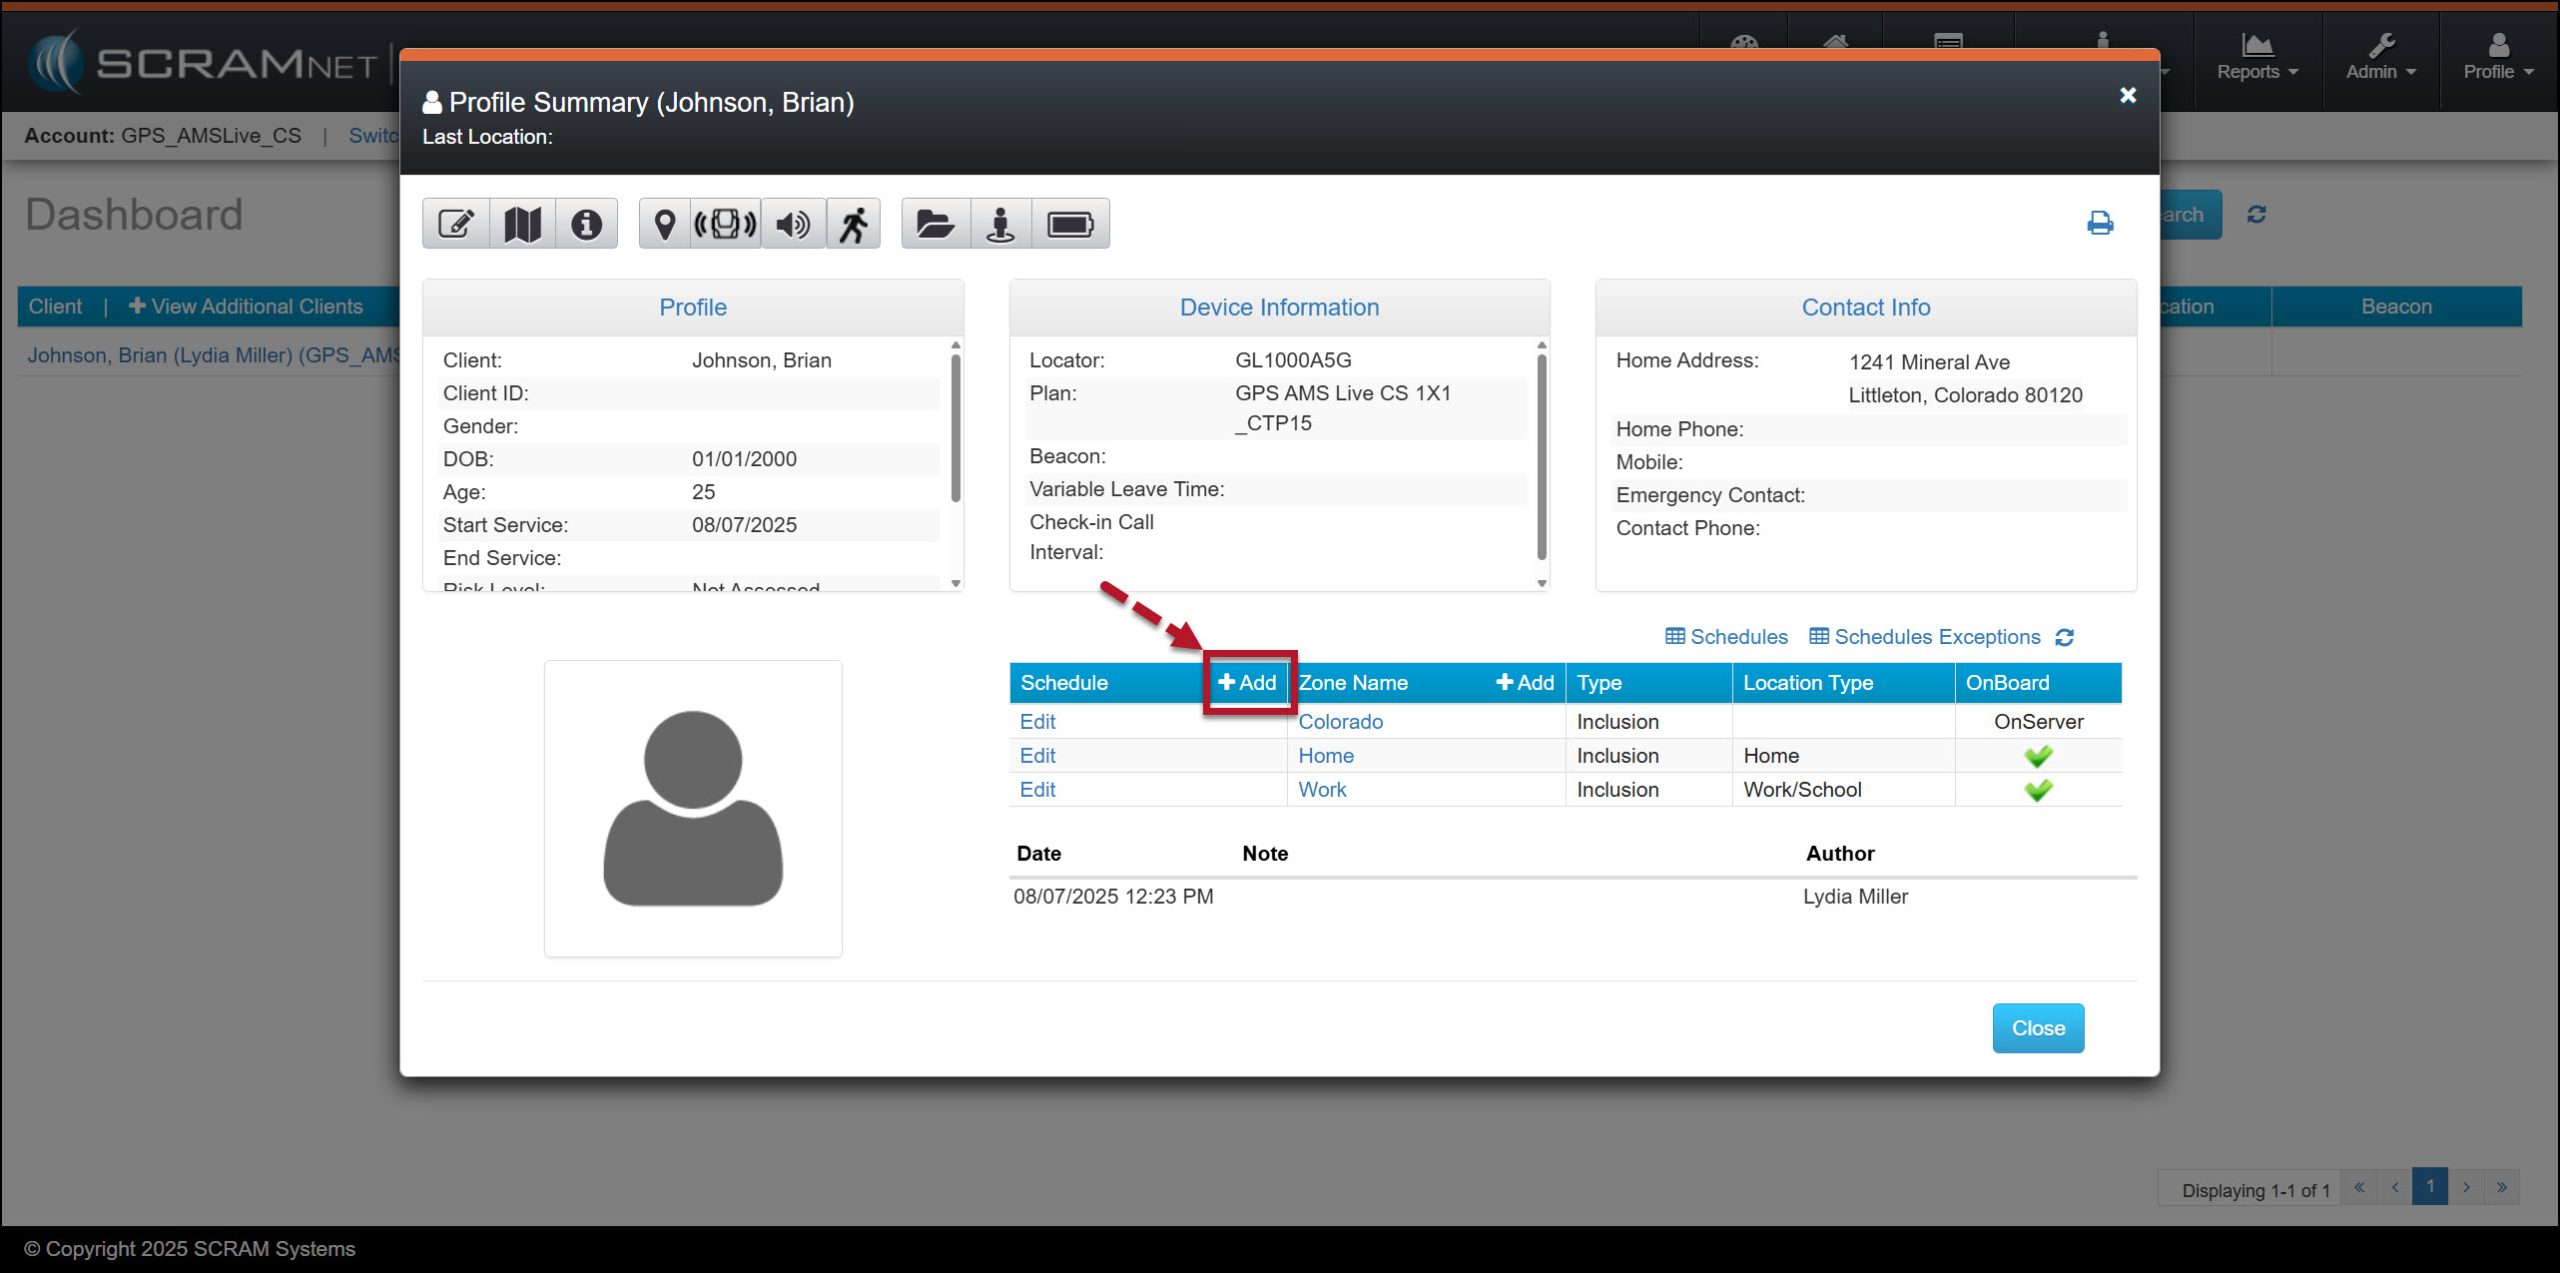
Client’s Profile Summary Pop-up Window, Schedule +Add button highlighted – click to enlarge
- On the Zones and Schedule page: Left-click and drag with your mouse in the white area on the next future day of the week to open the Scheduled Details pop-up window.
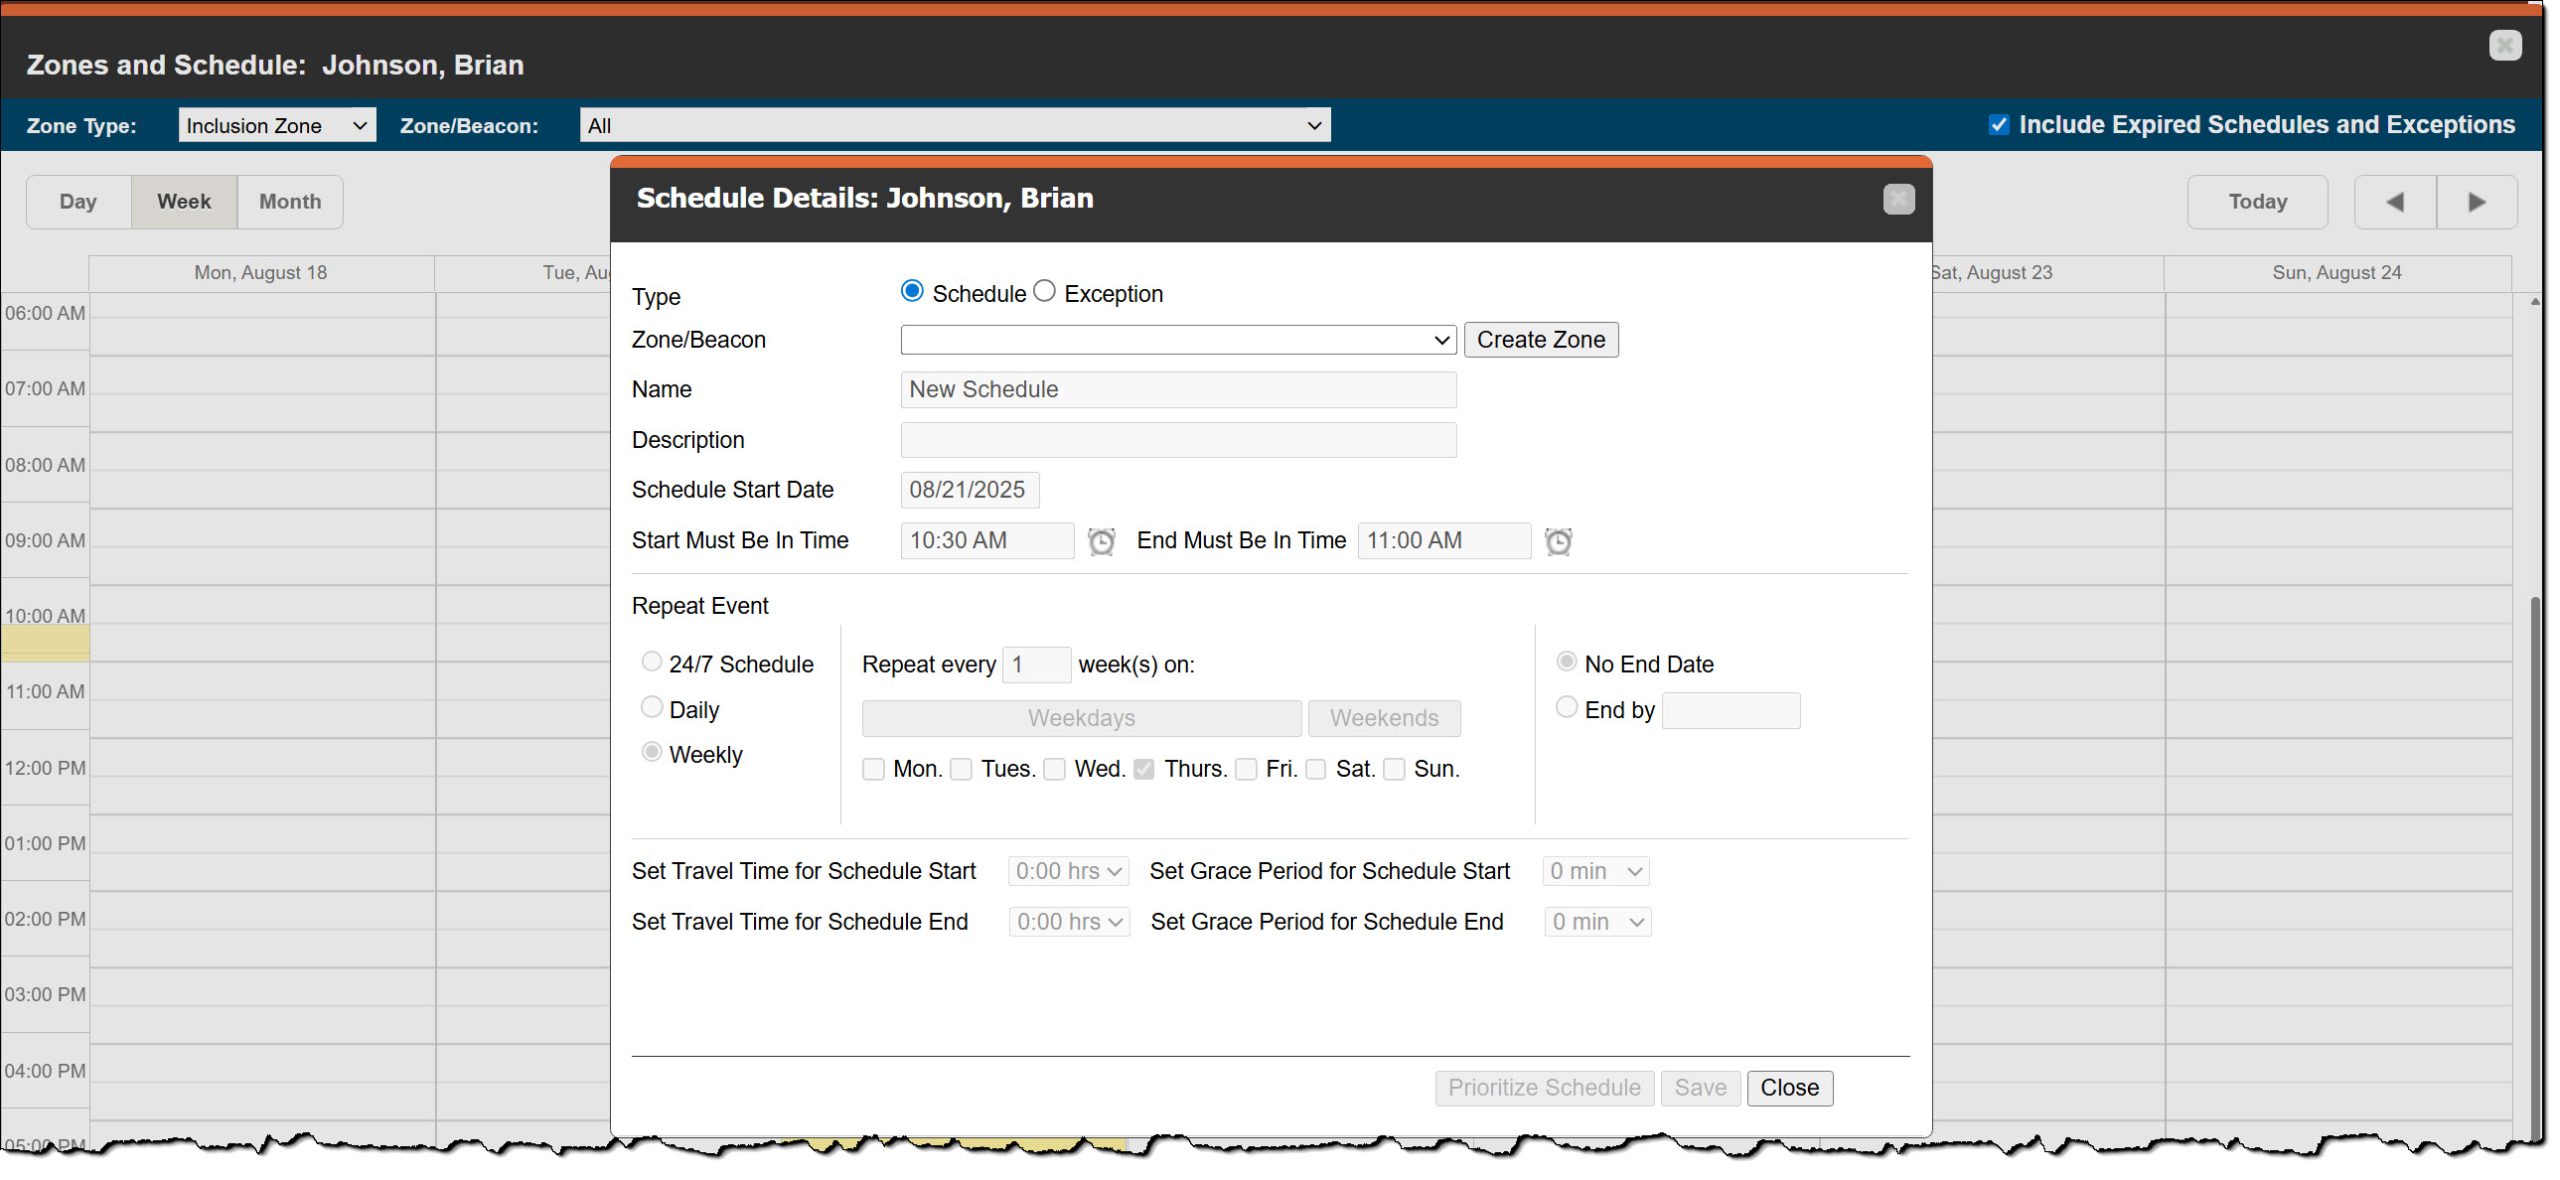
Schedule Details Pop-up Window – client to enlarge
On the Schedule Details pop-up window, enter the details for the schedule.
- Leaving the Type selection at the default setting of Schedule, open the “Zone/Beacon” dropdown menu and select the Inclusion zone you wish to add a 24/7 schedule to.
- Optional – You may add a description.
- Skip down to the Repeat Event section and select the 24/7 Schedule radio button.
- Select the Save button.
Example for a 24/7 Schedule – click to enlarge
Once saved, the 24/7 Inclusion Zone schedule is displayed on the calendar.
Zones and Schedule page with 24/7 Zone Schedule Added – click to enlarge
Moving forward, the Dashboard “Zones” column will identify if the client is not within the 24/7 Inclusion zone.
Add an Additional Zone Schedule
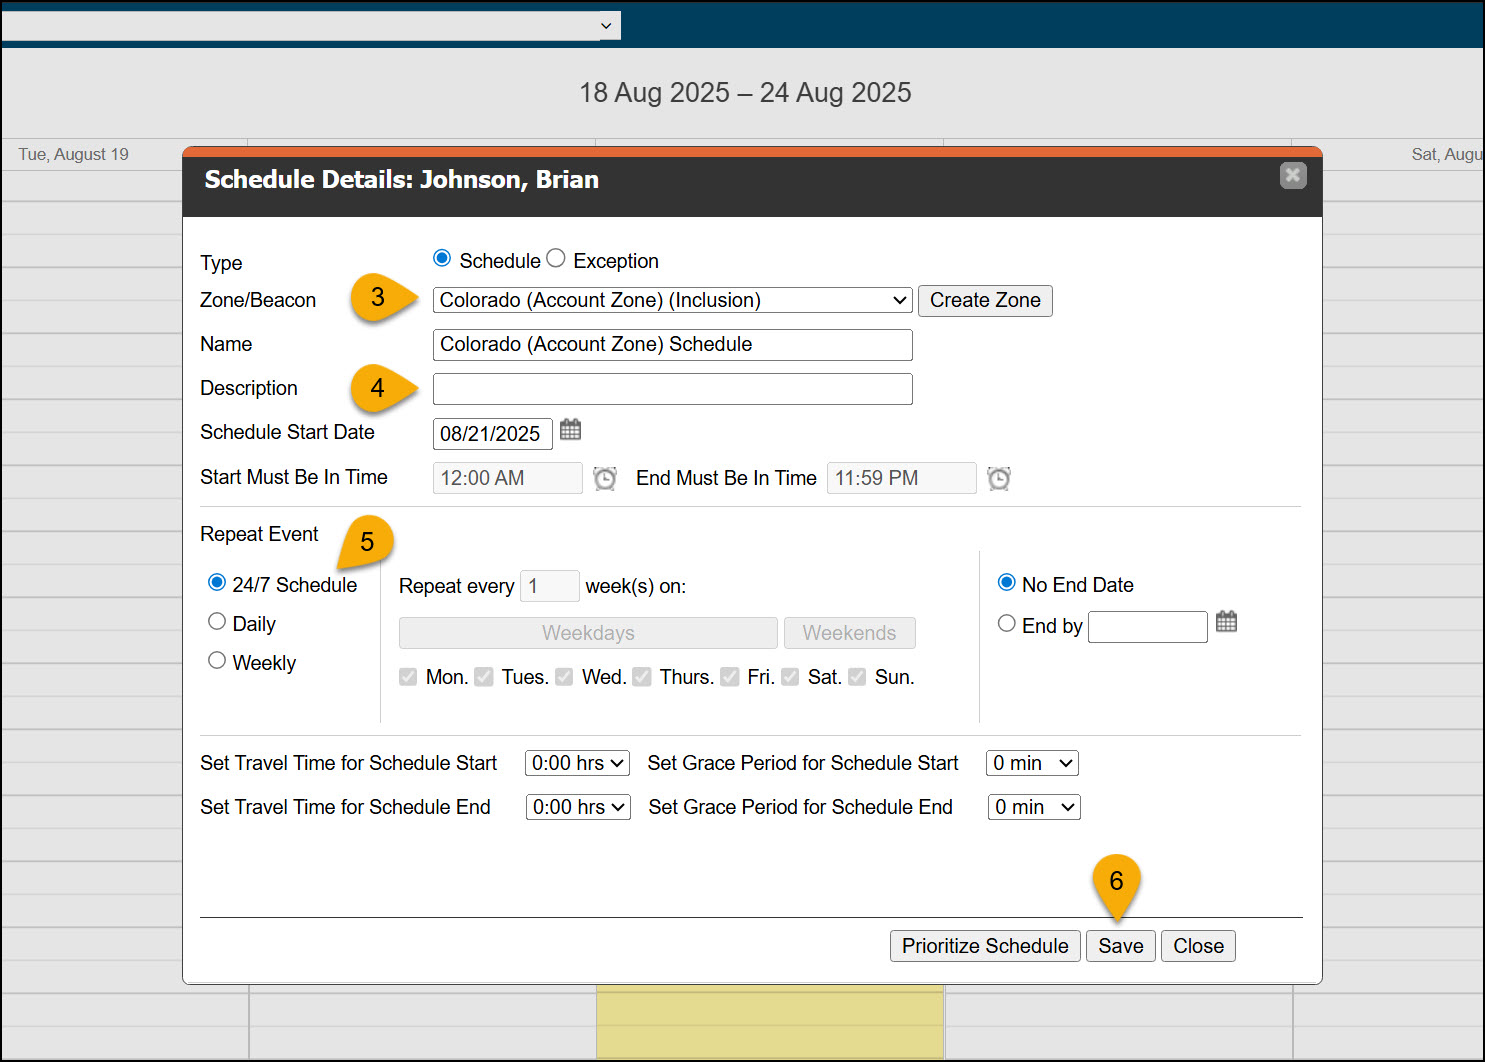
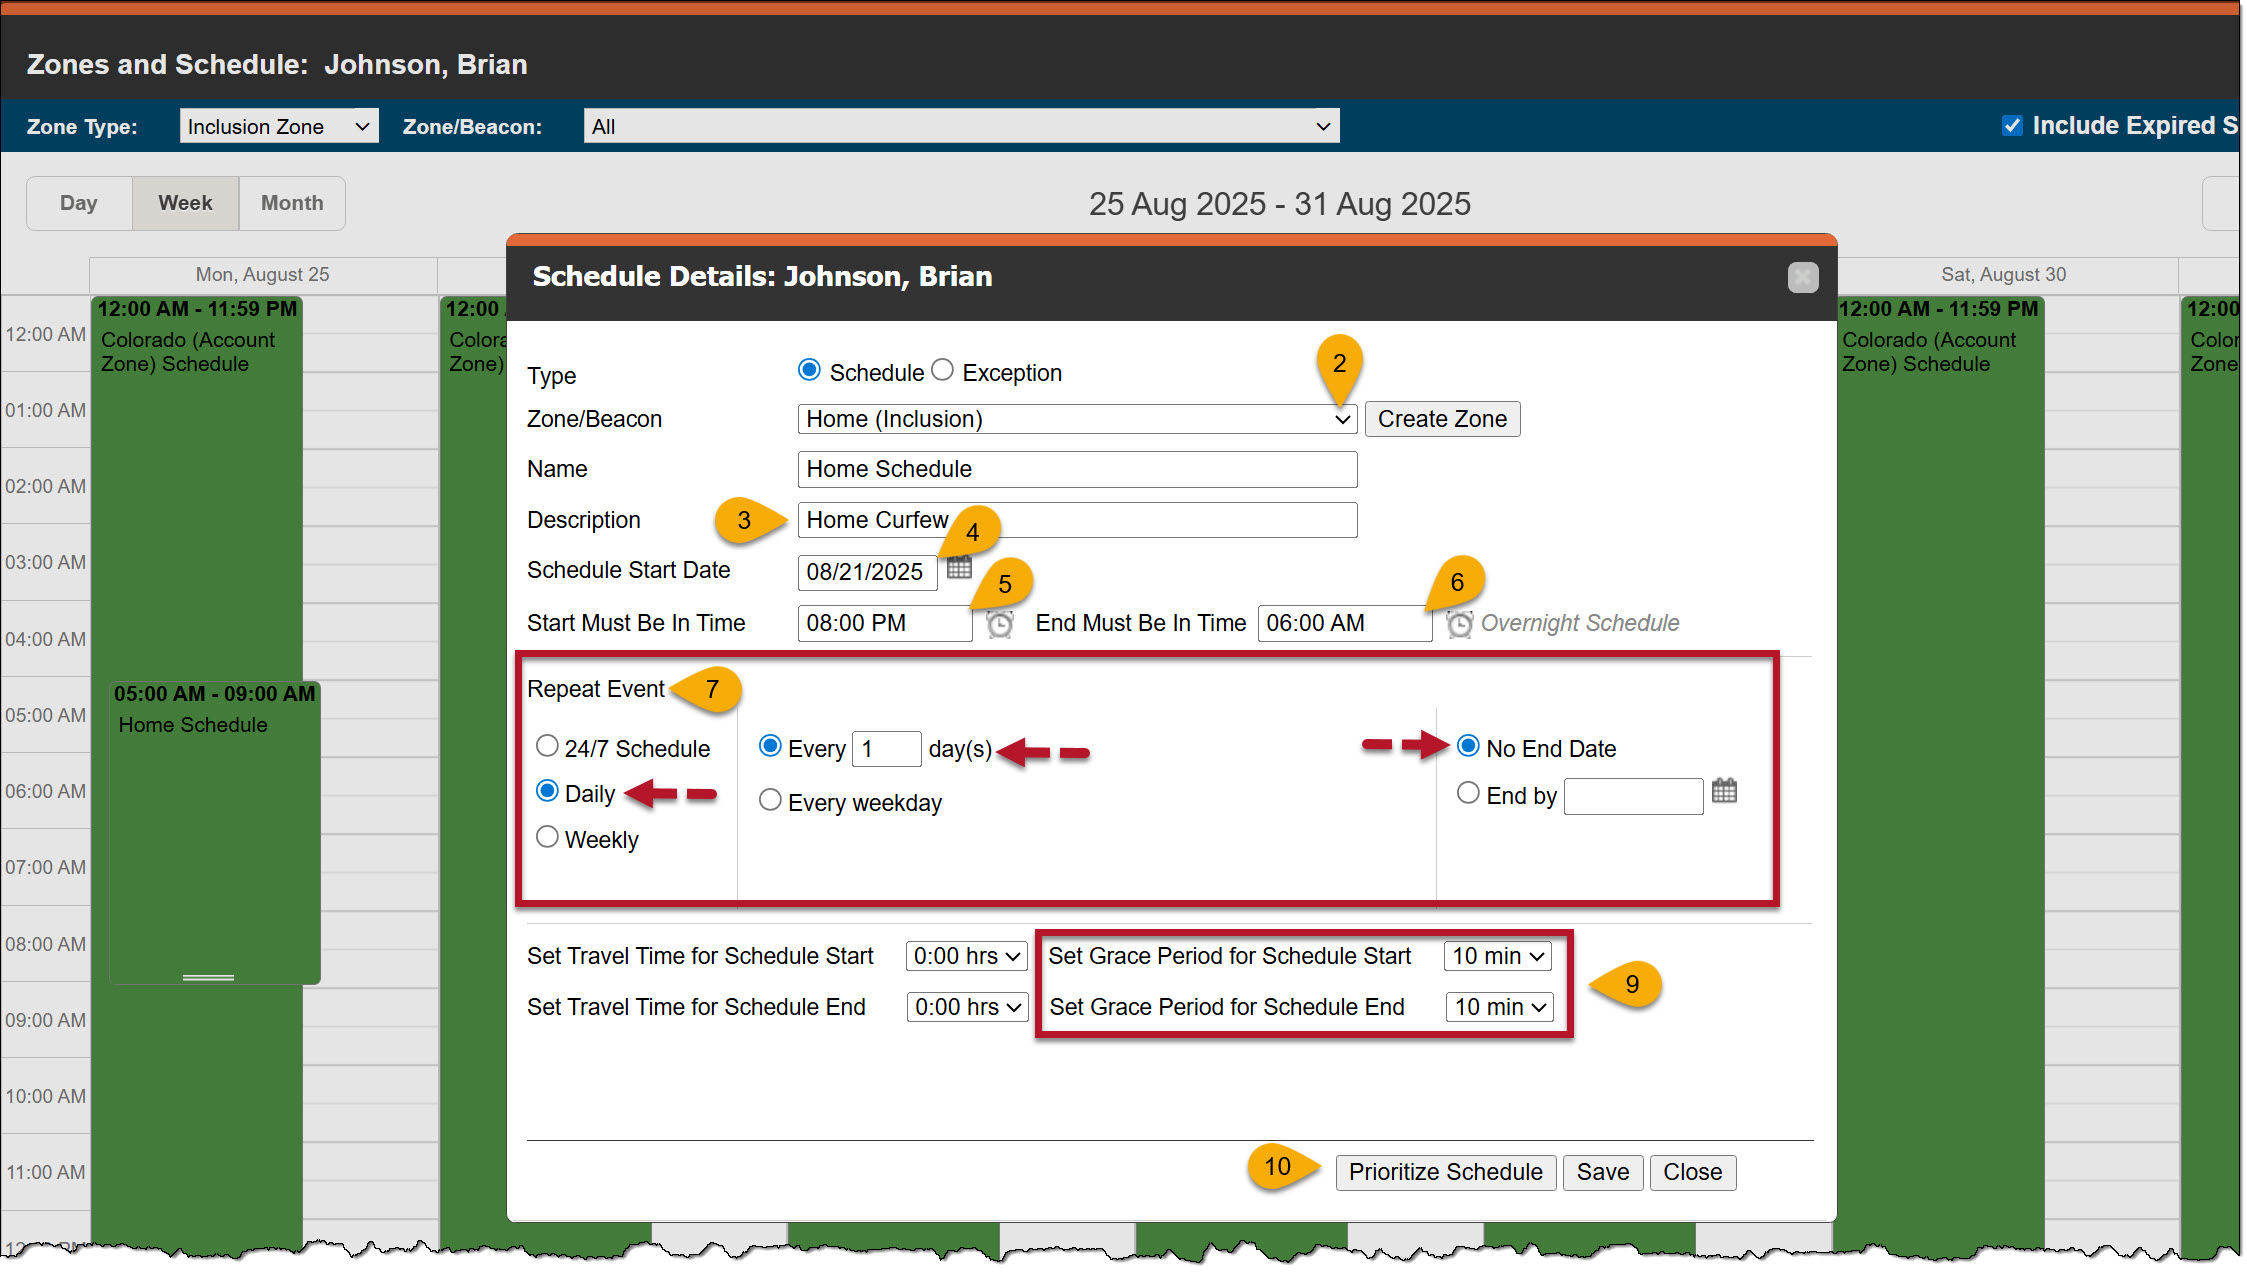
When required, you may include additional zone schedules in the client’s calendar. When adding these Inclusion zone schedules, we will be overlapping the 24/7 Inclusion zone schedule. Because of this, you must prioritize the schedules to ensure notifications are sent correctly.
In the following example, let’s add a Home Inclusion zone curfew schedule that requires the client to be in their Home zone from 8:00 PM to 6:00 AM Sunday to next Saturday. In this example, the Home Inclusion Zone schedule will be prioritized over the Colorado Inclusion Zone schedule.
To get started:
- Left-click and drag with your mouse in the white area of the calendar on the client’s Zones and Schedule page to open the Scheduled Details pop-up window.
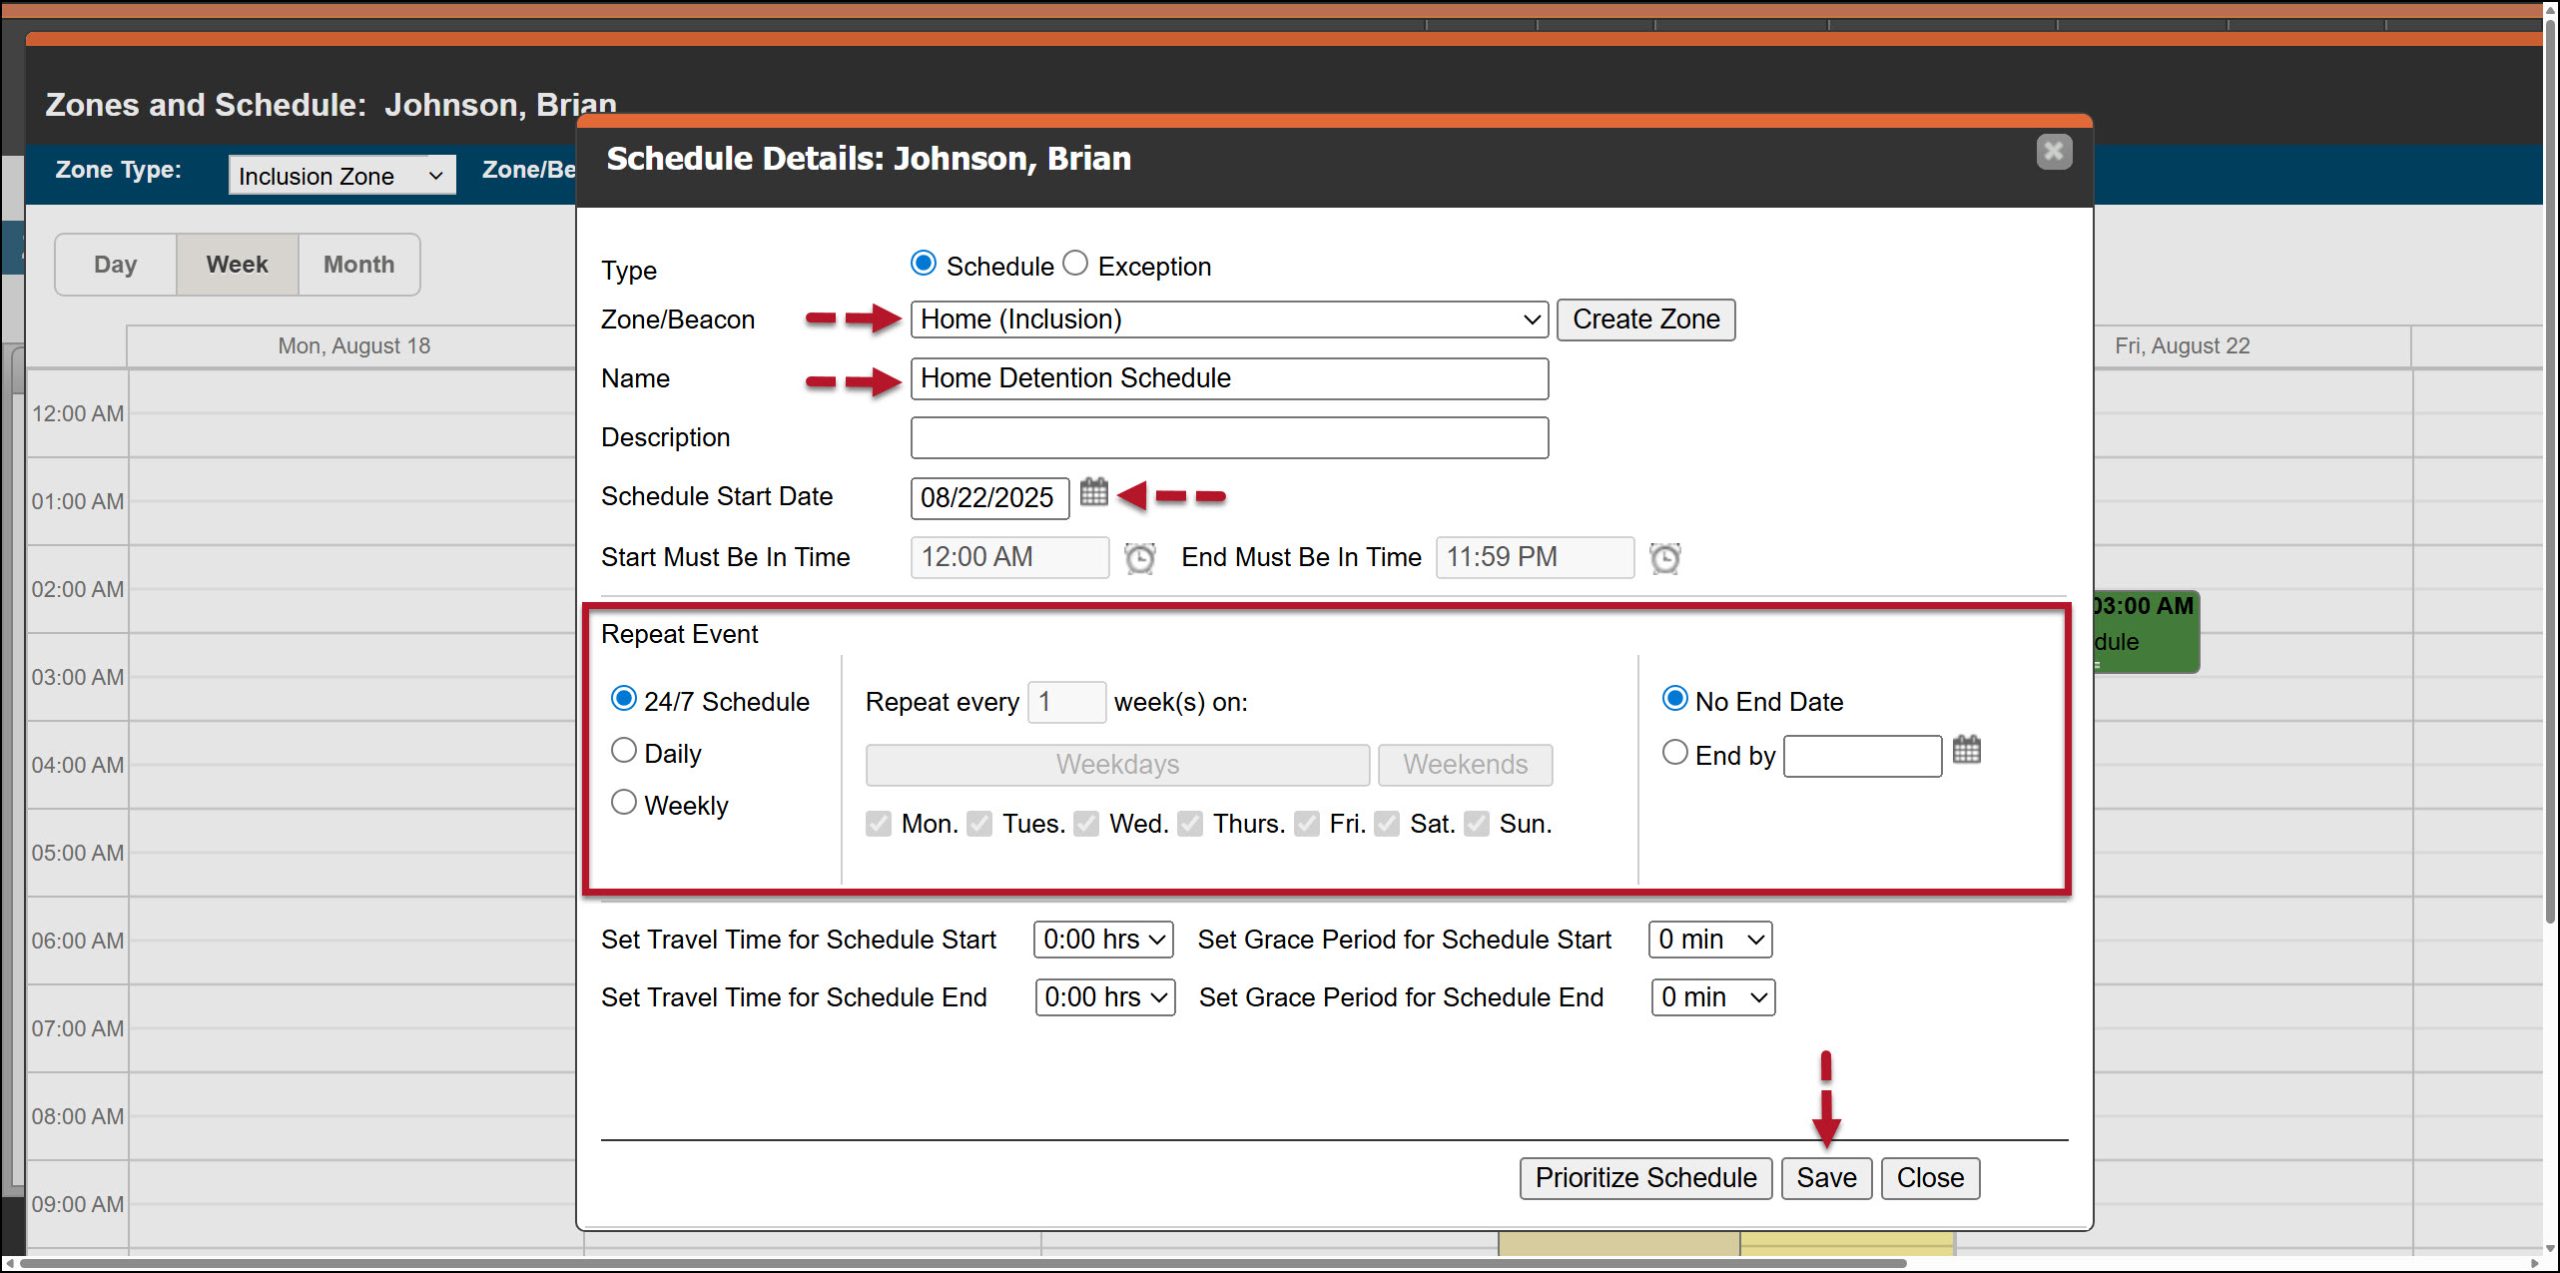
- Leaving the Type selection at the default setting of Schedule, open the “Zone/Beacon” dropdown menu and select the Home (Inclusion) zone.
- Optional – You may add a description.
- Enter the Schedule Start Date. For this example, the schedule will start tonight, so today’s date is selected. Reminder: You cannot create a schedule that falls in the past.
- Enter the “Start Must Be in Time” by typing in the time or select the clock icon to choose the time from a list.
- Repeat this process in the “End Must Be in Time”
- In the Repeat Event section, select the appropriate radio buttons to meet the monitoring requirements. For our example, this curfew is a Daily requirement that repeats every 1 day with no end date.
- In this scenario, no travel time is required.
- You may set a Grace Period for the start and end timeframe of the schedule. For example, if you set these fields to 10 minutes each, the client may enter the Home zone up to 10 minutes after the “Start must be in Time” to arrive home a little late, and may leave their Home zone up to 10 minutes before the “End Must Be in Time” to depart home early.
- Once all fields have been entered, select the Prioritize Schedule button.
Example of Adding a Home Inclusion Zone to a 24/7 Inclusion Schedule – click to enlarge
- On the Prioritize Schedule pop-up window, use the arrows to move the Home Inclusion schedule to the top position.
- Ensure that the Home schedule is in the top position and then select the Done button.
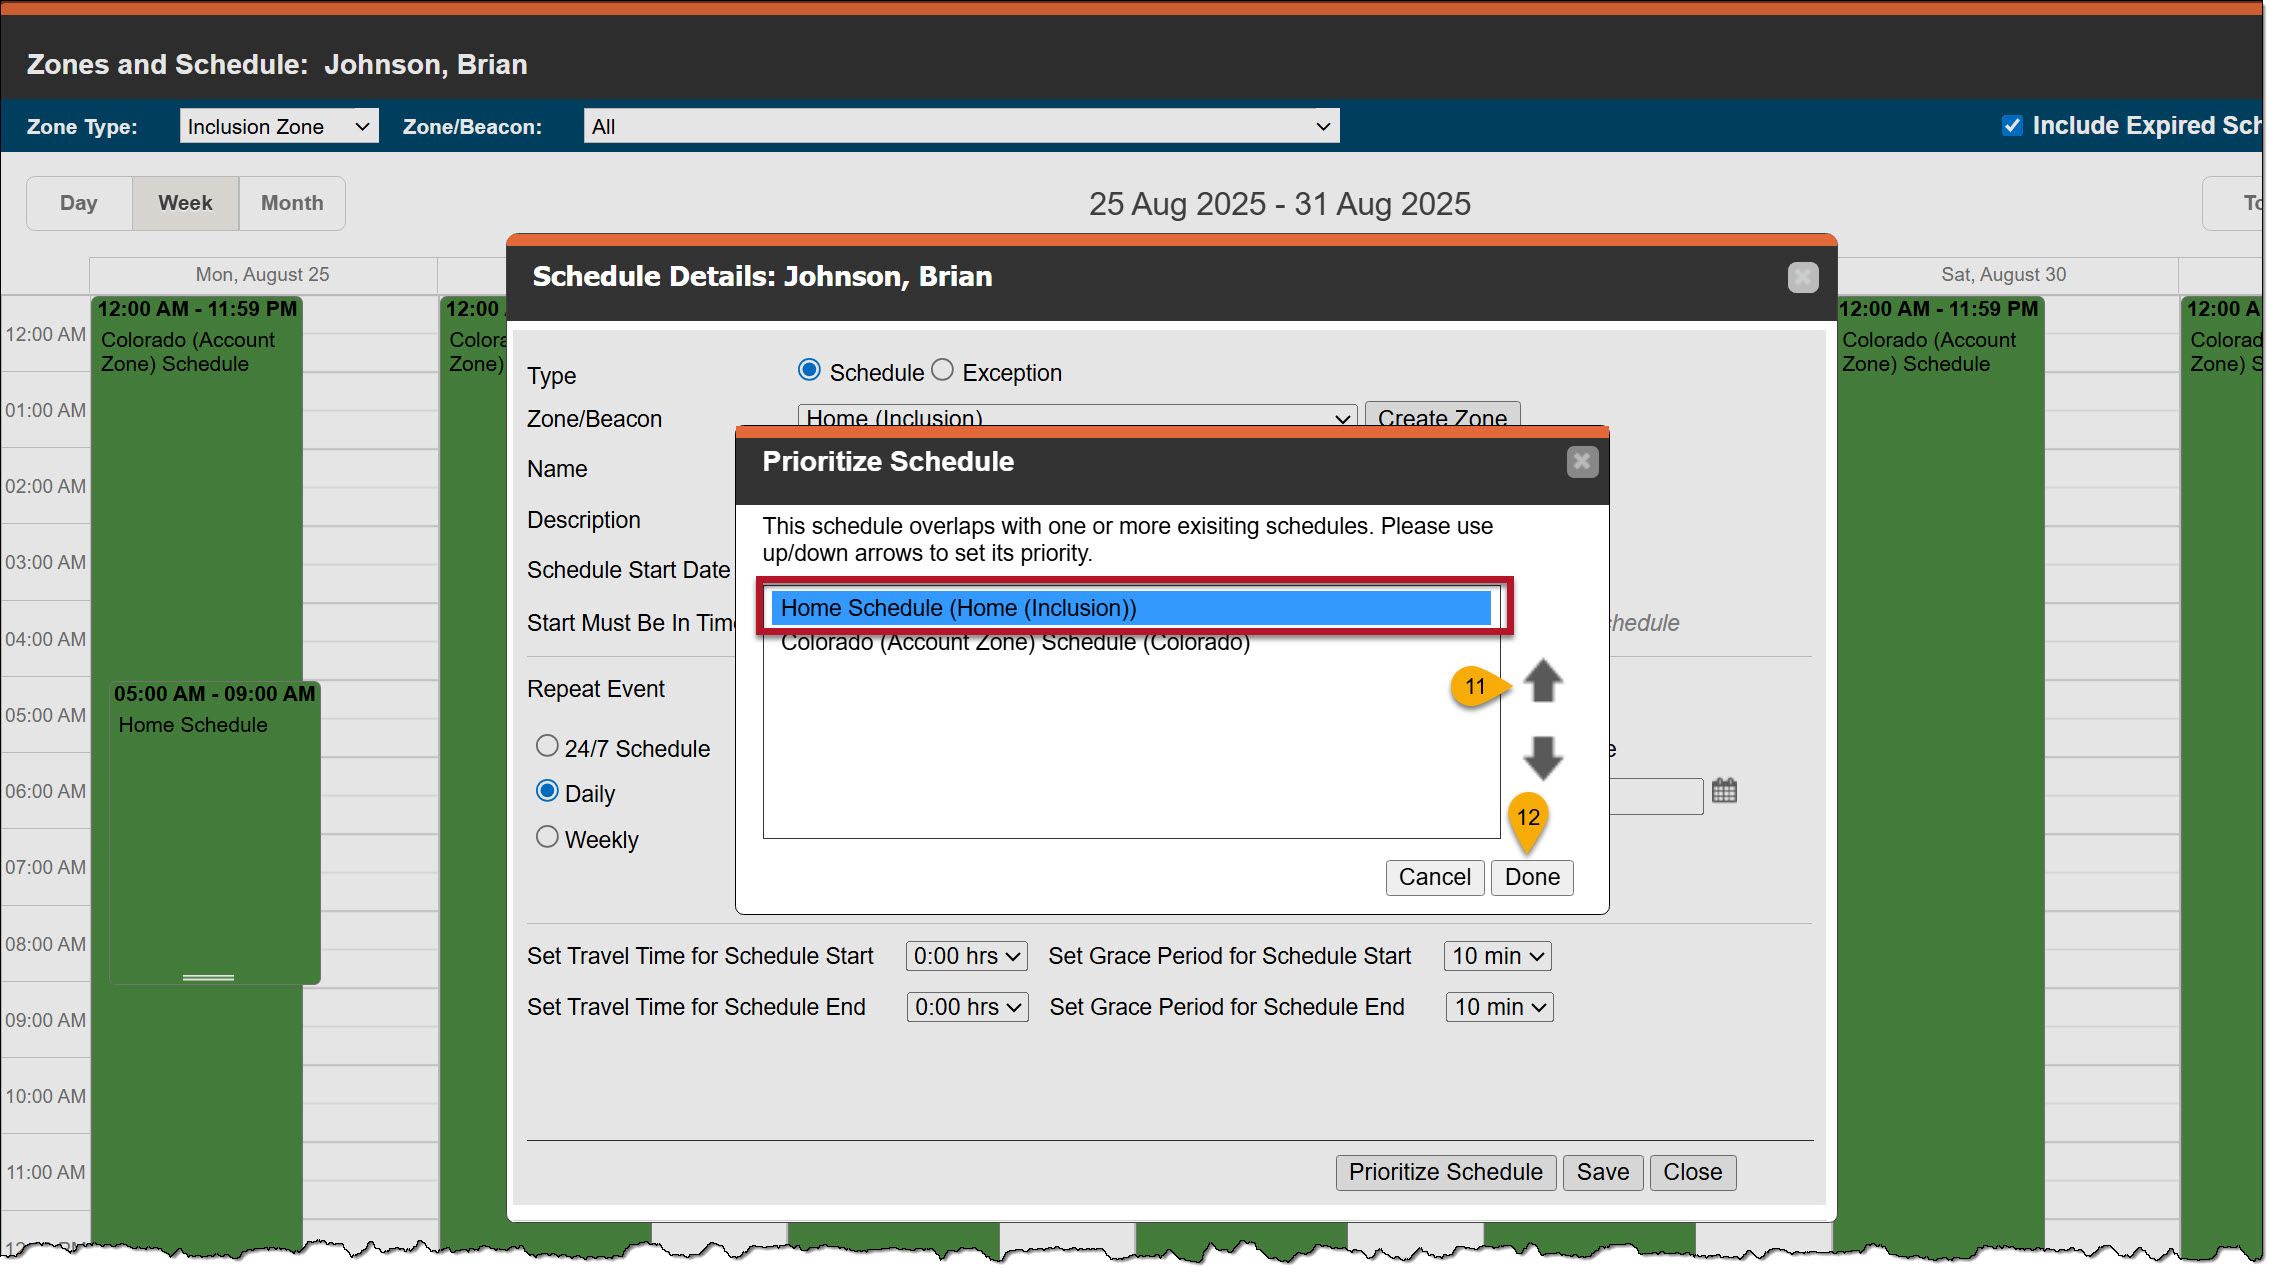
Prioritize Schedule Pop-up Window – click to enlarge
- The last step is to select the Save button on the Schedule Details pop-up window.

Schedule Details Pop-up Window with all Details and Prioritization Set – click to enlarge
Once saved, the schedule is displayed on the calendar. By prioritizing the Home zone schedule, the Dashboard Zones column will identify if the client is not within the Home zone during the established timeframe before alerting you that the client has left the Colorado zone.
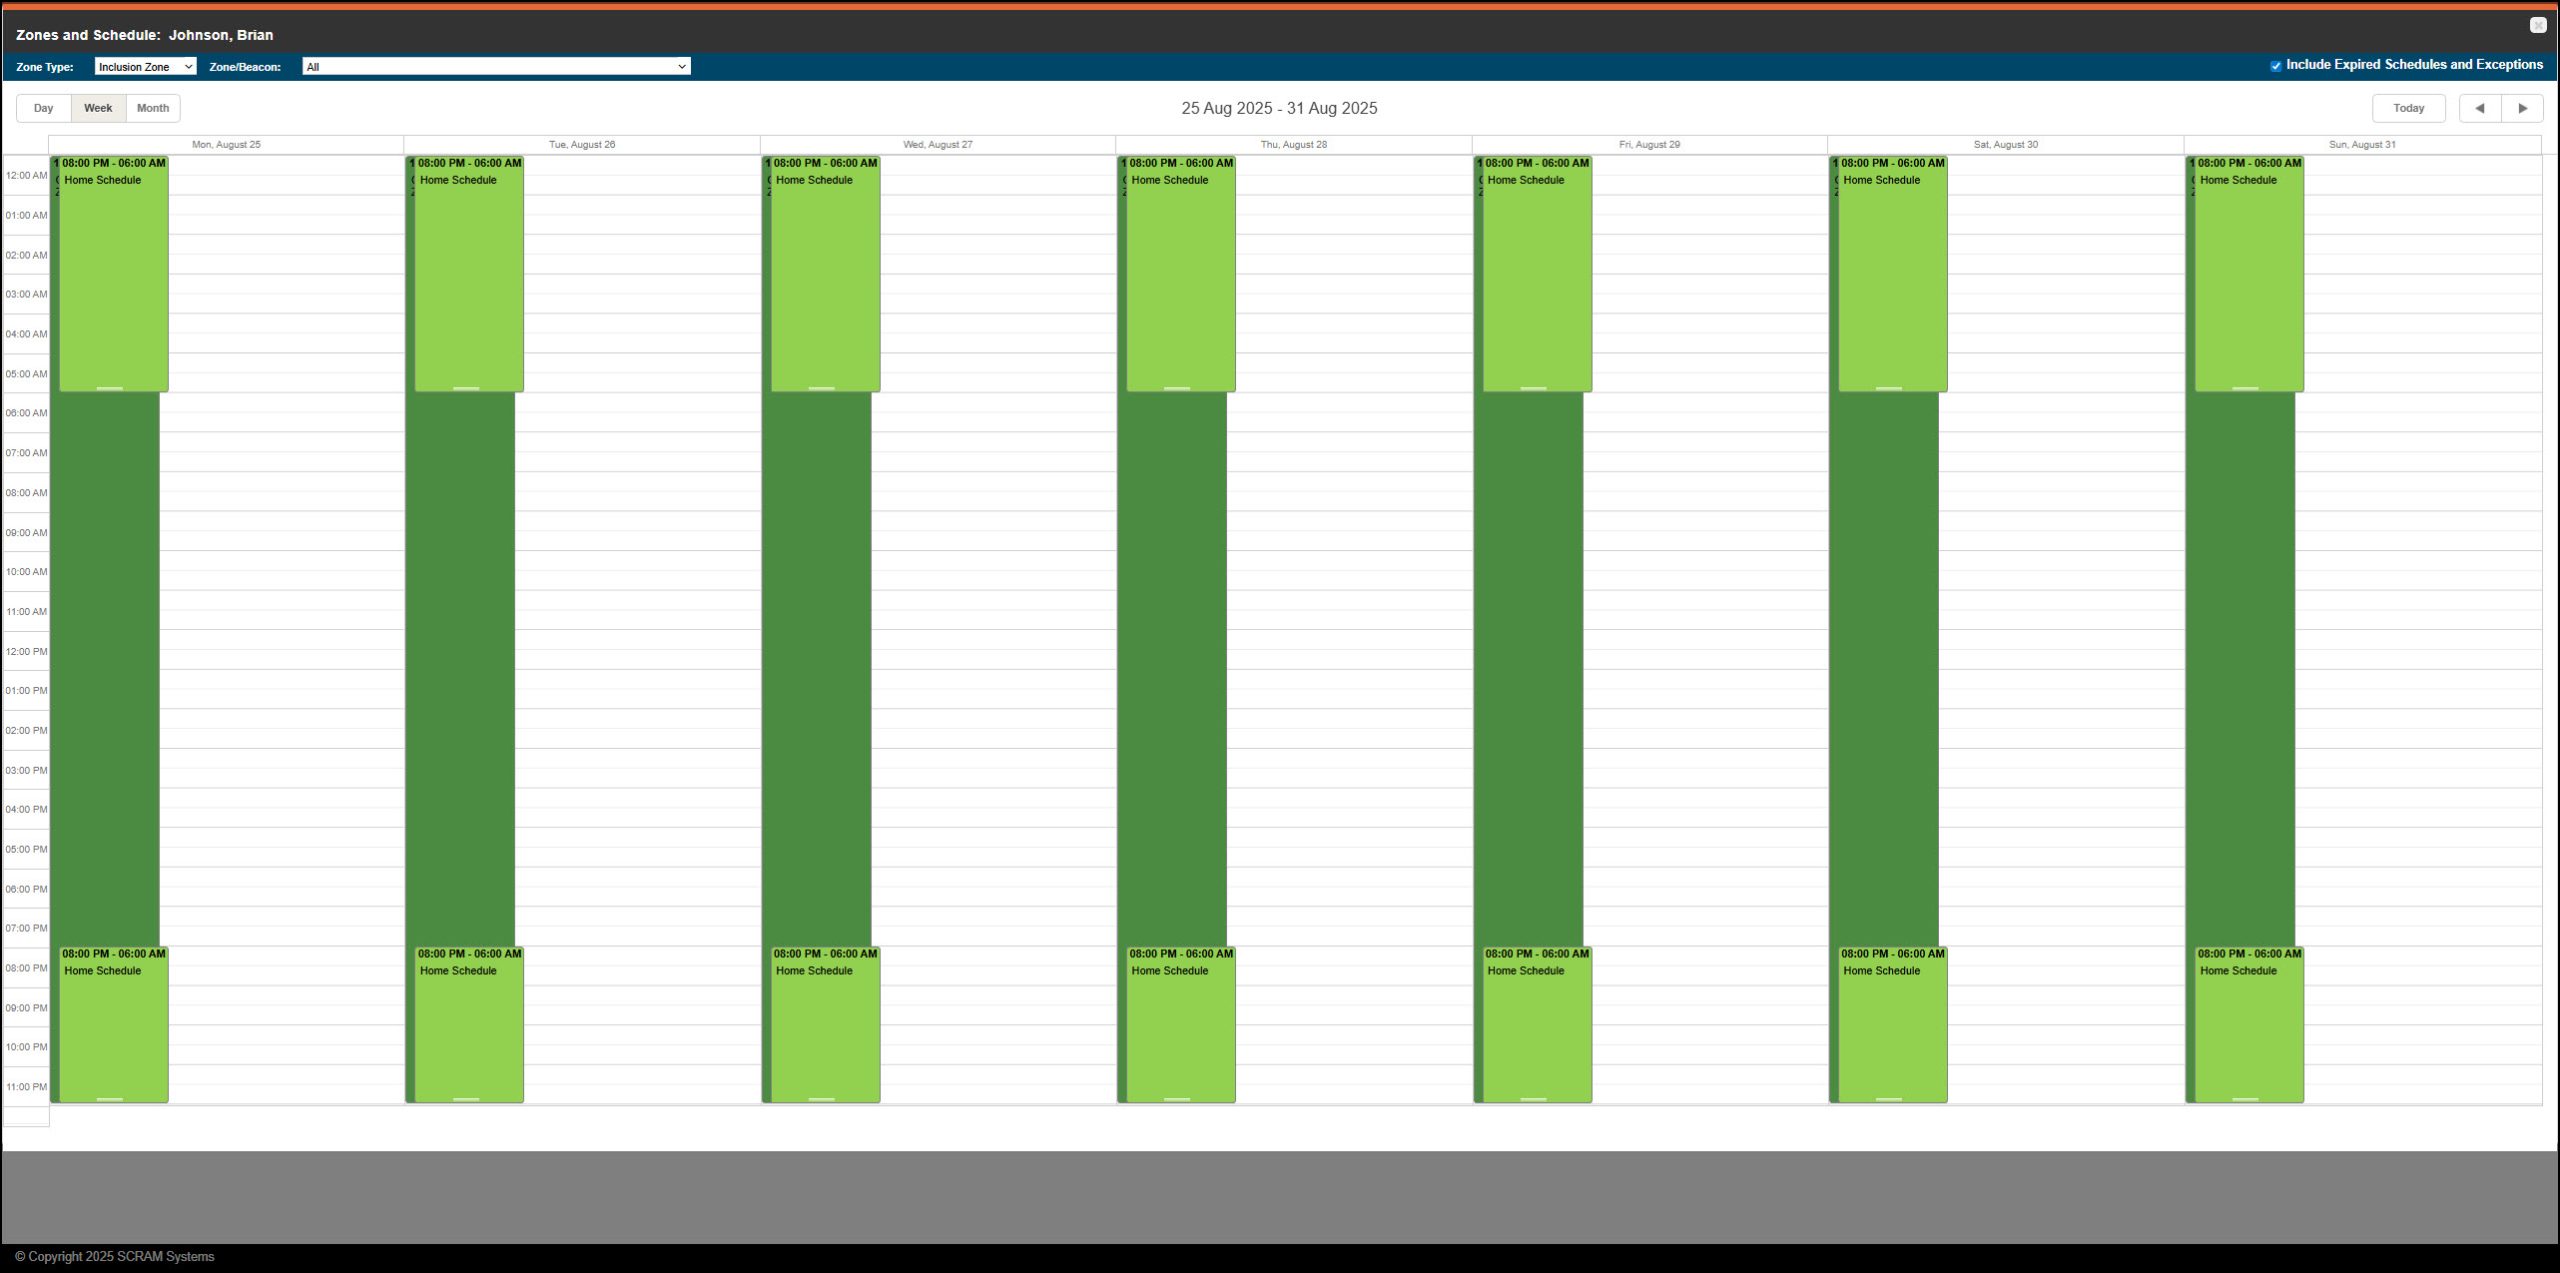
Zones and Schedule Page with Home Inclusion Added – click to enlarge
If needed, you may continue to add Inclusion zone schedules in this manner, remembering to prioritize each additional schedule to the client’s calendar.
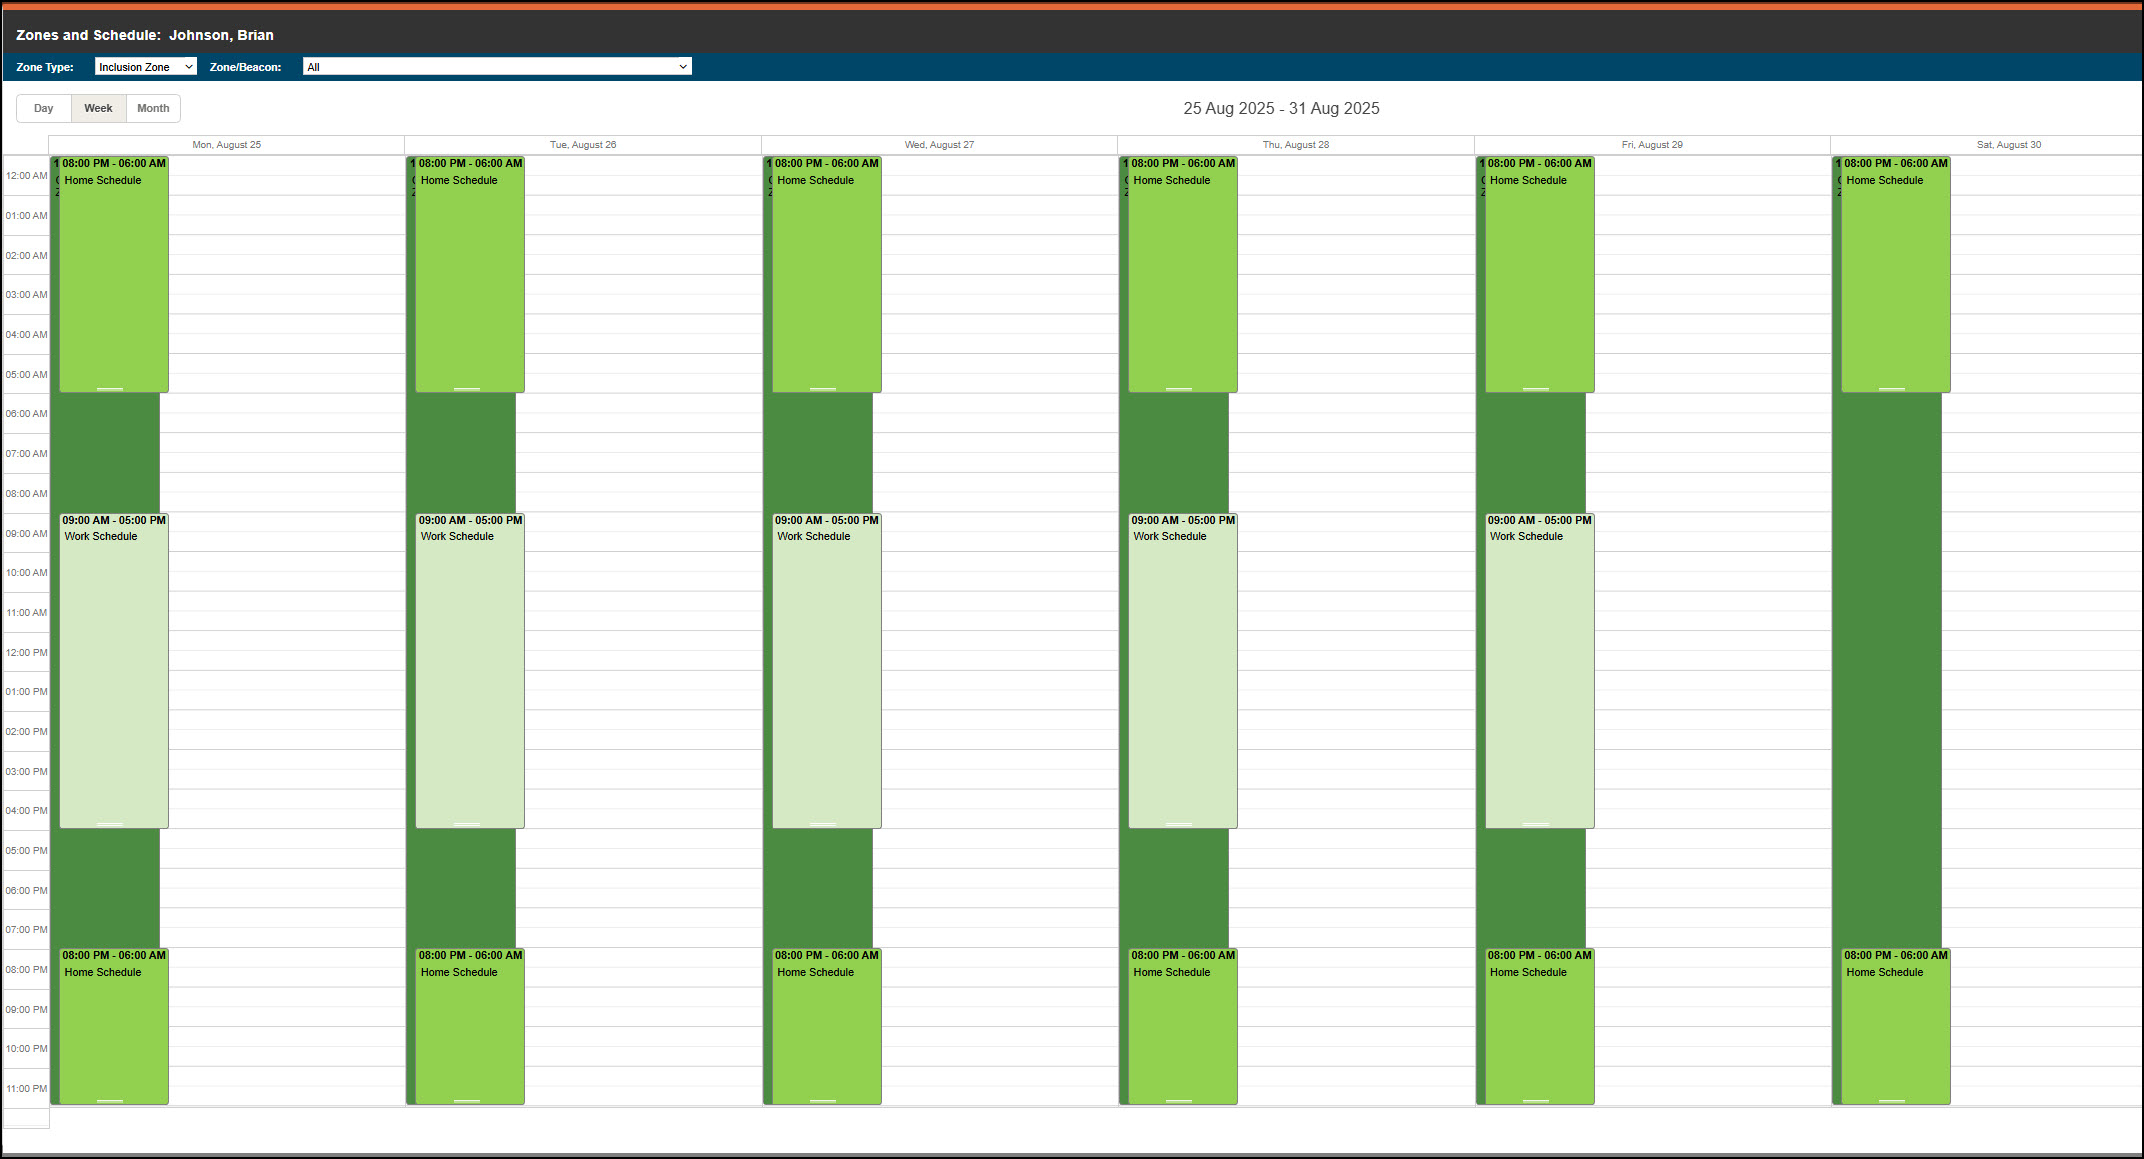
Example of an Additional Inclusion Zone Schedule Added to the Calendar – click to enlarge
In the following example, the client is on a 24/7 Home Inclusion zone schedule in which they are only allowed to leave for work.
To set up this schedule:
- Start by creating a 24/7 Home Inclusion zone schedule. The process is described above. (add anchor to that section)
Example of a 24/7 Home Inclusion Zone Schedule – click to enlarge
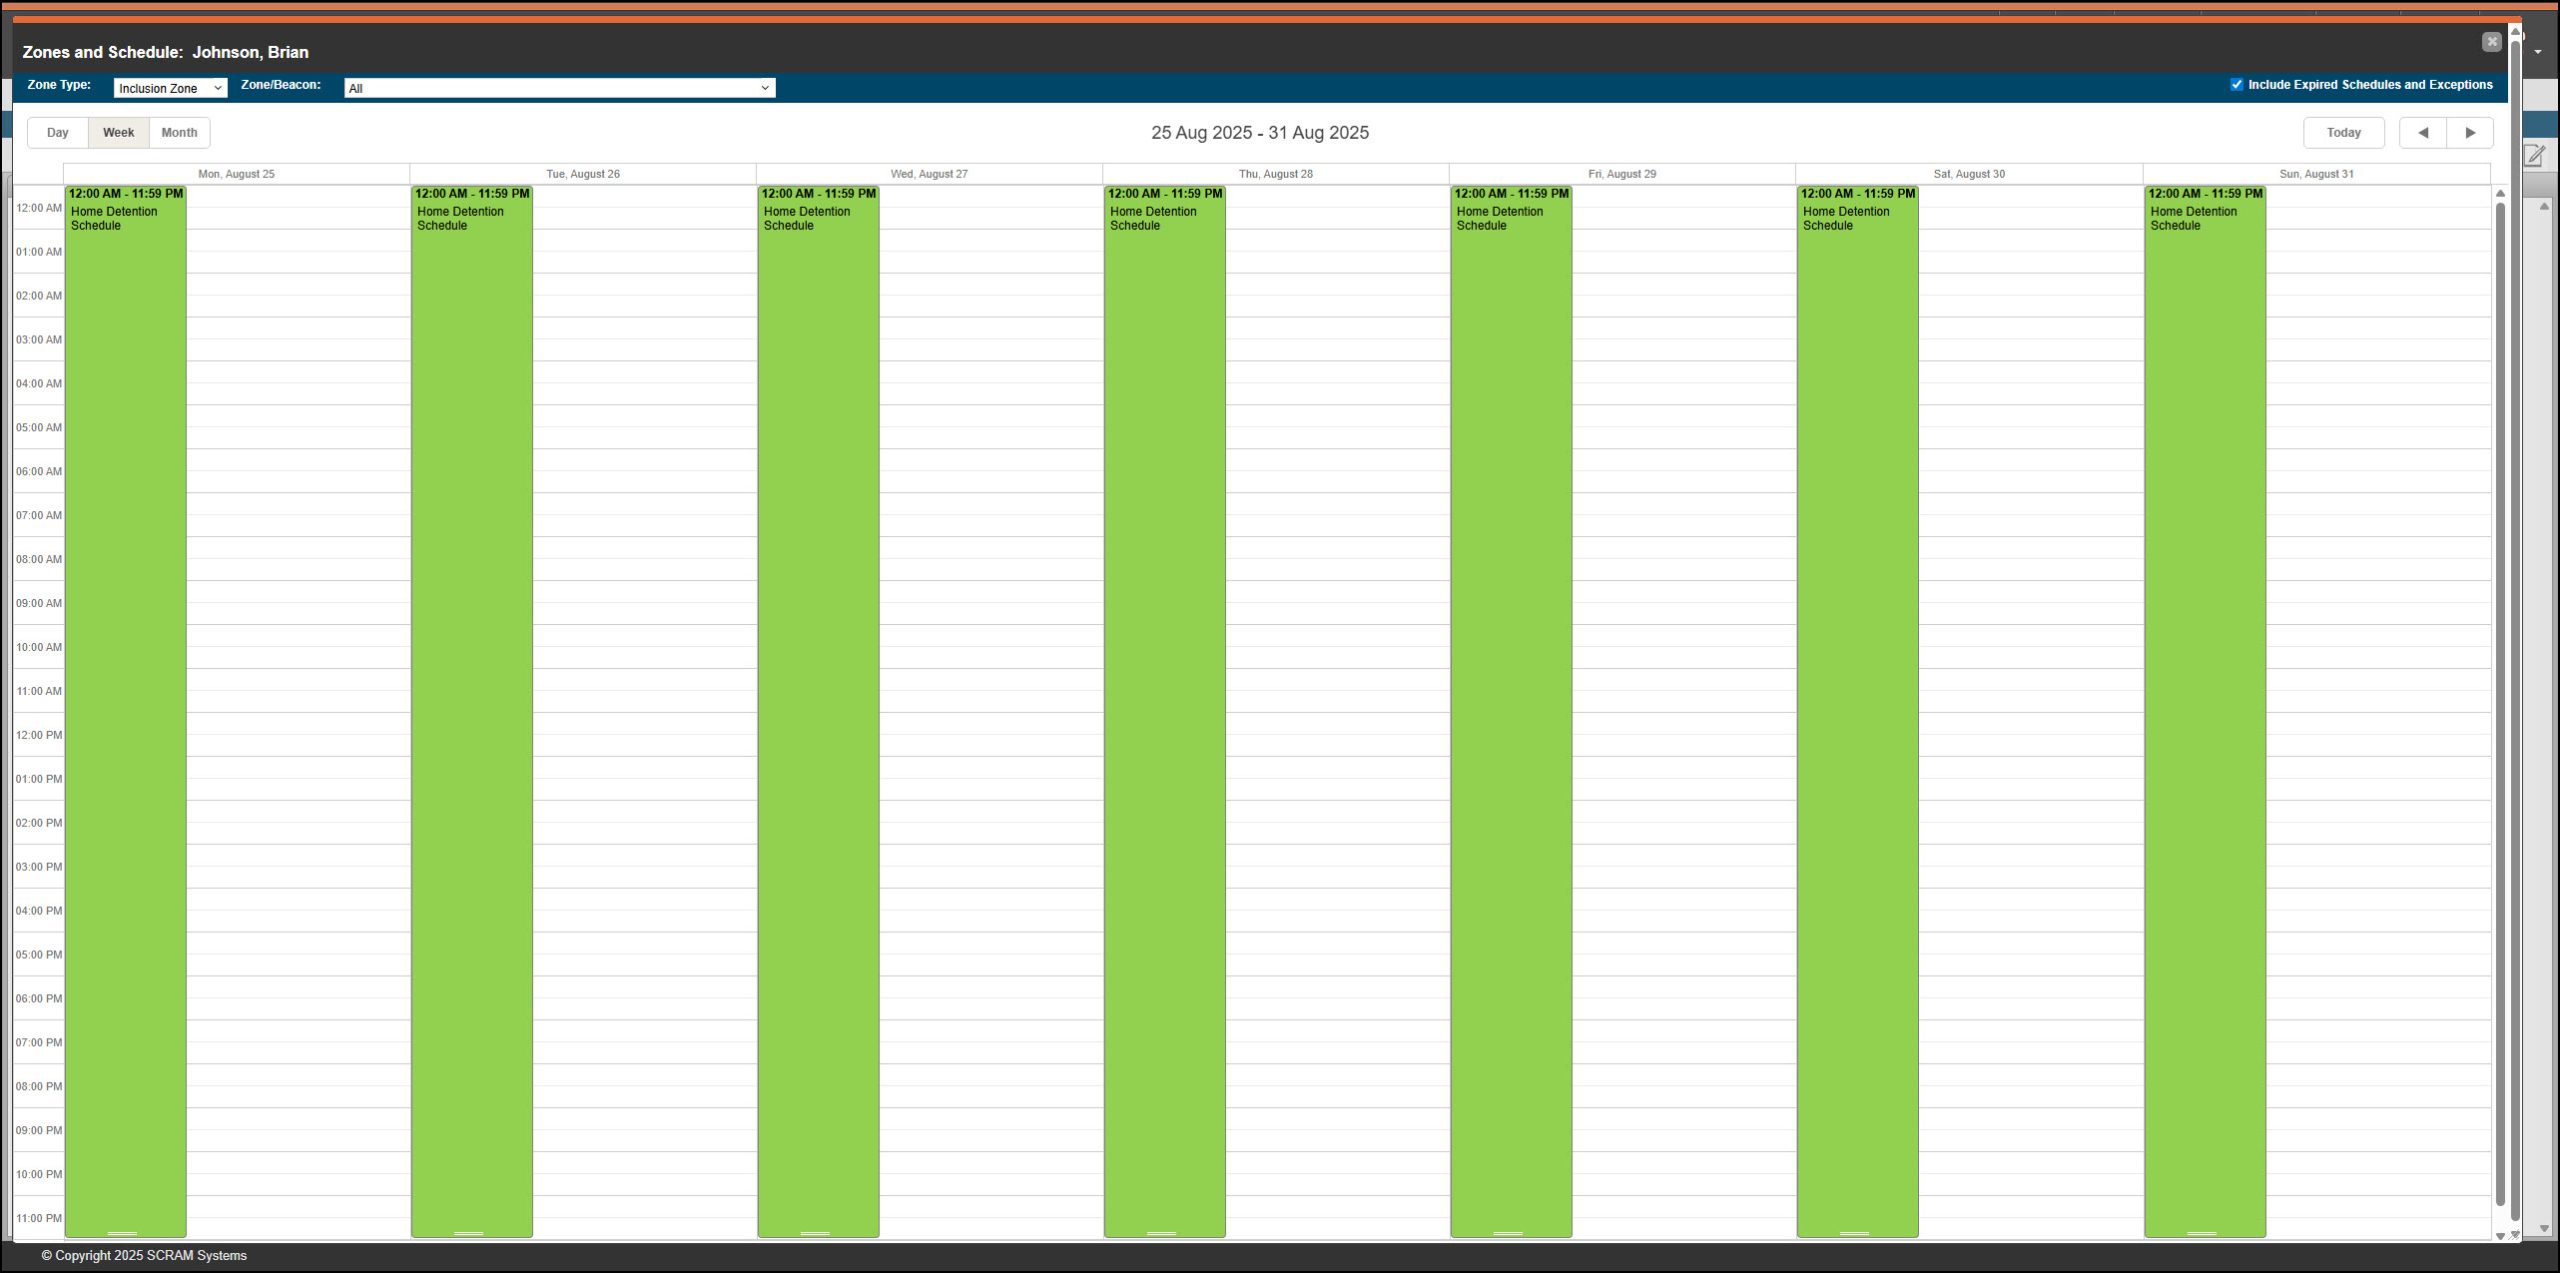
Zones and Schedule page with 24/7 Home Zone Schedule Added – click to enlarge
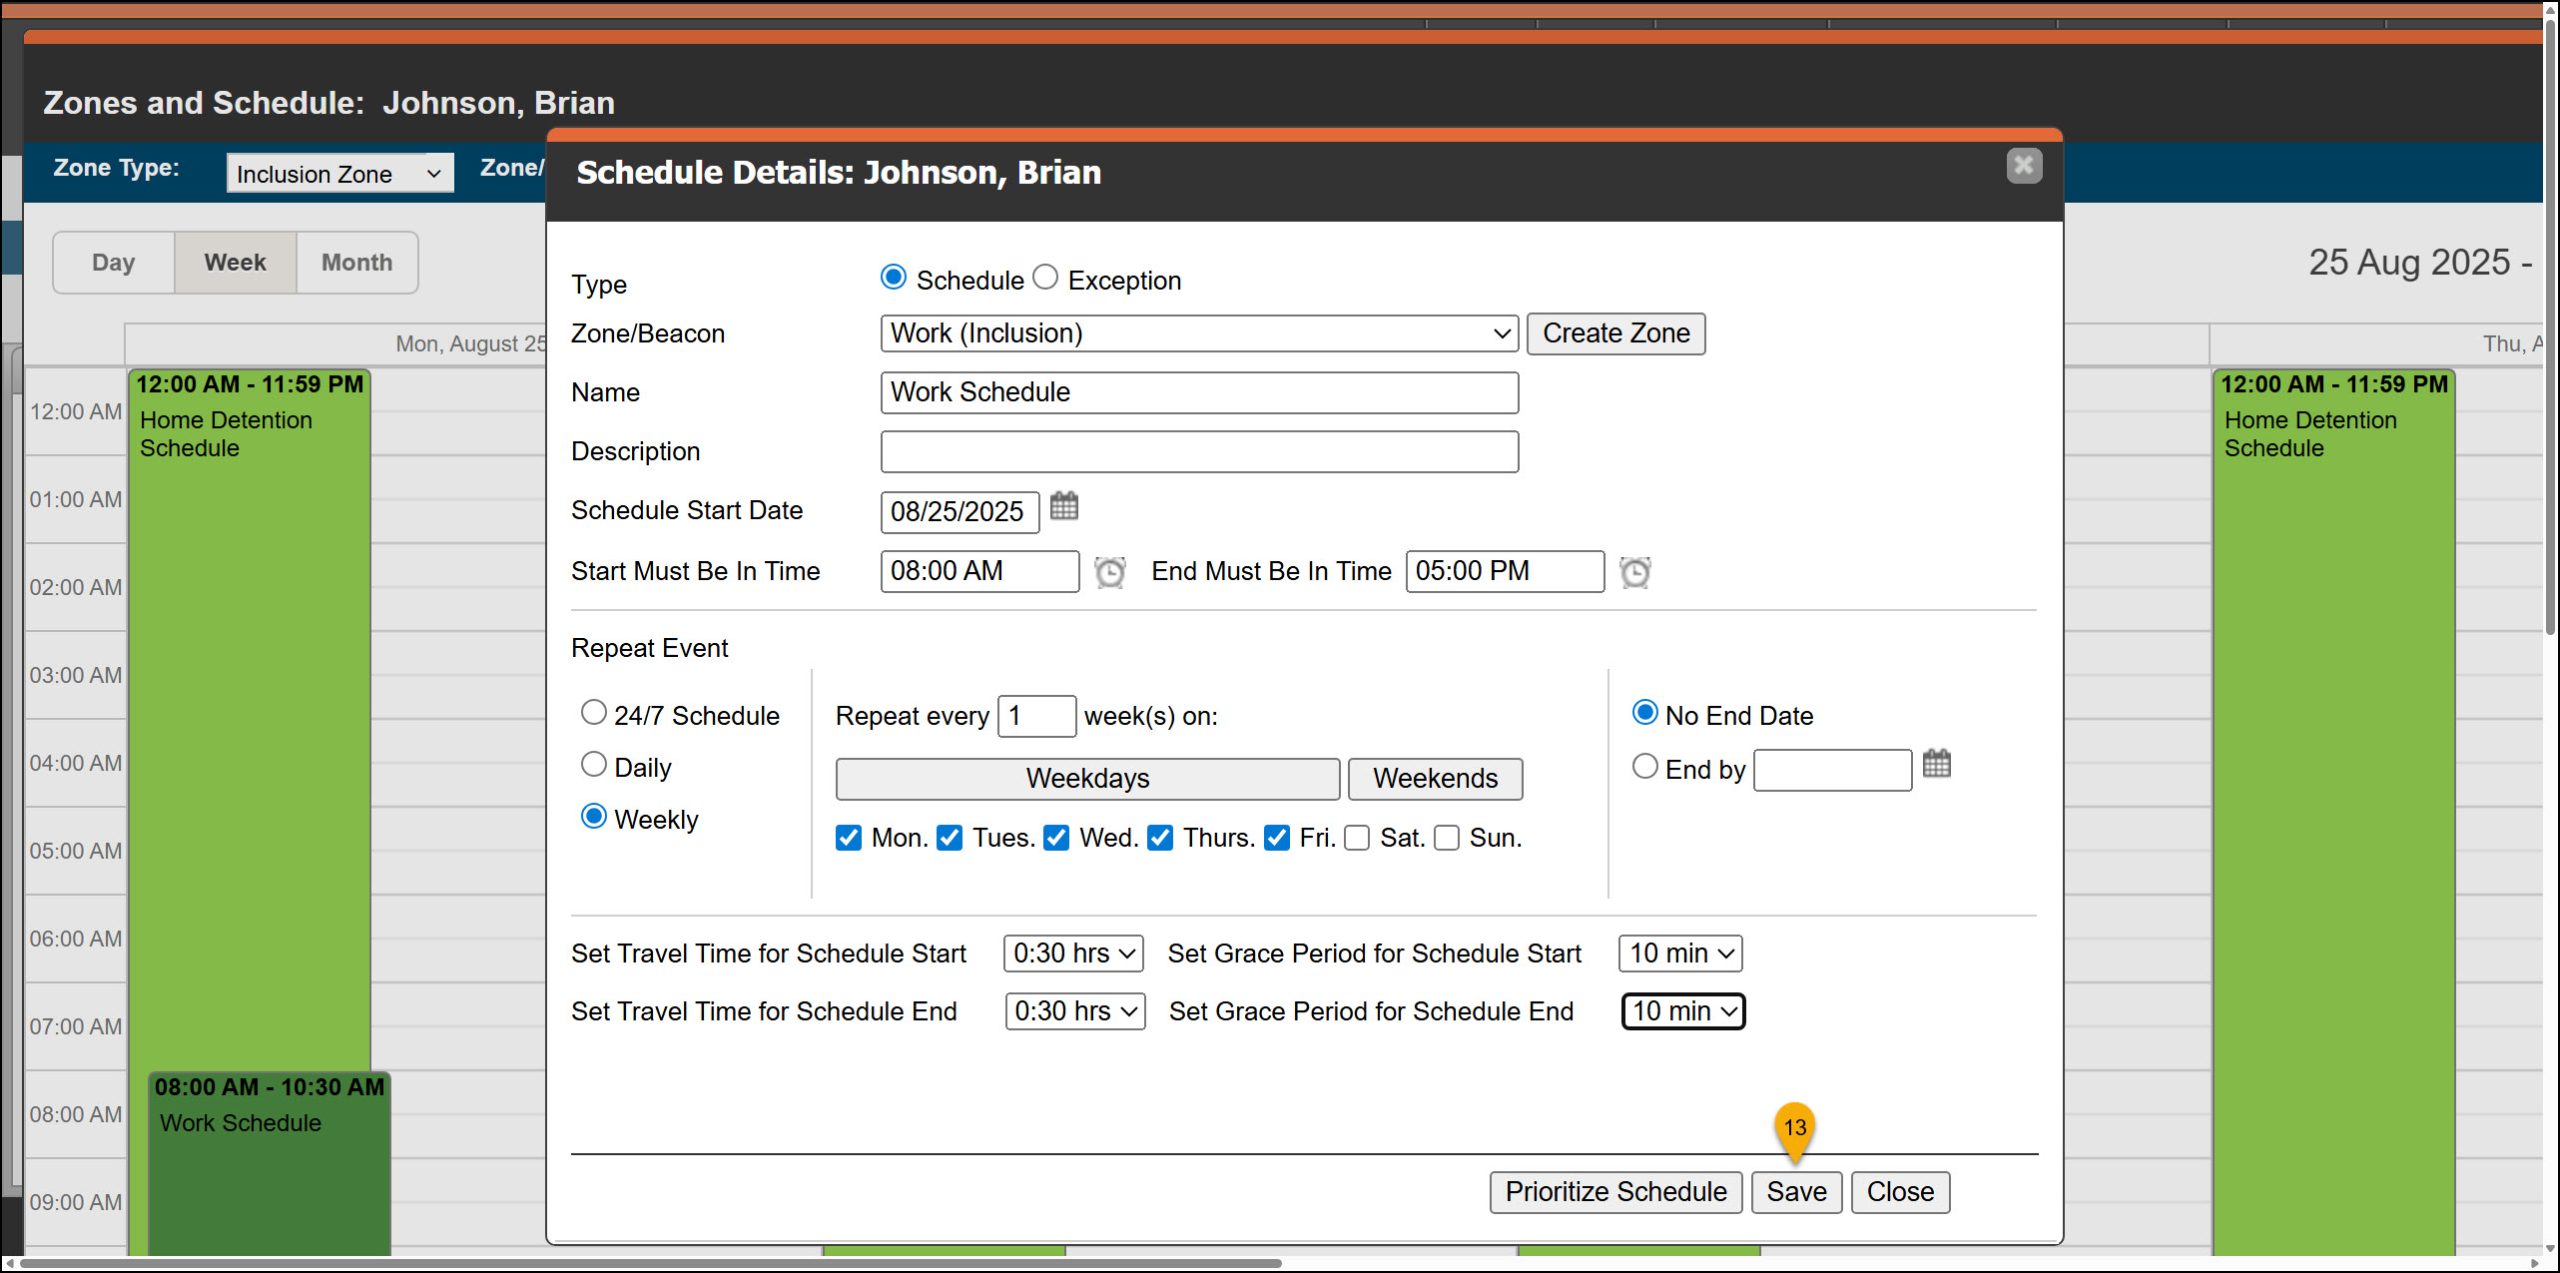
Next, add the Work Inclusion Zone Schedule.
- Left-click and drag with your mouse in the white area of the calendar on the client’s Zones and Schedule page to open the Scheduled Details pop-up window.
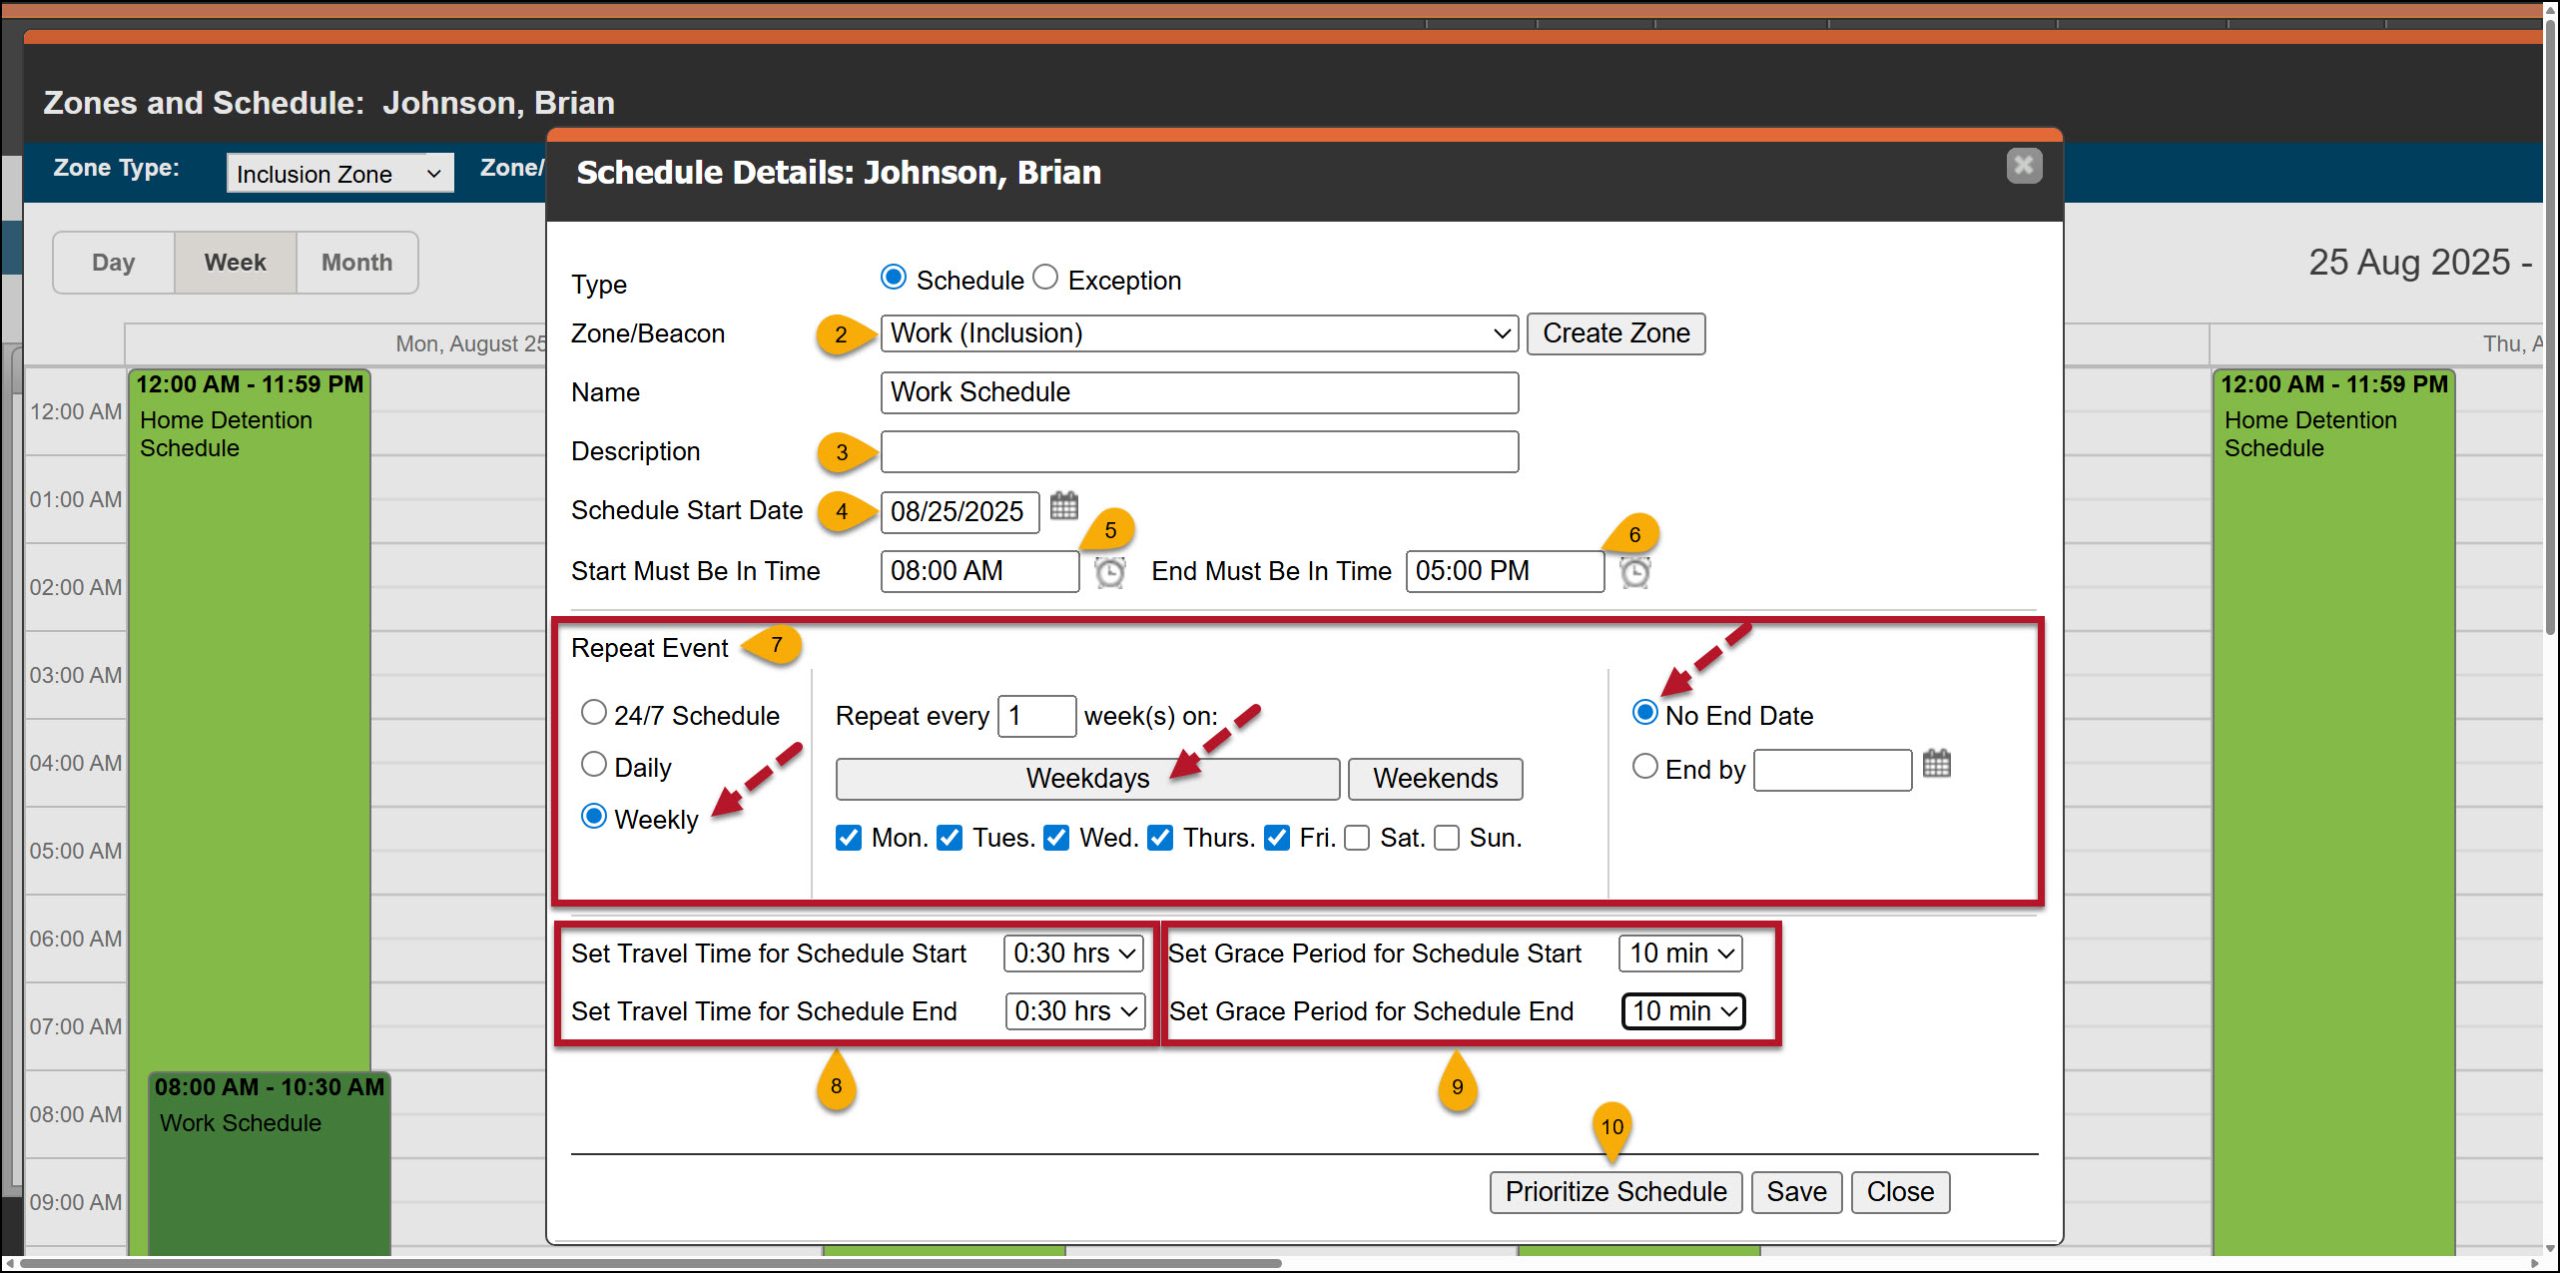
- Leaving the Type selection at the default setting of Schedule, open the “Zone/Beacon” dropdown menu and select the Work (Inclusion)
- Optional – You may add a description.
- Enter the Schedule Start Date. Reminder: You cannot create a schedule that falls in the past.
- Enter the “Start Must Be in Time” by typing in the time or select the clock icon to choose the time from a list.
- Repeat this process in the “End Must Be in Time”
- In the Repeat Event section, select the Weekly radio button and select the client’s workdays. In this case, Monday-Friday, with no end date.
- In this scenario, you must add travel time to and from work. Otherwise, a Home Zone Inclusion Event will be generated as soon as the client leaves their home zone. For this example, the client is given 30 minutes to get to work and 30 minutes to return home after work.
- You may set a Grace Period for the start and end timeframe of the schedule. For example, if you set these fields to 10 minutes each, the client may enter the Work zone up to 10 minutes after the “Start must be in Time,” arrive at work late, and leave their Work zone up to 10 minutes before the “End Must Be in Time”, to depart from work early.
- Once all fields have been entered, select the Prioritize Schedule button.
Example of a Schedule Details Pop-up Window for an Work schedule – click to enlarge
- On the Prioritize Schedule pop-up window, use the arrows to move the “Work Inclusion” schedule to the top position.
- Ensure that the Work schedule is in the top position and then select the Done button.
Prioritize Schedule Pop-up Window – click to enlarge
- The last step is to select the Save button on the Schedule Details pop-up window.
Schedule Details Pop-up Window Save button – click to enlarge
Once saved, the schedule is displayed on the calendar. By prioritizing the Work zone schedule, the Dashboard “Zones” column will identify if the client is not within the Work zone during the established timeframe.
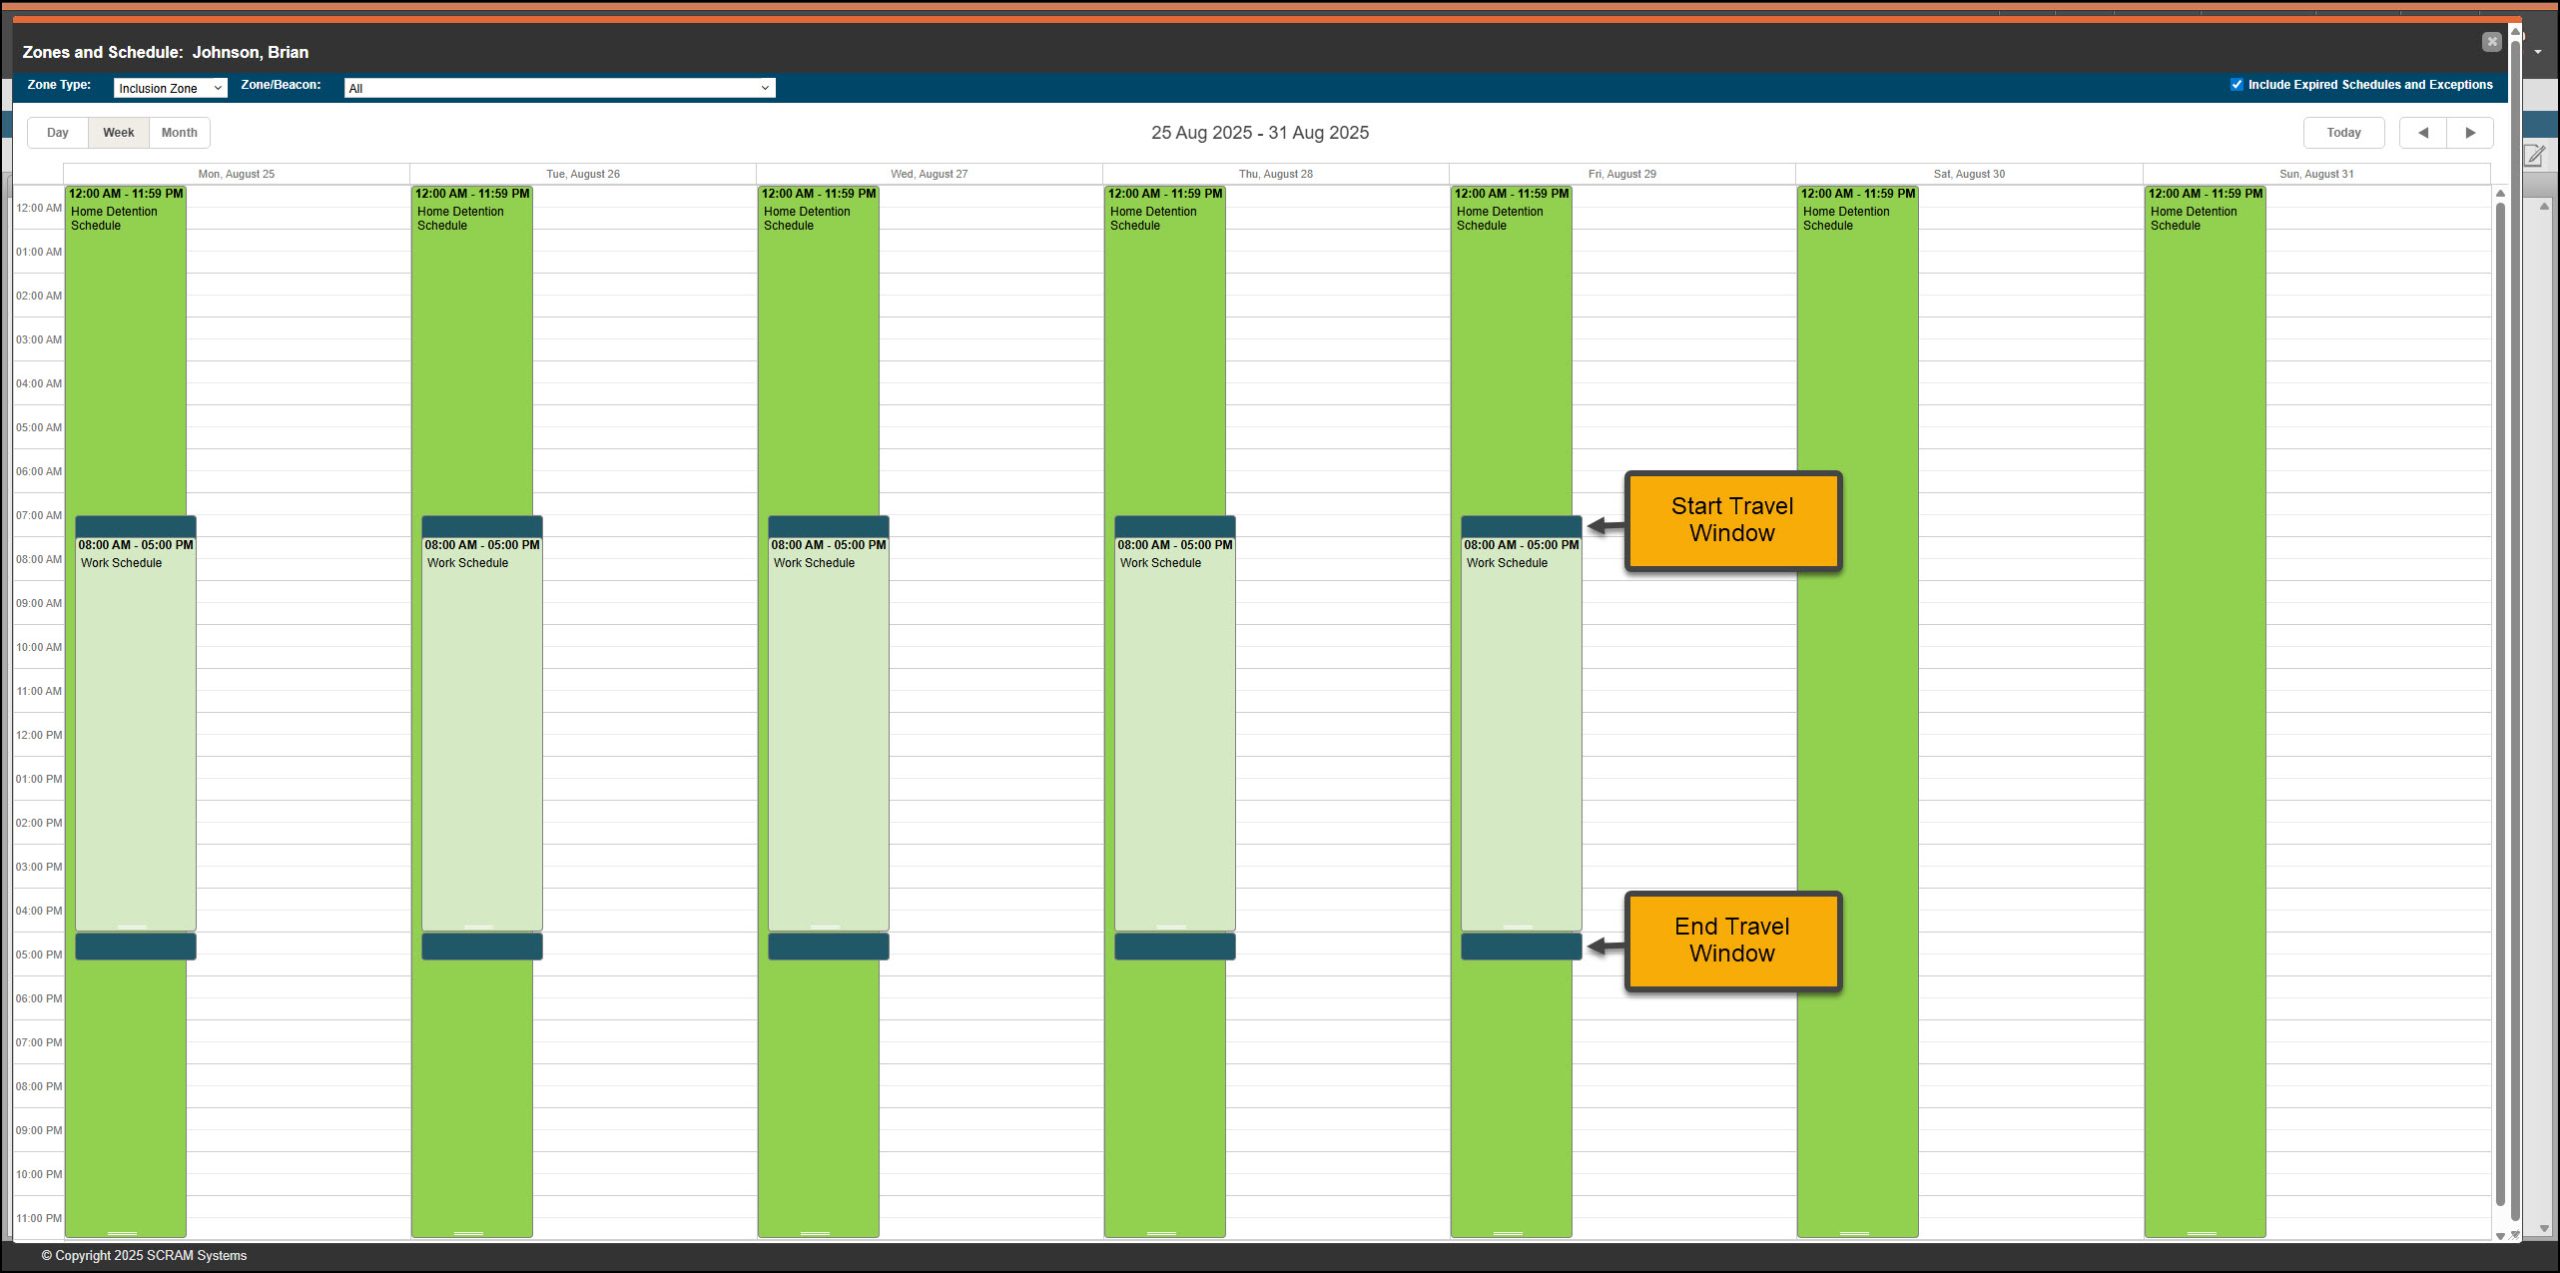
Zones and Schedule page with Work Schedule and Travel Time Visible – click to enlarge
Add an Exception to a Zone Schedule
There may be a scenario where the client is allowed to exit a 24/7 Home Inclusion zone schedule for a short time and is not required to be in a monitored zone. For example, this includes attending appointments, going to work, taking lunch breaks during work hours, or running errands such as grocery shopping. In this case, you may create an exception during the zone schedule.
Start by:
- Left-click and drag with your mouse in the white area of the calendar on the client’s Zones and Schedule page to open the Scheduled Details pop-up window.
- Select the Exception radio button.
- Open the Zone/Beacon dropdown menu and select the zone the exception falls within.
- Name the exception schedule.
- Select the Date.
- Enter the “Allowed Out – Start Time” and “Allowed Out – End Time.”
- Select the appropriate Recurrence Type radio button and then add Repeat Event details if applicable. In this example, the client may complete errands every Monday from 10:00 AM to 12:00 PM.
- In this case, no travel time is required.
- Select the Save button.

Example – 24/7 Home Inclusion Zone, Schedule Exception – click to enlarge
The Exception Schedule is displayed.
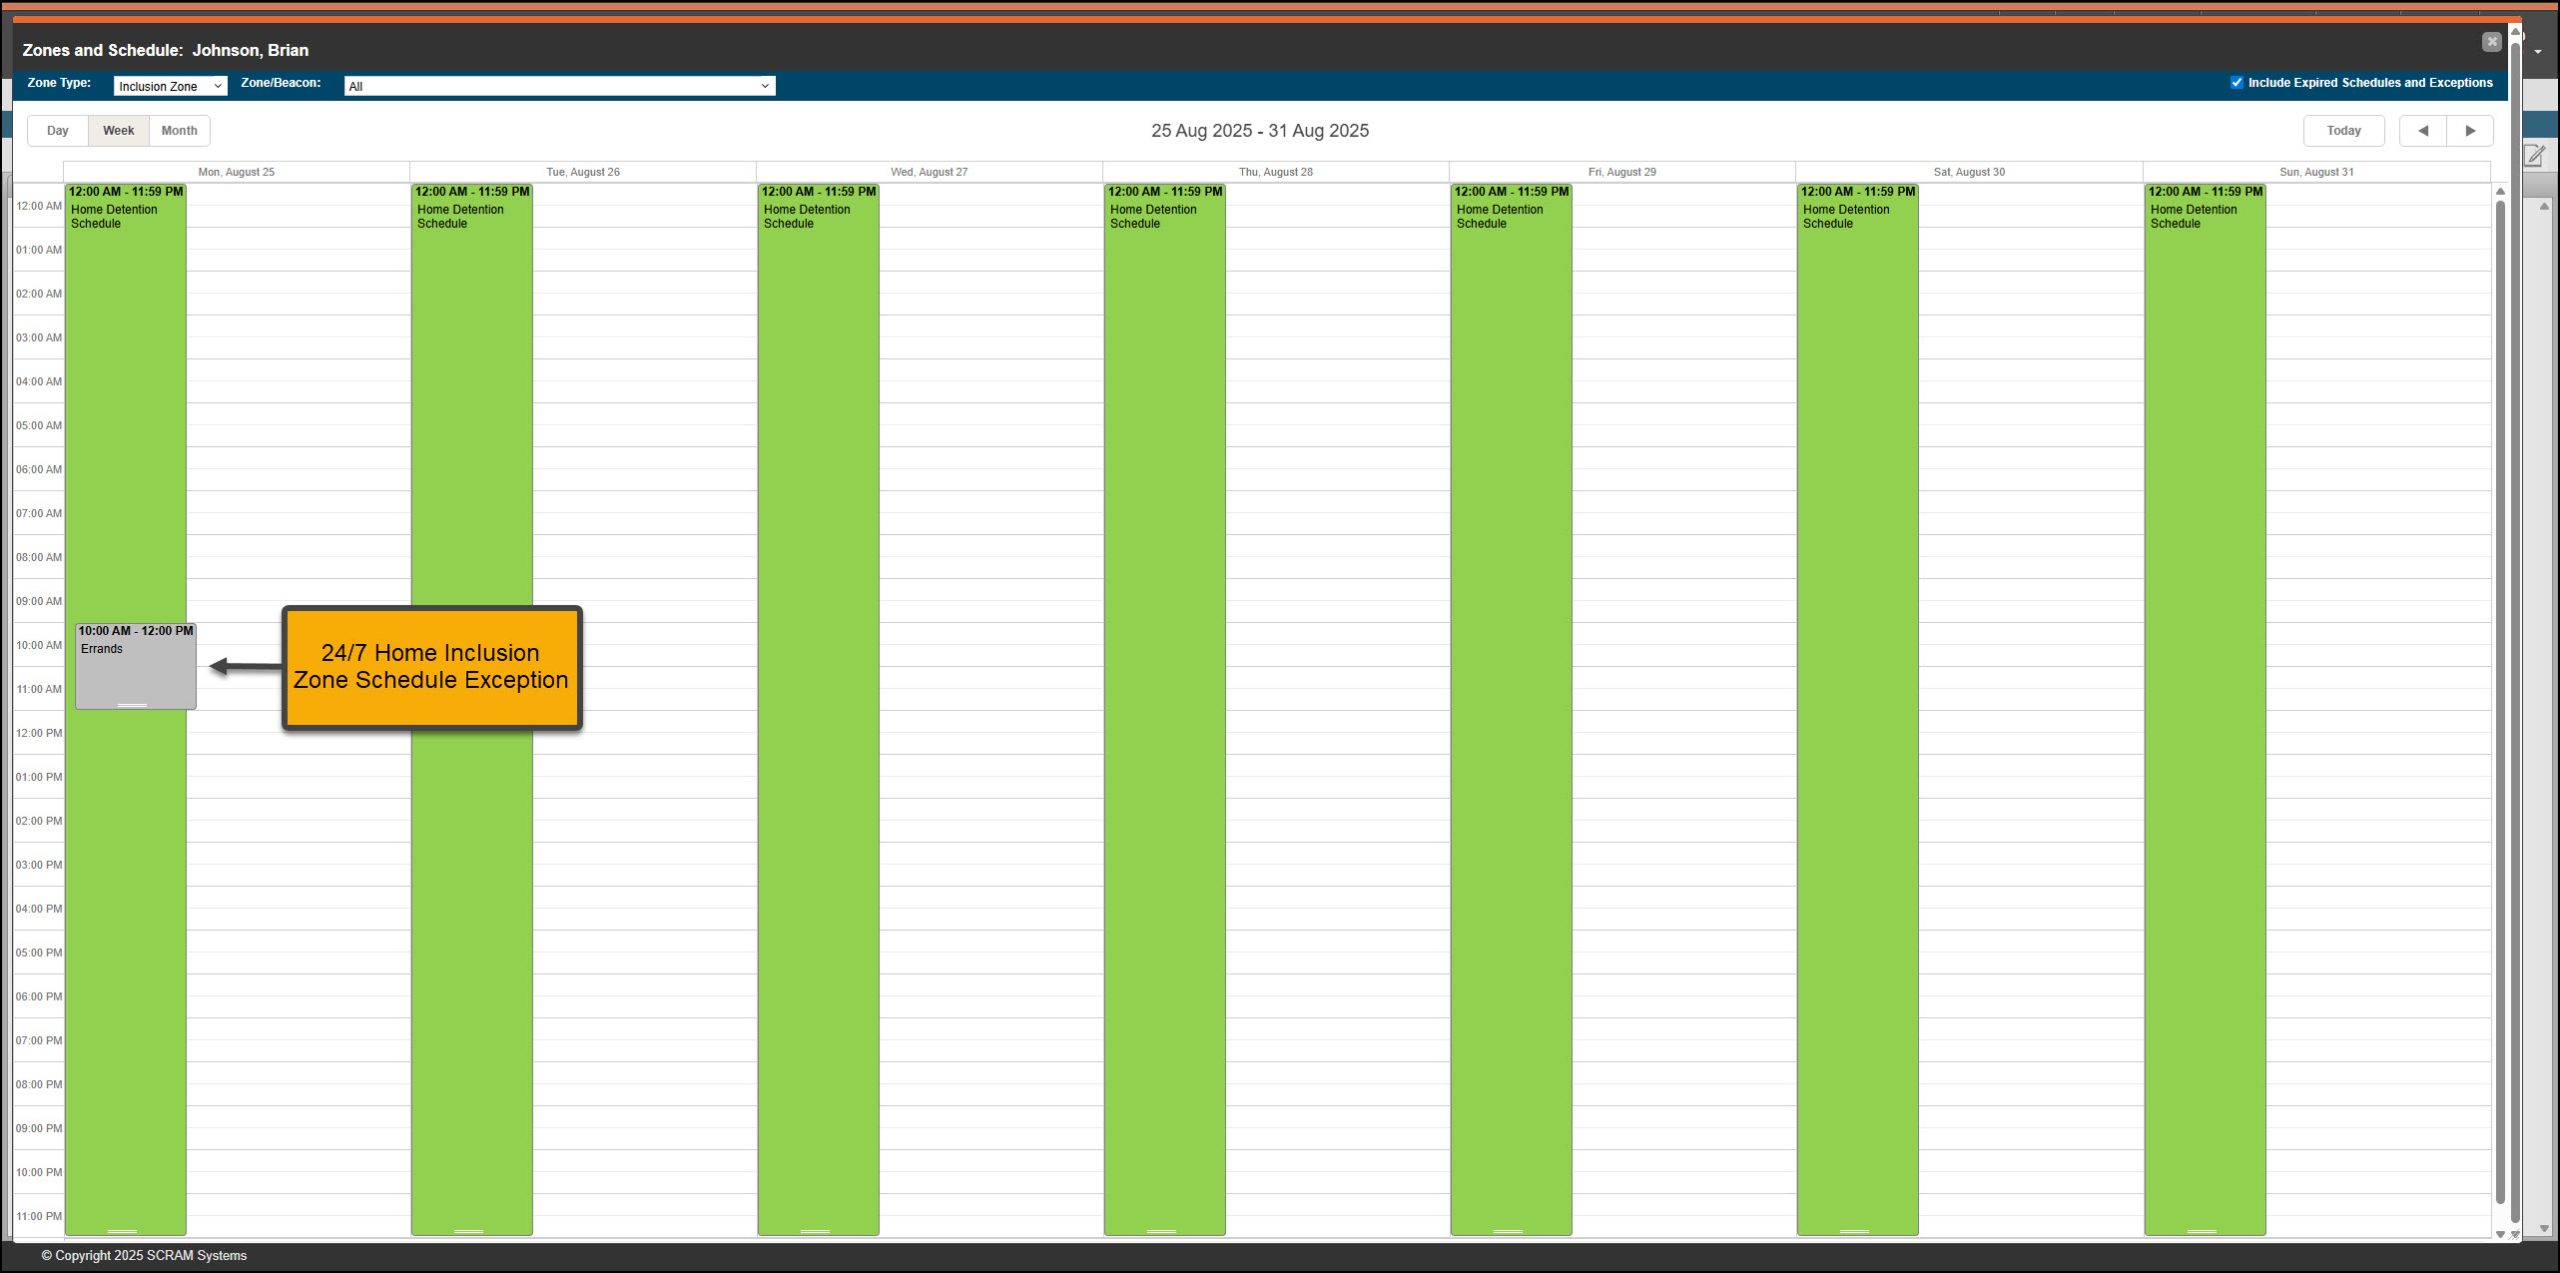
Zones and Schedule page with Exception Schedule Added – click to enlarge
Moving forward, the client may exit the zone during the exception schedule without generating a non-compliant event on the Dashboard. Their location information is still being collected, but they are not required to be at a specific location.
When the Entry and Exit checkboxes are selected for the zone, and the client leaves and then returns during the exception period, this movement is recorded on the client’s Event log.
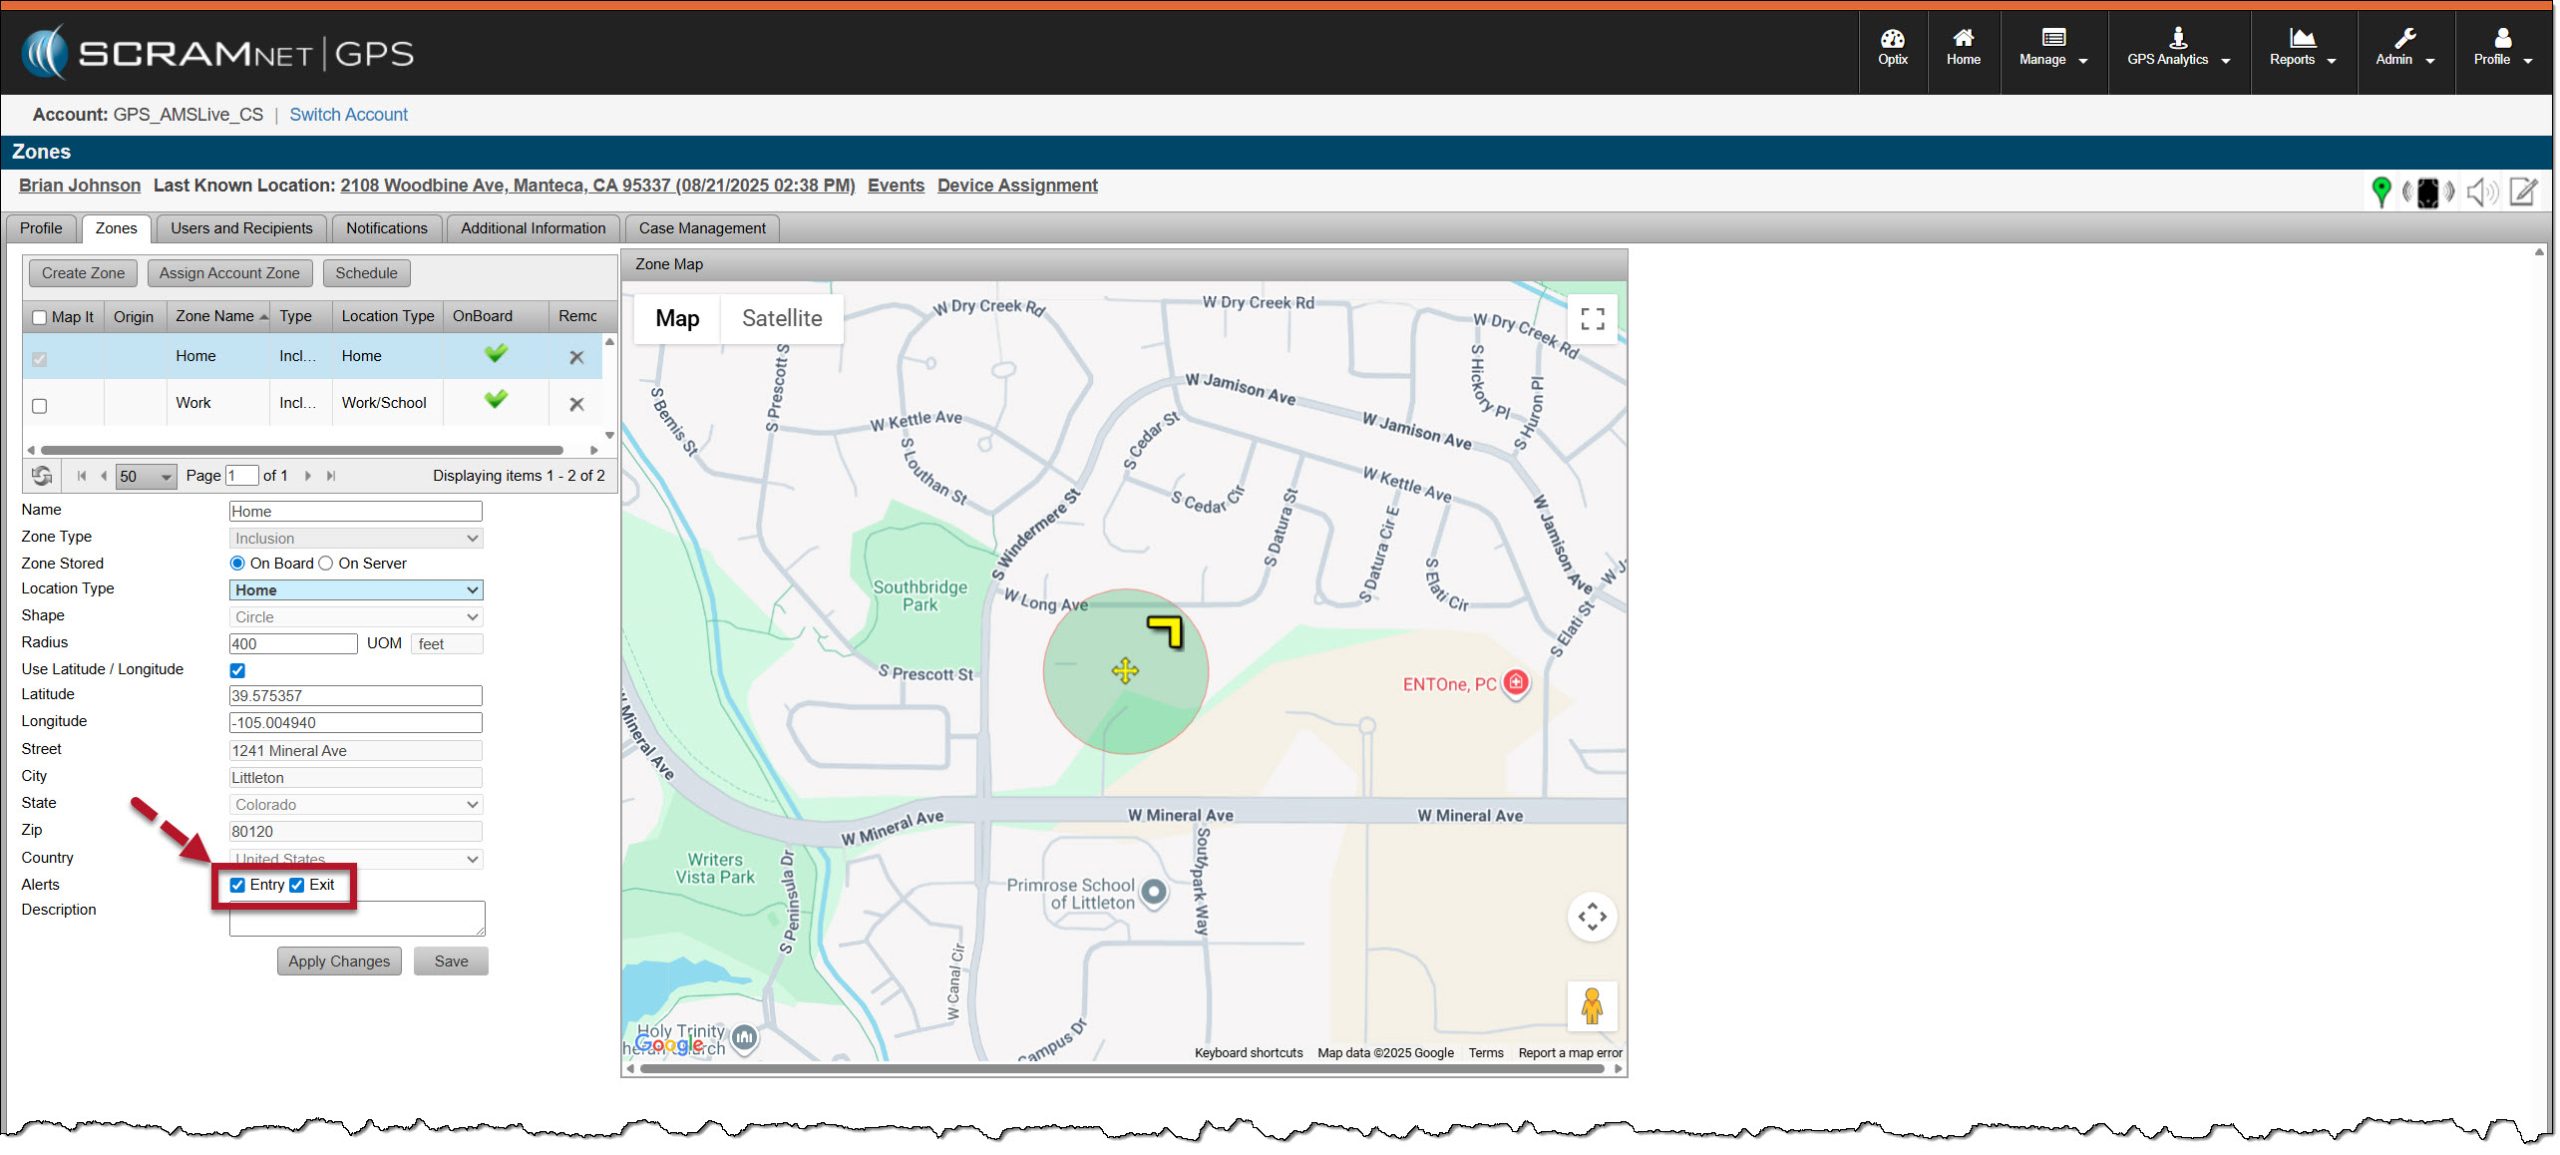
Client’s Zones page with Entry and Exit checkboxes selected for their Home Zone – click to enlarge
|