Software

Information The services for the mass transfer of clients and for managing fines and fees must be enabled before you may utilize them. For more information, contact your SCRAM Systems Account Representative.

On December 12, 2024, SCRAM Systems released two enhancements for your Nexus caseloads. These enhancements are:

  • SCRAM Nexus Mass Transfer
  • SCRAM Nexus Fines & Fees

Mass Transfer

The first enhancement available is SCRAM Nexus Mass Transfer. Once enabled, you may transfer a caseload or multiple clients in bulk to other officers or caseloads.

  1. Select the Clients tab from the Nexus Workload page.
  2. Select the checkbox next to each of the clients you’d like to transfer, then select the Transfer Caseload button.
Nexus Clients page (click to enlarge)
  1. On the Transfer Caseloads pop-up window, select the Caseload and Officer from the dropdown menus. Both fields are required.
  2. Select the Save button.
Transfer Caseloads pop-up (click to enlarge)
  1. Once saved, a success pop-up banner will display. Additionally, the clients will be displayed on the transferred officer’s Clients page.
The Transferred Officer’s Clients page (click to enlarge)

Fines & Fees

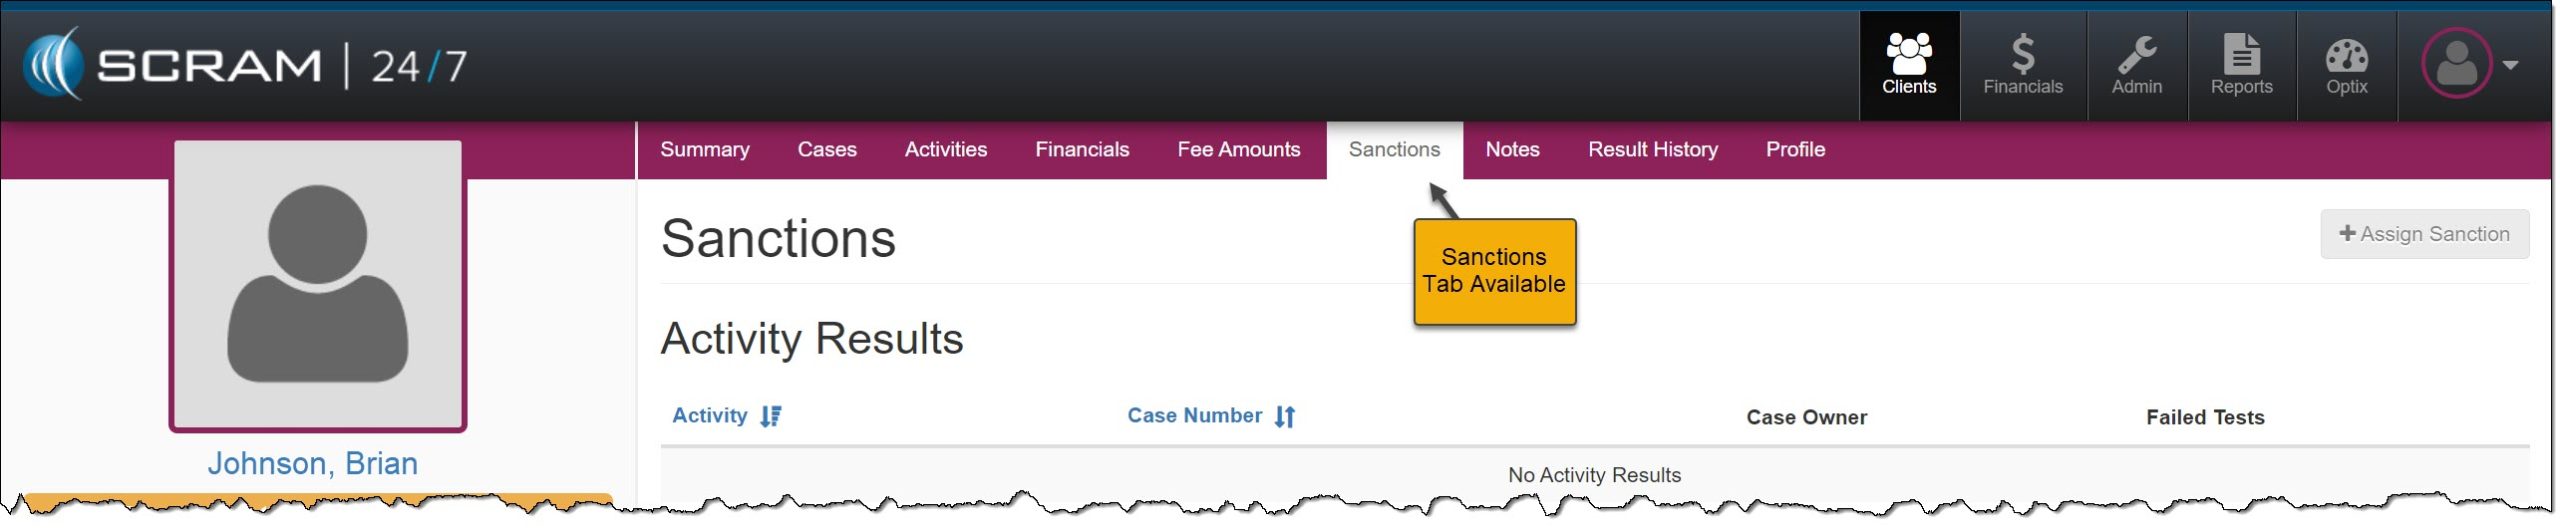
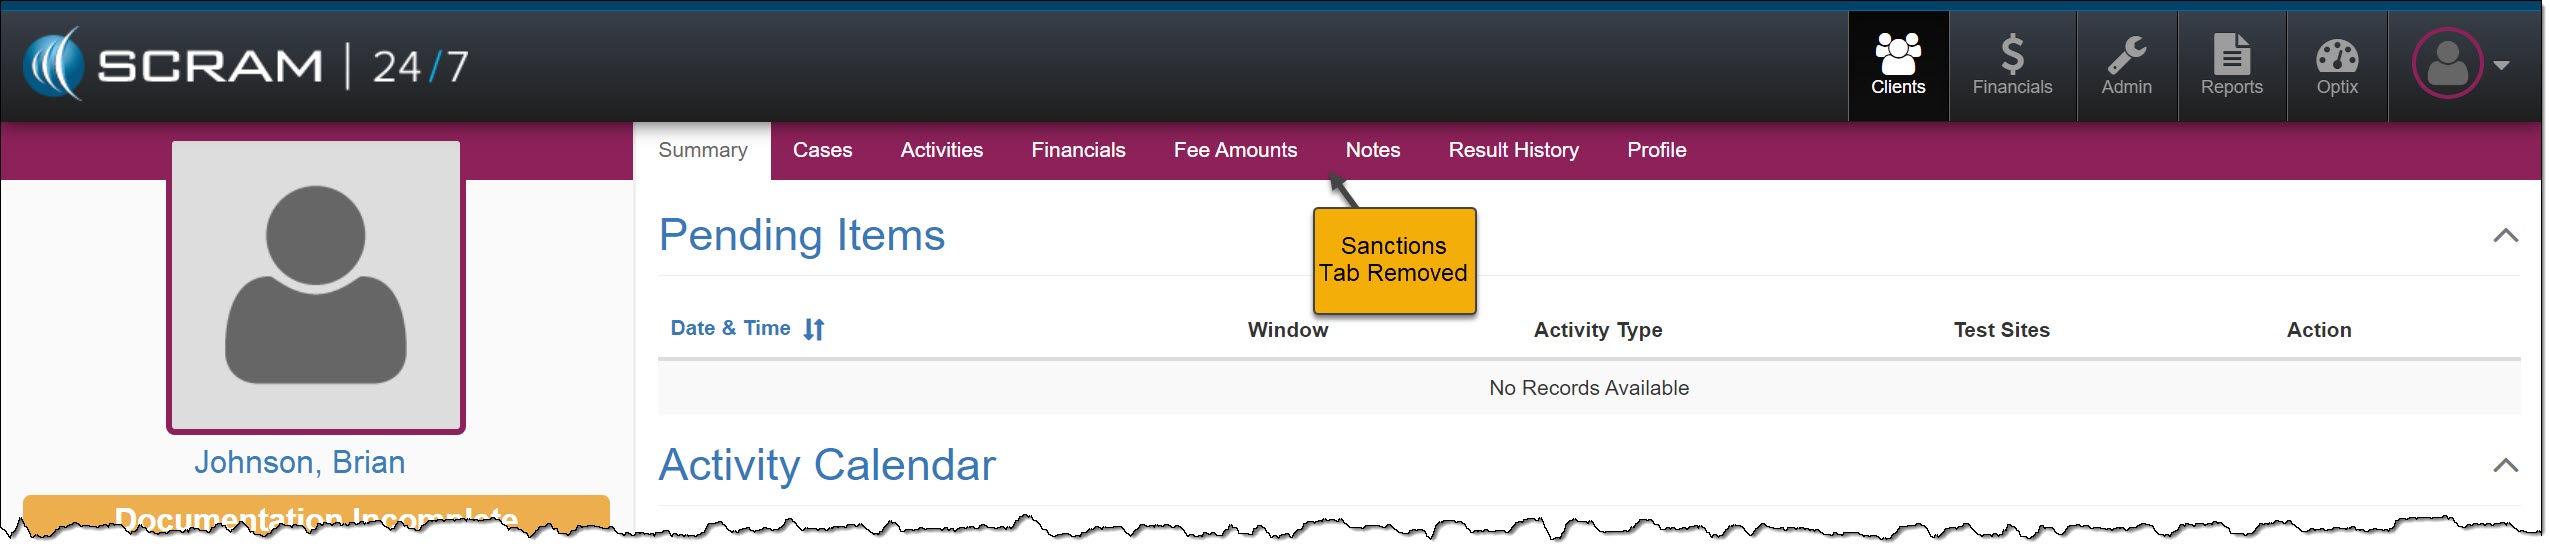
The second enhancement is SCRAM Nexus Fines & Fees. Once enabled, you may add, edit, and record payment for any fines and fees issued for the client.

Navigate to the Fines & Fees Tab

  1. Select the client’s name hyperlink from the Clients tab on the Home page.
Nexus Clients page (click to enlarge)
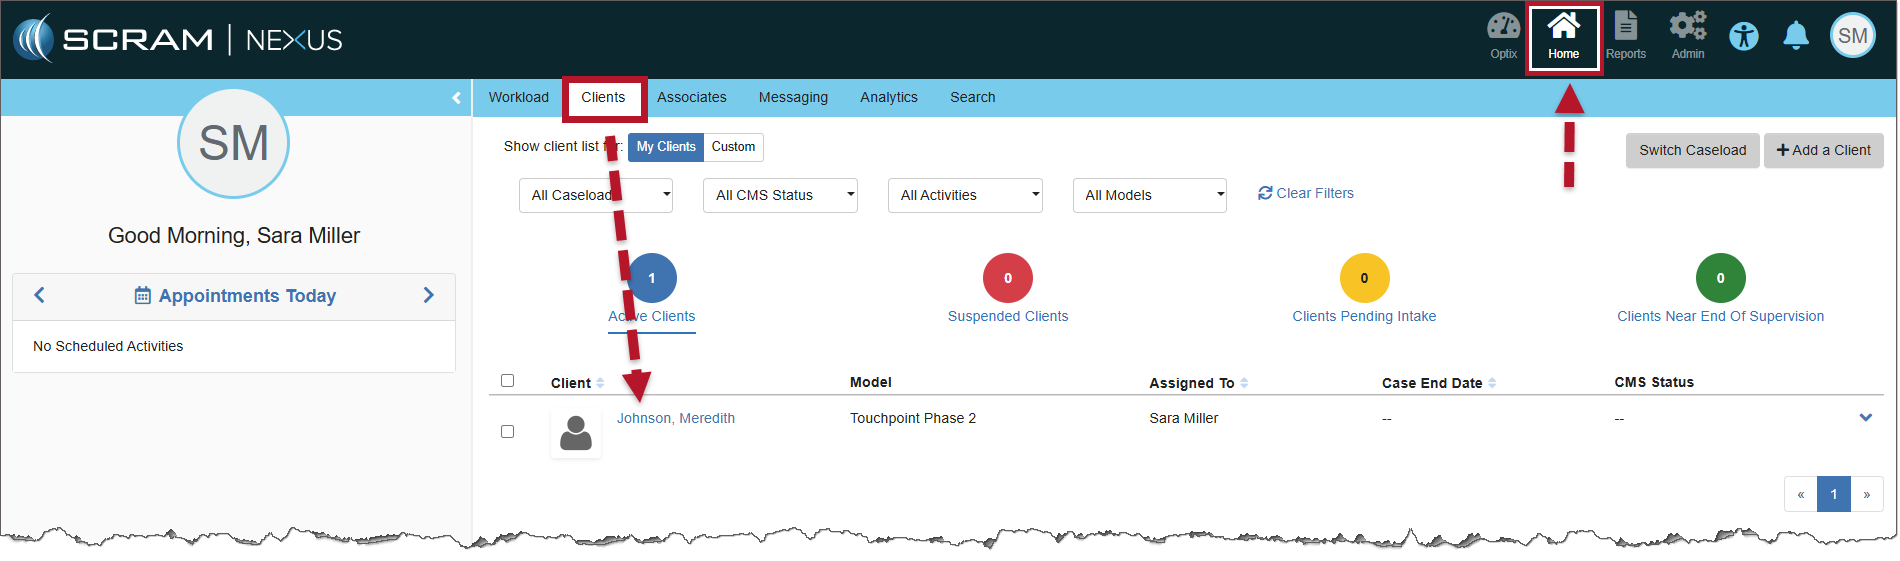
  1. On the Client Summary page, select the Fines & Fees tab.
The Add Fine/Fee page (click to enlarge)
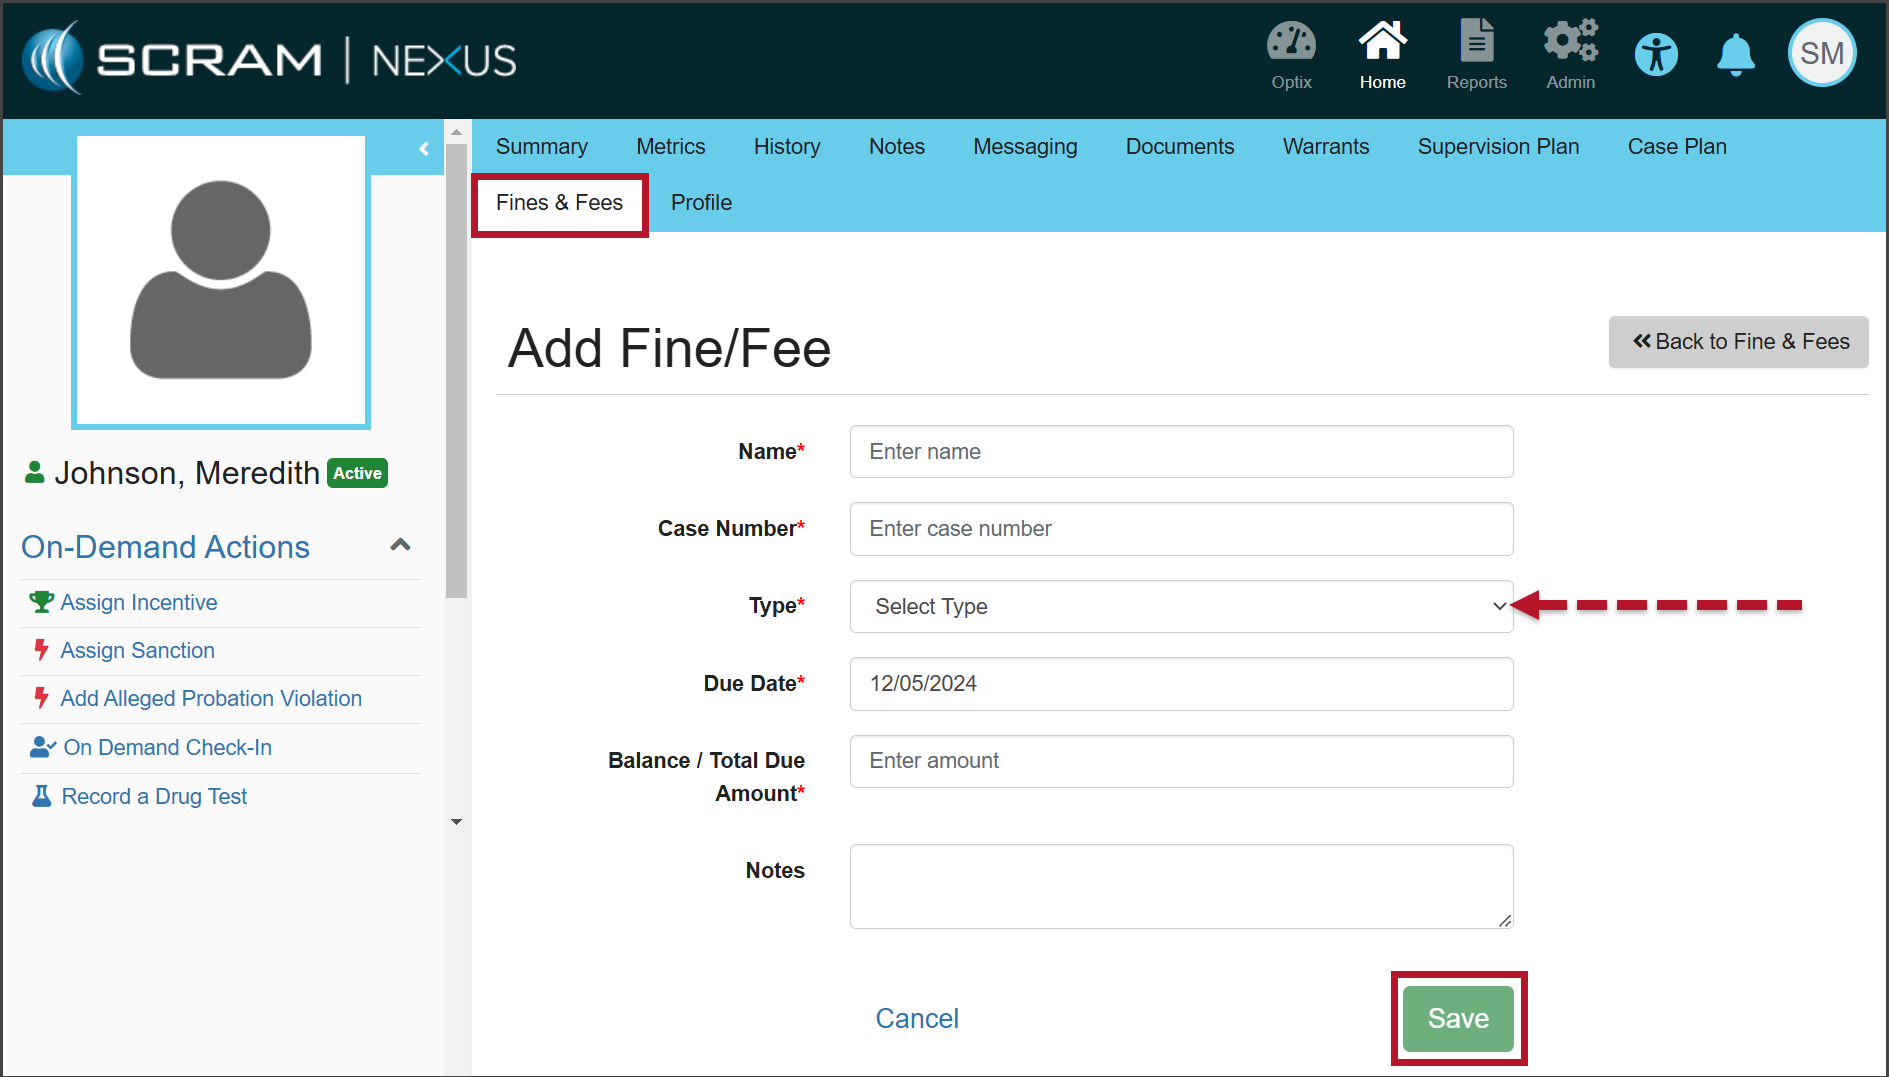
  1. Enter the details for the fine or fee, on the Add Fine/Fee page. Unless otherwise indicated, all fields are required.
  2. Open the Type dropdown menu and select whether this fine or fee is One Time or Scheduled.
  3. After entering the information, select the Save button.
  4. Once saved, a green “success” banner is displayed.

Record Payment of Fines & Fees

When recording a payment, users have the ability to record complete or partial payments submitted by the client.

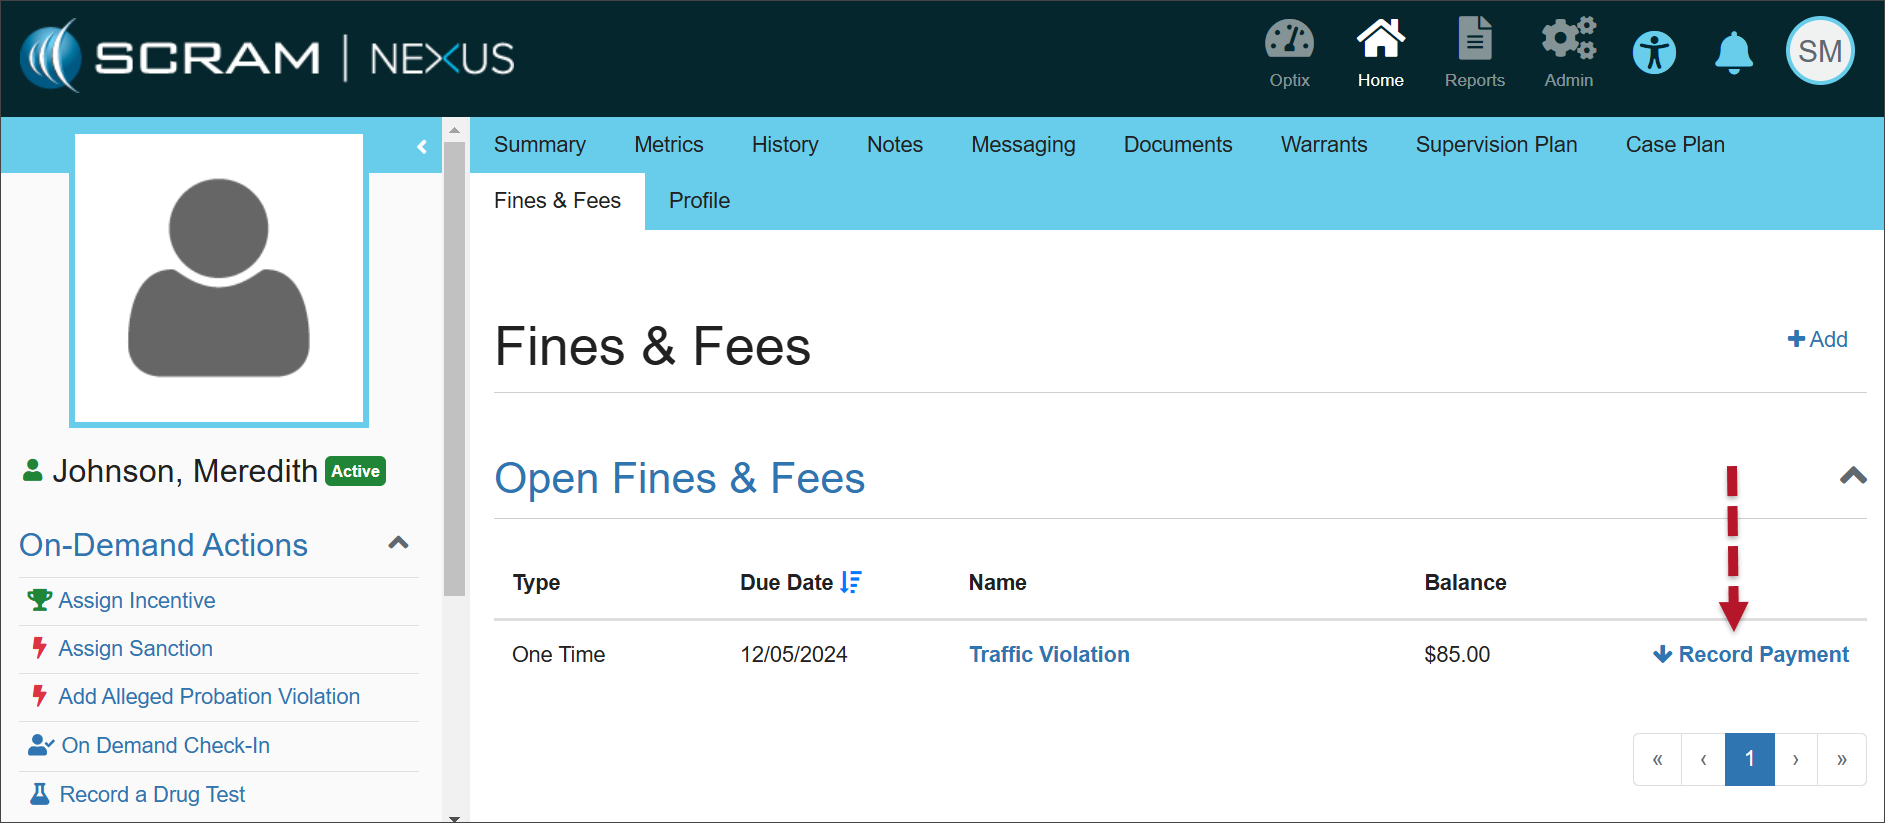
  1. On the Open Fines & Fees page, select the Record Payment hyperlink for the fine or fee for which you would like to record payment.
Open Fines & Fees (click to enlarge)
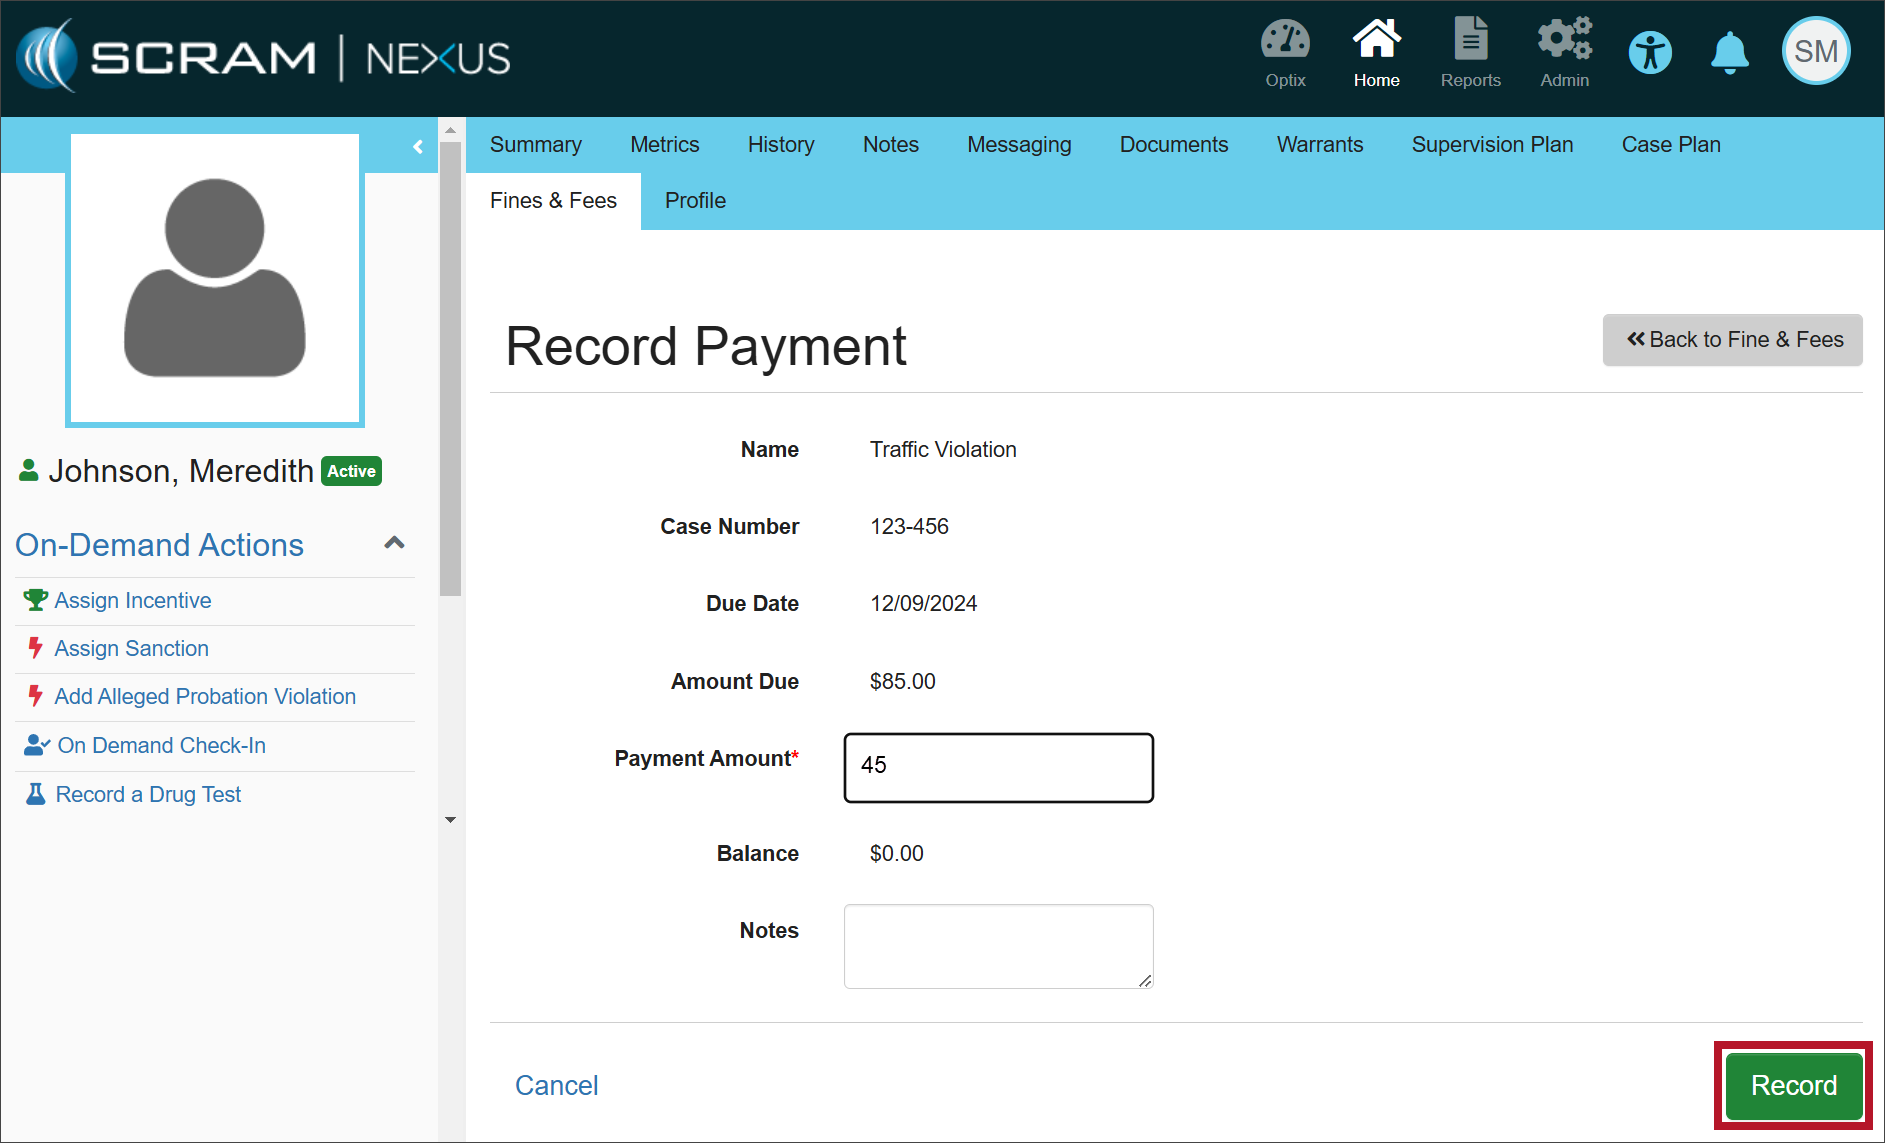
  1. Enter the payment amount and any relevant notes, then select the Record button.
Record Payment page (click to enlarge)

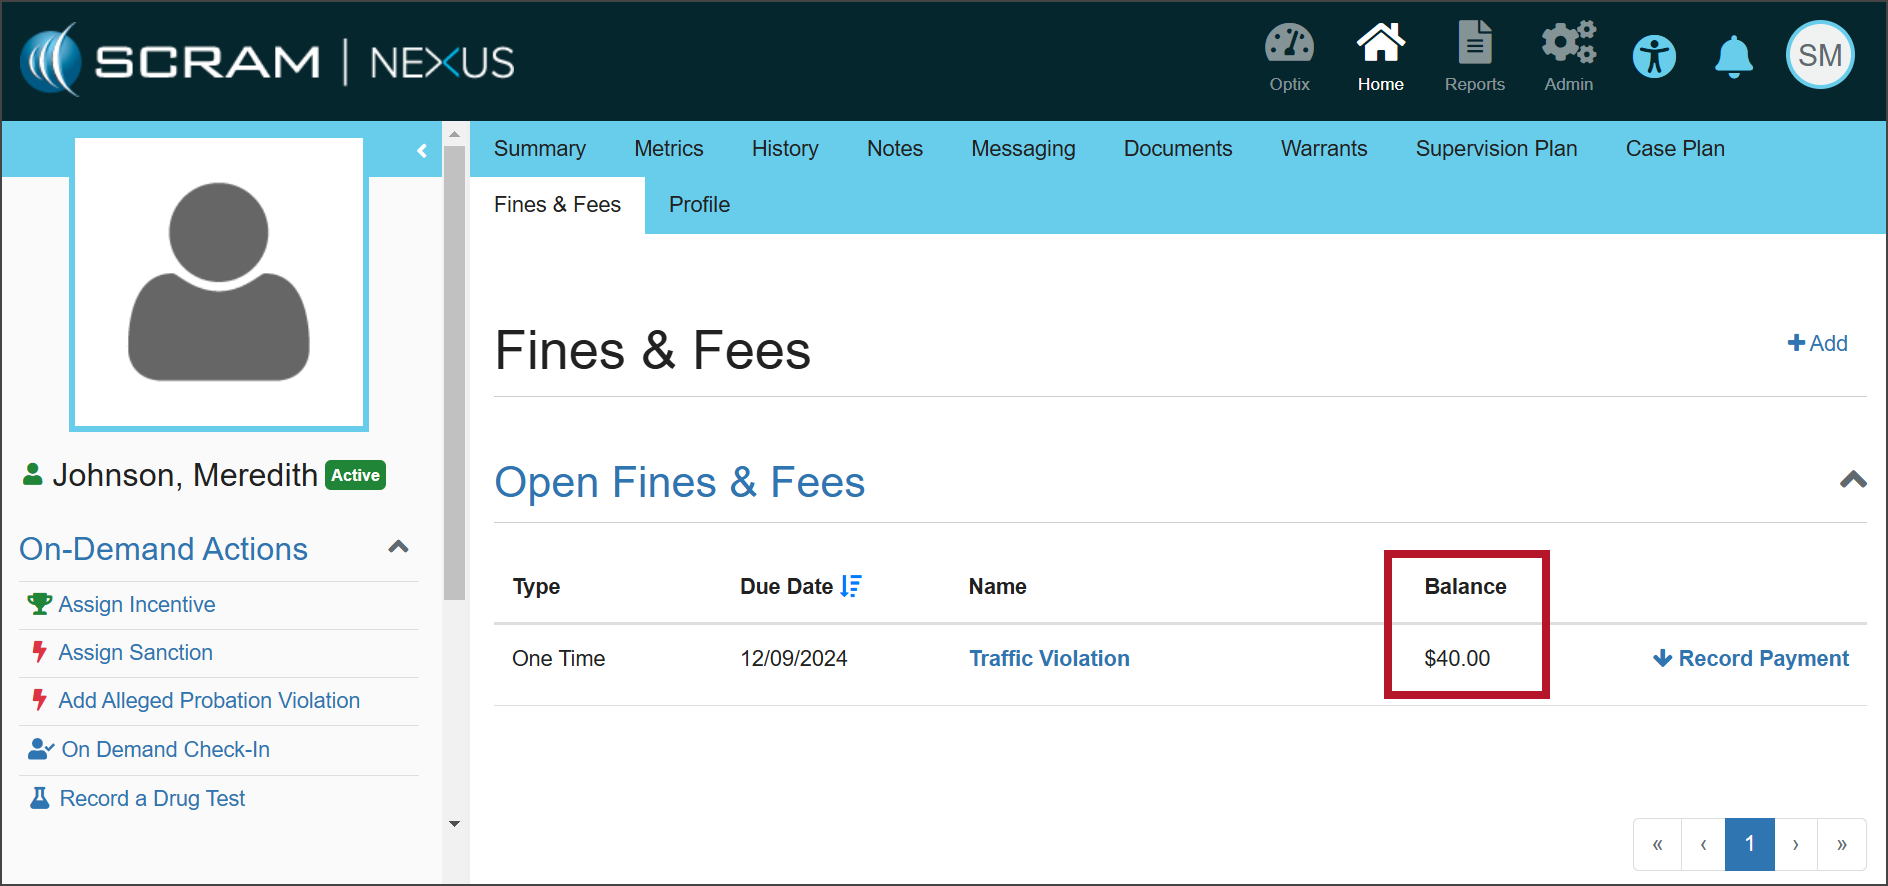
Once a fine or fee has been saved, the Open Fines & Fees section will display the details for each fine or fee with an “open” status.

When payment is made in full, the Balance will show as $0.00. When partial payment is made, the Balance will reflect the amount that remains due.

Fines & Fees (click to enlarge)
Information Once payment has been made in full, you must manually change the status of the fine or fee to “Closed.” If the status is not closed, the fee will appear under Open Fines & Fees with a balance of $0.00.

Edit the Fines/Fees

In some cases, the details of the fine or fee may need to be edited.

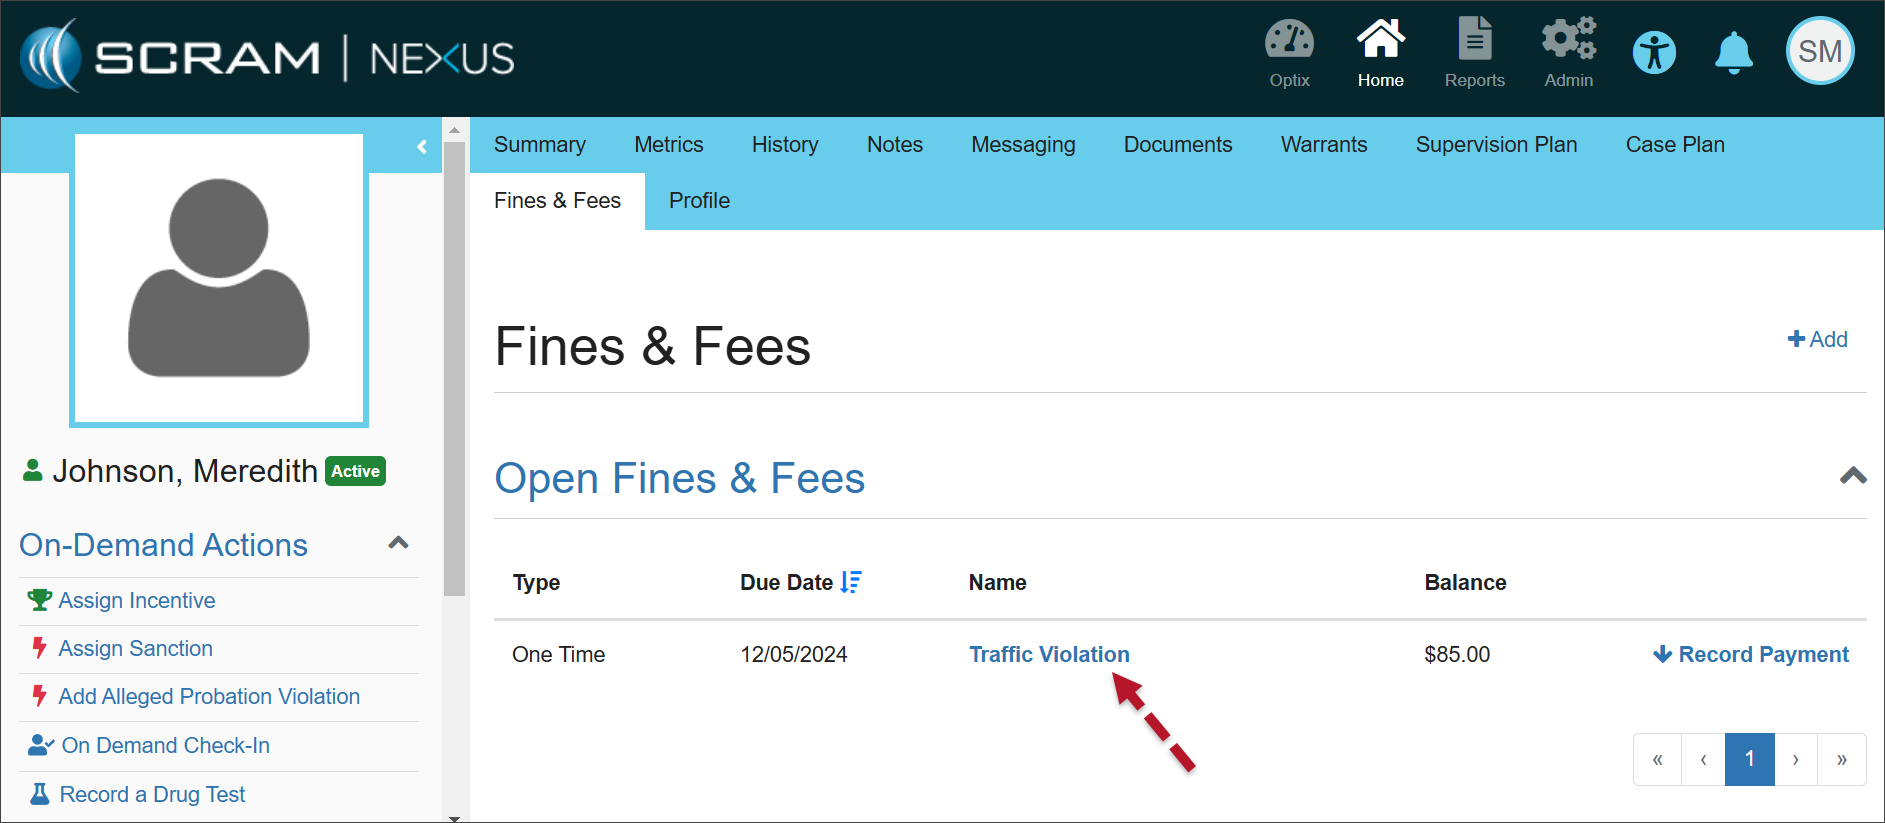
  1. Select the Name hyperlink in the Open Fines & Fees section.
Open Fines & Fees (click to enlarge)
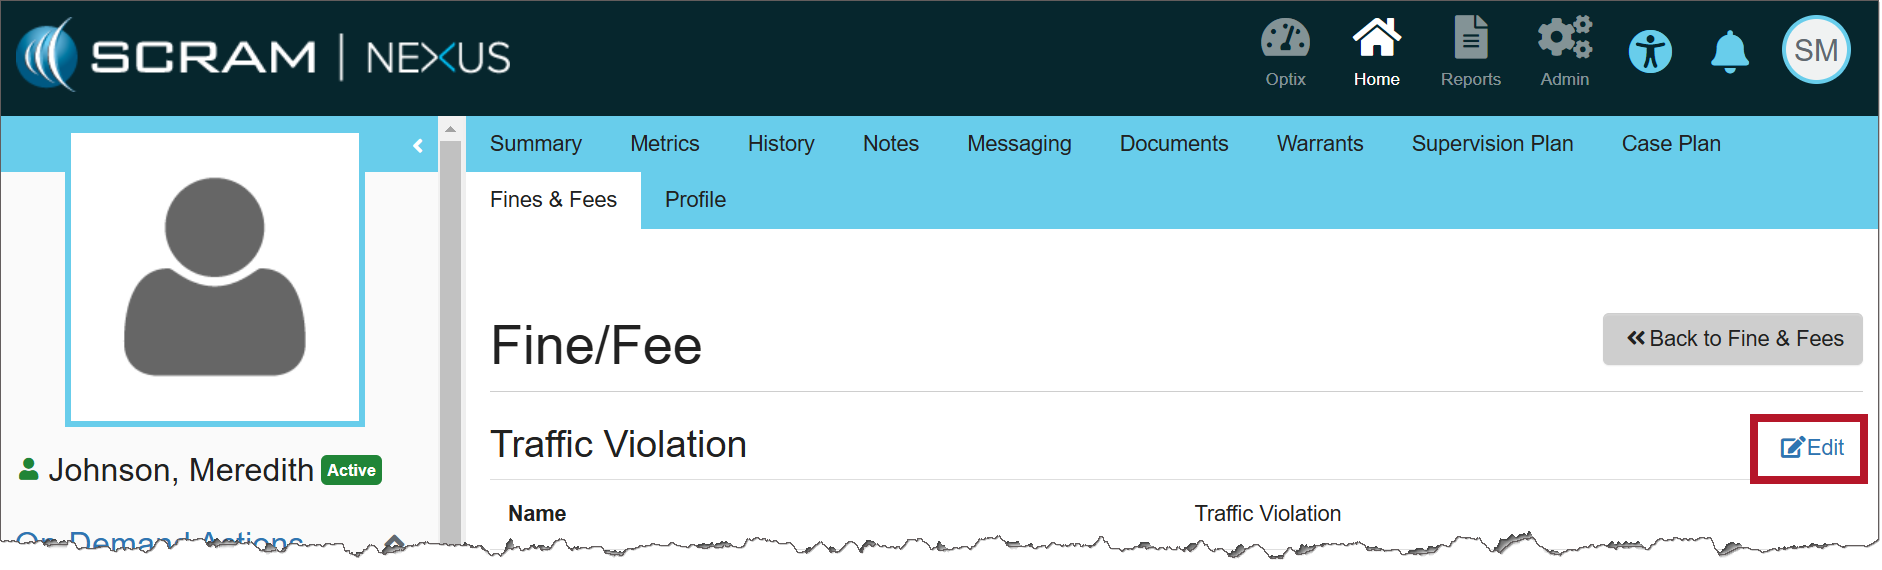
  1. Select Edit to make changes to the details of the specific fine or fee.
Fine/Fee page (click to enlarge)
  1. Make any necessary changes to the information.
  2. Once the status has been updated to either ‘Closed’ or ‘Dismissed,’ the fine or fee will be displayed with its details in the Closed Fines & Fees section.
  3. Select the Update button to save your changes.
Fine/Fee page (click to enlarge)

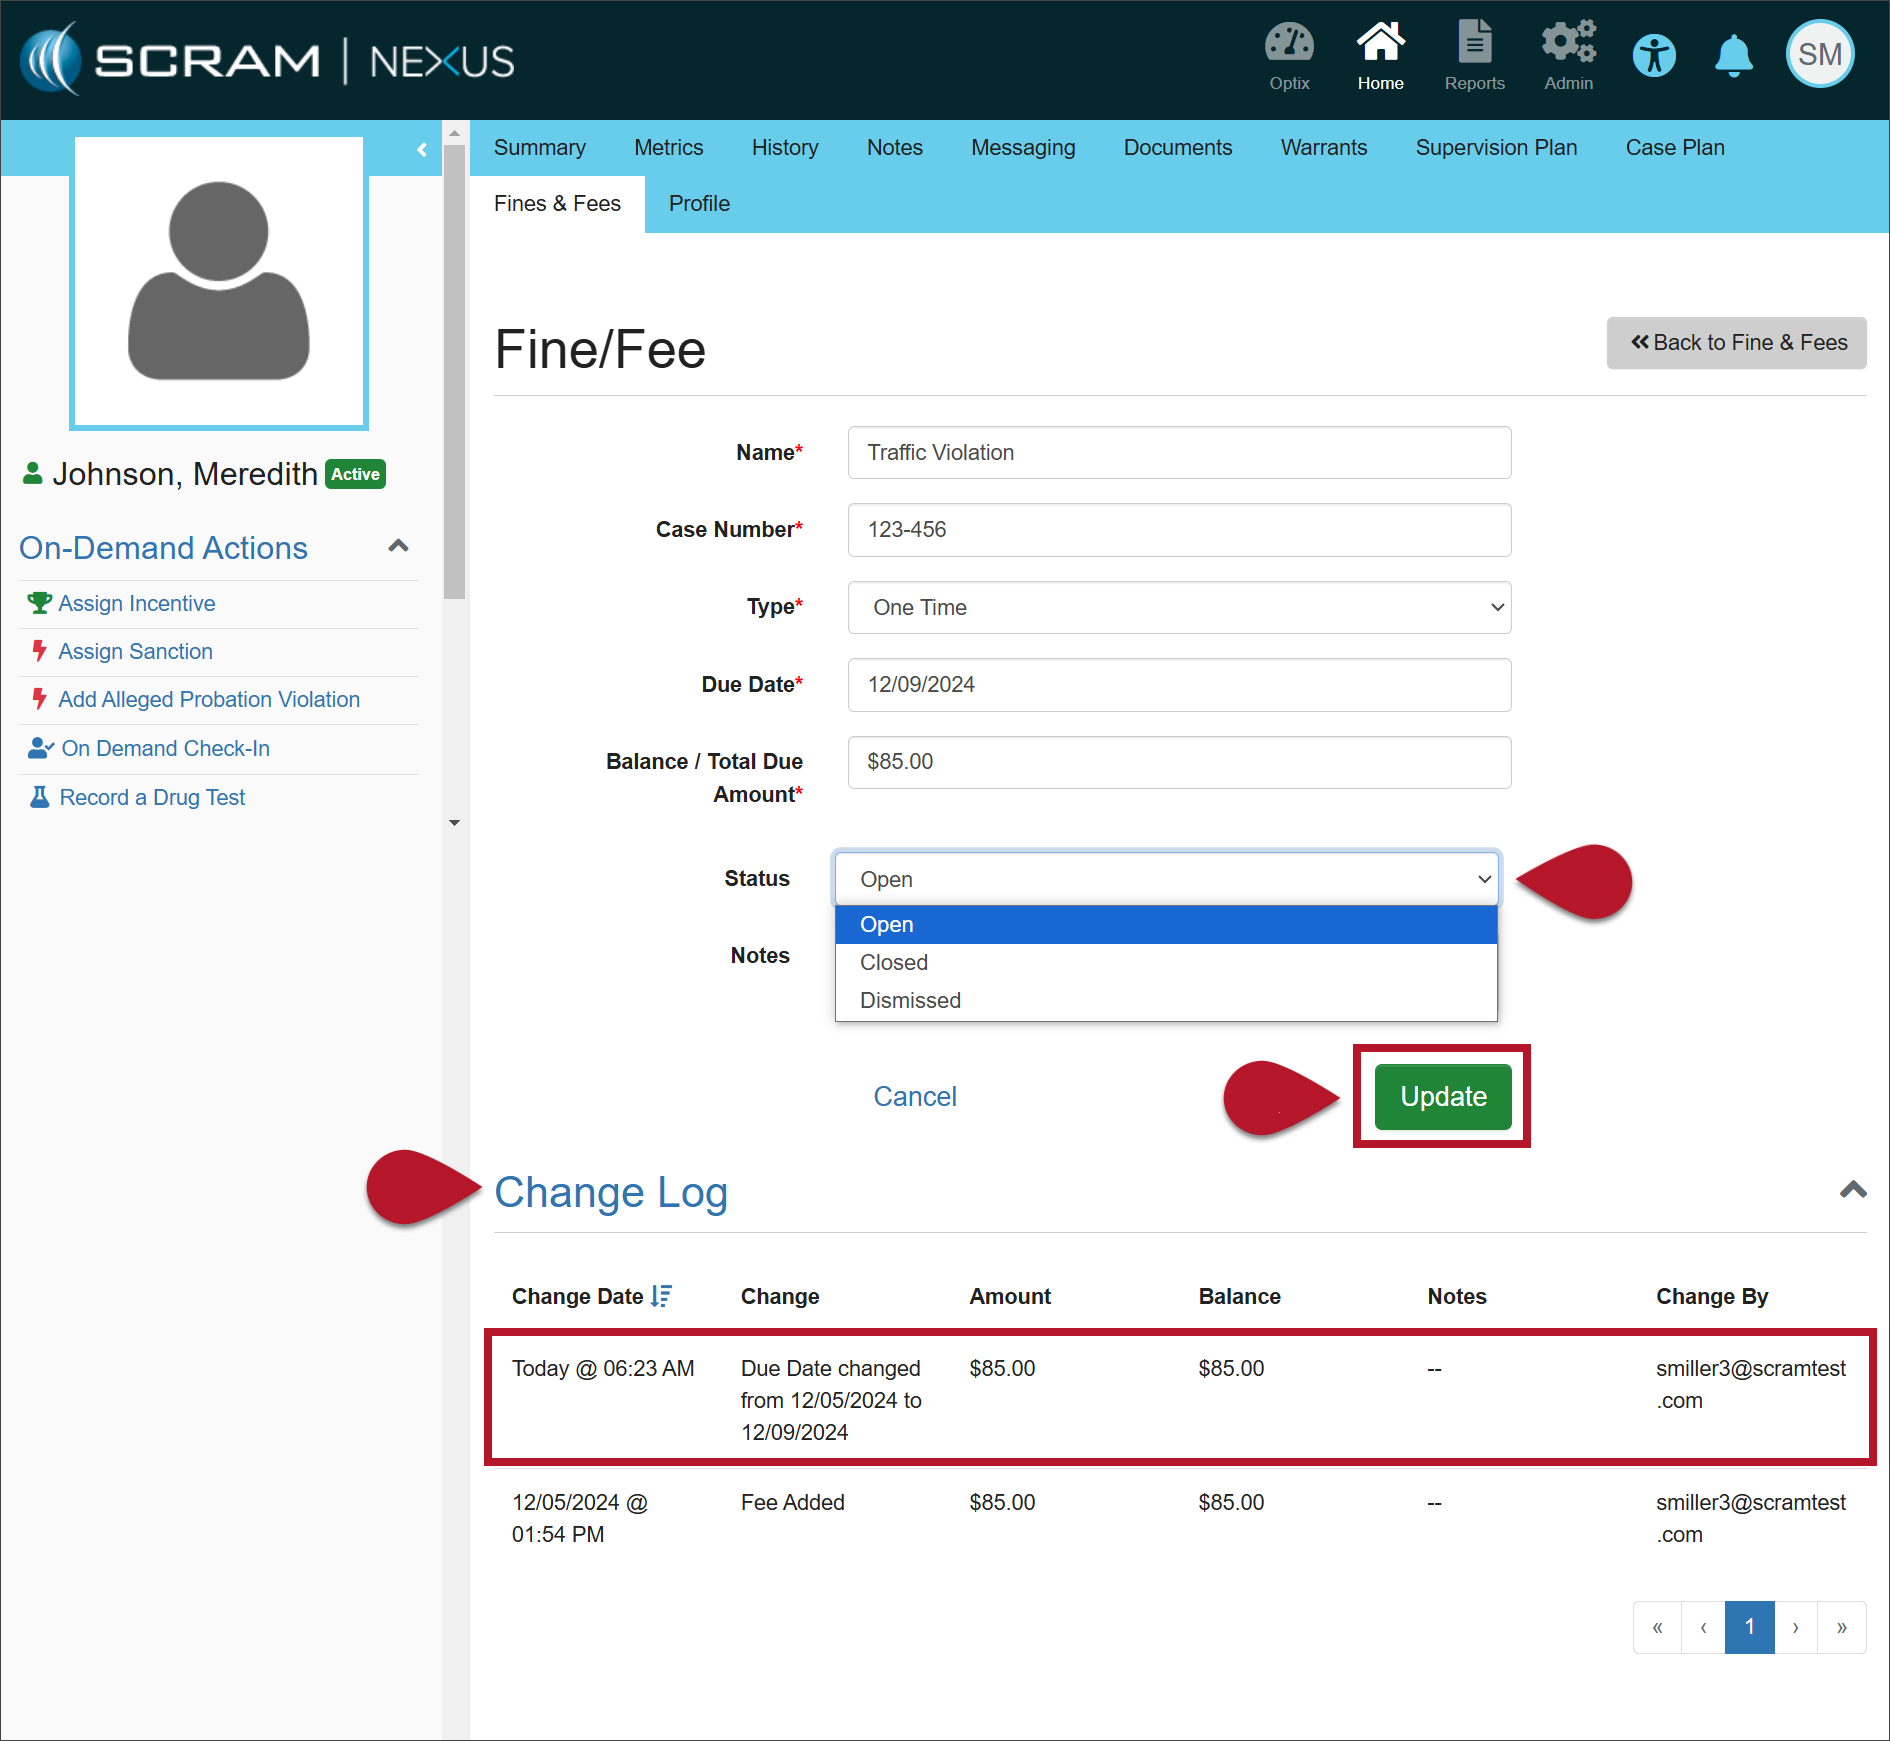
The Change Log will record your changes.

Continue Reading

At 5:00 AM MDT on Tuesday, October 22, 2024, SCRAM Systems is introducing a new feature in SCRAMNET GPS that will allow Officers, Agents, and Case Managers to send audible alarms to SCRAM GPS devices for longer than the standard 30-second duration.

Information SCRAMNET GPS deployments typically occur on Thursdays at 7:00 AM EST in the US, 10:00 PM AEST in Australia, and the following 12:00 AM EST (Friday) in Canada. Please refer to the official SCRAM Systems email communication associated with this release for more details. During the 15-minute deployment, you may not be able to access SCRAMNET GPS, but messages from the SCRAM GPS device will continue to be processed uninterrupted.

Send the Audible Alarm for Longer Duration

SCRAMNET GPS users may now send the Audible Alarm for durations longer than 30 seconds. This can be useful when the client is in a loud environment, or to help you find a lost bracelet.

The Audible Alarm can be sent from various pages in SCRAMNET GPS. The Audible Alarm now supports the following durations:

  • 30 seconds
  • 5 minutes
  • 10 minutes
  • 15 minutes
  • Continuous
Audible Alarm Duration Dropdown

SCRAMNET GPS will automatically send audible alarms in 30-second intervals followed by a brief pause between alarms, until the client presses the button or until the selected duration has elapsed.

To stop an Audible Alarm that has been set for a long (or continuous) duration, change the duration to 30 seconds.

The Client Events Dialog

The “Audible – Command Sent” message is shown in the Client Events dialog. The message shows the duration selected by the user.

Audible Alarm on Client Events Dialog

If the client presses the button for the Audible Alarm, then an “Audible – Offender pushed button event” is shown in the Client Events dialog. If the client has not pressed the button and the selected duration is reached, then an “Audible – Offender did not push button” event is shown.

Continue Reading

At 5:00 AM MDT on Tuesday, September 17, 2024, SCRAM Systems released an enhancement for SCRAMNET GPS. This enhancement allows you to view notes added to an active event on the Dashboard.

View Active Event Notes on the Dashboard

When adding an event note, you may “tag” it so it is visible on the Dashboard. This lets you quickly view the recorded actions taken to resolve the alert.

To tag an Event note:

  1. Select the Tag this note option in the Enter Event Note pop-up.
  2. Select the Save button.  
Enter Event Note Pop-Up (click to enlarge)

Once saved, the active alert is tagged, and a note icon will appear next to the alert on the Dashboard. Mouse over the note icon to view the abbreviated text of the note.

SCRAMNET GPS Dashboard Event Hover with “Tagged” Note (click to enlarge)

Continue Reading

At 5:00 AM MDT on Tuesday, August 20, 2024, SCRAM Systems released the following enhancement and new feature to the SCRAMNET GPS monitoring software:

  1. Pursuit Mode Message Delivery Enhancement
  2. Threshold Points Allowed for Exclusion Zones

Pursuit Mode Message Delivery Enhancement

Pursuit Mode in SCRAMNET GPS is often used in critical scenarios where quick access to information can be crucial. For this reason, the status messages displayed to the user while starting and running Pursuit Mode have been updated to provide status messages in a more timely fashion. These messages will be useful if there are delays starting Pursuit Mode.

Example: “Unable to Start Pursuit Mode” Message

Threshold Points Allowed for Exclusion Zones

Users can now allow up to four location points inside an Exclusion Zone before generating a violation. This may be useful to allow a client to briefly pass through an Exclusion Zone without generating a violation.

Enabling GPS Violation Threshold Points in Admin (click to enlarge)

For OnServer Exclusion Zones, set the number of Violation Threshold Points to allow up to four location points inside the zone before generating the violation. The violation will be generated on the subsequent (fifth, e.g.) point.

TipTip: Each time the Violation Threshold Points value is changed, an entry is logged in the SCRAMNET GPS Audit Report.

Continue Reading

On August 8, 2024, SCRAM Systems will release an enhancement to the Add Activity workflow for your SCRAM 24/7 monitoring program. When adding an EM Activity (CAM, House Arrest, Remote Breath, GPS, and TouchPoint) to your client, the “Add an Activity” workflow now includes many of the “steps” you traditionally completed in SCRAMNET, SCRAMNET GPS, and SCRAM Optix. This enhancement streamlines the client intake process.

Example: Add a Remote Breath Activity to a Client – click to enlarge

Select an EM Activity option below to learn more about the Add Activity process:

Continue Reading

On August 8, 2024, SCRAM Systems will release an enhancement for your 24/7 monitoring program. SCRAM Systems understands that not all programs utilize “sanctions” as a part of their client monitoring program, and with this release, you may now disable the Sanctions option for your entire program.

TipsIf you don’t see the enhancement in SCRAM 24/7, please clear your cache and cookies and refresh your browser window.

Disable Sanctions

As an administrator for your program, navigate to the Settings tab on the Admin page in SCRAM 24/7.

Admin Settings page – click to enlarge

In the Site Wide Settings section, locate the “Enabled Sanctions” option, toggle the “Enabled” selection to Disabled, and then select the Save Settings button.

Enabled Sanctions Disabled Selected – click to enlarge

This will remove the Sanctions tab at the administrative level and will propagate throughout the site; to the client level.

Admin Level

Sanctions Tab Available – click to enlarge
Sanctions Tab Removed – click to enlarge

Client Level

Client Profile Page Sanctions Tab – click to enlarge
Client Profile Page Sanctions Tab Removed – click to enlarge

Continue Reading

Effective the afternoon of August 7, 2024, SCRAM Systems will deploy a new automatic face obstruction scanning feature and release a new “Possible Face Obstruction” alert to go with it. This new feature automatically detects irregularities with the RB Pro device’s breath tube in the breath test photo. 

Irregularities that trigger a Possible Face Obstruction alert include, but are not limited to:

  • Anything – like hands, fingers, clothing, the RB Pro case itself, etc. – that blocks the camera’s view of the entire breath tube, from where it leaves the RB Pro device to where it enters the client’s mouth.
  • Irregularities in the color, size, or shape of the breath tube.
  • Attachments connected to the breath tube.
  • Breath tube is missing altogether.

Reviewing a Possible Face Obstruction Alert

Select the Possible Face Obstruction result from the table of breath test results found on the SCRAMNET Workload RB Results page to open it in the Alert Management Console:

Select the ‘Possible Face Obstruction’ Result Hyperlink (click to enlarge)

Review the breath test photo for obstructions to the breath tube. In this example, the client is grasping the breath tube near her mouth and obscuring the view of the breath tube entering her mouth:

Possible Face Obstruction Alert on the Alert Management Console (click to enlarge)

If you are fairly confident that the client did not grasp the breath tube in an effort to obscure a circumvention, then this may simply be a coaching opportunity. Pass this test, but reach out to the client to advise her NOT to grasp the tube while delivering a breath sample going forward.

Perform the following actions:

  1. Select Agent Match from the Image Comparison dropdown menu
  2. Add Notes describing the coaching actions you plan to take with the client
  3. Change the test result Status to Resolved
  4. Save & Exit the Alert Management Console
Resolving the Possible Face Obstruction Alert as Passed (click to enlarge)

The test will fall off the SCRAMNET Workload RB Results page, but you will find it as a “Passed” test result on the individual client’s RB Results page:

Resolved Test Result Shows ‘Passed’ on Client RB Results Page (click to enlarge)

Detailed Help Available

Visit the Possible Face Obstruction Alert article in the Remote Breath section of the SCRAM Systems Help & Support site for a more detailed explanation of this new feature, and for additional alert resolution example scenarios.

Continue Reading

SCRAM Systems has moved from its Mineral Avenue address in Littleton, Colorado. When conducting business with us, be sure to use the appropriate address:

RMA Address

When a Return Merchandise Authorization (RMA) is issued for one of your SCRAM Systems devices, please ensure that the return shipping address on the label reads:

SCRAM Systems (AMS)
8100 Southpark Way

Littleton, CO 80120

If your return shipping labels have the old, now-obsolete Mineral Avenue address on them, please discard them and request new labels from your SCRAM Systems Account Manager or Regional Sales Manager.


Payments Address

When making a bill payment to SCRAM Systems for monitoring services, equipment purchases and rentals, or any other reason, please remit payment to the SCRAM Systems bank lockbox:

Alcohol Monitoring Systems, Inc.
PO Box 561097

Denver, CO 80256-1097

Do not remit payments to the now-obsolete Mineral Avenue address or to the Southpark Way address.

Continue Reading

On July 312024, SCRAM Systems will release an enhancement for your Client Check-In Caseload. Before this release, you would compare the client’s baseline image to their check-in photo for verification. With this release, you may now create a check-in photo gallery to reference while verifying the check-in photo taken by the client during a check-in.  

TipsIf you don’t see the enhancement in SCRAM TouchPoint, please clear your cache and cookies and refresh your browser window.

Client Check-In Details

The client Check-In Details page’s Baseline and Check-In Photo section contains additional navigation and menu options.

Starting with the “magnifying glass” icon: Selecting the icon opens a pop-up window, isolating and enlarging the two photos for your review.

Isolate and Enlarge Photos – click to enlarge
Comparison Photos with “More” (⋮) Option – click to enlarge

The Check-In Photo heading contains a “More” (⋮) option that allows you to Add the current check-in photo to an image gallery. Once added, you may use the arrows below the Baseline Photo to scroll through the gallery. The gallery of comparison photos will hold up to 10 images, including the Baseline Photo.

Add Current Check-In Photo to Image Gallery – click to enlarge

As you scroll through the images, the check-in photos added to the gallery will have a heading labeled “Comparison Photo,” along with their check-in date and time information.

Check-In Details with Pop-up Date & Time – click to enlarge

Select the Menu (⋮) above the image to remove a comparison photo from the gallery and then the Delete option.

Remove Comparison Photo – click to enlarge

Each time you add or remove an image from the gallery, you will note a banner in the upper right corner of the page stating “Image Added” or “Image Deleted.”  Once you have reached the 10-image limit, the system will display a “Couldn’t add image (limit reached)” banner if you try to add additional images.

“Couldn’t add image” Message – click to enlarge

To proceed, you must delete an image from the gallery and add the desired image.

Continue Reading

At 5:00 AM MDT on Thursday, July 25, 2024, SCRAM Systems will release the following enhancements and new features to SCRAMNET GPS:

Information During the 15-minute deployment, you may not be able to access SCRAMNET GPS, but messages from the SCRAM GPS device will continue to be processed uninterrupted.

Pursuit Mode Enhancement

Currently, if an agent attempts to start Pursuit Mode for a client whose device has active No Communication or No Location alerts, SCRAMNET GPS fail to start Pursuit Mode, without informing the agent why Pursuit Mode will not start. With this change, the agent will be notified that Pursuit Mode is unable to start, and provide a reason why:

“Unable to Start Pursuit Mode” Message

New Entry and Exit Alert Default Settings for Inclusion Zones

When creating an Inclusion Zone, SCRAMNET GPS automatically generates Entry and Exit alerts for the zone. If the user does not want Entry or Exit events, they must manually uncheck these settings before saving the zone:

Entry and Exit Alerts are Selected (Checked) by Default

With this enhancement, Administrators may choose the default behavior when creating Inclusion Zones by navigating to Admin > Account Settings > Accounts (tab) > Preferences (sub-tab) to set the Default Entry/Exit Alerts for Inclusion Zones behavior. By default, this setting is selected (checked) to match existing behavior:

Admins May Choose the Default Entry/Exit Alert Behavior for Inclusion Zones (click to enlarge)

New “Deceased” Reason for Client Inactivation

If your program uses client “Inactivation Statuses” (reasons for inactivation), with this release agents may select “Deceased” as the reason for setting a client’s Status to Inactive:

Agents May Now Select “Deceased” as the Reason Setting Client Status to Inactive. (click to enlarge)

This reason is in line with the American Probation and Parole Association’s National Standards for Community Supervision. To activate this feature in SCRAMNET GPS, a program Administrator must navigate to Admin > Account Settings > Accounts (tab) > Preferences (sub-tab) and then select (check) Allow Assignment of Inactivation Statuses.

‘Device History Report’ Now Available to Officer Role

SCRAMNET GPS users in the Officer role may now run the Device History Report. This report was previously available only to Admin users. This report can be run for a specific device, or client, to see the assignment and unassignment history.

Enhancements to the SCRAM GPS Monitoring Center

For SCRAM Systems customers who use our SCRAM GPS Monitoring Center service, it allows them to define Service Level Agreements, and Standard Operating Procedures for addressing SCRAM GPS alerts. The Monitoring Center can be managed directly by the customer or by SCRAM Systems specialists. The following enhancements have been added to the service:

  1. Notes may be updated to Monitoring Center tickets without closing or suspending the ticket. As many notes as needed may be added to the ticket without changing its status.
  2. The Monitoring Center Dashboard shows the name of the Agent who last updated the ticket. This is useful for follow up with the agent when you have additional questions.
  3. The Monitoring Center now surfaces Neutral Zone Entry and Neutral Zone Exit events.

Continue Reading