Today, April 9th, 2026, at 11:00 AM MT, SCRAM Systems released multiple enhancements for your SCRAM 24/7 GPS Activity Client Caseload.
These enhancements allow you to perform the following tasks from within SCRAM 24/7:
- During the Add GPS activity setup, you may now add and assign the SCRAM GPS Bracelet and Beacon.
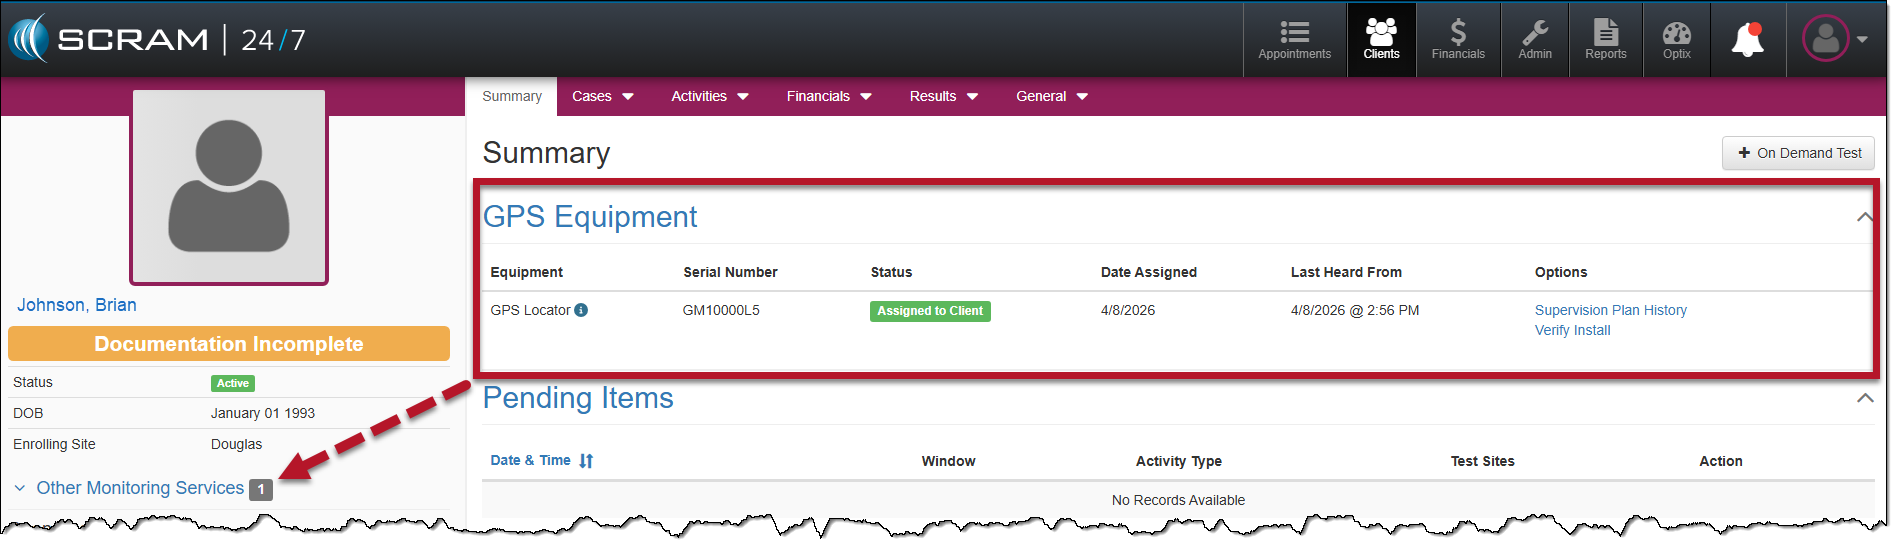
- View SCRAM GPS Supervision History on the client’s Summary page.
- Unassign the SCRAM GPS bracelet and Beacon when removing the GPS Activity.
Add GPS Activity
Once you have created the client’s profile in SCRAM 24/7, the next step is to add the GPS Activity and then complete the equipment assignment.
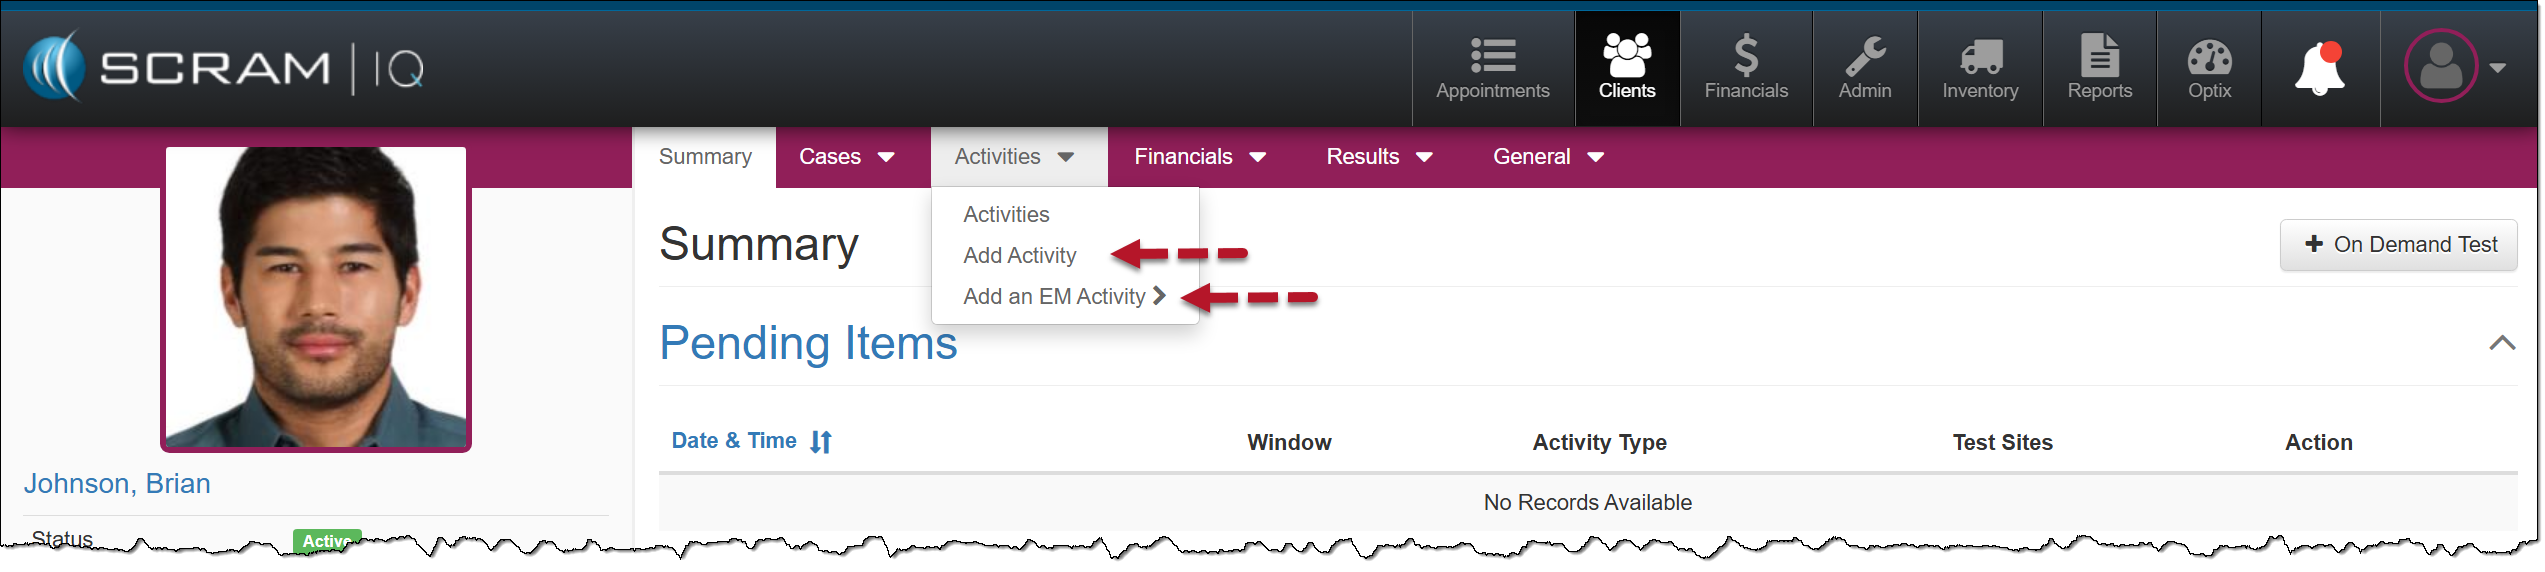
Starting on the client’s Activities tab:
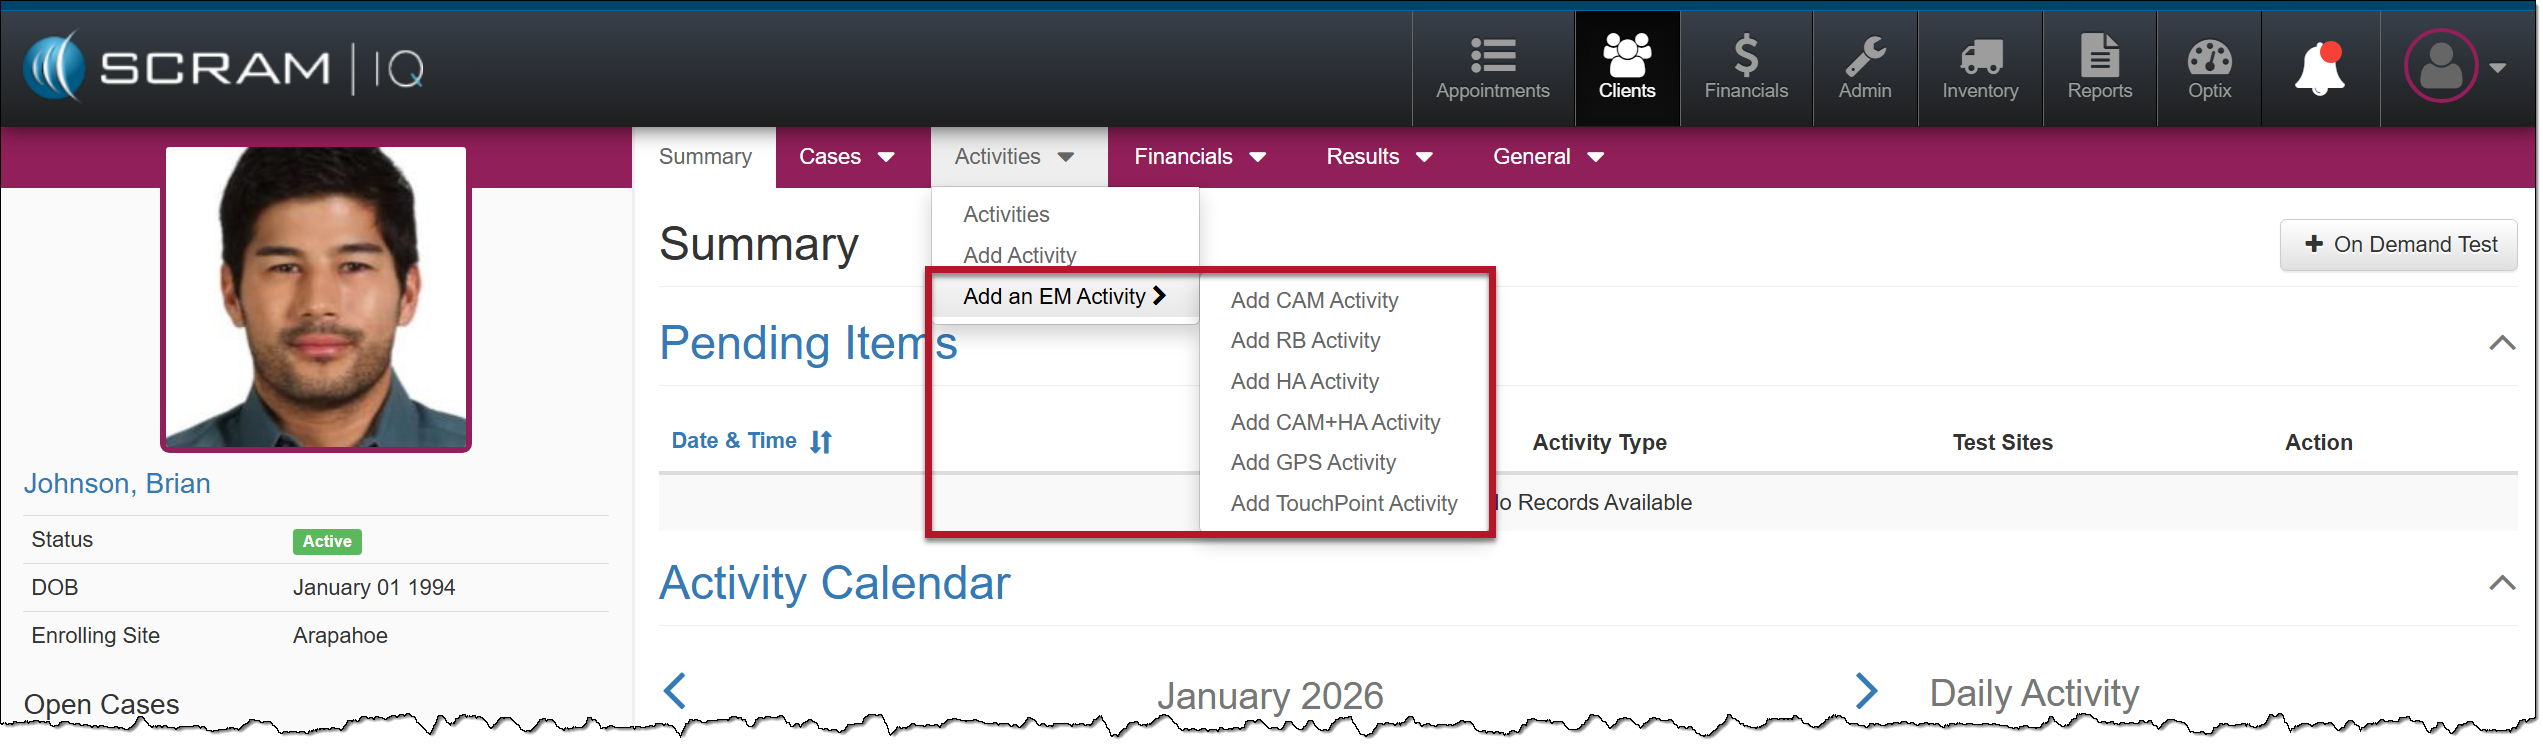
- Select the +Add an EM Activity button, and then select the Add GPS Activity option from the dropdown menu.
|
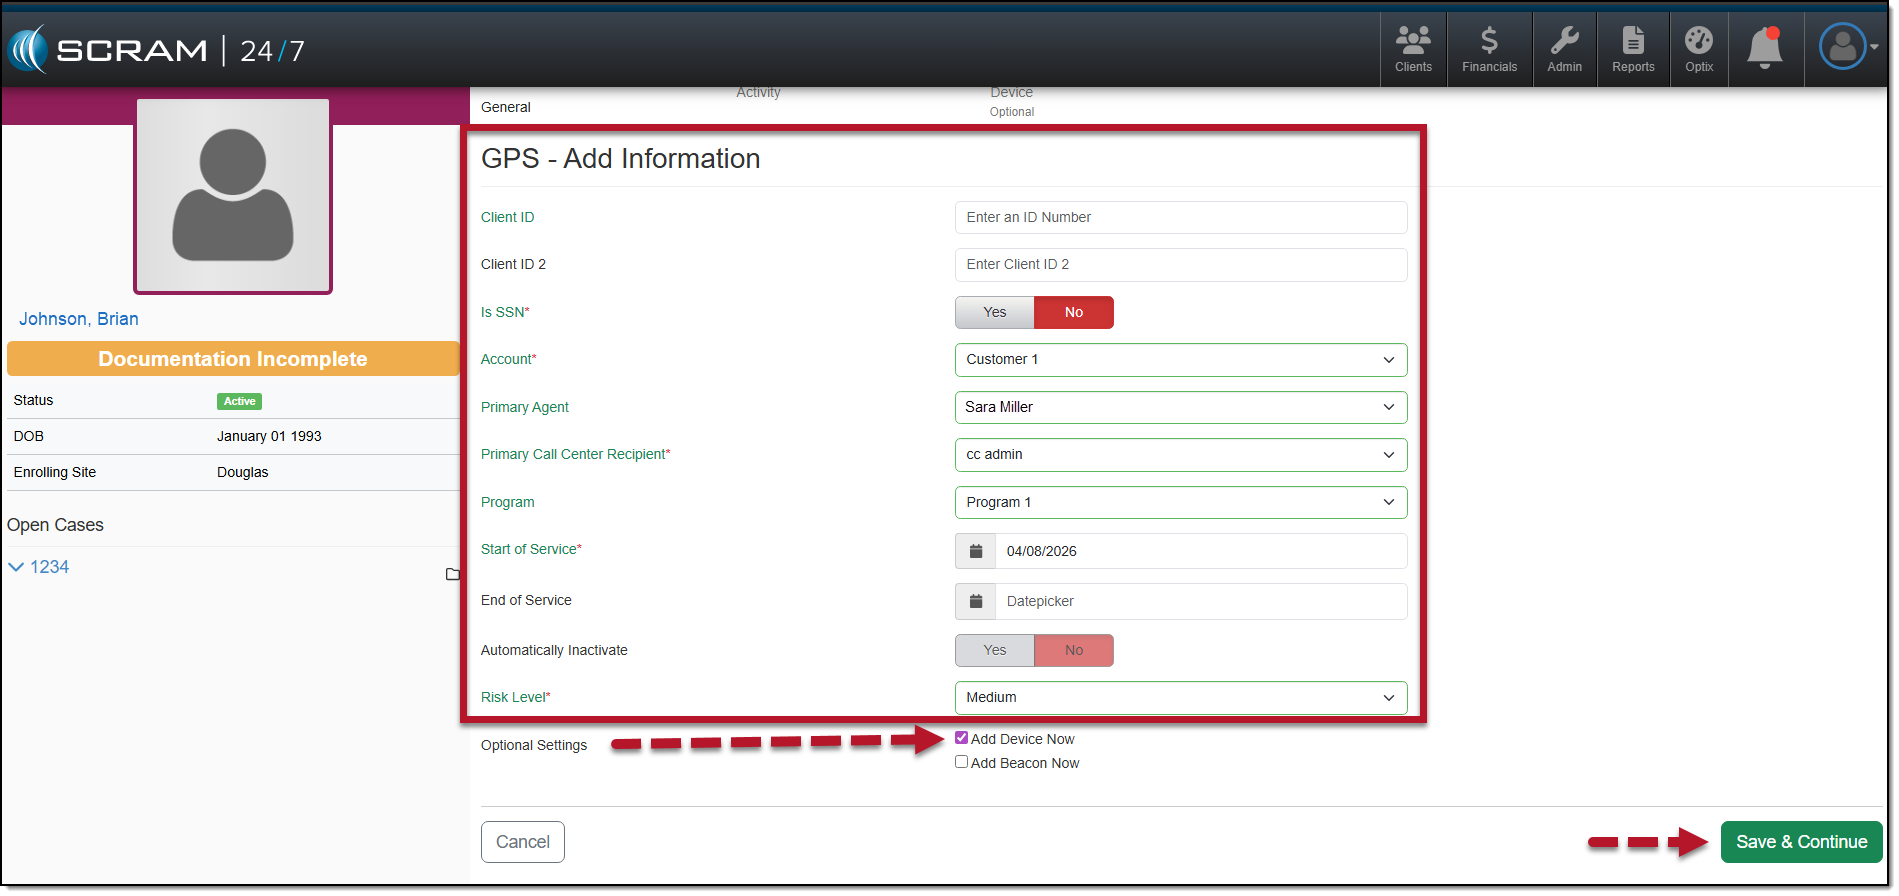
General Step
- Add the client-specific and “SCRAMNET GPS account” information. The fields and options available here are based on the selected Account.
- You may elect to assign a SCRAM GPS bracelet and Beacon at this time by selecting the checkboxes next to the appropriate selections in the Optional Settings section.
- Once your selections are made, select the Save & Continue button.
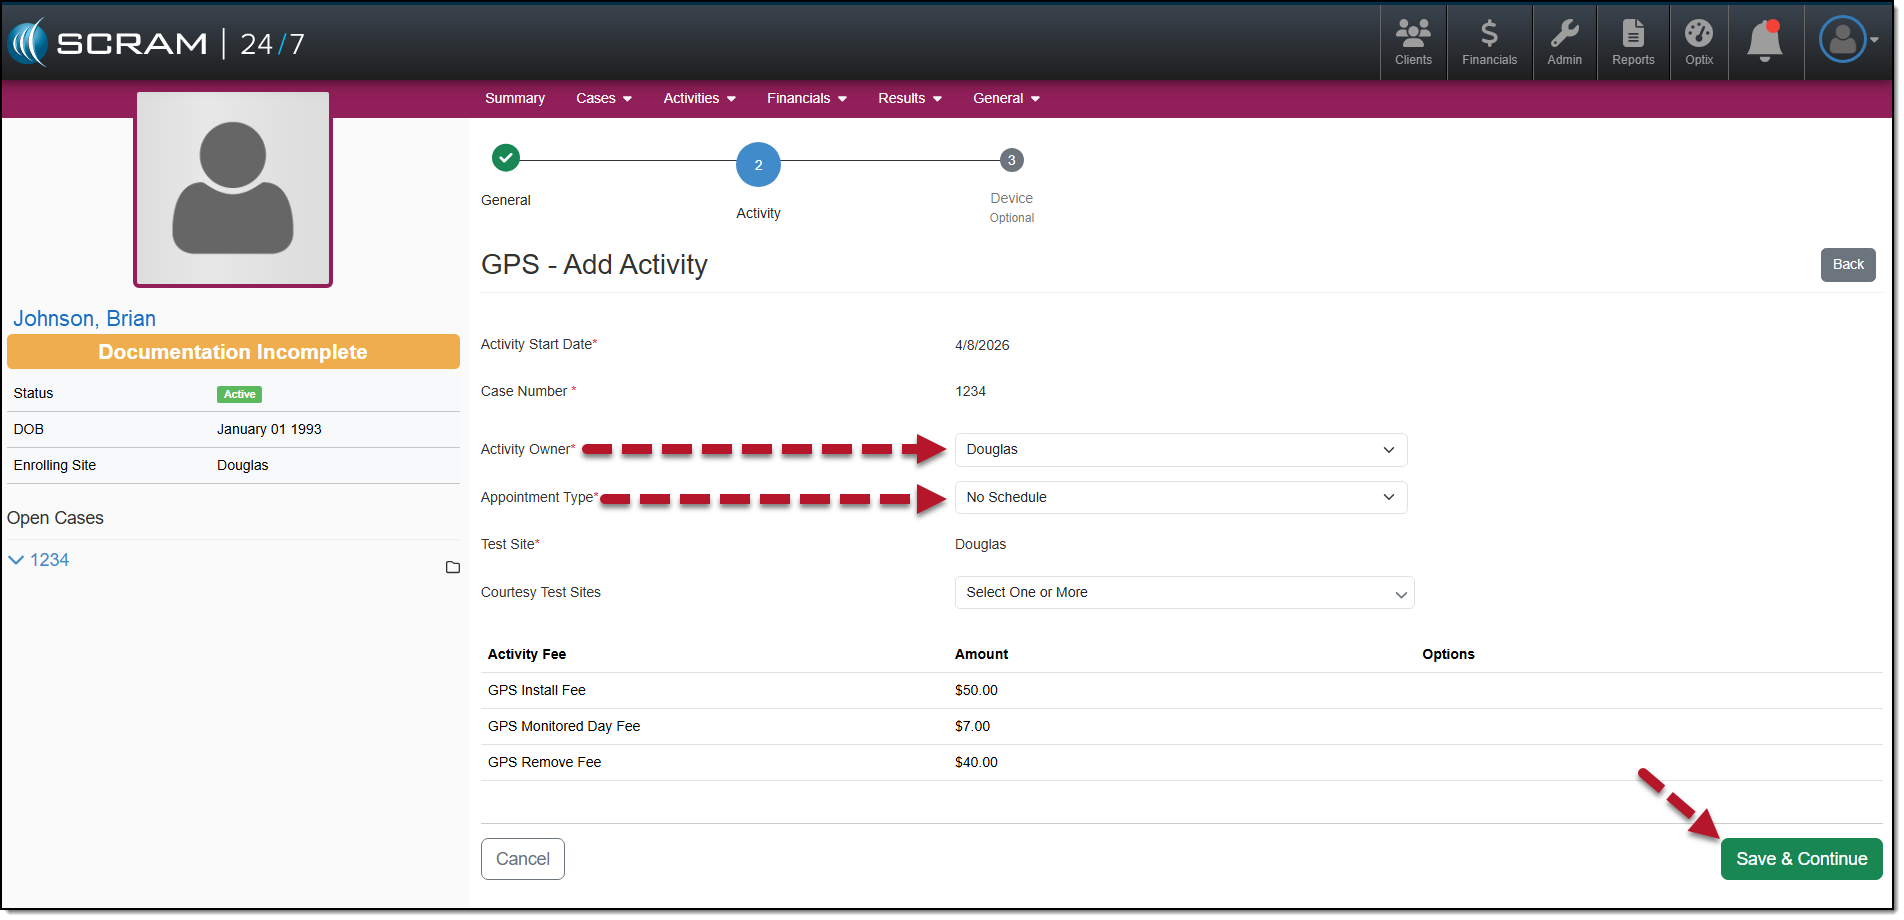
Activity Step
- Add the Activity details. All required fields are marked with a red asterisk.
- Appointment Type:
- The two options available are “No Schedule” or “In-Person Appointments.” When this In-Person Appointments option is selected, you will enter the appointment details. Once saved, the appointment is visible on the client’s Activity Calendar on the client’s Summary page and will populate on the Appointments Dashboard on the appointment date.
- Verify and update the Activity Fees if needed.
- After making your selections, select the Save & Continue button.
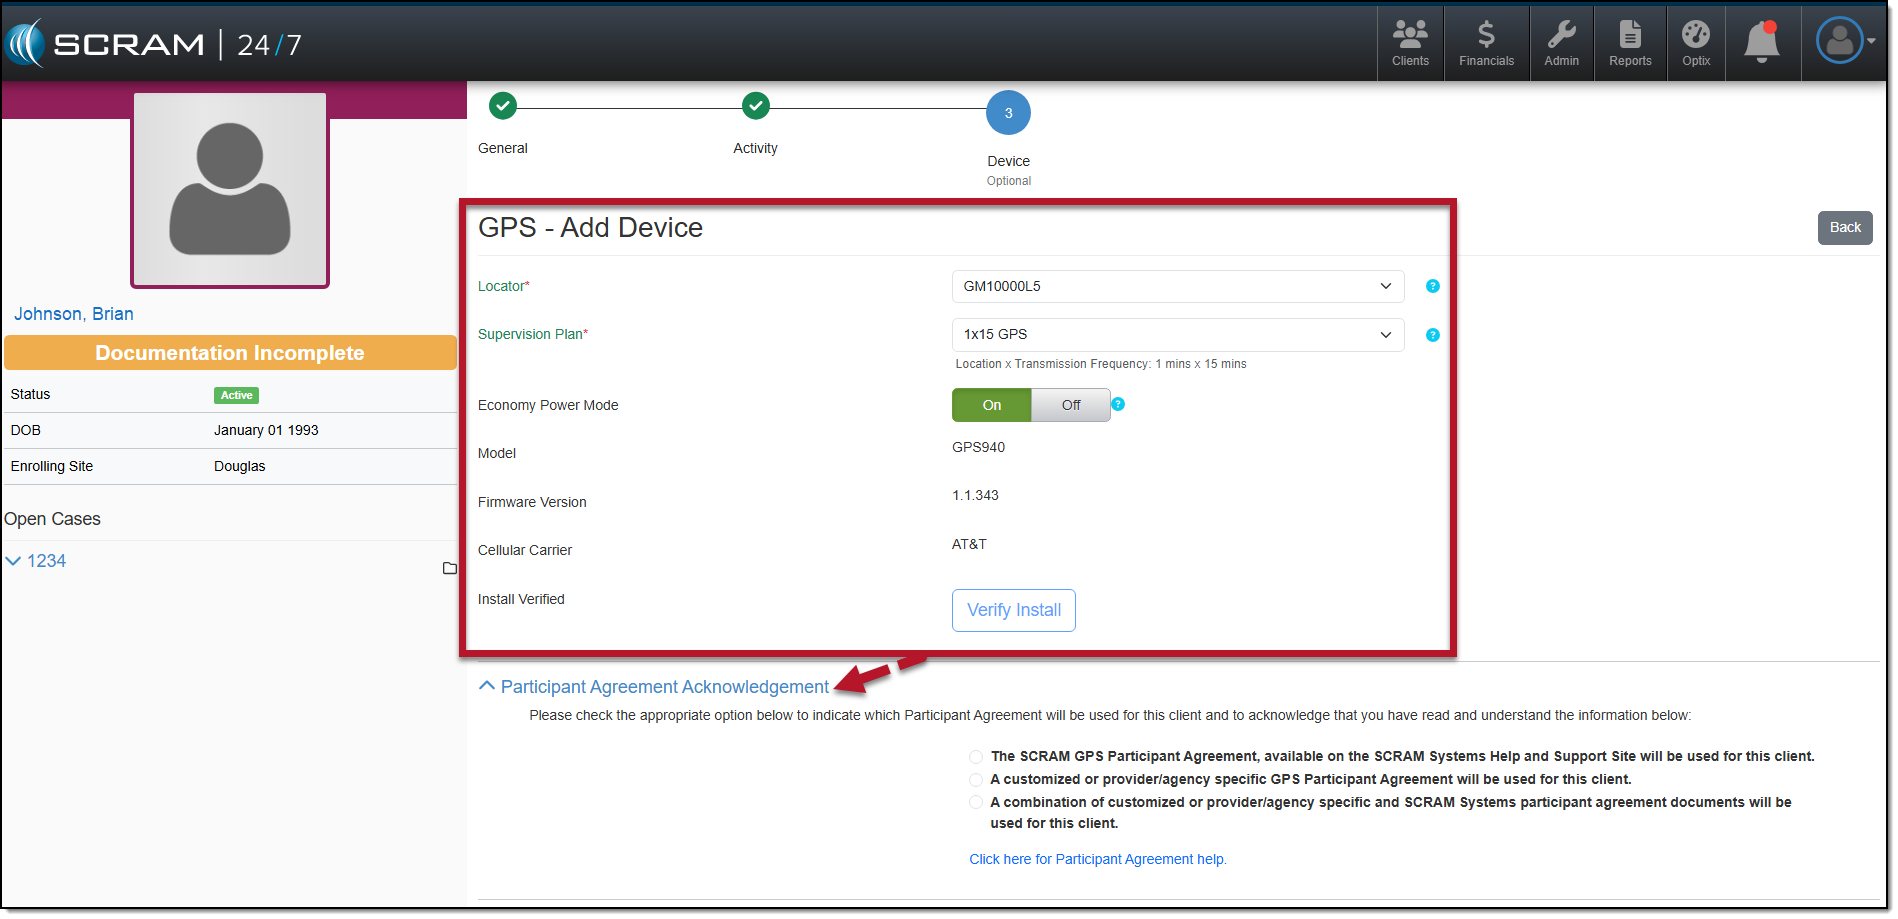
Device Step
- Select a locator from the dropdown menu.
- Select the Supervision Plan from the dropdown menu.
|
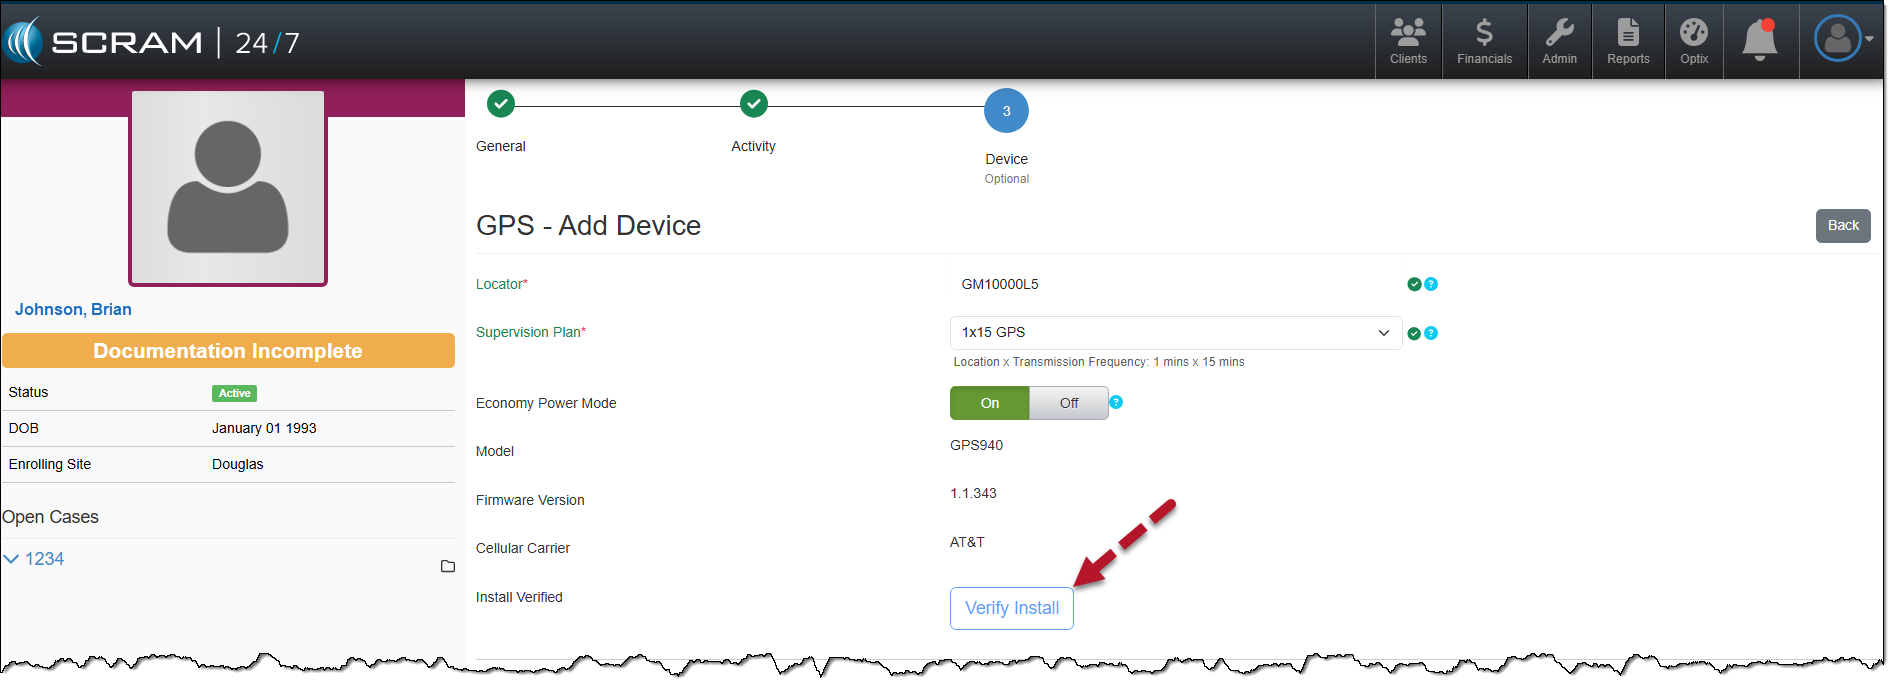
| At this time, you must access the client’s SCRAMNET GPS profile page by selecting their name hyperlink in the Other Monitoring Services section in the sidebar. It is imperative that you:
If you skip this step, the client may not be properly monitored. |
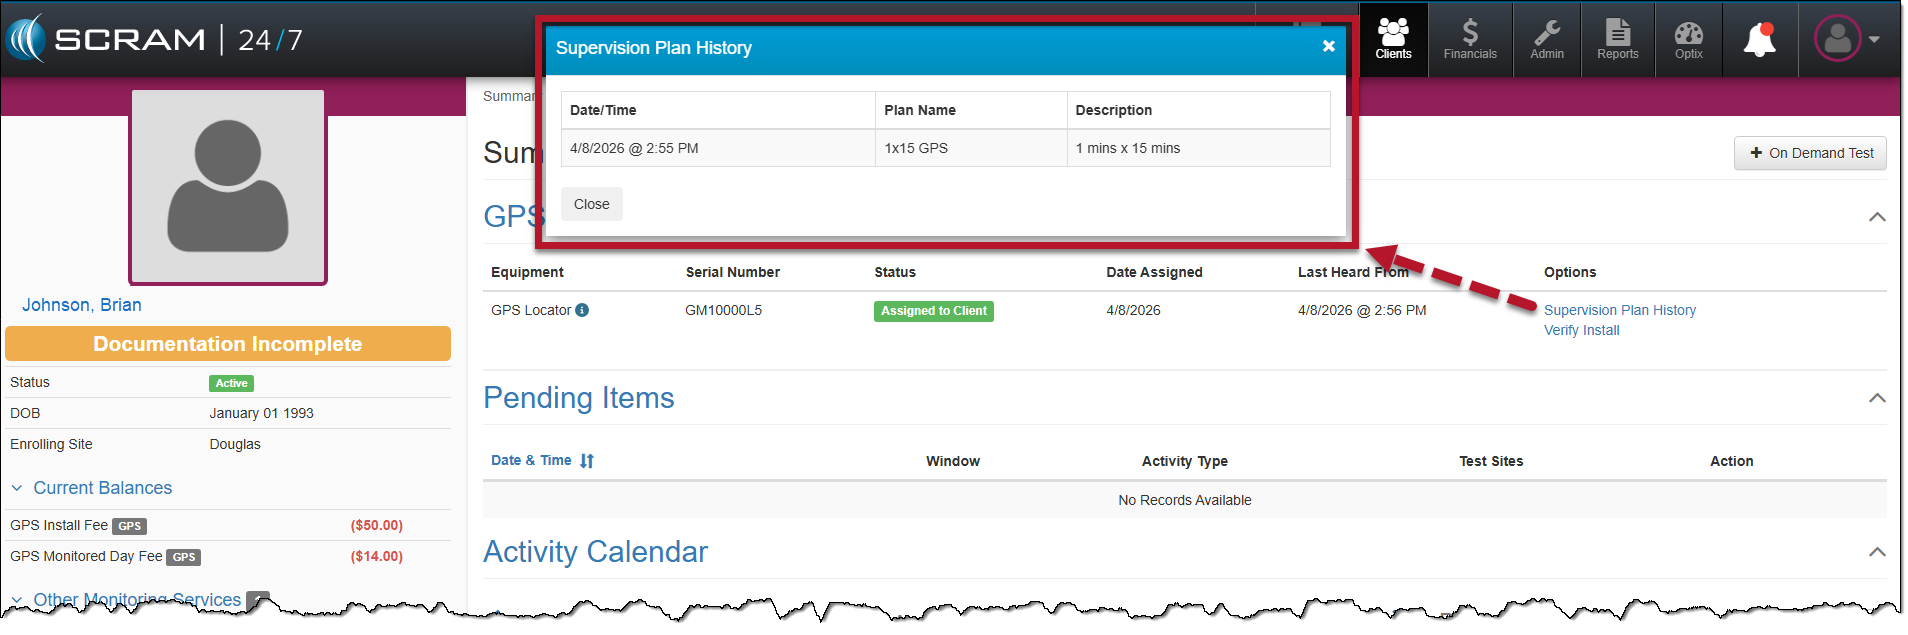
Supervision Plan History Hyperlink
You may view the supervision plan information for the assigned bracelet by selecting the Supervision Plan History hyperlink located in the Options column on the client’s Summary page.
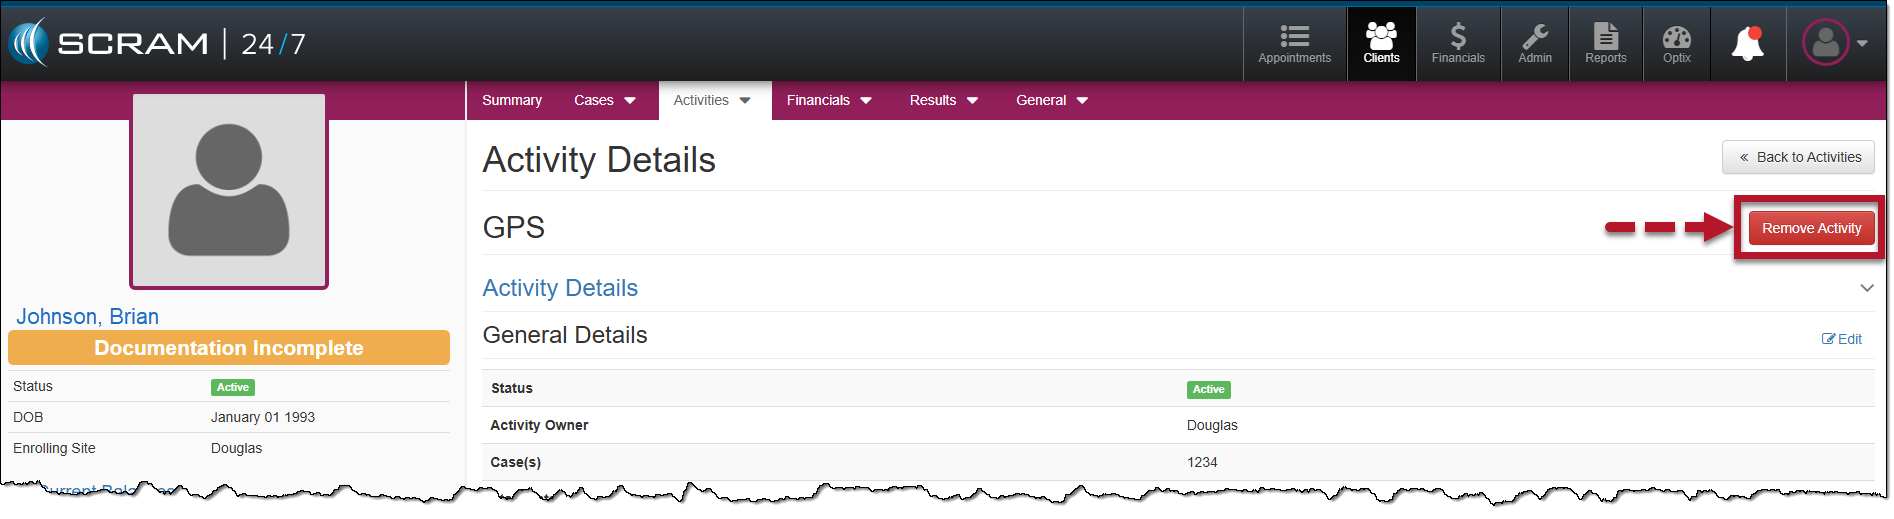
Removing the GPS Activity
When it is time to remove the GPS activity and check in the equipment, start by:
- Accessing the GPS Activity Details page.
- Select the Remove Activity button.
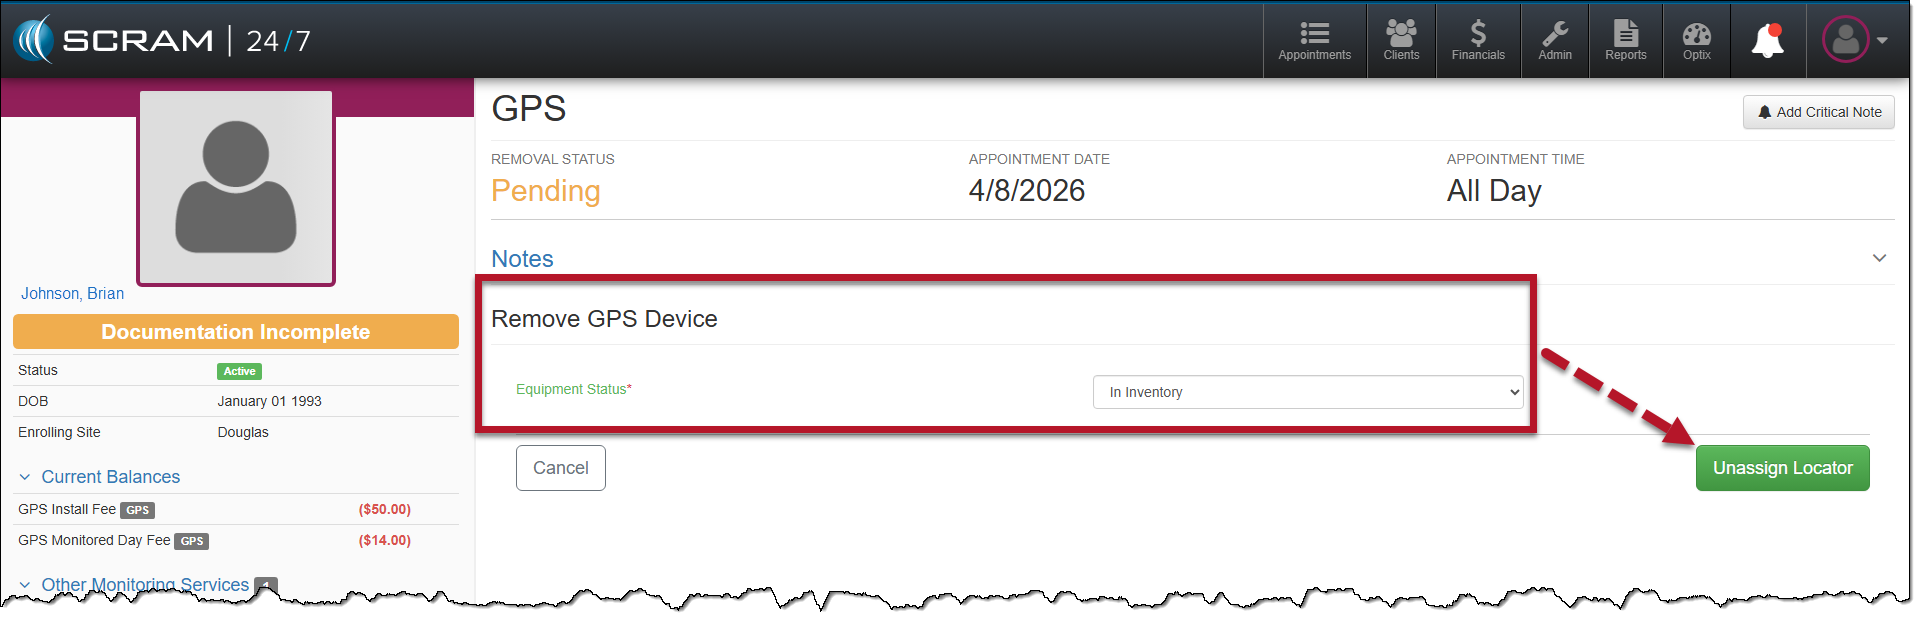
- On the Remove GPS Device page, open the Equipment Status dropdown menu and select the appropriate option. In this example, “In Inventory” was selected.
- After selecting the device status, select the Unassign Locator button.
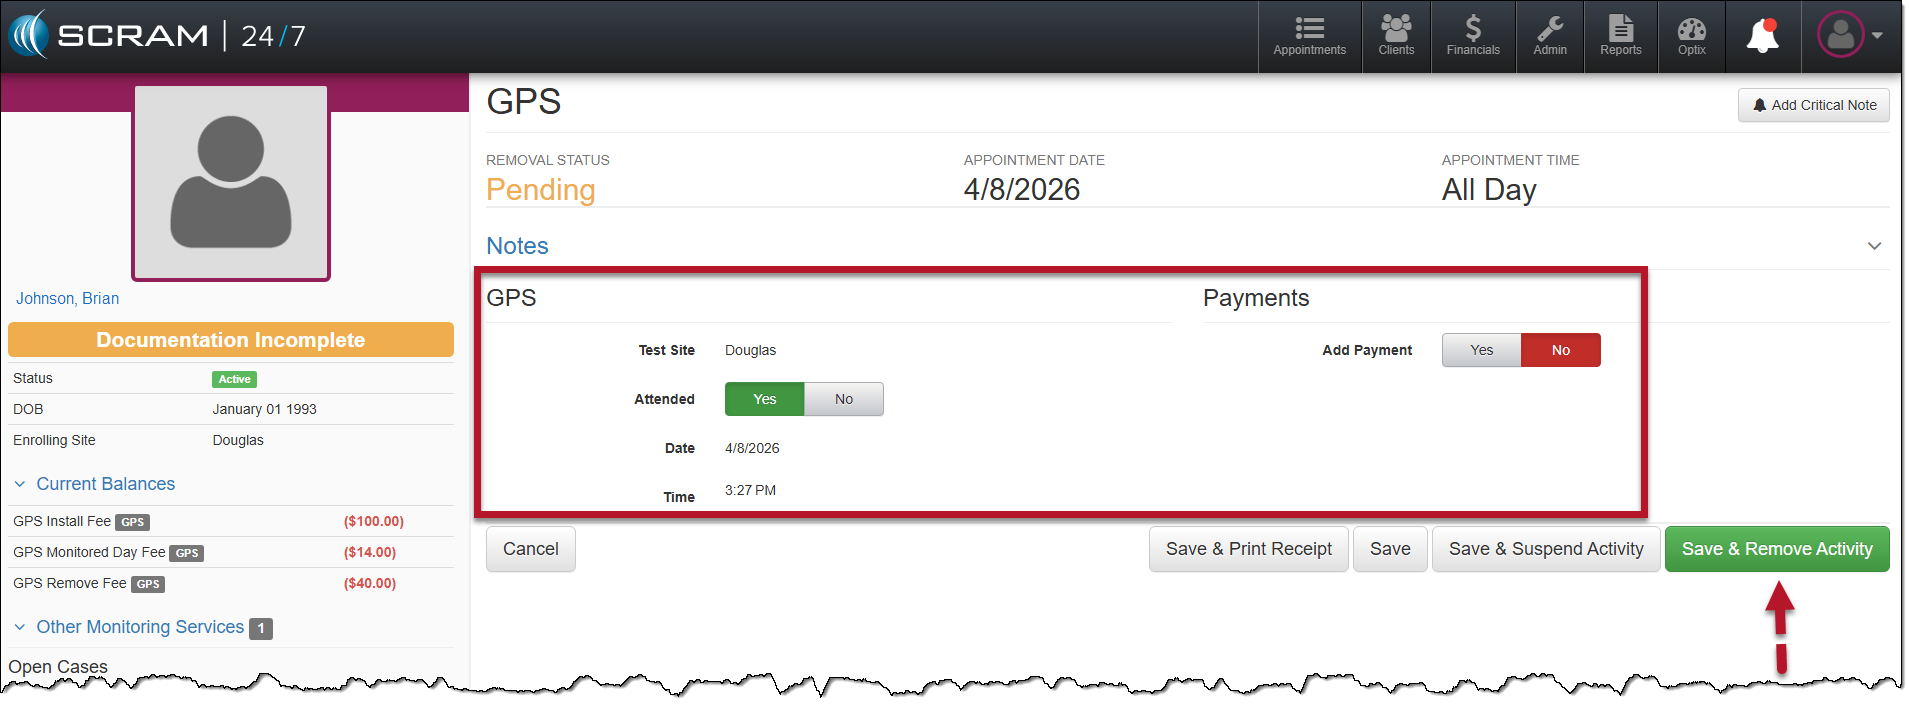
- Complete the GPS Removal appointment. Here, you may select whether the client is in attendance and record any payments made.
- Once information is entered, select the Save & Remove Activity button.
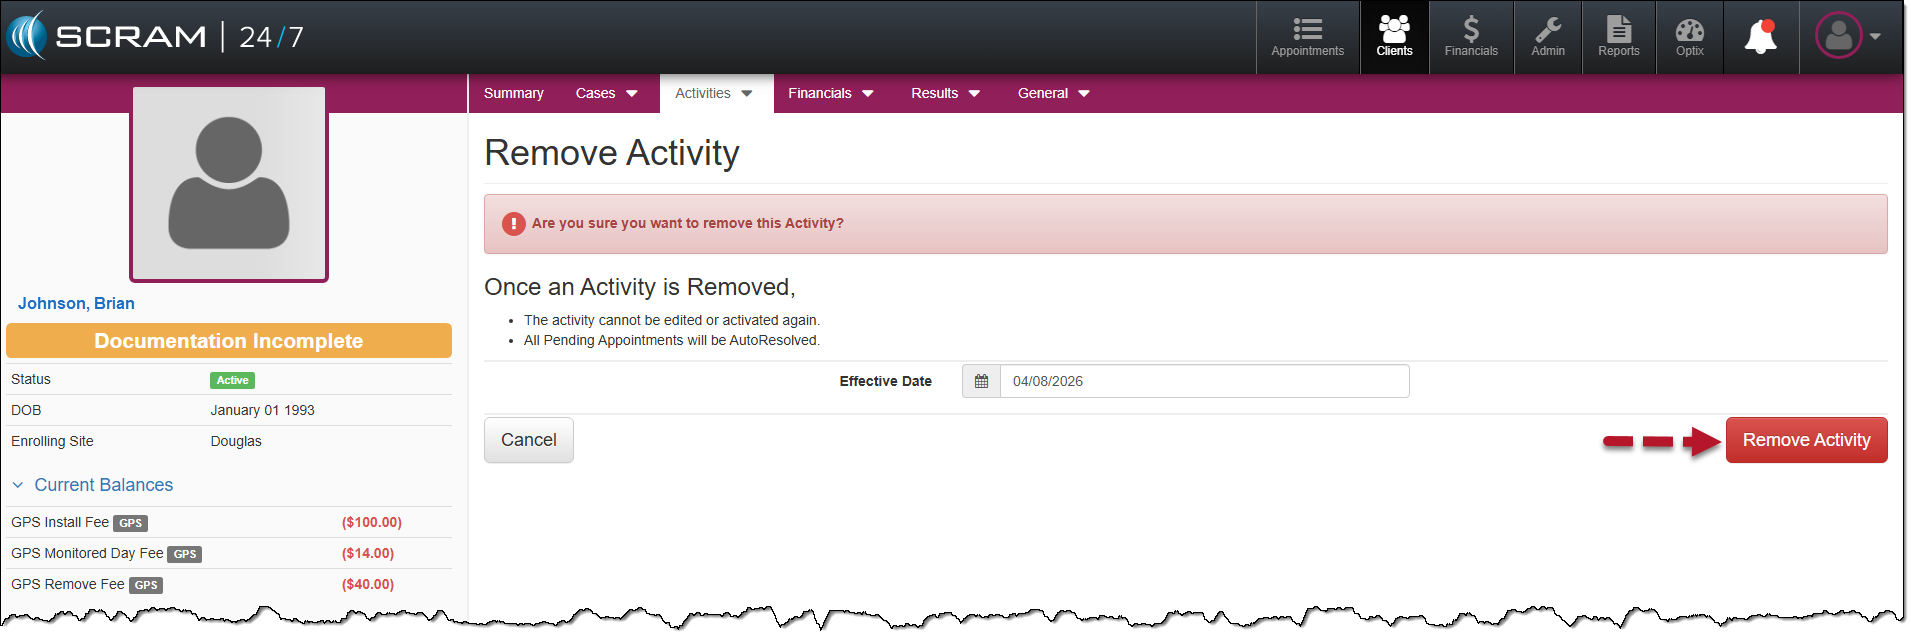
- Verify the Effective Data entry field and then select the Remove Activity button.
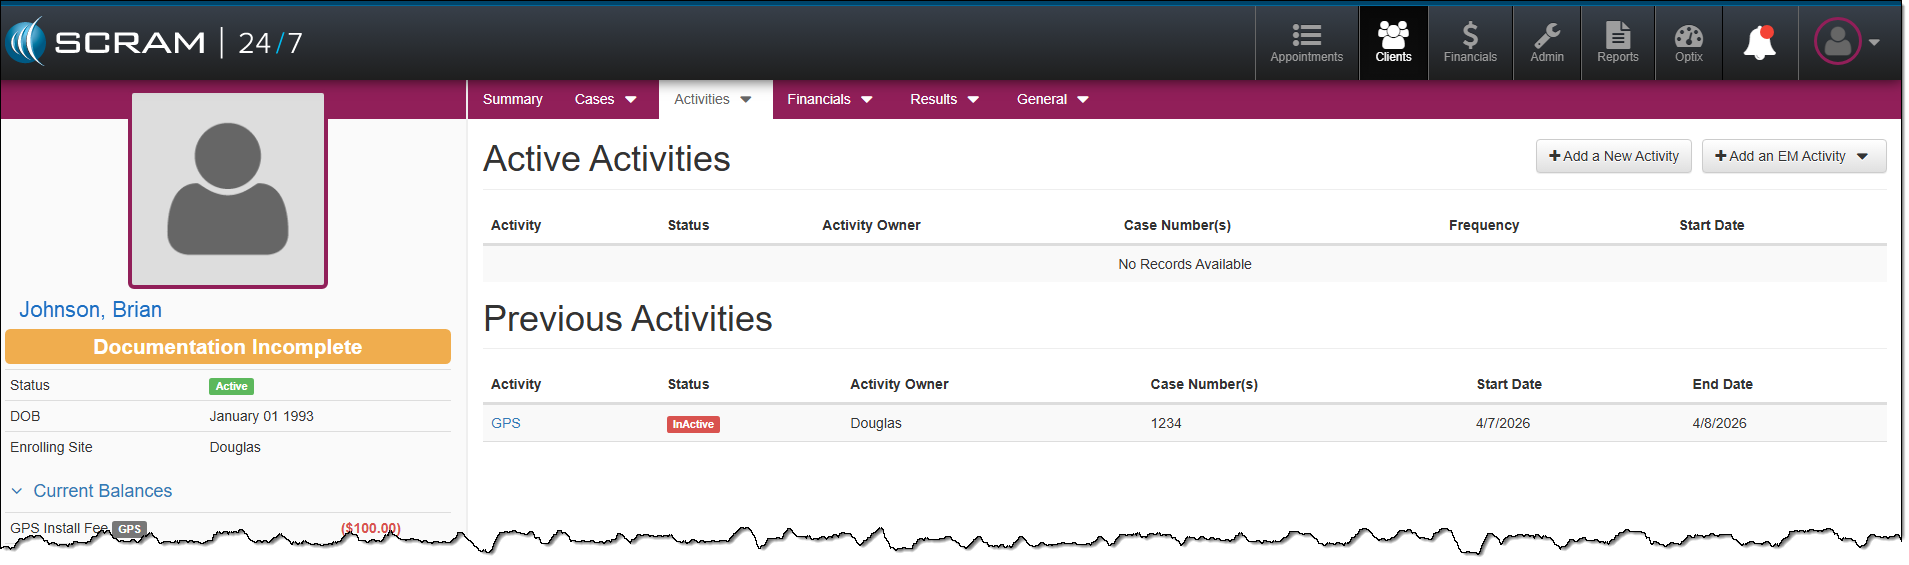
The Active Activities page now reflects the Inactive GPS Activity.
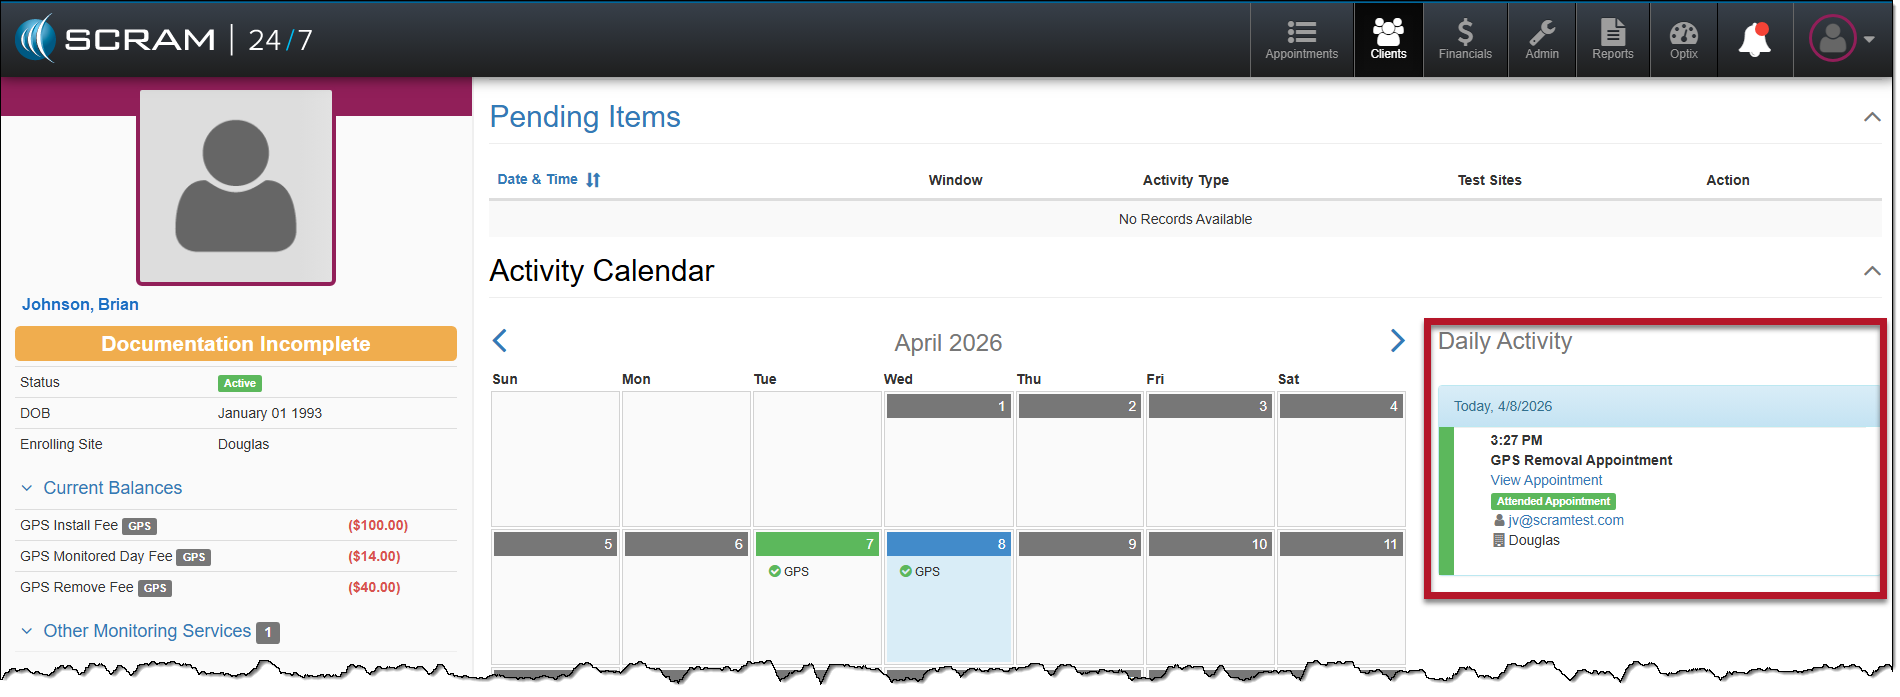
On the client’s Summary page, the Activity Calendar and Daily Activity stream will reflect a completed GPS Removal Appointment.
| Replace GPS Device To replace a GPS Bracelet
|
| In a future enhancement, you will be able to change the client’s username or email address for their TouchPoint Mobile application. For the time being, navigate to the client’s Optix TouchPoint profile to make any updates. |
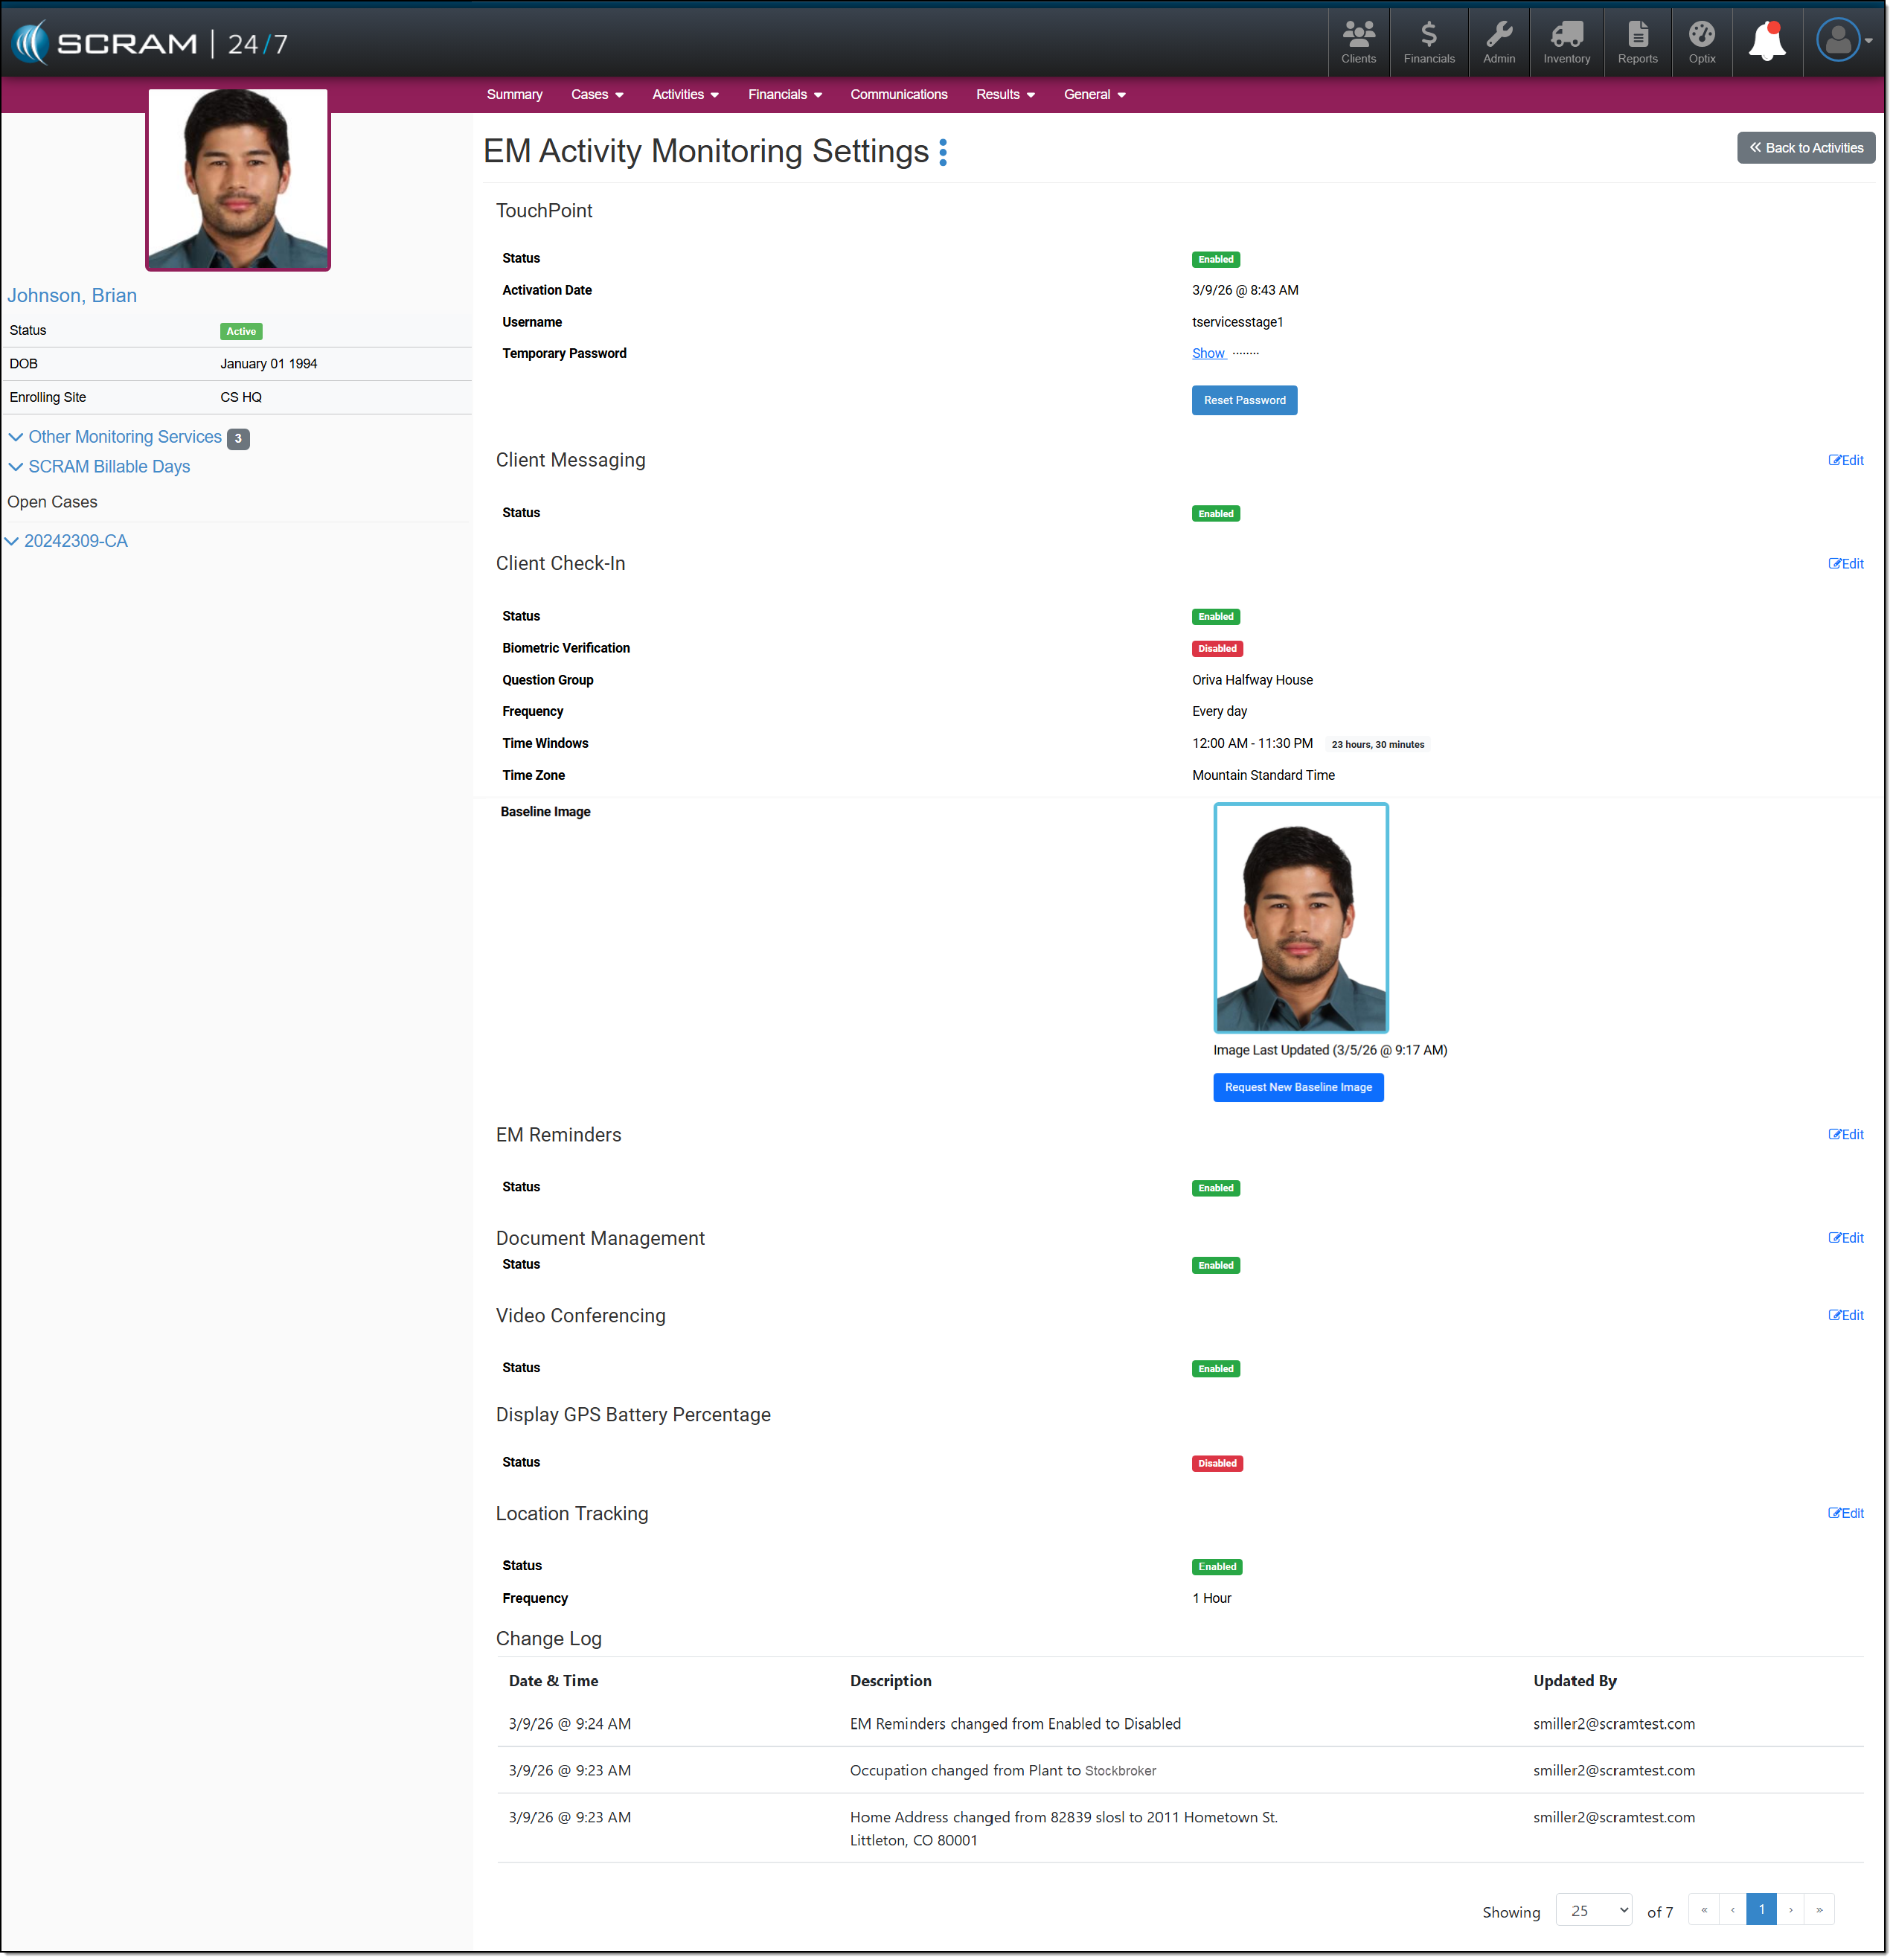
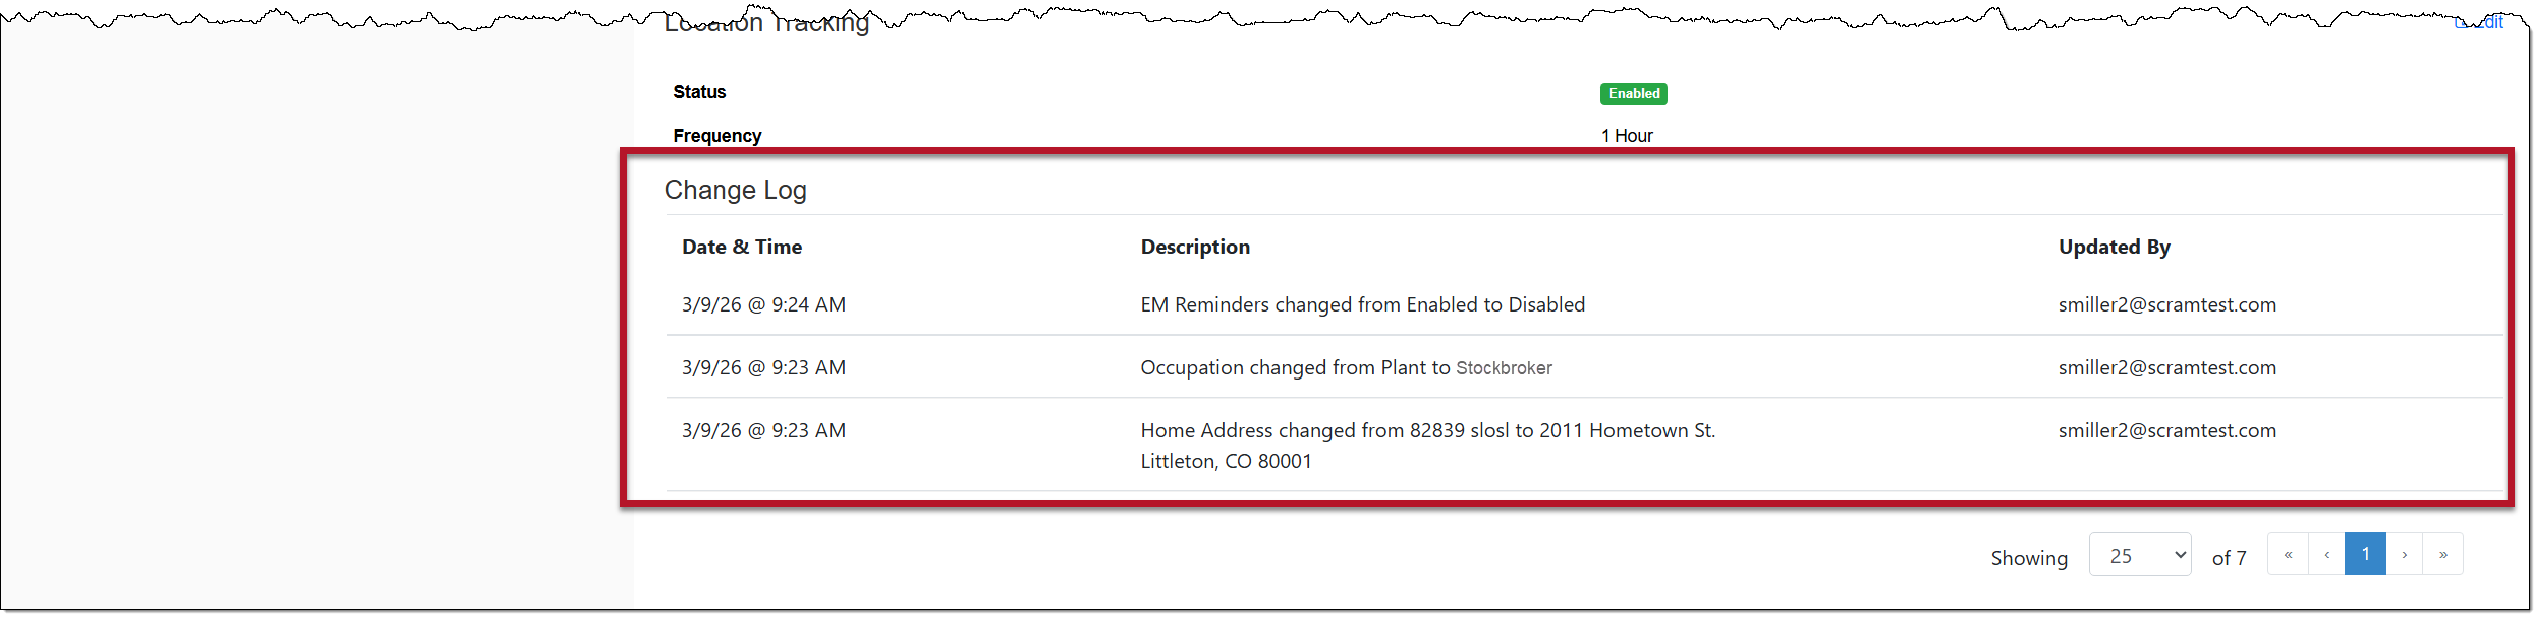
In addition to the TouchPoint services, the TouchPoint Change log history information will now be displayed on the TouchPoint Activity EM Activity Monitoring Settings page.
Offline Location Tracking
| Your account must be enabled for location tracking for these instructions to work. Contact your SCRAM Systems Account Representative if you are interested in activating this service. |
For clients who are enabled for the SCRAM TouchPoint Location Tracking service, their smartphone’s location data will be captured and stored during periods without network or internet connectivity. Once service is restored, the stored data will be transmitted to the system.
Here is how it works:
For this example, the client’s Location Tracking service is configured to collect location data every 5 minutes.
- View the Location Tracking Map by selecting the ellipsis next to the client’s name in the Other Monitoring Service, TouchPoint section.
- Select the Location Tracking Map option.
On the Location Tracking pop-up window:
When connectivity is available:
- The location points are plotted on the map.
- Each point is recorded as Successful.
- The Location Tracking pop-up window reflects normal communication.
When the connection is not available:
- The location table will indicate the last known location in bold.
- At the next location interval, in this case the 5-minute interval, the location table will display Connection Unavailable in red.
- Additionally, a red Location Failure heading is displayed at the top of the pop-up window, displaying the last communication date and time.
Once the connection is reestablished:
- The location data will automatically update on the map and on the location table.
- The “Connection Unavailable” message will no longer display in bold or in red.
- A “Connection Restored” message will appear bolded and in green on the location table with the date and time stamp of when communication was restored.
| Status Updates: Location Tracking status updates are tied to the client’s configured frequency. For example, location information is gathered and communicated every 5, 10, 15, 30, and 60 minutes. Any change in connectivity or location status will only be displayed at the sent interval. |
Loss of Connectivity During Pursuit Mode
During the 15-minute Pursuit mode window, if connectivity is lost, the location table will display “Connection Unavailable,” and the red failure banner will display in the Location Tracking pop-up window.
If the device reconnects during the 15-minute Pursuit Mode window, location collection will resume automatically and continue at one-minute intervals for the remainder of the session.
On February 4, 2026, SCRAM Systems will release an update that allows providers to control whether the GPS battery level is visible to clients in the TouchPoint Mobile app. This setting can be managed in SCRAM Optix or 24×7.
Enable the Display GPS Battery Level Setting in Optix
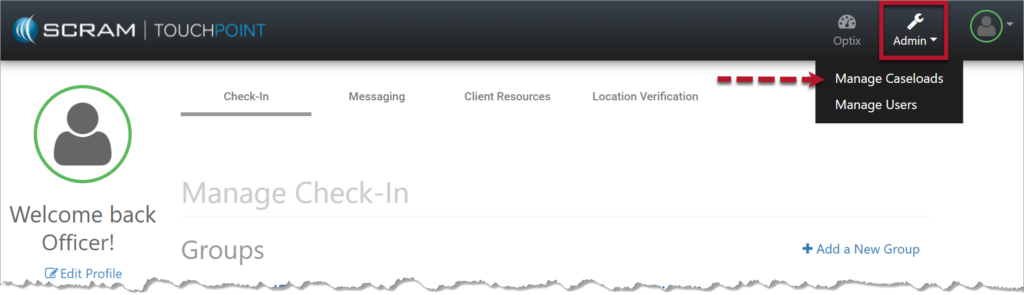
- In Optix, navigate to TouchPoint.
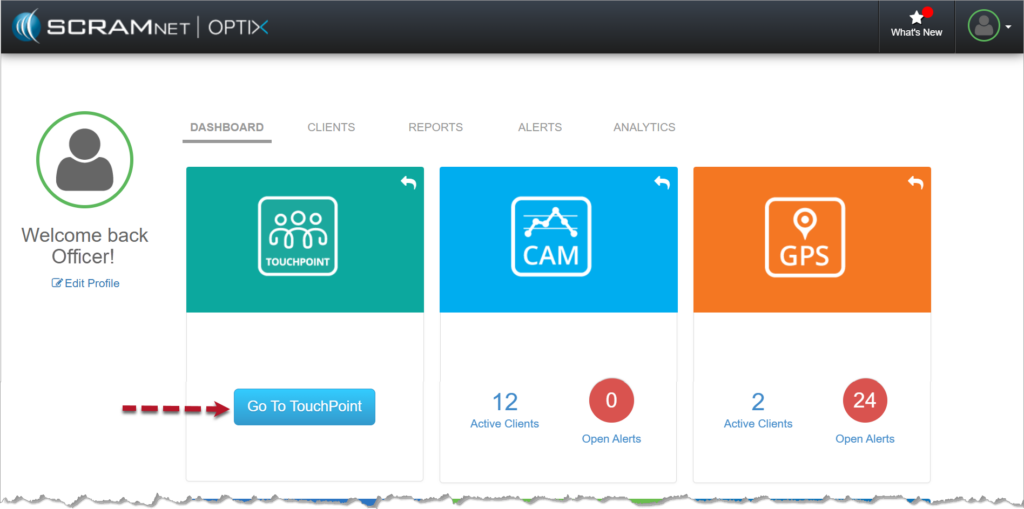
- Select the Admin tab from the top toolbar and then the Manage Caseloads option.
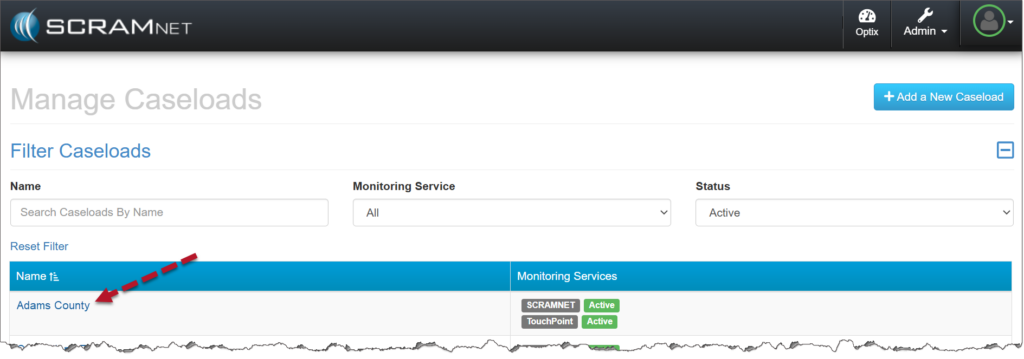
- Select the caseload.
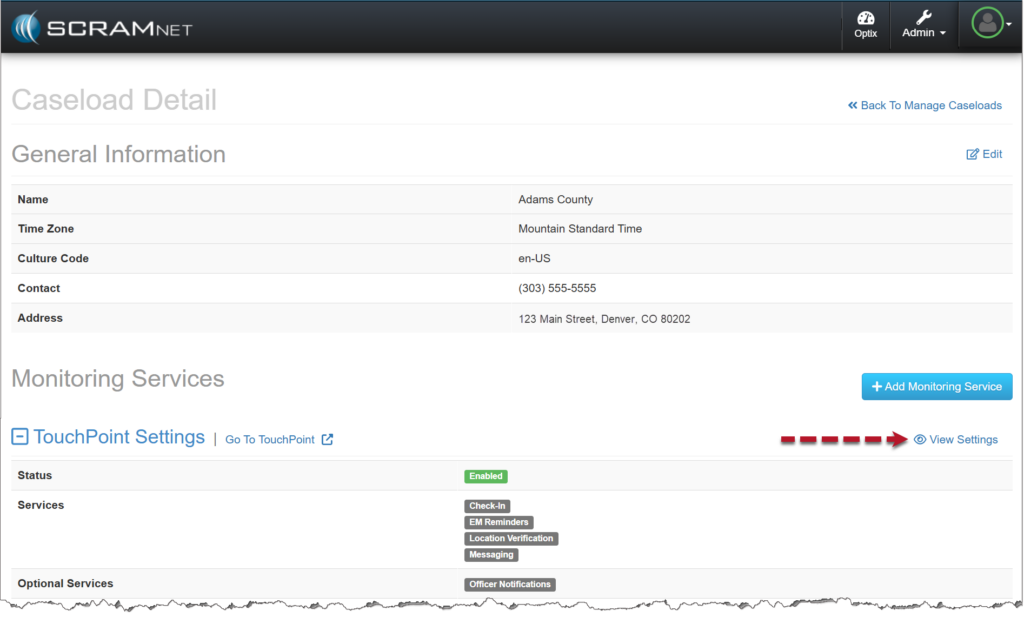
- From the Caseload Detail page, select the View Settings hyperlink.
- Select the Edit hyperlink.
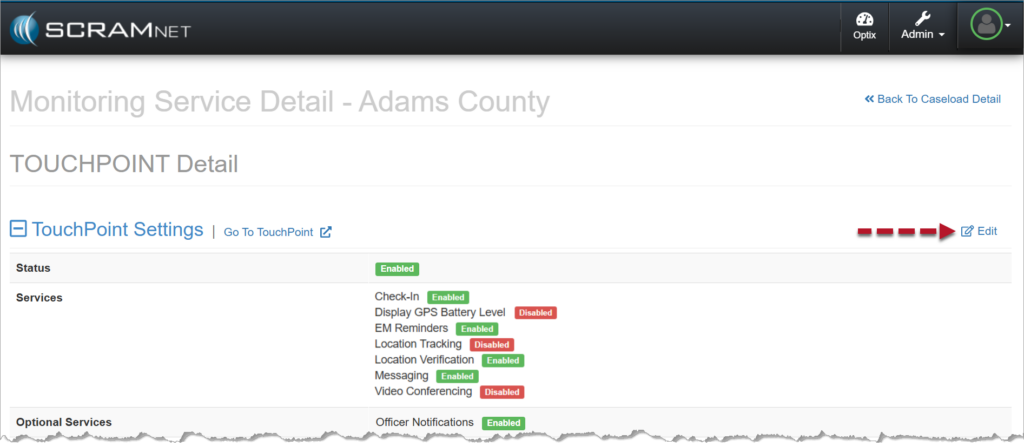
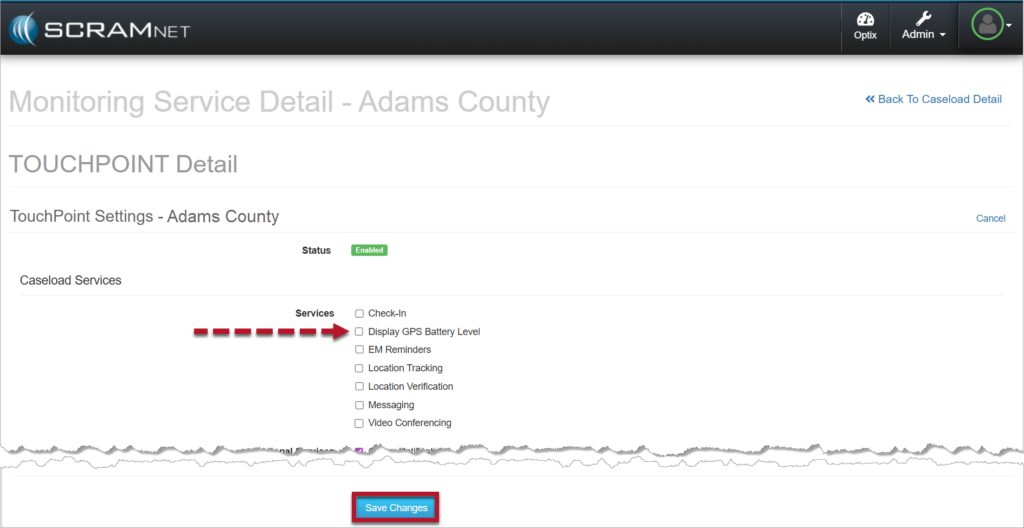
- Select the checkbox next to Display GPS Battery Level.
- Save your changes.
Once saved:
- The setting will appear as Enabled under TouchPoint Settings on the TouchPoint Detail page for the caseload.
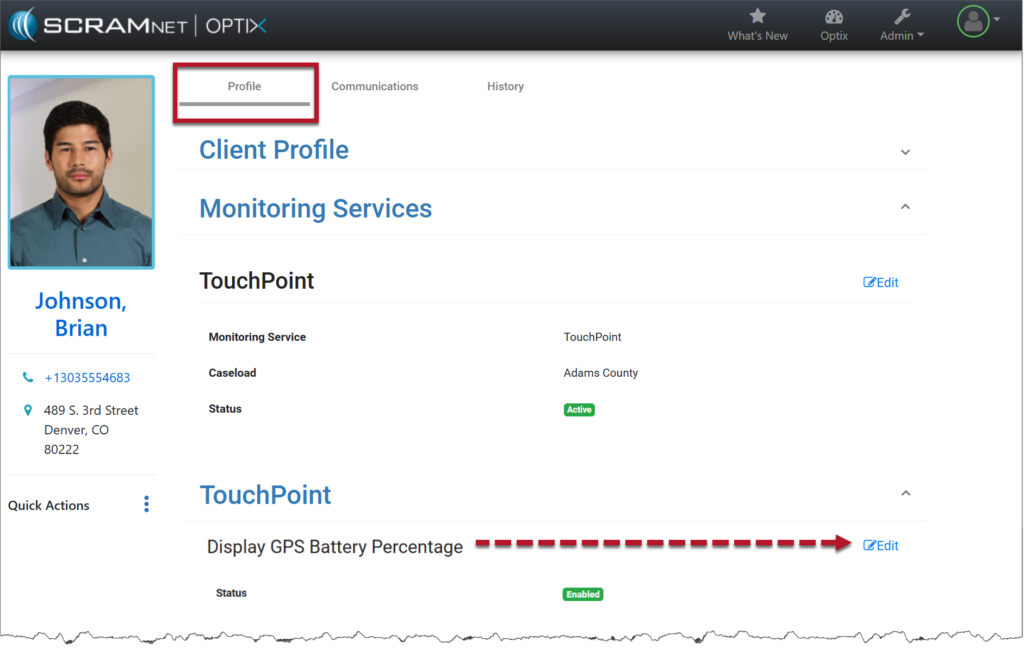
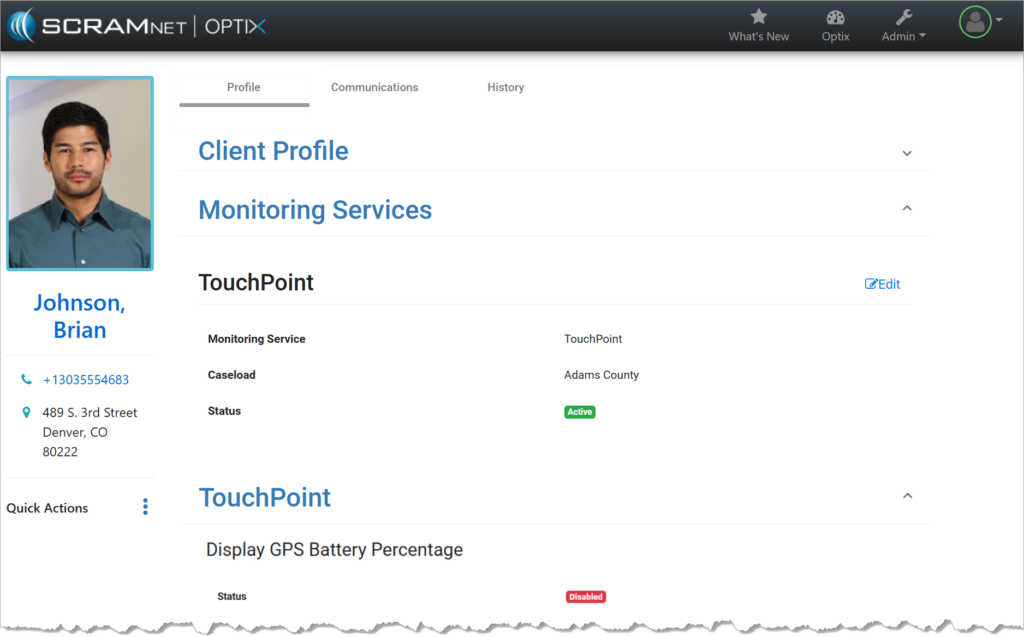
- The Display GPS Battery Percentage option will be visible on the client’s Profile page in Optix.
- Enable the Display GPS Battery Percentage service for the client:
- Select the Edit hyperlink on the client’s Profile page.
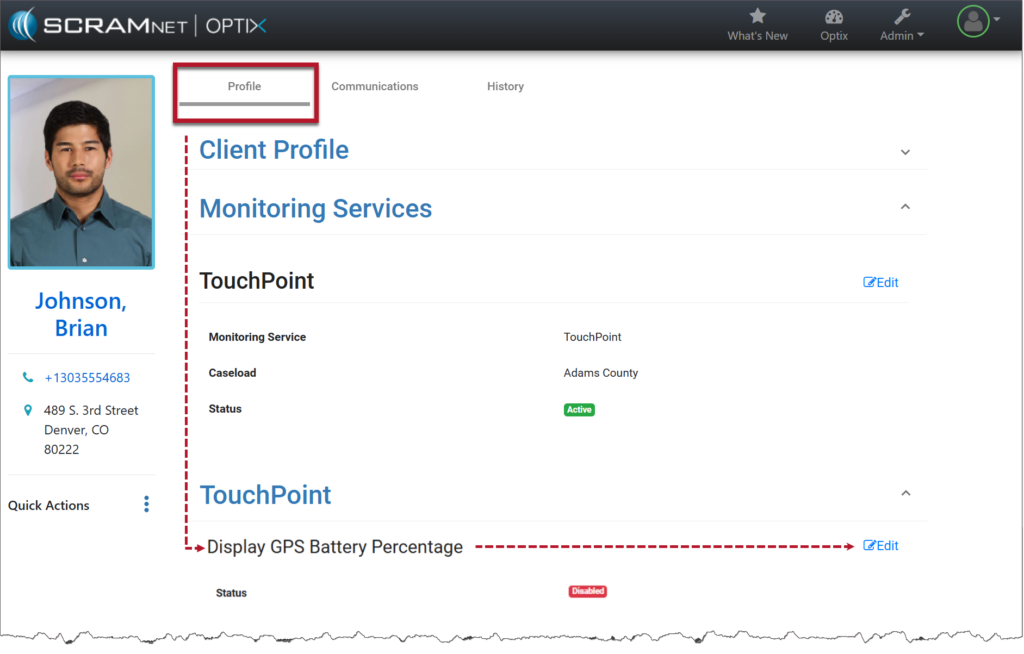
- Change the Status from Disabled to Enabled.
- Save your changes.

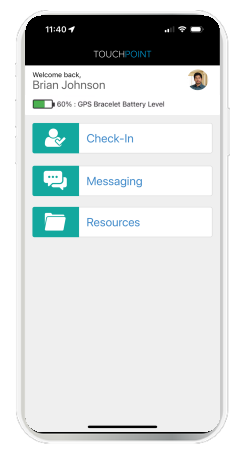
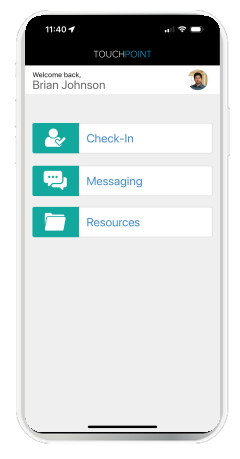
The client’s last reported SCRAM GPS bracelet’s battery level is displayed at the top of the home screen within the TouchPoint mobile application.
Important Notes:
|
Disable the Display GPS Battery Level Setting Once Enabled in Optix
- From the client’s Profile page, select the Edit hyperlink next to Display GPS Battery Percentage.
- Toggle the status to Disabled and select the Save Changes button.

- The Display GPS Battery Percentage setting has been disabled for the client.
- The SCRAM GPS bracelet’s battery level is no longer displayed at the top of the home screen within the TouchPoint Mobile application.
Enable the Display GPS Battery Level Setting for a SCRAM 24×7 Client
After adding a GPS Activity to a client, you may also add a TouchPoint Activity and enable the GPS Battery Level feature from within SCRAM 24/7.
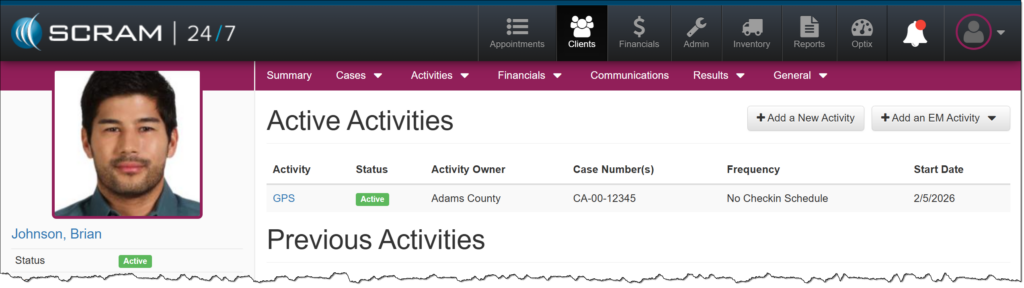
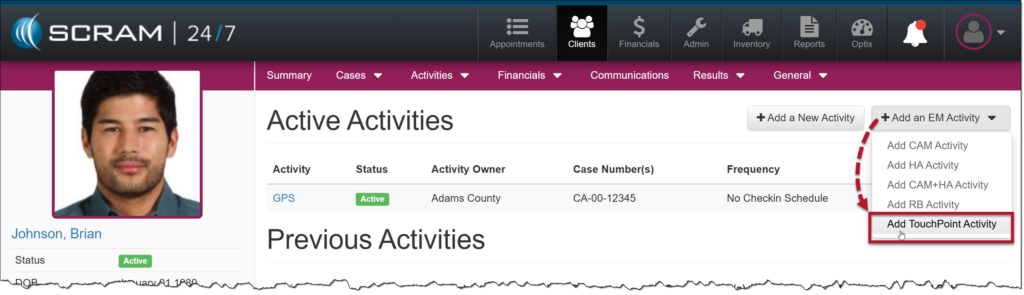
On the client’s Activities page:
- Open the +Add an EM Activity dropdown menu, and then select the Add TouchPoint Activity option.
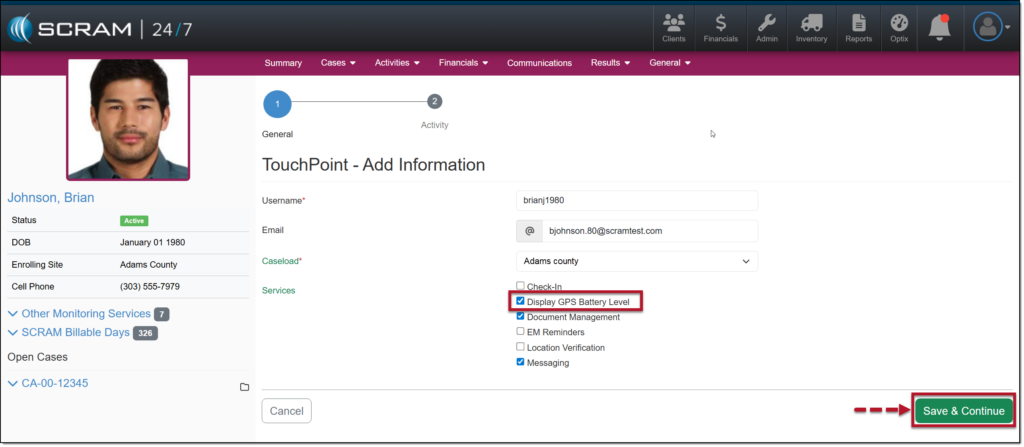
- On the TouchPoint – Add Information page, enter the TouchPoint details. This includes the client’s username for the mobile application, email address, and TouchPoint Caseload.
- Select the checkbox next to each TouchPoint service the client will be utilizing. To display the client’s GPS battery voltage in the mobile application, select the checkbox next to the Display GPS Battery Level option.
- Once you have made your selections, select the Save & Continue button.
| When adding a TouchPoint Activity, the services and features available to select on dependent on the TouchPoint Caseload selected. |
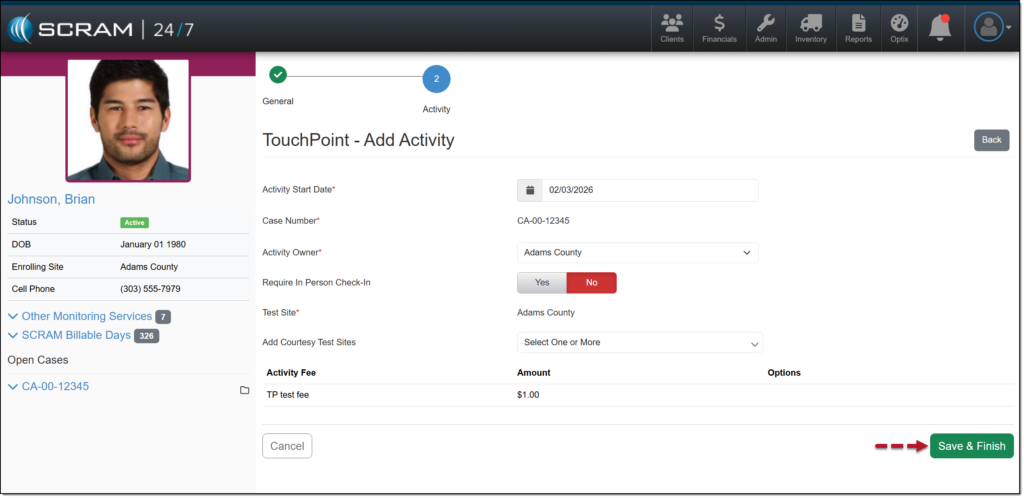
- Add the Activity Start Date and any additional monitoring requirements, and then select the Save & Finish button.
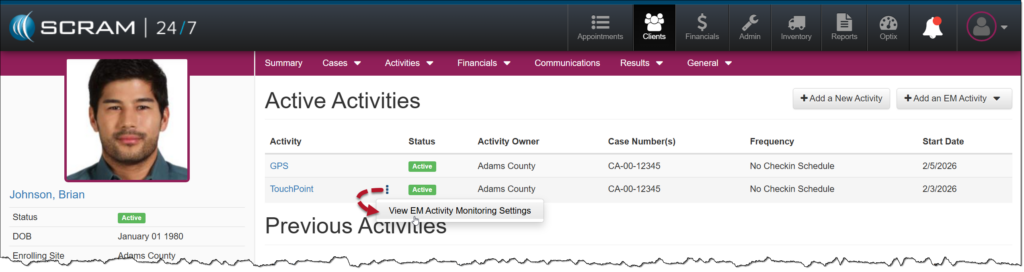
The TouchPoint Activity is now displayed on the client’s Activity page.
To view or edit the TouchPoint settings, select the ellipsis, and then the View EM Activity Monitoring Settings option.
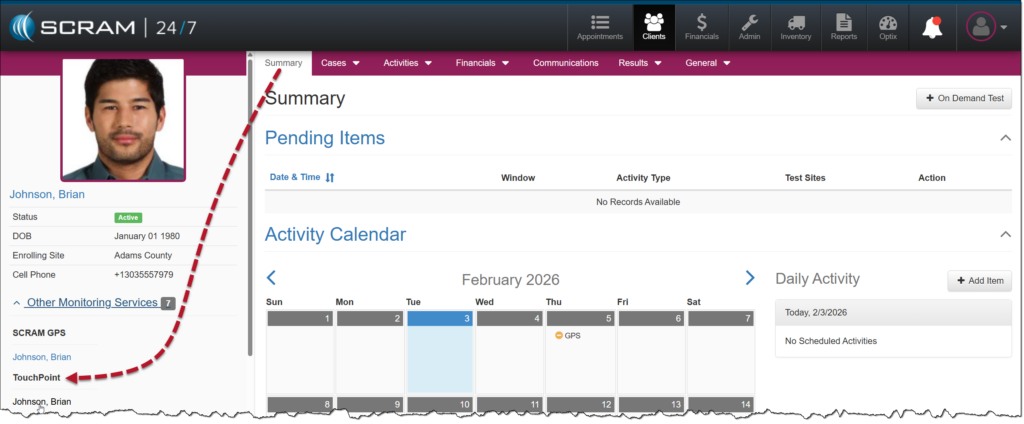
Or, you may navigate to the client’s TouchPoint Profile page in Optix by selecting their name hyperlink in the Other Monitoring Services section on the Summary page.
| The Display GPS Battery Level option is only editable after a GPS device has been assigned to the client. |
On January 28, 2026, SCRAM Systems will release multiple enhancements for your SCRAM 24/7 Client Caseload.
These enhancements are:
- Consolidate Topic-Driven Client Tabs
- Activity Type Menu Options Update
- Activity Electronic Monitoring (EM) Monitoring Settings
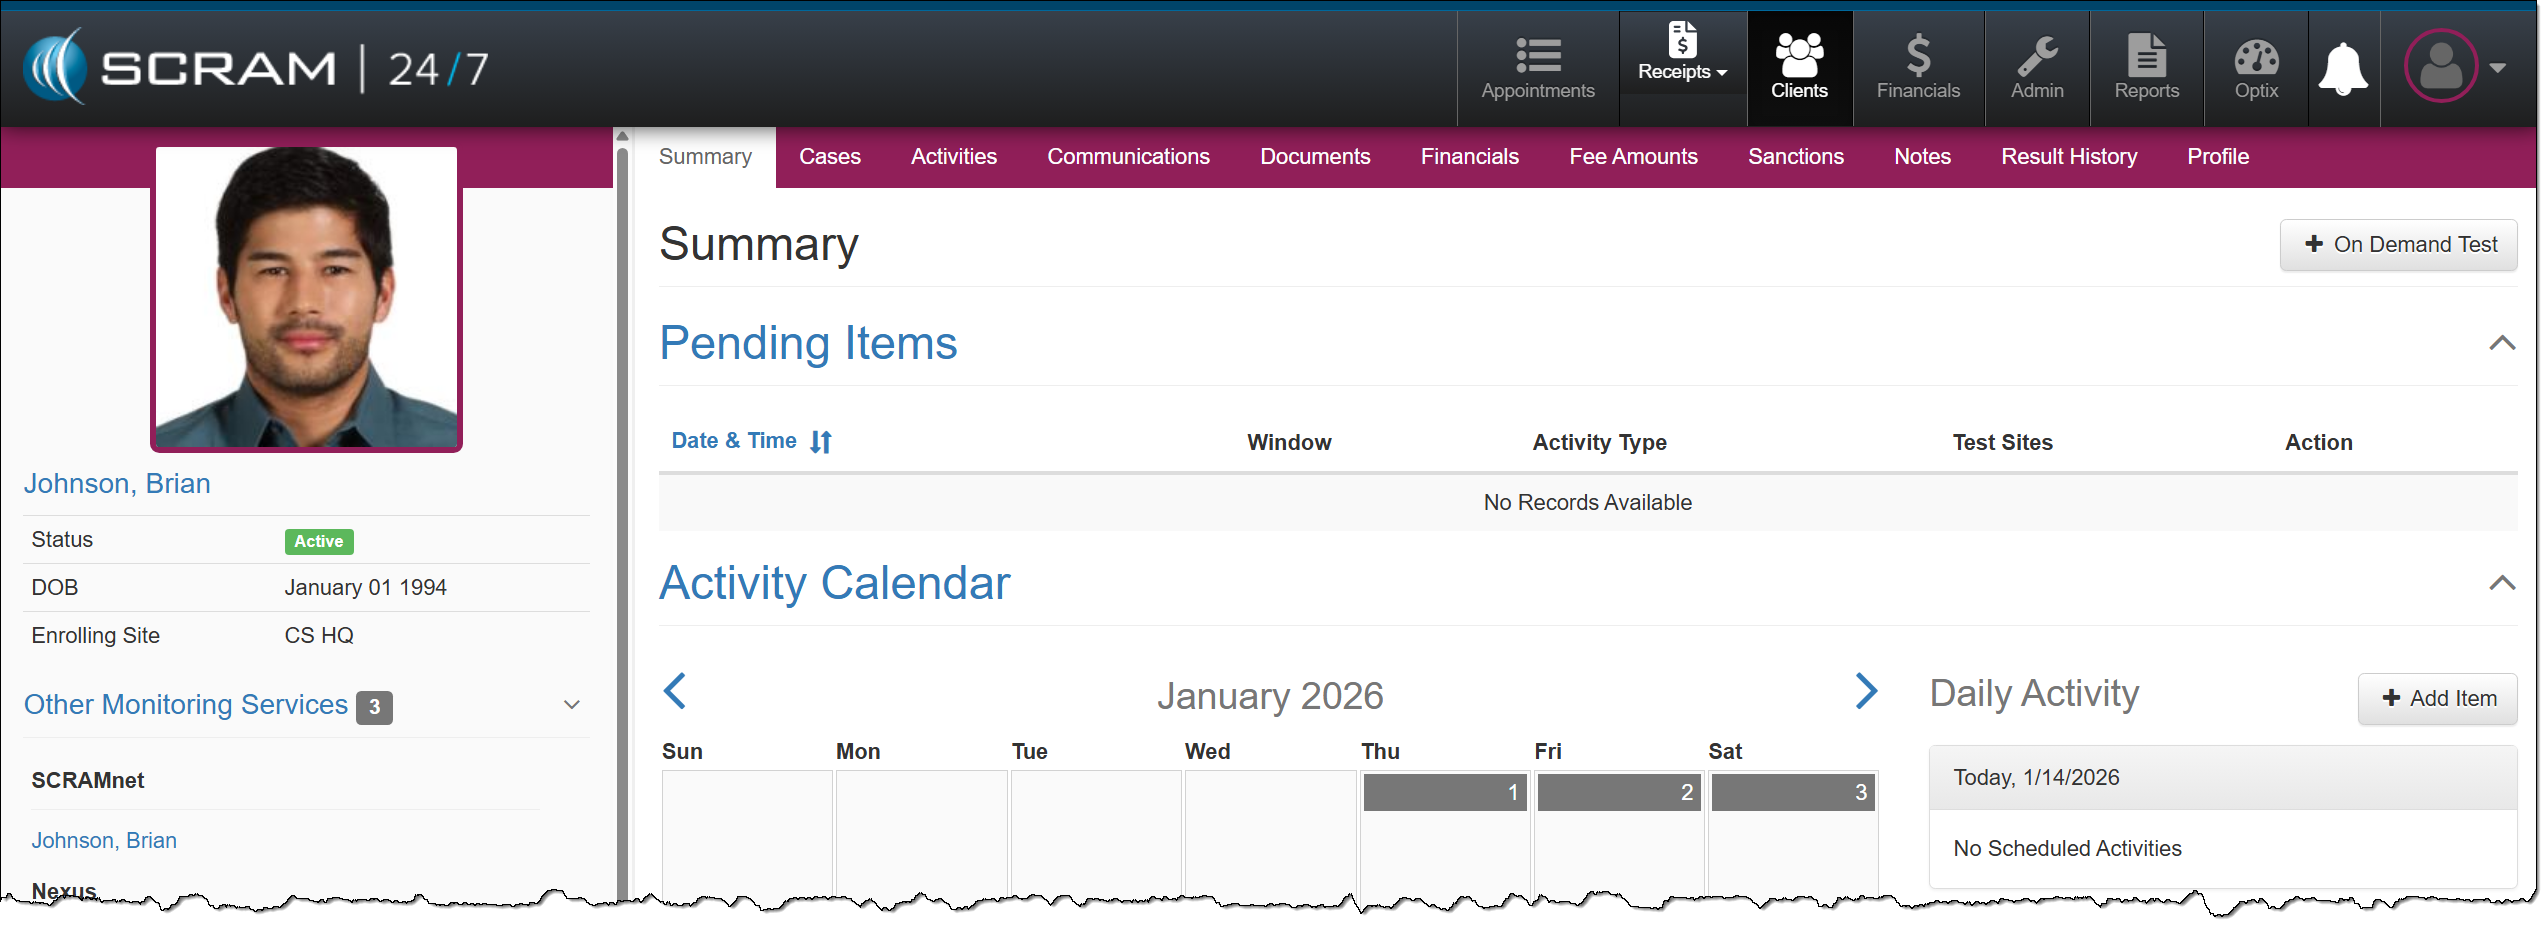
Topic Driven Client Tabs
To accommodate future enhancements and provide an efficient user experience, the tabs used to view and access client information and tasks have been consolidated into topic-driven navigation tabs that include dropdown menus.
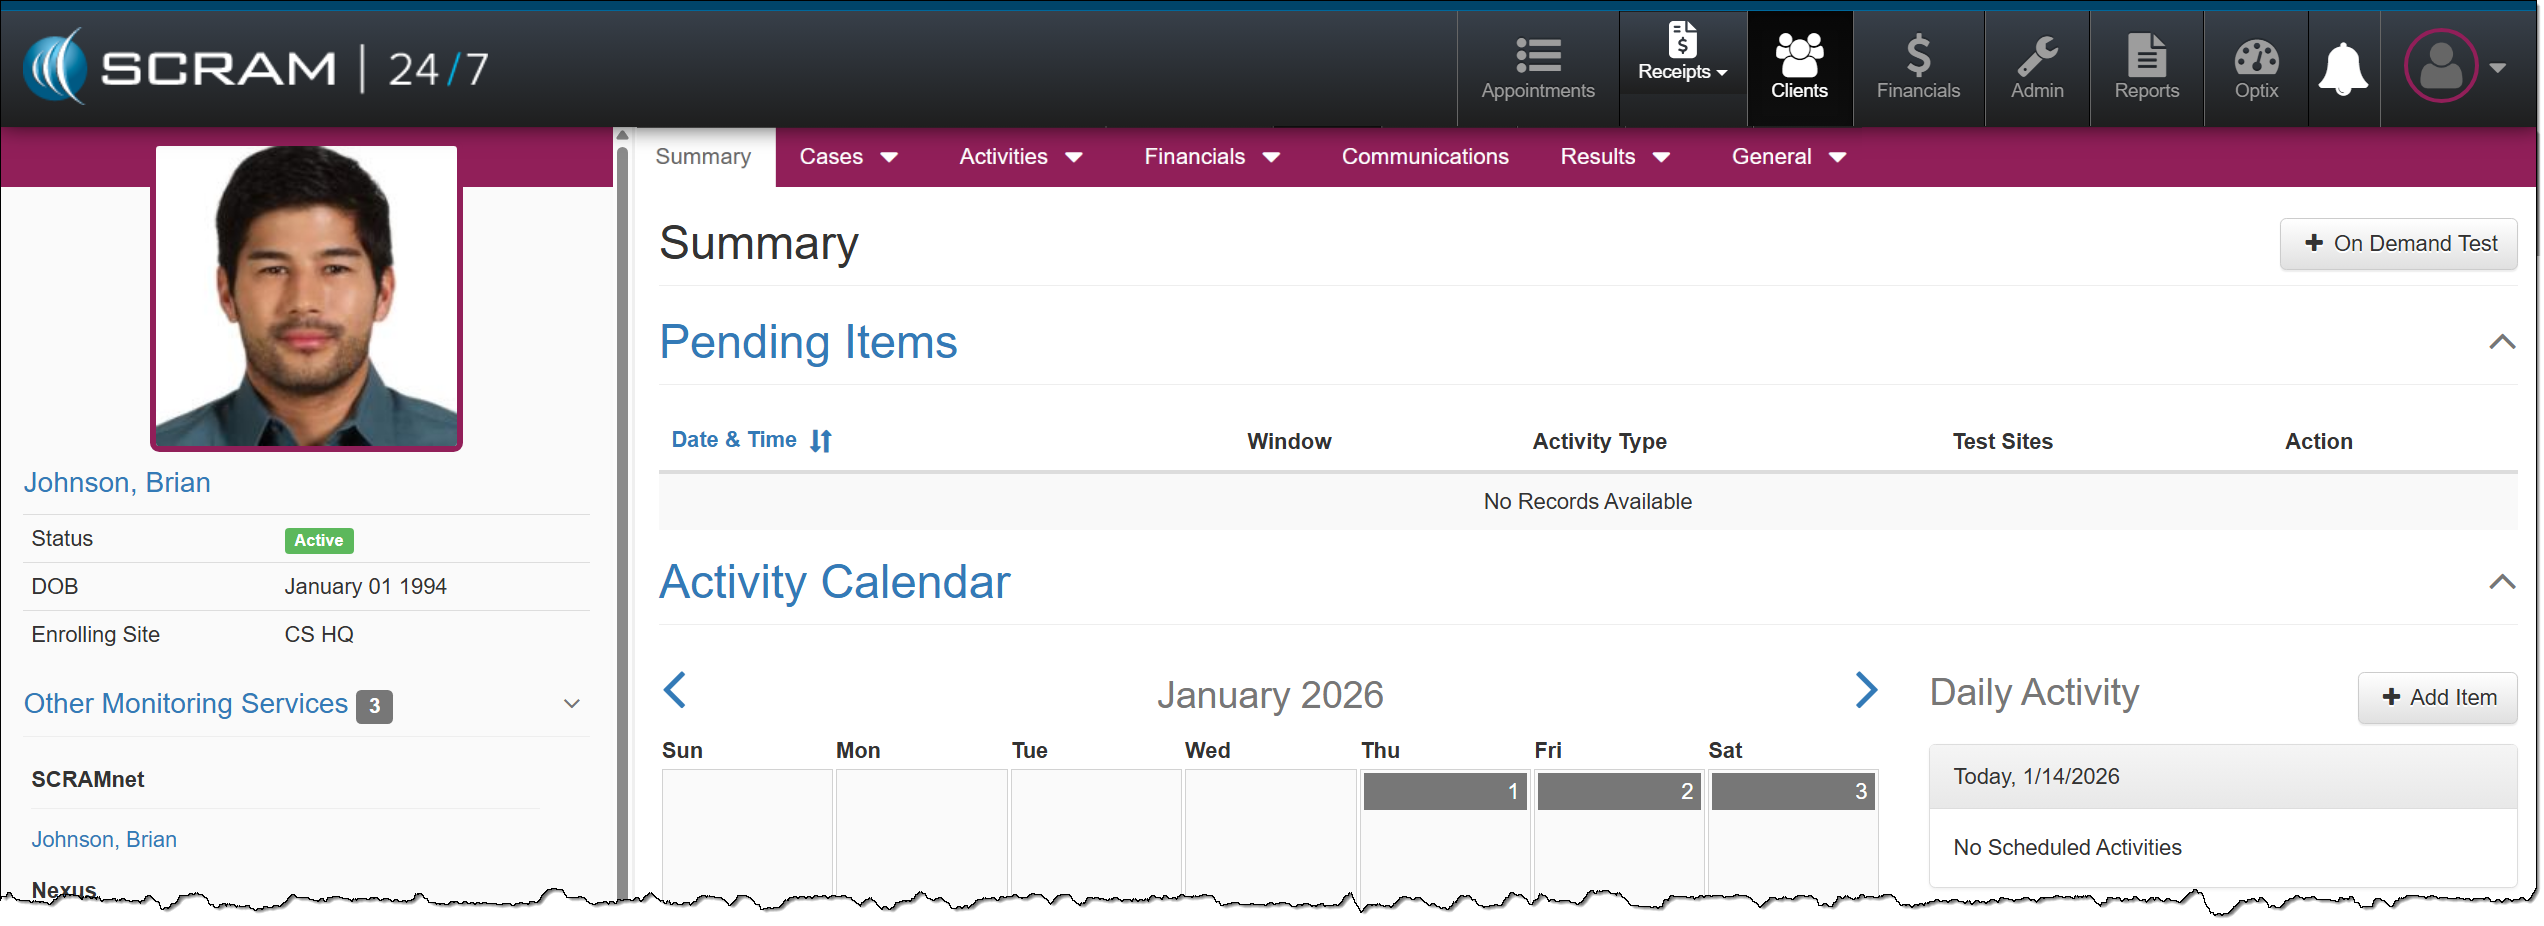
The Cases tab dropdown menu includes access to the client’s:
- Cases
- Add Case*
The Activities tab dropdown menu includes access to the client’s:
- Activities
- Add Activity
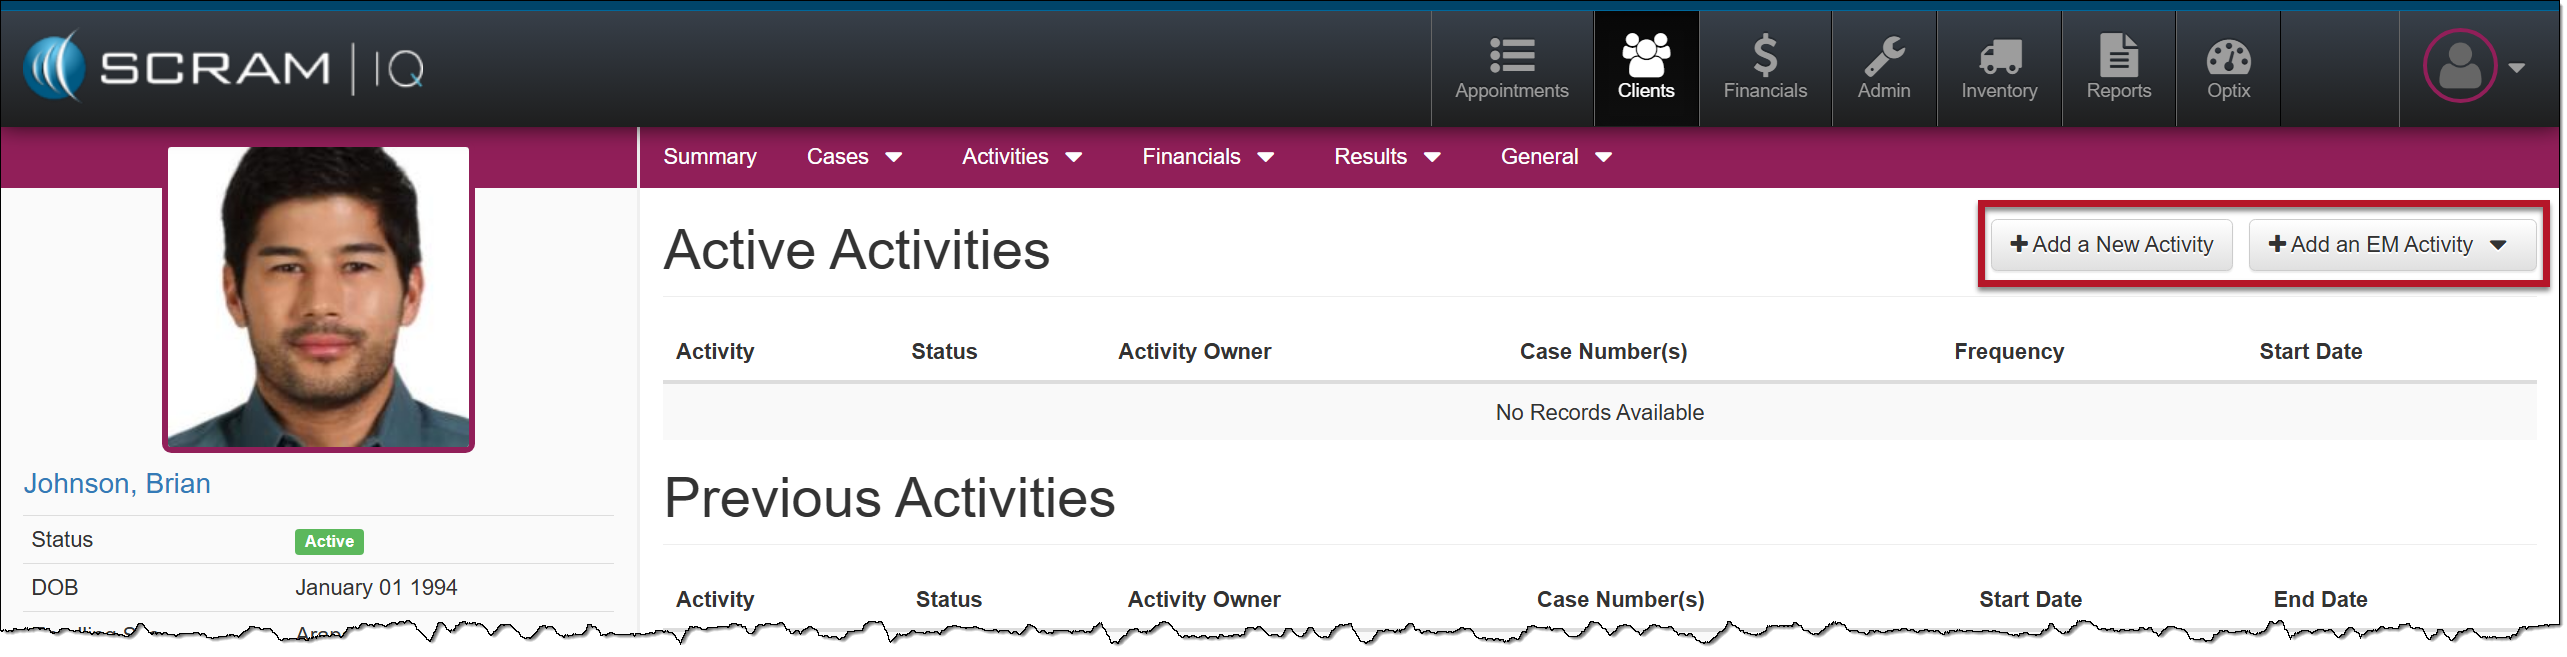
- Add an EM Activity**
The Financials tab dropdown menu includes access to:
- Client Financials
- Fee Amounts
The Results tab dropdown menu includes access to the client’s:
- Result History
- Sanctions
The General tab dropdown menu includes access to the client’s:
- Profile
- Documents
- Notes
- Add Notes*
*New direct access to specific tasks.
Activities Option
There are two additional options available on the Activities tab dropdown menu: Add Activity and Add an EM Activity. These two options separate the EM-related activities from the non-EM-related activities.
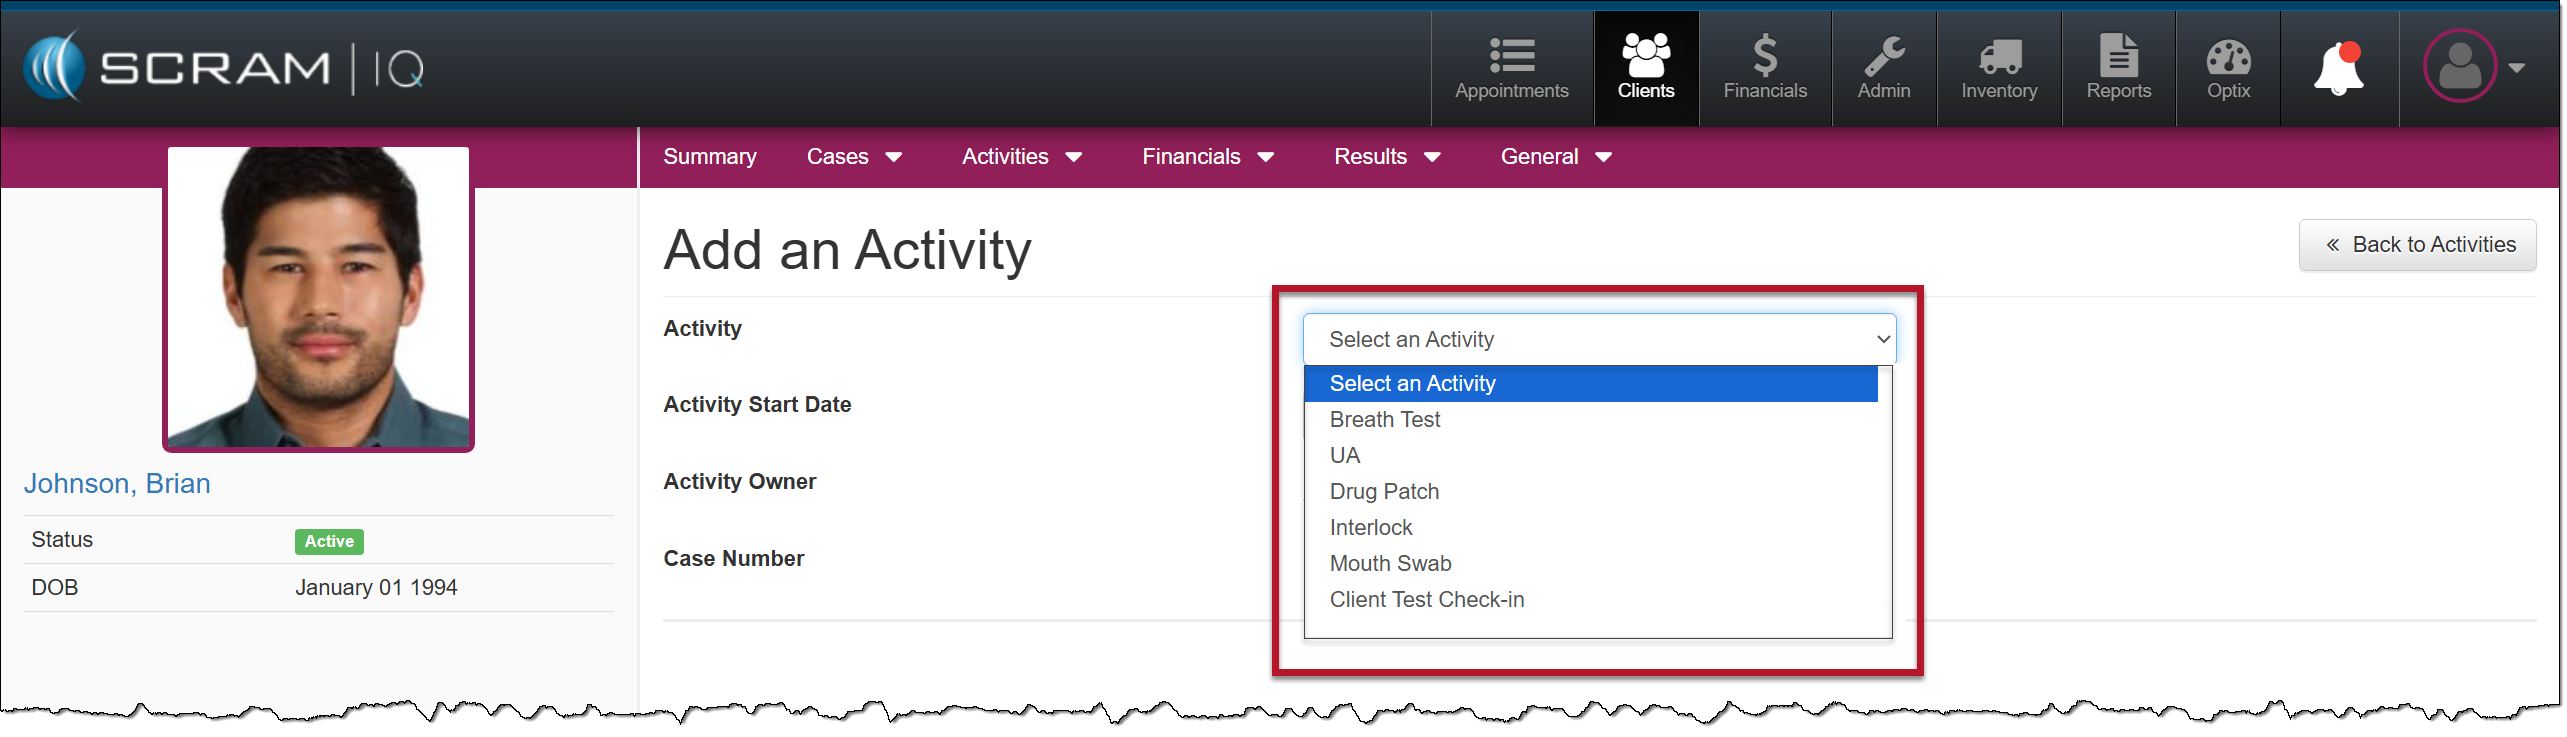
The client’s Activities page will also reflect EM-related activities from the non-EM-related activities.
| Tip: The available Activity options will reflect the activities currently active in your program and the EM Activities you have access to. Additionally, if an Activity is currently active for the client, that option will NOT appear in the dropdown menu. |
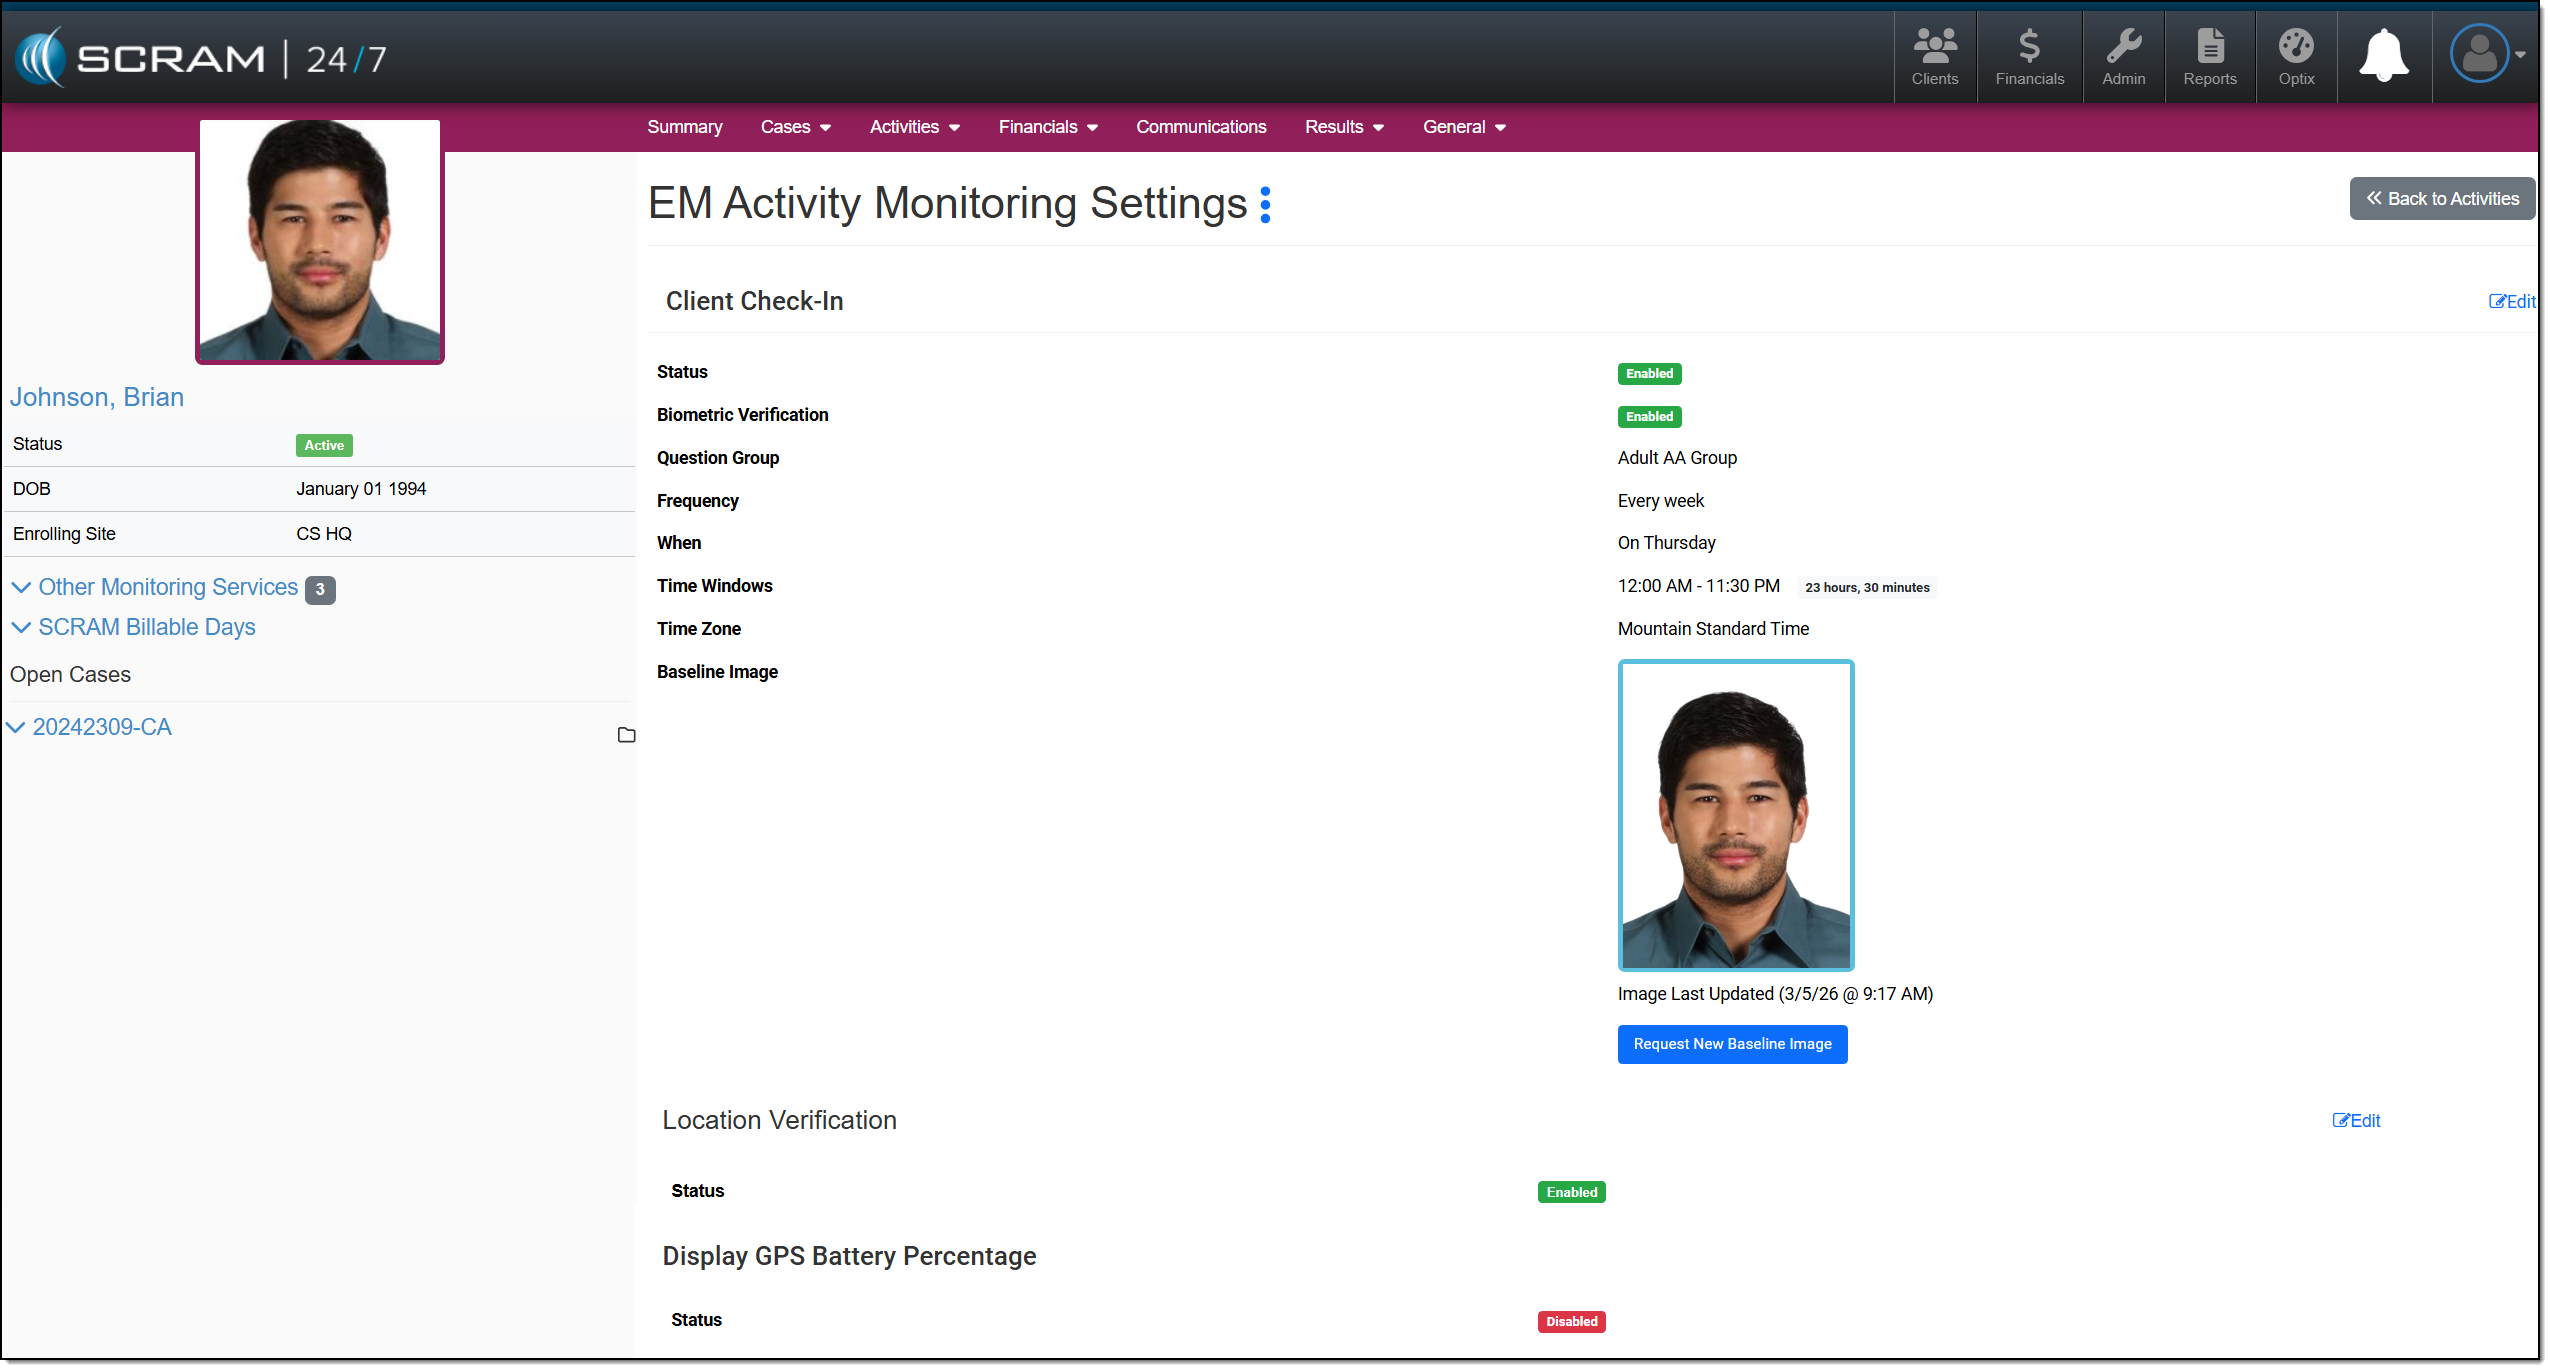
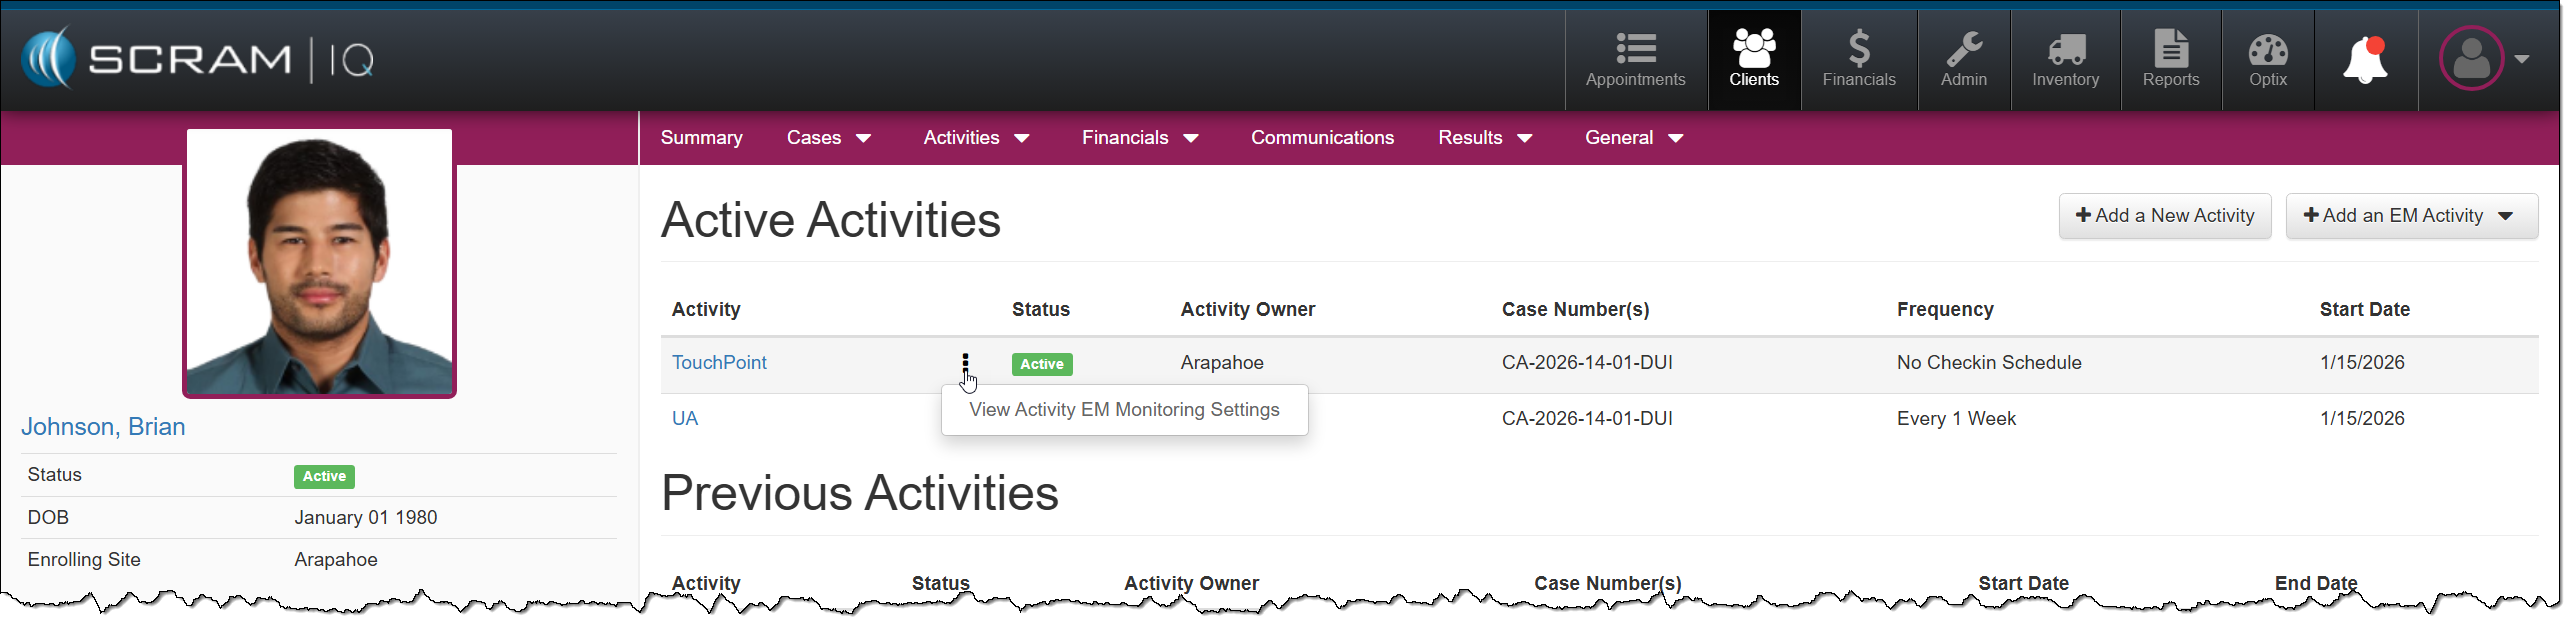
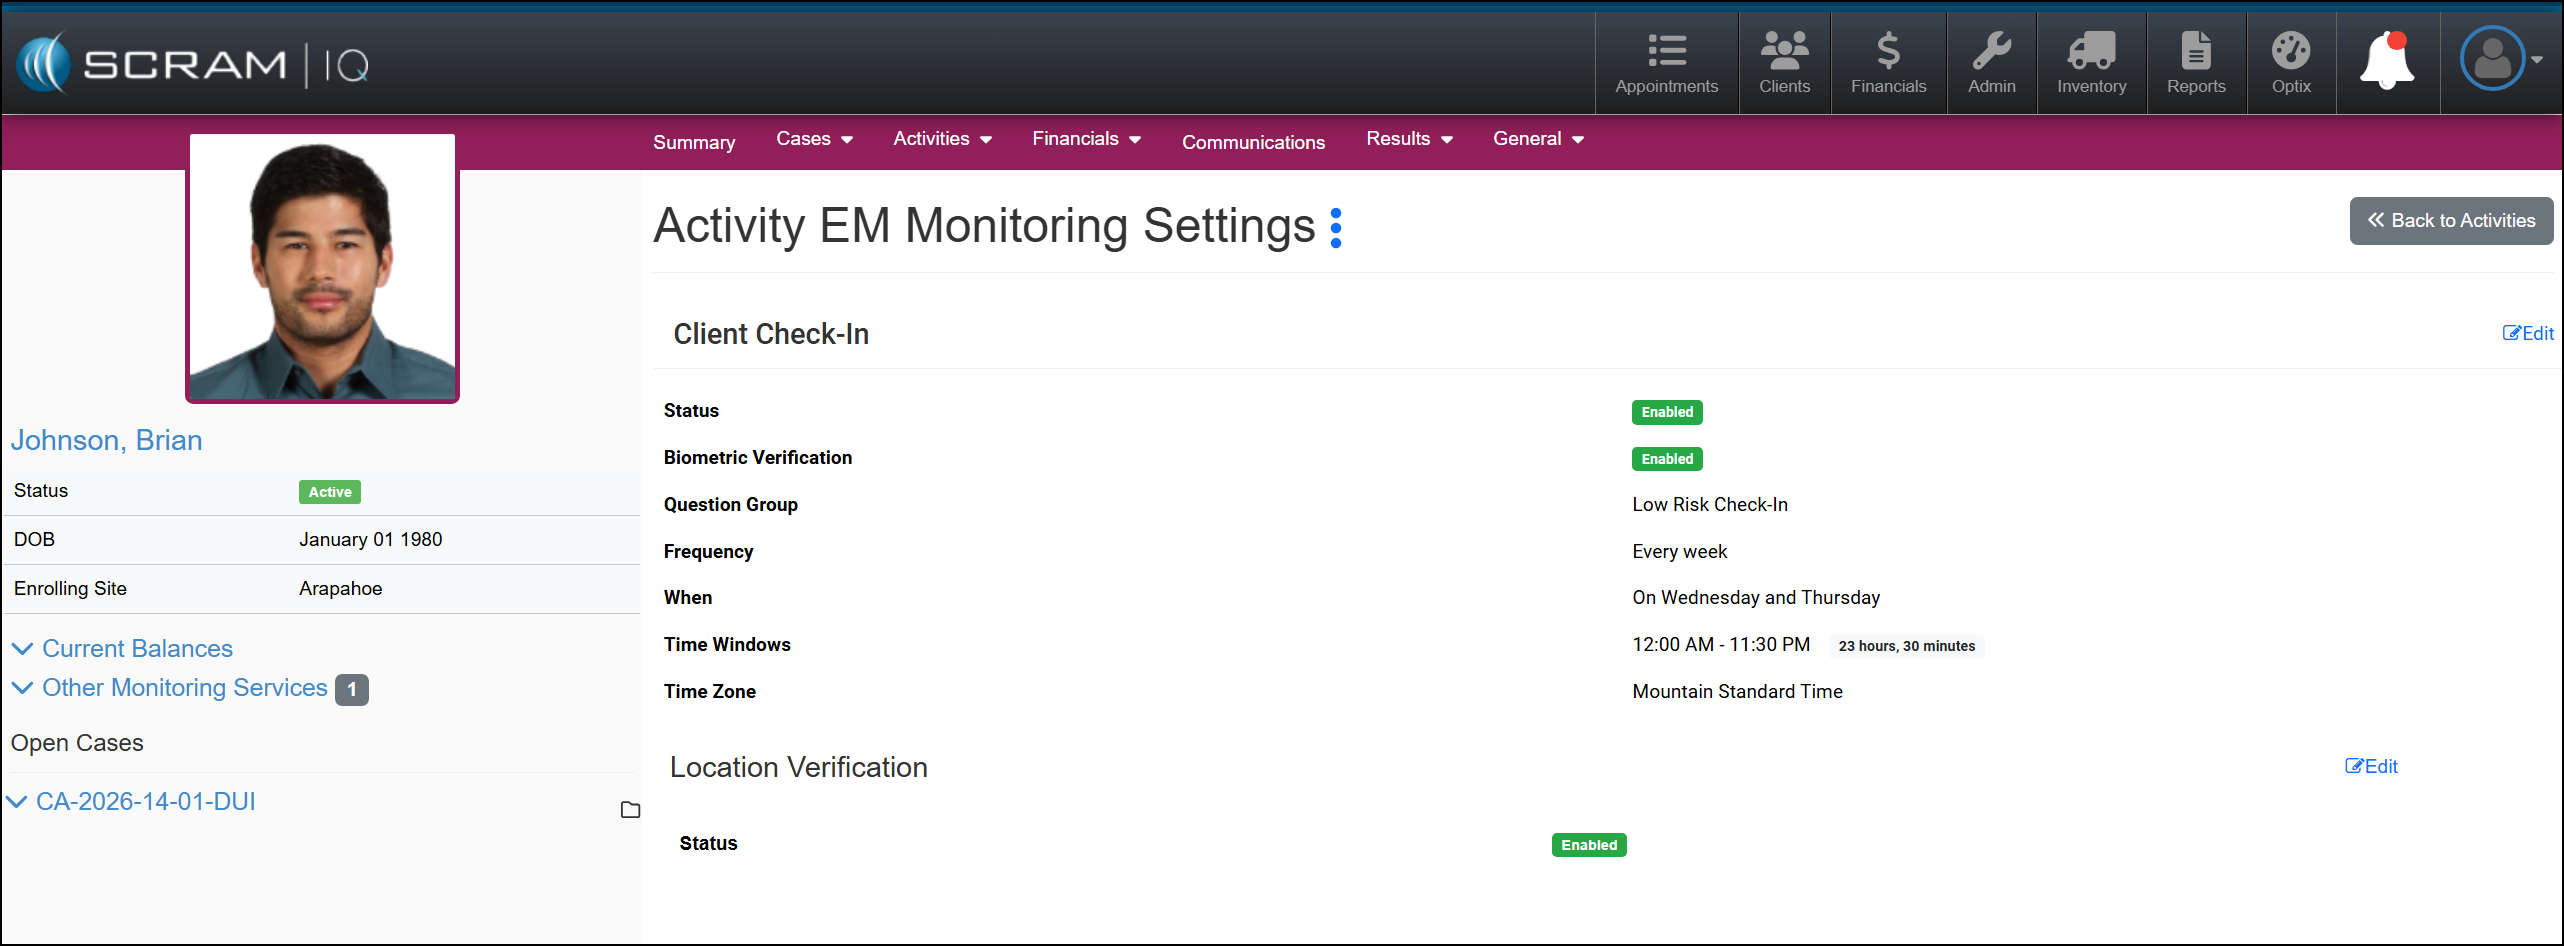
Monitoring Settings for an Electronic Monitoring (EM) Activity
Once an EM Activity is active for a client, you may view their EM Monitoring Settings by selecting the ellipsis next to the Activity on the Active Activities page or the Activity Details page and then the View Activity EM Monitoring Settings option.
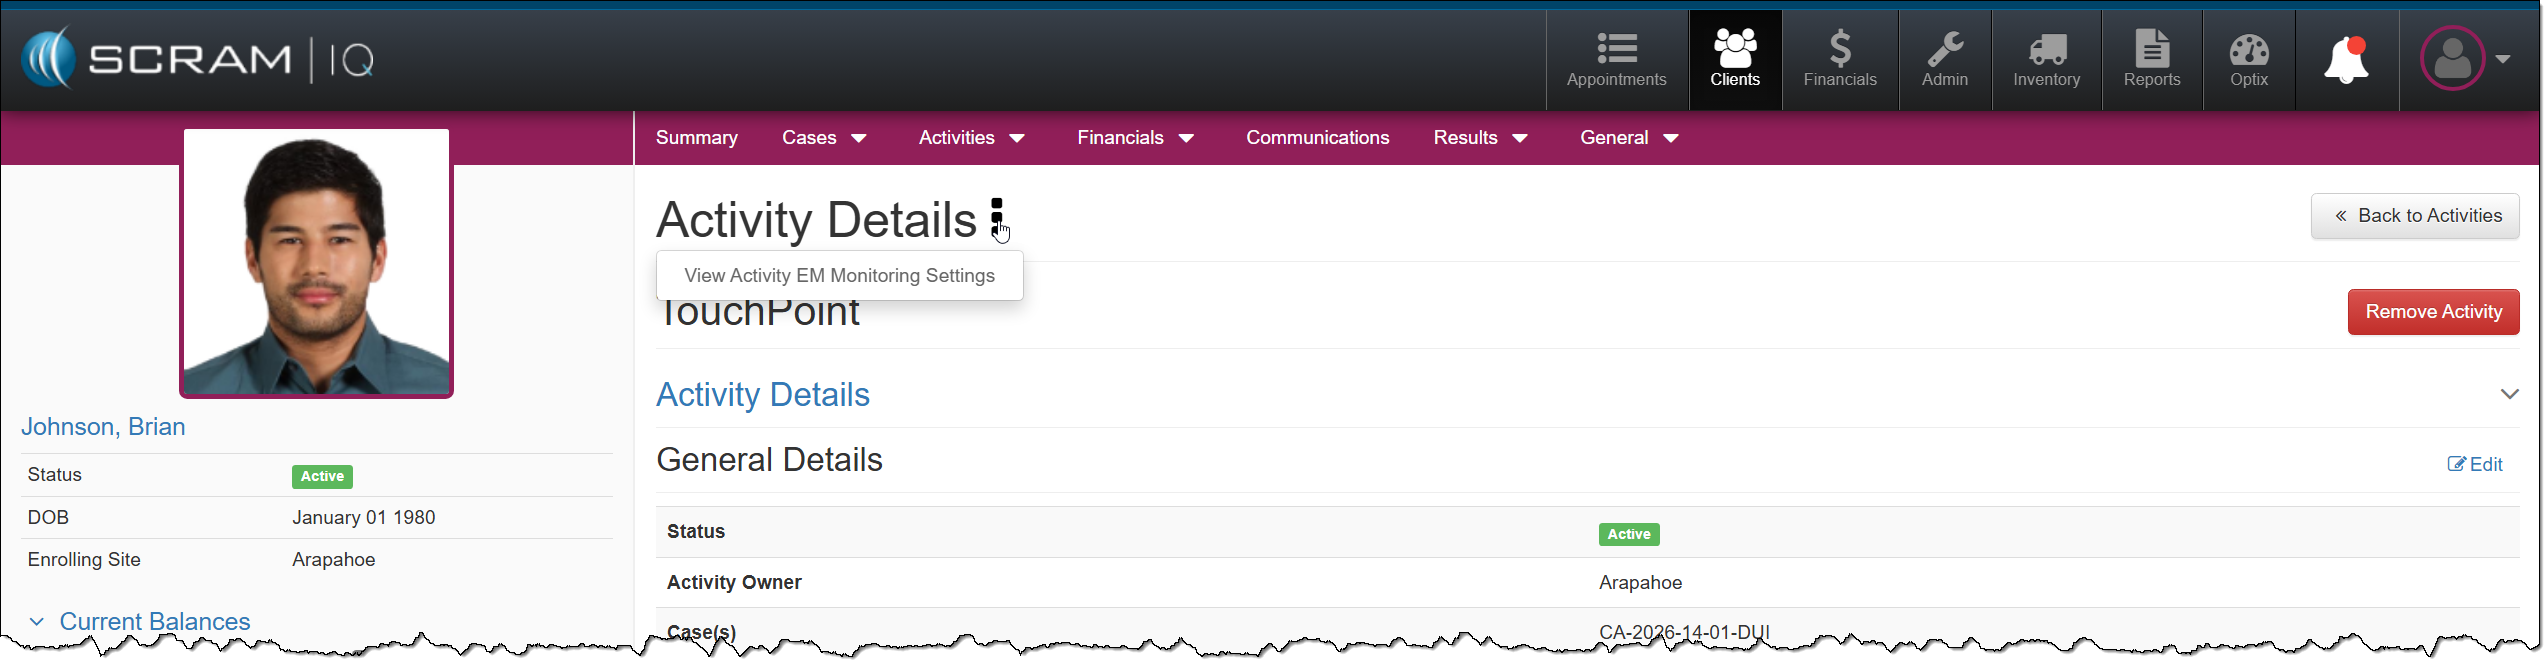
On the Activity EM Monitoring Settings page, you can view the current settings or select the Edit hyperlink to modify them.
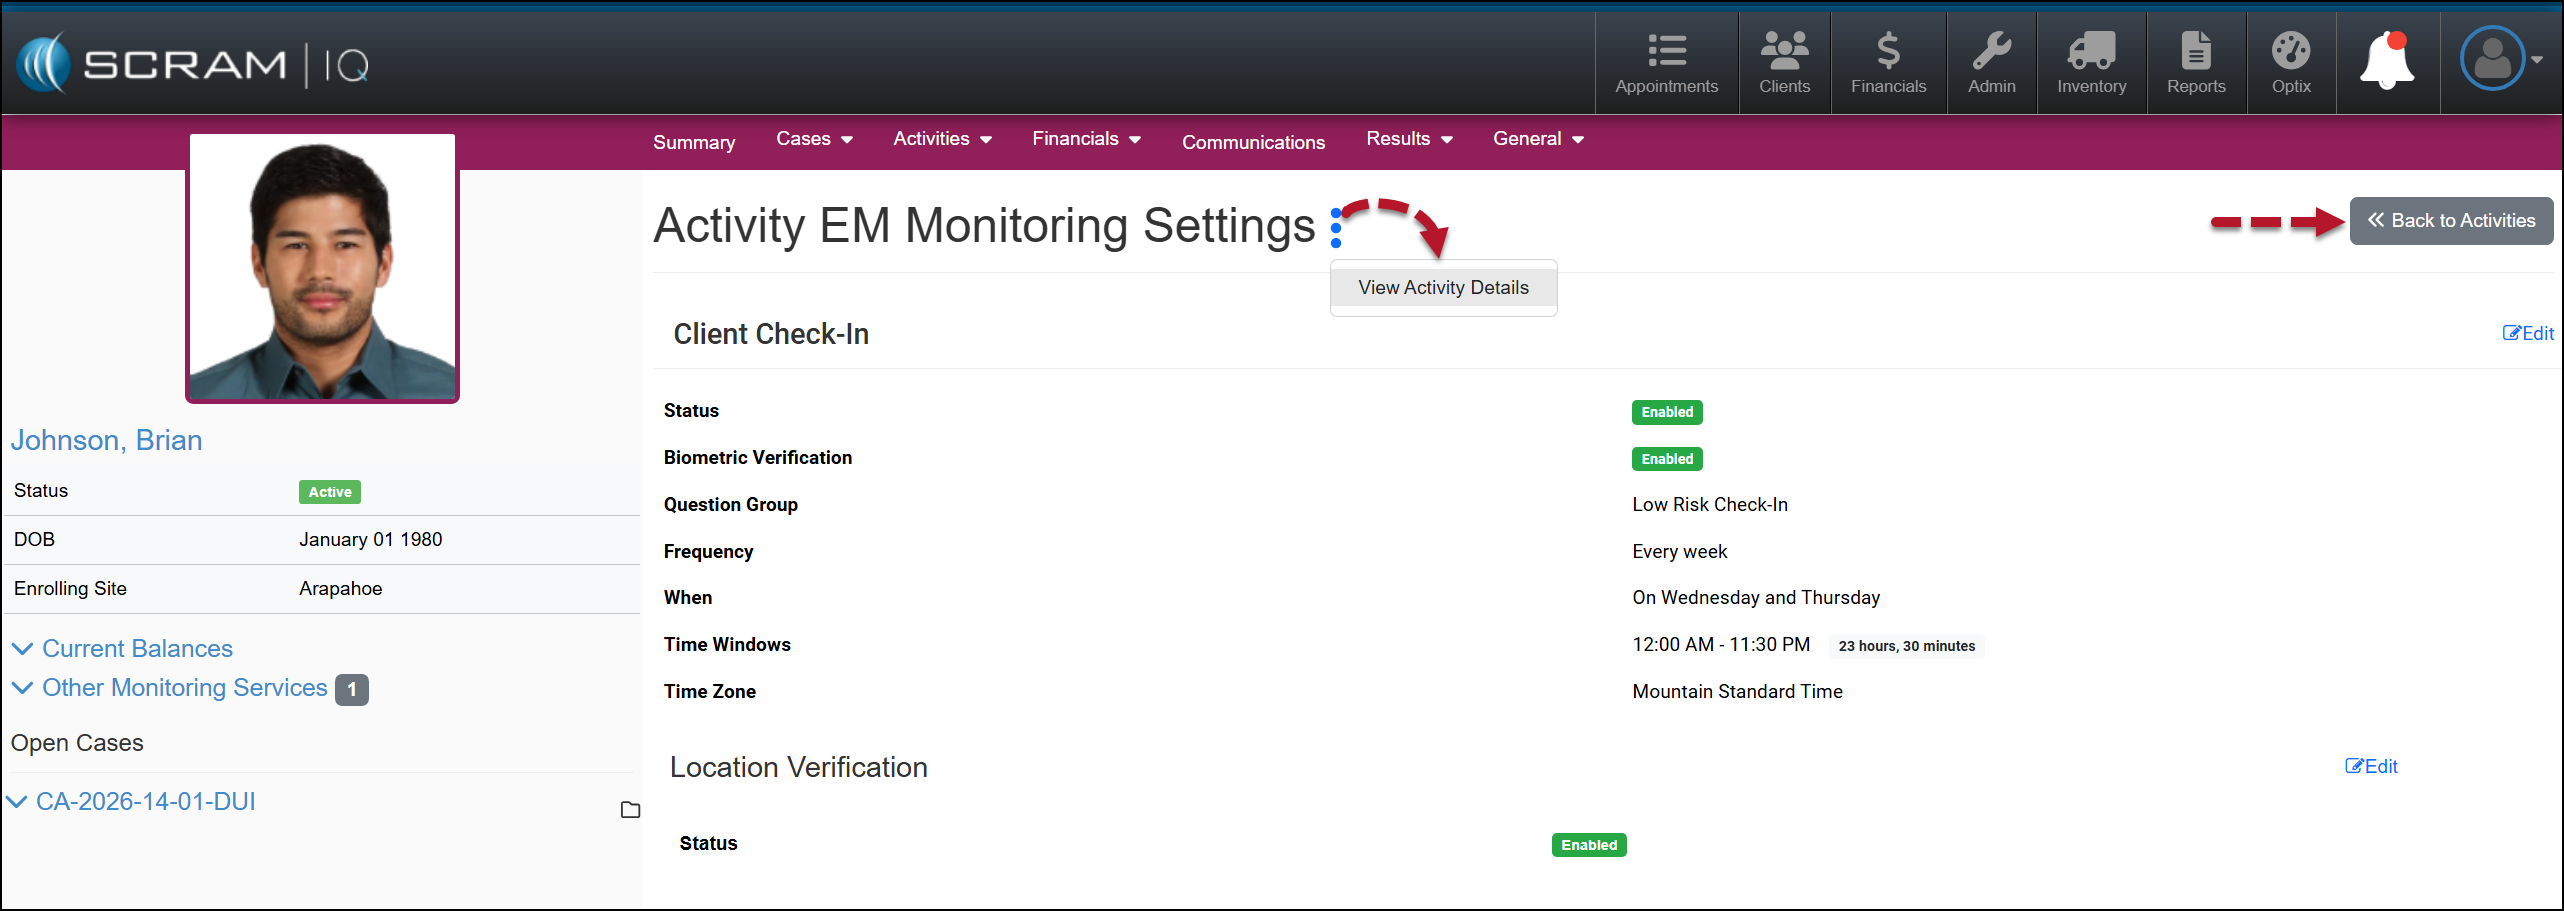
Select the ellipsis, and then the View Activity Details option to navigate back to the selected Activity Details page, or use the Back to Activities button to navigate back to the Active Activities page.
On January 14th, 2026, from 11:00 AM to Noon MST, SCRAM Systems will release two enhancements in SCRAM 24/7. The first enhancement improves client search capabilities. The second allows you to perform additional equipment actions directly from the Options column on the client’s Summary page for your CAM+HA and RB Activity clients when equipment is assigned.
During the release window, SCRAM 24/7 access will be interrupted for 1 hour. During this time frame, SCRAM 24/7 will be unavailable, and you will not be able to perform client-related tasks, such as adding a new client or managing current client activities. Once the maintenance window has expired, you will need to refresh your connection (logout/login) to the SCRAM 24/7 system to resume access and navigation.
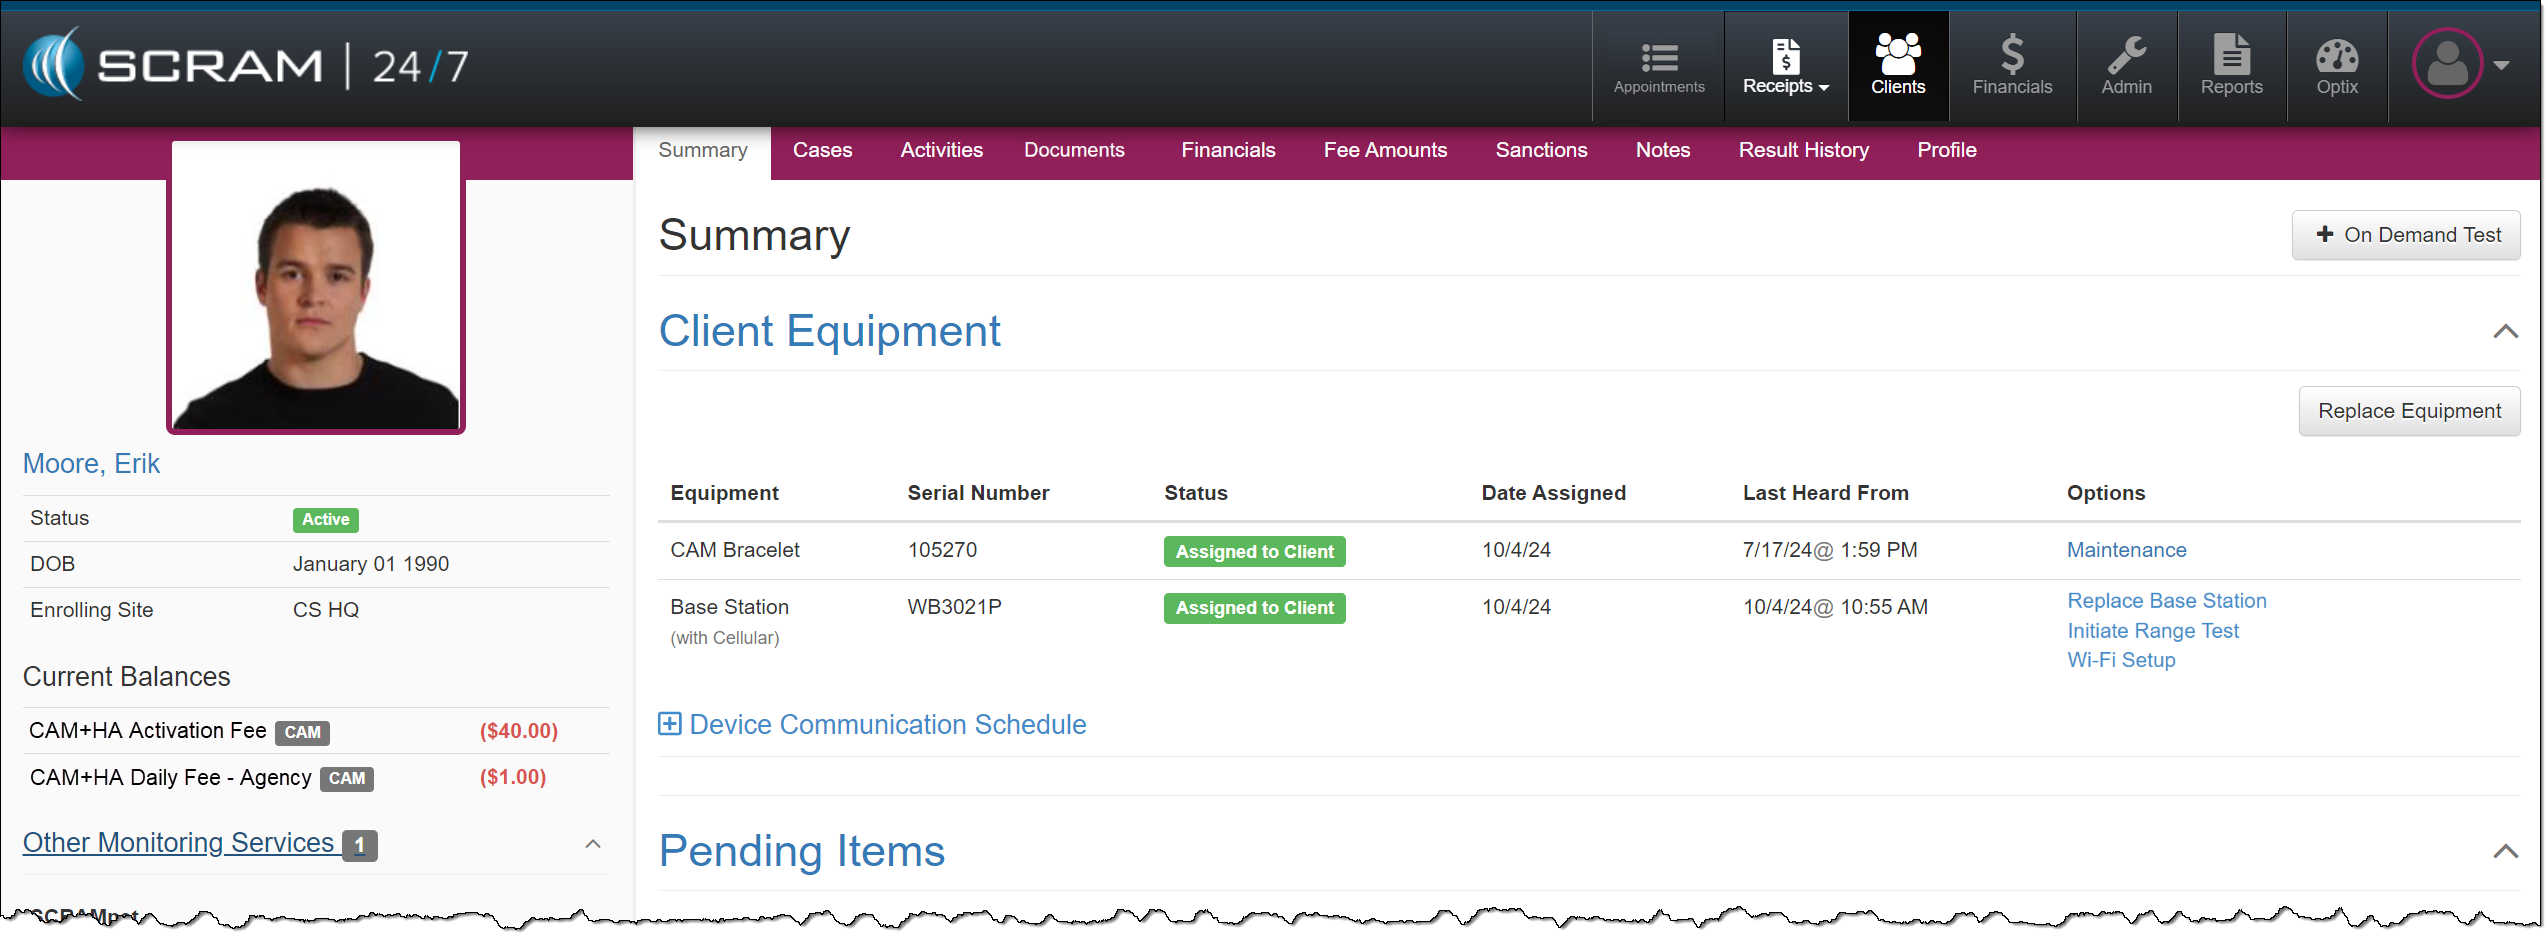
Equipment Options Column
Actions typically completed in SCRAMNET for assigned equipment may now be performed on the client’s Summary page for the Remote Breath and CAM/House Arrest Activities. Select the task you wish to perform from the new ‘Options’ column found in the table under the Client Equipment heading.

Search Options
In addition to the current search fields, you may now search by:
- Date of Birth
- Gender
- Phone Number
- Address
- Case Type
- Case Reason
This update will be reflected on both the Clients page, on the Search All Clients tab, and the Financials page, on the Clients tab.
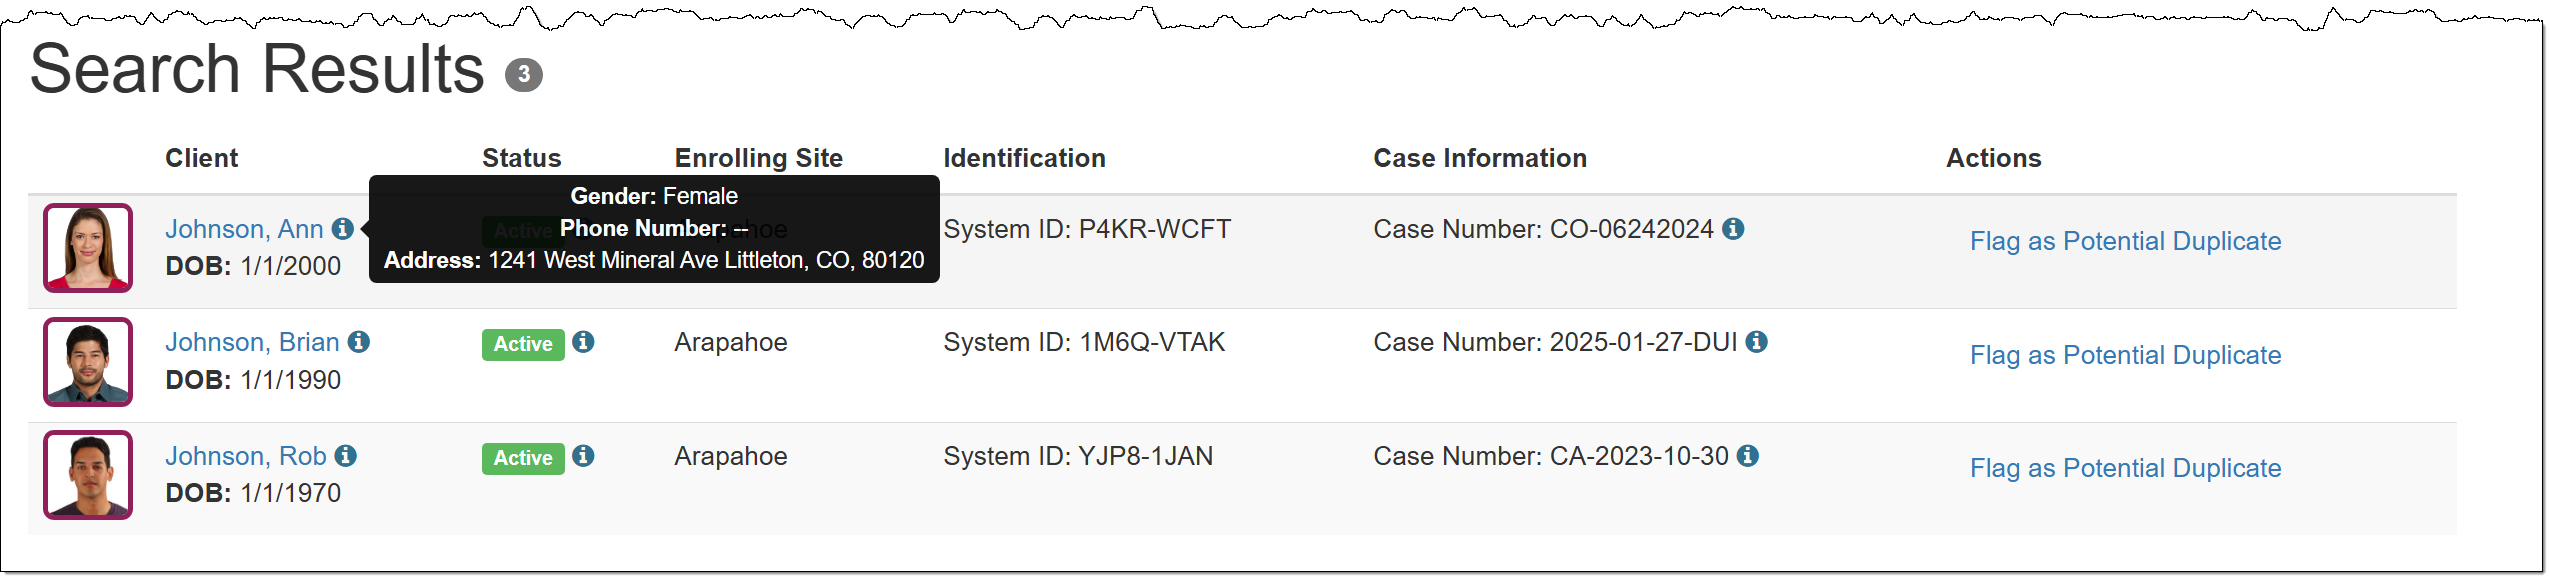
In the Search Results section, you will note some additional changes
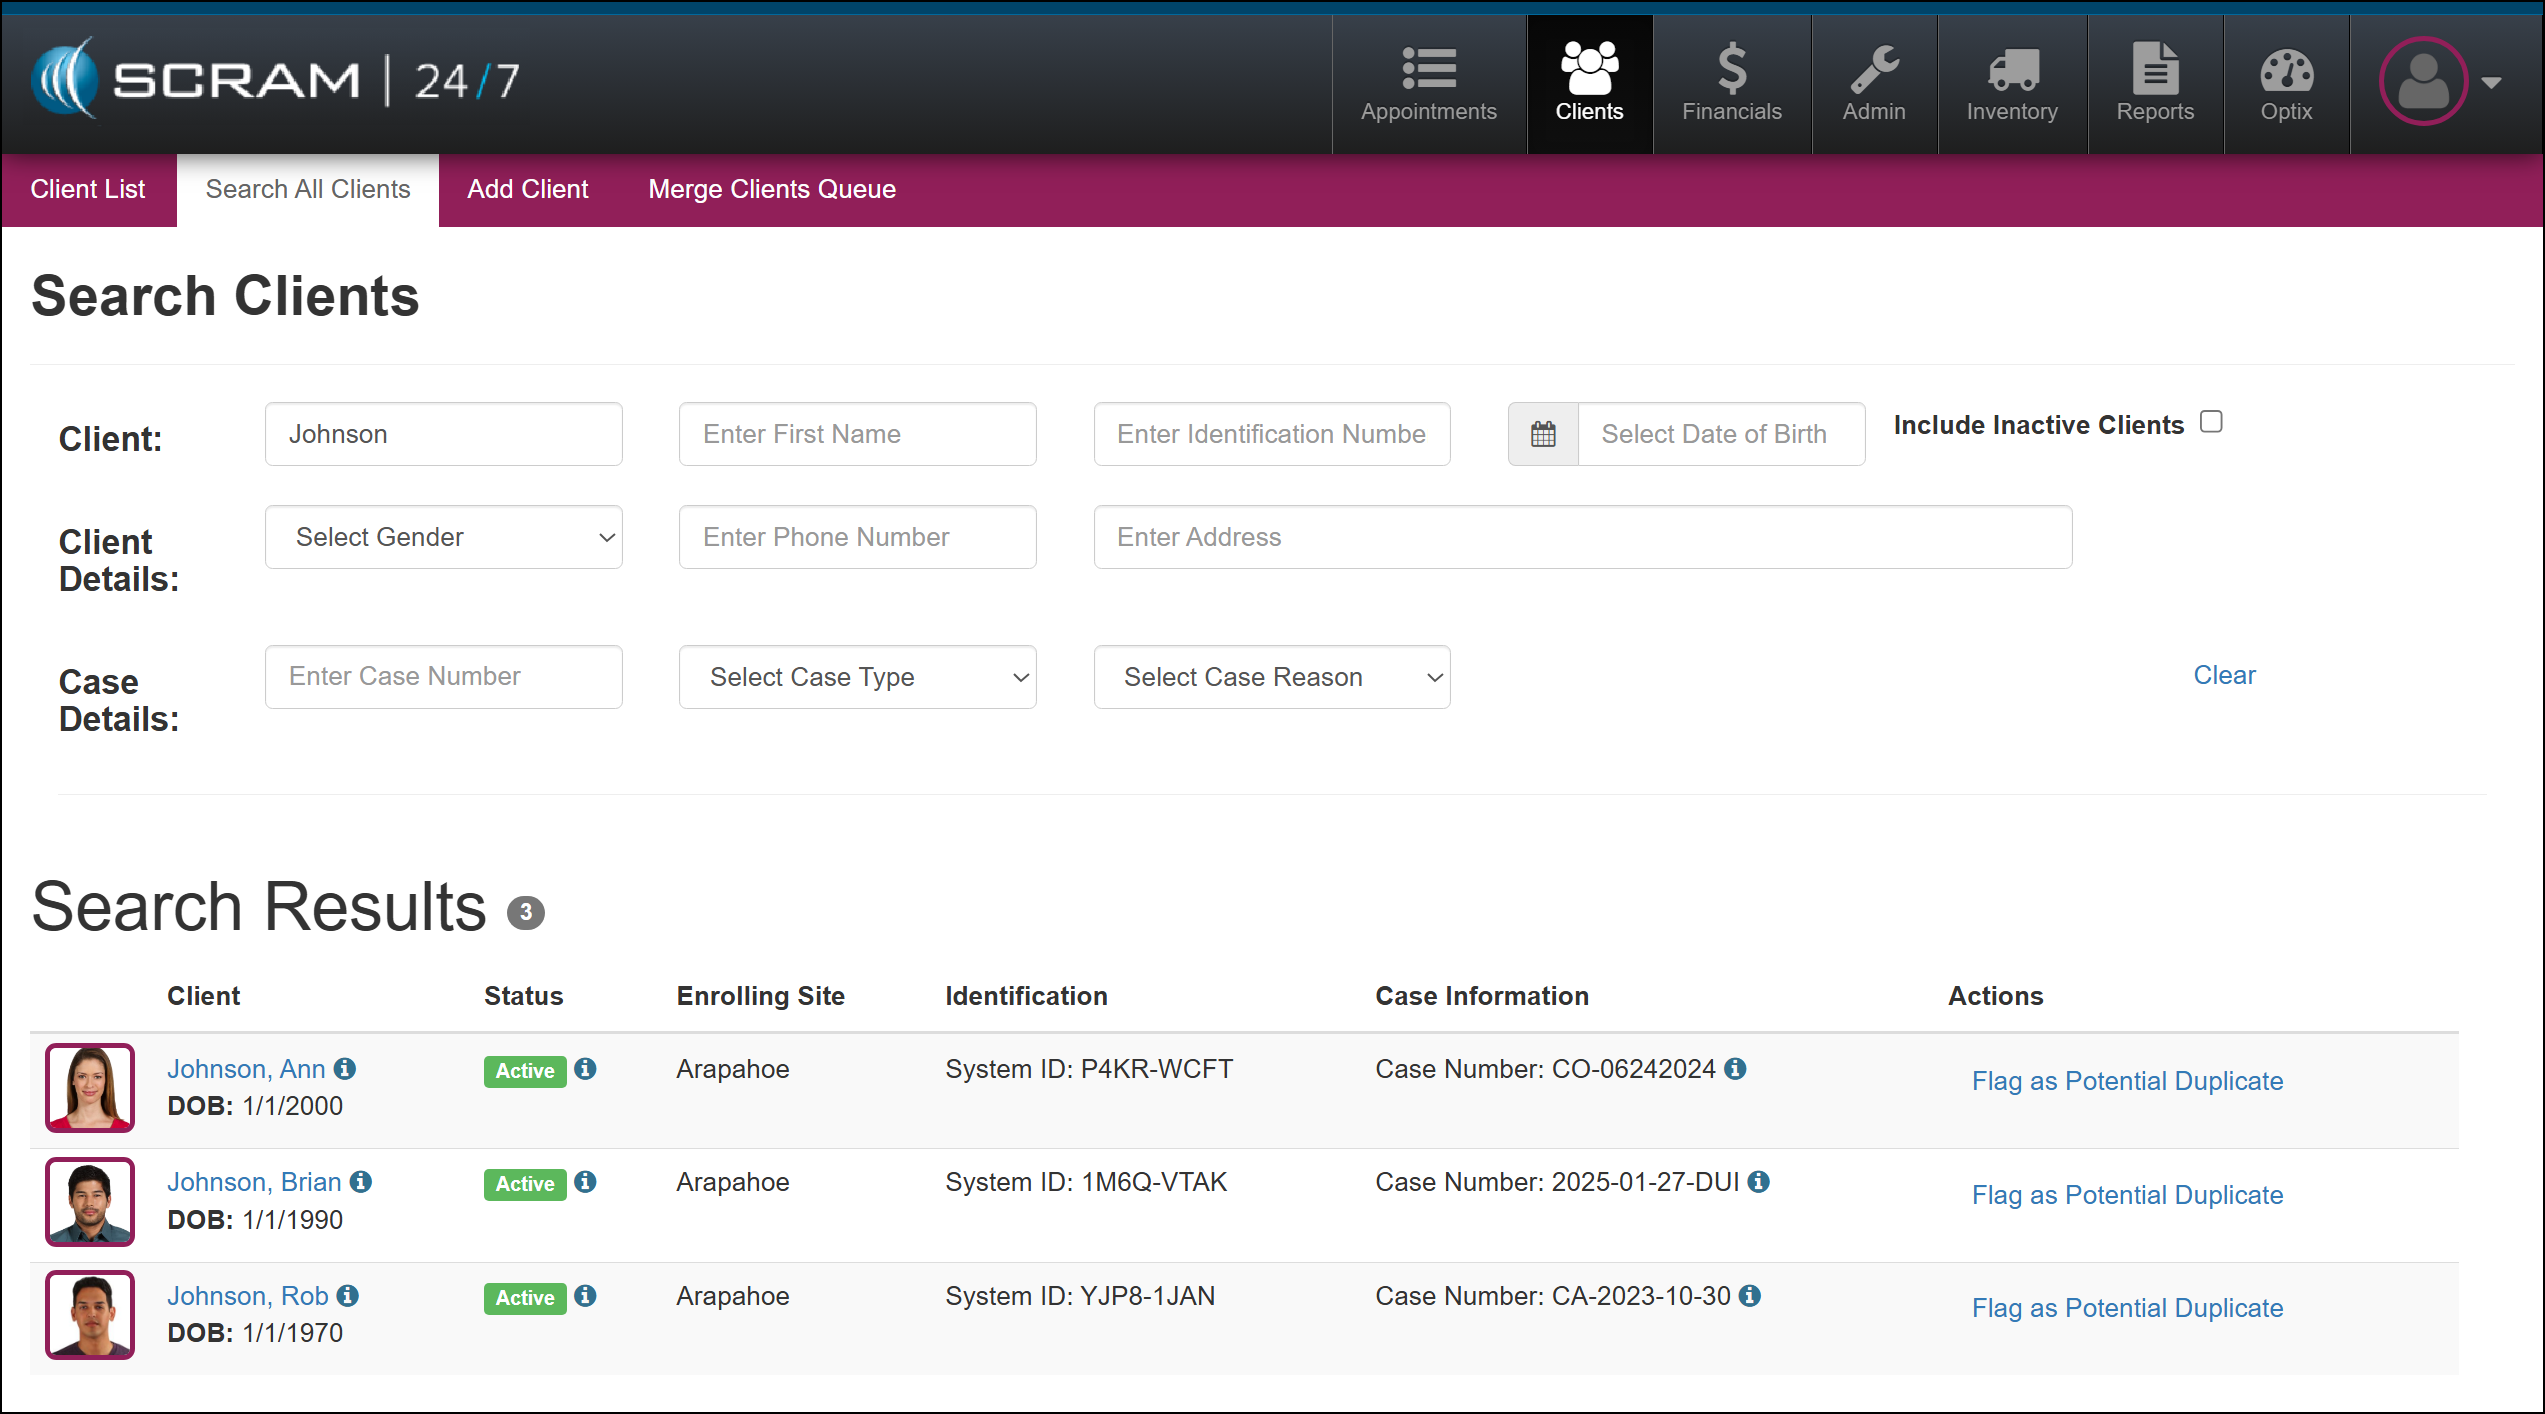
The client’s Date of Birth is now located under their name hyperlink, along with an information icon that displays the client’s gender, phone number, and address when you hover your mouse pointer over it.
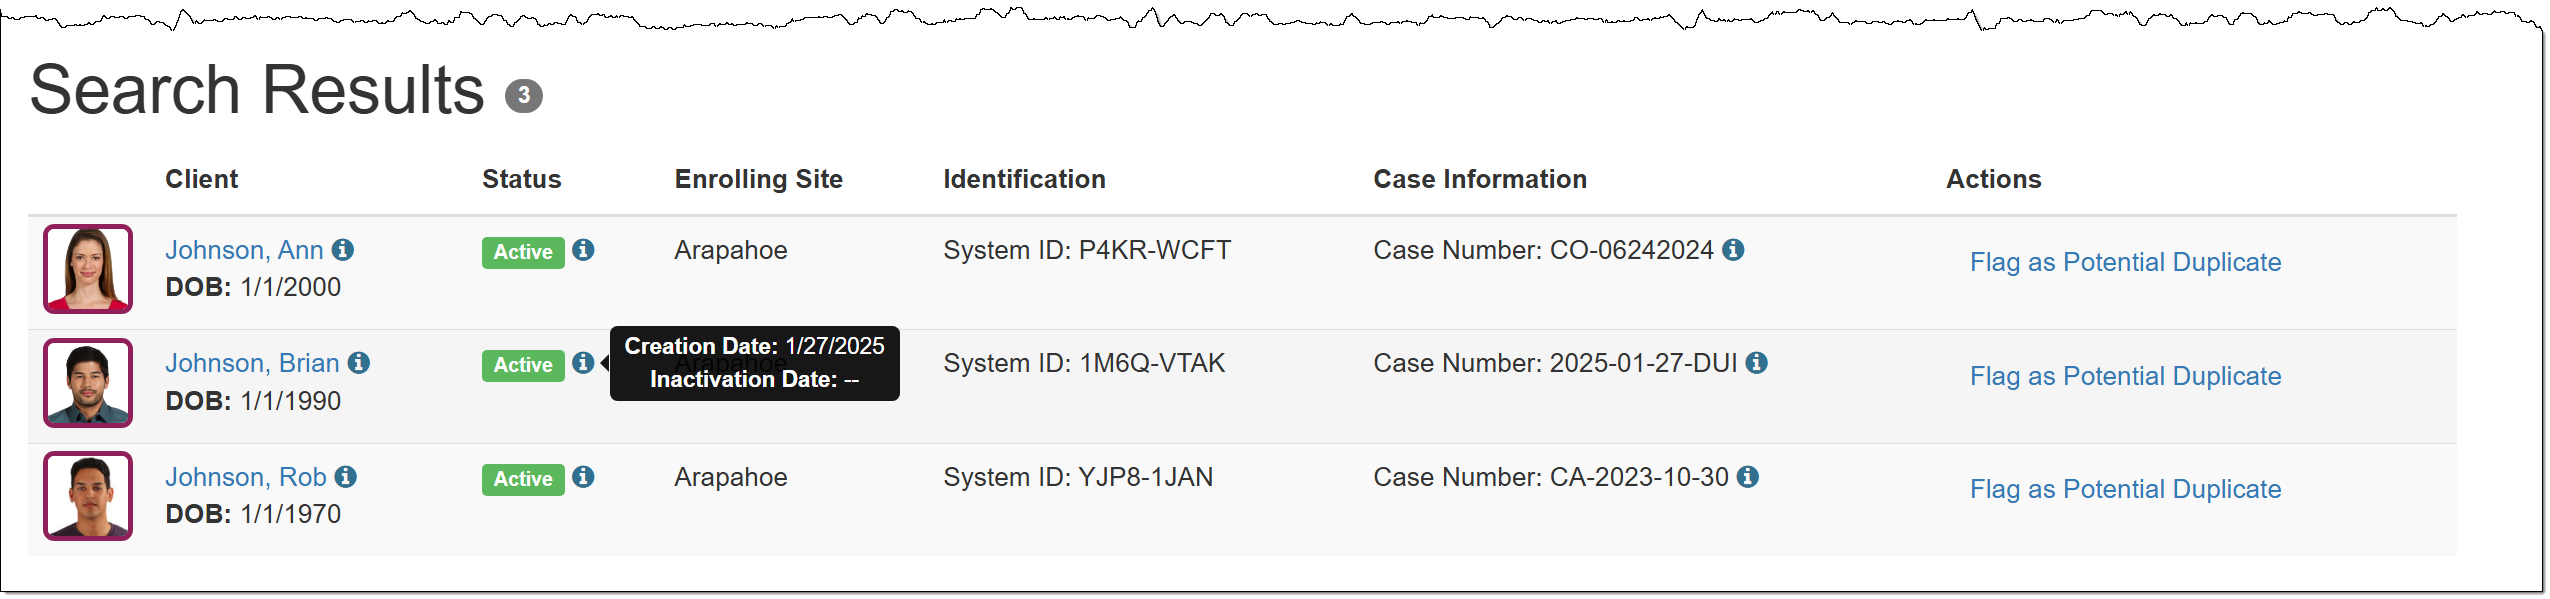
The Status column has been relocated, and an information icon that will display the creation and inactivation dates when hovered over has been added.
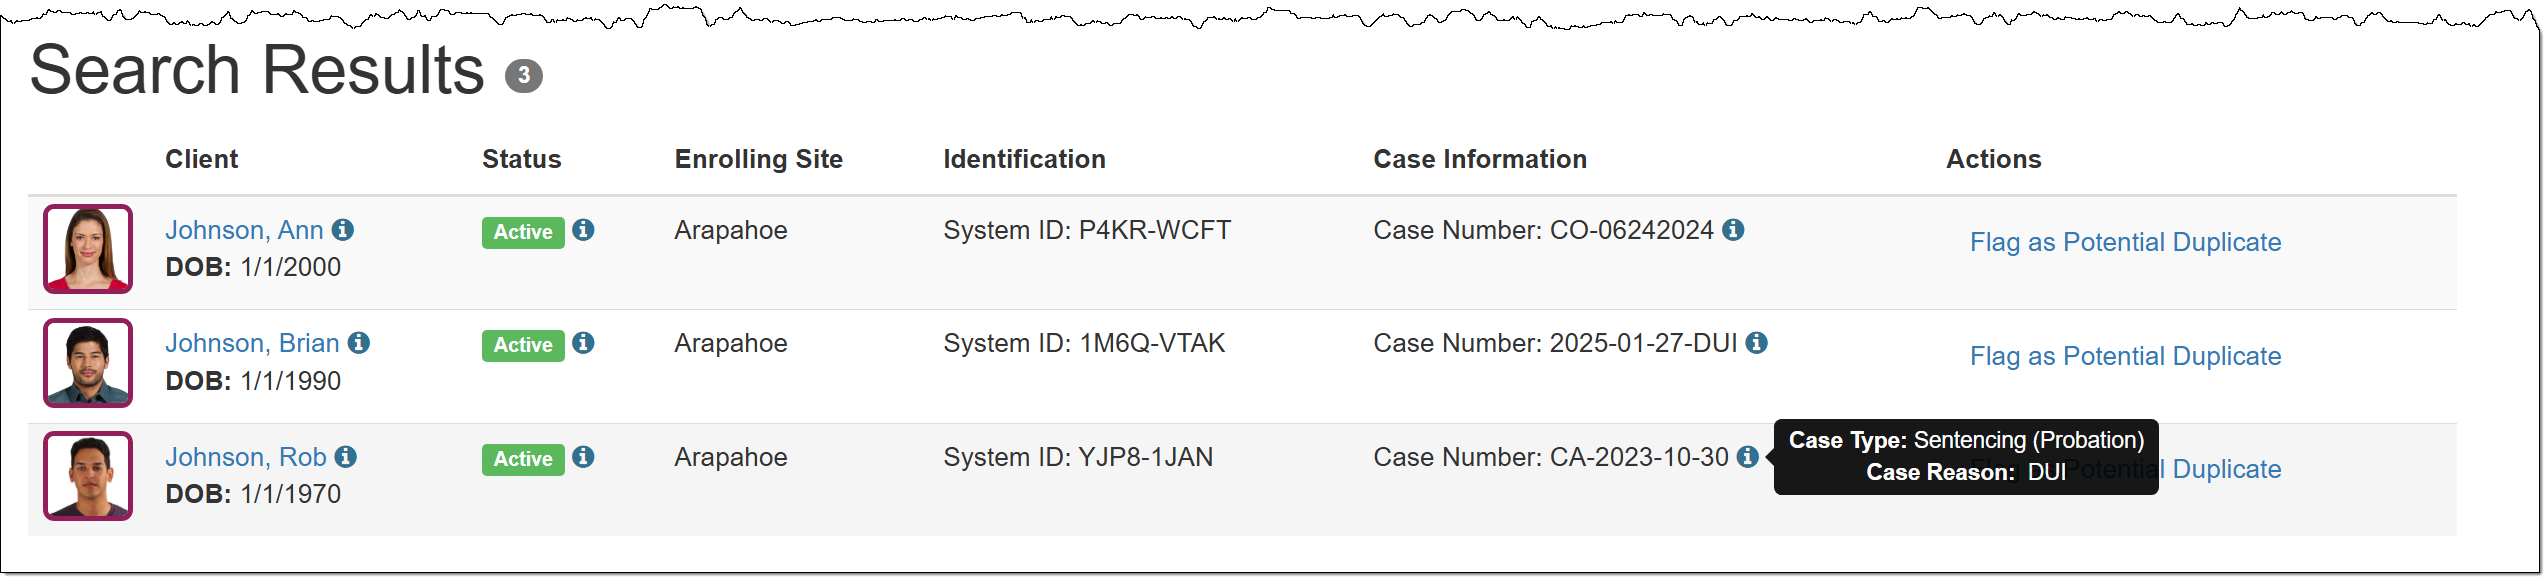
A new Case Information column displays the client’s case number, along with an information icon that shows the case type and case reason when hovered over.
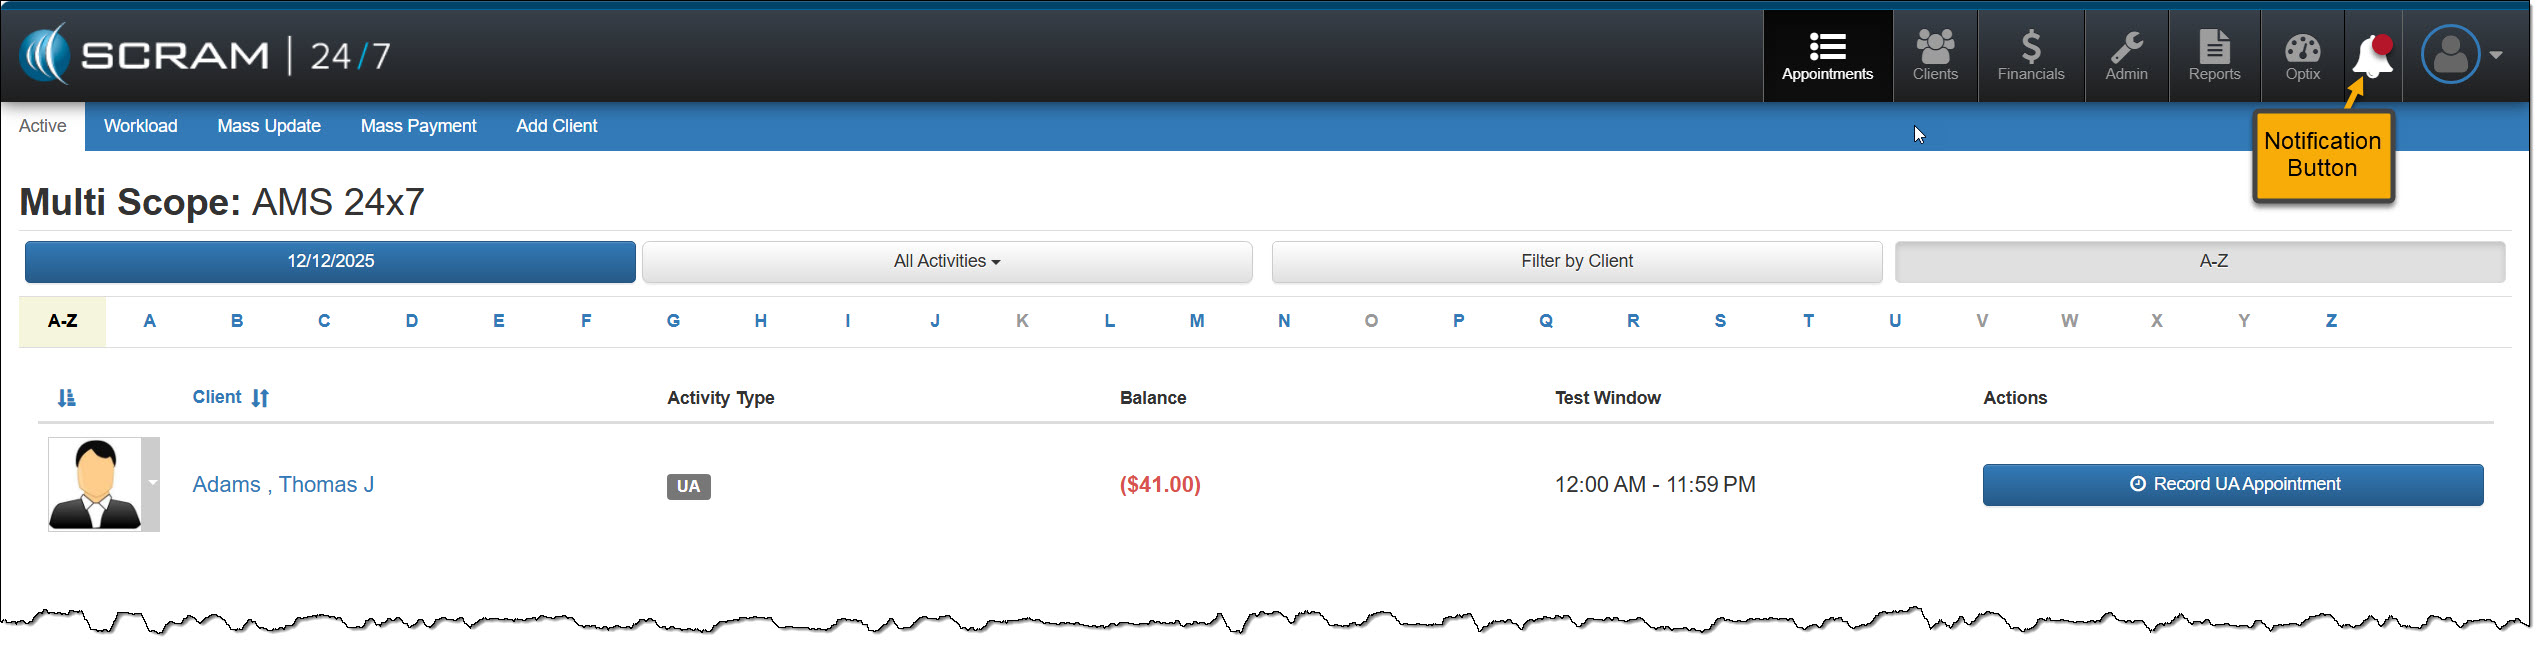
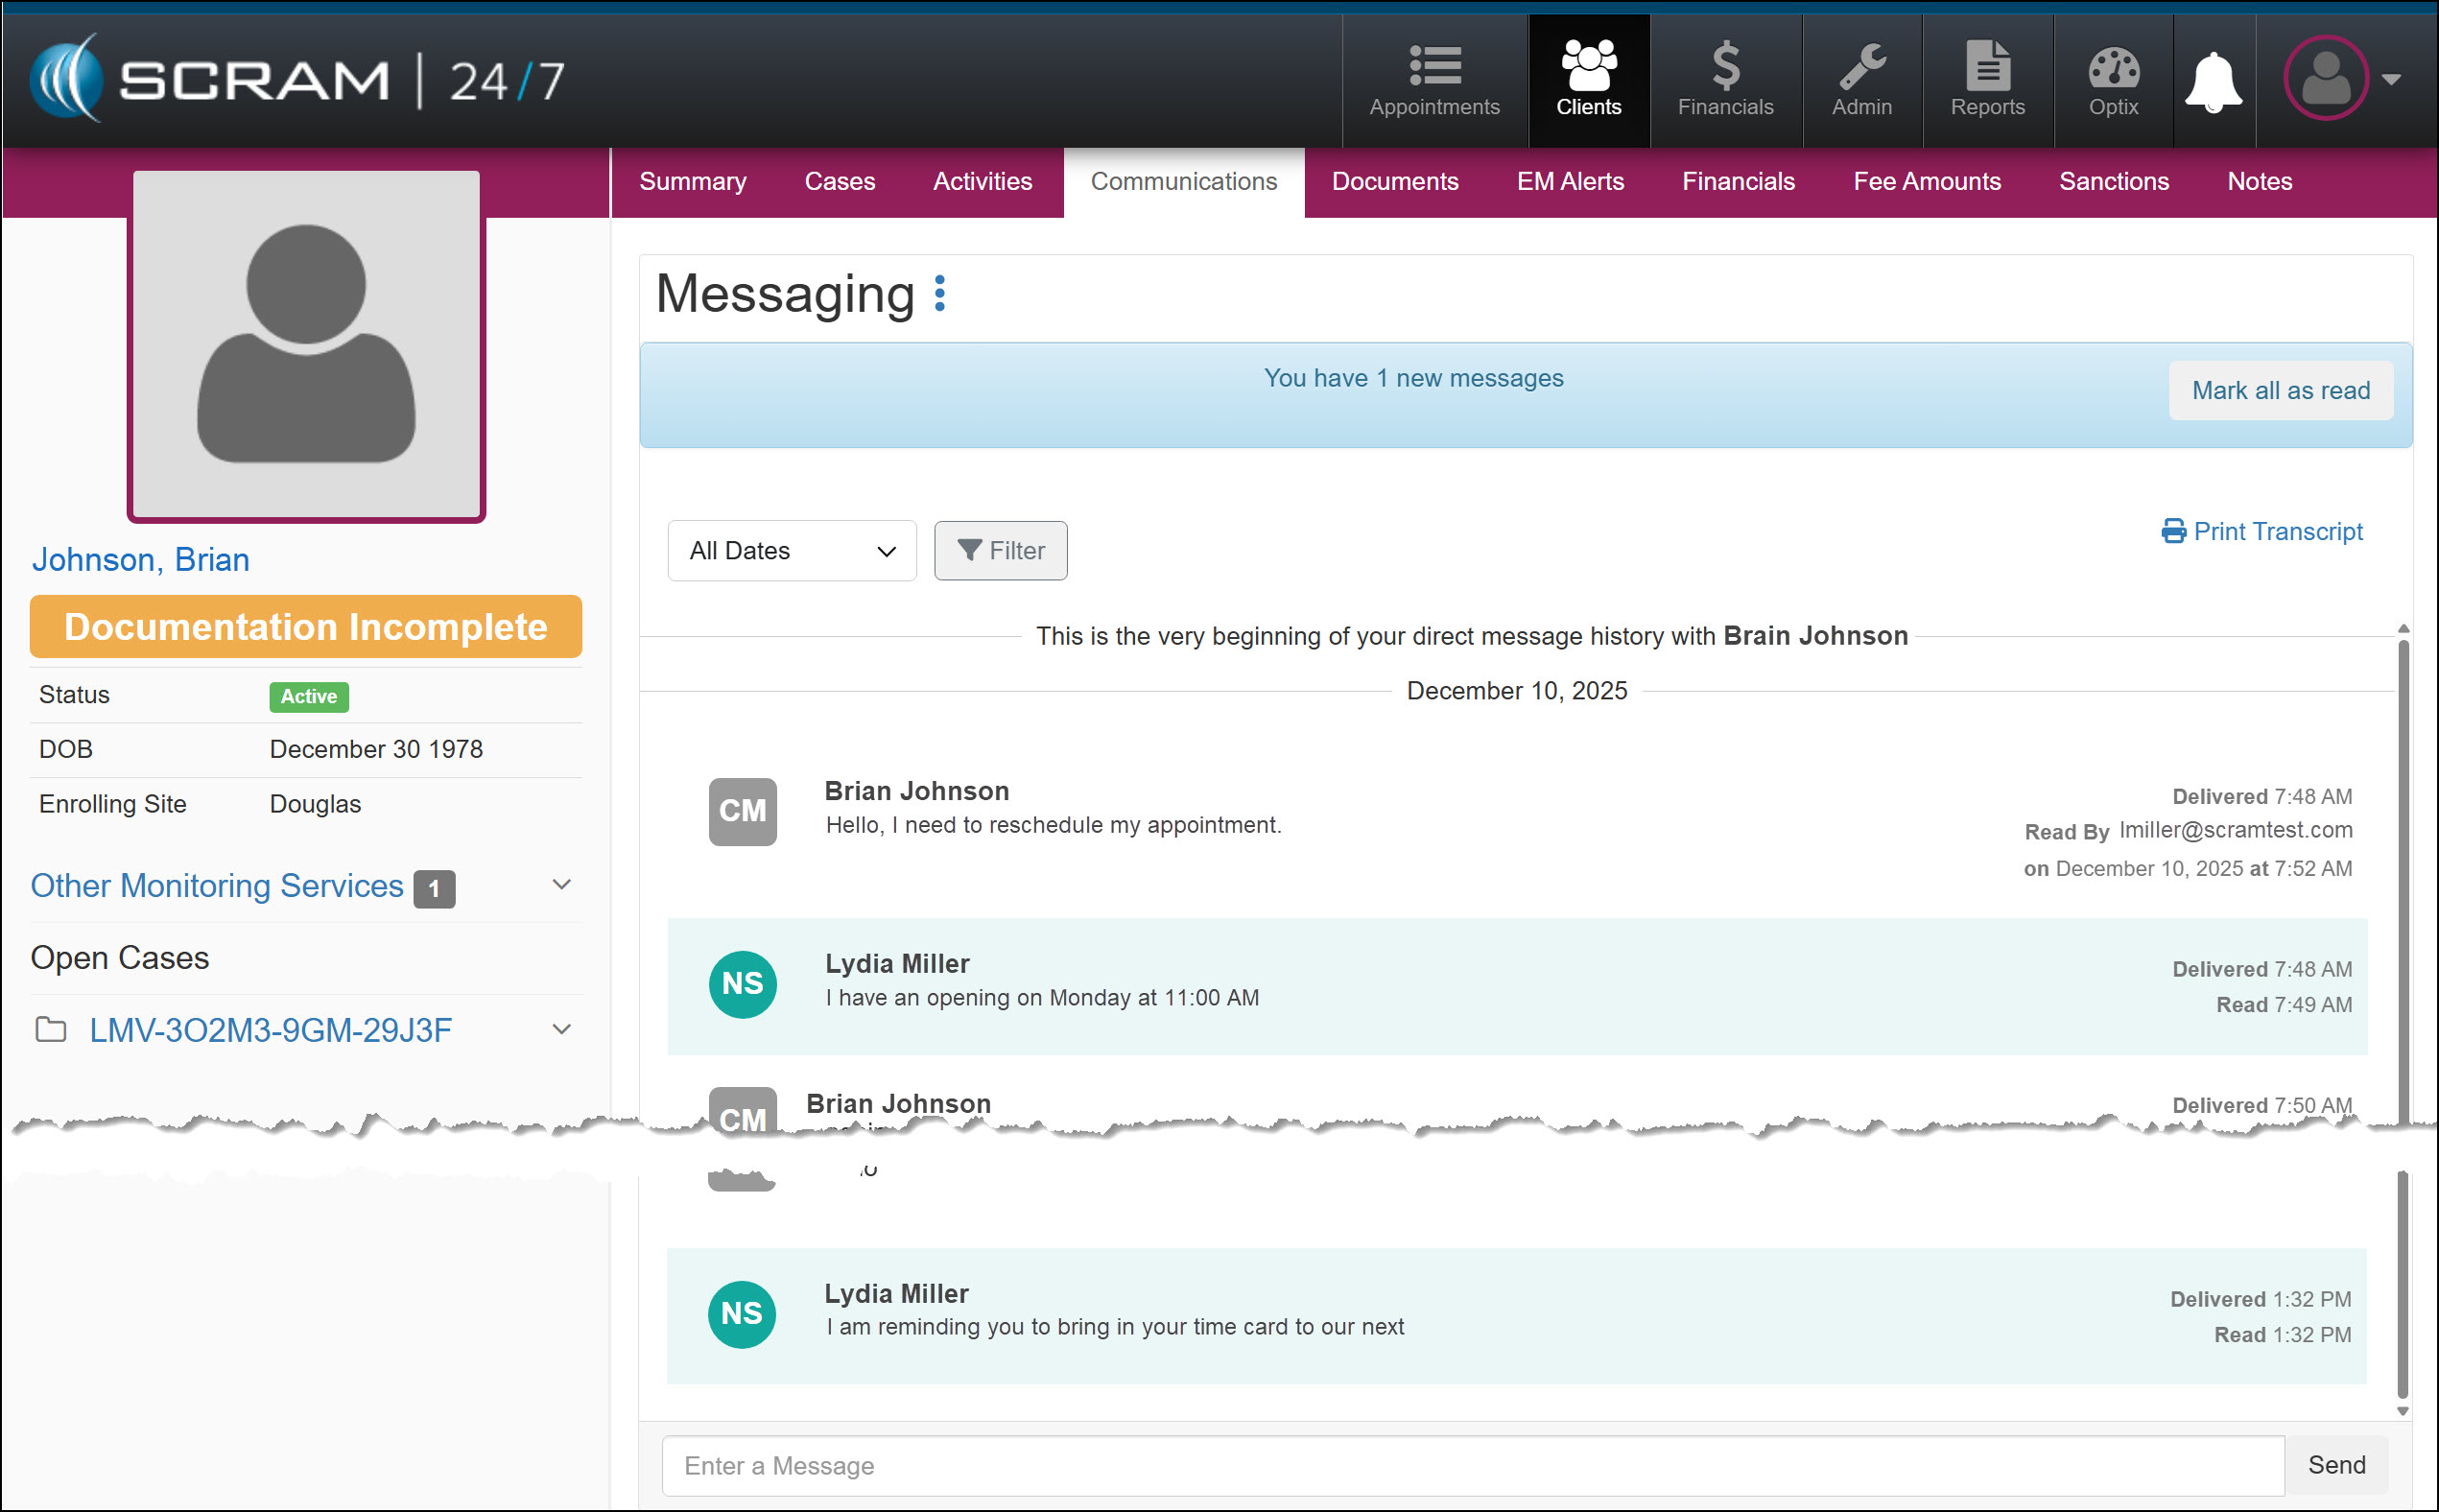
On December 17,th, 2025, SCRAM Systems will release a new Notifications “bell” button in SCRAM 24/7. This Notification dropdown window displays new messages sent from your clients who have a TouchPoint Activity with Messaging enabled. With this feature, you may view, clear, mark messages as read, or respond to your clients’ messages from within SCRAM 24/7. All actions completed within the Notifications dropdown window are reflected on the client’s Communication tab and within their SCRAM Optix TouchPoint profile.
Notifications in SCRAM 24/7
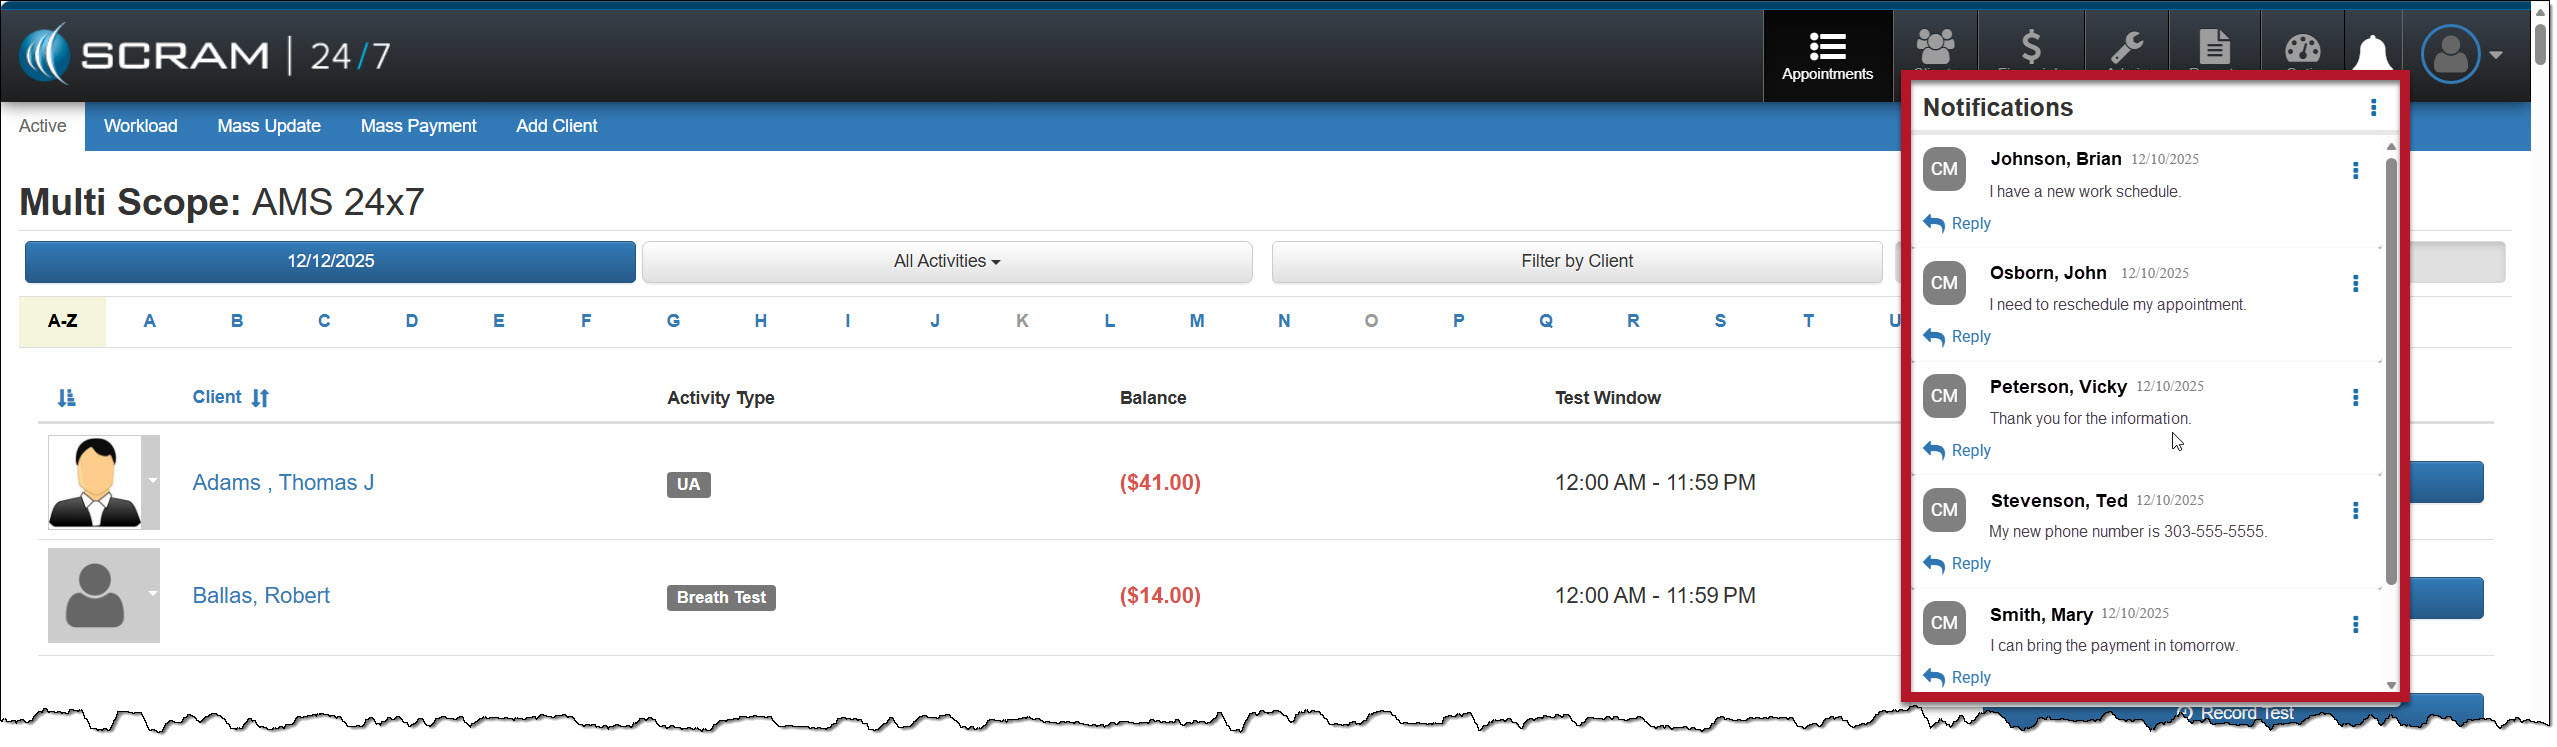
When your client sends a new message via their SCRAM TouchPoint mobile app, the Notifications button in SCRAM 24/7 will display a red badge. To view the message, select the button.
On the Notifications dropdown window, the client’s name, date, and message are displayed.
Managing the Notifications Window
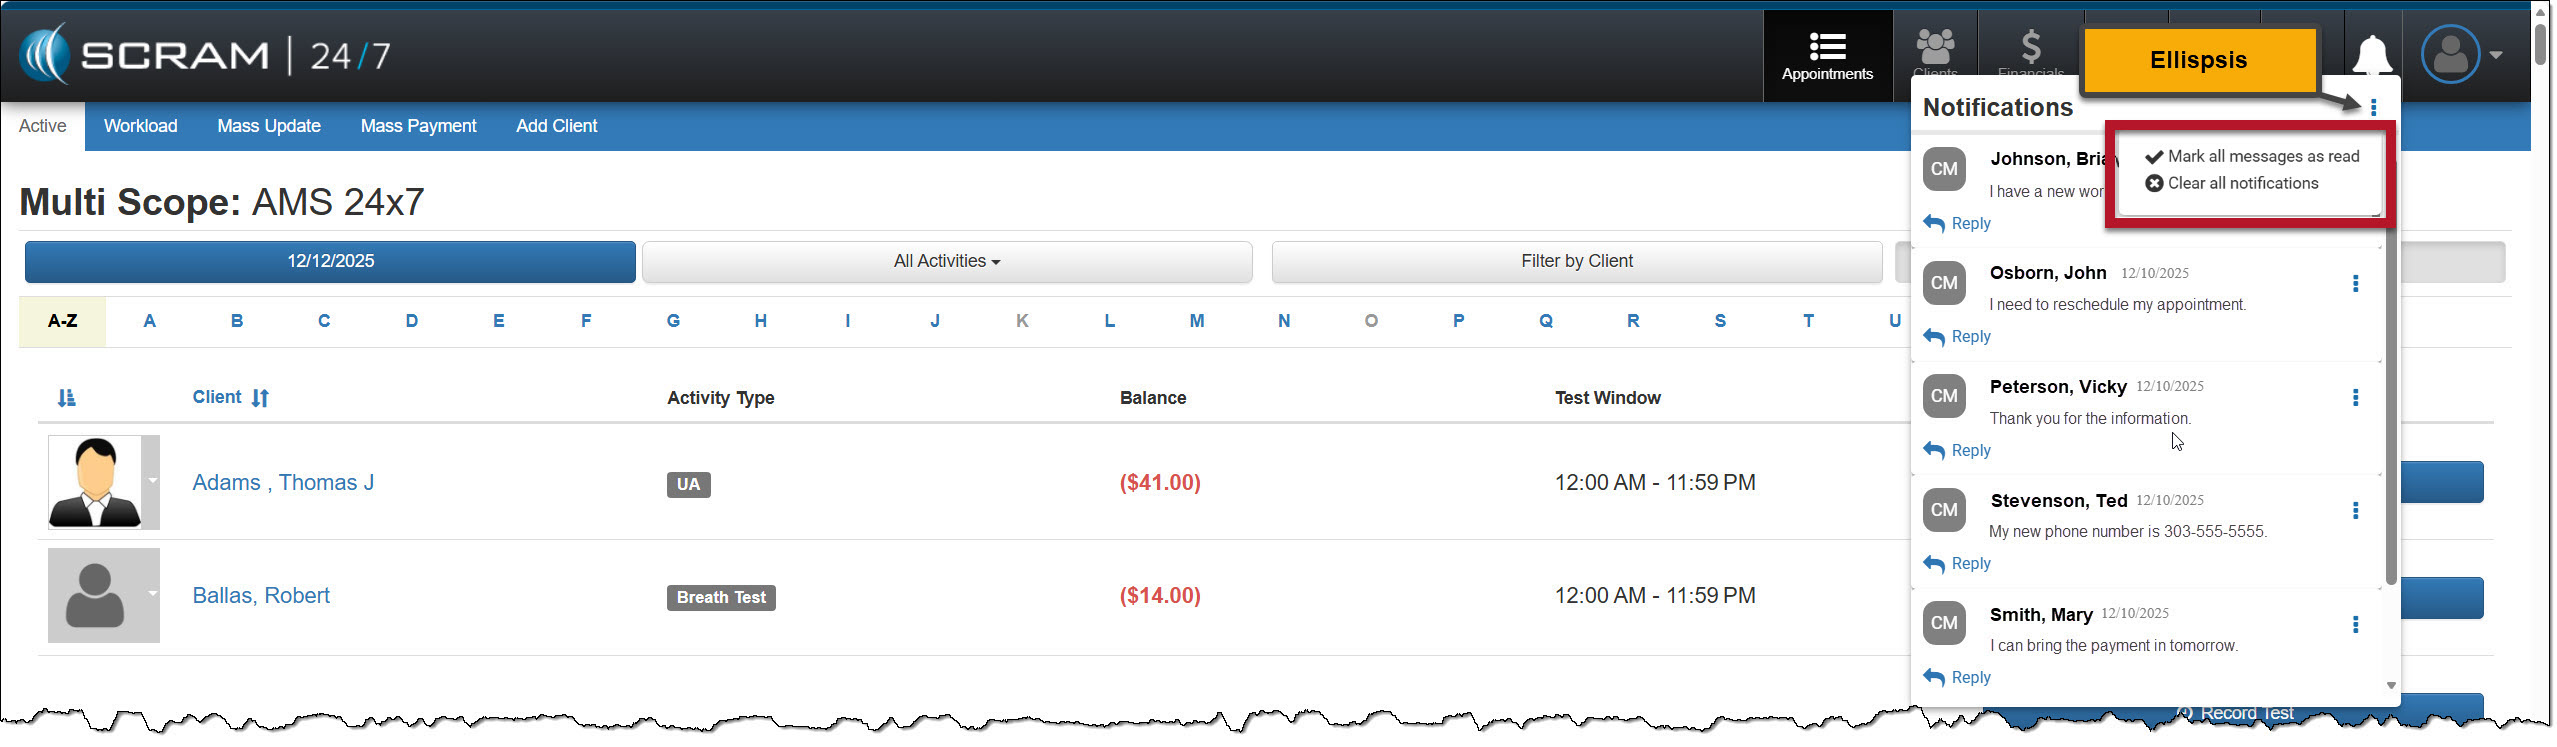
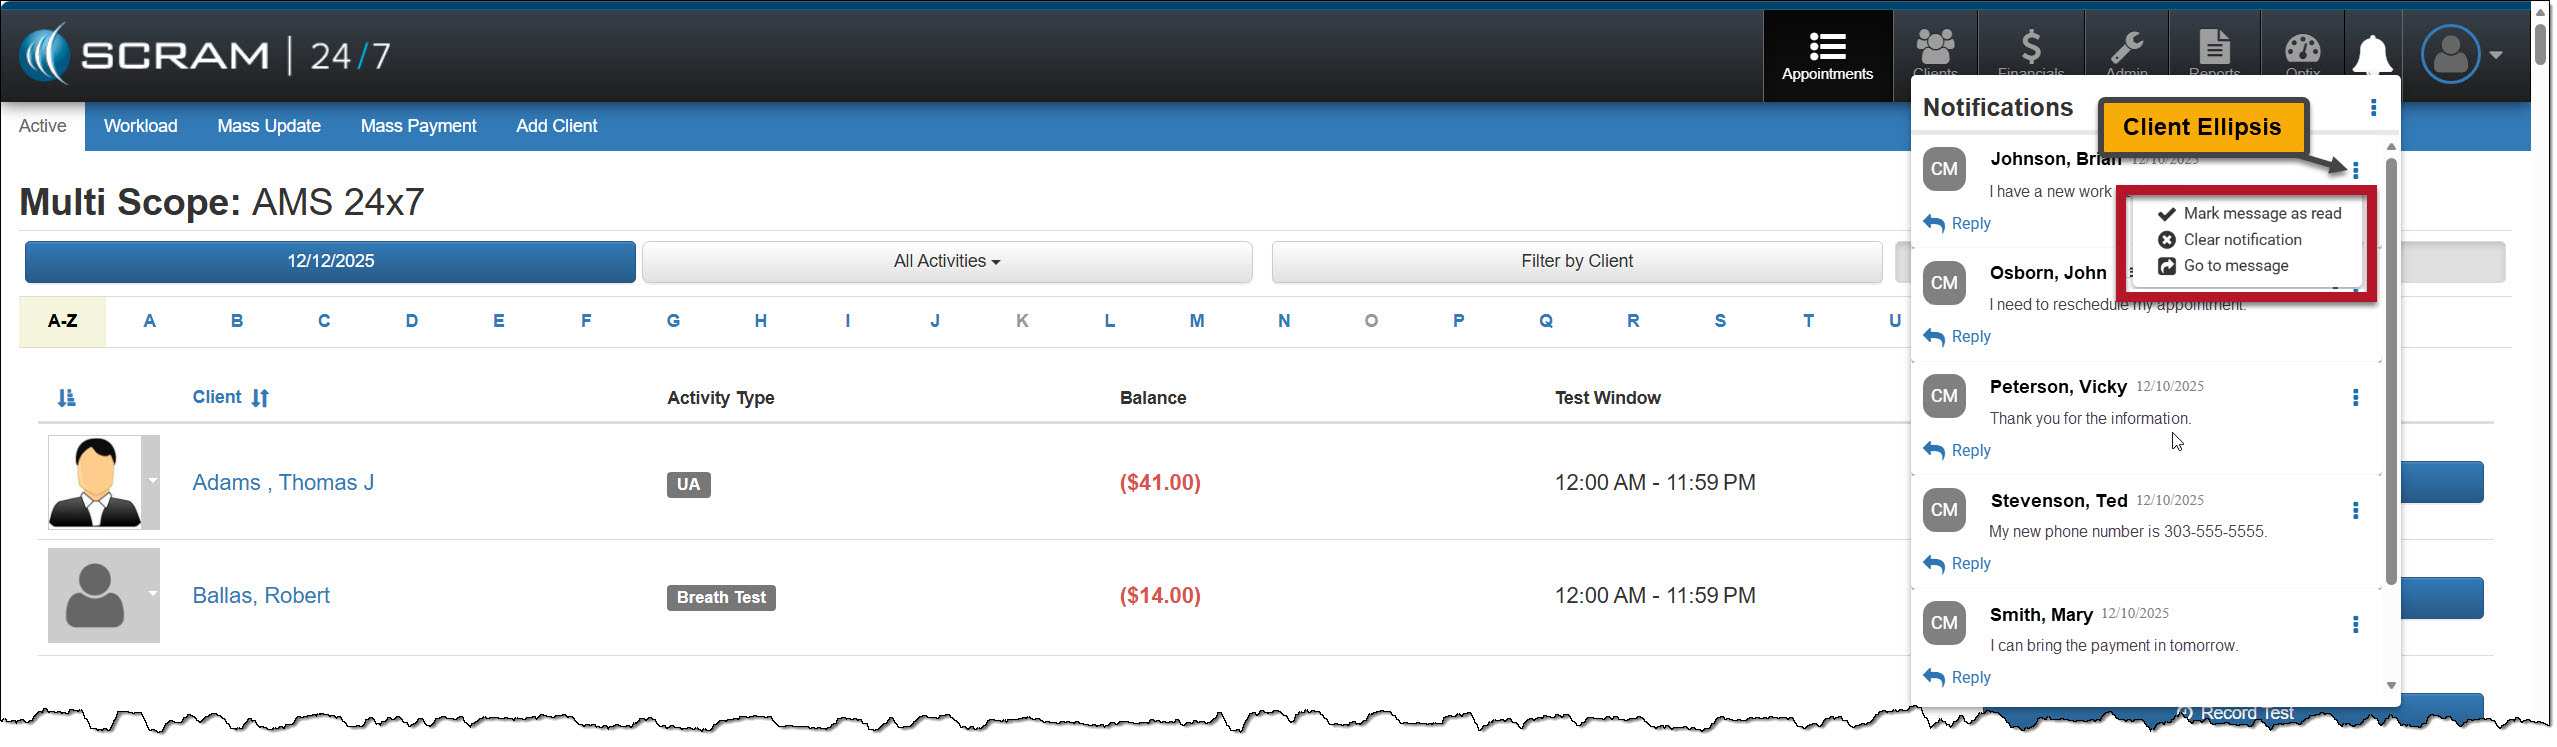
Selecting the ellipsis next to the Notifications heading at the top of the dropdown window, or next to the client’s name, will display a menu with following options:
- Mark all messages as read, or mark a message as read: When selected, the message will be removed from the Notifications window. On the client’s Communication Messaging page in SCRAM 24/7 and their Optix TouchPoint Messaging page, the message will display as Read for the client.
- Clear all Notifications or Clear Notification: When selected, this option clears all messages from the Notifications window in SCRAM 24/7. This does not mark the message as Read on the client’s Communication Messaging page in SCRAM 24/7 and their Optix TouchPoint Messaging page; it simply clears the message from the Notifications window.
- Go to Message: This option will open a new tab that displays the client’s Optix TouchPoint Messaging page. This action will clear the message from the Notifications window.
Option One
Mark all messages as read or clear all notifications by selection the ellipsis to the right of the Notifications heading.
Option Two
Manage each message individually by selecting the ellipsis next to the message.
Reply
Click the Reply hyperlink to respond to the client’s message. After entering a response, select the Send button.
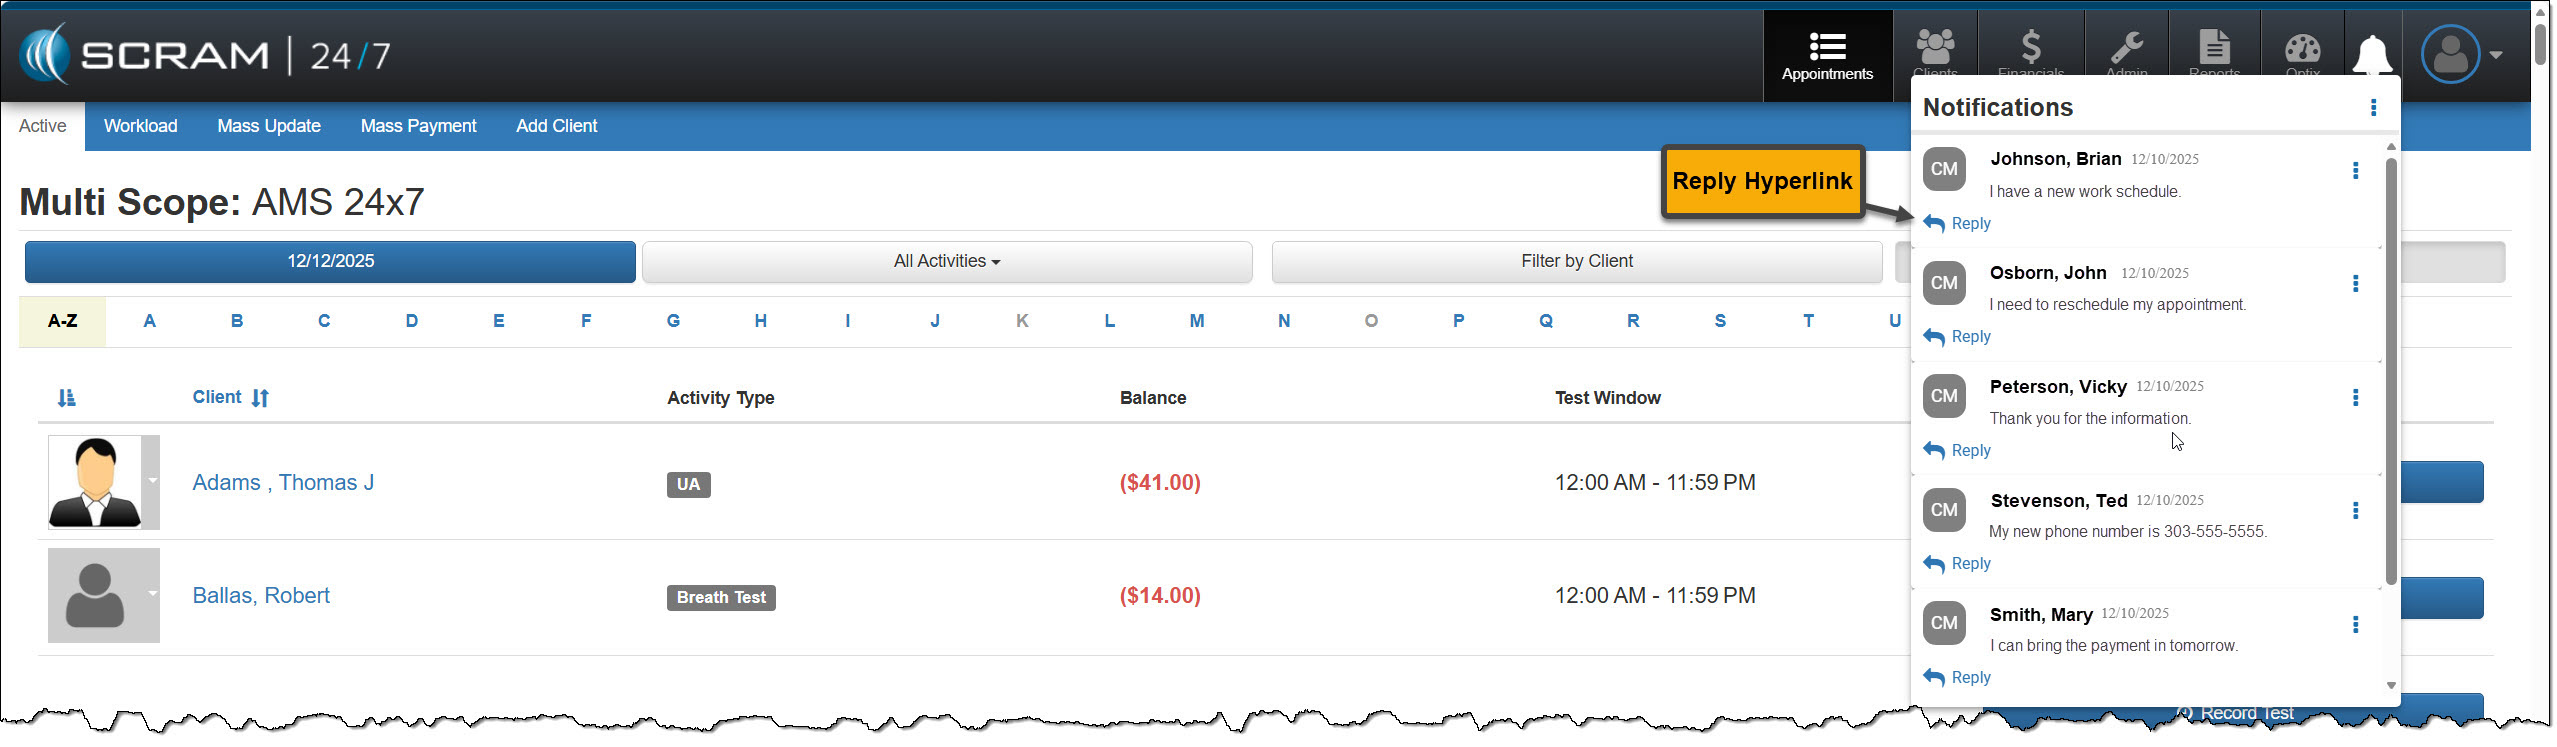

The message will no longer be displayed in the Notifications window.
On the client’s Communications / Messaging page, the message will be marked as Read, and the user’s response will be displayed.
On December 11, 2025, SCRAM Systems will release an enhancement for your SCRAM 24/7 and TouchPoint Monitoring programs. With this update, 24/7 users may view the historical activity for the services connected to TouchPoint Activity communication. TouchPoint users will find Electronic Monitoring Reminders, Messaging, and Video Conferencing in one consolidated place under the Communications tab in Optix.
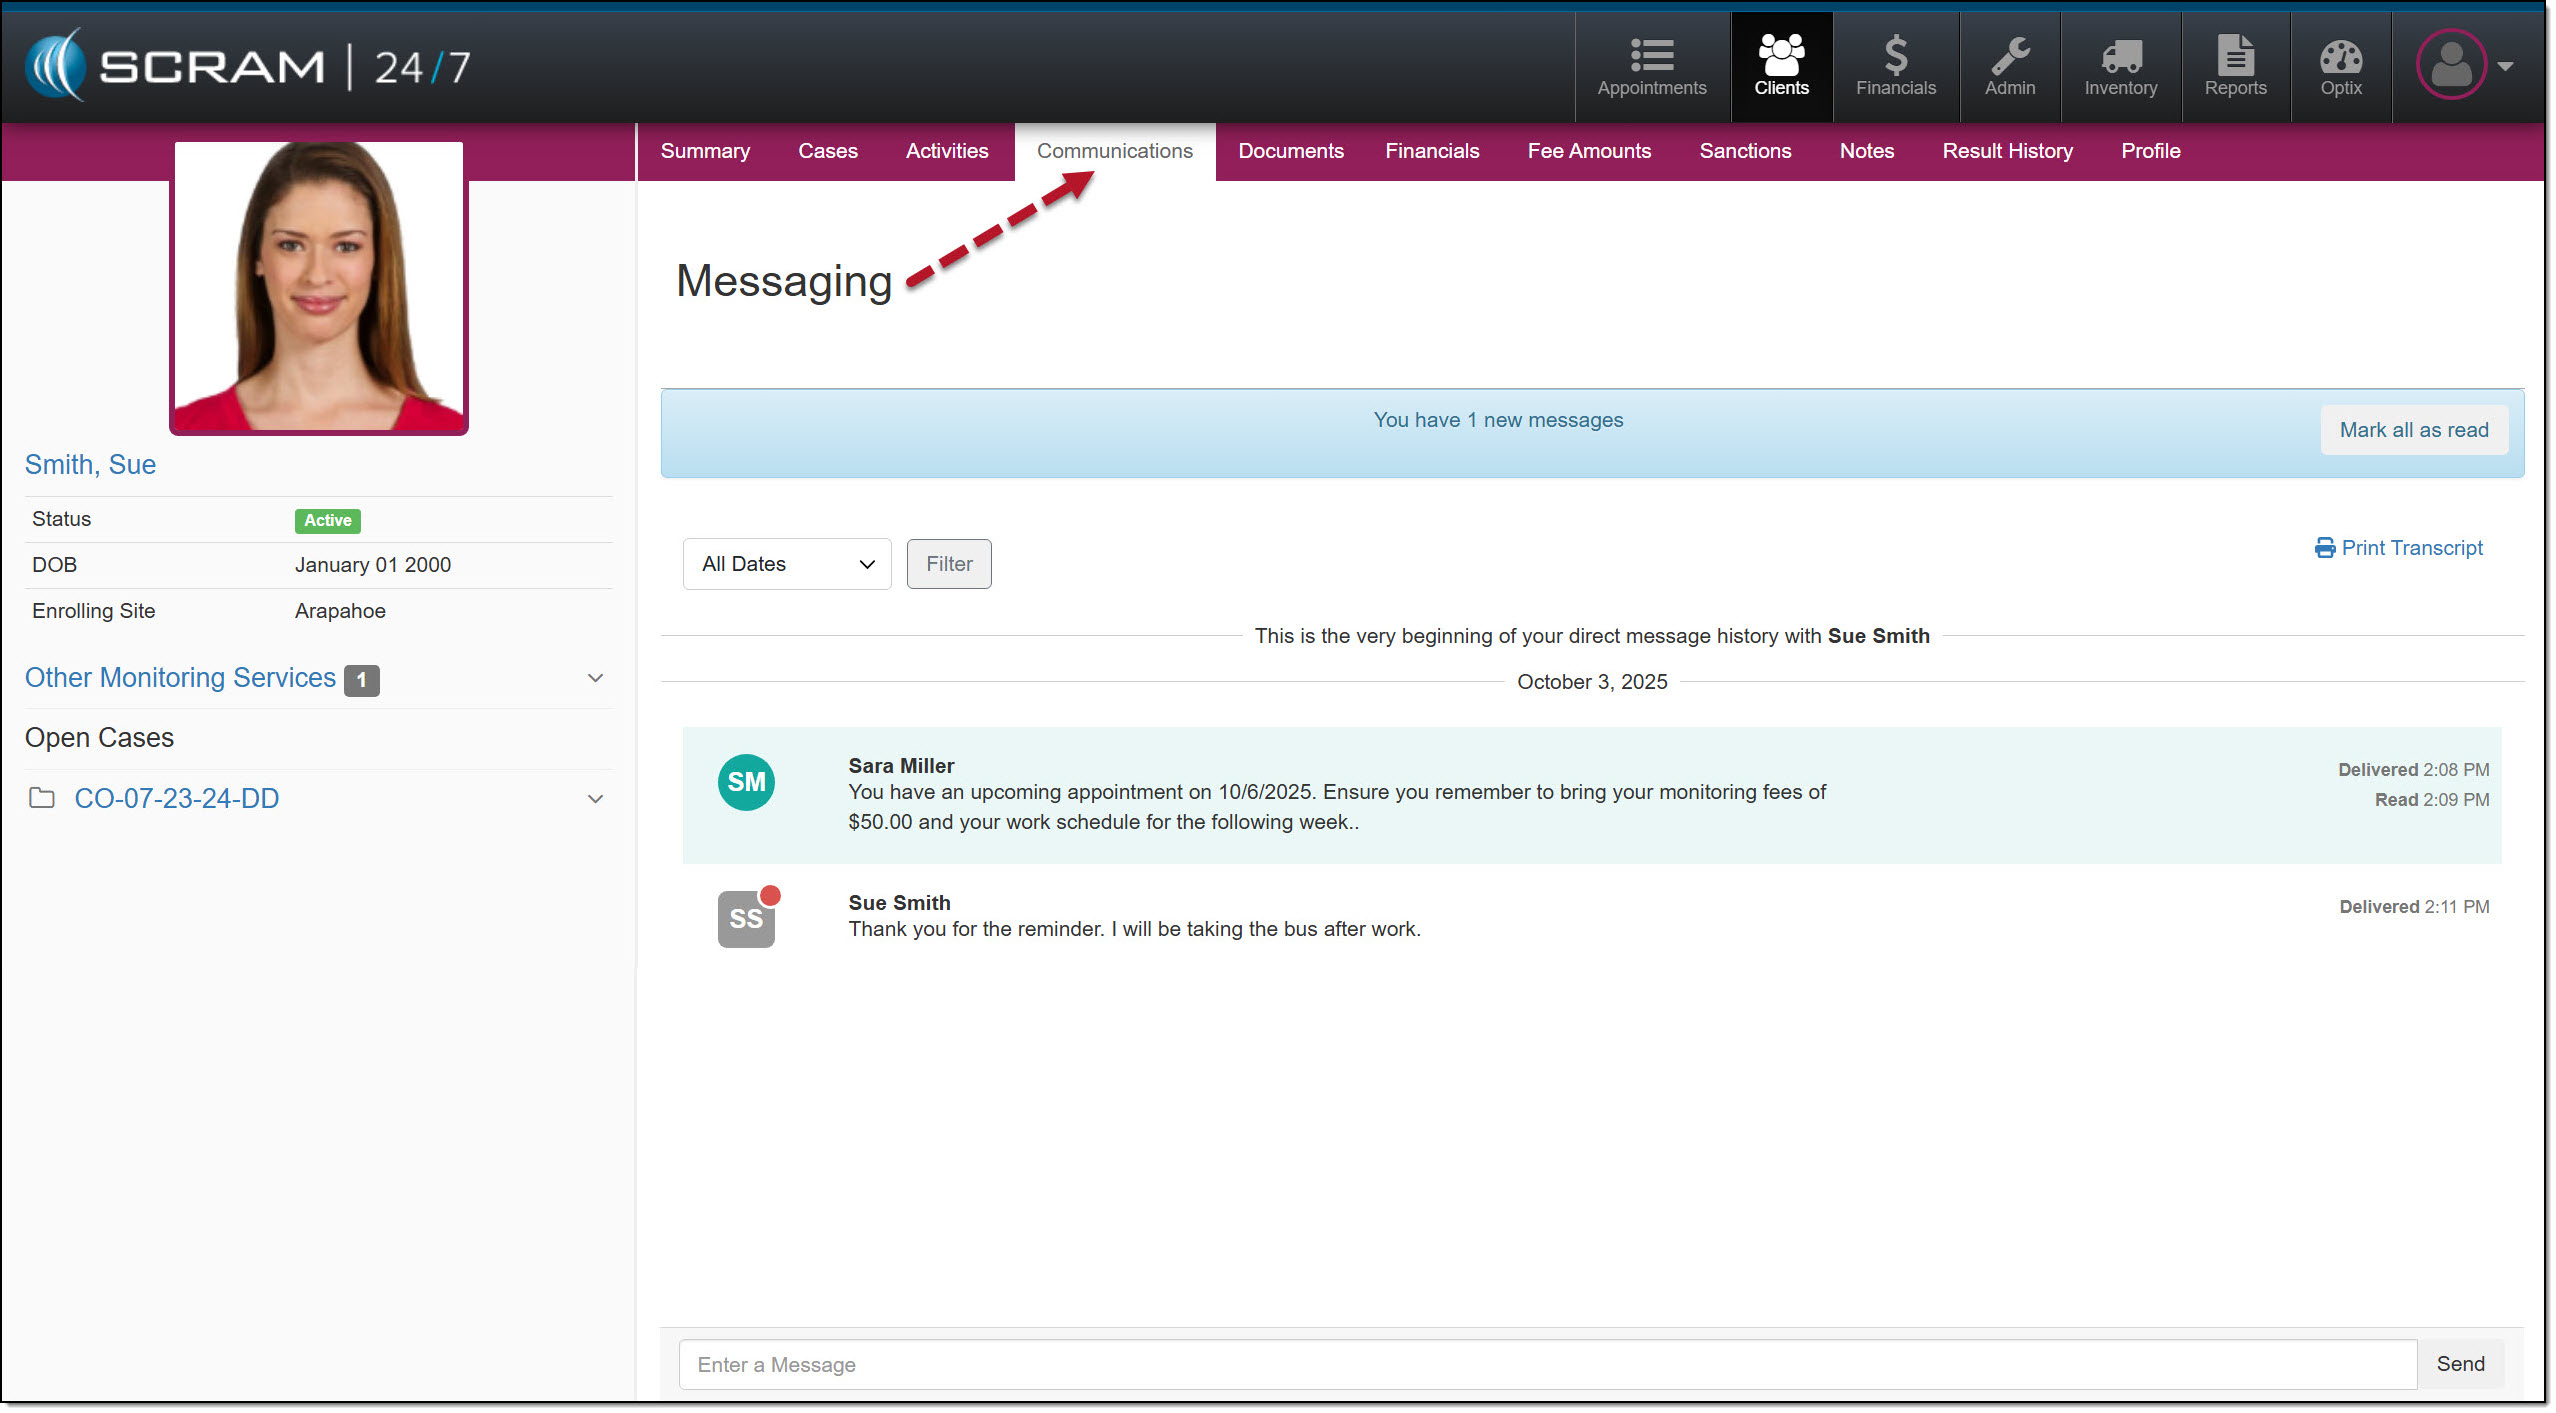
SCRAM 24/7 Communications Tab
In a previous update, SCRAM Systems enabled 24/7 users to complete all messaging functions within SCRAM 24/7 without navigating to Optix. With a recent update, users are able to view the historical activity associated with services connected to TouchPoint Activity communication.
- The Communications tab becomes available once the TouchPoint activity has been added. If TouchPoint has never been added, this tab will not appear.
- After the TouchPoint activity has been added – whether it remains active or has been disabled – the Communications tab will continue to display historical activity for Messaging, Video Conferencing, and Reminders.
- Service availablility determines whether users may interact with each option in the dropdown menu. For example, if Messaging is not enabled, users may view historical messages, but may not send new messages.
| If Video Conferencing has not been enabled for the account, that option will not display. |
| Would you like to learn more about the benefits of the SCRAM TouchPoint Mobile application? Contact your Account Manager for details on getting started. |
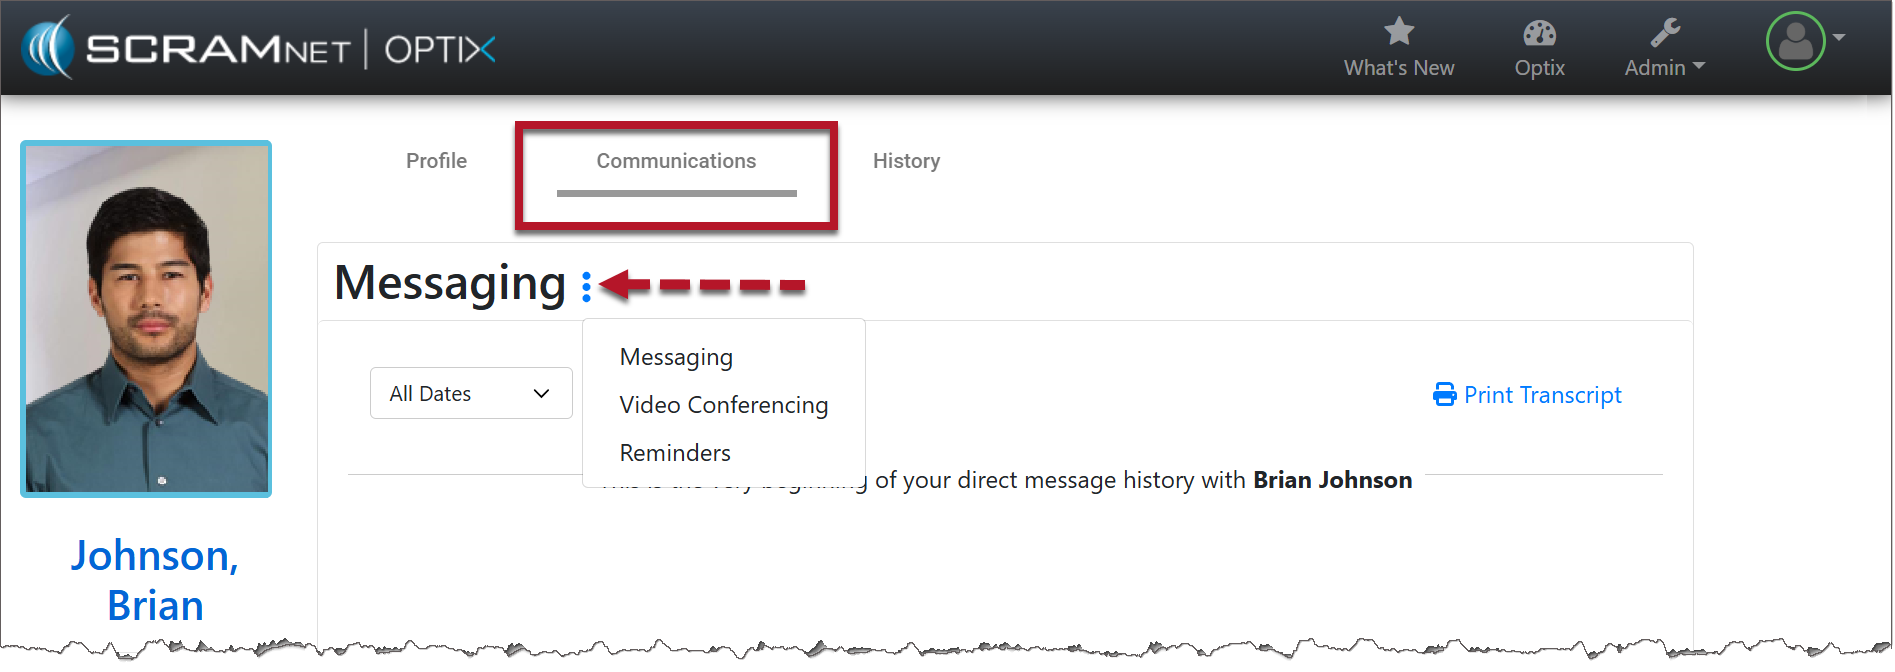
Optix Communications Tab
With this enhancement, users will find a consolidated view of communication and monitoring information under the Communications tab. This tab will contain:
- Electronic Monitoring Reminders
- Messaging
- Video Conferencing
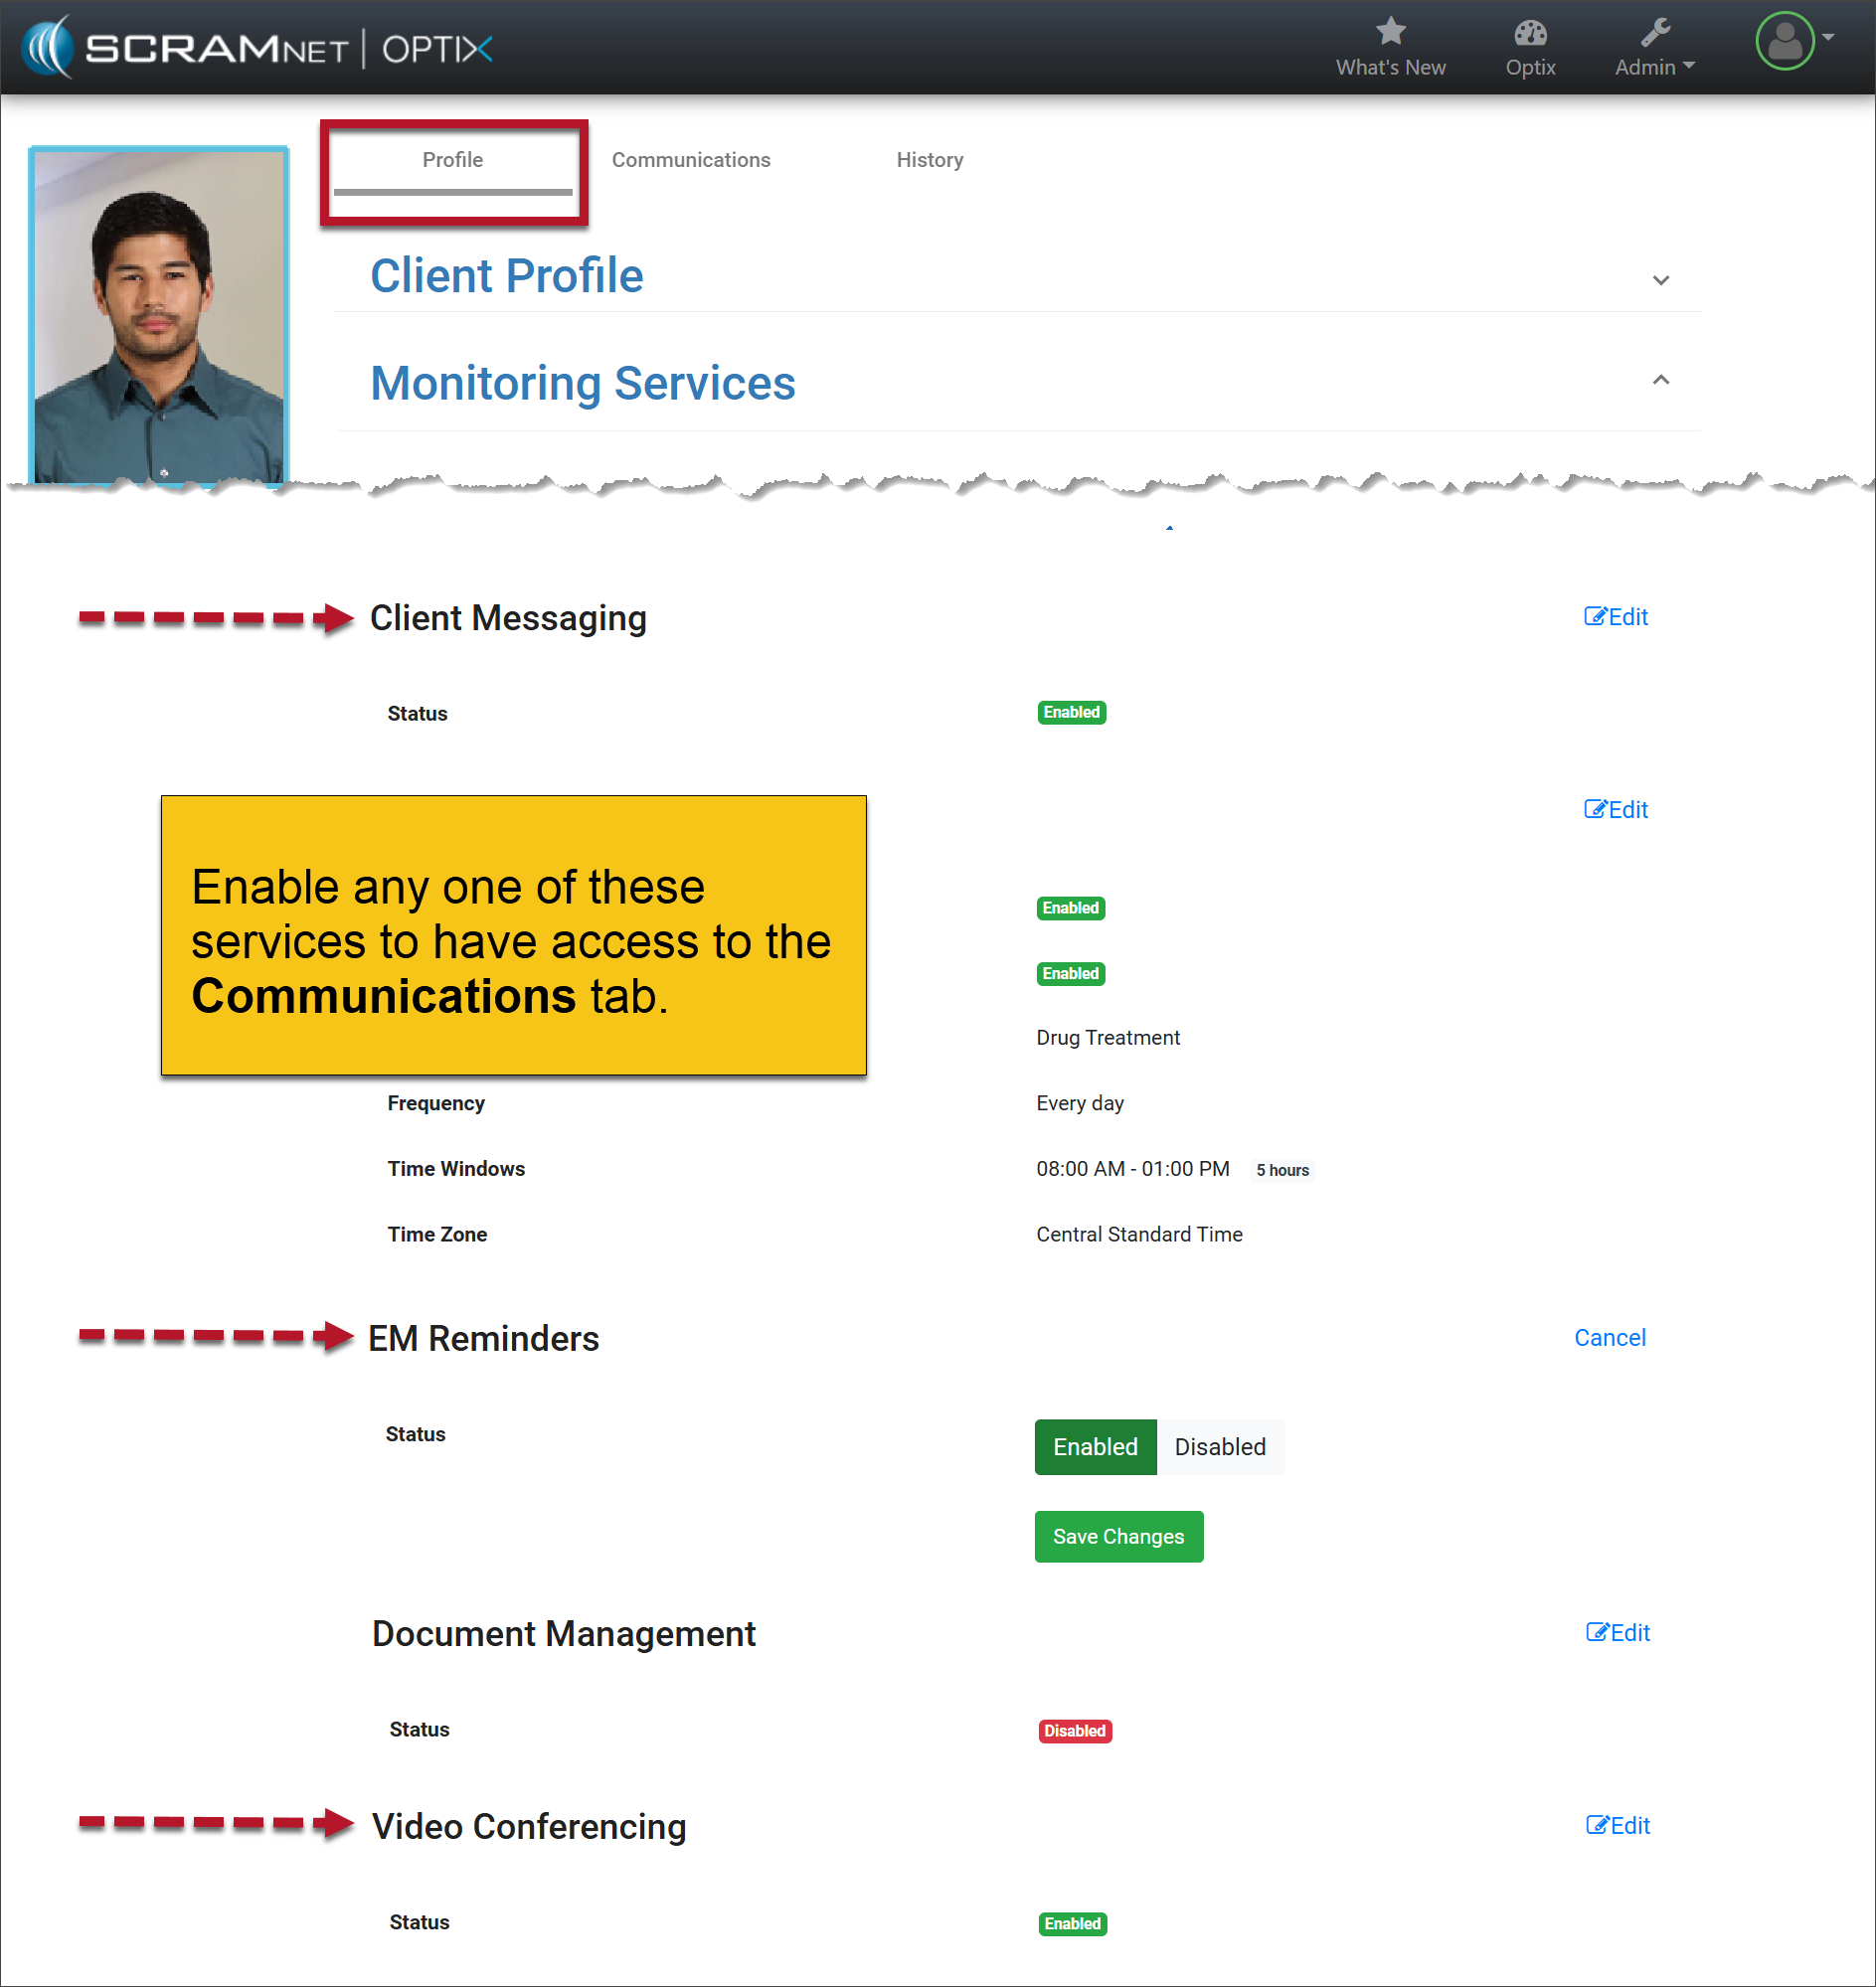
Enable the Service(s)
The Communications tab is available once any of the services is enabled.
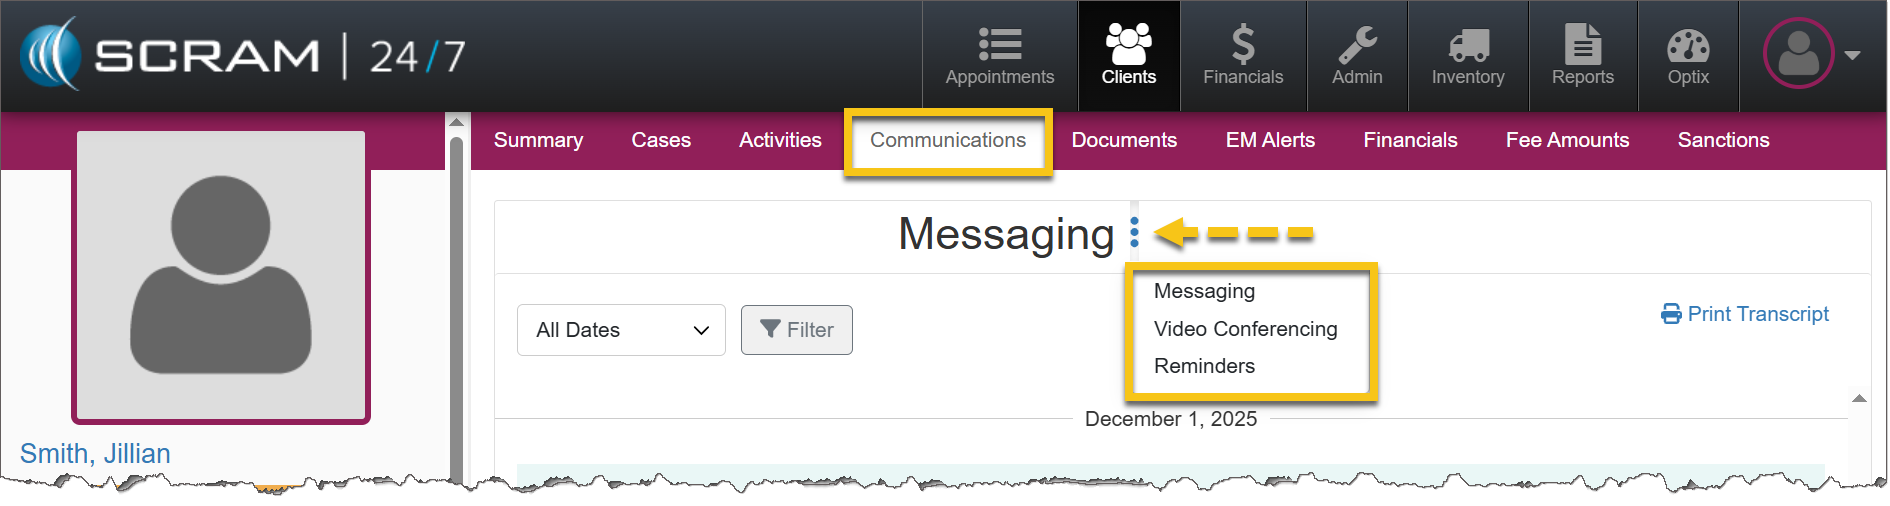
Communications Tab
- Select the Communications tab.
- Open the More (ellipsis) menu next to Messaging.
- Select the desired service.
- If the services are later disabled, users may still view the historical activity associated with those features. However, they will no longer be able to interact with the service or perform any new actions.
| If Video Conferencing has not been enabled for the account, that option will not display. |
| Your account must be enabled for video conferencing for these instructions to work. Contact your SCRAM Systems Account Representative if you are interested in activating this service. |
On October 15th, 2025, SCRAM Systems will release multiple enhancements for your SCRAM 24/7 Monitoring program.
These enhancements are:
- New “Appointments” button replaces the “Testing” button.
- A Documents page for your client caseloads.
- A Communications page within SCRAM 24/7 for clients utilizing the Messaging feature with their TouchPoint Activity.
- Touchpoint Activity “Quick Actions” dropdown menu.
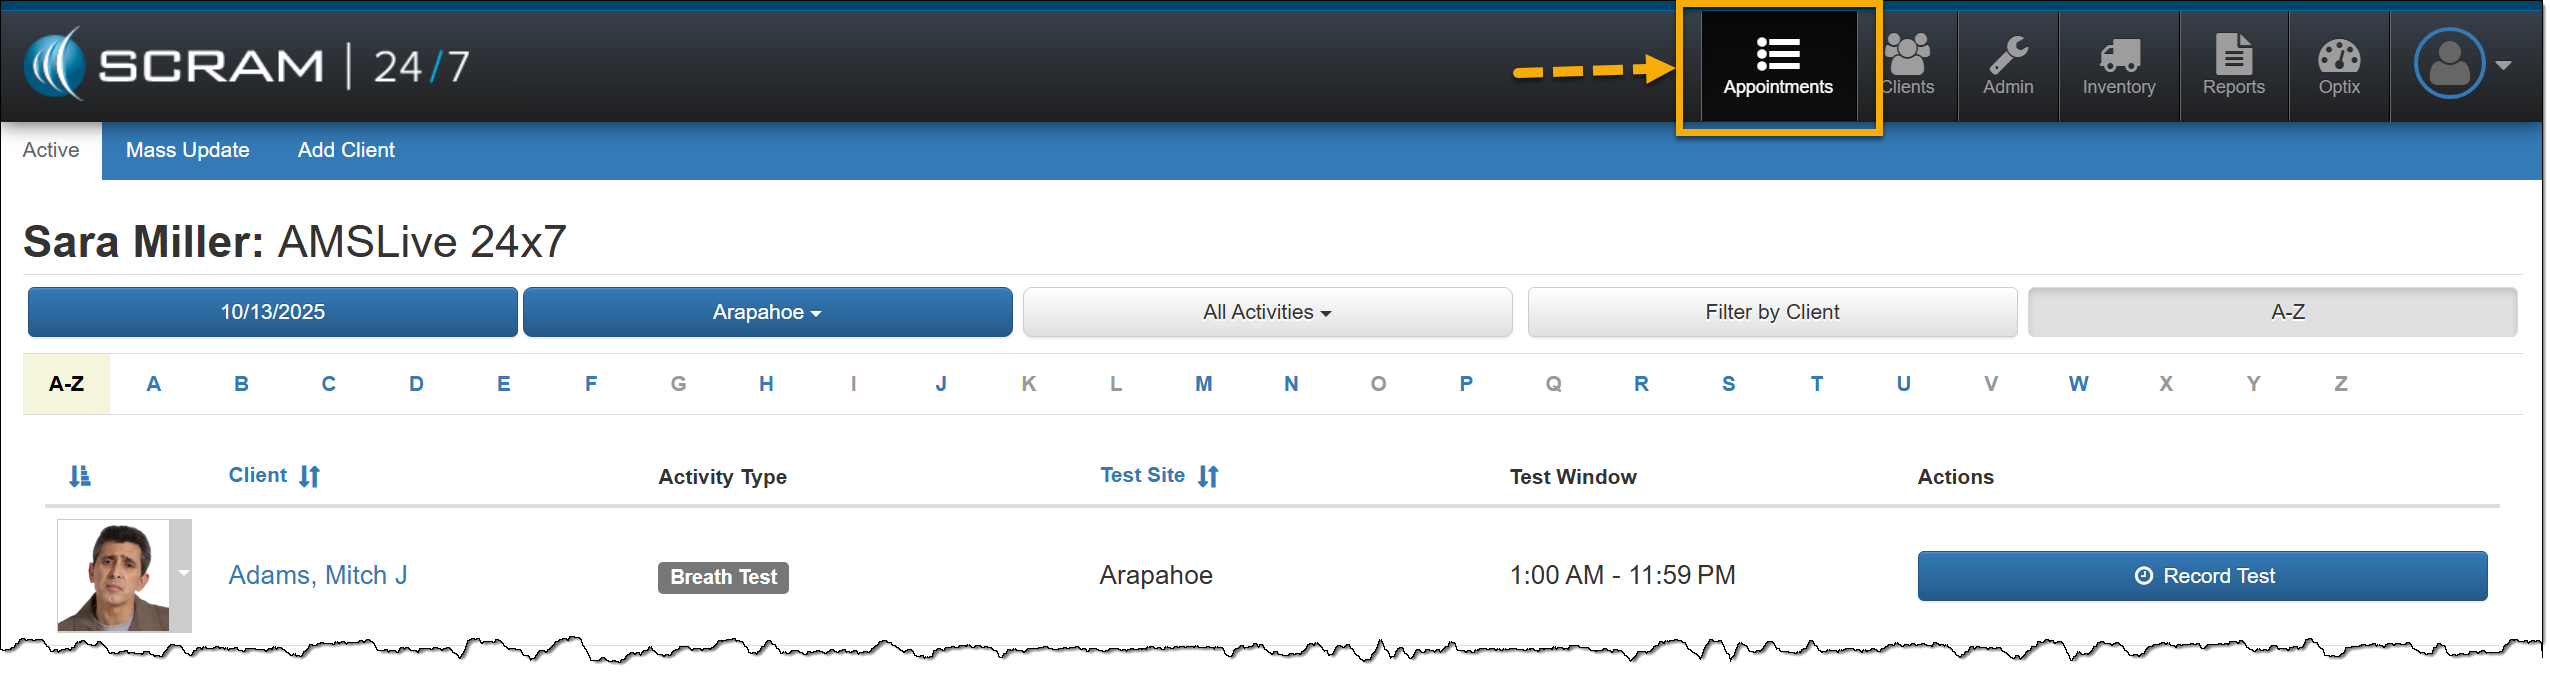
Appointments
With this release, the current main navigation button of “Testing” will be updated to “Appointments” to more accurately represent the activities that may be required for clients during their monitoring program.
Documents
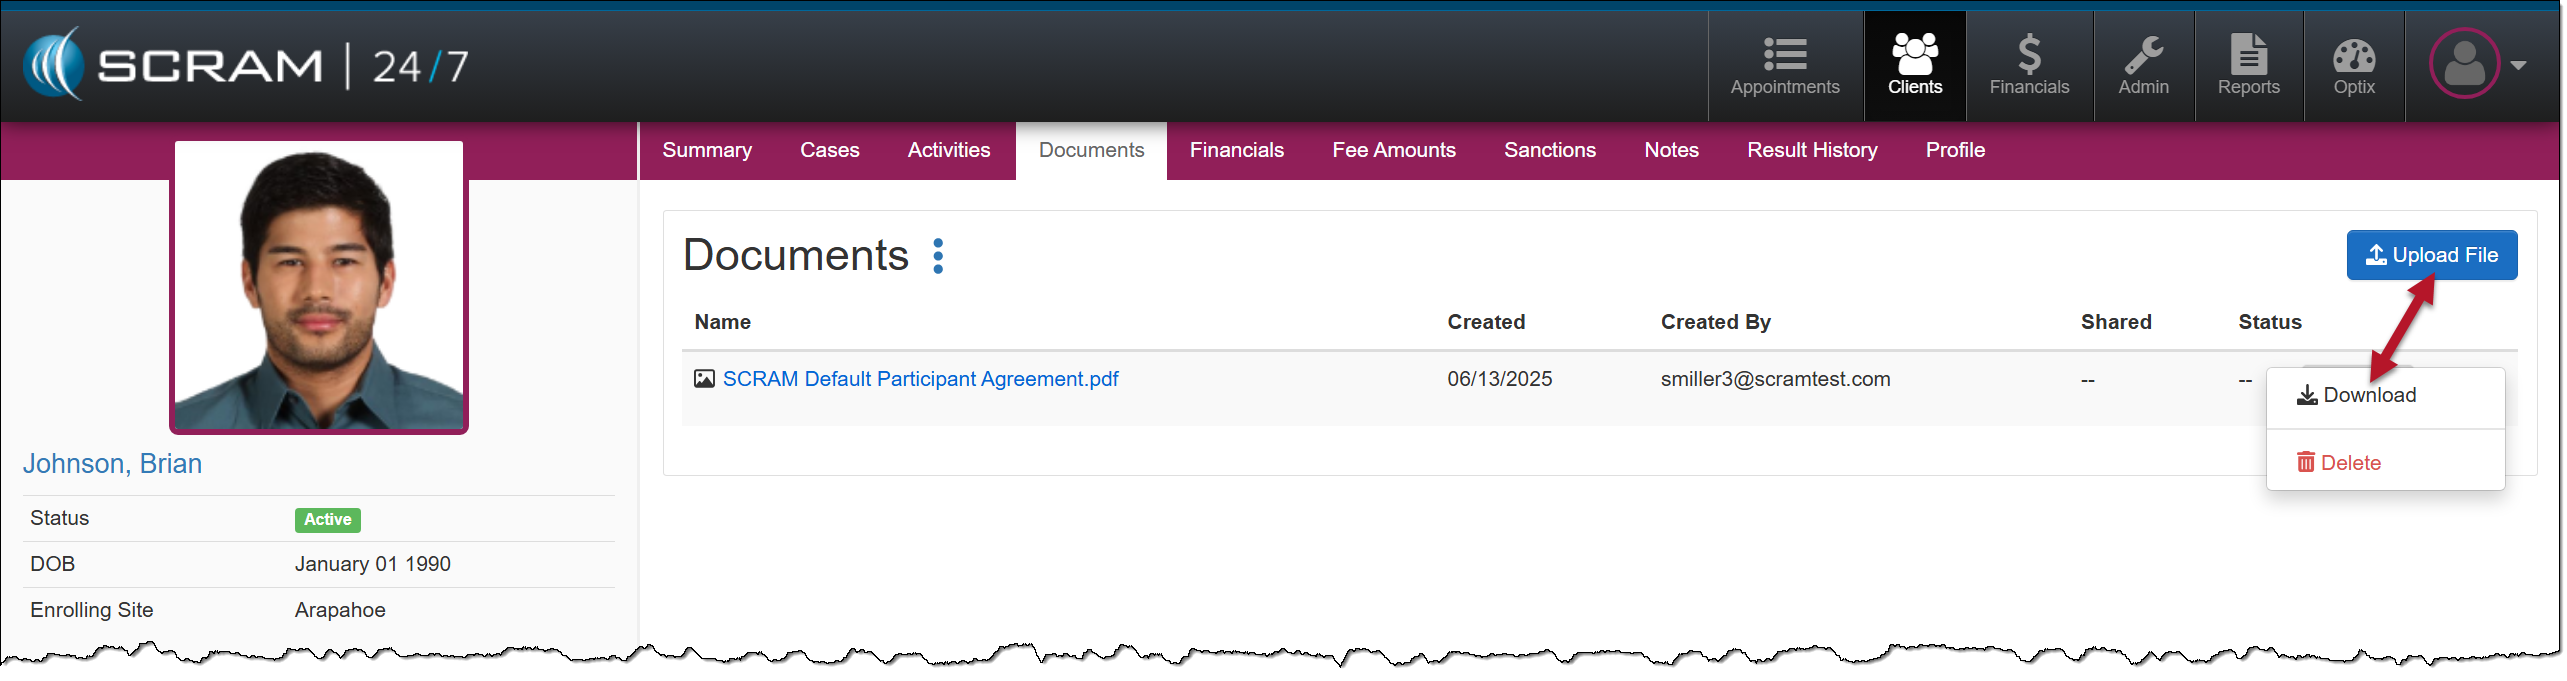
Currently, during your client’s monitoring program, you may associate and save documents relating to a specific case on the Cases tab. Depending on the client, there may be occasions when the client has multiple cases and documents. This enhancement will add a dedicated Documents tab for each client in SCRAM 24/7, providing centralized management of client documents.

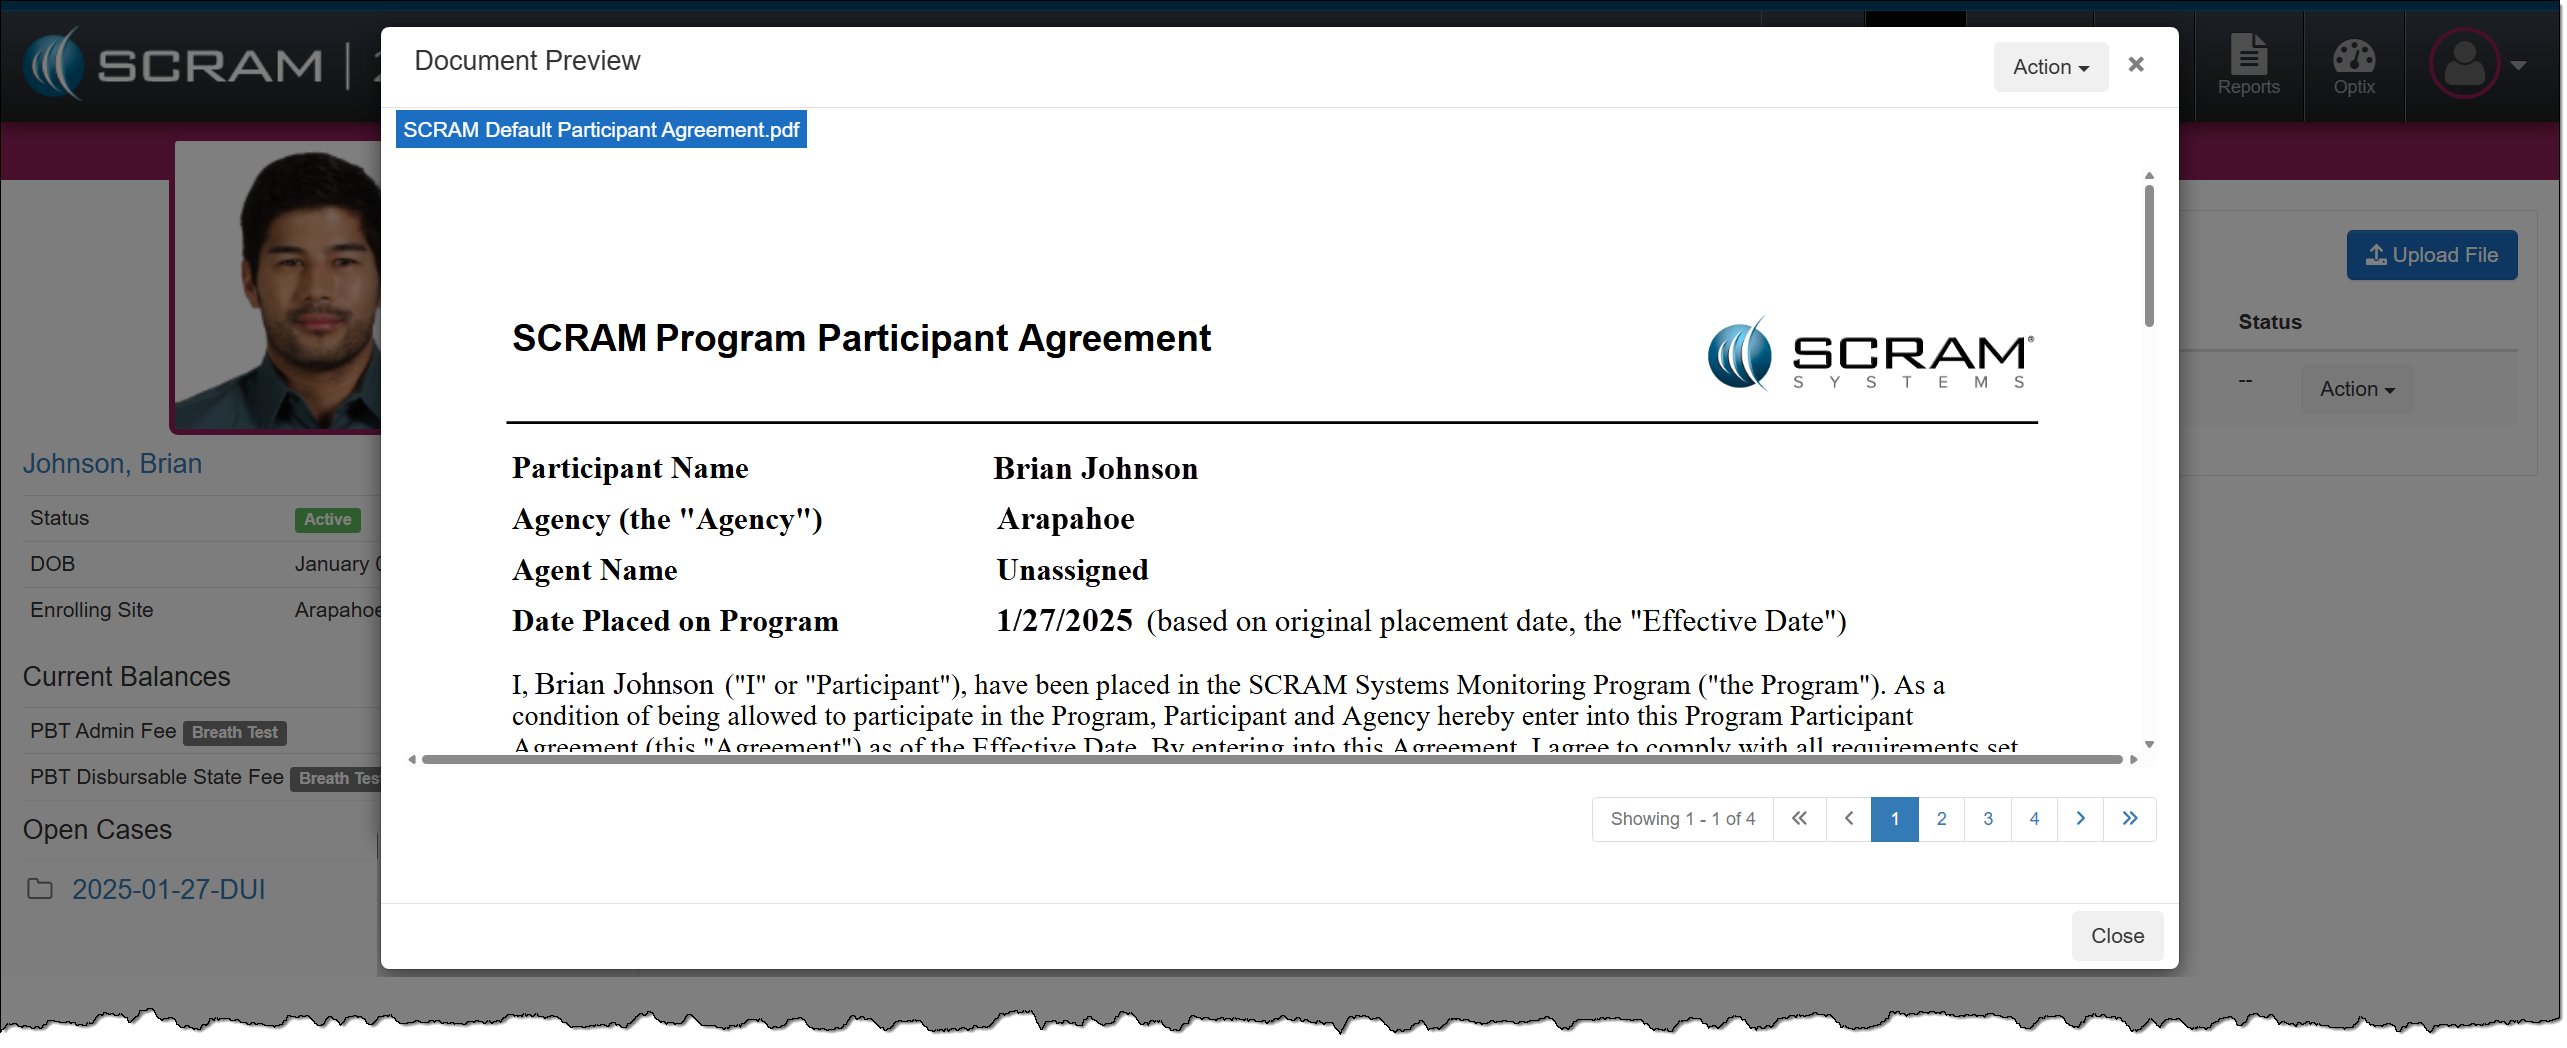
Once the Documents enhancement is released, all current documents saved on the Cases tab will automatically be relocated to the client’s Documents tab for easy access. From there, you may upload or download files, select the document’s hyperlink to view it in a preview window, or delete it.
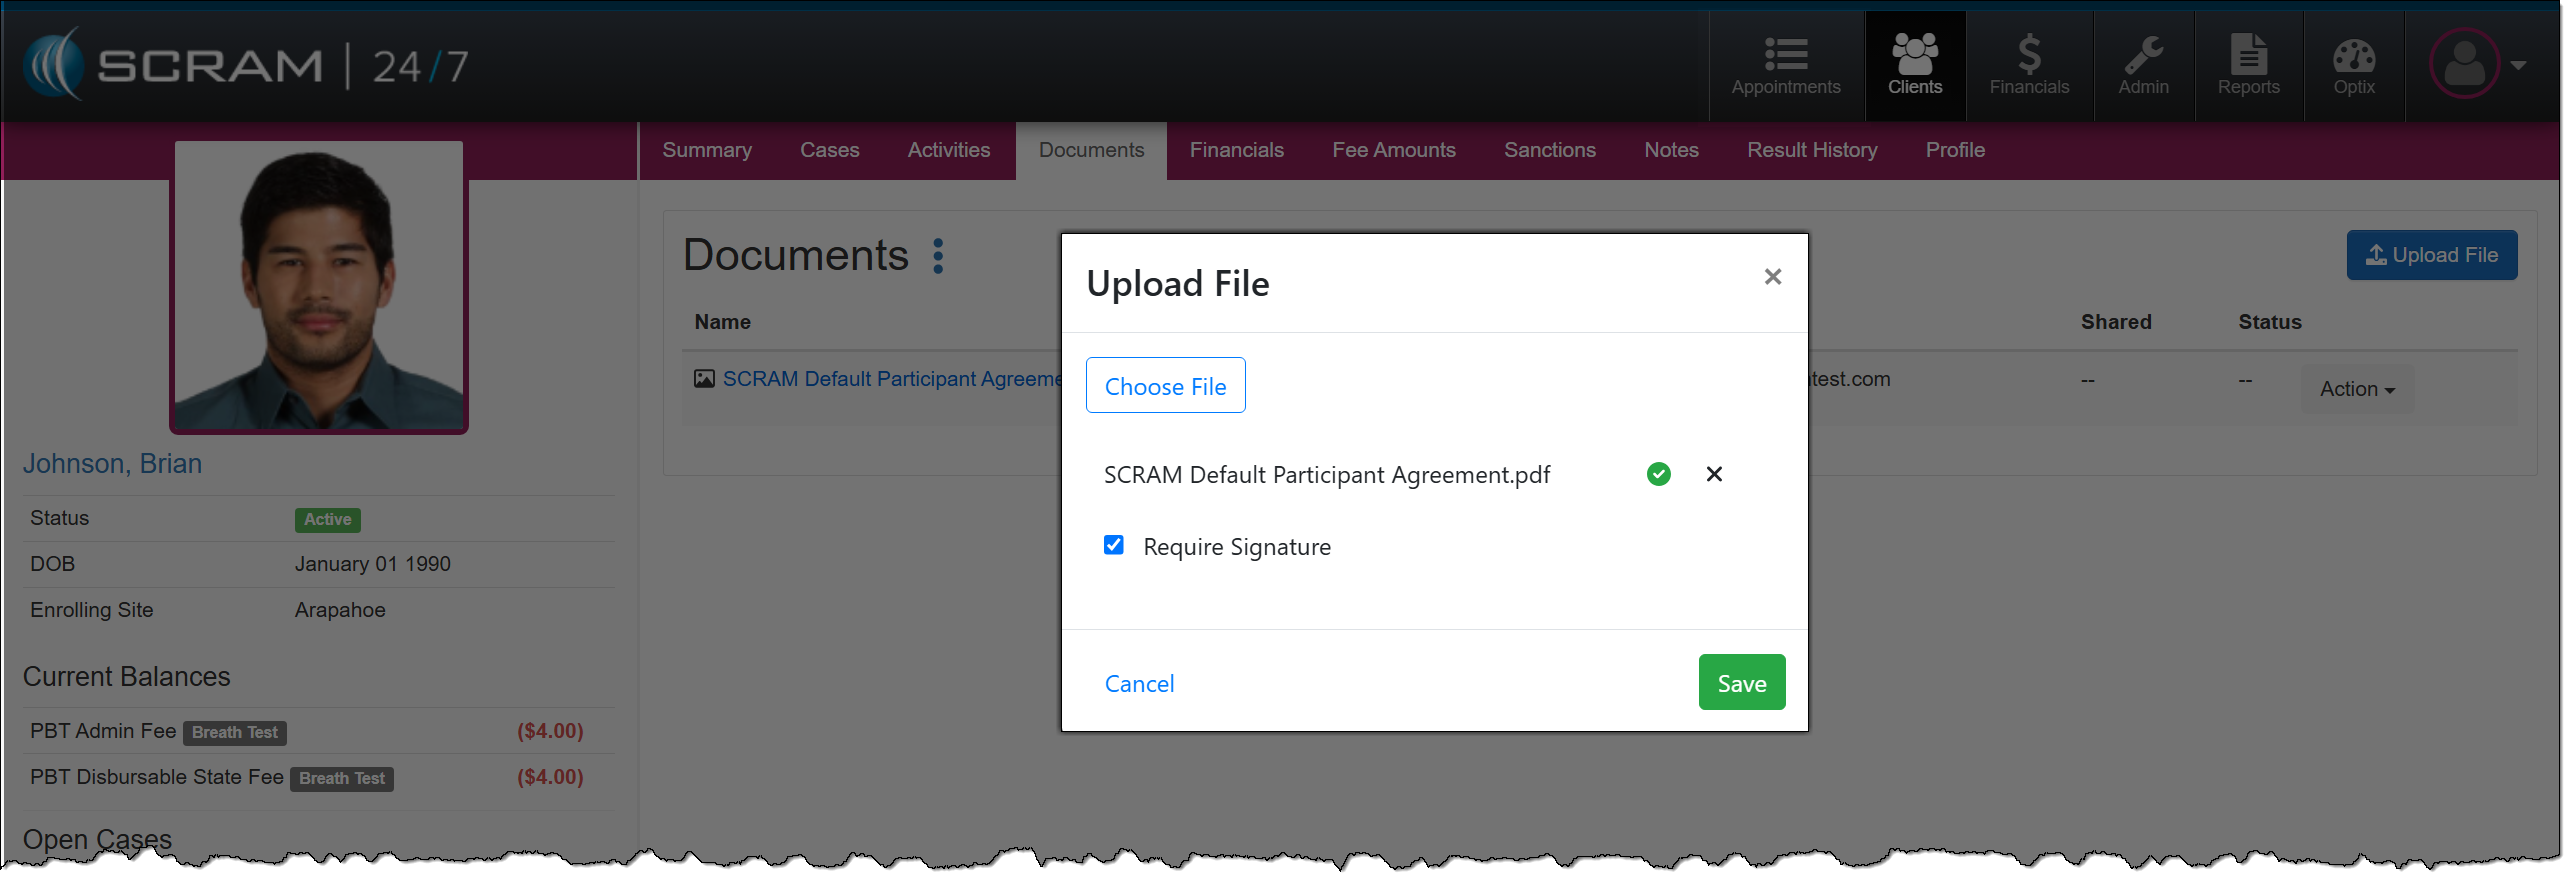
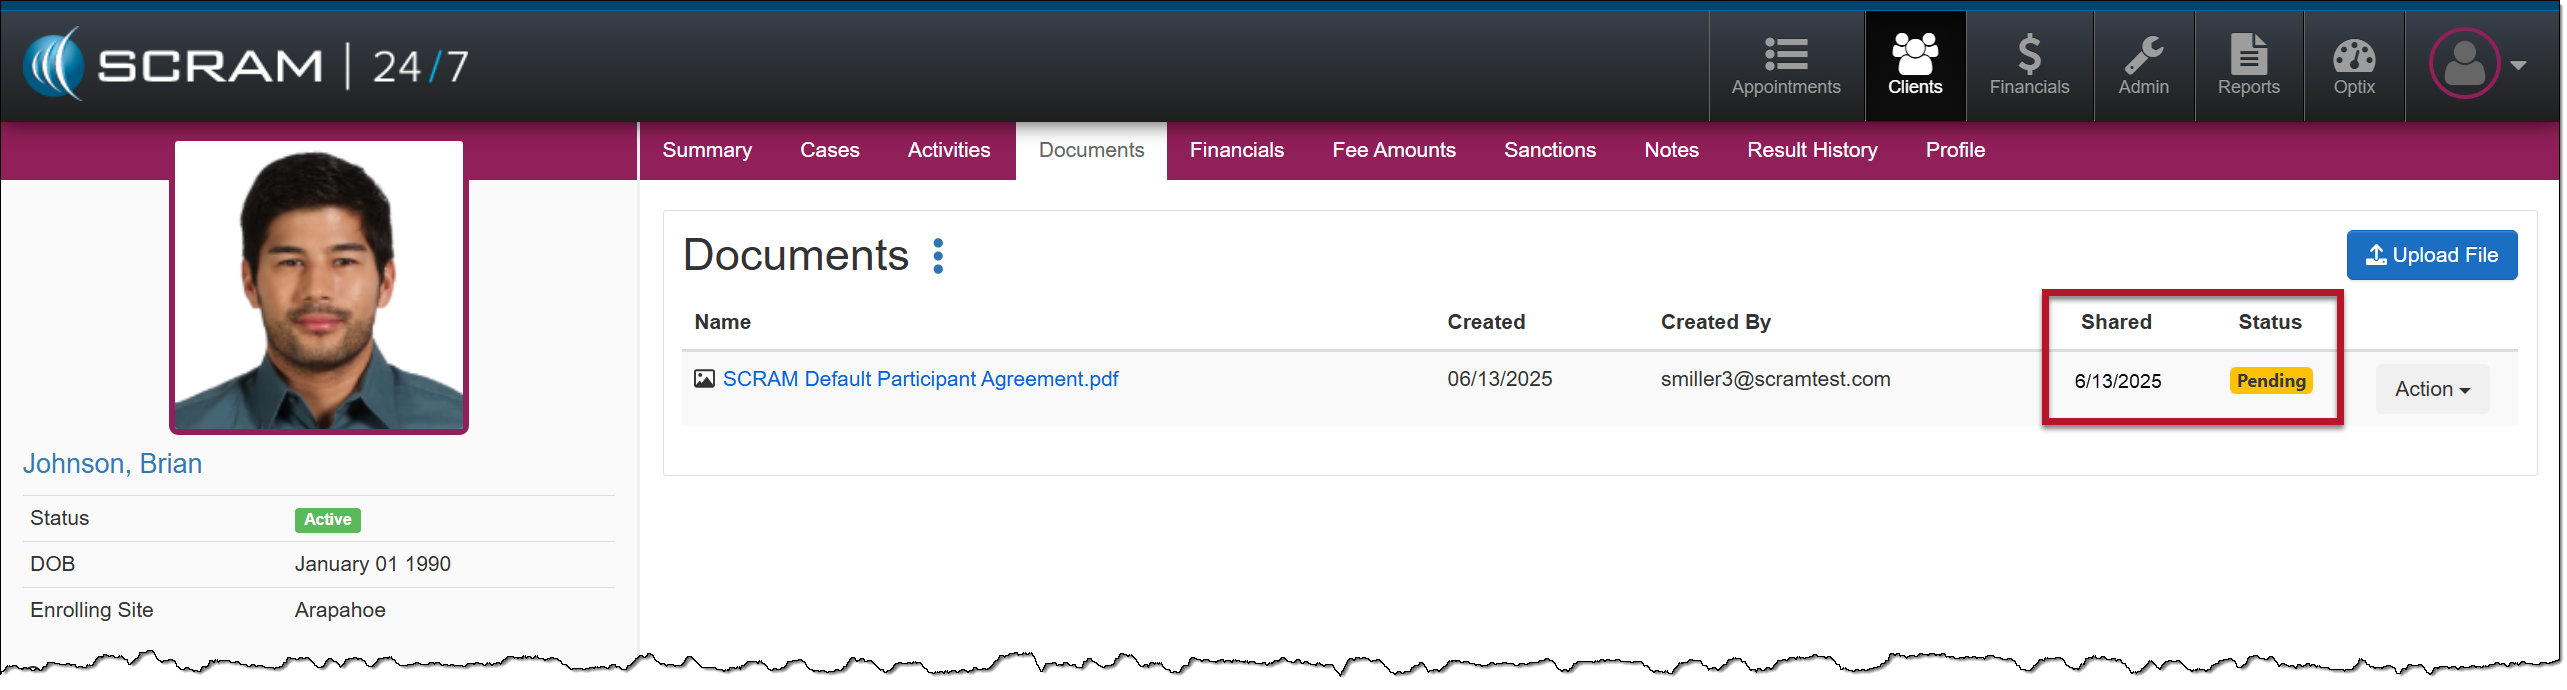
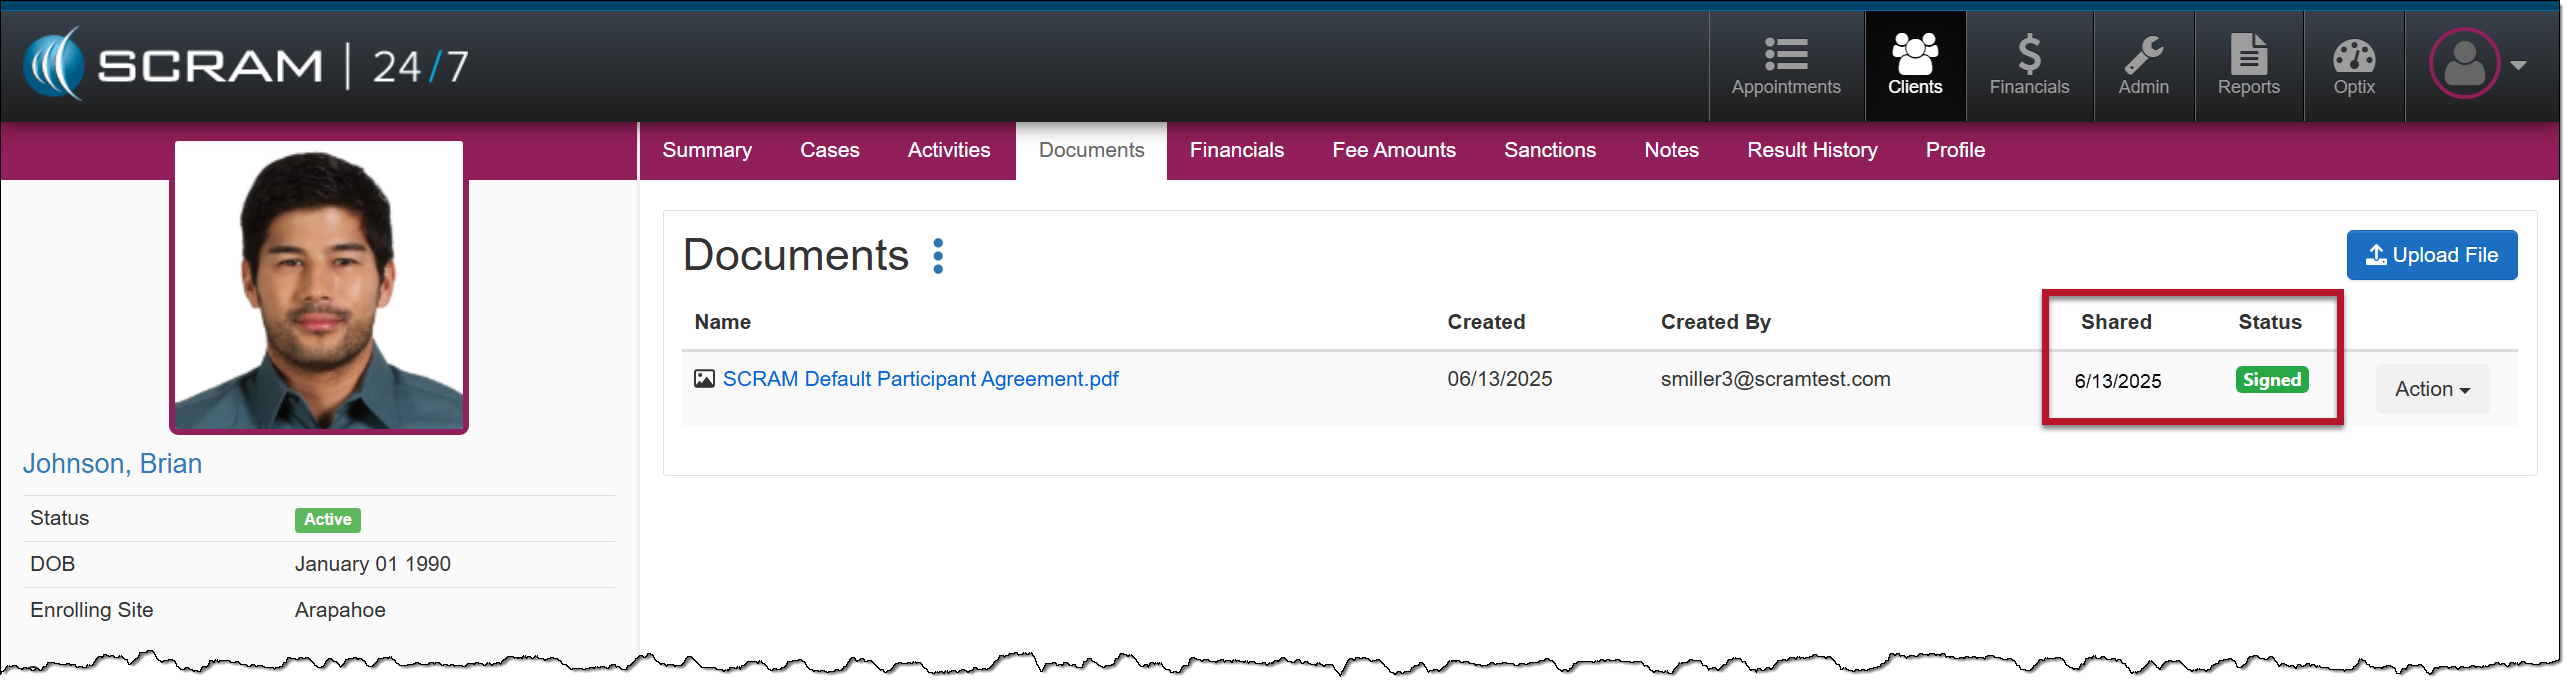
An additional benefit of this Documents enhancement for clients utilizing the TouchPoint Activity and the SCRAM TouchPoint Mobile application is that you may take advantage of all the benefits of the Documents service without navigating to the client’s Optix Profile. This includes:
- sharing documents directly with the client through the SCRAM TouchPoint Mobile application,
- requiring client e-signatures, and
- generating “Read” date and time stamps on shared documents.
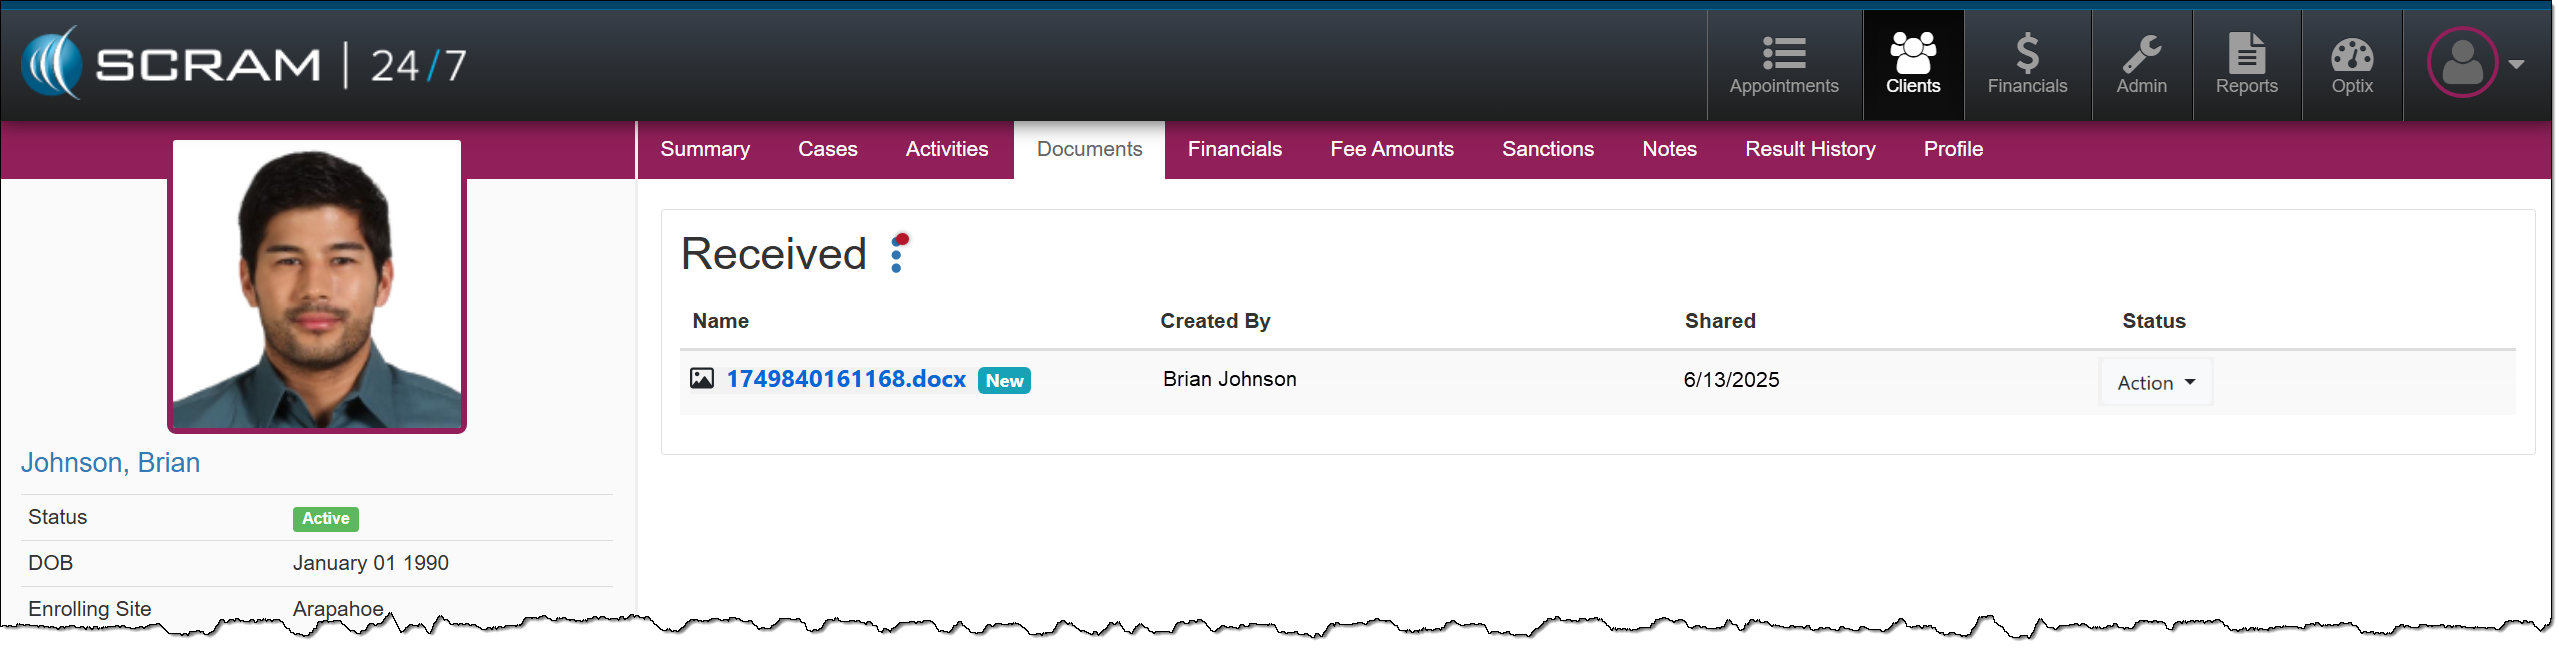
Additionally, the client may send documents and images directly from their mobile application to their Documents page in SCRAM 24/7, thus streamlining the delivery, receiving, and saving of documents to the client’s SCRAM 24/7 Profile.
Communications
Currently, after adding the TouchPoint Activity and enabling the Messaging feature for your client, you must navigate to the client’s Optix TouchPoint profile to send, view, and print a history of messages.
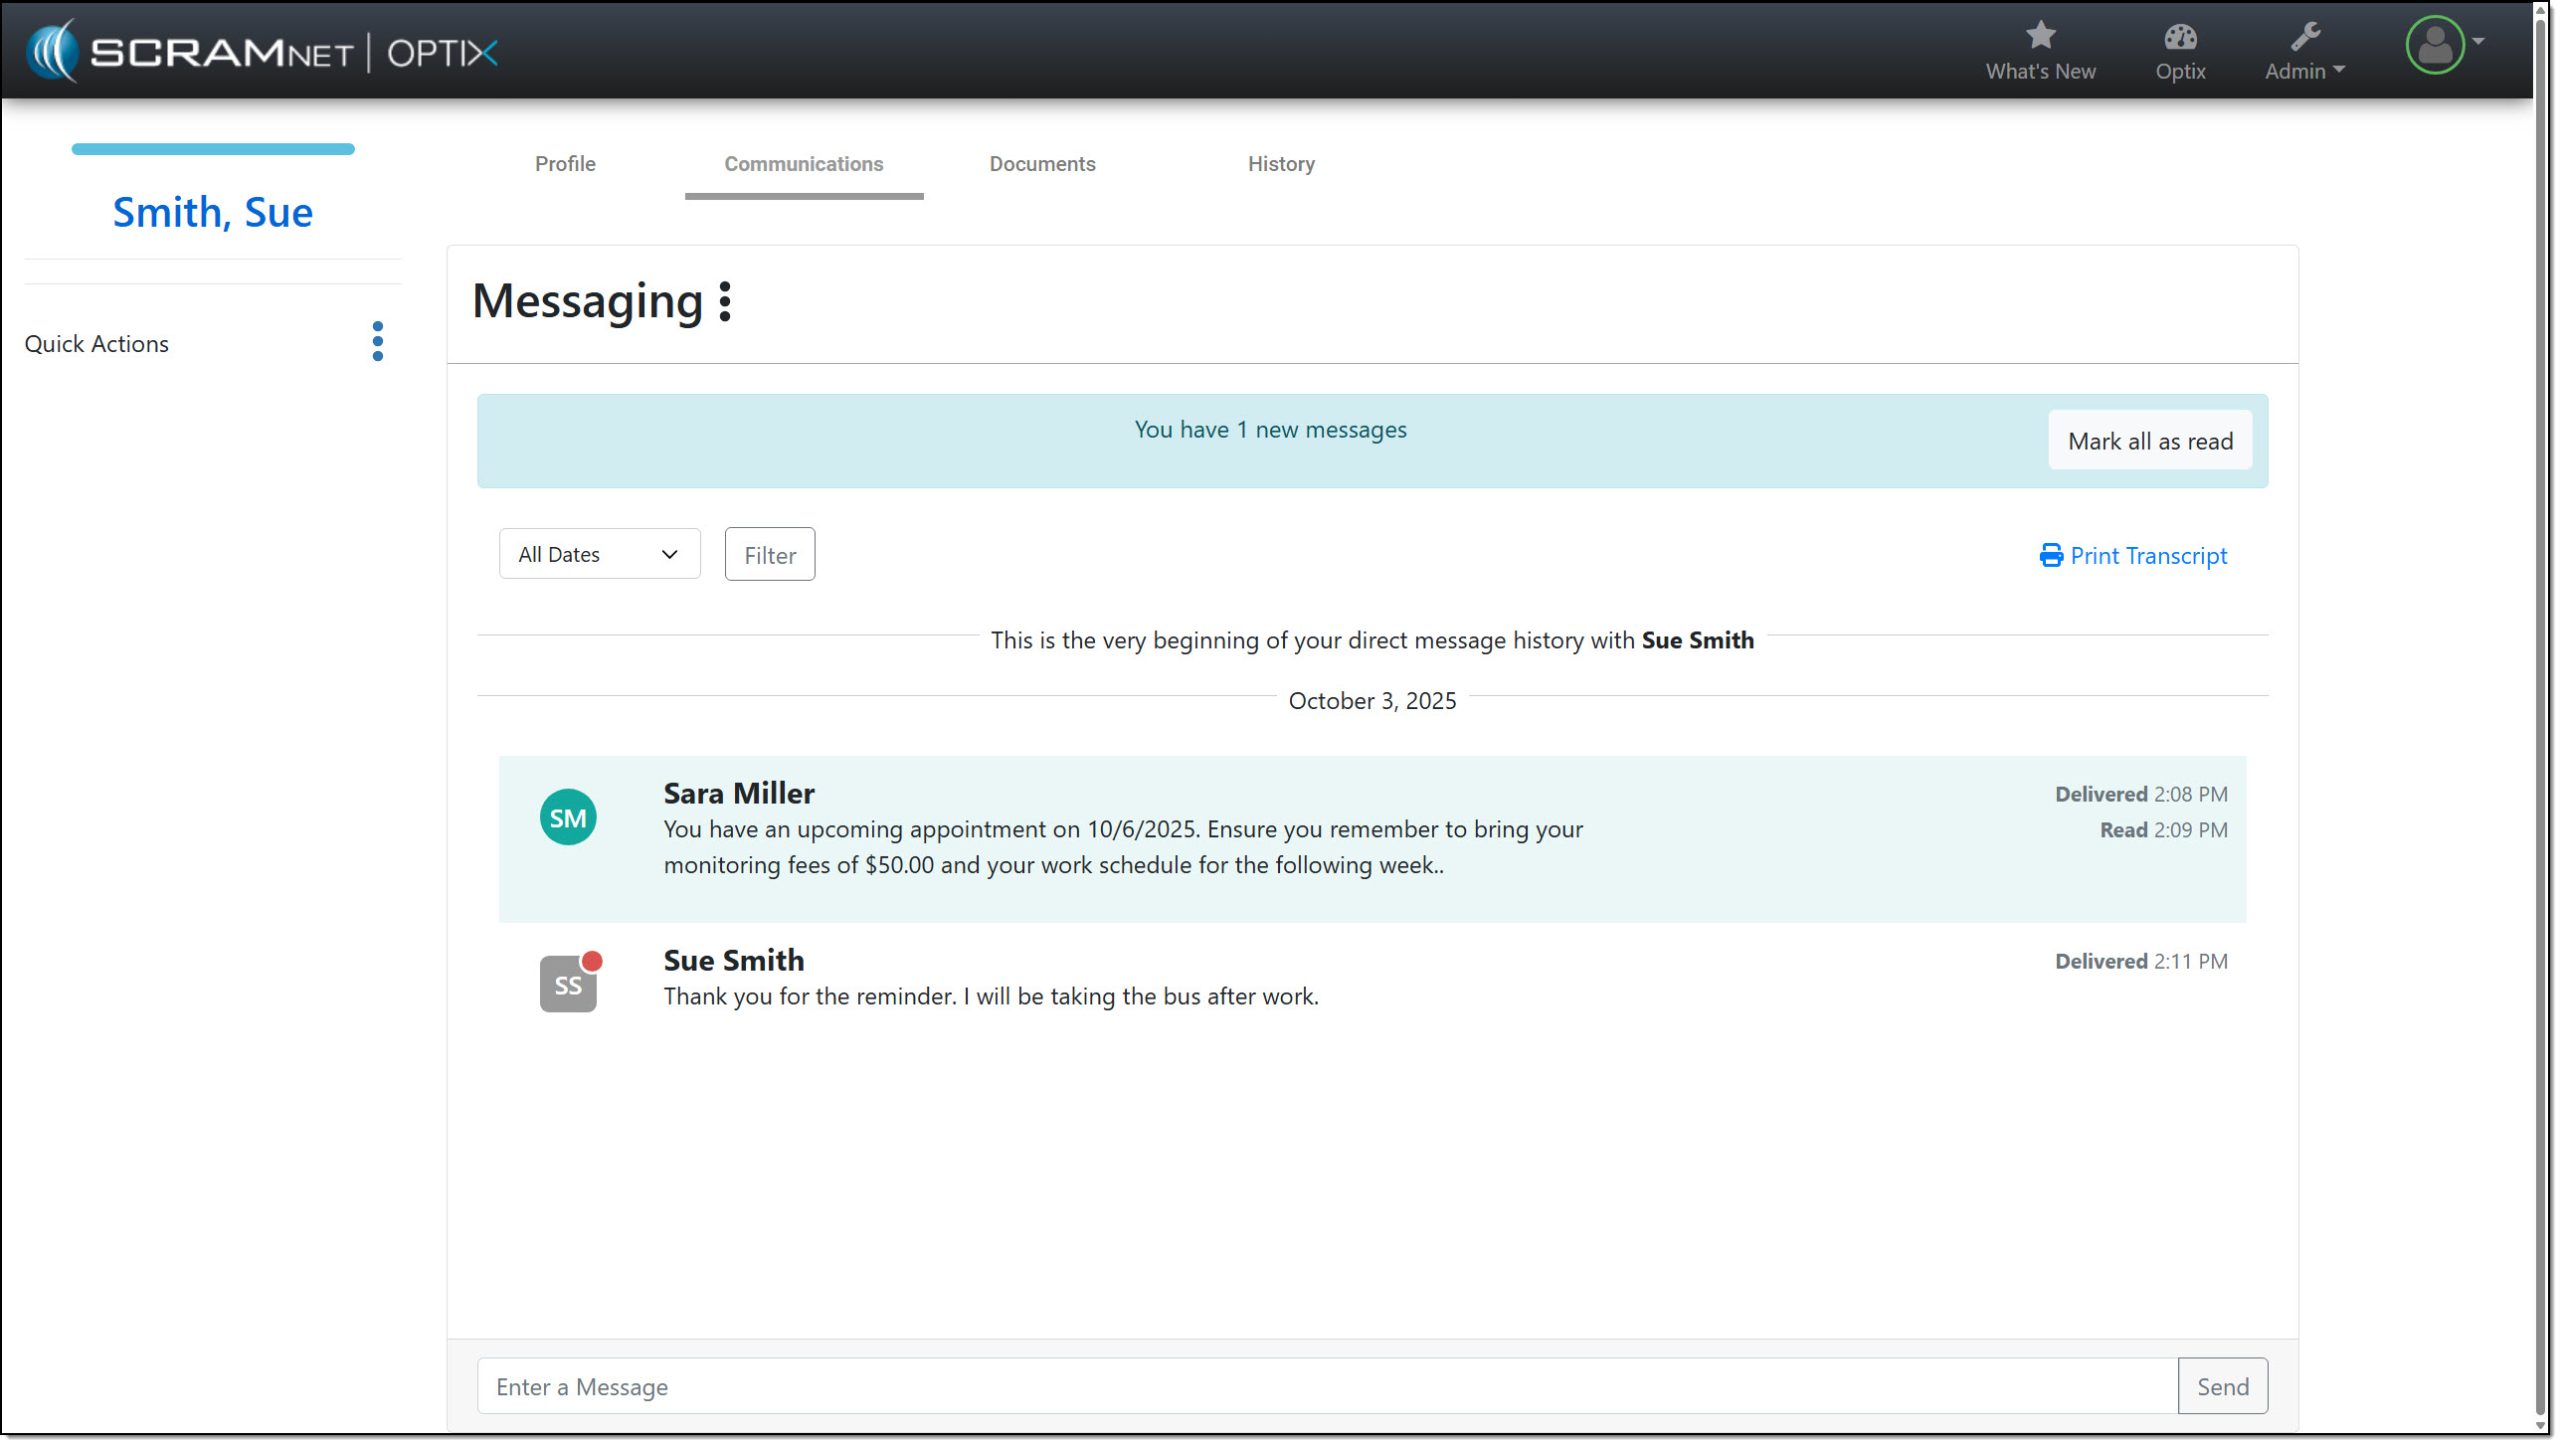
With this enhancement, you may complete all messaging tasks from within SCRAM 24/7.
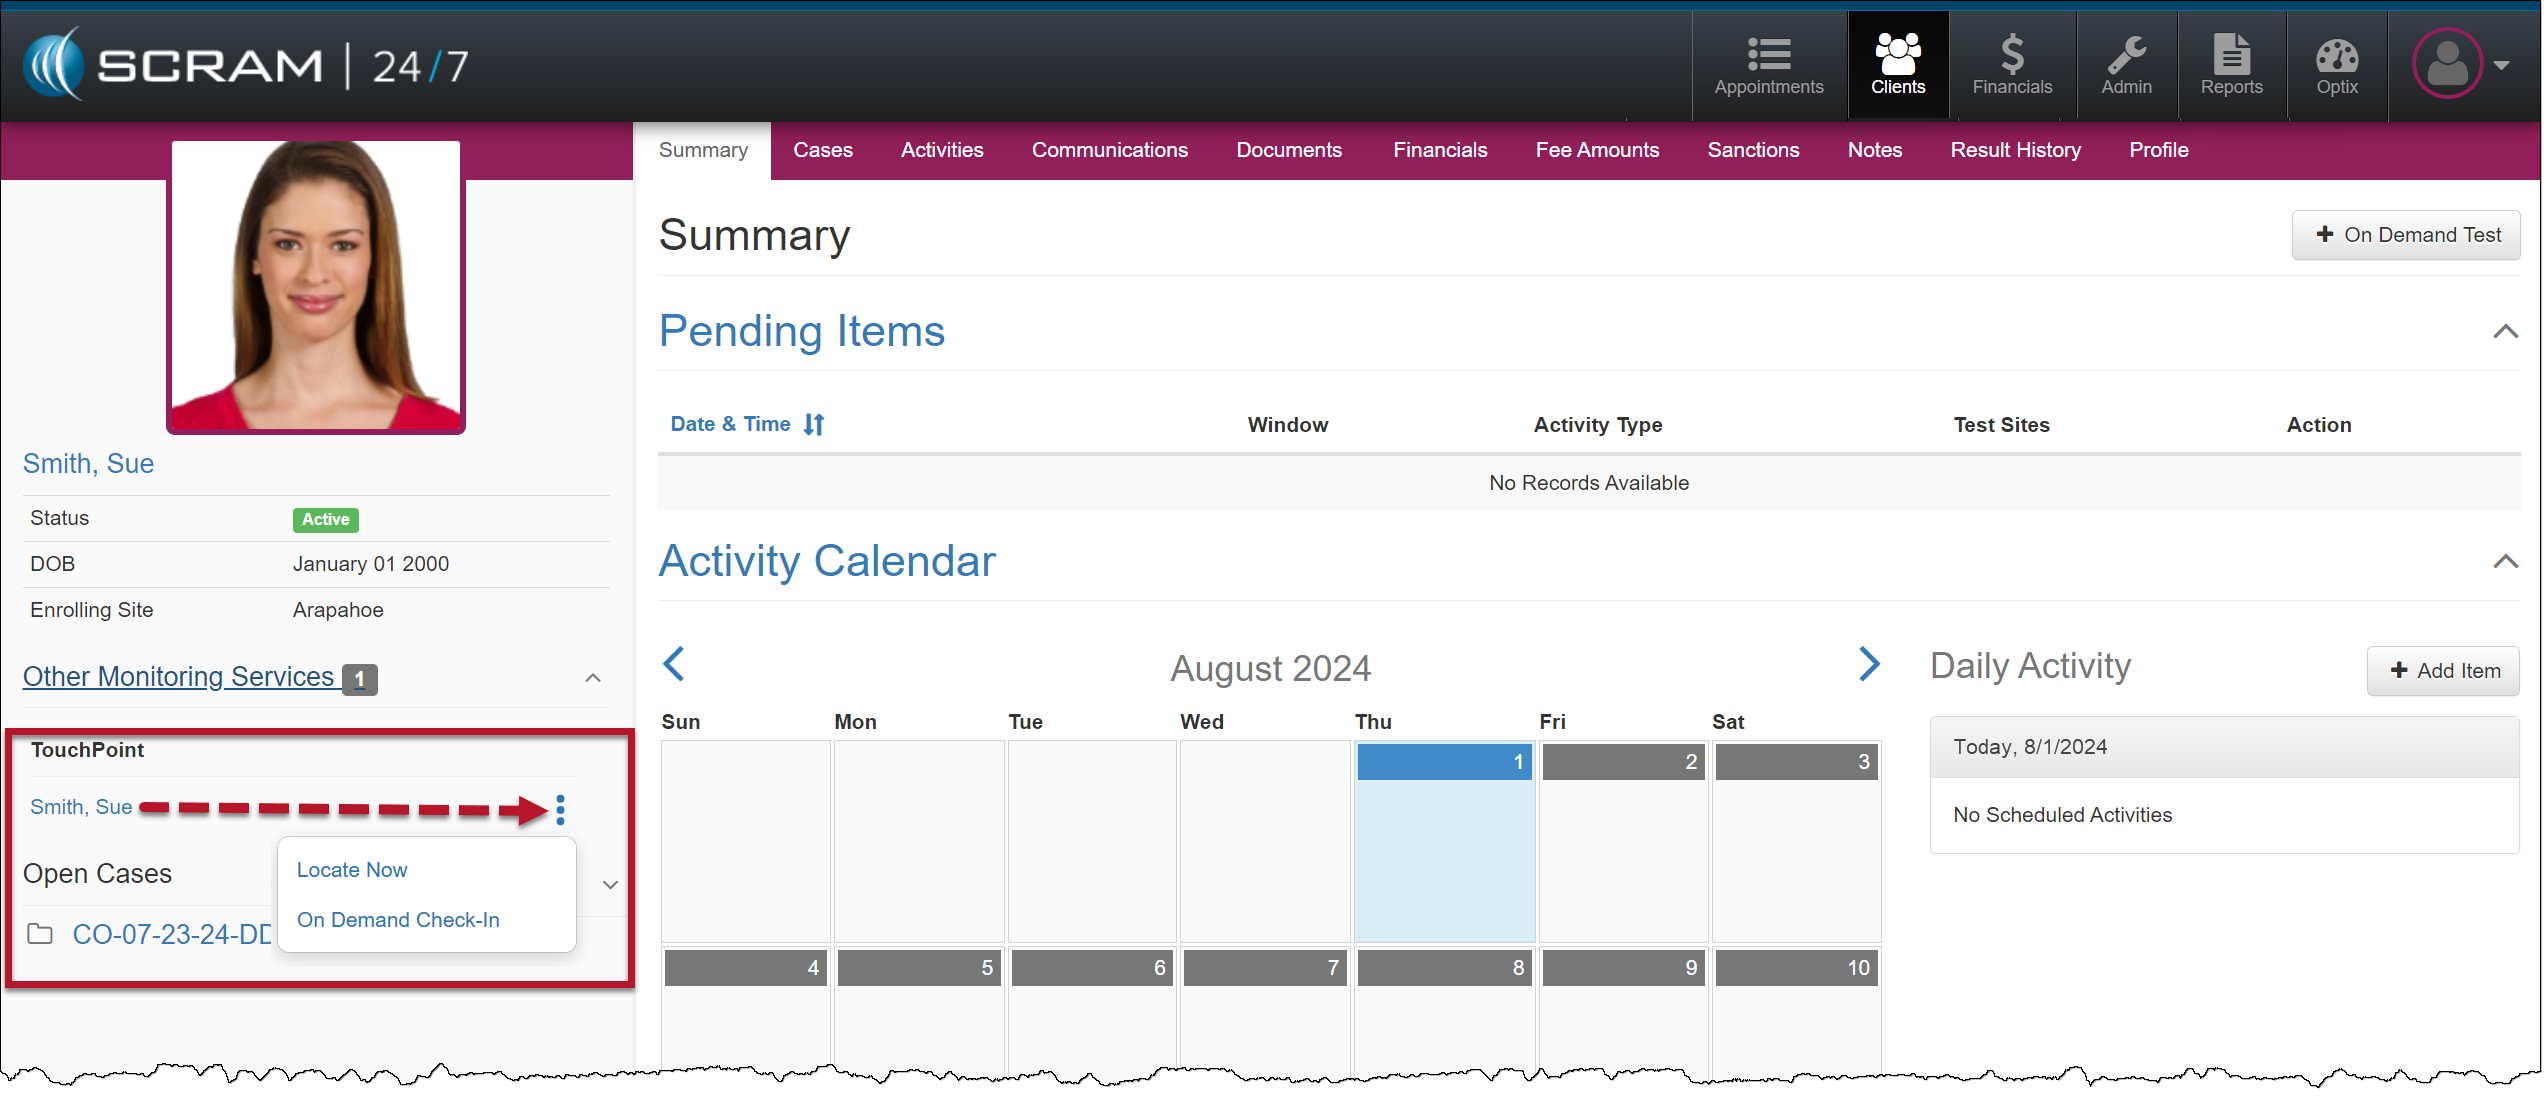
TouchPoint Activity “Quick Actions” Options
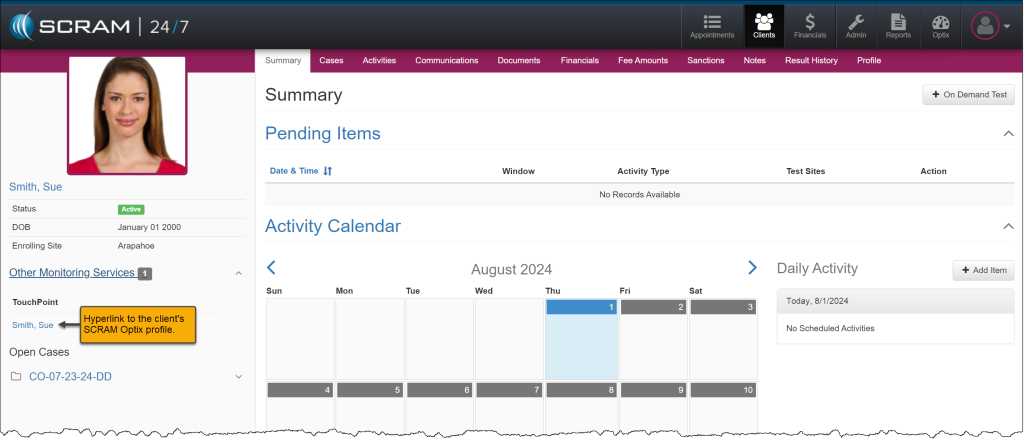
Once a TouchPoint Activity has been enabled for your SCRAM 24/7 client, to utilize the on-demand features like “Locate Now” or to request an “On Demand Check-in,” you would navigate to the client’s Optix profile using the client’s name hyperlink located in the Other Monitoring Services section under the “TouchPoint” heading.
With this enhancement, you may now access and launch these features within SCRAM 24/7 by opening the Quick Actions dropdown menu.
|
On April 30th, 2025, SCRAM Systems will release multiple enhancements for your SCRAM 24/7 program.
These enhancements are:
- Updates to the personally identifiable information (PII) that is available on the Add 24/7 Client page and the client’s Profile page.
- Google Address validation for client address on the Add 24/7 Client page in the Contact Information section.
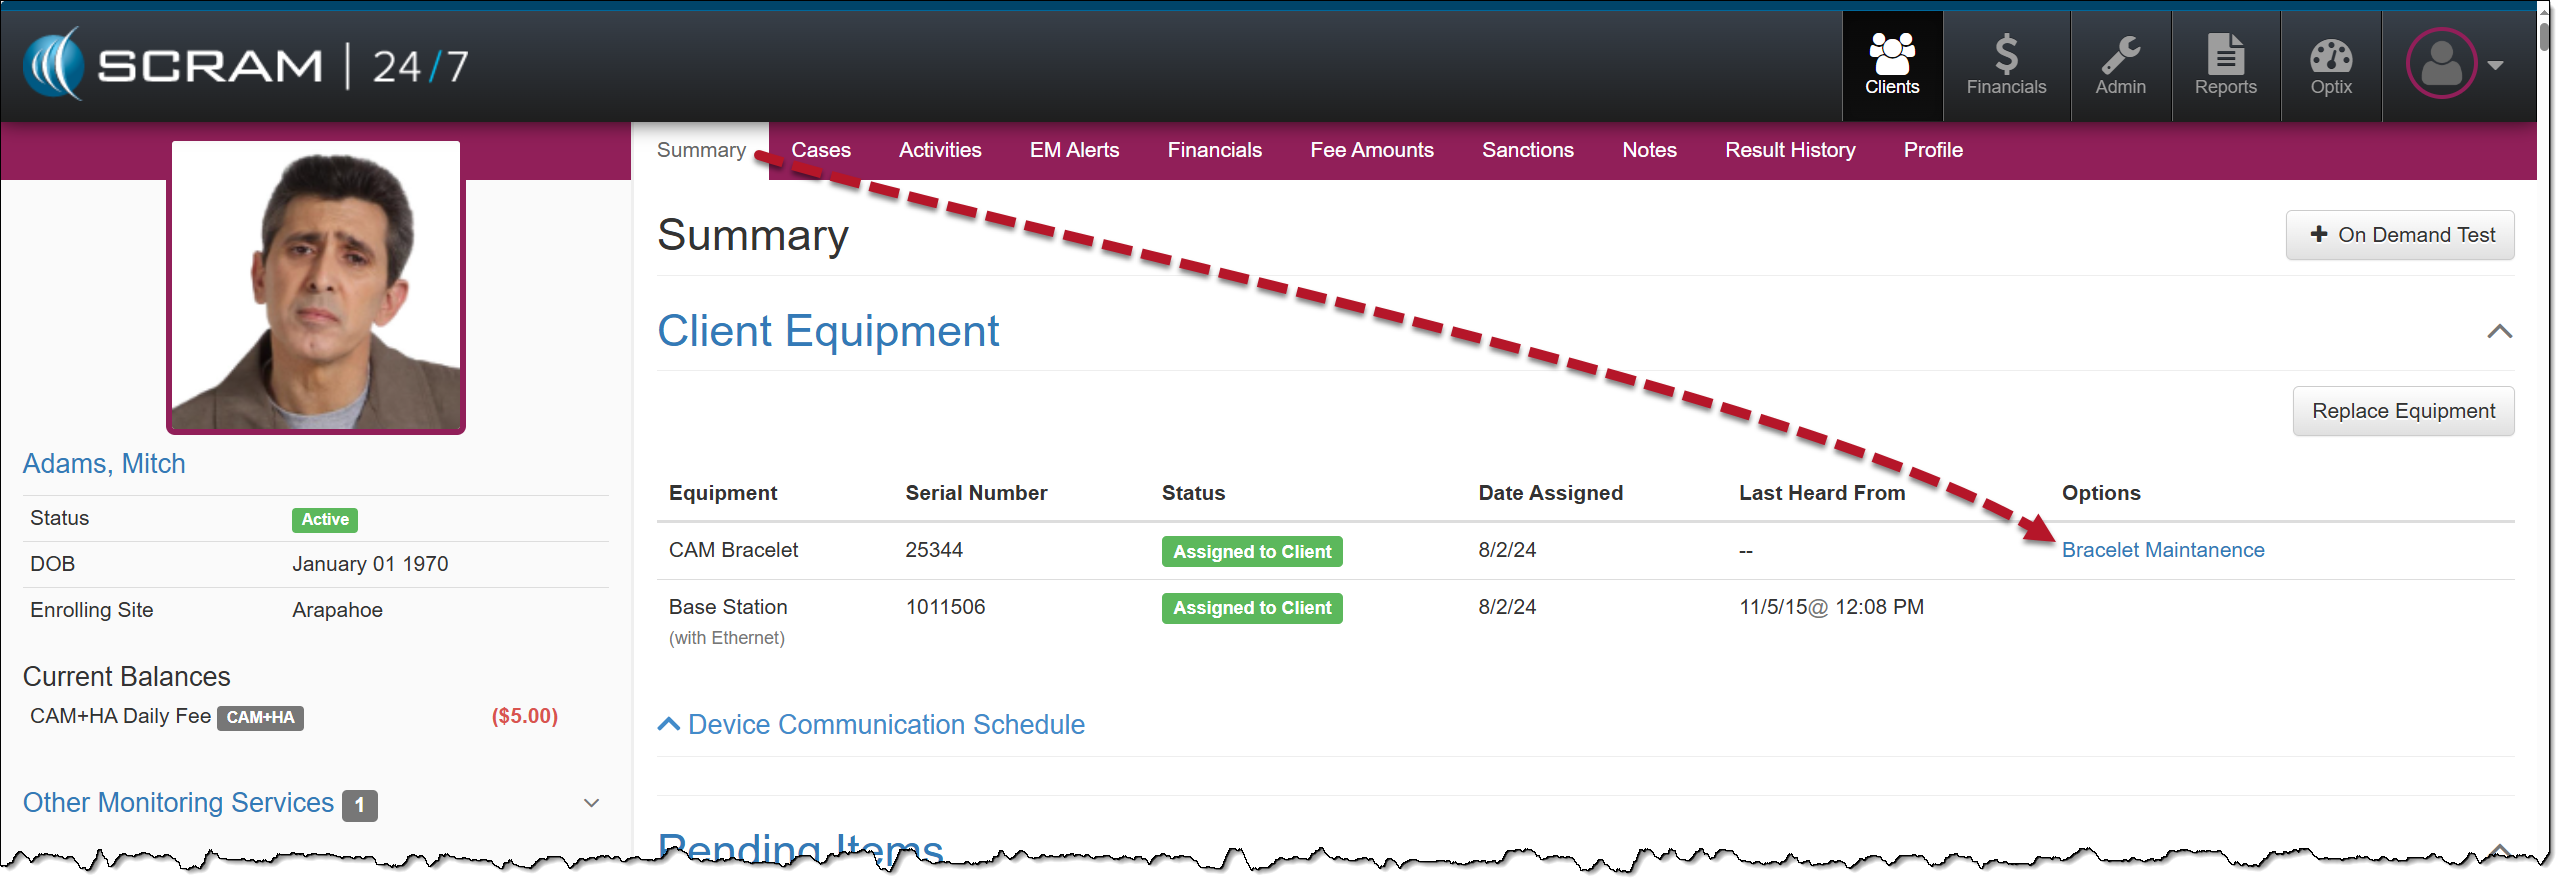
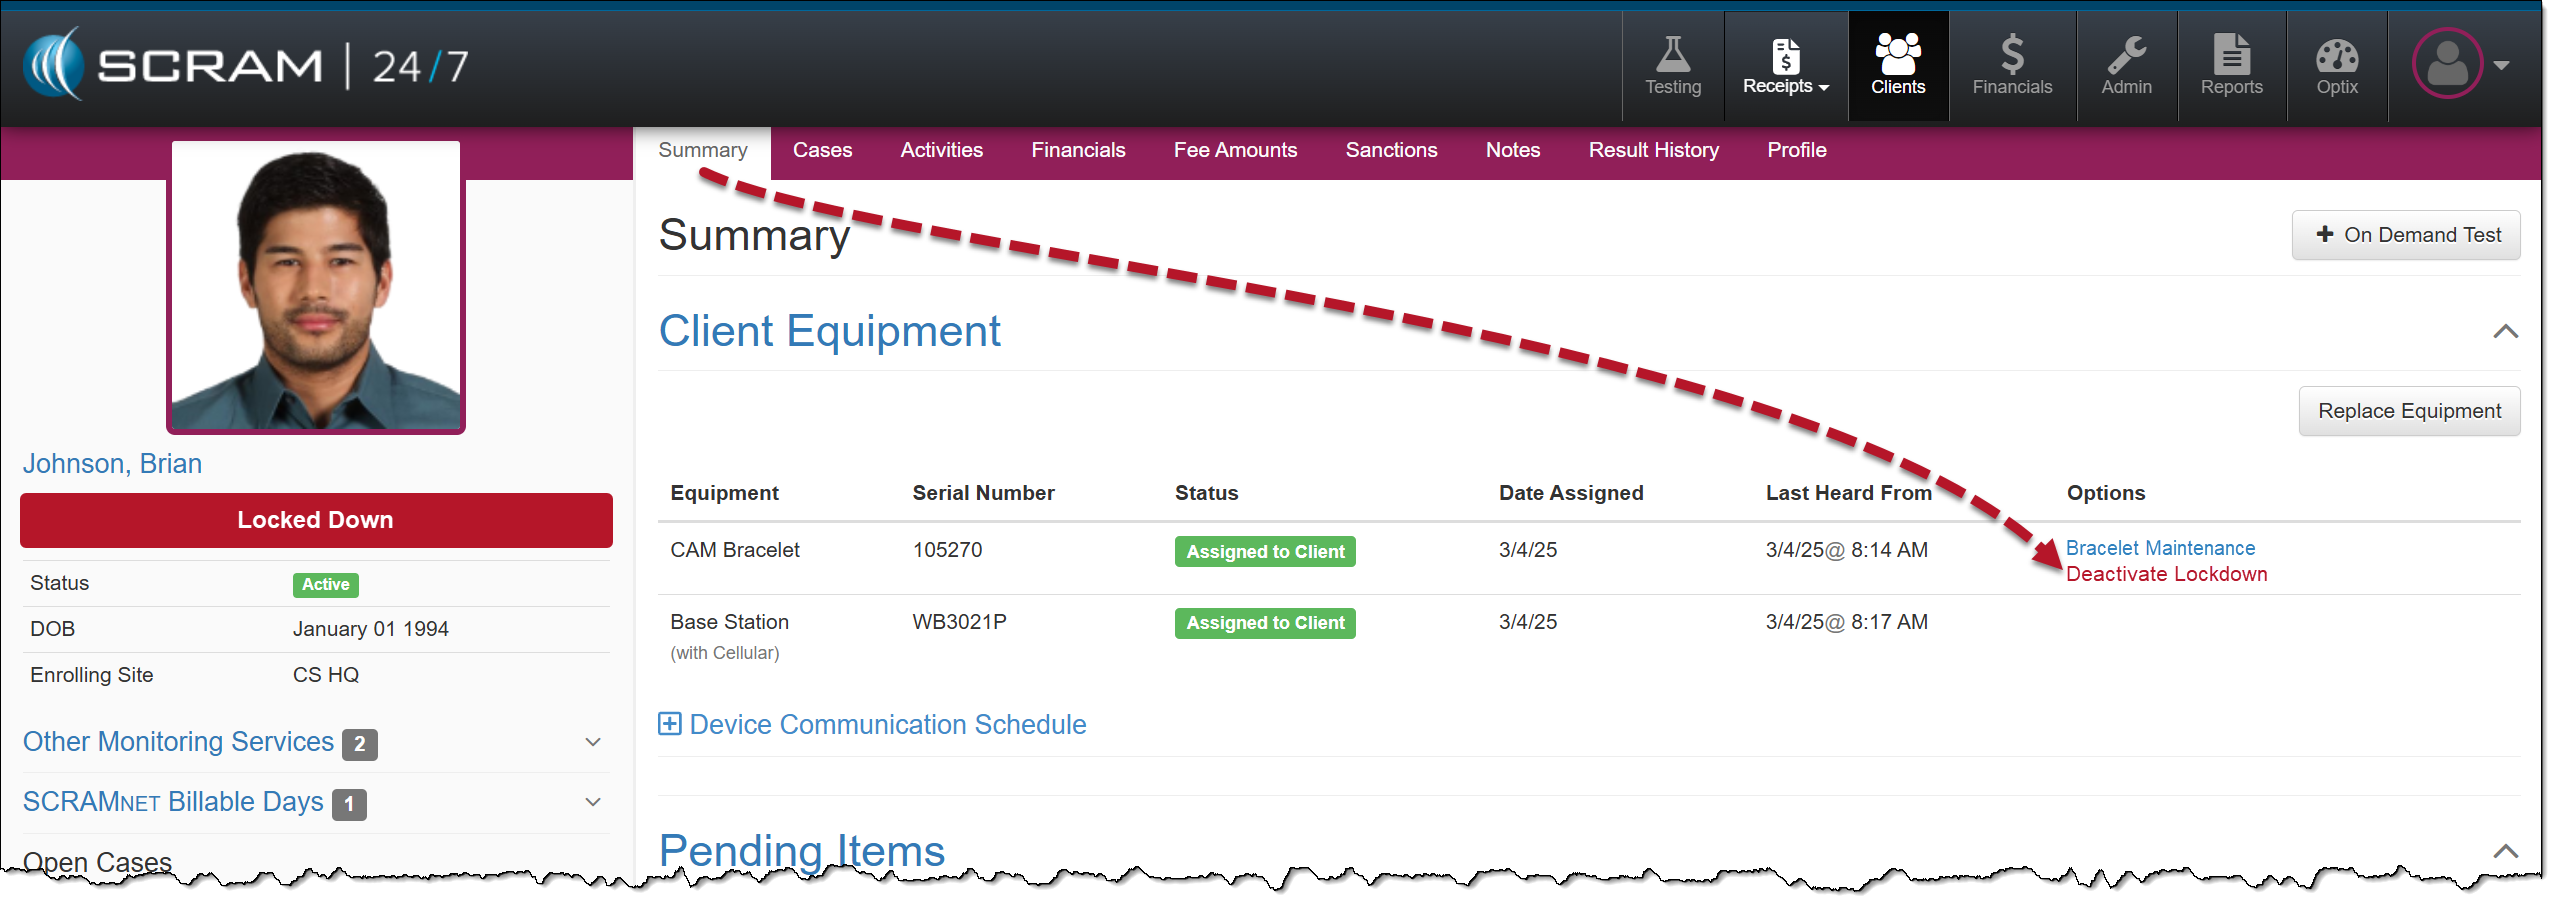
- On the client’s Summary page, the Maintenance hyperlink located in the Options column will now display as “Bracelet Maintenance.”
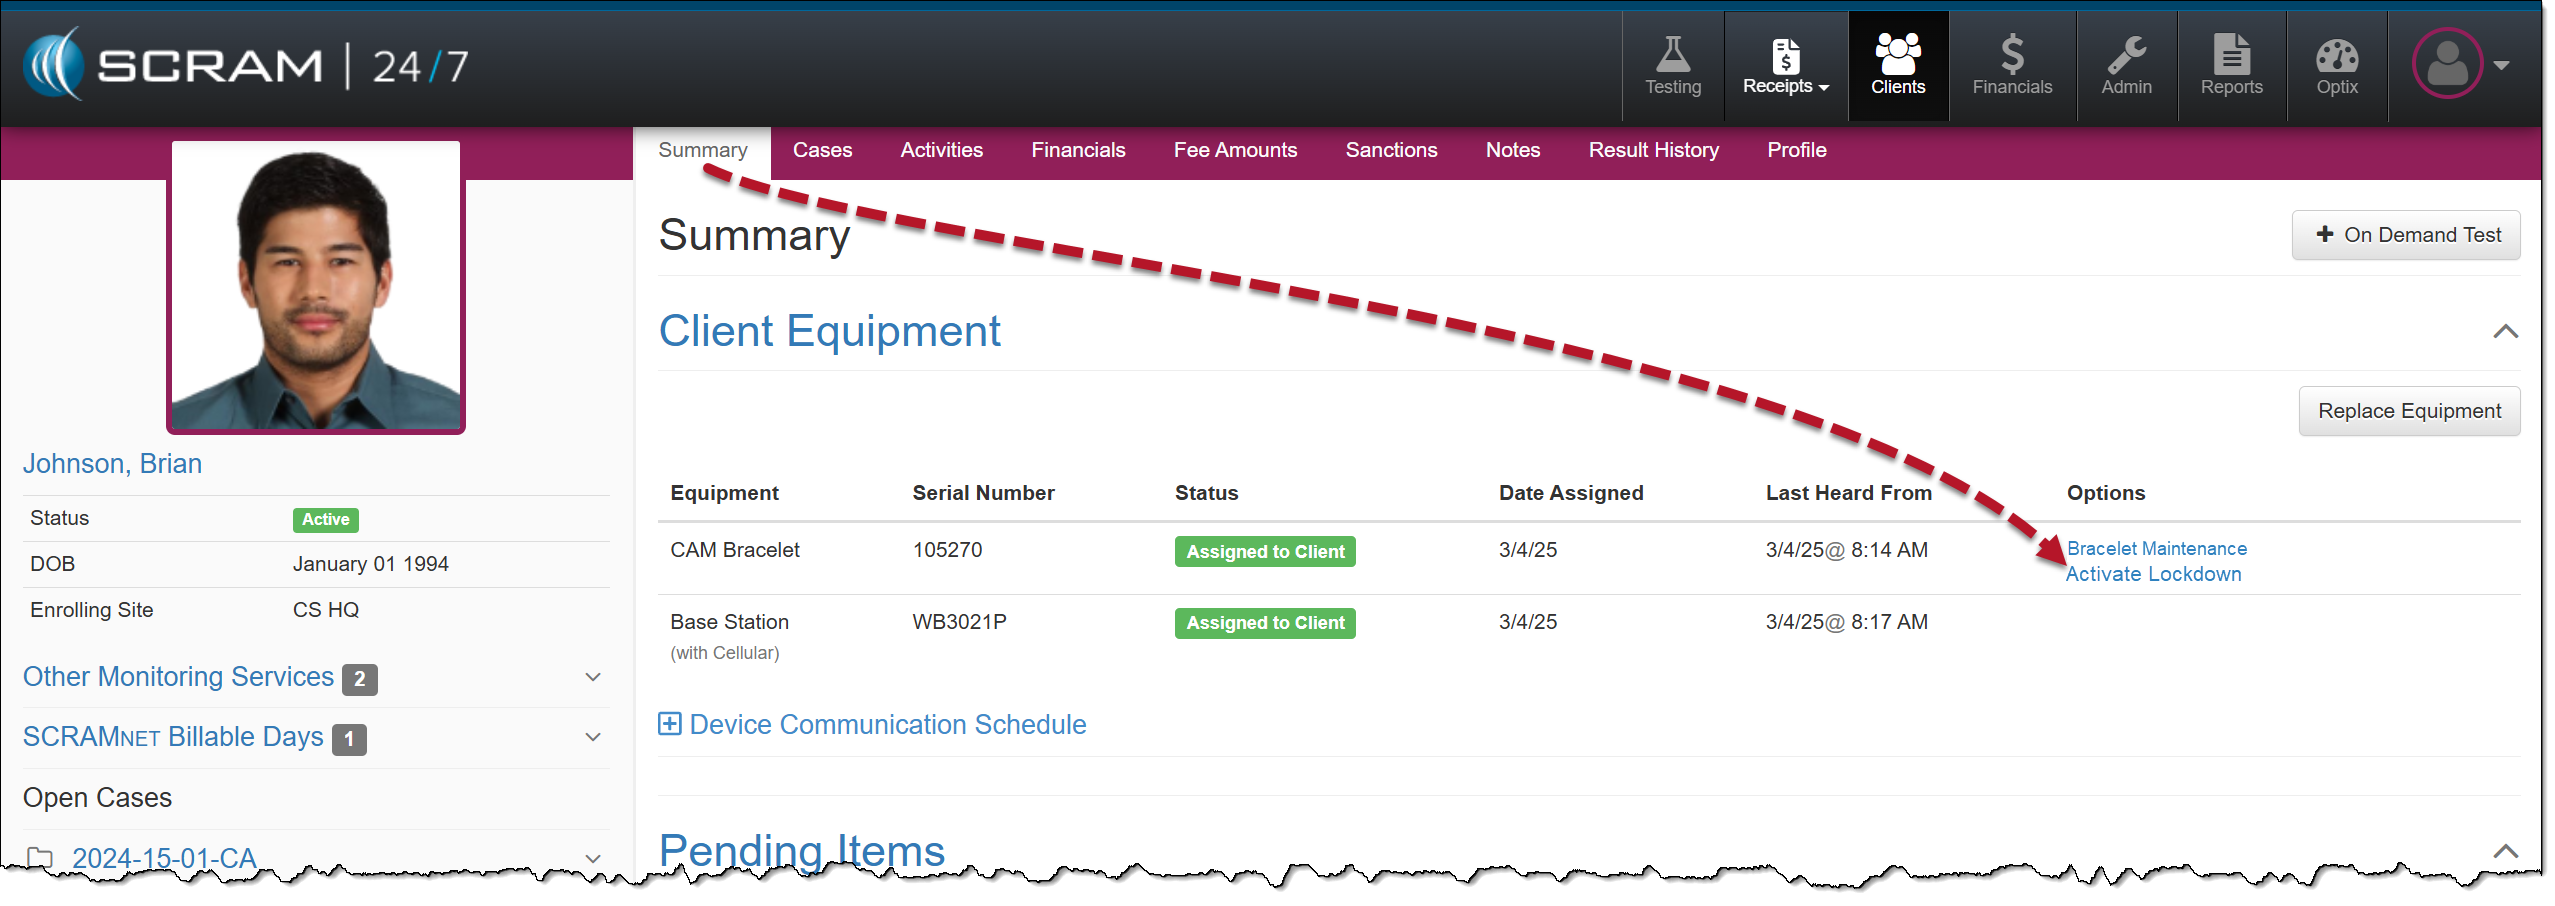
- For clients participating in a CAM+HA or House Arrest Activity, an Activate Lockdown hyperlink is available in the Options column.
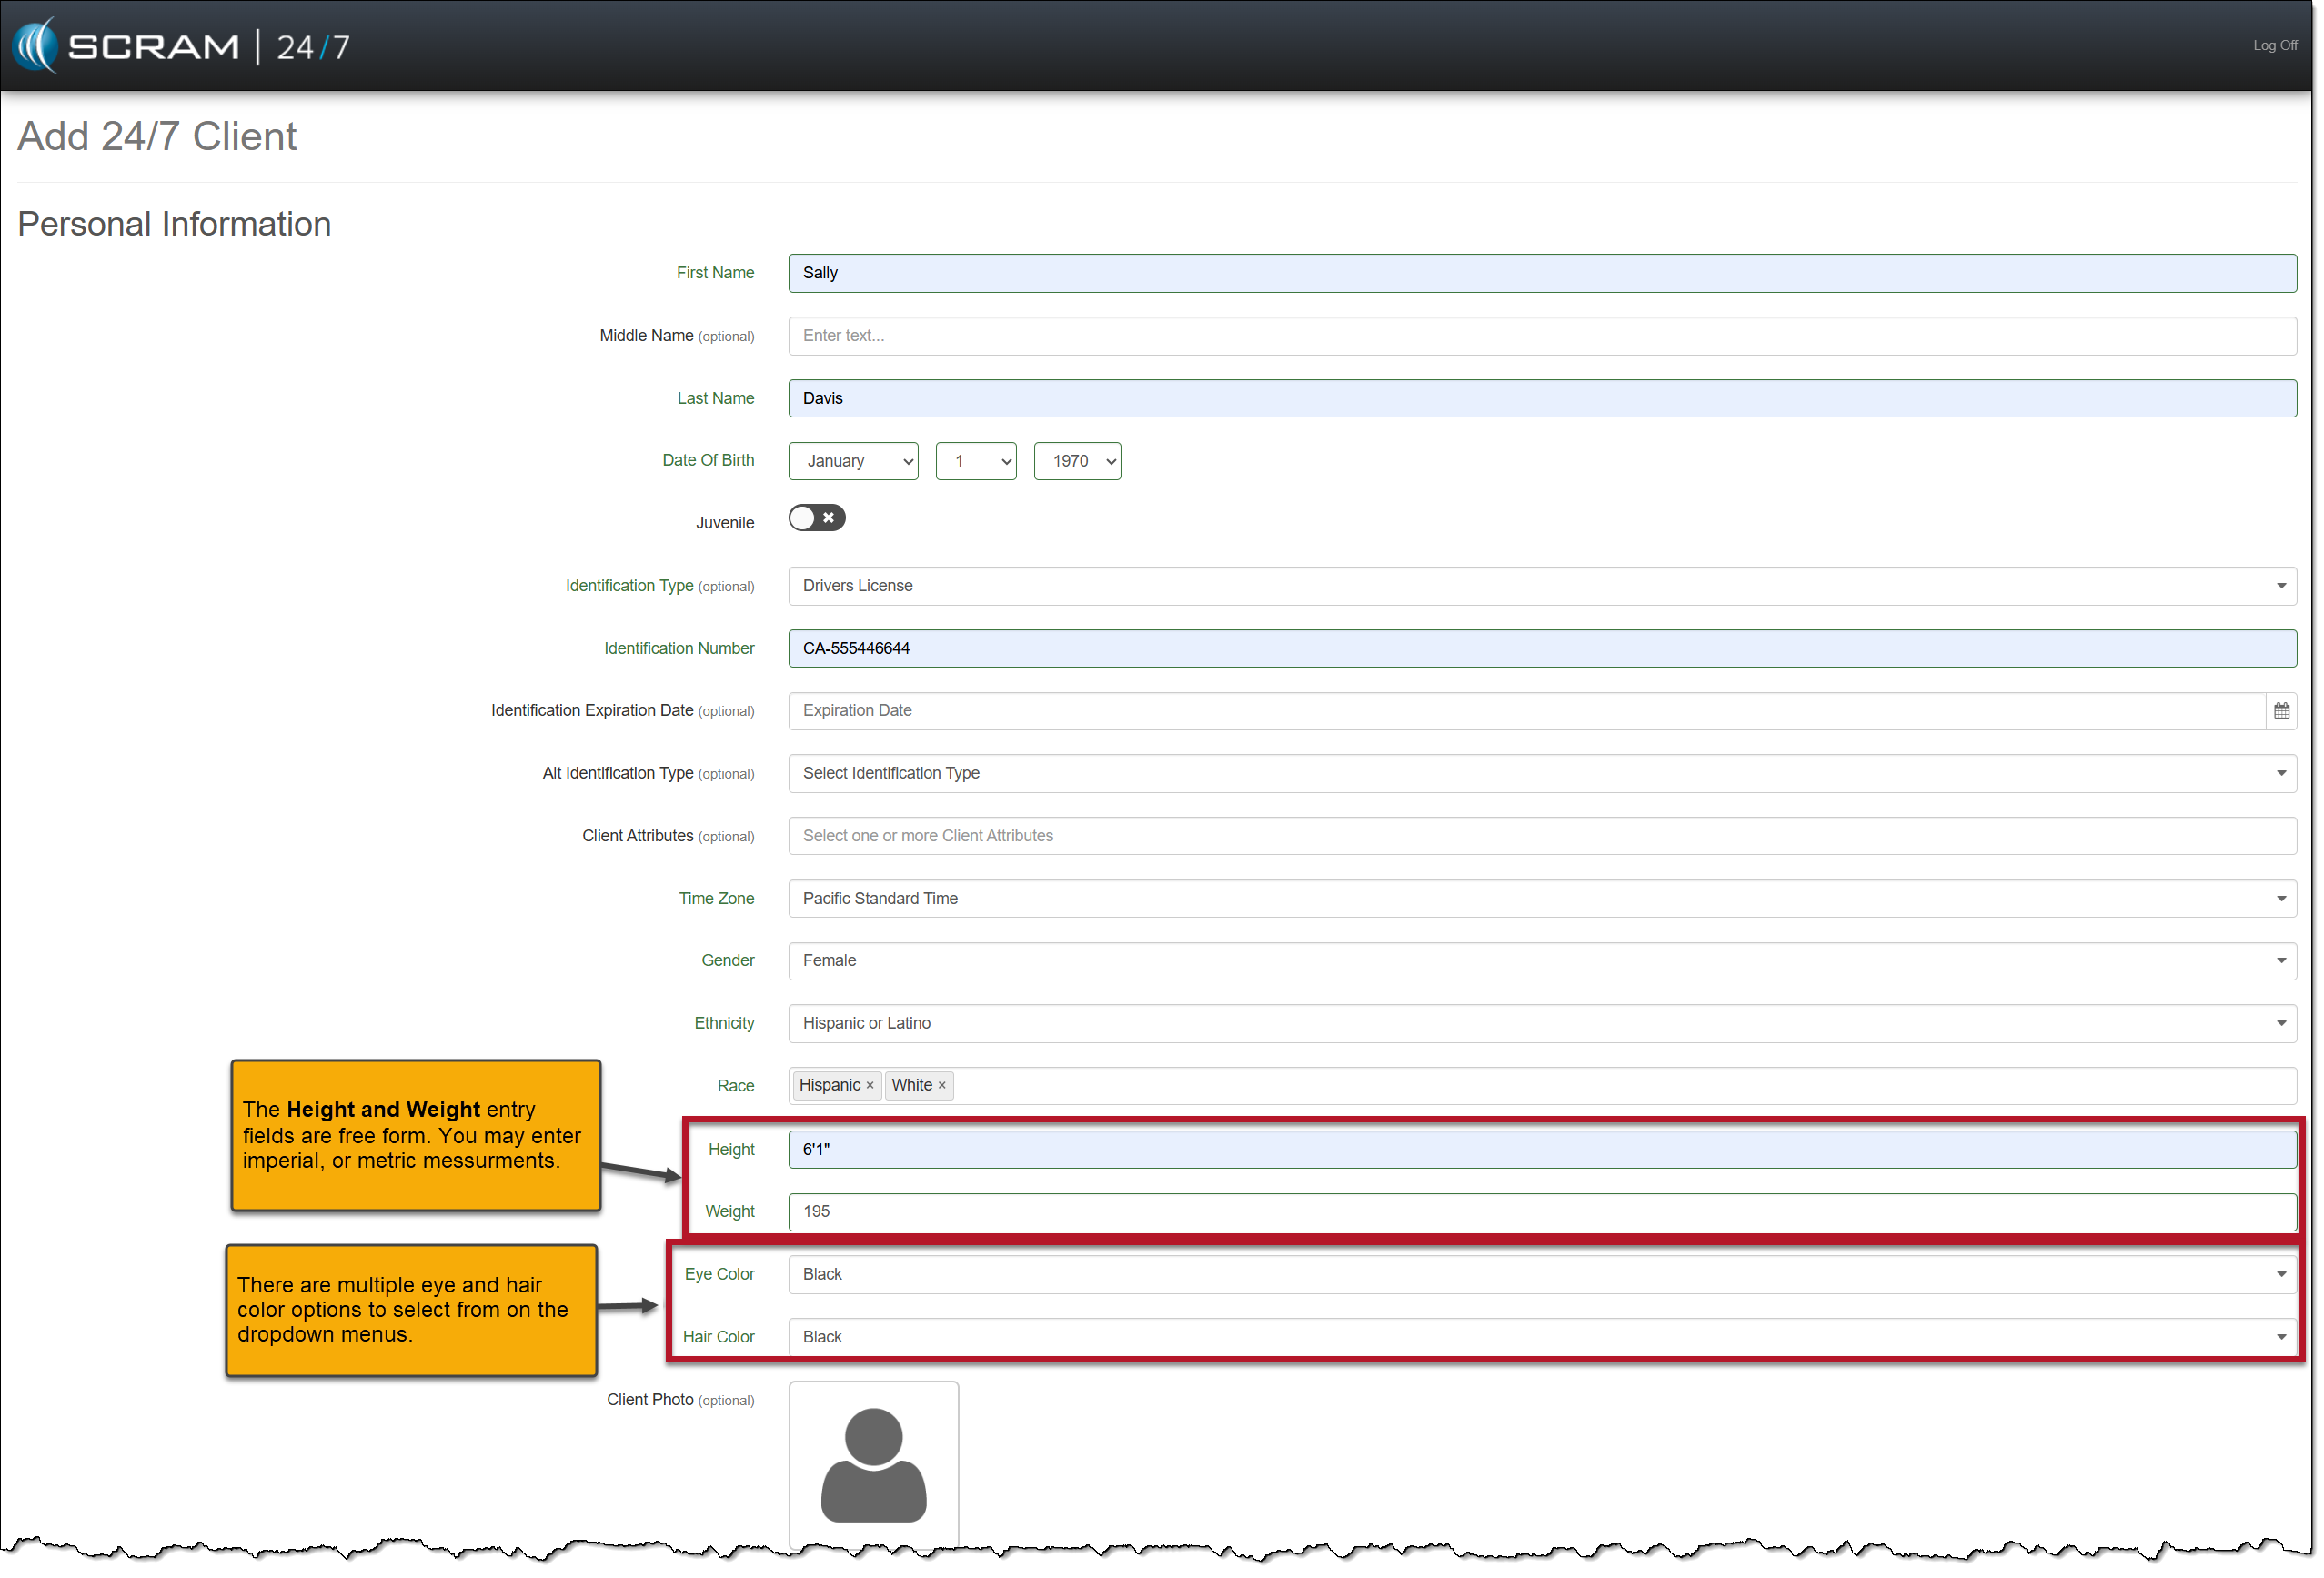
Personally Identifiable Information (PII)
When adding a new client to the system, you will notice five additional required fields in the Personal Information section on the Add 24/7 Client page and some dropdown menu option updates. These updates allow you to include more detailed PII for your clients.
The additional PII fields are:
- Race (multiple select)
- Height
- Weight
- Eye Color
- Hair Color
Updated dropdown menus include the following:
- Gender
- Ethnicity
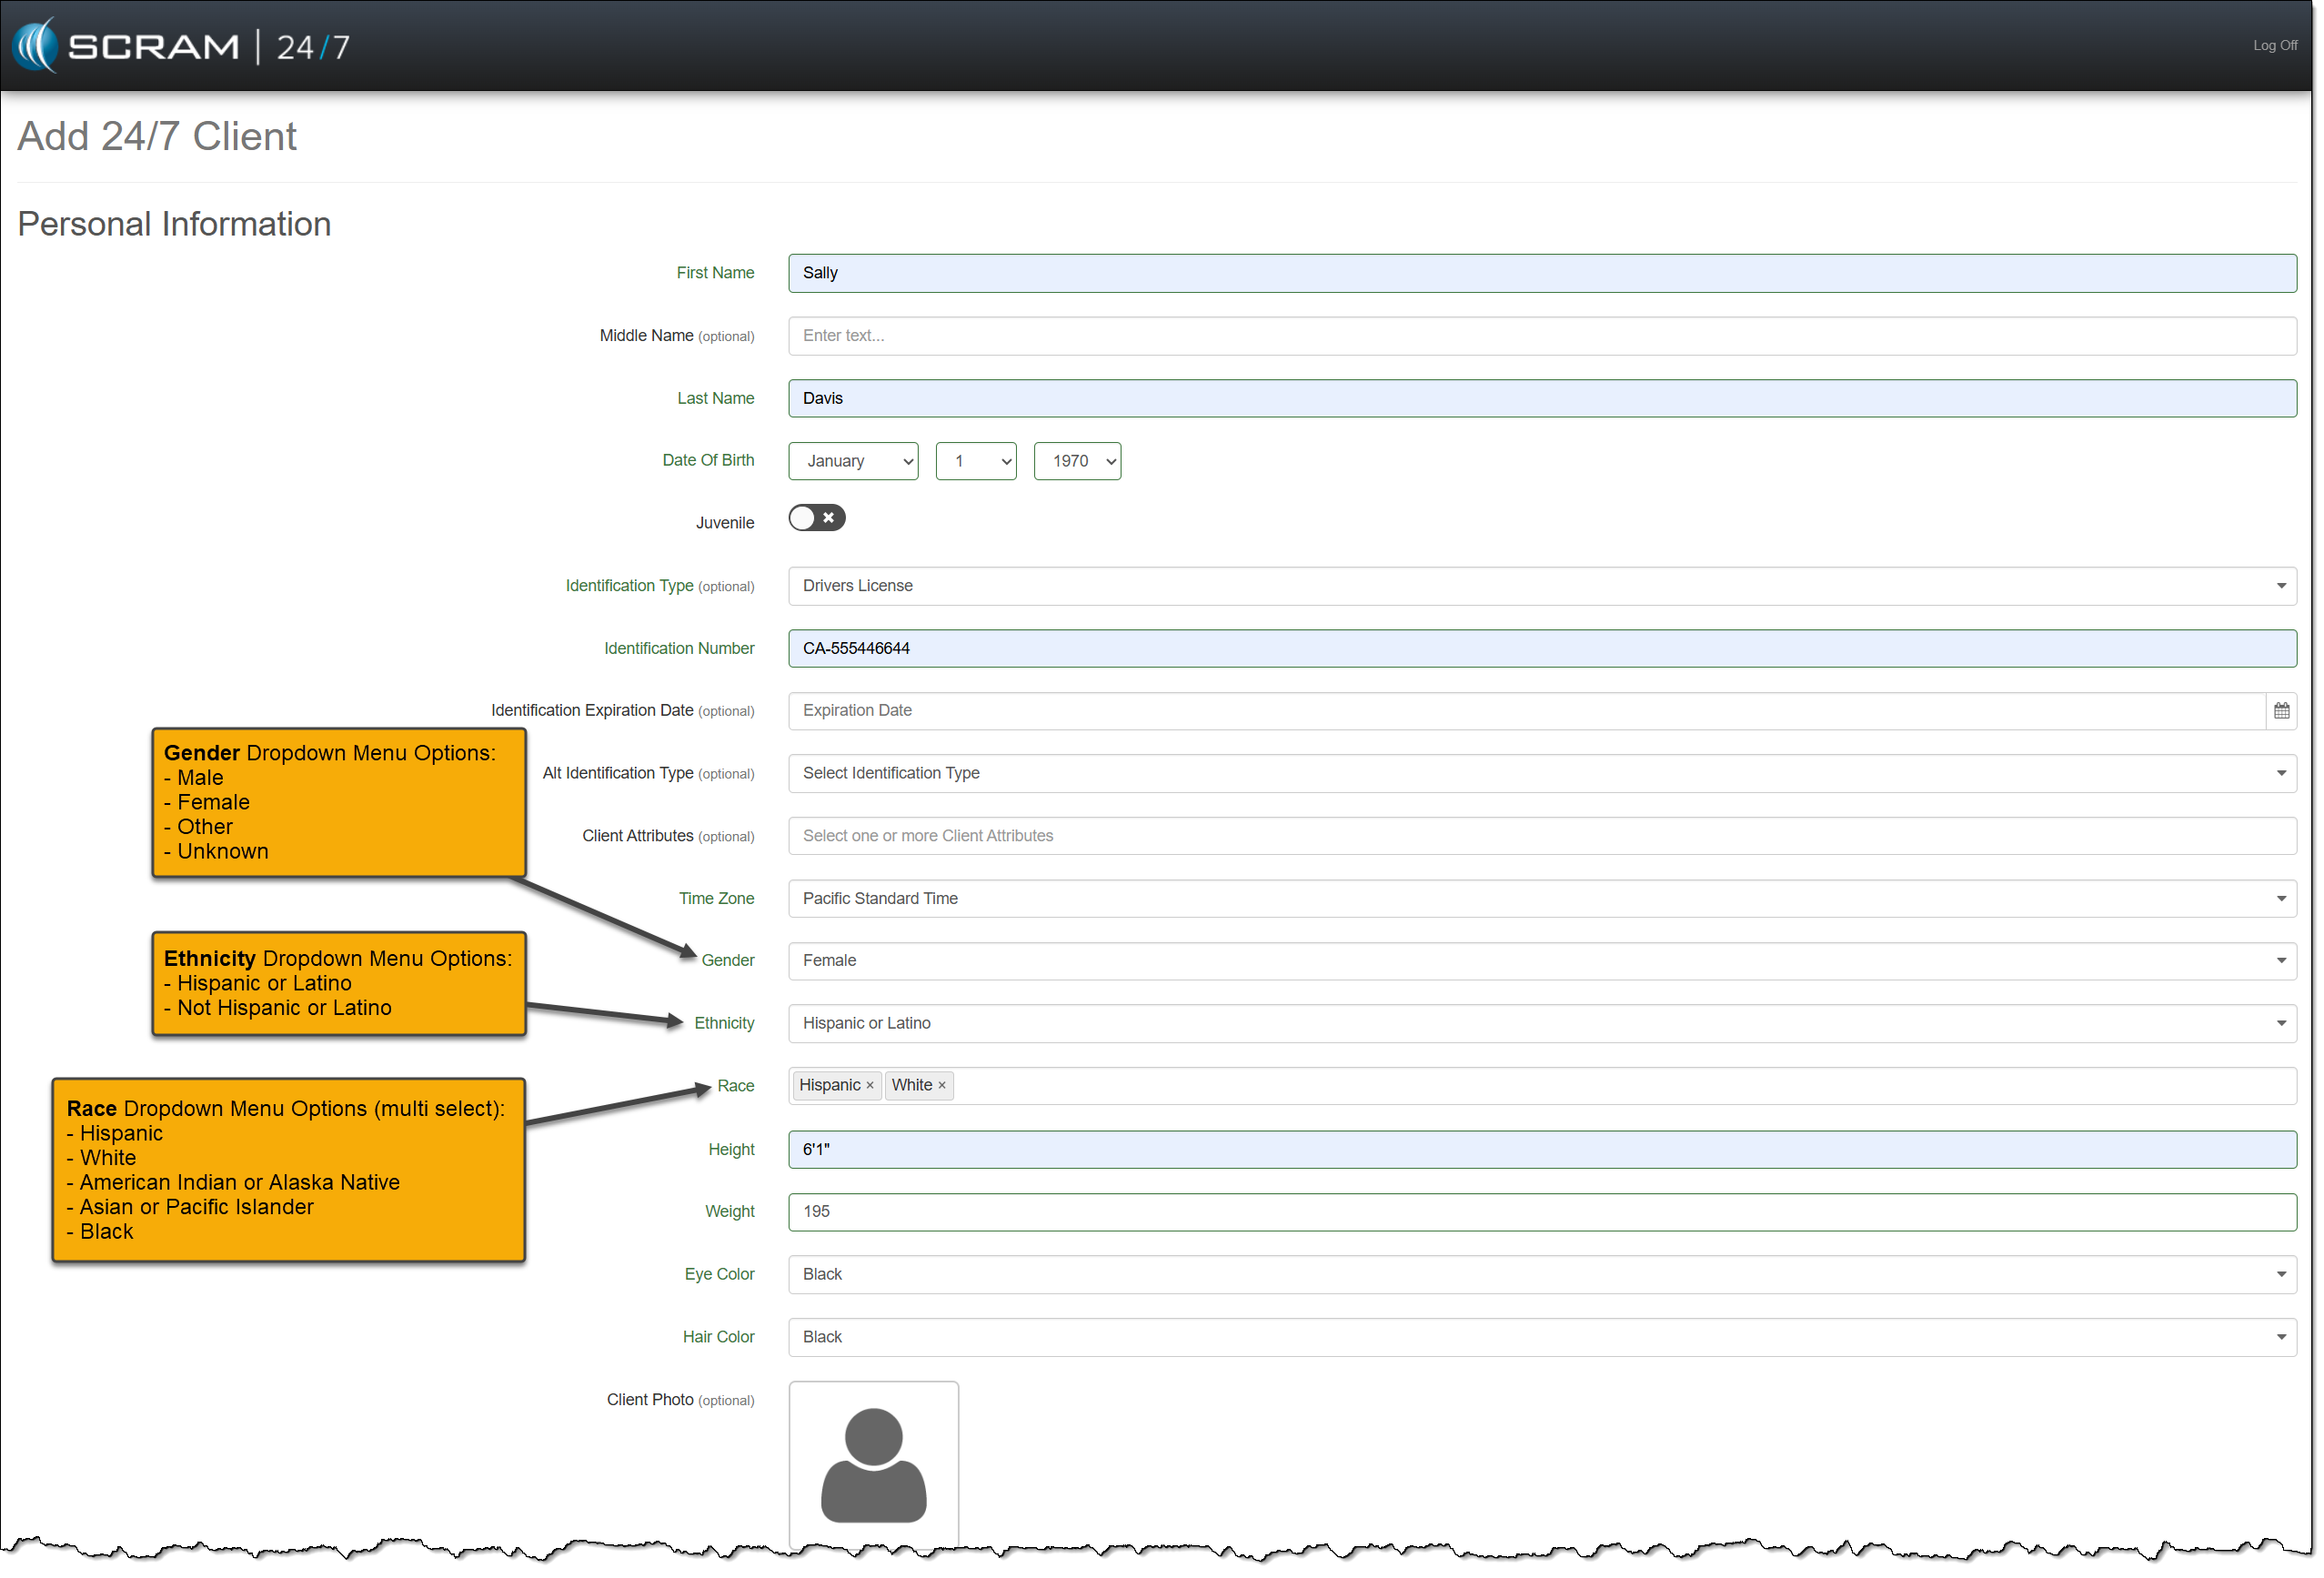
You may also update an existing client’s PII on their Profile page.
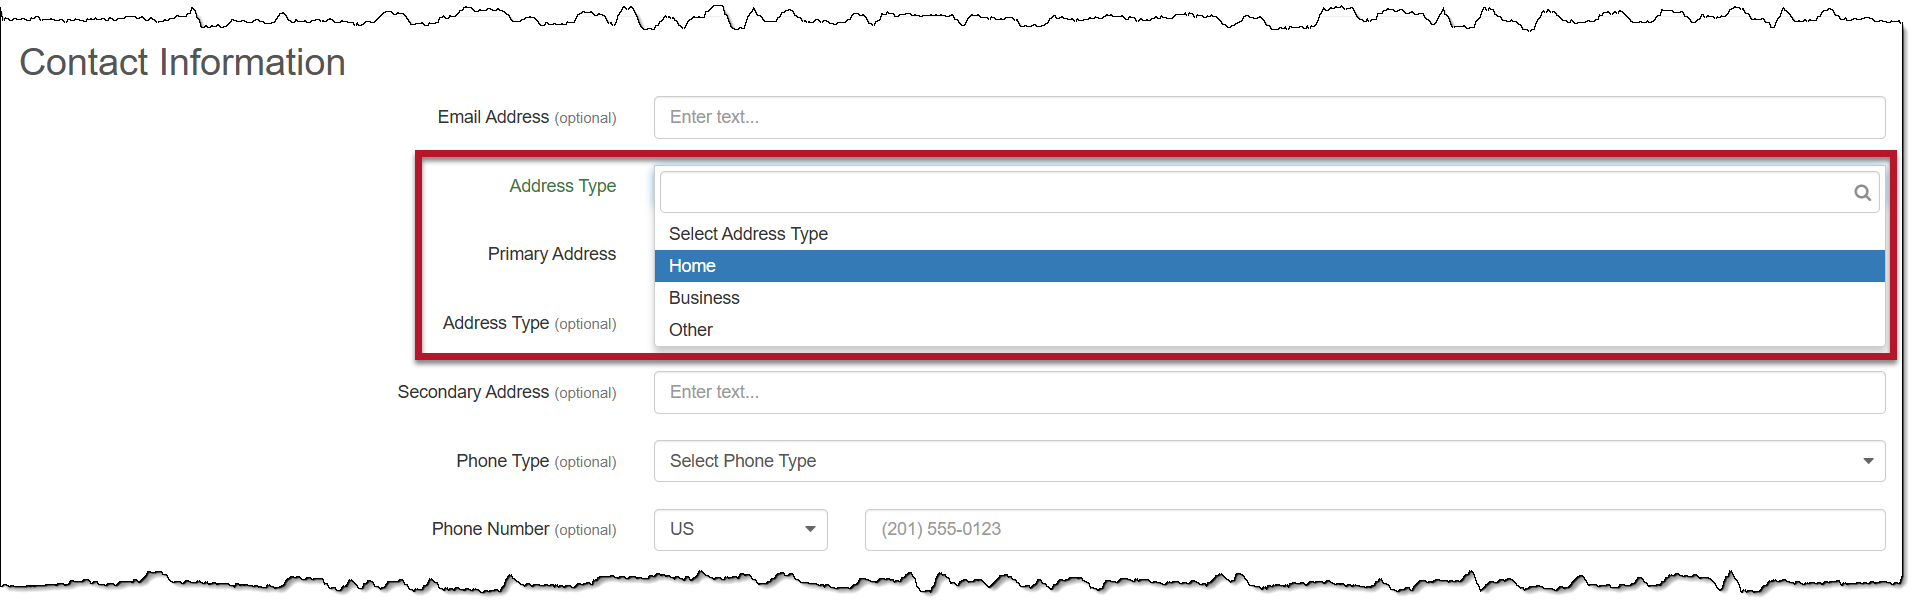
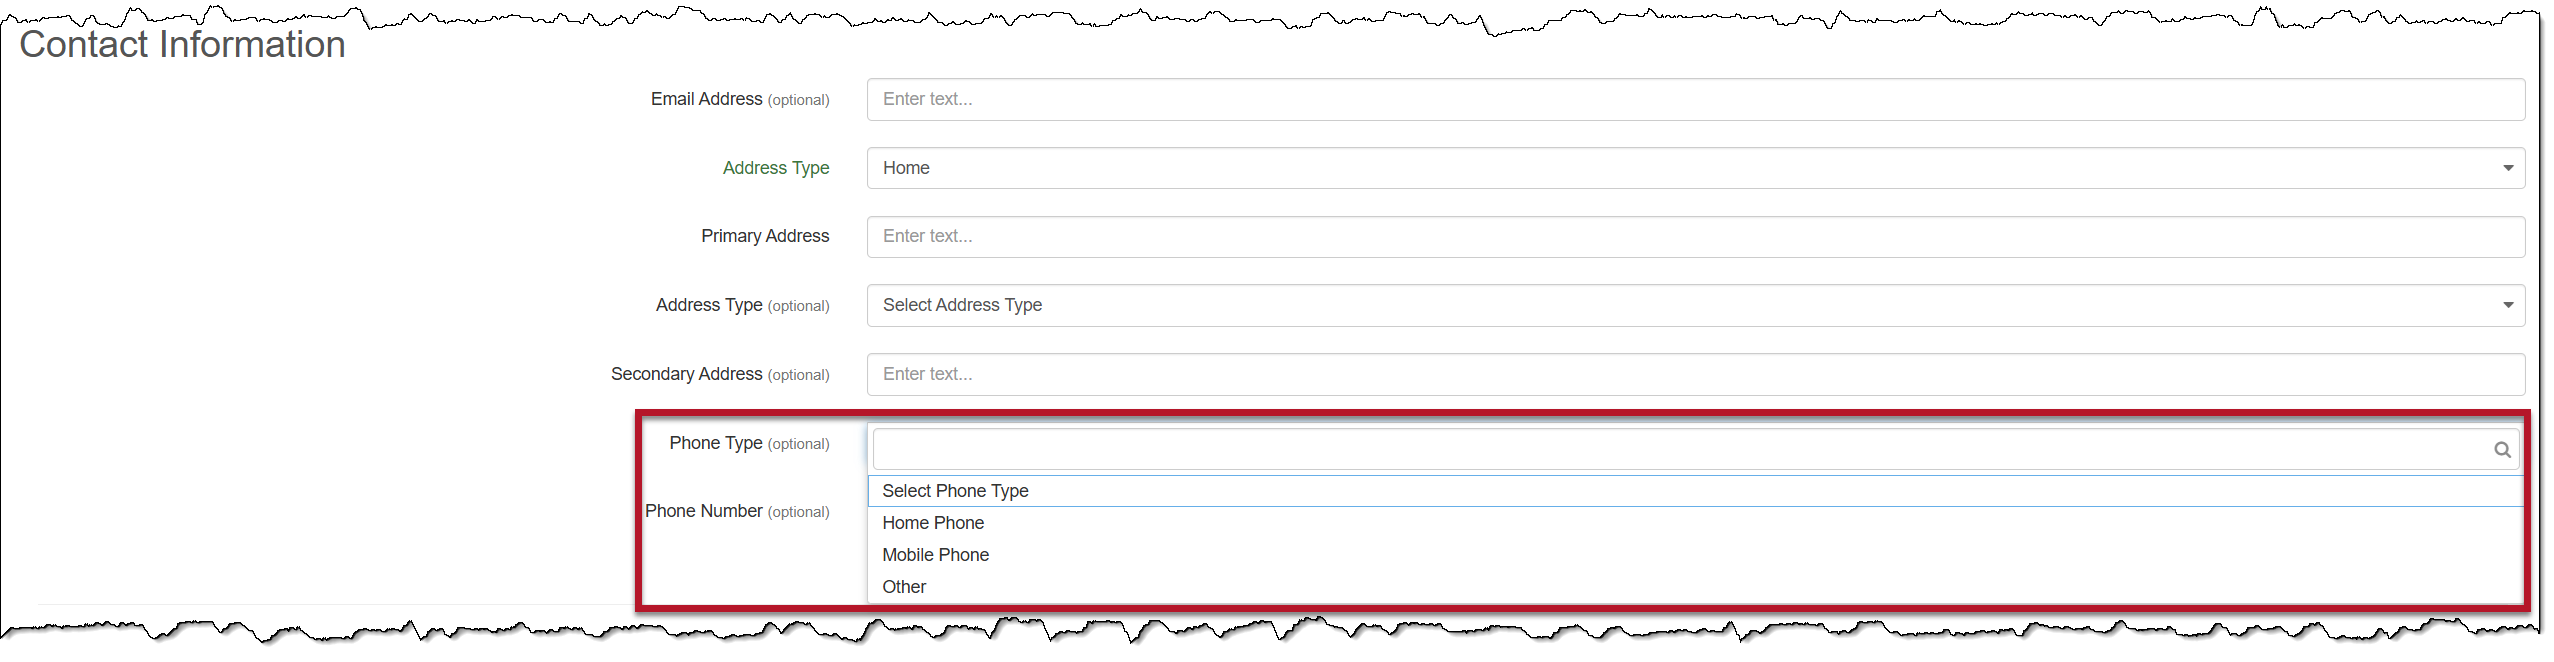
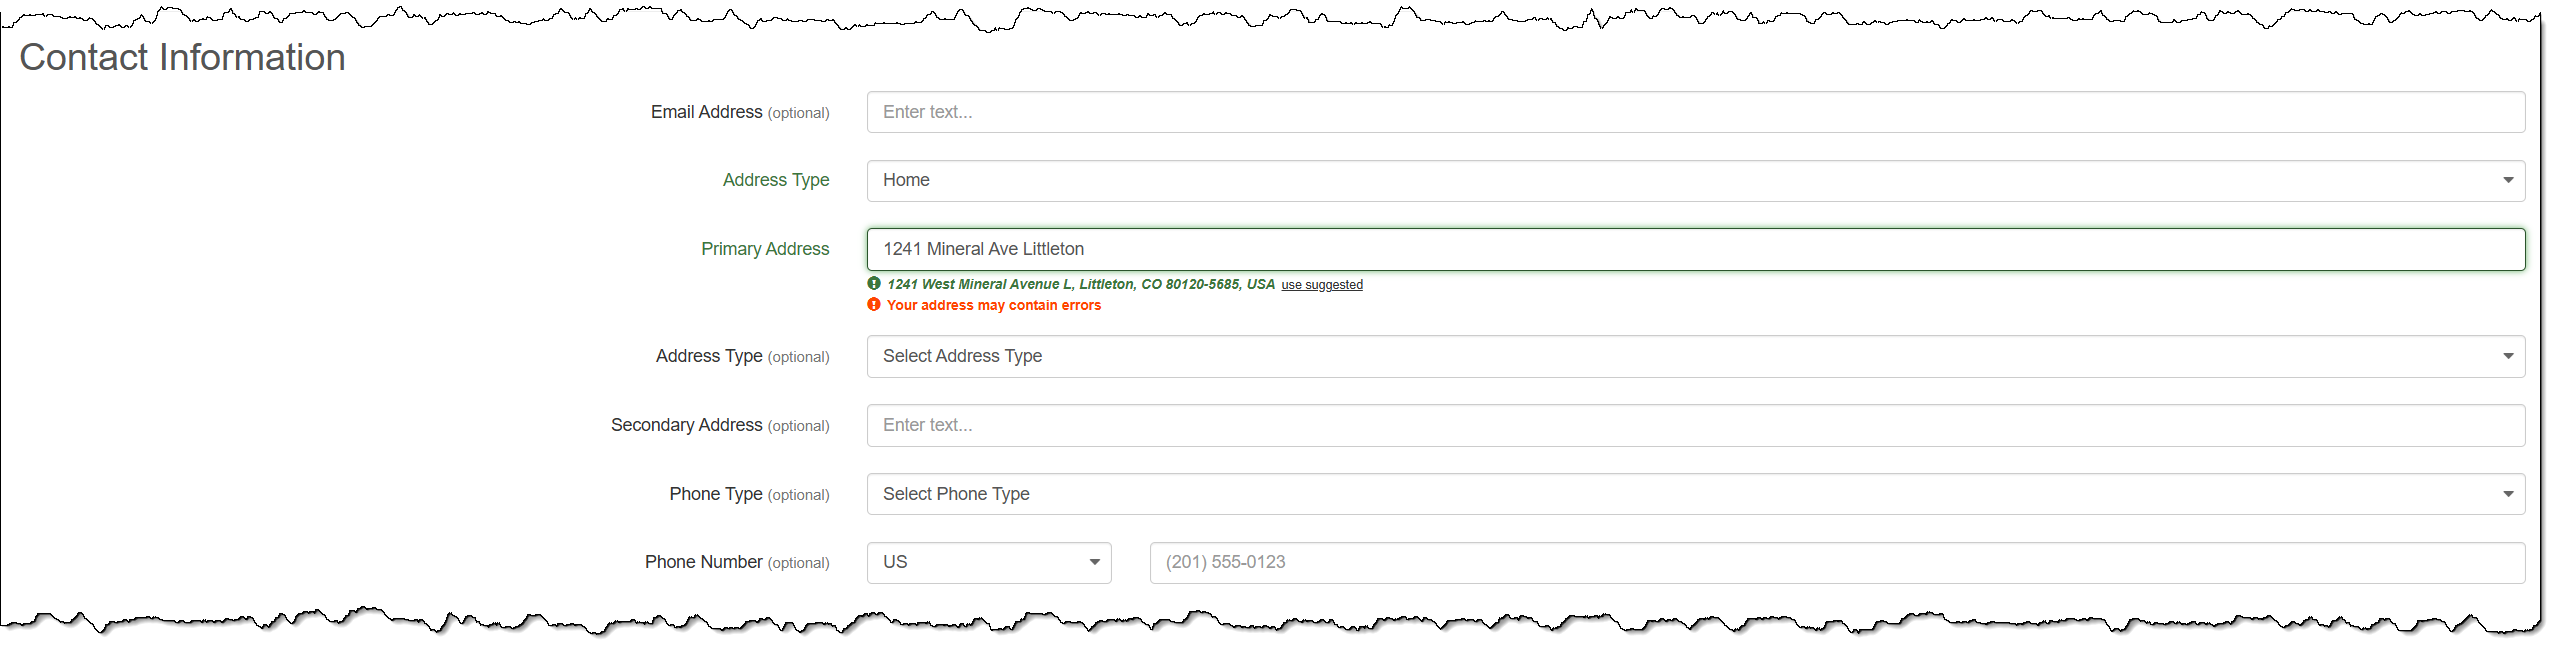
Client Contact Information
On the Add 24/7 Client page, you will notice a new Address Type dropdown menu, and the options for the Phone Type dropdown menu have been updated.
While entering the address details, you will notice an address validation warning.
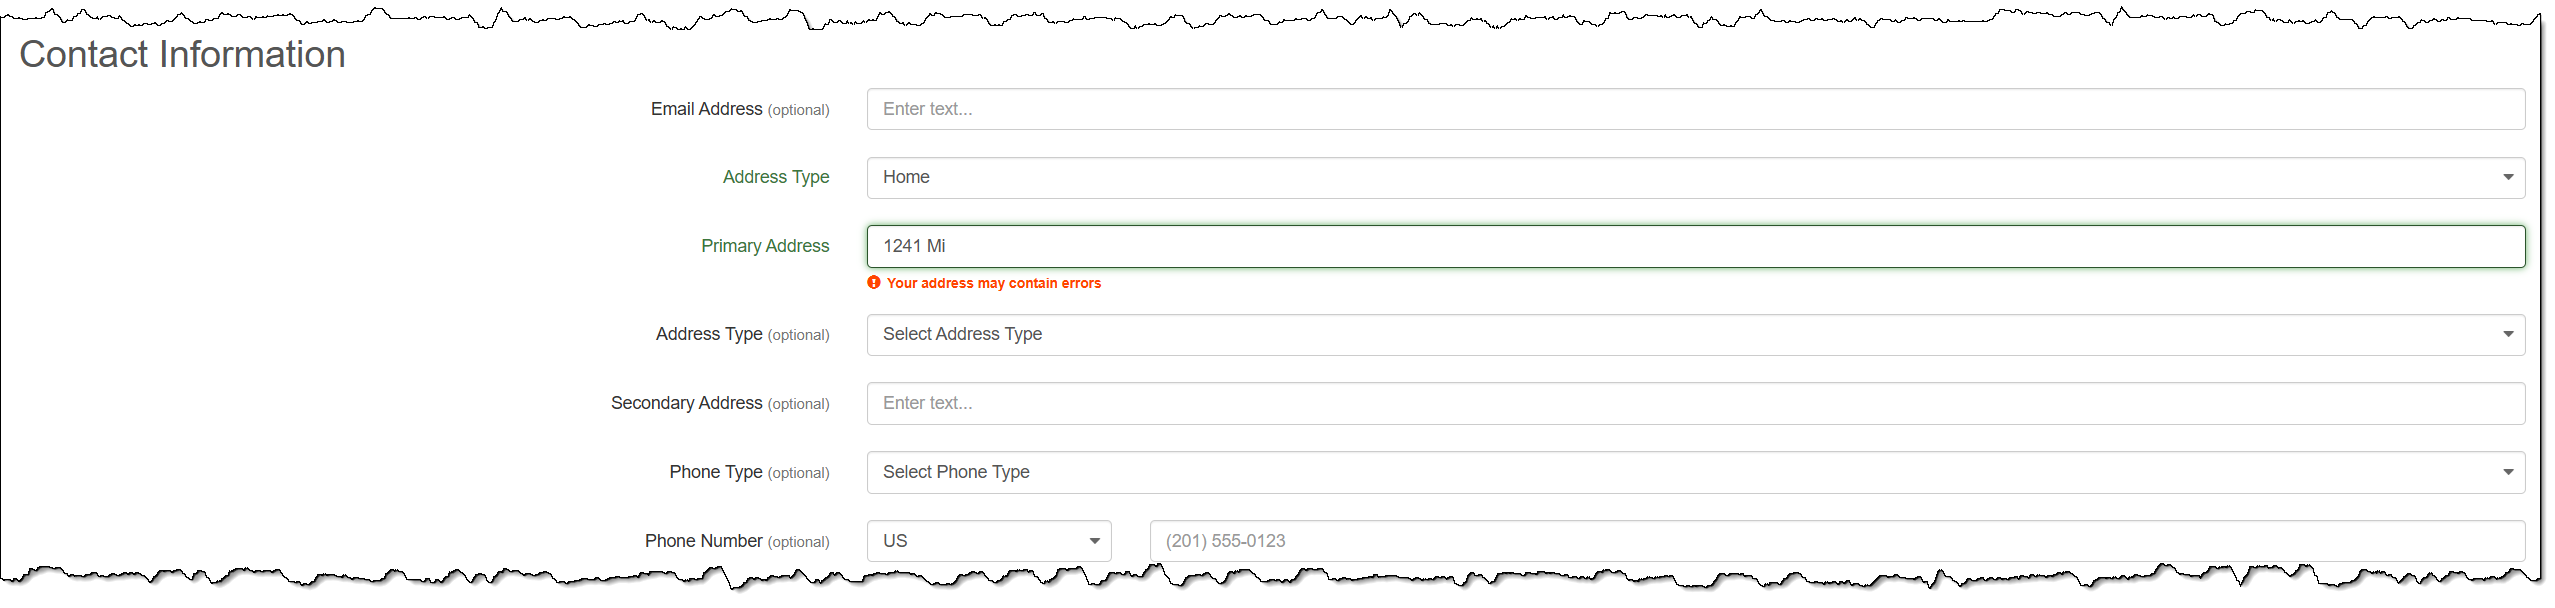
As you continue to add the details, Google will validate the address, and a suggested address will be available for you to select.
|
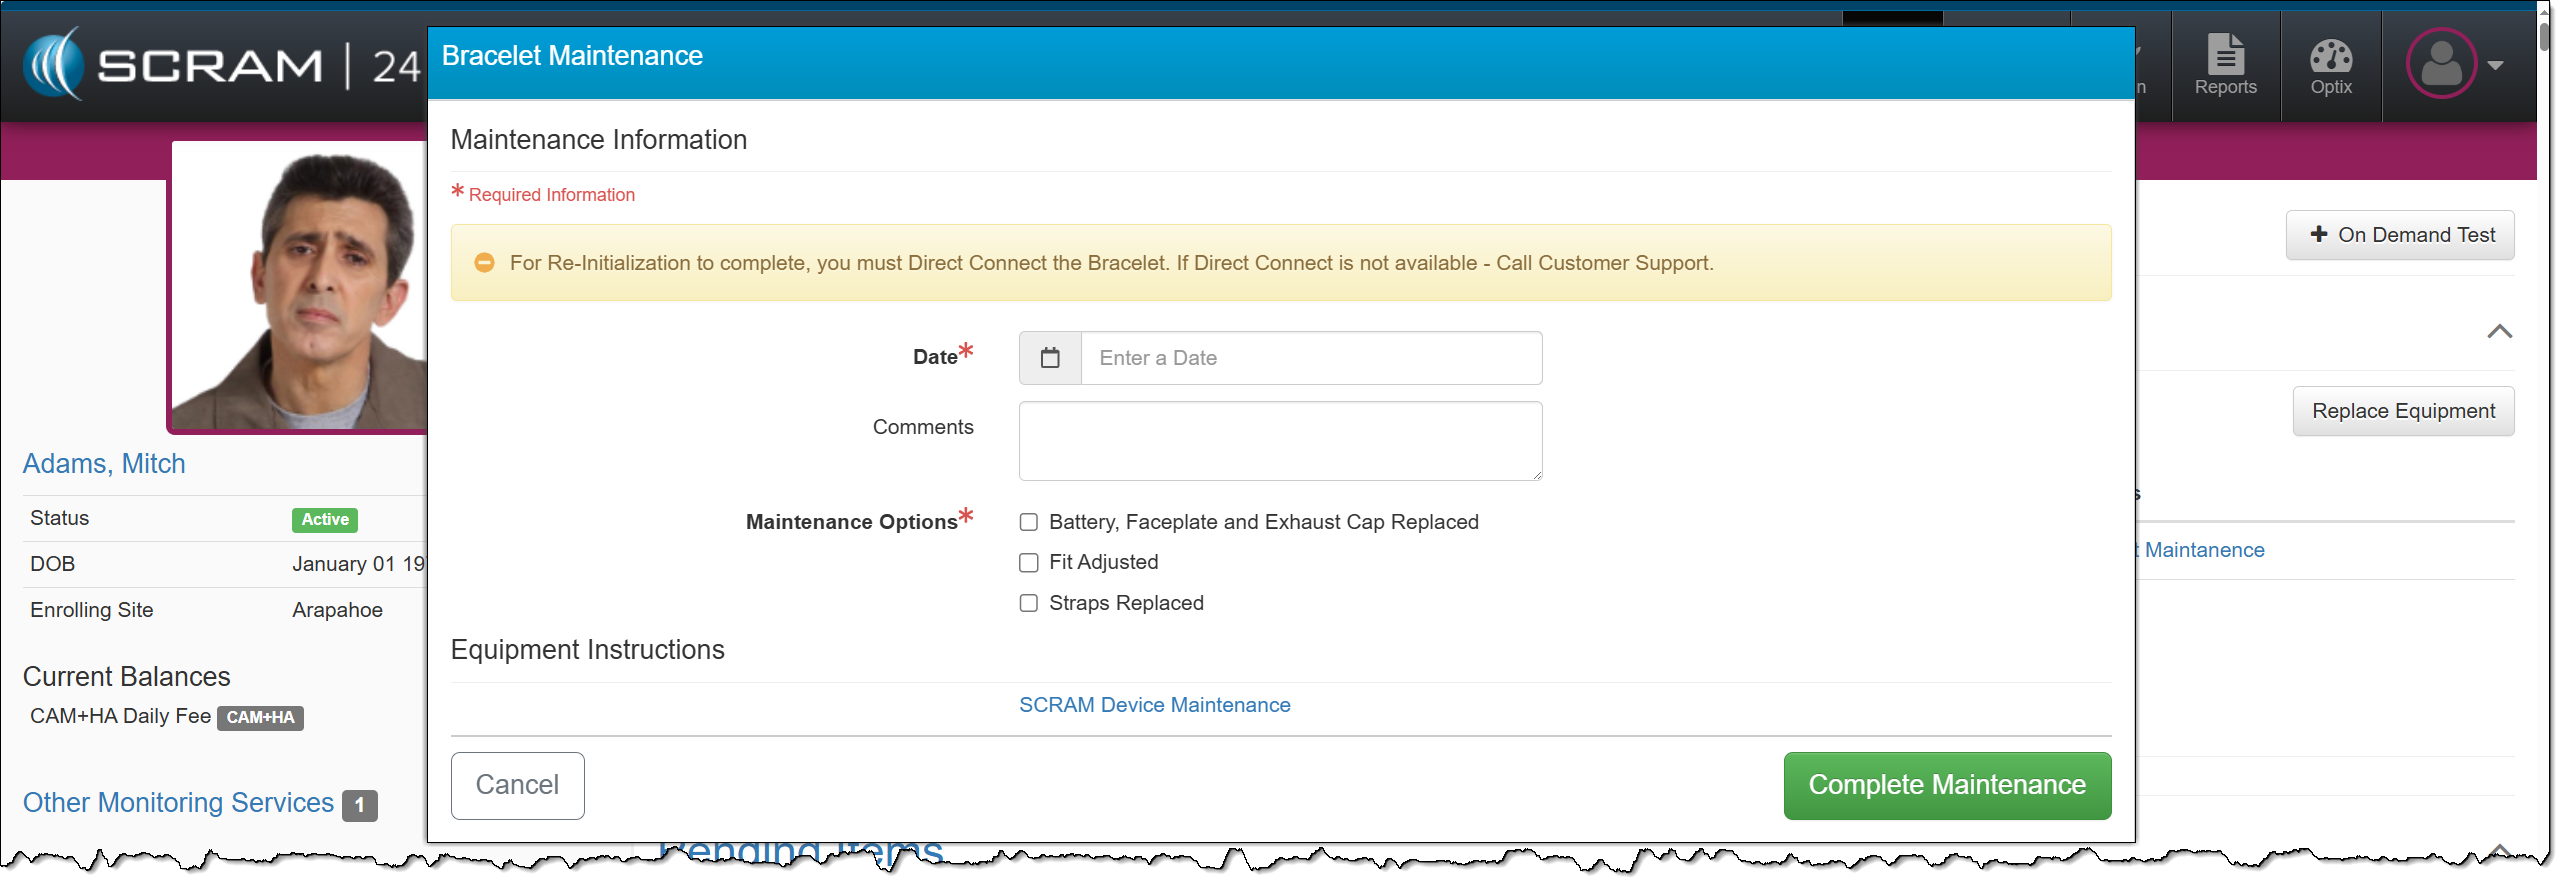
Bracelet Maintenance Hyperlink
On the client’s Summary page, you will now access the Bracelet Maintenance hyperlink when completing maintenance on SCRAM CAM and SCRAM House Arrest bracelets. This maintenance includes Battery/Faceplate Replacement, Fit Adjustments, and Strap Replacement.
Activate Lockdown
Clients participating in a curfew monitoring program, also known as house arrest, typically have permission to leave throughout the day to work or engage in other activities. These leaves are scheduled on the HA Schedule page in SCRAMNET. In some cases, non-compliant behavior or court orders may result in the revocation of the client’s freedom to leave their home.
When this occurs, quickly override the client’s HA Schedule by selecting the Activate Lockdown hyperlink in the Client Equipment section on the Summary page in SCRAM 24/7.
Once the Lockdown status is active, an Unauthorized Leave alert is generated any time the client moves outside the range of the base station, regardless of the HA schedule.
To remove the lockdown status, select the Deactivate Lockdown hyperlink, and the client may resume their activities based on the HA schedule saved in the system.
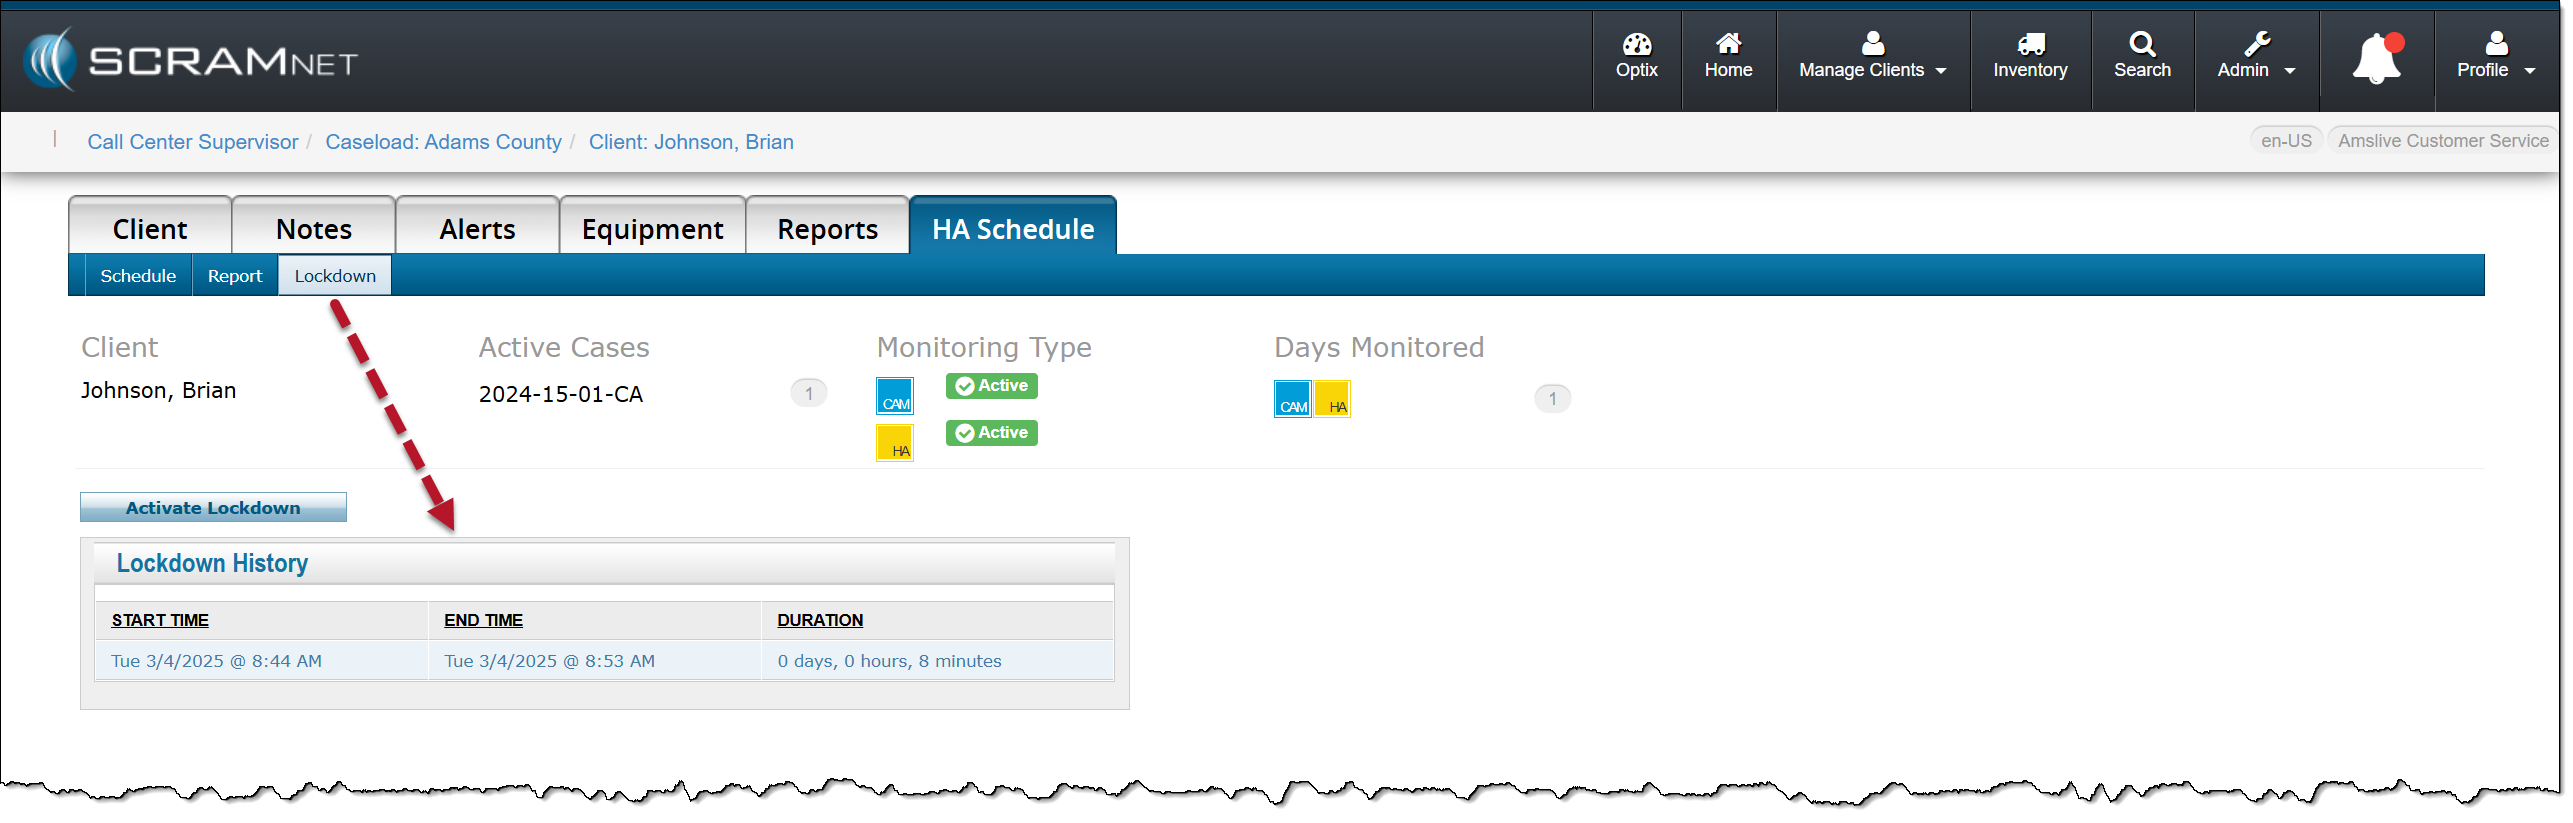
In SCRAMNET, you can view the client’s Lockdown History on the HA Schedule page, under the Lockdown subtab.
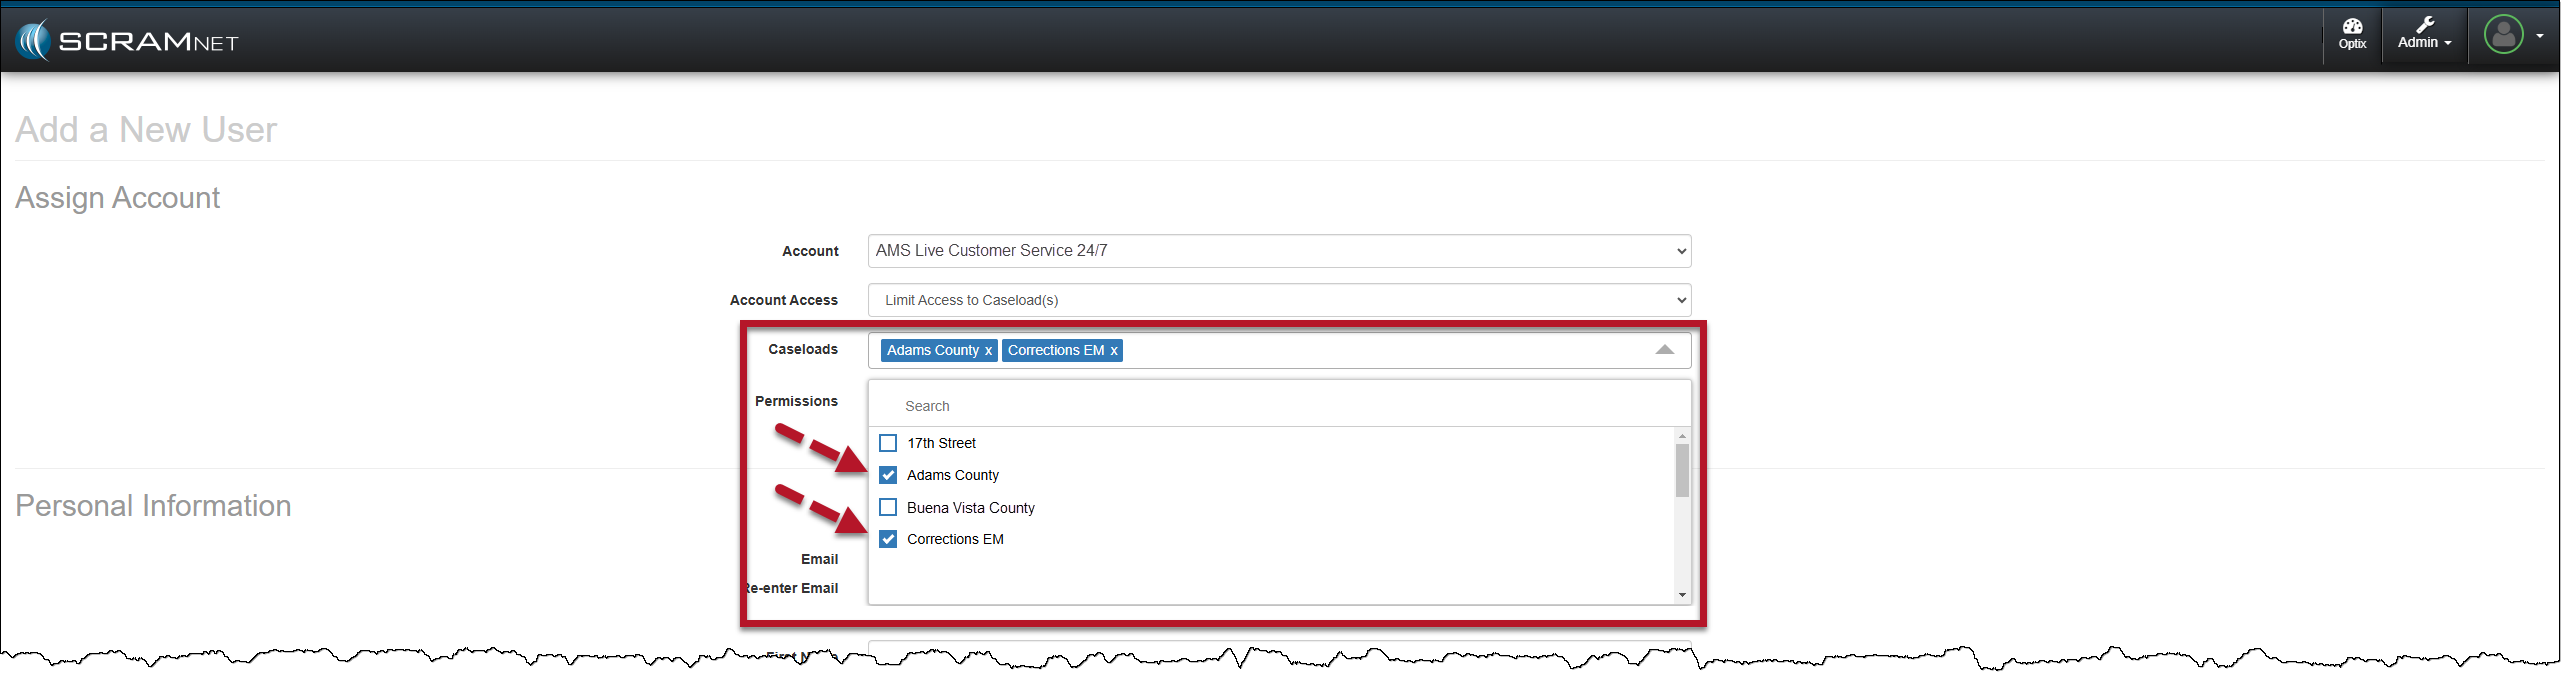
On April 16th, 2025, at 11:00 AM MDT, SCRAM Systems will release an enhancement to your SCRAM 24/7 monitoring program software. Currently, you may only associate a SCRAM 24/7 user with a single enrollment site (Caseload). With this enhancement, you may configure a user’s profile to access and manage clients on multiple enrollment sites (caseloads).
| During the deployment, you will be unable to access SCRAM 24/7 for up to one hour. |
Associate Multiple Caseloads with a User
When editing a current user or adding a new user to your program, once the SCRAM 24/7 Account and Account Access options are selected, choose one or multiple Caseloads for the user to access and manage clients from within SCRAM 24/7, and then set the user’s Permissions for the selected Caseloads.
Tips:
|
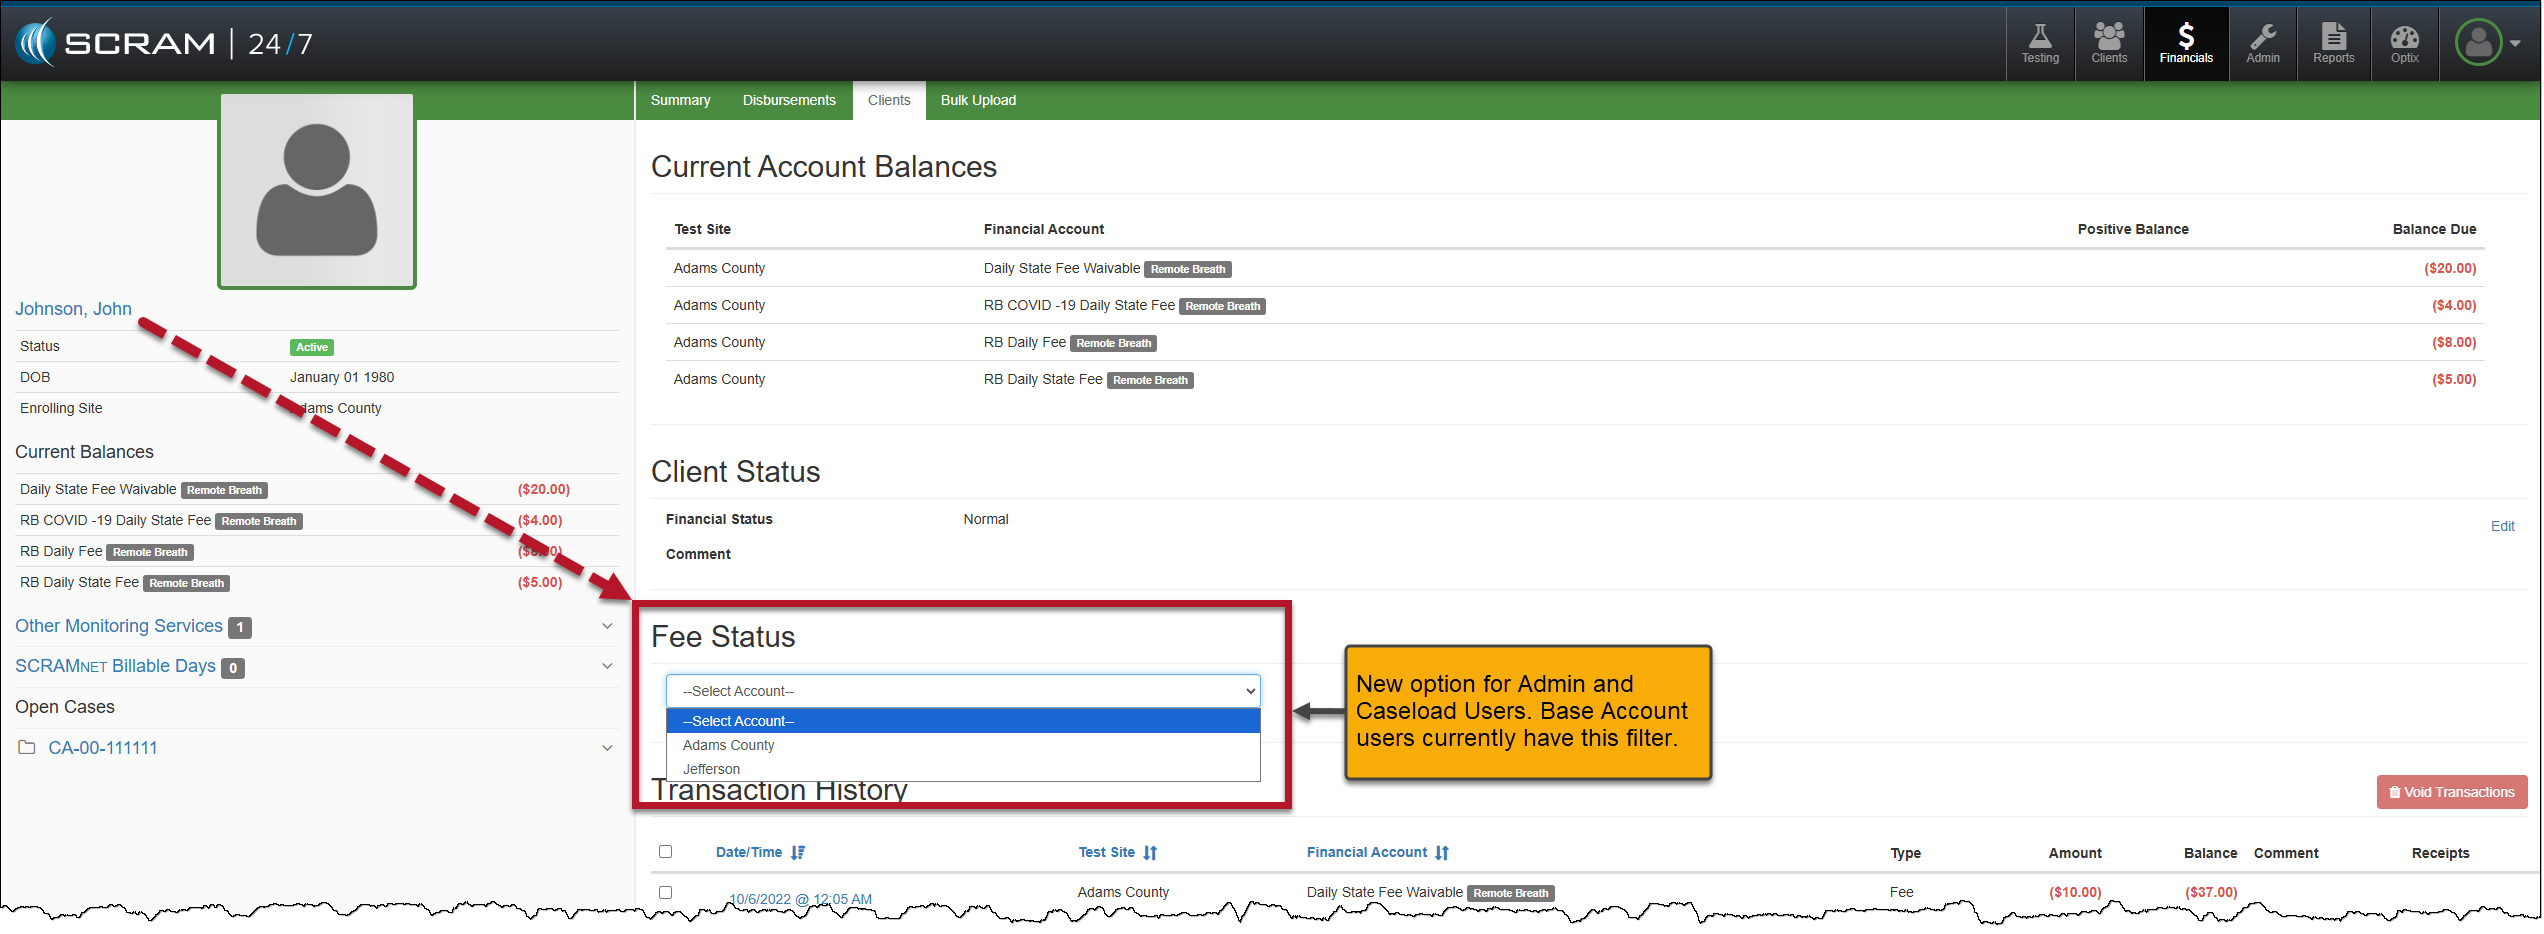
SCRAM 24/7 Filter Updates for a Multiple Caseload User
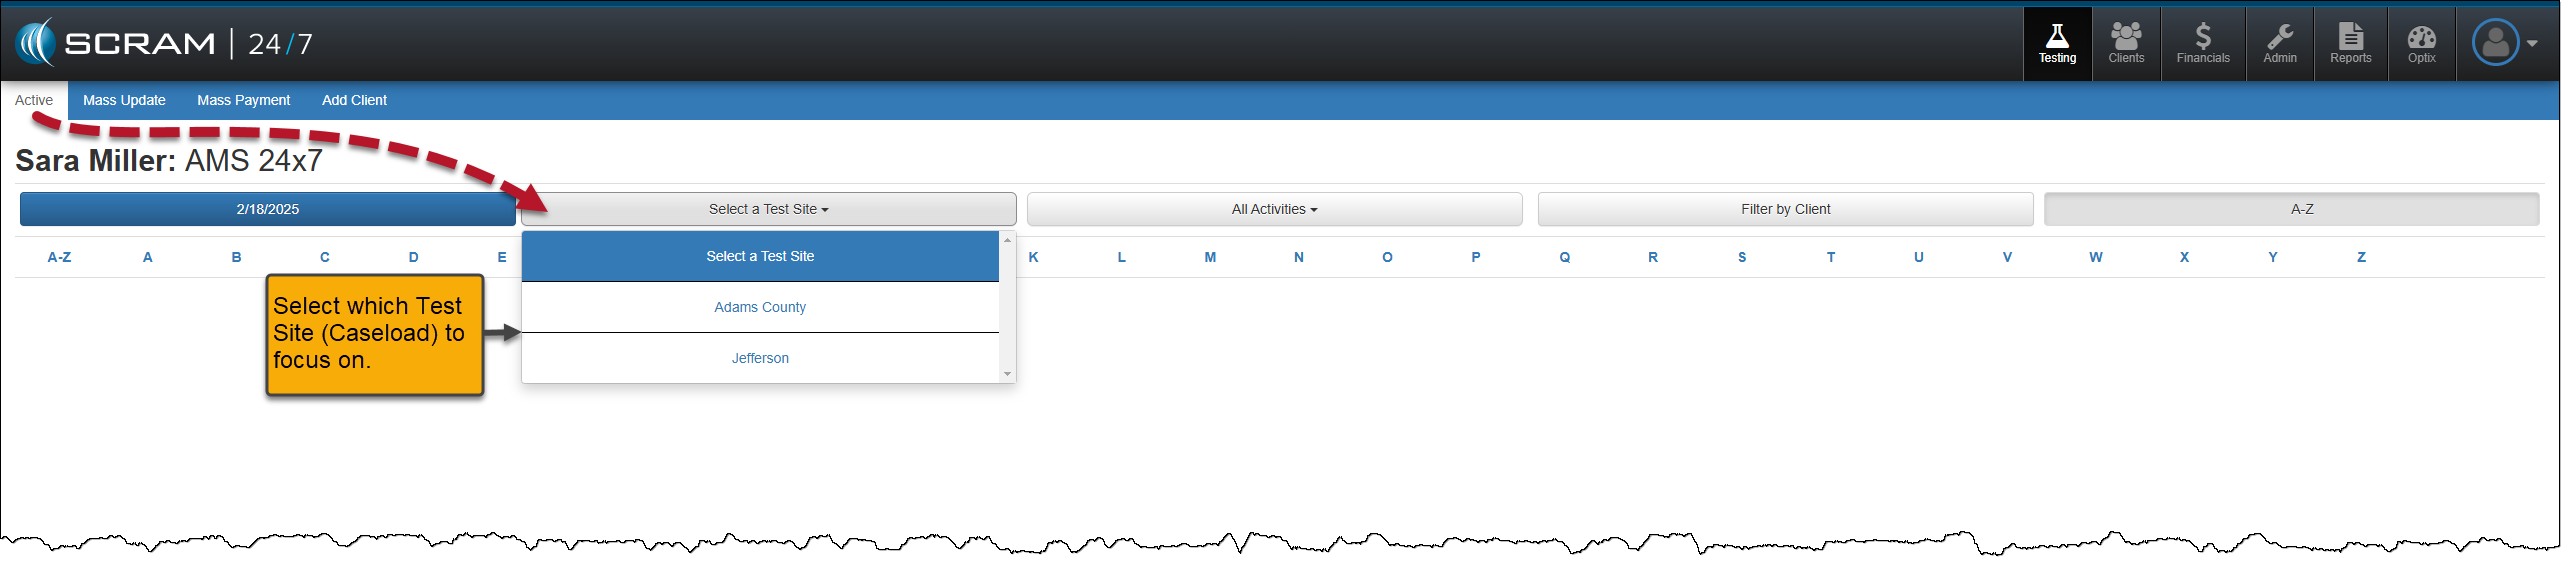
Once a user has access to multiple caseloads for client management, the user must remember to select the caseload in which they wish to complete their daily tasks from the various dropdown menus throughout the SCRAM 24/7 site.
For example, quickly filter the clients associated with a specific caseload on the Testing Dashboard and the Clients page by selecting the appropriate caseload in the Test Site and Caseload dropdown menus, respectively. Once selected, the clients displayed on the page are associated with the chosen caseload.

Additional Examples of Filters and Dropdown Menus
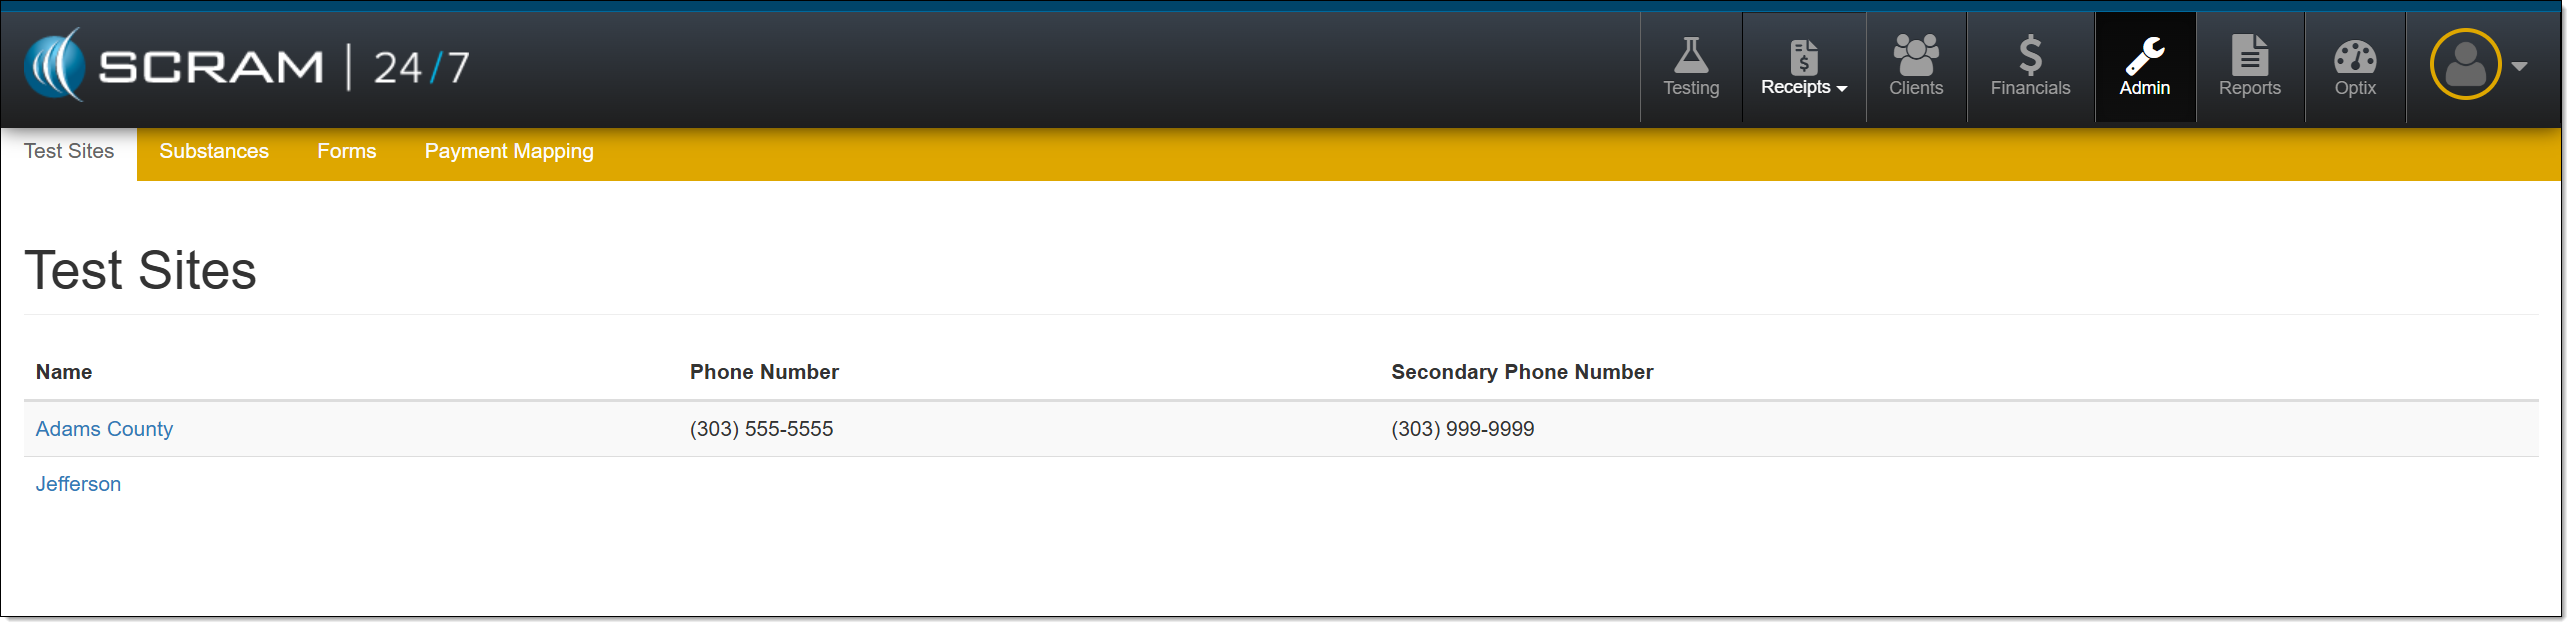

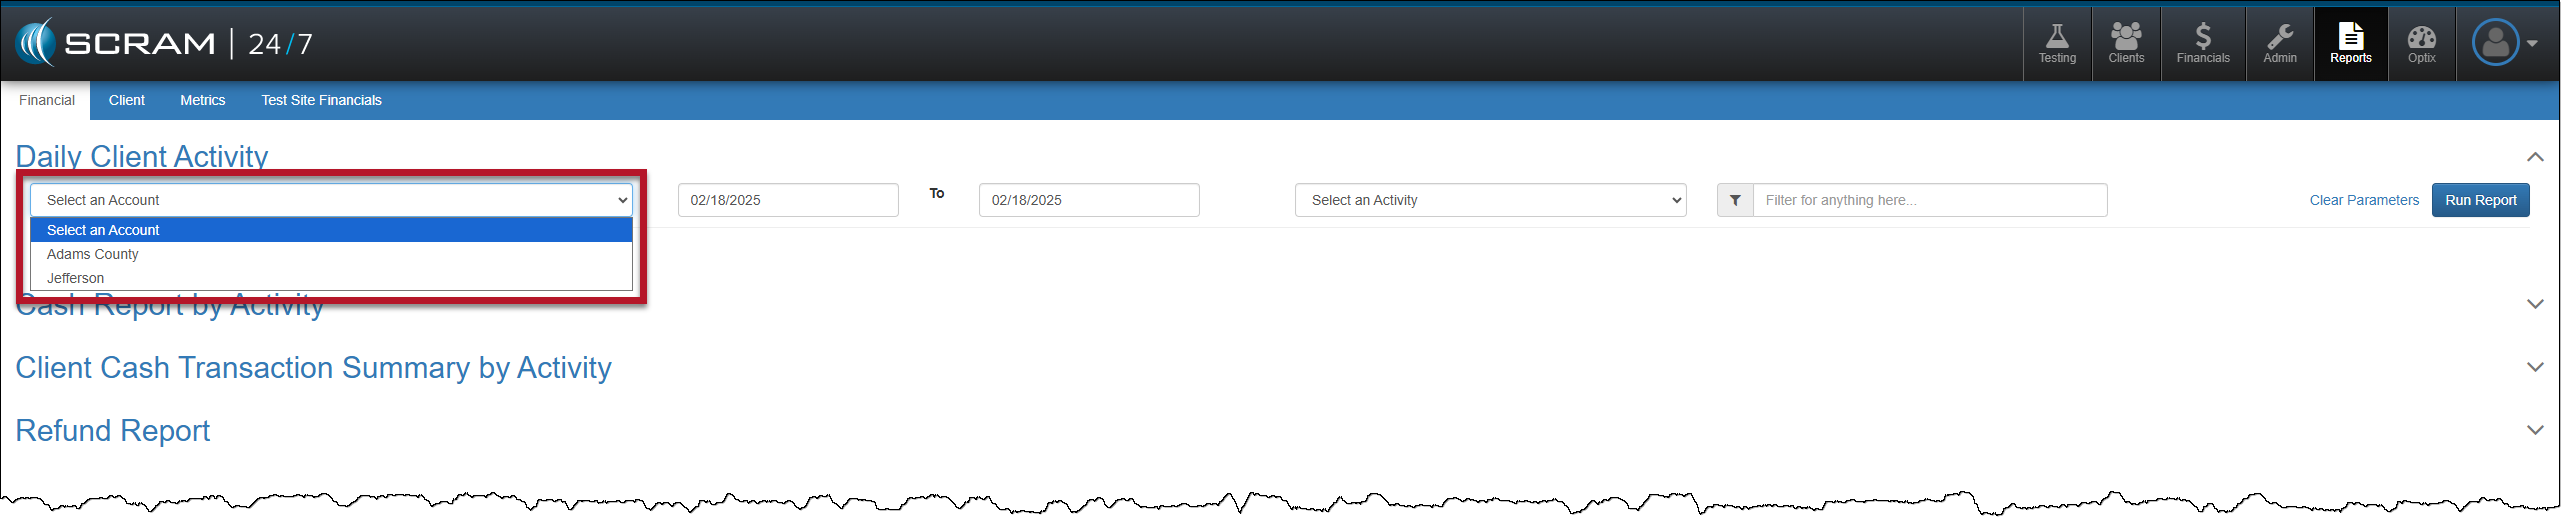
| There are no visual changes to the navigation for a single-caseload user. |