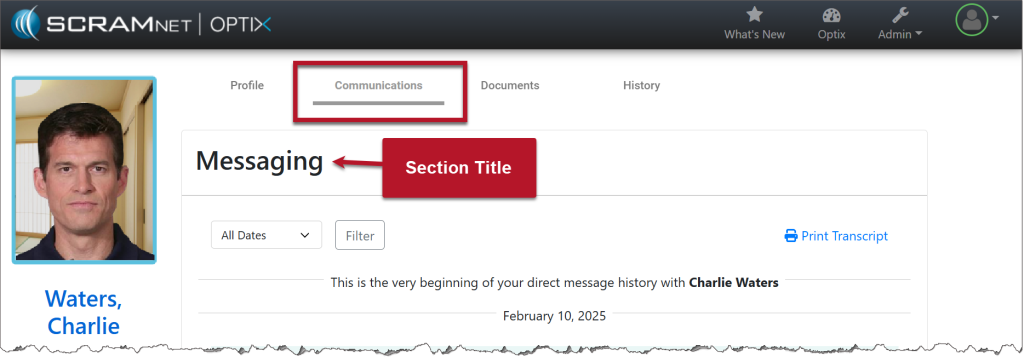
On December 11, 2025, SCRAM Systems will release an enhancement for your SCRAM 24/7 and TouchPoint Monitoring programs. With this update, 24/7 users may view the historical activity for the services connected to TouchPoint Activity communication. TouchPoint users will find Electronic Monitoring Reminders, Messaging, and Video Conferencing in one consolidated place under the Communications tab in Optix.
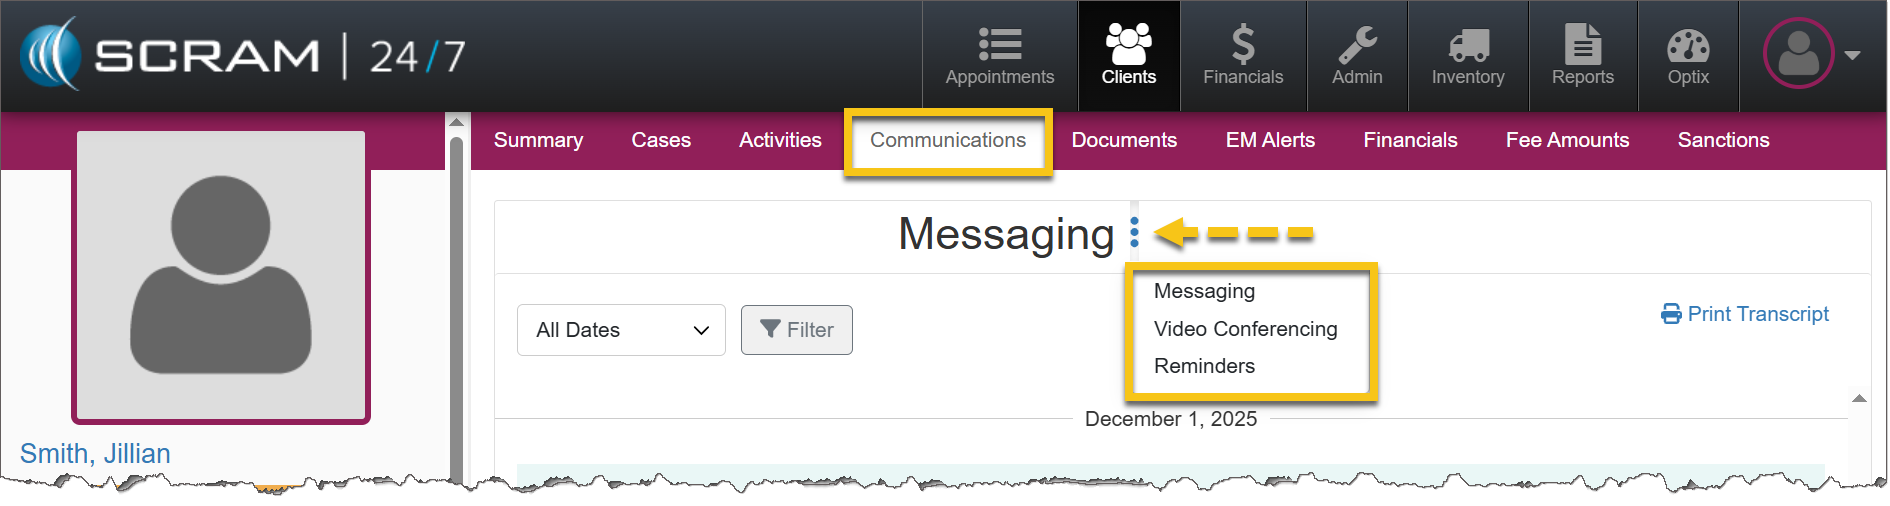
SCRAM 24/7 Communications Tab
In a previous update, SCRAM Systems enabled 24/7 users to complete all messaging functions within SCRAM 24/7 without navigating to Optix. With a recent update, users are able to view the historical activity associated with services connected to TouchPoint Activity communication.
The Communications tab becomes available once the TouchPoint activity has been added. If TouchPoint has never been added, this tab will not appear.
After the TouchPoint activity has been added – whether it remains active or has been disabled – the Communications tab will continue to display historical activity for Messaging, Video Conferencing, and Reminders.
Service availablility determines whether users may interact with each option in the dropdown menu. For example, if Messaging is not enabled, users may view historical messages, but may not send new messages.
If Video Conferencing has not been enabled for the account, that option will not display.
Communications Tab in SCRAM 24/7 (click to enlarge)
Would you like to learn more about the benefits of the SCRAM TouchPoint Mobile application? Contact your Account Manager for details on getting started.
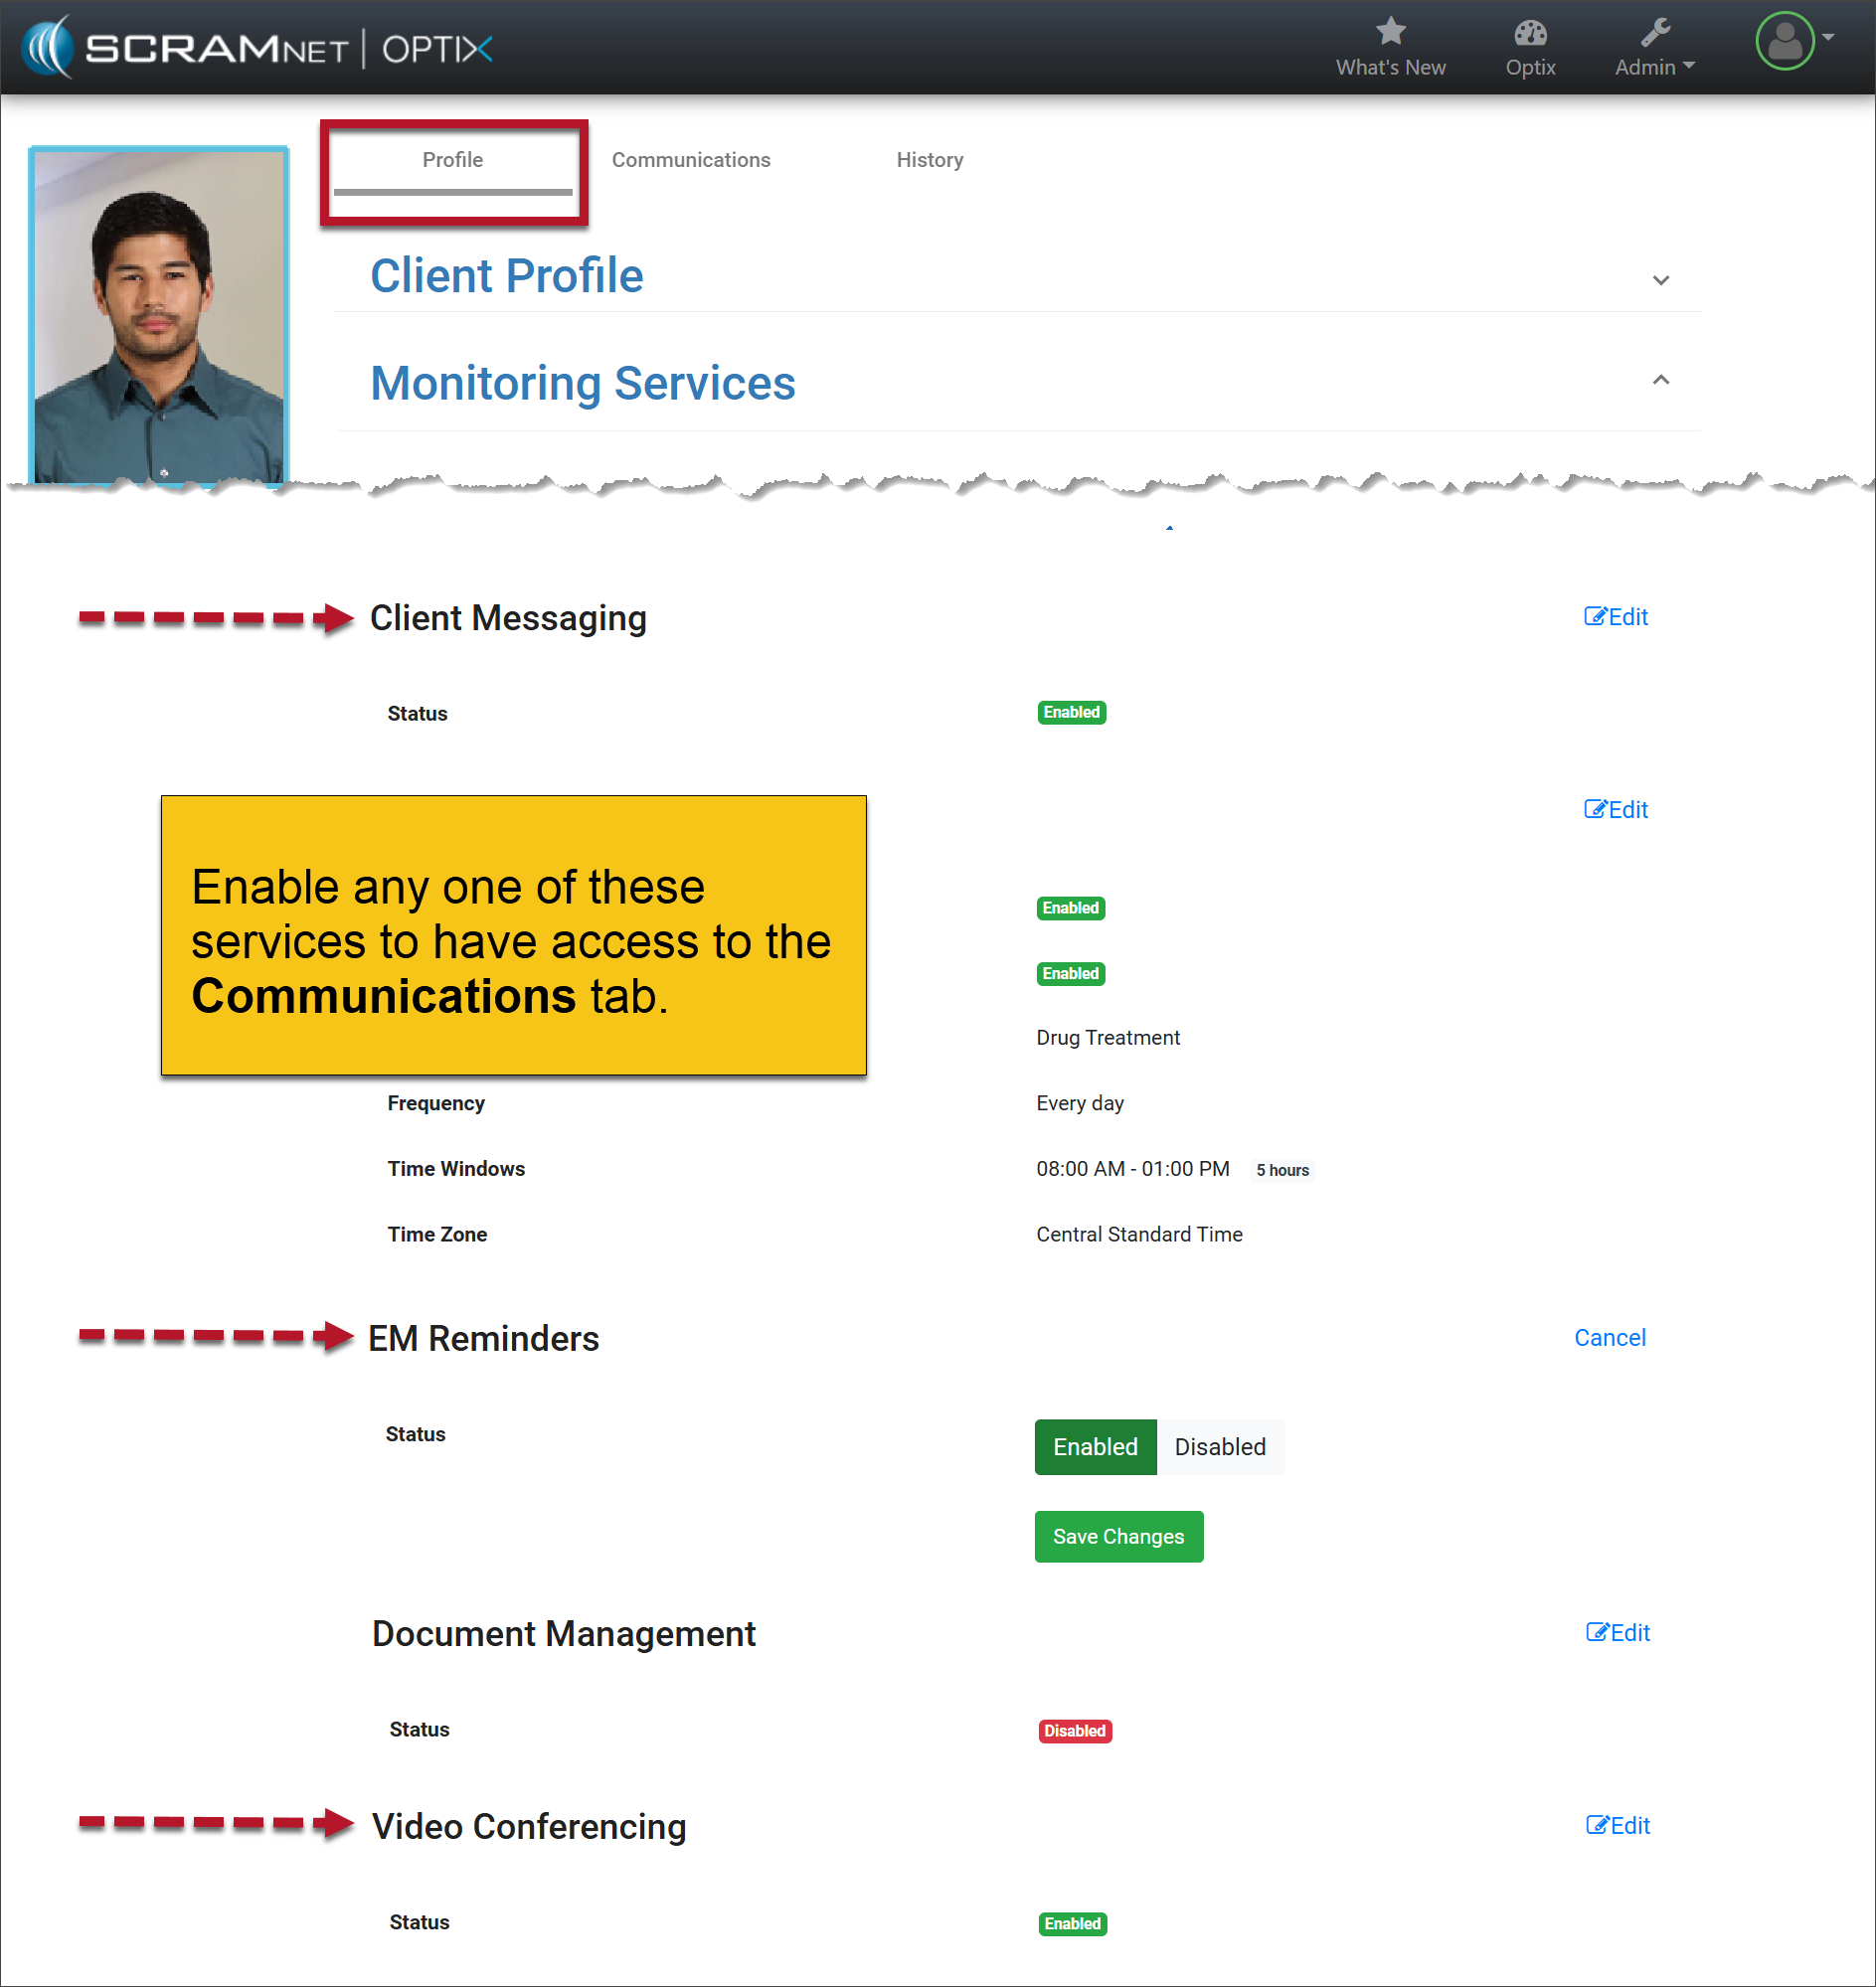
Optix Communications Tab
With this enhancement, users will find a consolidated view of communication and monitoring information under the Communications tab. This tab will contain:
Electronic Monitoring Reminders
Messaging
Video Conferencing
Enable the Service(s)
The Communications tab is available once any of the services is enabled.
Client Profile Page in Optix (click to enlarge)
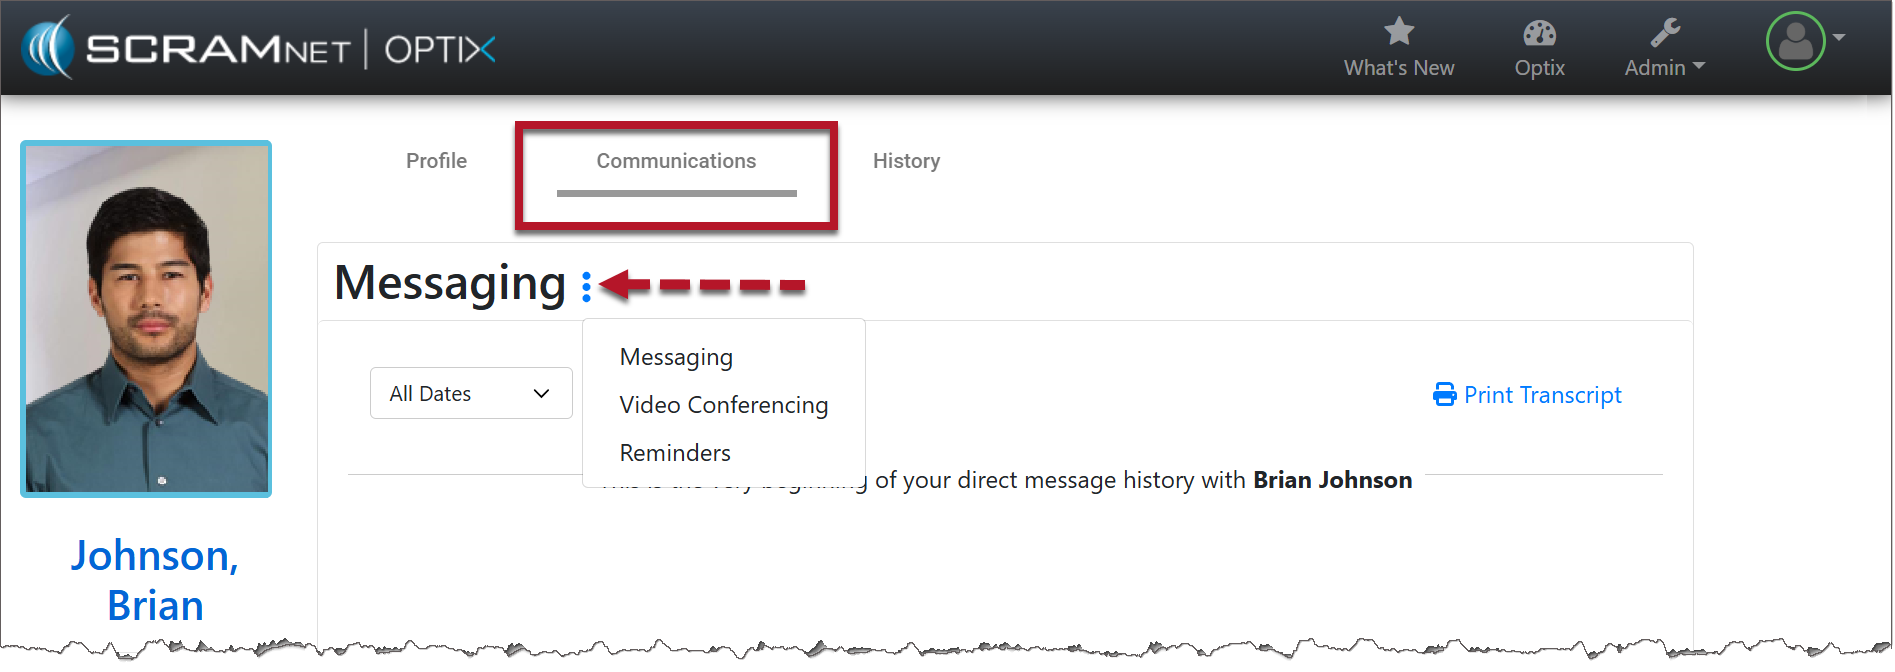
Communications Tab
Select the Communications tab.
Open the More (ellipsis) menu next to Messaging.
Select the desired service.
If the services are later disabled, users may still view the historical activity associated with those features. However, they will no longer be able to interact with the service or perform any new actions.
If Video Conferencing has not been enabled for the account, that option will not display.
Communications Tab in Optix (click to enlarge)
Your account must be enabled for video conferencing for these instructions to work. Contact your SCRAM Systems Account Representative if you are interested in activating this service.
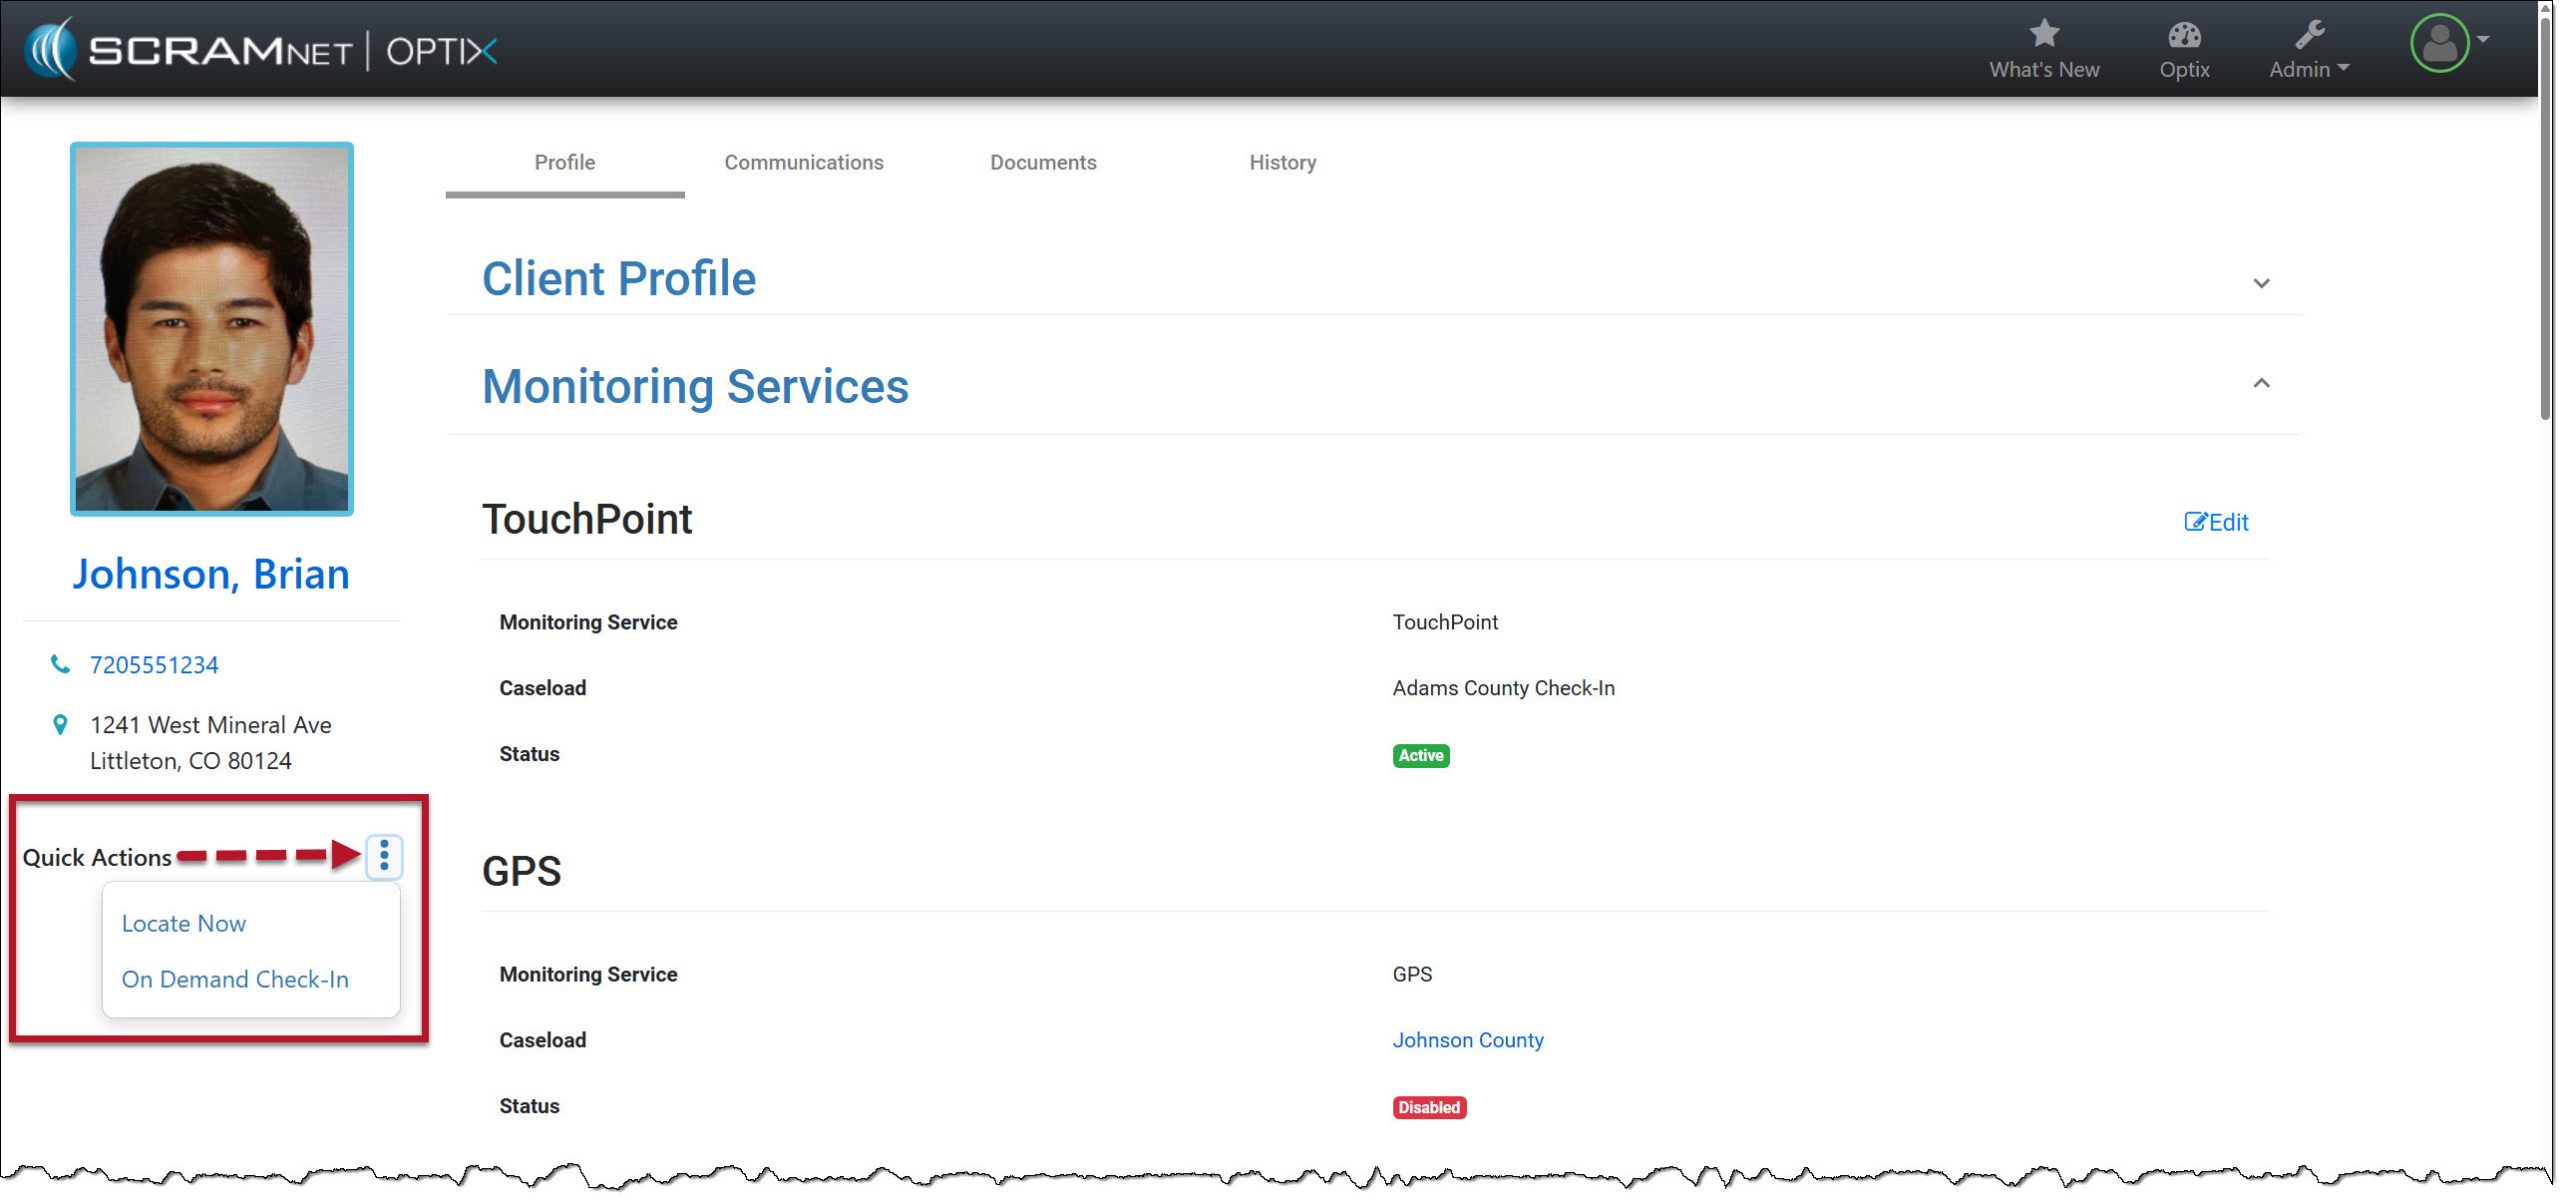
On October 15, 2025, SCRAM Systems will release an enhancement for your SCRAM TouchPoint caseload. This enhancement consolidates the one-touch action hyperlinks into a Quick Actions dropdown menu and allows room for additional Quick Actions to be added in the future..
The options available on the “Quick Actions” dropdown menu will reflect the current SCRAM TouchPoint features enabled for the client.
Current View of the Quick Actions Hyperlinks – click to enlargeQuick Actions Consolidated Dropdown Menu – click to enlarge
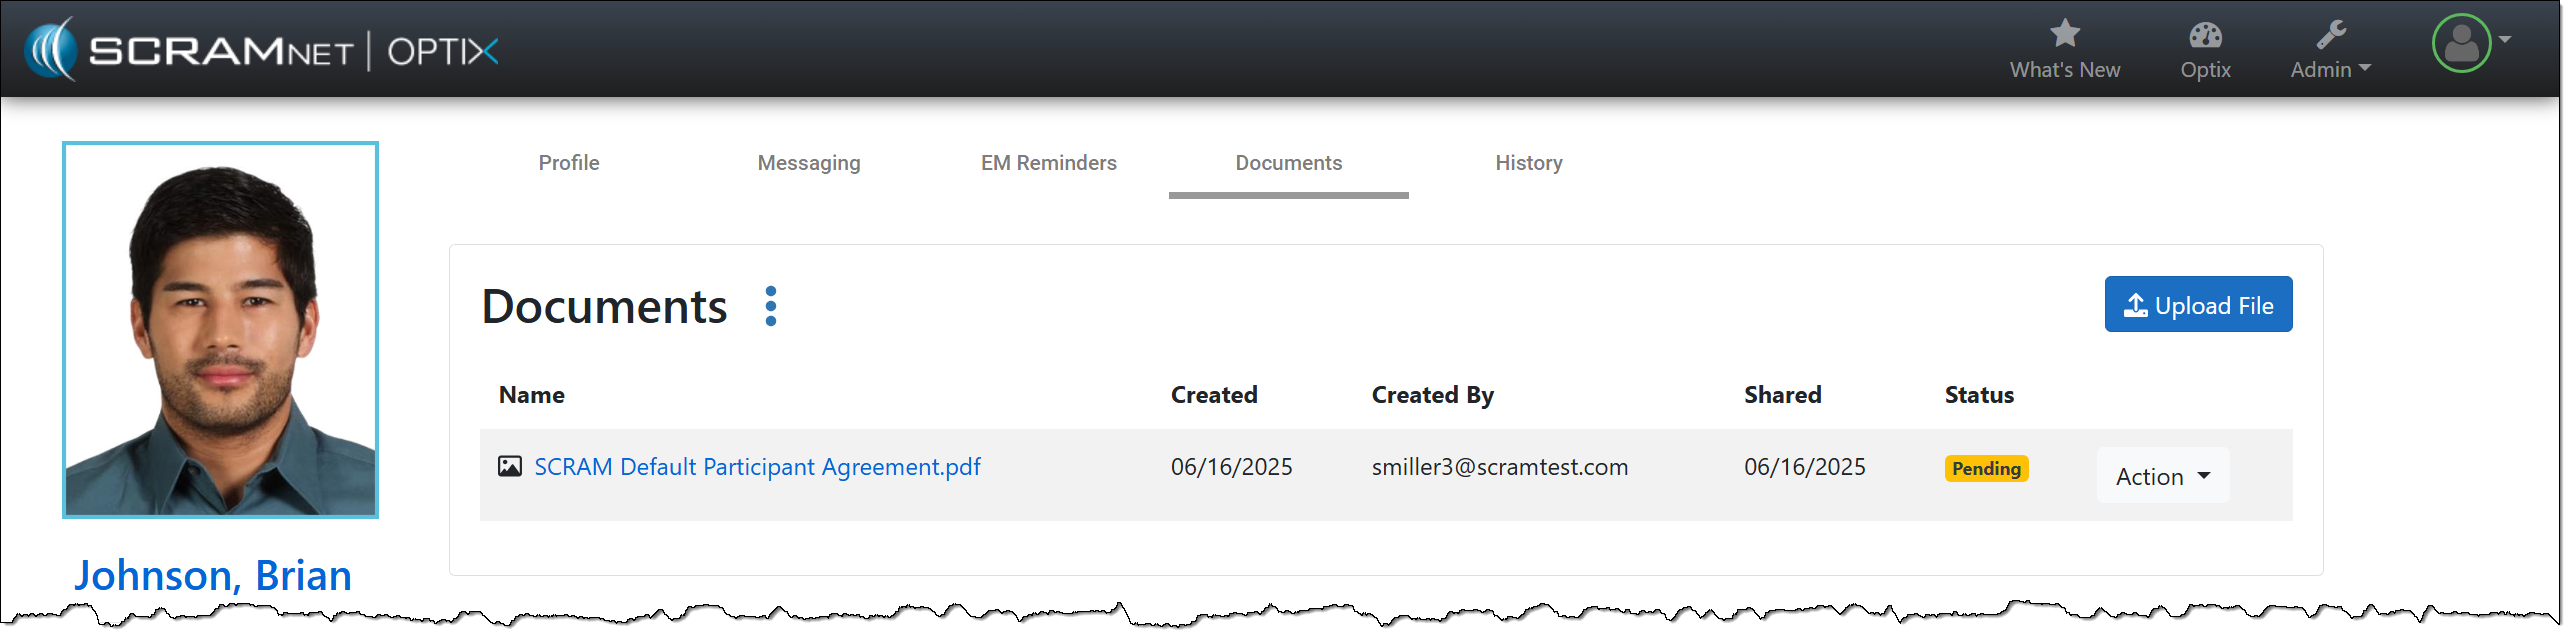
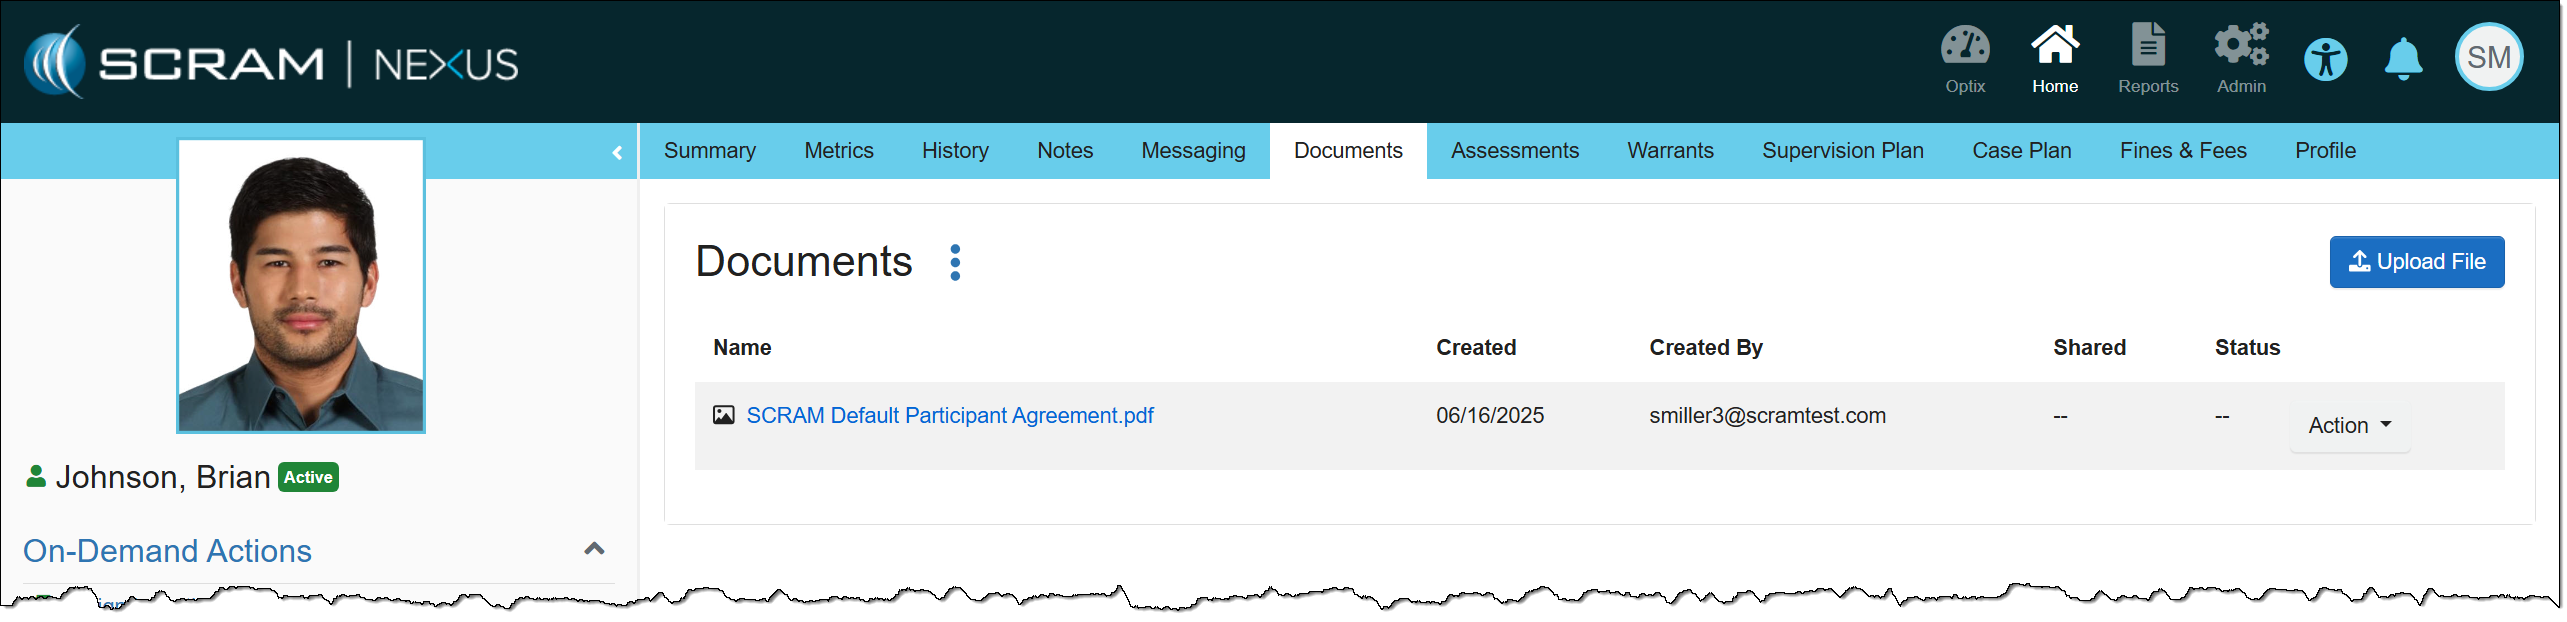
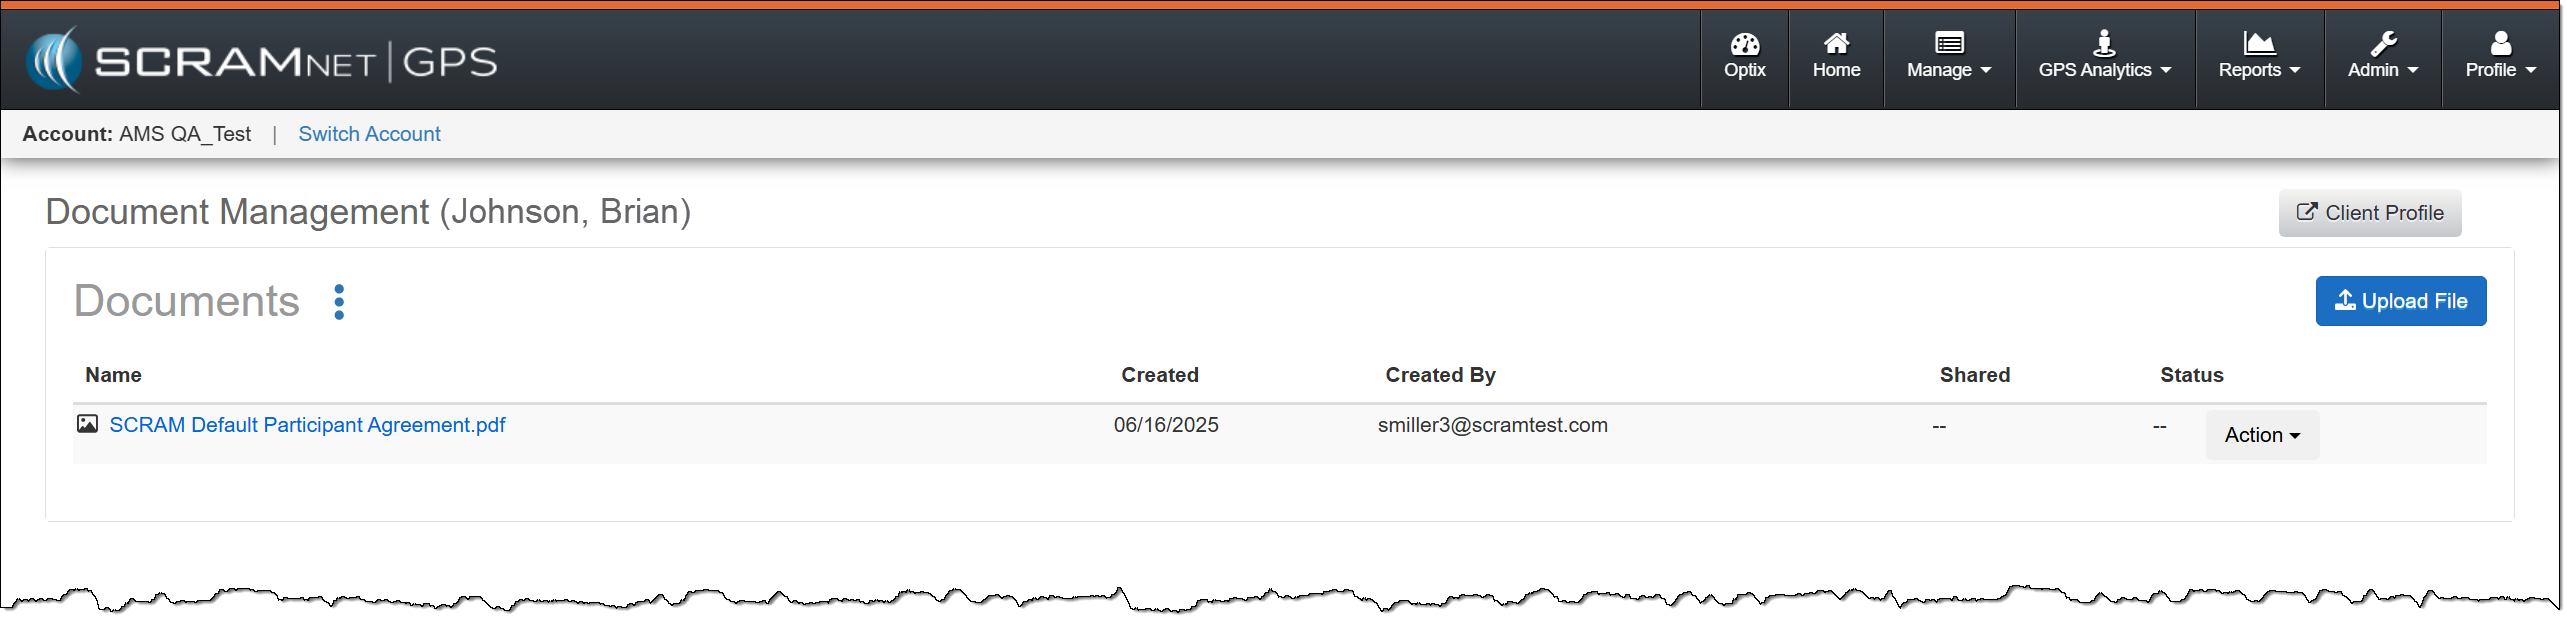
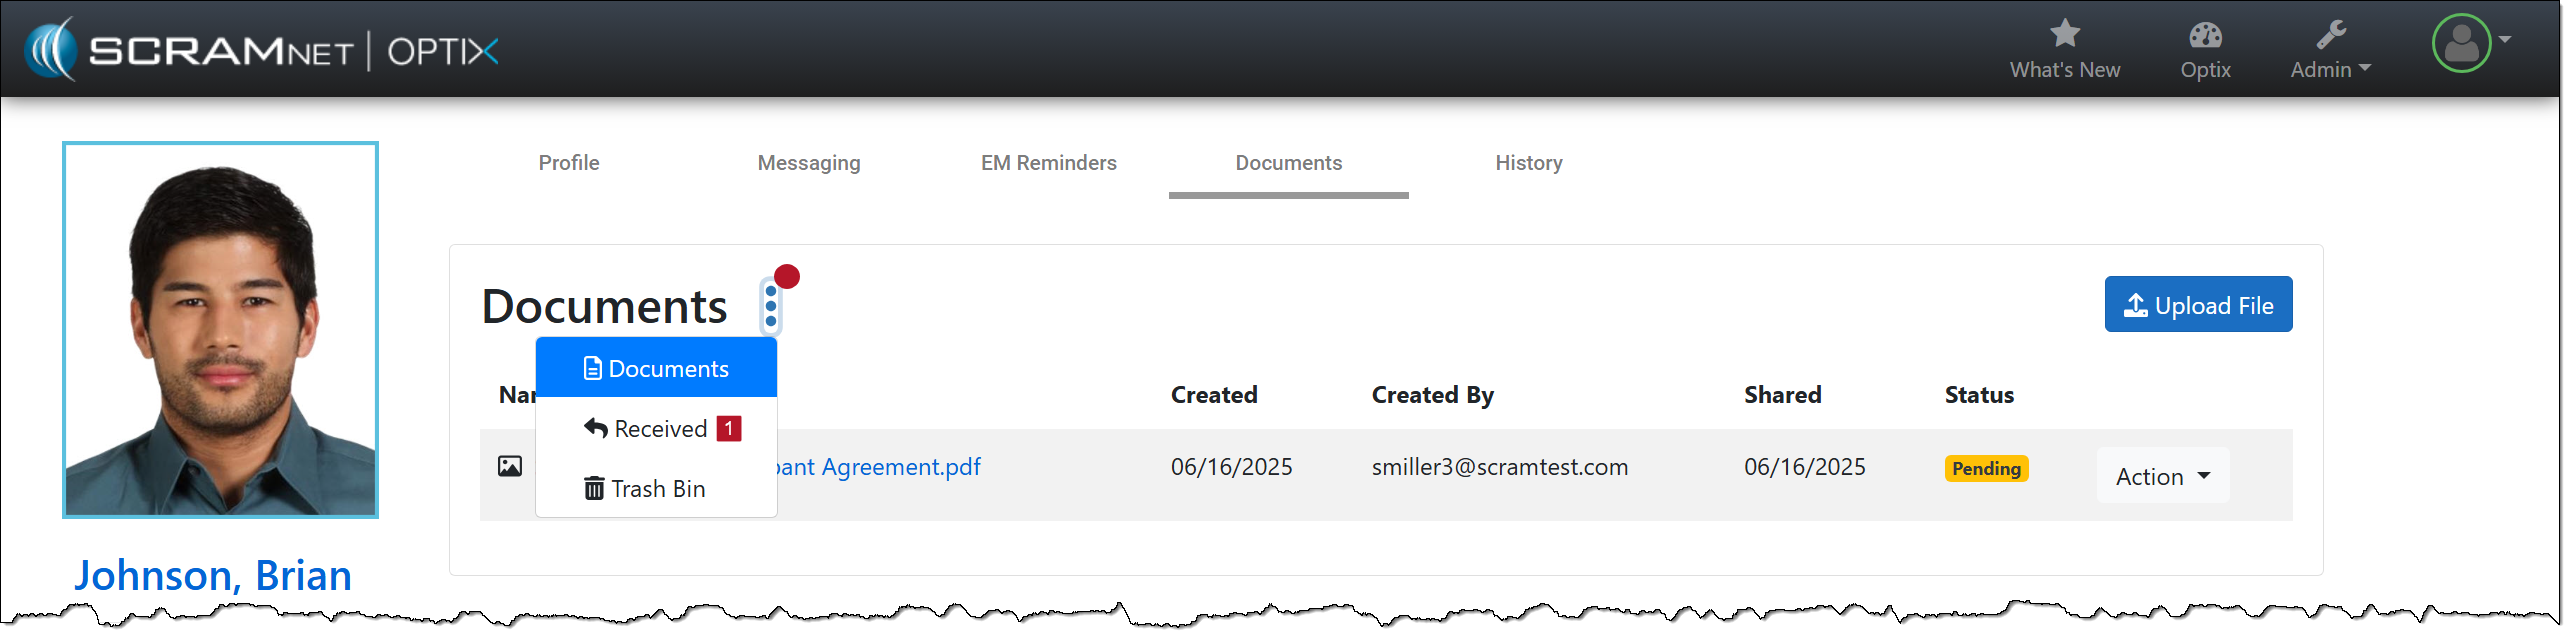
On July 9, 2025, SCRAM Systems released a client Document Management enhancement within SCRAM Optix, SCRAMNET GPS and SCRAM Nexus.
If you don’t see the enhancement, please clear your cache and cookies and refresh your browser window.
SCRAM Documents Page Enhancement
When viewing the client’s Documents page, you will notice a redesign. The “Documents, Received, and Trash Bin” options have been consolidated into an ellipsis menu, and the “Upload File” button has been moved to the right sideof the page.
SCRAM Optix Documents Page – click to enlargeSCRAM Nexus Documents Page – click to enlargeSCRAMNET GPS Documents page – click to enlargeExample of Notification Badge – click to enlarge
SCRAM Systems has moved from its Mineral Avenue address in Littleton, Colorado. When conducting business with us, be sure to use the appropriate address:
RMA Address
When a Return Merchandise Authorization (RMA) is issued for one of your SCRAM Systems devices, please ensure that the return shipping address on the label reads:
SCRAM Systems (AMS) 8100 Southpark Way Littleton, CO 80120
If your return shipping labels have the old, now-obsolete Mineral Avenue address on them, please discard them and request new labels from your SCRAM Systems Account Manager or Regional Sales Manager.
Payments Address
When making a bill payment to SCRAM Systems for monitoring services, equipment purchases and rentals, or any other reason, please remit payment to the SCRAM Systems bank lockbox:
Alcohol Monitoring Systems, Inc. PO Box 561097 Denver, CO 80256-1097
Do not remit payments to the now-obsolete Mineral Avenue address or to the Southpark Way address.
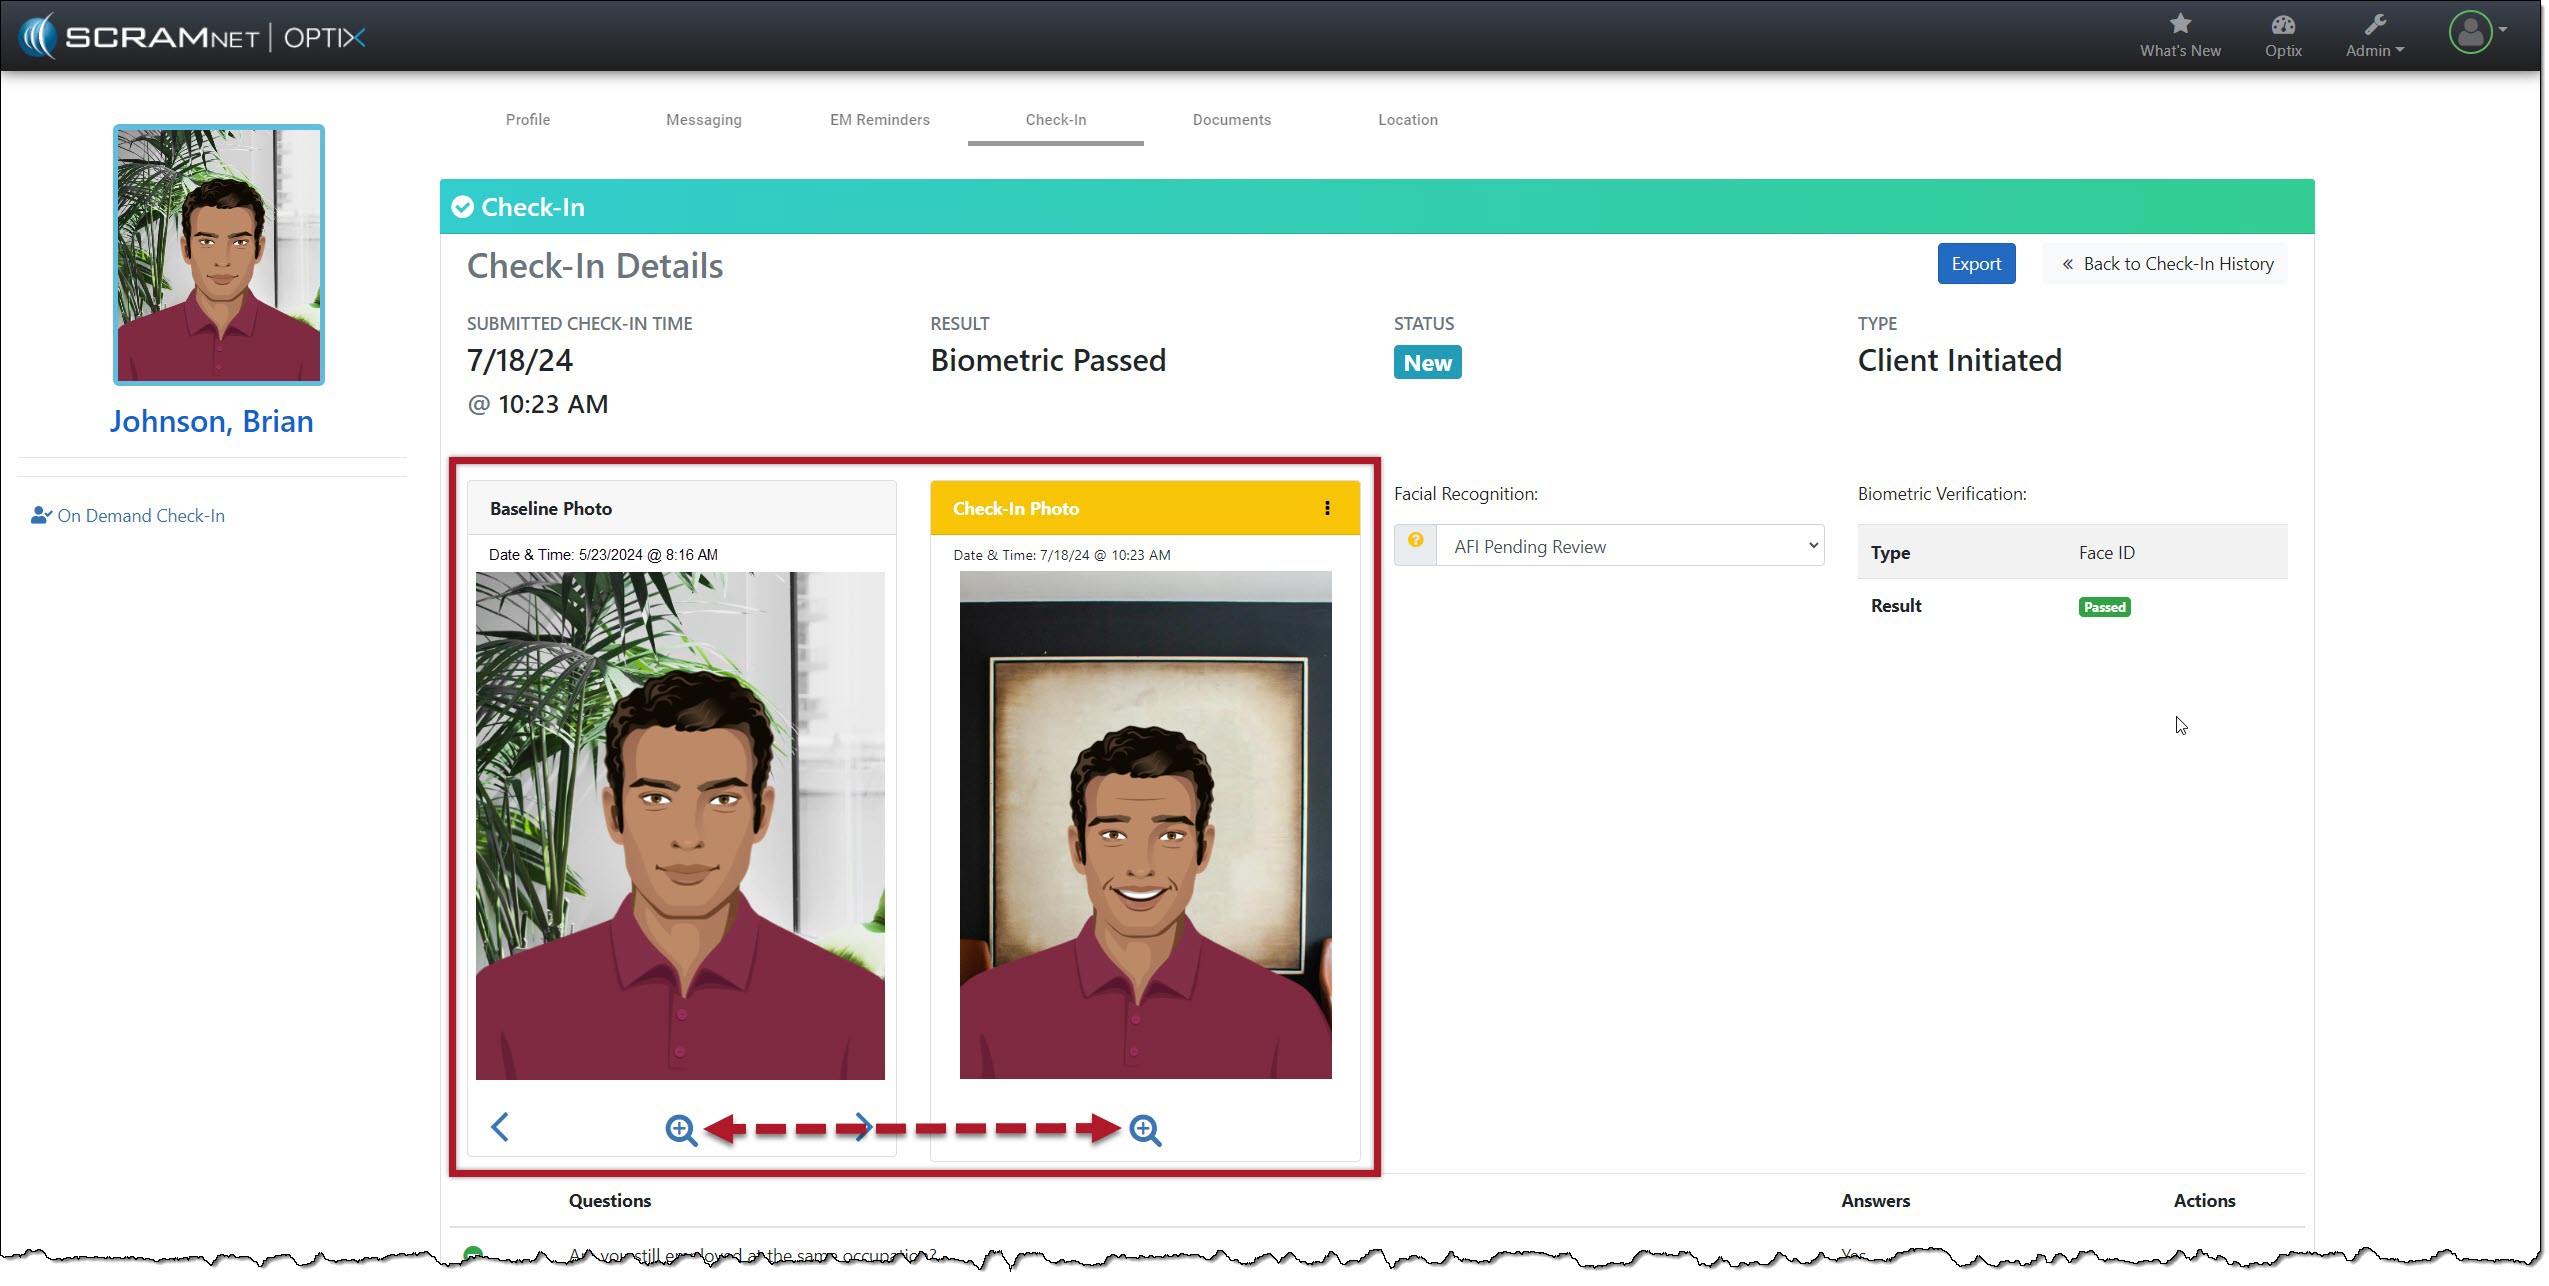
On July 31, 2024, SCRAM Systems will release an enhancement for your Client Check-In Caseload. Before this release, you would compare the client’s baseline image to their check-in photo for verification. With this release, you may now create a check-in photo gallery to reference while verifying the check-in photo taken by the client during a check-in.
If you don’t see the enhancement in SCRAM TouchPoint, please clear your cache and cookies and refresh your browser window.
Client Check-In Details
The client Check-In Details page’s Baseline and Check-In Photo section contains additional navigation and menu options.
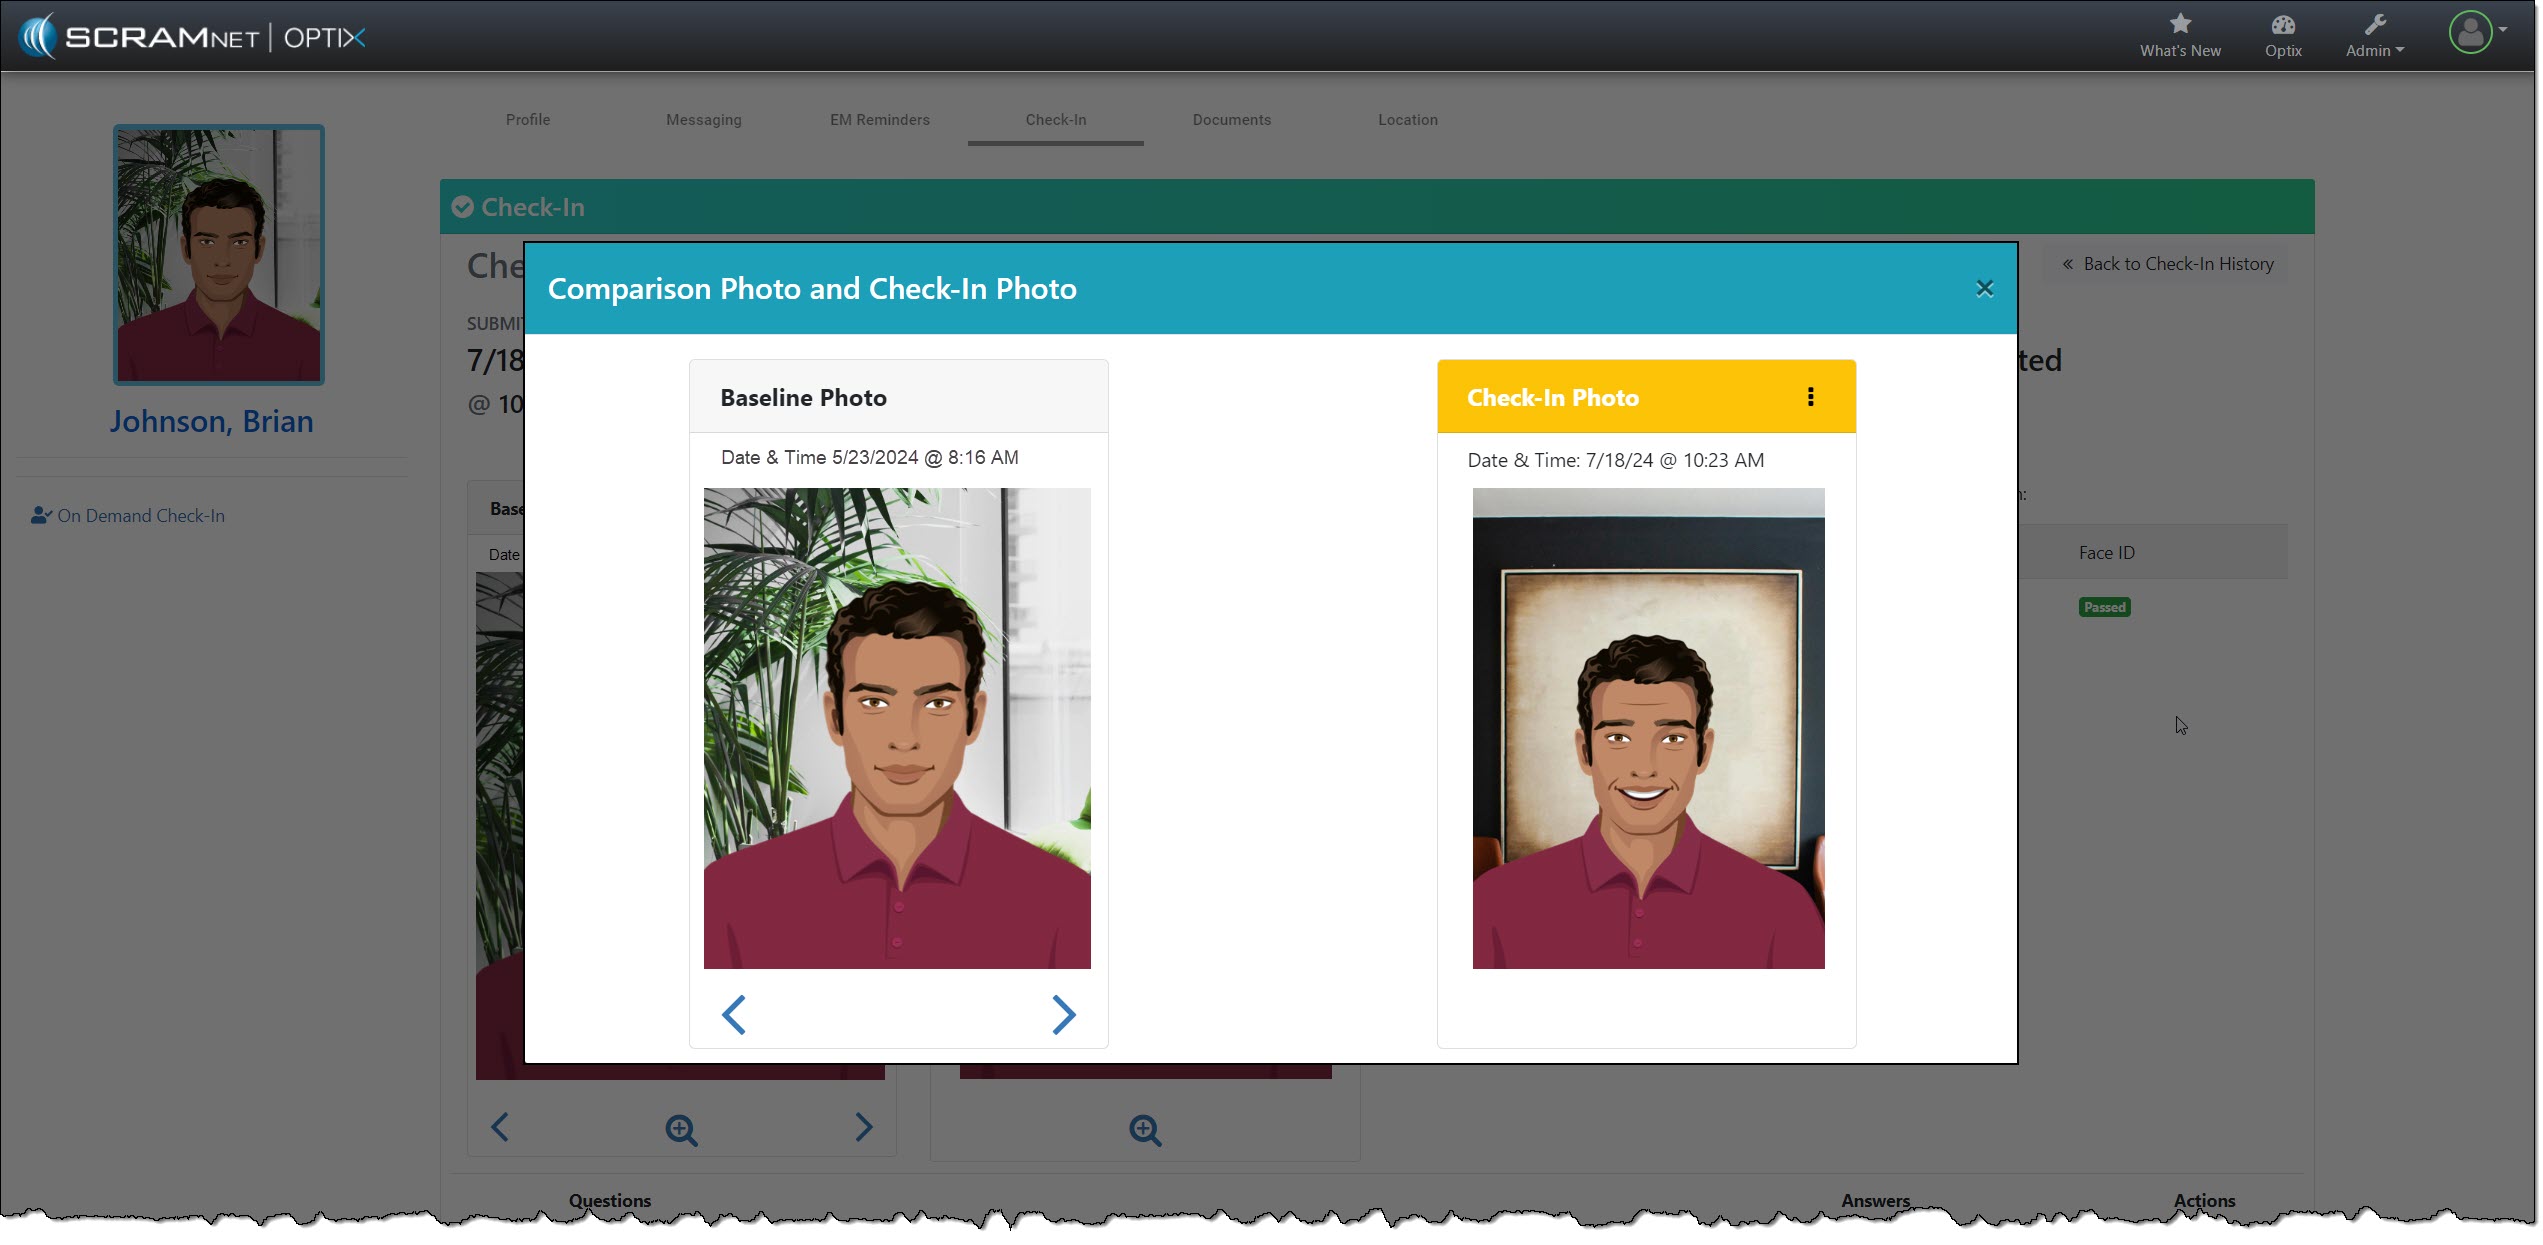
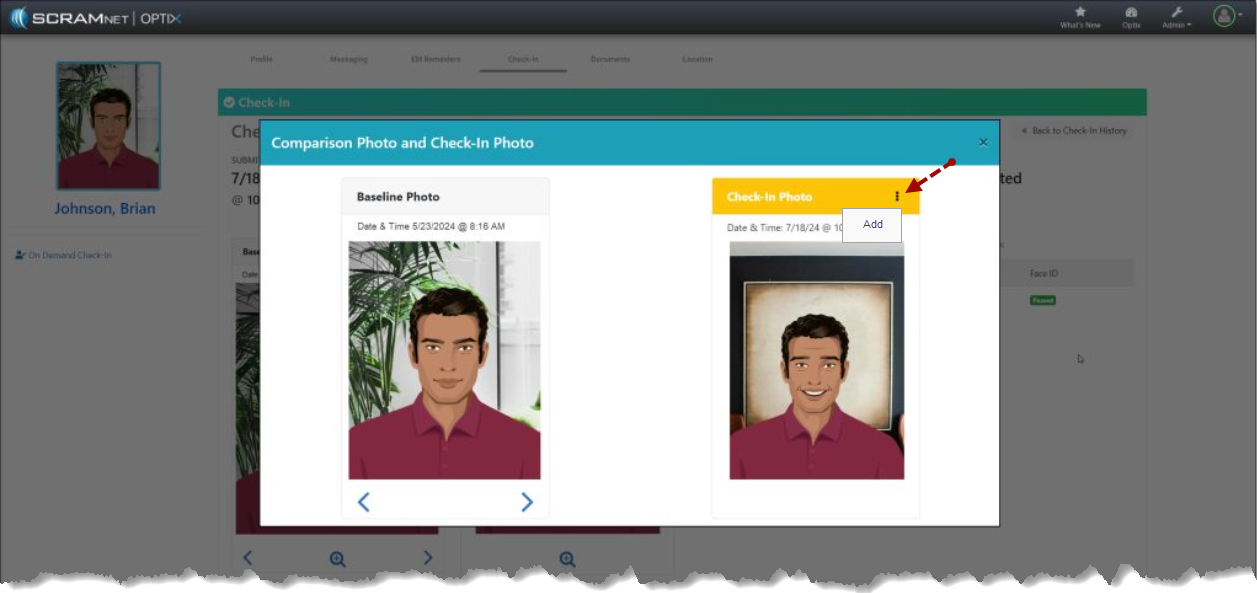
Starting with the “magnifying glass” icon: Selecting the icon opens a pop-up window, isolating and enlarging the two photos for your review.
Isolate and Enlarge Photos – click to enlargeComparison Photos with “More” (⋮) Option – click to enlarge
The Check-In Photo heading contains a “More” (⋮) option that allows you to Add the current check-in photo to an image gallery. Once added, you may use the arrows below the Baseline Photo to scroll through the gallery. The gallery of comparison photos will hold up to 10 images, including the Baseline Photo.
Add Current Check-In Photo to Image Gallery – click to enlarge
As you scroll through the images, the check-in photos added to the gallery will have a heading labeled “Comparison Photo,” along with their check-in date and time information.
Check-In Details with Pop-up Date & Time – click to enlarge
Select the Menu (⋮) above the image to remove a comparison photo from the gallery and then the Delete option.
Remove Comparison Photo – click to enlarge
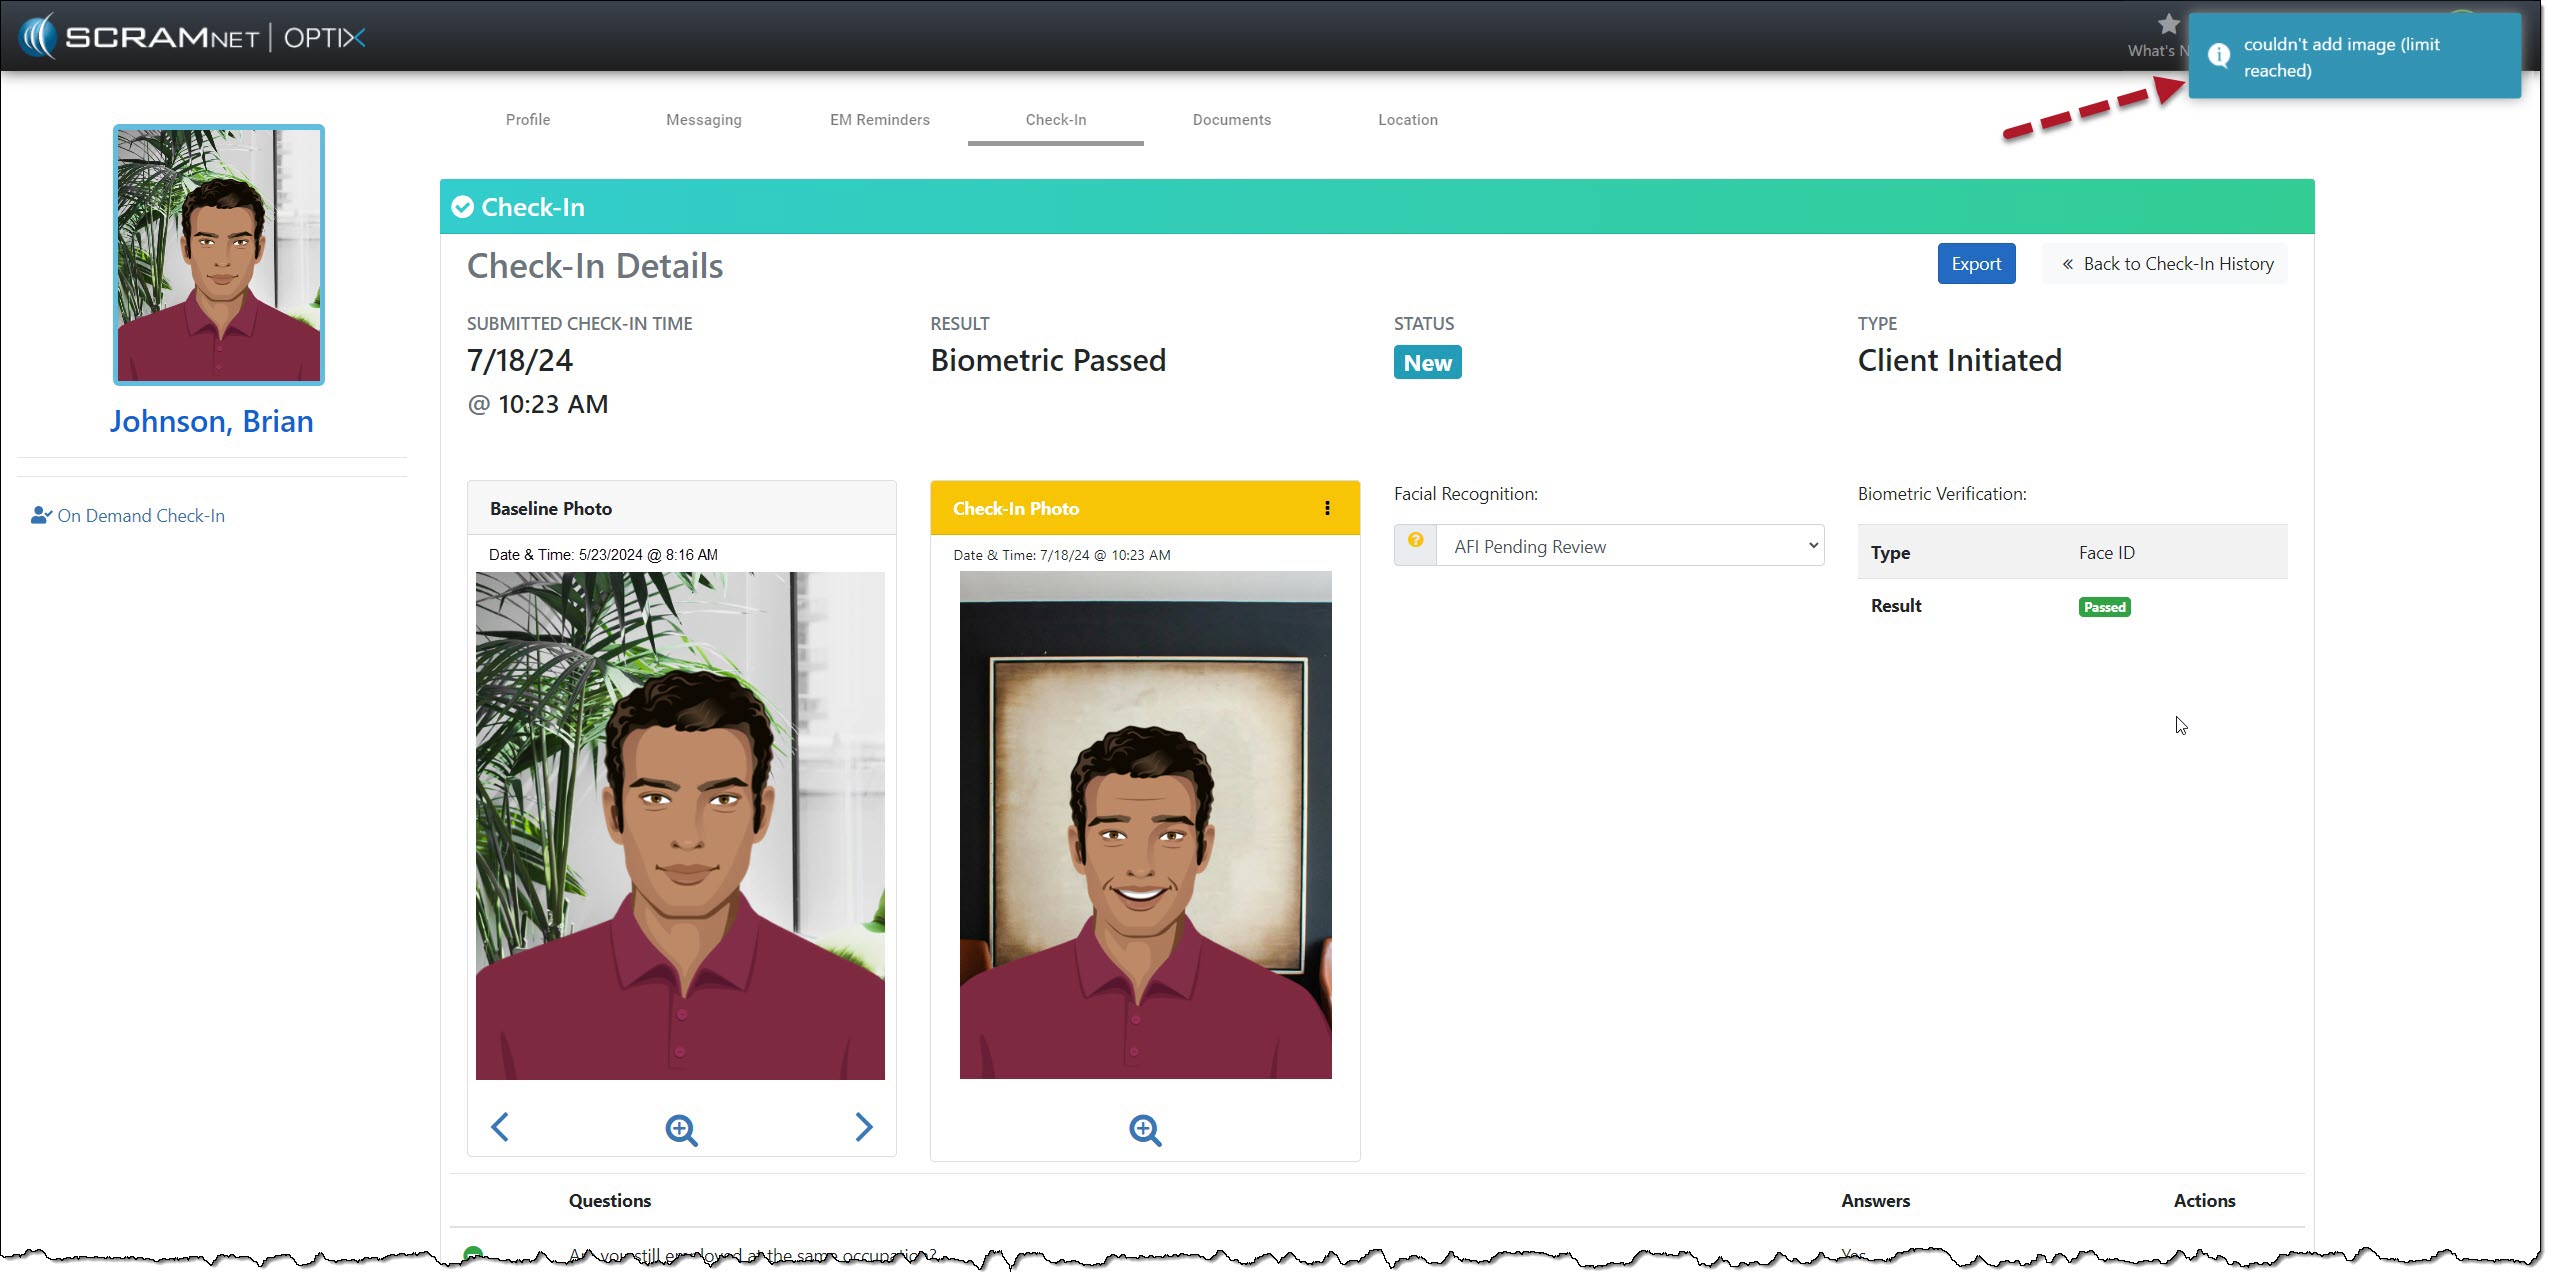
Each time you add or remove an image from the gallery, you will note a banner in the upper right corner of the page stating “Image Added” or “Image Deleted.” Once you have reached the 10-image limit, the system will display a “Couldn’t add image (limit reached)” banner if you try to add additional images.
“Couldn’t add image” Message – click to enlarge
To proceed, you must delete an image from the gallery and add the desired image.
On July 11, 2024, SCRAM Systems will release enhancements for your client Check-In and Document-sharing Caseloads. Specifically:
You may now eliminate the requirement for the client to answer questions during a TouchPoint Check-In.
Clients may send Word and PDF documents, as well as images, by utilizing the Documents feature within the TouchPoint mobile application.
The latest version of the TouchPoint app will be available to clients in the app stores. As a best practice, SCRAM Systems recommends that all TouchPoint app users enable their smartphones to automatically update their apps to make this process easier.
Not seeing the enhancement in SCRAM Optix? Clear your cache and cookies and refresh your browser window.
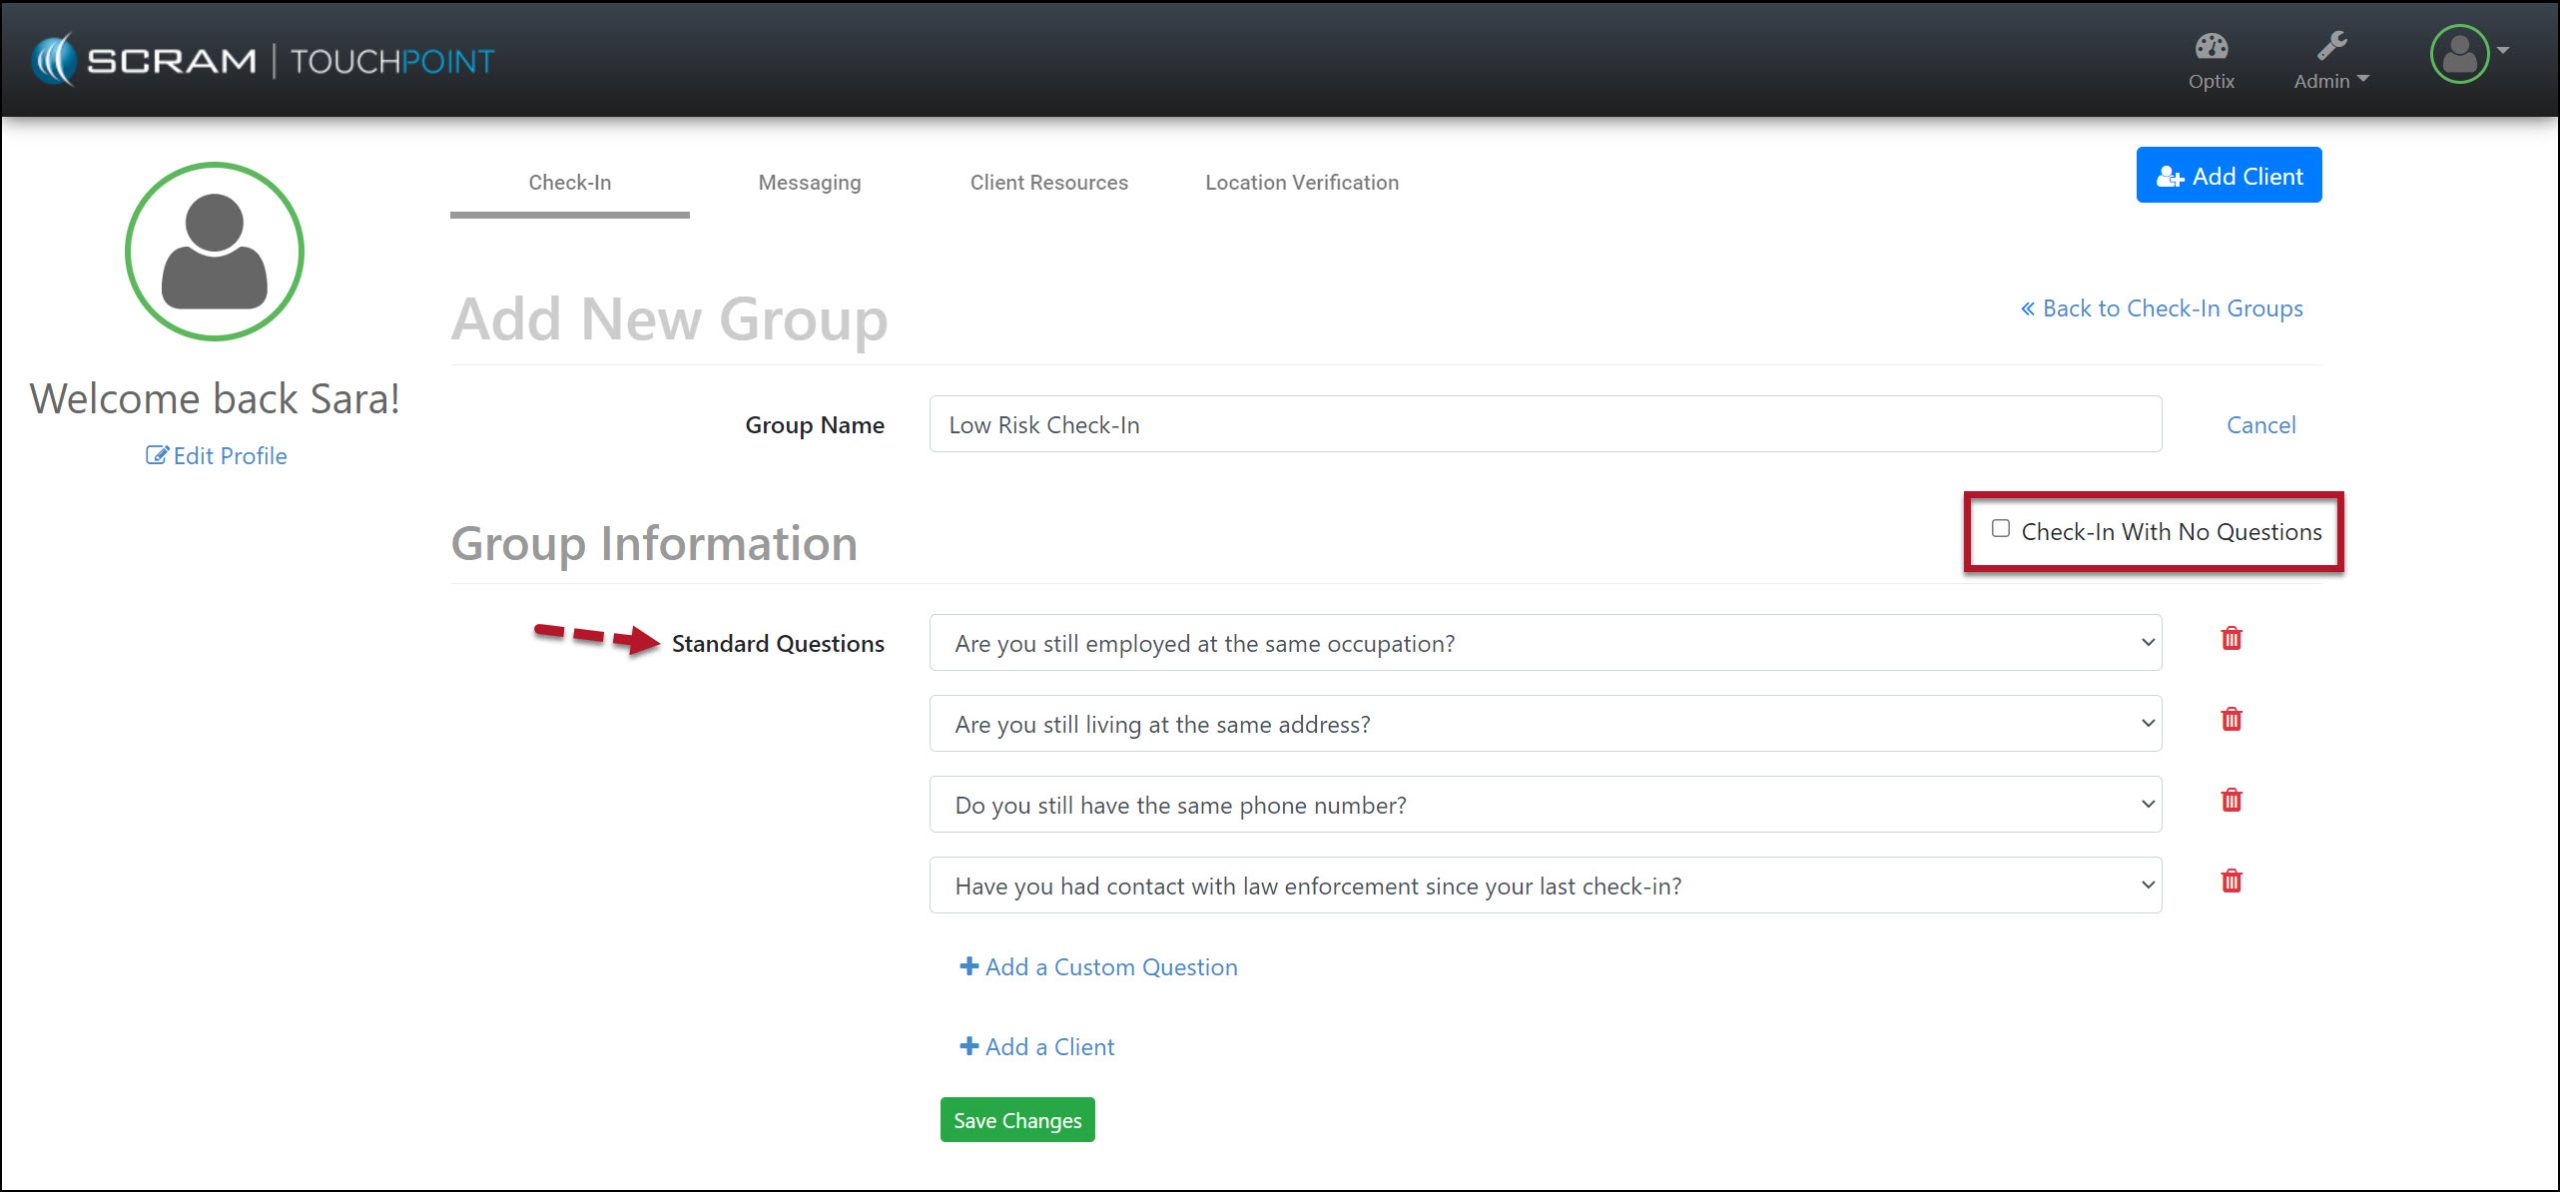
No Question Check-In Group
When a client is not required to answer questions during a TouchPoint check-in, you may remove that requirement for current Check-In Groups or create a new Check-In Group with the questions removed.
New Check-In Group
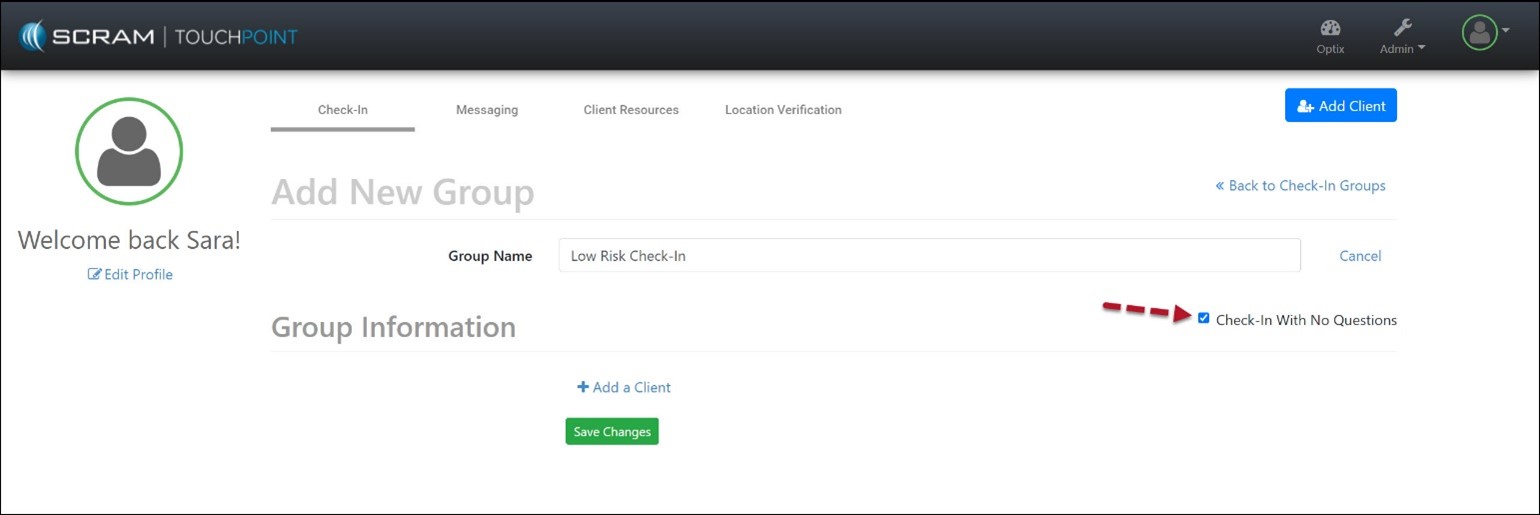
When creating a new Check-In Group, select the checkbox next to the statement “Check-In With No Questions” to remove all questions from the check-in.
Example: Before the checkbox is selected – click to enlargeExample: After the checkbox is selected – click to enlarge
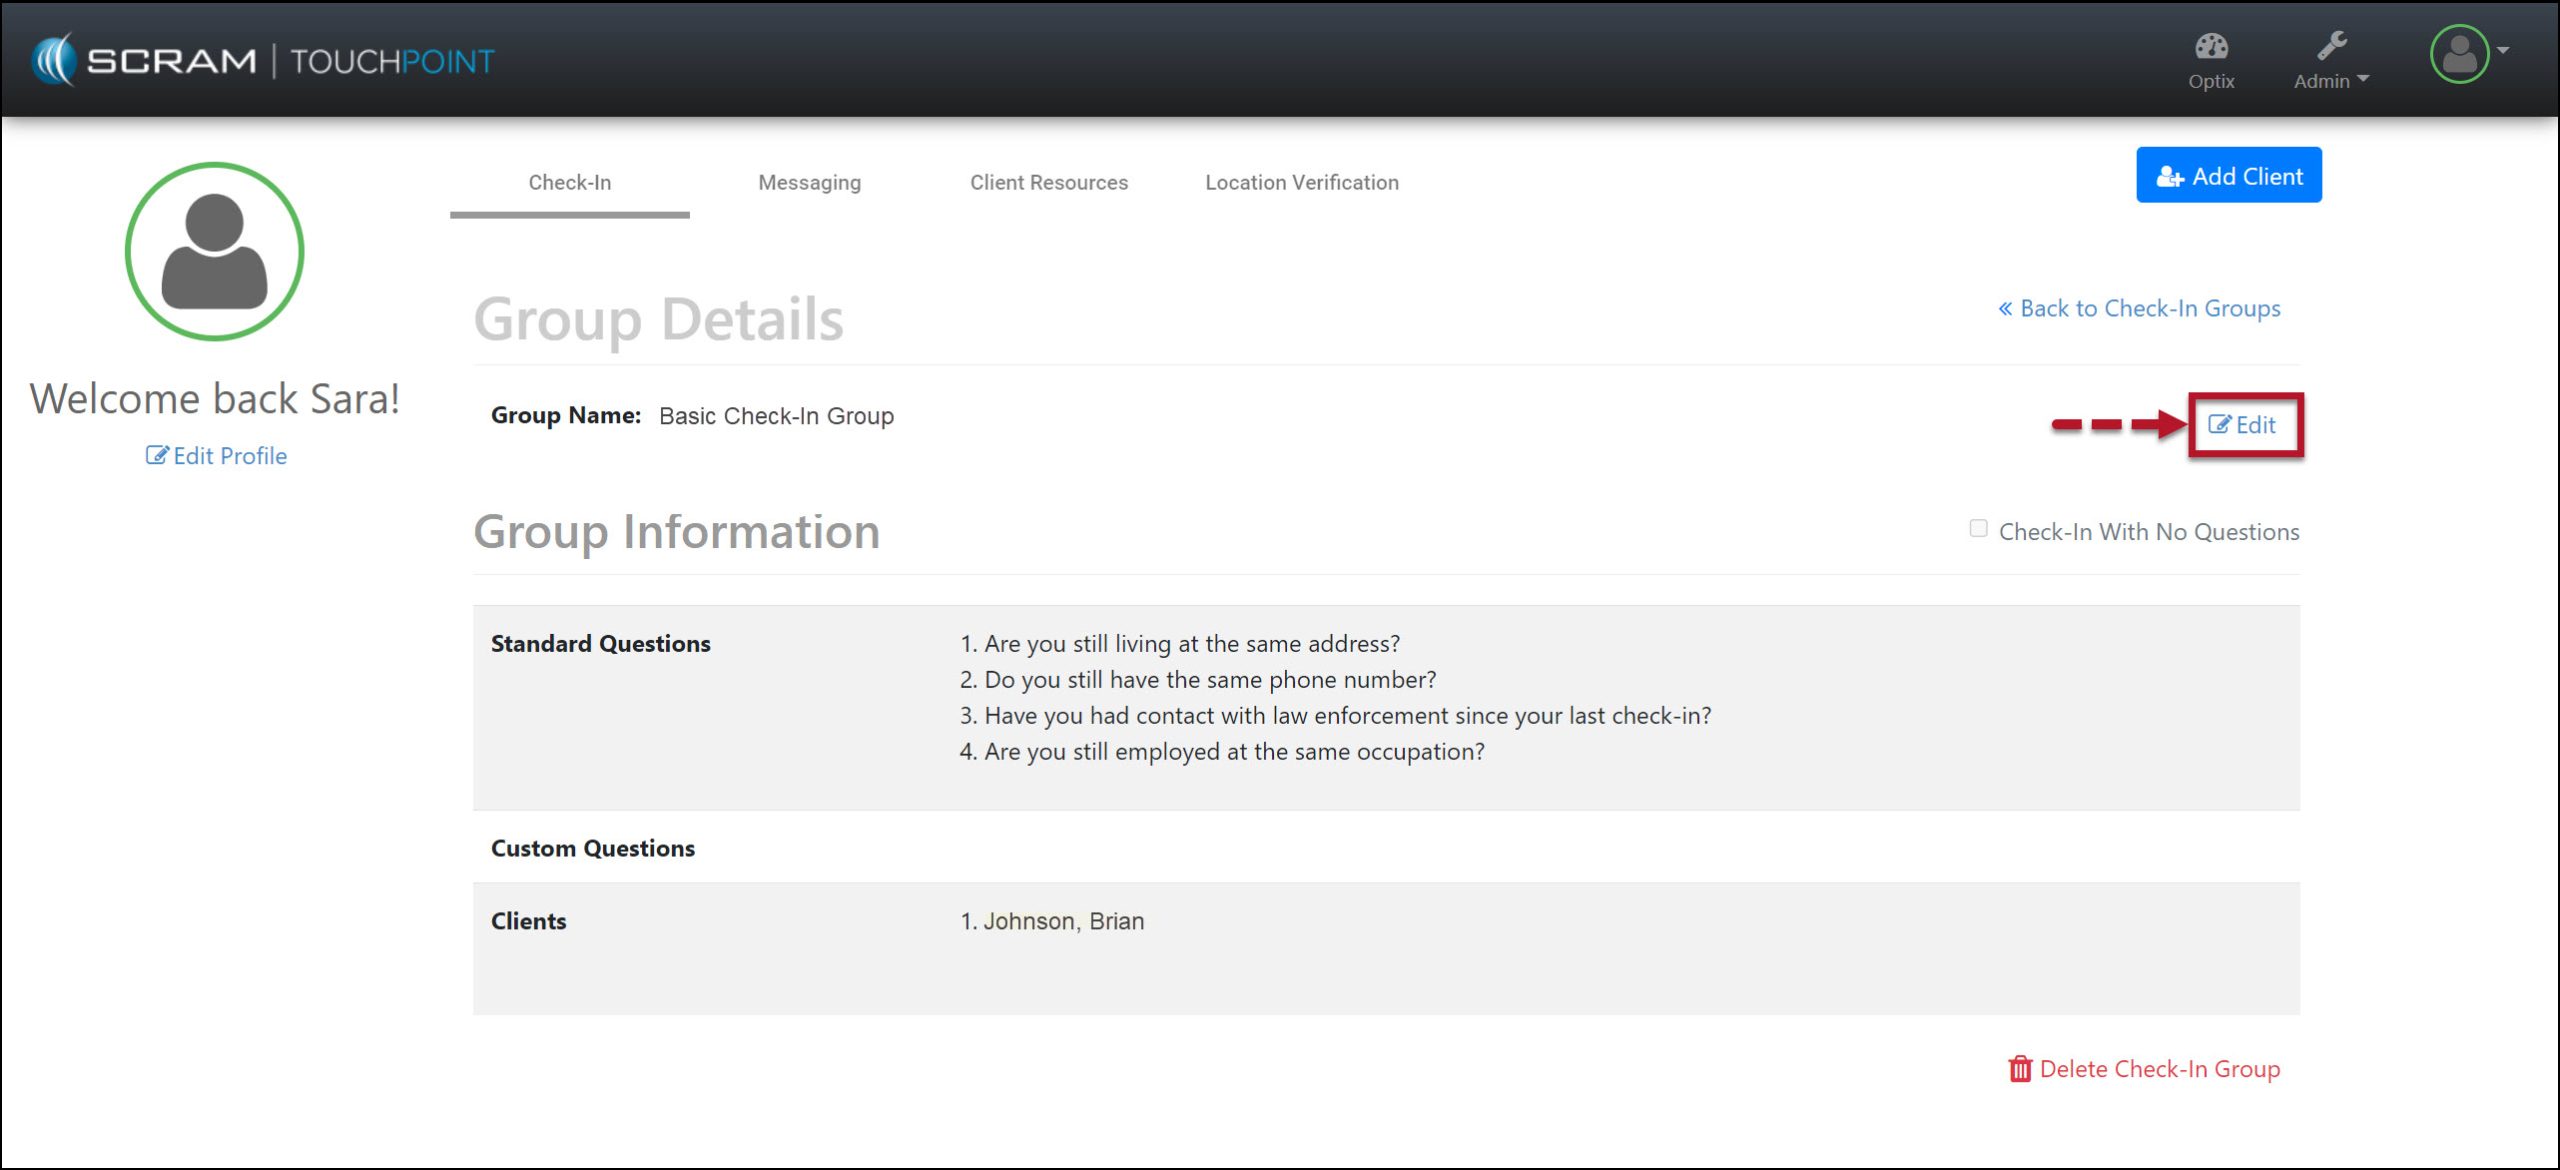
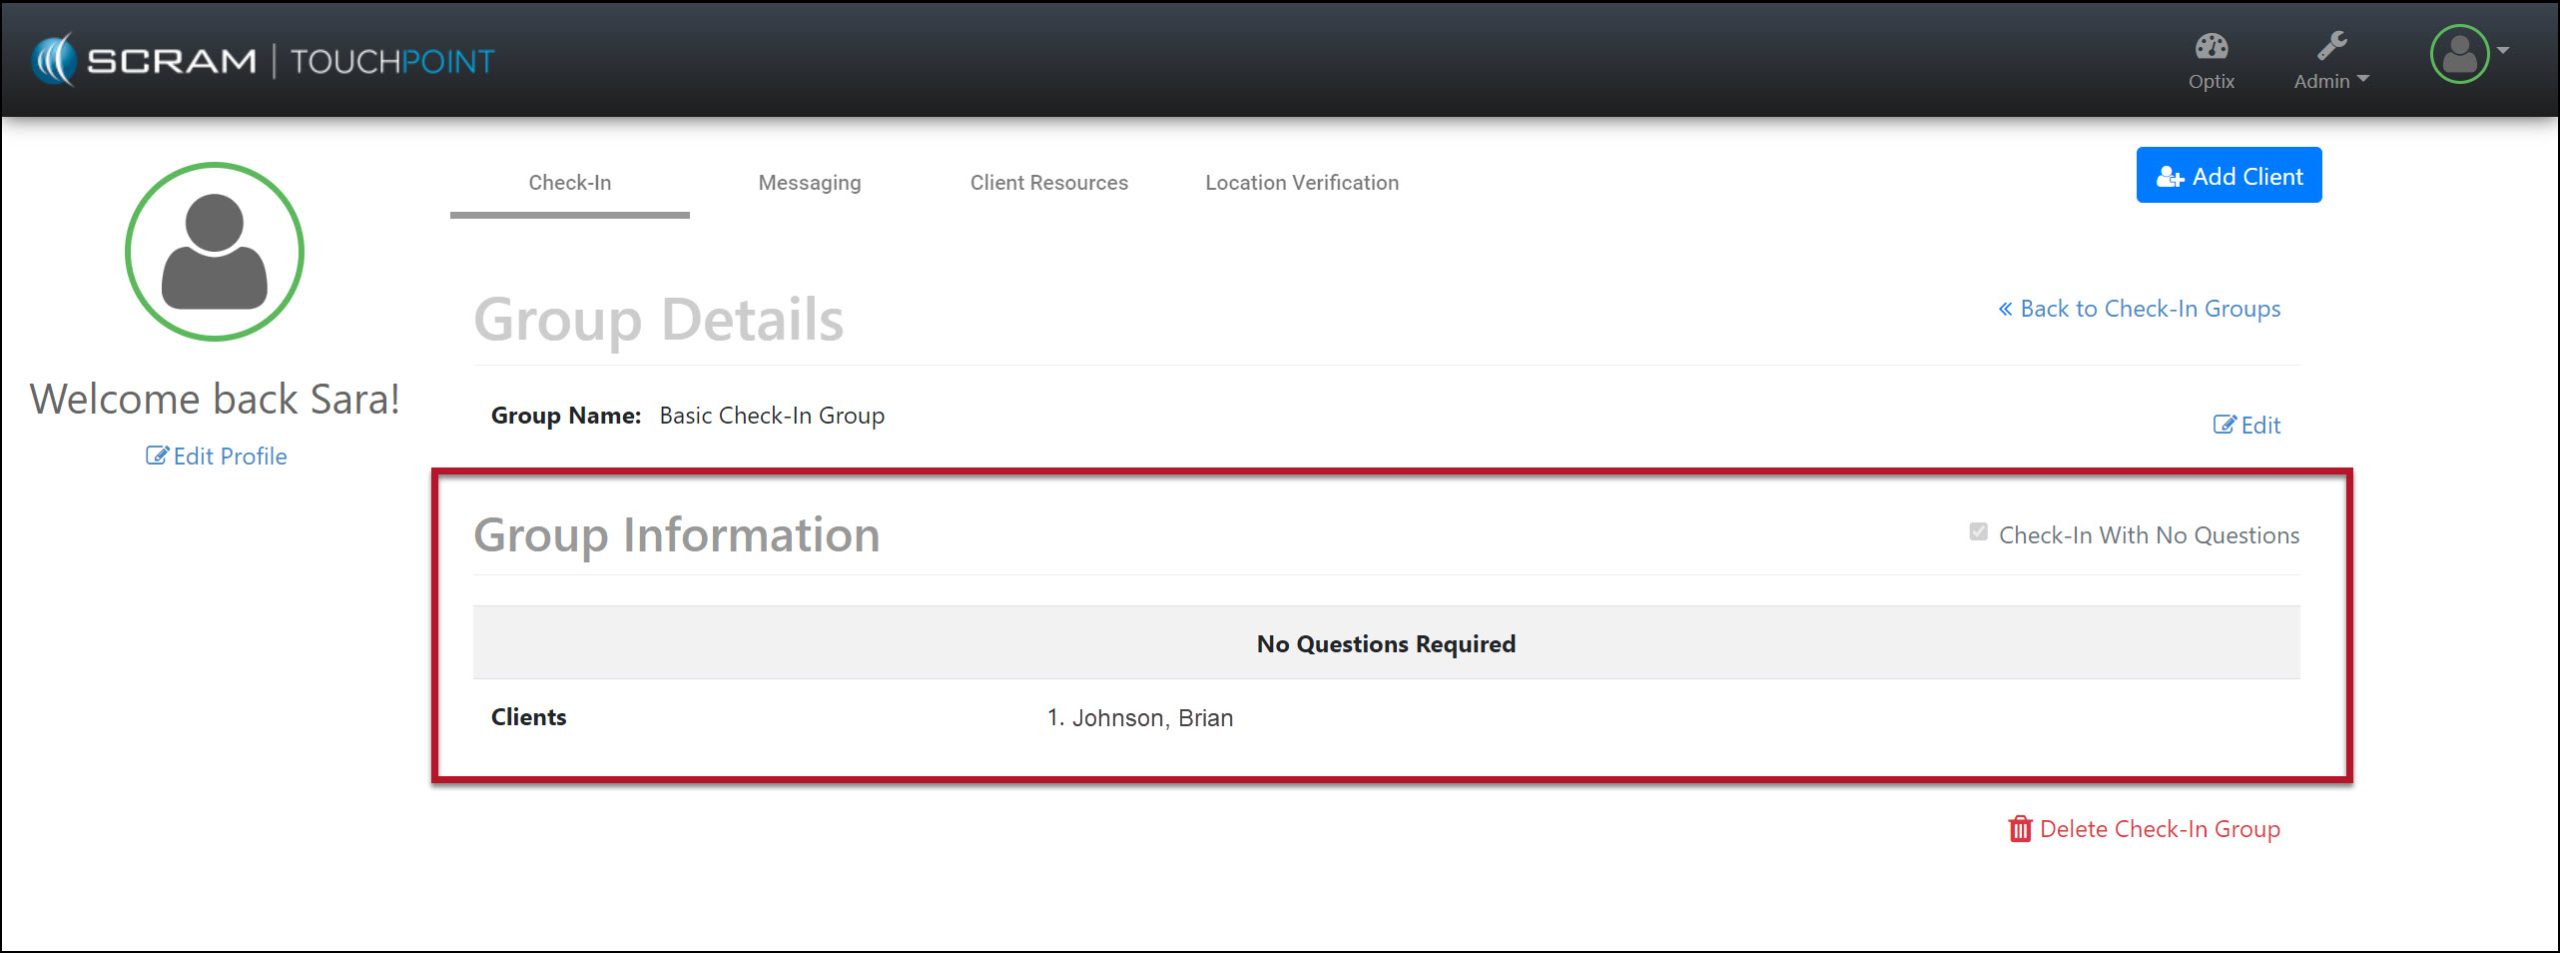
Edit a Current Check-In Group
To remove the questions from a current Check-in Group, select the Edit link and the checkbox next to “Check-in Group With No Questions.”
Edit current Check-In Group – click to enlargeCheck-In Saved with Updated Settings – click to enlarge
During a Check-In, once the client has selected the Check-In button within the TouchPoint mobile application and completes the Biometric verification (fingerprint or face ID), they will be prompted to take a photo and submit the check-in.
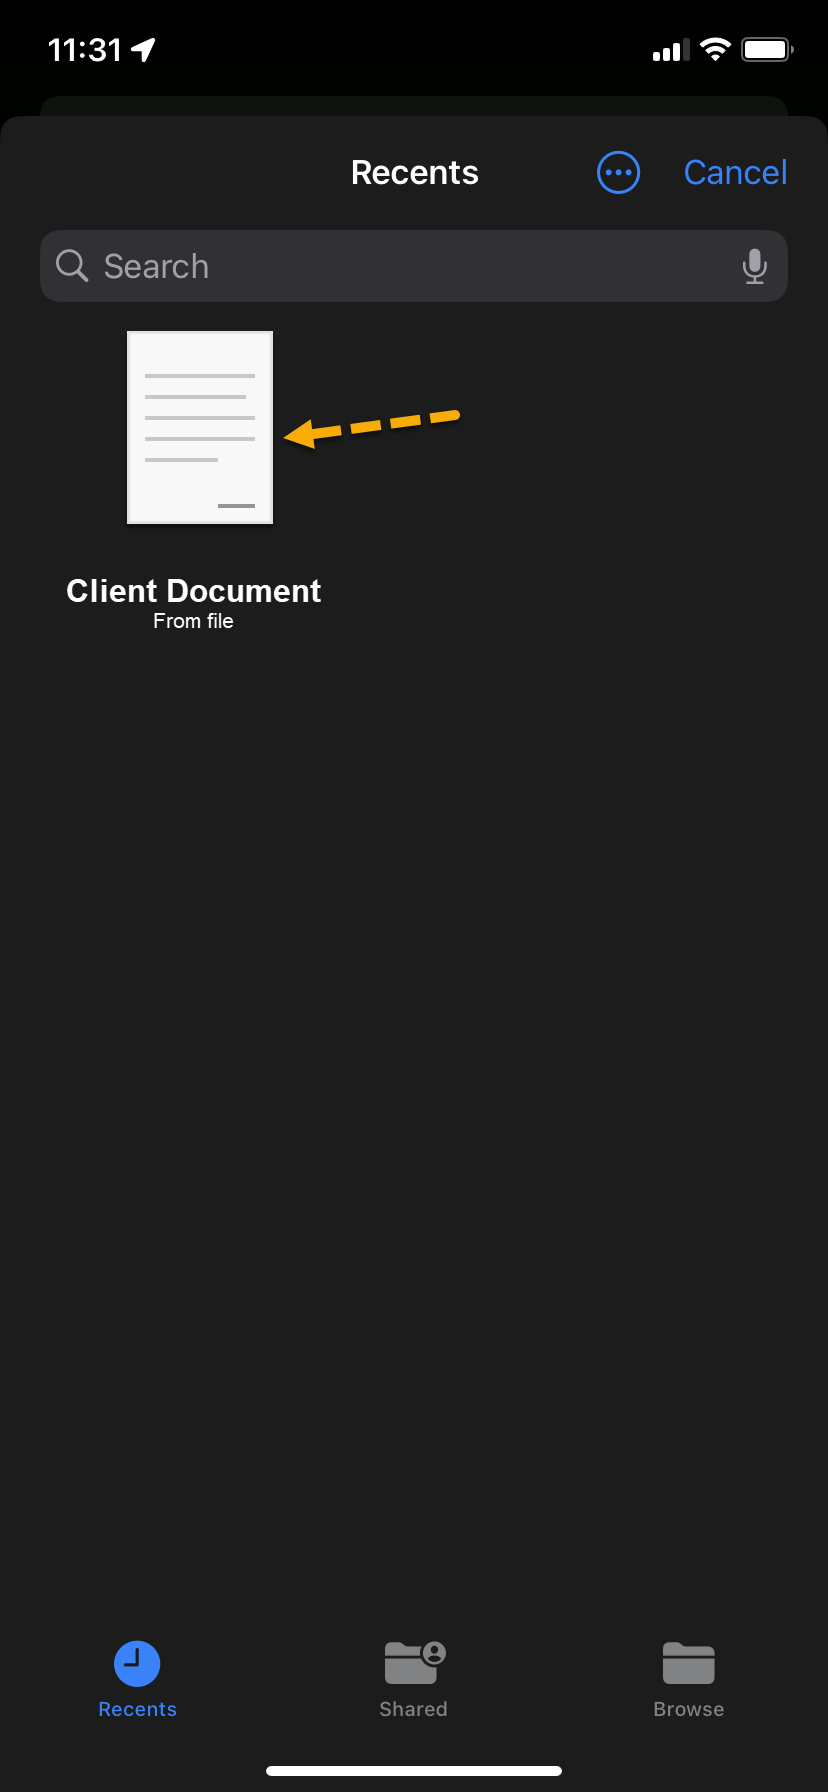
Document Sharing from the Client’s TouchPoint Mobile Application
The client may share images from their TouchPoint mobile application from the Documents Capture screen. With this update, the client may also share Word documents and PDF files from their mobile application.
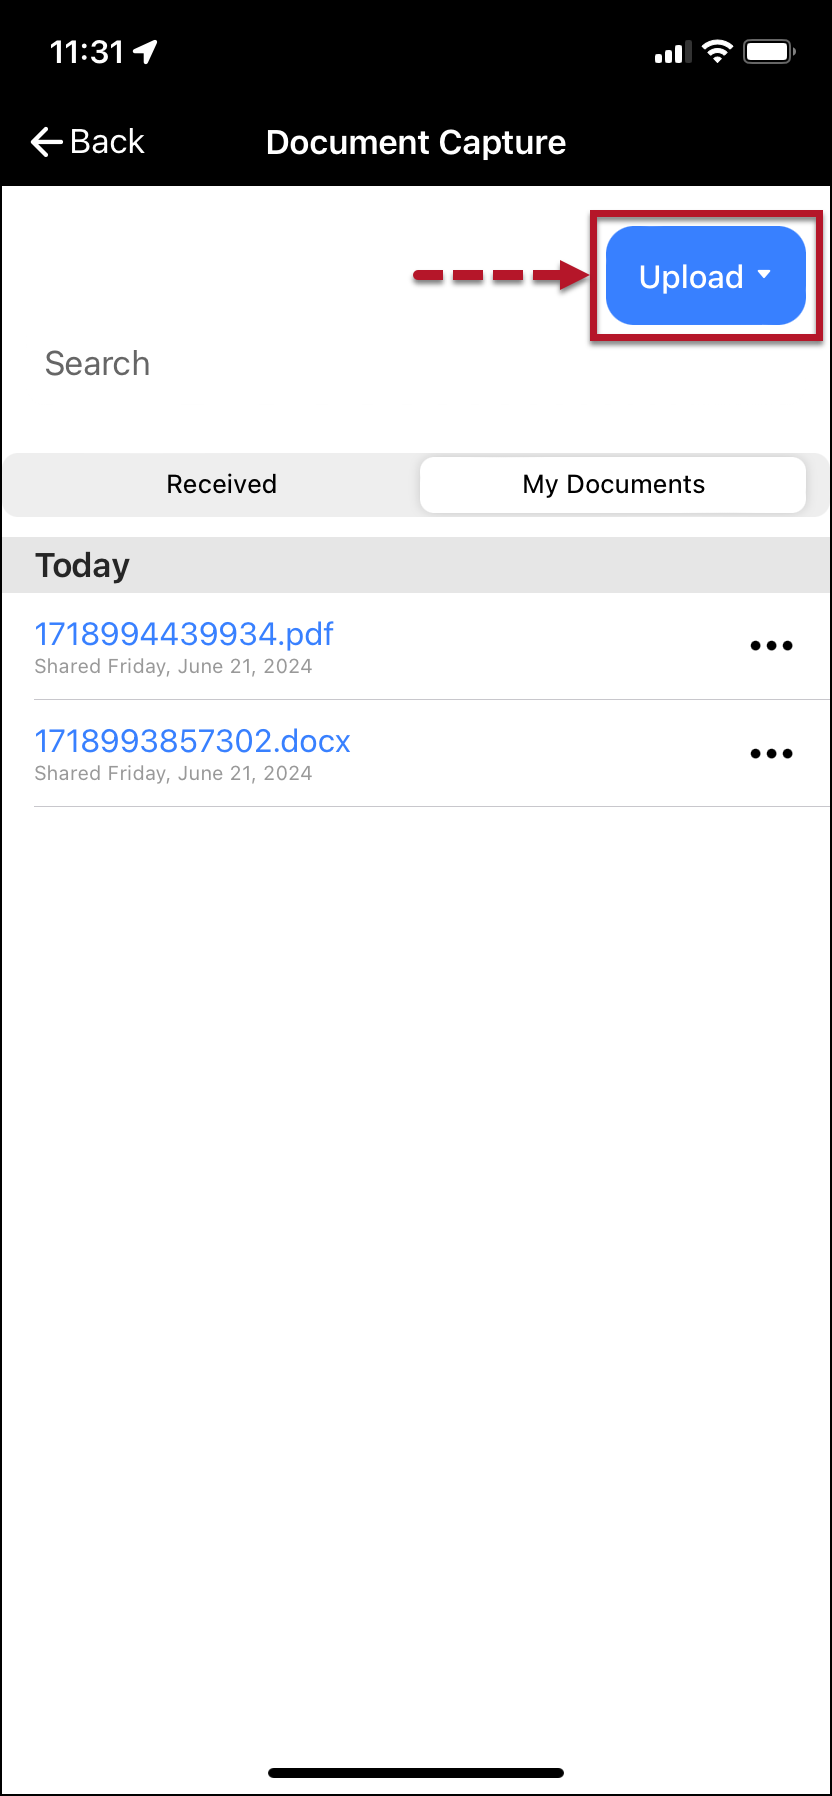
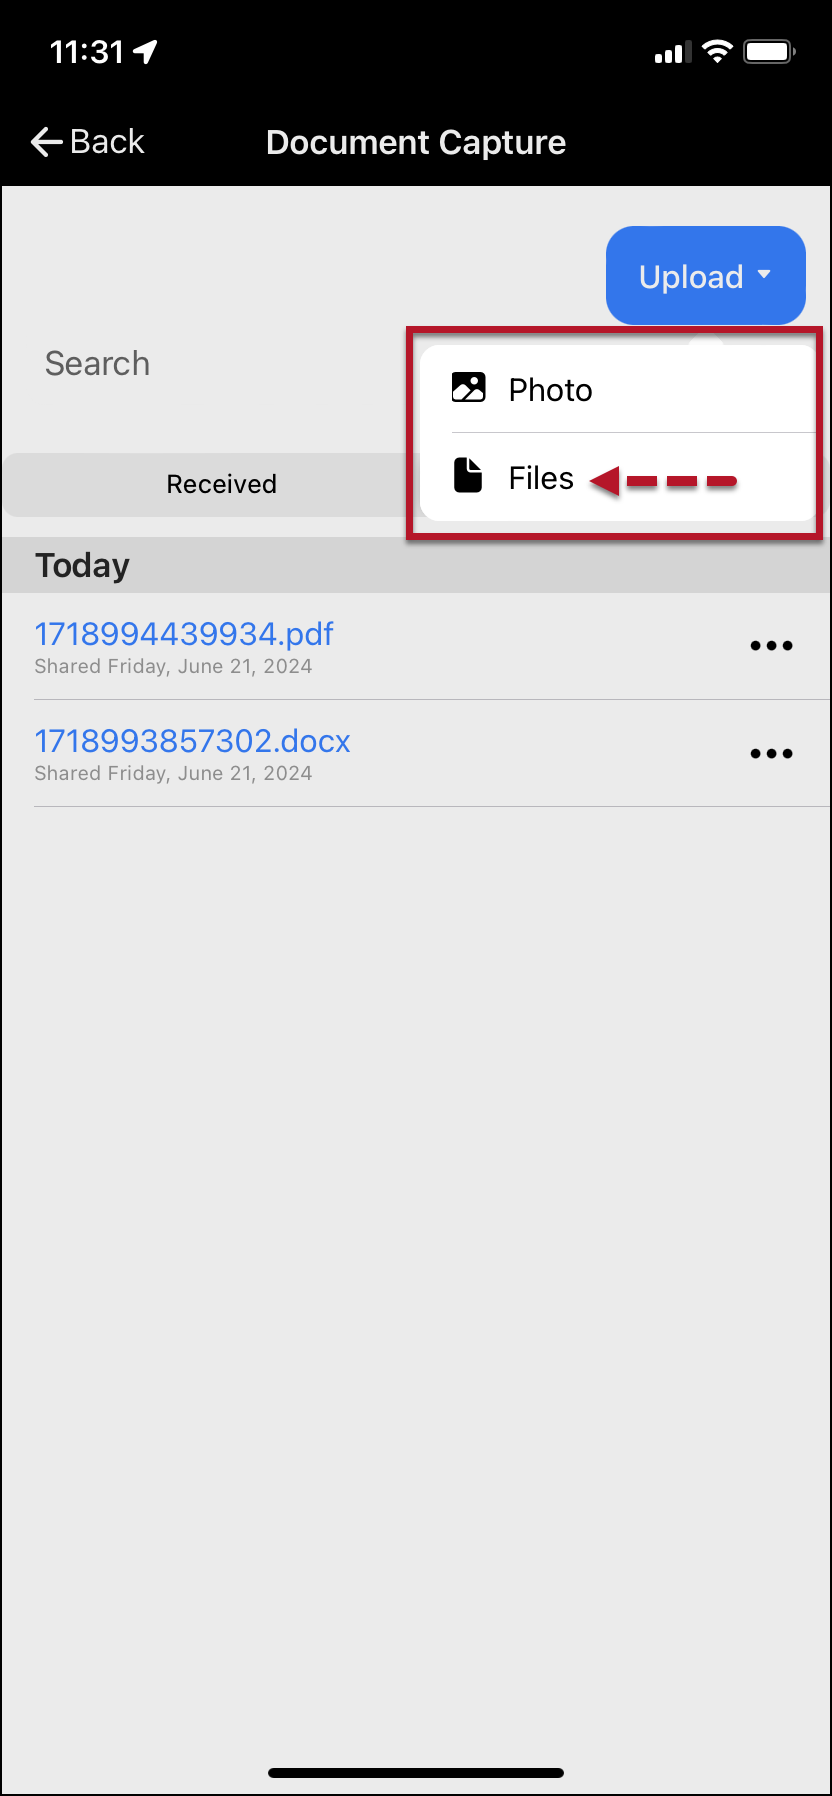
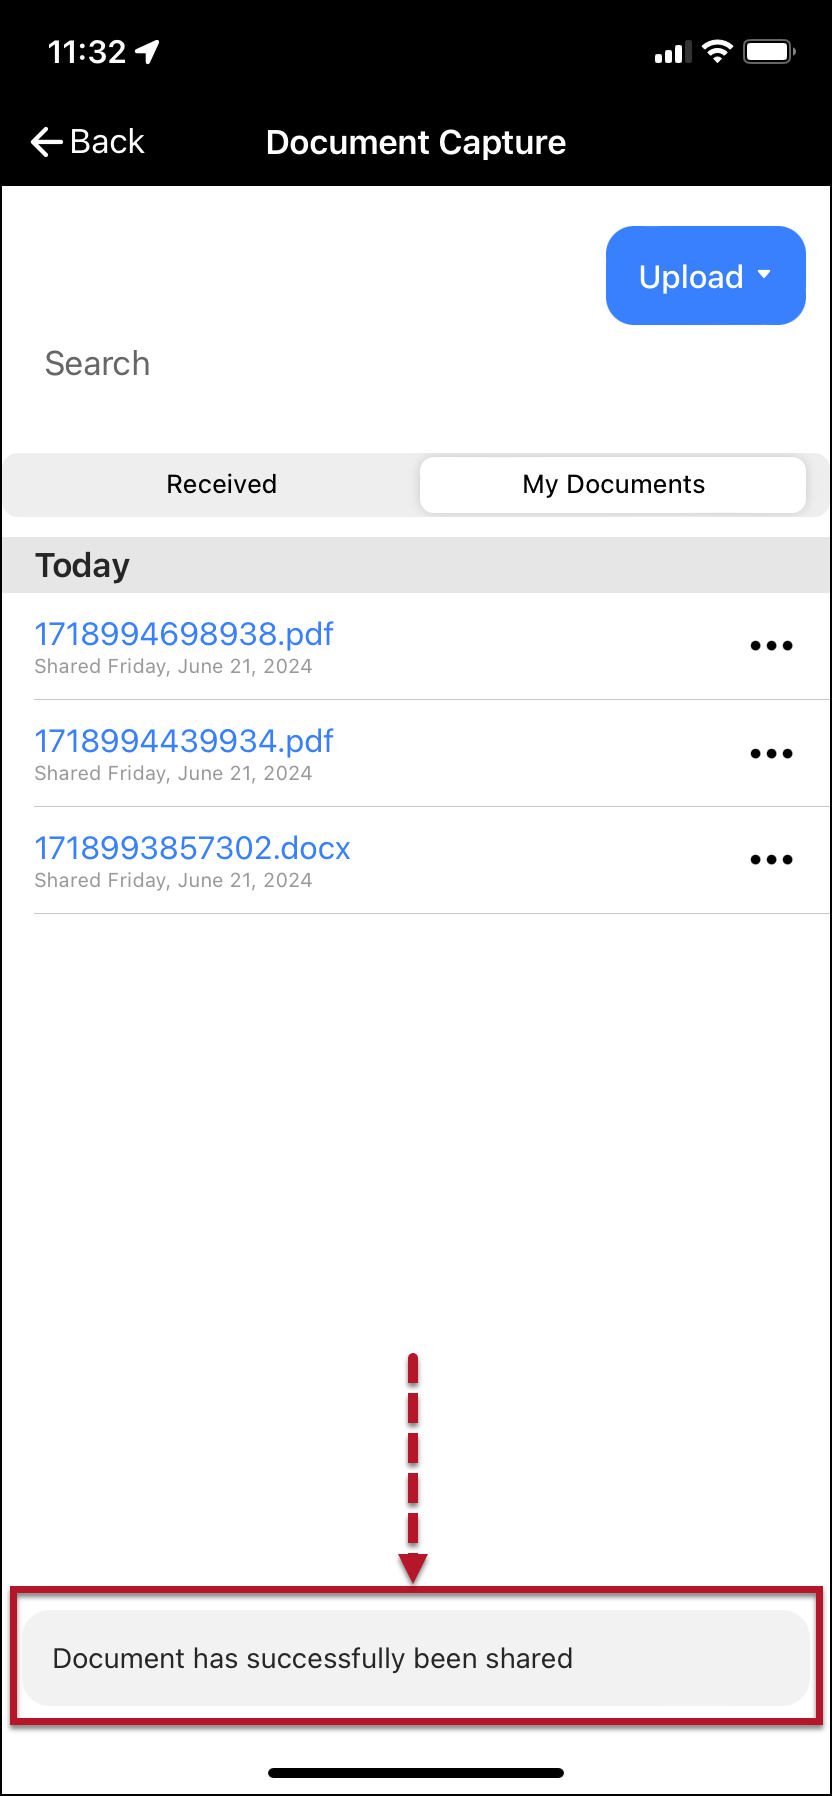
Once the client has saved a document to the smartphone, on the Document Capture screen:
Tap the Upload button.
Tap the Files option on the dropdown menu.
Search for or tap on the file to be shared.
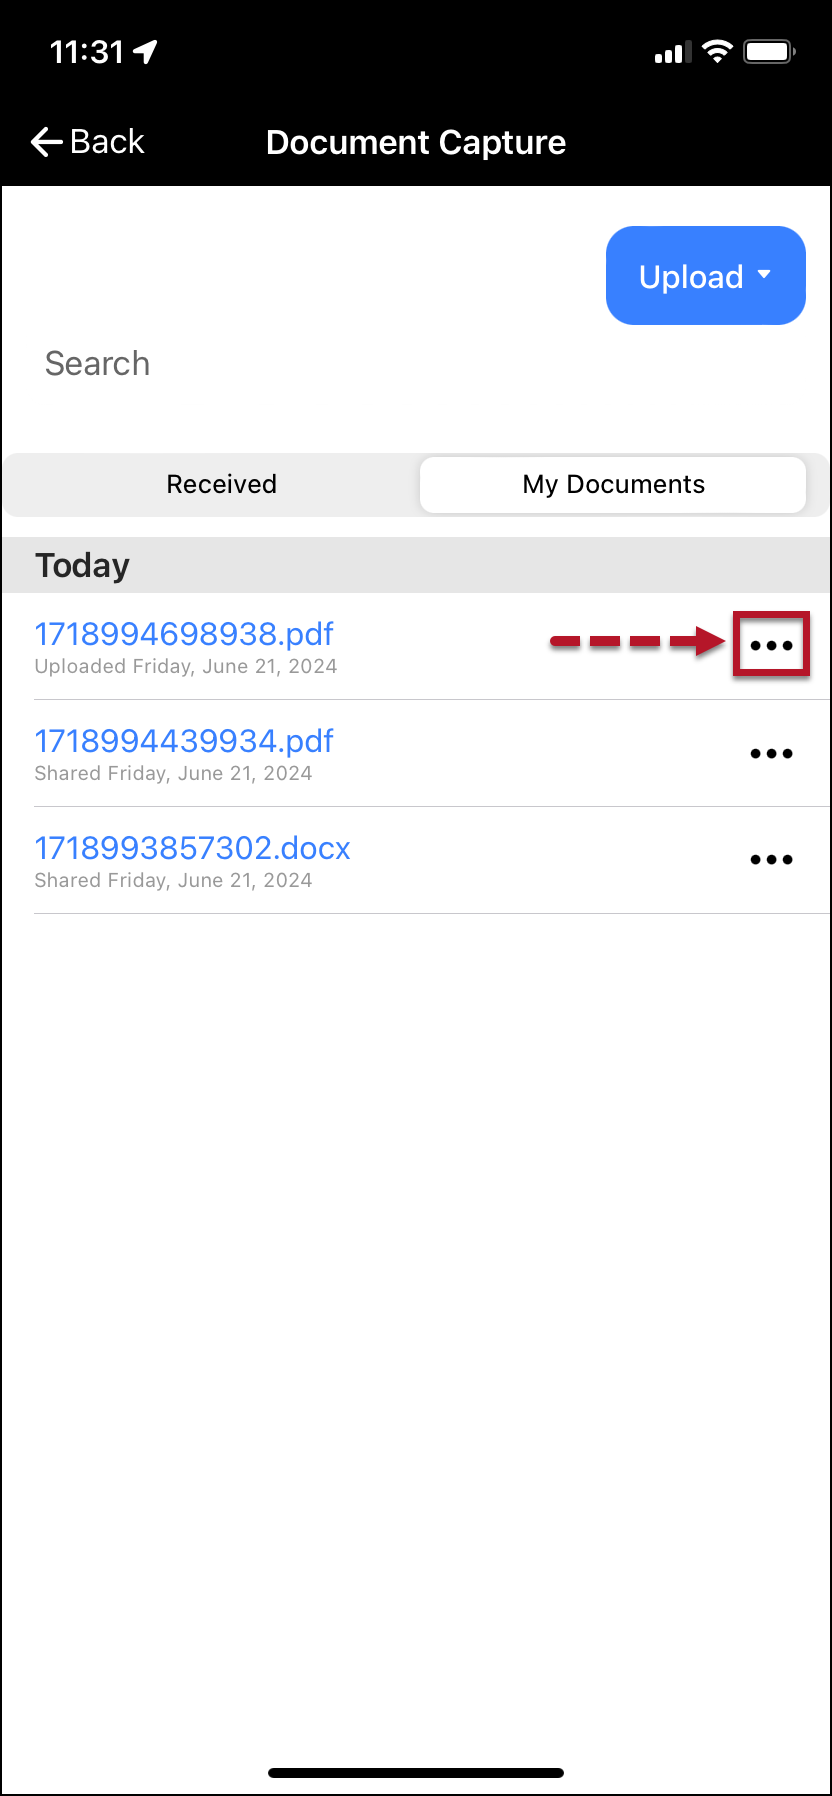
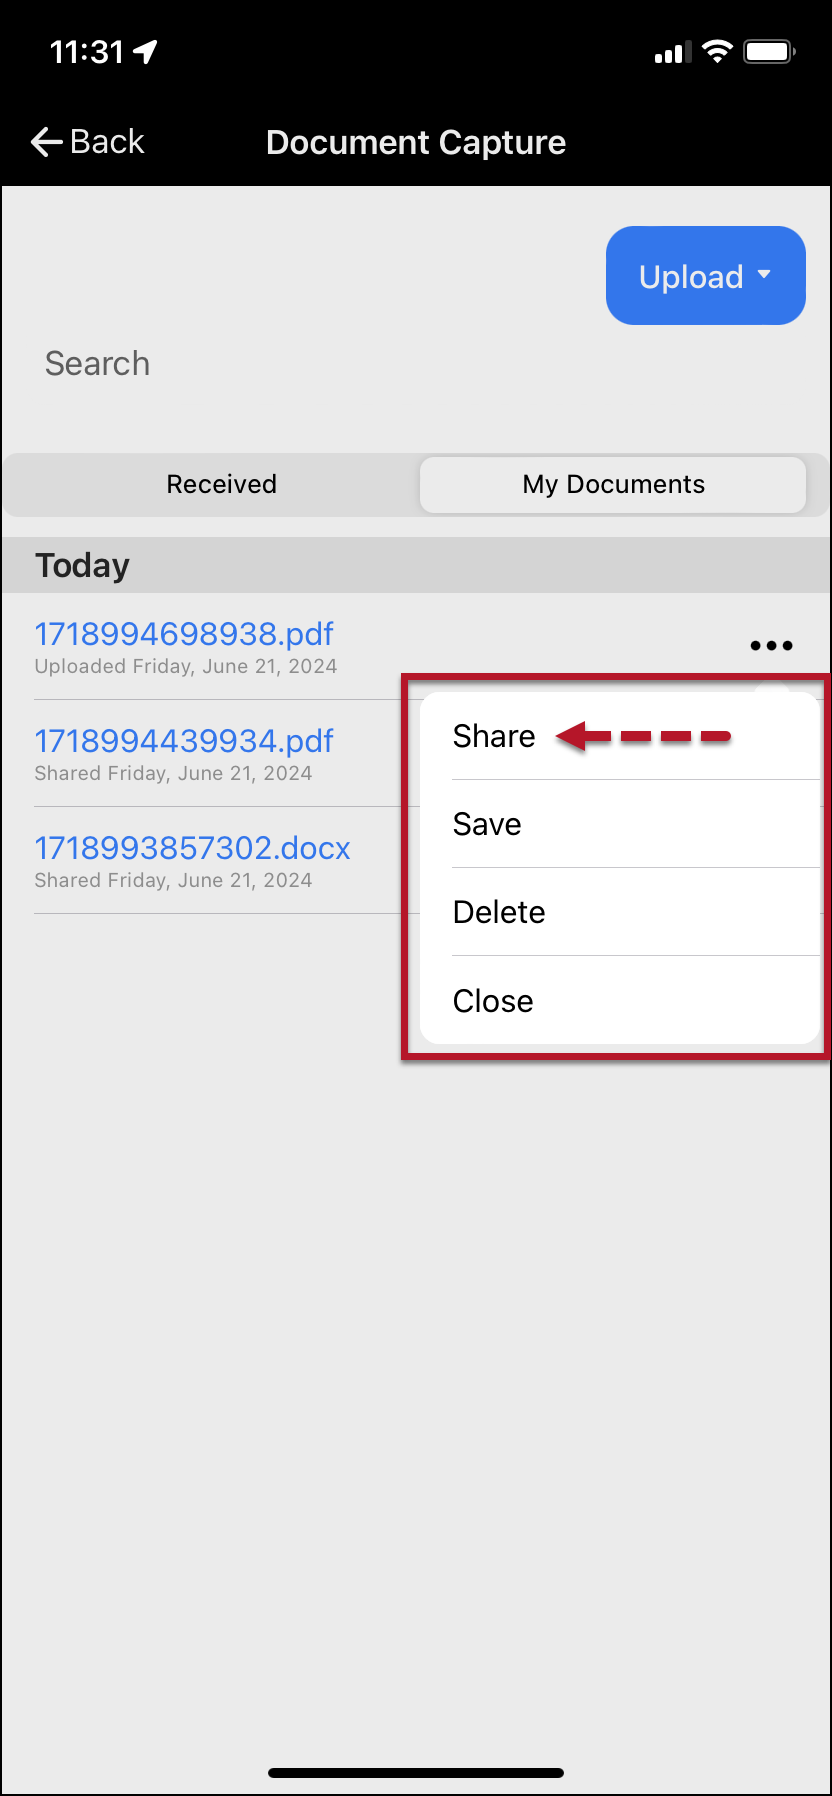
The uploaded file will be listed on the client’s My Documents screen. Select the ellipsis next to the file and tap the Share option on the dropdown menu to access it.
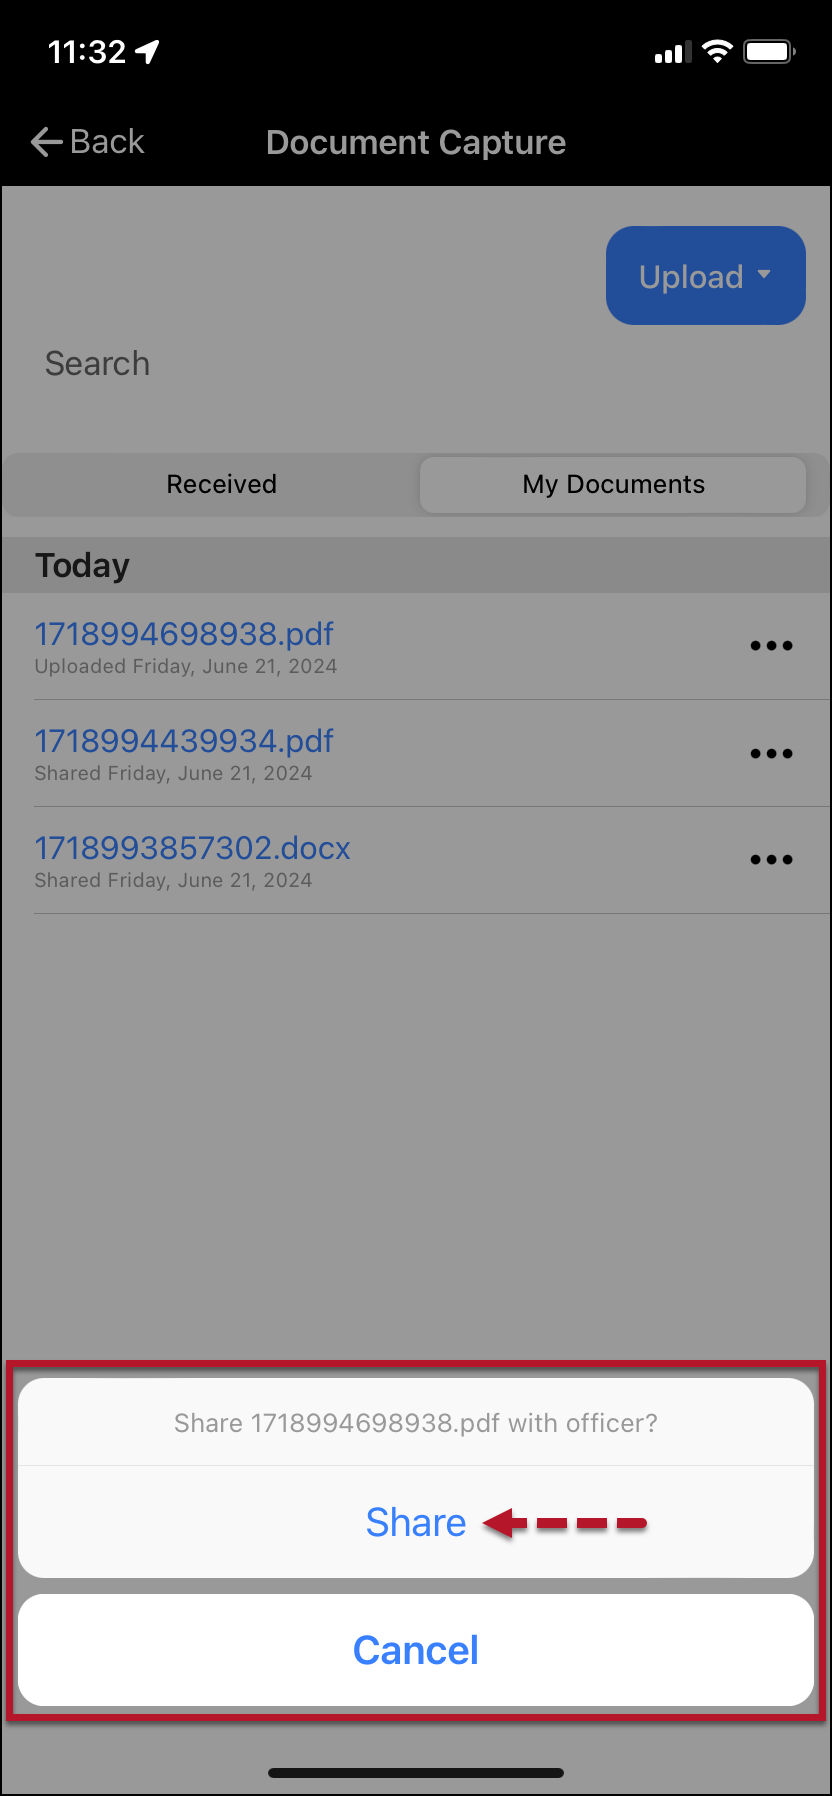
Tap the Share file acknowledgment button.
Once shared, a “success” banner will be displayed on the bottom of the screen.
click to enlarge
click to enlarge
click to enlarge
click to enlarge
click to enlarge
click to enlarge
click to enlarge
Supported file types include .pdf, .doc, and .docx.
There is a 5 MB file size maximum.
The client is responsible for managing their smartphone’s file storage location.
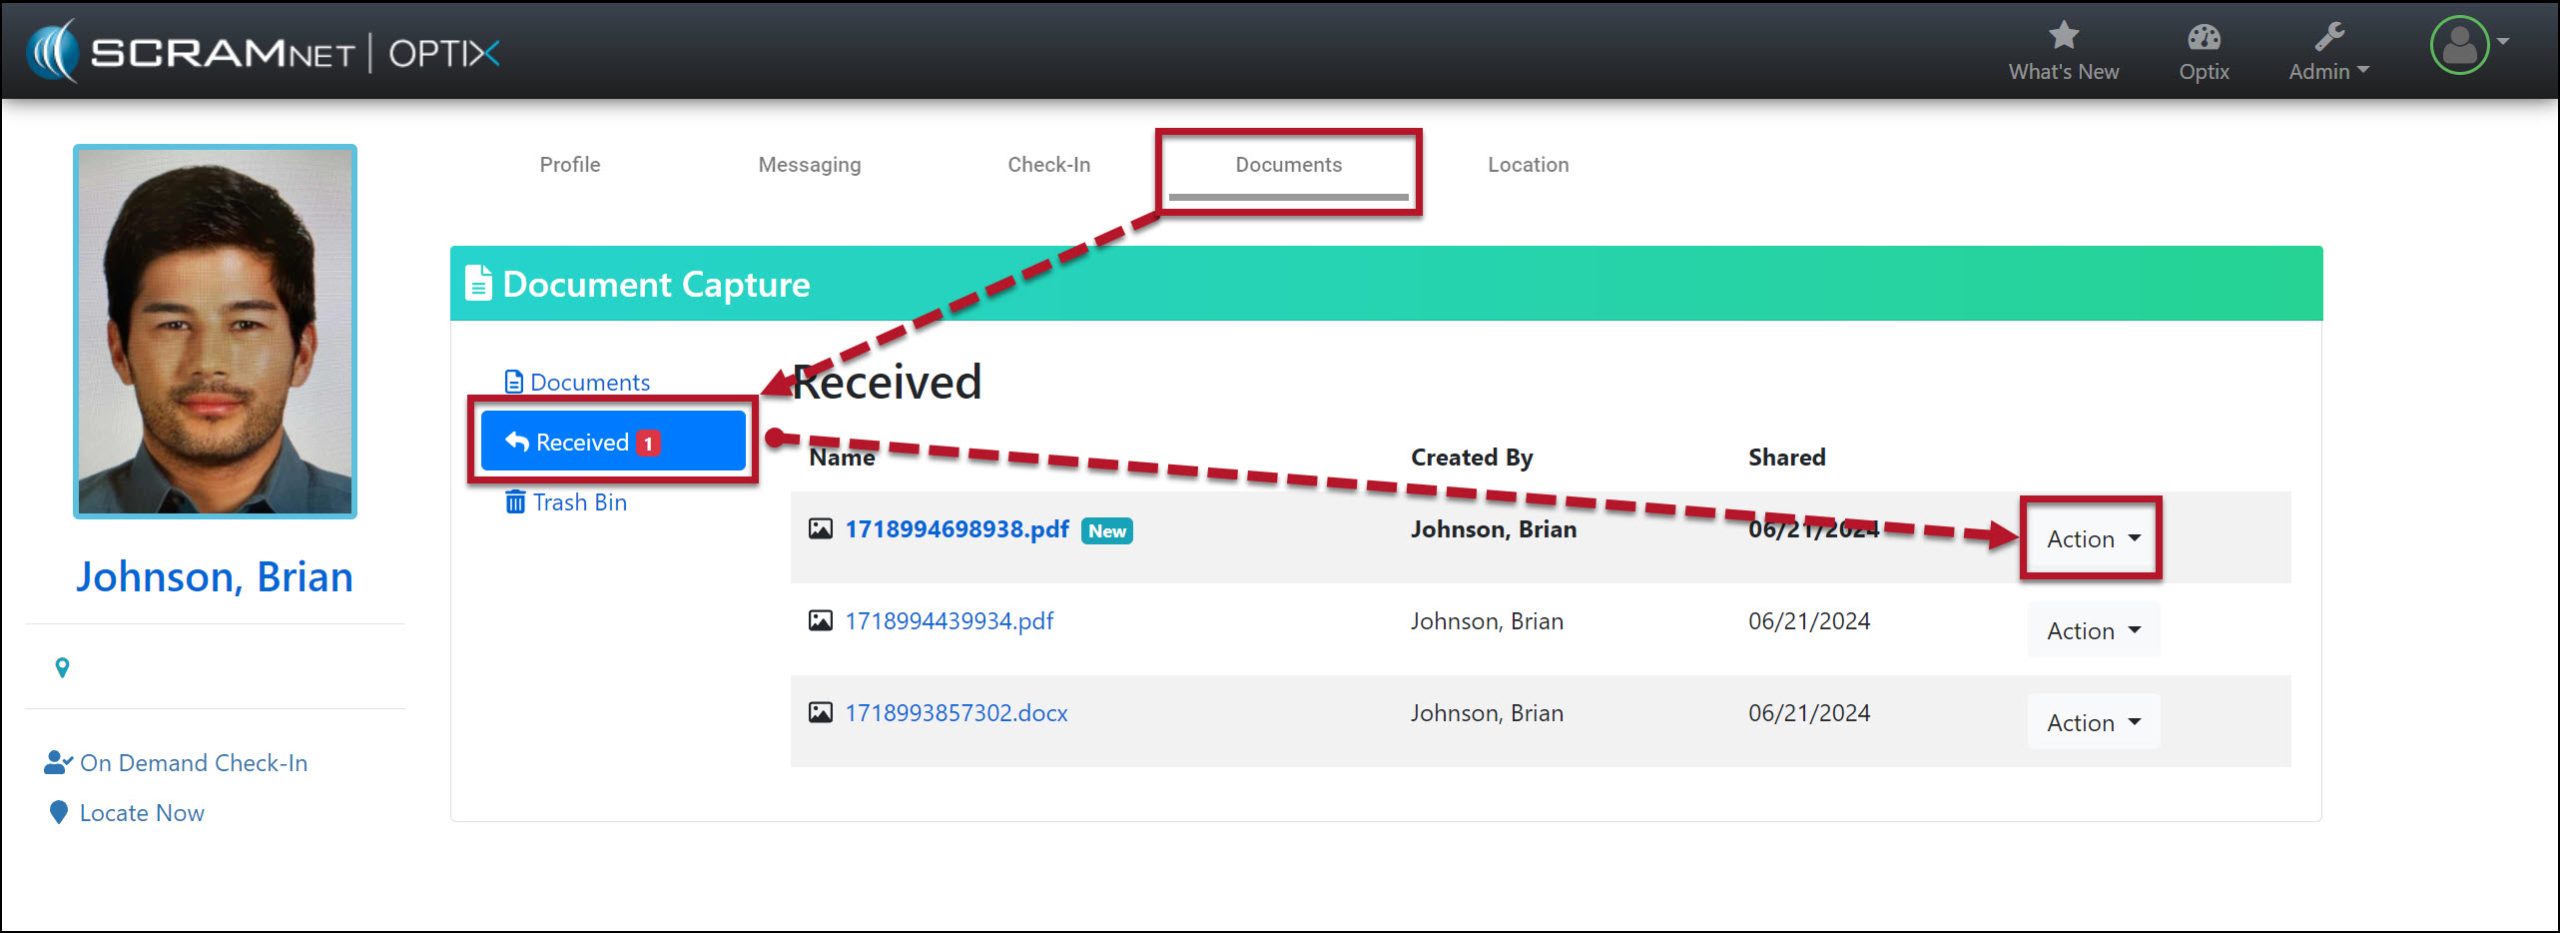
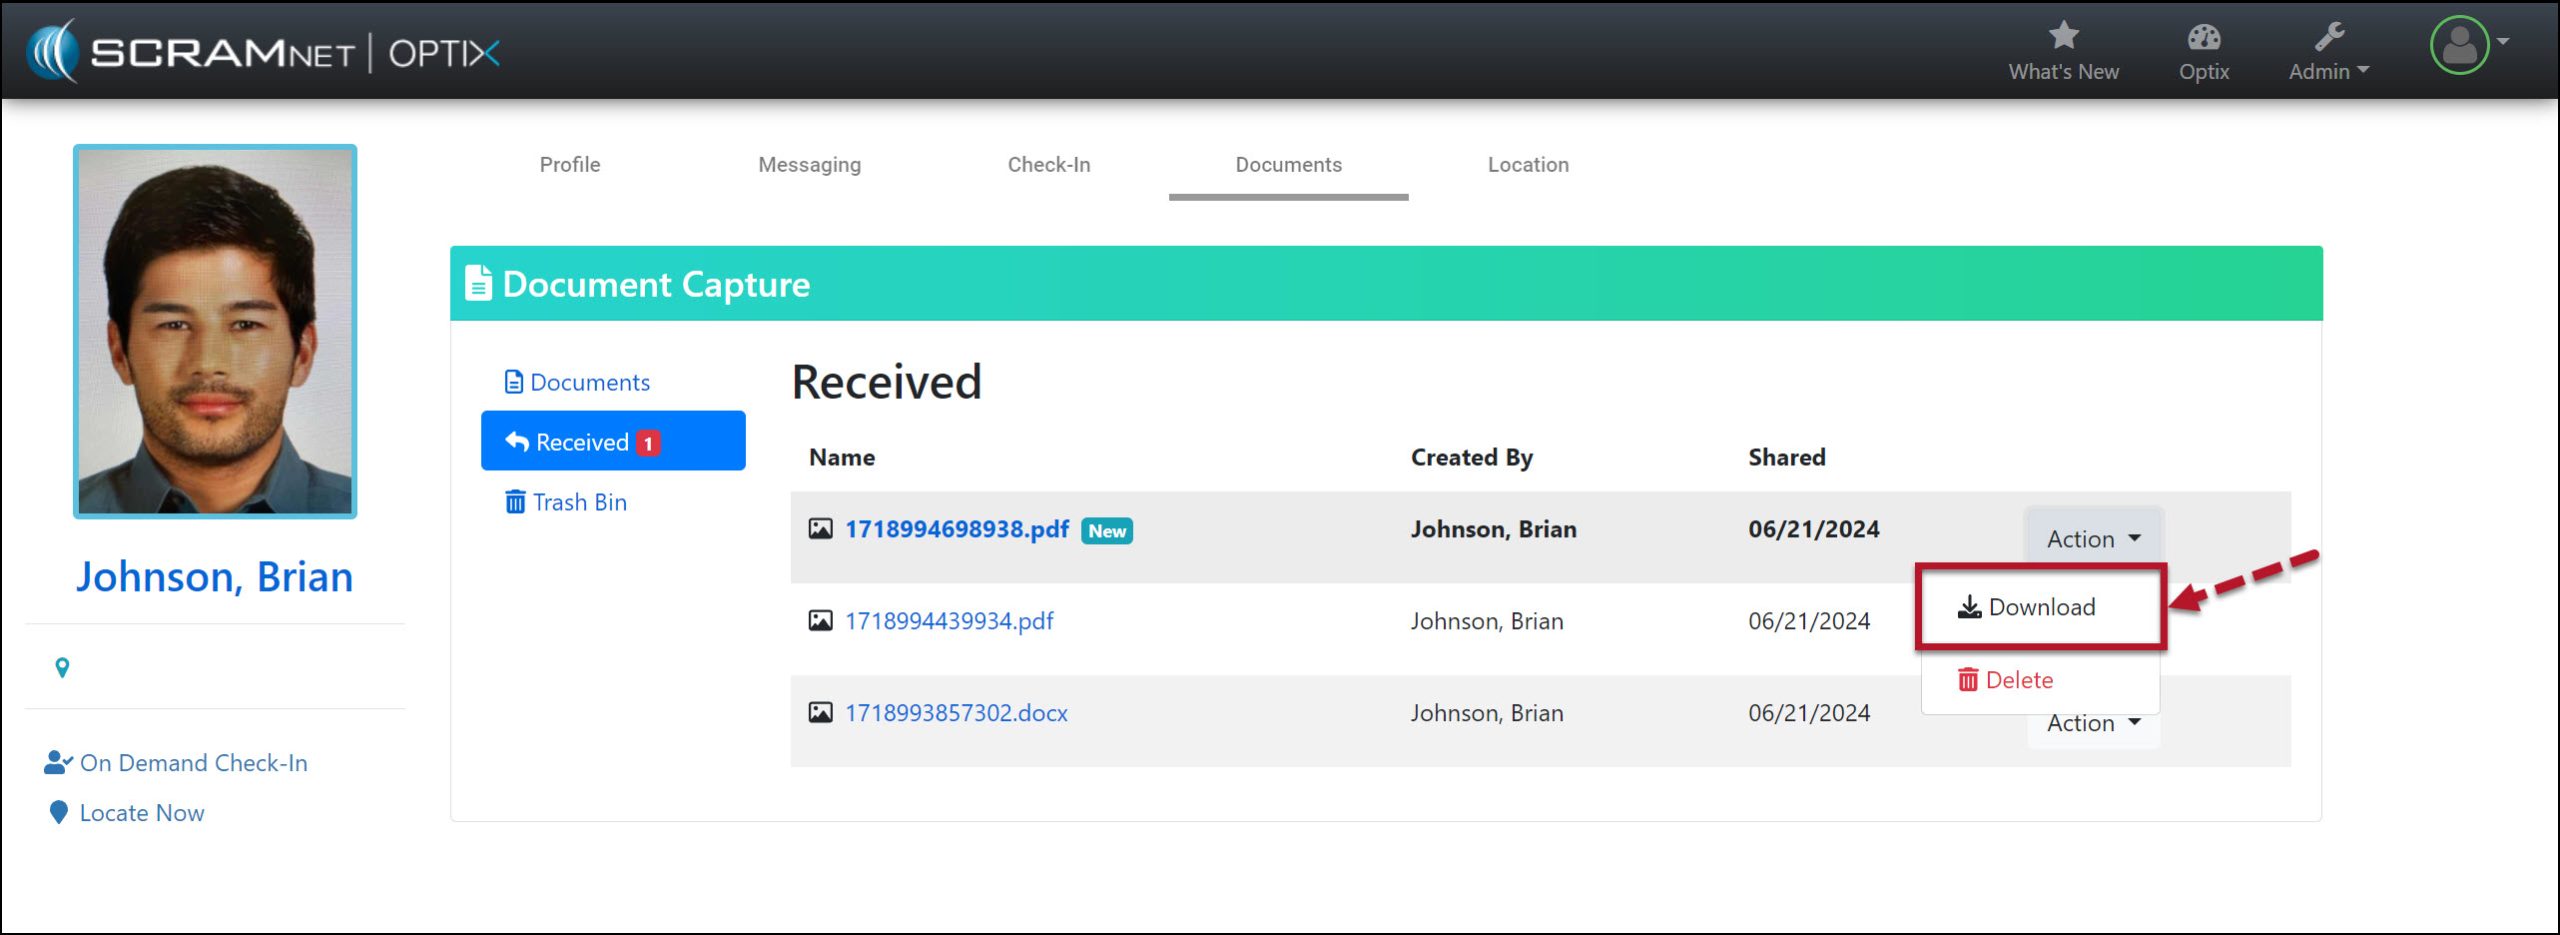
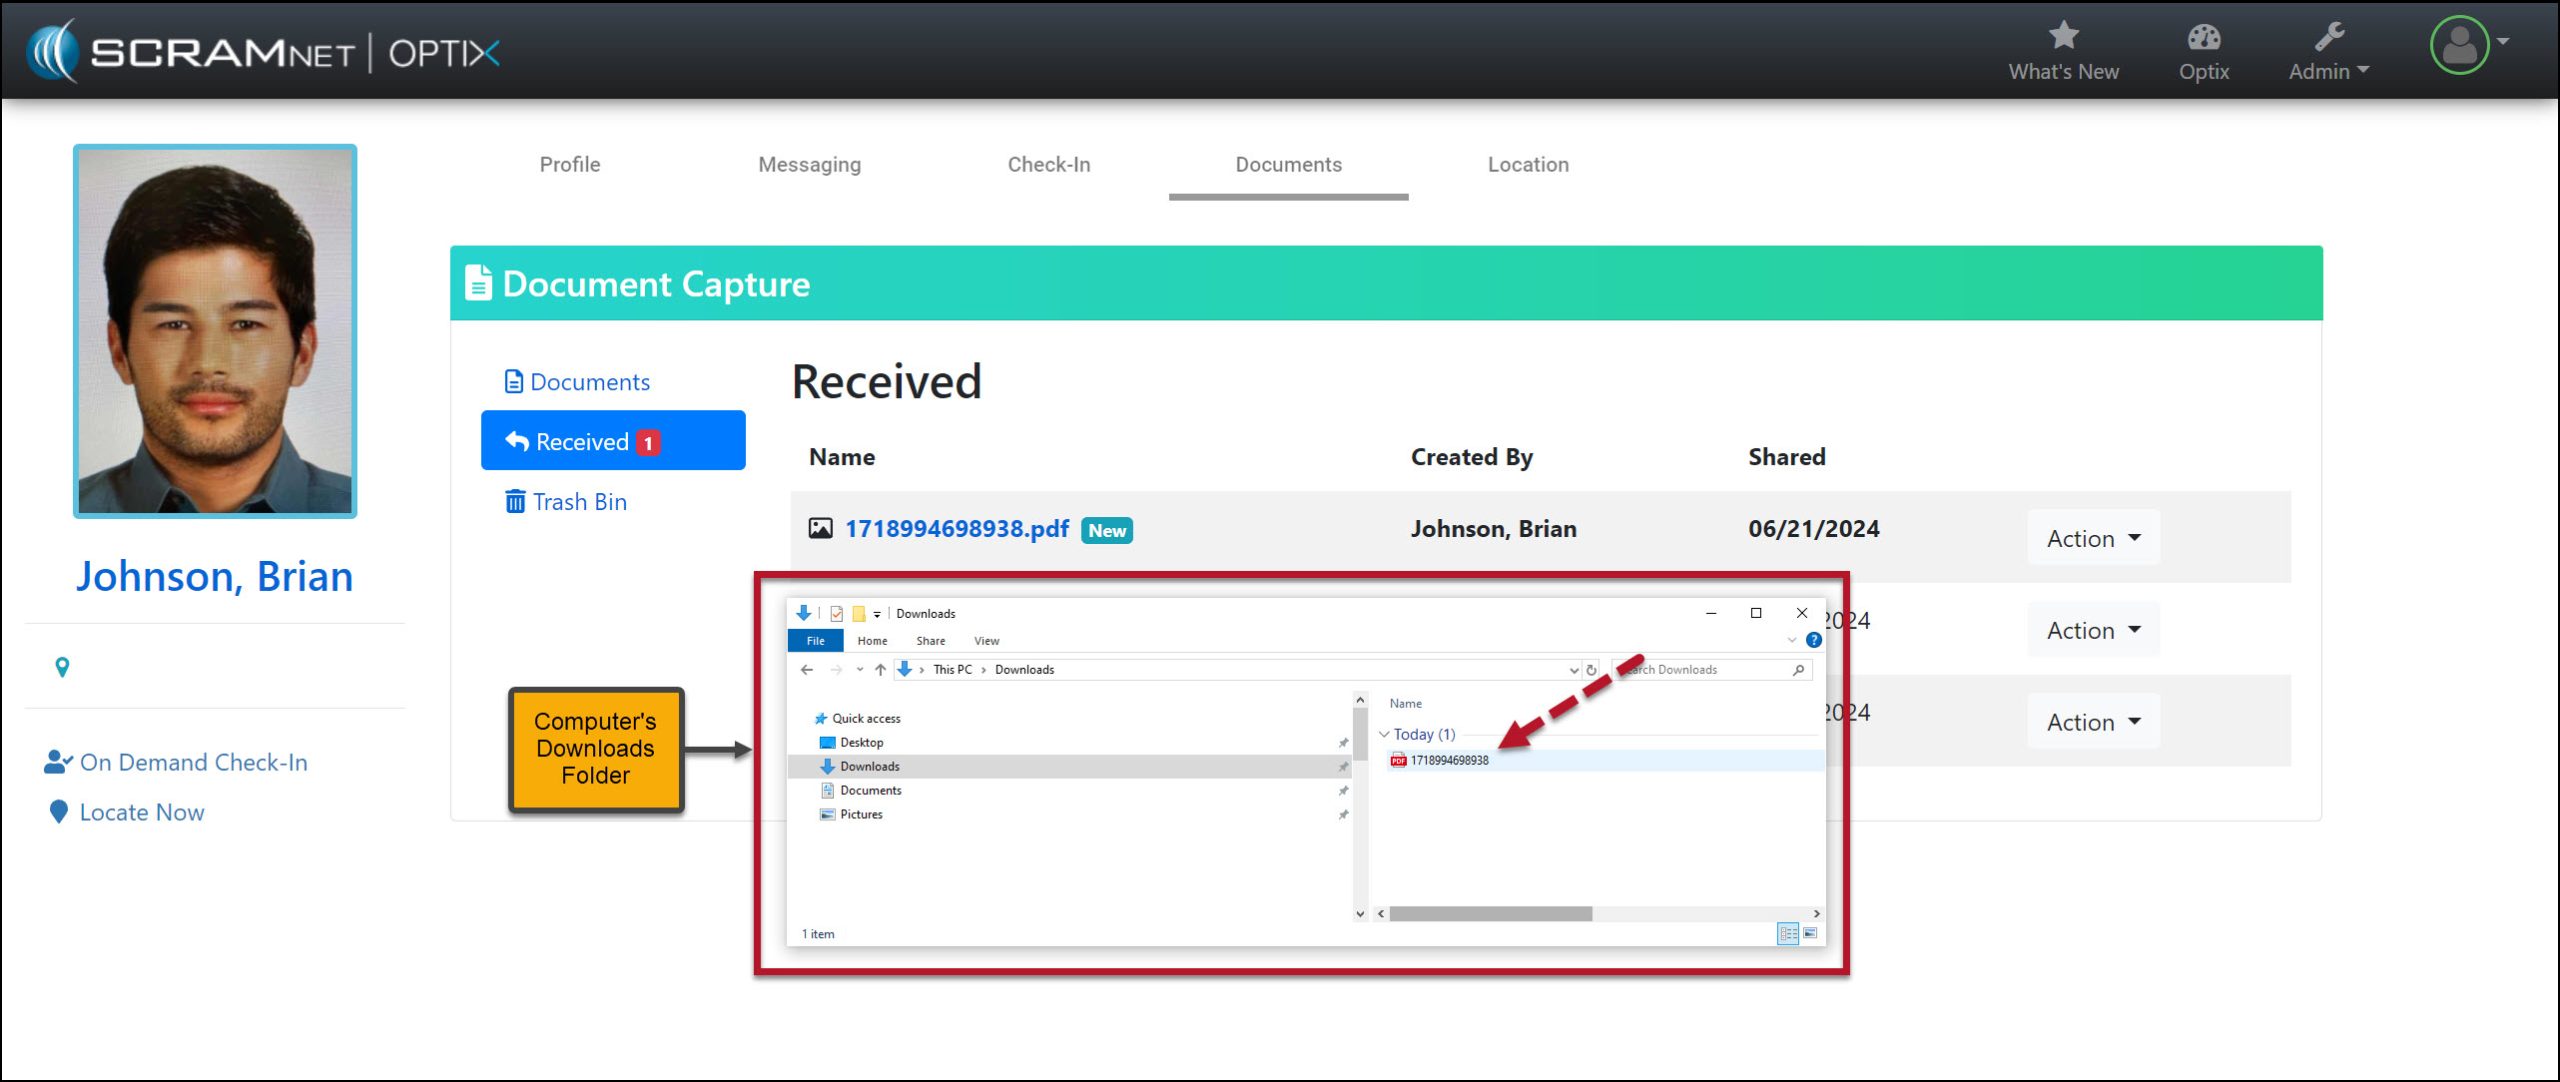
Viewing a Shared File
In SCRAM Optix, access the Received section of the DocumentsCapture page for the client, and then open the Action dropdown menu to download the shared file.
Received Documents Screen – click to enlargeAction Dropdown Menu Download Option – click to enlargeComputer’s Downloads Folder – click to enlarge
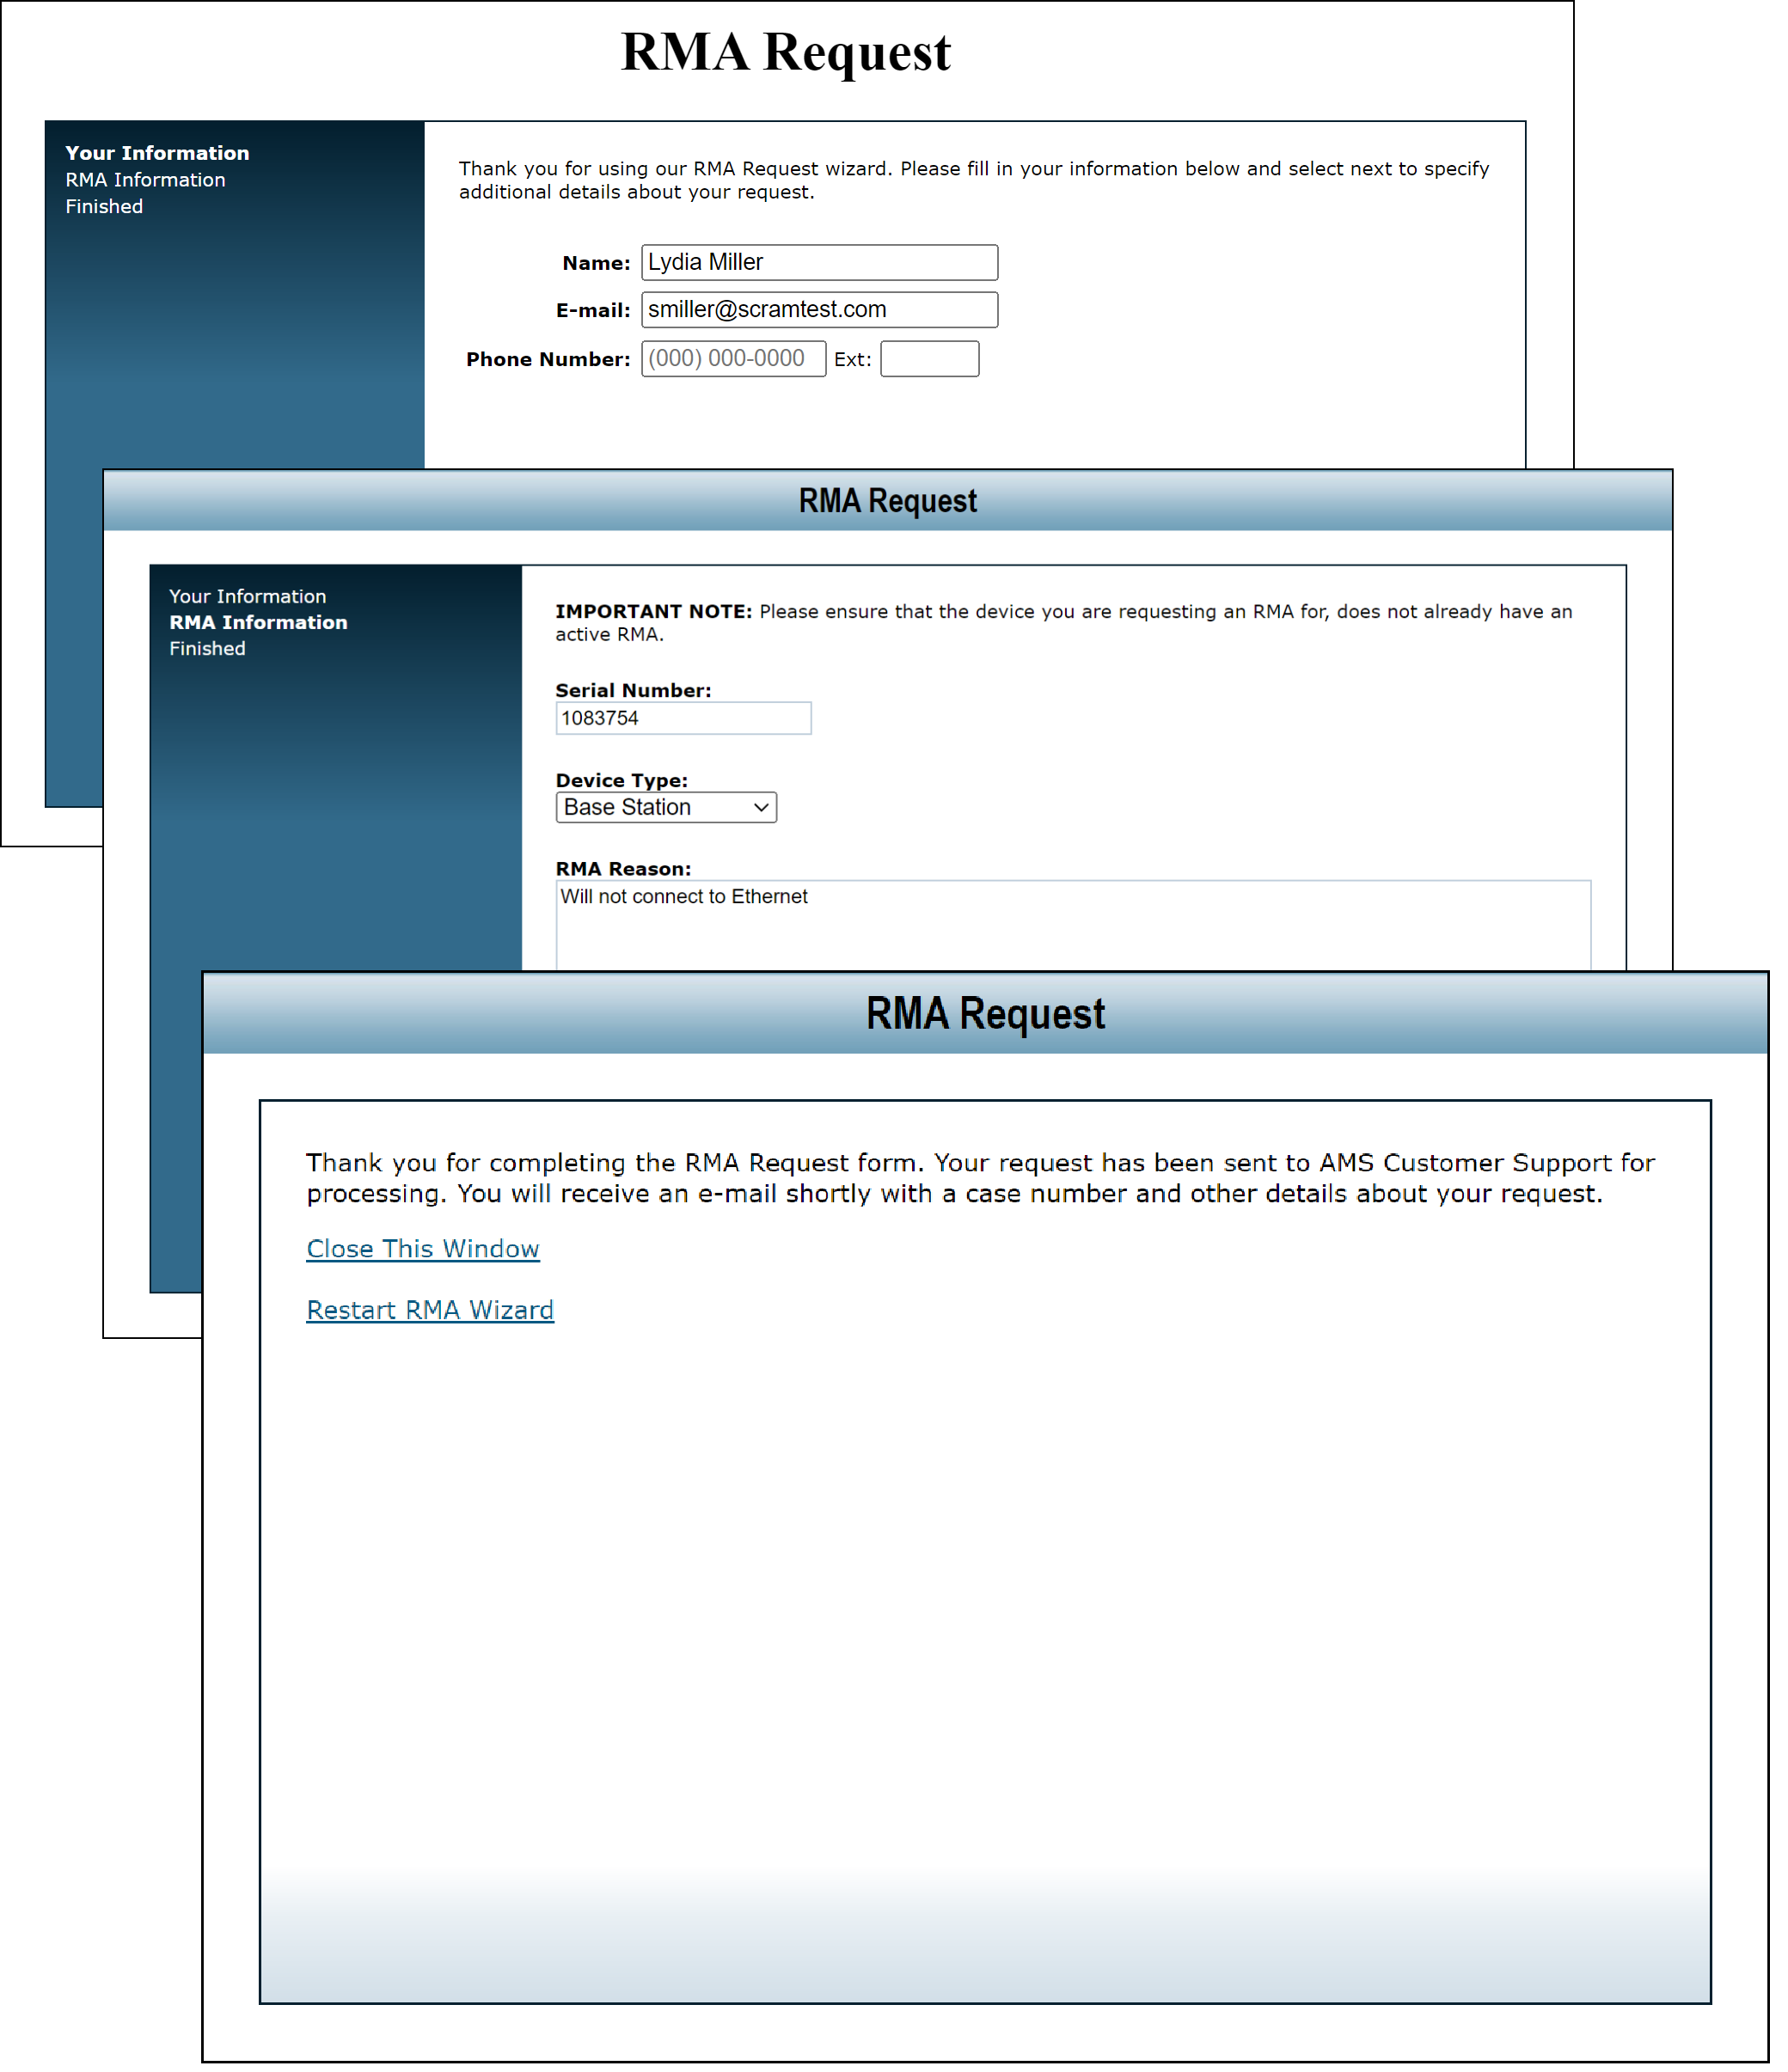
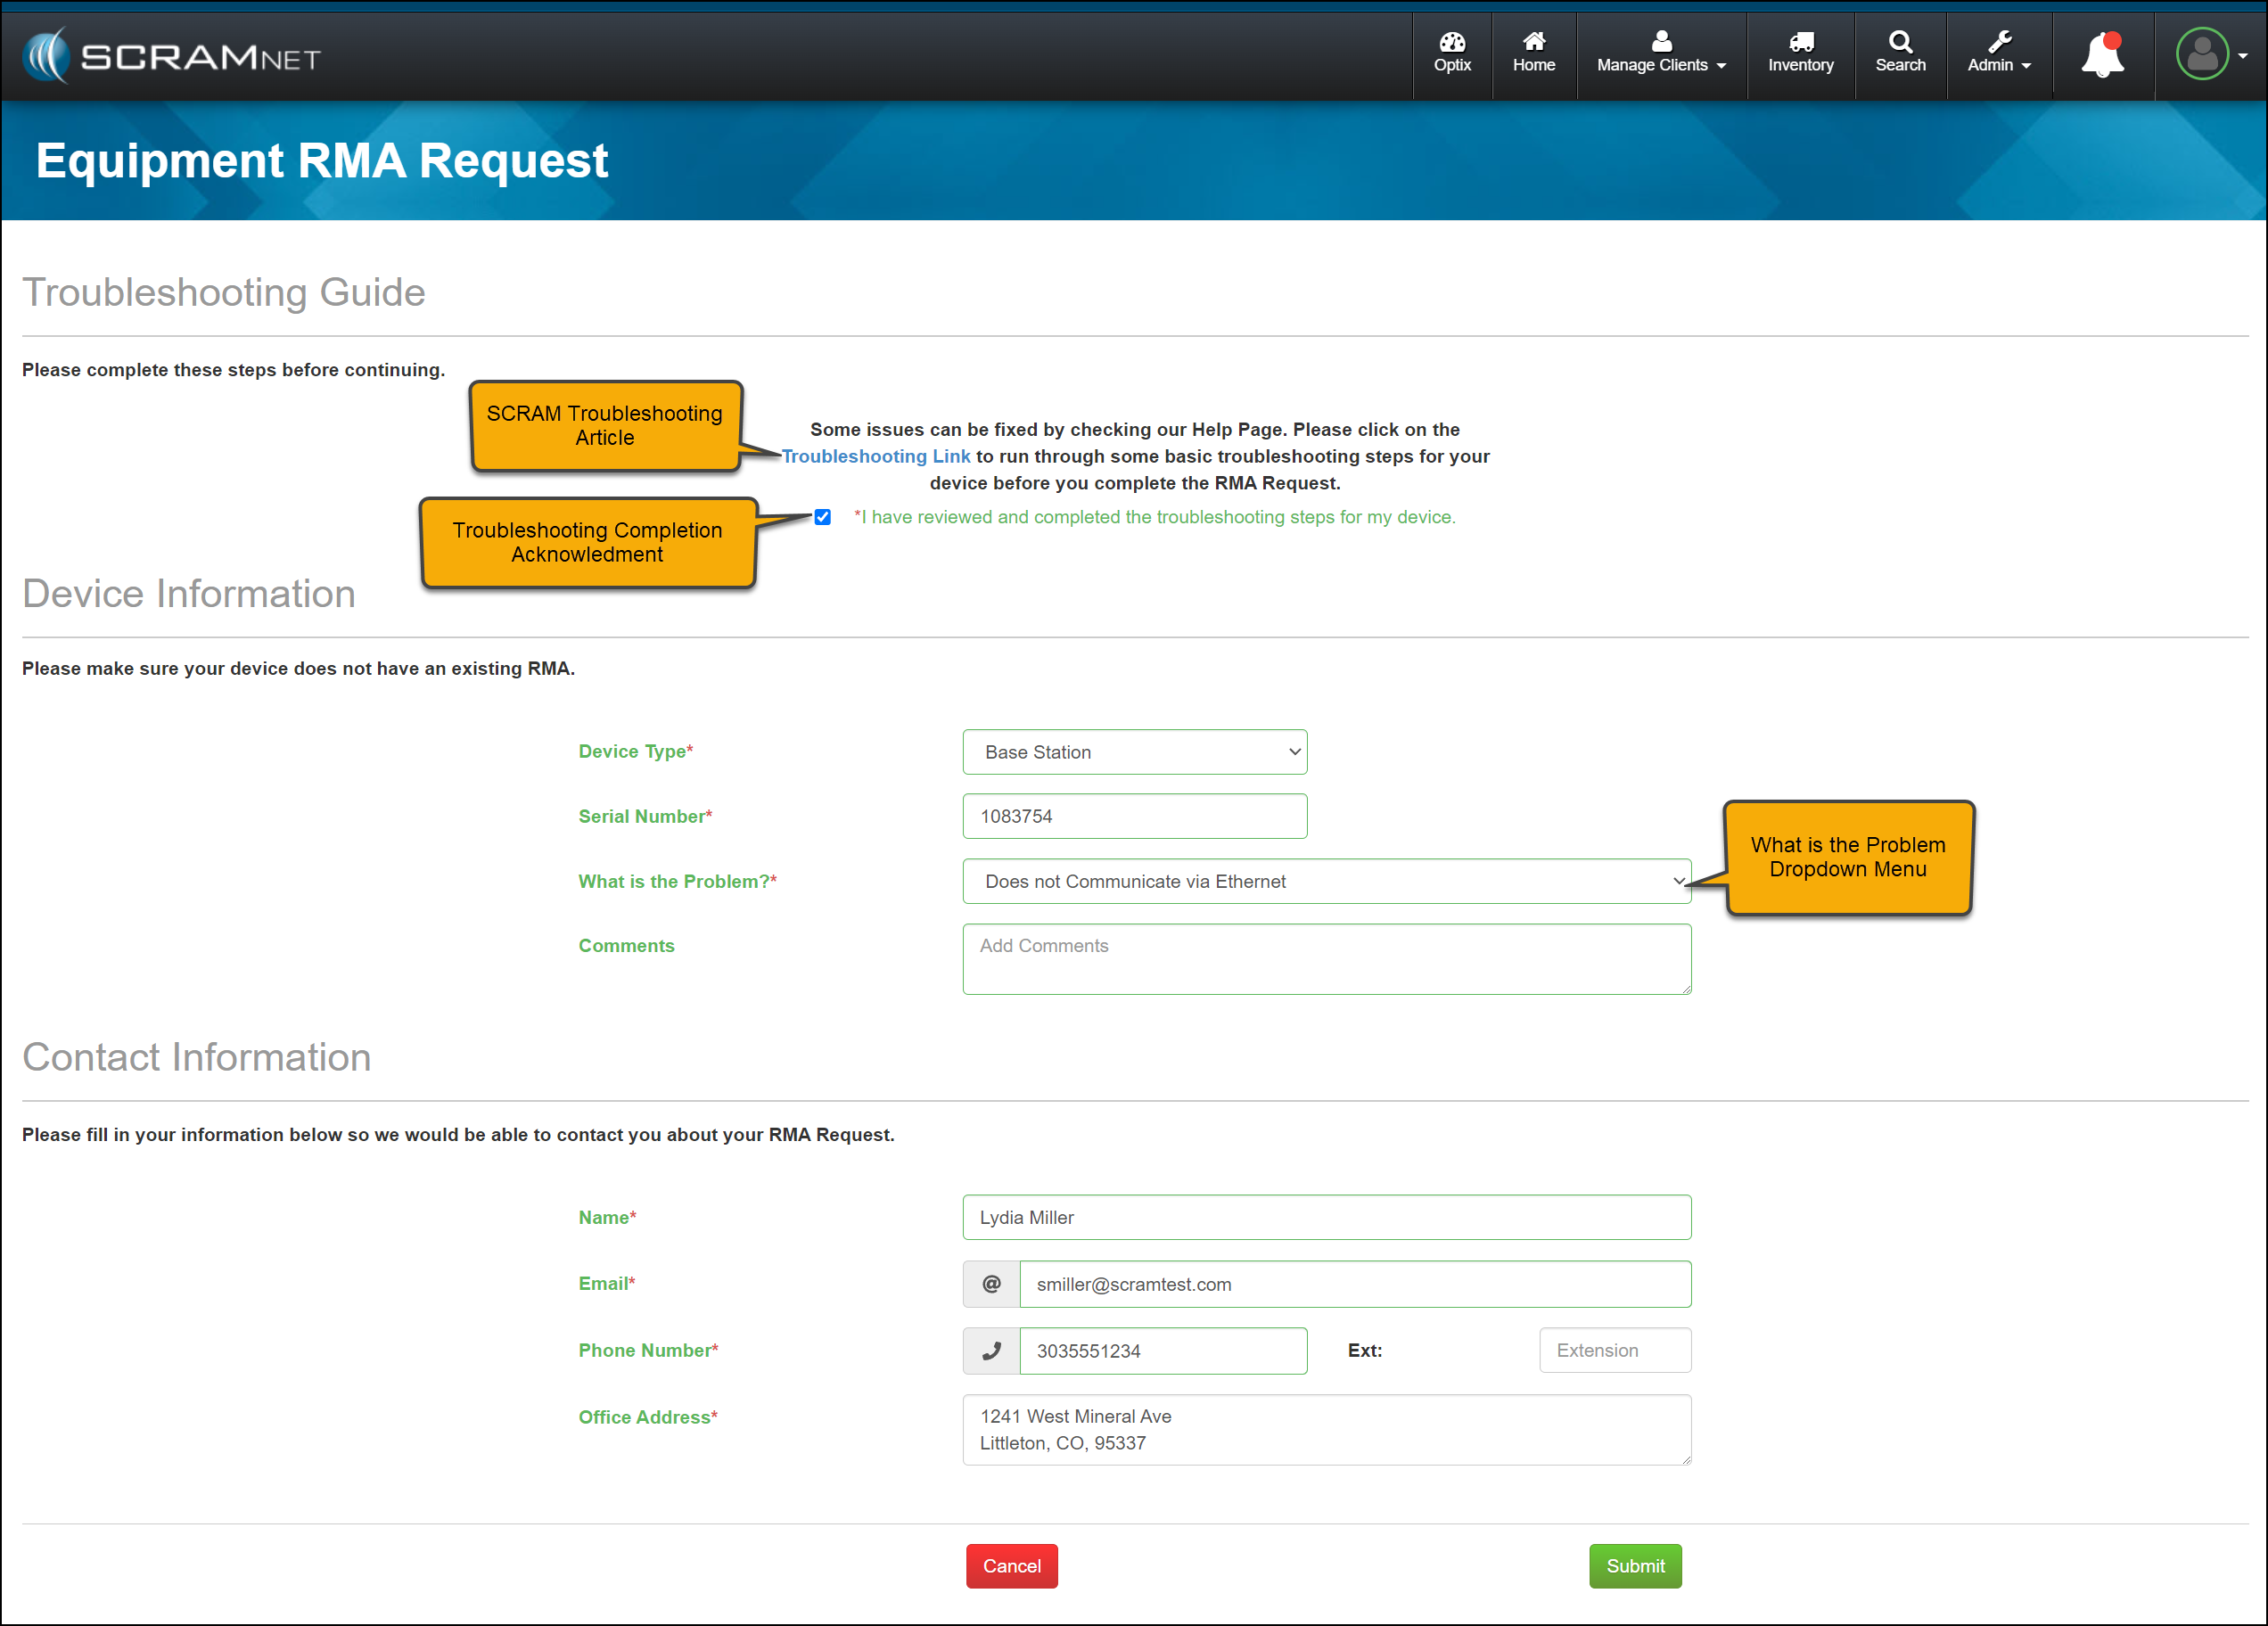
On June 12, 2024, SCRAM Systems will unveil an enhanced Equipment RMA Request page accessible from the SCRAM Systems Help & Support page. The new design contains a significant upgrade to streamline the workflow and improve your experience.
The newly designed page includes:
An updated single-page equipment RMA form.
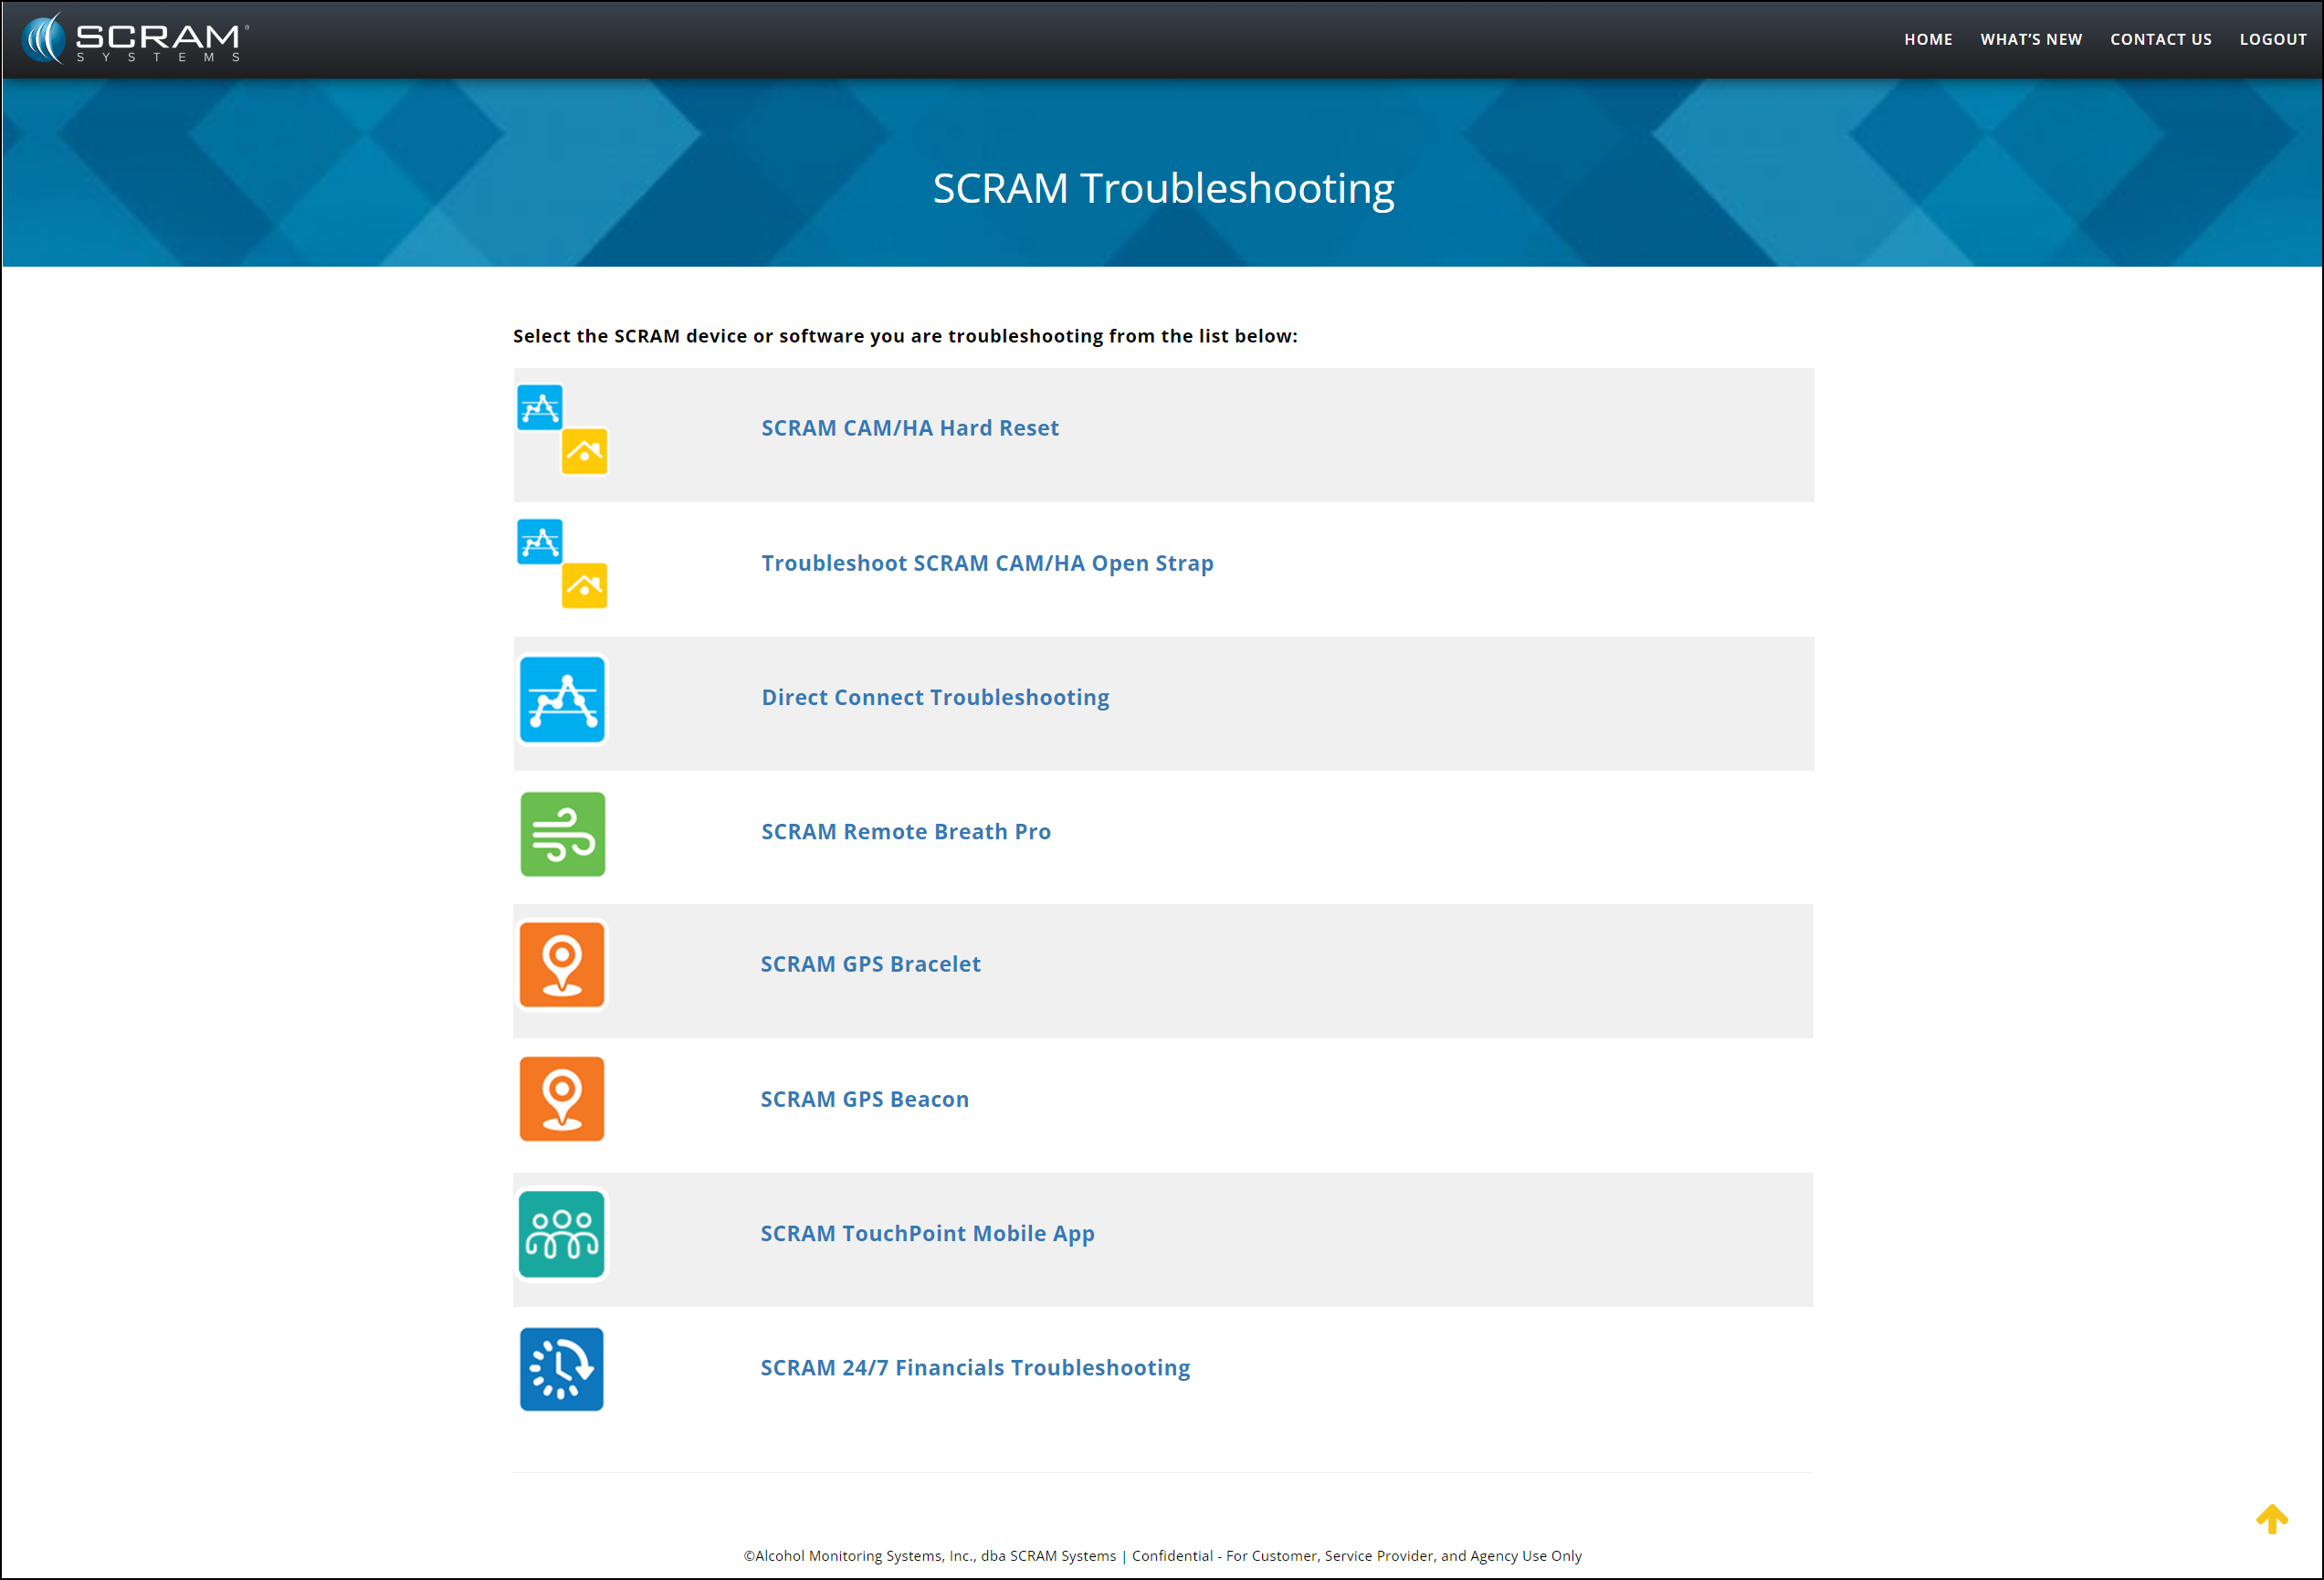
A SCRAM Equipment Troubleshooting hyperlink providing quick access to basic troubleshooting. Following the troubleshooting steps may resolve the most common equipment issues, keeping functioning equipment available for client monitoring.
A troubleshooting acknowledgment checkbox confirming that troubleshooting steps have been taken before requesting an RMA for a device, thus ensuring no delay in processing the RMA request.
The Device Information section now includes a “What is the Problem?” dropdown menu to identify the specific issue quickly. The dropdown menu will also reflect the device type to customize the options available further.
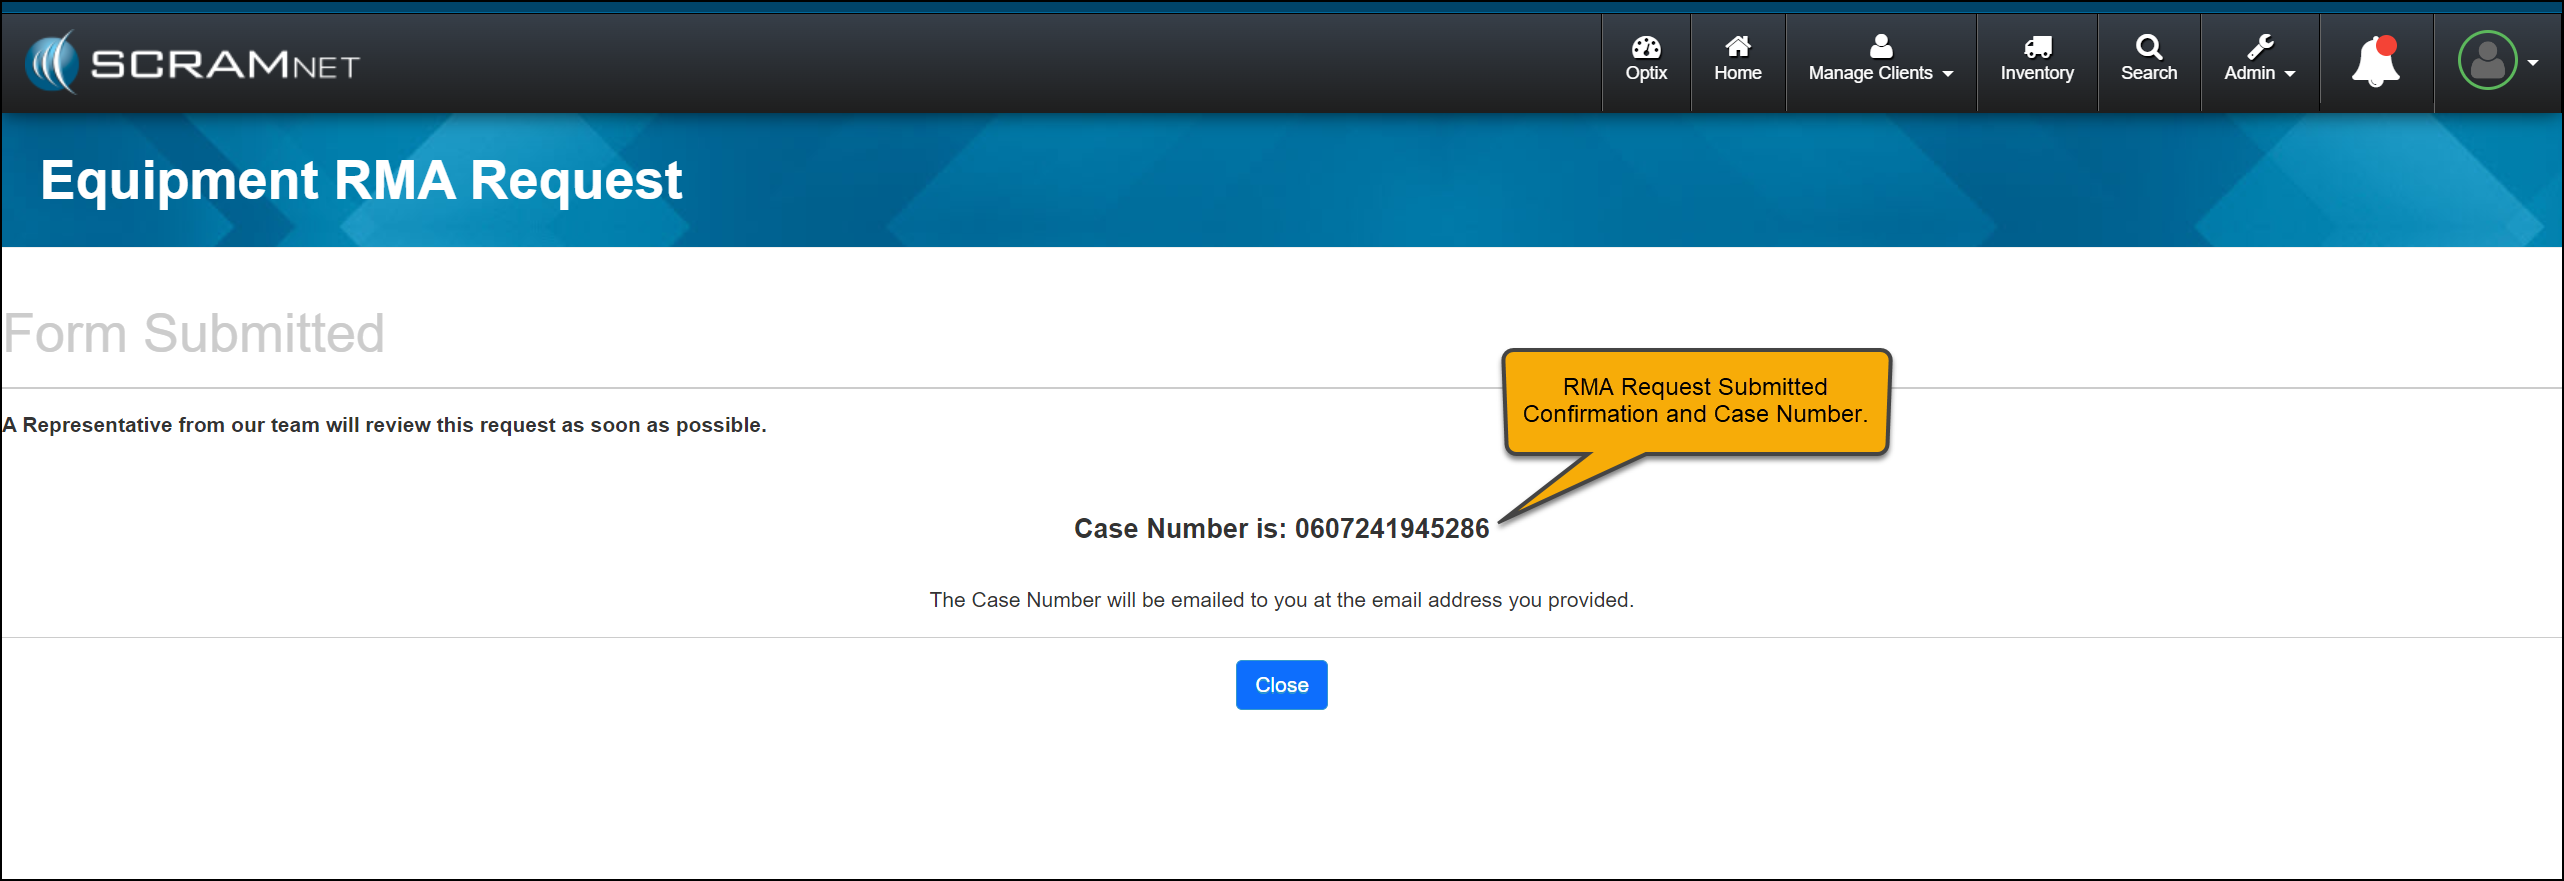
Once the RMA request has been submitted, the acknowledgment page will include the case number associated with the request for your reference.
Not seeing the enhancement in SCRAM Systems Help & Support page? Clear your cache and cookies and refresh your browser window.
Current Equipment RMA Request Page
Pre-release RMA Request page (click to enlarge)
Enhanced Equipment RMA Request Page
Equipment RMA Request page (click to enlarge)RMA Acknowledgement page with Case Number (click to enlarge)
SCRAM Troubleshooting
On the SCRAM Troubleshooting article, select the product and issue to view step-by-step instructions.
SCRAM Troubleshooting Help Article (click to enlarge)
On June 6, 2024, SCRAM Systems will release three SCRAM TouchPoint Location feature enhancements:
The SCRAM Optix Location tab will display “Compliant” or “Non-Compliant” depending on the location service settings the client has chosen for the SCRAM TouchPoint Mobile app.
For clients on a Nexus Supervision Plan with Location Verification enabled, Location Records will now indicate whether the location record was captured before, during, or after the scheduled appointment.
The TouchPoint Location Verification service may now be disabled at the client level for clients who do not need to report their location as part of their monitoring program.
The latest version of the TouchPoint app will be available to clients in the app stores. As a best practice, SCRAM Systems recommends that all TouchPoint app users enable their smartphones to automatically update their apps to make this process easier.
Not seeing the enhancement in SCRAM Optix? Clear your cache and cookies and refresh your browser window.
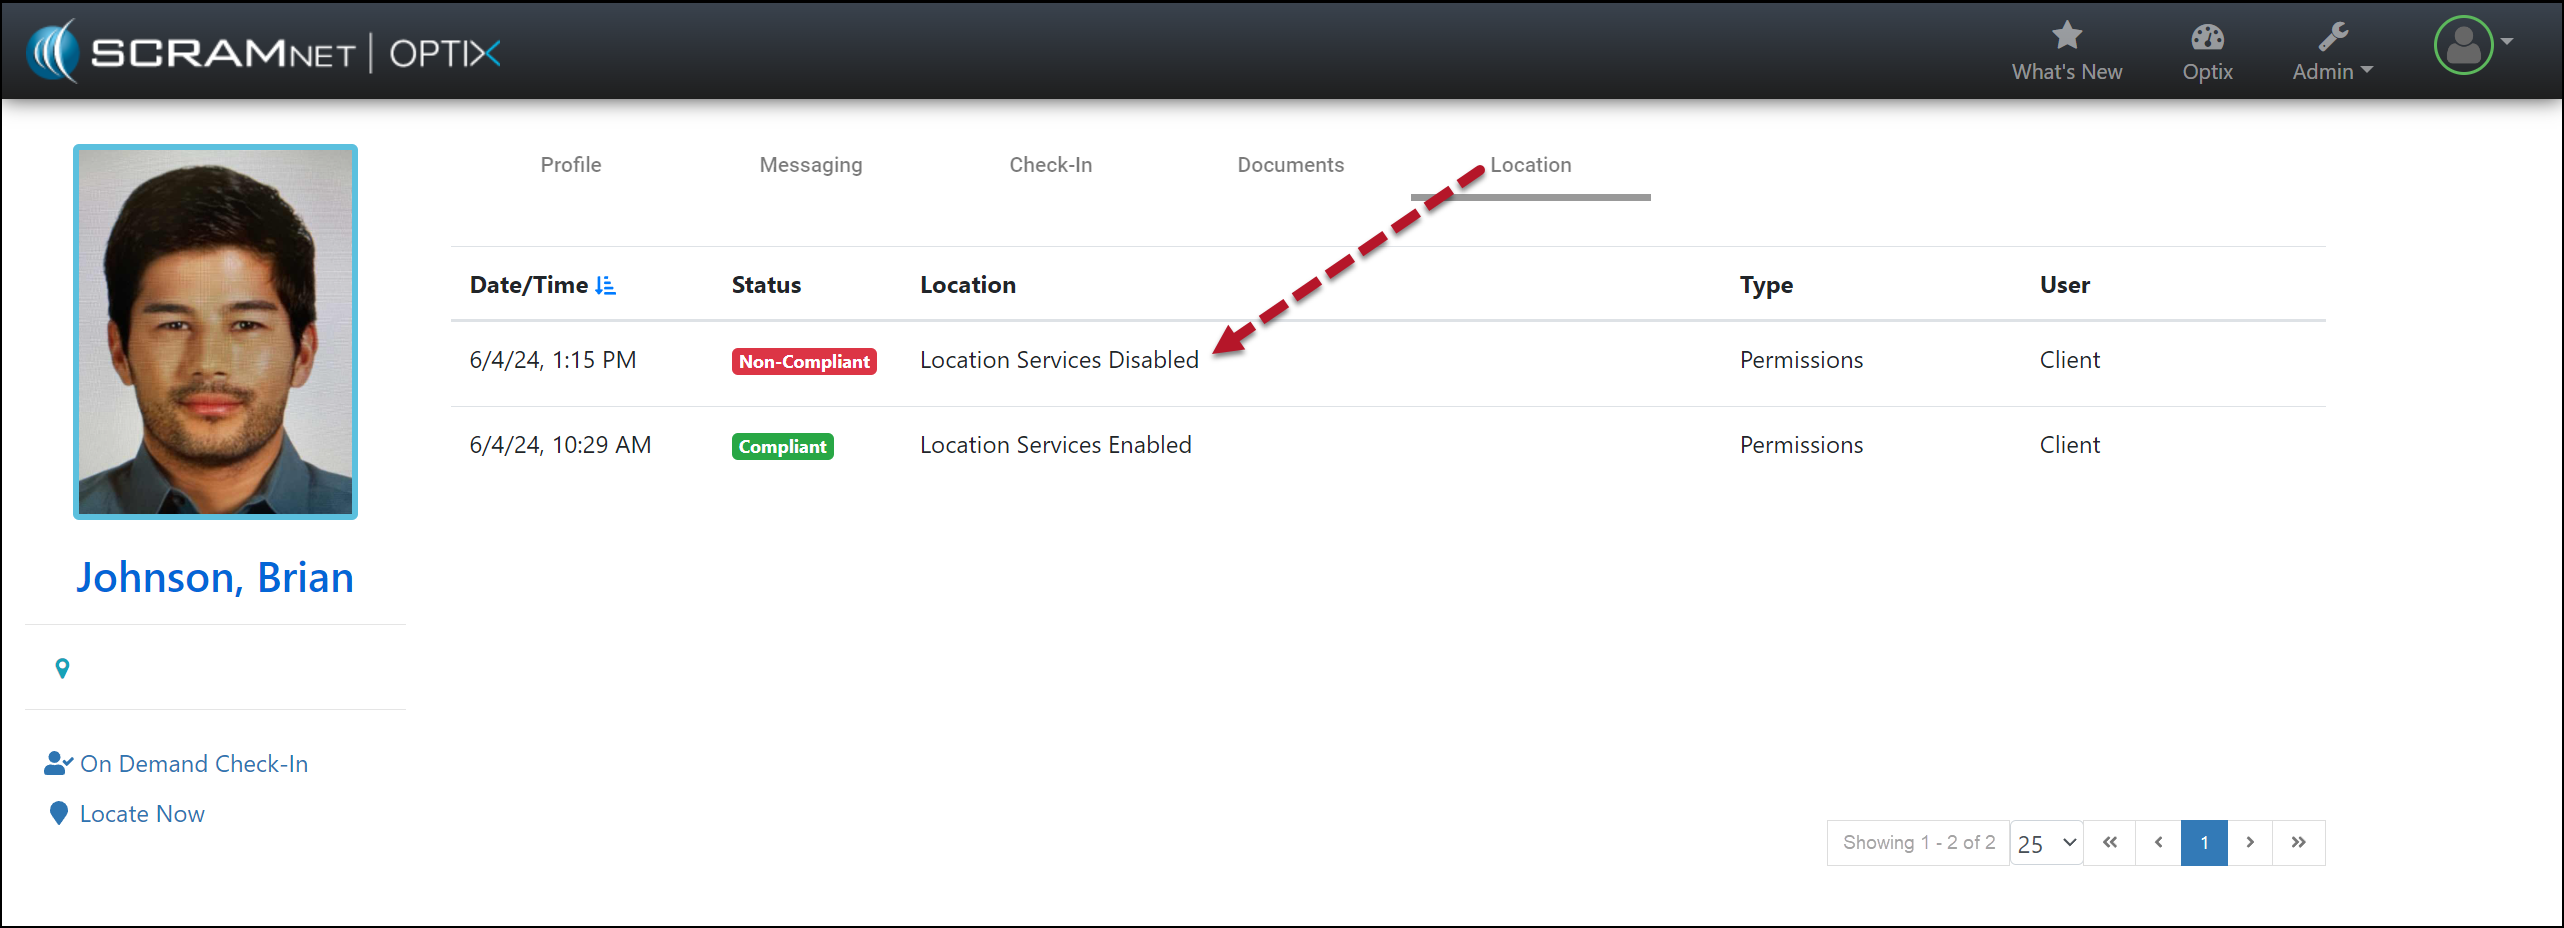
Compliant and Non-Compliant Smartphone Location Access
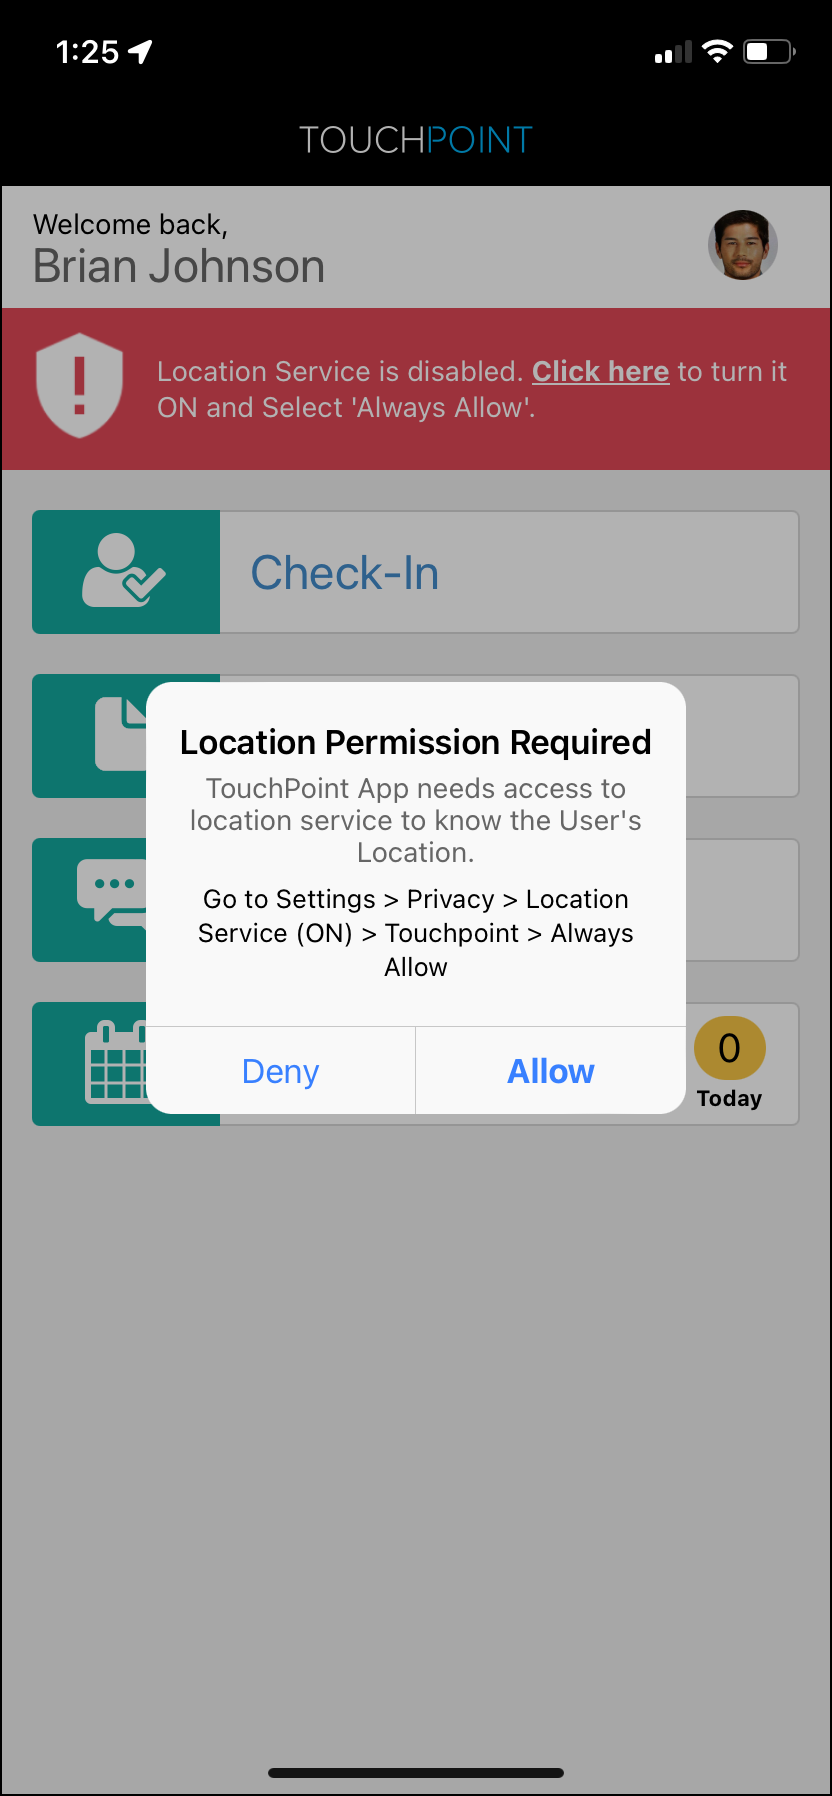
During a client’s TouchPoint monitoring program, you may now view in real-time whether or not the client has the SCRAM TouchPoint application’s location access permissions set to “Always Allow” the location data to be shared. The SCRAM TouchPoint Location tab will display “Compliant” when the client’s smartphone location permissions are set to Always Allow for the TouchPoint app, and will display “Non-Compliant” when the client has selected something other than Always Allow.
Additionally, when location services access is set to any option other than Always Allow, an event will be generated with a time and date stamp indicating when location services were disabled.
SCRAM Optix Client Location Page (click to enlarge)
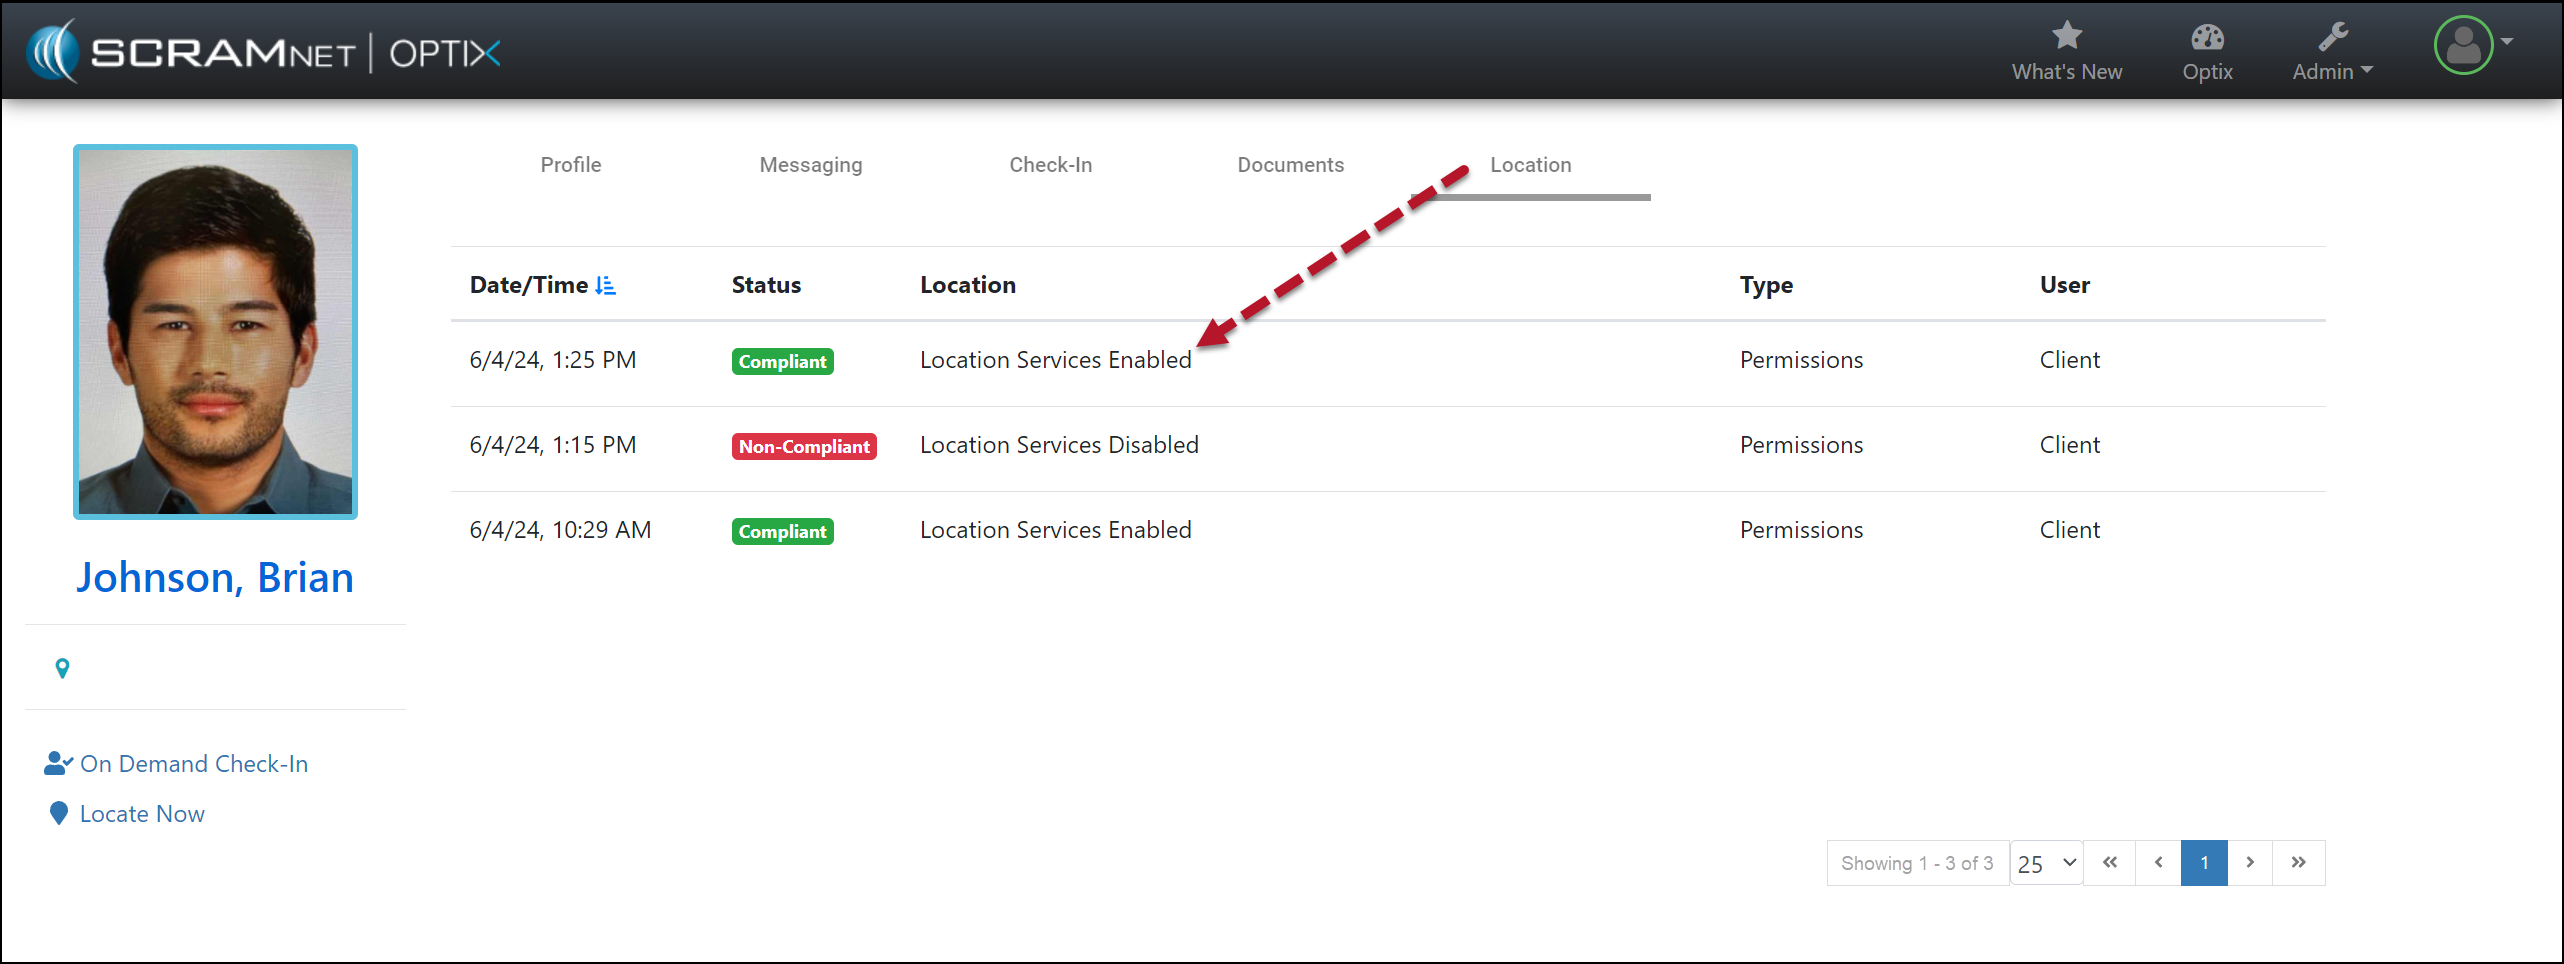
As soon as the client updates the location service settings on their smartphone to “Always Allow” location access, a new event will be generated with the updated “Compliant” status.
SCRAM Optix Location Page (click to enlarge)
Android smartphones only: An event of Non-Compliant is reported within one minute of the change to the smartphone’s location service settings, however, the update from Non-Compliant to Compliant (location services enabled) may take up to 12 hours to be reported to the monitoring software.
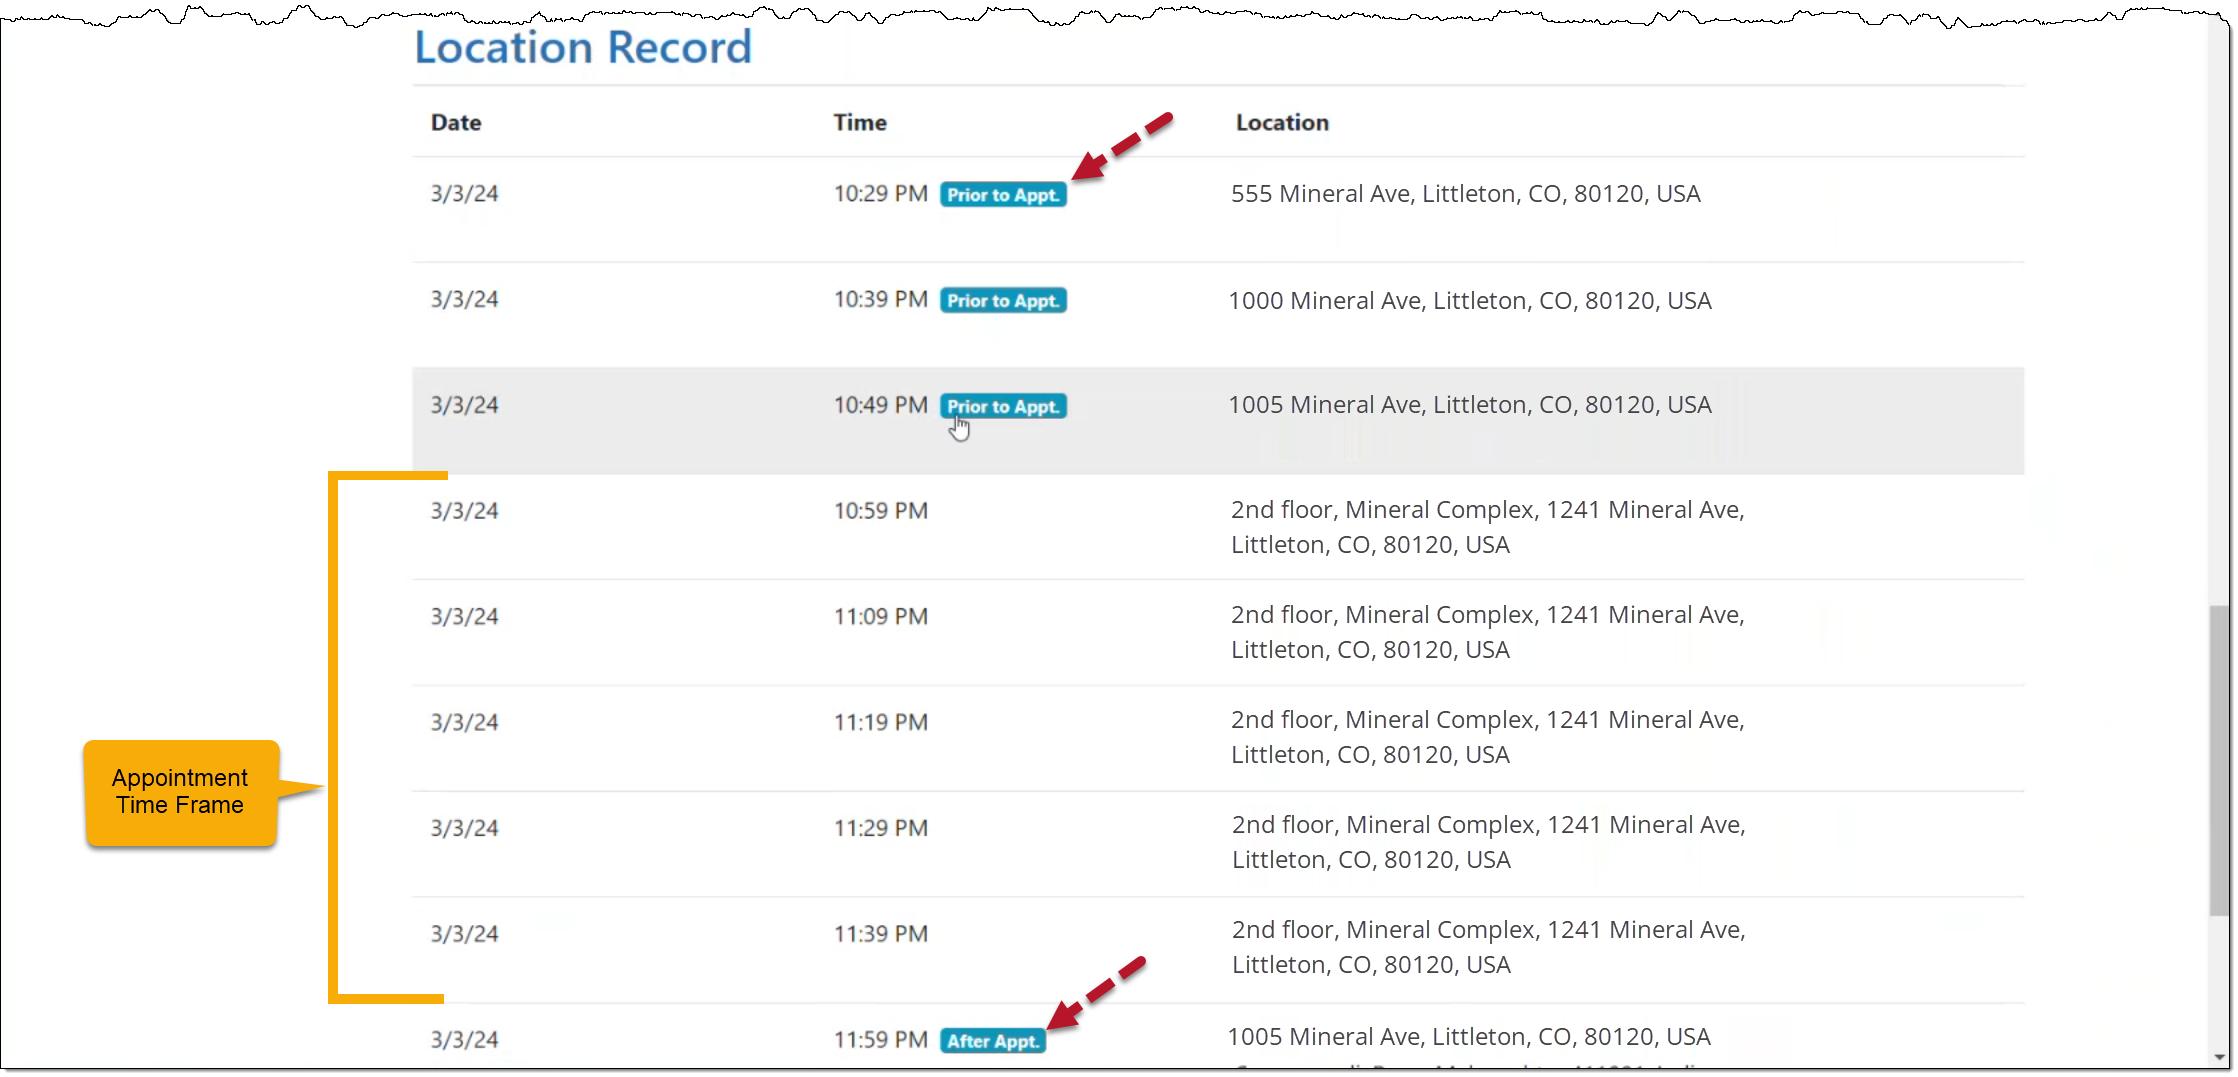
Location Verification Notation “Prior to” and “After” an Appointment
For clients on a Nexus Supervision Plan with Location Verification enabled, when accessing the Location page, the “Time” column for an individual Location Record will now clearly indicate whether the location record was captured prior to, during, or after the scheduled appointment timeframe, thus aiding in interpreting the location data presented.
When viewing the Location Record for a client’s appointment, the “Time” column displays “Prior to Appt.” for location points gathered before the appointment start time, and “After Appt.” for location points gathered after the appointment.
When there is no notation, the location points were captured within the appointment timeframe.
Client Location Record with Details of Appointment (click to enlarge)
Disable Location Verification Services
Currently, any time the client restricts access to their smartphone’s location data, the SCRAM TouchPoint application prompts the client to allow access to this data by sending push notifications, a pop-up, and a red banner within the application itself. These notifications will continue until the client updates the application’s location permissions.
Client Location Verification Enabled (click to enlarge)
SCRAM TouchPoint Mobile App Location Permission Alert (click to enlarge)
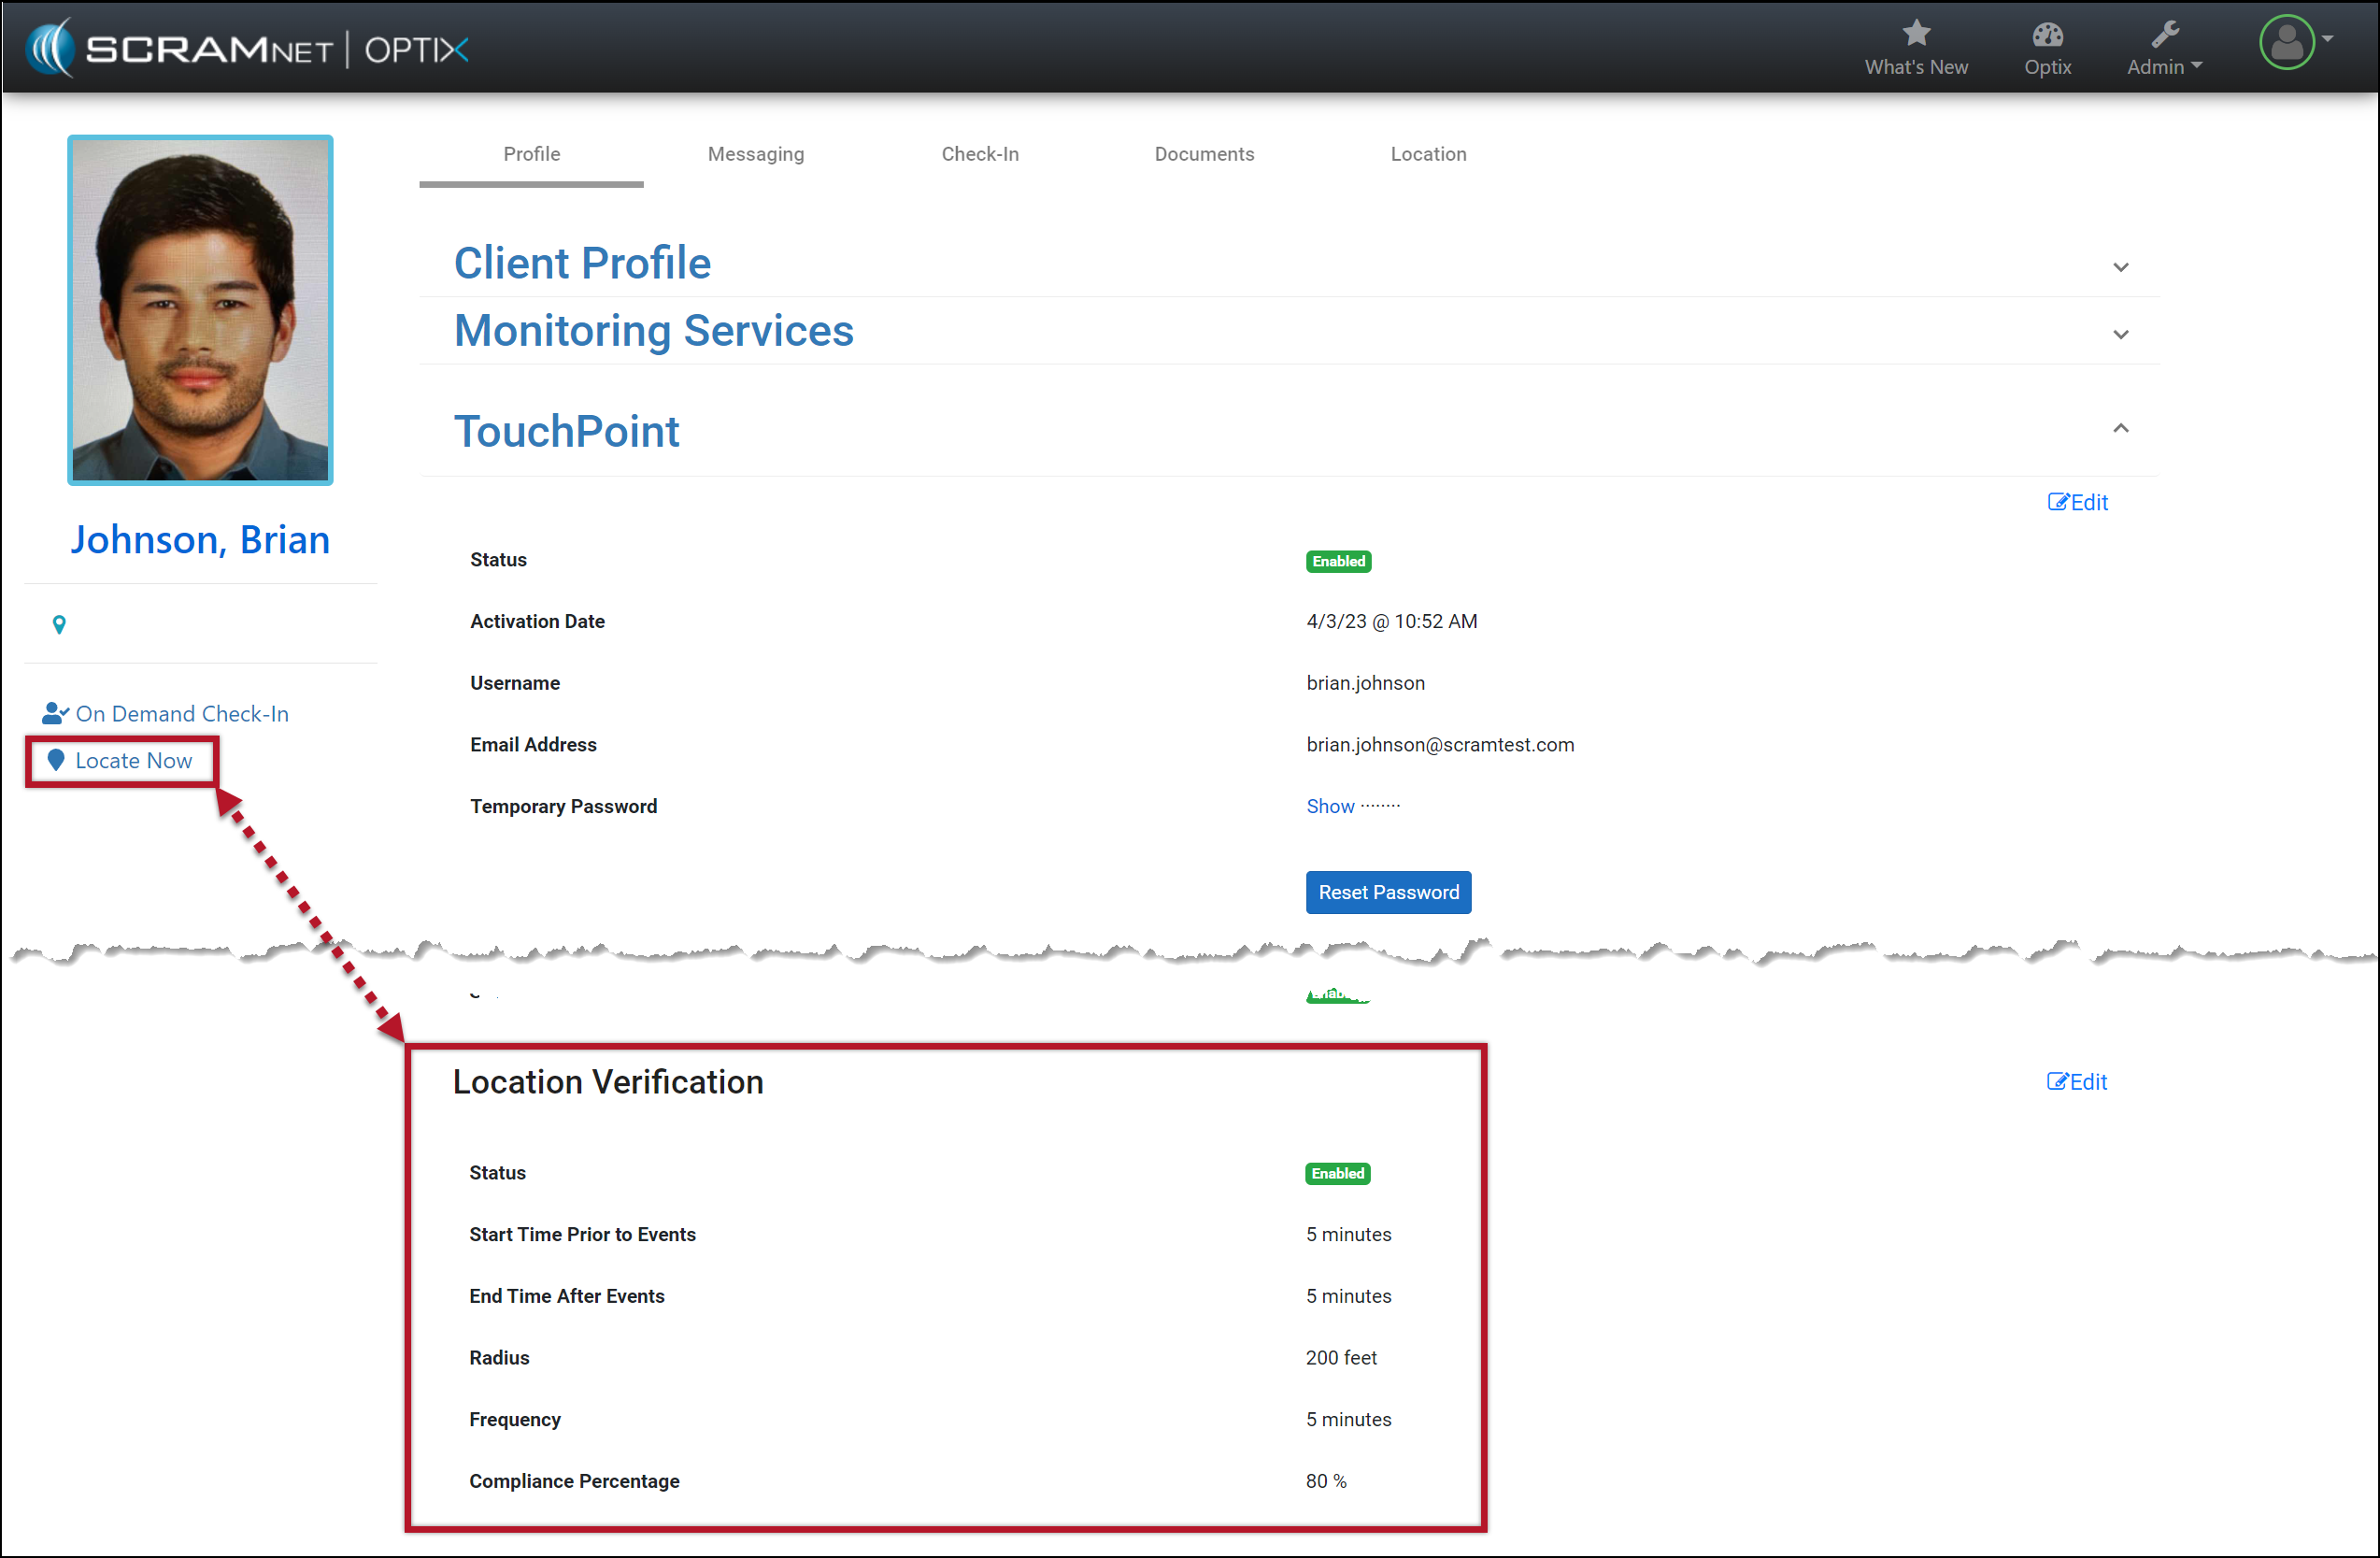
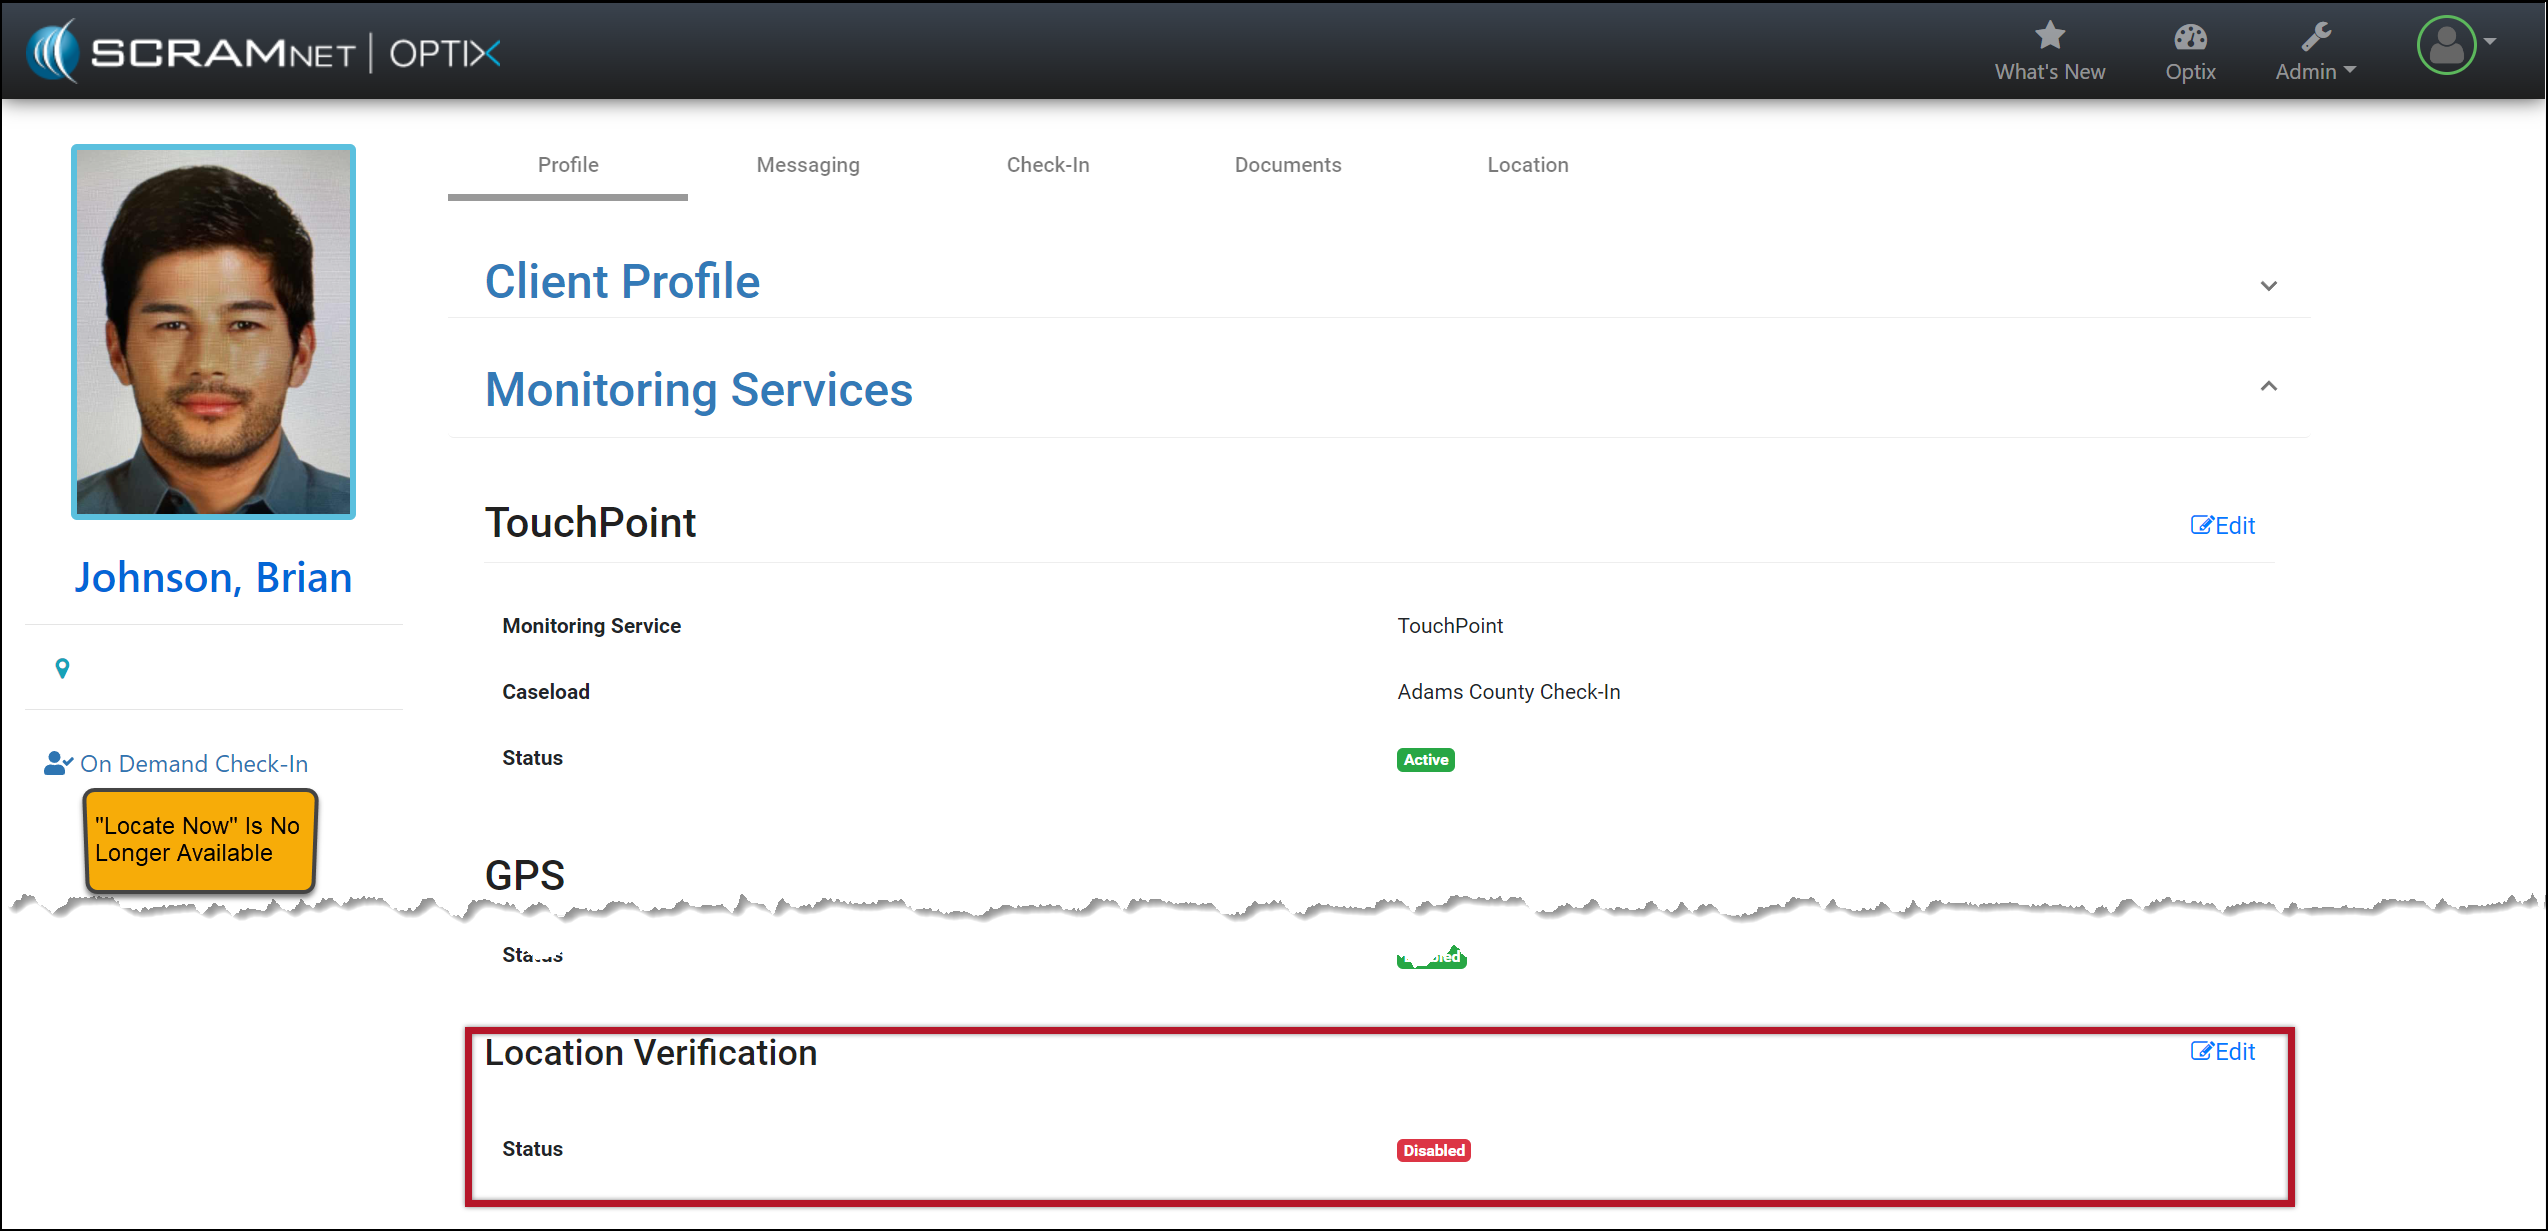
With this update, you may disable the Location Verification feature on the client’s Profile page when it is not required for client monitoring. Once disabled, regardless of the smartphone location access settings, the client will no longer be prompted to share their smartphone’s location data. Additionally, the on-demand Locate Now feature will no longer be available.
Client Location Verification Disabled (click to enlarge)
At 1:00 PM MDT today, March 21, 2024, SCRAM Systems® will introduce a new Location Verification feature in the SCRAM Nexus® caseload management system. Working in conjunction with the SCRAM TouchPoint™ client smartphone app, the Location Verification feature will provide officers, agents, and case managers with useful information regarding a client’s whereabouts during Supervised Appointment Activities.
This article is for Nexus/TouchPoint Administrators as well as Officers. If you are an Officer-only user, you may skip to the Officer process.
Enable Location Verification for Your TouchPoint Caseloads
Before the new Location Verification feature can be used, a Nexus/TouchPoint Administrator will need to enable the feature for your caseloads. As an Administrator:
Access the SCRAM Optix TouchPoint Facility:
Open the SCRAM Optix TouchPoint Facility (click to enlarge)
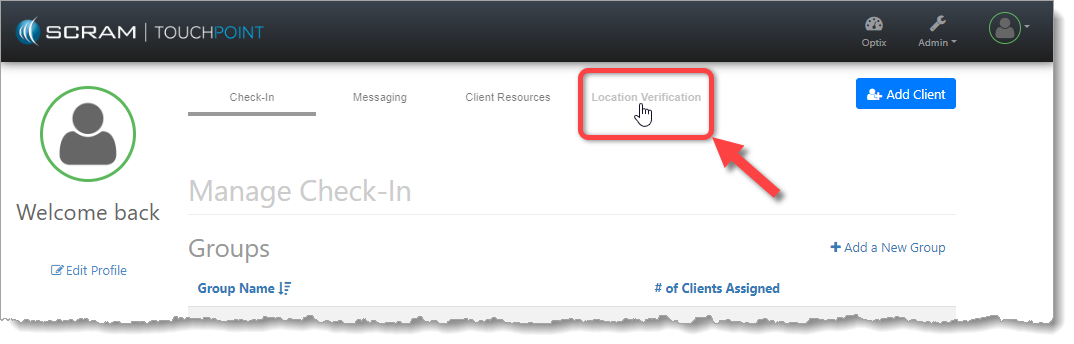
Select the New Location Verification Tab:
Select the New Location Verification Tab (click to enlarge)
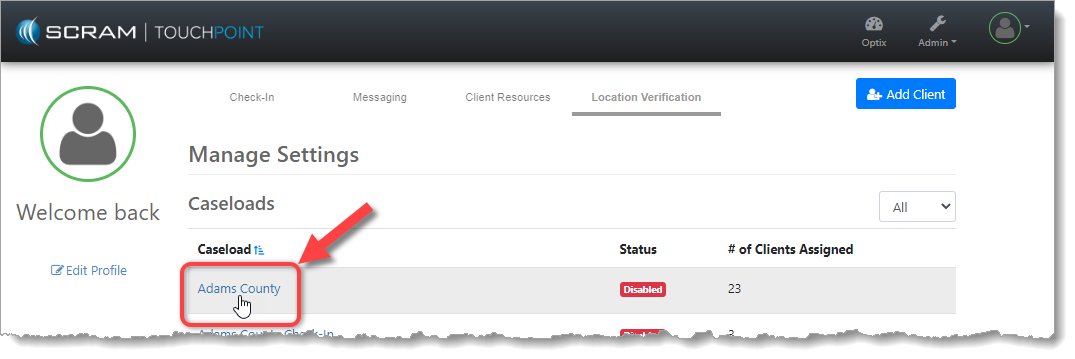
Select the Caseload You Wish to Enable:
Select the TouchPoint Caseload You Wish to Enable (click to enlarge)
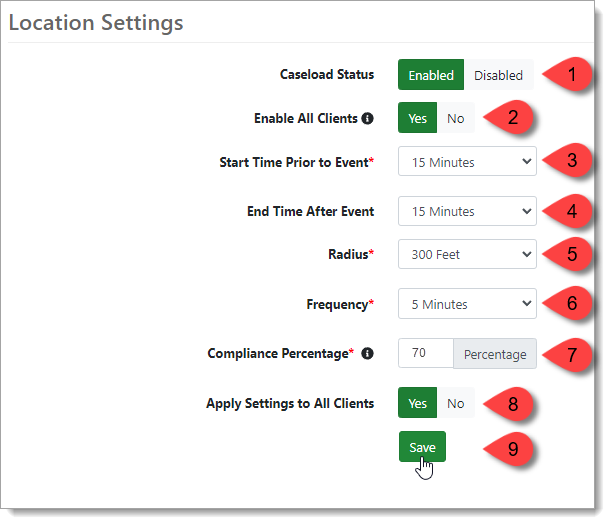
Enable Location Verification and Establish Settings:
Please see the corresponding numbered pointers in the image below.
Toggle the Caseload Status to Enabled. This will reveal the rest of the options.
Select Yes to enable Location Verification services for all client profiles in the Caseload. If No is selected, all clients will have Location Verification services disabled in their profiles and will have to be enabled individually.
Begin tracking the client’s smartphone location between 0 and 30 minutes (in five-minute increments) prior to the Supervised Appointment’s scheduled start time.
Continue tracking the client’s smartphone location between 0 and 30 minutes (in five-minute increments) after the Supervised Appointment’s scheduled end time.
Set the “Compliance Radius” for Supervised Appointment locations. This establishes the distance (200 to 500 feet in 100-foot increments) from the center of the verified location address within which the client will be considered at the address and in attendance at the appointment.
Enable Location Verification and Select the Desired Options (click to enlarge)
Set the frequency (every 1, 5, or 10 minutes) at which client smartphone location information should be collected.
Set the acceptable “Compliance Percentage.” The Compliance Percentage is the number of actual client smartphone location data points collected from within the Radius, divided by the number of location points expected during the Supervised Appointment time period.
Example: If we collect location points from the client’s smartphone every five minutes, and the client is scheduled for a 30-minute appointment, then we would expect to collect seven location points inside the Radius of the appointment address for the duration of the appointment. But, if the client runs late to the appointment, and the appointment ends early, then, even though the client was in compliance, we may only collect five out of the expected seven location points within the Radius, which is only 71% of the expected points. Keep this in mind when setting the Compliance Percentage.
Select Yes to apply these Location Verification settings to all clients in the Caseload.
Save the Location Verification settings.
Enable Location Verification for Your SCRAM Nexus ‘Conditions’
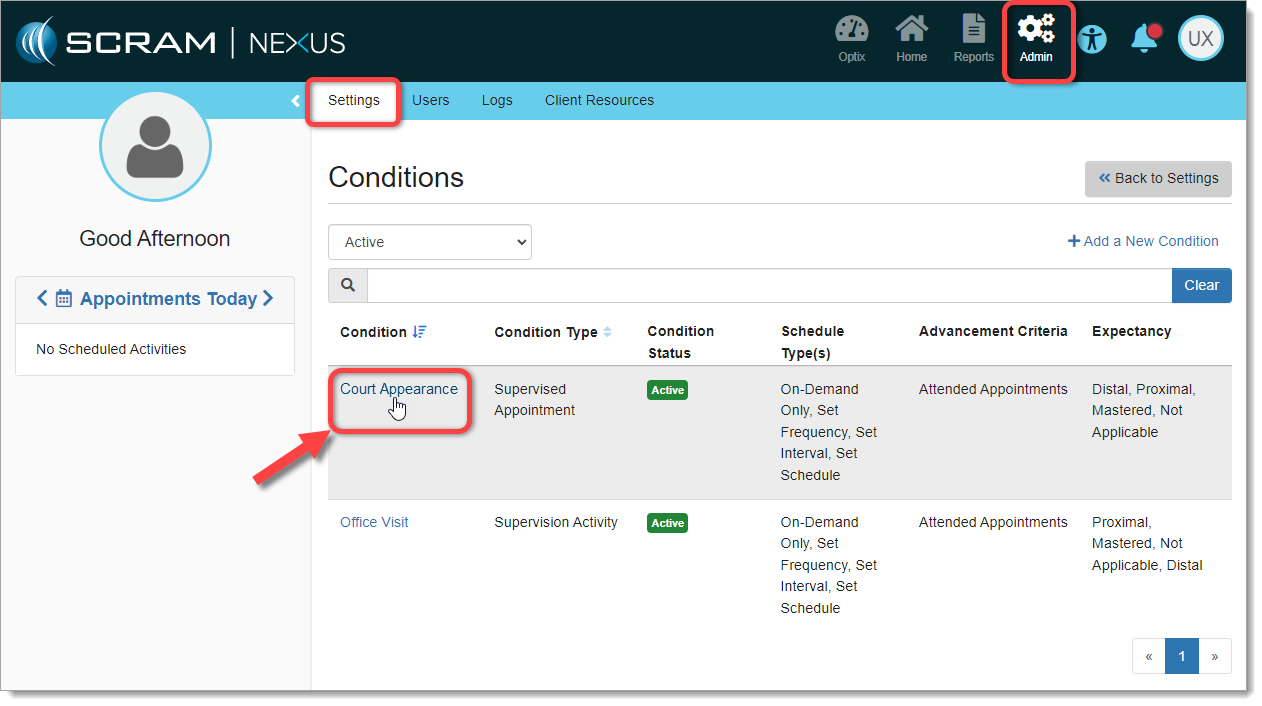
The Location Verification feature is only available to Supervised Appointment Condition Types, however, the feature must be enabled for each Condition before it can be used. As an Administrator:
Access Admin > Settings > Conditions and Select the Condition to Enable:
Nexus Admin Selects a ‘Condition’ to Enable (click to enlarge)
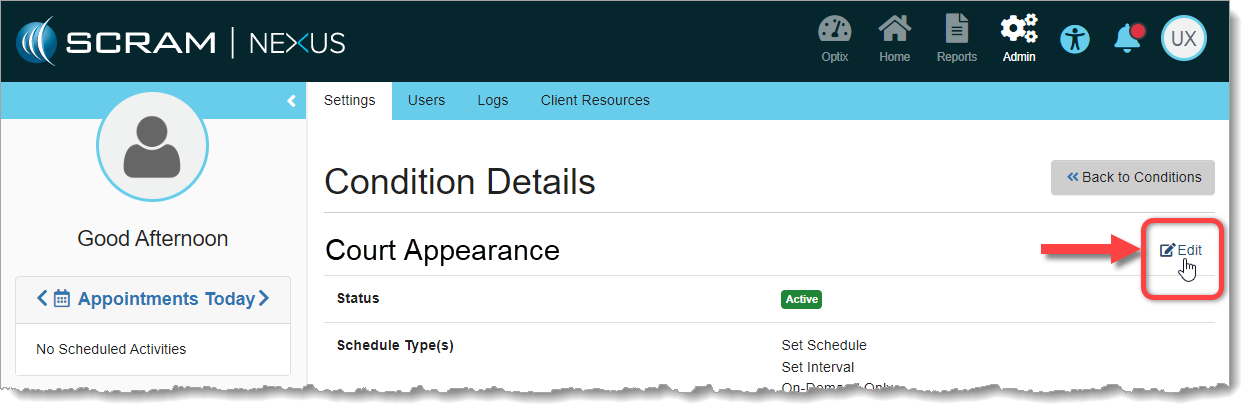
Select ‘Edit’ on the Condition Details Page:
Edit the Condition (click to enlarge)
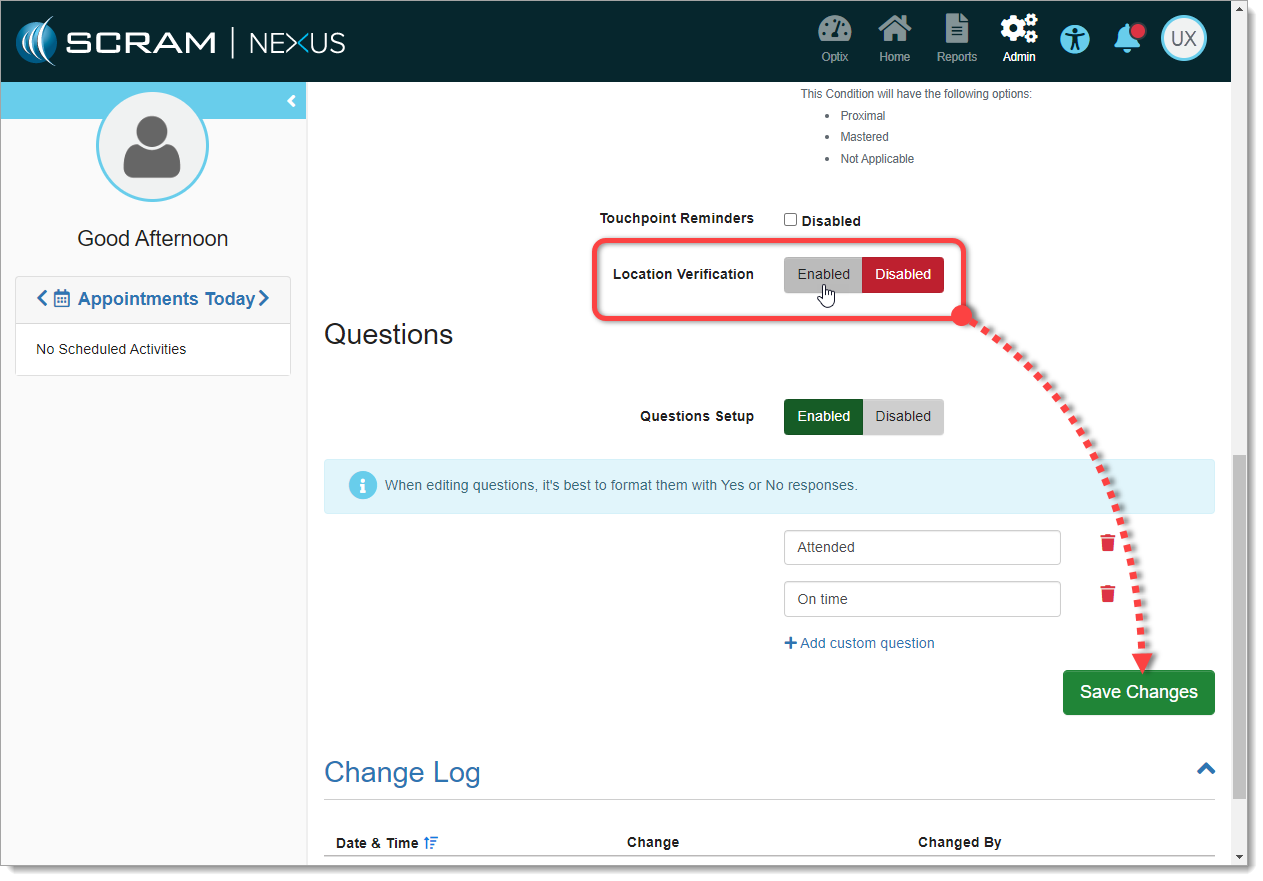
Scroll Down to the New ‘Location Verification’ Toggle
Select Enable and then Save Changes:
Enable Location Verification and Save Changes (click to enlarge)
Your Condition is now enabled for Location Verification. Repeat the process for each Condition you wish to enable.
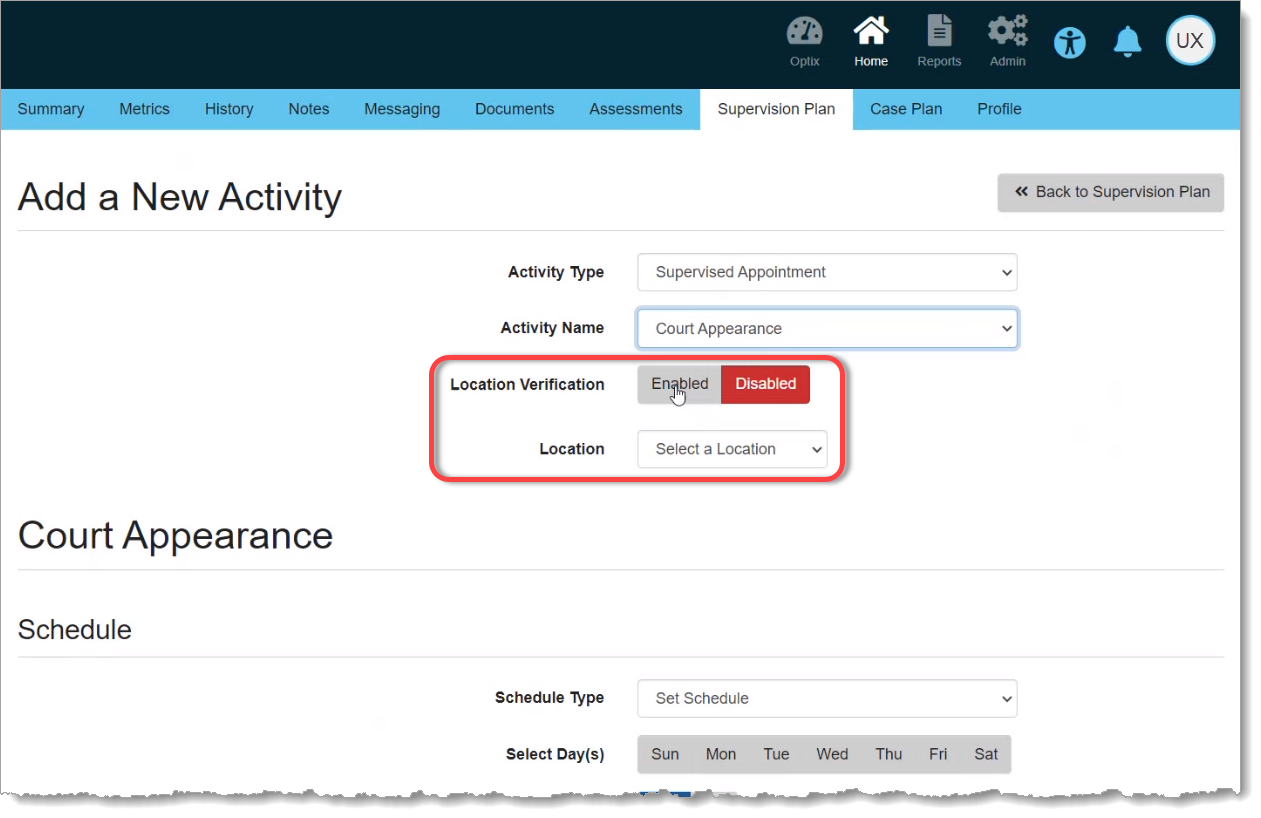
Enable Location Verification for a Supervised Appointment Activity
The Location Verification feature is only available on Supervised Appointment Activity Types. Your SCRAM Nexus/TouchPoint Administrator must first enable Location Verification for your TouchPoint Caseloads, as well as enable it for the appropriate Supervised Appointment Activities.
Once enabled, when you Add or Edit a Supervised Appointment Activity, a new Location Verification toggle switch will be available to you. Simply Enable the feature for your Activity, select a verified Location where the appointment will take place, and proceed as normal:
Enabling Location Verification on a New ‘Supervised Appointment’ Activity for a Client (click to enlarge)
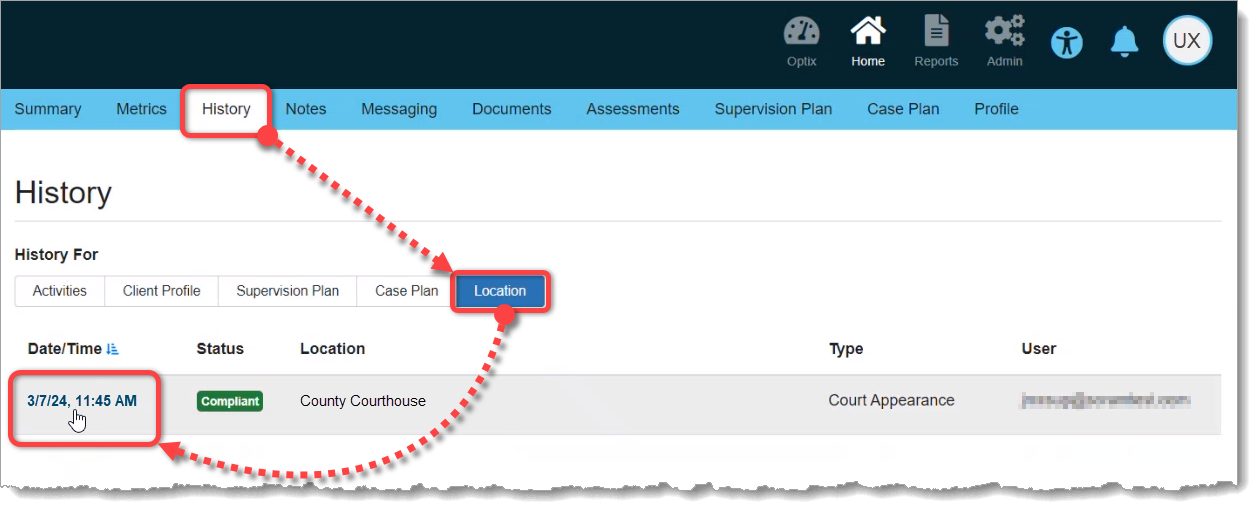
After the Supervised Appointment
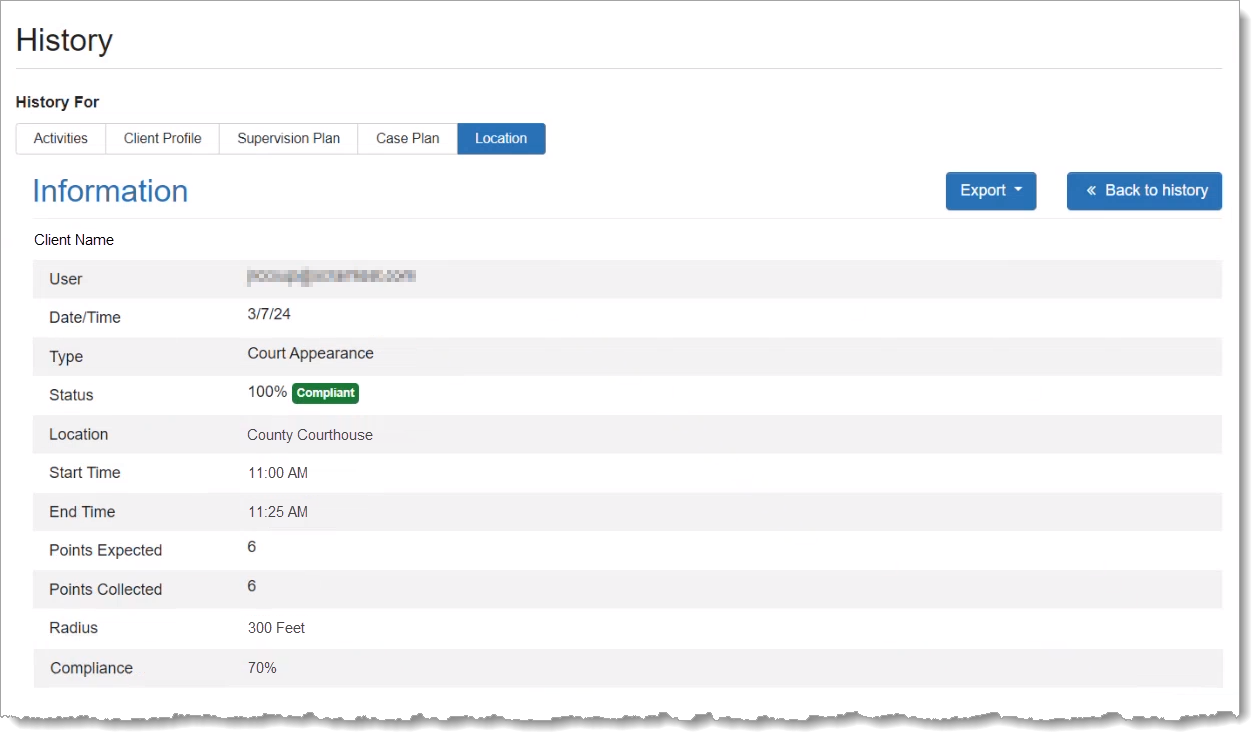
Once the scheduled appointment time has passed, you can check for compliance by accessing the the client’s History tab. Then select the Location button for an “at-a-glance” look at the client’s Supervised Appointment status and location. For detailed location information, select the Date/Time link for the appointment in which you are interested:
Access the Client History Tab to View Appointment Location Information (click to enlarge)
The Location section of the detail page provides a breakdown of the client’s appointment compliance status as calculated by collecting location points from the TouchPoint app on the client’s smartphone during the time of the appointment:
Supervised Appointment Detail – Information Section (click to enlarge)
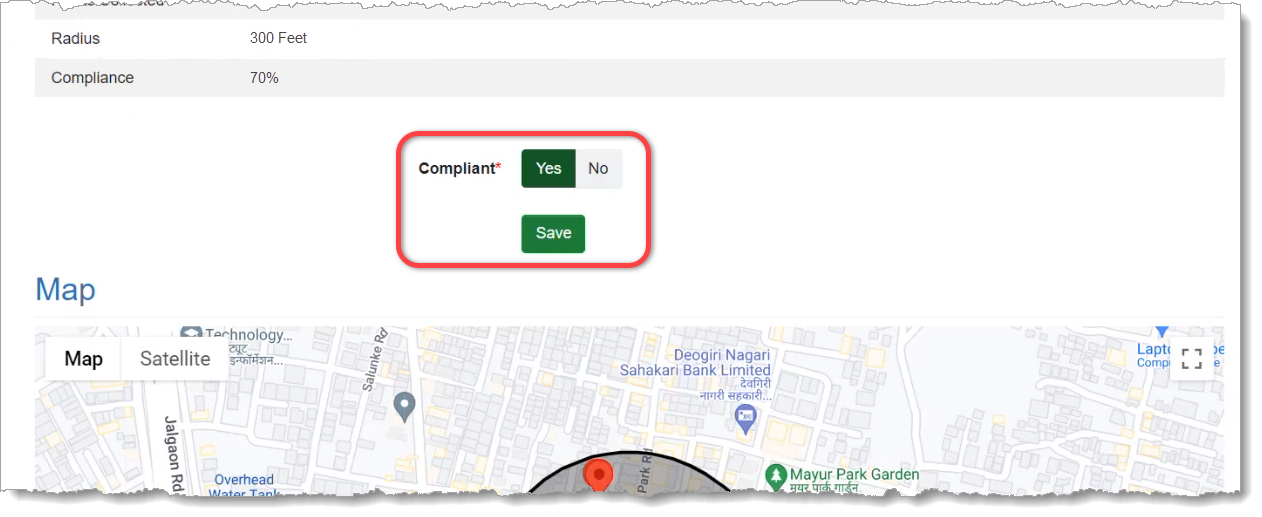
Scroll down the Location section to access the Compliant toggle switch, which allows you to override the automatic compliance calculation if needed:
Supervised Appointment Detail – Compliance Override Toggle (click to enlarge)
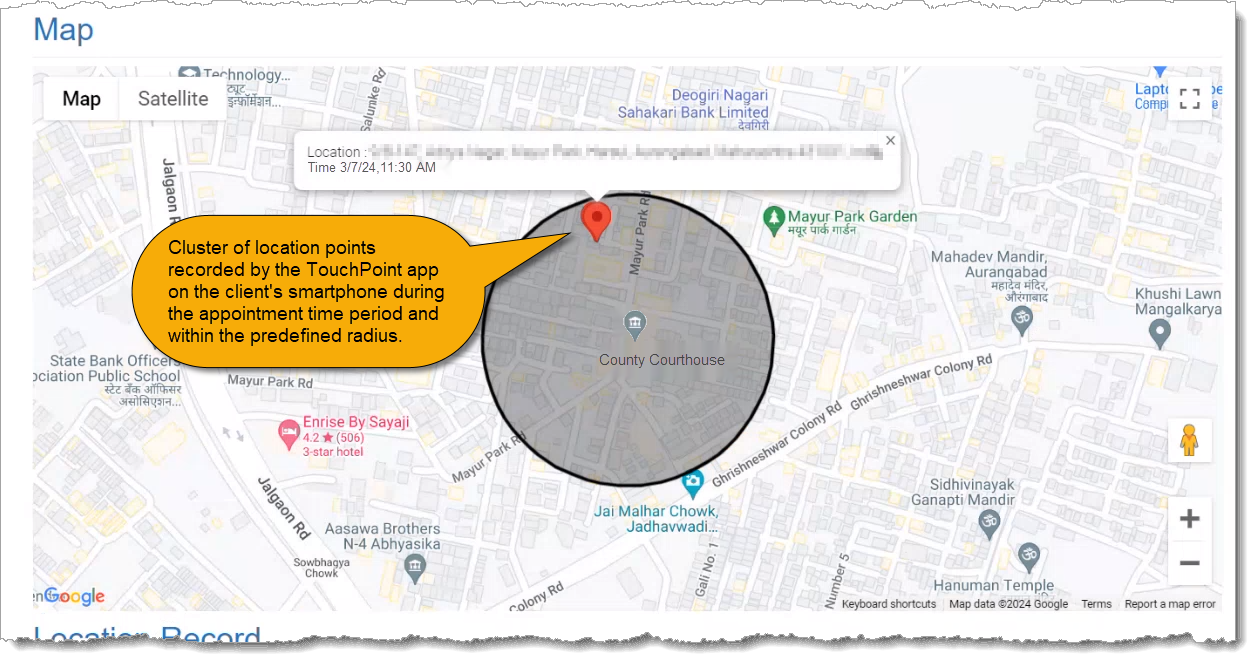
Scroll further down the detail page to reveal the Map, which displays the location points collected during the Supervised Appointment Activity and where they fall within the location’s “Compliance Radius.” The Compliance Radius is the predefined distance (from 200 to 500 feet) from the center of the verified location address, within which the client is considered at the address and in attendance at the appointment:
Supervised Appointment Detail – Map Section (click to enlarge)
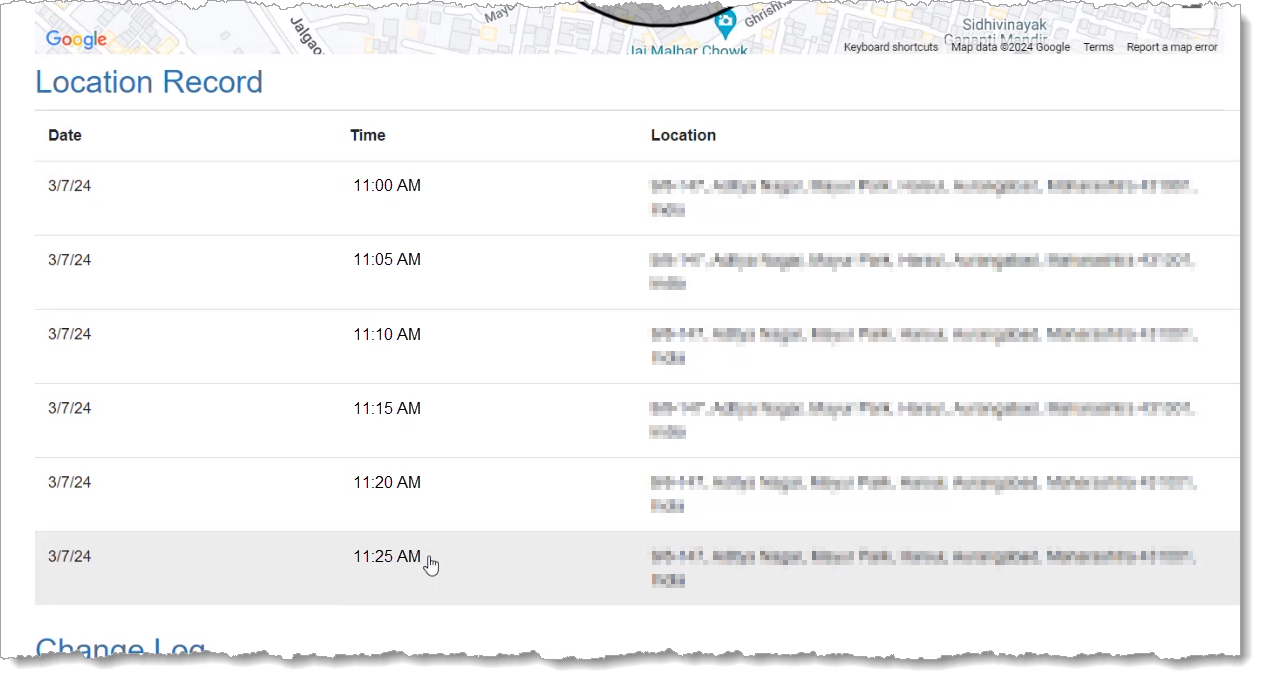
Below the Map you will find the Location Record, which is a matrix of the location points displayed on the Map, including the date, time, and address from which each point was collected from the client’s TouchPoint smartphone app:
Supervised Appointment Detail – Location Record (click to enlarge)
COMING SOON: An update scheduled for the near future will make the Location Information available on the Supervised Appointment Activity itself, as well as on the client’s History tab.