On 24 March 2026, SCRAM Systems deployed an enhancement to the Suspend Alerts facility in SCRAMNET GPS that allows for continuous suspension of alerts over a series of consecutive days.
Scenario
In some cases, it would be practical to suspend GPS alerts continuously across multiple days. For example, for a client on a monitoring program that allows the client to live at home and go to work during the work week, but the client must report to jail for incarceration through the weekend, it would be useful to be able to suspend alerts generated by the SCRAM GPS device for the weekend hours during which the client is incarcerated.
Pre-Enhancement
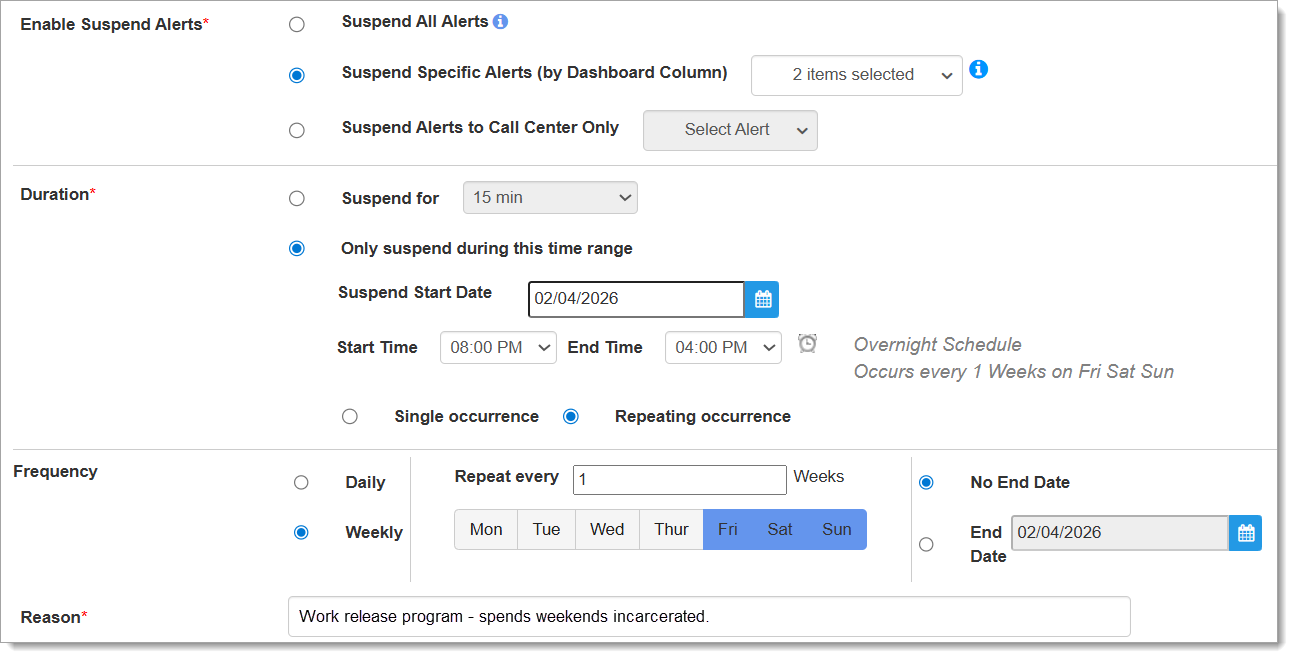
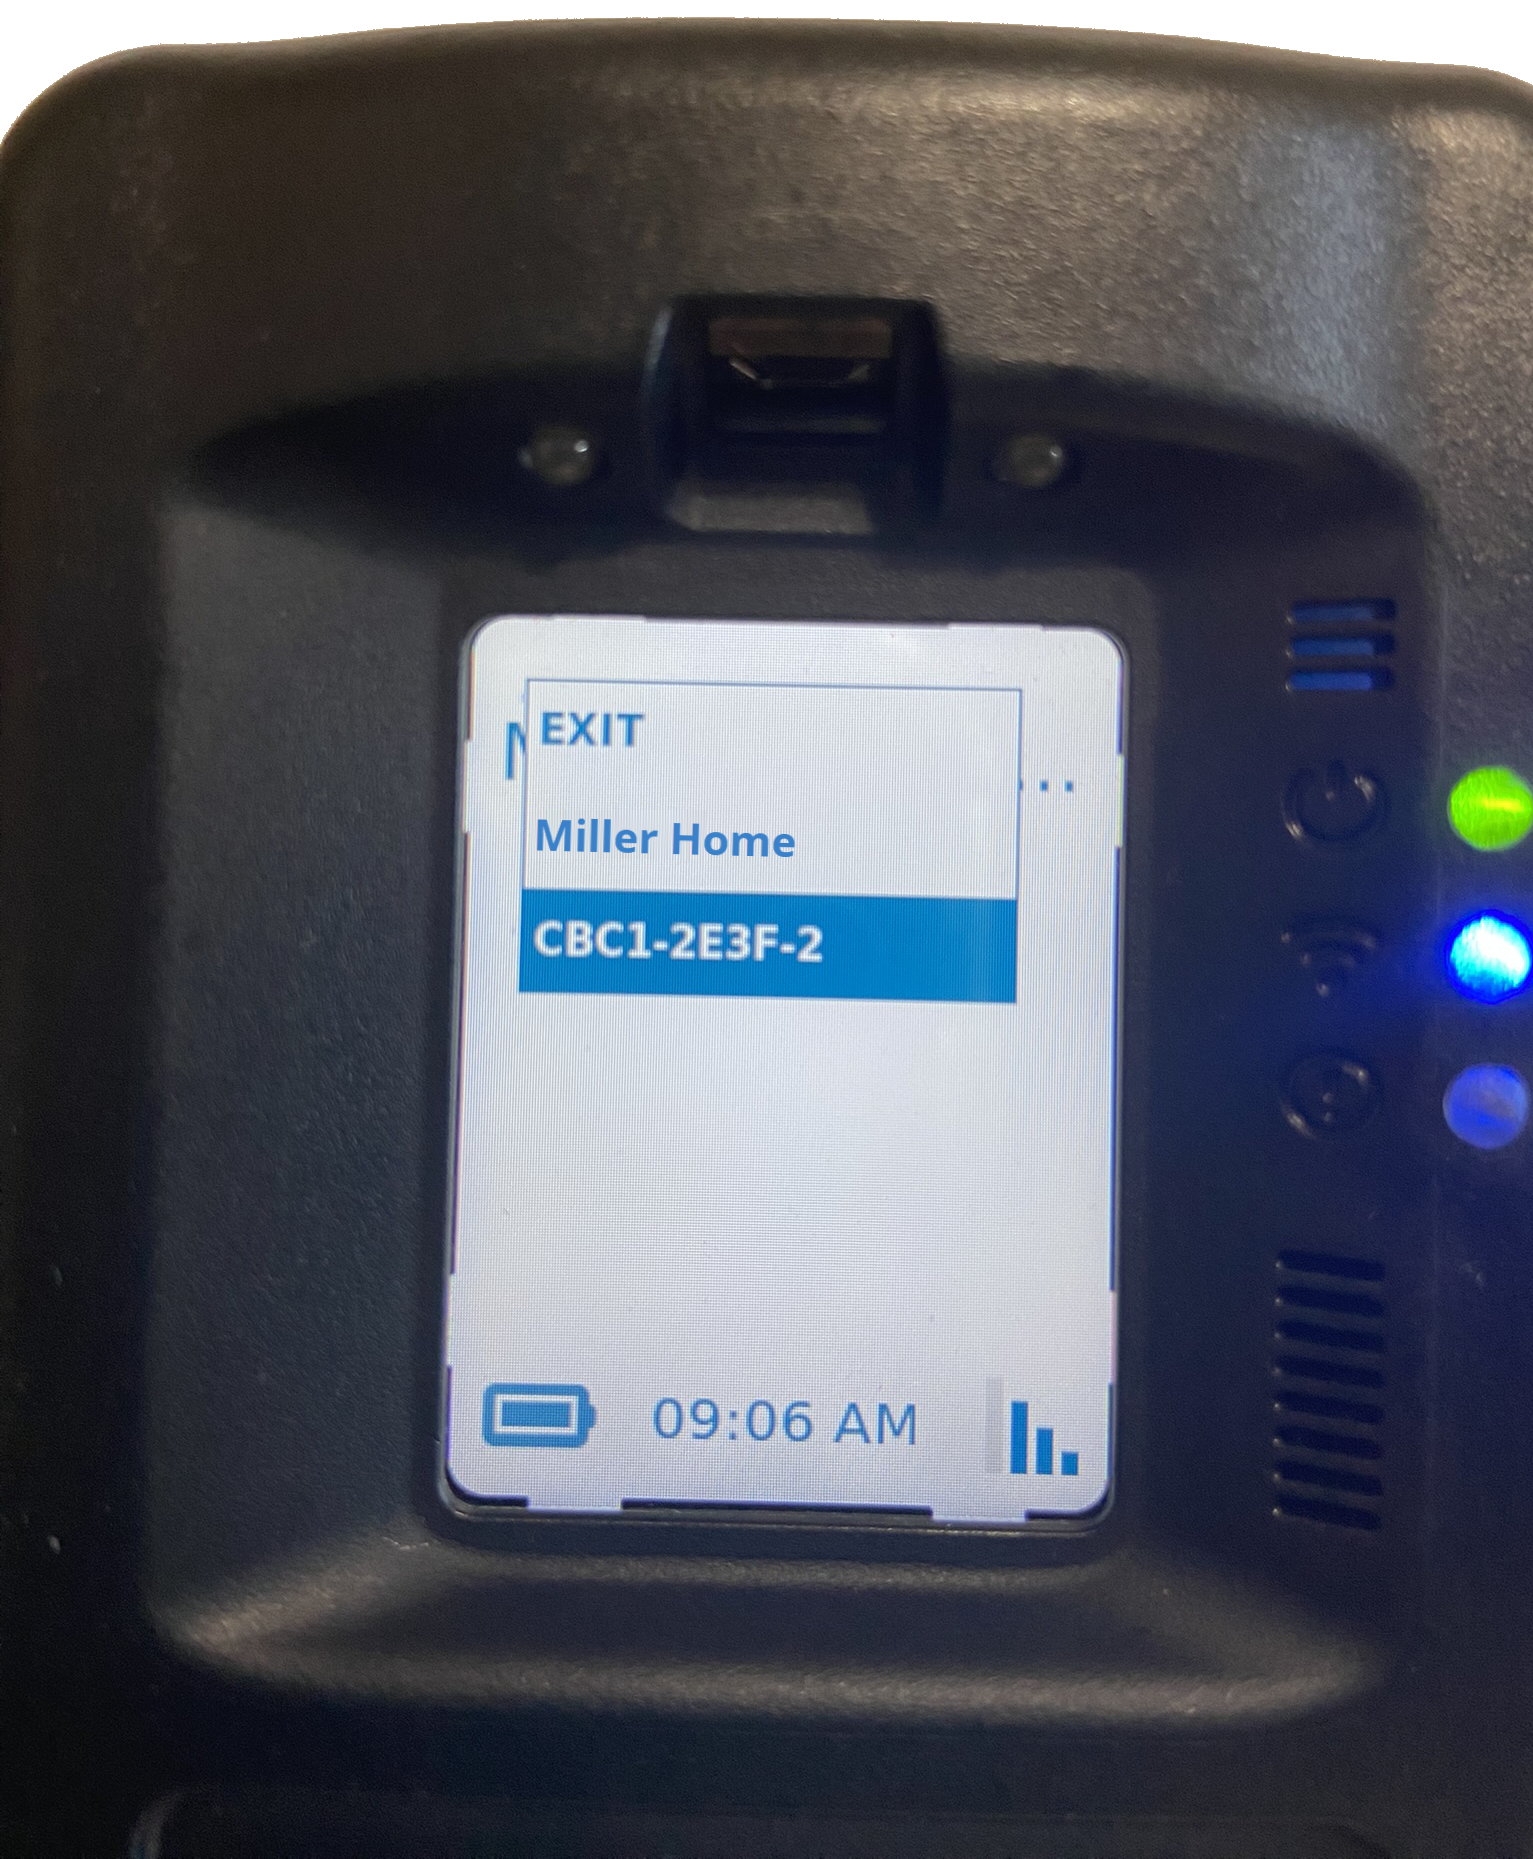
Prior to this enhancement, officers were able to schedule alert suspension for the desired days, but not continuously from a start-time on day one to an end-time on the last day. For example, if an officer wished to suspend alerts from Friday at 8 PM to Sunday at 4 PM with no gaps in between, the officer would complete the SCRAMNET GPS Suspend Alerts page as follows:
Pre-Enhancement Alert Suspension Configuration (click to enlarge)
Instead of a continuous alert suspension through the weekend, however, this would result in GPS alerts being suspended from 8PM Friday to 4PM Saturday; then again from 8PM Saturday to 4PM Sunday. But from 4PM Saturday to 8PM Saturday, there would be a four-hour gap during which GPS alerts could generate while the client is still incarcerated.
Post-Enhancement
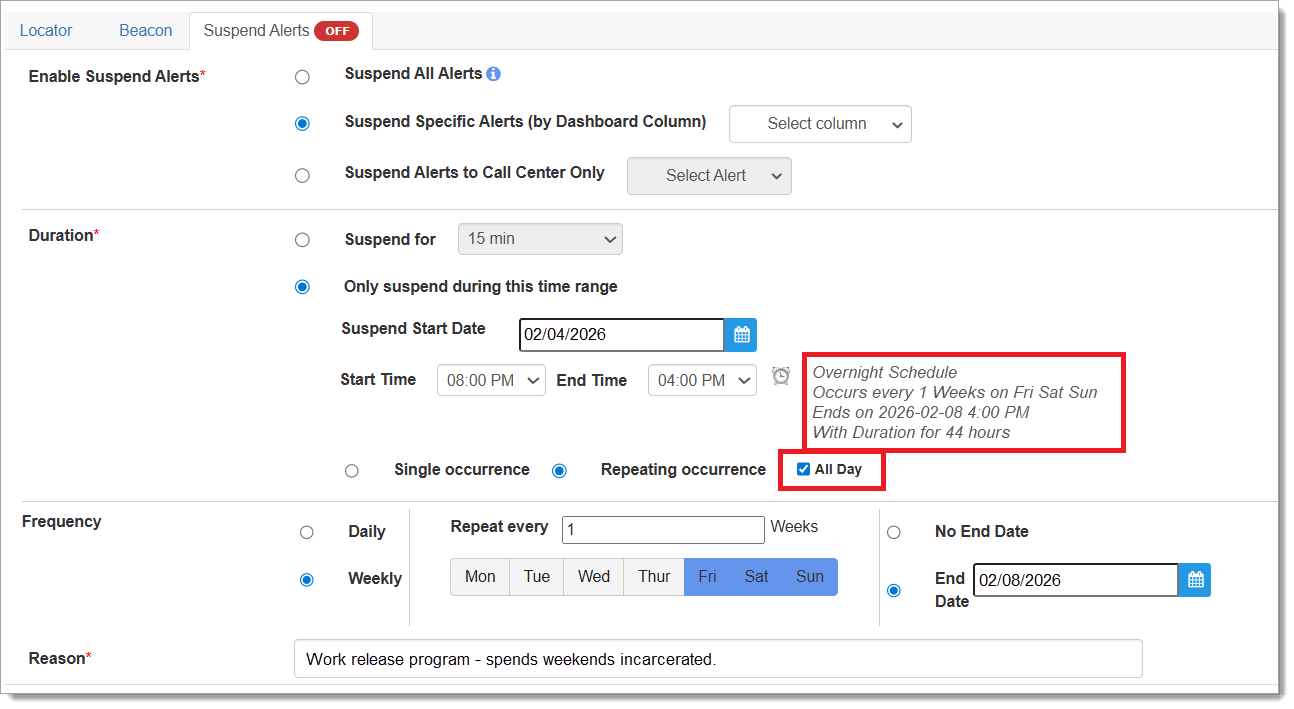
With the release of this enhancement, officers may now schedule an alert suspension not only for the desired days, but continuously from the desired start-time on the first day to the end-time on the last day. Using the same scenario as above, the officer would complete the SCRAMNET GPS Suspend Alerts page as follows, but now including the use of the new “All Day” checkbox:
Post-Enhancement Alert Suspension Configuration (click to enlarge)
Enhanced Confirmation Messaging
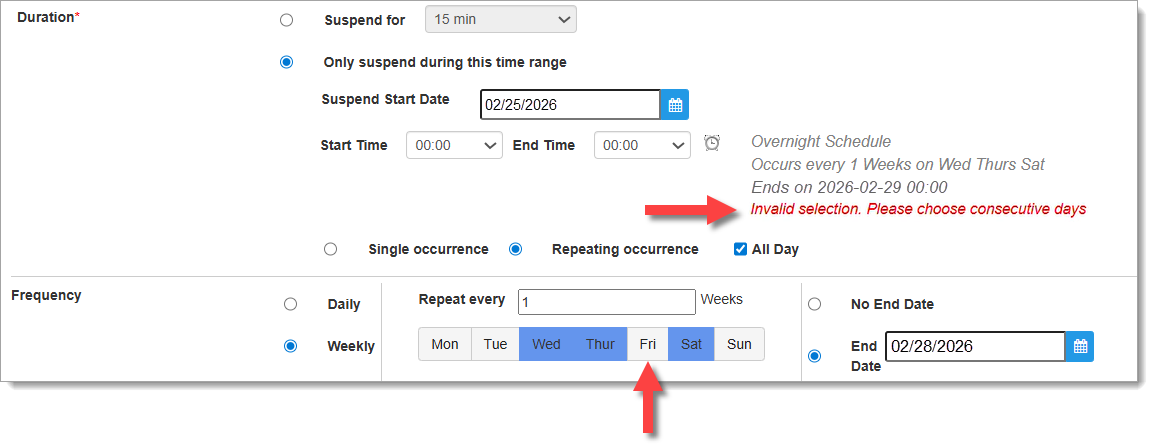
Updated messaging confirms the officer’s selections prior to saving, including a message about the total duration of the alert suspension. If a mistake is made in the configuration input by the officer, updated error messaging explains the mistake prior to saving as well:
Updated Messaging Provides Confirmation and Error Information (click to enlarge)
In the example above, the officer checked the “All Day” checkbox to indicate continuous alert suspension across multiple days, however, the officer also selected Wednesday, Thursday, and Saturday as the Weekly Frequency; Friday was not selected. The “All Day” feature only works if consecutive days are selected, and the error message indicates this in red text.
RE: Fraudulent Phone Calls Targeting Individuals on Electronic Monitoring
To our valued partners,
We want to make you aware of a recent increase in fraudulent phone calls being made to individuals involved in electronic monitoring (EM) or community supervision programs. These scams are occurring nationwide in the United States, and have affected programs using a variety of EM technologies—not just SCRAM Systems monitoring technologies.
In these calls, the scammer poses as a representative of a sheriff’s office, court, or monitoring company and claims that the individual owes money, is in violation, or could be taken back into custody unless a payment is made immediately. The goal of these calls is to create fear and prompt a quick payment.
Please note the following:
There has been no data breach or security incident at SCRAM Systems.
This is not a SCRAM-specific issue. Similar scams have targeted programs using other EM devices, as well as drug-testing and supervision programs with no electronic monitoring at all.
These scams appear to draw on publicly available information or data obtained through unrelated means.
If any client, agency, or staff member receives such a call:
Do not provide any personal or payment information.
Do not make any payment requests over the phone.
Immediately contact local law enforcement to report the incident.
SCRAM Systems continues to monitor these incidents closely and remains in contact with law enforcement and agency partners. Protecting the integrity of our programs and the safety of the individuals we serve is our top priority.
Thank you for your continued vigilance and partnership.
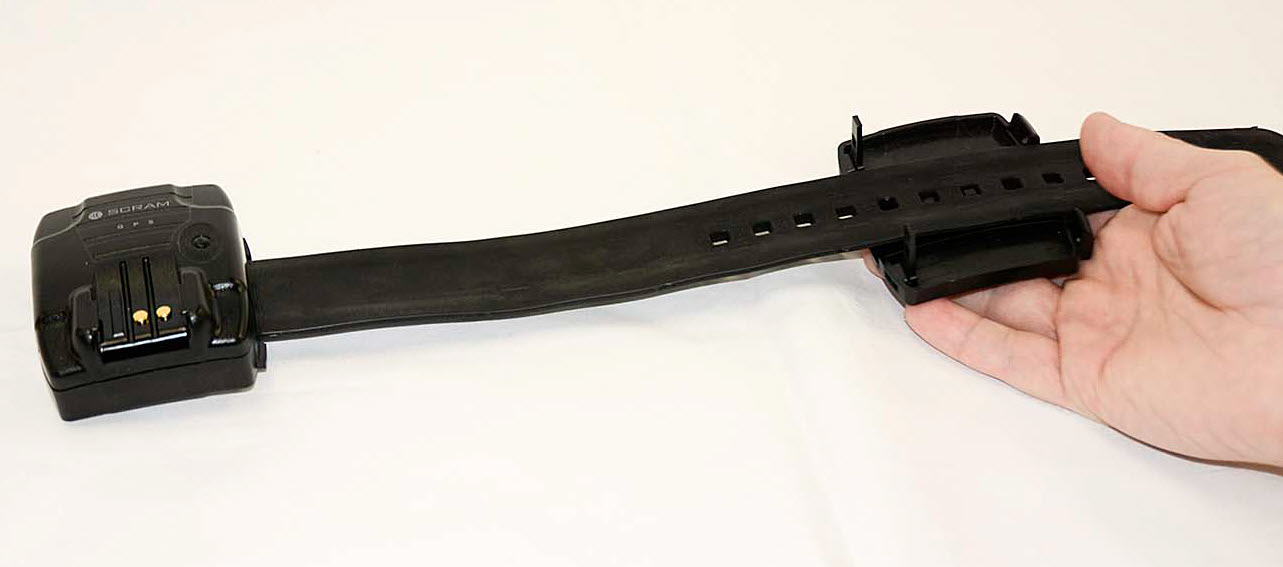
Proper Alignment of the Device Strap and Backplate
To ensure the backplate is oriented correctly for installation:
Place the bracelet face up on a desk with the strap on the right side.
Next, place the backplate under the strap with the large posts closest to the bracelet.
The farther away the backplate is positioned from the bracelet body, the larger the circumference of the strap.
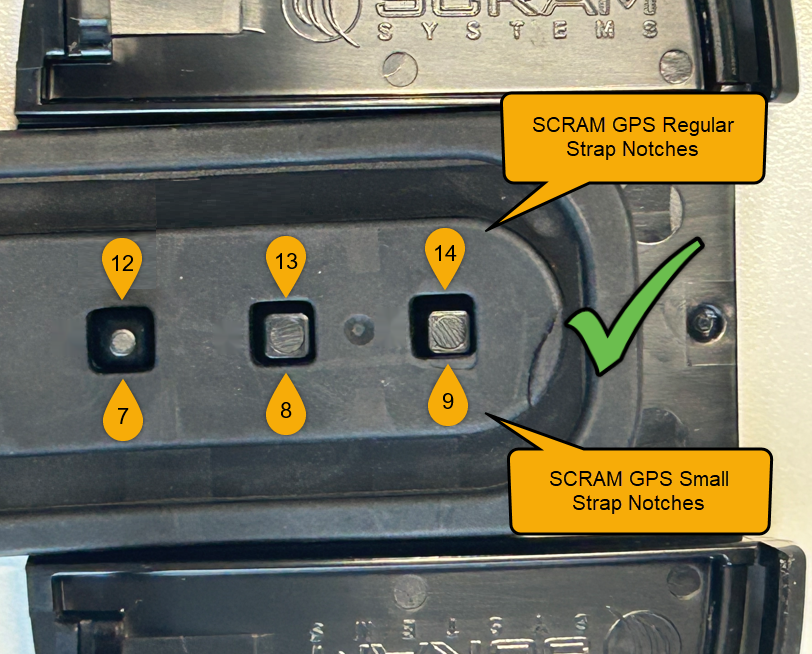
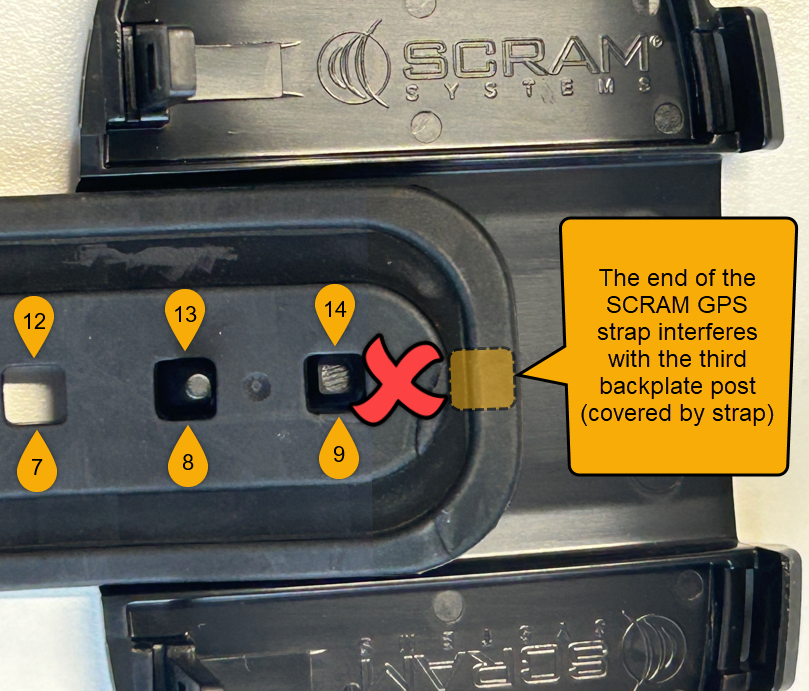
Proper Alignment of GPS Device Strap and Backplate
IMPORTANT!
There are nine sizing notches in a “small” (sometimes referred to as “juvenile”) SCRAM GPS strap, and 14 sizing notches in a “regular” (adult) SCRAM GPS strap. Ensure that the three raised pegs in the backplate fit into threeof the available sizing notches in the strap. DO NOT attempt to secure the strap on only the last two notchesof the strap (8 & 9 for small, or 13 & 14 for regular); otherwise the backplate will not close flush against the device casing and may result in tamper alerts being generated in SCRAMNET GPS.
Proper Positioning of the end of SCRAM GPS Straps on Backplate (click to enlarge)
Based on SCRAM GPS customer feedback, SCRAM Systems is introducing two new No Motion-related features in SCRAMNET GPS:
New ‘No Motion Cleared’ Alert for SCRAM GPS 9 Plus Devices
Ability to Include or Exclude No Motion Alerts from Alert Suspensions
SCRAMNET GPS deployments typically occur on Thursdays at 7:00 AM EST in the US, 10:00 PM AEST in Australia, and the following 12:00 AM EST (Friday) in Canada. Please refer to the official SCRAM Systems email communication associated with this release for more details. During the 15-minute deployment, you may not be able to access SCRAMNET GPS, but messages from the SCRAM GPS device will continue to be processed uninterrupted.
New ‘No Motion Cleared’ Alert for SCRAM GPS 9 Plus Devices
Based on customer feedback, we have added the ability to indicate when a No Motion alert on a SCRAM GPS 9 Plus device has auto-cleared. This displays a blue icon on the Dashboard and allows users to document how the alert was handled.
SCRAM GPS 9 Plus Device No Motion Alert Auto-Clear on the Dashboard (click to enlarge)
Administrators can enable this feature by selecting the No Motion Alert “AutoClear” checkbox in Account Notifications.
Activate No Motion Alert Auto-Clear on the Account Notifications Page (click to enlarge)
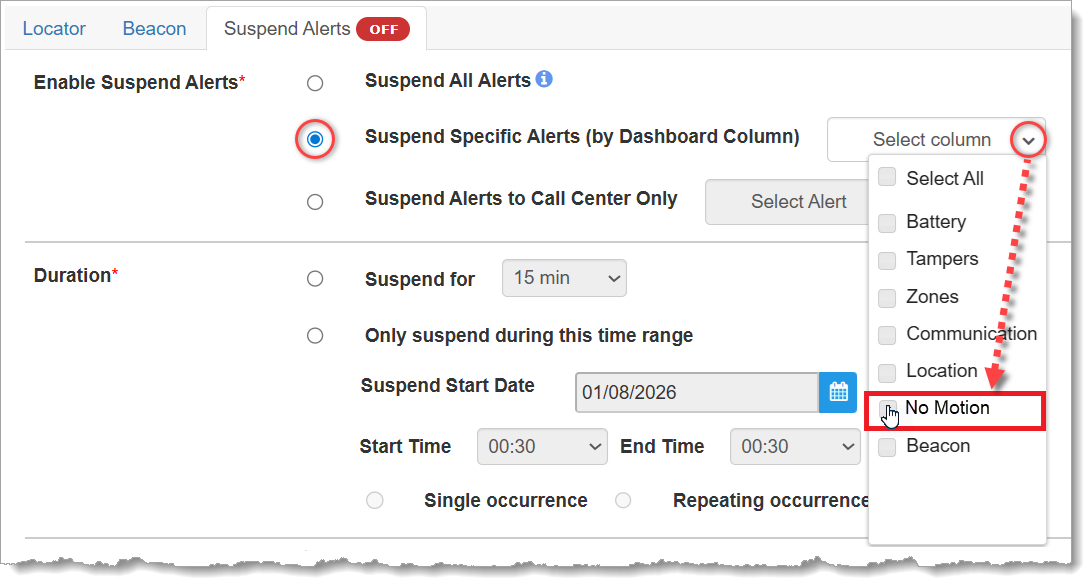
New No Motion Alert Suspension Feature
Under the suspend alerts section, SCRAMNET GPS users are now able to include or exclude No Motion alerts from the alert suspension process.
Include or Exclude No Motion Alerts from Alert Suspension (click to enlarge)
SCRAM Systems is introducing several new enhancements to the SCRAMNET GPS monitoring system. While many of the enhancements are either caseload-specific or back-end updates, two notable enhancements will be available to all SCRAM GPS customers:
New Icon to Indicate Wi-Fi points for SCRAM GPS 9 Plus Devices
Account Level Setting to Set Default for Client SSN Checkbox
SCRAMNET GPS deployments typically occur on Thursdays at 7:00 AM EST in the US, 10:00 PM AEST in Australia, and the following 12:00 AM EST (Friday) in Canada. Please refer to the official SCRAM Systems email communication associated with this release for more details. During the 15-minute deployment, you may not be able to access SCRAMNET GPS, but messages from the SCRAM GPS device will continue to be processed uninterrupted.
New Icon to Indicate Wi-Fi points for SCRAM GPS 9 Plus Devices
Location points that are derived from Wi-Fi hotspots instead of through GPS or Cell Tower Points (CTP) will now be displayed with a blue icon. This will allow users to immediately identify the source of the location points without drilling down.
Wi-Fi Points Display in Blue
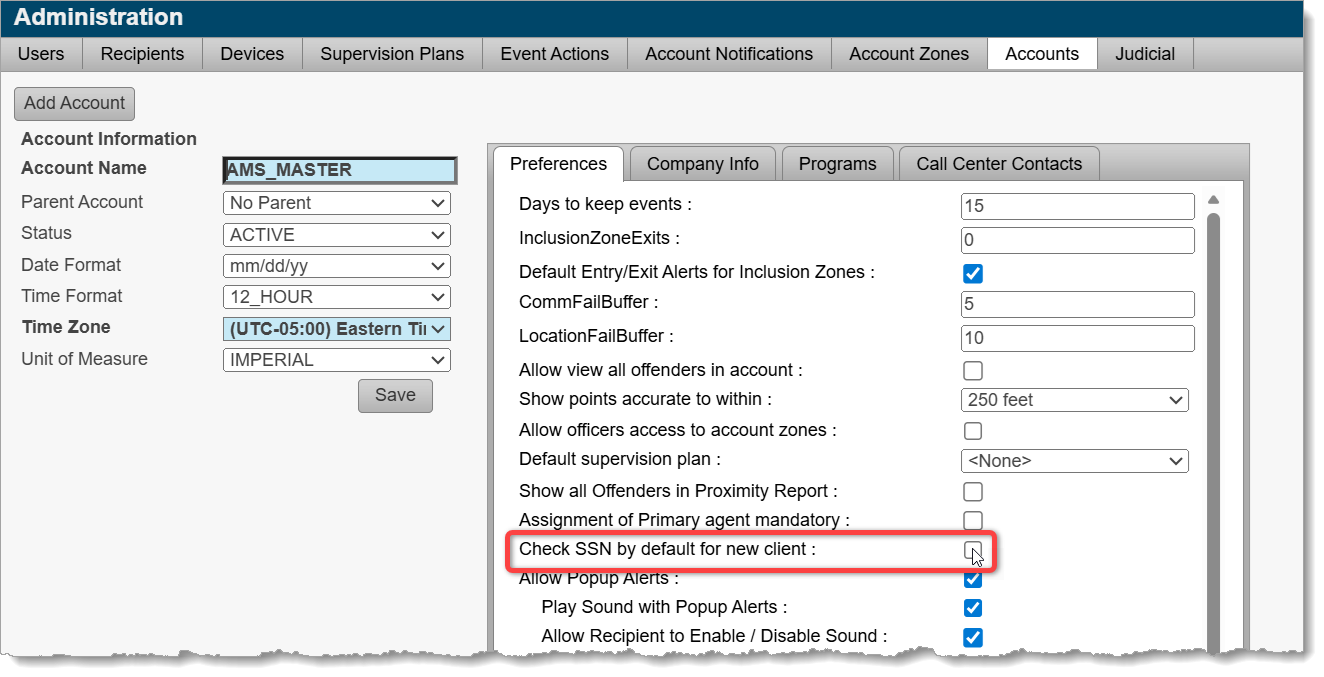
Account Level Setting to Set Default for Client SSN Checkbox
With this release, Administrators may select a checkbox at the account level that ensures that all new clients added will have the SSN checkbox enabled. Enabling this checkbox encrypts the social security number of the client in reports and provides an additional level of protection for that information.
New Checkbox: Check SSN by default for new client (click to enlarge)
After extensive research and testing, SCRAM Systems has decided to move away from its previous line of device cleaning agents in favor of a simplified – but equally effective – approach. Effective immediately, SCRAM Systems recommends all SCRAM devices be cleaned and disinfected with 3% Hydrogen Peroxide (H2O2) Solution. Yes, the stuff in the brown bottle you can get at any local supermarket or drug store.
When used correctly and allowed to remain on surfaces for 10-15 minutes, 3% Hydrogen Peroxide solution is an effective disinfectant, but without the harsh fumes or smell associated with the previous selection of disinfectants. For this reason, 3% Hydrogen Peroxide solution is now the only cleaner approved by SCRAM Systems.
Finish Your Existing Stock of Cleaners
Although SCRAM Systems now recommends 3% Hydrogen Peroxide solution as its only approved cleaning and disinfecting agent for SCRAM devices, you are still welcome to use up your existing stock of previously-approved alcohol-free cleaning agents. Once those previously-purchased cleaning and disinfecting agents are depleted, however, please do not replenish them, and instead make the switch to 3% Hydrogen Peroxide solution.
Where to Get It
3% Hydrogen Peroxide solution is available at almost any local supermarket or drug store, and you are welcome to purchase bottles of it from those local outlets. SCRAM Systems also has supplies in stock and available to order from the SCRAMNET Equipment Order Form or through your SCRAM Systems account representative.
Brown Bottle Benefits
How to Use It
SCRAM Systems has updated all of its training and help resources to reflect the change. Additionally, the Quick Reference Guides (booklets) for all products have also been updated. Please visit the SCRAM Device Cleaning page on the SCRAM Systems Help and Support site to navigate to cleaning help for your specific device and situation. You may also download our all-in-one Disinfect and Clean SCRAM Equipment “quick sheet,” which includes a one-page matrix on the last page that summarizes the cleaning steps for each device – perfect for printing off and posting at a cleaning station!
Starting on December 2nd, 2025, and continuing through December 18th, SCRAM Systems® will release enhancements for your Remote Breath Pro (RB Pro) Caseload. The first enhancement focuses on devices currently in “Storage Mode.” The second enhancement provides the client with four (4) options to establish and manage Wi-Fi networks from the RB Pro device’s menu.
Included in this enhancement:
Auto “Power off” functionality for devices in Storage Mode.
RB Pro menu options for client-accessible Wi-Fi management.
Contact your Account Manager for details on your devices’ firmware enhancement dates.
Auto “Power off” functionality
With this enhancement, when devices in “Storage Mode” are powered on to check the battery level status, they will automatically power off – if not manually powered off – after 30 minutes of being cycled on. This will conserve battery levels between client assignments.
RB Pro Wi-Fi Menu Options
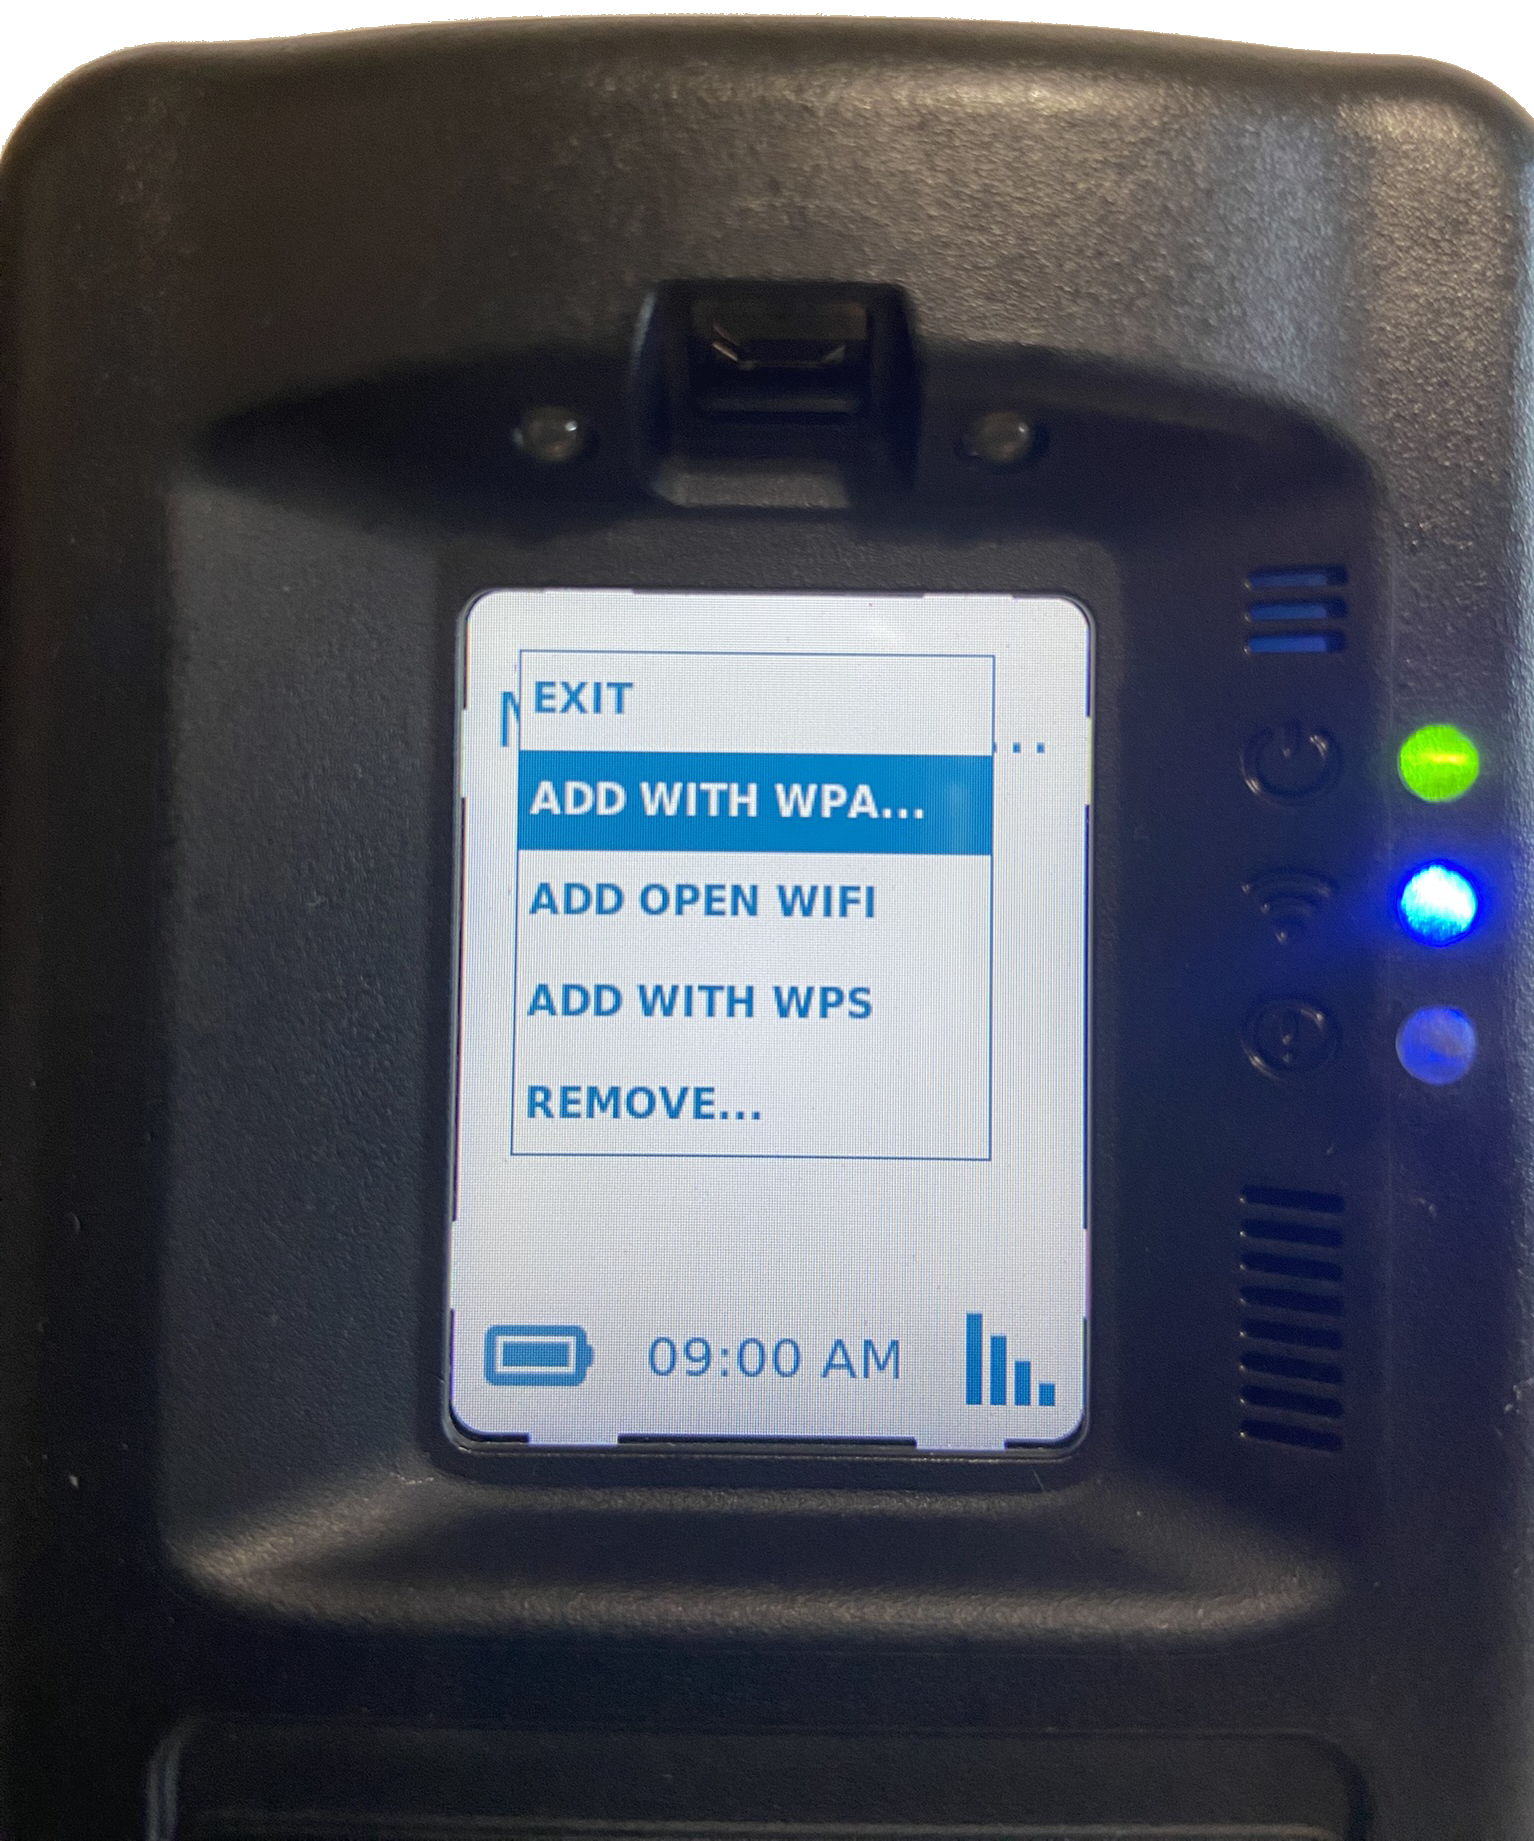
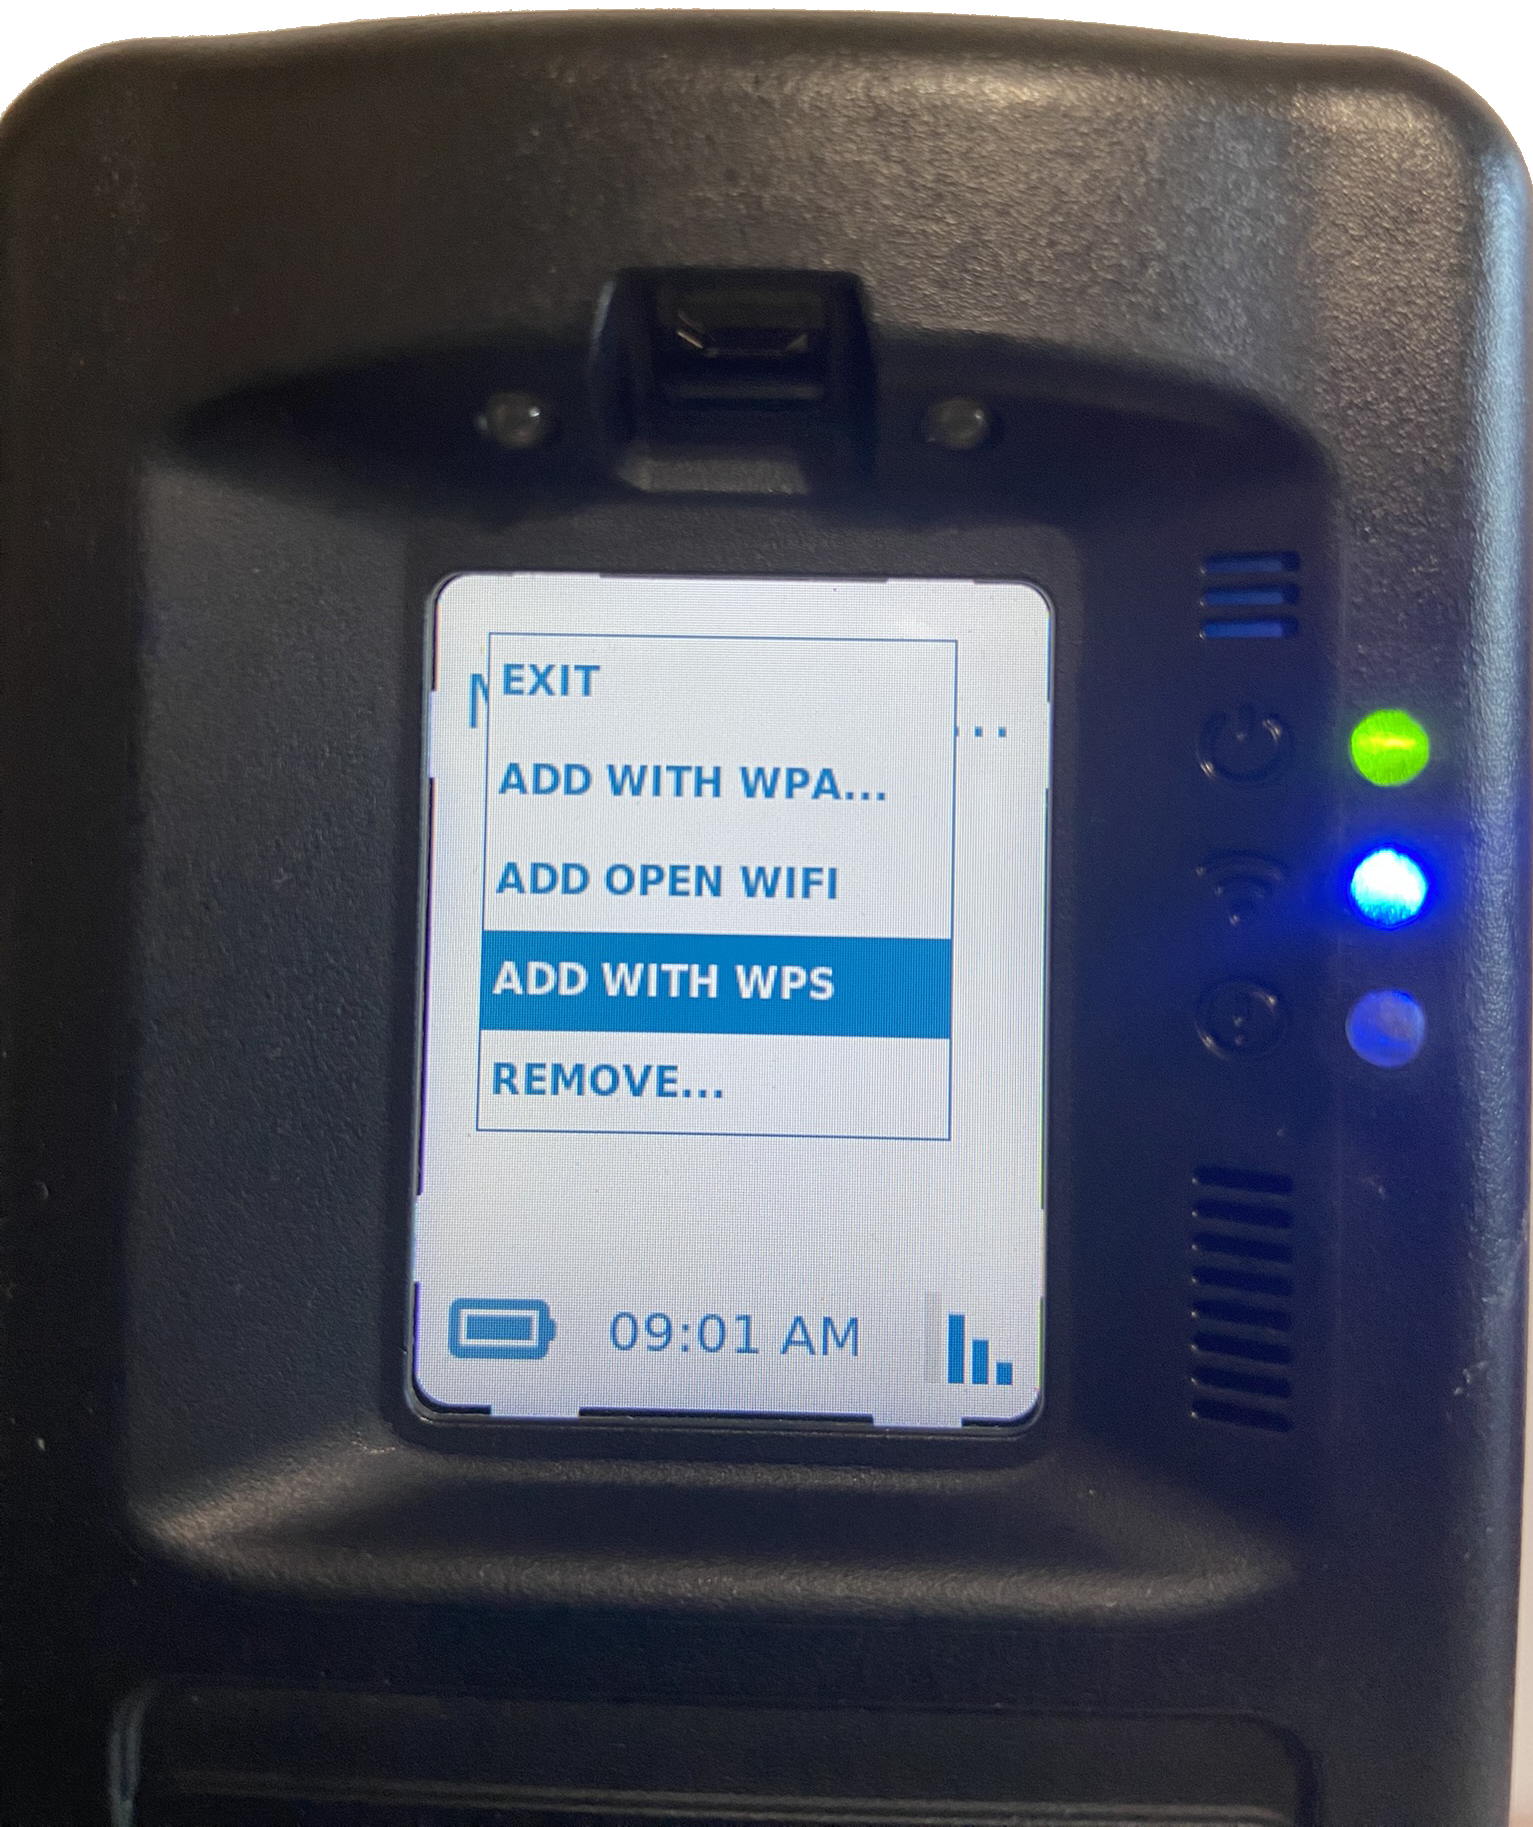
Currently, to connect to their Wi-Fi network, clients must navigate to wifisetup.scramsystems.com and enter their Wi-Fi network name and device serial number. Additionally, their RB Pro device must have a good cellular connection for the Wi-Fi setup to work. To simplify this process and provide additional options for connecting and managing client-accessible Wi-Fi networks, the client may access the RB Pro’s Wi-Fi Setup menu options. On the Wi-Fi setup menu, the client may select :
Add with WPA (Wireless Protected Access)
Add Open WiFi (Unprotected Wireless Access)
Add with WPS (Wireless Protected Setup)
Remove (remove a client-added Wi-Fi network)
Once the RB Pro device has successfully connected to the Wi-Fi network, it will automatically switch back to a cellular network after 60 minutes, regardless of the cellular network’s signal strength. Moving forward, the device will only connect to the Wi-Fi network when it cannot communicate data over the cellular network.
The RB Pro device will only connect to Wi-Fi access points that use a 2.4 GHz band frequency.
There is no limit to the number of Wi-Fi networks the client may add.
Wi-Fi networks (SSIDs) that contain quotation marks (‘ or “), spaces, or dots (.) may cause issues when trying to connect to the RB Pro device. SCRAM Systems recommends either not using these networks, or renaming them.
Connect to a Client’s Wi-Fi Network:
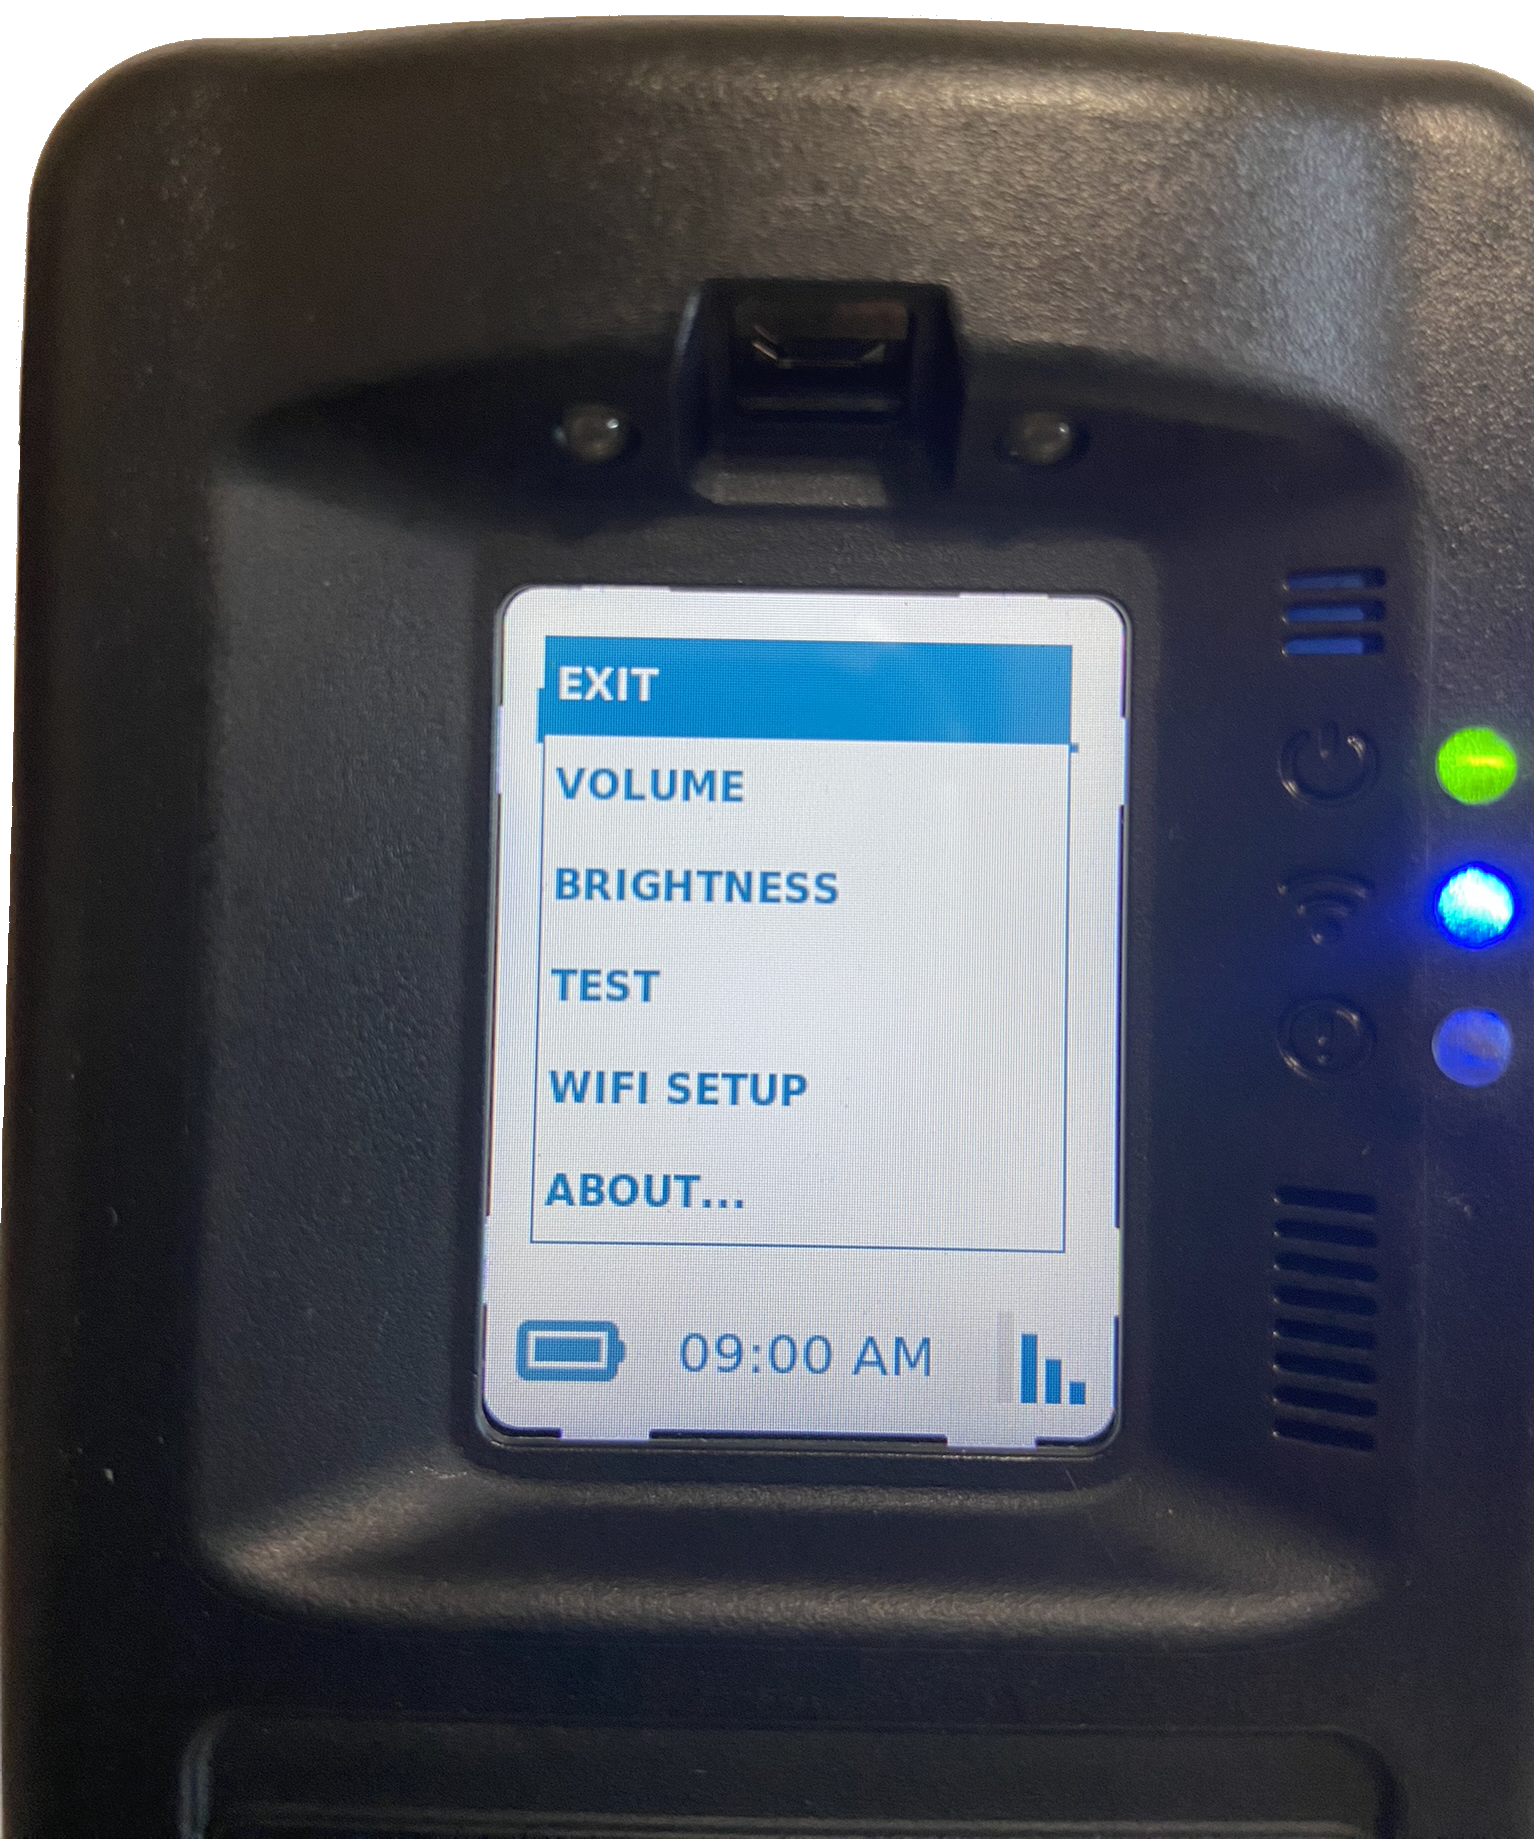
Start by accessing the RB Pro Menu.
Use the up/down buttons on the RB Pro to highlight the WIFI SETUP option and then press the select button.
RB Pro Menu Options – click to enlarge
Wi-Fi Setup Option – click to enlarge
On the Wi-Fi option screen, select one of the options available and follow the instructions for connecting
RB Pro Menu Wi-Fi Setup Options – click to enlarge
Connect using the “Add with WPA” Option
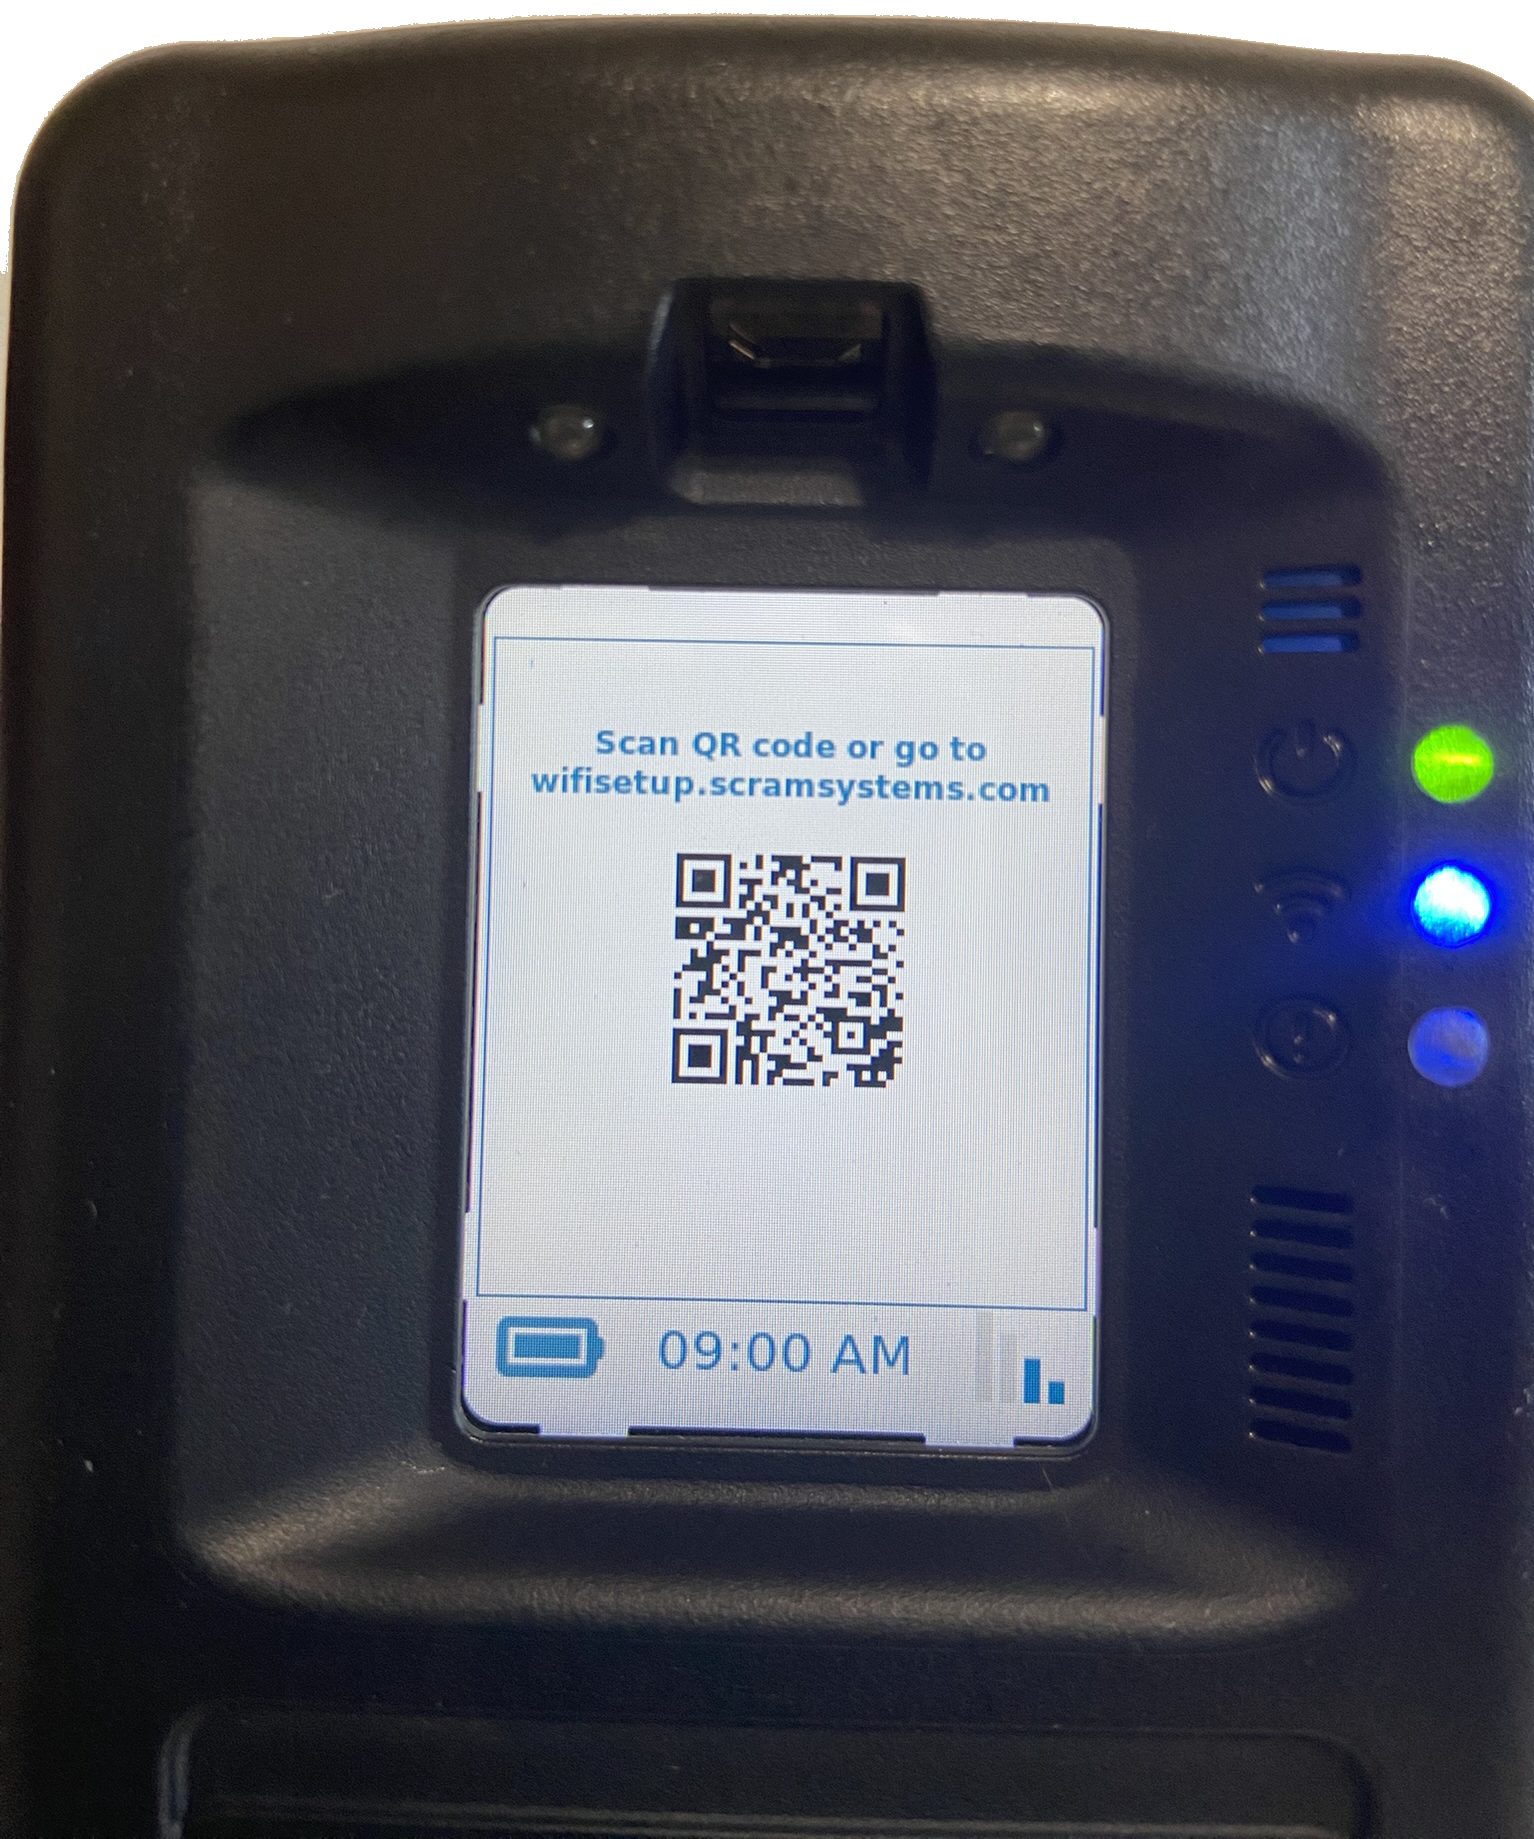
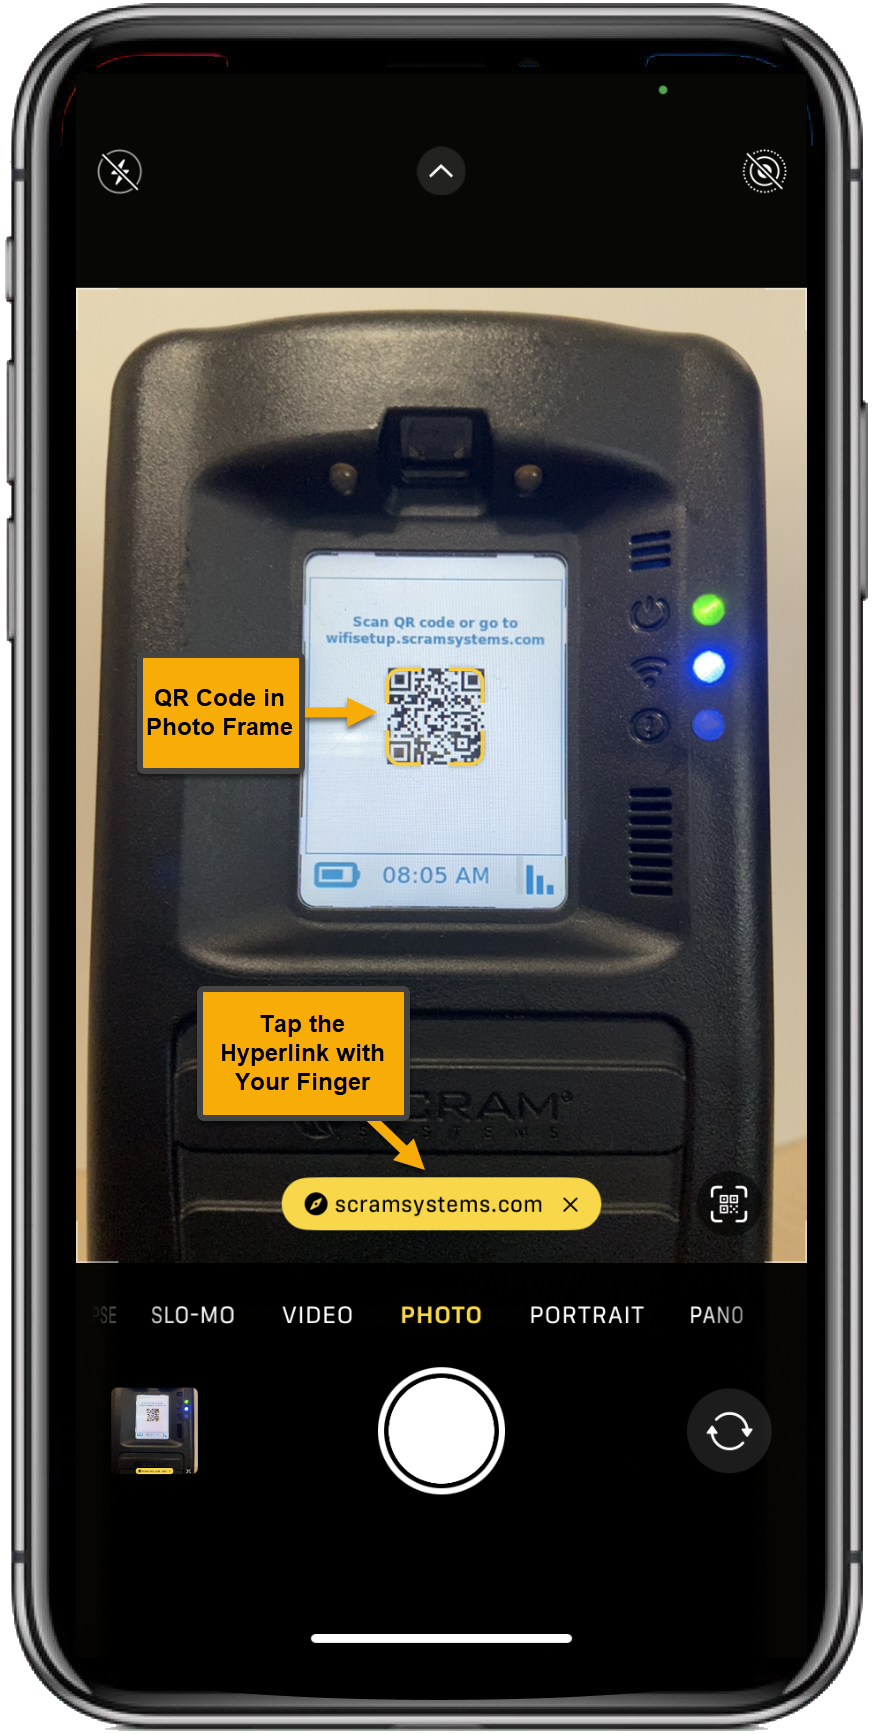
Once the “Add With WPA” option is selected on the RB Pro, the screen will display instructions for accessing the wifisetup.scramsystems.com by either entering in the web address or using the QR code displayed.
Add With WPA Option Highlighted – click to enlarge
QR Code for Wifisetup.scramsystems.com – click to enlarge
Connect using the QR code:
Using a smartphone, open the camera option and bring the QR code into the photo frame.
On the smartphone’s screen, tap the revealed hyperlink for “scramsystems.com.”
Viewing RB Pro’s Screen and QR Code – click to enlarge
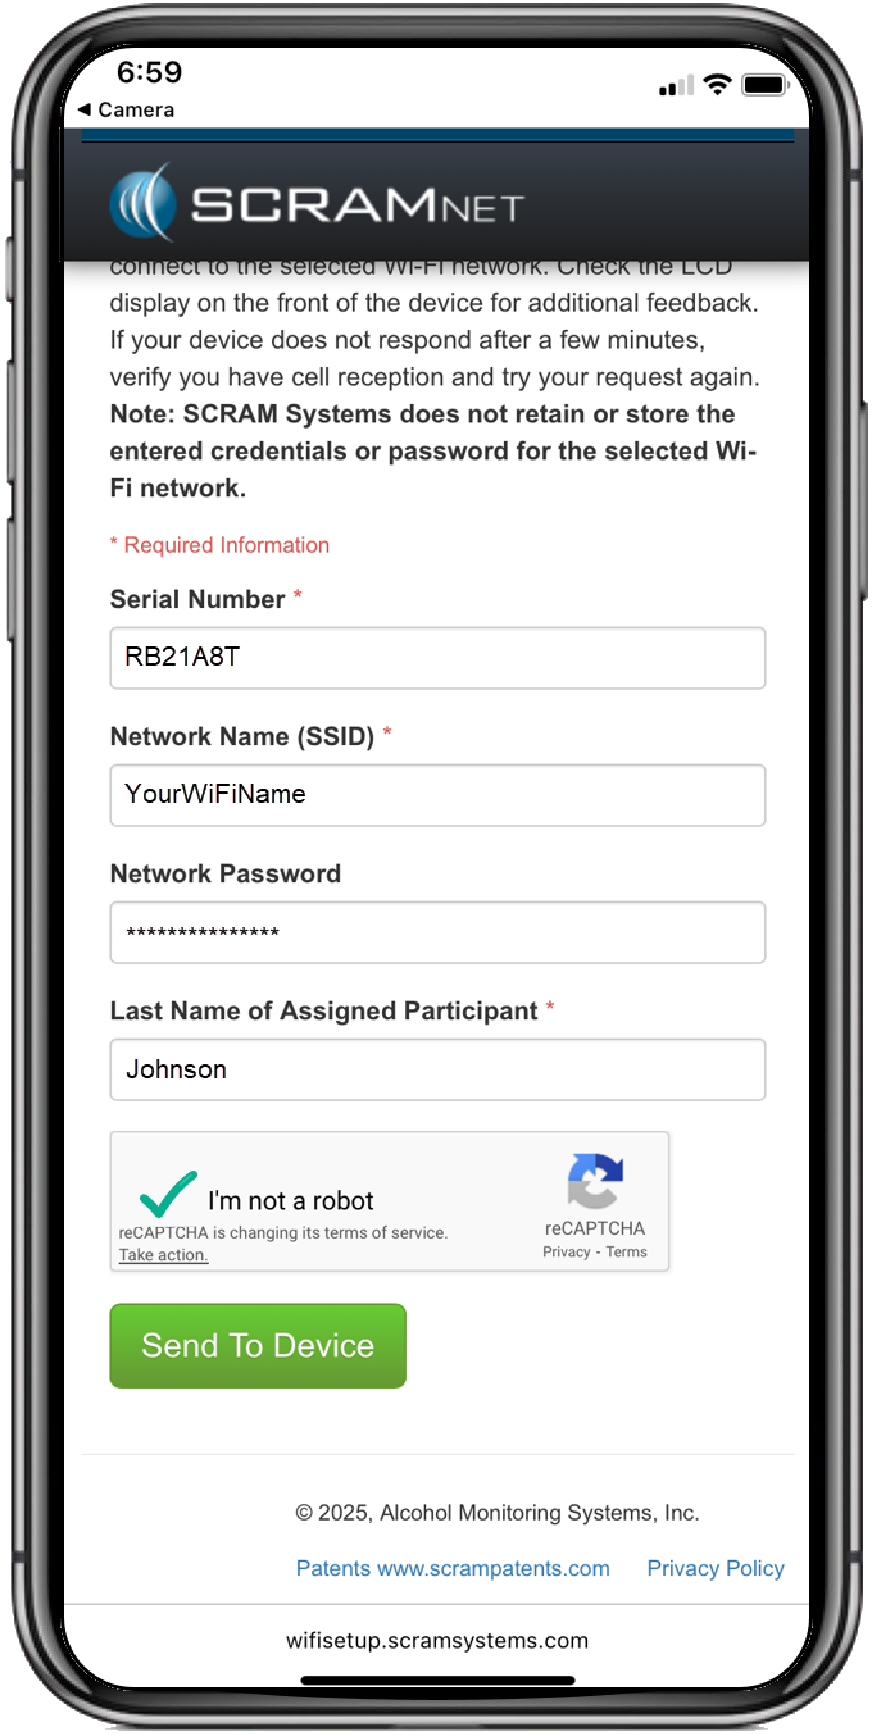
An internet page for SCRAM System Wi-Fi Setup will open on the smartphone. Enter the required information and complete the captcha requirement.
Wi-Fi Setup Web Page- click to enlarge
Wi-Fi Setup Details Entered and Captcha Completed – click to enlarge
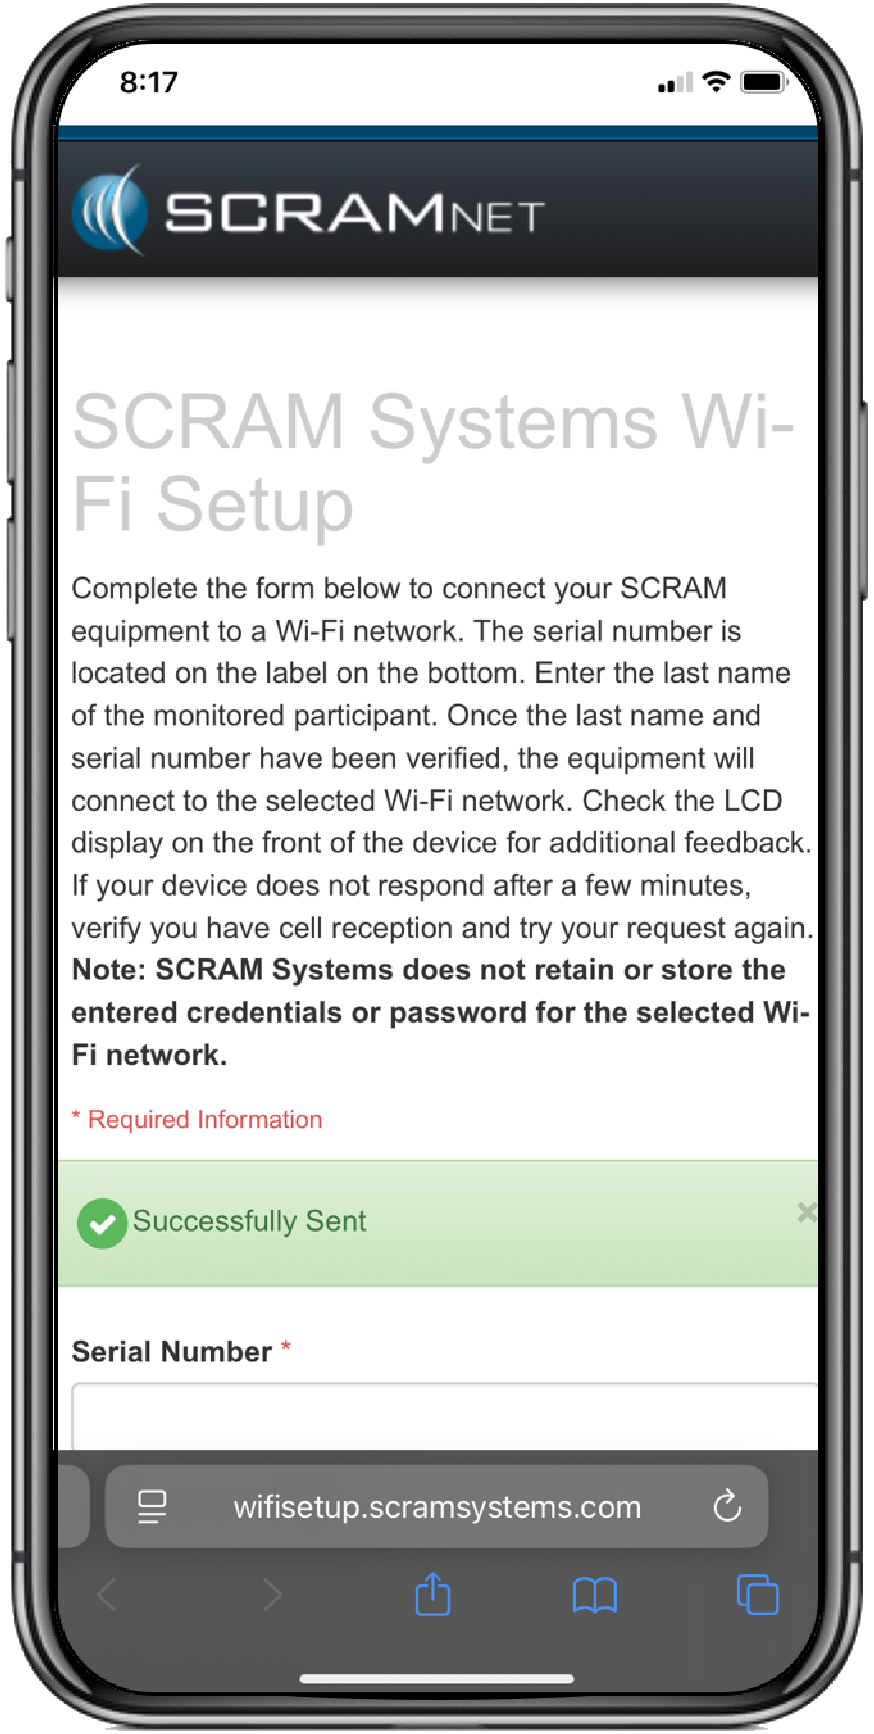
Tap the Send to Device button.
A Successfully Sent banner will be displayed on the smartphone’s screen.
Wi-Fi Setup Successfully Banner – click to enlarge
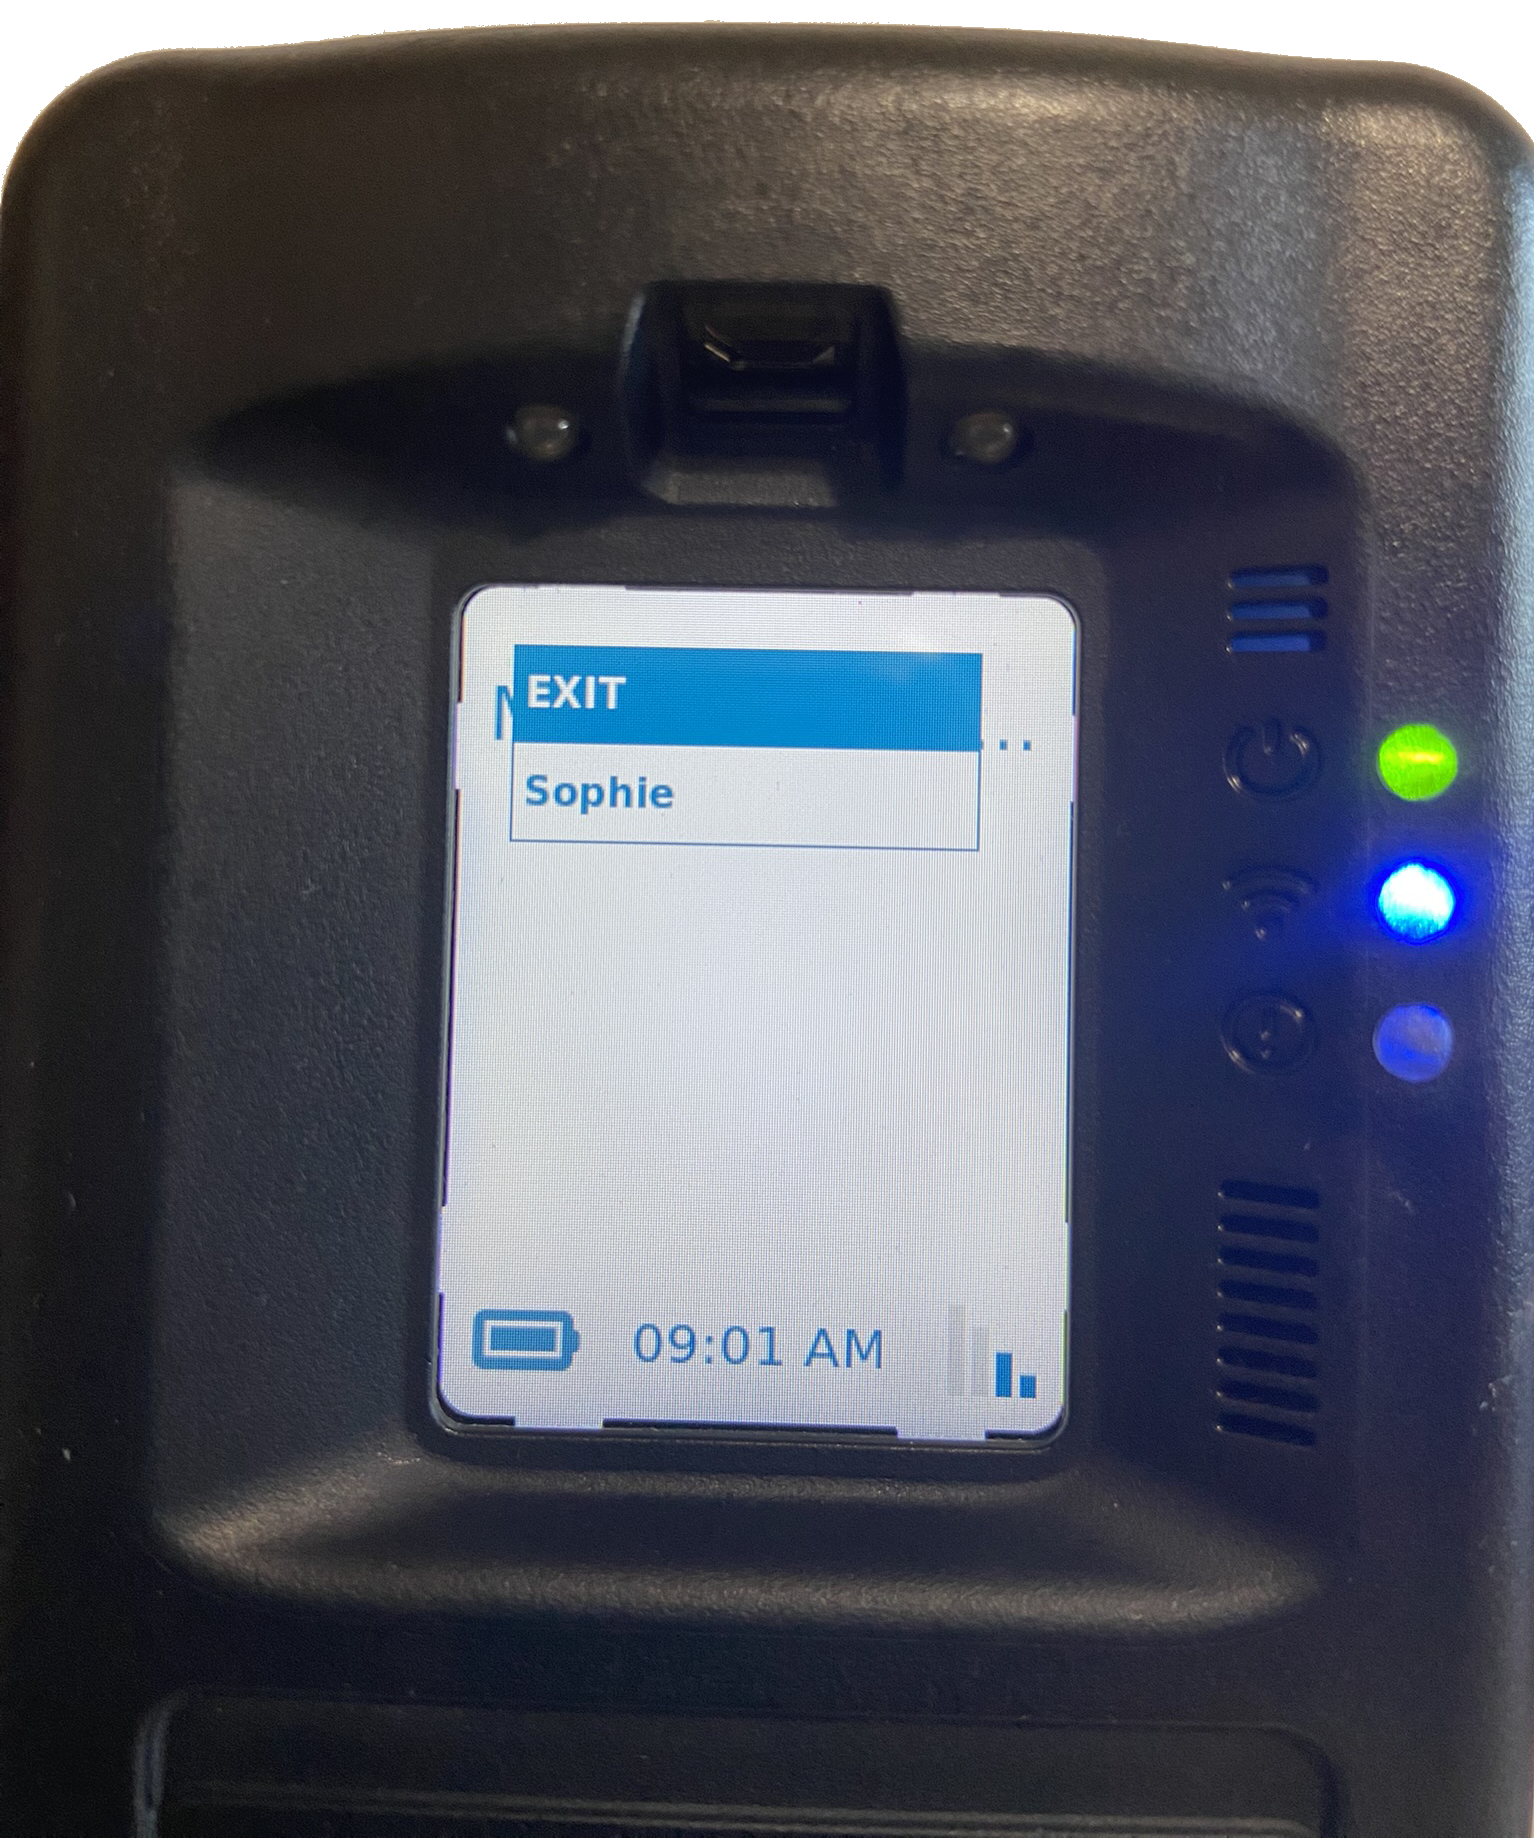
Once the Wi-Fi’s information has been communicated to the RB Pro over a cellular network connection, the RB Pro’s screen will display the Wi-Fi icon in the lower right corner. After 60 minutes, it will automatically switch back to a cellular network, regardless of the cellular network’s signal strength. Moving forward, the device will only connect to the Wi-Fi network when it cannot communicate data over the cellular network.
For the RB Pro device to receive Wi-Fi network information, it must first connect to the cellular network. It may be necessary for a client to relocate the device to an area with a cellular network connection.
Connect using the “Add Open WiFi” Option
Using the up/down buttons on the RB Pro device, highlight the “open Wi-Fi” network you wish to connect to.
Once highlighted, press the “select” button on the RB Pro device.
Add Open Wi-Fi Option Highlighted – click to enlarge
Open Wi-Fi Screen and Available Options – click to enlarge
After a few minutes, the RB Pro’s screen will display the Wi-Fi connection in the lower right corner. After 60 minutes, it will automatically switch back to a cellular network, regardless of the cellular network’s signal strength. Moving forward, the device will only connect to the Wi-Fi network when it cannot communicate data over the cellular network.
A cellular network connection is not required to connect the RB Pro device to an “open Wi-Fi” network.
When connecting to an “open Wi-Fi” network, if the network requires you to acknowledge its terms and conditions or if you must enter additional data before accessing the network, the RB Pro cannot be connected to that open wi-fi network.
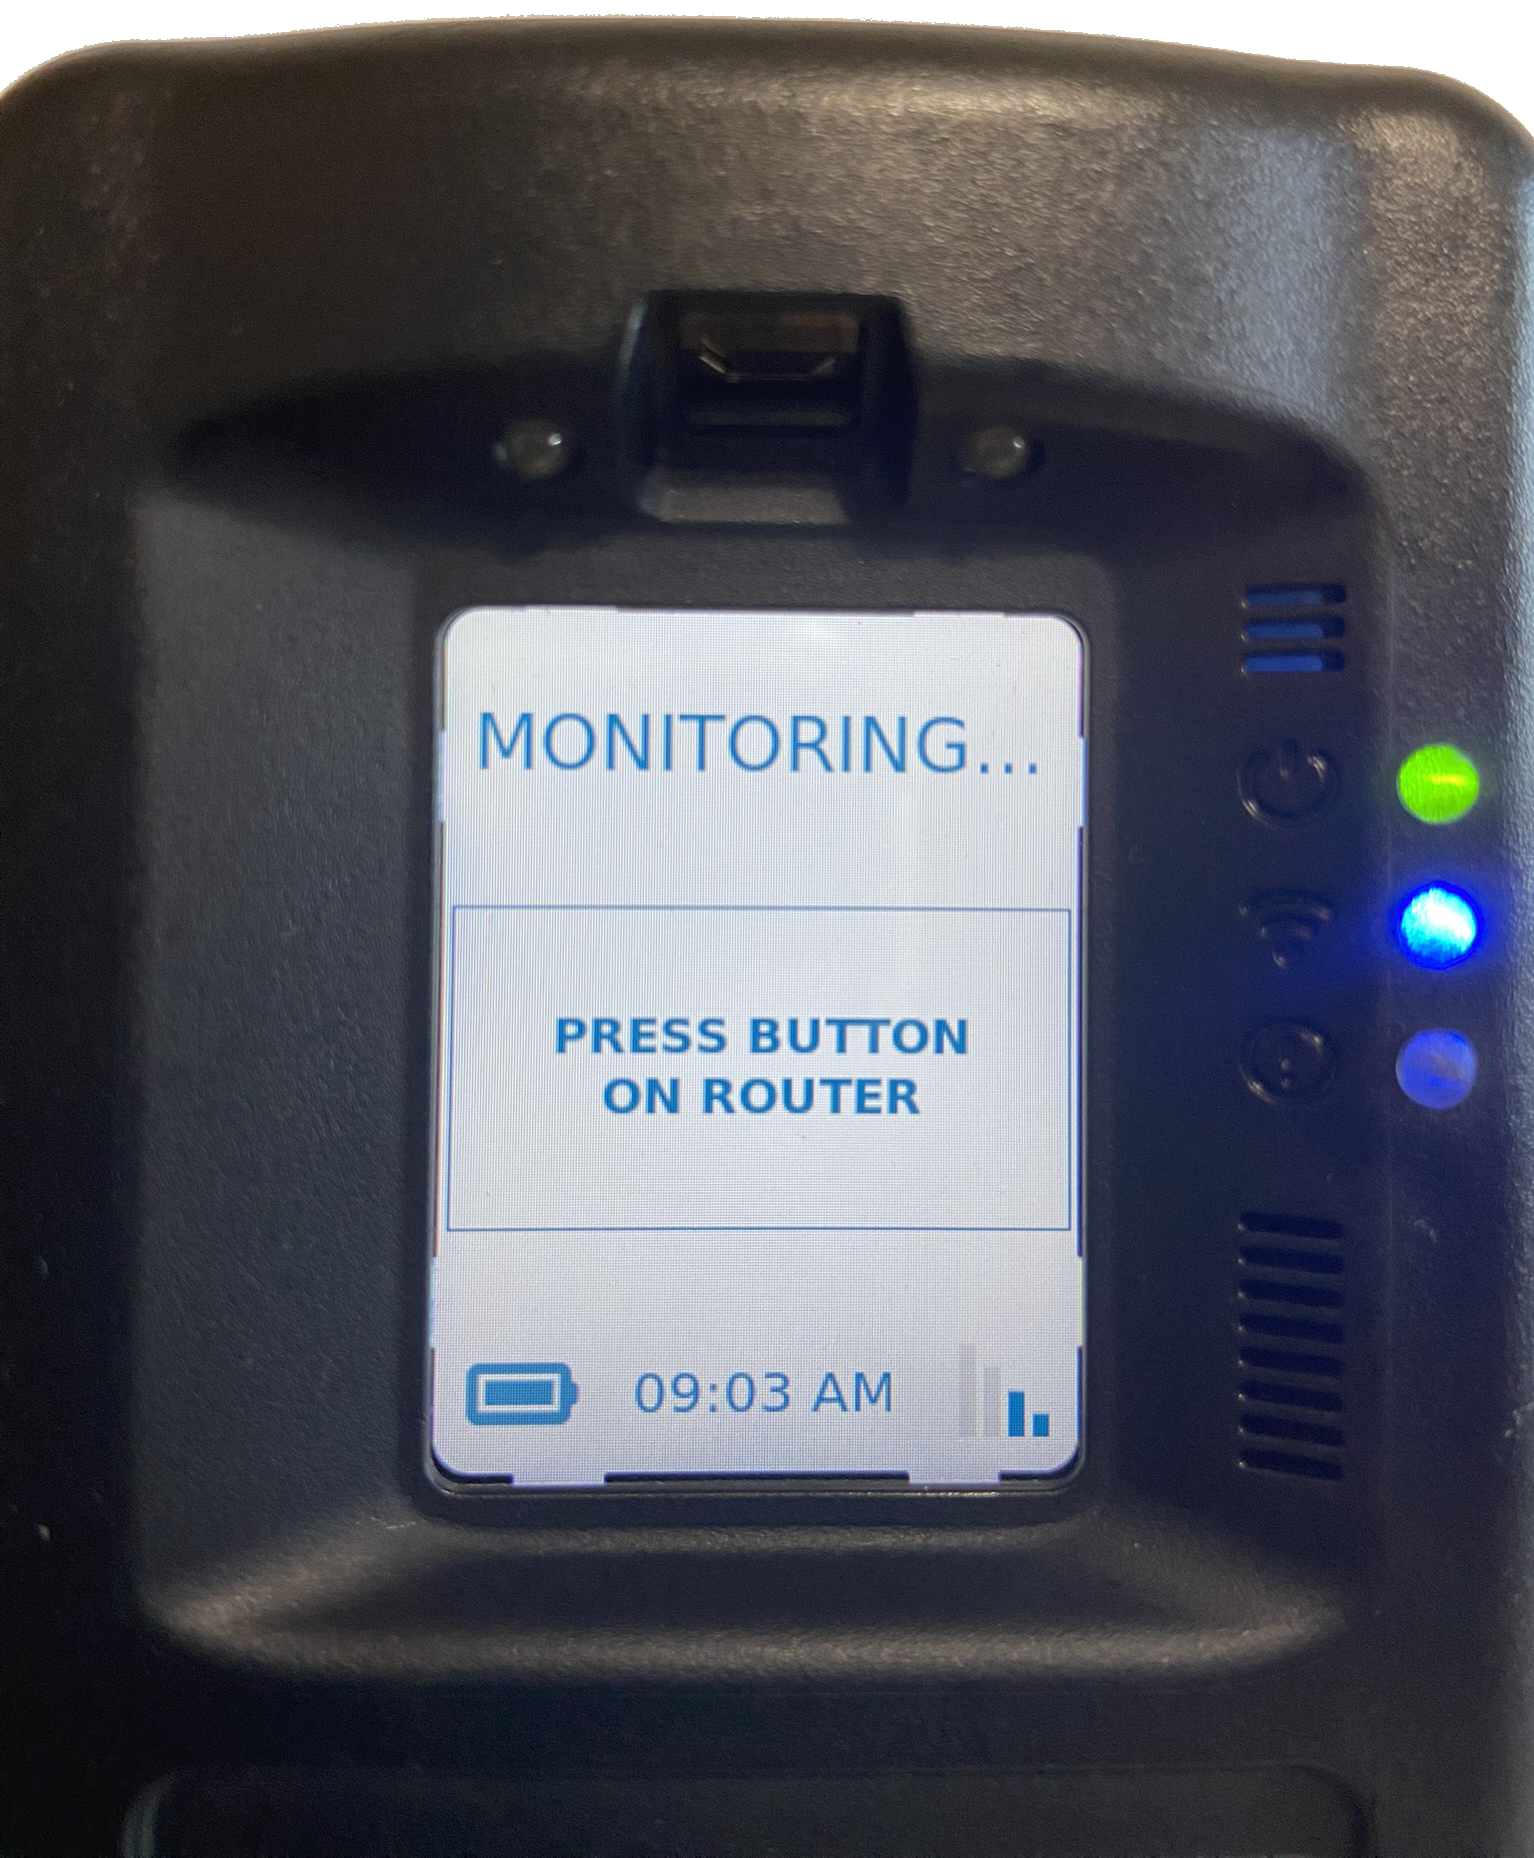
Connect using the “Add With WPS” Option
Once the “Add With WPS” option is selected on the RB Pro device, instruct the client to locate the WPS button on their modem or router and press that button.
Add with WPS Option Highlighted – click to enlarge
WPS Set Up On Screen Instruction – click to enlarge
After a few minutes, the RB Pro’s screen will display the Wi-Fi connection in the lower right corner. After 60 minutes, it will automatically switch back to a cellular network, regardless of the cellular network’s signal strength. Moving forward, the device will only connect to the Wi-Fi network when it cannot communicate data over the cellular network.
A cellular network connection is not required to connect the client’s Wi-Fi network to the RB Pro Device when using the Add with WPS option.
The “Press Button on Router” screen will remain for approximately two (2) minutes. After which, the screen will update to Monitoring, and the device will go into “sleep” mode.
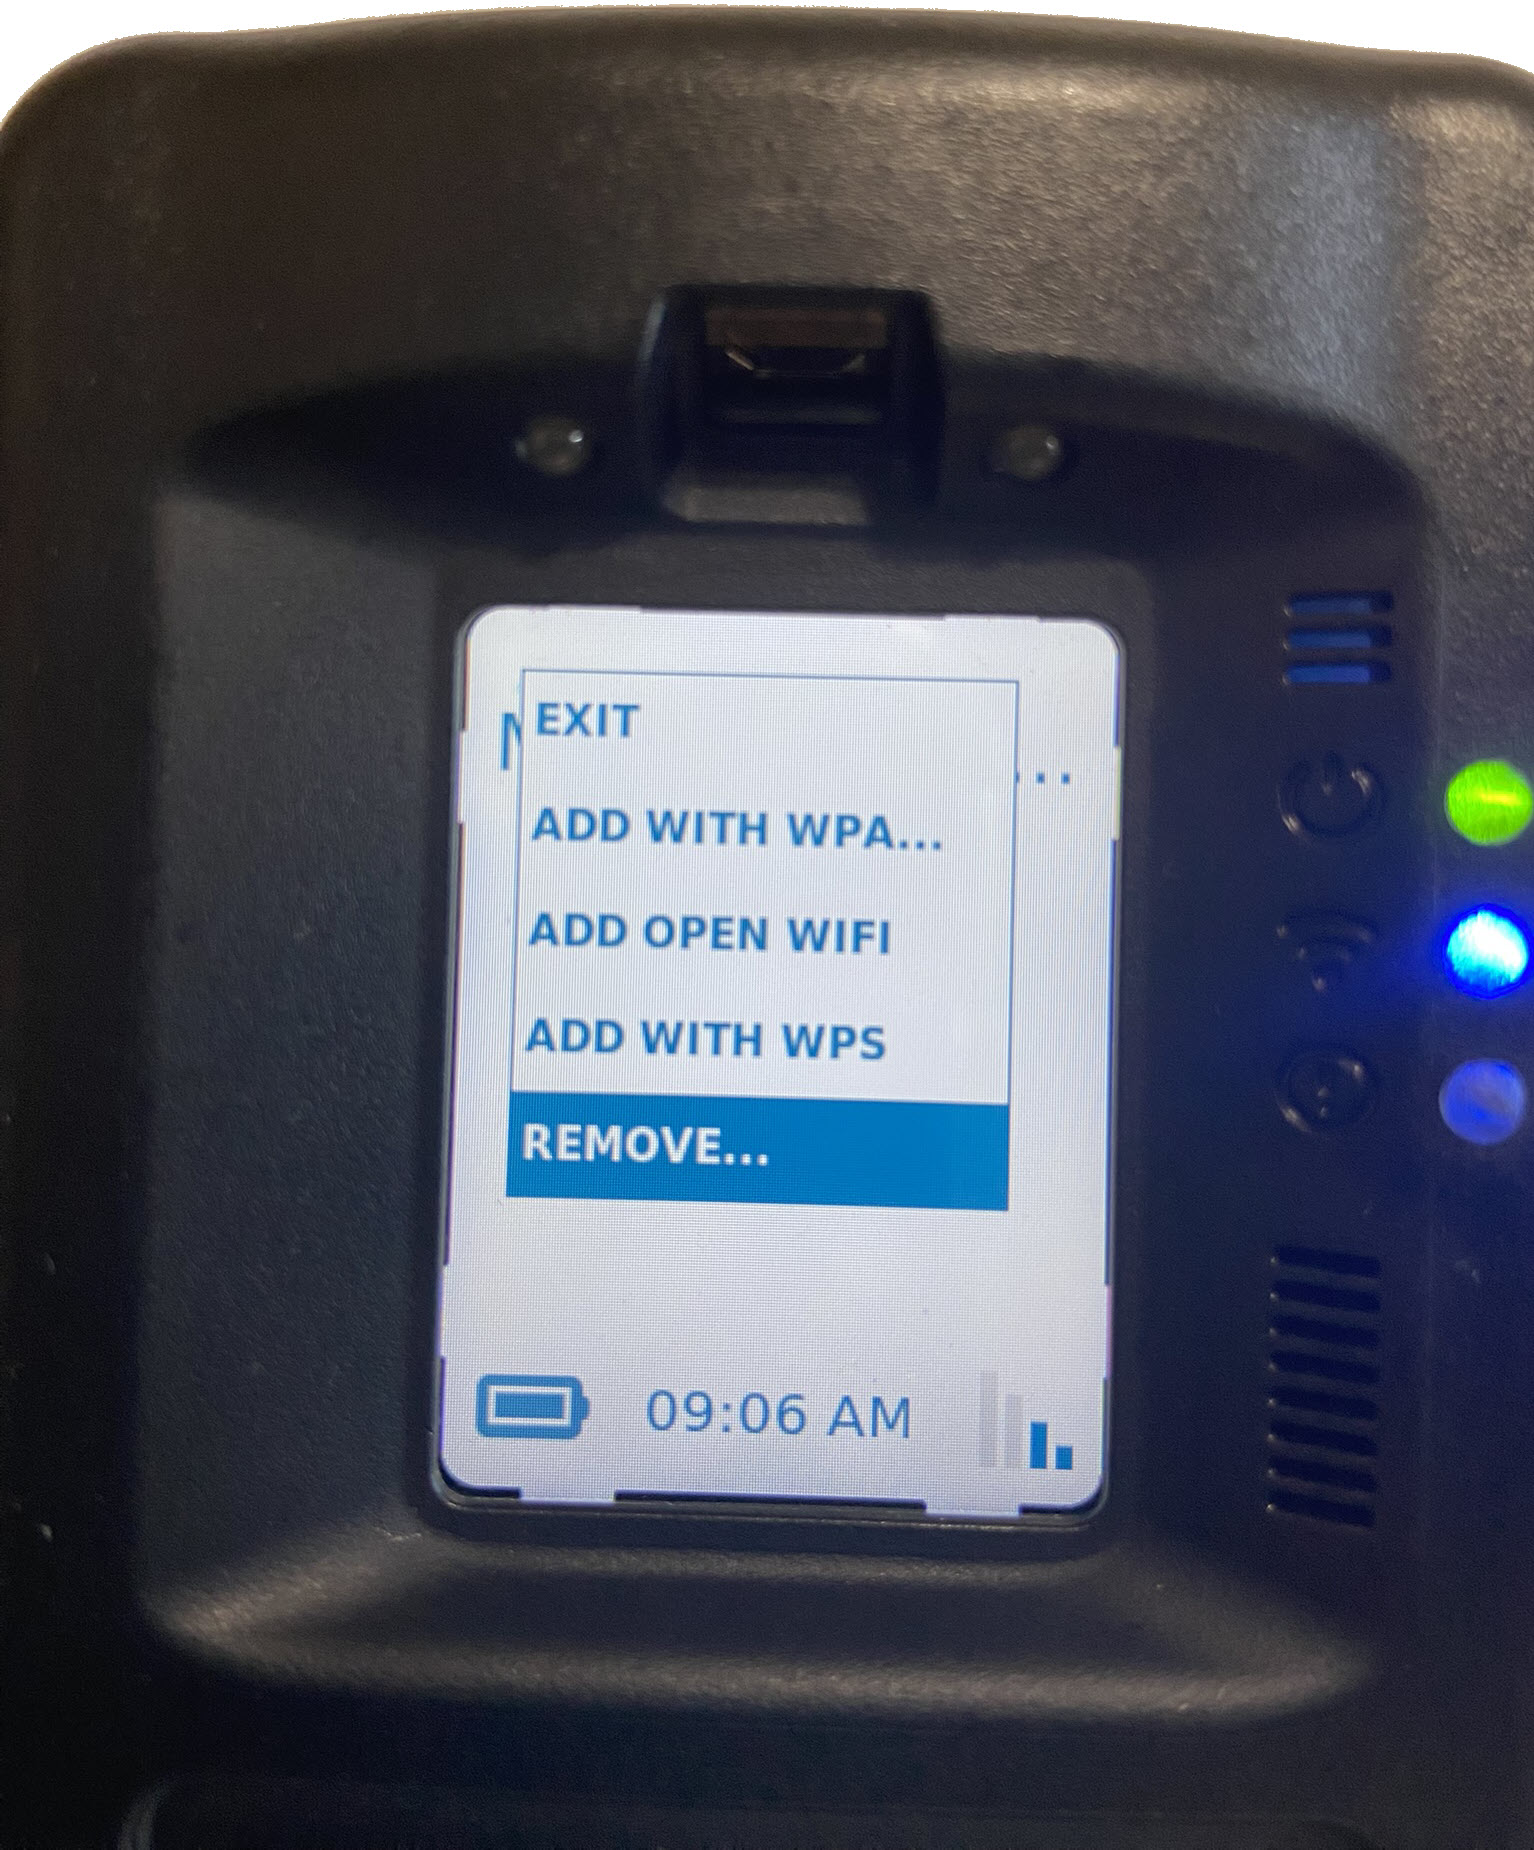
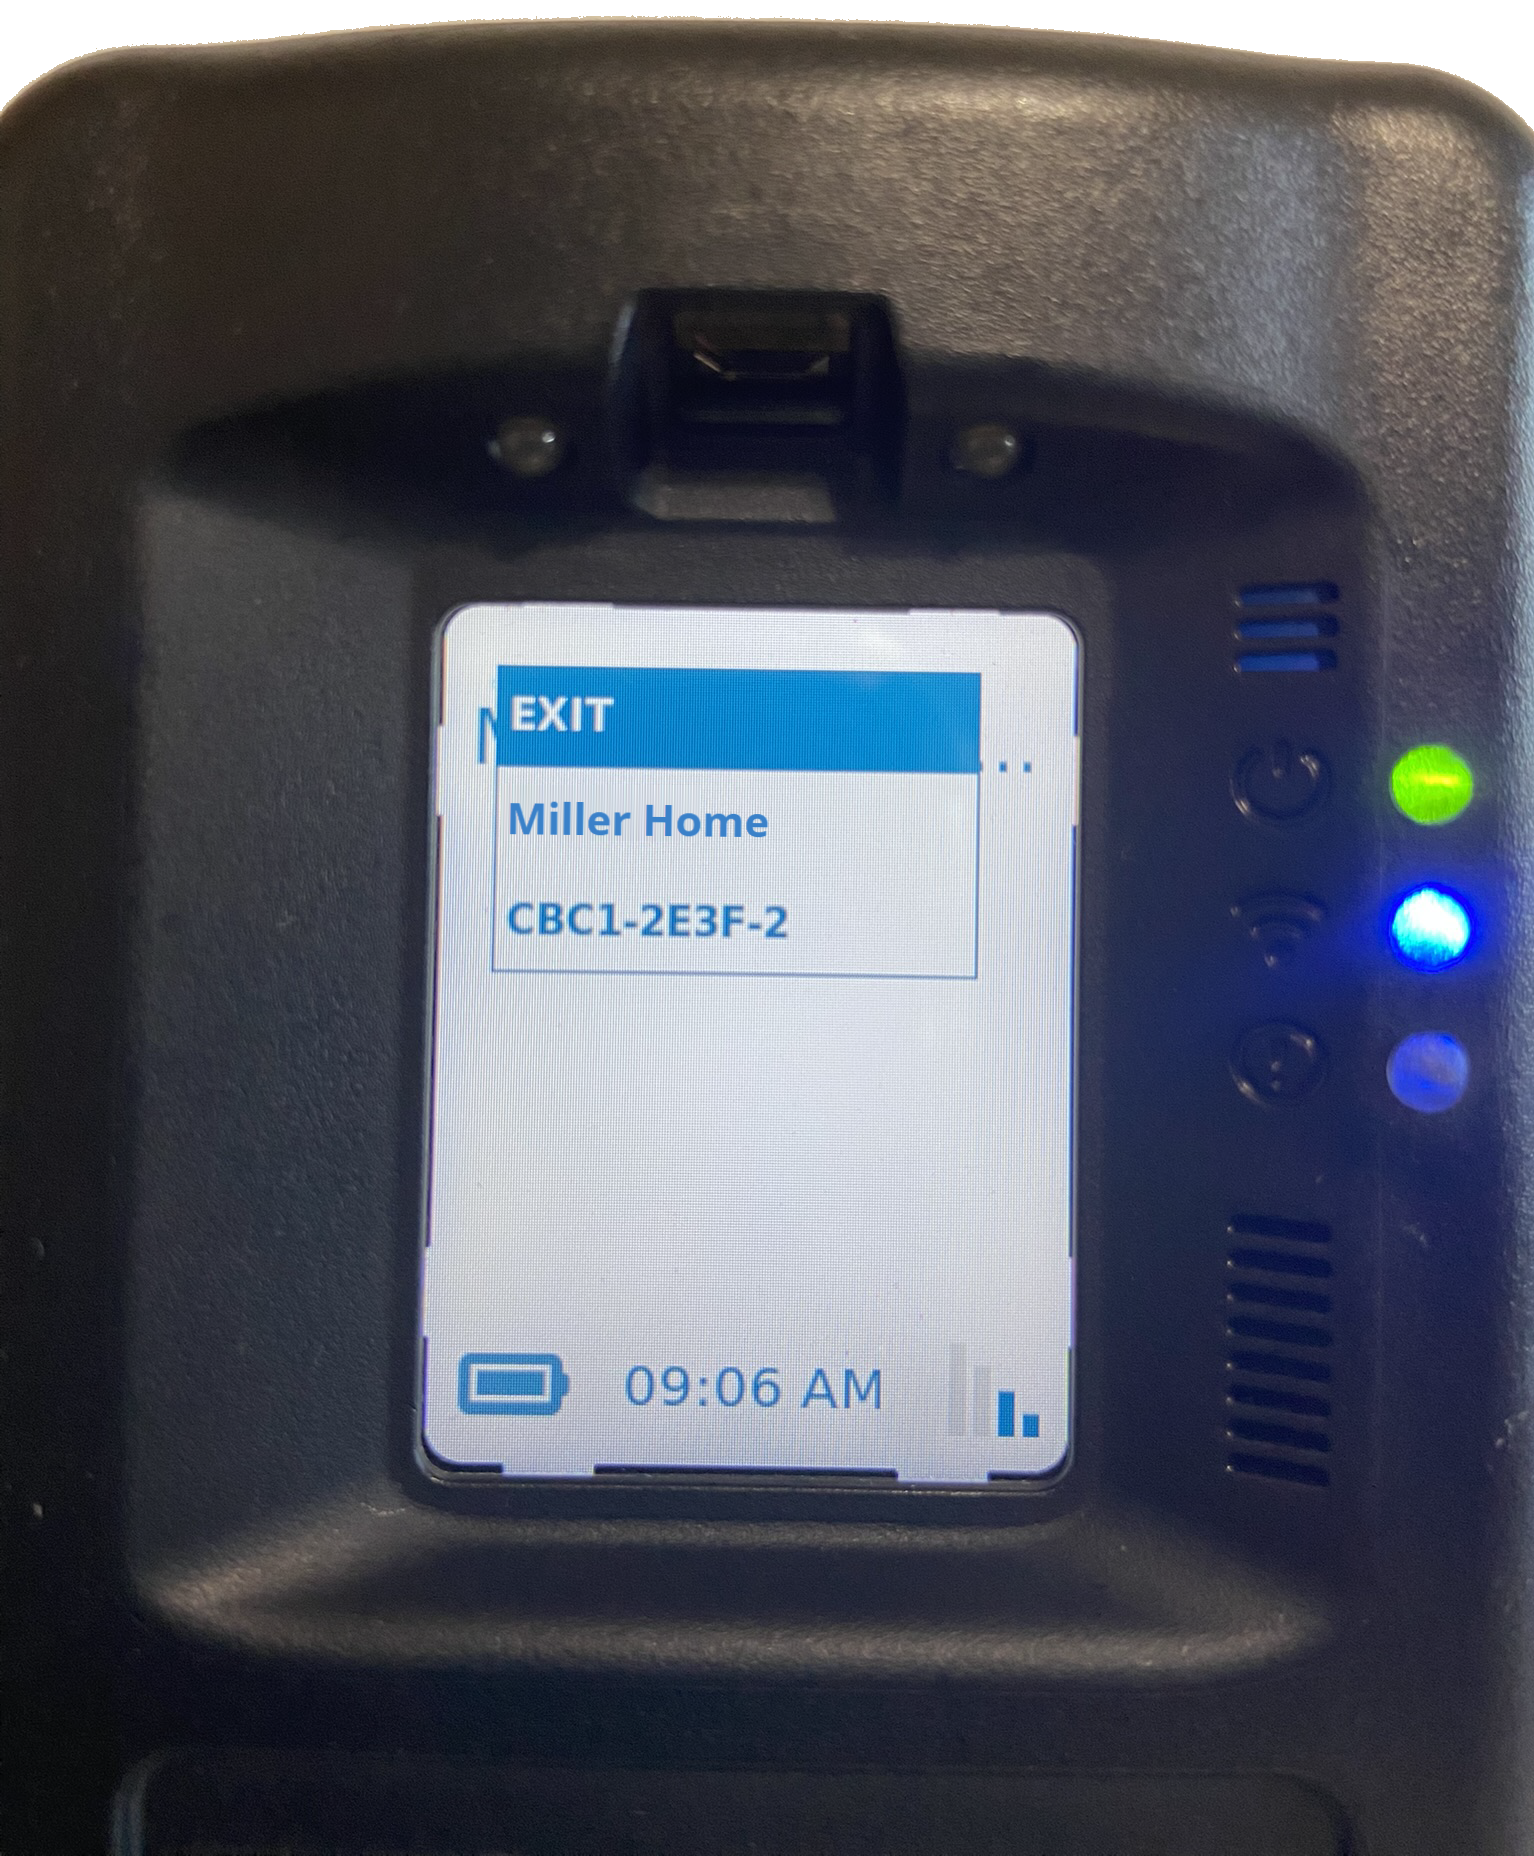
Manually Remove a Client-Added Wi-Fi Network
If the client would like to remove a Wi-Fi network that they have connected to, they may accomplish this task by:
Accessing the RB Pro WiFi Setup menu.
Use the up/down buttons on the RB Pro to highlight the Remove option and then press the select button.
Wi-Fi Setup Option – click to enlarge
Wi-Fi Remove Option Highlighted – click to enlarge
Use the up/down buttons to highlight the wi-fi network to be removed and then press the “select” button.
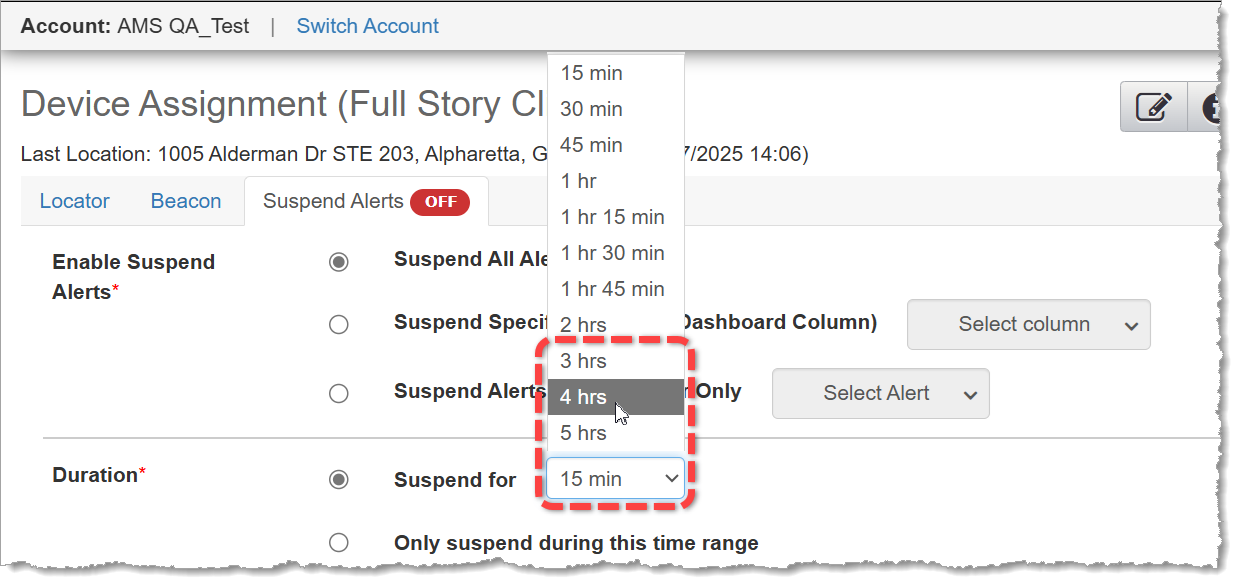
At 5:00 AM MST on Tuesday, November 4, 2025, SCRAM Systems will release an enhancement that will give you more duration options for suspending client alerts.
During the 15-minute deployment, you may not be able to access SCRAMNET GPS, but messages from the SCRAM GPS device will continue to be processed uninterrupted.
New, Longer Suspension Durations
Three, four, and five-hour durations have been added to the “Suspend for” dropdown menu. These expanded durations may be useful in situations where your client is scheduled to be in a location for a relatively long time that is normally “off limits,” or is an impaired communications environment.
3 hrs, 4 hrs, and 5 hrs are now available alert suspension durations (click to enlarge)
Please visit the Suspend Event Notification article in SCRAM GPS Help for detailed instructions on how to use this feature.
It can sometimes be difficult for a client with a breathing issue, such as COPD or asthma, to provide a breath sample with enough air volume in it to test. The SCRAM Remote Breath Pro (RB Pro) device is designed to test a breath sample for alcohol once 1.5 liters of air has passed through it. The device will, however, test a breath sample for alcohol once 1.3 liters of air has passed through it, if it senses the breath sample air pressure dropping.
Tips for Breath-Testing Success
Doublecheck the Straw: RB Pro breath tubes are fatter on one end versus the other. Make sure your client is inserting the “skinny” end of the straw all the way down into the device and then blowing through the fatter end.
Keep it Clear: There is an exhaust port on the bottom of the RB Pro device. If that port is covered, it will create backpressure through the breath tube and make it difficult to pass enough air through the device. Ensure that your client is not inadvertently covering the exhaust port with a thumb or the palm of their hand, and make sure they never take a breath test with the device lying flat on a table.
Start Strong: Blowing a large volume of air through the breath tube early tells the RB Pro device to start measuring air volume immediately. Starting gently and increasing volume causes some amount of air to pass through the device before it begins measuring to the target volume (1.5 L).
Following these tips will give your clients the best chance at successfully completing their SCRAM Remote Breath monitoring program.
At 5:00 AM MDT on Thursday, September 18, 2025, SCRAM Systems will introduce a new third option to the Participant Agreement Acknowledgement during device assignment in SCRAMNET GPS.
During the 15-minute deployment, you may not be able to access SCRAMNET GPS, but messages from the SCRAM GPS device will continue to be processed uninterrupted.
Device Assignment Enhancement
In June of 2025, SCRAM Systems released an enhancement in SCRAMNET GPS that requires you to make a “Participant Agreement Acknowledgement.” The addition of this acknowledgement to the enrollment process grew out of a need for better recordkeeping. This acknowledgement is simply a record of which Agreement was used at the time of enrollment and does not impact the level of court support you receive from SCRAM Systems.
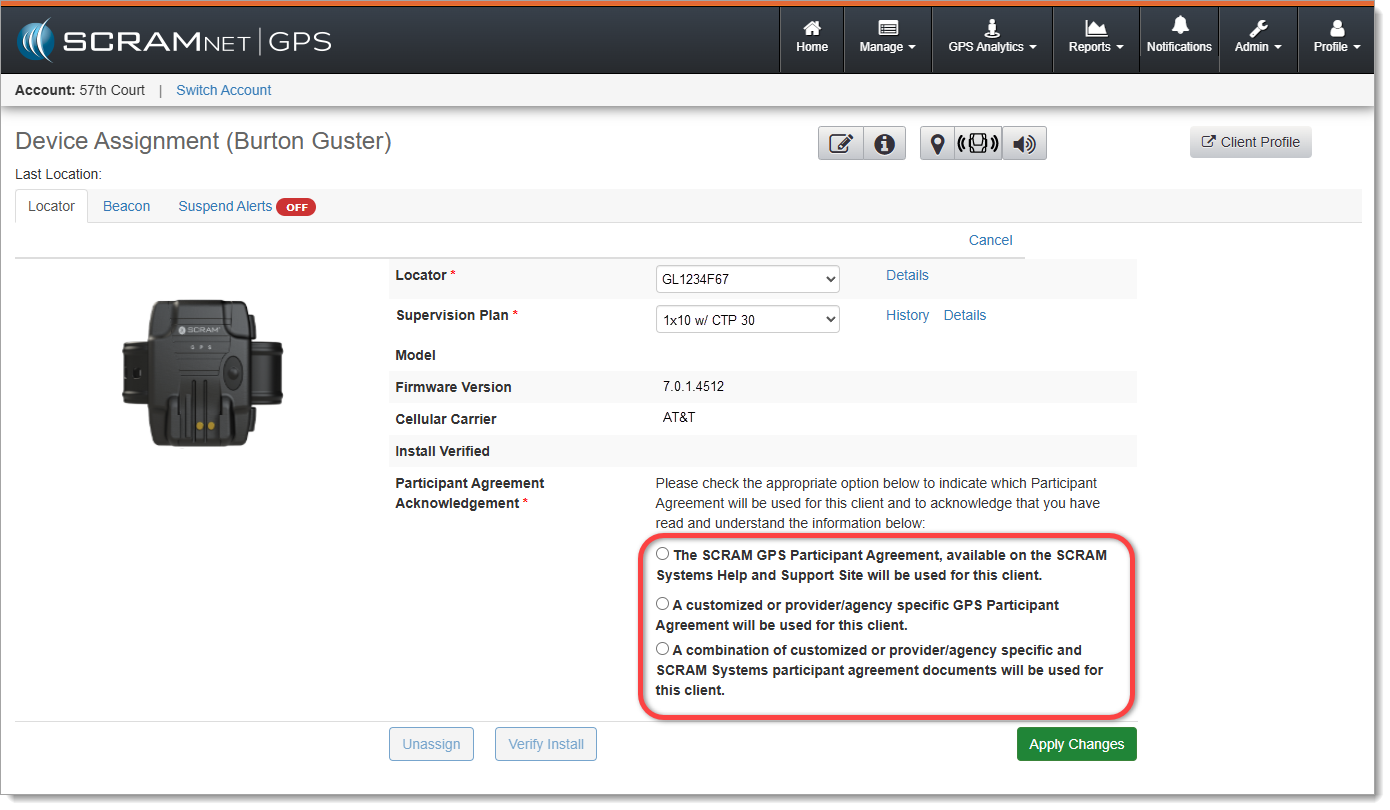
Originally, you were presented with two choices. With this release you will now have three options from which to choose:
The SCRAM GPS Participant Agreement, available on the SCRAM Systems Help and Support Site will be used for this client.
A customized or provider/agency specific GPS Participant Agreement will be used for this client.
NEW! A combination of customized or provider/agency specific and SCRAM Systems participant agreement documents will be used for this client.
The new ‘Participant Agreement Acknowledgement’ section on the Device Assignment page in SCRAMNET GPS (click to enlarge)
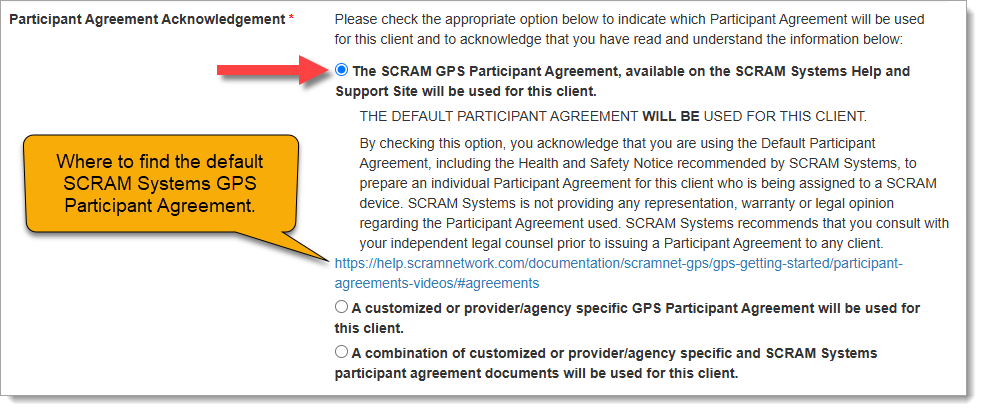
First Option
Customers who use the SCRAM Systems-provided SCRAM GPS Program Participant Agreement and Health & Safety Notice, which is available for download from SCRAM Systems Help & Support, will choose the first option, “The SCRAM GPS Participant Agreement, available on the SCRAM Systems Help and Support Site will be used for this client.” This option indicates that you are using the default SCRAM GPS Participant Agreement that was developed by SCRAM Systems and is currently available in SCRAM GPS Help.
Once you have chosen an option, a more detailed explanation of the choice you have made will appear, along with a link to the SCRAM GPS Participant Agreement documents on GPS Help:
Participant Agreement Acknowledgement Option 1 chosen (click to enlarge)
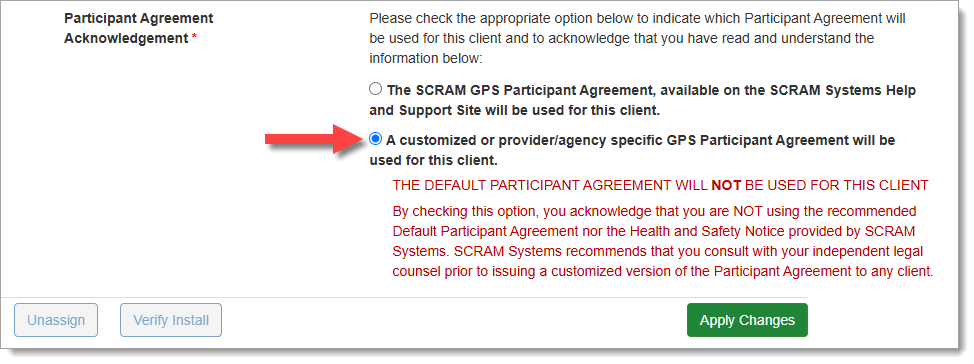
Second Option
Customers who use their own monitoring program participation agreements, which they have developed in-house, independent of SCRAM Systems, and are NOT accessed from SCRAM Systems Help & Support, should choose the second option, “A customized or provider/agency specific GPS Participant Agreement will be used for this client,” as shown below:
Participant Agreement Acknowledgement Option 2 chosen (click to enlarge)
Third Option
Customers who use their own monitoring program participation agreements, which they have developed in-house and independent of SCRAM Systems, but combine it with the SCRAM Systems Health & Safety Notice, should select the third Participant Agreement Acknowledgement option.
Participant Agreement Acknowledgement Option 3 chosen (click to enlarge)
If you are unsure about the type of monitoring program participation agreement used by your organization, ask your supervisor or program administrator.
Completing the Device Assignment
Once you have chosen the appropriate Participant Agreement Acknowledgement, then Apply Changes and continue with the device assignment process as usual.
Tip: Regardless of which option you select, SCRAM Systems recommends you print two copies of the Participant Agreement and have the client and agent sign both copies – one copy for your records and one copy for the client’s records.
Audit Report
The Participant Agreement Acknowledgement selection made will be reflected in the Audit Report. This ensures a comprehensive and auditable history of agreement usage for each device assignment.