On 10/2/2025, SCRAM Systems will release an enhancement for your SCRAM Nexus caseload. This enhancement allows users to record a client’s Education and Military Experience directly within the Profile section.
If you don’t see the enhancement in SCRAM Nexus, please clear your cache and cookies and refresh your browser window.
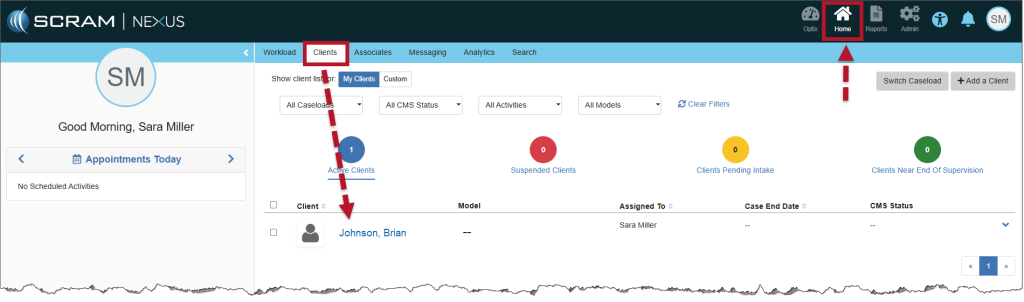
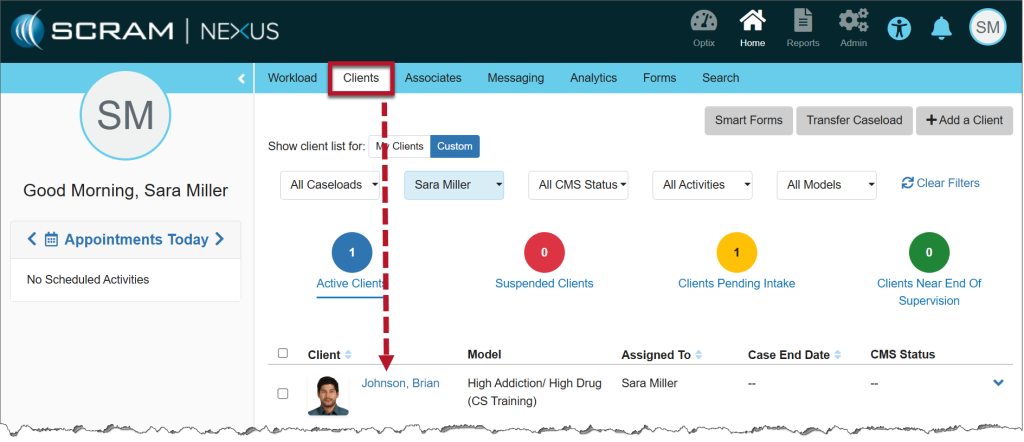
Access the Client’s Profile Page
Select the client’s name hyperlink from the Clients tab on the Home page.
Home Page, Clients Tab
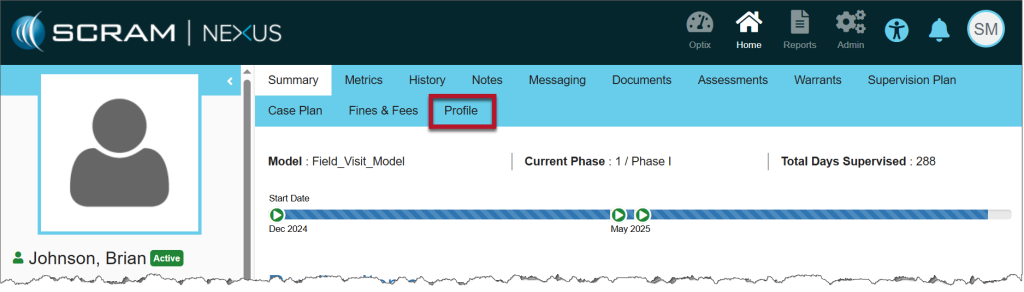
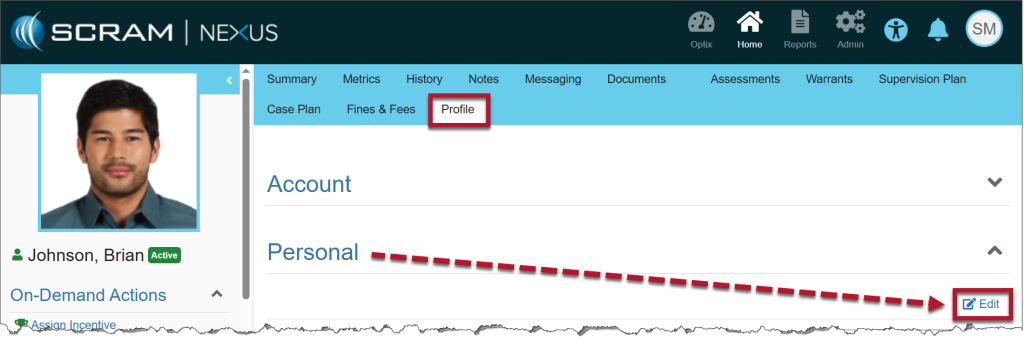
From the client’s Summary page, open the Profile tab.
Client’s Summary Page
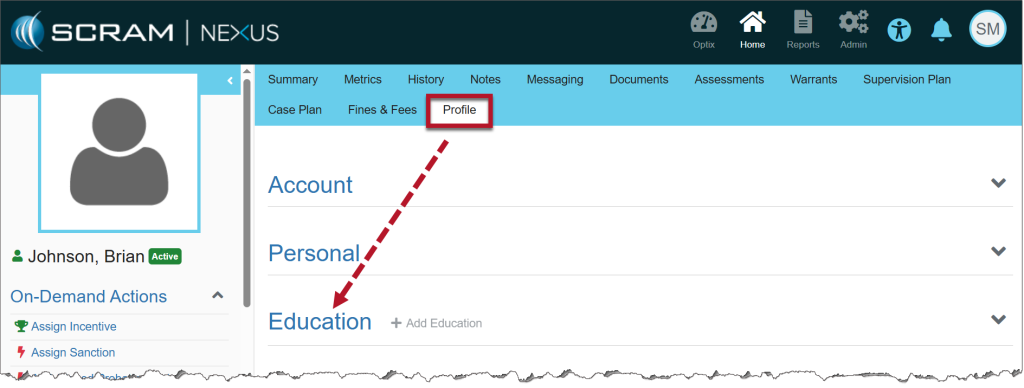
Add Education Information
On the Profile page, scroll to the Education section and select the Education heading to expand it.
Profile Tab, Education heading
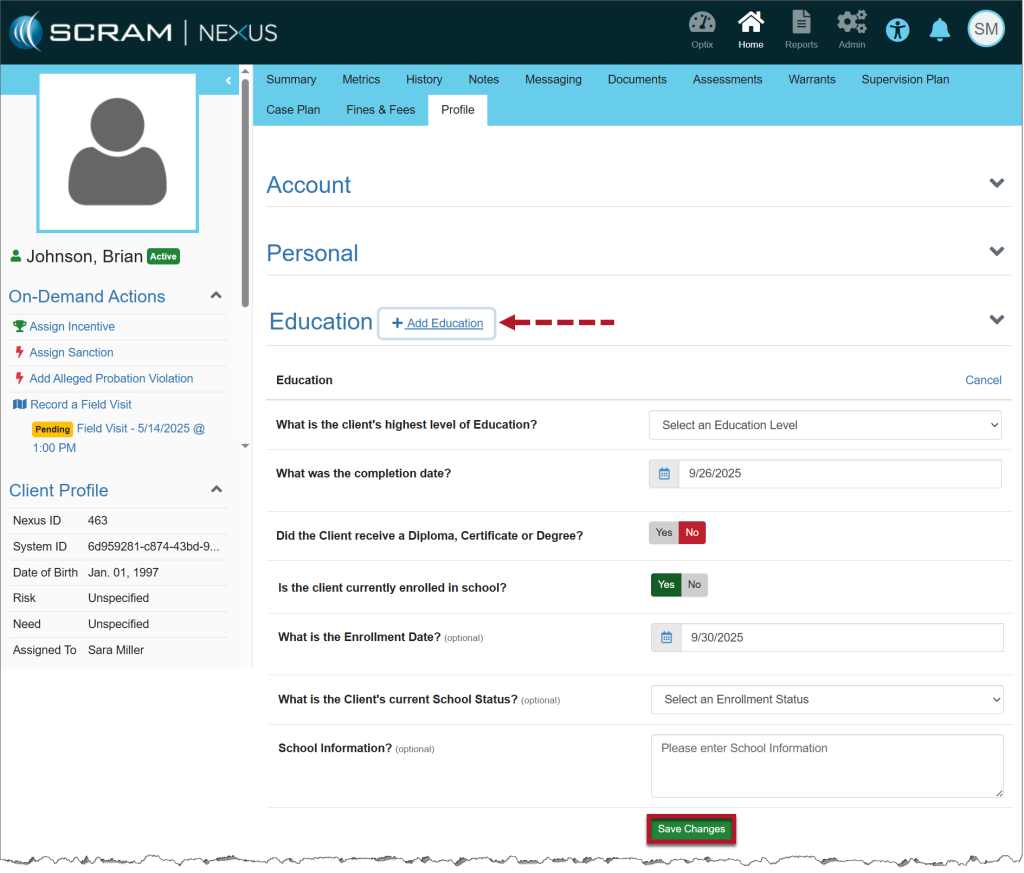
Select the +Add Education link.
The related question and answer options will display.
Some questions will trigger additional fields. For example, toggling Yes for “Is the client currently enrolled in school?” reveals optional follow-up questions.
Enter the relevant client information.
Fields marked Optional may be left blank.
Select Save Changes to add the information to the client’s Profile.
+Add Education Link
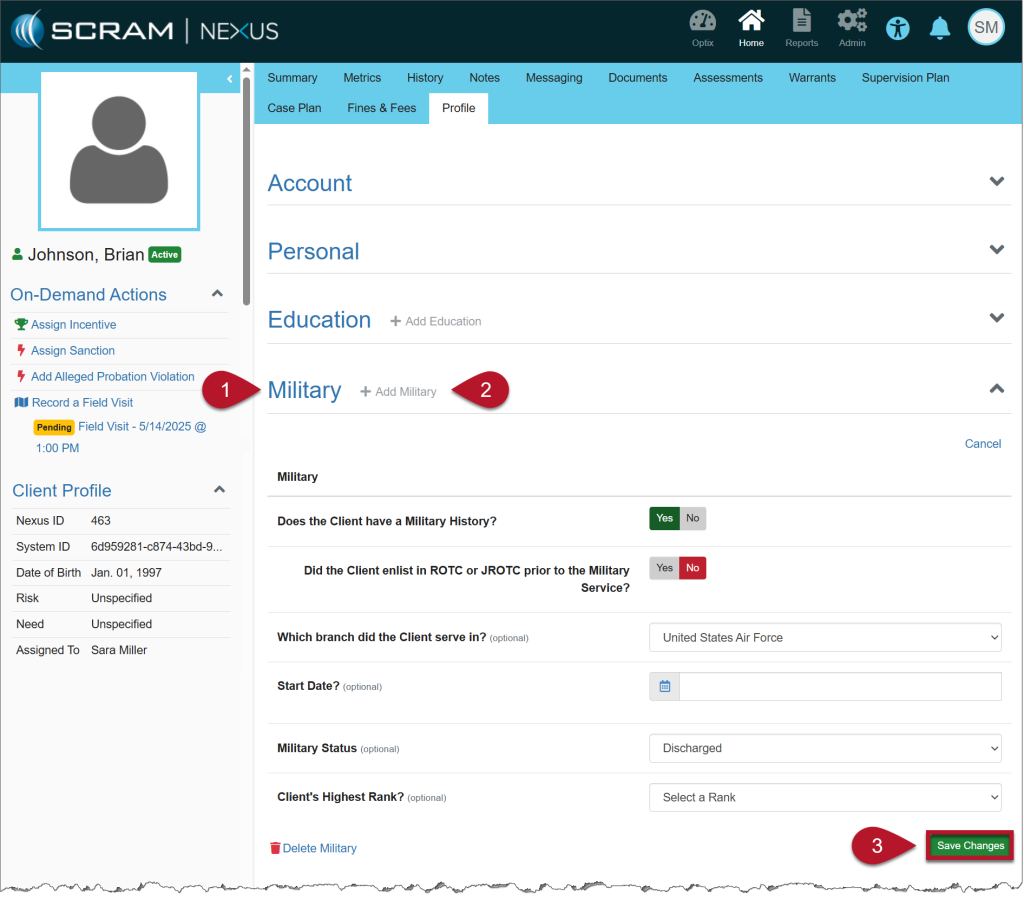
Add Military Education
Select the Military heading to expand it.
Select the +Add Military link.
The first question will display: Does the Client have a Military History?
If Yes is selected, additional fields will appear for you to complete.
If No is selected, choose Save Changes to record the response.
Fields marked Optional may be left blank.
Select Save Changes to add the information to the client’s Profile.
Military Heading
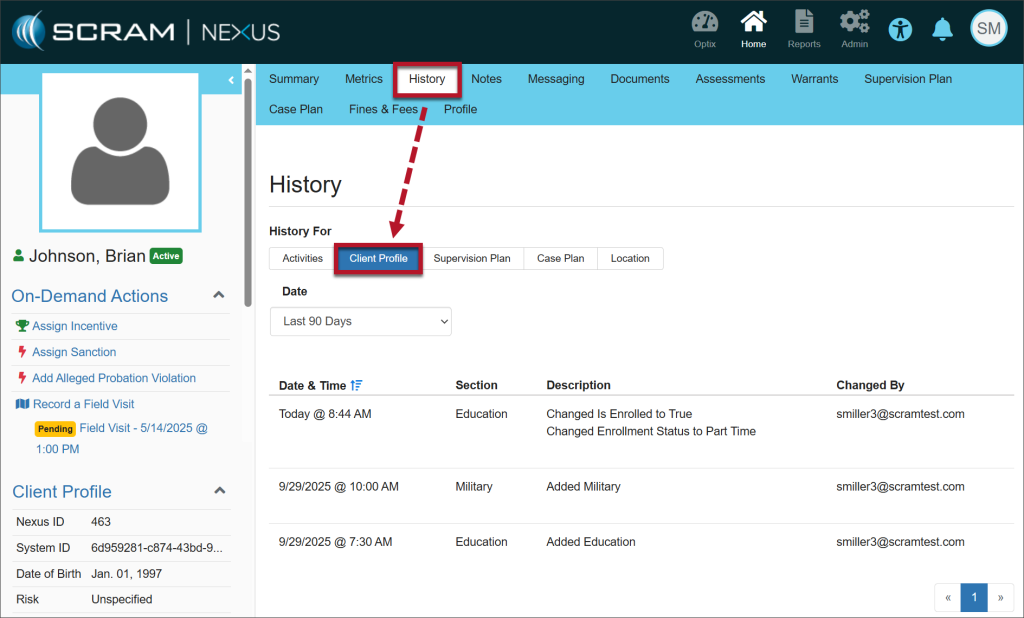
View Changes
Any edits or additions will appear in the History tab, Client Profile.
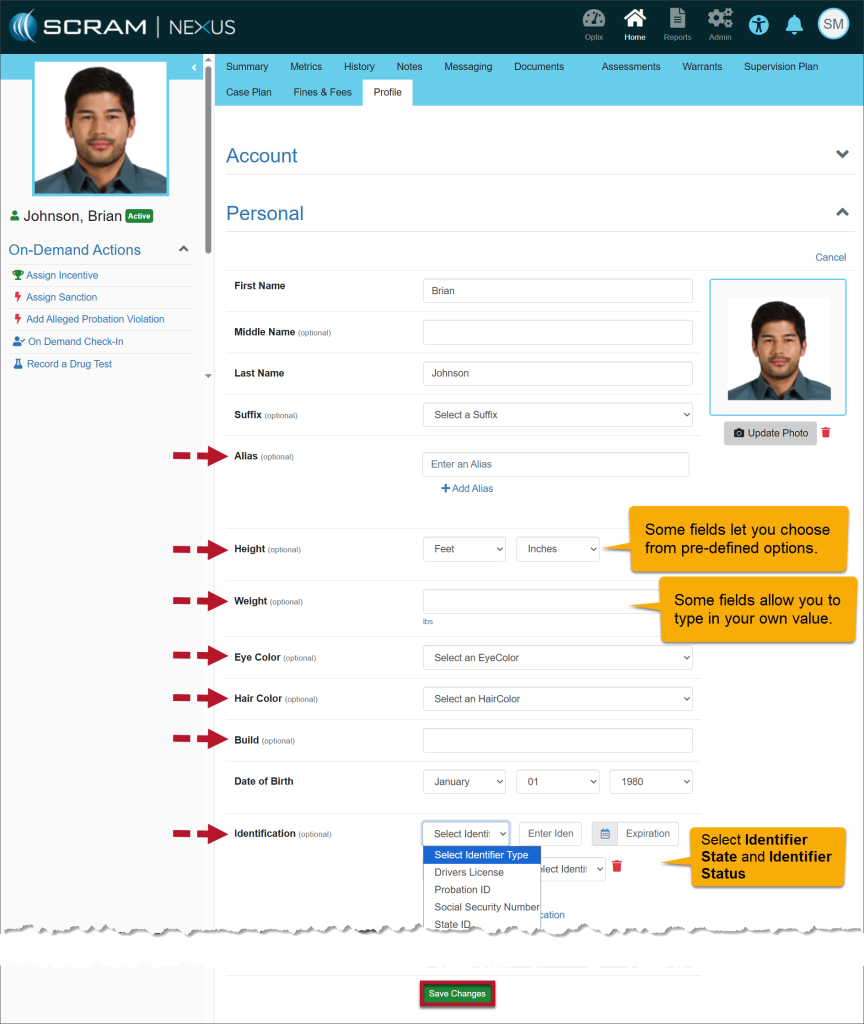
On August 21, 2025, SCRAM Systems will release an enhancement for your SCRAM Nexus Caseloads. With this improvement, the Personal section of the client’s Profile page has been expanded to include new optional identifying attributes, along with additional identification details.
To Edit the Client’s Profile
From the Clients tab in Nexus, select the client’s name hyperlink.
Nexus Clients tab – Click to enlarge
Select the Profile tab and then select the Edit hyperlink in the Personal section.
Nexus Profile tab – Click to enlarge
Add or edit all required fields, then enter any additional details in the new optional fields.
Nexus Profile page
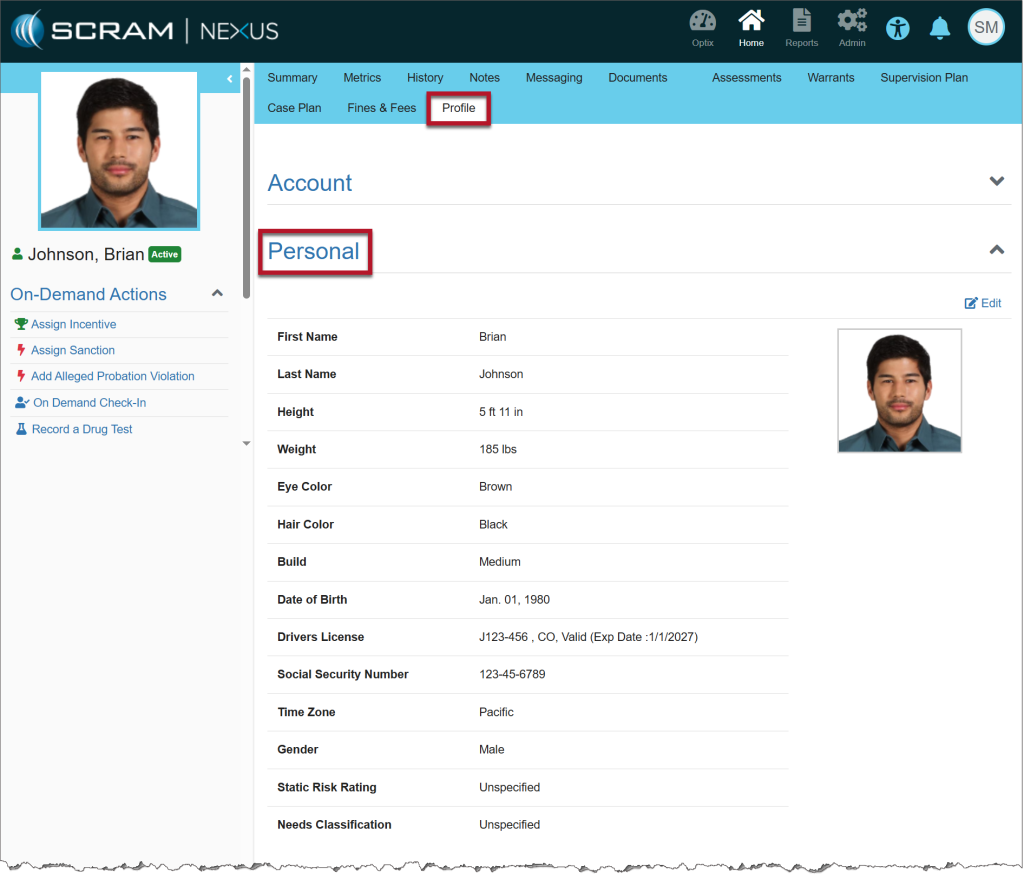
After making any updates, select the Save Changes button.
Once saved, the details entered are displayed under the Personal heading.
Saved Information on the Profile page
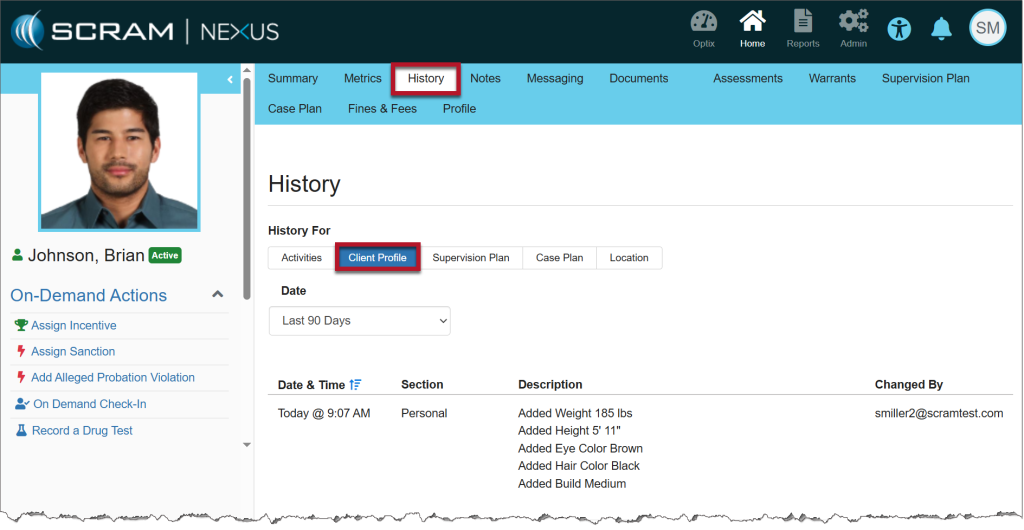
All updates made to the client’s profile may be viewed on their History page, Client Profile sub-tab.
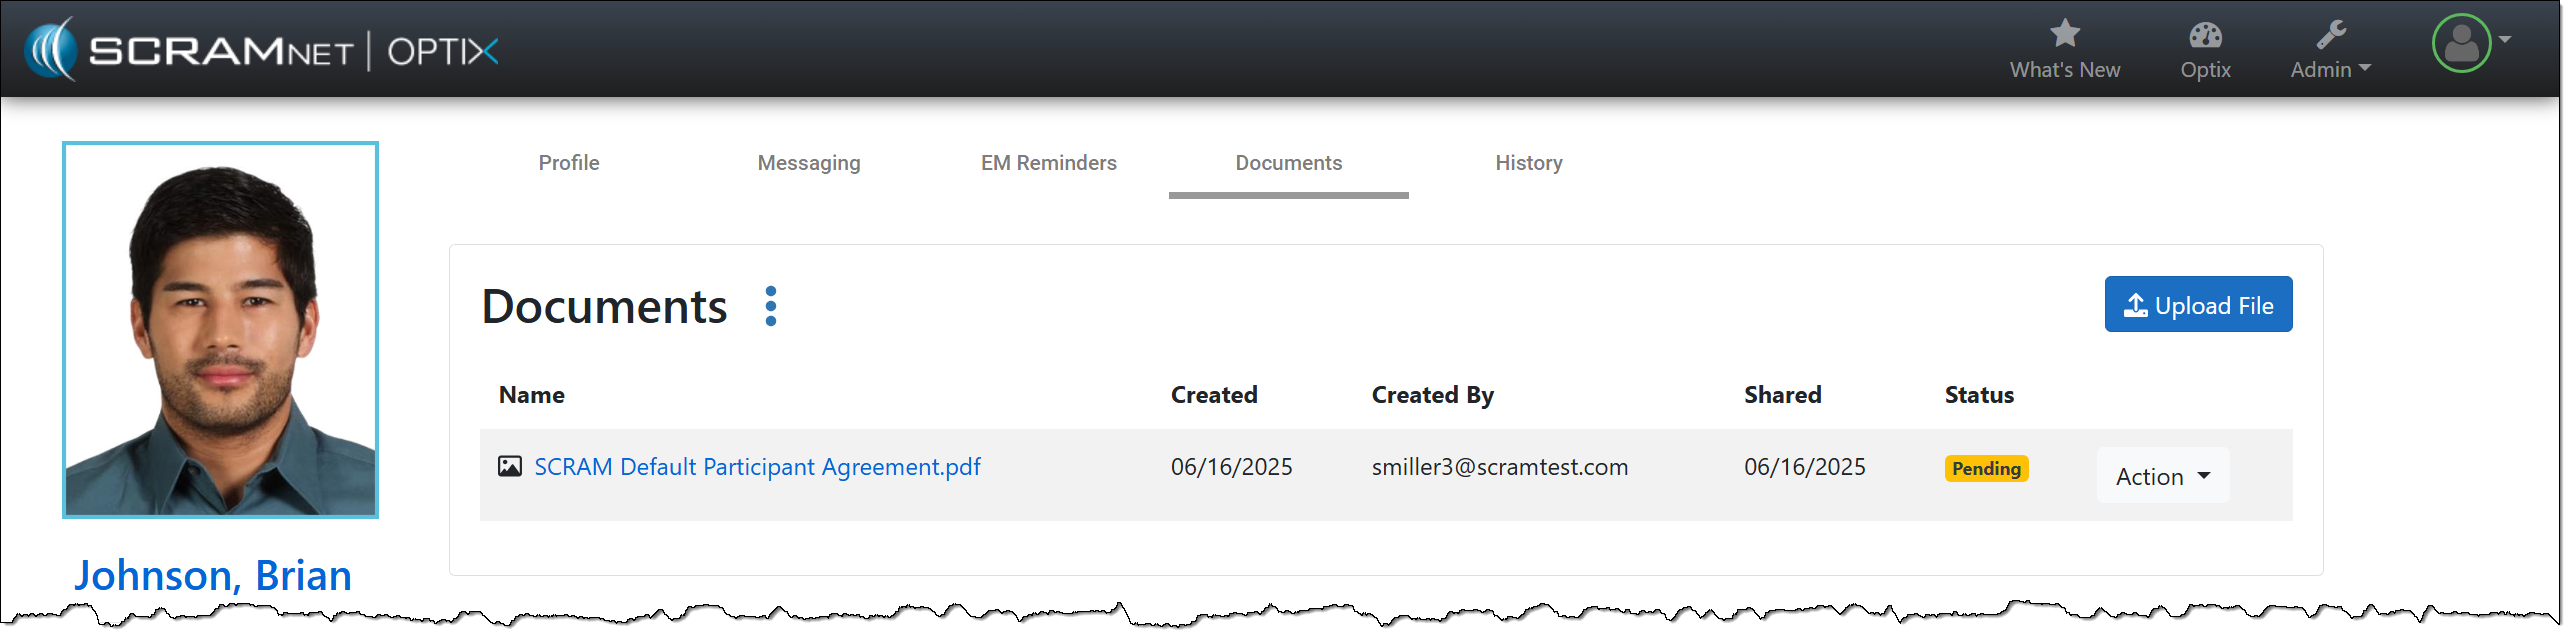
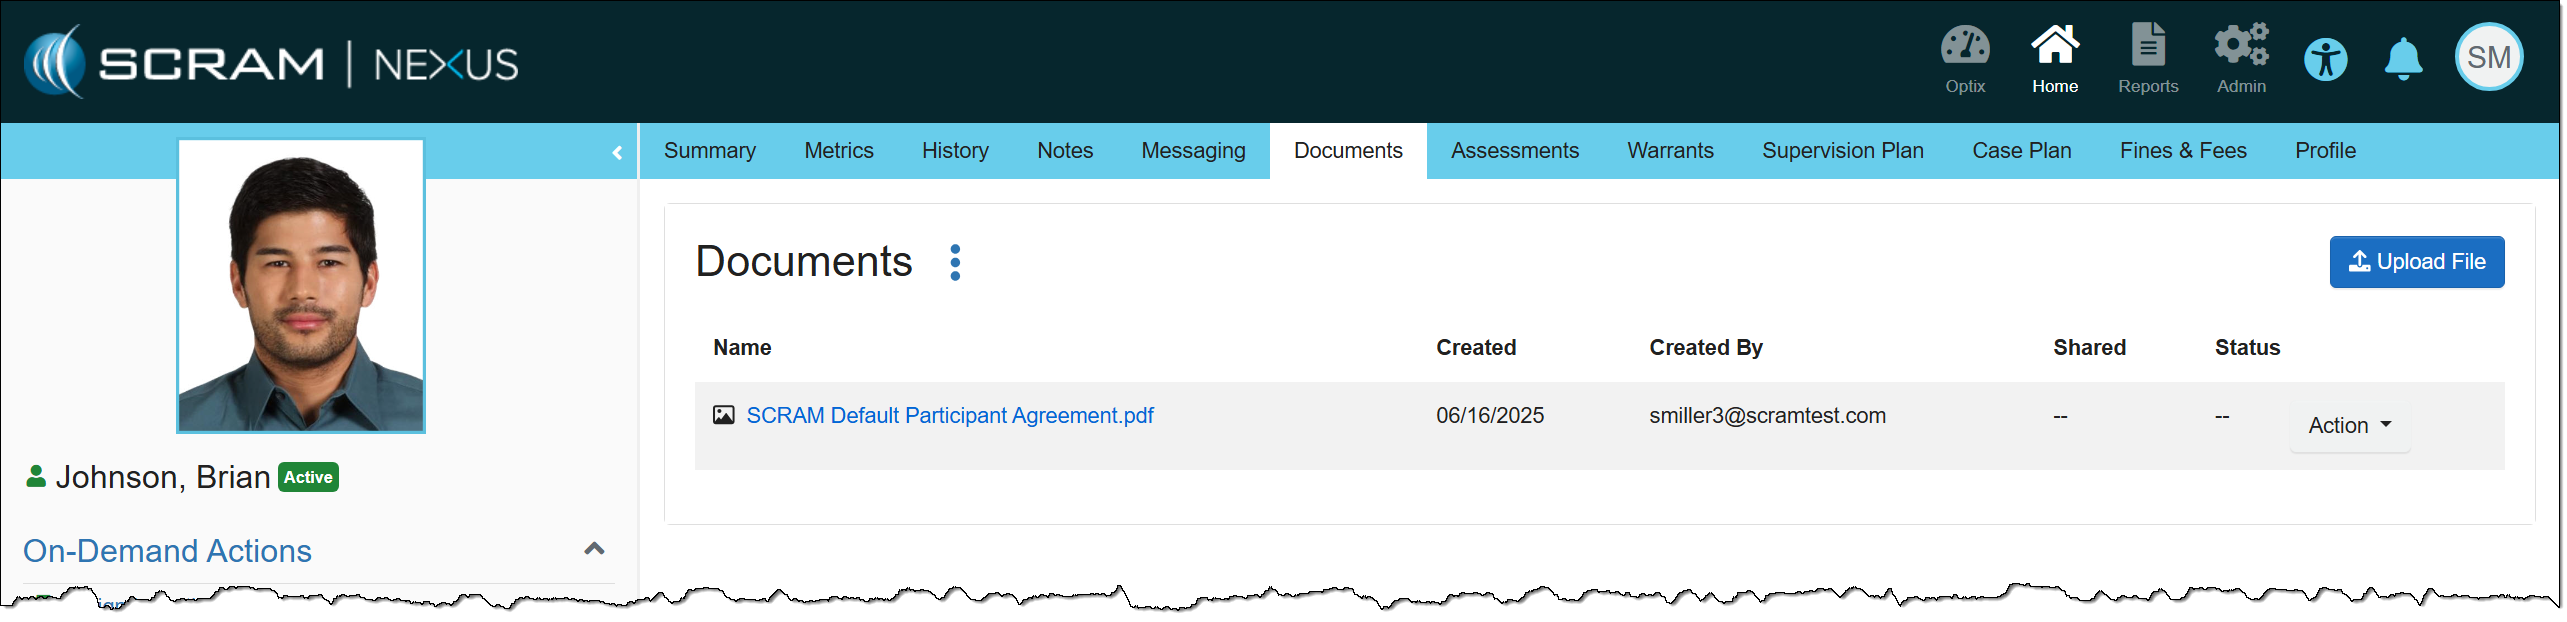
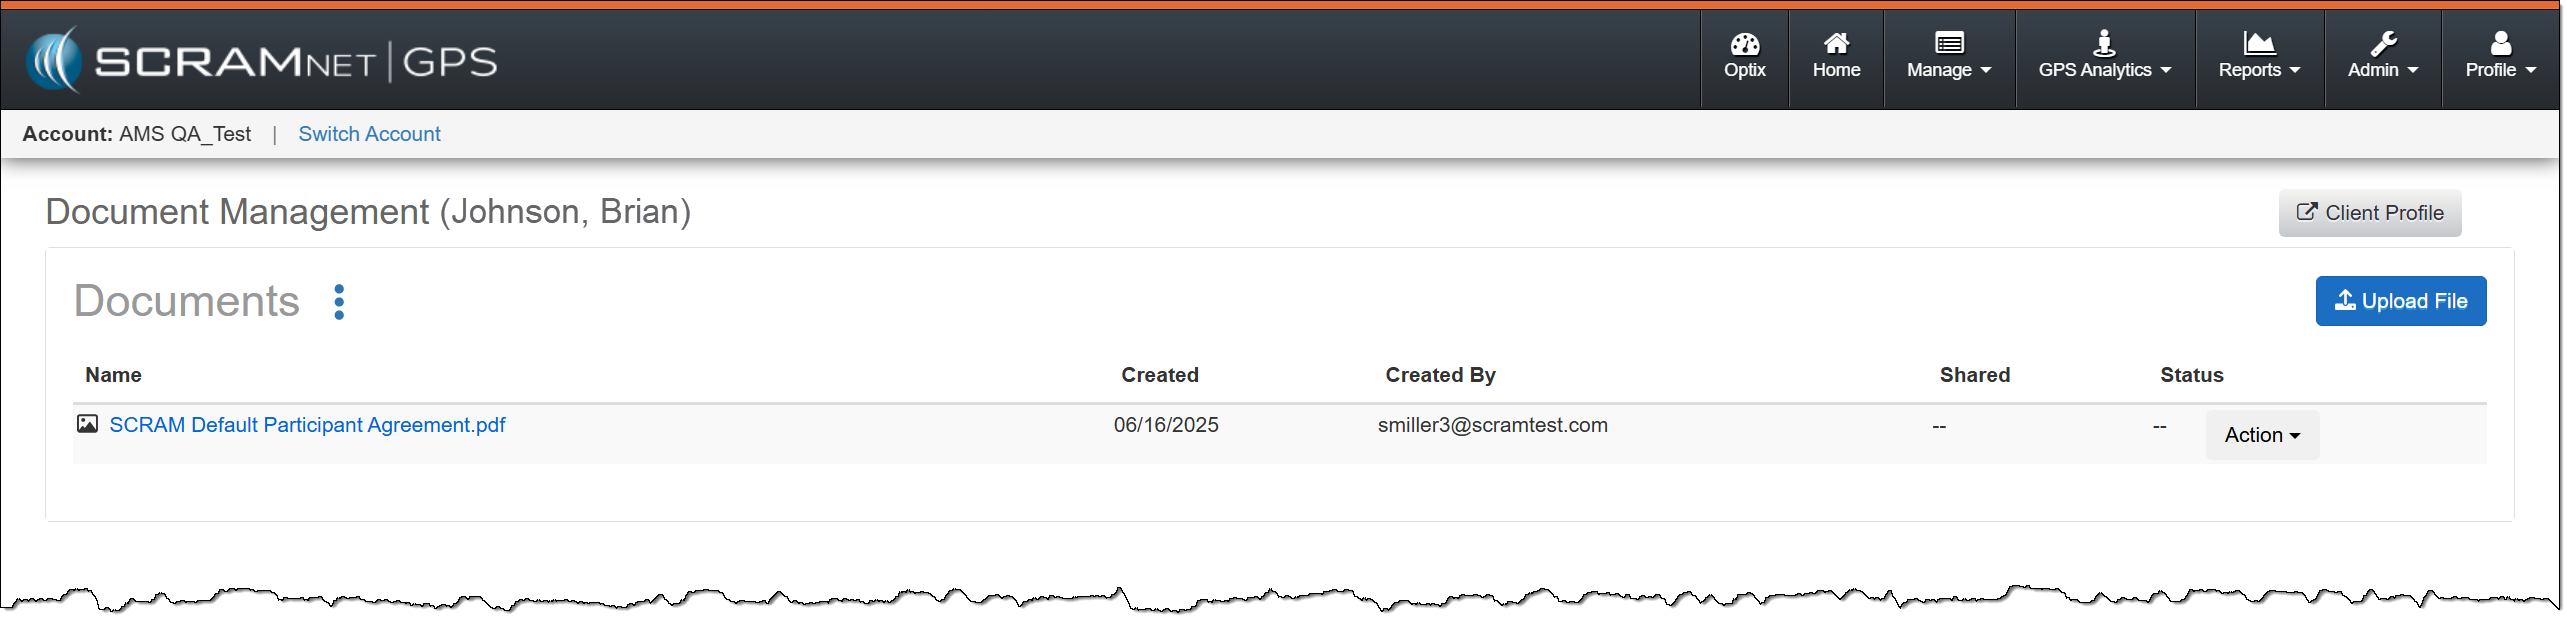
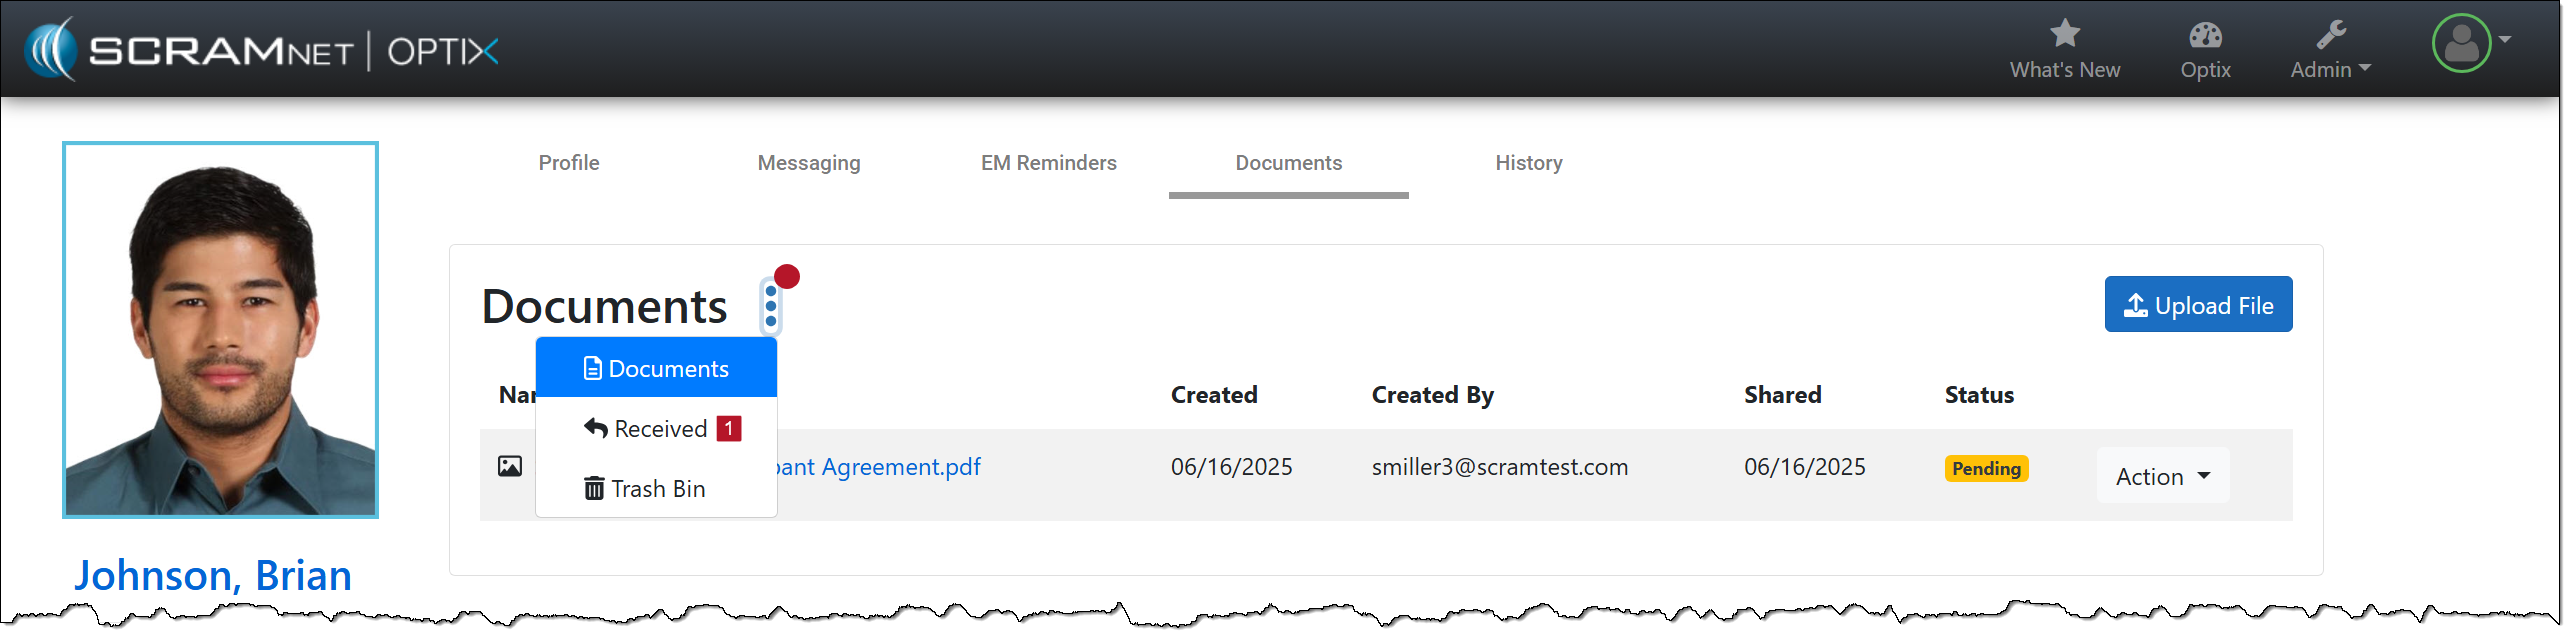
On July 9, 2025, SCRAM Systems released a client Document Management enhancement within SCRAM Optix, SCRAMNET GPS and SCRAM Nexus.
If you don’t see the enhancement, please clear your cache and cookies and refresh your browser window.
SCRAM Documents Page Enhancement
When viewing the client’s Documents page, you will notice a redesign. The “Documents, Received, and Trash Bin” options have been consolidated into an ellipsis menu, and the “Upload File” button has been moved to the right sideof the page.
SCRAM Optix Documents Page – click to enlargeSCRAM Nexus Documents Page – click to enlargeSCRAMNET GPS Documents page – click to enlargeExample of Notification Badge – click to enlarge
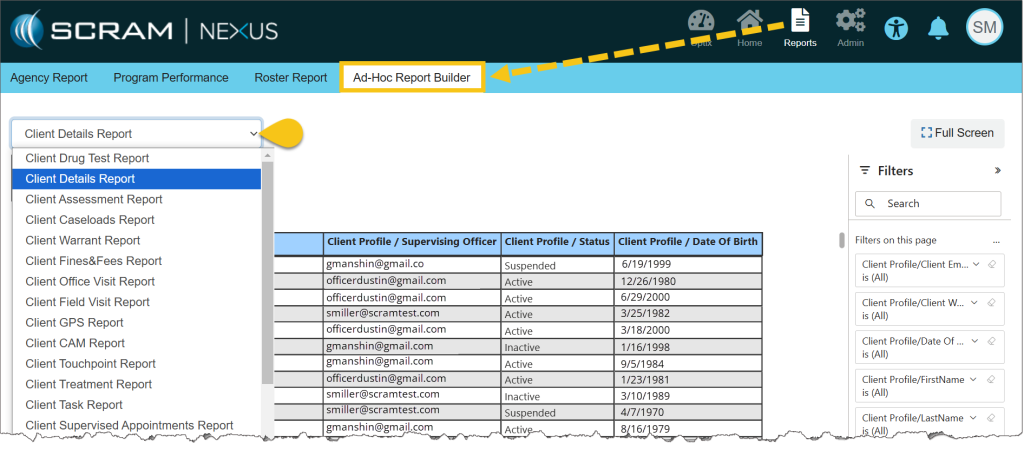
On February 27, 2025, SCRAM Systems will release two enhancements for your SCRAM Nexus caseloads:
Ad Hoc Reporting allows for multiple options in building dynamic reports using data already entered from the Nexus database. Reports may be customized to fit the requirements necessary for the monitoring of clients.
Smart Forms allows users to create, maintain, and customize the official forms they use to communicate with the courts. Some information the forms use is static, for example, content originating from the courts, and some needs to be personalized to the client. The forms can be customized to include information on a single client or on multiple clients.
SCRAM Nexus Ad Hoc Reporting
Customizing a Report
From the Reports menu, select the Ad Hoc Report Builder tab, and then select the desired Report Type from the dropdown menu.
Ad Hoc Report Builder Tab
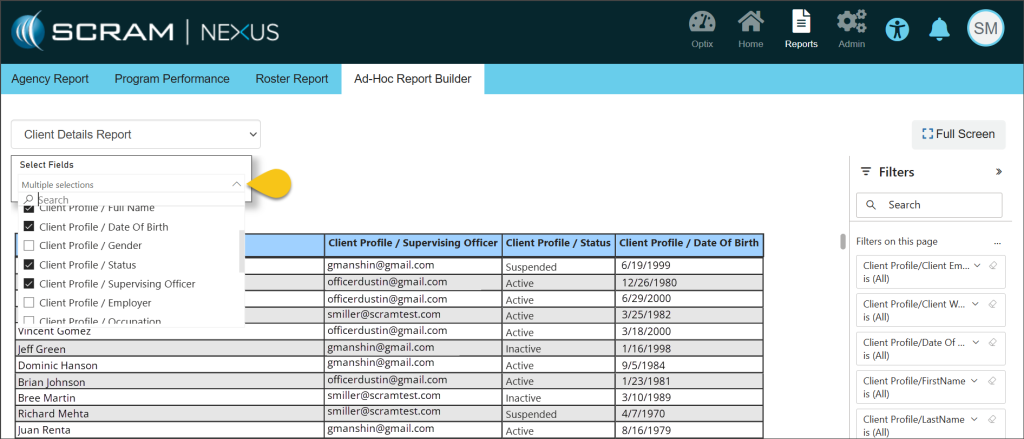
Once a report is selected, use the Select Fields dropdown list to choose the data fields that will be included in the report. The selected fields will show as titles of the columns in the report. As each choice is selected, the report will dynamically populate.
Select Fields Dropdown
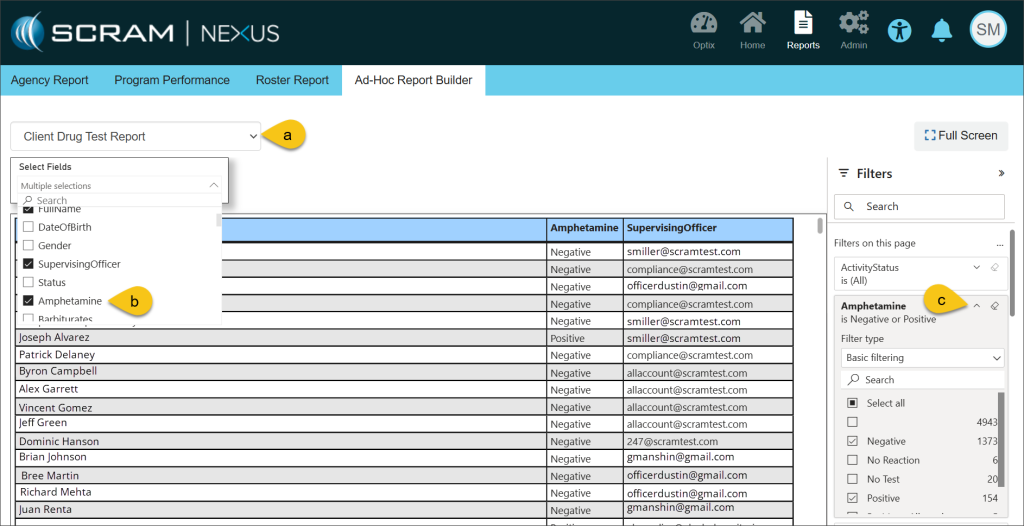
Further customization is available using the Filters section on the right side of the page. These advanced filters allow you to add more conditions for the information that will be displayed on the report. For example, choosing the Client Drug Test Report with the field of Amphetamine selected, allows you to filter the report even further to only show clients who have tested negative or positive for amphetamines.
Additional Filters
Printing a Report
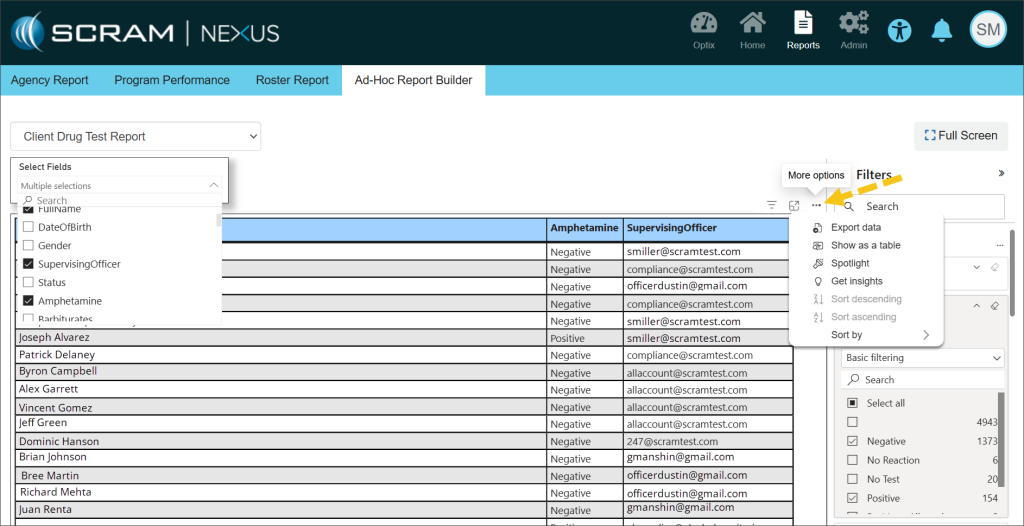
Hovering your mouse over any field in the table uncovers more options for viewing the information contained in the report. Selecting the More Options ellipsis (…) allows for exporting and printing your report in Excel.
More Options
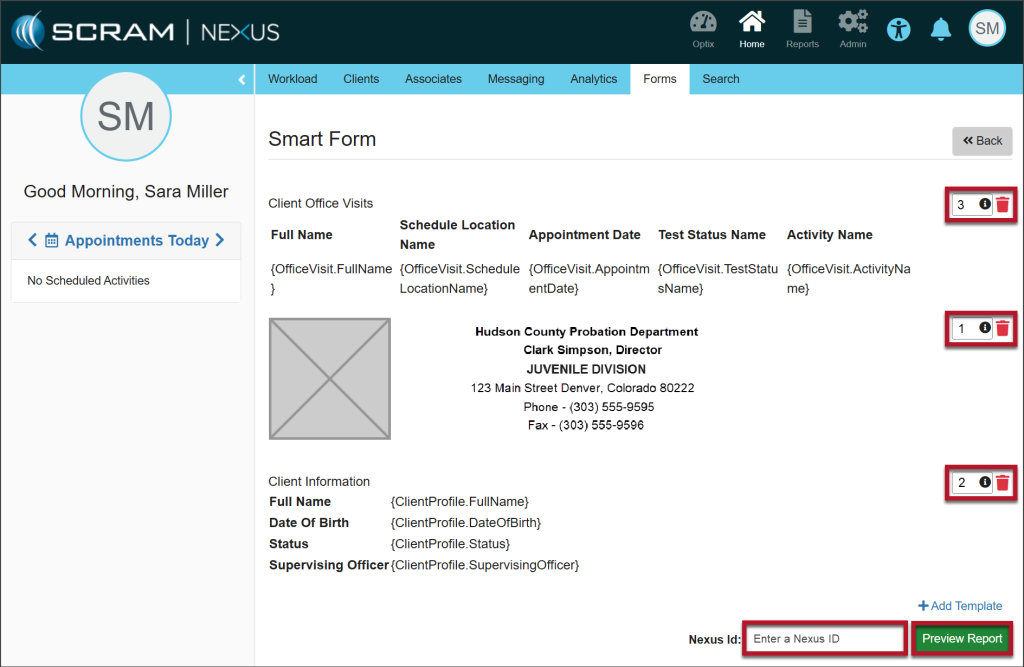
SCRAM Nexus Smart Forms
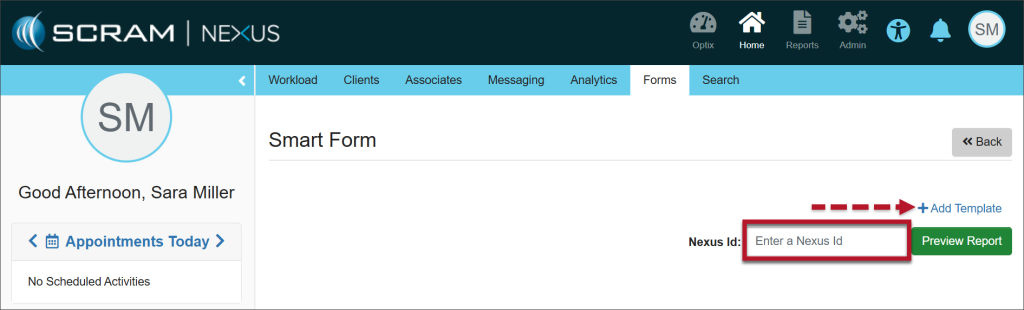
Customizing a Smart Form
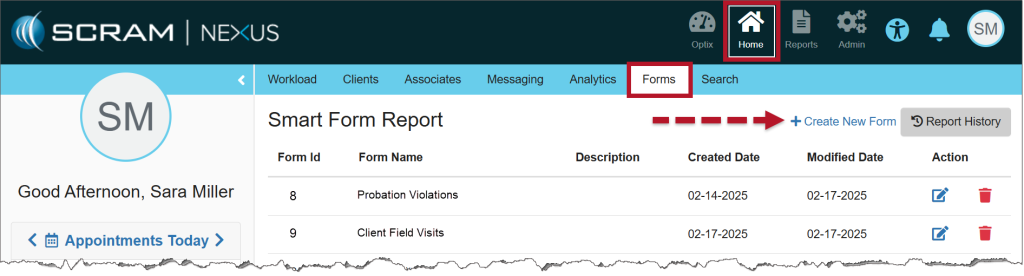
From the Home menu, select the Forms tab, and then select the +Create New Form hyperlink.
Smart Form Report
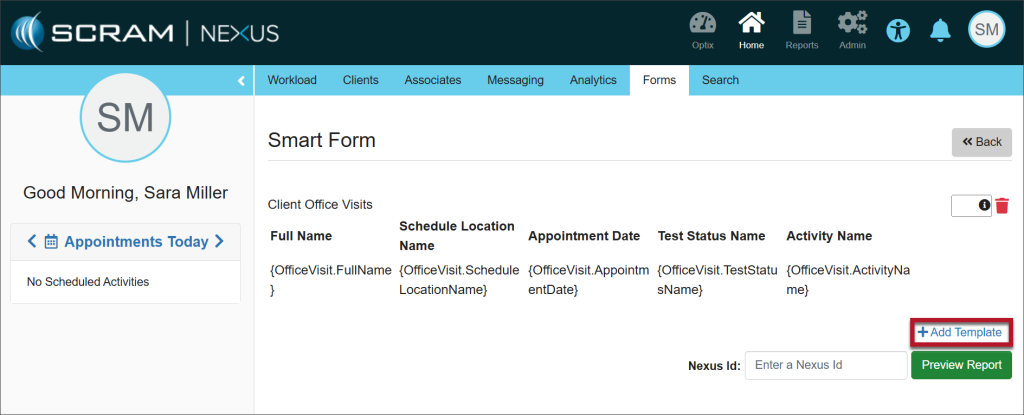
Enter the client’s Nexus Id (Find the Nexus Id) and select the +Add Template hyperlink.
Select +Add Template
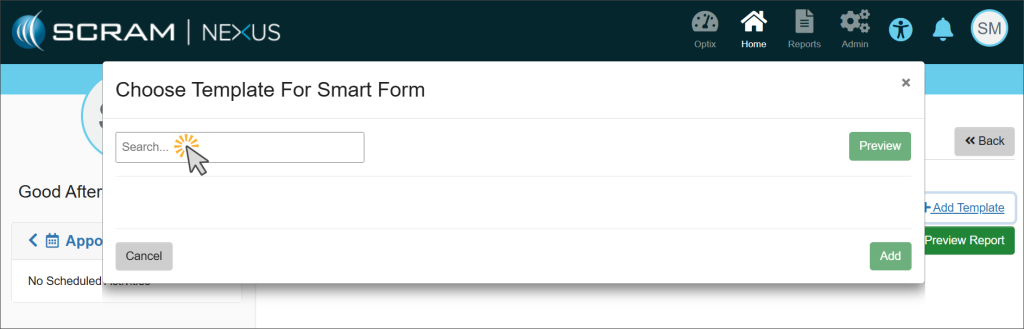
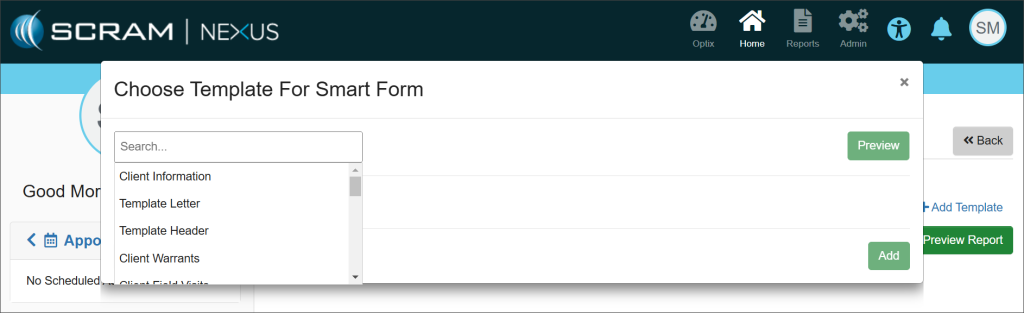
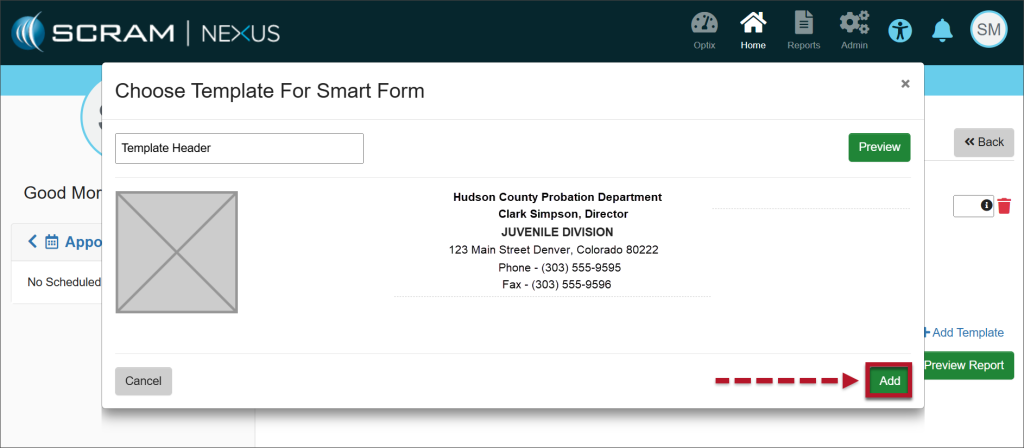
A Choose Template for Smart Form pop-up window will display. Select the Search field to activate a dropdown menu of template choices and select the desired template.
Select the Search FieldChoose the Desired Template
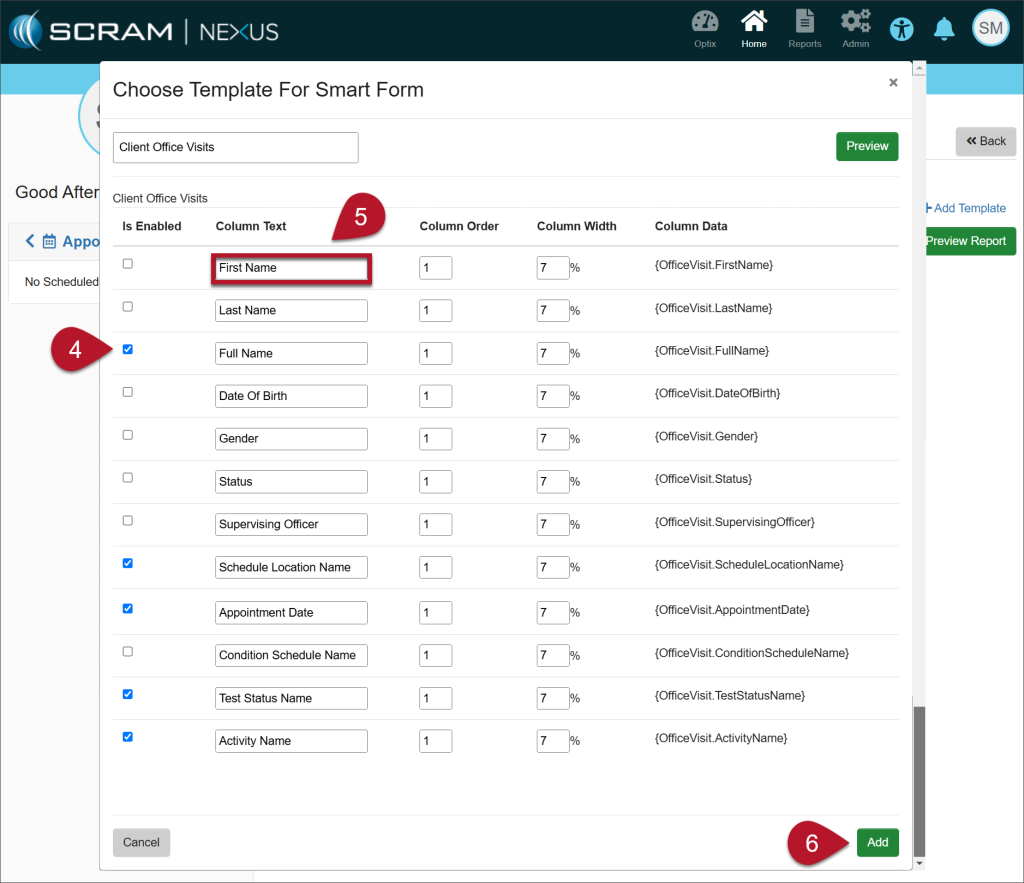
Select the checkboxes of the attributes necessary to include on the form.
Each template is editable. Edit the text contained in any Column Text field to change the information. This gives you the ability to customize the headings as they will appear on the report output.
Once you have made your changes, select the Add button.
Deselect the columns you do not need, edit the Column Text headings, if desired, and then select Add.
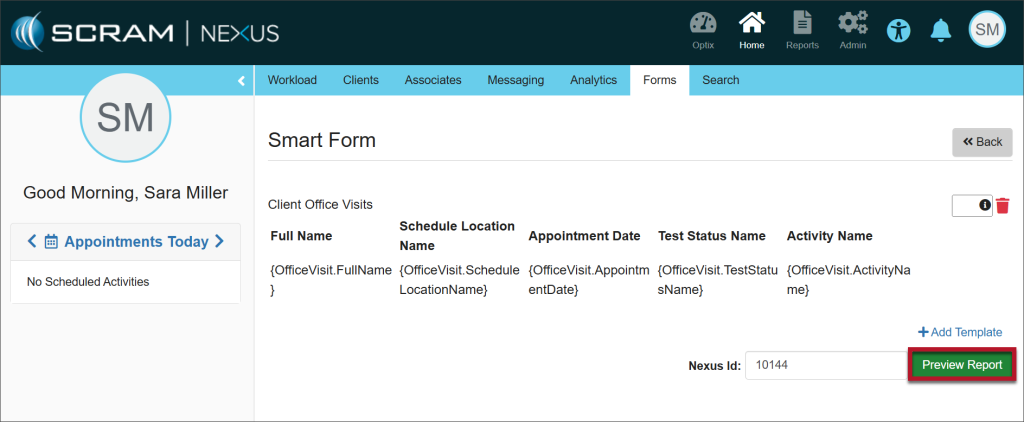
Select the Preview Report button.
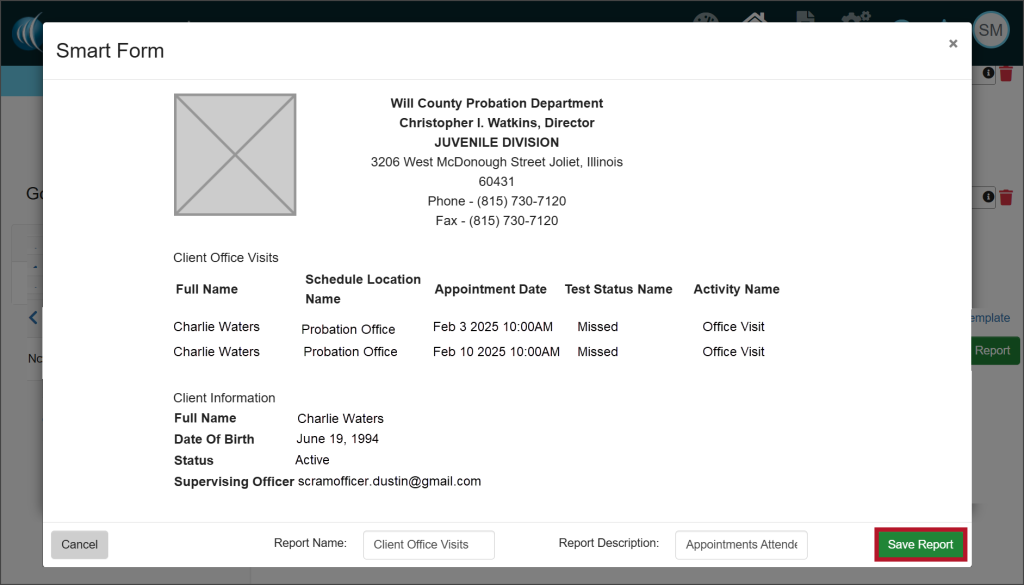
Preview the Report
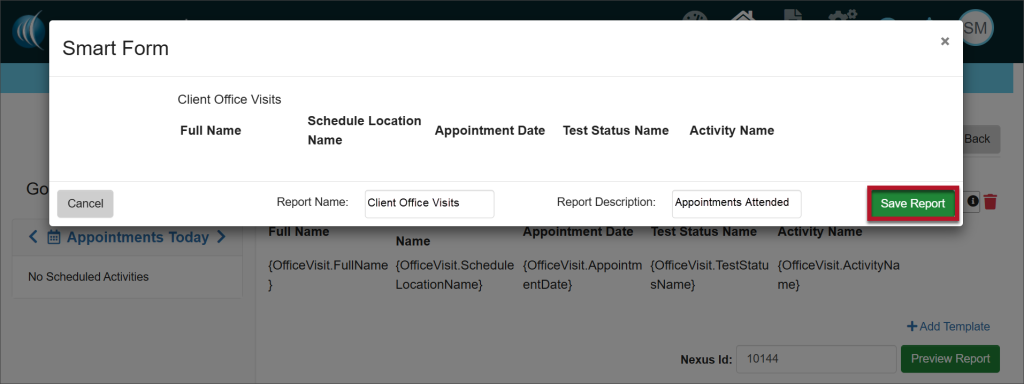
From the Preview, add a report name and description. Select the Save Report button.
Add a Report Name and Description
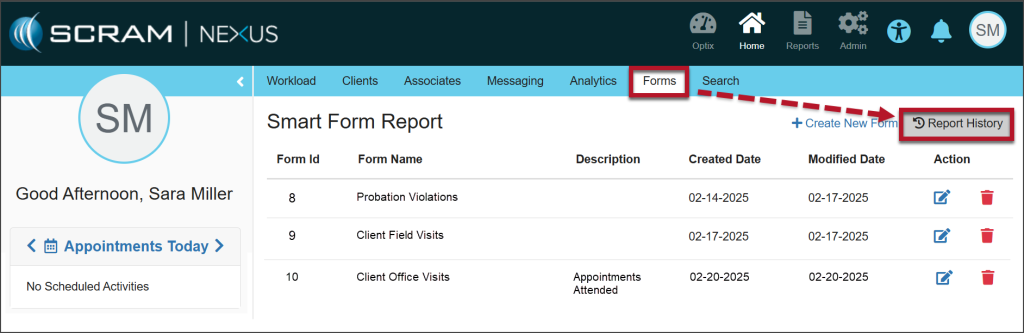
A green Success banner will indicate that the Smart form was saved successfully. The form has been saved in the Smart Form Report section. To continue customizing the form, select the Edit icon under the Action heading.
Saved Form
Re-enter the client’s Nexus Id and select the +Add Template hyperlink to continue adding components to the saved form.
Add Template
Select the Add button to add the new template to the existing report.
Add Button
Final Edits to the Form
Once the information has been customized to meet your needs, you have the ability to adjust the order of the sections on your form.
Add numbers to the fields on the right side of the page to order the sections in the sequence you’d like them to appear on the form.
Enter the client’s Nexus Id.
Select Preview Report to view the final product.
Change the Order of the Sections
Select the Save Report button. The green Success banner indicates that the Smart Form was added successfully.
The form is available to run from the Forms tab. Select the Report History button to access the form.
Access the New Form
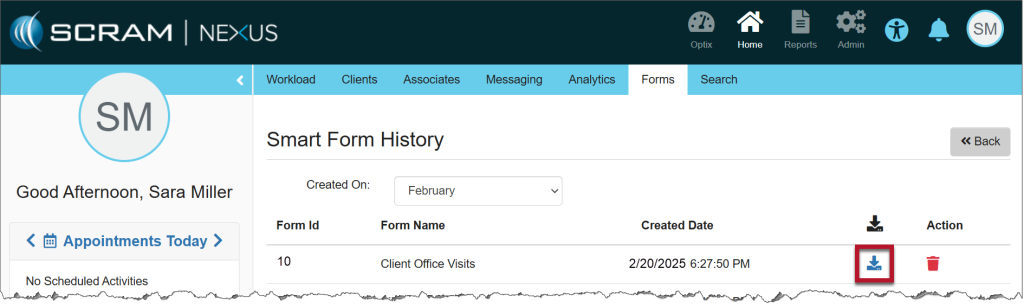
Select the download icon next to the Form Name.
Download the Form
Acknowledge that you want to download the Smart Form.
The document will be available in your Downloads folder.
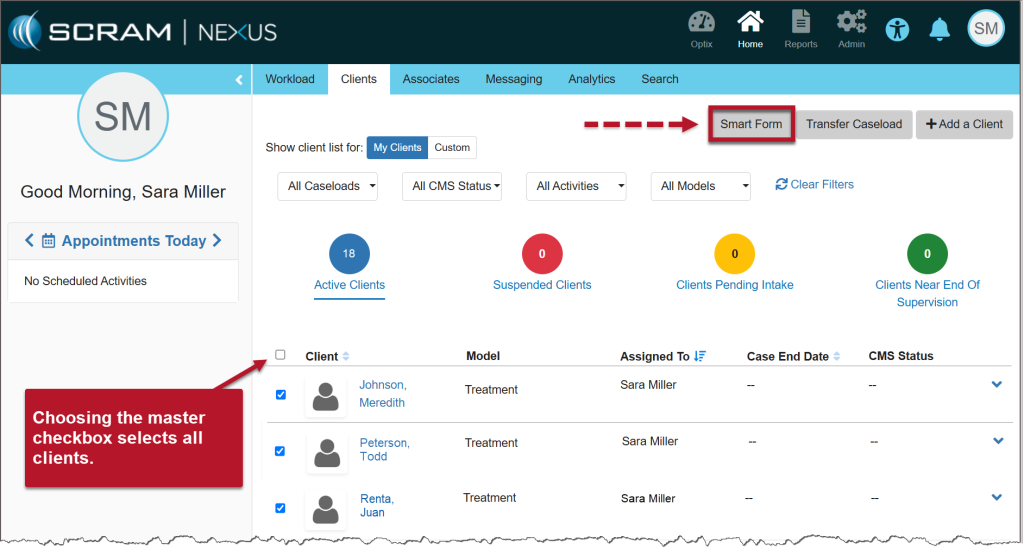
One Form, Multiple Clients
The form for a single client can also be shared with multiple clients using the Mass Transfer feature.
Select the checkbox next to each of the clients that you want to send the form to.
Select the Smart Form button.
Smart Form Button
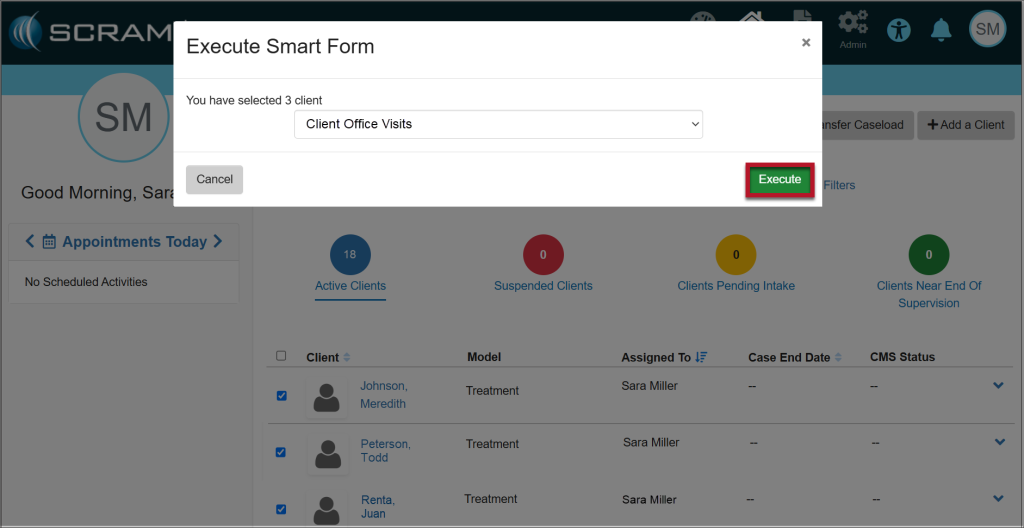
The Execute Smart Form pop-up displays a dropdown of forms you have created. Choose the form you want to use for the selected clients and select the Execute button.
Execute Smart Form
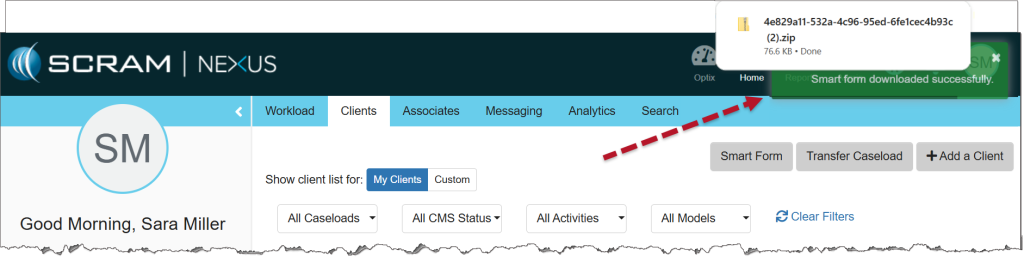
A green Success banner will indicate that the Smart Form was downloaded successfully. The document for each client will be available as a .zip file in your Downloads folder.
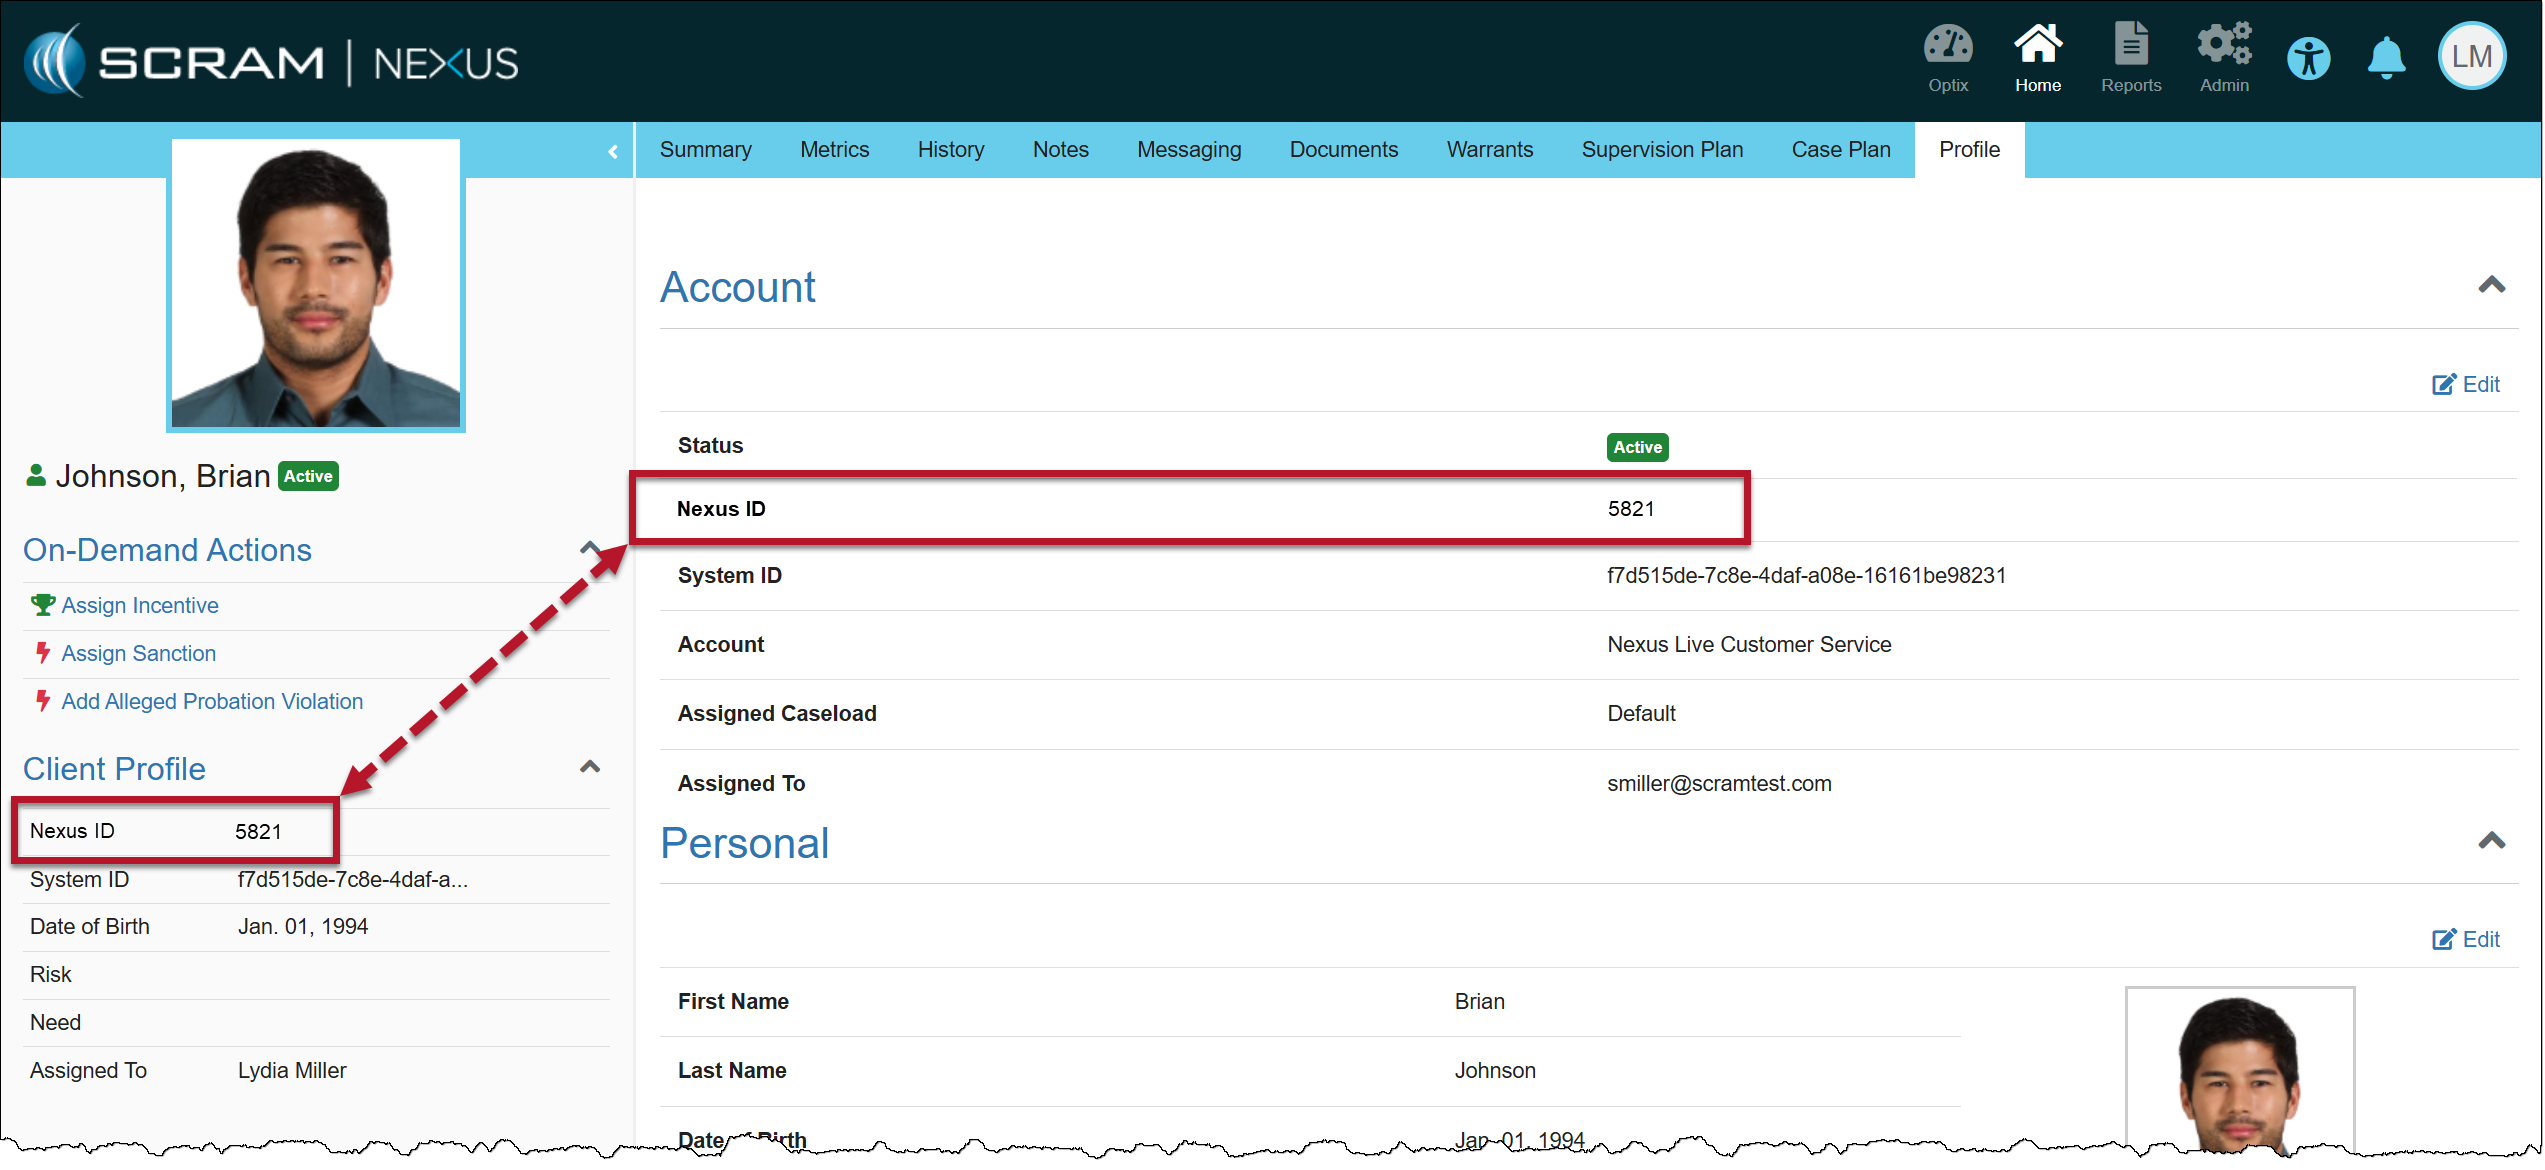
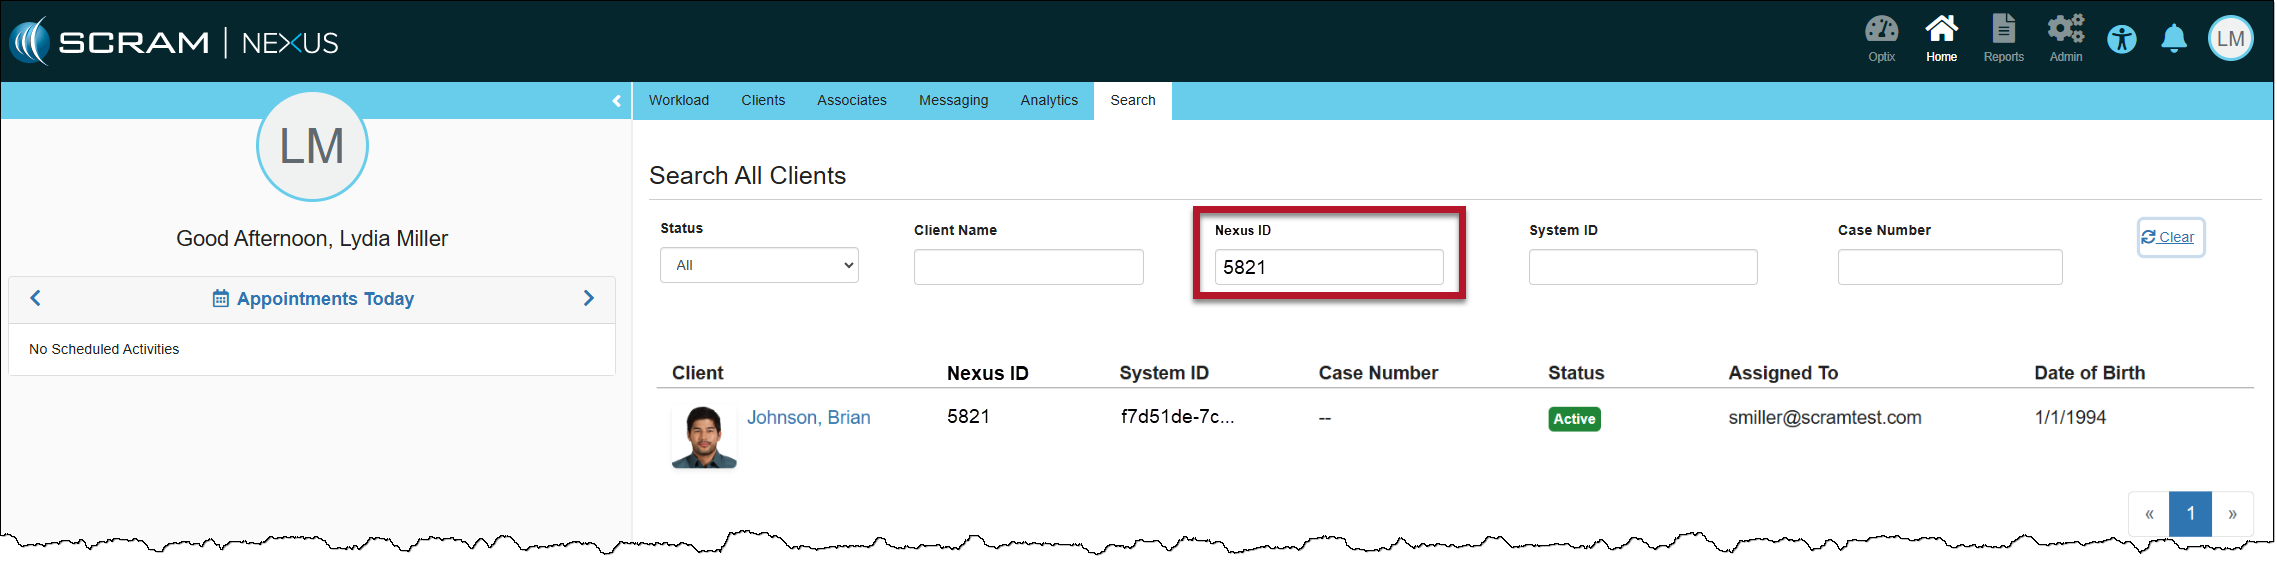
Yesterday, February 4, 2025, SCRAM Systems released an enhancement for your SCRAM Nexus Caseloads. When adding a new client to your Nexus Caseload, a Nexus ID number will be generated in addition to the System ID.
The Nexus ID will be displayed on the client’s sidebar and may be used when you search your client caseload.
Client Profile Page with Nexus IDClient Search Page
The Nexus ID is an autogenerated number that cannot be edited.
This easy-to-remember ID number may be used to expedite your client search by making it easier for you to distinguish between clients with similar names.
On December 19, 2024, SCRAM Systems released an enhancement for your Nexus caseload. This enhancement will allow you to schedule randomized drug tests for your client.
The service for the randomized scheduling of drug tests must be enabled for your account before you may utilize it. For more information, contact your SCRAM Systems Account Representative.
Once enabled, you may select the Random schedule option when adding a Drug Test Activity to your client’s supervision plan.
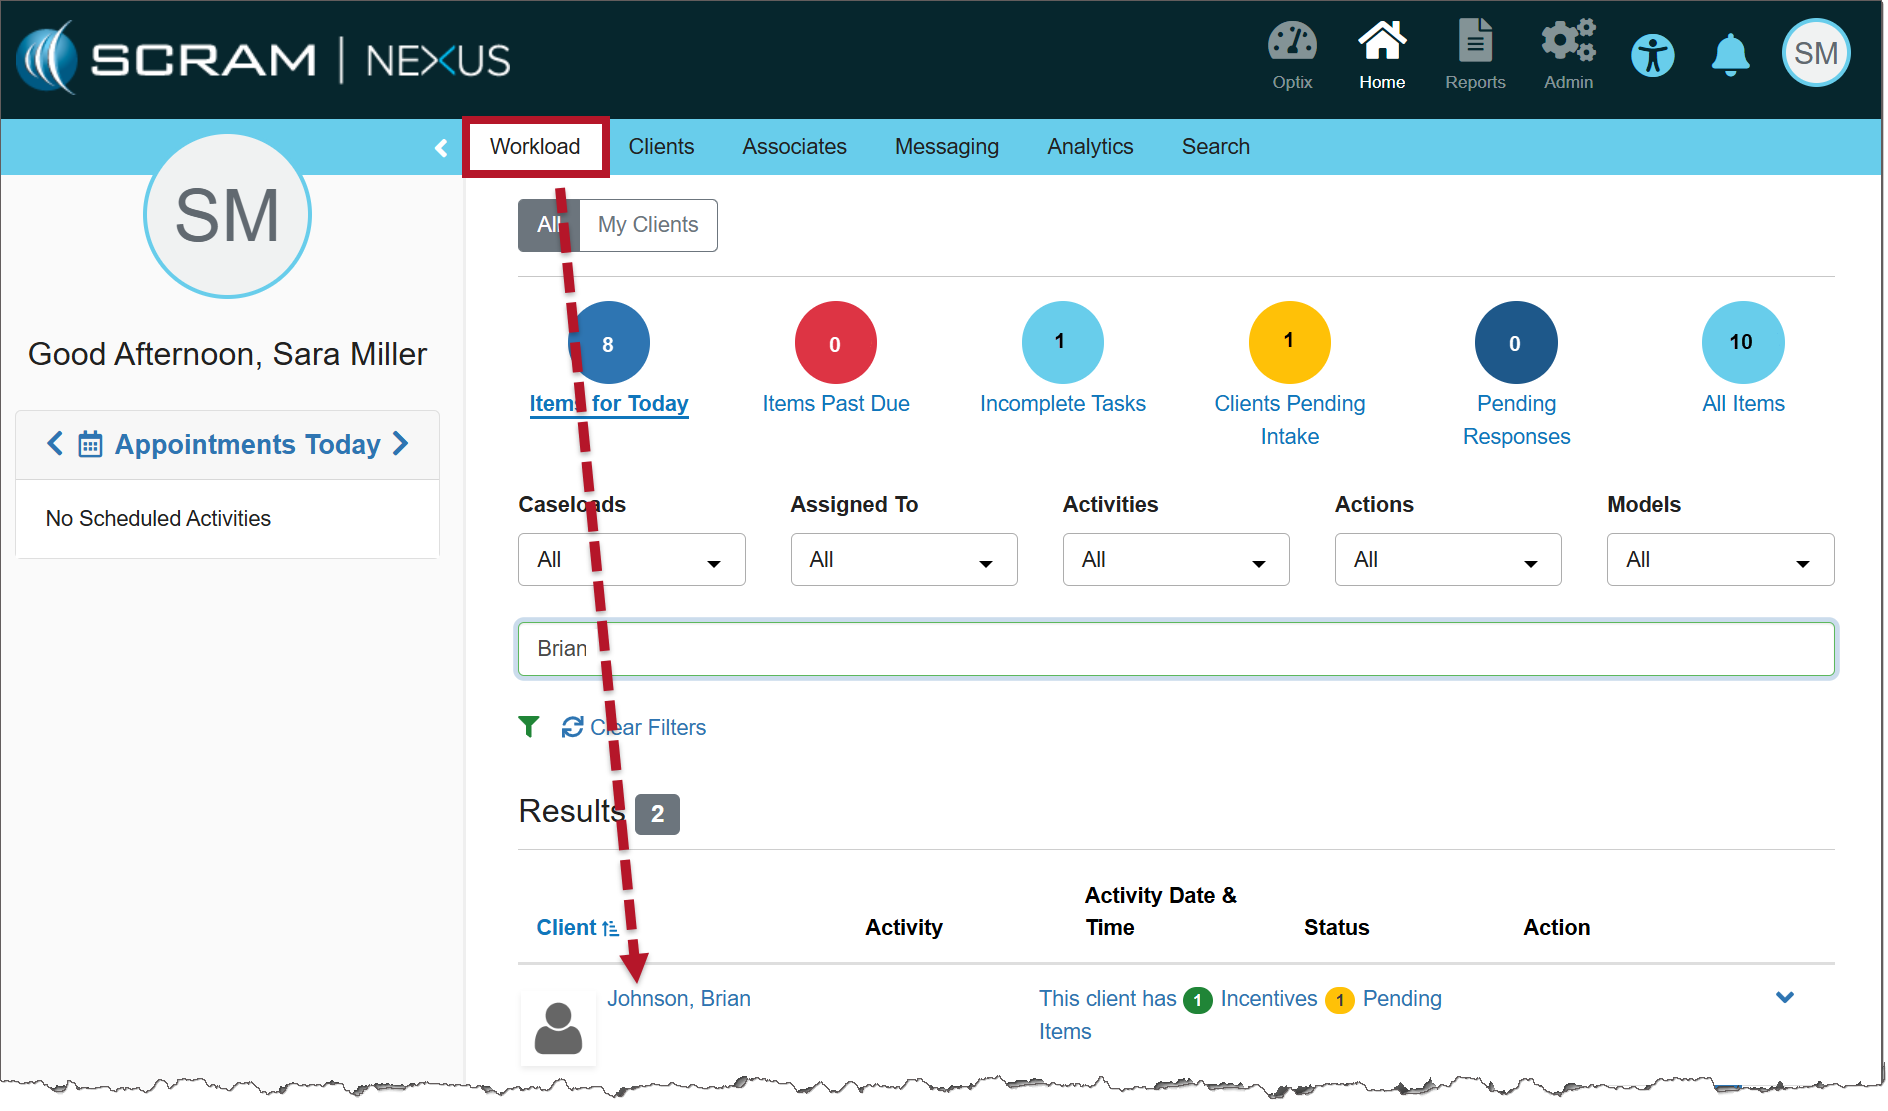
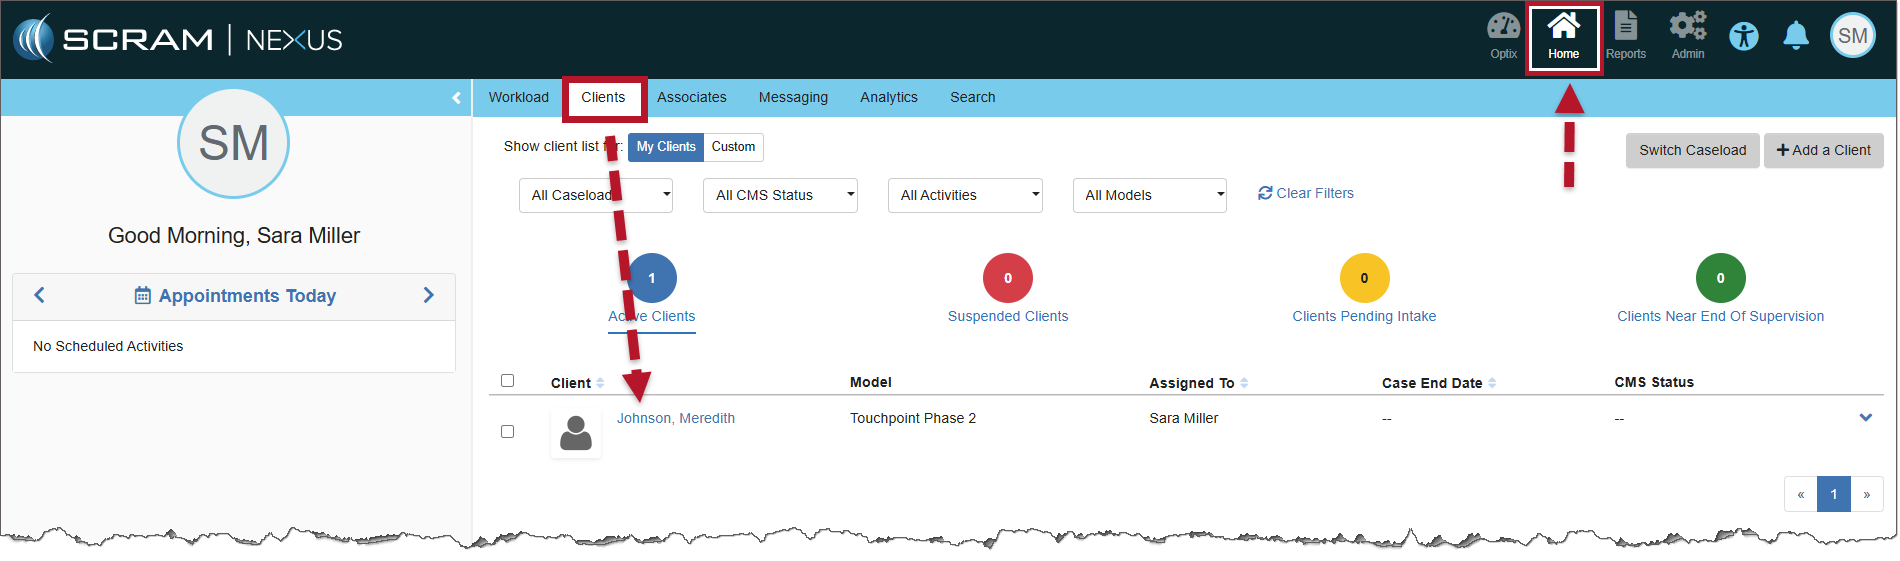
From the Nexus Workload page, select the client’s name hyperlink.
Nexus Clients tab (click to enlarge)
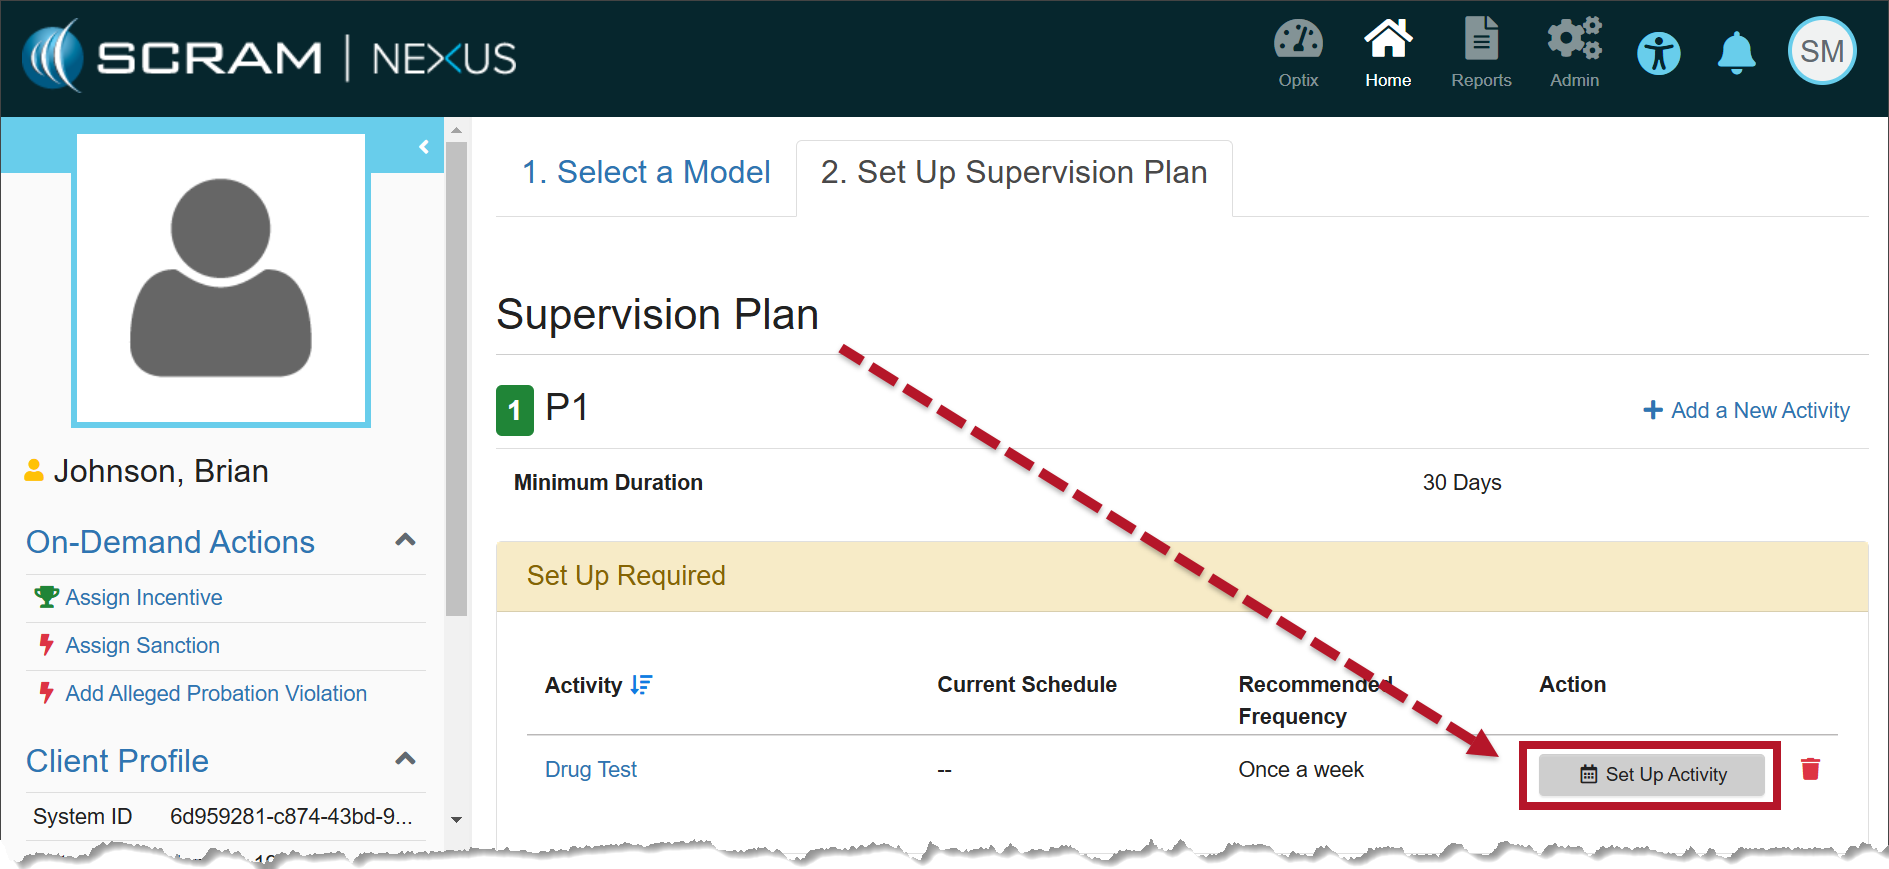
On the client’s Summary page, select the Supervision Plan tab.
In the Supervision Plan section, select the Set Up Activity button.
Supervision Plan information (click to enlarge)
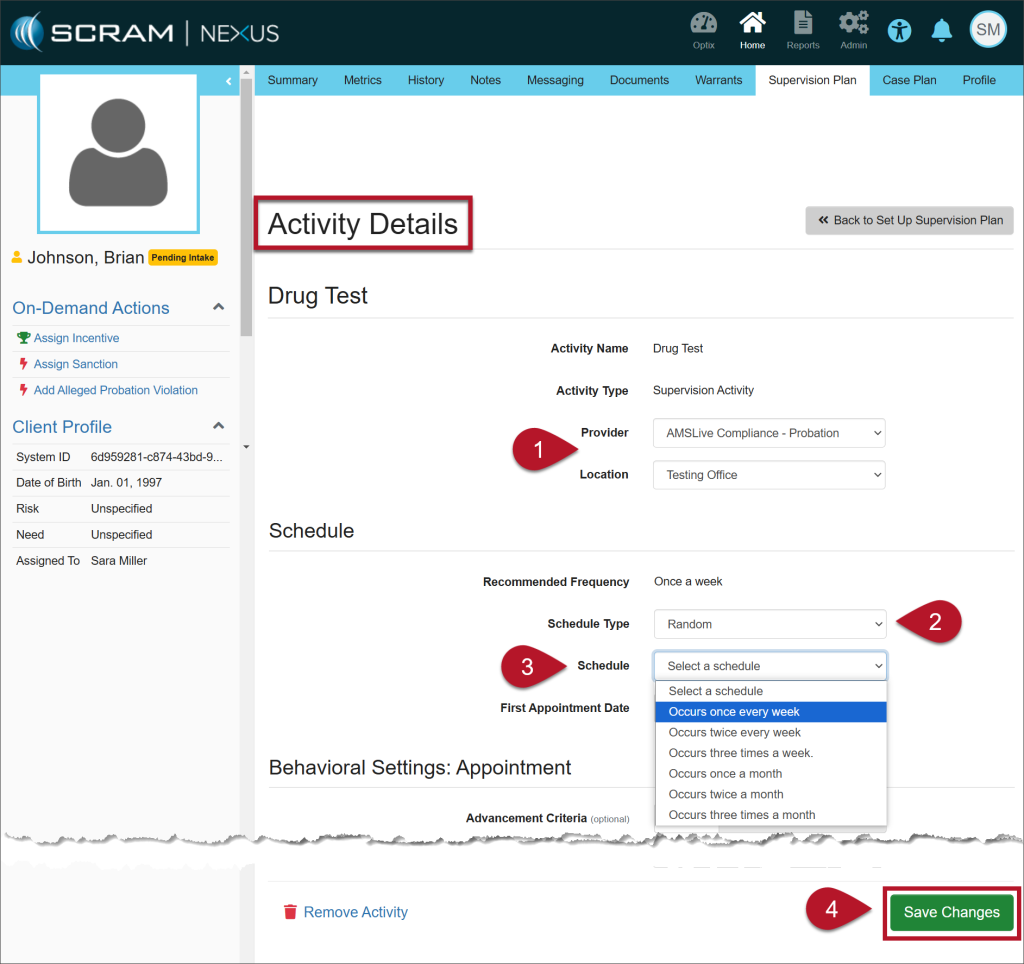
On the Activity Details page, enter the details for the Drug Test Activity:
Select the Provider and the Location from the dropdown menus.
On the Schedule Type dropdown menu, select the option of Random.
Once selected, the Specific Time field is no longer editable.
The Recommended Frequency is based on the model for the client, but you may choose from the other options in the Schedule dropdown.
Select the Save Changes button.
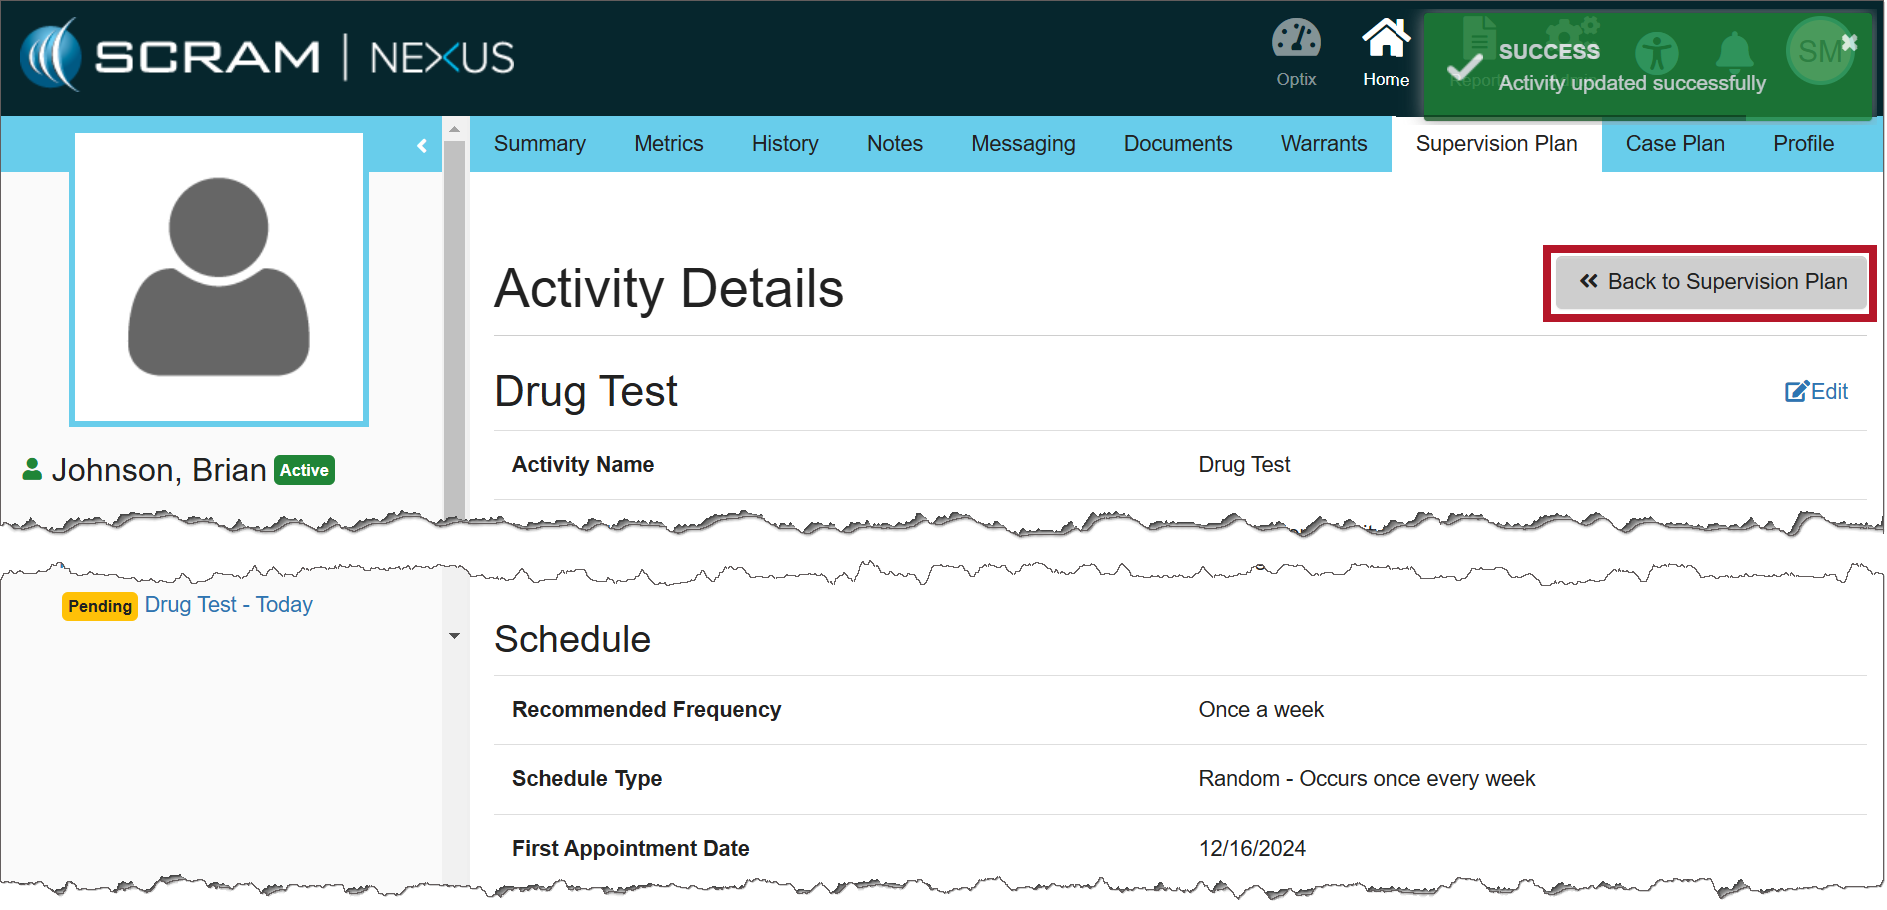
Activity Details page (click to enlarge)
Once saved, a green success banner will display on the page. You may view the details for the Drug Test Activity in the Activity Details section.
To return to the Supervision Plan page, select the >>Back to Supervision Plan button.
Activity Details page (click to enlarge)
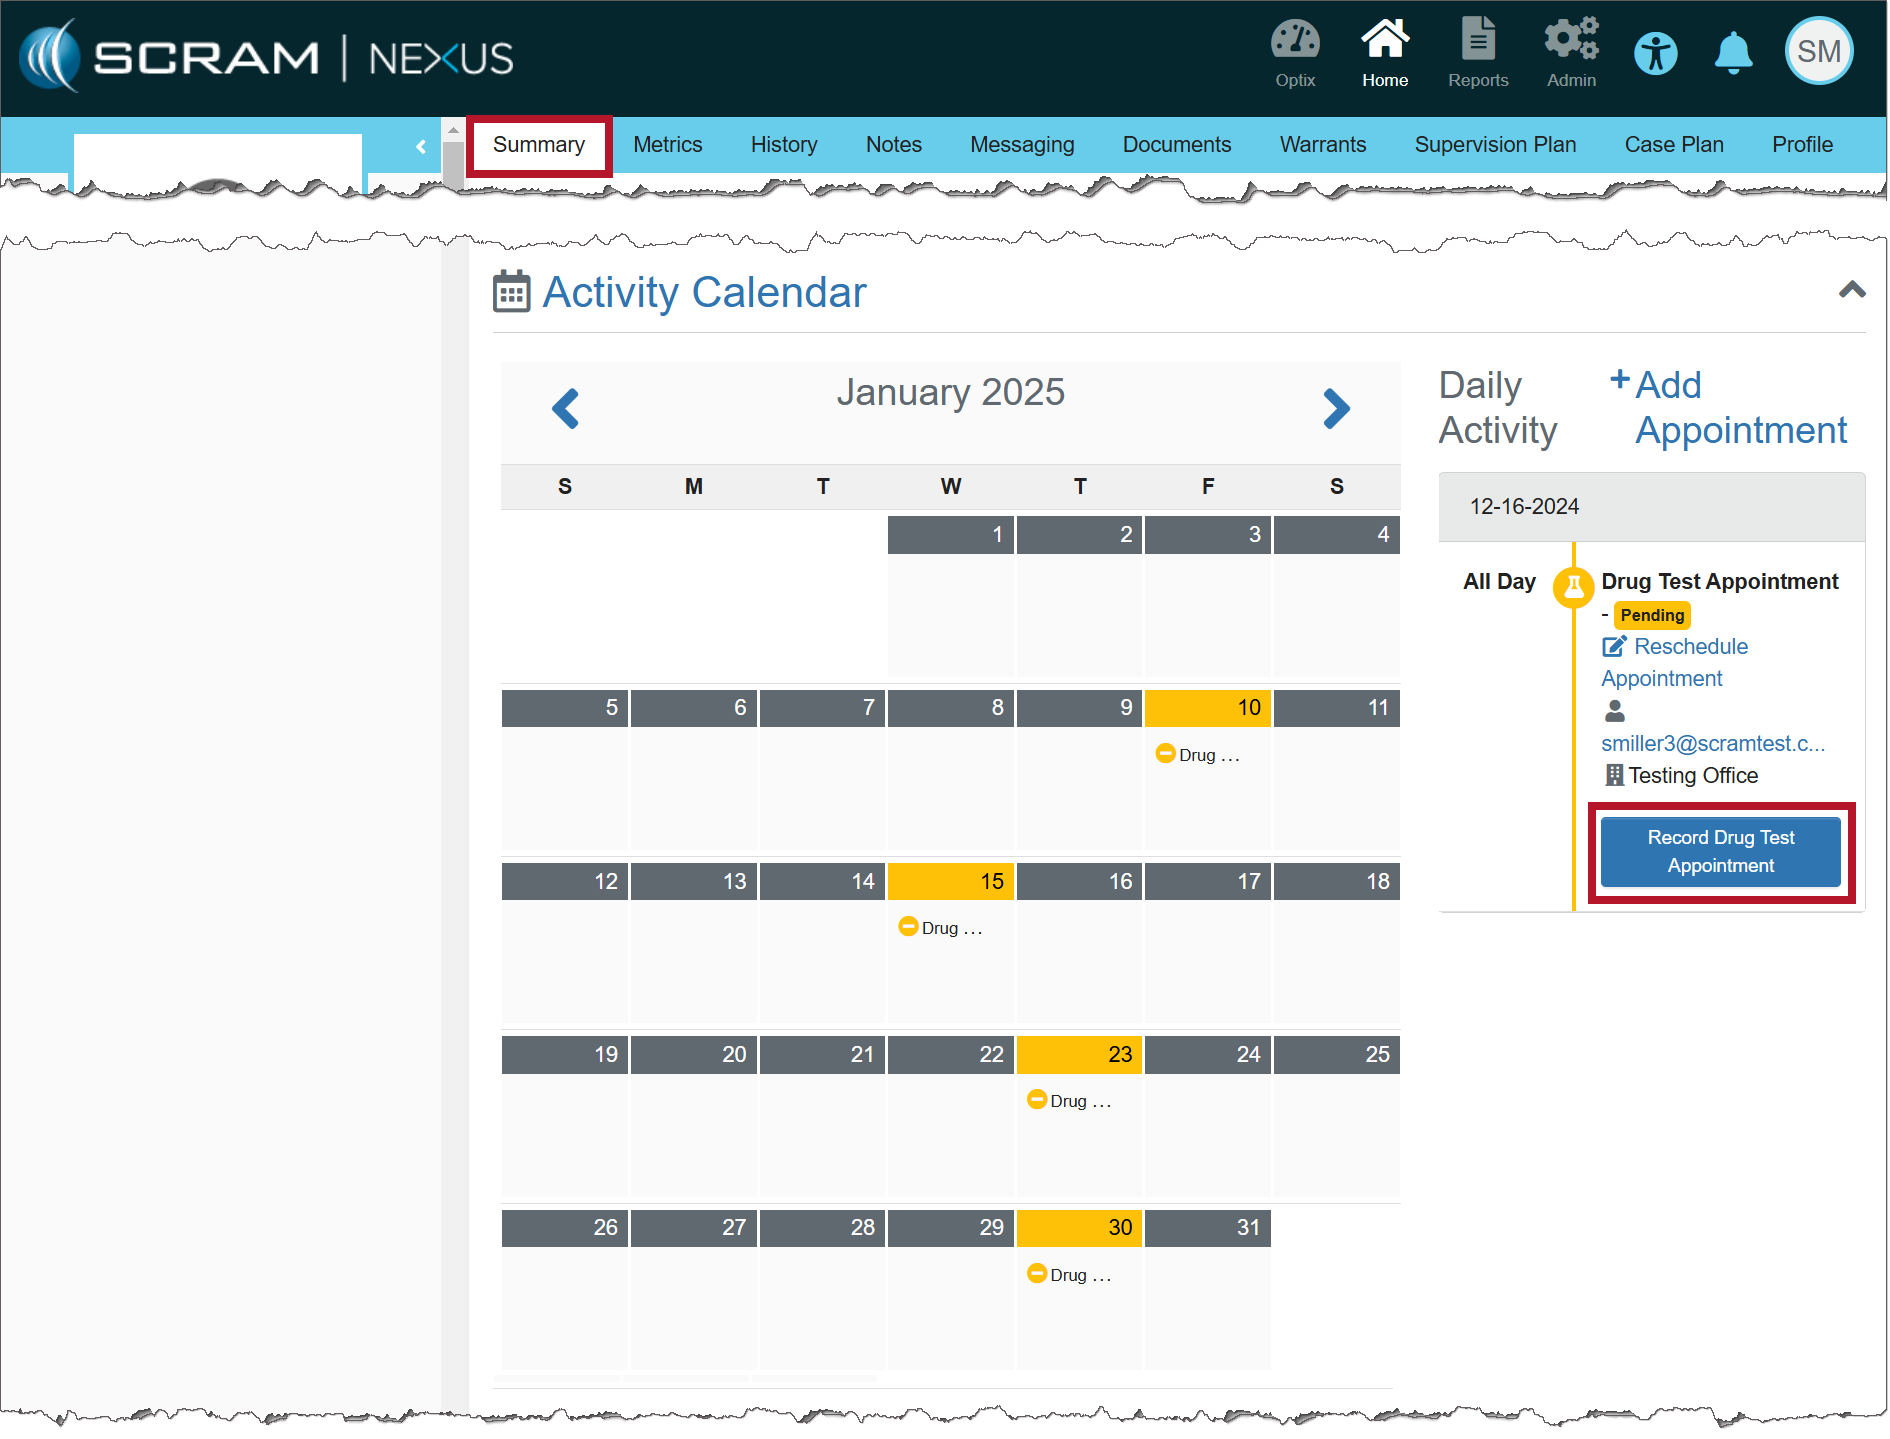
The calendar on the client’s Summary page will display the drug tests interspersed randomly based on the frequency entered.
Activity Calendar (click to enlarge)
Important Notes:
When creating a random Drug Test schedule, appointments are not scheduled on weekends or Federal holidays.
The client will receive an automated push notification by 5:00 AM via TouchPoint Messaging that a drug test must be completed that day.
You may cancel or reschedule the random Drug Test appointment using the established process.
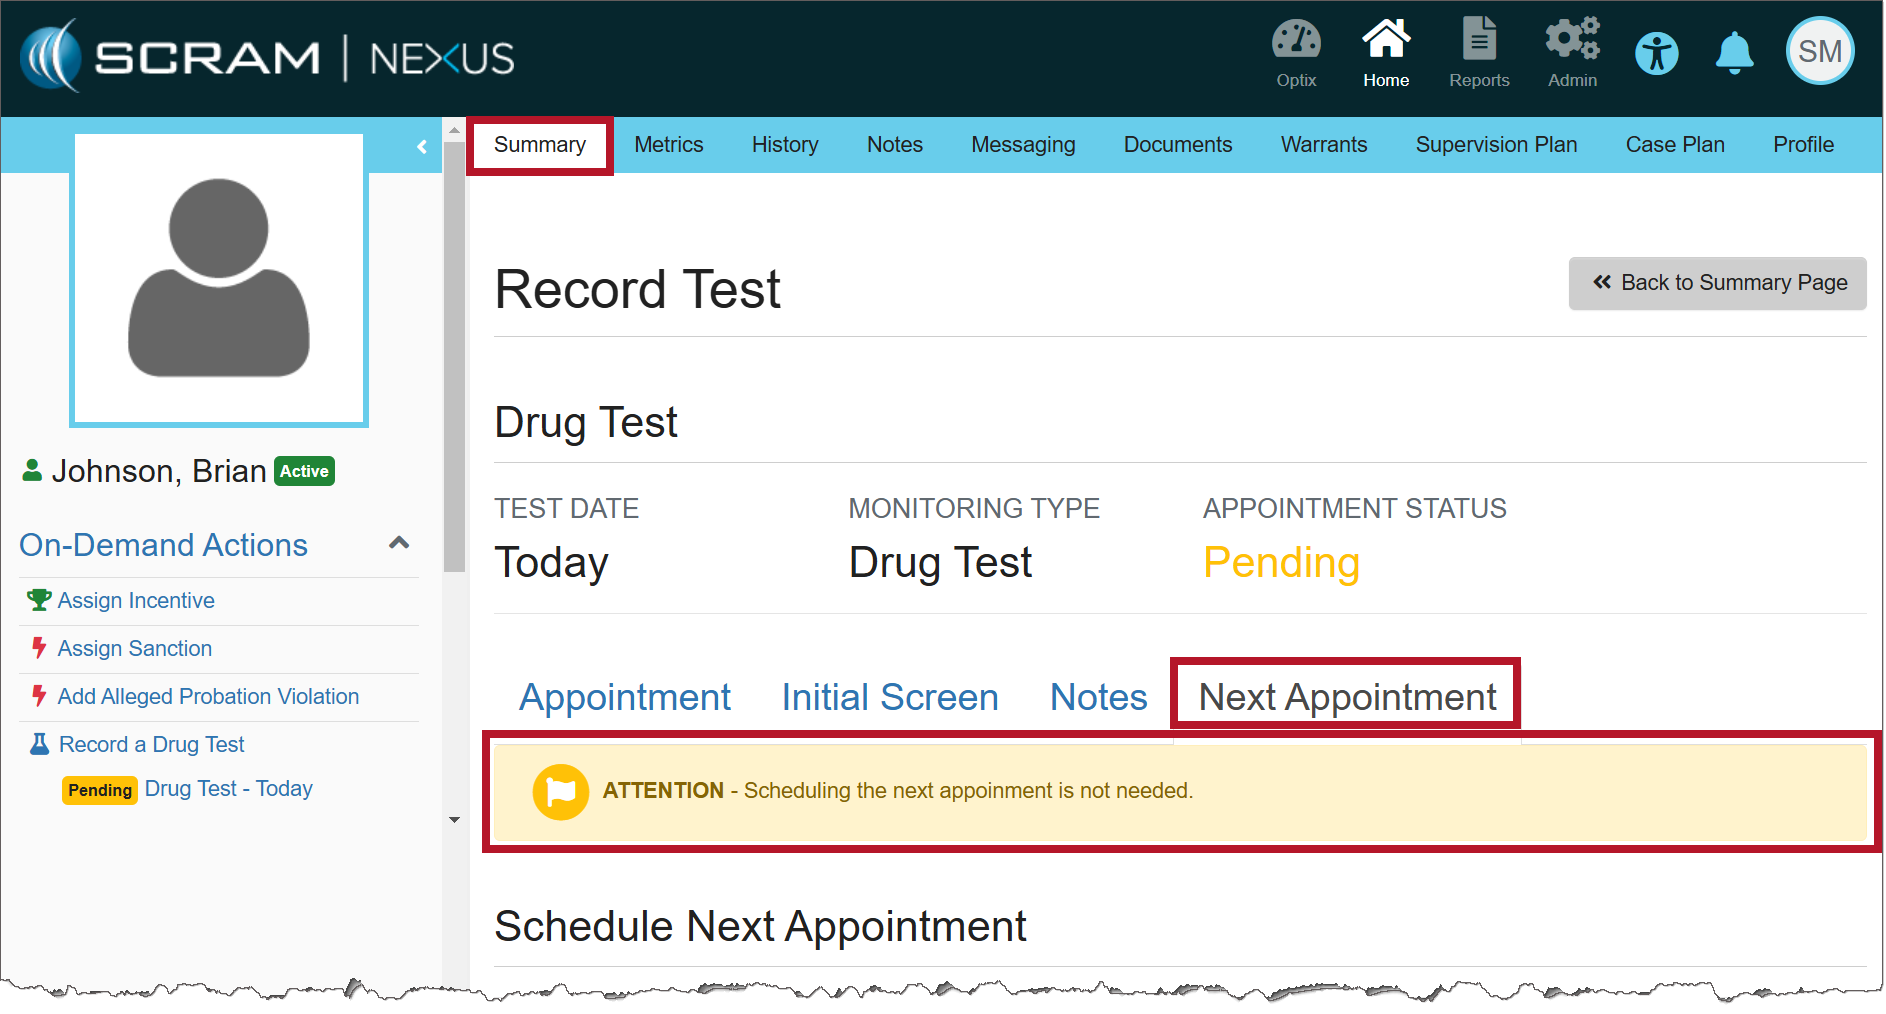
Entering the Results of the Drug Test
When recording the results of the Drug Test Appointment, there is no need to schedule the client’s next appointment because the random schedule has already been established.
The services for the mass transfer of clients and for managing fines and fees must be enabled before you may utilize them. For more information, contact your SCRAM Systems Account Representative.
On December 12, 2024, SCRAM Systems released two enhancements for your Nexus caseloads. These enhancements are:
SCRAM Nexus Mass Transfer
SCRAM Nexus Fines & Fees
Mass Transfer
The first enhancement available is SCRAM Nexus Mass Transfer. Once enabled, you may transfer a caseload or multiple clients in bulk to other officers or caseloads.
Select the Clients tab from the Nexus Workload page.
Select the checkbox next to each of the clients you’d like to transfer, then select the Transfer Caseload button.
Nexus Clients page (click to enlarge)
On the Transfer Caseloads pop-up window, select the Caseload and Officer from the dropdown menus. Both fields are required.
Select the Save button.
Transfer Caseloads pop-up (click to enlarge)
Once saved, a success pop-up banner will display. Additionally, the clients will be displayed on the transferred officer’s Clients page.
The Transferred Officer’s Clients page (click to enlarge)
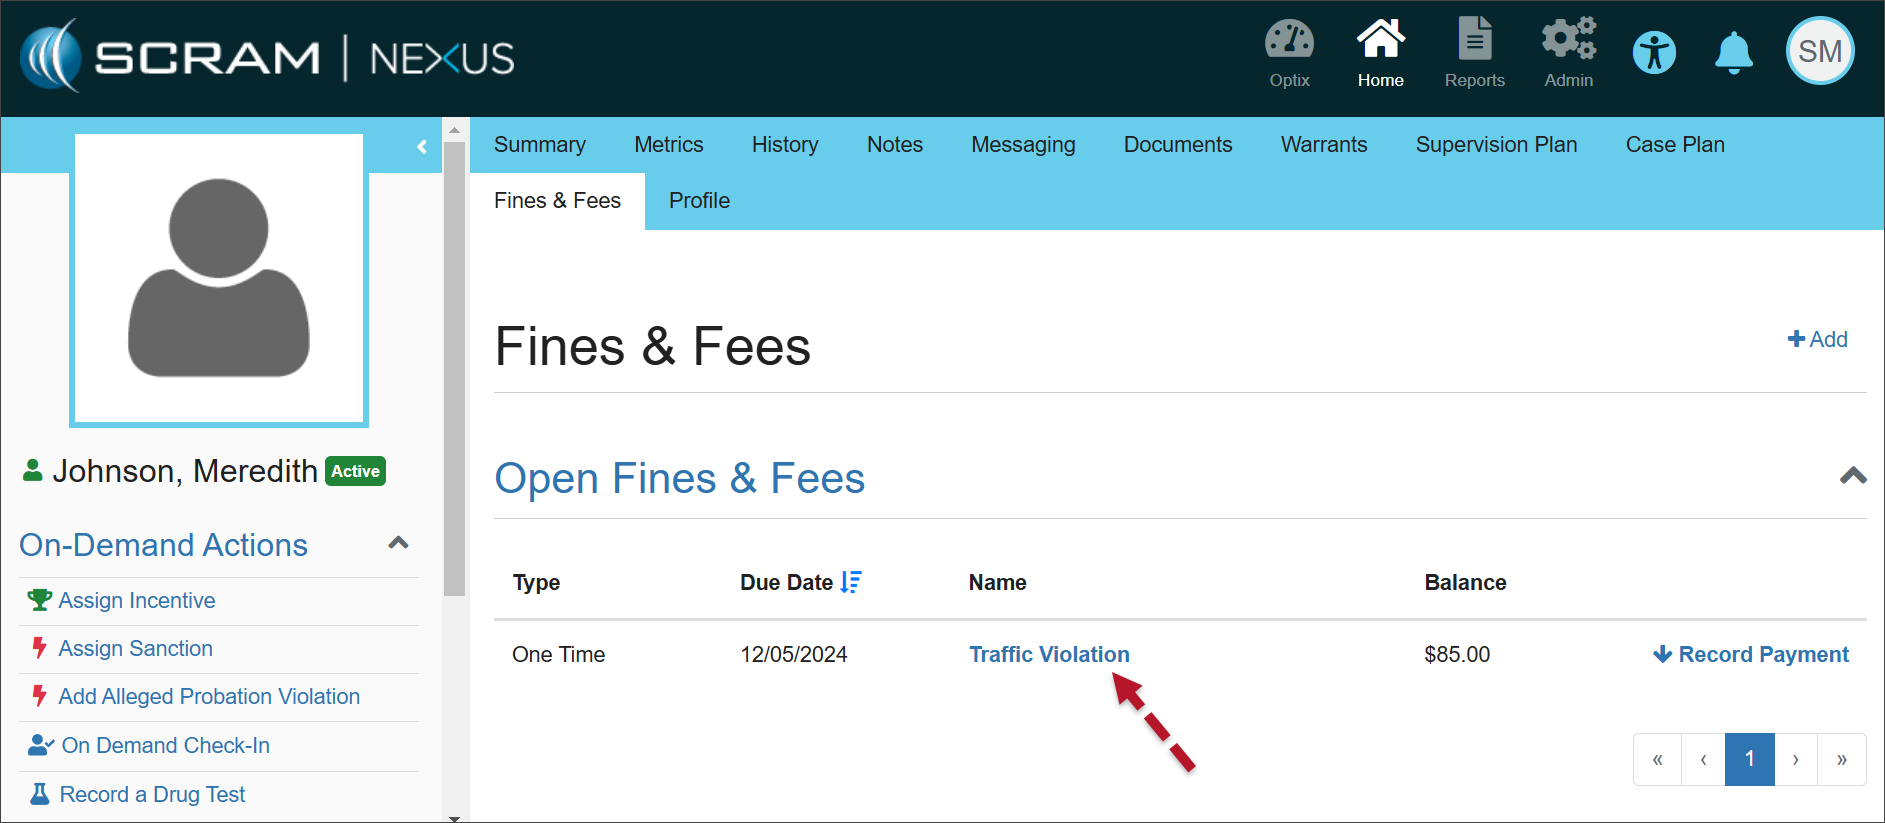
Fines & Fees
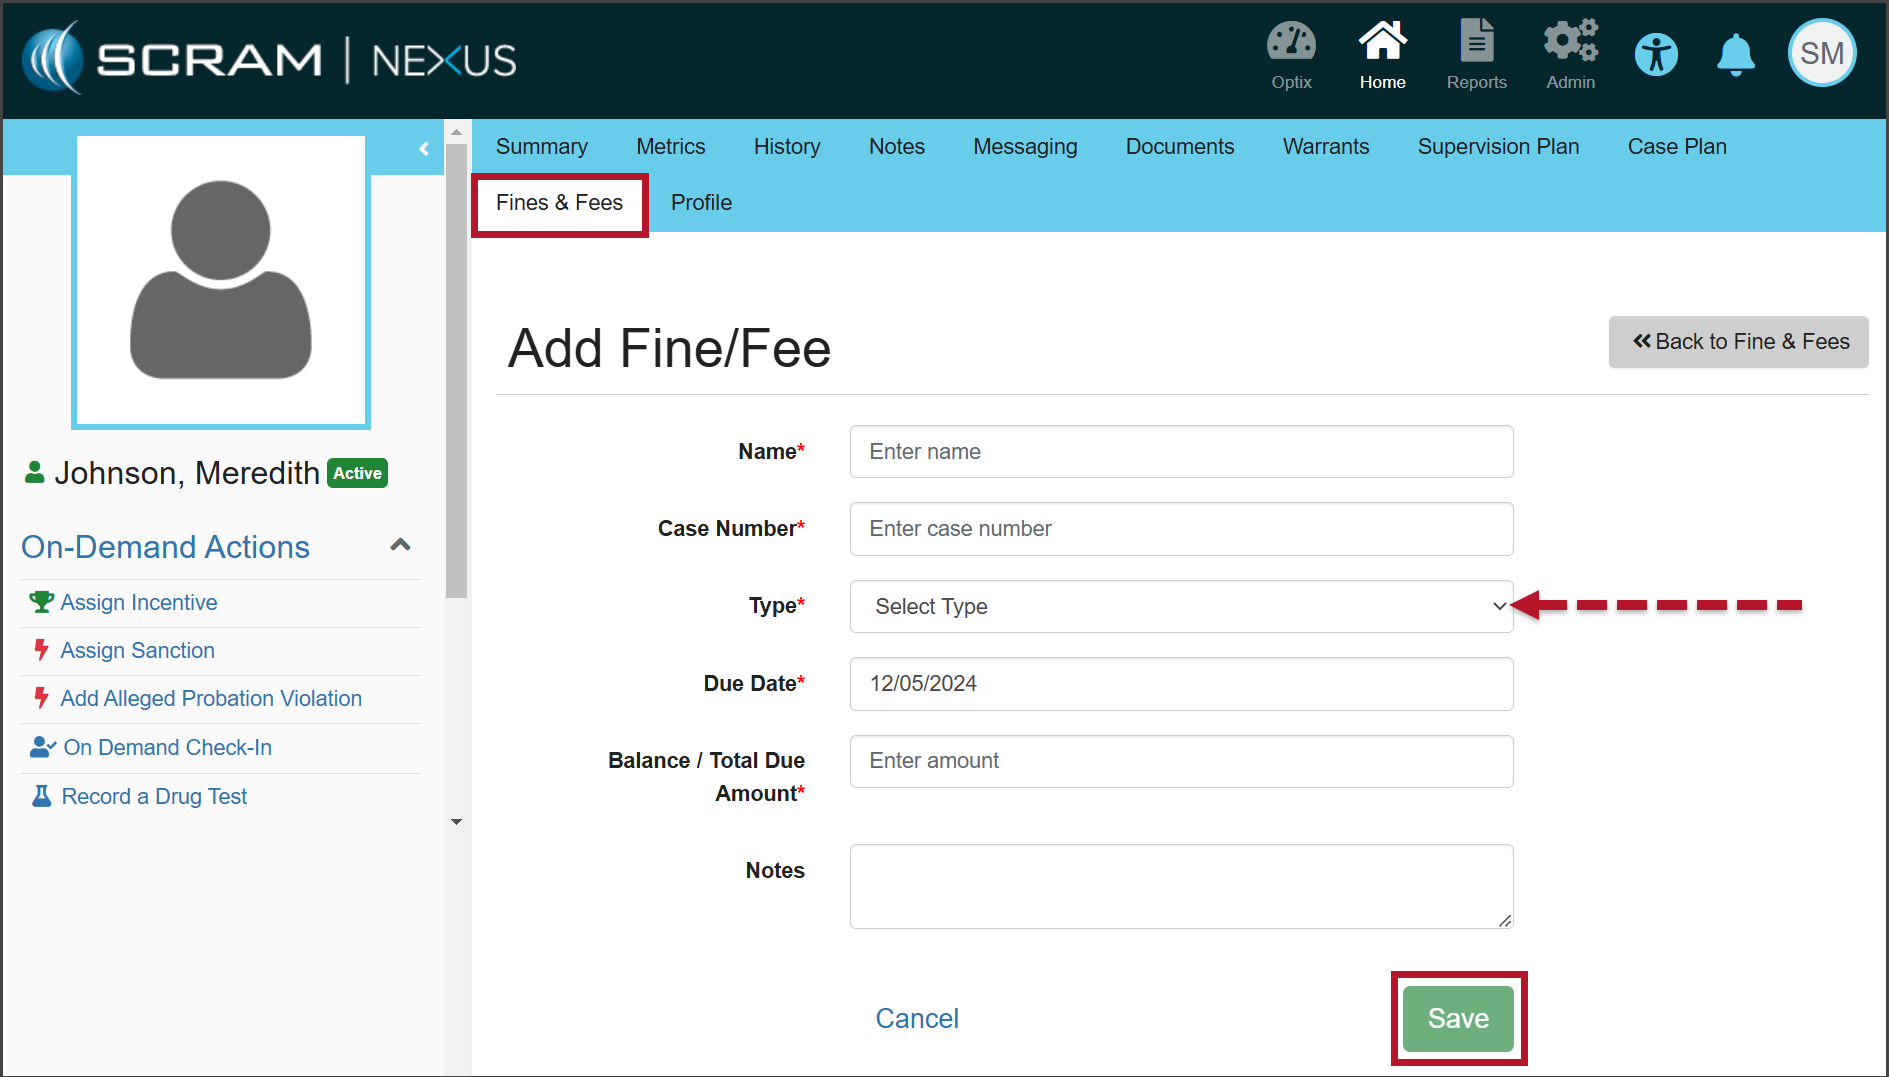
The second enhancement is SCRAM Nexus Fines & Fees. Once enabled, you may add, edit, and record payment for any fines and fees issued for the client.
Navigate to the Fines & Fees Tab
Select the client’s name hyperlink from the Clients tab on the Home page.
Nexus Clients page (click to enlarge)
On the Client Summary page, select the Fines & Fees tab.
The Add Fine/Fee page (click to enlarge)
Enter the details for the fine or fee, on the Add Fine/Fee page. Unless otherwise indicated, all fields are required.
Open the Type dropdown menu and select whether this fine or fee is One Time or Scheduled.
After entering the information, select the Save button.
Once saved, a green “success” banner is displayed.
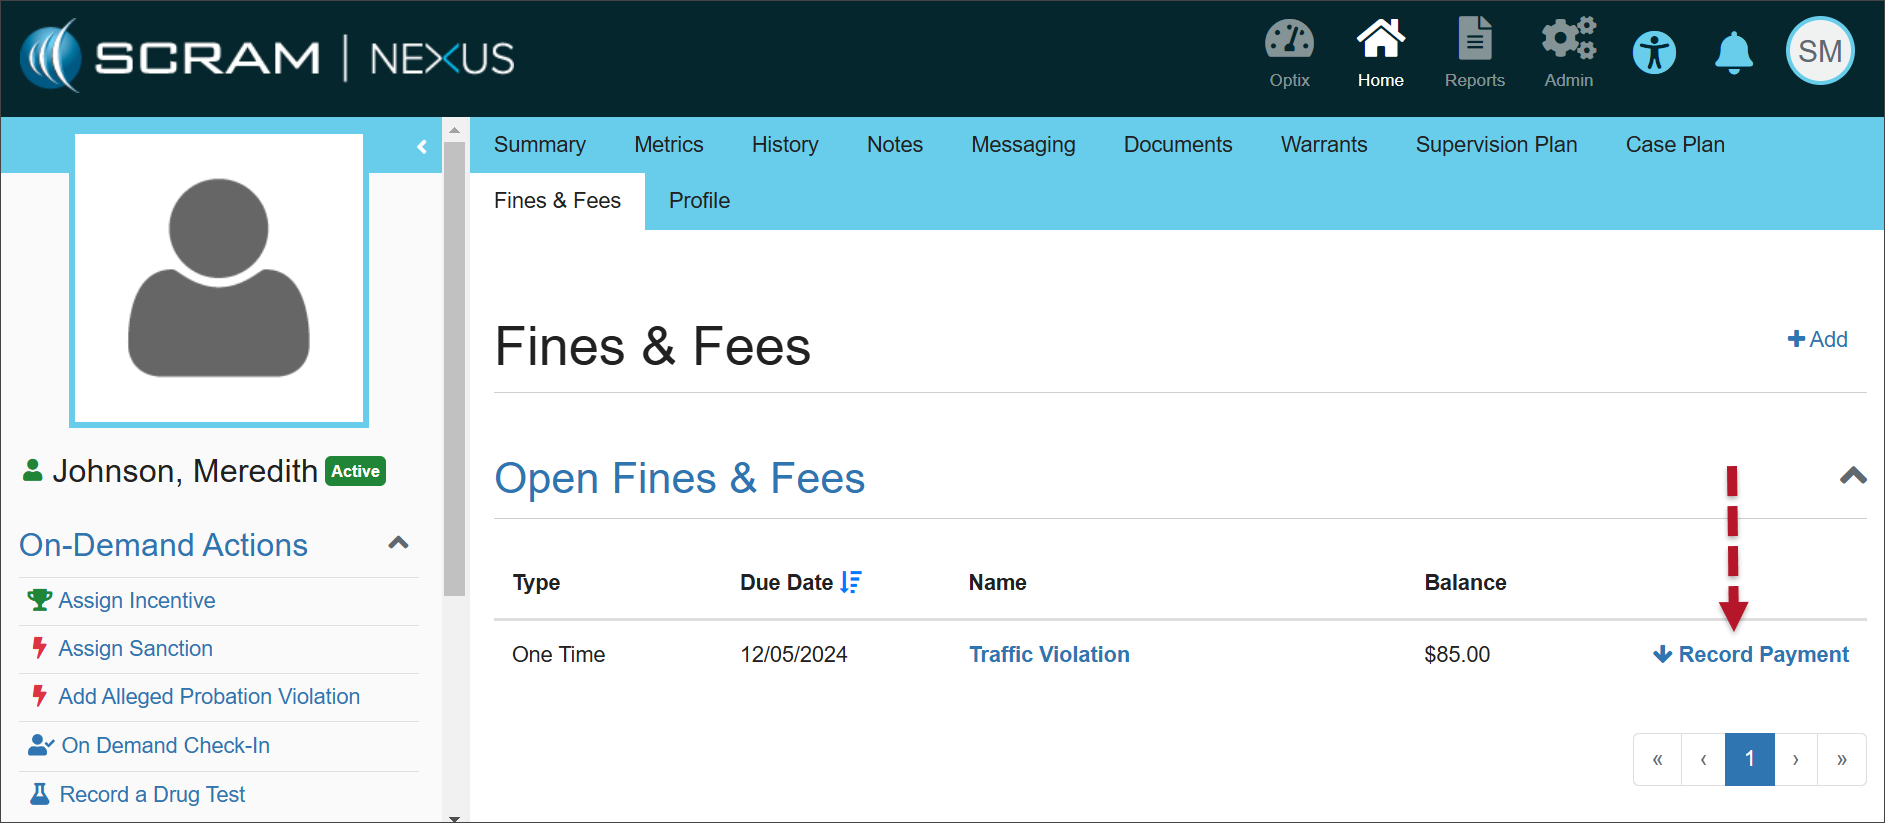
Record Payment of Fines & Fees
When recording a payment, users have the ability to record complete or partial payments submitted by the client.
On the Open Fines & Fees page, select the Record Payment hyperlink for the fine or fee for which you would like to record payment.
Open Fines & Fees (click to enlarge)
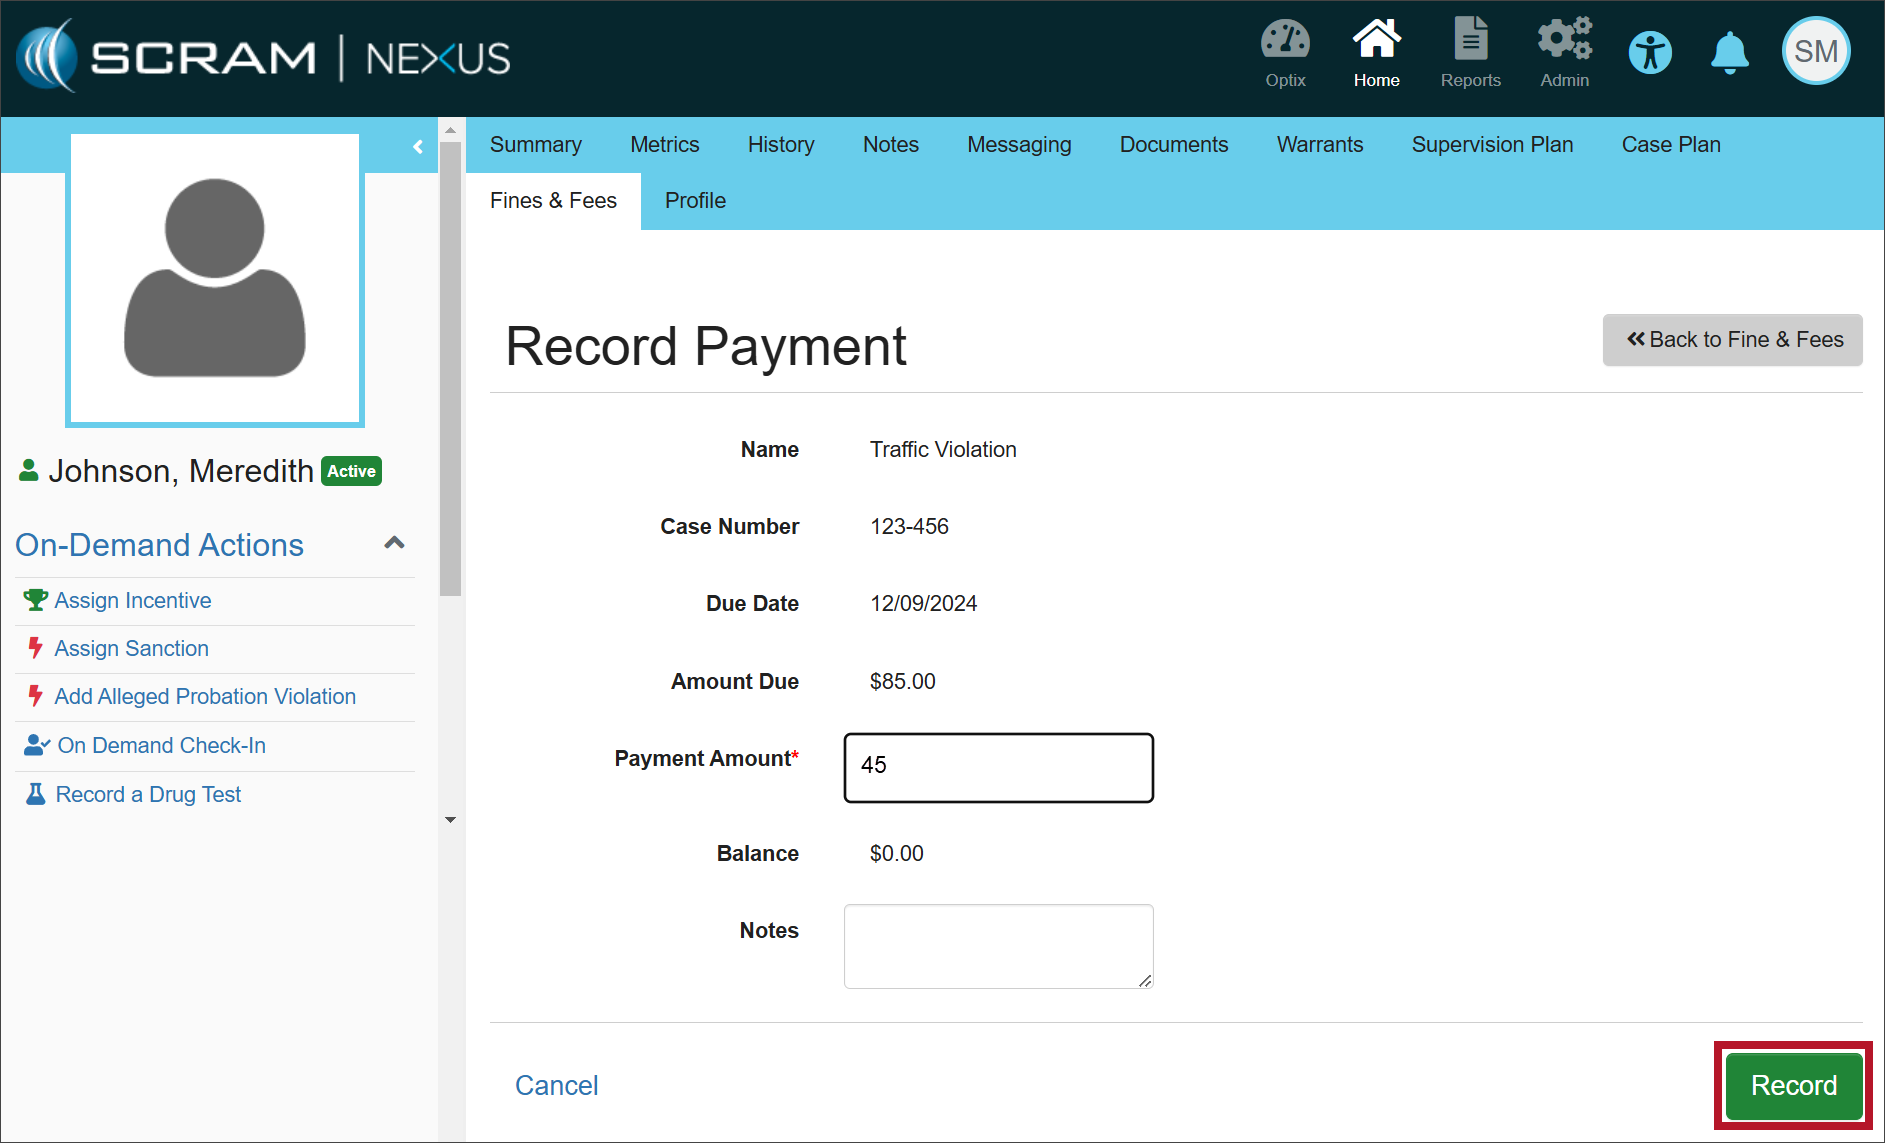
Enter the payment amount and any relevant notes, then select the Record button.
Record Payment page (click to enlarge)
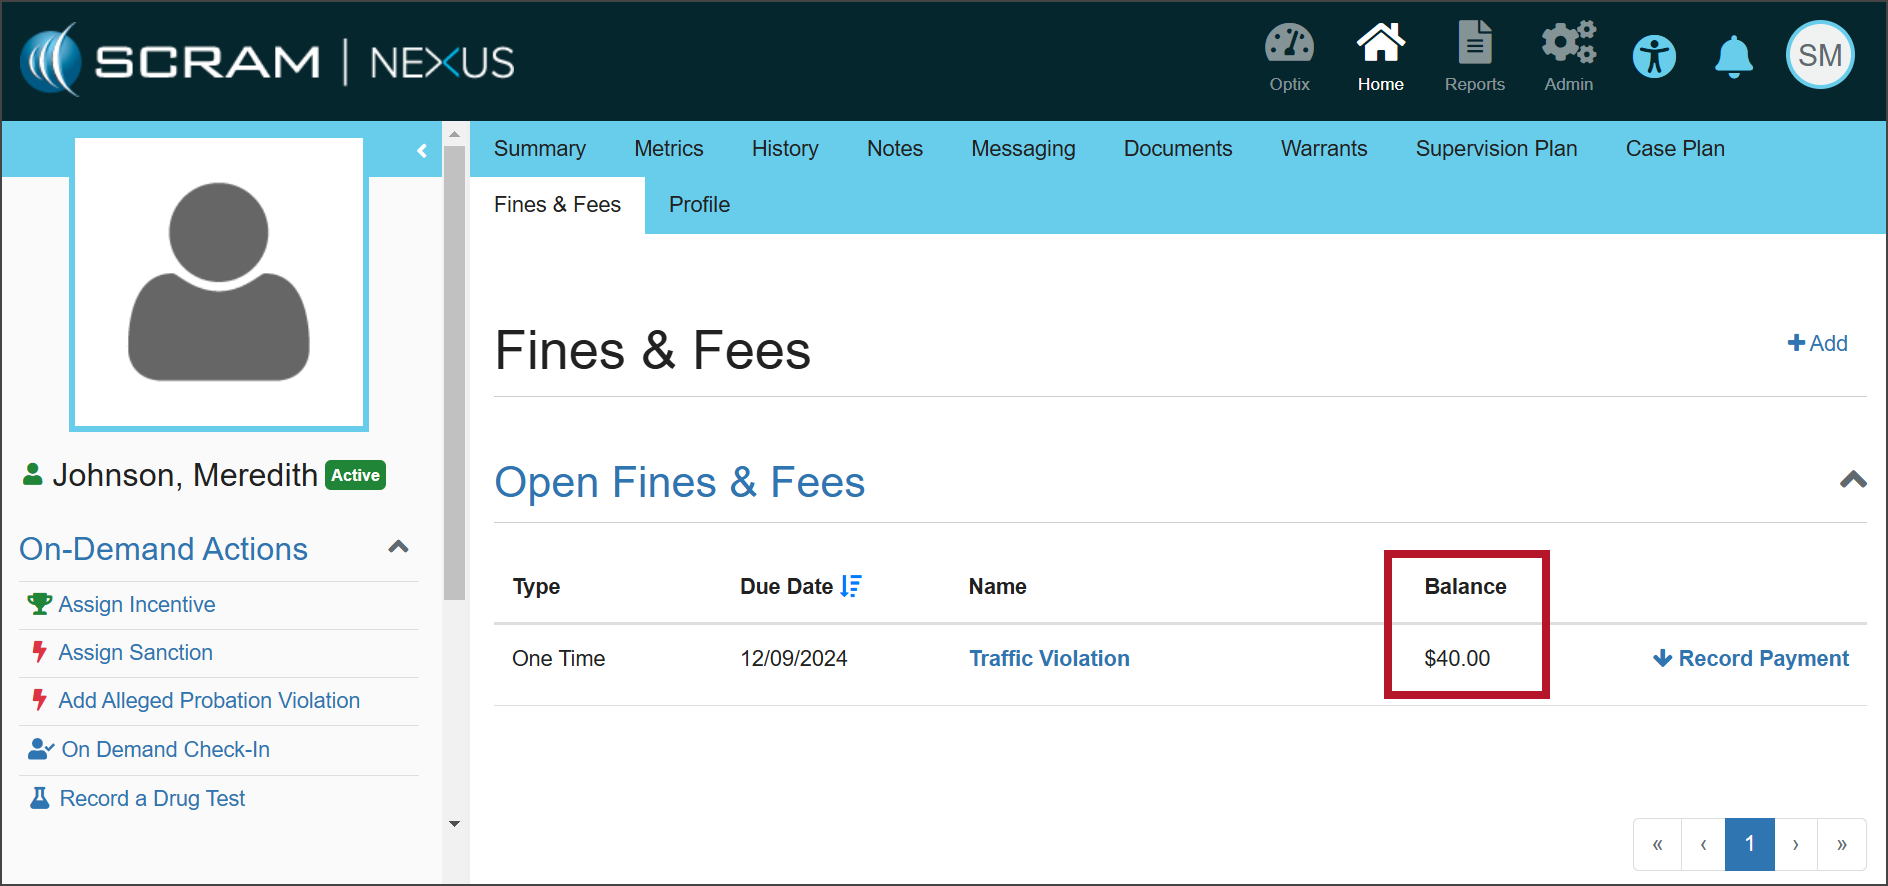
Once a fine or fee has been saved, the Open Fines & Fees section will display the details for each fine or fee with an “open” status.
When payment is made in full, the Balance will show as $0.00. When partial payment is made, the Balance will reflect the amount that remains due.
Fines & Fees (click to enlarge)
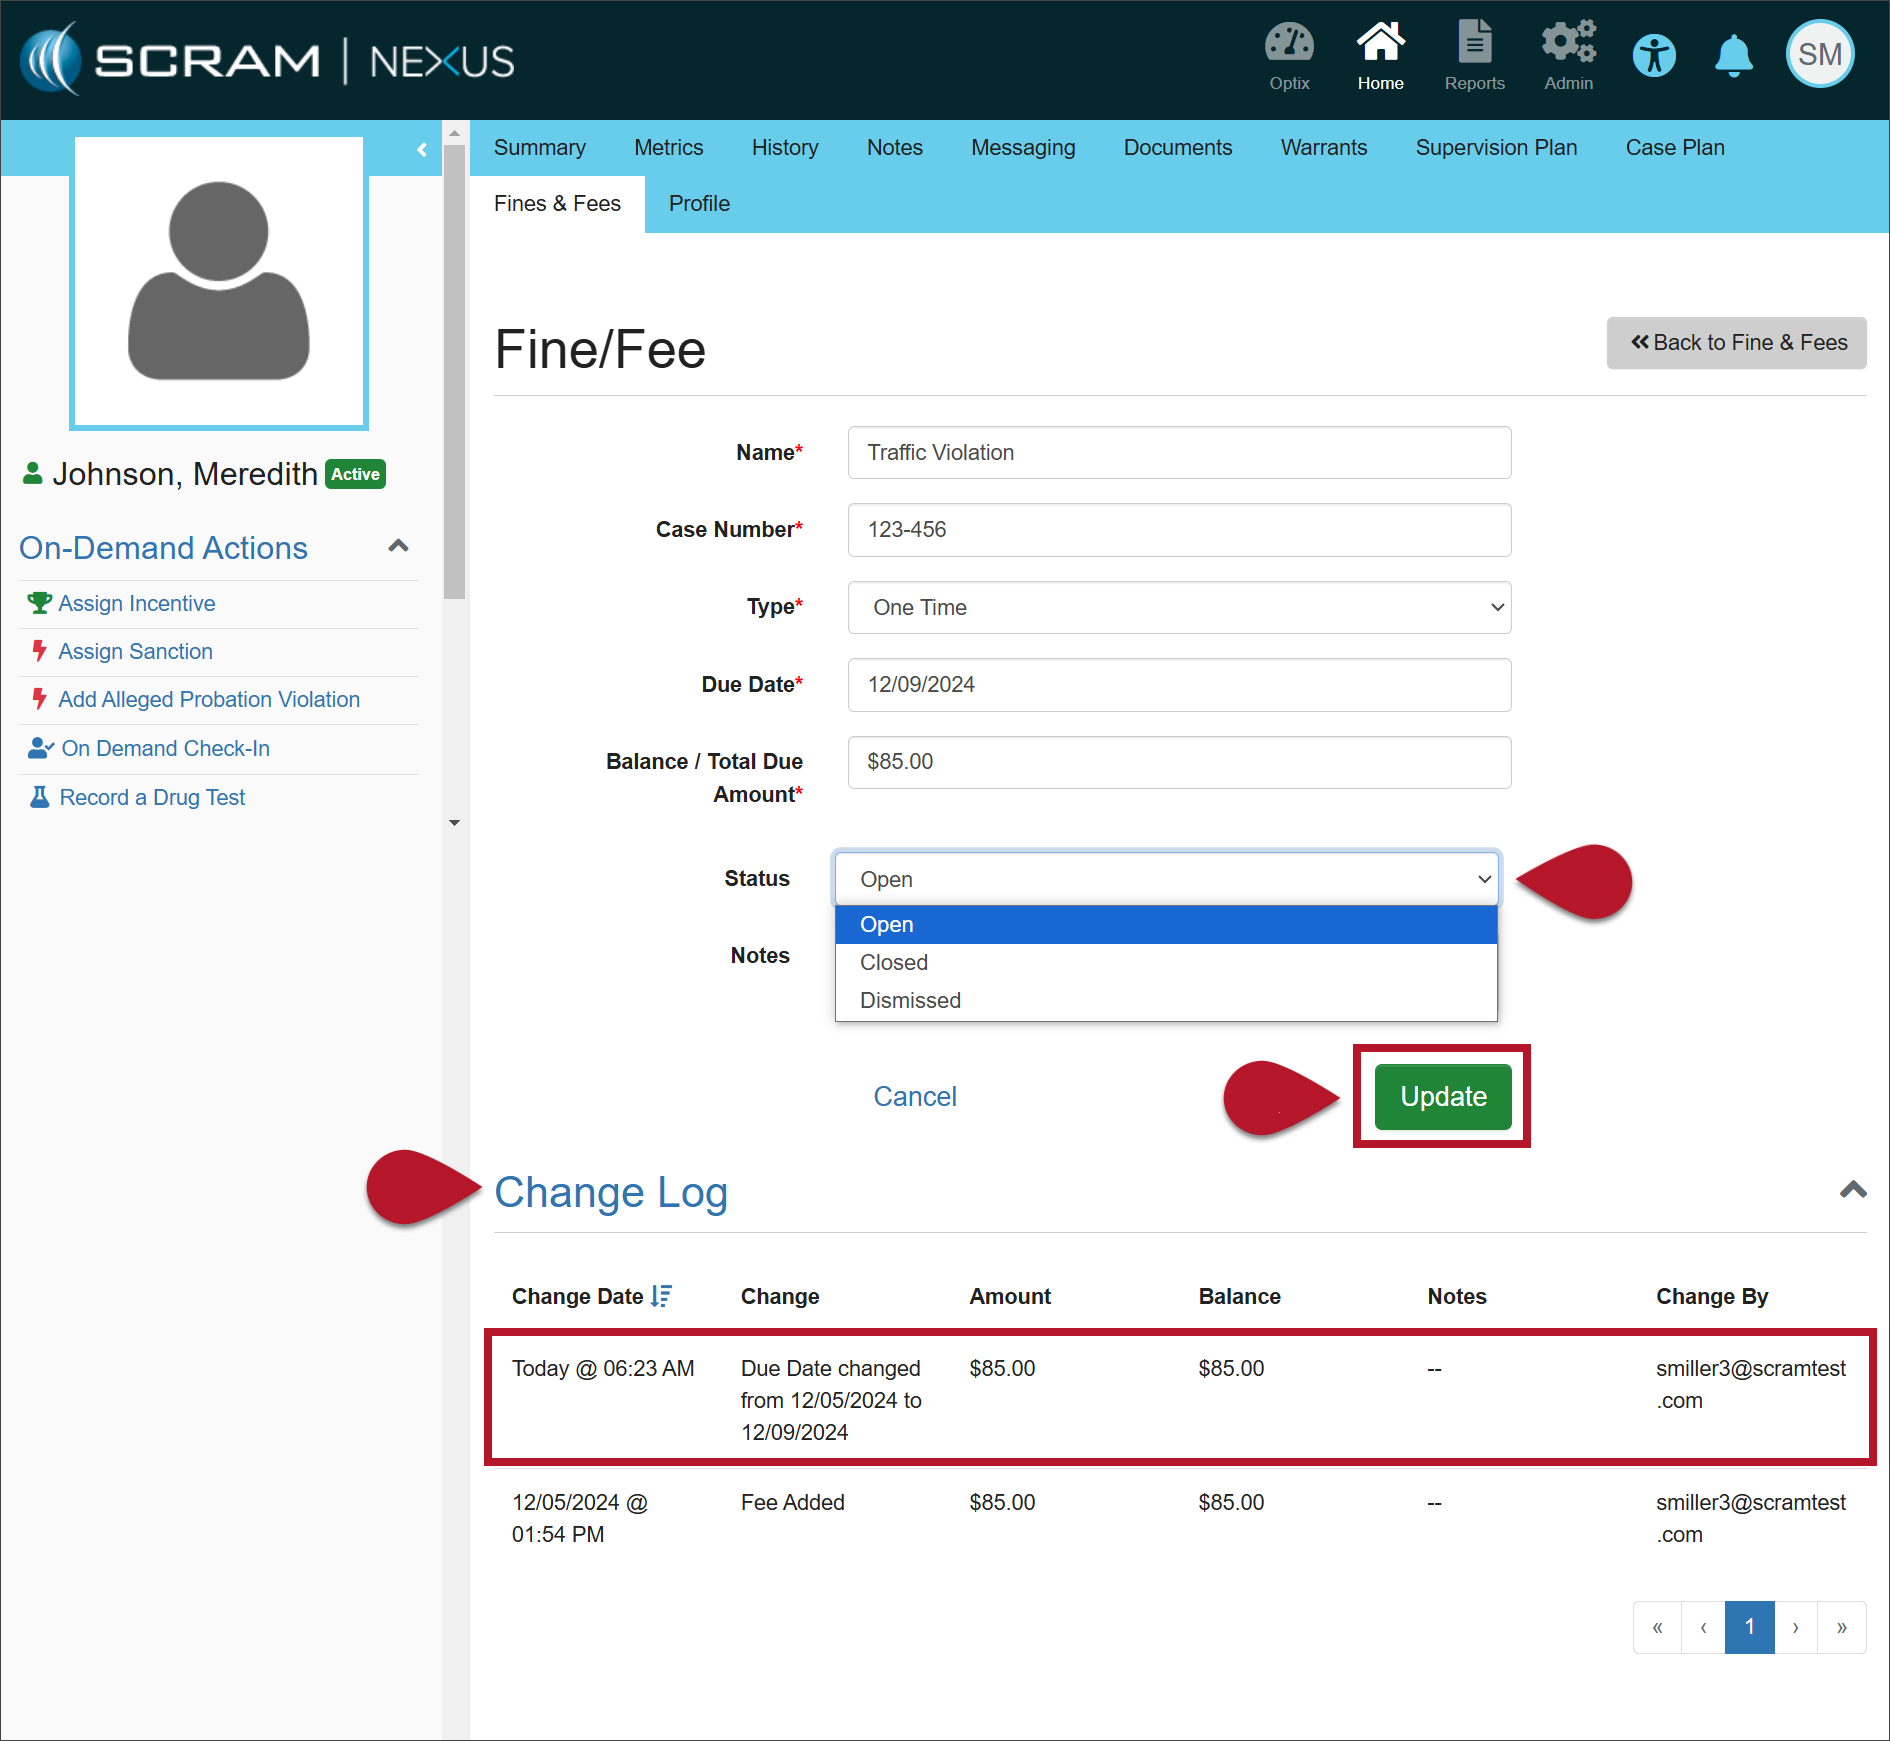
Once payment has been made in full, you must manually change the status of the fine or fee to “Closed.” If the status is not closed, the fee will appear under Open Fines & Fees with a balance of $0.00.
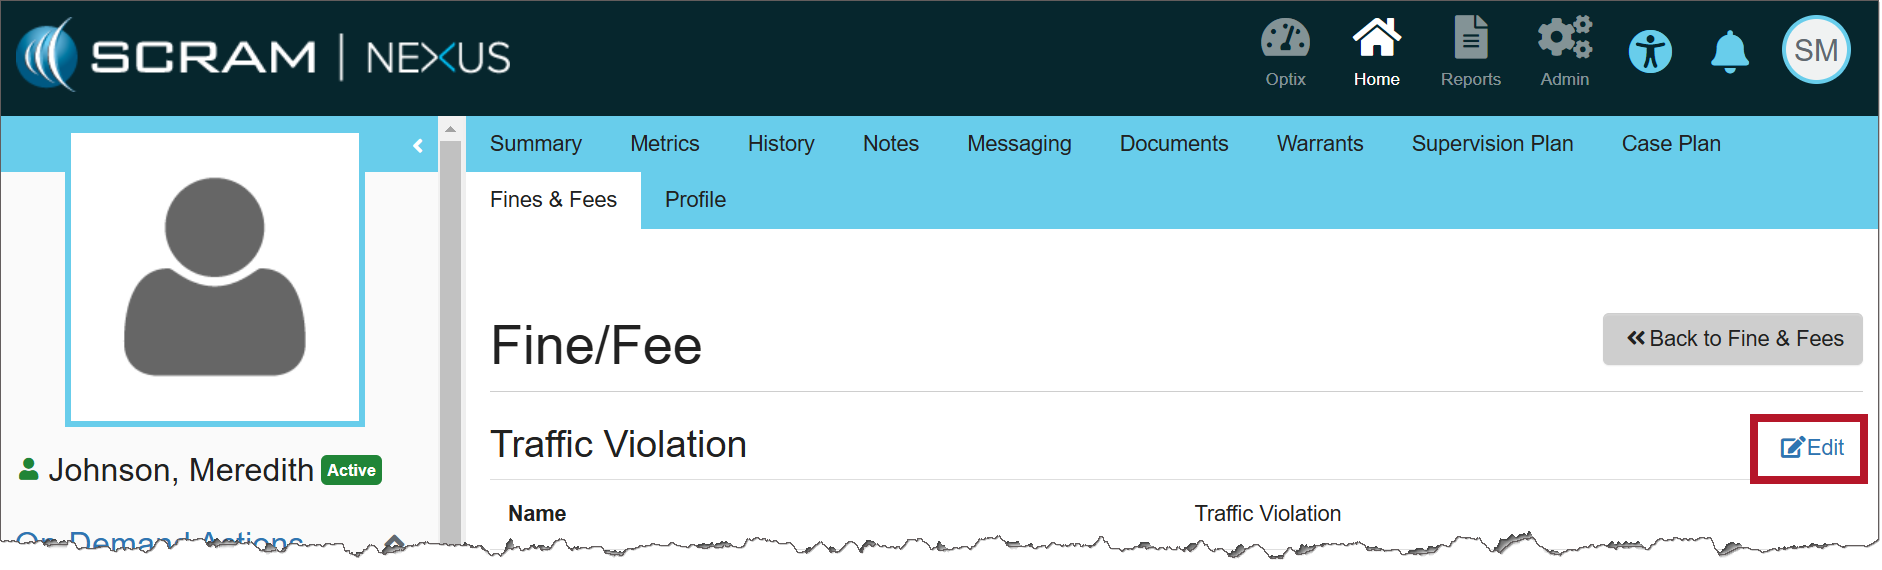
Edit the Fines/Fees
In some cases, the details of the fine or fee may need to be edited.
Select the Name hyperlink in the Open Fines & Fees section.
Open Fines & Fees (click to enlarge)
Select Edit to make changes to the details of the specific fine or fee.
Fine/Fee page (click to enlarge)
Make any necessary changes to the information.
Once the status has been updated to either ‘Closed’ or ‘Dismissed,’ the fine or fee will be displayed with its details in the Closed Fines & Fees section.
SCRAM Systems has moved from its Mineral Avenue address in Littleton, Colorado. When conducting business with us, be sure to use the appropriate address:
RMA Address
When a Return Merchandise Authorization (RMA) is issued for one of your SCRAM Systems devices, please ensure that the return shipping address on the label reads:
SCRAM Systems (AMS) 8100 Southpark Way Littleton, CO 80120
If your return shipping labels have the old, now-obsolete Mineral Avenue address on them, please discard them and request new labels from your SCRAM Systems Account Manager or Regional Sales Manager.
Payments Address
When making a bill payment to SCRAM Systems for monitoring services, equipment purchases and rentals, or any other reason, please remit payment to the SCRAM Systems bank lockbox:
Alcohol Monitoring Systems, Inc. PO Box 561097 Denver, CO 80256-1097
Do not remit payments to the now-obsolete Mineral Avenue address or to the Southpark Way address.
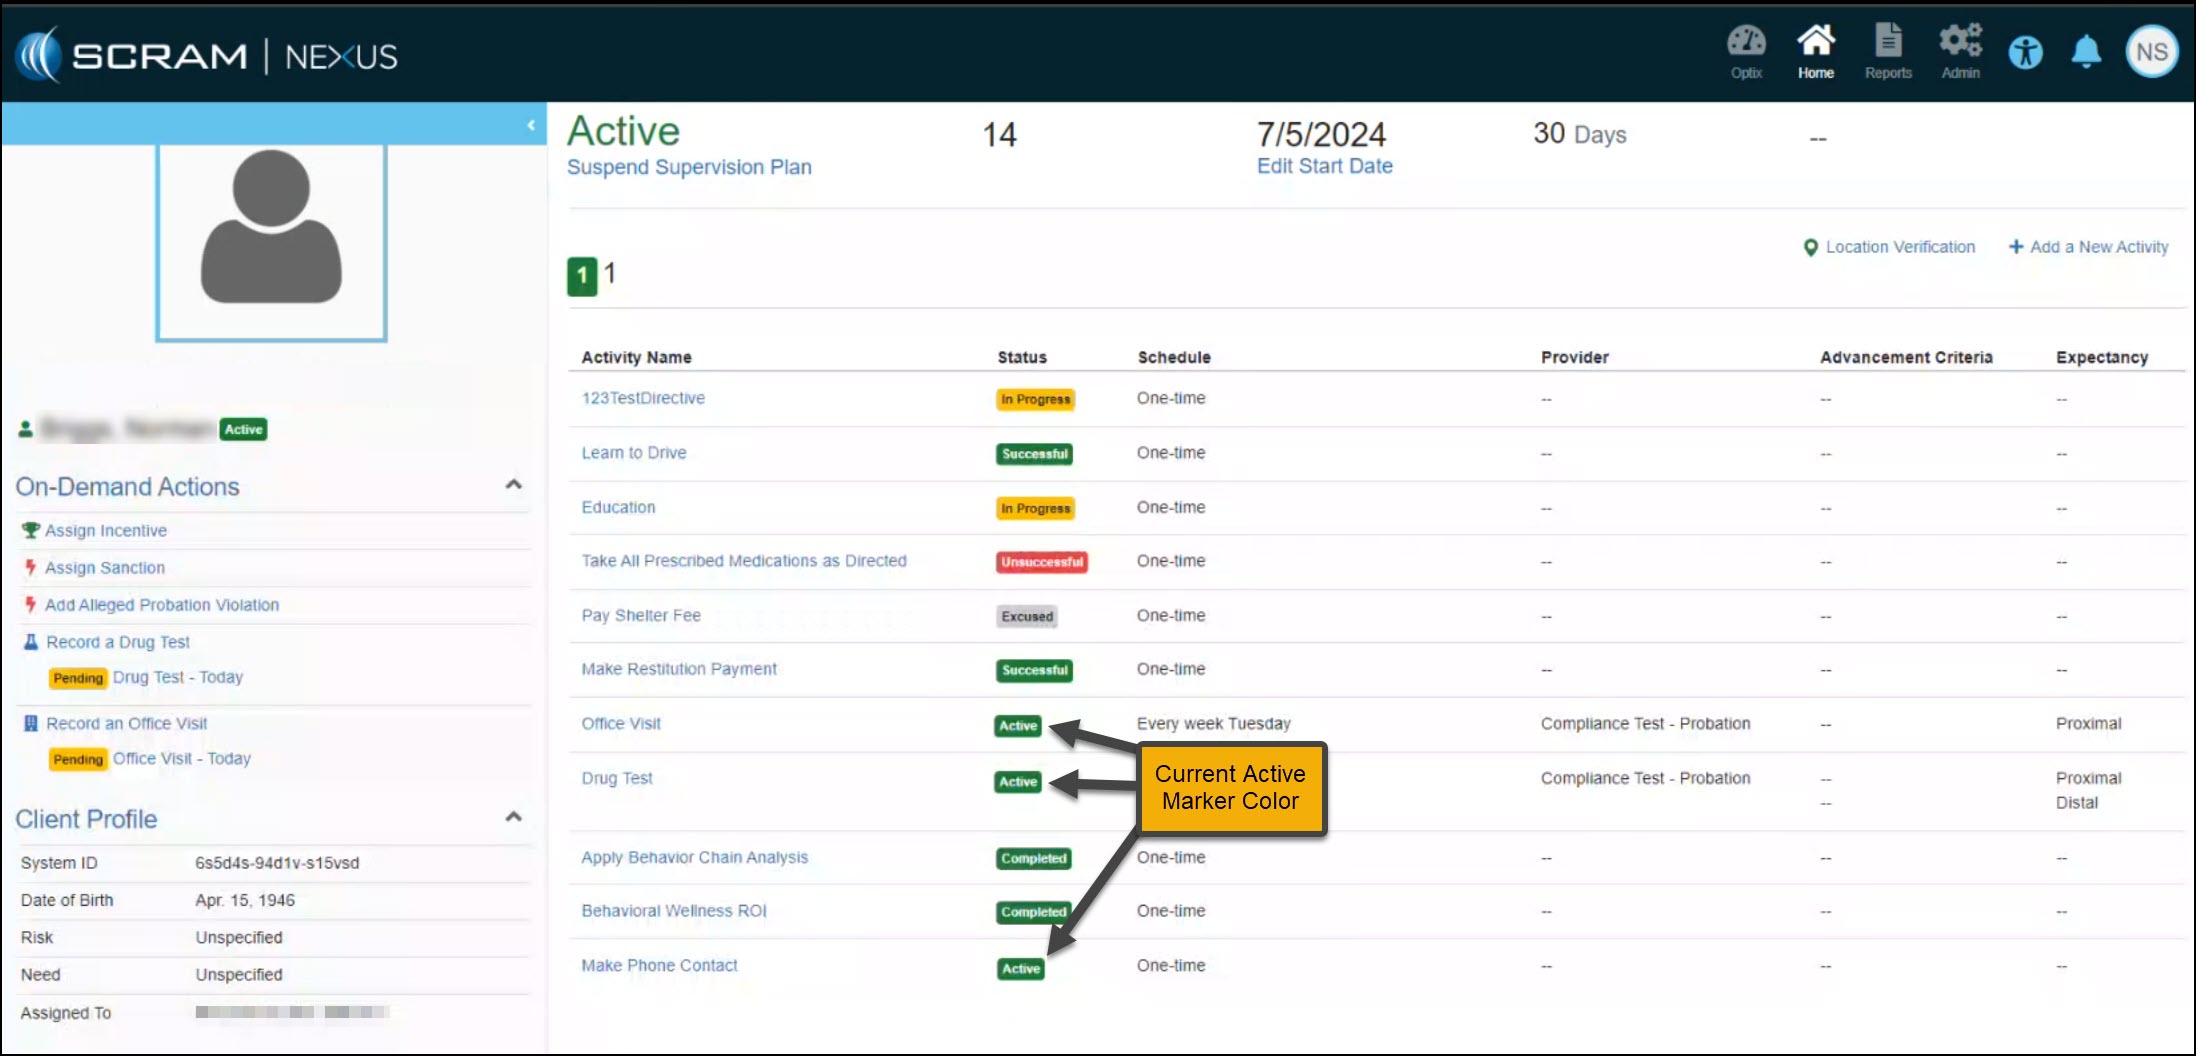
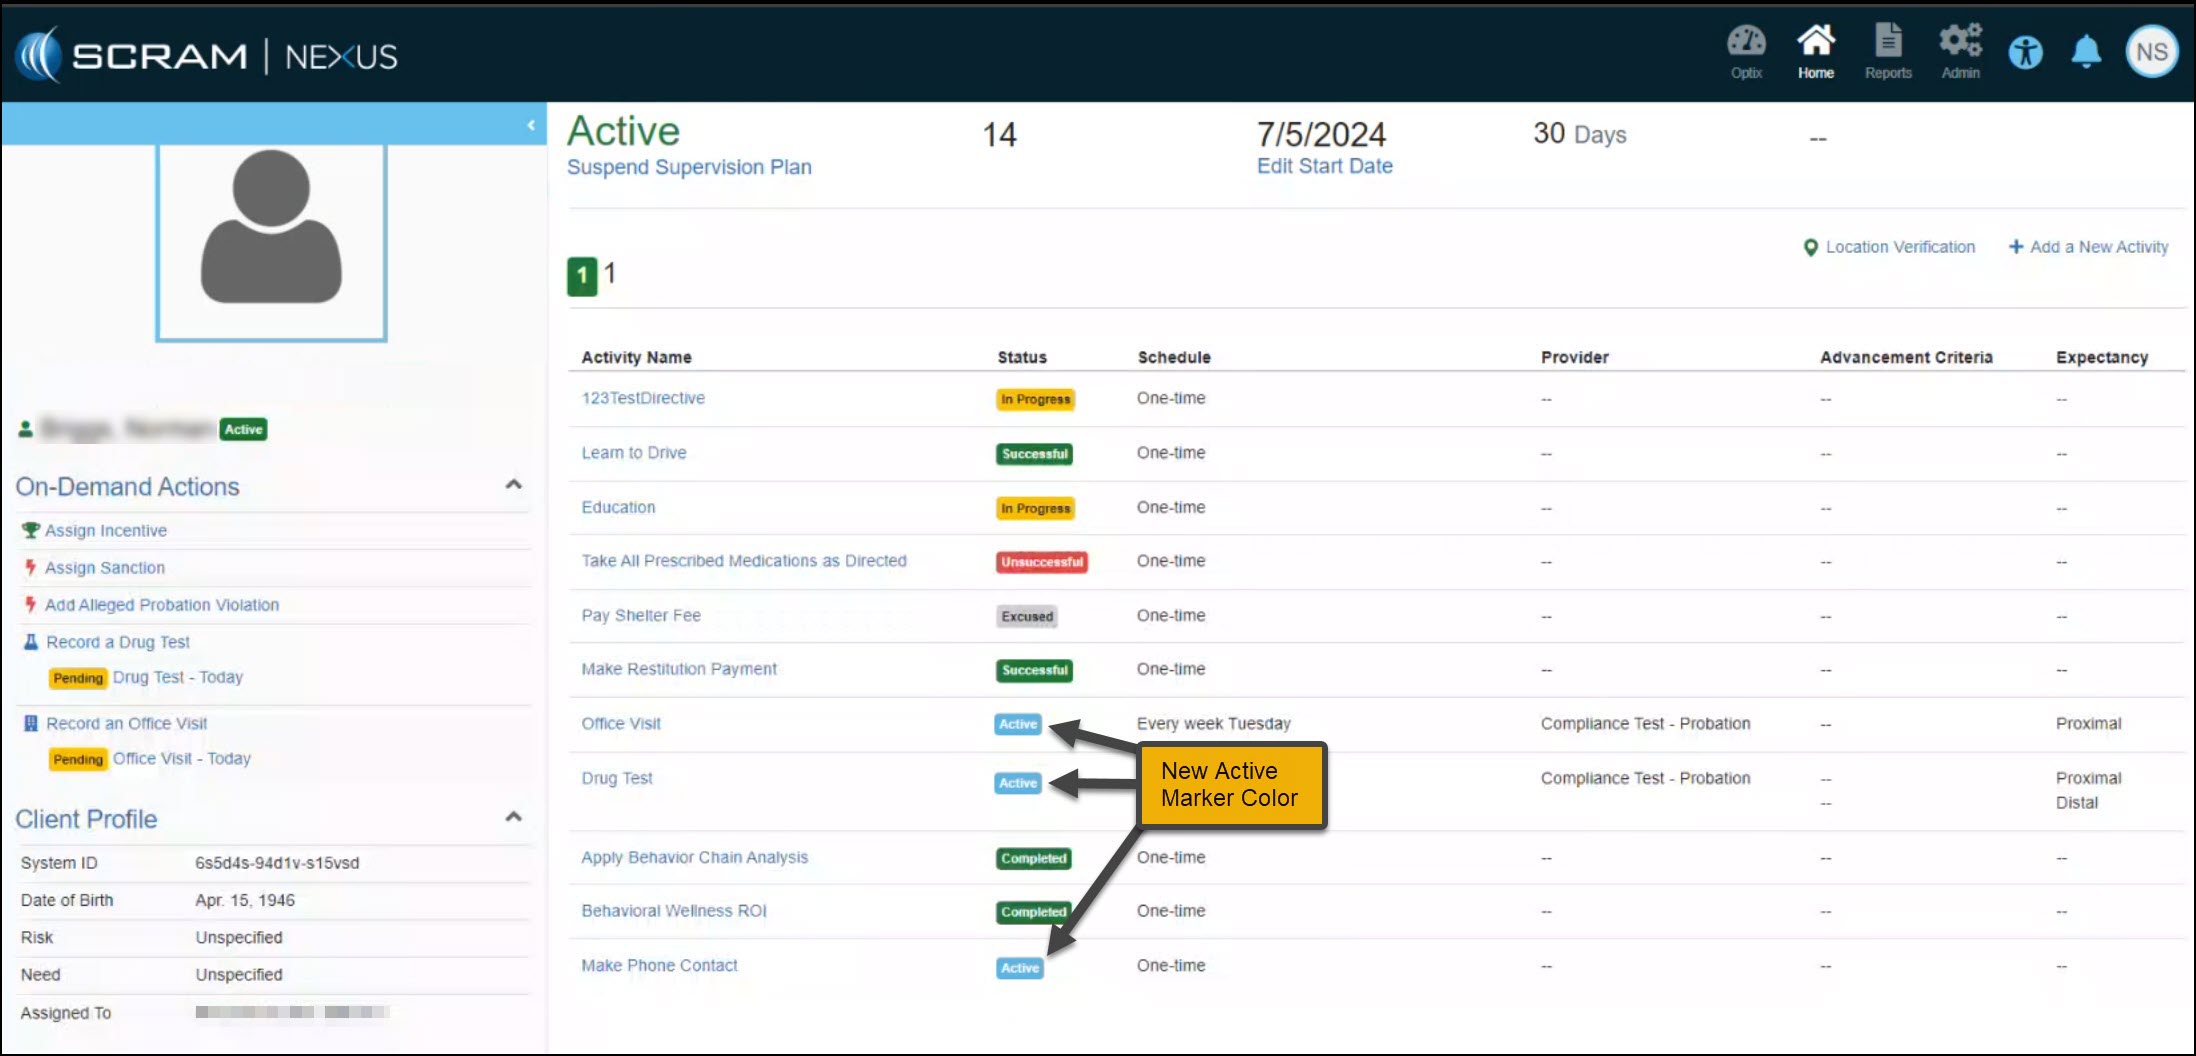
On July 25, 2024, SCRAM Systems will release an enhancement to help you identify the Active, Successful, and Completed status markers for Activities within a Supervision plan. Currently, all three (3) status markers are green. With this enhancement, the Active marker will now be light blue.
If you don’t see the enhancement in SCRAM Nexus, please clear your cache and cookies and refresh your browser window.
Nexus Active Status Markers in Green – click to enlargeNew Active status Markers in Blue – click to enlarge
This color enhancement is reflected throughout the SCRAM Nexus software.
On June 6, 2024, SCRAM Systems will release three SCRAM TouchPoint Location feature enhancements:
The SCRAM Optix Location tab will display “Compliant” or “Non-Compliant” depending on the location service settings the client has chosen for the SCRAM TouchPoint Mobile app.
For clients on a Nexus Supervision Plan with Location Verification enabled, Location Records will now indicate whether the location record was captured before, during, or after the scheduled appointment.
The TouchPoint Location Verification service may now be disabled at the client level for clients who do not need to report their location as part of their monitoring program.
The latest version of the TouchPoint app will be available to clients in the app stores. As a best practice, SCRAM Systems recommends that all TouchPoint app users enable their smartphones to automatically update their apps to make this process easier.
Not seeing the enhancement in SCRAM Optix? Clear your cache and cookies and refresh your browser window.
Compliant and Non-Compliant Smartphone Location Access
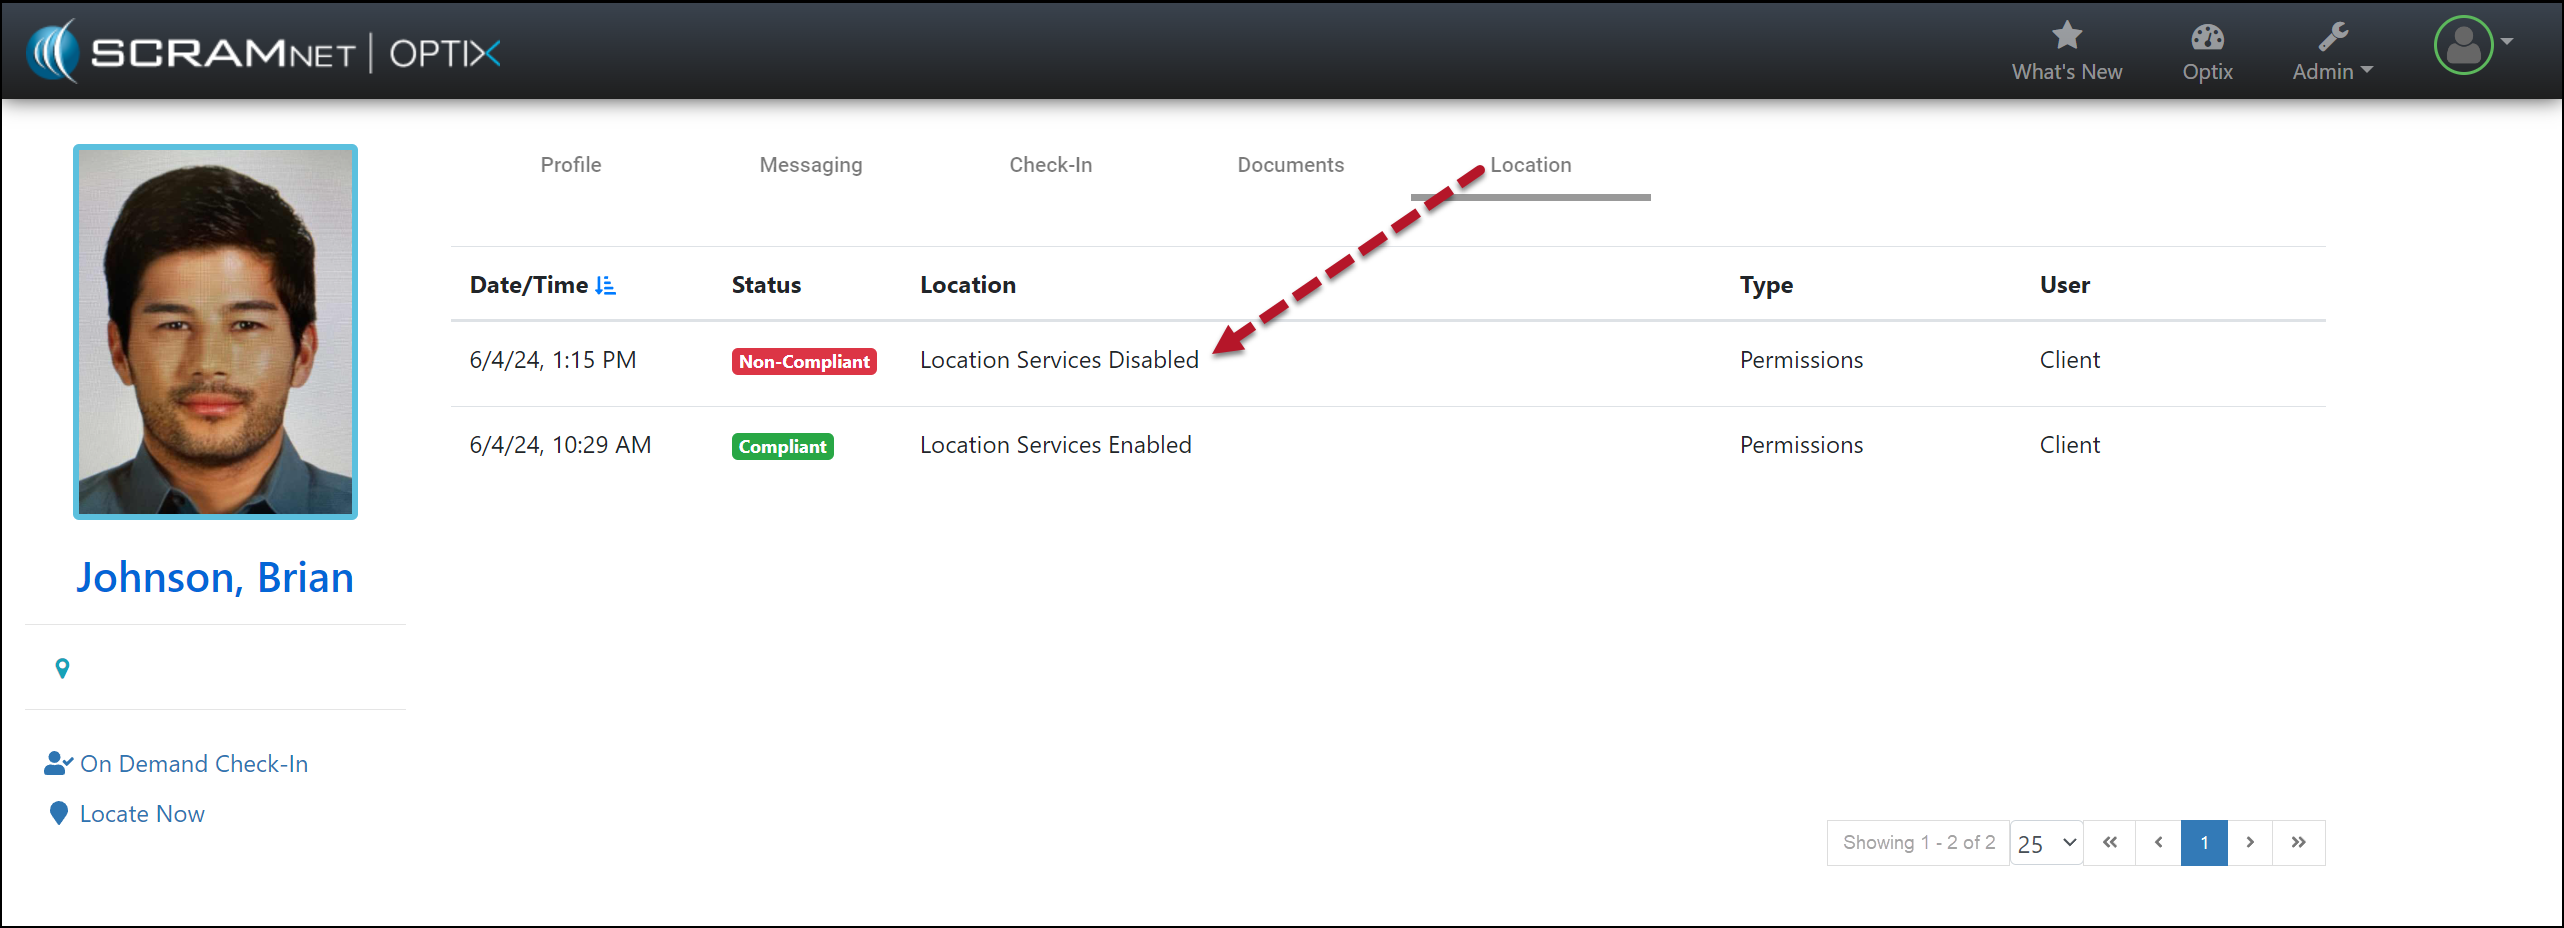
During a client’s TouchPoint monitoring program, you may now view in real-time whether or not the client has the SCRAM TouchPoint application’s location access permissions set to “Always Allow” the location data to be shared. The SCRAM TouchPoint Location tab will display “Compliant” when the client’s smartphone location permissions are set to Always Allow for the TouchPoint app, and will display “Non-Compliant” when the client has selected something other than Always Allow.
Additionally, when location services access is set to any option other than Always Allow, an event will be generated with a time and date stamp indicating when location services were disabled.
SCRAM Optix Client Location Page (click to enlarge)
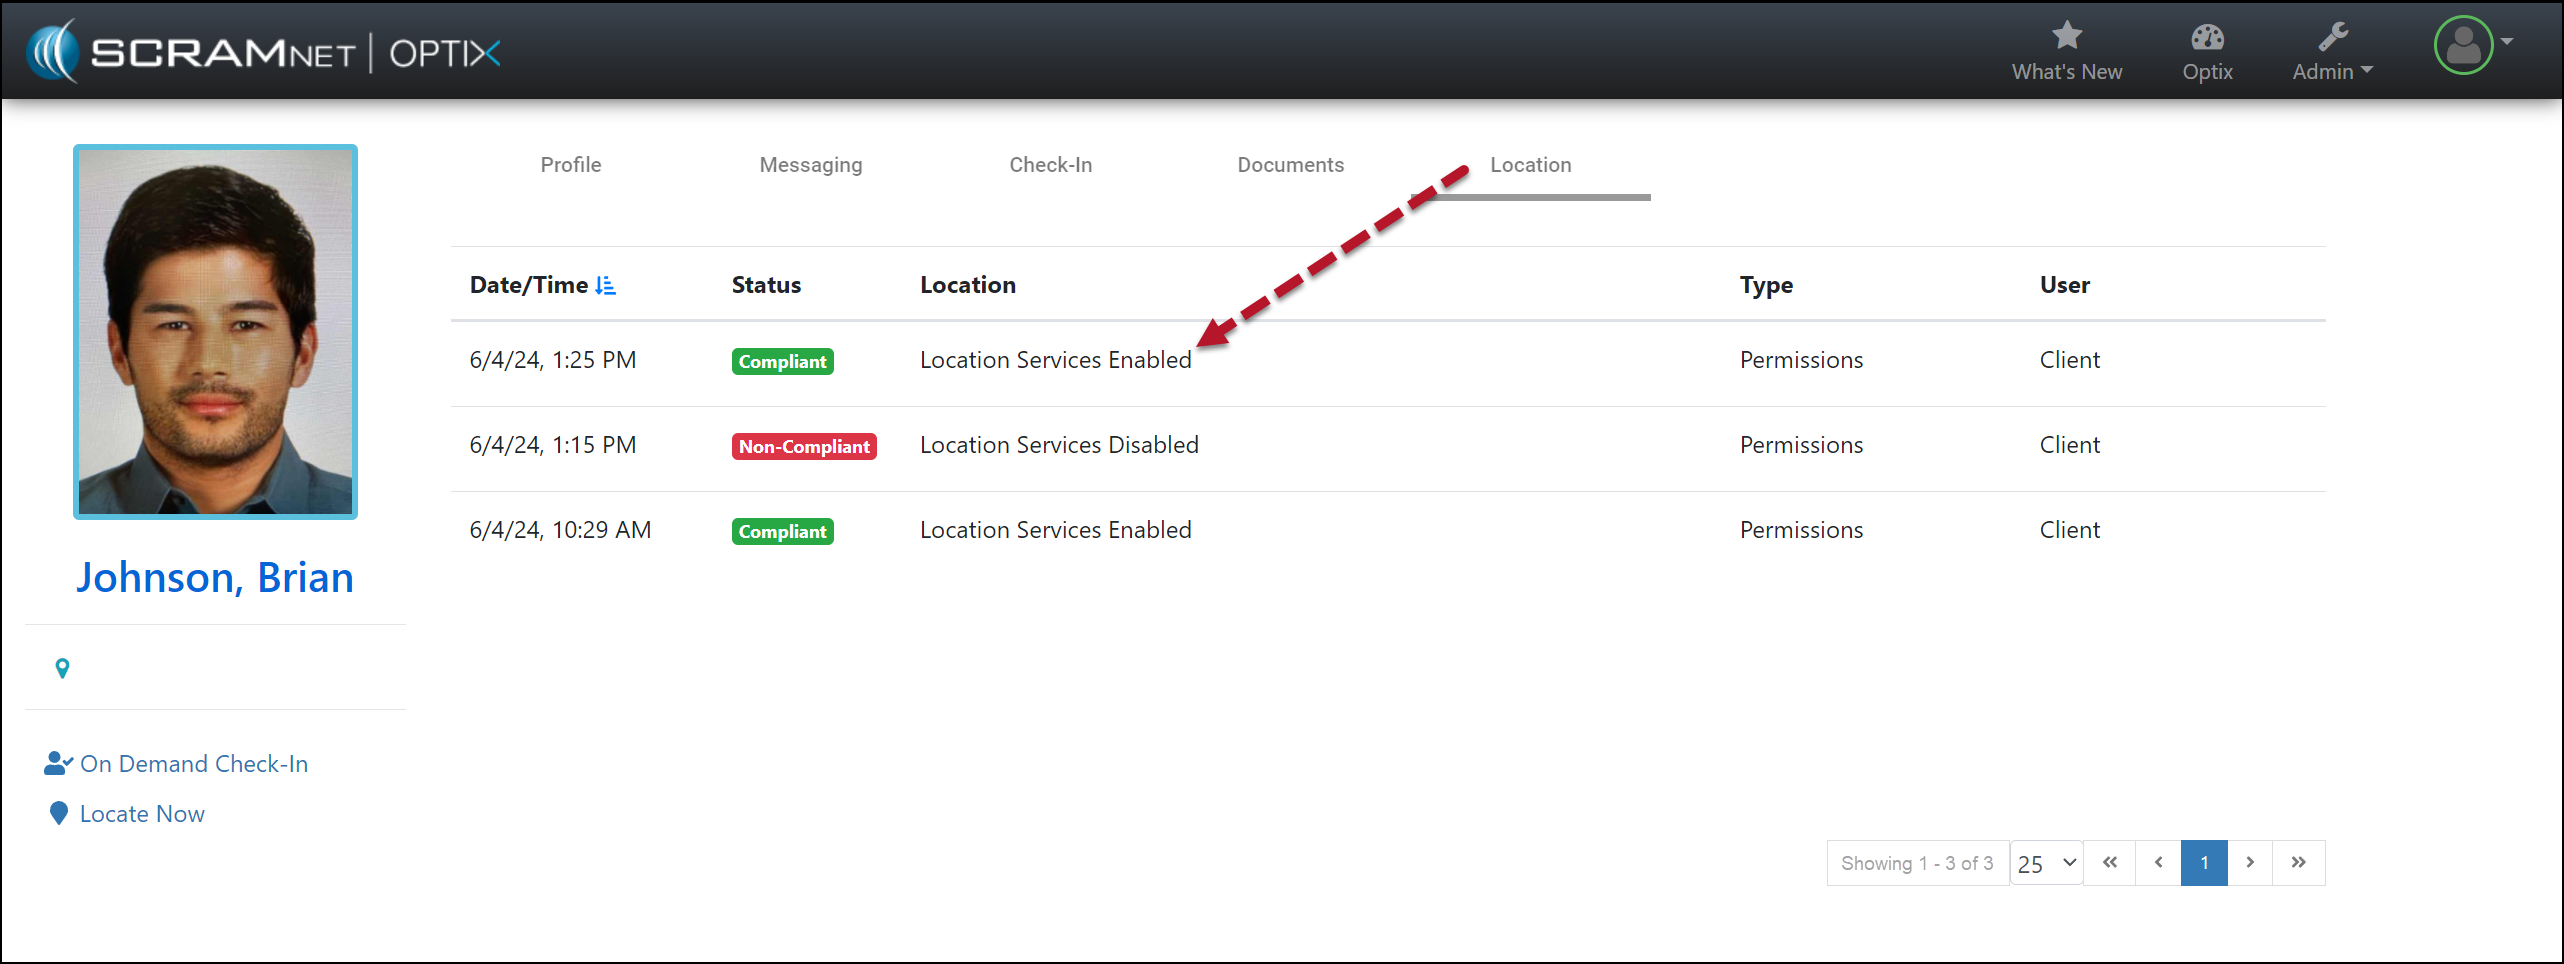
As soon as the client updates the location service settings on their smartphone to “Always Allow” location access, a new event will be generated with the updated “Compliant” status.
SCRAM Optix Location Page (click to enlarge)
Android smartphones only: An event of Non-Compliant is reported within one minute of the change to the smartphone’s location service settings, however, the update from Non-Compliant to Compliant (location services enabled) may take up to 12 hours to be reported to the monitoring software.
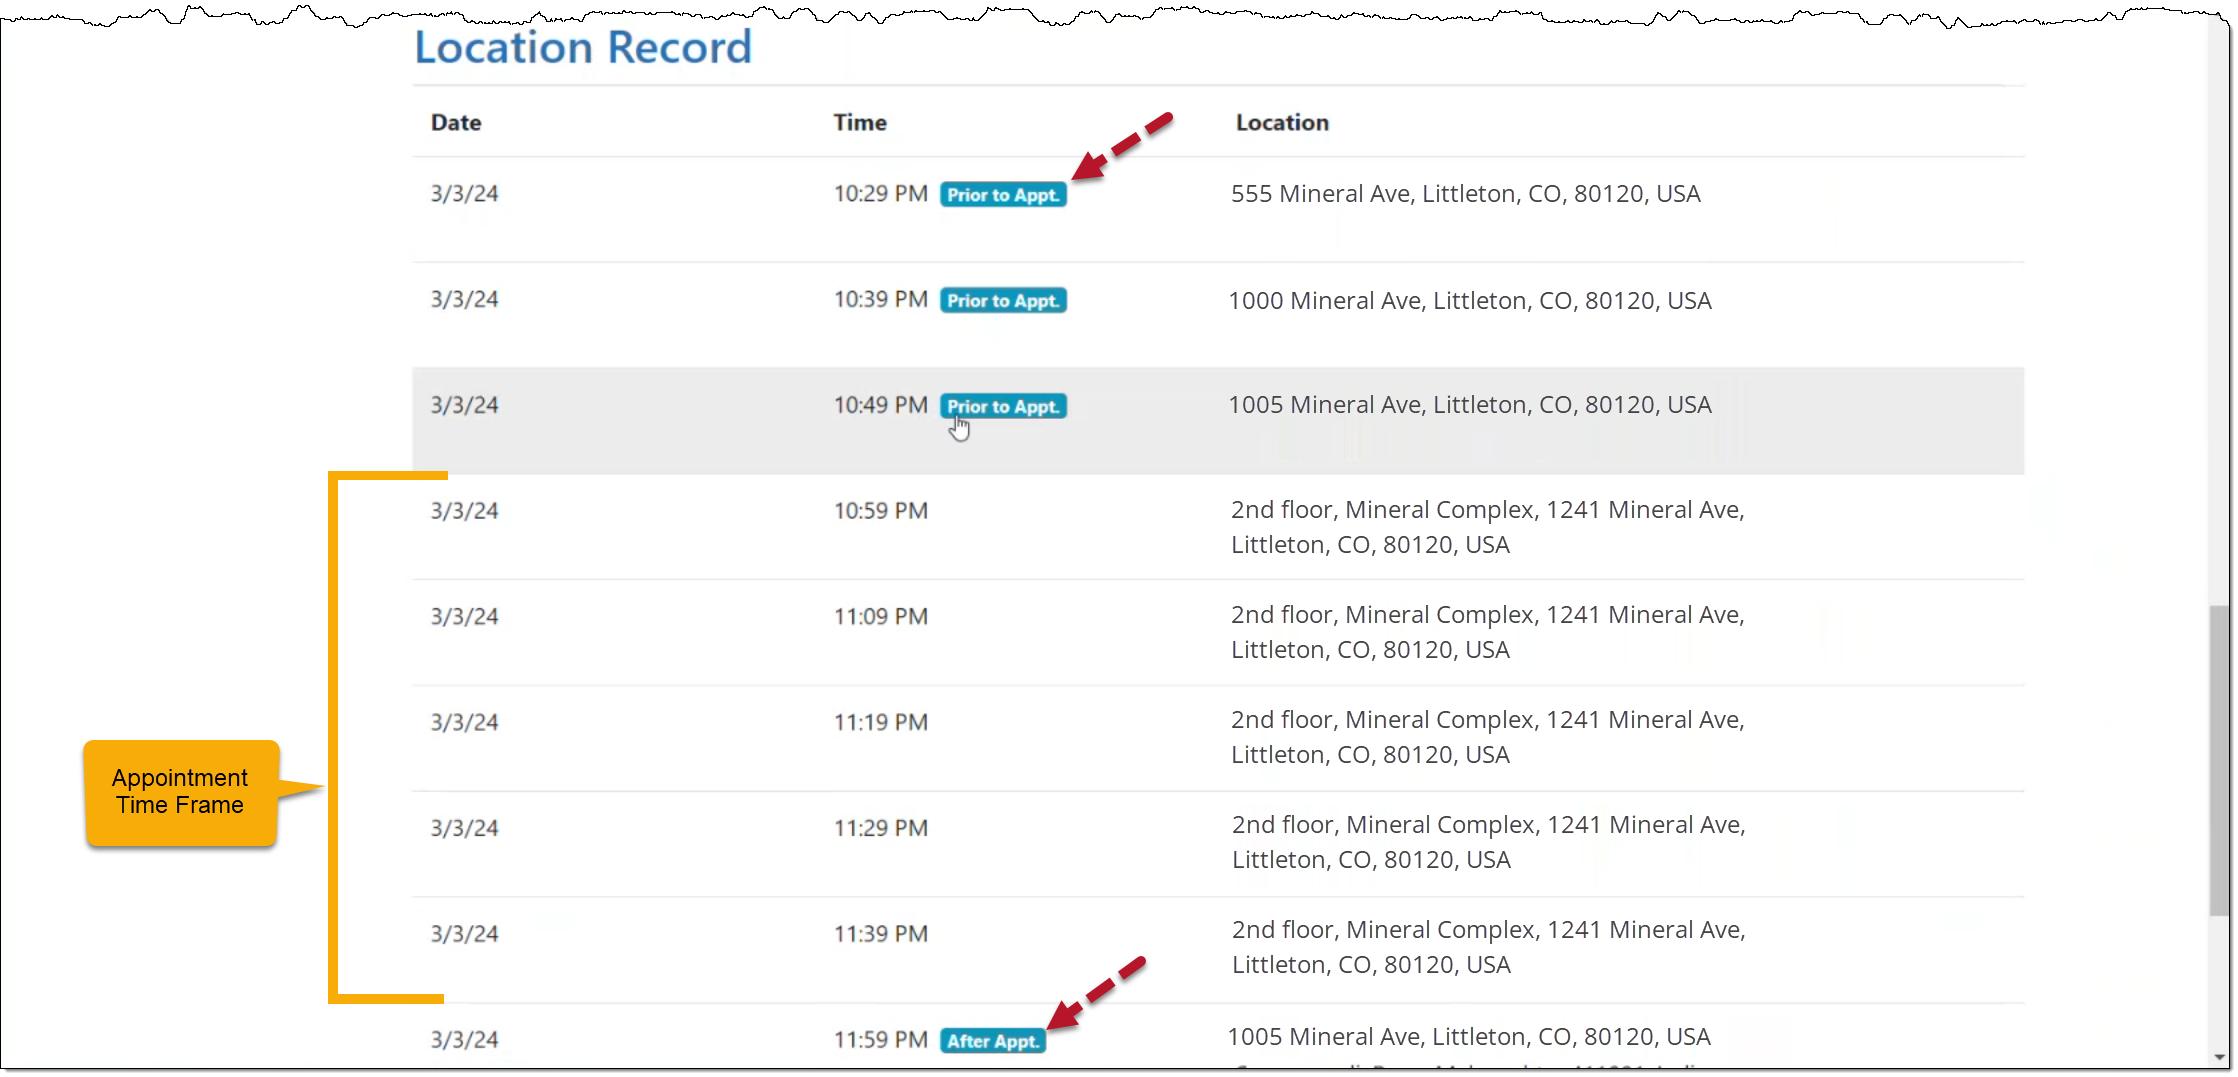
Location Verification Notation “Prior to” and “After” an Appointment
For clients on a Nexus Supervision Plan with Location Verification enabled, when accessing the Location page, the “Time” column for an individual Location Record will now clearly indicate whether the location record was captured prior to, during, or after the scheduled appointment timeframe, thus aiding in interpreting the location data presented.
When viewing the Location Record for a client’s appointment, the “Time” column displays “Prior to Appt.” for location points gathered before the appointment start time, and “After Appt.” for location points gathered after the appointment.
When there is no notation, the location points were captured within the appointment timeframe.
Client Location Record with Details of Appointment (click to enlarge)
Disable Location Verification Services
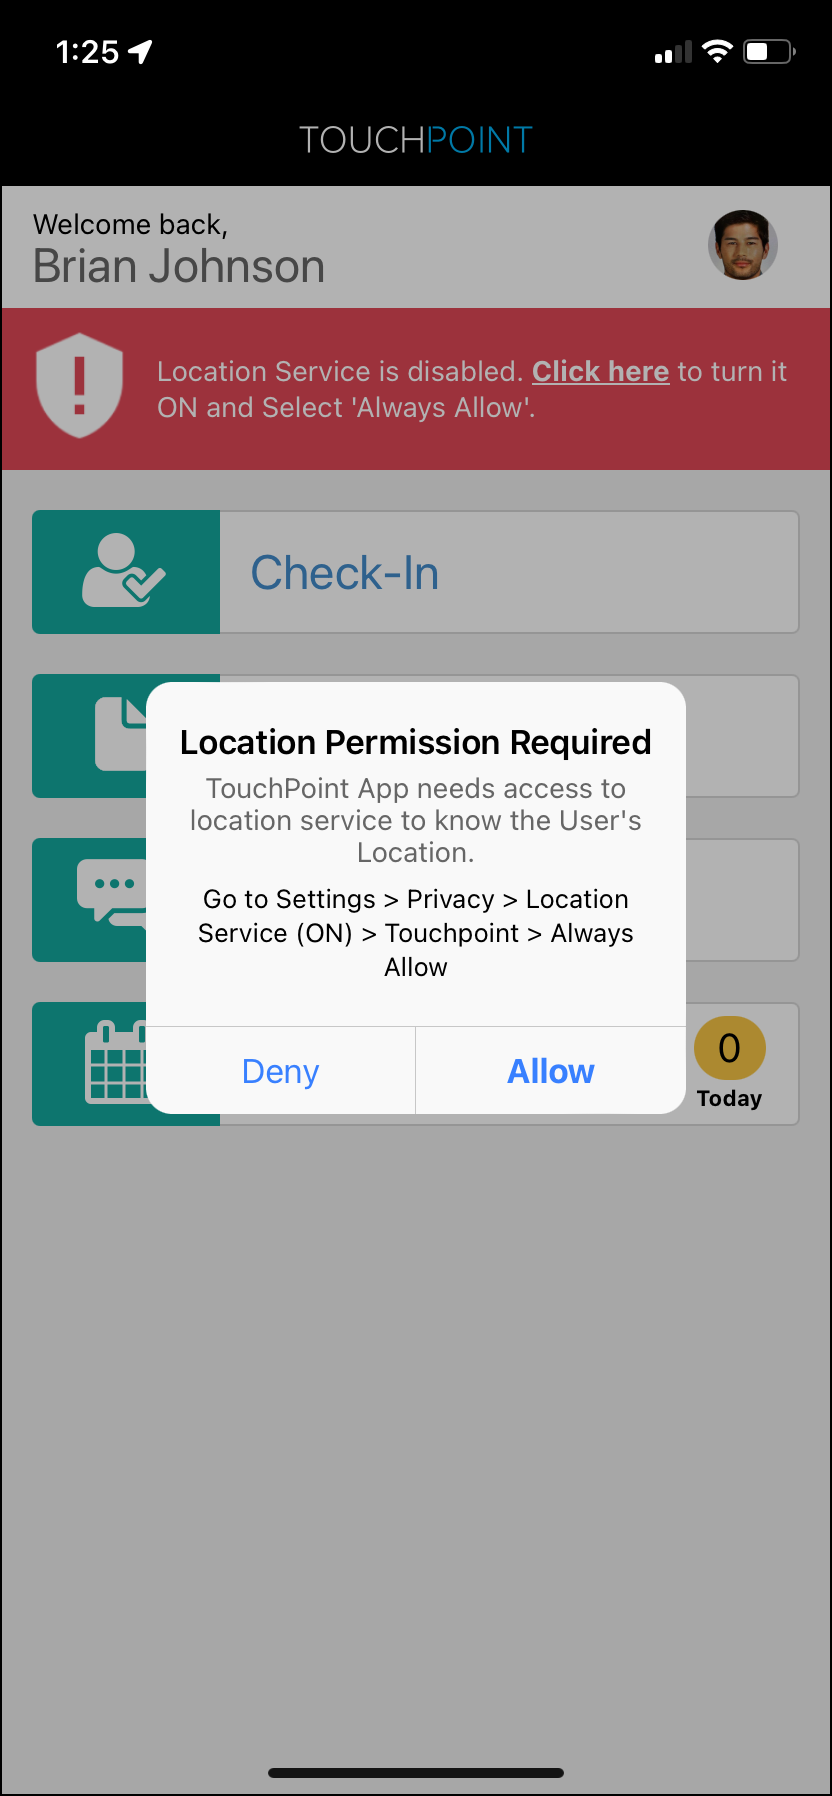
Currently, any time the client restricts access to their smartphone’s location data, the SCRAM TouchPoint application prompts the client to allow access to this data by sending push notifications, a pop-up, and a red banner within the application itself. These notifications will continue until the client updates the application’s location permissions.
Client Location Verification Enabled (click to enlarge)
SCRAM TouchPoint Mobile App Location Permission Alert (click to enlarge)
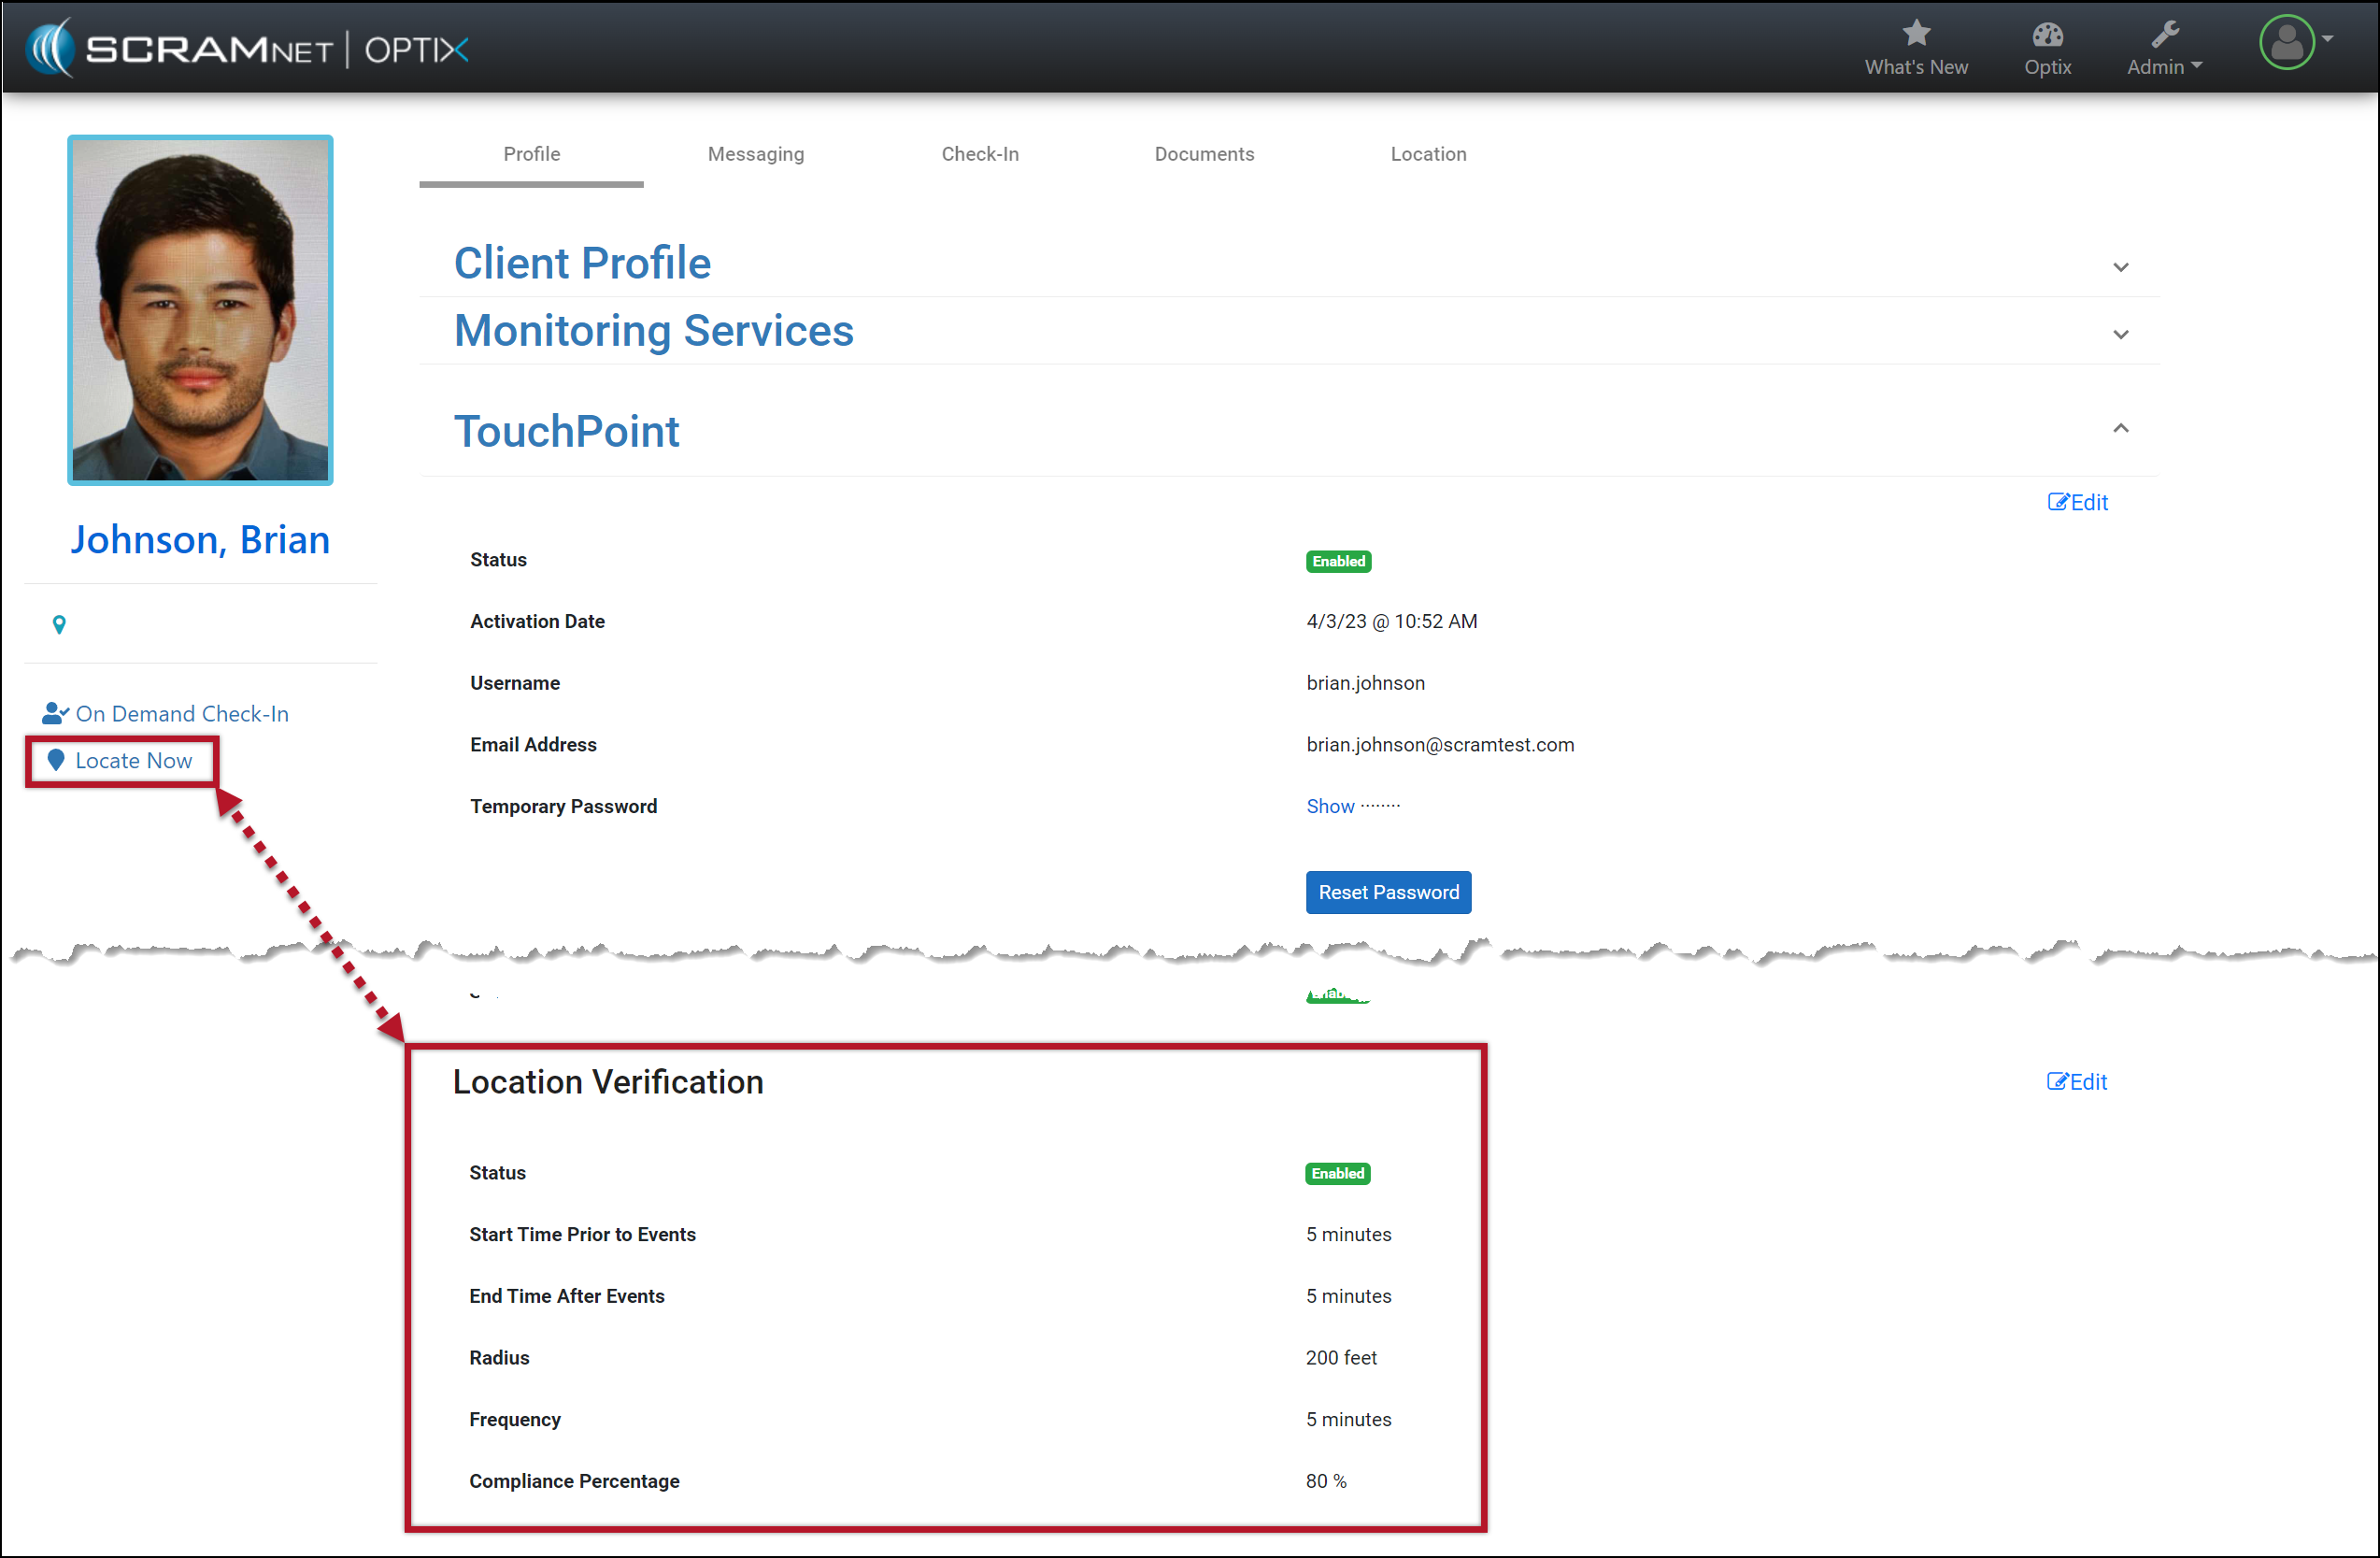
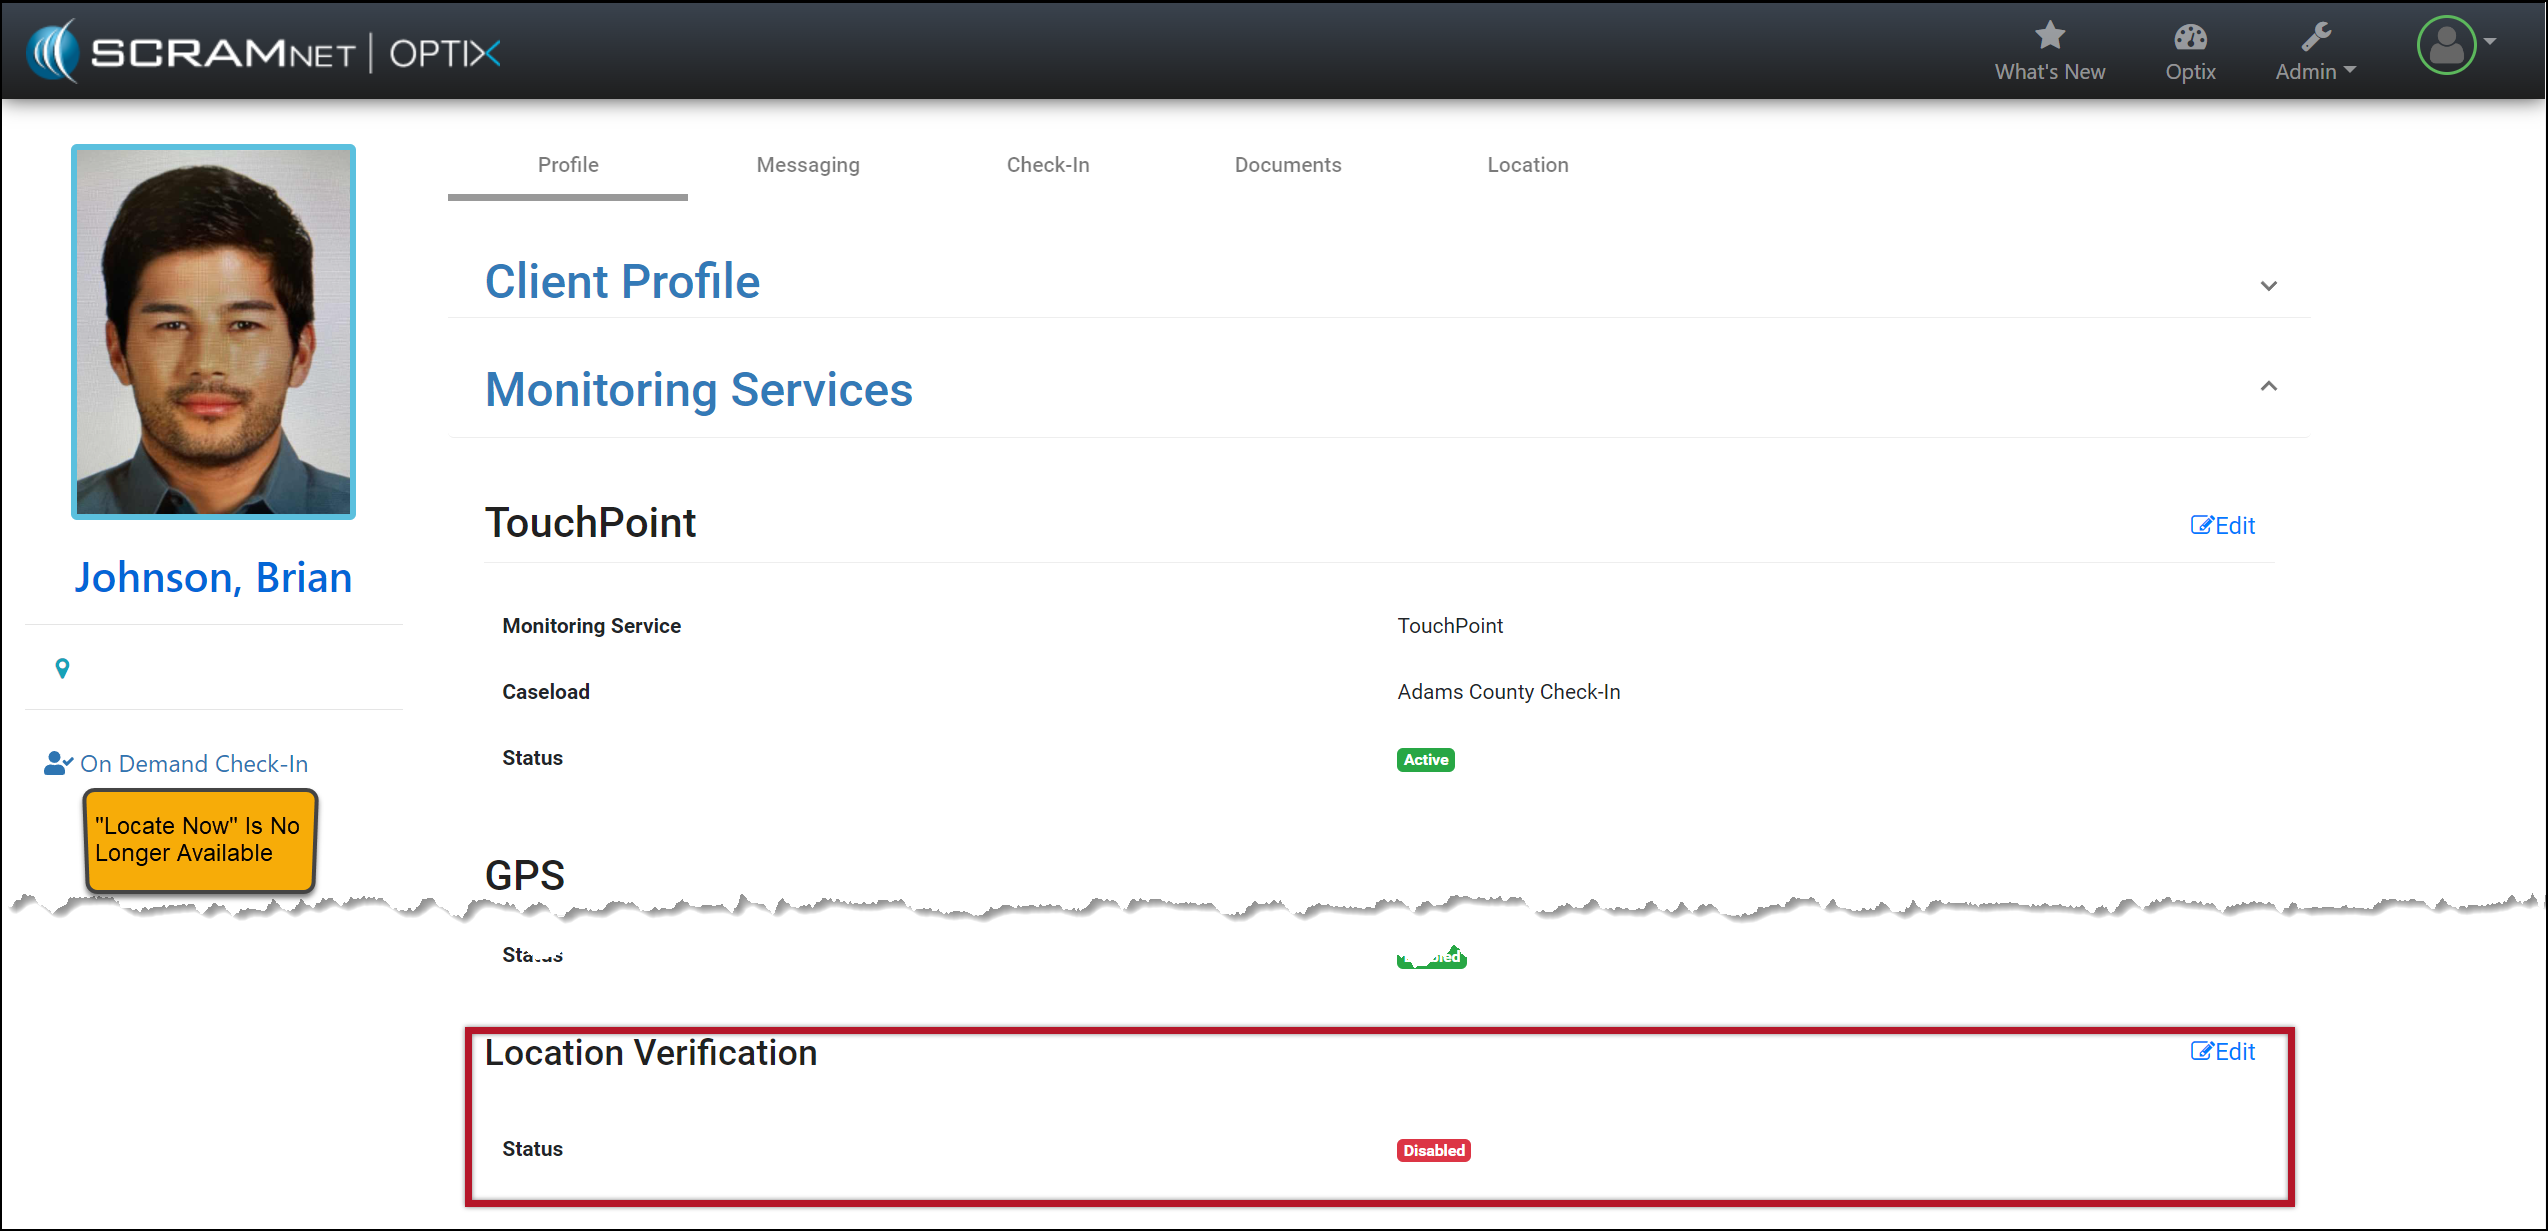
With this update, you may disable the Location Verification feature on the client’s Profile page when it is not required for client monitoring. Once disabled, regardless of the smartphone location access settings, the client will no longer be prompted to share their smartphone’s location data. Additionally, the on-demand Locate Now feature will no longer be available.
Client Location Verification Disabled (click to enlarge)