Software

On April 16th, 2025, at 11:00 AM MDT, SCRAM Systems will release an enhancement to your SCRAM 24/7 monitoring program software. Currently, you may only associate a SCRAM 24/7 user with a single enrollment site (Caseload). With this enhancement, you may configure a user’s profile to access and manage clients on multiple enrollment sites (caseloads).

TipsDuring the deployment, you will be unable to access SCRAM 24/7 for up to one hour.

Associate Multiple Caseloads with a User

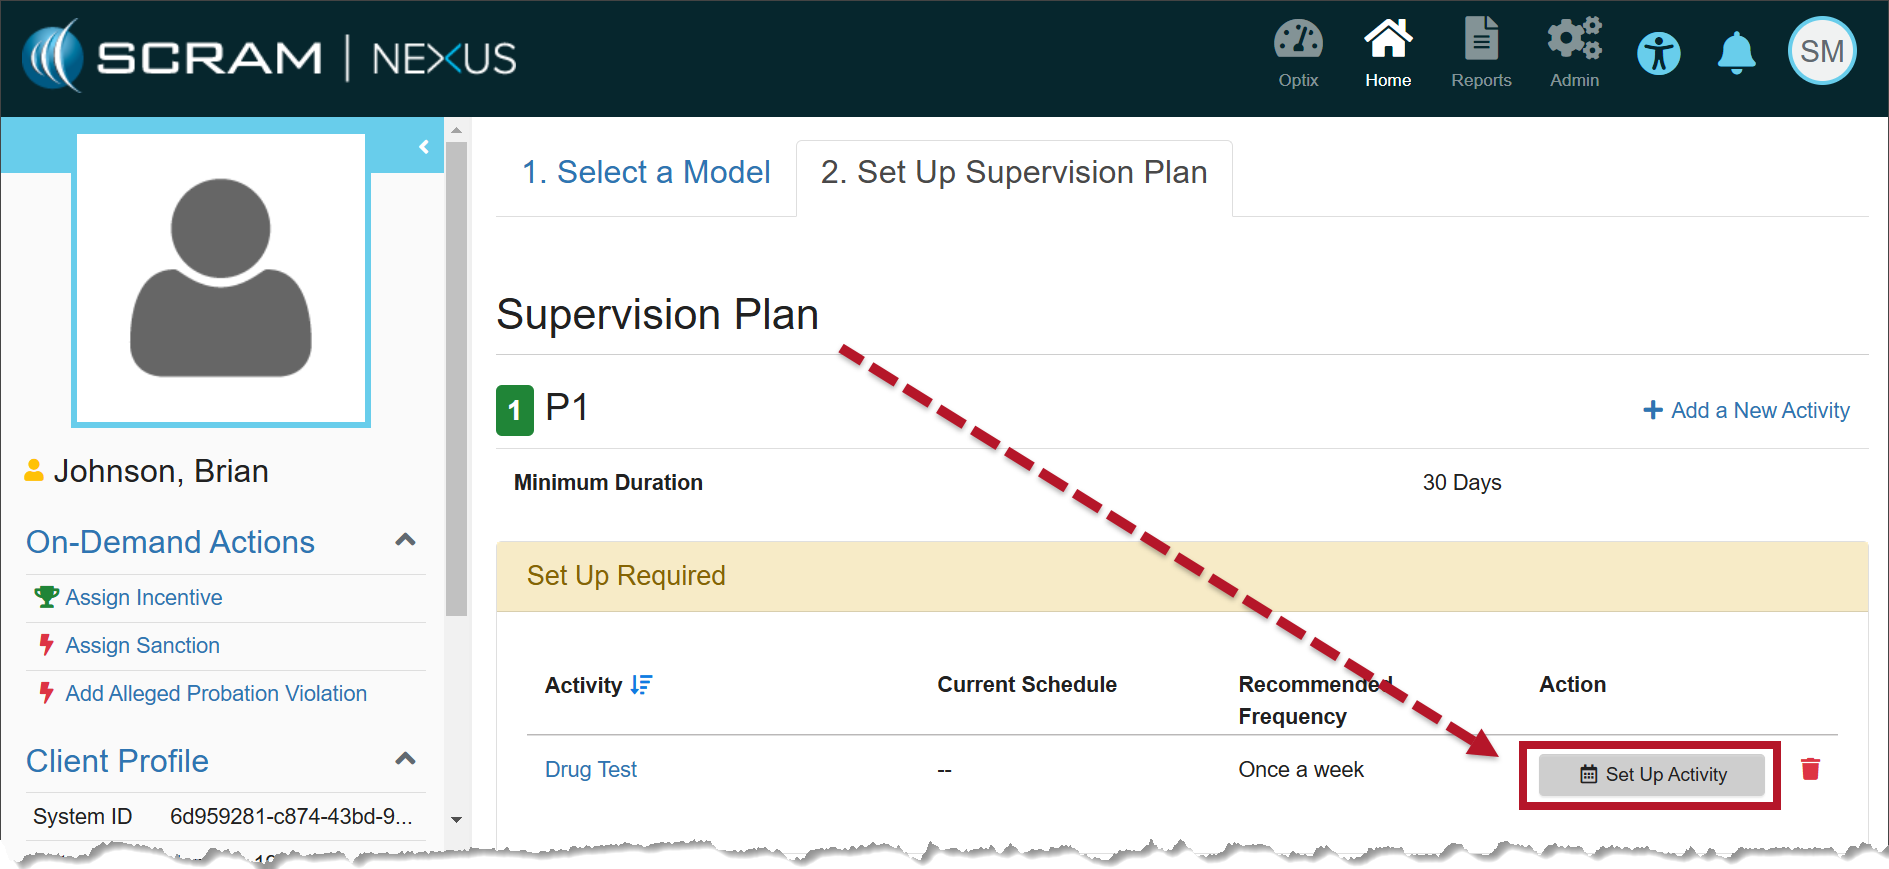
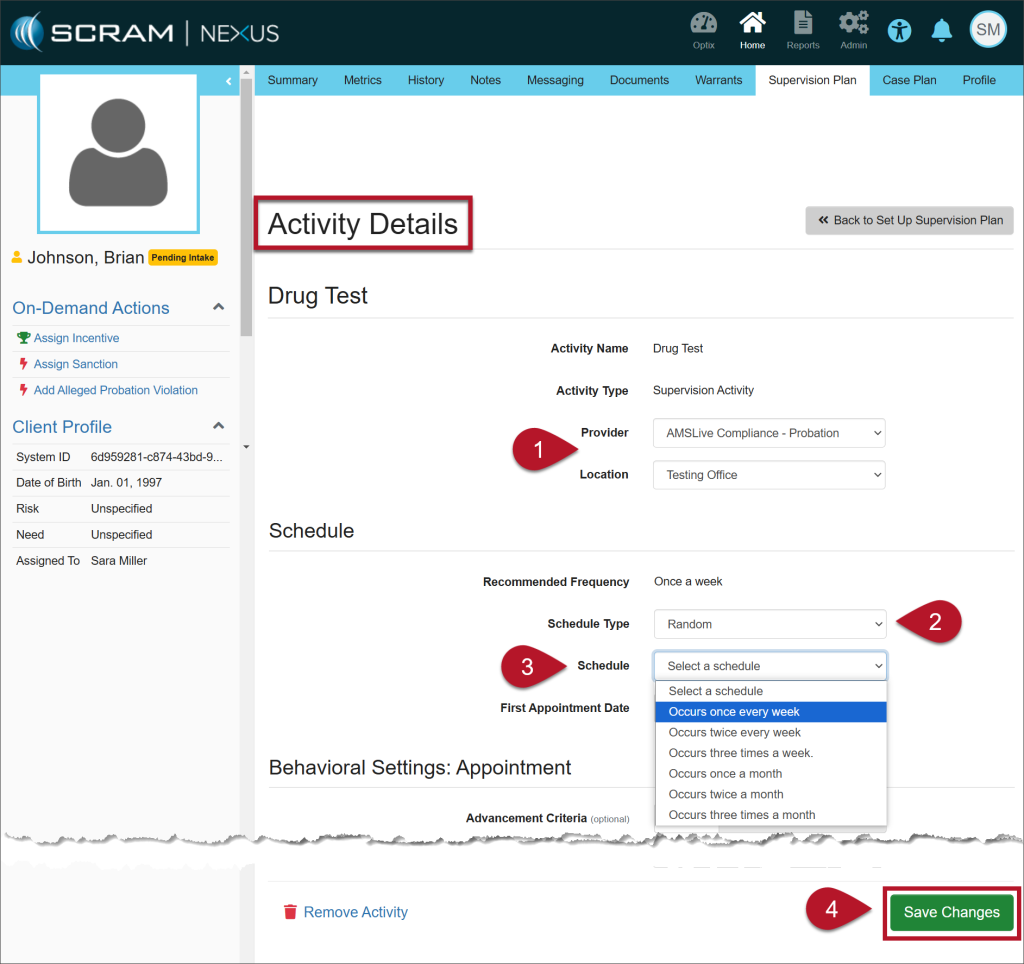
When editing a current user or adding a new user to your program, once the SCRAM 24/7 Account and Account Access options are selected, choose one or multiple Caseloads for the user to access and manage clients from within SCRAM 24/7, and then set the user’s Permissions for the selected Caseloads.  
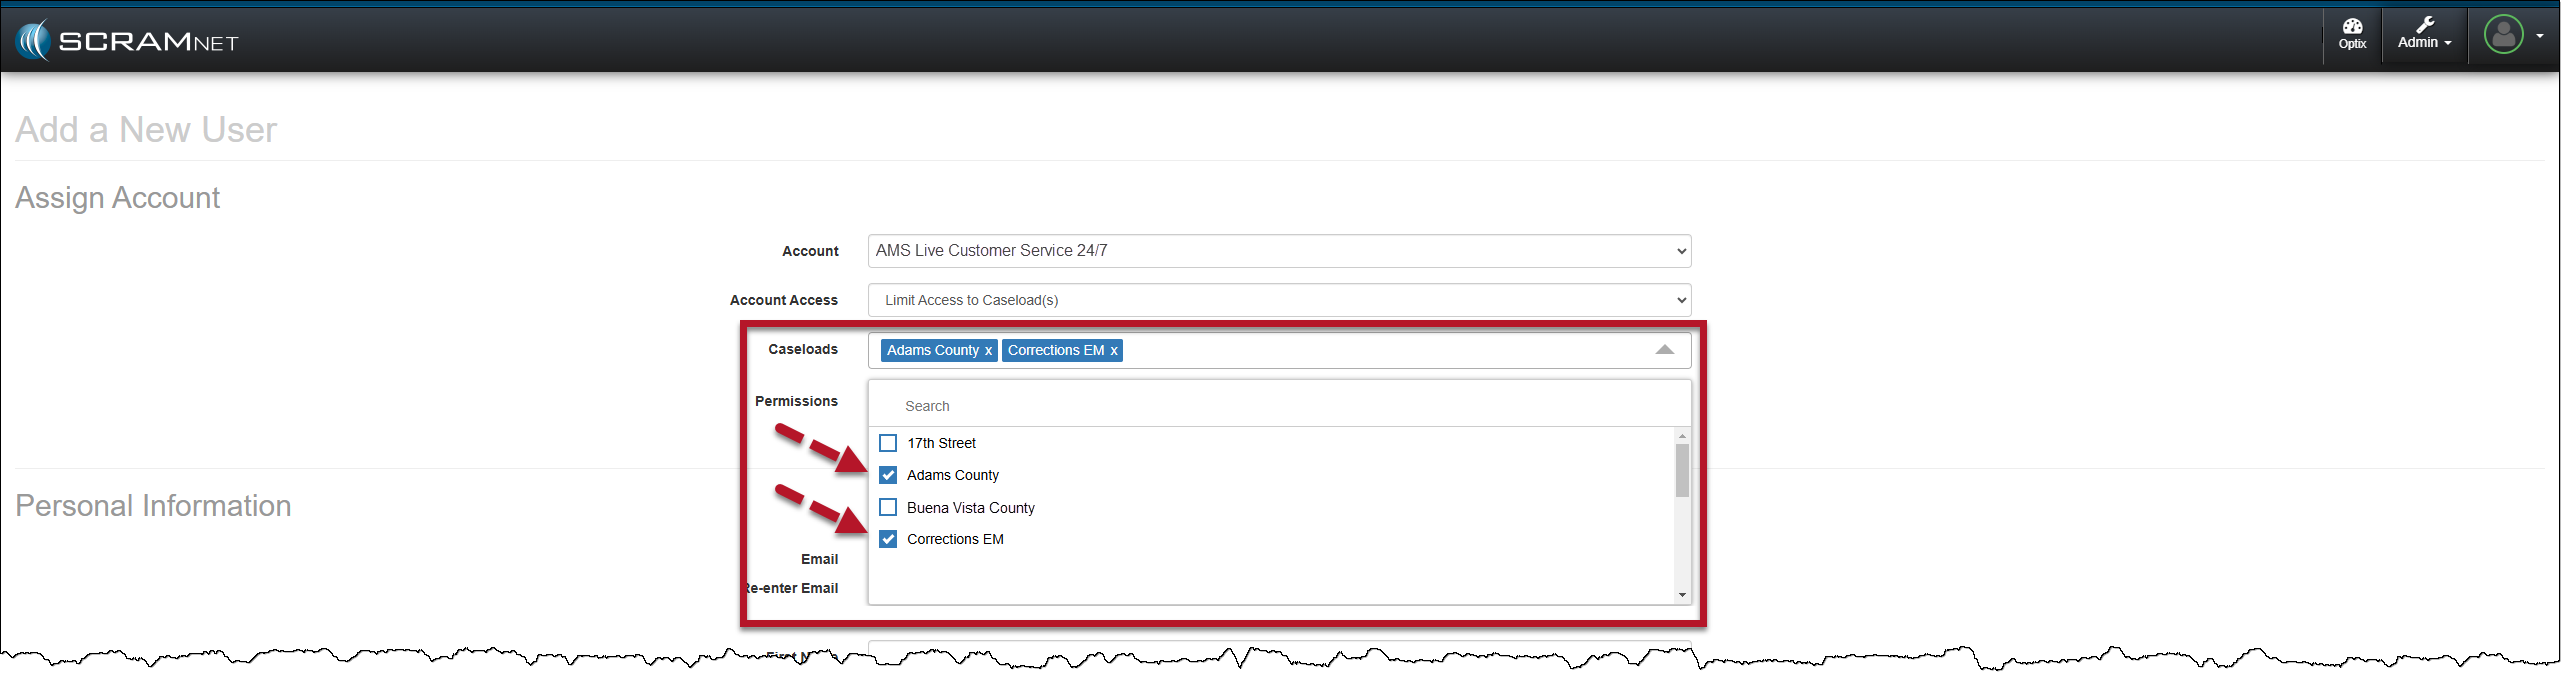
Manage User Page, Select Multiple Caseload
TipTips:
  • An Administrator for your program may update a user’s profile from the Manage Users page.
  • The permissions selected for the user apply to each caseload associated with that user.
  • When editing a current user’s profile, the user should log out of the system and back in after the Administrator has saved changes to their profile.

SCRAM 24/7 Filter Updates for a Multiple Caseload User

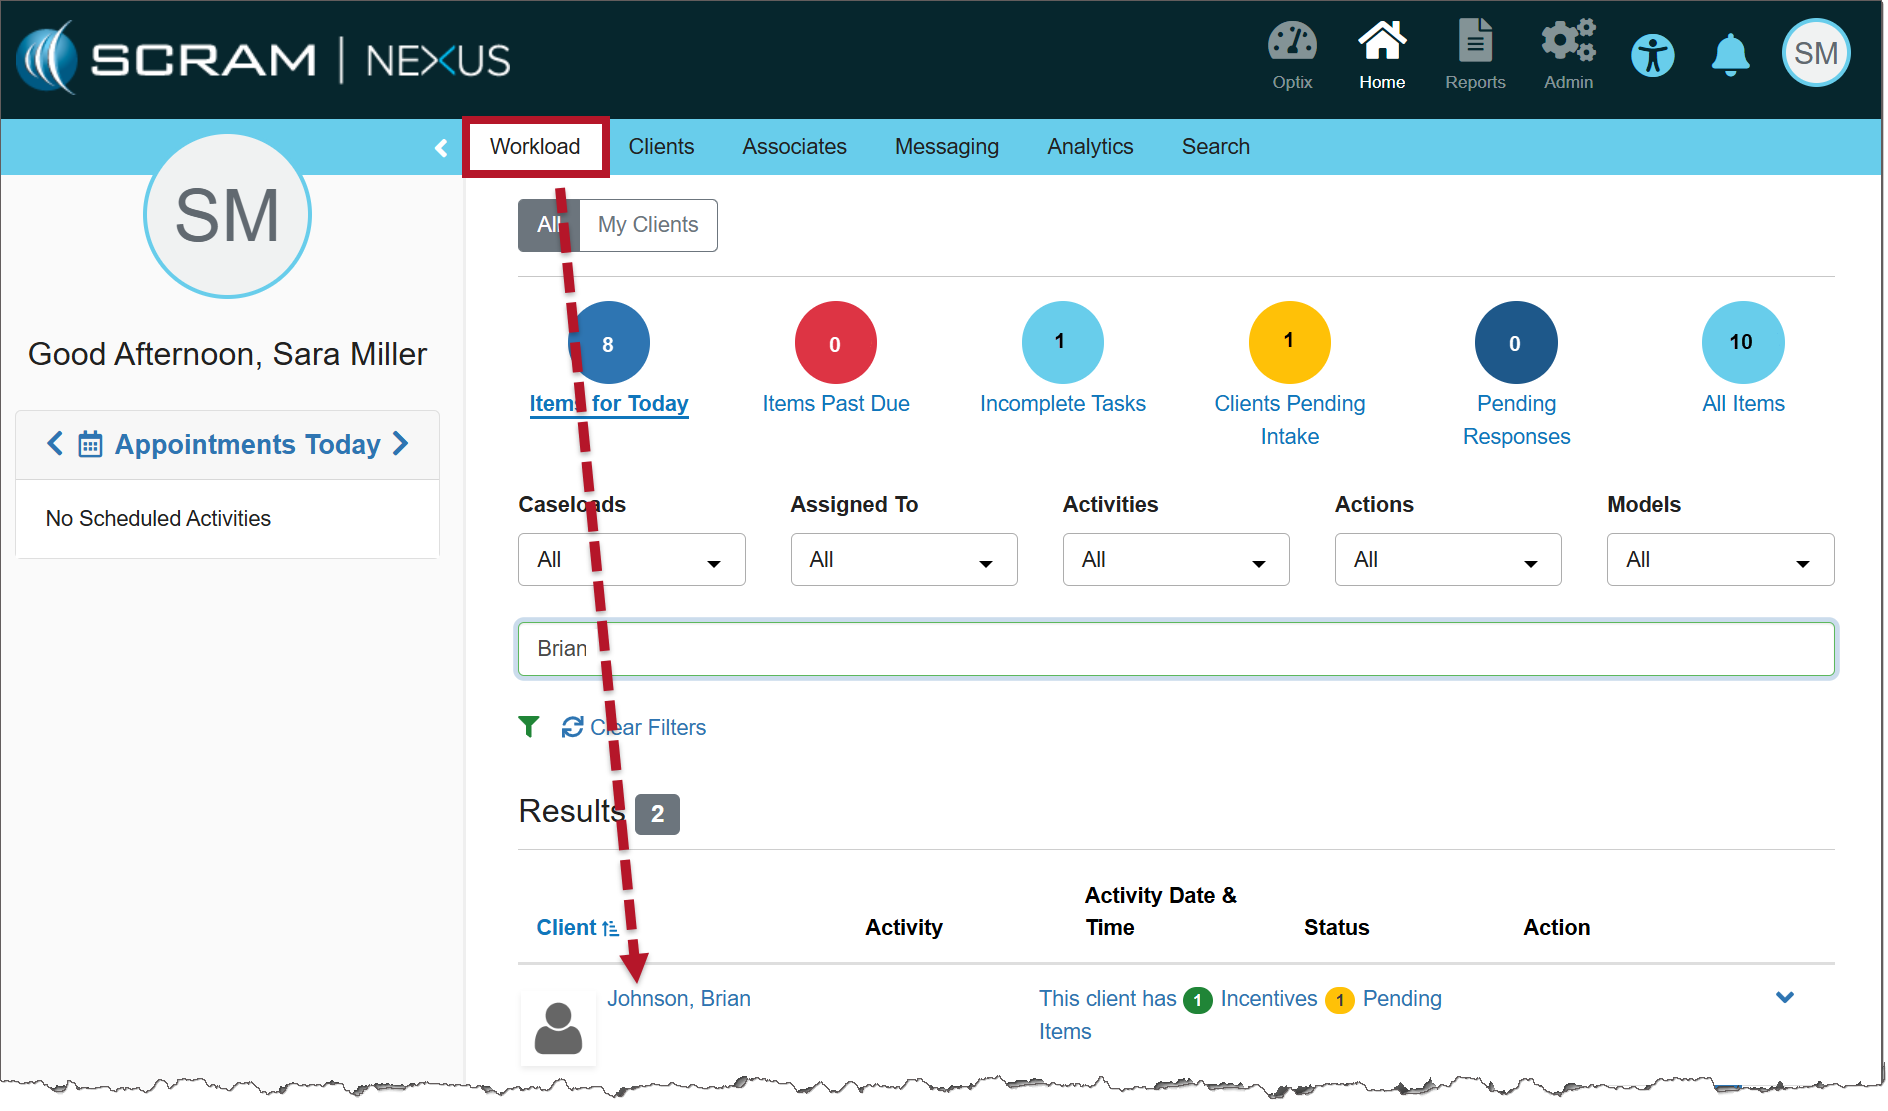
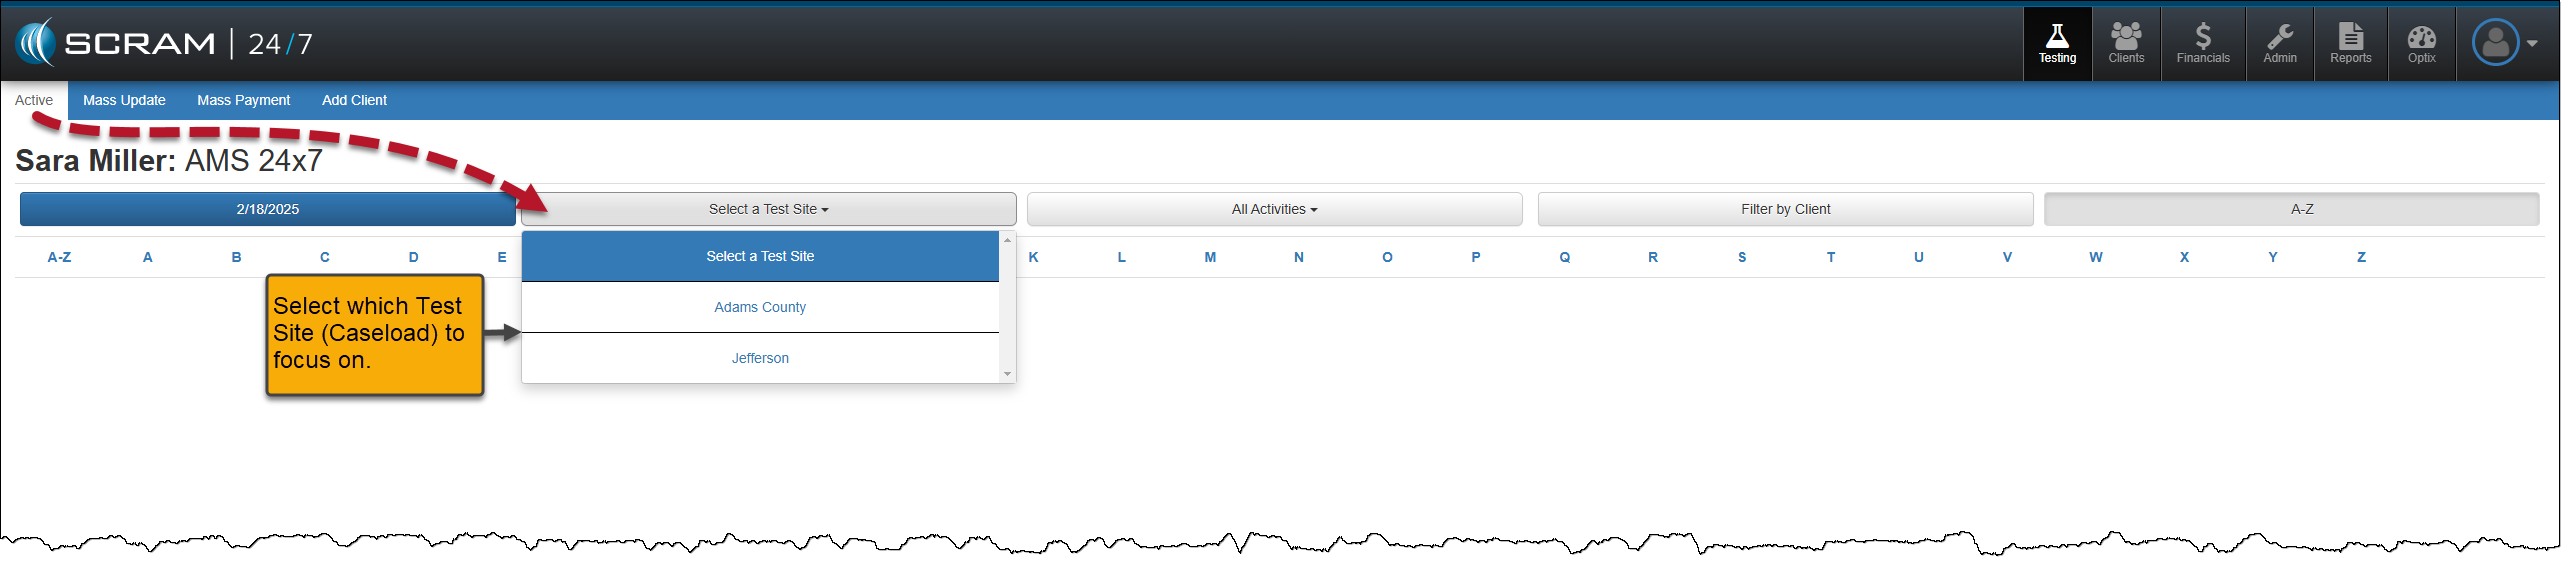
Once a user has access to multiple caseloads for client management, the user must remember to select the caseload in which they wish to complete their daily tasks from the various dropdown menus throughout the SCRAM 24/7 site.  

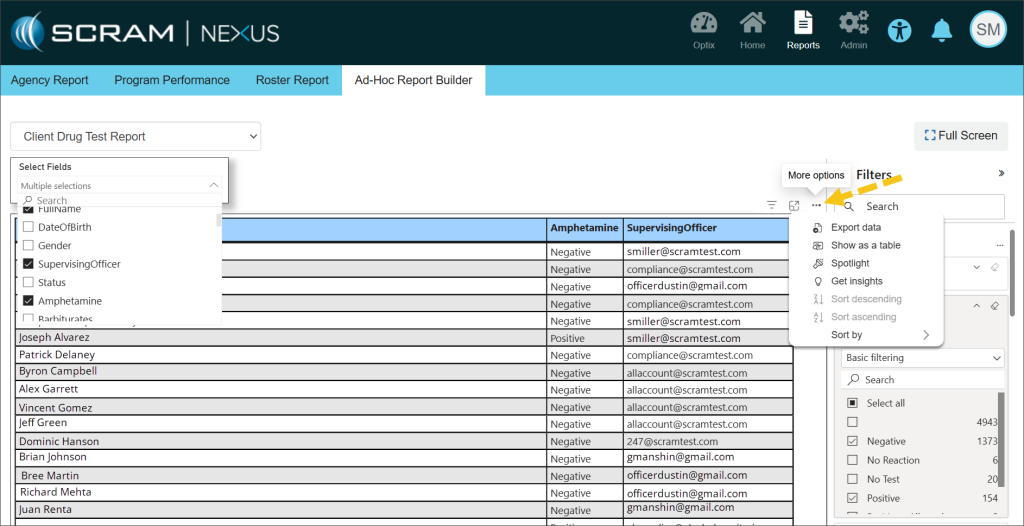
For example, quickly filter the clients associated with a specific caseload on the Testing Dashboard and the Clients page by selecting the appropriate caseload in the Test Site and Caseload dropdown menus, respectively. Once selected, the clients displayed on the page are associated with the chosen caseload.

Testing Dashboard – Test Site Dropdown Menu
Clients page – Caseload Dropdown Menu

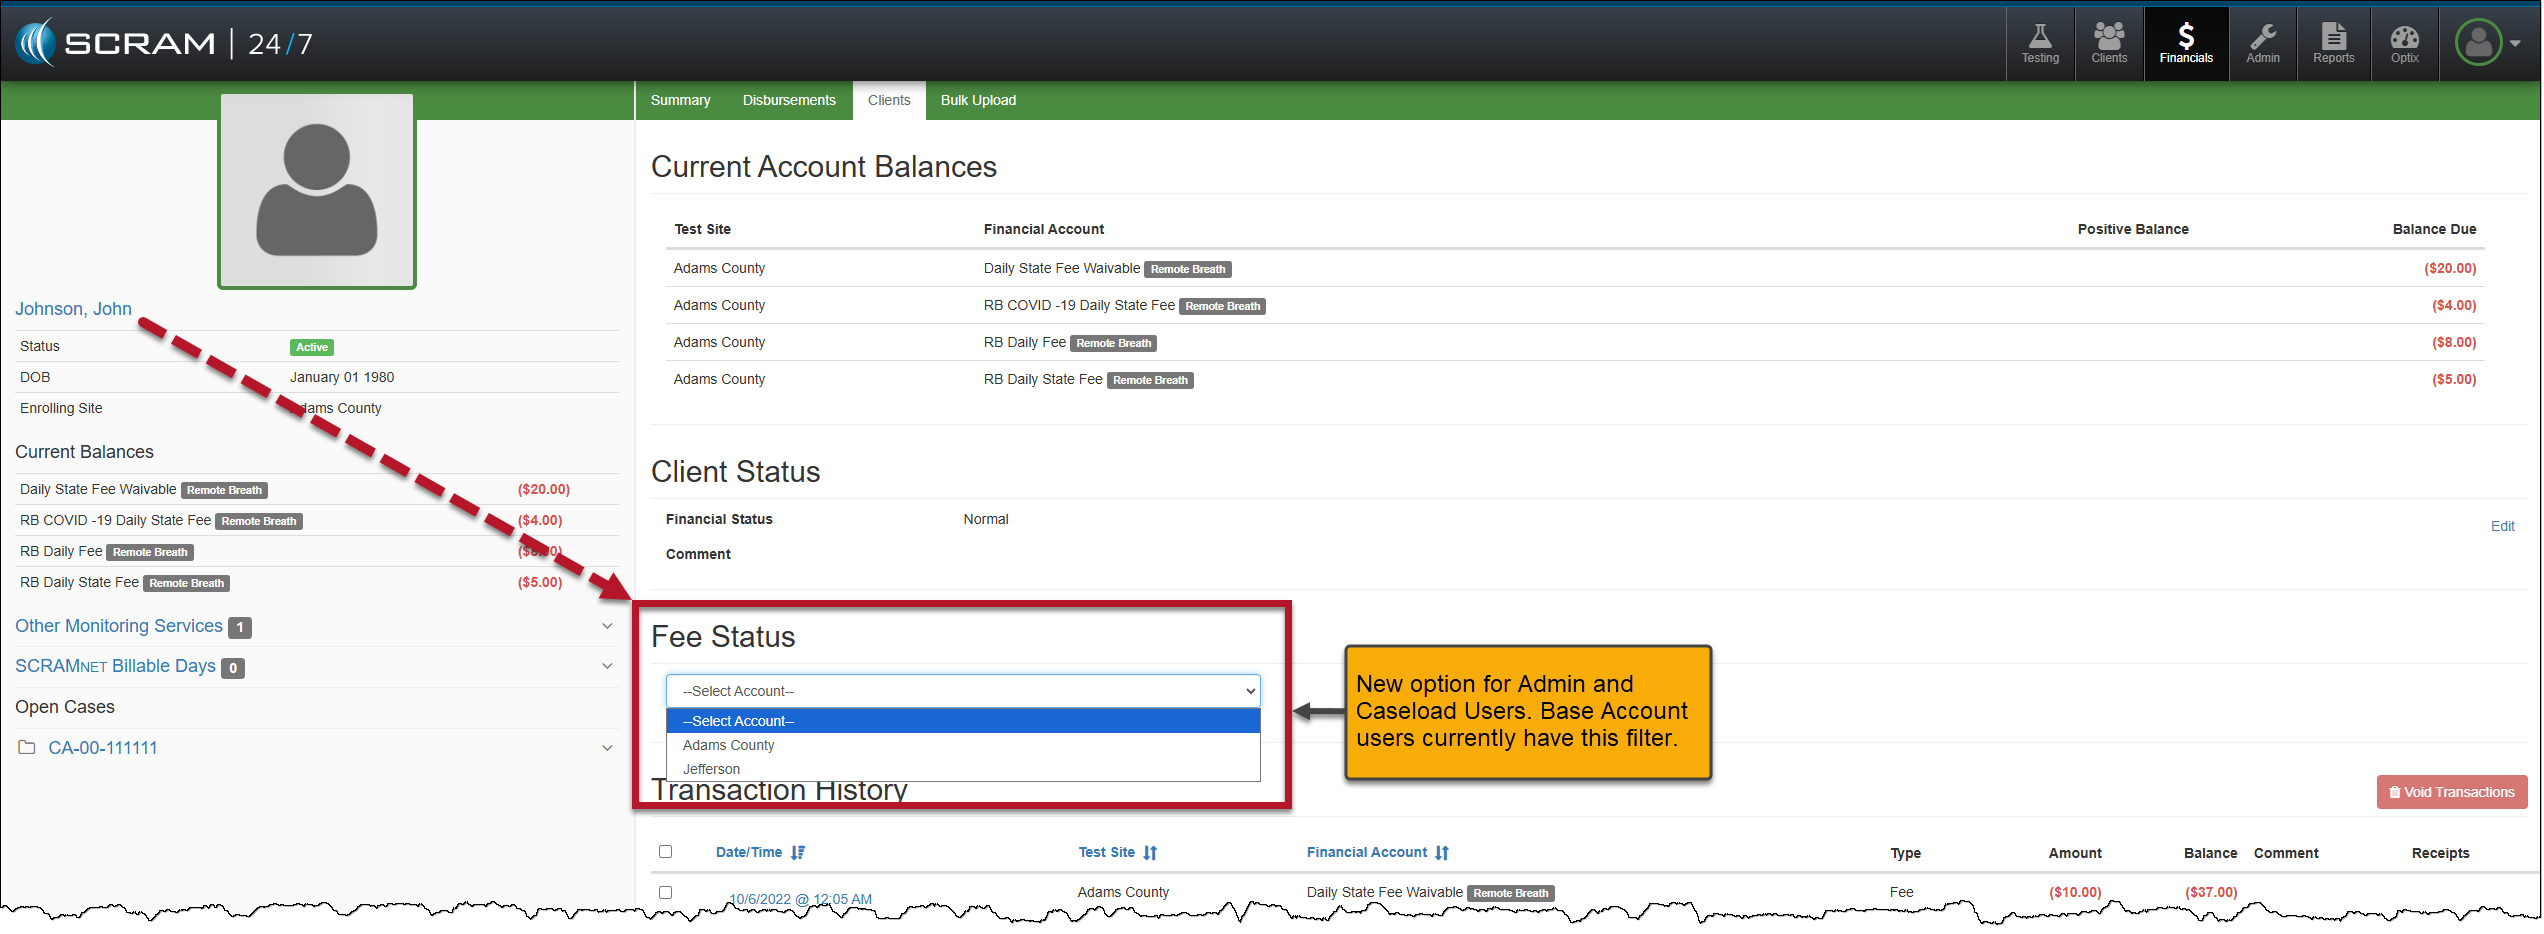
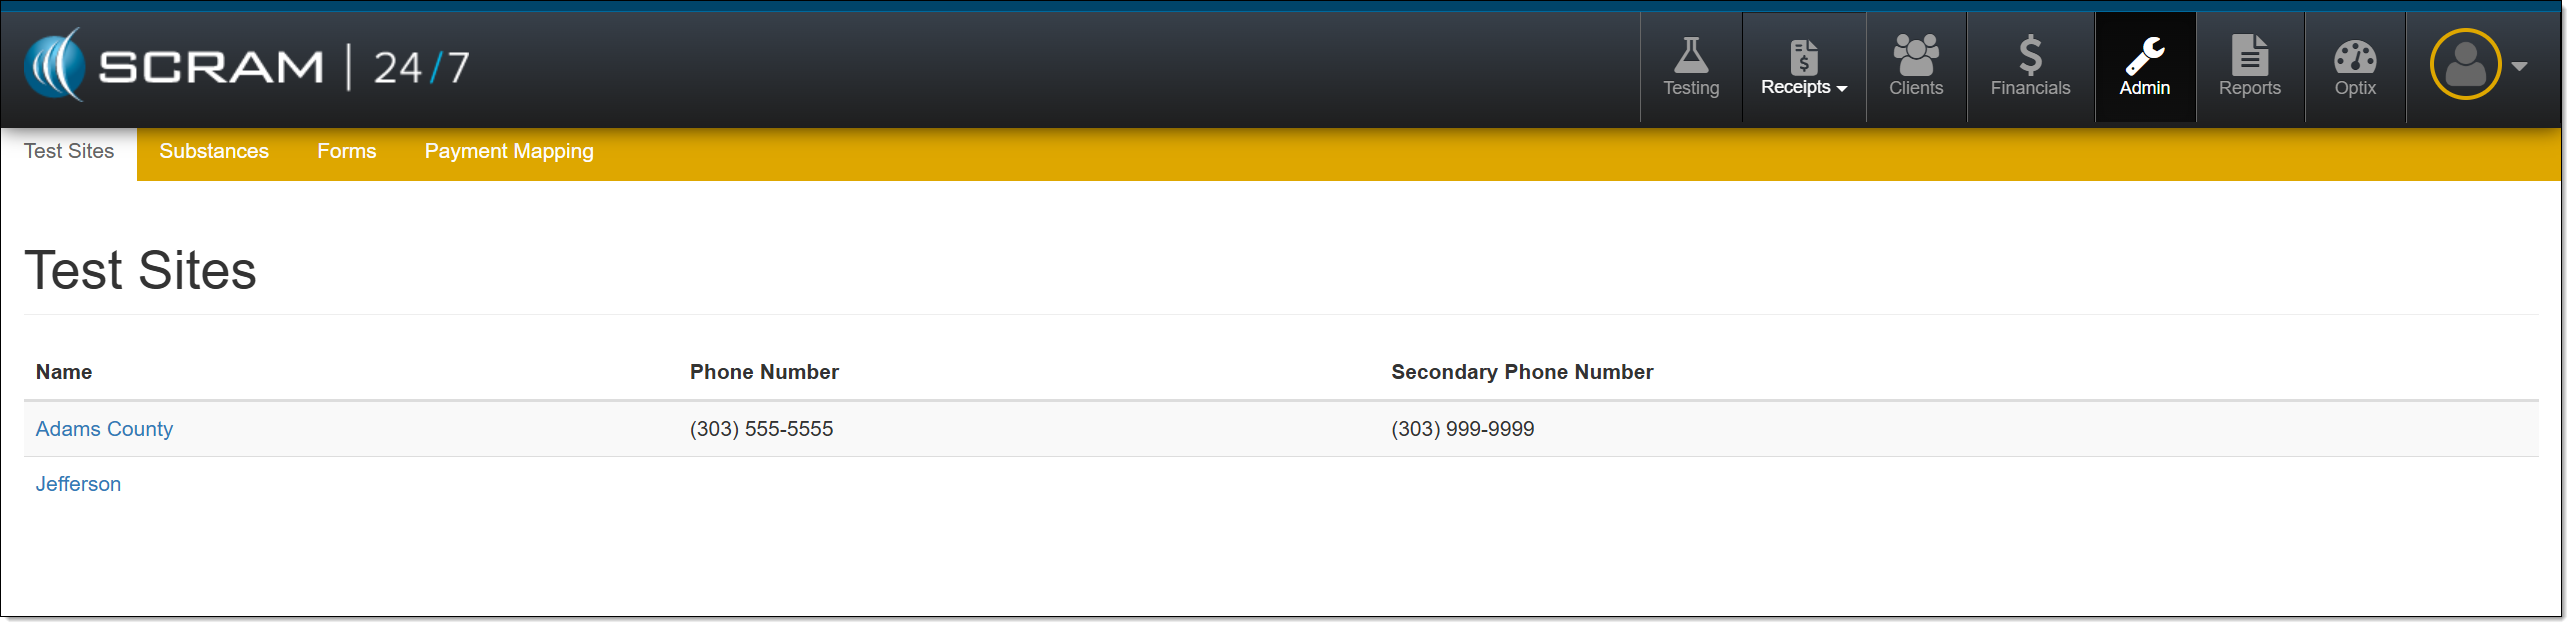
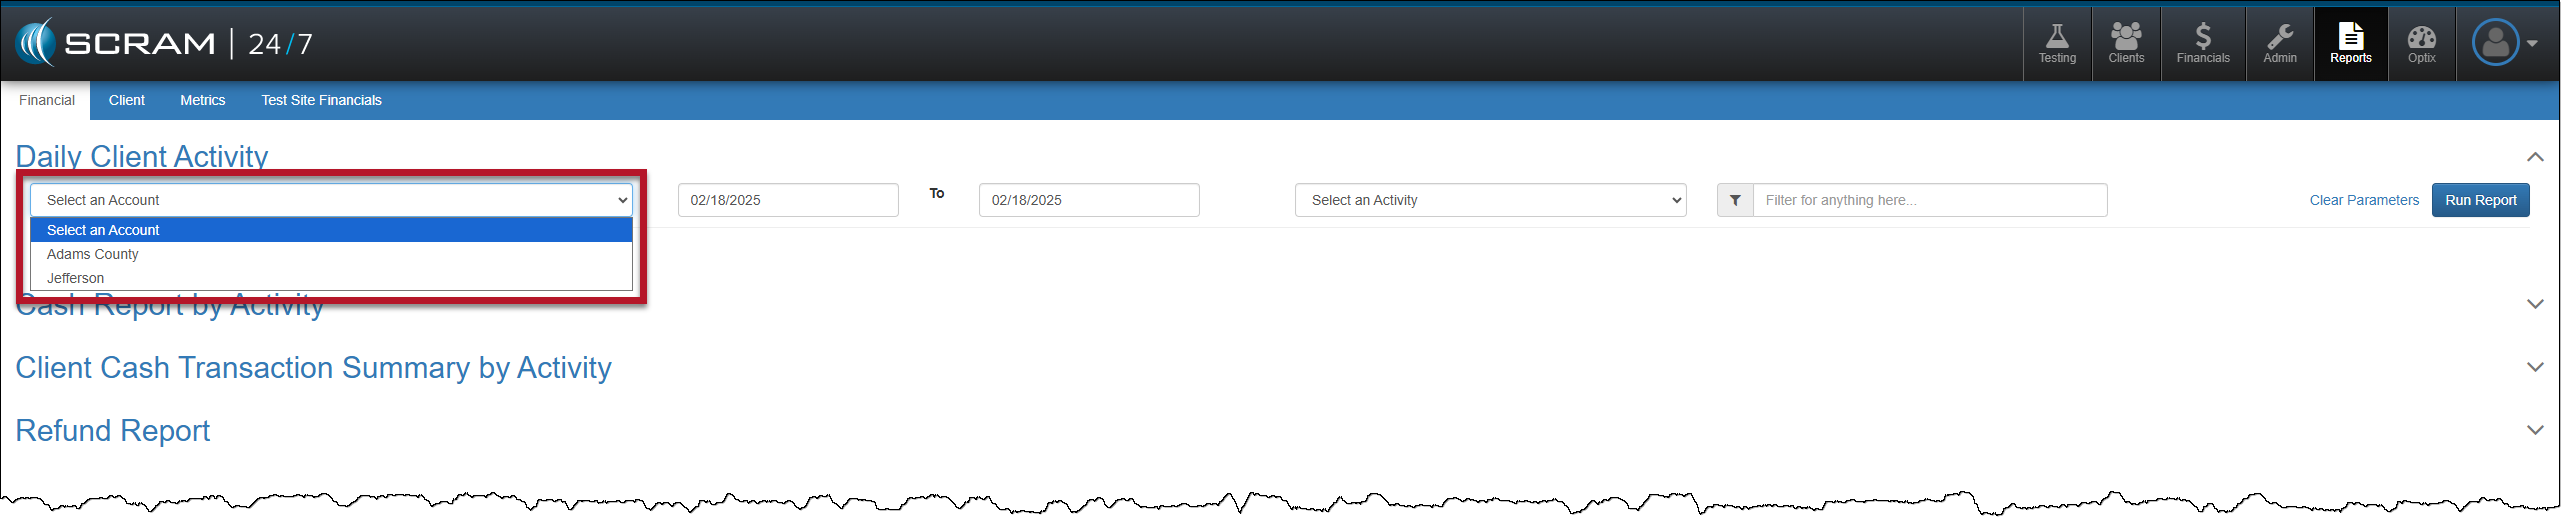
Additional Examples of Filters and Dropdown Menus

Financials Page – Clients Tab – Client Page
Admin Page
Admin Page – Adams County Caseload Selected
Reports page – Account Dropdown Menu
TipsThere are no visual changes to the navigation for a single-caseload user.

Continue Reading

At 5:00 AM MDT on Thursday, April 3, 2025, SCRAM Systems is introducing two new features in SCRAMNET GPS. Enhancements include:

  1. Changes to the SCRAM Ally mobile app registration and login process
  2. Enhanced performance with HTTP/2 support
Information During the 15-minute deployment, you may not be able to access SCRAMNET GPS, but messages from the SCRAM GPS device will continue to be processed uninterrupted.

Changes to SCRAM Ally Registration & Login

Victim Notification: Background

The SCRAMNET GPS Victim Notification service, paired with its companion smartphone app, SCRAM Ally™, allows officers and case managers to automatically inform victims when an assigned GPS client is in close proximity to the victim’s smartphone, and possibly in violation of a restraining order.

Important! IMPORTANT: Activation of the Victim Notification service requires a contract amendment. If you are interested in the service, please contact your SCRAM Systems Account Manager or Sales Representative.


Changes That Impact Existing Victim Notification Customers

New victim-users of the SCRAM Ally mobile app must now select their home Country / Region* when registering the app:

Install Ally, allow services, and select your region.
Select the image above to open the SCRAM Ally App Victim Instructions help page
Important! IMPORTANT NOTES:
  • *If a new victim-user selects the wrong Region by mistake during registration, contact SCRAM Systems Customer Support for assistance immediately.
  • Existing users of the SCRAM Ally app will not need to take any action to continue using the app.

Enhanced Performance with HTTP/2 Support

SCRAMNET GPS now supports HTTP/2, a modern standard for allowing web browsers to communicate more efficiently with SCRAM Systems servers, which results in faster page-load times. You don’t need to do anything to take advantage of this feature. It is automatically enabled on your browser.

TipTip: For optimal performance we suggest clearing your browser’s cache and cookies following the April 3rd deployment of the feature.

Continue Reading

On February 27, 2025, SCRAM Systems will release two enhancements for your SCRAM Nexus caseloads:

  1. Ad Hoc Reporting allows for multiple options in building dynamic reports using data already entered from the Nexus database. Reports may be customized to fit the requirements necessary for the monitoring of clients.
  2. Smart Forms allows users to create, maintain, and customize the official forms they use to communicate with the courts. Some information the forms use is static, for example, content originating from the courts, and some needs to be personalized to the client. The forms can be customized to include information on a single client or on multiple clients.

SCRAM Nexus Ad Hoc Reporting

Customizing a Report

From the Reports menu, select the Ad Hoc Report Builder tab, and then select the desired Report Type from the dropdown menu.

Ad Hoc Report Builder Tab

Once a report is selected, use the Select Fields dropdown list to choose the data fields that will be included in the report. The selected fields will show as titles of the columns in the report. As each choice is selected, the report will dynamically populate.

Select Fields Dropdown

Further customization is available using the Filters section on the right side of the page. These advanced filters allow you to add more conditions for the information that will be displayed on the report. For example, choosing the Client Drug Test Report with the field of Amphetamine selected, allows you to filter the report even further to only show clients who have tested negative or positive for amphetamines.

Additional Filters

Printing a Report

Hovering your mouse over any field in the table uncovers more options for viewing the information contained in the report. Selecting the More Options ellipsis (…) allows for exporting and printing your report in Excel.

More Options

SCRAM Nexus Smart Forms

Customizing a Smart Form

  1. From the Home menu, select the Forms tab, and then select the +Create New Form hyperlink.
Smart Form Report
  1. Enter the client’s Nexus Id (Find the Nexus Id) and select the +Add Template hyperlink.
Select +Add Template
  1. A Choose Template for Smart Form pop-up window will display. Select the Search field to activate a dropdown menu of template choices and select the desired template.
Select the Search Field
Choose the Desired Template
  1. Select the checkboxes of the attributes necessary to include on the form.
  2. Each template is editable. Edit the text contained in any Column Text field to change the information. This gives you the ability to customize the headings as they will appear on the report output.
  3. Once you have made your changes, select the Add button.
Deselect the columns you do not need, edit the Column Text headings, if desired, and then select Add.
  1. Select the Preview Report button.
Preview the Report
  1. From the Preview, add a report name and description. Select the Save Report button.
Add a Report Name and Description
  1. A green Success banner will indicate that the Smart form was saved successfully. The form has been saved in the Smart Form Report section. To continue customizing the form, select the Edit icon under the Action heading.
Saved Form
  1. Re-enter the client’s Nexus Id and select the +Add Template hyperlink to continue adding components to the saved form.
Add Template
  1. Select the Add button to add the new template to the existing report.
Add Button

Final Edits to the Form

Once the information has been customized to meet your needs, you have the ability to adjust the order of the sections on your form.

  1. Add numbers to the fields on the right side of the page to order the sections in the sequence you’d like them to appear on the form.
  2. Enter the client’s Nexus Id.
  3. Select Preview Report to view the final product.
Change the Order of the Sections
  1. Select the Save Report button. The green Success banner indicates that the Smart Form was added successfully.
  1. The form is available to run from the Forms tab. Select the Report History button to access the form.
Access the New Form
  1. Select the download icon next to the Form Name.
Download the Form
  1. Acknowledge that you want to download the Smart Form.
  2. The document will be available in your Downloads folder.

One Form, Multiple Clients

The form for a single client can also be shared with multiple clients using the Mass Transfer feature.

  1. Select the checkbox next to each of the clients that you want to send the form to.
  2. Select the Smart Form button.
Smart Form Button
  1. The Execute Smart Form pop-up displays a dropdown of forms you have created. Choose the form you want to use for the selected clients and select the Execute button.
Execute Smart Form
  1. A green Success banner will indicate that the Smart Form was downloaded successfully. The document for each client will be available as a .zip file in your Downloads folder.
Smart Form Downloaded Successfully

Continue Reading

Yesterday, February 4, 2025, SCRAM Systems released an enhancement for your SCRAM Nexus Caseloads. When adding a new client to your Nexus Caseload, a Nexus ID number will be generated in addition to the System ID.

The Nexus ID will be displayed on the client’s sidebar and may be used when you search your client caseload.

Client Profile Page with Nexus ID
Client Search Page
Information
  • The Nexus ID is an autogenerated number that cannot be edited.
  • This easy-to-remember ID number may be used to expedite your client search by making it easier for you to distinguish between clients with similar names.

Continue Reading

A new version of the SCRAM Ally (Victim Notification) mobile app is available on the Google Play Store. Users are encouraged to update to the latest version (2.1.0), which includes the following changes:

  • Support for newer versions of the Android OS
  • Updates to the core messaging system used for alert notifications
  • Permissions to access Location Service and Motion Activity are now optional

Support for Newer Versions of the Android OS

SCRAM Ally supports Android versions 9 through 15, and this latest update provides a smoother, more optimized experience for users on Android 14 and 15 devices.

Updates to the Core Messaging System Used for Alert Notifications

The SCRAM Ally app’s core messaging system – Firebase Cloud Messaging (FCM) – was updated for improved reliability and performance. Android smartphone users are strongly encouraged to visit the Google Play Store and update to the latest version of SCRAM Ally for Android to ensure proper delivery of important alerts via push notifications.

TipTip: After updating the SCRAM Ally app, it is important that your Victim users open the app and visit the Homepage. This action will ensure alert notifications function properly.

Access to Location Service and Motion Activity

For accurate, continuous monitoring, SCRAM Ally requires permission to access Location Service and Motion & Fitness Activity. Even when permissions are required by the app to function properly, both Apple and Google recommend making these permissions optional, to give users more control over their data.  

SCRAM Ally requires these permissions to properly monitor Victims and deliver important alerts with regard to Victims’ proximity to their assigned individuals. When Ally does not have these permissions, the following dialogs are displayed:

SCRAM Ally App Requests Access to Location Service
SCRAM Ally Requests Access to Motion & Fitness Activity

If Victim users do not grant permission to either of these services, the following banner warnings are displayed in the SCRAM Ally app:

Warning Banner: Location Service is Disabled
Warning Banner: Motion & Fitness Activity is Disabled

Additionally, when the Location Service is disabled, a critical alert is generated in SCRAMNET GPS. It is important to address this alert as it indicates the Victim is not properly monitored:

SCRAMNET Alert: Location Service Disabled – Victim (click to enlarge)

Continue Reading

On January 29, 2025, SCRAM Systems will release an enhancement for your clients participating in a Remote Breath Activity. For current or new clients within your SCRAM 24/7 program, you may enable Remote Breath Courtesy Reminders, as well as enable notifications to be sent to third-party recipients.

Information If you don’t see the enhancement in SCRAM 24/7, please clear your cache and cookies and refresh your browser window.

New Client Setup

When adding a new Remote Breath Activity to your client:

  1. To enable the monitoring settings for the client, select the checkbox next to the Add Monitoring Settings Now option and then the Save and Continue button.
Add A Remote Breath Activity
  1. On the Monitoring step, you will enable and enter the details for client Courtesy Reminders and third-party Recipients.
Remote Breath Activity Monitoring Settings Step

Courtesy Reminders

Enable Courtesy Reminders for the Client
Client’s Courtesy Reminders Details

Third-Party Recipient Notifications

Add Recipient Details
Recipient Notification Method Awaiting Validation
TipsTip: Third-party Recipient notifications are for non-SCRAM users only. To ensure other Officers and Agents in your Program receive appropriate alerts, enable and use “Priority Notifications” instead.

Enable/Edit Active Remote Breath Activity

To add or edit the client’s Remote Breath Courtesy Reminders or third-party notification Recipients, select the Remote Breath Activity on the client’s Activities page, and then expand the Courtesy Reminders Detail or the Recipients heading.

Client Remote Breath Activity Details Page

Continue Reading

On January 29, 2025, SCRAM Systems® will release two enhancements for your SCRAM Remote Breath Caseload.

  • Resolve multiple Ambient VOC Detected alerts on the RB Results page.
  • Configure your Caseload to automatically send a single On-Demand test to the device following a “Missed” scheduled breath test.

Resolve Multiple (bulk) Ambient VOC Detected Alerts

On the RB Results page for your Caseload, you may select the checkbox next to multiple Ambient VOC detected alerts and then select the Resolve Selected Alerts button to “bulk” resolve of them all at once.

RB Results page – Multiple Ambient VOC Detected Alerts Selected
Resolve All Selected Alerts Pop-Up Acknowledgement

Configure your Remote Breath Caseload to Send an On-Demand Test after a Missed Scheduled Breath Test:

  1. Select the Monitoring tab for the selected Caseload.
  2. In the Remote Breath section, select the Edit hyperlink.
Caseload-Monitoring page-Remote Breath section
  1. Select the checkbox next to the Auto Retest Missed Test option in the Optional Services section.  
  2. Select the Save Changes button.
Configure Remote Breath Optional Services
Auto Retest Missed Tests Enabled

Moving forward, when SCRAMNET reports that the client has missed their scheduled breath test, an On-Demand test will be sent.

RB Results Page with Missed Test with Automated On-Demand test sent

Continue Reading

At 5:00 AM MDT on Monday, January 13, 2025, SCRAM Systems will release four enhancements for your SCRAM GPS monitoring program.

These enhancements are:

  1. The Monthly Monitored Days report will track the GPS 9 Plus bracelets separately
  2. Optionally include Client ID in Text and Email Notifications
  3. Notes Can Be Sorted by Any Column
  4. Device Assignment “Classic View” No Longer Available
Information During the 15-minute deployment, you may not be able to access SCRAMNET GPS, but messages from the SCRAM GPS device will continue to be processed uninterrupted.

Update to the Monthly Monitored Days Report – GPS 9 Plus Bracelets Type / Model Added

The Summary section of the Monthly Monitored Days Report will display the total active days by device type, supervision plan, and services, providing a clear view of reporting and billing for your monitoring program.  

The Type / Model column is broken out into the following devices and services:

  • Ally App
  • Beacon
  • Locator/Gen7* (Standard GPS Bracelet)
  • Locator/GPS9* (GPS 9 Plus Bracelet)
  • Locator/OM500
GPS Monthly Monitored Days Report – Summary Page
GPS Monthly Monitored Days Report – Detail Section

Include the Client ID in Text and Email Notifications

An Administrator for your program may include one or both of the Client ID fields in Text and Email notifications. This can be useful for programs relying on the Client ID fields to identify clients.

To include Client ID field(s):

  1. Select the Admin button and then the Account Settings option.
  2. On the Administration page, select the Accounts tab.
  3. On the Preferences tab, locate the “Include client ID(s) in Notifications” option and open the dropdown menu to select your options.
Include Client ID(s) in Notifications Option

Once selected in Account Administration, one or both (depending on what is selected) Client IDs will be included in Notifications sent to recipients.

Event Notification Example
Information When the client ID field has been identified as a social security number (SSN), only the last four (4) numbers are visible on the Text or Email notification.

Filter Client Notes by Column

With this update, you may filter how the Notes are displayed for client Events using the filter icons on each column header. This can be useful to filter for specific Event types or usernames (Entered By). 

Client Notes Pop-Up

Device Assignment “Classic View” No Longer Available

To ensure SCRAMNET GPS supports both the Standard and GPS 9 Plus features, the “Classic View” will no longer be available on the Device Assignment page.  

Current Device Assignment View
Updated Device Assignment Page

Continue Reading

On December 19, 2024, SCRAM Systems released an enhancement for your Nexus caseload. This enhancement will allow you to schedule randomized drug tests for your client.

TipsThe service for the randomized scheduling of drug tests must be enabled for your account before you may utilize it. For more information, contact your SCRAM Systems Account Representative.

Once enabled, you may select the Random schedule option when adding a Drug Test Activity to your client’s supervision plan.

From the Nexus Workload page, select the client’s name hyperlink.

Nexus Clients tab (click to enlarge)

On the client’s Summary page, select the Supervision Plan tab.

In the Supervision Plan section, select the Set Up Activity button.

Supervision Plan information (click to enlarge)

On the Activity Details page, enter the details for the Drug Test Activity: 

  1. Select the Provider and the Location from the dropdown menus. 
  2. On the Schedule Type dropdown menu, select the option of Random.
    • Once selected, the Specific Time field is no longer editable.
  3. The Recommended Frequency is based on the model for the client, but you may choose from the other options in the Schedule dropdown.
  4. Select the Save Changes button.
Activity Details page (click to enlarge)

Once saved, a green success banner will display on the page. You may view the details for the Drug Test Activity in the Activity Details section.

To return to the Supervision Plan page, select the >>Back to Supervision Plan button.

Activity Details page (click to enlarge)

The calendar on the client’s Summary page will display the drug tests interspersed randomly based on the frequency entered.

Activity Calendar (click to enlarge)
NotesImportant Notes:
  • When creating a random Drug Test schedule, appointments are not scheduled on weekends or Federal holidays.
  • The client will receive an automated push notification by 5:00 AM via TouchPoint Messaging that a drug test must be completed that day.
  • You may cancel or reschedule the random Drug Test appointment using the established process.

Entering the Results of the Drug Test

When recording the results of the Drug Test Appointment, there is no need to schedule the client’s next appointment because the random schedule has already been established.

Record Test information (click to enlarge)

Continue Reading

On December 18, 2024, SCRAM Systems® will release an enhancement for your Remote Breath Pro client Caseloads. With this enhancement, when an RMA has been issued for an RB Pro device that has failed, the Alert Management Console (AMC) will include a new Device Warnings section that displays a “Failed RMA issued” warning for all breath test results (for example, Passed, Missed, or Scheduled Test Not Received alerts) received after the RMA is created. 

AMC with Device Warning Message – click to enlarge
Tips
  • A “failed RMA” is issued when the device is not operating within normal parameters.
  • When utilizing the Remote Breath Carousel, the “Device Warning” section will not display regardless of the device’s RMA status.
  • Once the client’s RB Pro device has been replaced or checked in, the Device Warning section and “Failed RMA issued” message will no longer be displayed on the alert’s AMC.
  • If SCRAM Systems cancels the RMA, the Device Warning section and “Failed RMA issued” message will no longer be displayed on the alert’s AMC.

Continue Reading