Today, April 9th, 2026, at 11:00 AM MT, SCRAM Systems released multiple enhancements for your SCRAM 24/7 GPS Activity Client Caseload.
These enhancements allow you to perform the following tasks from within SCRAM 24/7:
- During the Add GPS activity setup, you may now add and assign the SCRAM GPS Bracelet and Beacon.
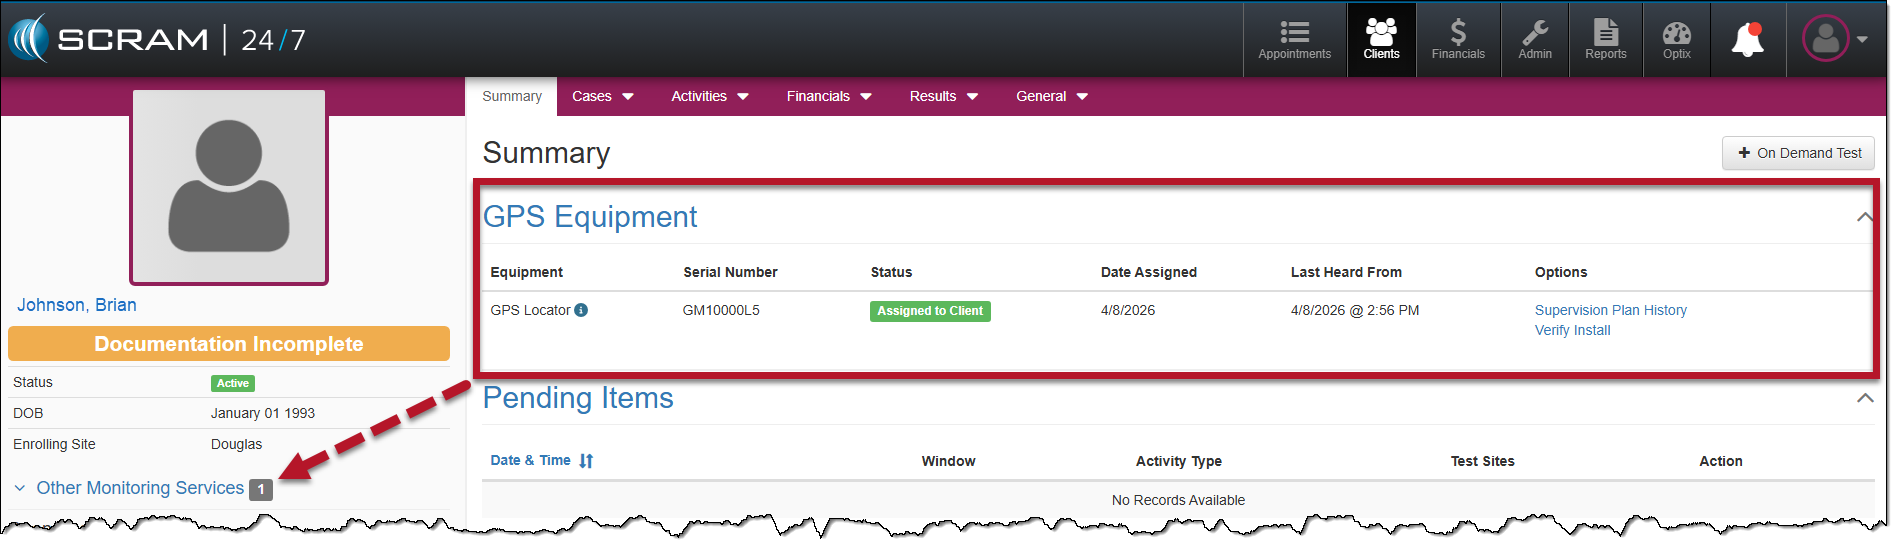
- View SCRAM GPS Supervision History on the client’s Summary page.
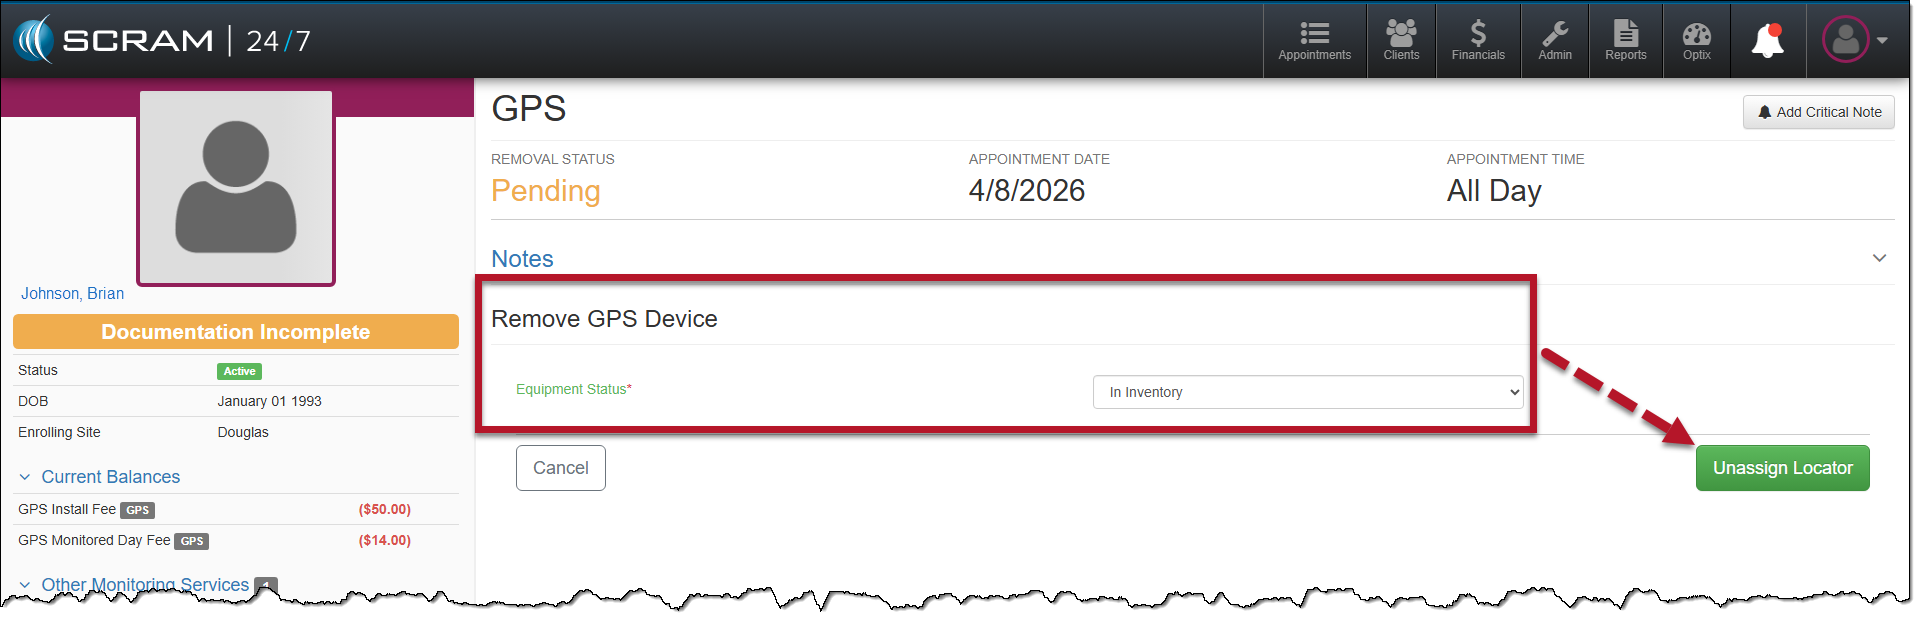
- Unassign the SCRAM GPS bracelet and Beacon when removing the GPS Activity.
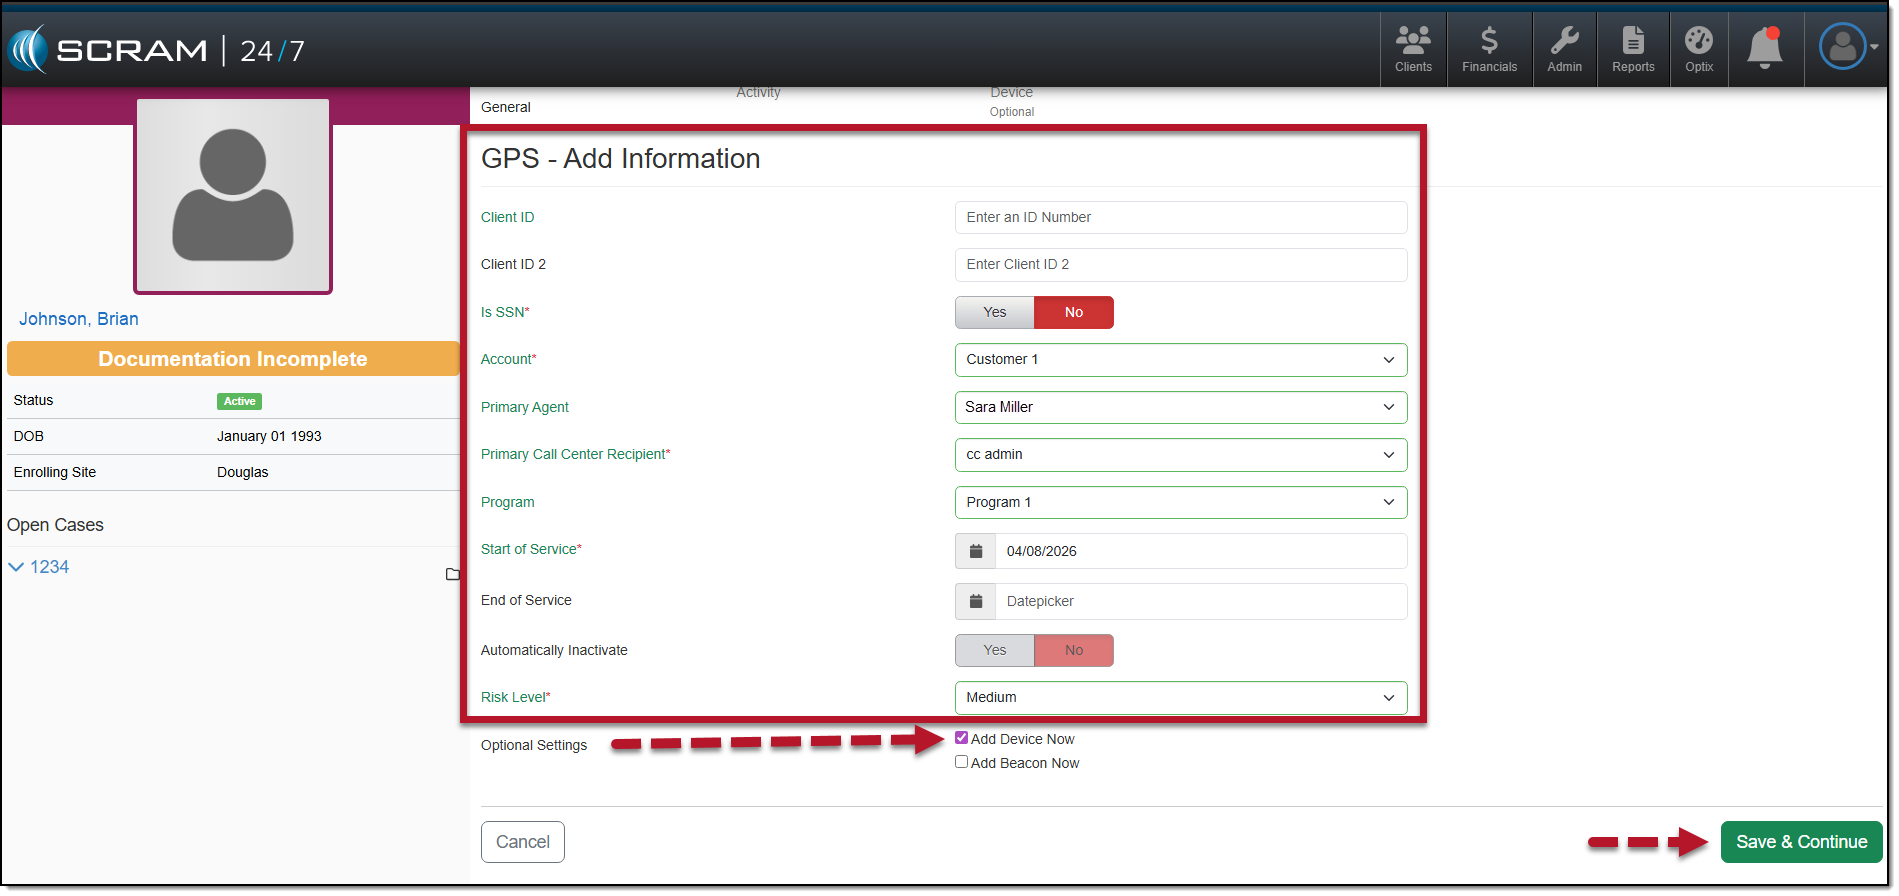
Add GPS Activity
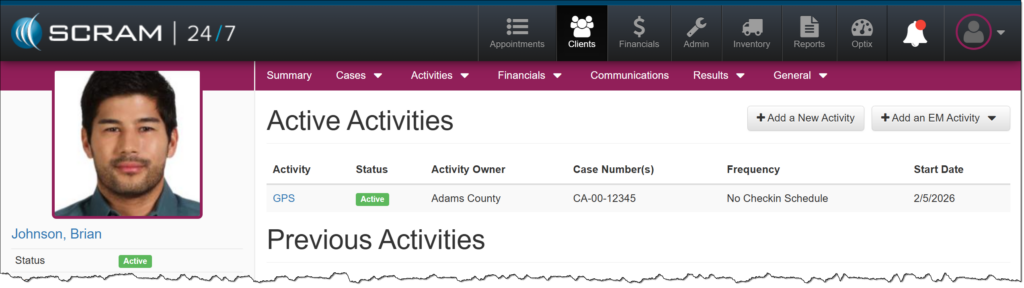
Once you have created the client’s profile in SCRAM 24/7, the next step is to add the GPS Activity and then complete the equipment assignment.
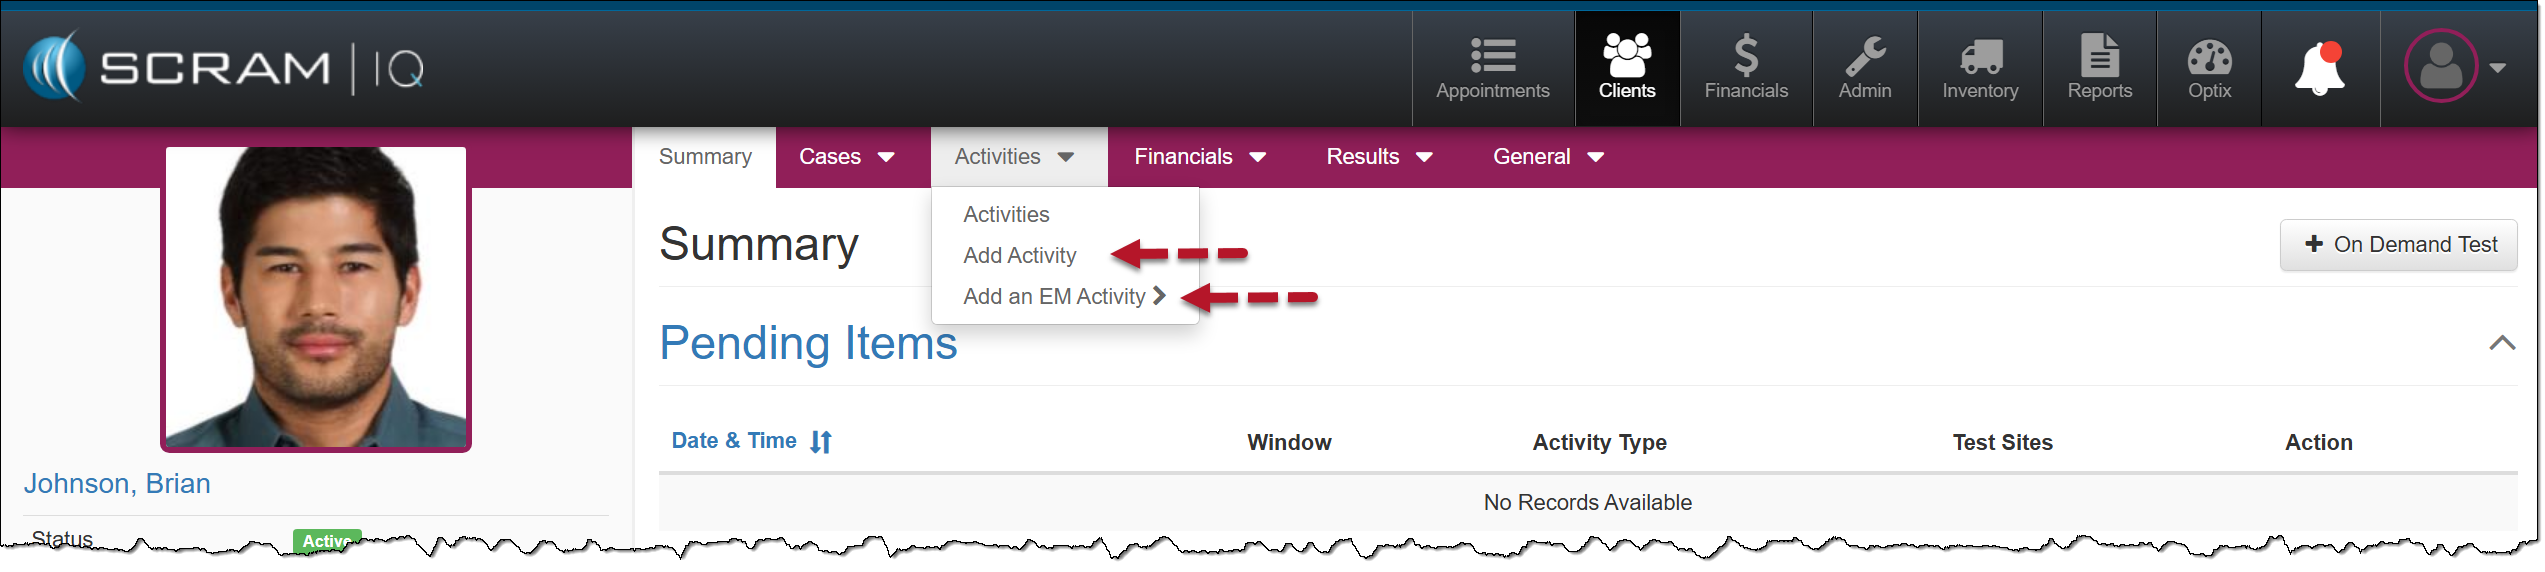
Starting on the client’s Activities tab:
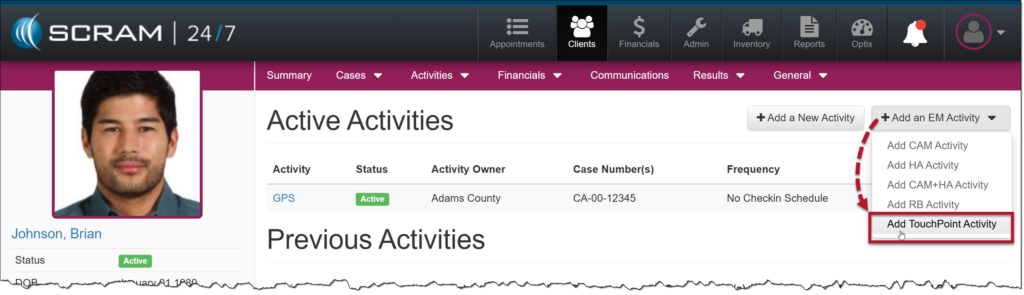
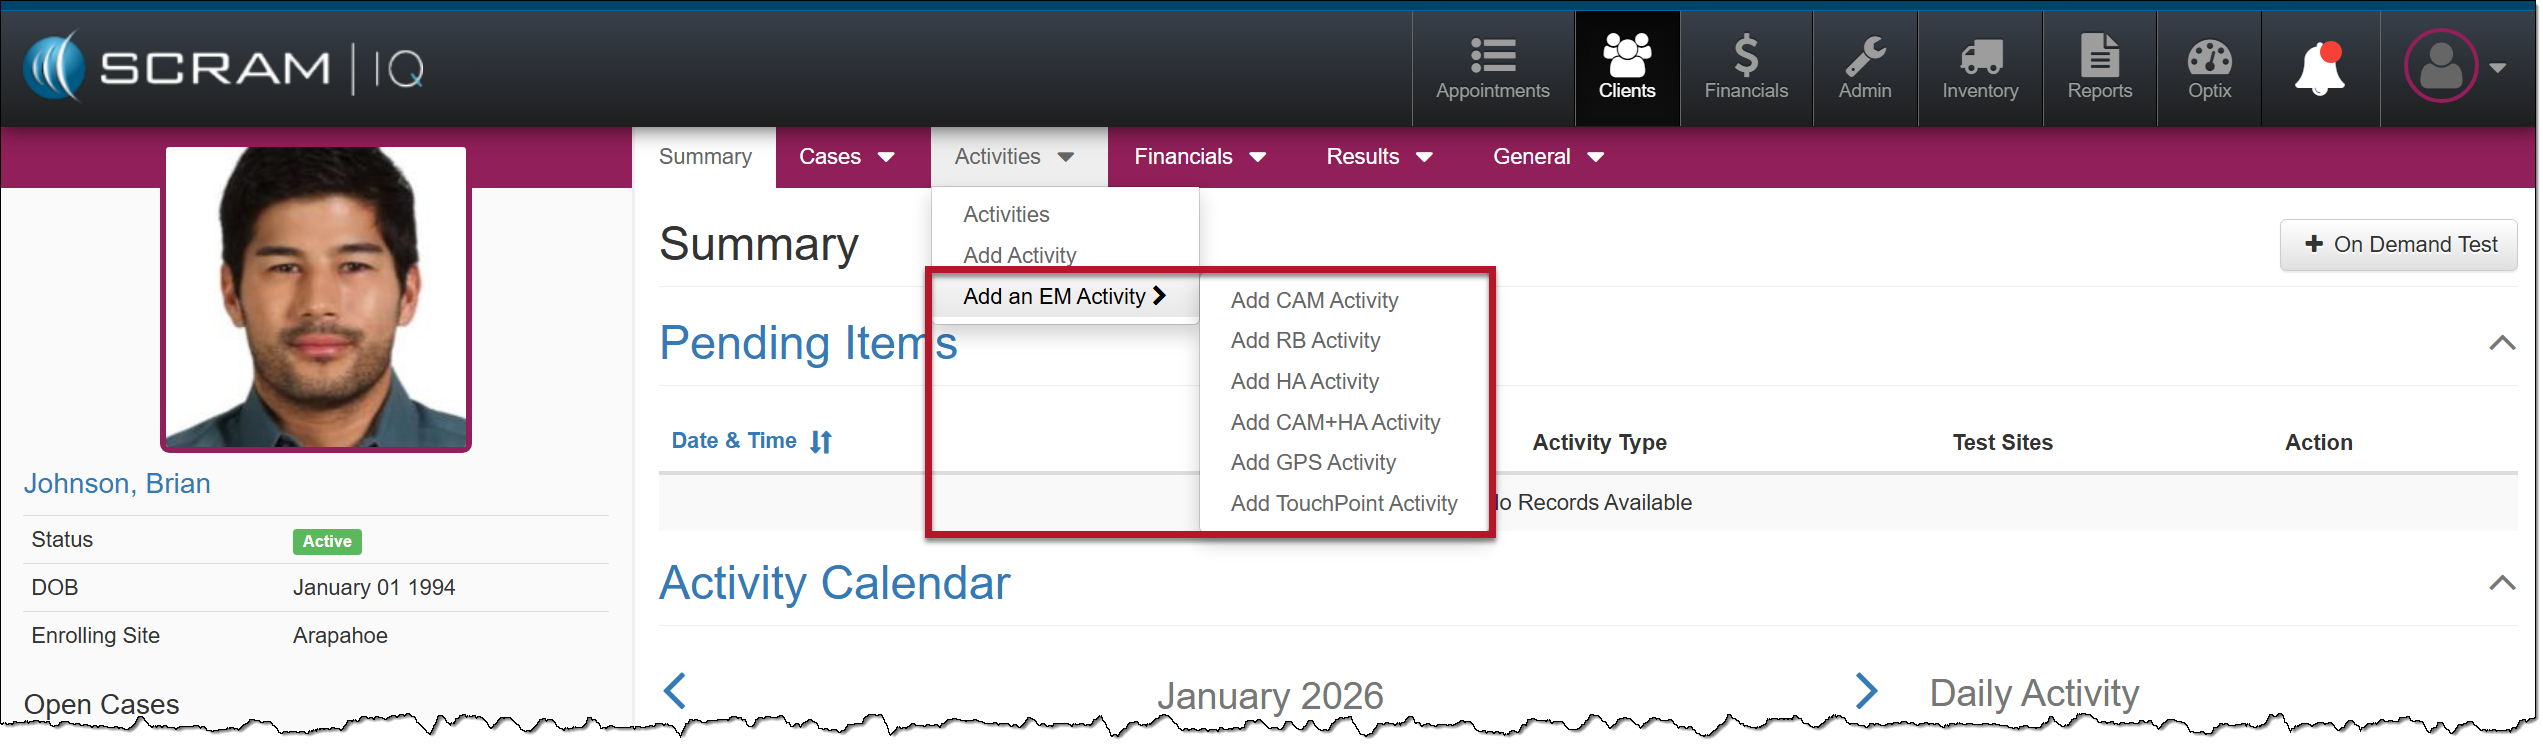
- Select the +Add an EM Activity button, and then select the Add GPS Activity option from the dropdown menu.
|
General Step
- Add the client-specific and “SCRAMNET GPS account” information. The fields and options available here are based on the selected Account.
- You may elect to assign a SCRAM GPS bracelet and Beacon at this time by selecting the checkboxes next to the appropriate selections in the Optional Settings section.
- Once your selections are made, select the Save & Continue button.
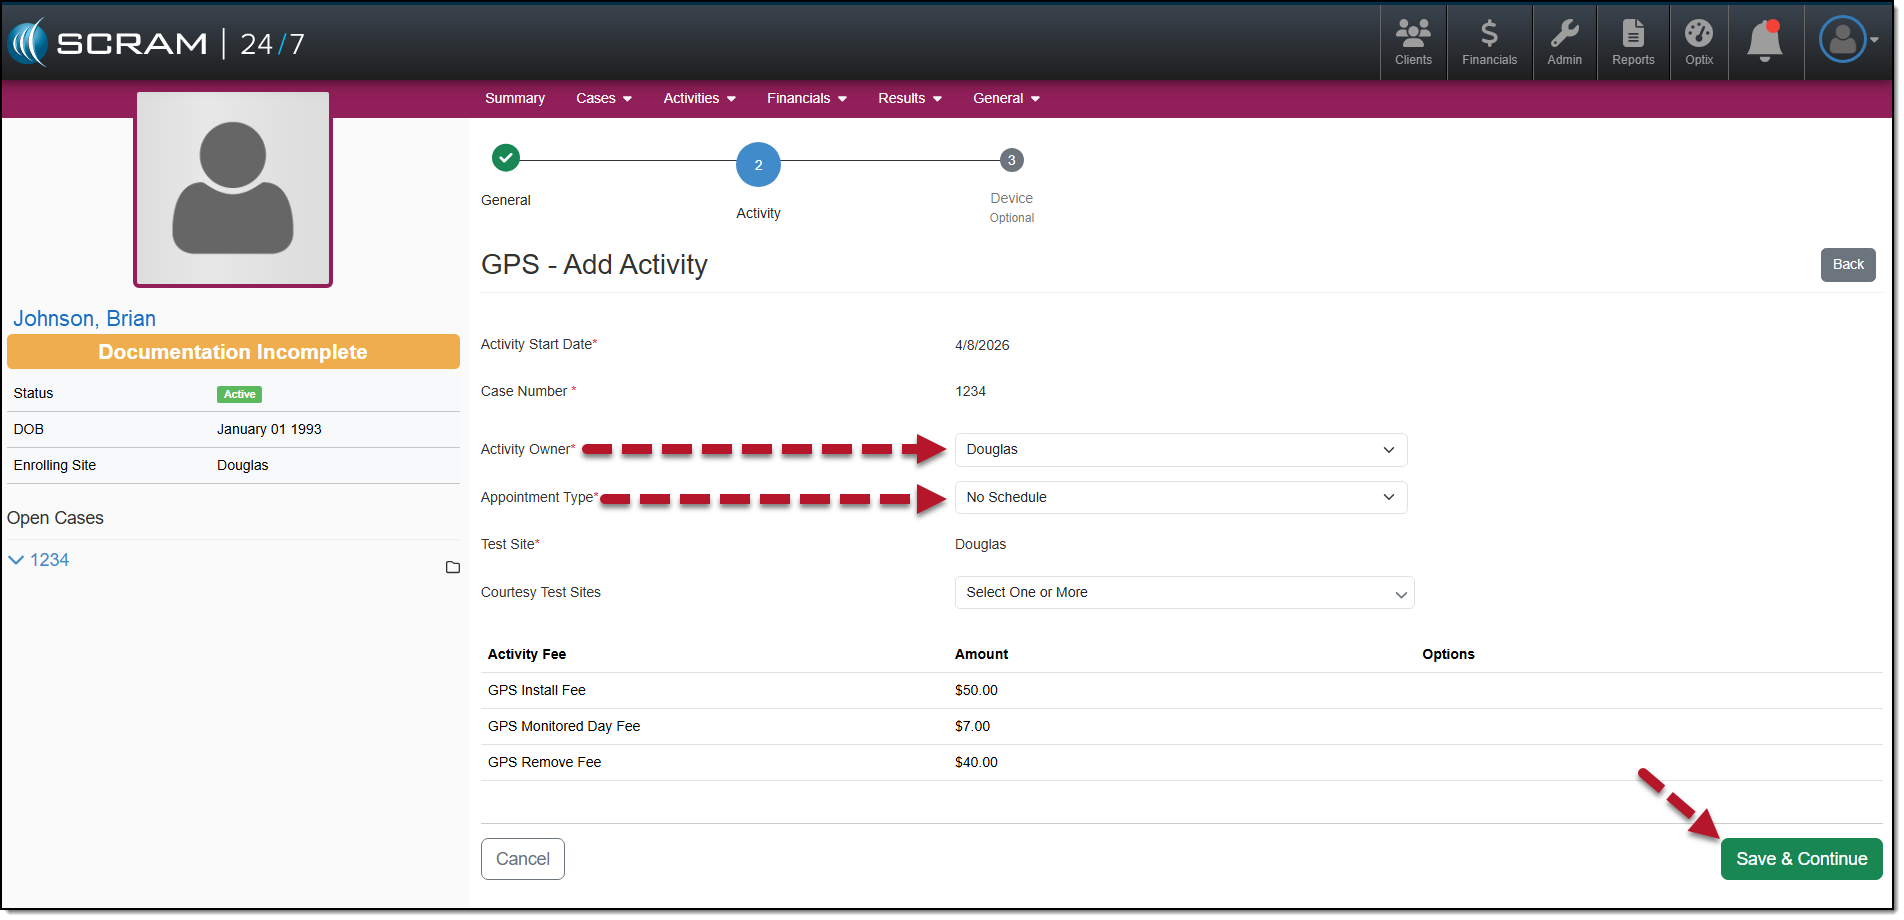
Activity Step
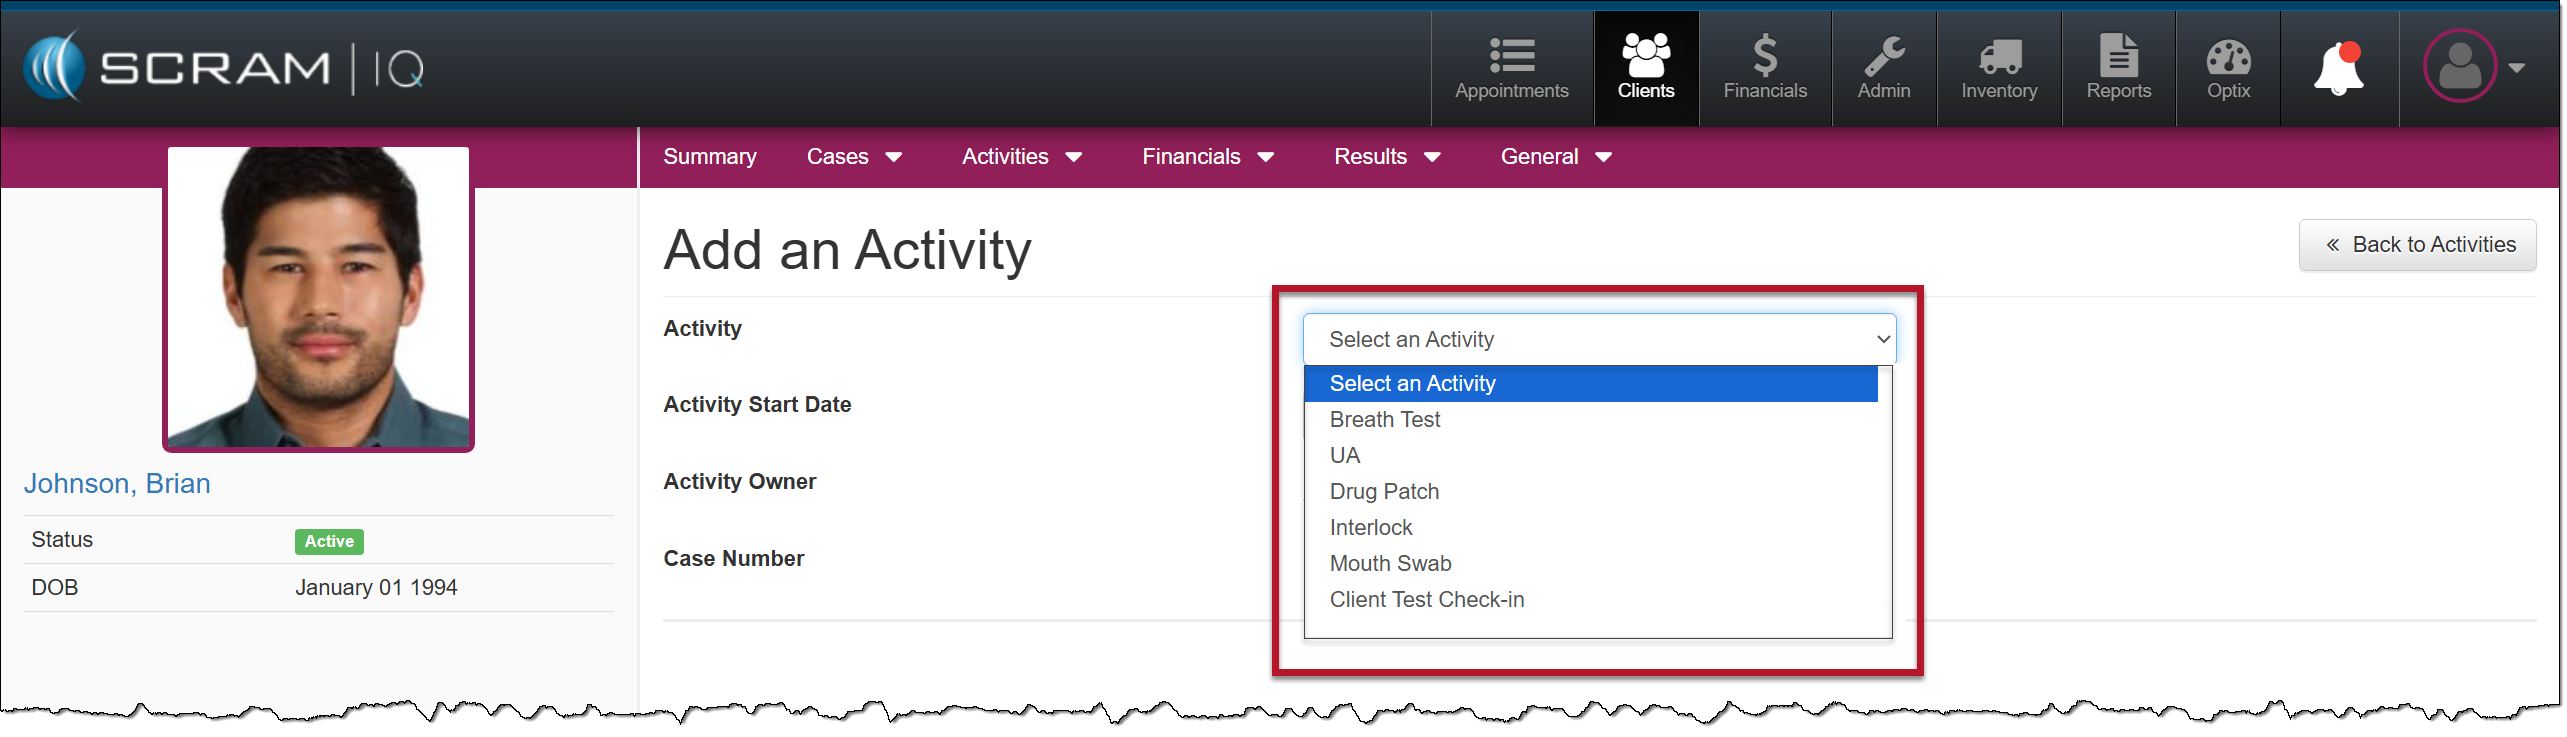
- Add the Activity details. All required fields are marked with a red asterisk.
- Appointment Type:
- The two options available are “No Schedule” or “In-Person Appointments.” When this In-Person Appointments option is selected, you will enter the appointment details. Once saved, the appointment is visible on the client’s Activity Calendar on the client’s Summary page and will populate on the Appointments Dashboard on the appointment date.
- Verify and update the Activity Fees if needed.
- After making your selections, select the Save & Continue button.
Device Step
- Select a locator from the dropdown menu.
- Select the Supervision Plan from the dropdown menu.
|
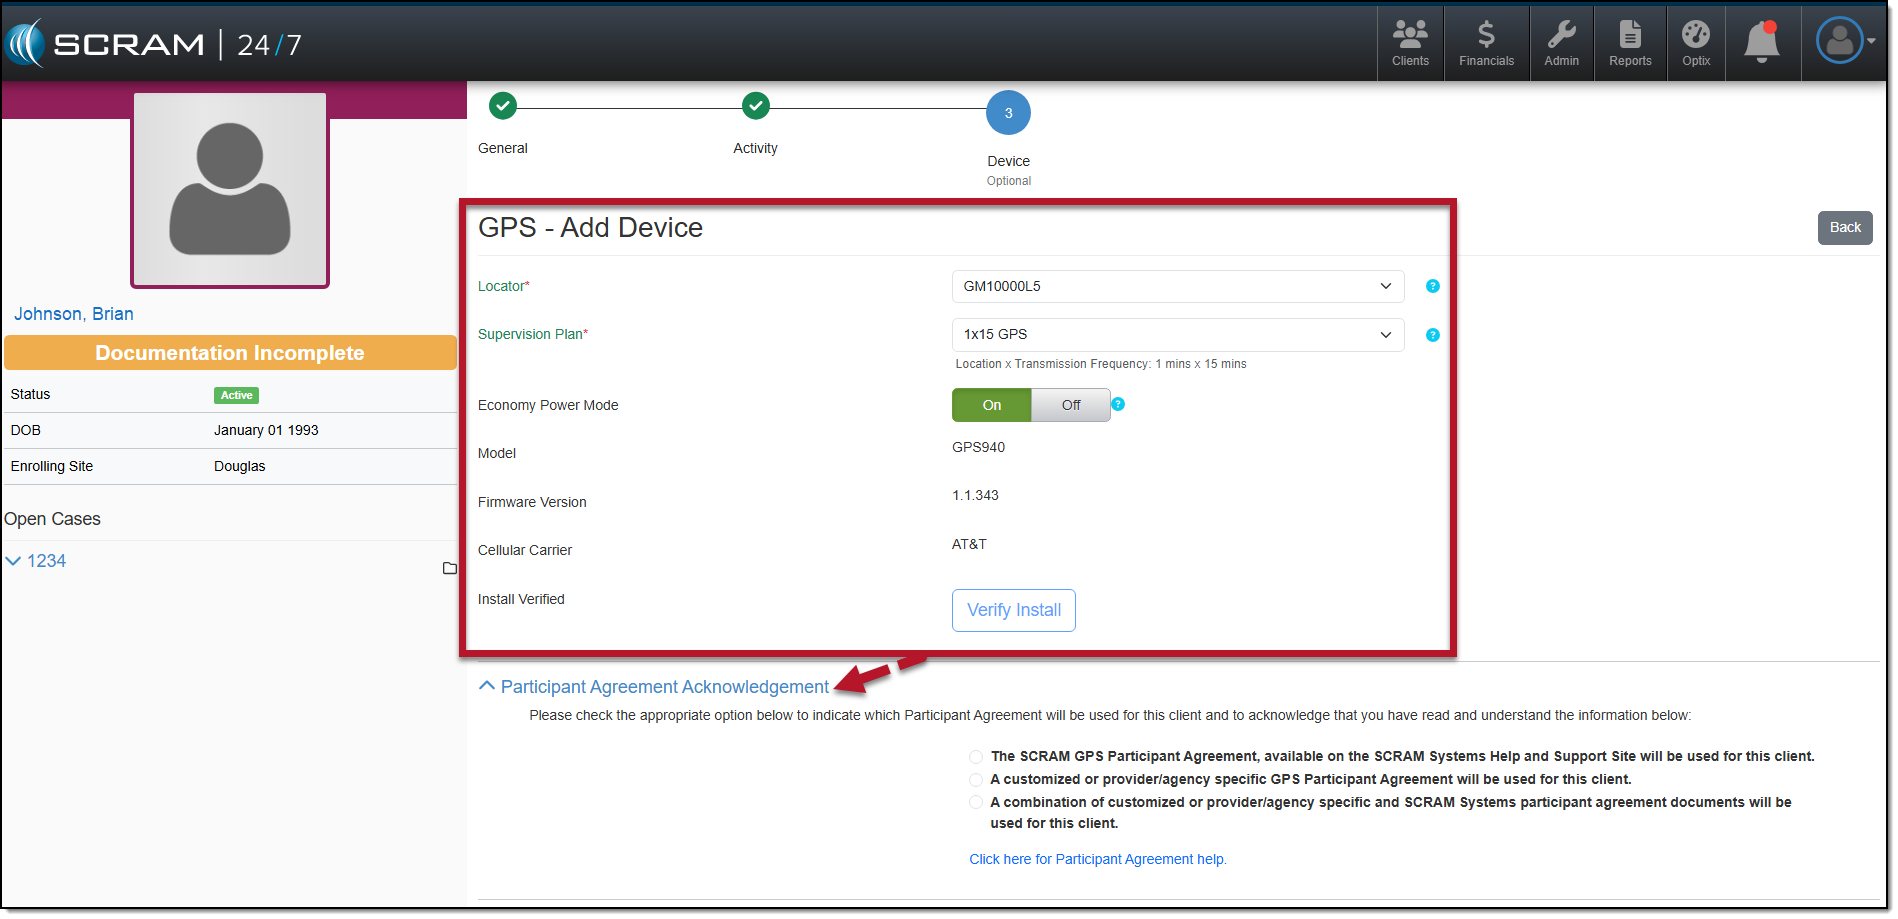
| At this time, you must access the client’s SCRAMNET GPS profile page by selecting their name hyperlink in the Other Monitoring Services section in the sidebar. It is imperative that you:
If you skip this step, the client may not be properly monitored. |
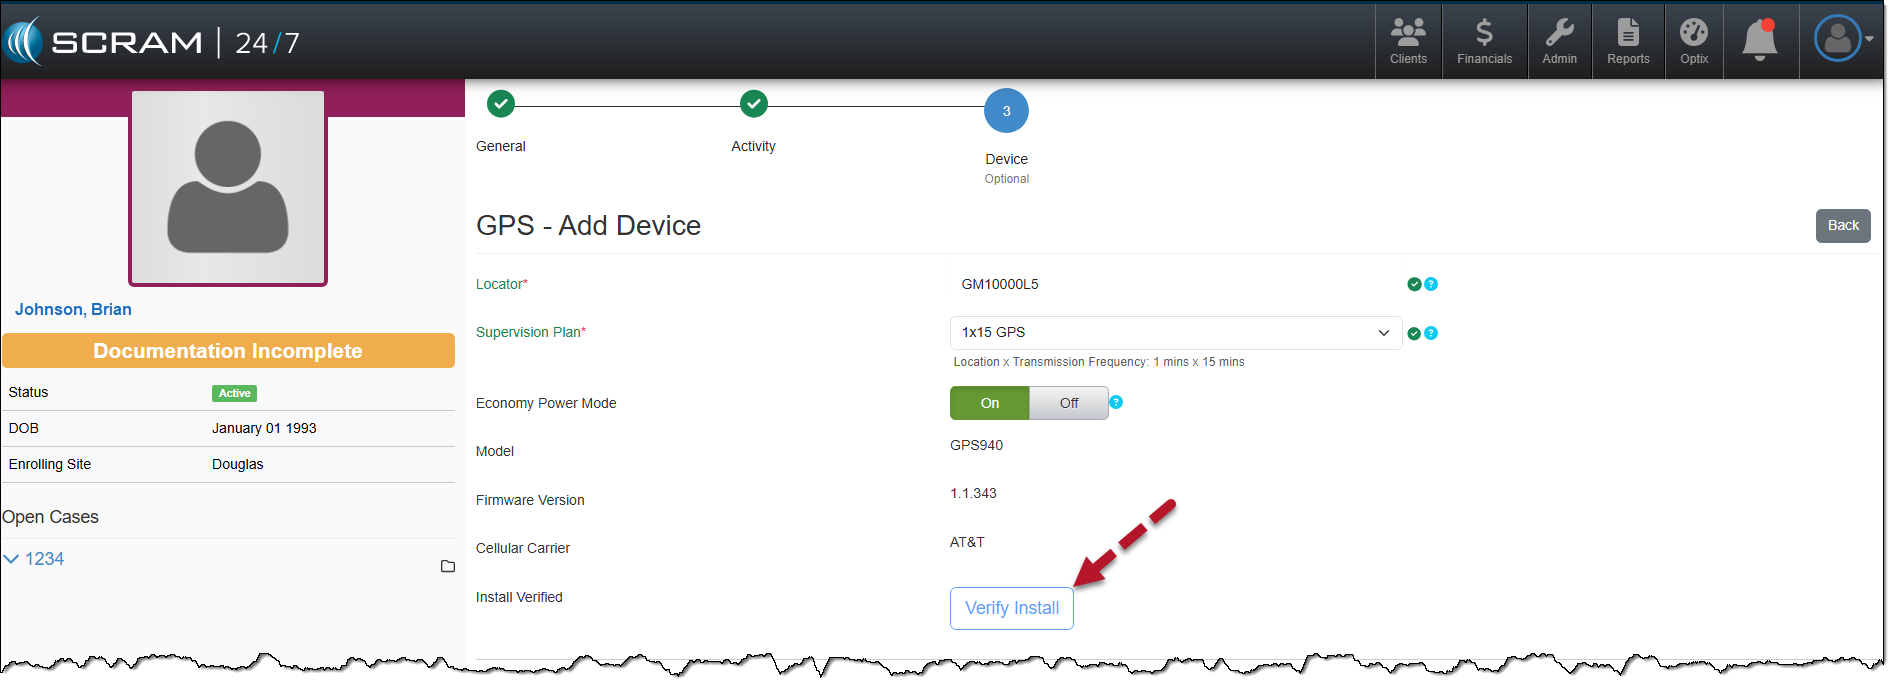
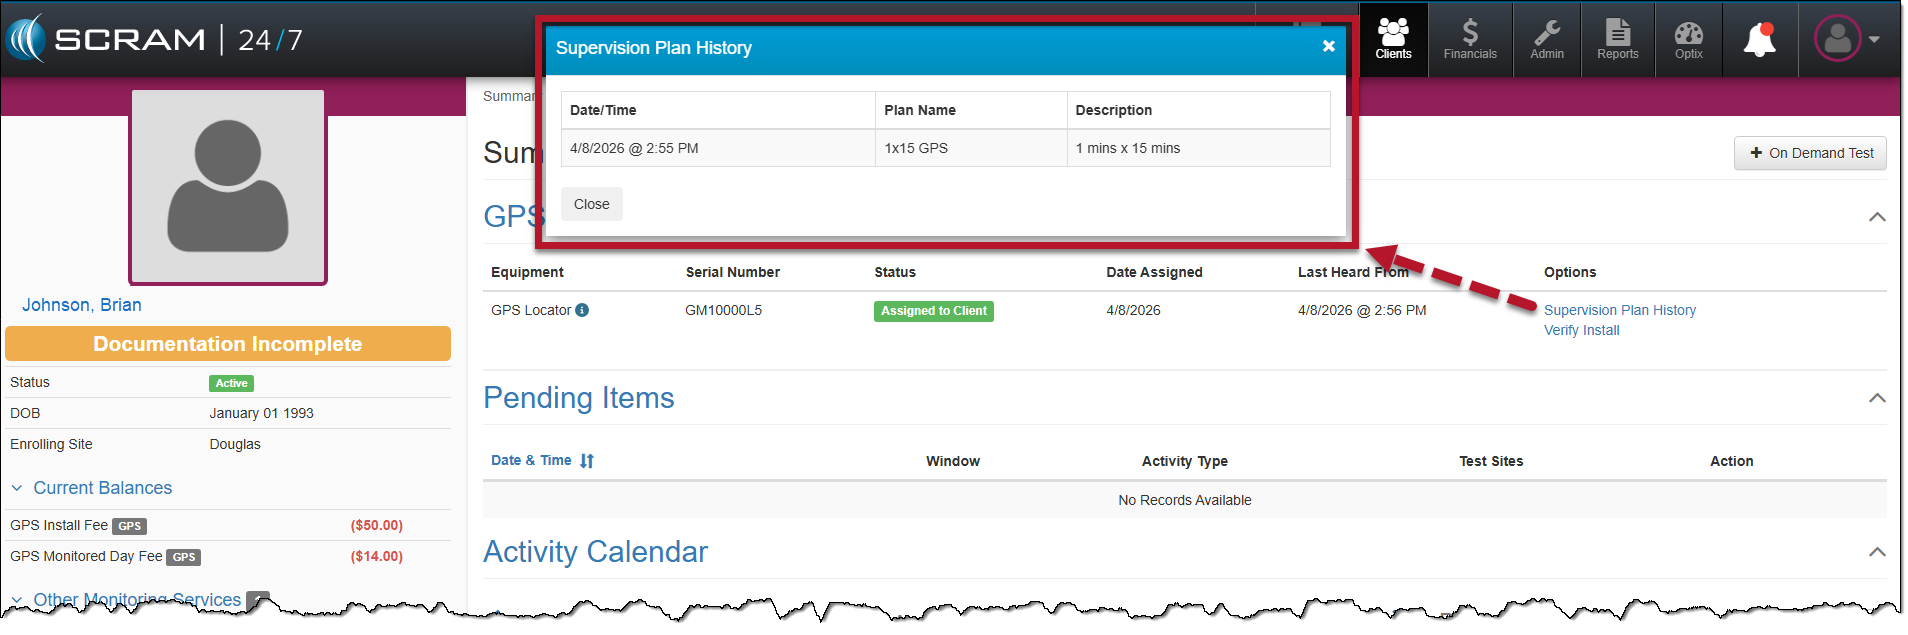
Supervision Plan History Hyperlink
You may view the supervision plan information for the assigned bracelet by selecting the Supervision Plan History hyperlink located in the Options column on the client’s Summary page.
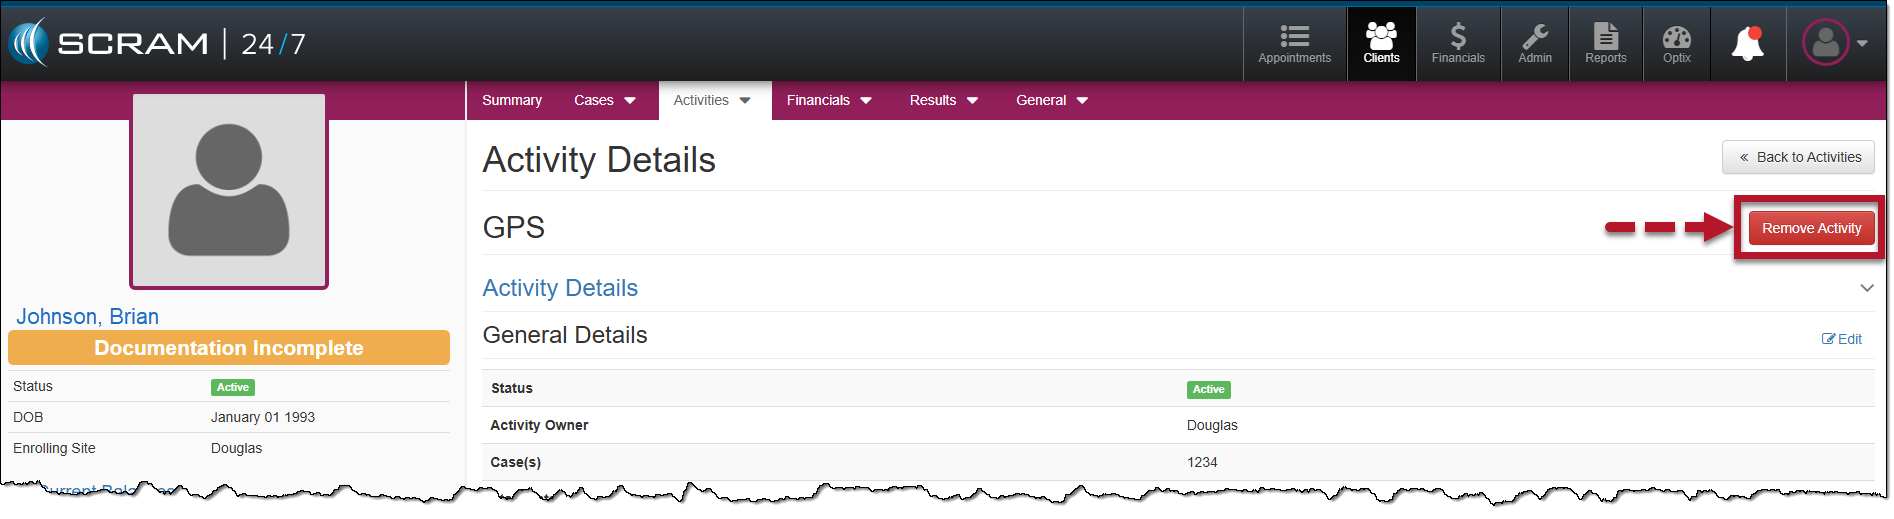
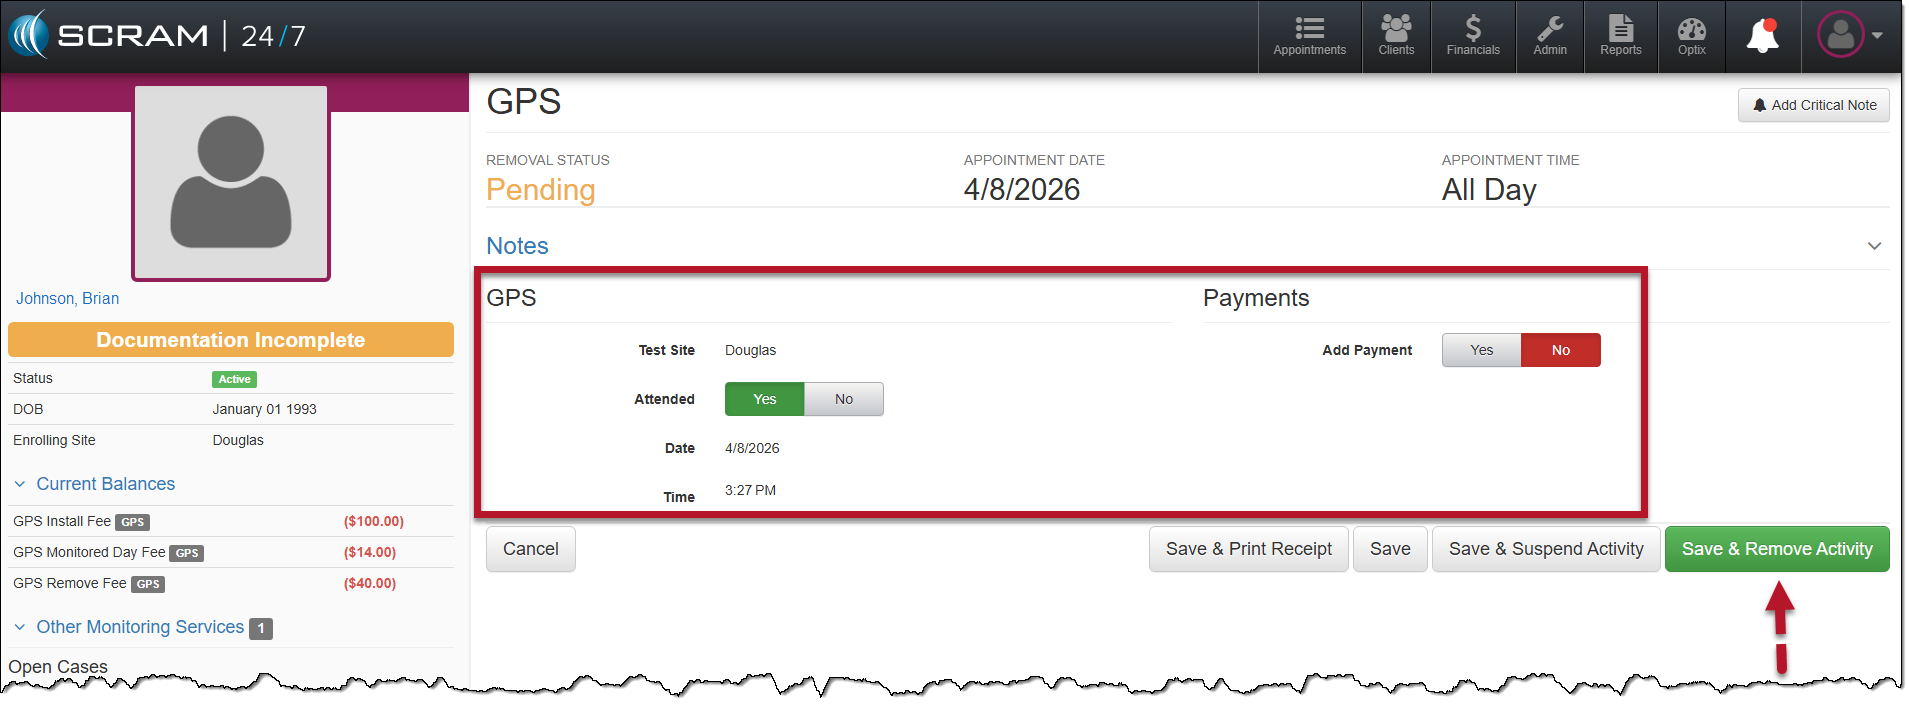
Removing the GPS Activity
When it is time to remove the GPS activity and check in the equipment, start by:
- Accessing the GPS Activity Details page.
- Select the Remove Activity button.
- On the Remove GPS Device page, open the Equipment Status dropdown menu and select the appropriate option. In this example, “In Inventory” was selected.
- After selecting the device status, select the Unassign Locator button.
- Complete the GPS Removal appointment. Here, you may select whether the client is in attendance and record any payments made.
- Once information is entered, select the Save & Remove Activity button.
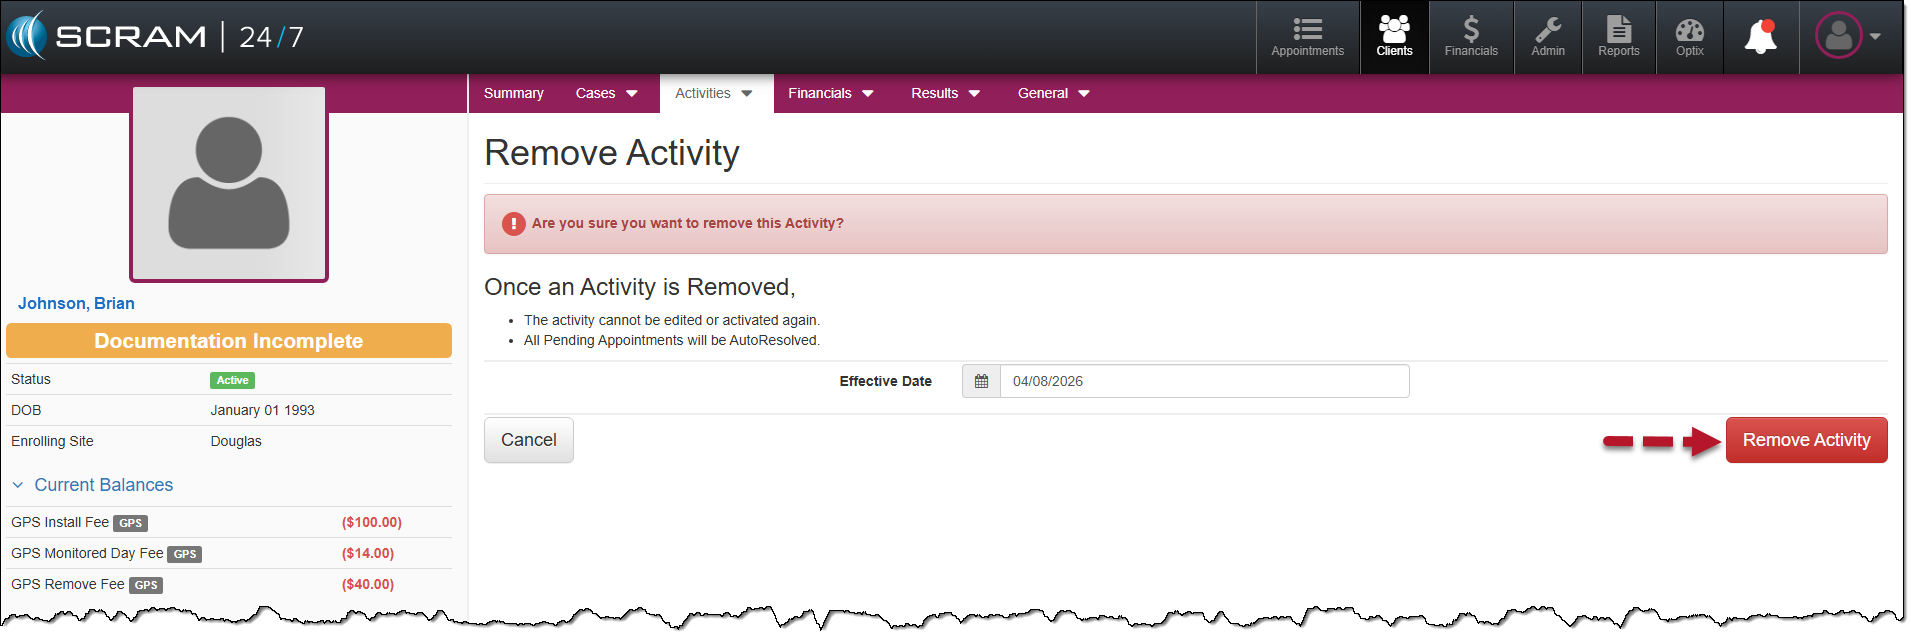
- Verify the Effective Data entry field and then select the Remove Activity button.
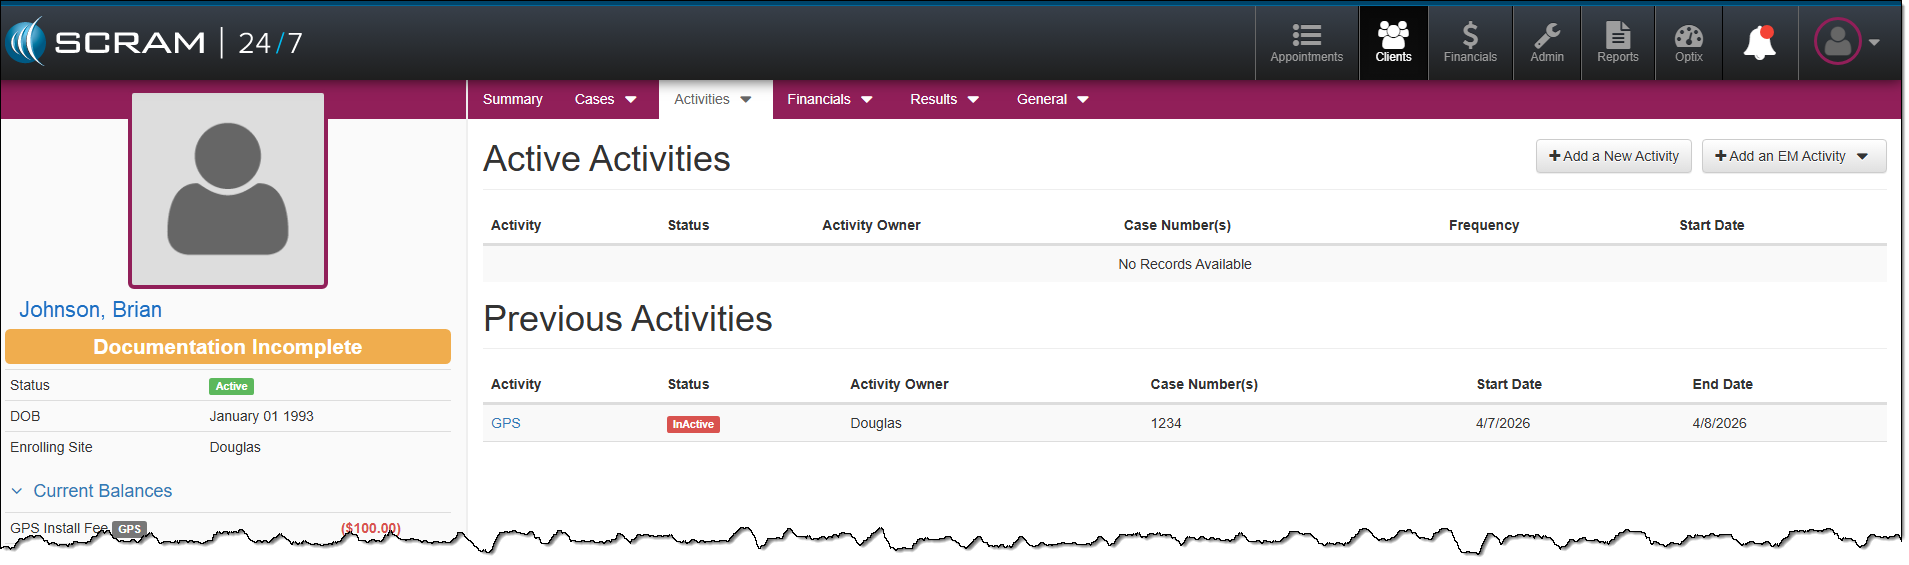
The Active Activities page now reflects the Inactive GPS Activity.
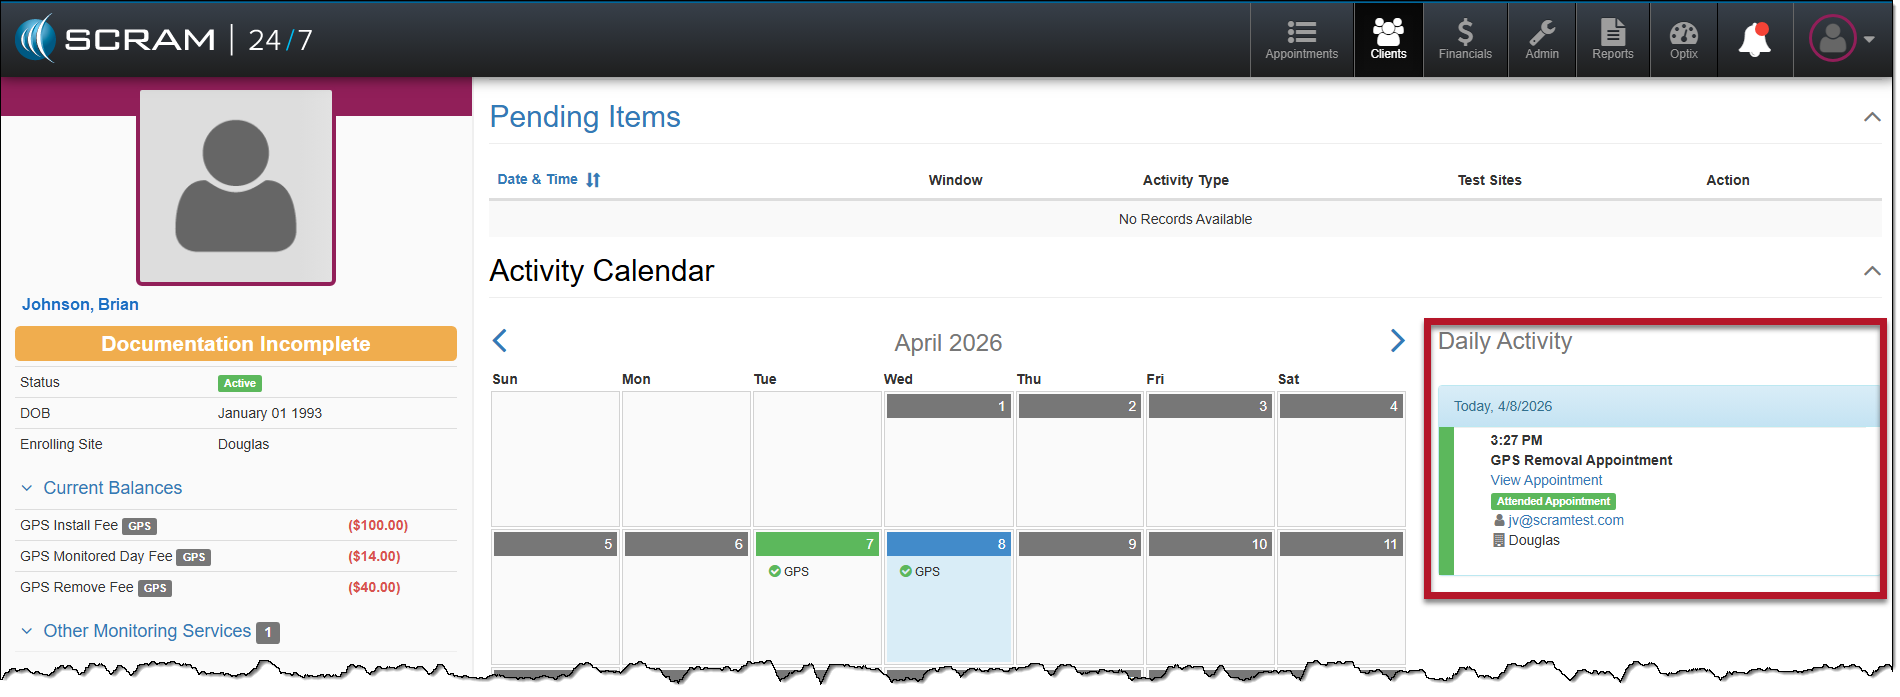
On the client’s Summary page, the Activity Calendar and Daily Activity stream will reflect a completed GPS Removal Appointment.
| Replace GPS Device To replace a GPS Bracelet
|
| In a future enhancement, you will be able to change the client’s username or email address for their TouchPoint Mobile application. For the time being, navigate to the client’s Optix TouchPoint profile to make any updates. |
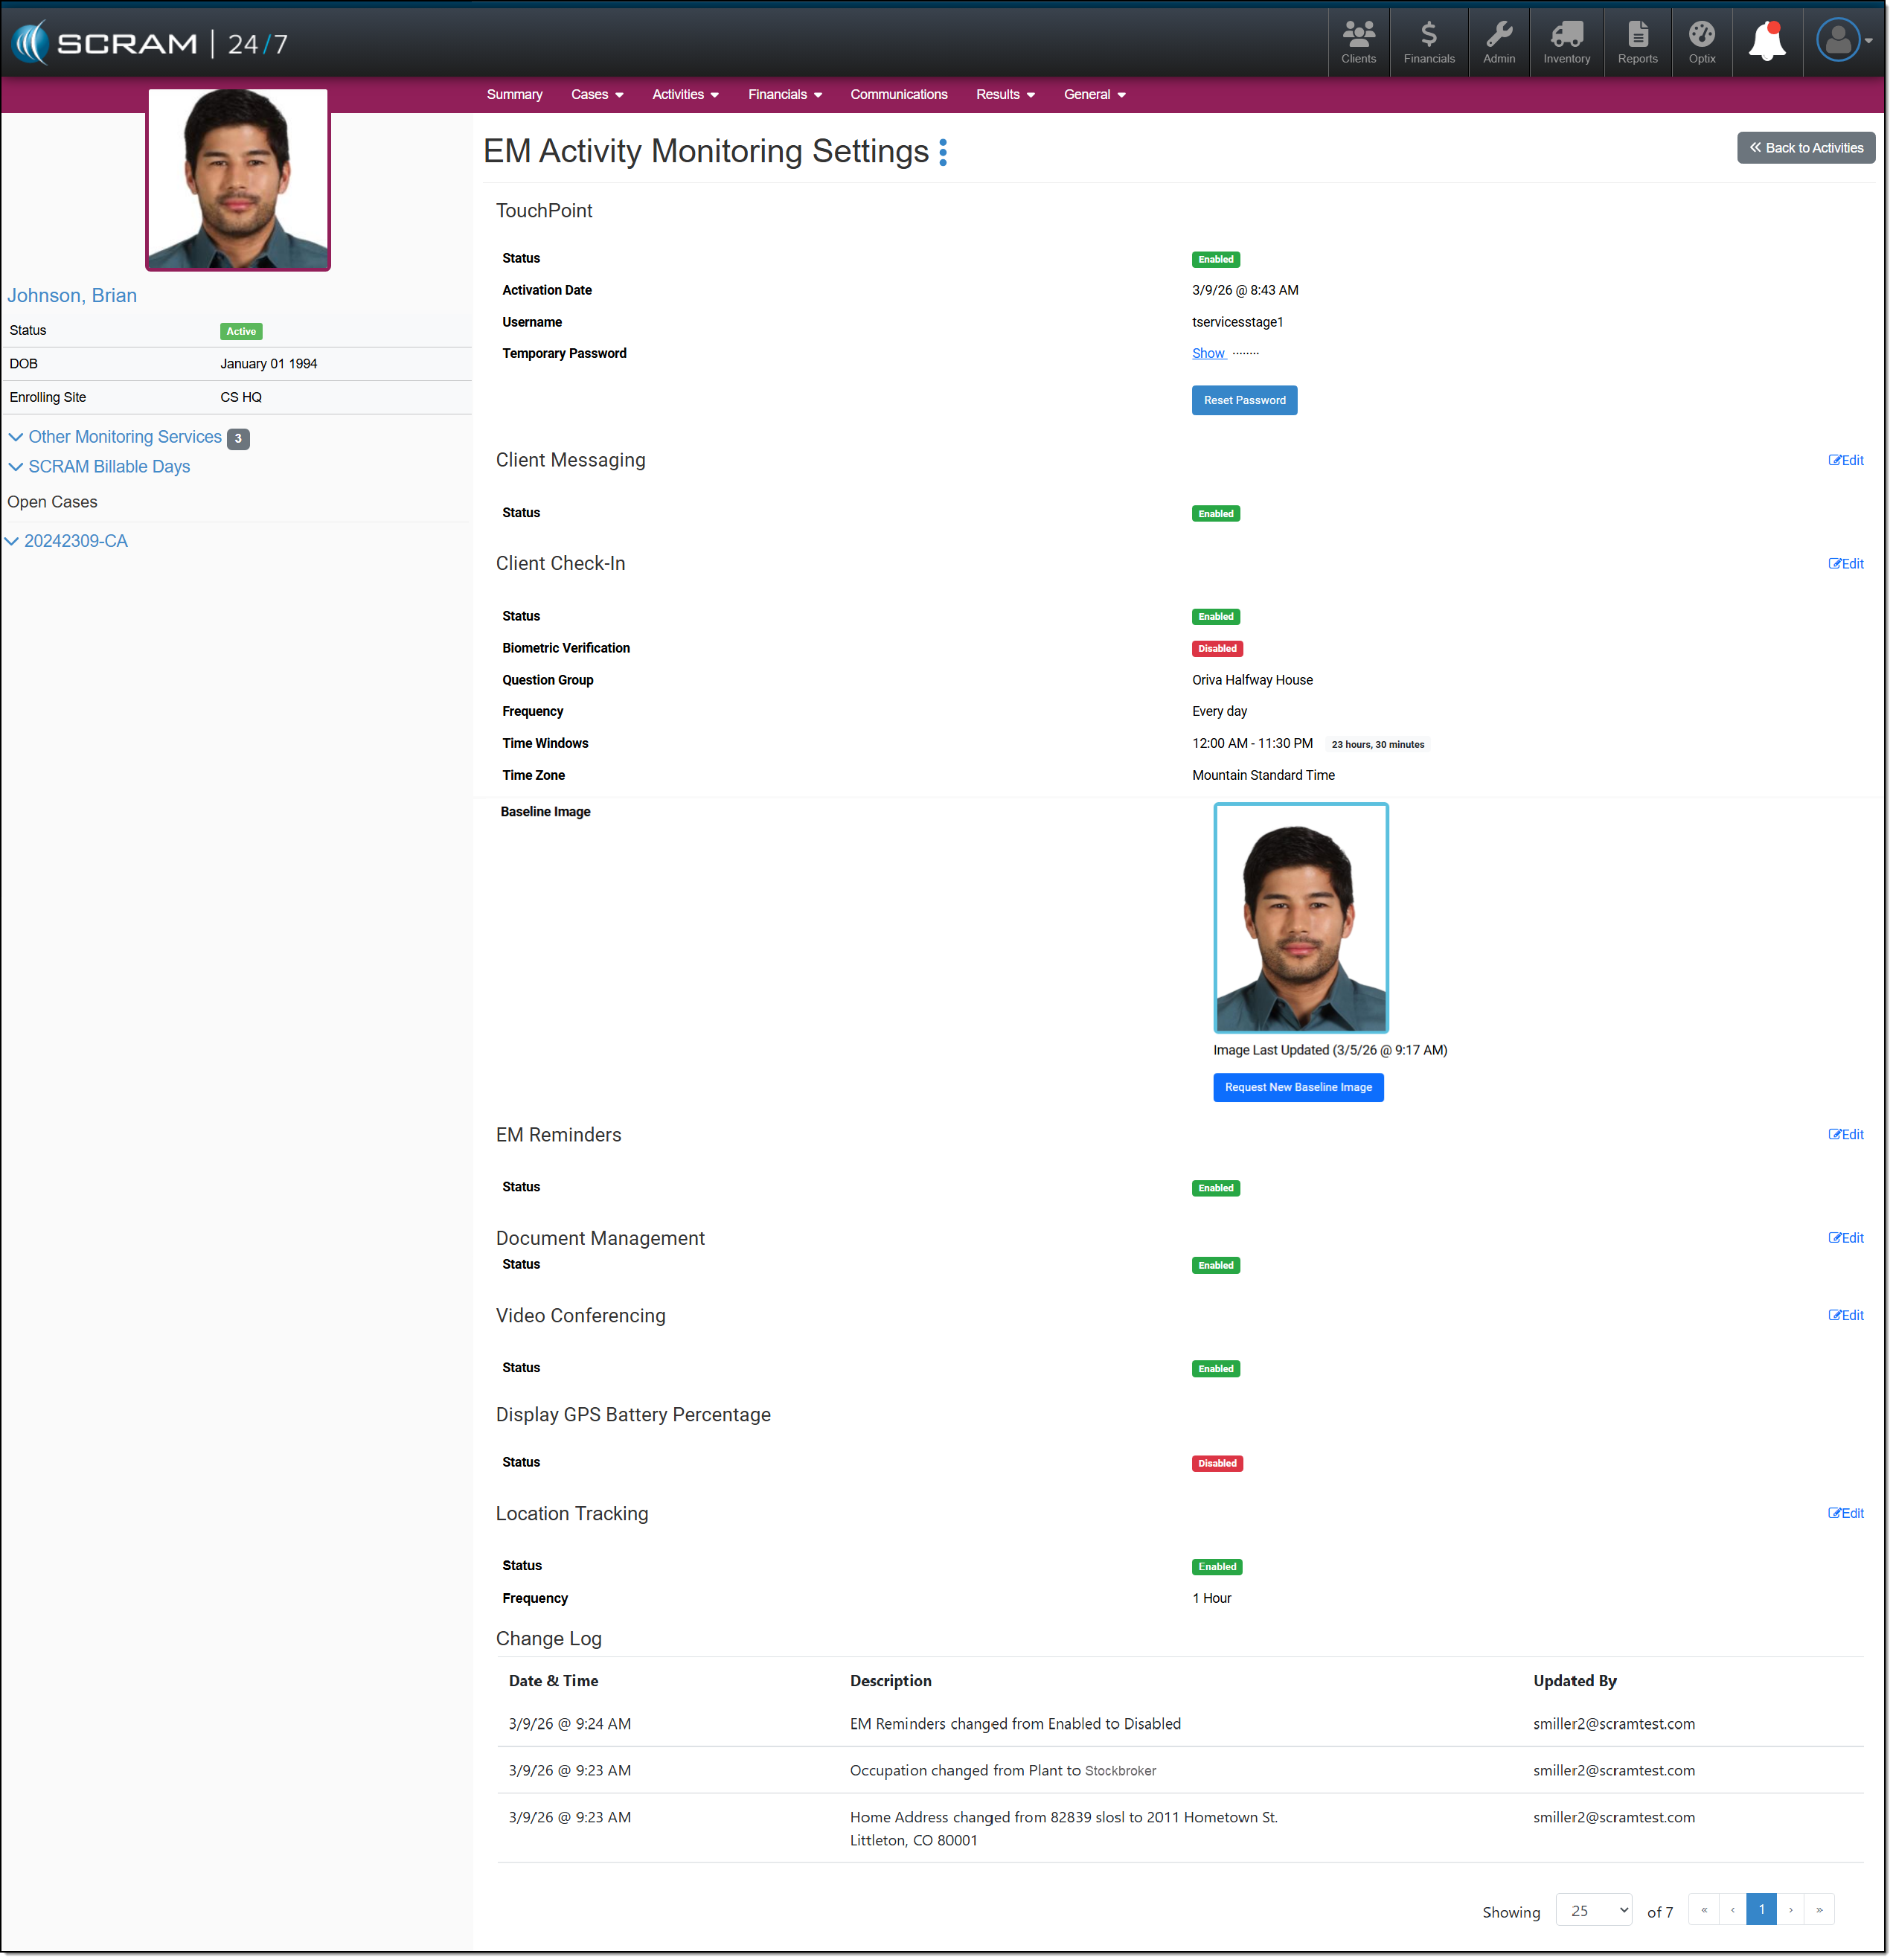
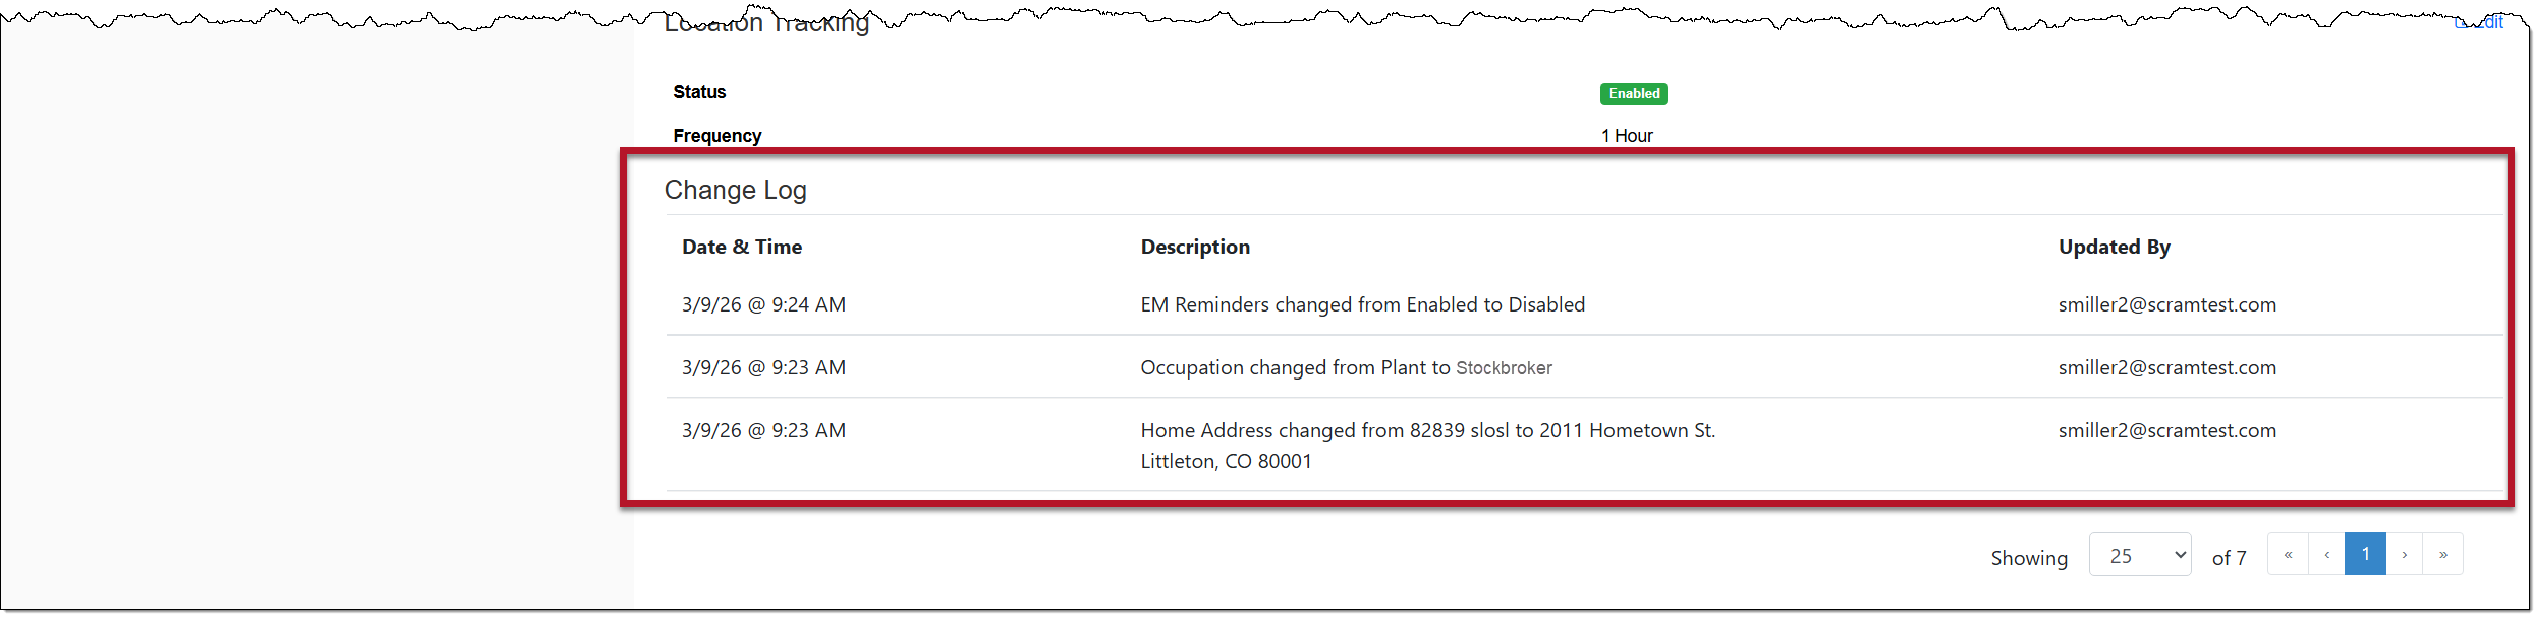
In addition to the TouchPoint services, the TouchPoint Change log history information will now be displayed on the TouchPoint Activity EM Activity Monitoring Settings page.
Offline Location Tracking
| Your account must be enabled for location tracking for these instructions to work. Contact your SCRAM Systems Account Representative if you are interested in activating this service. |
For clients who are enabled for the SCRAM TouchPoint Location Tracking service, their smartphone’s location data will be captured and stored during periods without network or internet connectivity. Once service is restored, the stored data will be transmitted to the system.
Here is how it works:
For this example, the client’s Location Tracking service is configured to collect location data every 5 minutes.
- View the Location Tracking Map by selecting the ellipsis next to the client’s name in the Other Monitoring Service, TouchPoint section.
- Select the Location Tracking Map option.
On the Location Tracking pop-up window:
When connectivity is available:
- The location points are plotted on the map.
- Each point is recorded as Successful.
- The Location Tracking pop-up window reflects normal communication.
When the connection is not available:
- The location table will indicate the last known location in bold.
- At the next location interval, in this case the 5-minute interval, the location table will display Connection Unavailable in red.
- Additionally, a red Location Failure heading is displayed at the top of the pop-up window, displaying the last communication date and time.
Once the connection is reestablished:
- The location data will automatically update on the map and on the location table.
- The “Connection Unavailable” message will no longer display in bold or in red.
- A “Connection Restored” message will appear bolded and in green on the location table with the date and time stamp of when communication was restored.
| Status Updates: Location Tracking status updates are tied to the client’s configured frequency. For example, location information is gathered and communicated every 5, 10, 15, 30, and 60 minutes. Any change in connectivity or location status will only be displayed at the sent interval. |
Loss of Connectivity During Pursuit Mode
During the 15-minute Pursuit mode window, if connectivity is lost, the location table will display “Connection Unavailable,” and the red failure banner will display in the Location Tracking pop-up window.
If the device reconnects during the 15-minute Pursuit Mode window, location collection will resume automatically and continue at one-minute intervals for the remainder of the session.
RE: Fraudulent Phone Calls Targeting Individuals on Electronic Monitoring
To our valued partners,
We want to make you aware of a recent increase in fraudulent phone calls being made to individuals involved in electronic monitoring (EM) or community supervision programs. These scams are occurring nationwide in the United States, and have affected programs using a variety of EM technologies—not just SCRAM Systems monitoring technologies.
In these calls, the scammer poses as a representative of a sheriff’s office, court, or monitoring company and claims that the individual owes money, is in violation, or could be taken back into custody unless a payment is made immediately. The goal of these calls is to create fear and prompt a quick payment.
Please note the following:
- There has been no data breach or security incident at SCRAM Systems.
- This is not a SCRAM-specific issue. Similar scams have targeted programs using other EM devices, as well as drug-testing and supervision programs with no electronic monitoring at all.
- These scams appear to draw on publicly available information or data obtained through unrelated means.
If any client, agency, or staff member receives such a call:
- Do not provide any personal or payment information.
- Do not make any payment requests over the phone.
- Immediately contact local law enforcement to report the incident.
- Notify your SCRAM Account Manager or SCRAM Systems Customer Support so we can assist with awareness and tracking.
SCRAM Systems continues to monitor these incidents closely and remains in contact with law enforcement and agency partners. Protecting the integrity of our programs and the safety of the individuals we serve is our top priority.
Thank you for your continued vigilance and partnership.
Sincerely,
John Hennessey
Chief Operating Officer
SCRAM Systems
jhennessey@scramsystems.com
815-342-4469
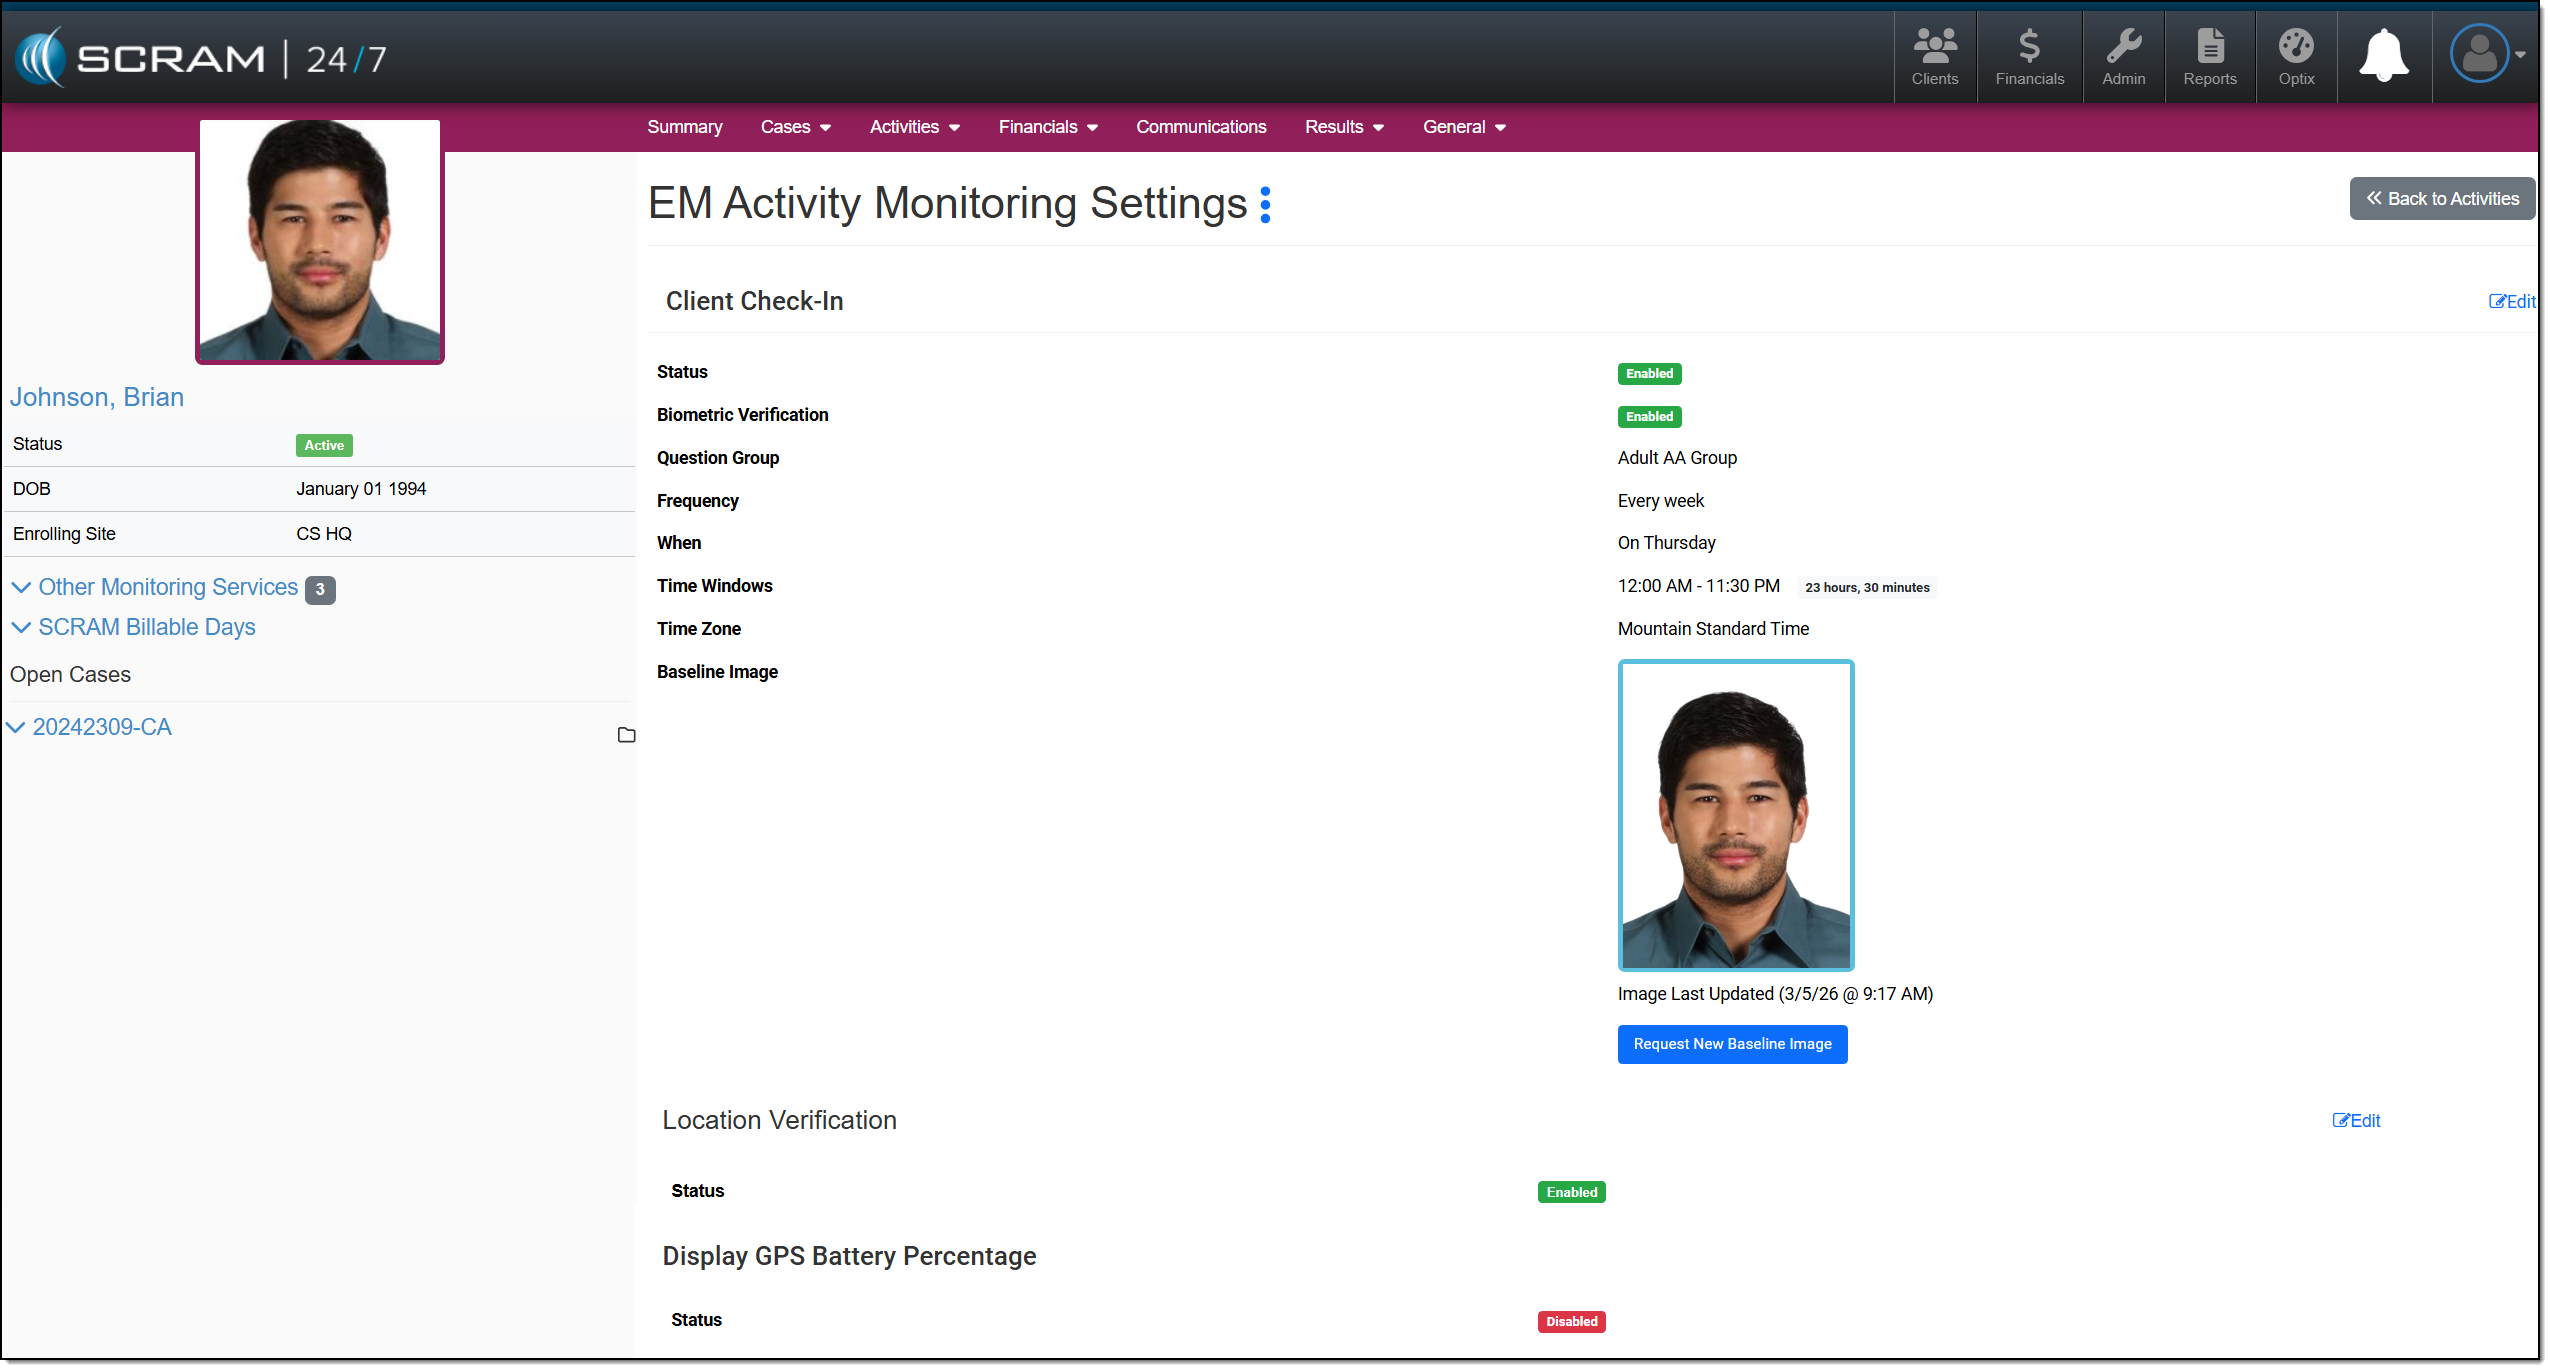
On February 4, 2026, SCRAM Systems will release an update that allows providers to control whether the GPS battery level is visible to clients in the TouchPoint Mobile app. This setting can be managed in SCRAM Optix or 24×7.
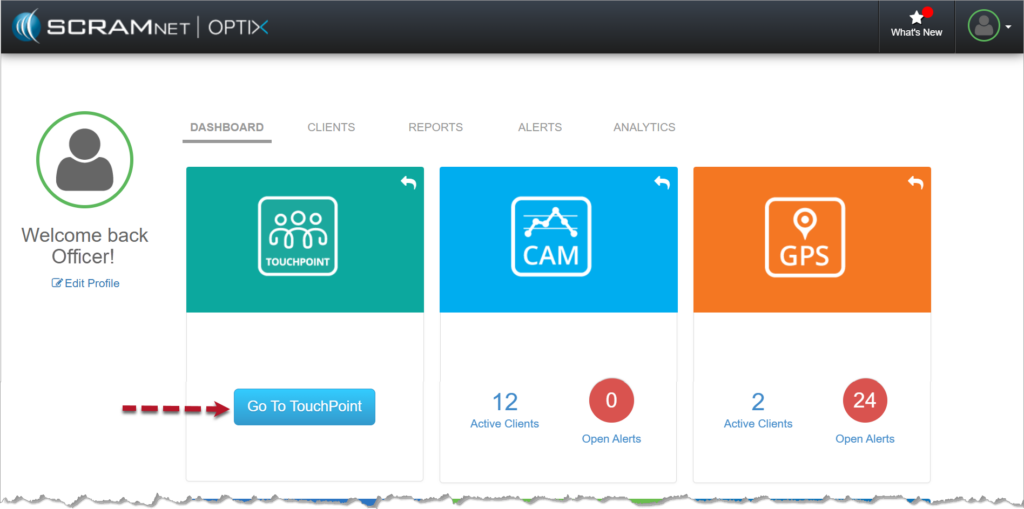
Enable the Display GPS Battery Level Setting in Optix
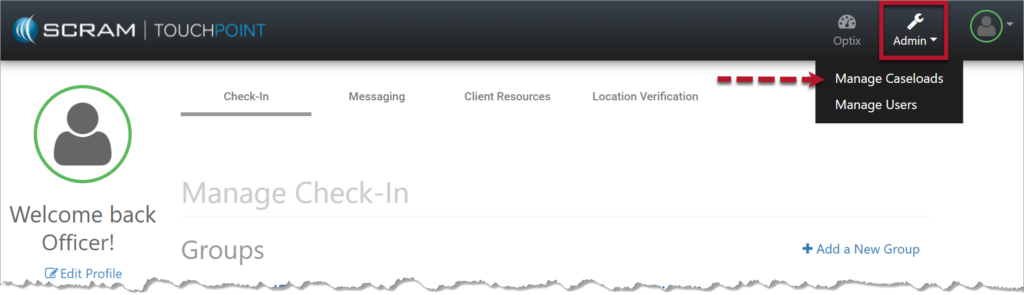
- In Optix, navigate to TouchPoint.
- Select the Admin tab from the top toolbar and then the Manage Caseloads option.
- Select the caseload.
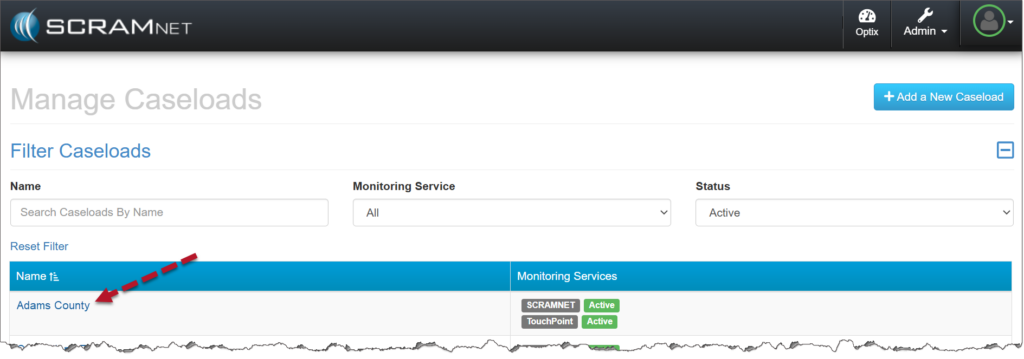
- From the Caseload Detail page, select the View Settings hyperlink.
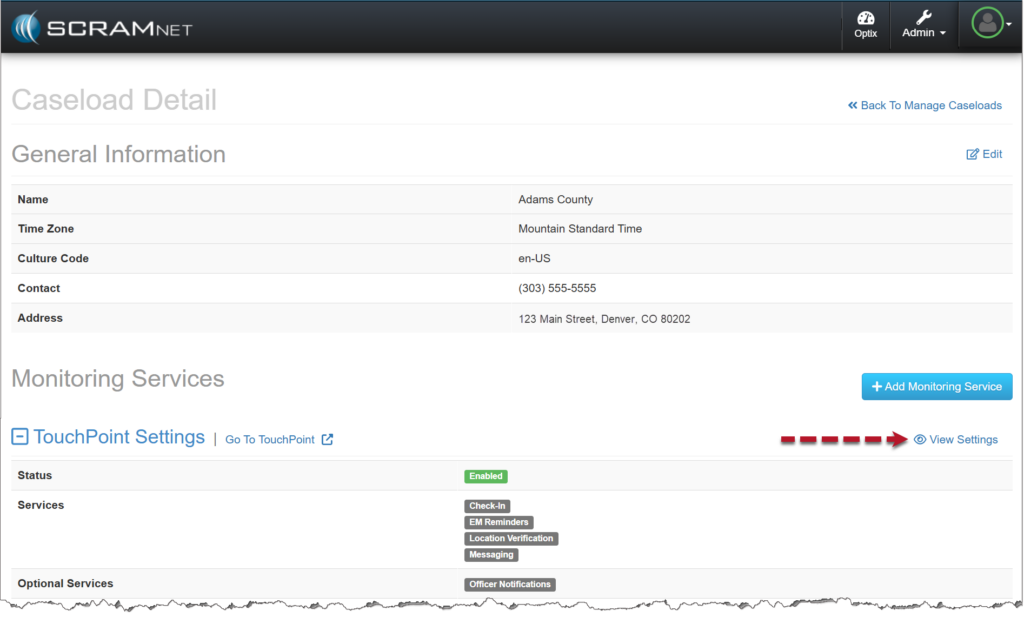
- Select the Edit hyperlink.
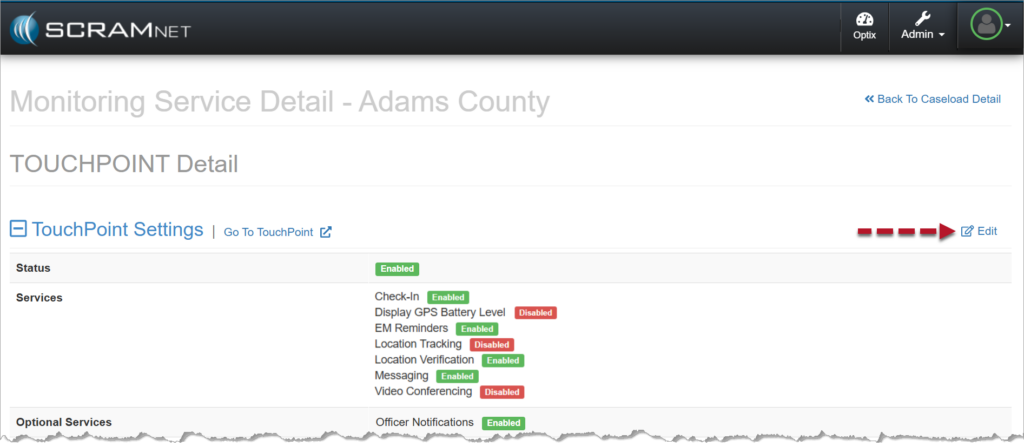
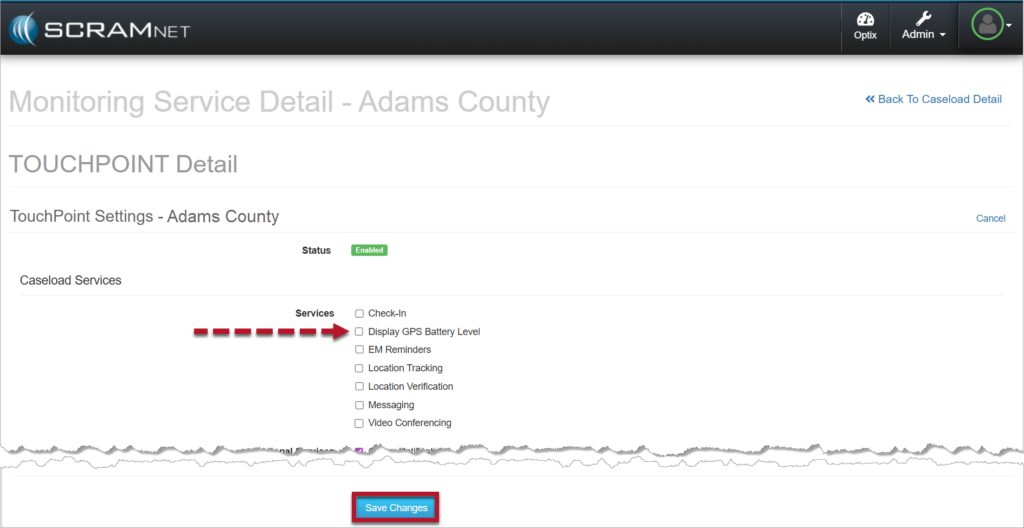
- Select the checkbox next to Display GPS Battery Level.
- Save your changes.
Once saved:
- The setting will appear as Enabled under TouchPoint Settings on the TouchPoint Detail page for the caseload.
- The Display GPS Battery Percentage option will be visible on the client’s Profile page in Optix.
- Enable the Display GPS Battery Percentage service for the client:
- Select the Edit hyperlink on the client’s Profile page.
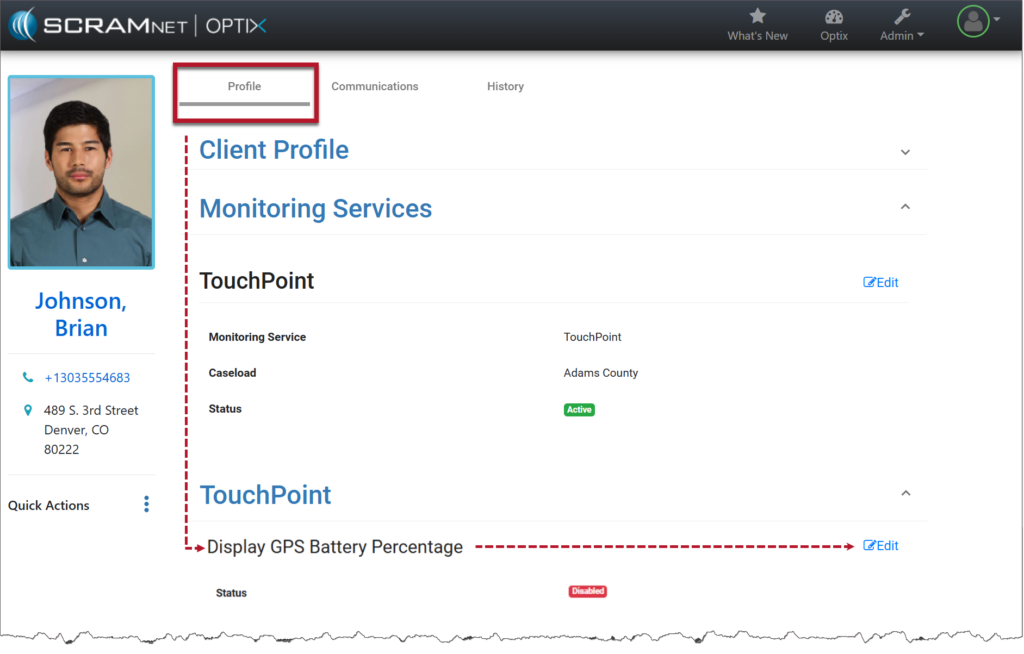
- Change the Status from Disabled to Enabled.
- Save your changes.

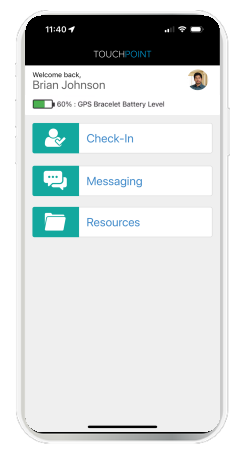
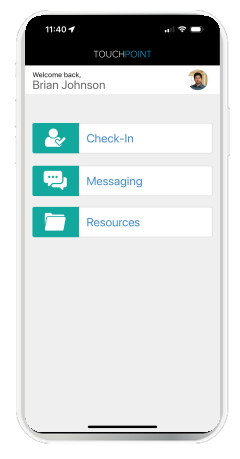
The client’s last reported SCRAM GPS bracelet’s battery level is displayed at the top of the home screen within the TouchPoint mobile application.
Important Notes:
|
Disable the Display GPS Battery Level Setting Once Enabled in Optix
- From the client’s Profile page, select the Edit hyperlink next to Display GPS Battery Percentage.
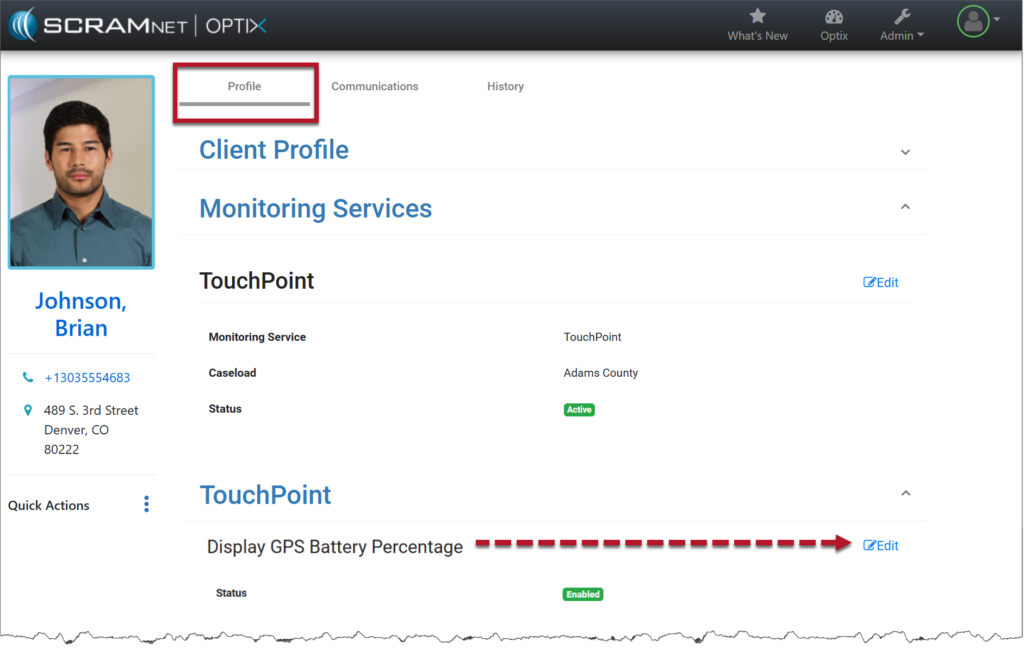
- Toggle the status to Disabled and select the Save Changes button.

- The Display GPS Battery Percentage setting has been disabled for the client.
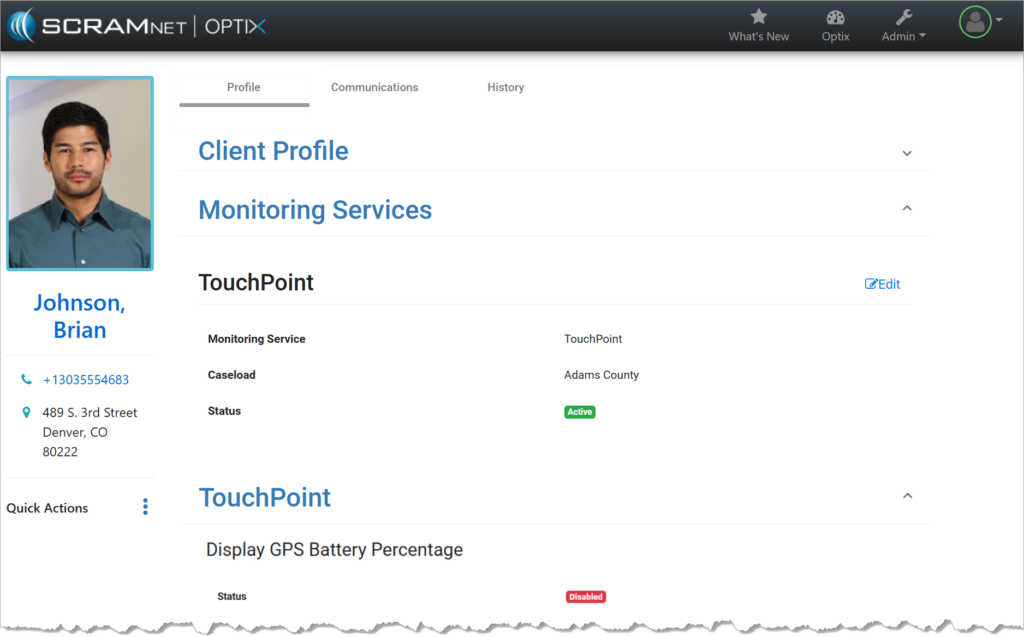
- The SCRAM GPS bracelet’s battery level is no longer displayed at the top of the home screen within the TouchPoint Mobile application.
Enable the Display GPS Battery Level Setting for a SCRAM 24×7 Client
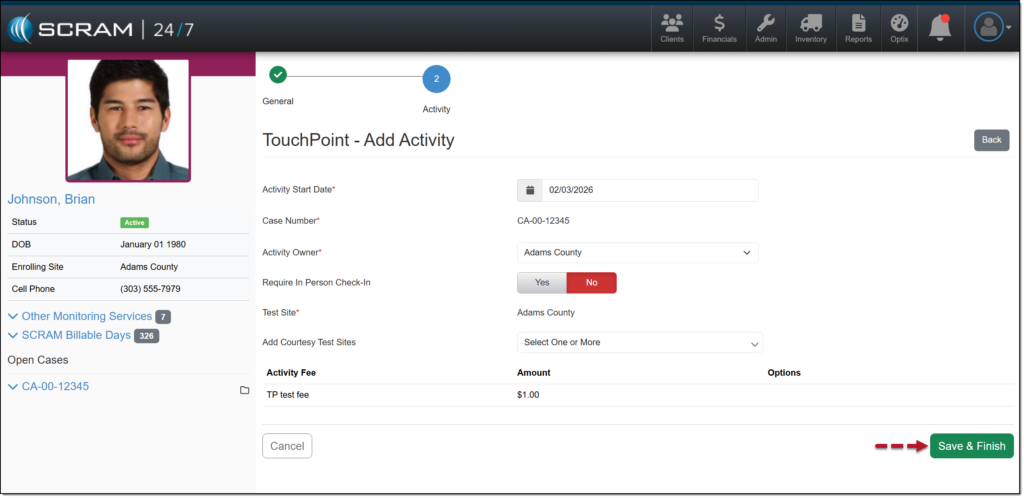
After adding a GPS Activity to a client, you may also add a TouchPoint Activity and enable the GPS Battery Level feature from within SCRAM 24/7.
On the client’s Activities page:
- Open the +Add an EM Activity dropdown menu, and then select the Add TouchPoint Activity option.
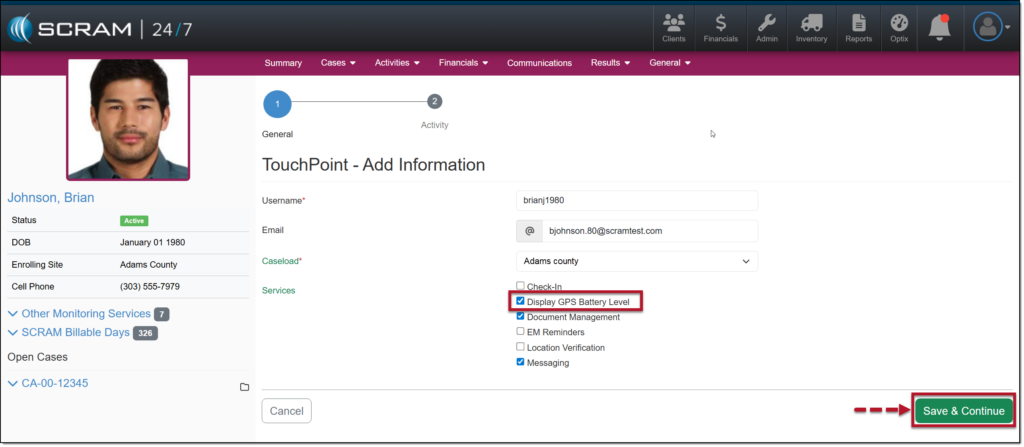
- On the TouchPoint – Add Information page, enter the TouchPoint details. This includes the client’s username for the mobile application, email address, and TouchPoint Caseload.
- Select the checkbox next to each TouchPoint service the client will be utilizing. To display the client’s GPS battery voltage in the mobile application, select the checkbox next to the Display GPS Battery Level option.
- Once you have made your selections, select the Save & Continue button.
| When adding a TouchPoint Activity, the services and features available to select on dependent on the TouchPoint Caseload selected. |
- Add the Activity Start Date and any additional monitoring requirements, and then select the Save & Finish button.
The TouchPoint Activity is now displayed on the client’s Activity page.
To view or edit the TouchPoint settings, select the ellipsis, and then the View EM Activity Monitoring Settings option.
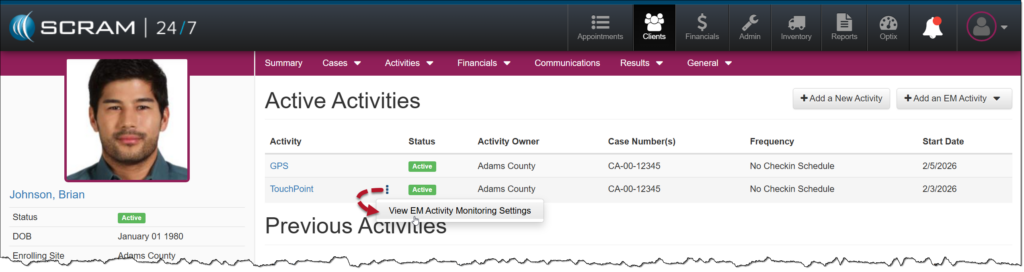
Or, you may navigate to the client’s TouchPoint Profile page in Optix by selecting their name hyperlink in the Other Monitoring Services section on the Summary page.
| The Display GPS Battery Level option is only editable after a GPS device has been assigned to the client. |
On January 28, 2026, SCRAM Systems will release multiple enhancements for your SCRAM 24/7 Client Caseload.
These enhancements are:
- Consolidate Topic-Driven Client Tabs
- Activity Type Menu Options Update
- Activity Electronic Monitoring (EM) Monitoring Settings
Topic Driven Client Tabs
To accommodate future enhancements and provide an efficient user experience, the tabs used to view and access client information and tasks have been consolidated into topic-driven navigation tabs that include dropdown menus.
The Cases tab dropdown menu includes access to the client’s:
- Cases
- Add Case*
The Activities tab dropdown menu includes access to the client’s:
- Activities
- Add Activity
- Add an EM Activity**
The Financials tab dropdown menu includes access to:
- Client Financials
- Fee Amounts
The Results tab dropdown menu includes access to the client’s:
- Result History
- Sanctions
The General tab dropdown menu includes access to the client’s:
- Profile
- Documents
- Notes
- Add Notes*
*New direct access to specific tasks.
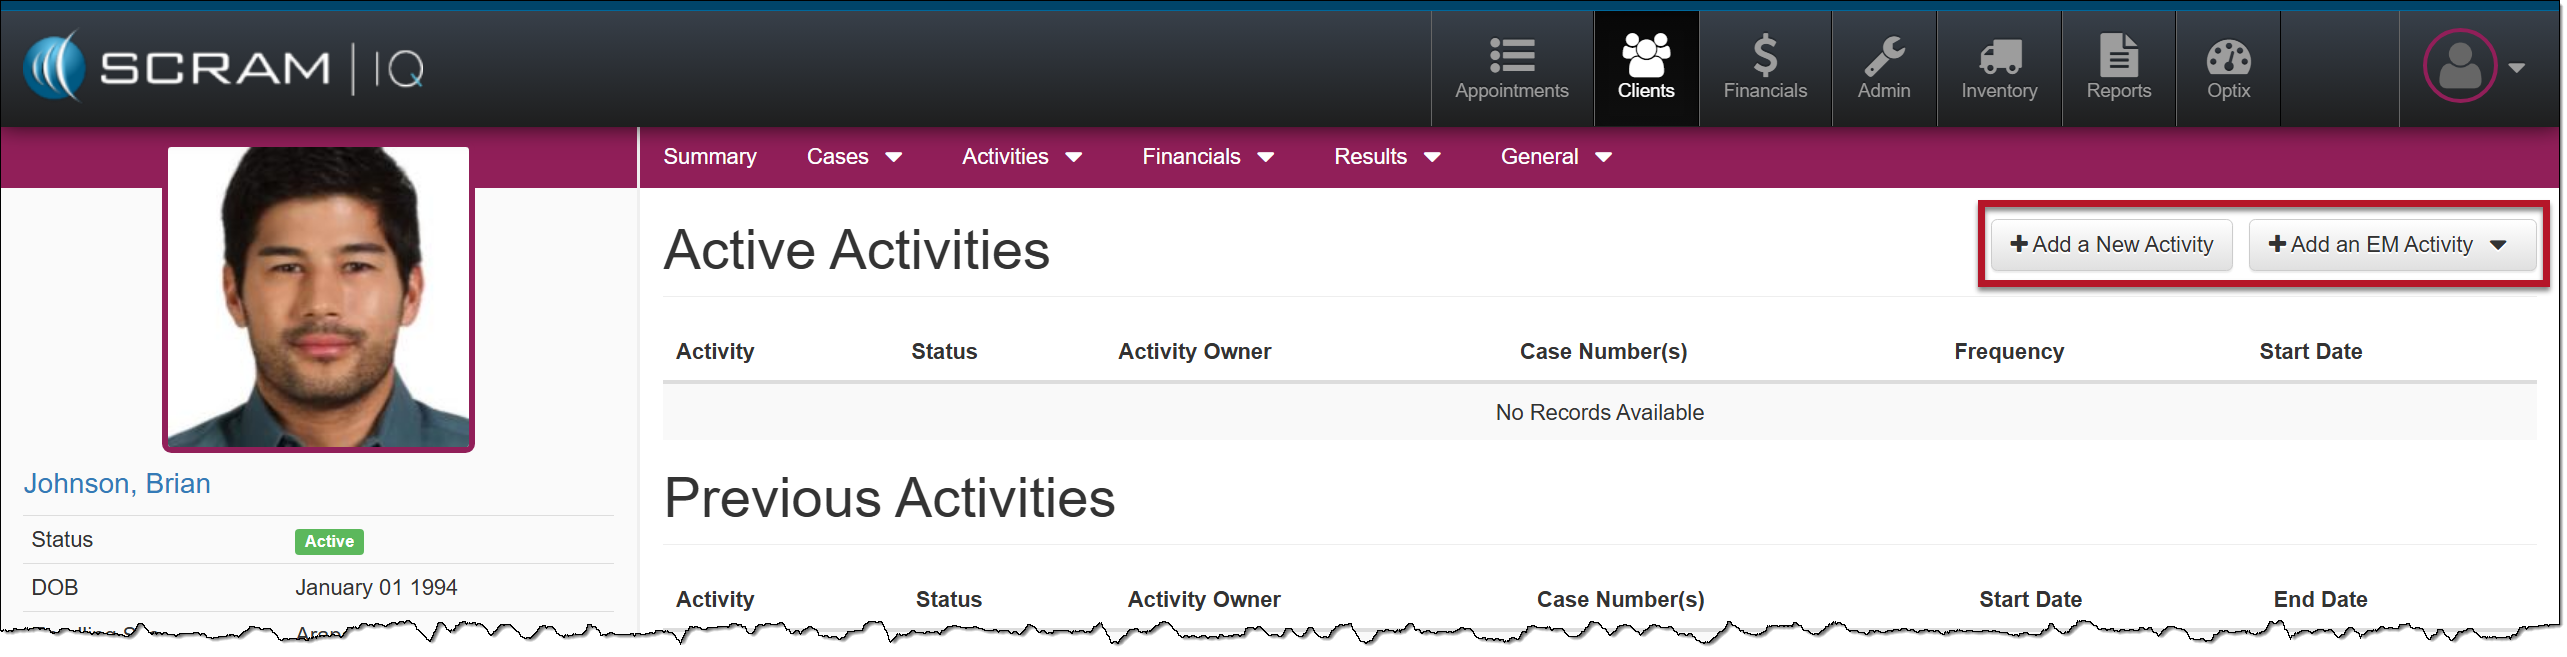
Activities Option
There are two additional options available on the Activities tab dropdown menu: Add Activity and Add an EM Activity. These two options separate the EM-related activities from the non-EM-related activities.
The client’s Activities page will also reflect EM-related activities from the non-EM-related activities.
| Tip: The available Activity options will reflect the activities currently active in your program and the EM Activities you have access to. Additionally, if an Activity is currently active for the client, that option will NOT appear in the dropdown menu. |
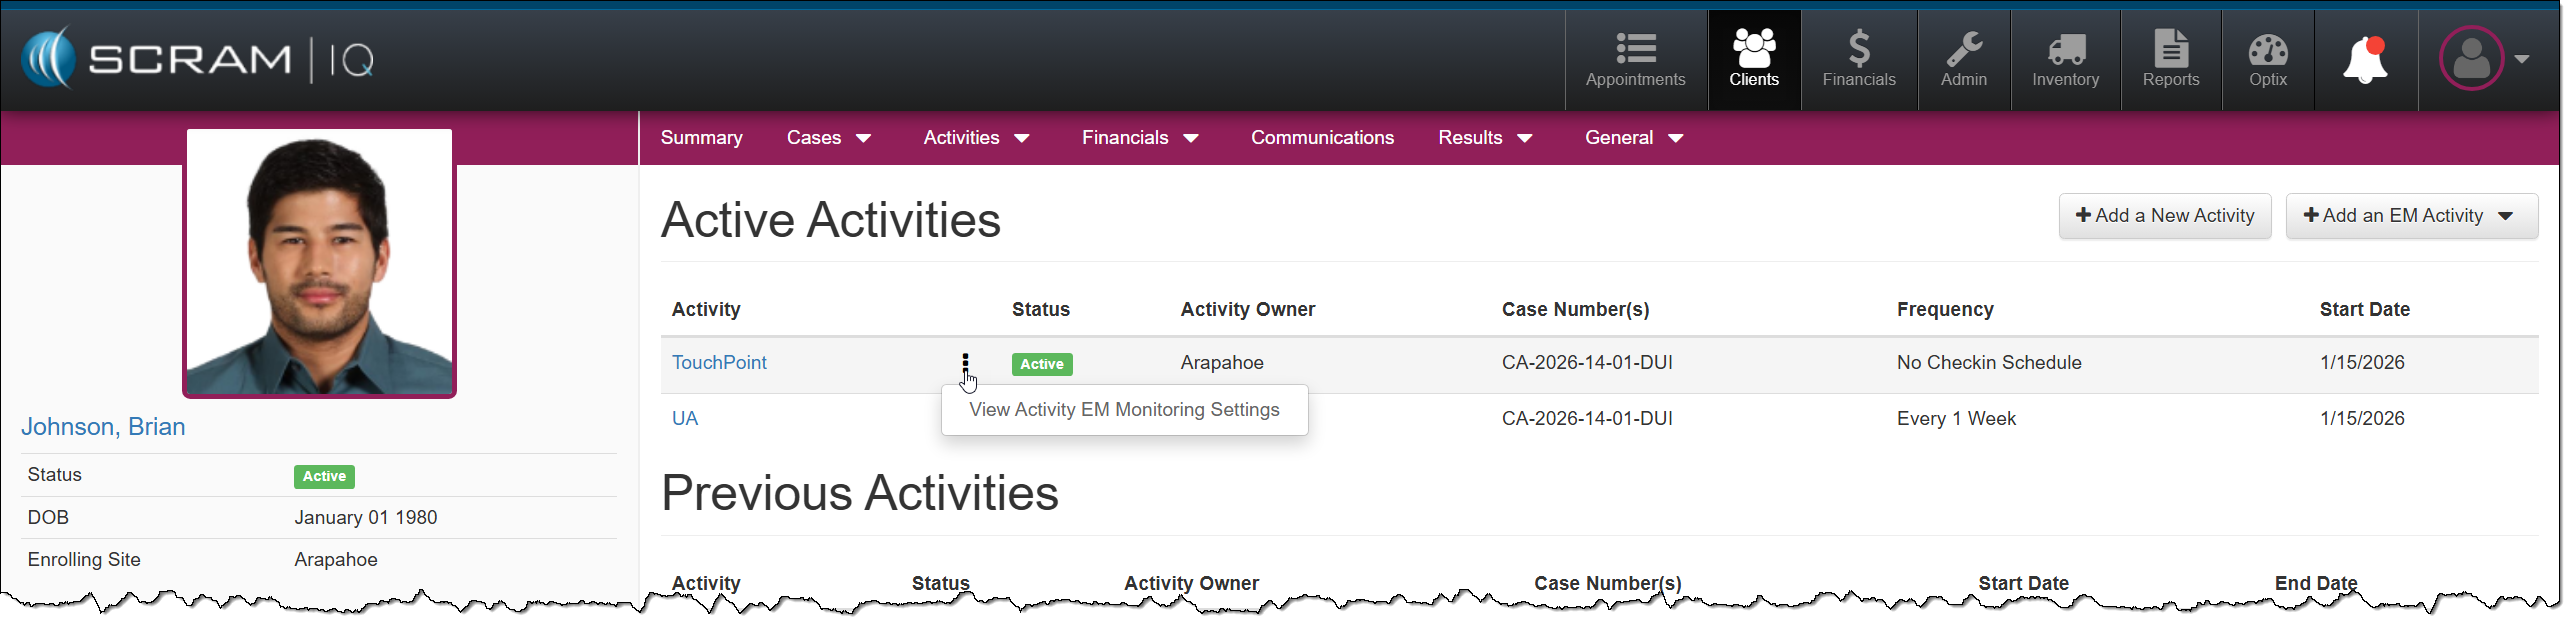
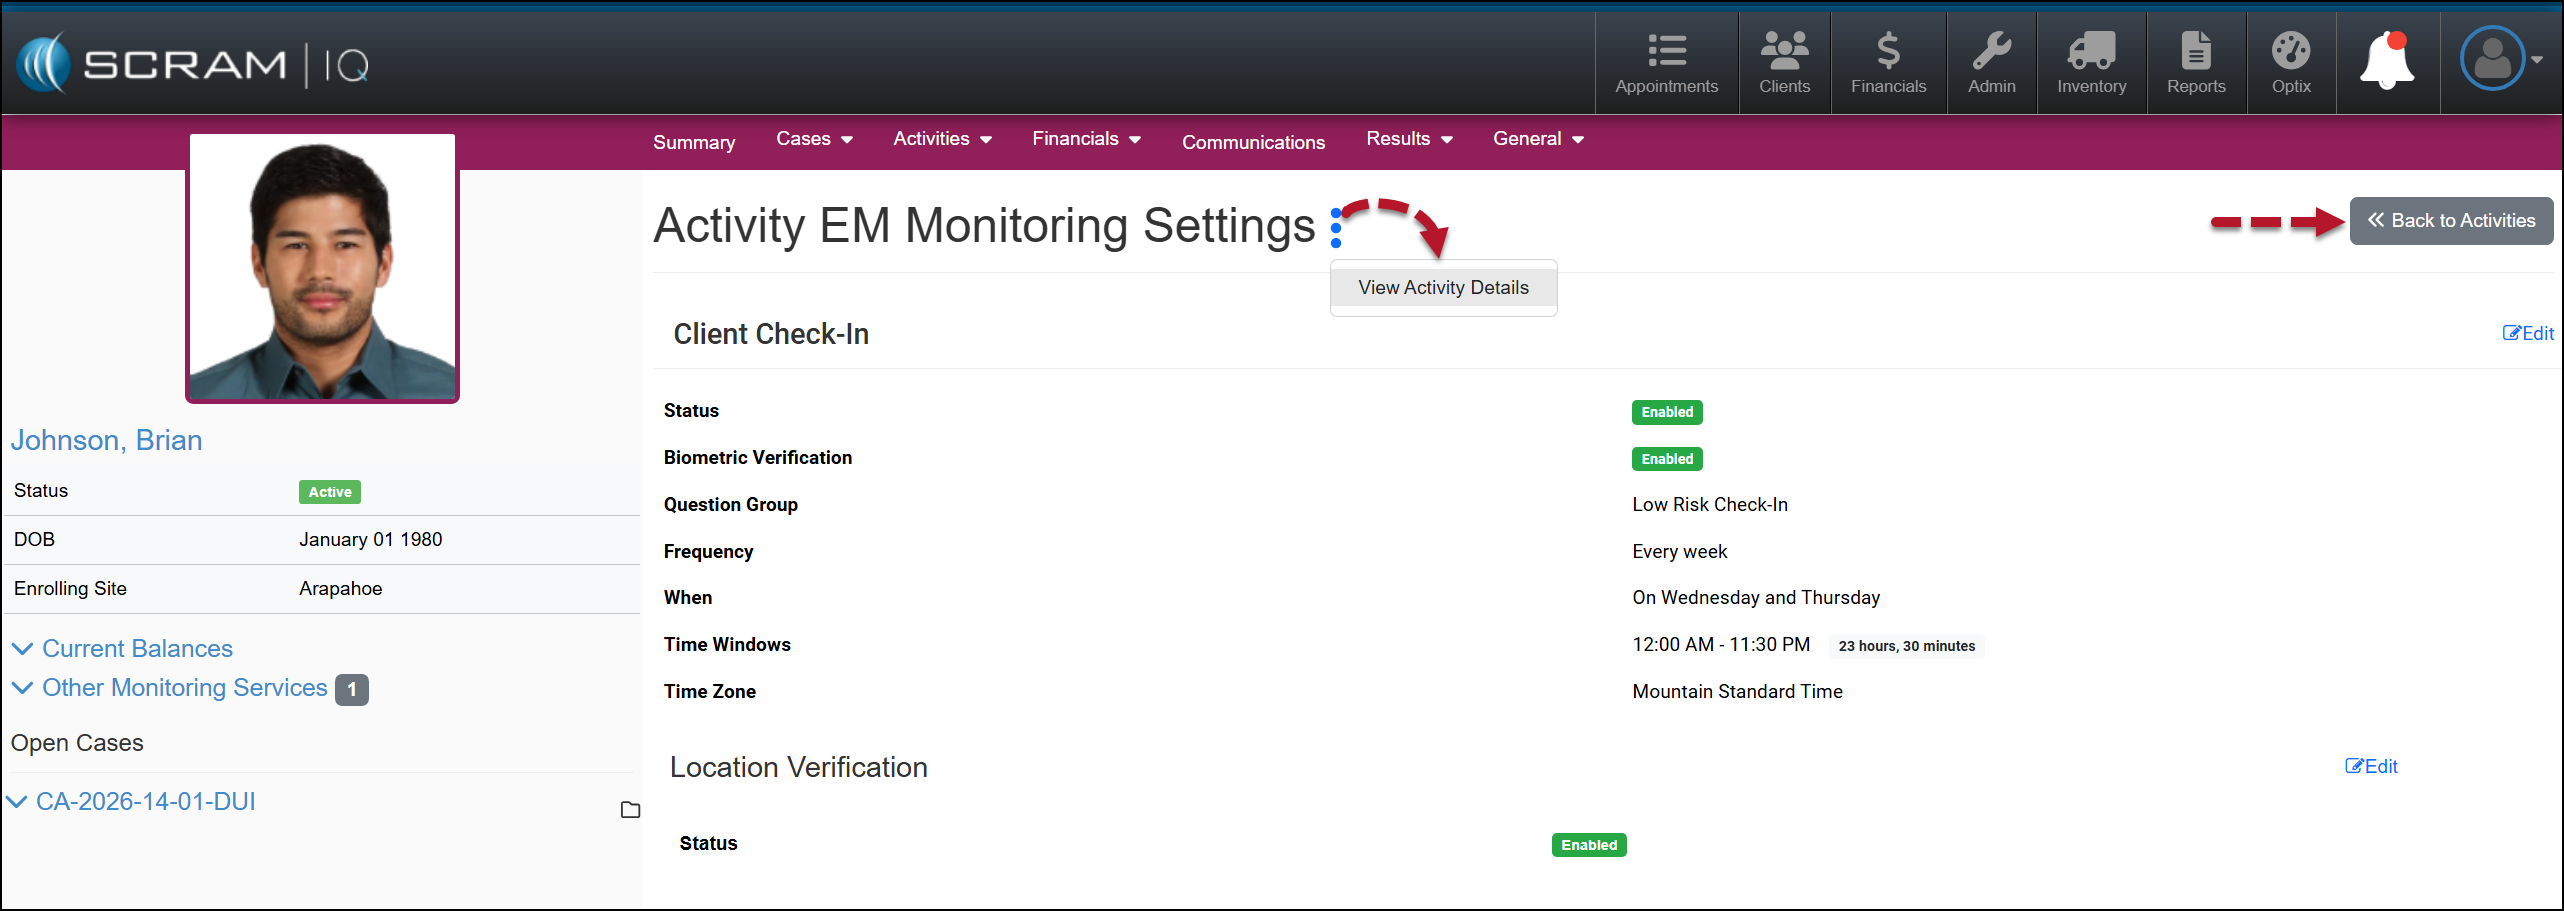
Monitoring Settings for an Electronic Monitoring (EM) Activity
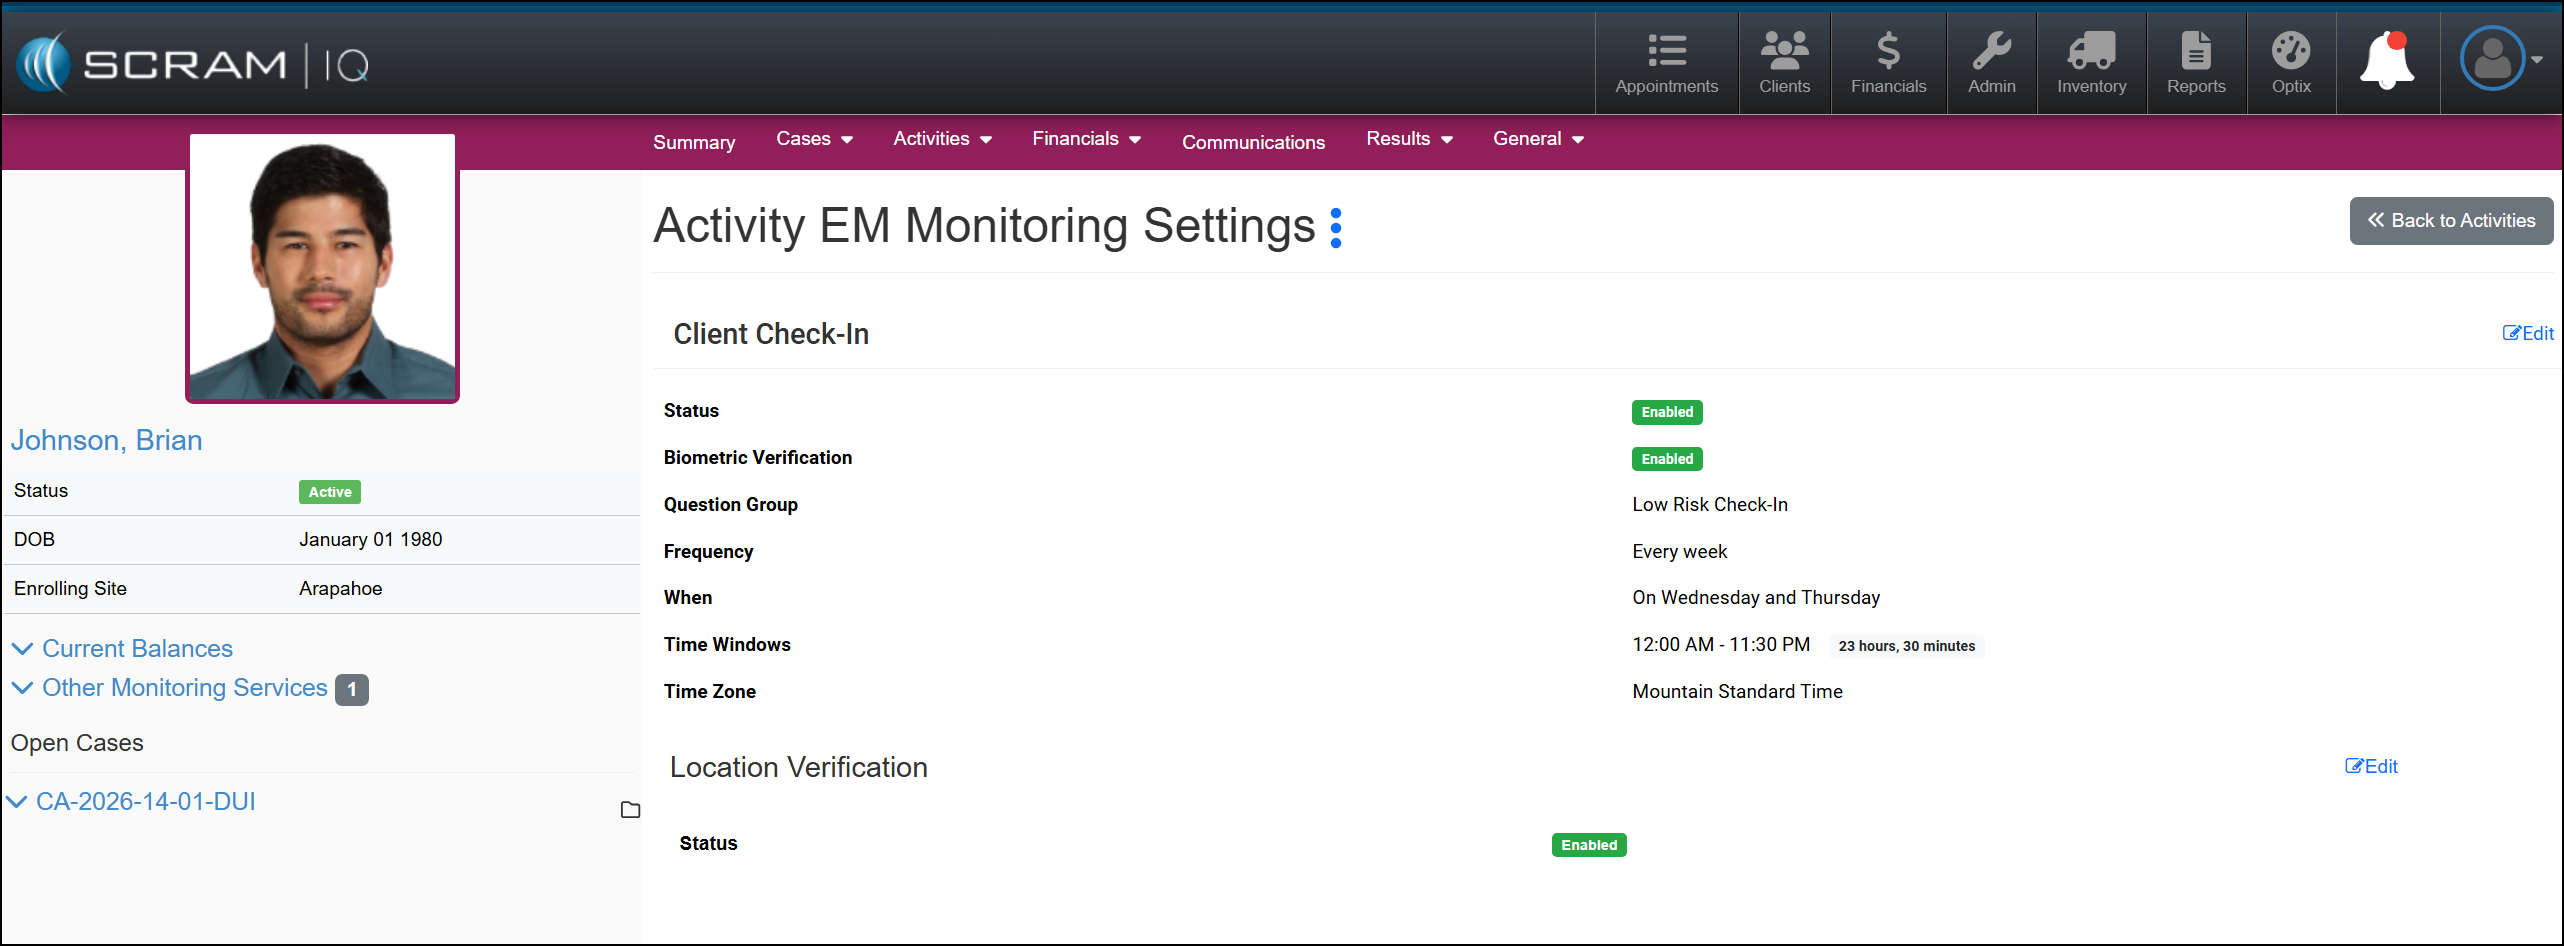
Once an EM Activity is active for a client, you may view their EM Monitoring Settings by selecting the ellipsis next to the Activity on the Active Activities page or the Activity Details page and then the View Activity EM Monitoring Settings option.
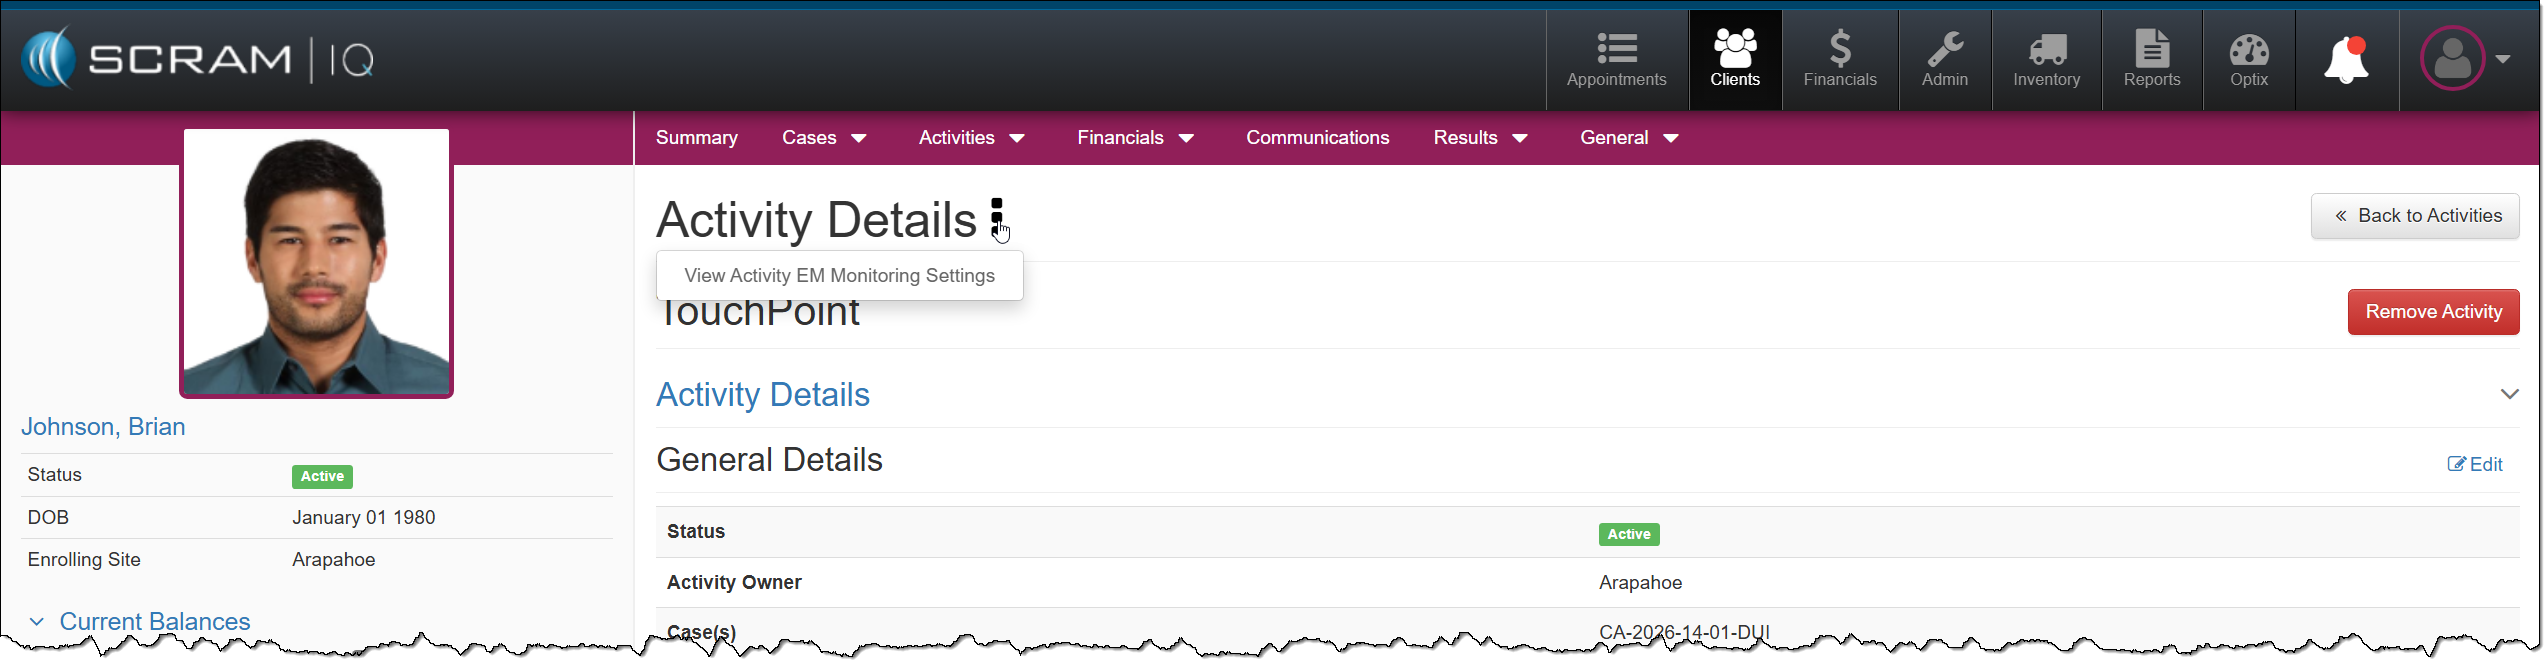
On the Activity EM Monitoring Settings page, you can view the current settings or select the Edit hyperlink to modify them.
Select the ellipsis, and then the View Activity Details option to navigate back to the selected Activity Details page, or use the Back to Activities button to navigate back to the Active Activities page.
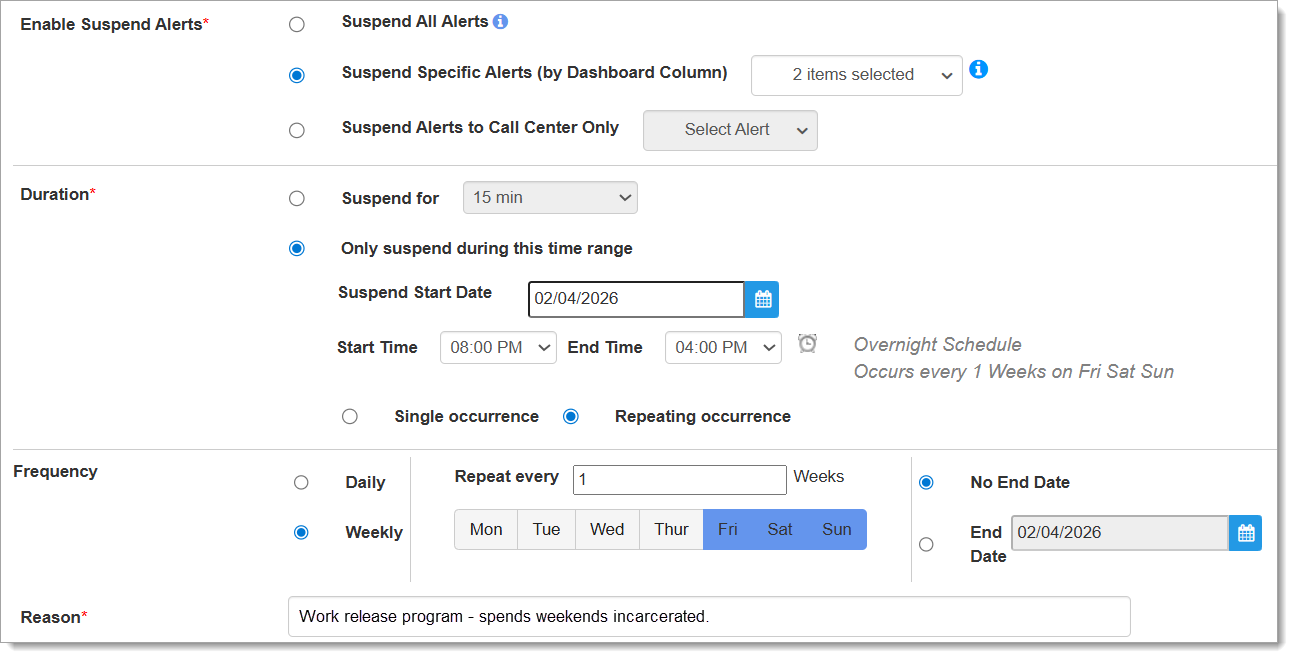
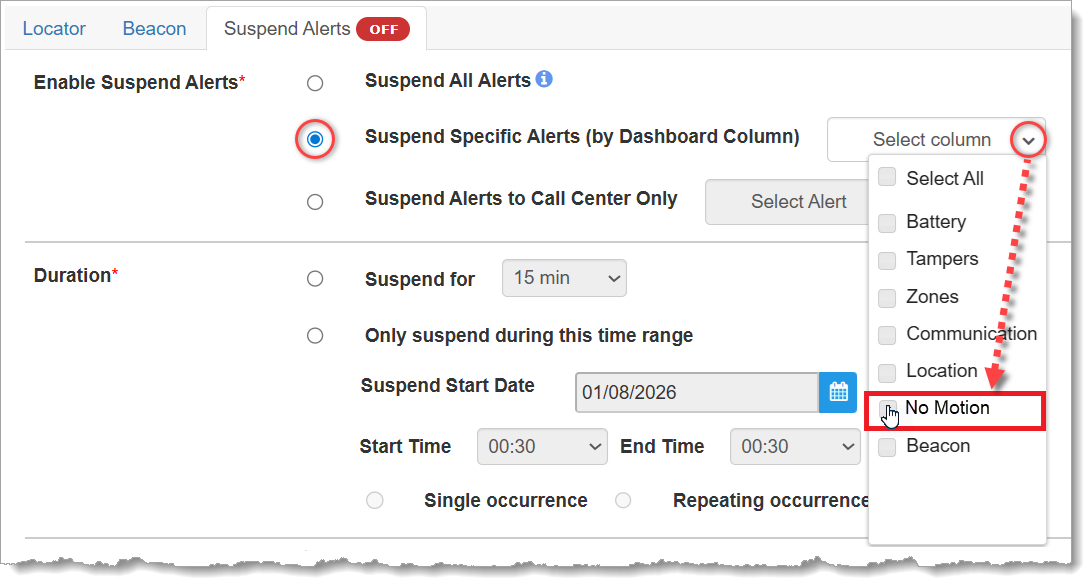
Based on SCRAM GPS customer feedback, SCRAM Systems is introducing two new No Motion-related features in SCRAMNET GPS:
- New ‘No Motion Cleared’ Alert for SCRAM GPS 9 Plus Devices
- Ability to Include or Exclude No Motion Alerts from Alert Suspensions
| SCRAMNET GPS deployments typically occur on Thursdays at 7:00 AM EST in the US, 10:00 PM AEST in Australia, and the following 12:00 AM EST (Friday) in Canada. Please refer to the official SCRAM Systems email communication associated with this release for more details. During the 15-minute deployment, you may not be able to access SCRAMNET GPS, but messages from the SCRAM GPS device will continue to be processed uninterrupted. |
New ‘No Motion Cleared’ Alert for SCRAM GPS 9 Plus Devices
Based on customer feedback, we have added the ability to indicate when a No Motion alert on a SCRAM GPS 9 Plus device has auto-cleared. This displays a blue icon on the Dashboard and allows users to document how the alert was handled.
Administrators can enable this feature by selecting the No Motion Alert “AutoClear” checkbox in Account Notifications.
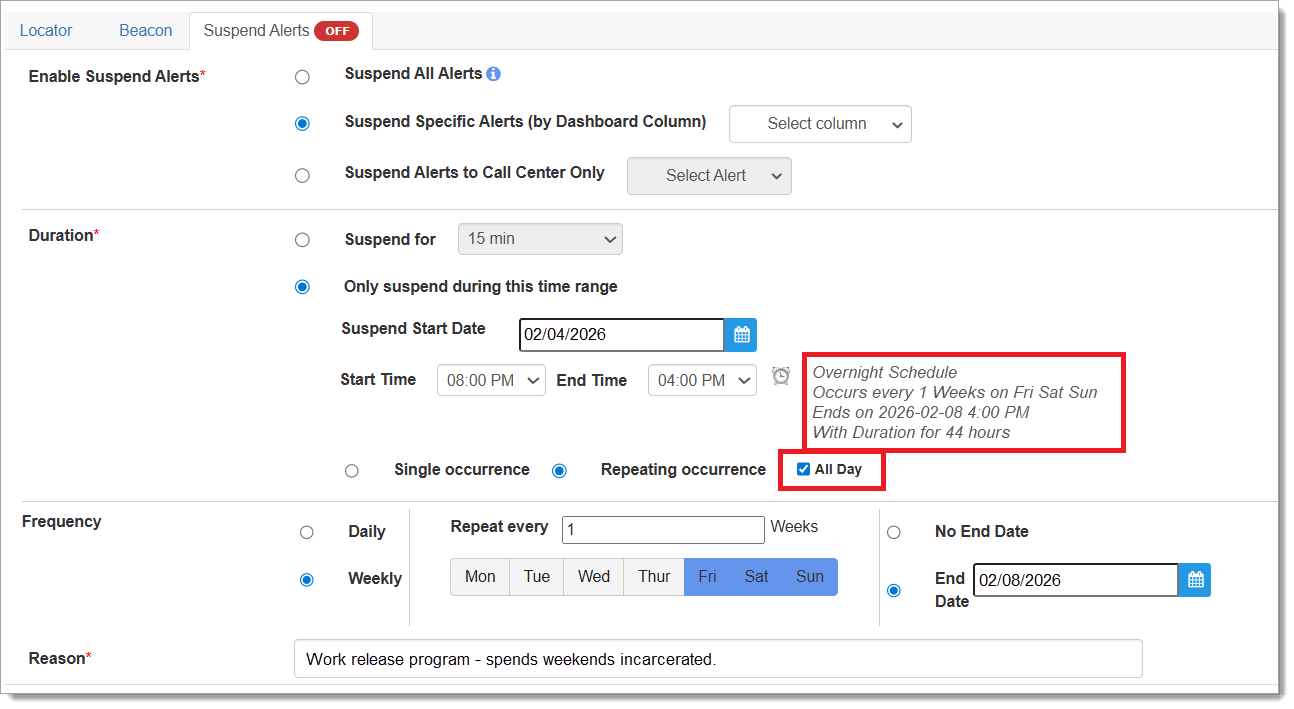
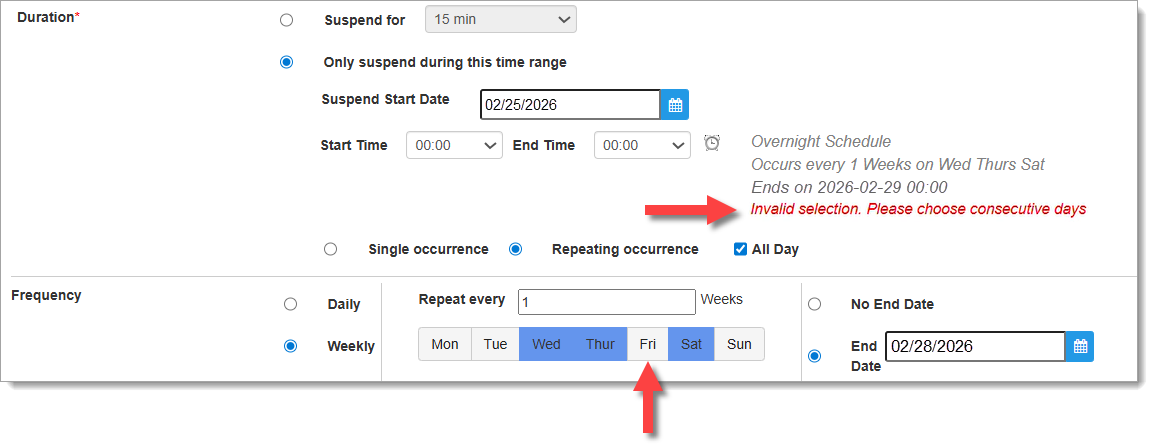
New No Motion Alert Suspension Feature
Under the suspend alerts section, SCRAMNET GPS users are now able to include or exclude No Motion alerts from the alert suspension process.
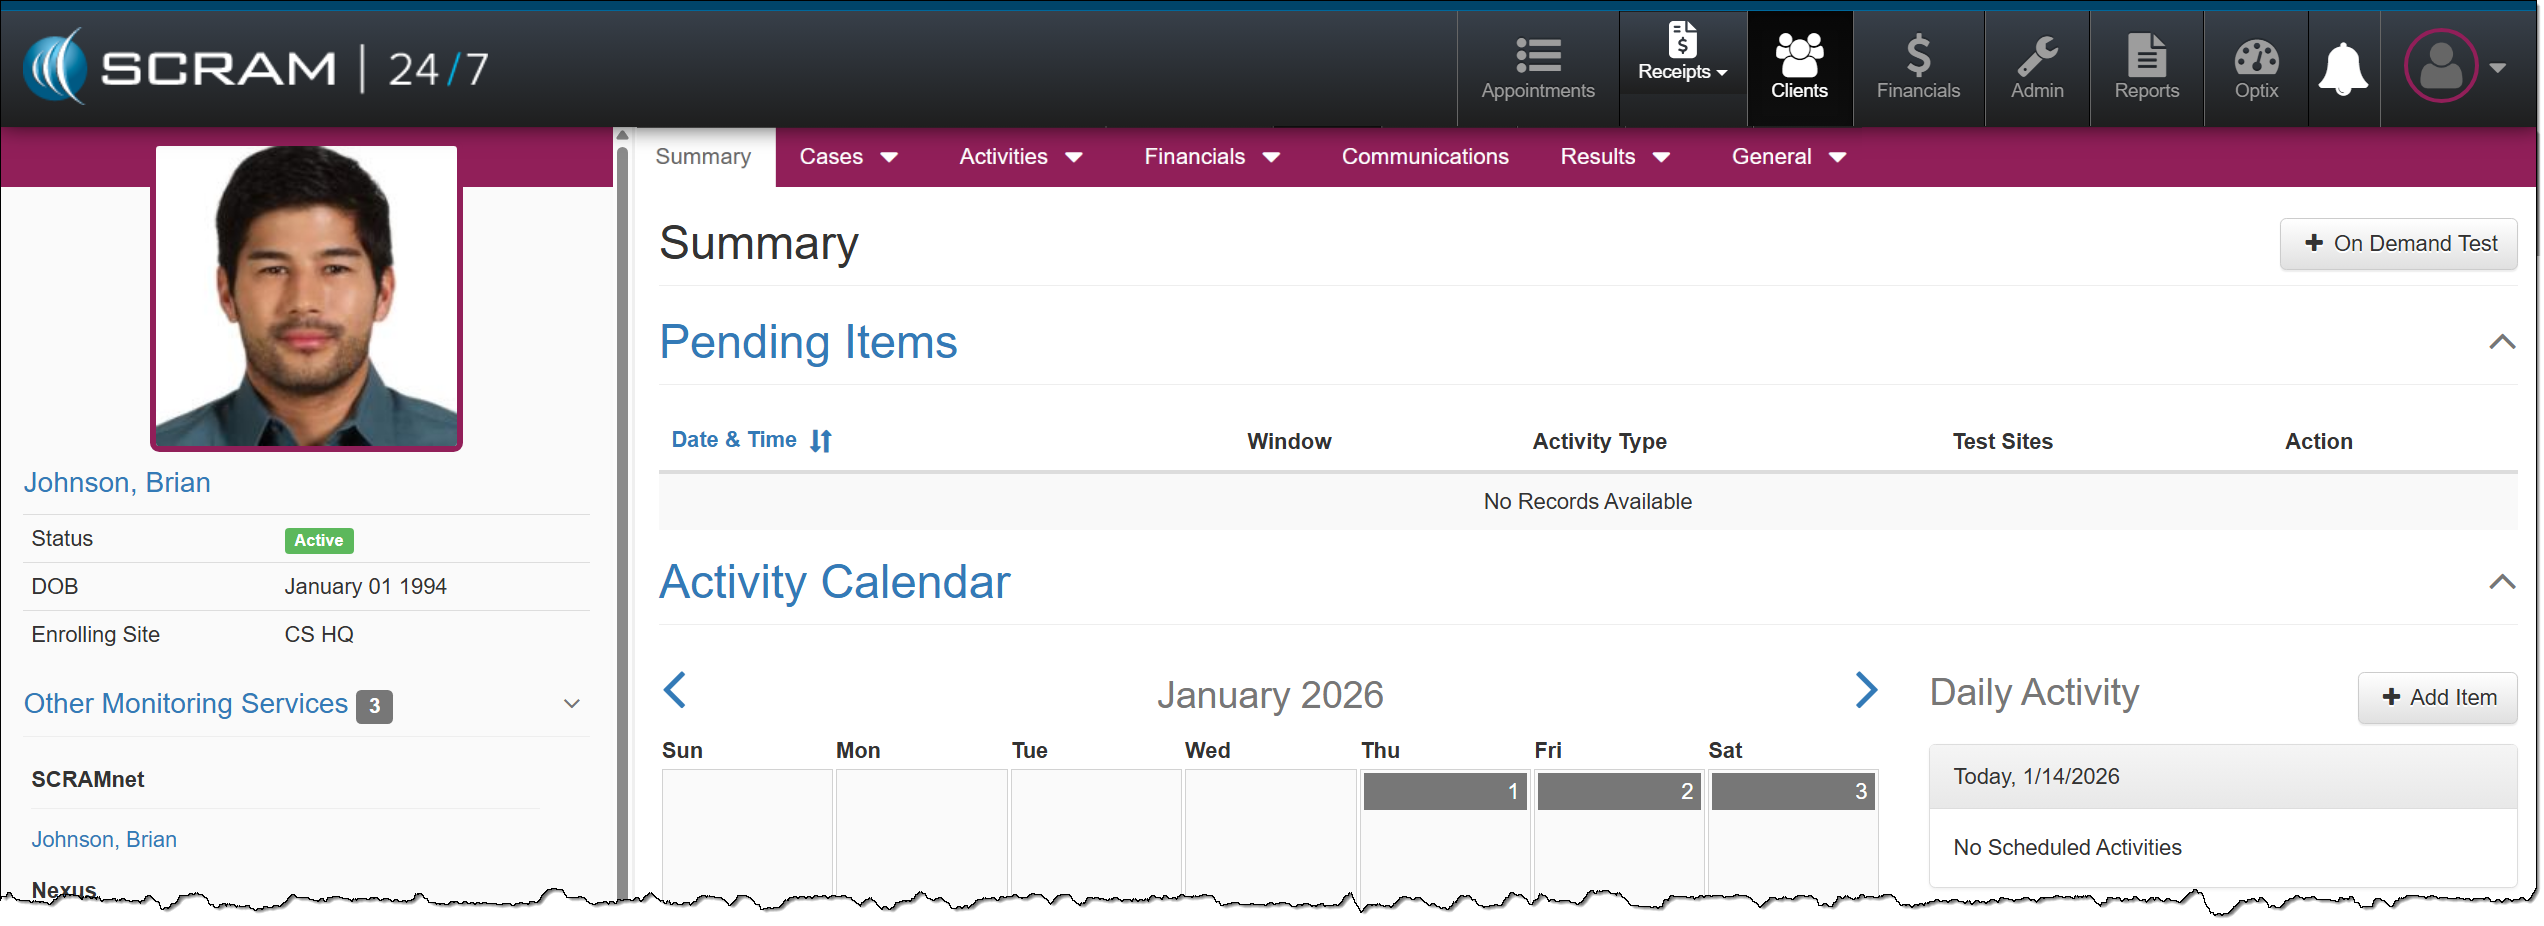
On January 14th, 2026, from 11:00 AM to Noon MST, SCRAM Systems will release two enhancements in SCRAM 24/7. The first enhancement improves client search capabilities. The second allows you to perform additional equipment actions directly from the Options column on the client’s Summary page for your CAM+HA and RB Activity clients when equipment is assigned.
During the release window, SCRAM 24/7 access will be interrupted for 1 hour. During this time frame, SCRAM 24/7 will be unavailable, and you will not be able to perform client-related tasks, such as adding a new client or managing current client activities. Once the maintenance window has expired, you will need to refresh your connection (logout/login) to the SCRAM 24/7 system to resume access and navigation.
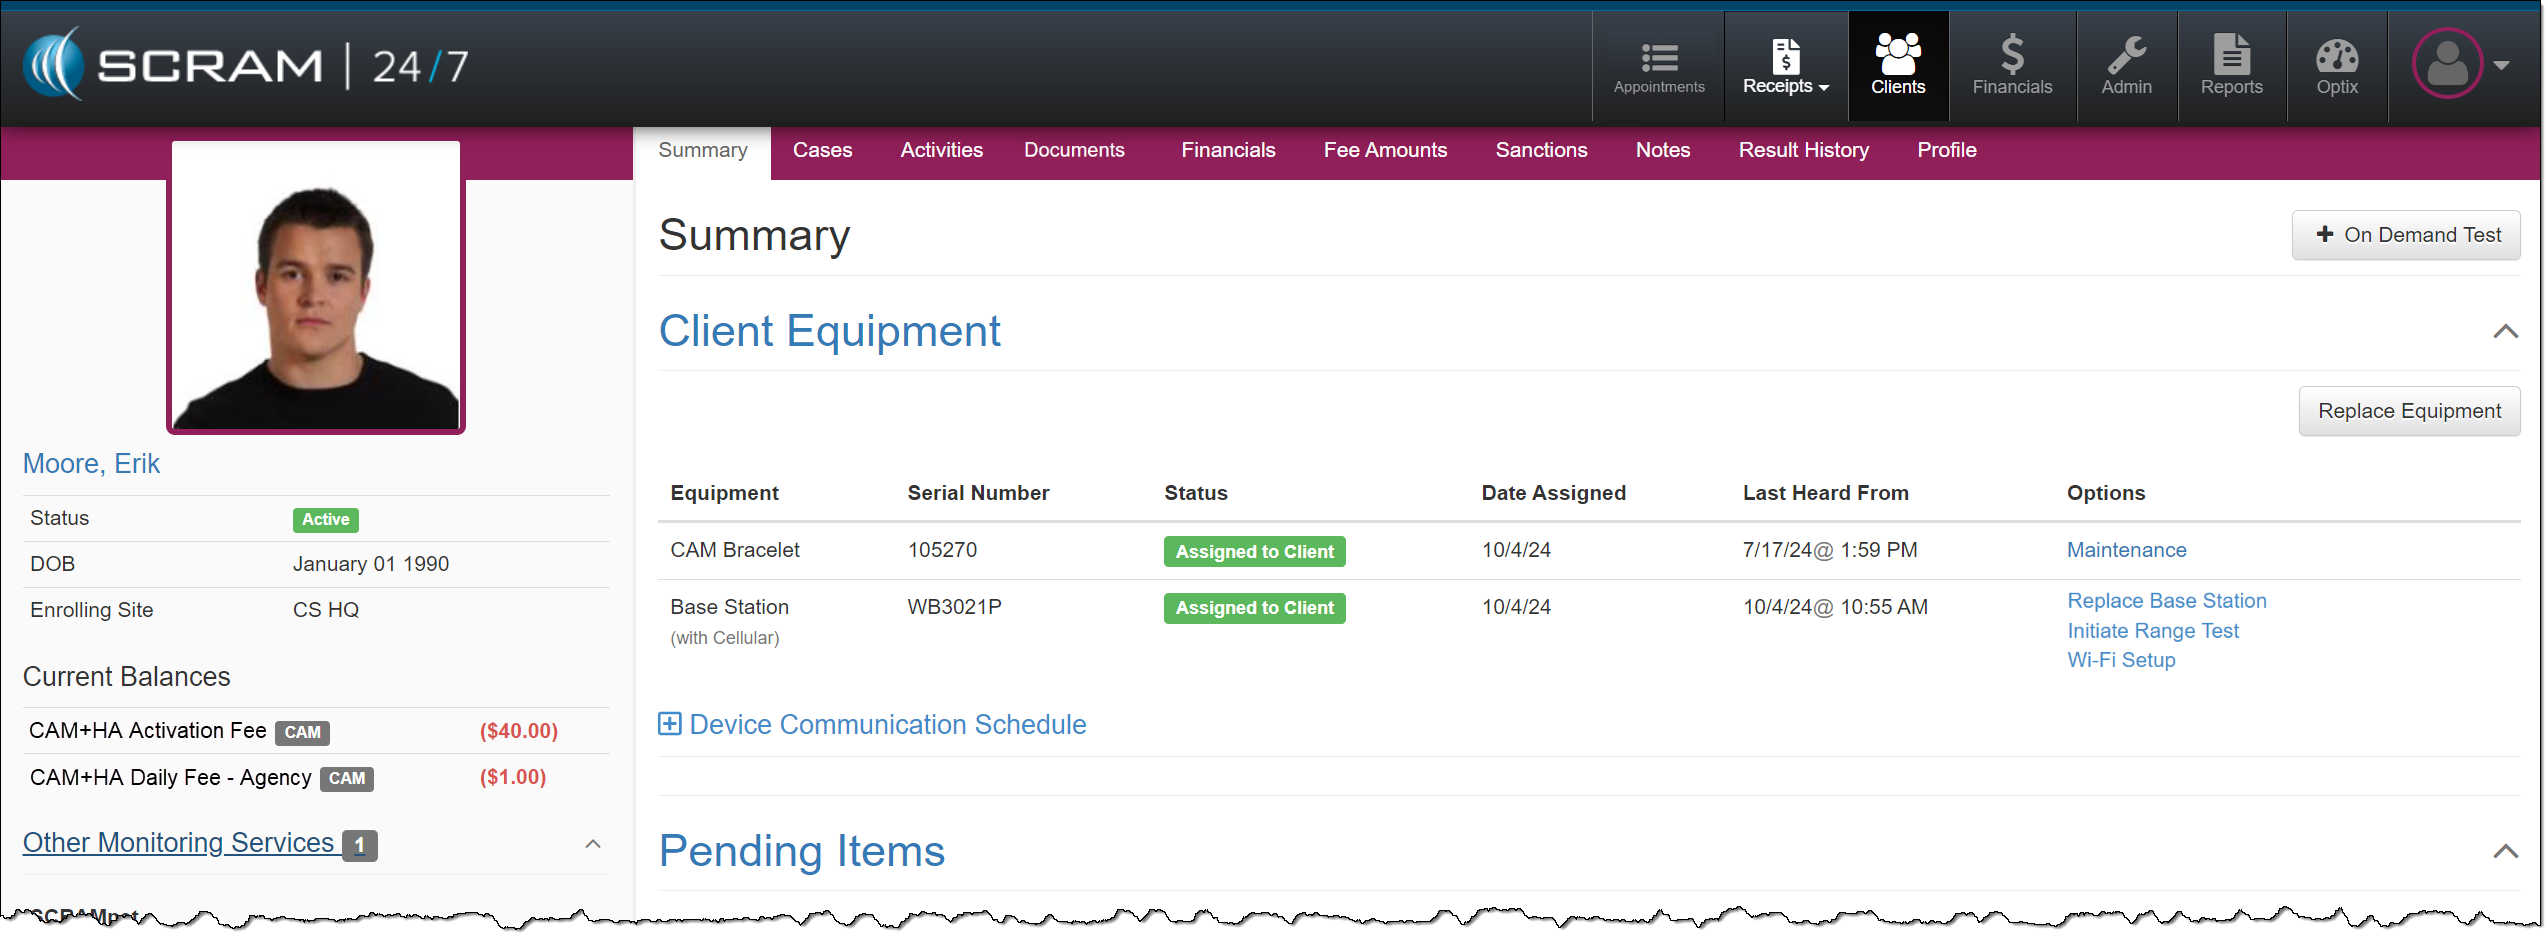
Equipment Options Column
Actions typically completed in SCRAMNET for assigned equipment may now be performed on the client’s Summary page for the Remote Breath and CAM/House Arrest Activities. Select the task you wish to perform from the new ‘Options’ column found in the table under the Client Equipment heading.

Search Options
In addition to the current search fields, you may now search by:
- Date of Birth
- Gender
- Phone Number
- Address
- Case Type
- Case Reason
This update will be reflected on both the Clients page, on the Search All Clients tab, and the Financials page, on the Clients tab.
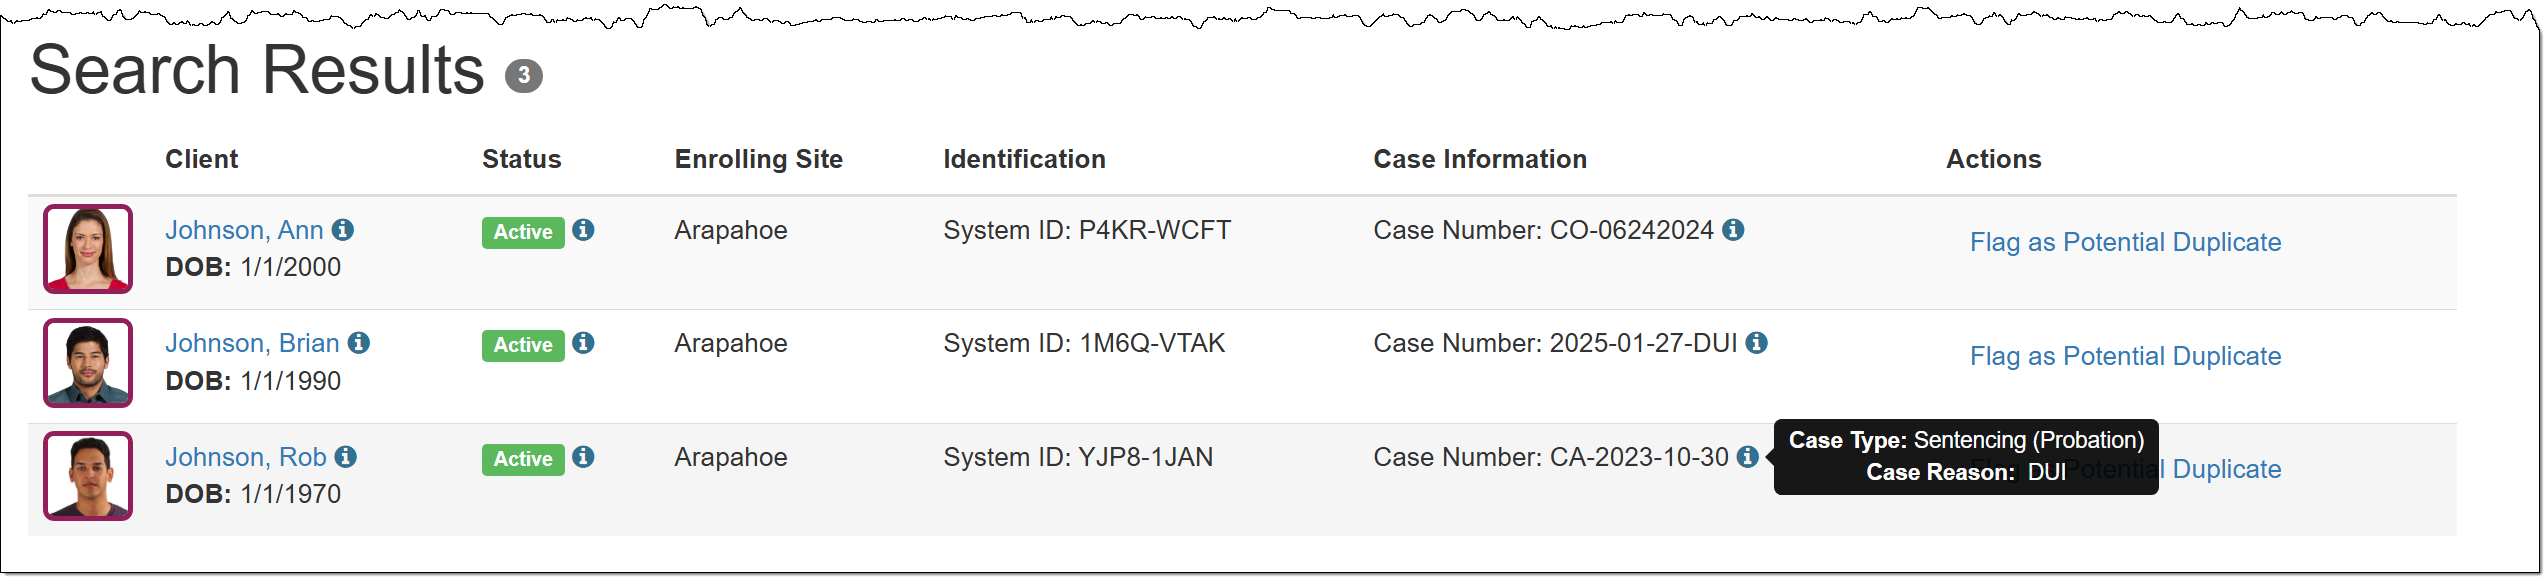
In the Search Results section, you will note some additional changes
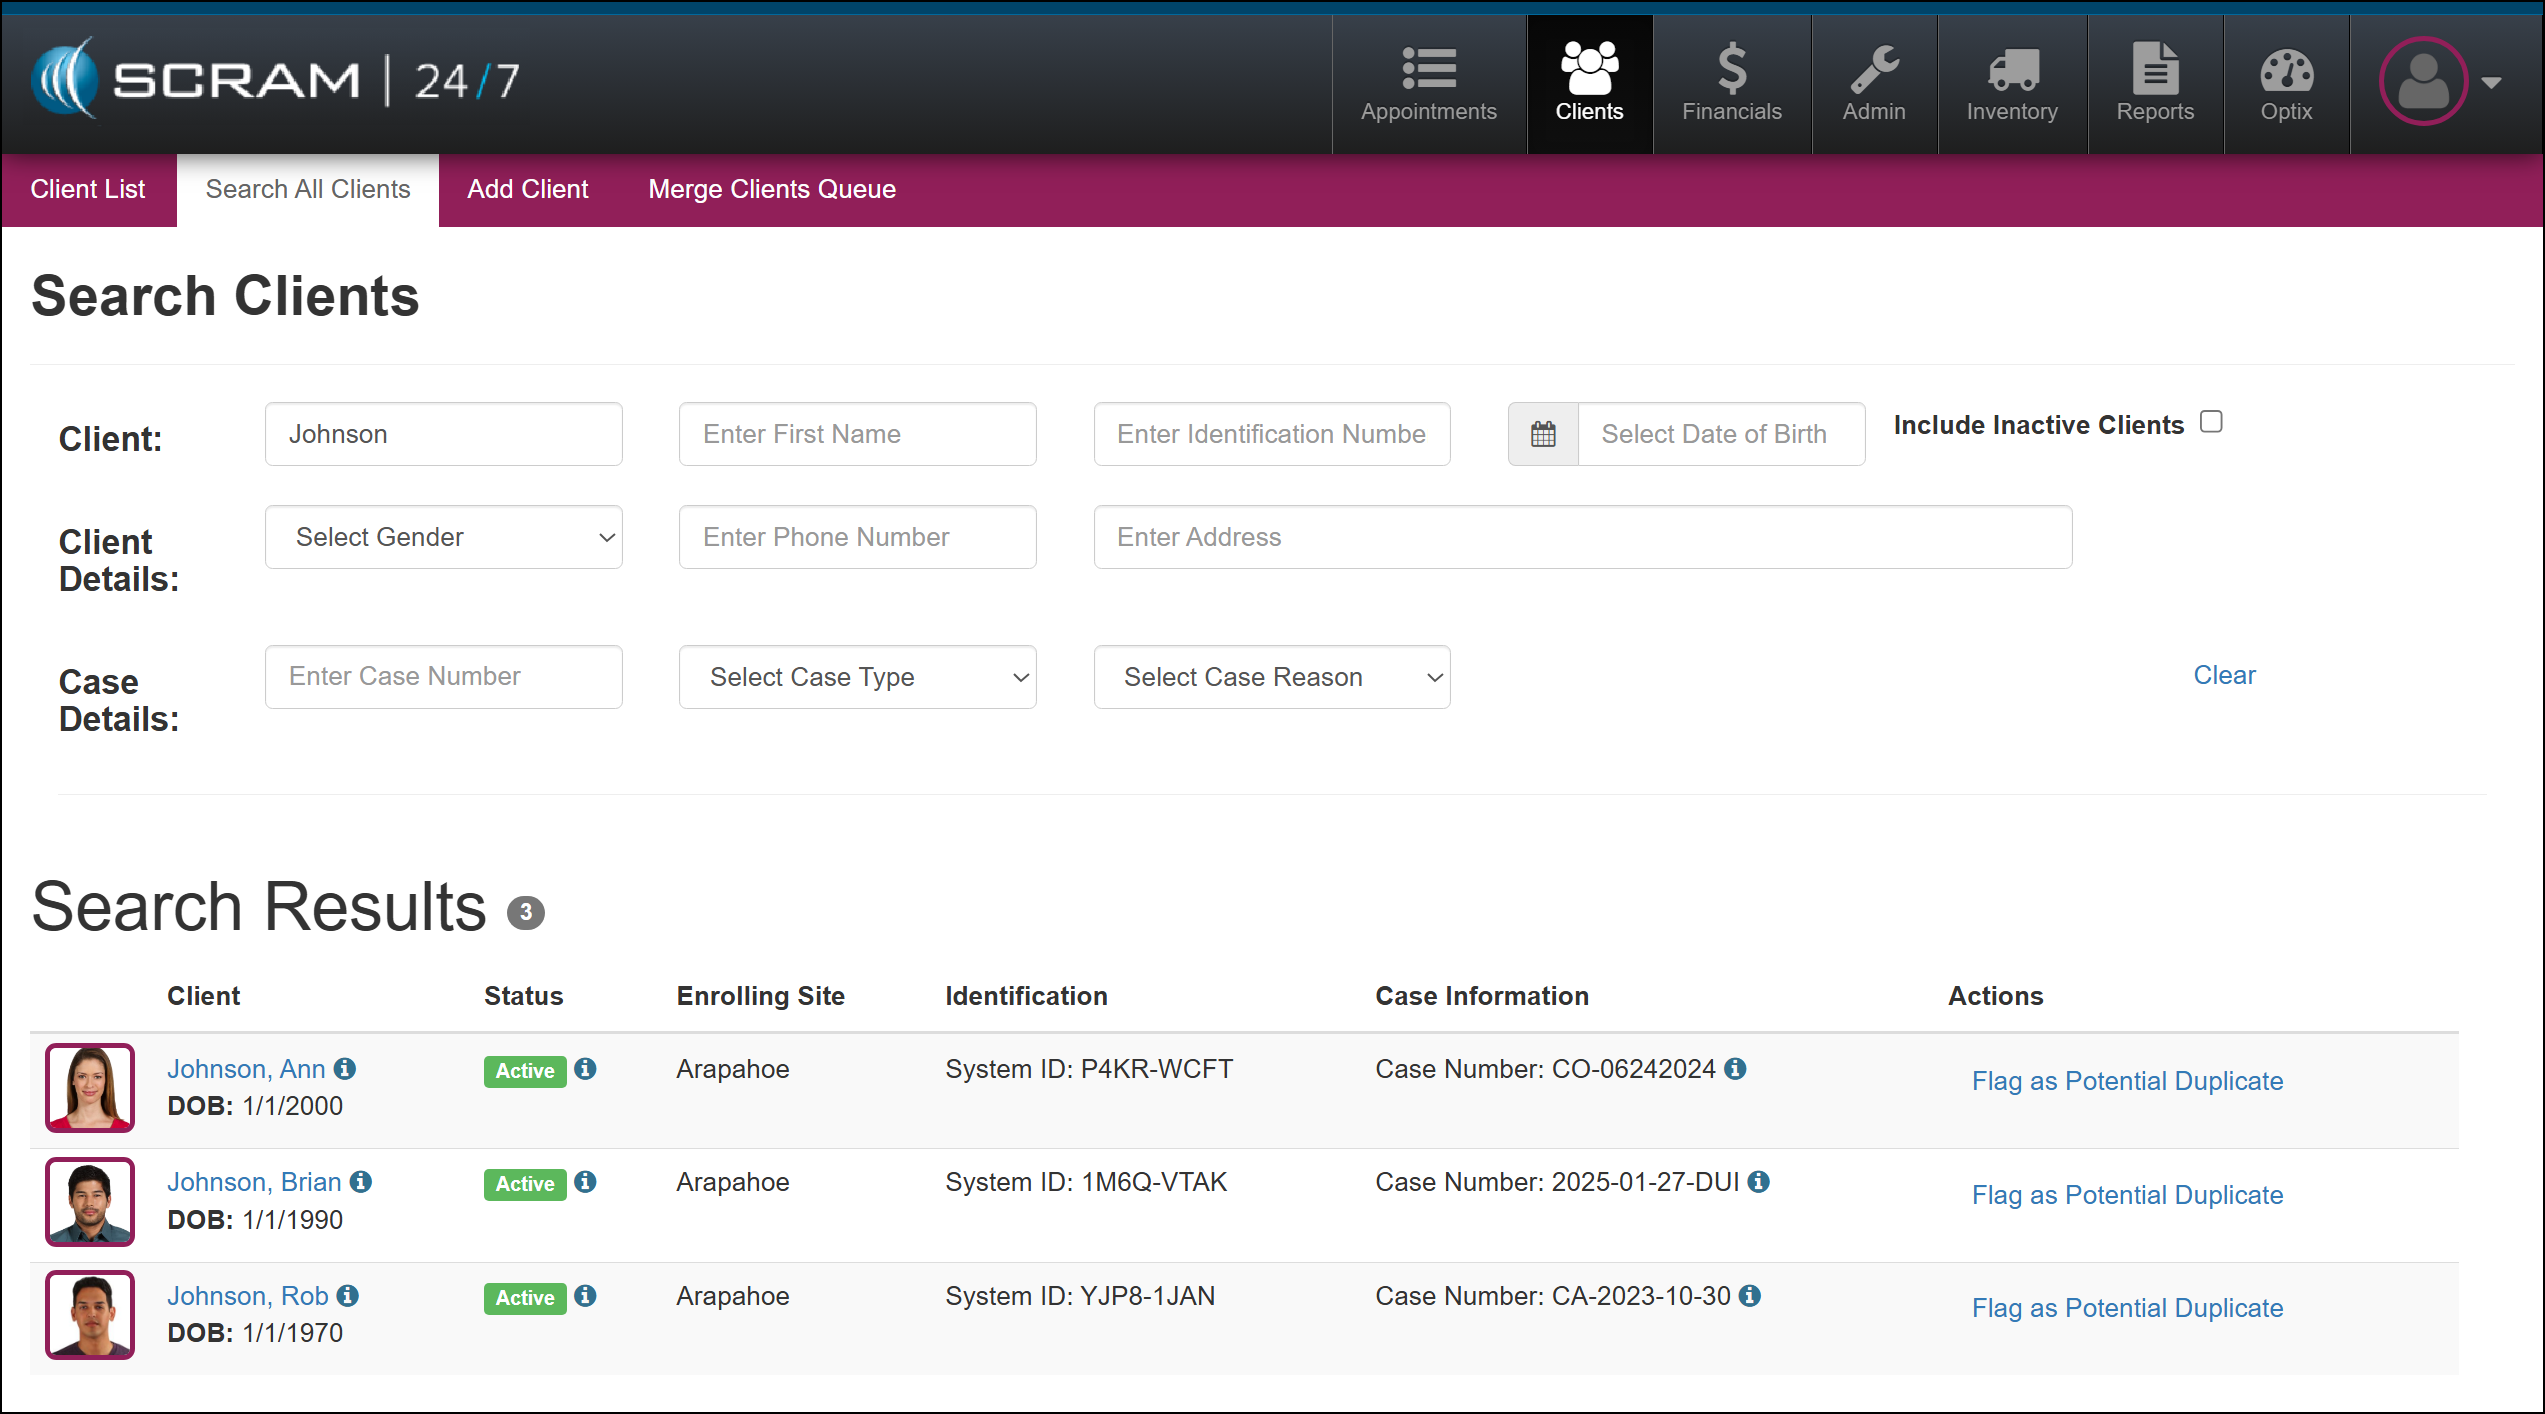
The client’s Date of Birth is now located under their name hyperlink, along with an information icon that displays the client’s gender, phone number, and address when you hover your mouse pointer over it.
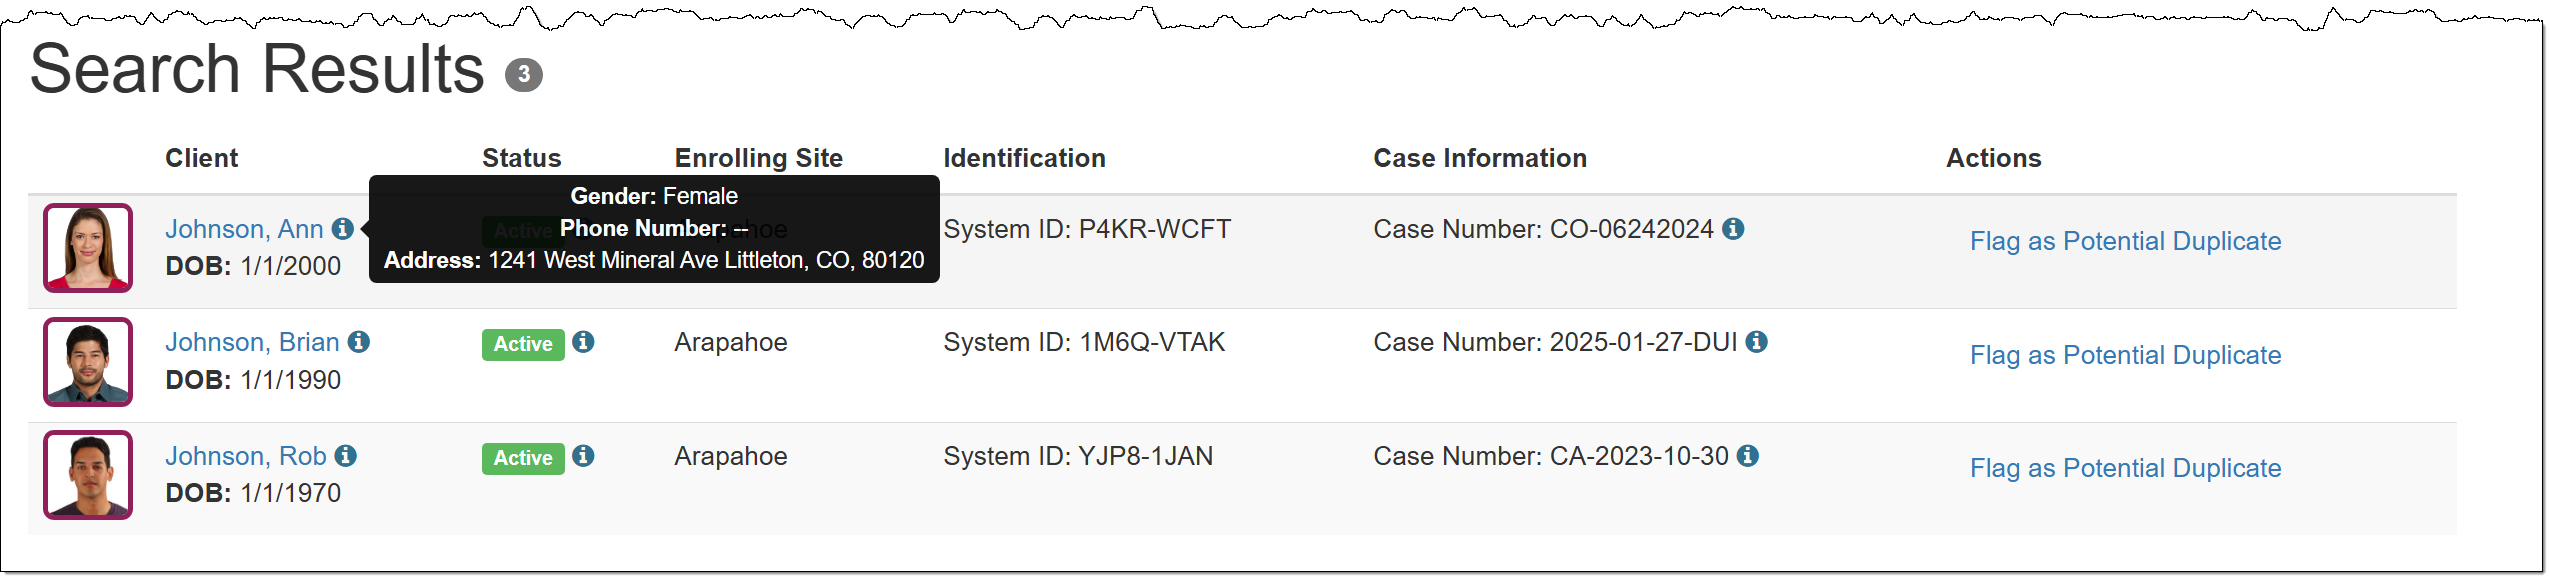
The Status column has been relocated, and an information icon that will display the creation and inactivation dates when hovered over has been added.
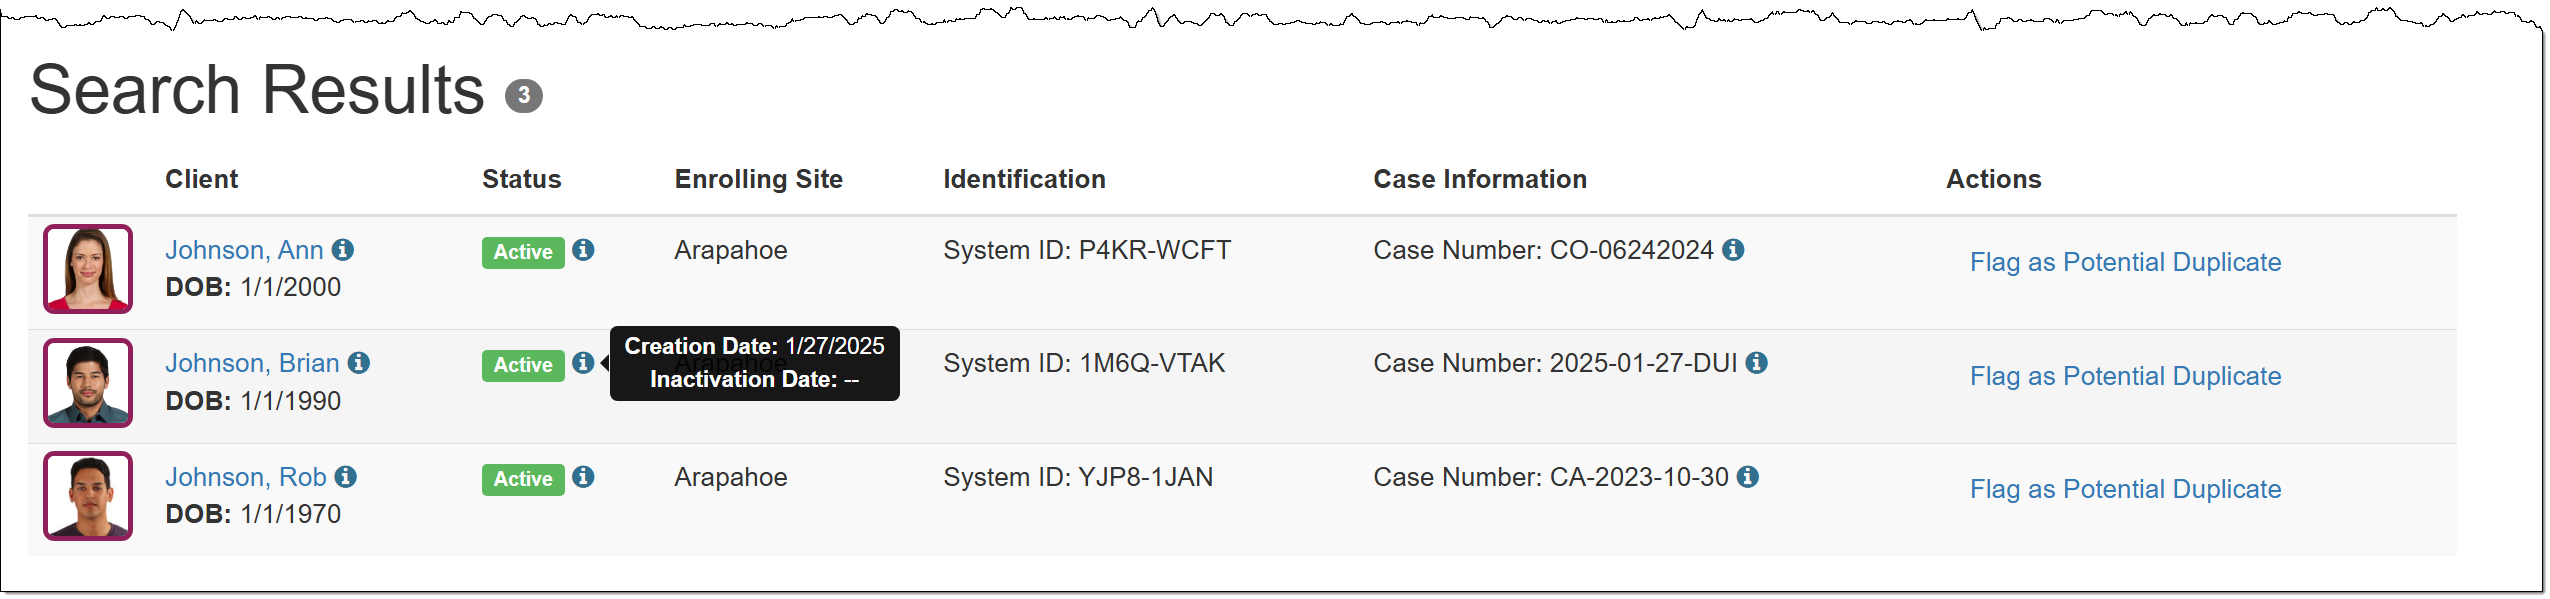
A new Case Information column displays the client’s case number, along with an information icon that shows the case type and case reason when hovered over.
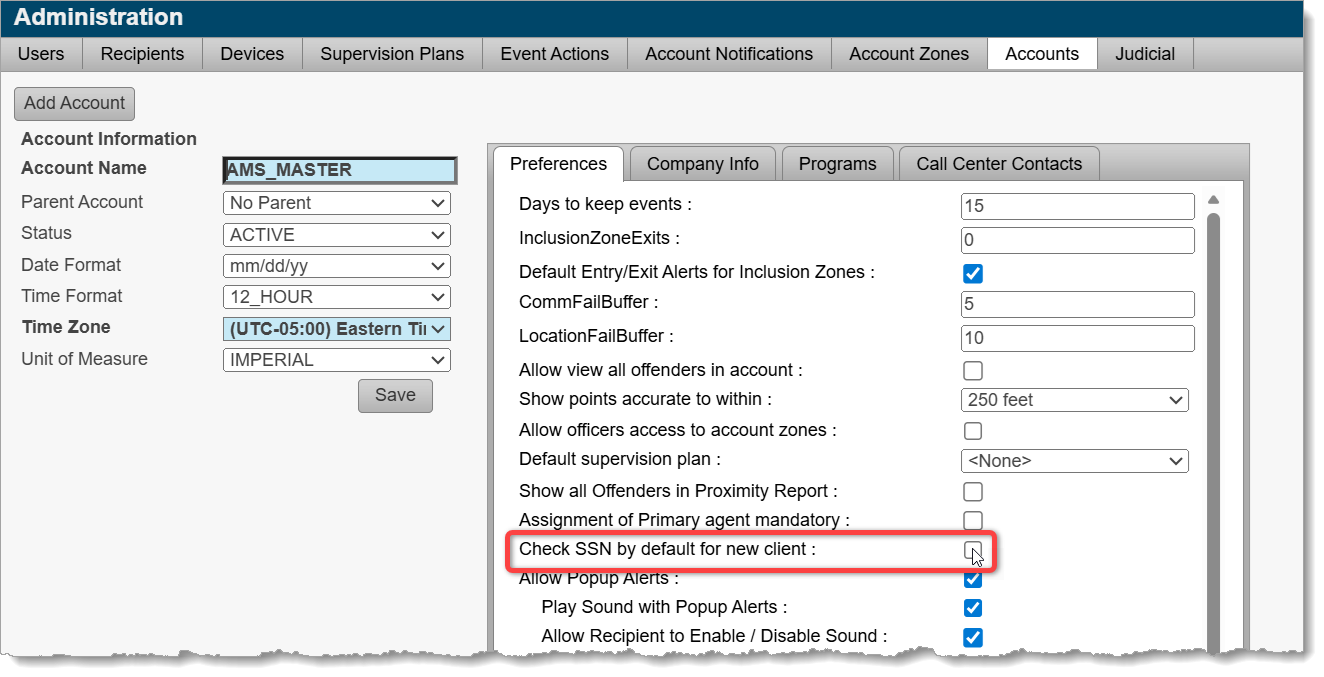
SCRAM Systems is introducing several new enhancements to the SCRAMNET GPS monitoring system. While many of the enhancements are either caseload-specific or back-end updates, two notable enhancements will be available to all SCRAM GPS customers:
- New Icon to Indicate Wi-Fi points for SCRAM GPS 9 Plus Devices
- Account Level Setting to Set Default for Client SSN Checkbox
| SCRAMNET GPS deployments typically occur on Thursdays at 7:00 AM EST in the US, 10:00 PM AEST in Australia, and the following 12:00 AM EST (Friday) in Canada. Please refer to the official SCRAM Systems email communication associated with this release for more details. During the 15-minute deployment, you may not be able to access SCRAMNET GPS, but messages from the SCRAM GPS device will continue to be processed uninterrupted. |
New Icon to Indicate Wi-Fi points for SCRAM GPS 9 Plus Devices
Location points that are derived from Wi-Fi hotspots instead of through GPS or Cell Tower Points (CTP) will now be displayed with a blue icon. This will allow users to immediately identify the source of the location points without drilling down.
Account Level Setting to Set Default for Client SSN Checkbox
With this release, Administrators may select a checkbox at the account level that ensures that all new clients added will have the SSN checkbox enabled. Enabling this checkbox encrypts the social security number of the client in reports and provides an additional level of protection for that information.
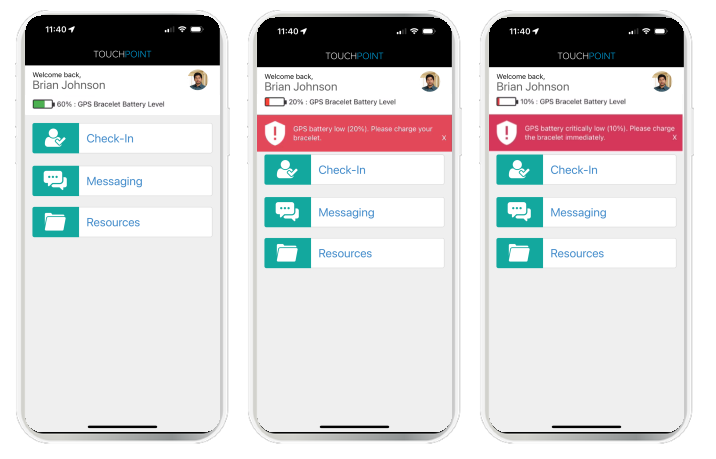
Today, December 18th, 2025, SCRAM Systems released an enhancement for your SCRAM TouchPoint Monitoring program. With this update, clients enrolled in both SCRAM GPS monitoring and SCRAM TouchPoint may now view their GPS bracelet’s battery level within their TouchPoint mobile app.
| The latest version of the TouchPoint app is available to clients in the app stores. As a best practice, SCRAM Systems recommends that all TouchPoint app users enable automatic app updates on their smartphones to make this process easier. |
What’s New
- The client’s last reported SCRAM GPS bracelet’s battery level is displayed at the top of the home screen within the TouchPoint mobile application.
- A red banner with charging instructions for the client will display on the Home screen within the app when the device requires charging. The banners will display when the device’s battery level is:
- Below 20%, indicating a Battery Low alert.
- Below 10%, indicating a Critically Low Battery alert.
Important Reminder
The battery level shown in the client’s TouchPoint mobile app is for reference only. The client should not rely solely on the app’s display to manage charging. To remain compliant and avoid interruptions in monitoring, clients must continue to charge their GPS device regularly, following program instructions.
| The battery level shown in the TouchPoint mobile app may not exactly match the battery level displayed on the GPS Dashboard in the agent view. In TouchPoint, battery levels are shown in 10% increments. For example, if the GPS Dashboard shows a battery level of 66%, the TouchPoint app will display 70%. |