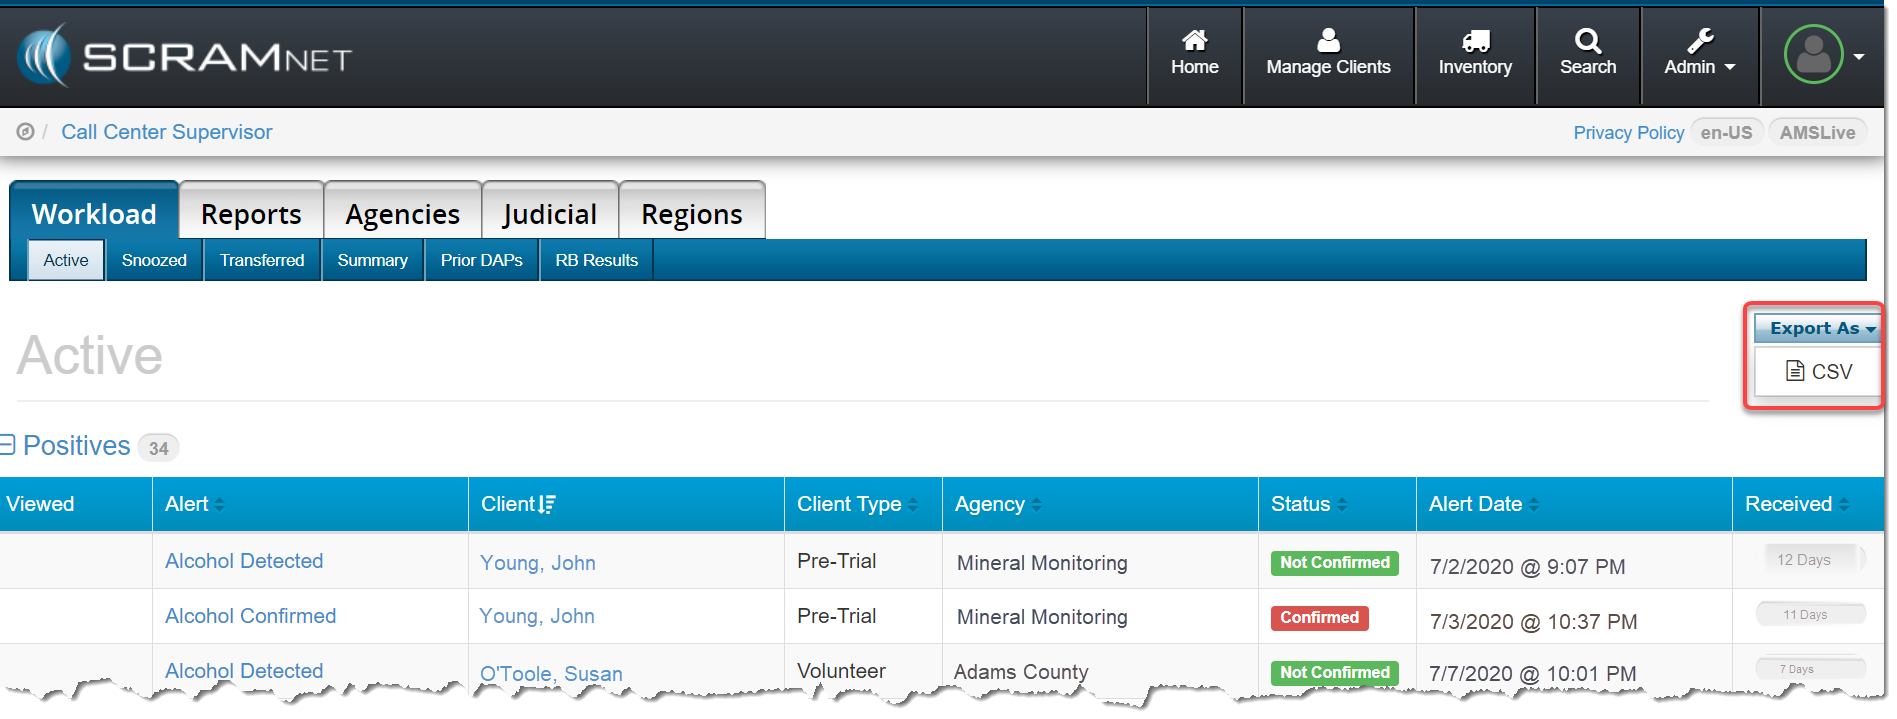
With this release, you can now export the data that appears on any Workload page in SCRAMNET® to a.csv-format spreadsheet file. To do this, click the Export As button then click the “CSV” option.
Reminder: A Workload page can be viewed in the following areas in SCRAMNET:
Call Center (Service Provider)
Region
Location
Caseload
Agent
Once the .csv file is downloaded to your computer, you can open the file in any popular spreadsheet editing program and easily modify the list as needed. Any comments entered for the case will appear in the “Comments” column.
At 9:30 PM MDT on July 13, 2020, SCRAM Systems® will introduce several new enhancements to the SCRAM Nexus® caseload management system that make it easier to use. These enhancements include:
A new Pending Intake status and associated filter for client management
New “Alert” and “Success” banners
Updated labels on the Office Visit screen tabs
An increase to the ‘Note’ size to 10,000 characters
The ability to change past appointment dates
A new “My Staff” view on the Supervisor Report tab (for supervisors)
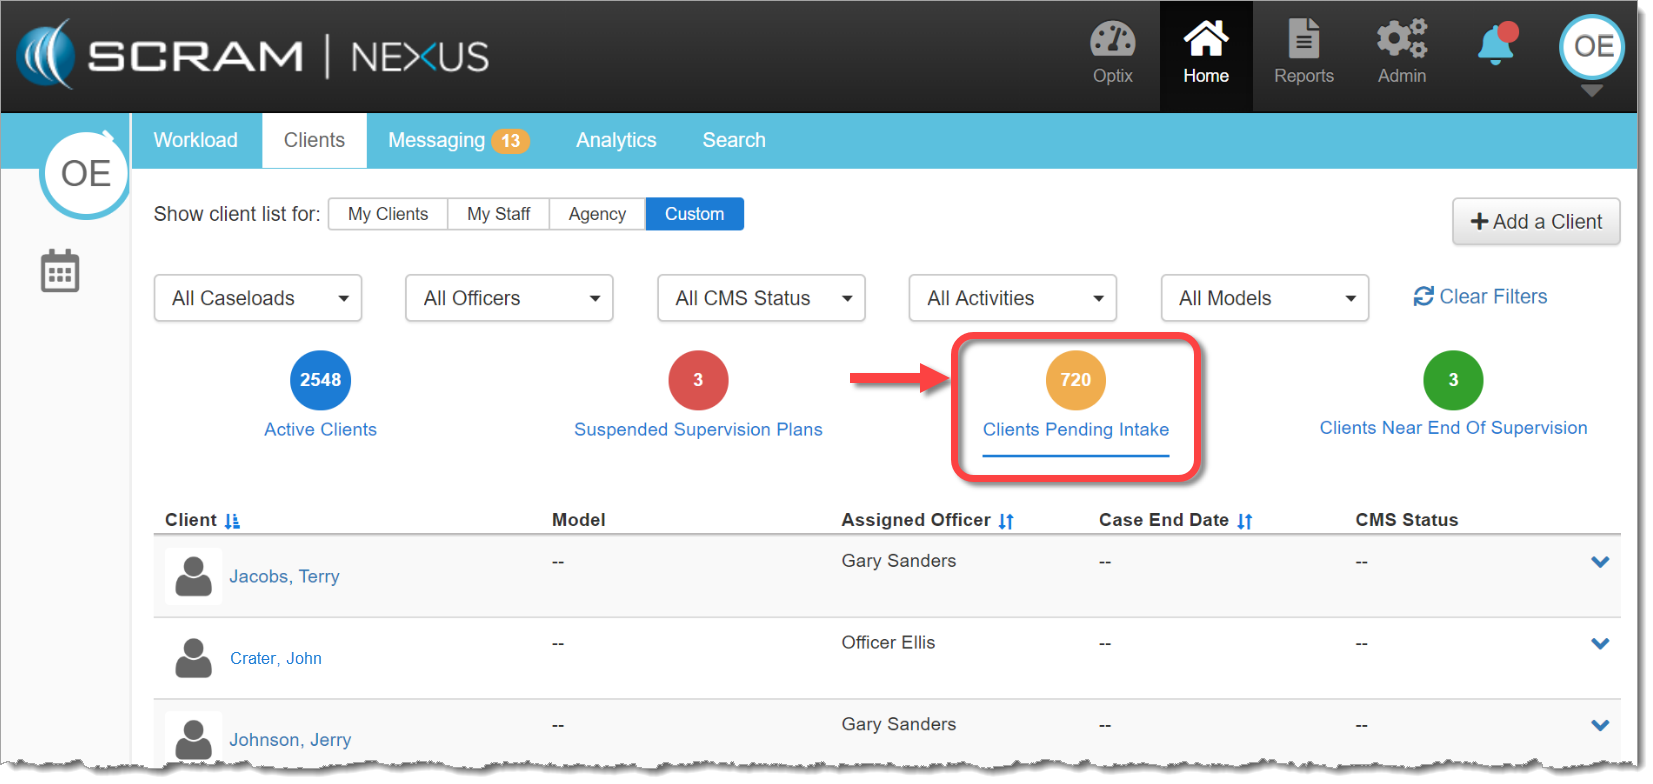
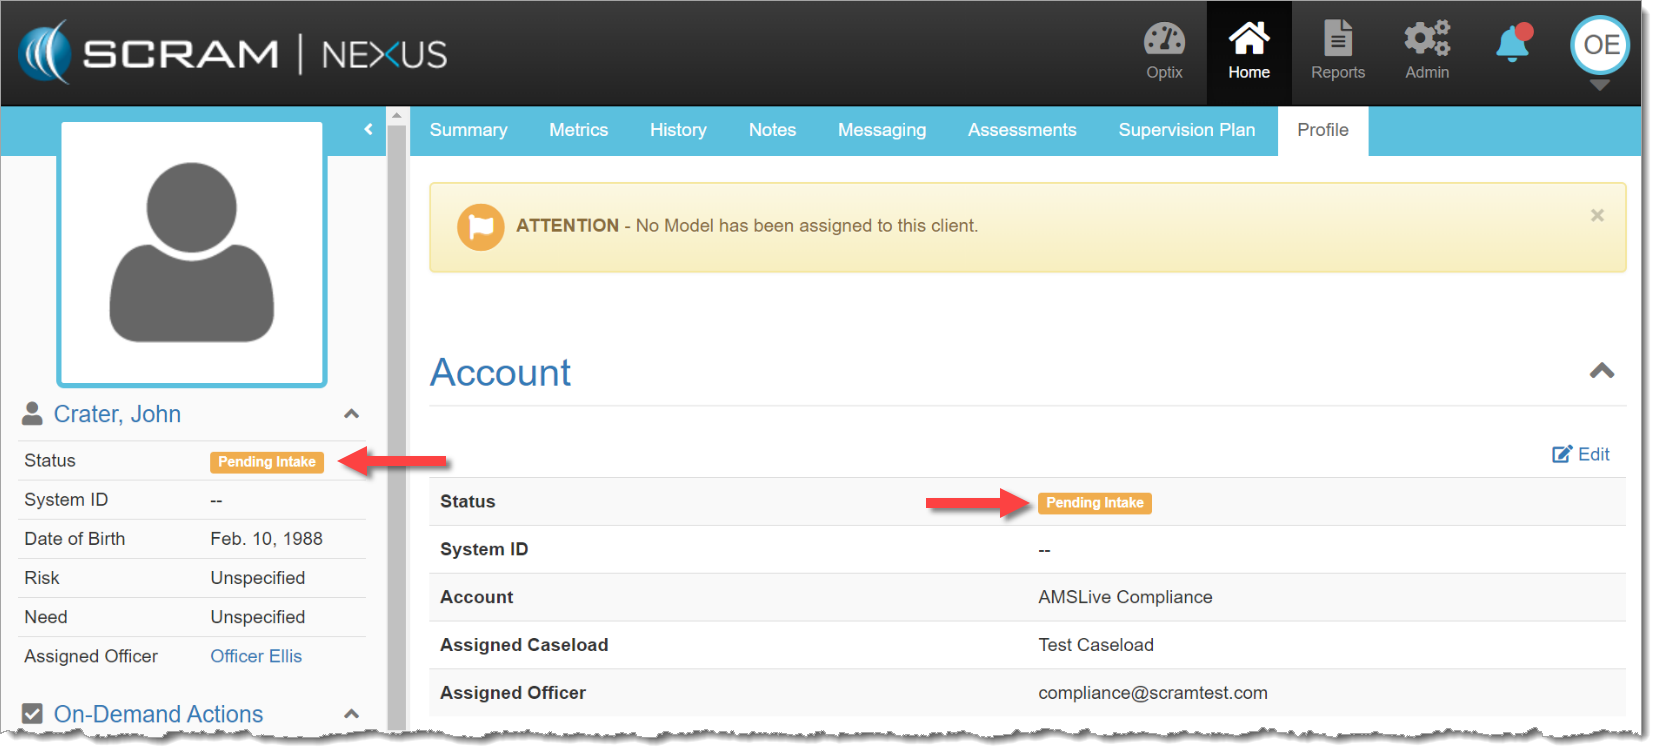
New ‘Pending Intake’ Status
Clients who are active in Nexus but not assigned to a model will now be listed as ‘Pending Intake,’ and will be separate from active clients who are being monitored, as well as inactive clients who are no longer being supervised. This helps officers organize their clients and better represents the status of each client. This new status will appear both as a filter on the officer’s Clients tab, as well as a status on client’s Profile tab.
Clients Pending Intake filter on Clients tab (click to enlarge)Pending Intake status on client Profile tab (click to enlarge)
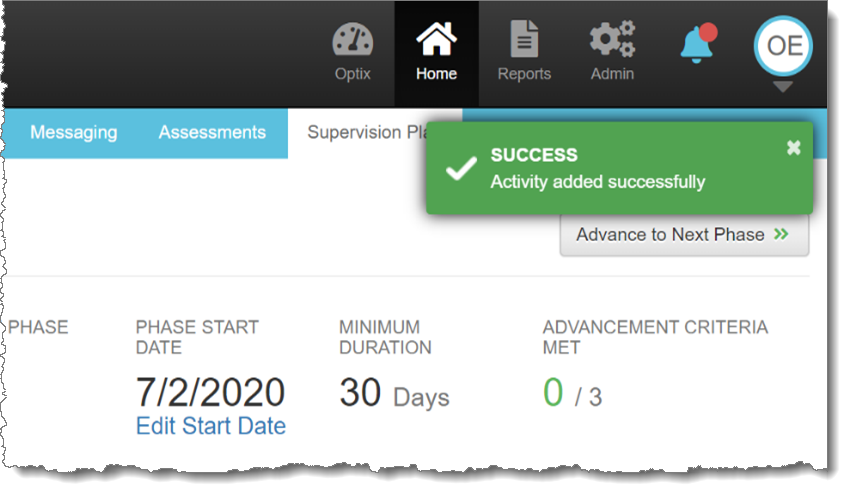
New “Alert” and “Success” Banners
New Alert and Success banners will display in the top-right corner of the screen after an action is completed. Alert (or Error) banners will disappear automatically after 30 seconds. Success banners will show for five seconds before disappearing automatically. Hovering your mouse pointer over either banner will cause them to remain on-screen longer.
Alert / Error banner
Success banner
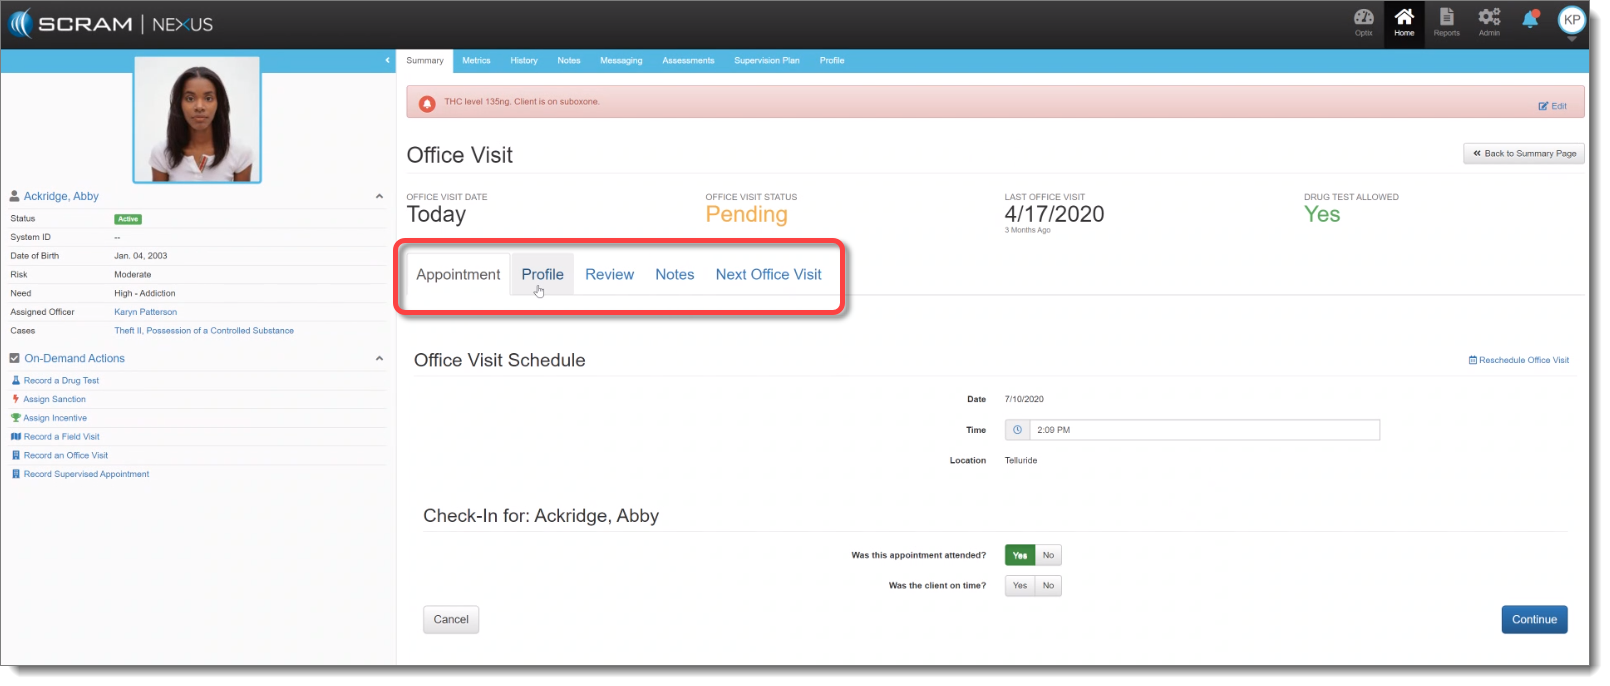
Updated Tabs on the Office Visit Screen
The tab labels on the Office Visit screen now align better to the structure of an actual office visit.
Updated tab labels (click to enlarge)
The updated tabs are:
Appointment: Allows you to select attendance options.
Profile: Provides option to review and edit client information with the client.
Review: Shows list of pending client actions as well as “Activity Progress.” Will surface items completed since last visit.
Notes: Provides officer open text box to capture meeting narrative as well as displays prior notations made for that client.
Next Office Visit: Automatically populates with the scheduled next appointment date, though all the fields are editable, so the client and officer can confirm or reschedule a different time for the next meeting
Additional Client Enhancements:
Longer Notes – up to 10,000 characters in length – are now supported in Nexus. This includes notes on Activities, Treatment Provider Notes, Sanction/Incentive Notes, and General Notes. Critical Notes are still limited to 500 characters.
Record/Change past appointment dates: When an officer records an on-demand appointment (Drug Test, Office Visit, Supervised Appointment, Sanction, or Incentive) the officer may select any date for that appointment between Jan 1, 1900 and today’s date.
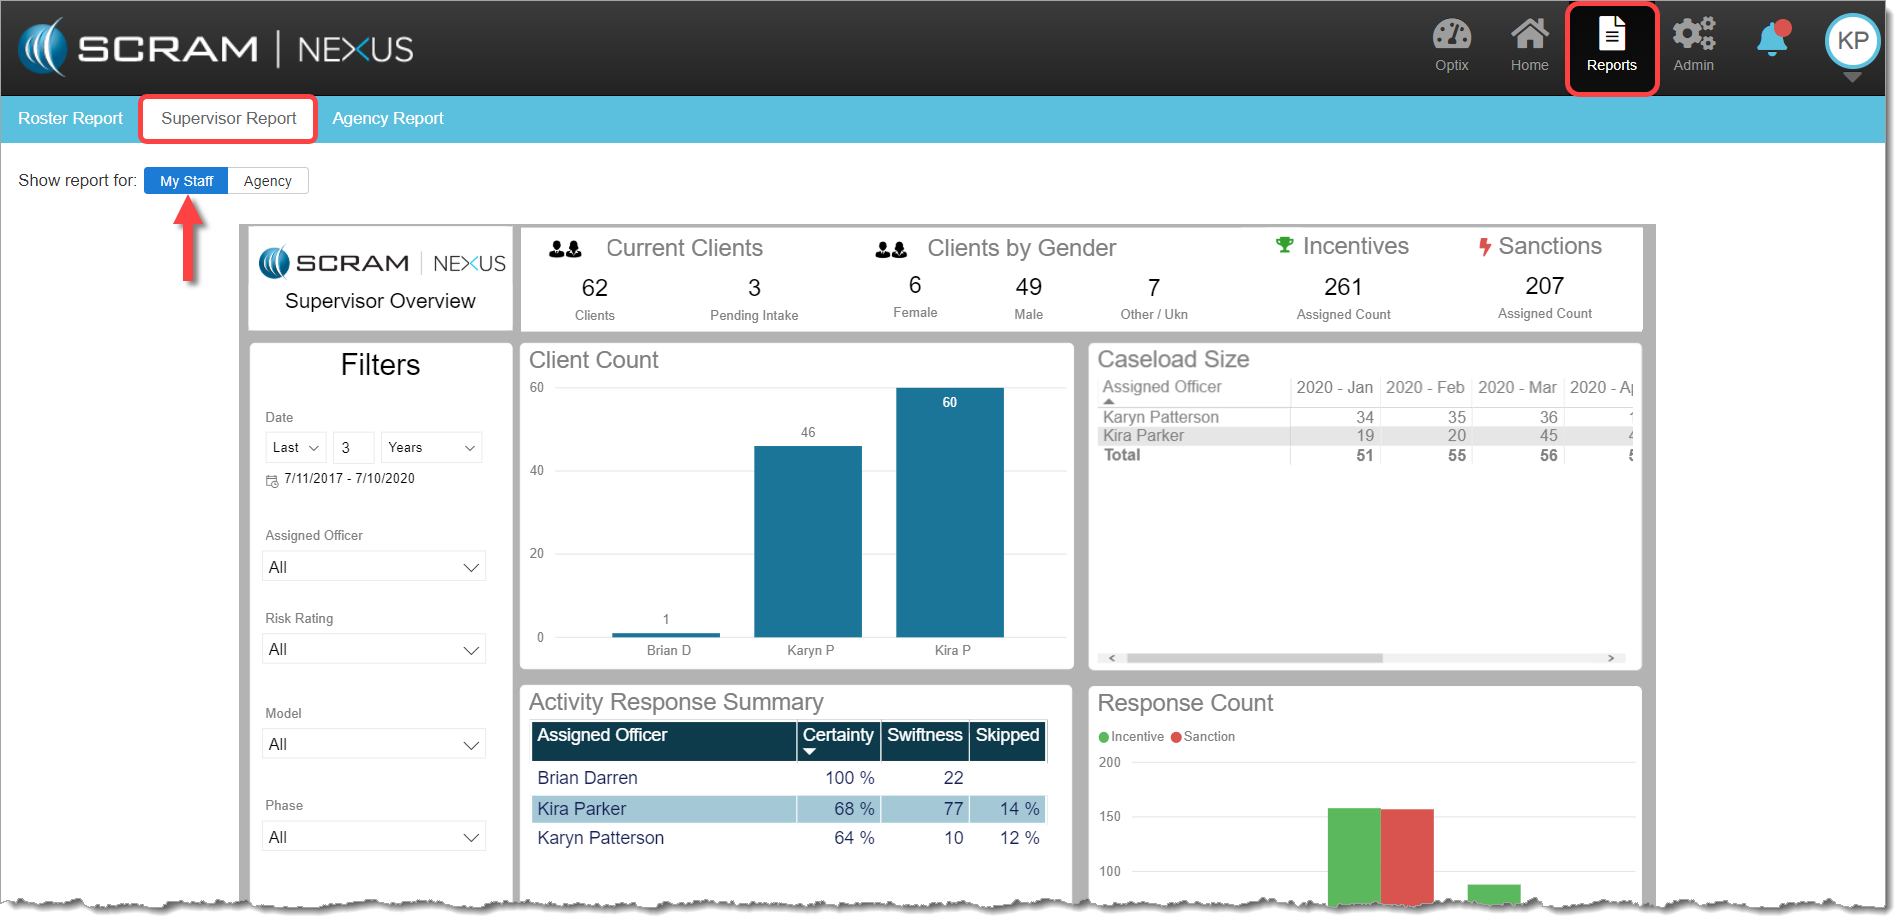
New ‘My Staff’ View on the Supervisor Report
Supervisors who access the Supervisor Report will now have a My Staff view that will filter the officer data to show only their direct reports . If a Supervisor wishes to see more data than their immediate staff, the Supervisor can go to the ‘Agency’ view and data will be displayed for all officers.
My Staff view (click to enlarge)
Feedback
Please contact our Customer Service department at 1-303-785-7879 if you have questions or recommendations for system improvements.
Effective July 8, 2020 SCRAM Systems®
has added three new 24/7 Monitoring and Compliance reports available on the Analytics
tab in SCRAMNET OPTIX™. Additionally,
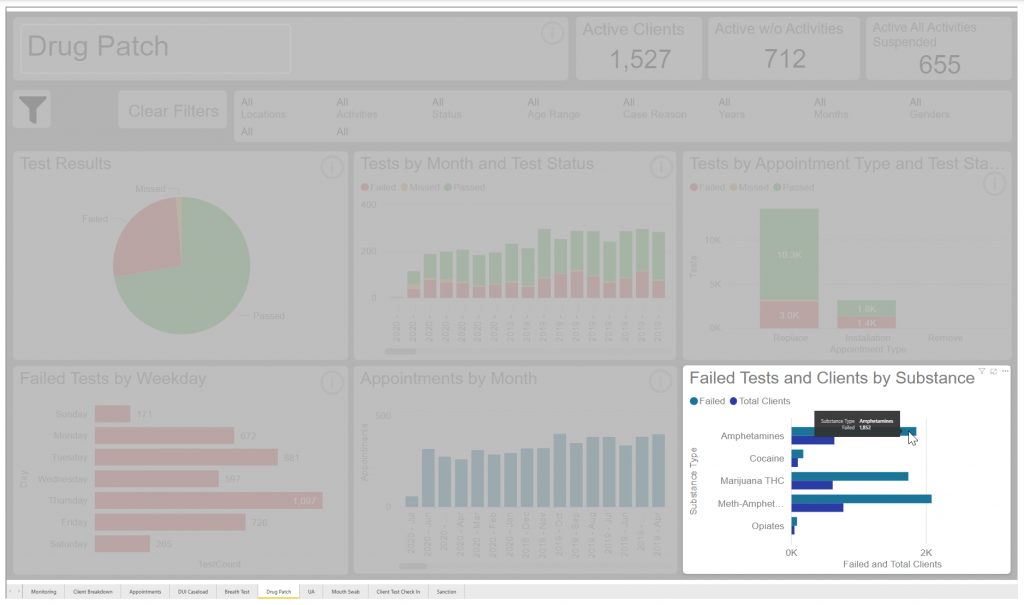
a new section entitled Failed Test and Clients by Substance has been
added to the current Drug Patch and UA reports.
New 24/7 Monitoring and Compliance Analytics Reports
The new analytic reporting available provides insight into compliance, activity treads, and sanction details for your program. The new reports available are:
Visit the Analytics page on SCRAMNET Optix Help to learn more.
Update to the Drug Patch and UA Report
With the addition of the Failed Test and Clients by Substance data, the Drug Patch and UA reports will now display the total failed tests by substances and the number of clients who tested positive for that substance.
Feedback
As always, please contact SCRAM Systems Customer Service at
1-303-785-7879 with any recommendations for system improvements.
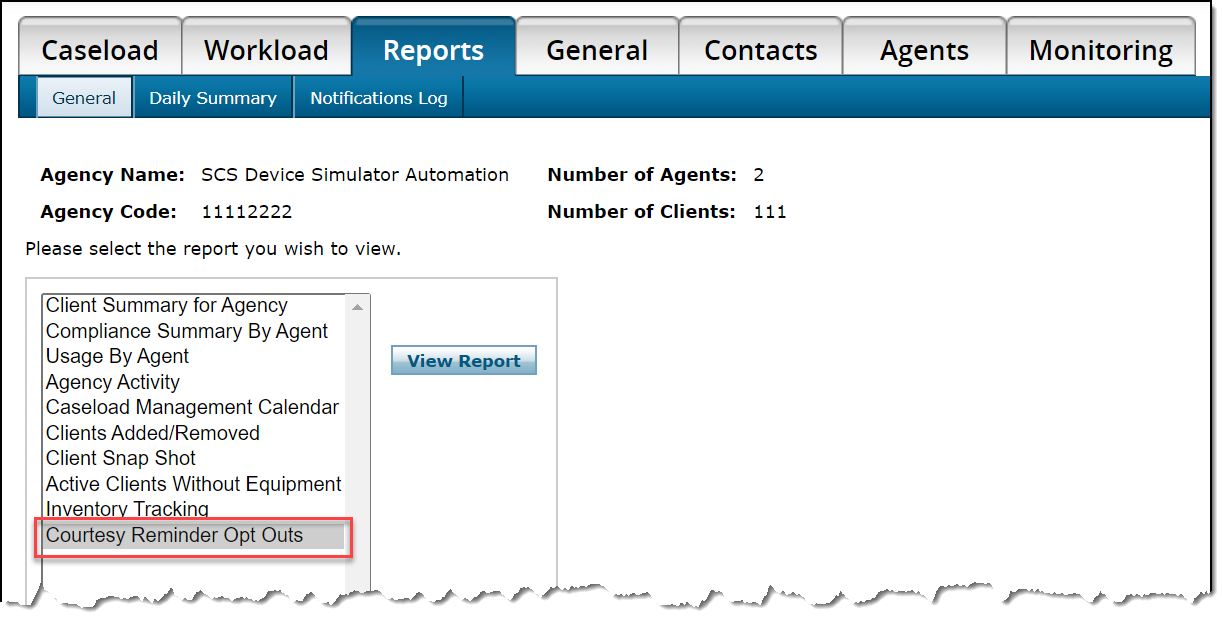
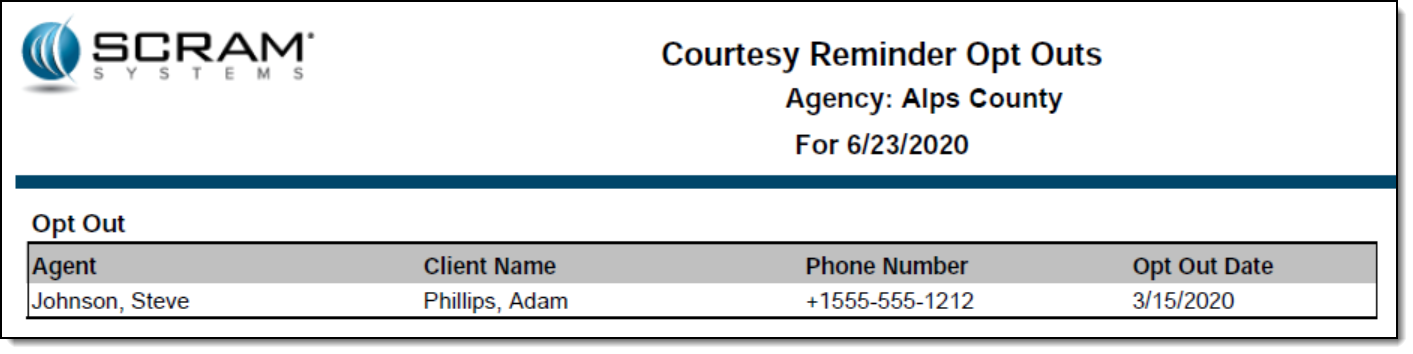
A new Courtesy Reminder Opt Outs report is now available for each caseload in SCRAMNET®. This report lists all SCRAM Remote Breath® clients who elected to opt out of receiving courtesy reminders that assist those clients with performing each breath test at the scheduled time.
To access the report:
Access the caseload in SCRAMNET.
Click the Reports tab.
Select the Courtesy Reminder Opt Outs option in the left report list.
Click the View Report button.
All active SCRAM Remote Breath clients in the caseload who have ever opted out of receiving courtesy reminders will appear on the report.
The second page of the report will list each client with an associated phone number that resulted in an “Undeliverable” message being generated when a courtesy reminder was sent.
Feedback
As always, please feel free to contact SCRAM Systems Customer Services at 1-303-785-7879 with any recommendations for system improvements.
This Release includes a couple of very exciting new features:
Browser Notifications for SCRAM TouchPoint™ Messages
The addition of Client Directives
Officer: TouchPoint Message Browser Notifications
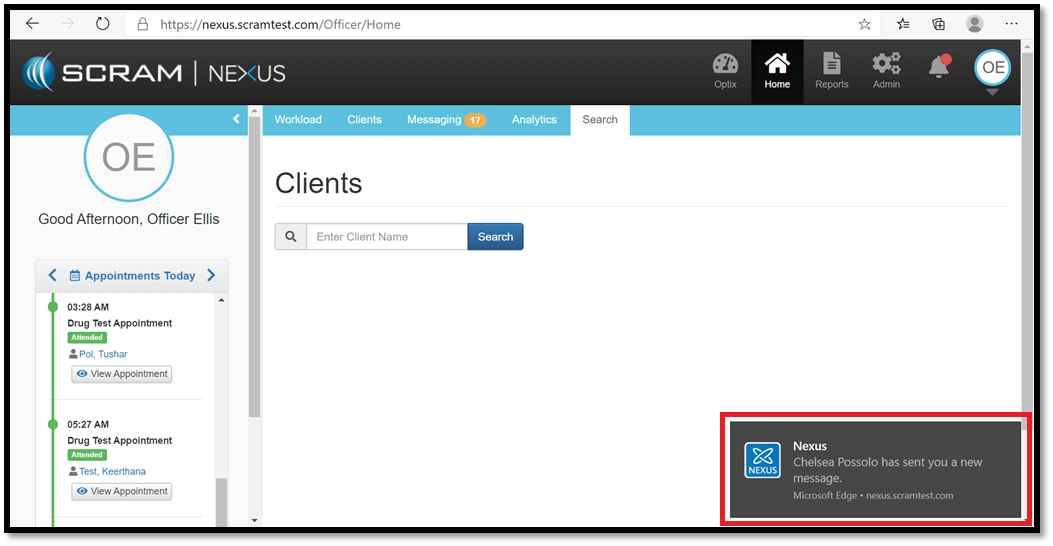
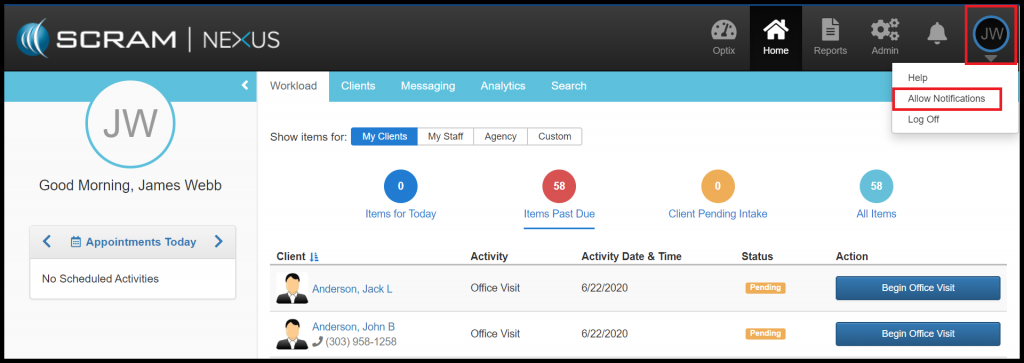
As an officer, you now can opt-in to receive Browser Notifications from SCRAM Nexus®. This will allow you to be notified when you have new TouchPoint messages, even if you do not have Nexus visible on a screen.
The next time you log into Nexus, you will be asked to “Allow”
notifications on the browser that you are logged in with. This feature works on
all modern browsers (Chrome, Firefox, and Edge to name a few). If you are not
prompted to “Allow” notifications, you can manually do this by clicking on your
user initials in the upper right corner and select “Allow Notifications”.
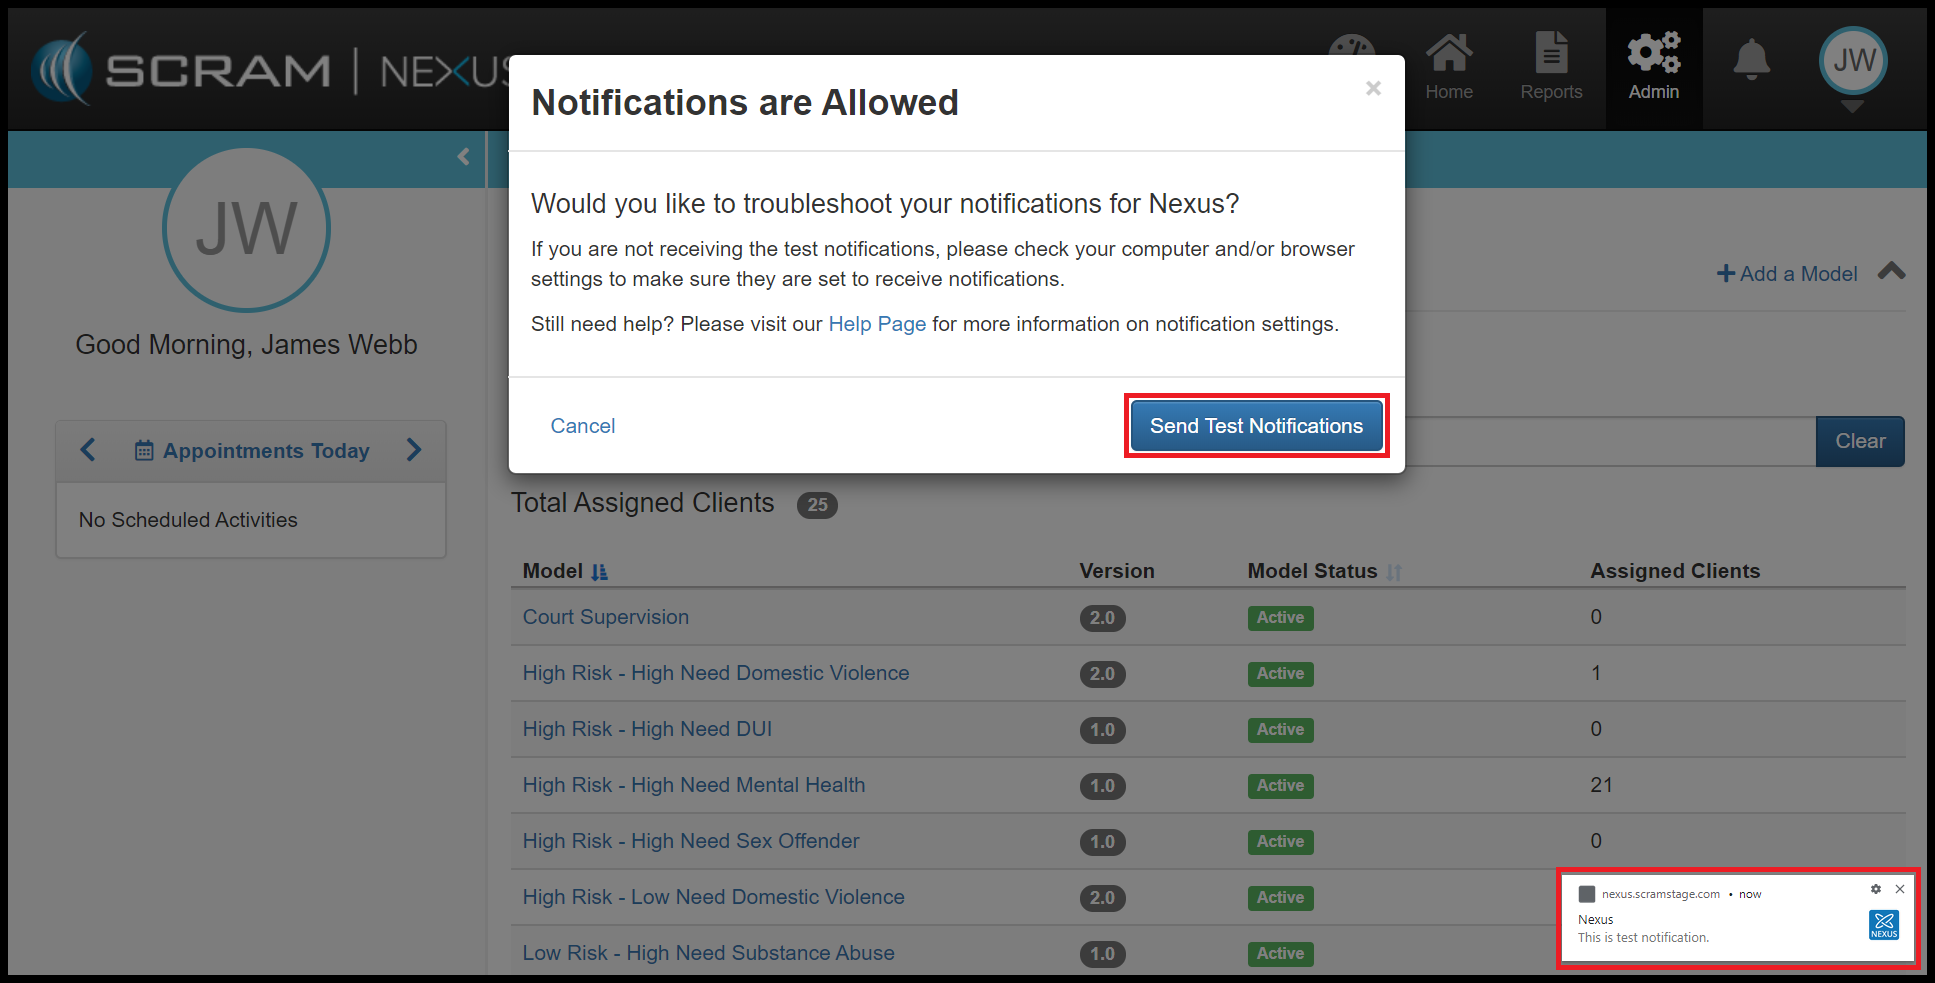
Once the notifications are enabled, you can send yourself a test message.
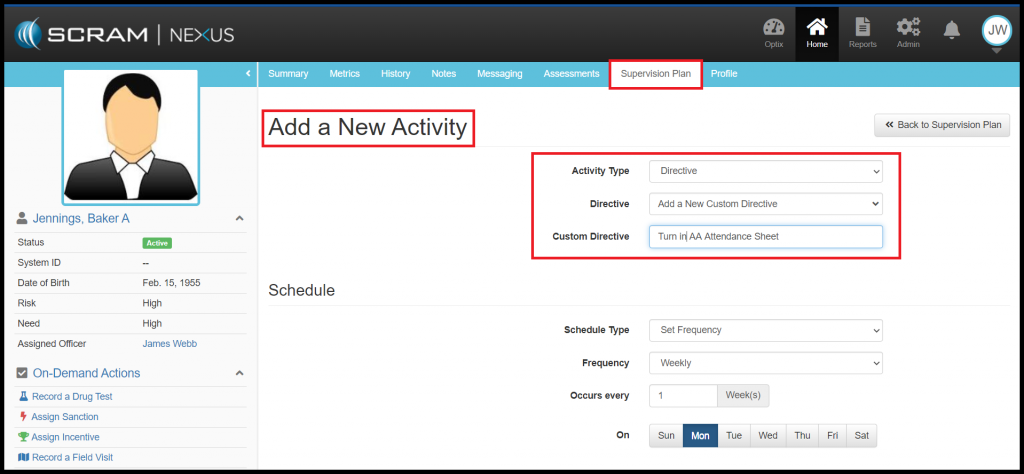
Client: Track Client Directives
As an Officer, you now can assign Client Directives. Client Directives differ from Client Tasks in that directives can be used to easily track recurring instructions. For example, “Bring in your time-sheet every 2 weeks” or “Turn in AA Attendance Sheet”. Directives have a start dates, due dates, and can track when the client successfully completed or failed to complete the directive.
Administrators of Nexus can add Directives to the Condition
Catalog and to a Model. Directives can then be assigned to a client through the
Supervision Plan. An Officer can add a Directive to a Client’s Supervision Plan
from the Activity list, or they can create a Custom Directive for the client. The
officer will need to indicate whether the directive will be a one-time or a recurring
event and enter in a date that the directive is due. Officers can also indicate
whether the directives will require a behavior response based on the outcome of
the directive. If a response is required, Nexus will automatically recommend an
incentive or sanction upon completion (or incompletion) of the Directive.
Feedback
As always, please contact SCRAM Systems Customer Service
at 1-303-785-7879 with any
recommendations for system improvements.
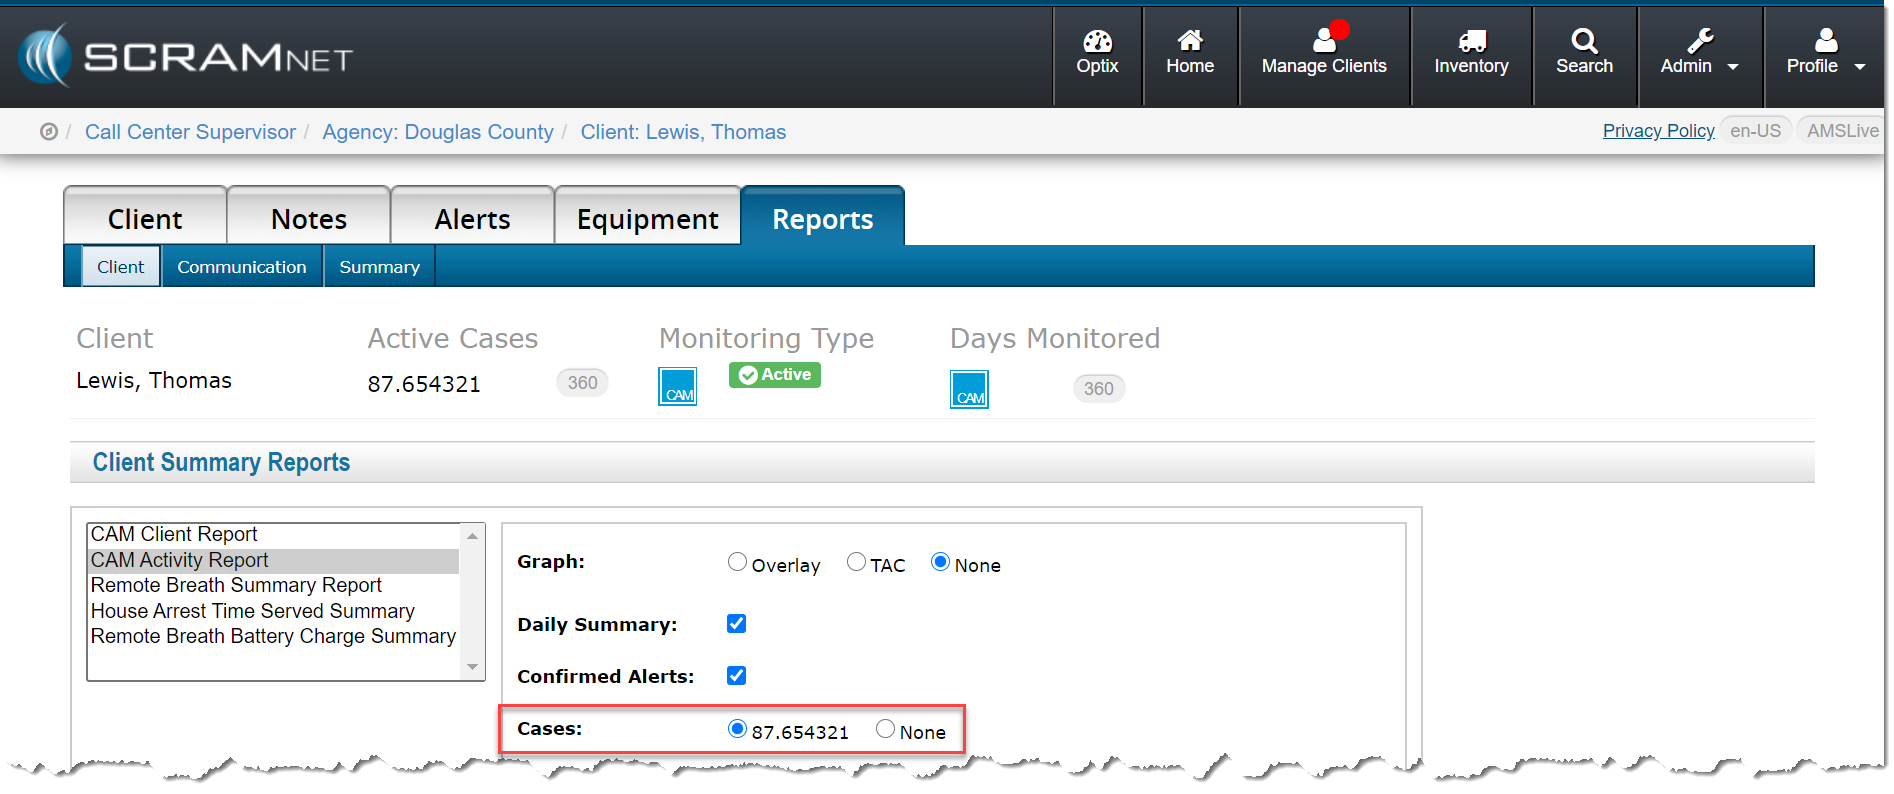
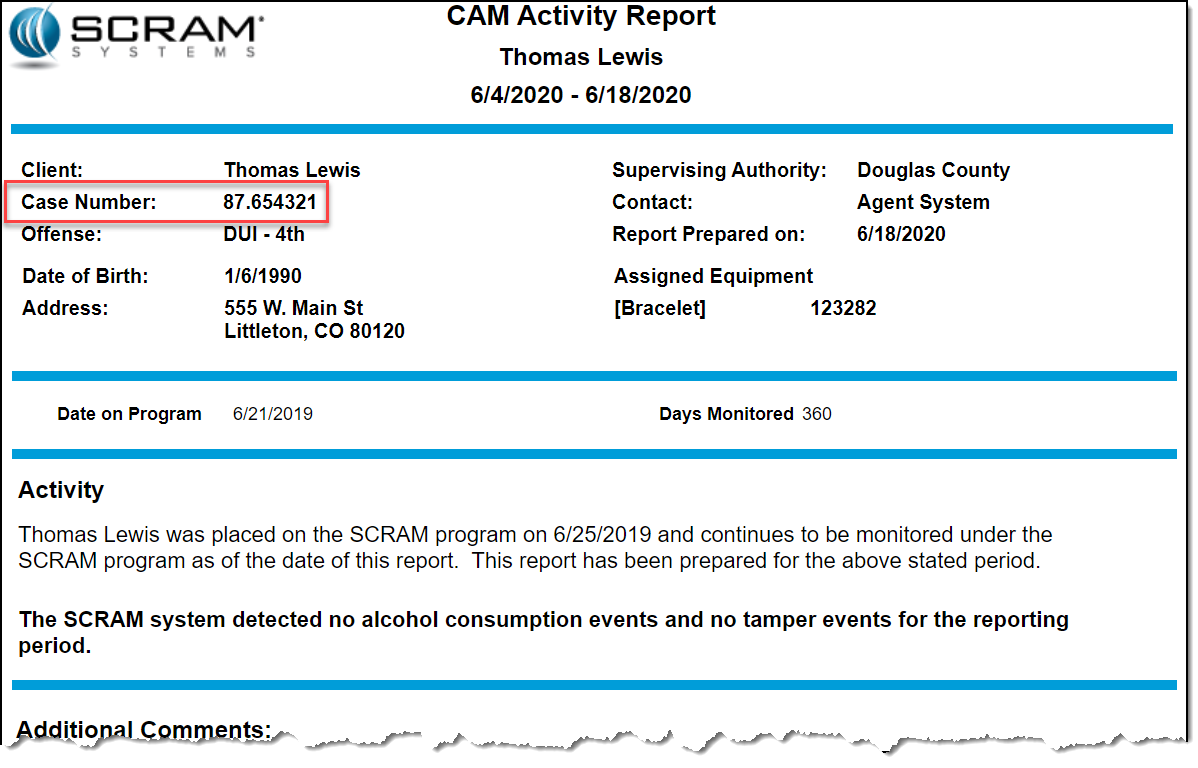
Today’s release allows you to include the case number assigned to a client when running a CAM Activity report in SCRAMNET®. To do that:
Locate the client in SCRAMNET.
Click the Reports tab.
Select the CAM Activity Report option in the left report list.
As shown below, you now have the option to select a case.
With the selection made, the case number appears in the top area when you run the report.
Effective June 18, 2020, SCRAM Systems® will implement a software enhancement that will improve your visibility of new documents shared by clients who are active for the SCRAM TouchPoint Documents service in SCRAMNET OPTIX™. Additionally, we have streamlined the client’s experience with updates to the Documents and Check-In services for the SCRAM TouchPoint™ smartphone app, which should be available in the Apple App Store and the Google Play store within the next week.
These changes will take effect once clients have updated the SCRAM TouchPoint app on their smartphones.
Update to Documents page in SCRAMNET OPTIX
With this new update, you will
now be able to identify new images shared by the client. Once a new image is
received, the name of the image will display in a bold font, and a badge to the
right of the image name will display as New. Once the image is selected
and viewed, the text will display in a normal font and the New badge
disappears.
Updates to the SCRAM TouchPoint Application
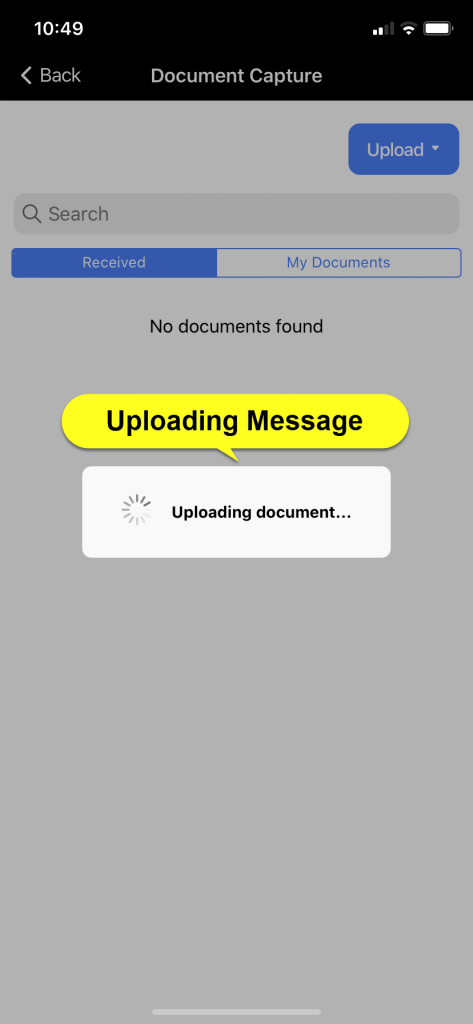
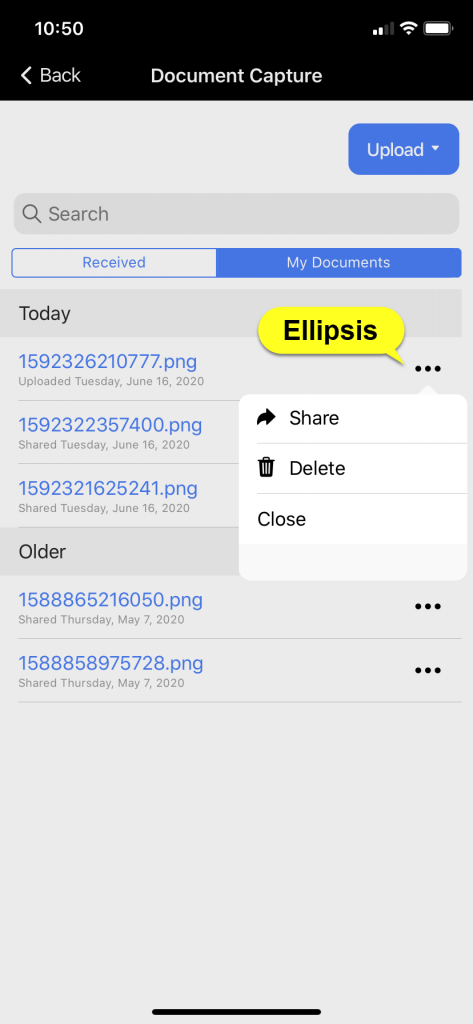
Documents Tile
With this new update, we have streamlined the client’s experience to help eliminate confusion after uploading an image to the SCRAM TouchPoint app and then locating and sharing the image. After the client has updated the app, once an image is uploaded; the screen will automatically display the My Documents tab, which will allow the client to select the ellipsis and share the document as normal.
Only iPhone images are shown for this example. For a full list of instruction on Uploading and Sharing a document for both Android and iPhone, visit the Client Instructions page on SCRAMNET OPTIX Help.
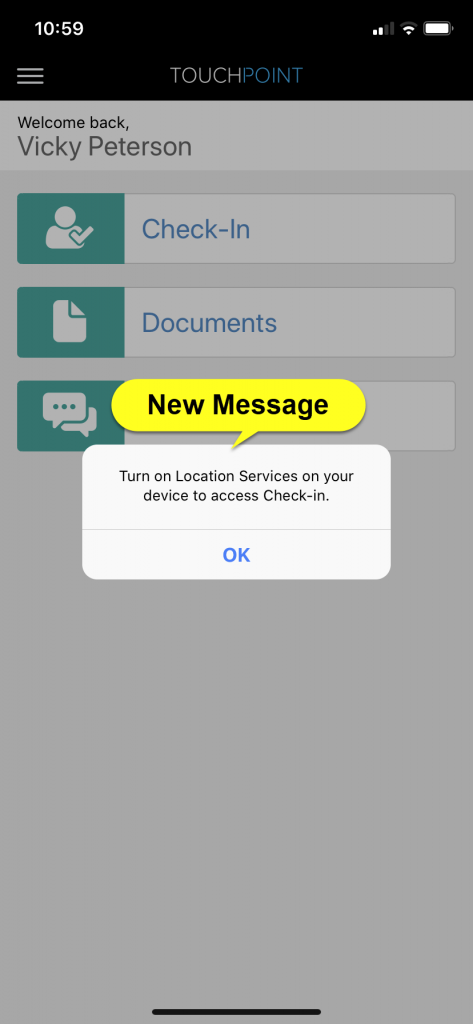
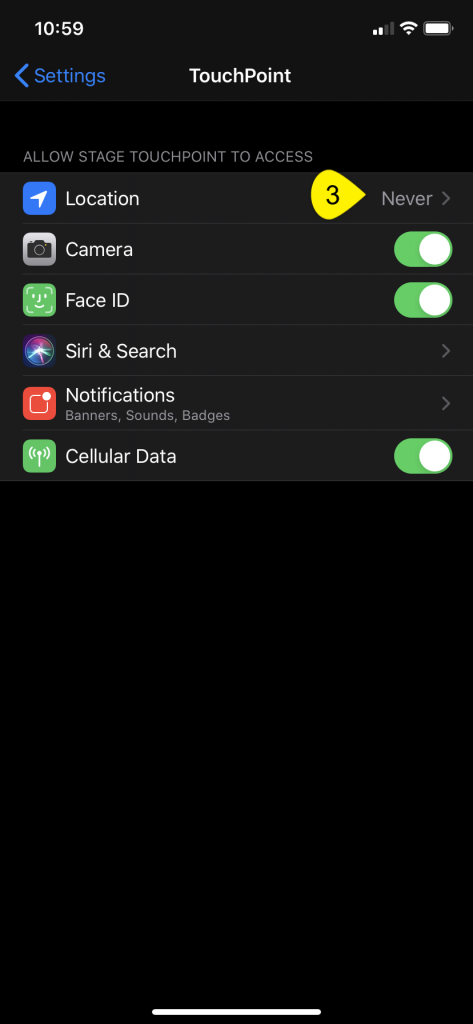
Client Check-In Location
Services
With this update, the client is now required to have Location Services turned on for the app or they will not be able to complete a check-in. If the Location Services are turned off, once the client taps the Check-In tile within the app, they will be prompted to turn on the Location Services on their smartphone.
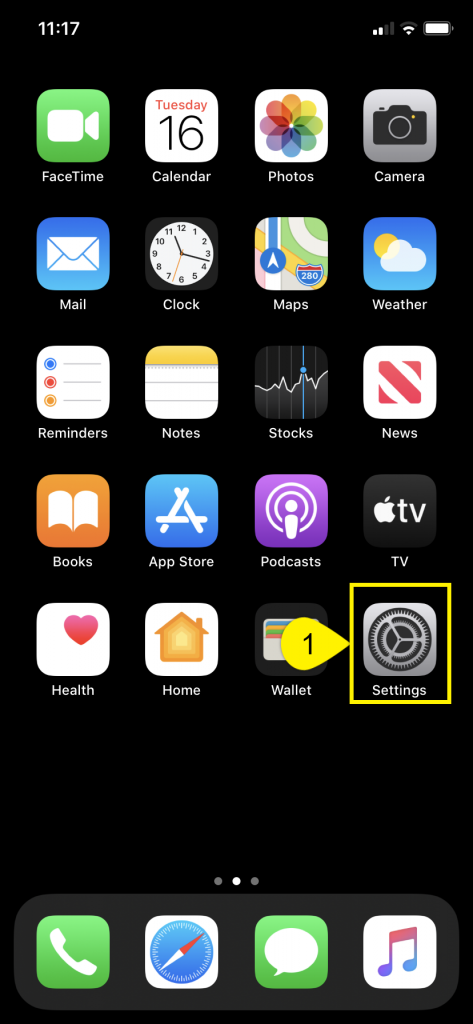
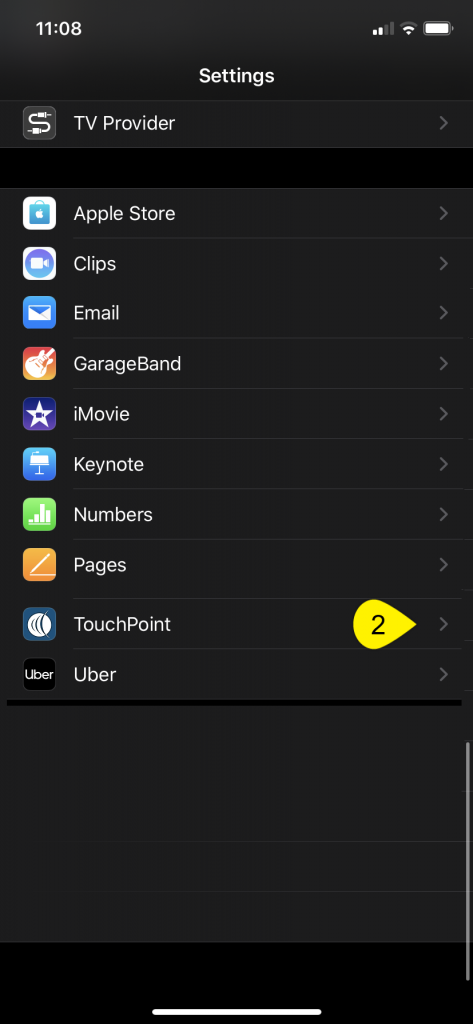
To enable the Location Services, have the client:
Select the Settings icon on their
smartphone.
Select the SCRAM TouchPoint app.
Select the Location option.
Select the option of “While Using the App”.
Once completed, the client can navigate back to the SCRAM
TouchPoint app and complete their check-in.
Only iPhone images are shown for this example. For a full list of troubleshooting steps for both Android and iPhone visit the SCRAMNET OPTIX Help page.
Feedback
As always, please contact SCRAM Systems Customer Service at 1-303-785-7879 with any recommendations for system improvements.
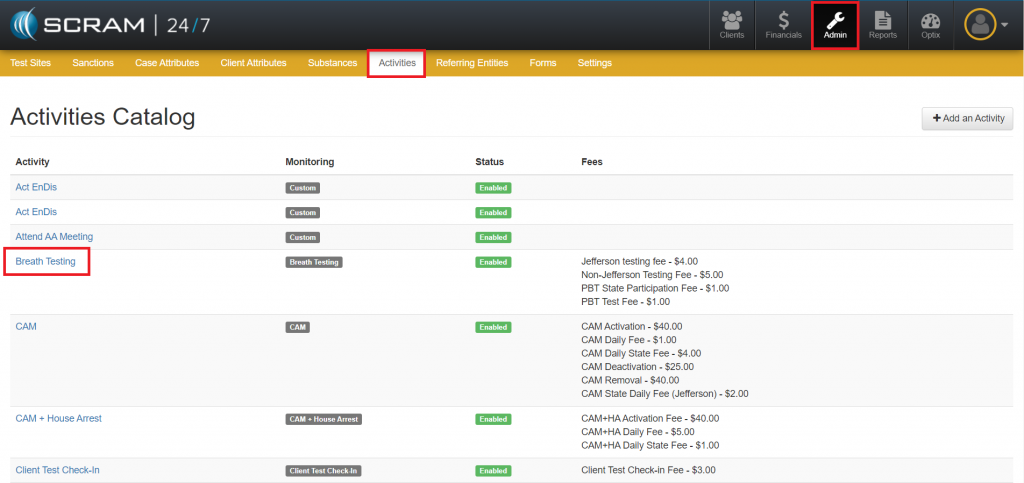
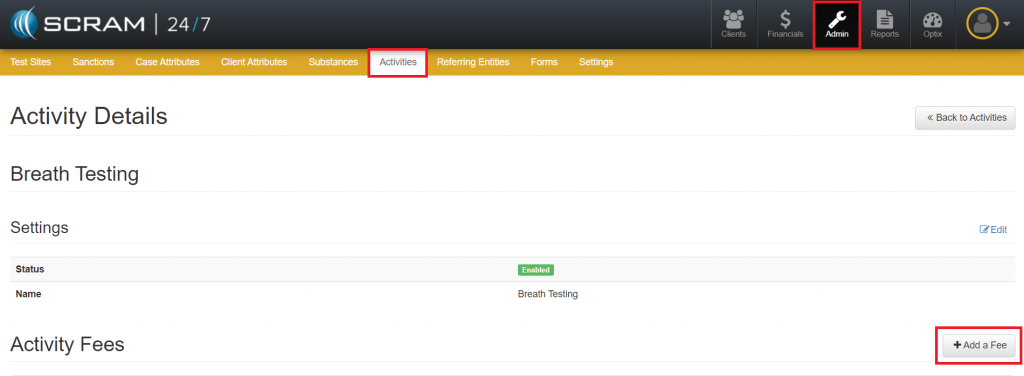
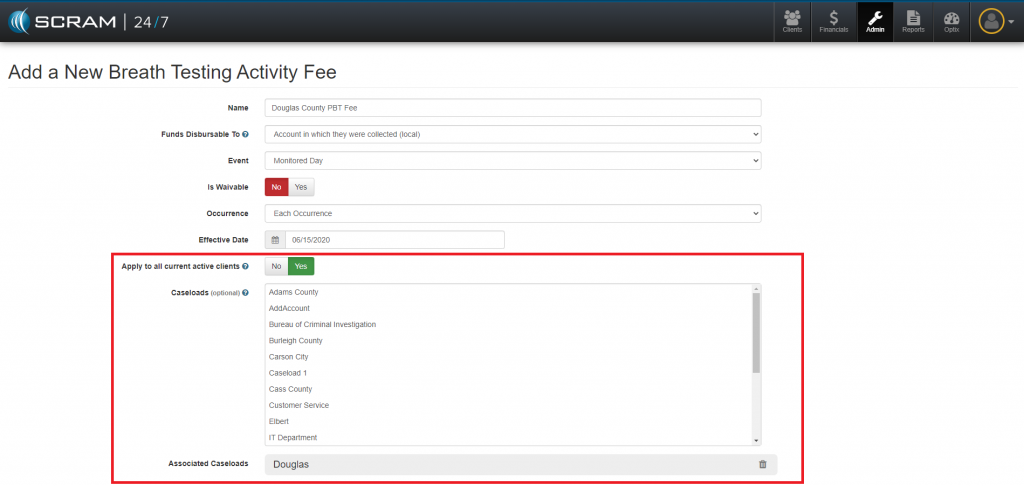
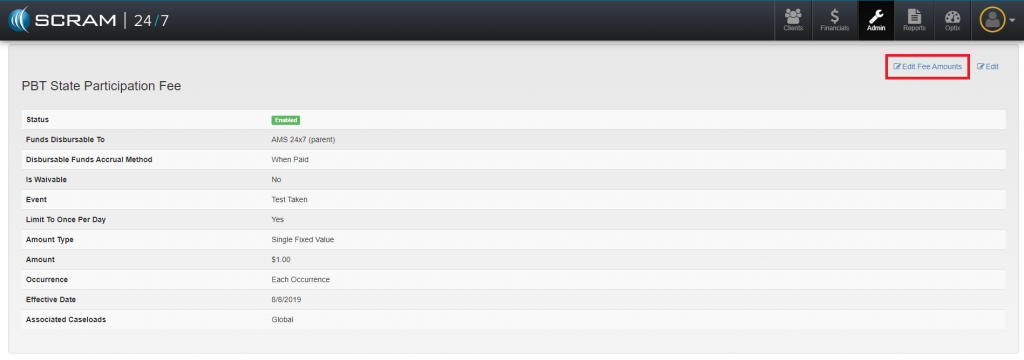
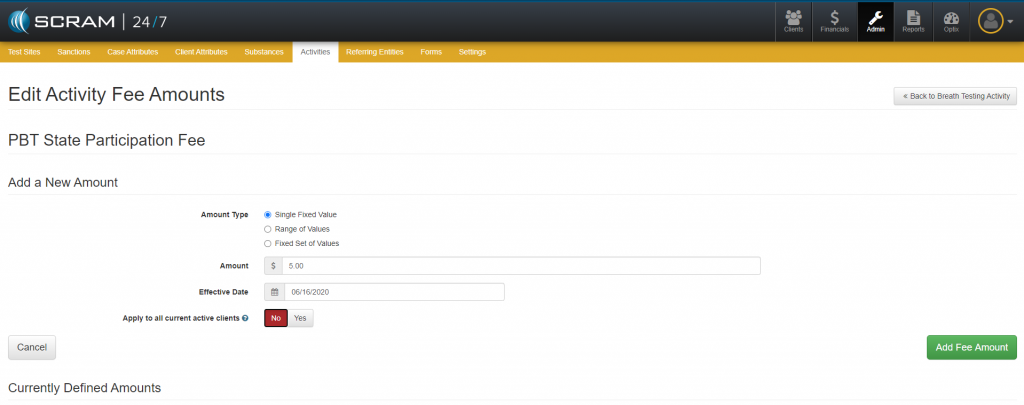
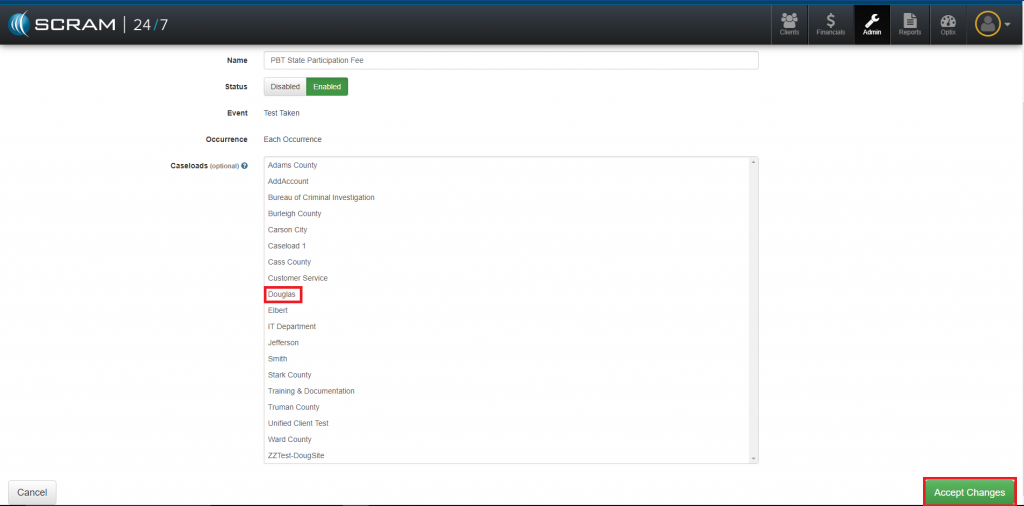
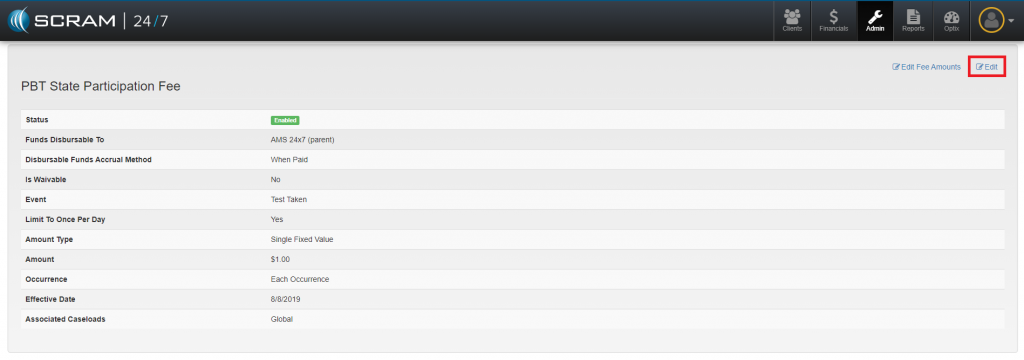
On Wednesday June 17, 2020, SCRAM Systems will be
releasing new features in SCRAM 24/7™
that include the ability to create a Caseload Specific Fees and the
option of having a new or edited fee be applied to all current clients or just
new clients.
Add a Caseload Specific Fee
Apply a New or Edited Fee to all Active Clients
Associate an Existing Fee to a Specific Caseload
Disable a Fee for an Activity and Apply to All
Active Clients
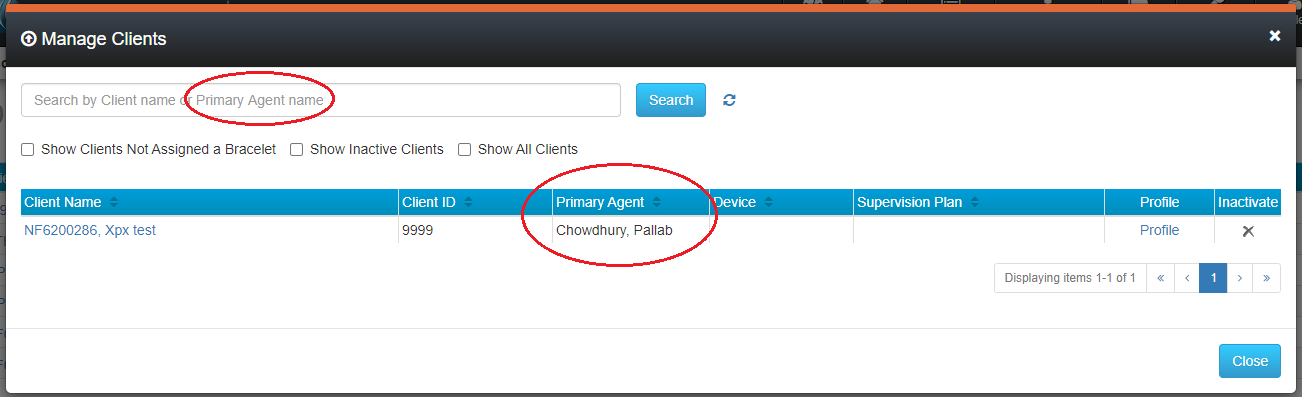
Two new features have been added to the Manage Clients pop up. To access the pop up, select the Manage->Clients top menu option. The Primary Agent assigned to a client will be listed in the Manage Clients pop up window, as shown below. Additionally, you may search clients by Primary Agent.
To search clients by Primary Agent, enter all or part of the Primary Agent’s first or last name in the search bar and click the Search button.
Move Clients Between Sub Accounts
Designated users can now move clients between sub accounts. While clients are being moved, all messages from the SCRAM GPS® bracelet continue to be processed, and the client continues to be monitored. Moving a client from one sub account to another also moves all historical data associated with that client to the new sub account. No reference to the client remains in the prior account. The following conditions apply:
Only users in the Admin role can move clients
Clients can only be moved within accounts in which the Admin user has access
Clients can only be moved within the account’s hierarchy
SCRAM Systems released enhancements for the SCRAM TouchPoint™ mobile application to the Apple App Store and the Google Play store on Monday, March 30, 2020. Corresponding enhancements were released for the SCRAMNET Optix™ platform on the same day. The enhancements are as follows:
Client Check-In Face ID and Fingerprint
Verification (in the TouchPoint app)
Client Check-In Biometric Results (Optix)
EM Reminders Read Receipt (Optix)
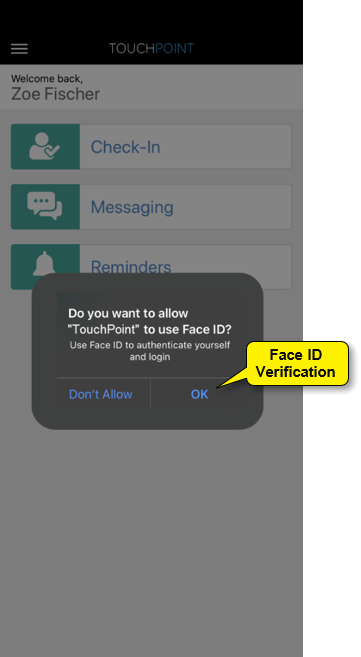
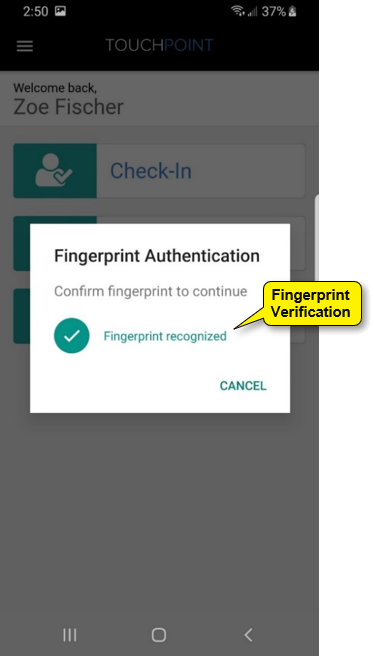
New Client Check-In Face ID and Fingerprint ID Verification
In order to begin each TouchPoint Client Check-In, clients will be required to provide a passed Face ID or Fingerprint ID, if this feature is supported by their phones (see flyer entitled SCRAM TouchPoint Supported Smartphones). The pass/failed outcome is based on the security setting for each individual’s smartphone. Clients will need to ensure the app is updated to enable this feature.
iPhone: Face ID or Fingerprint ID
Android: Fingerprint ID Only
If clients are unable to provide a passed Face ID or Fingerprint
verification after 3 to 5 attempts, they are still able to complete the
check-in by tapping the Cancel option. This will result in a Biometric
Verification Unsuccessful result.
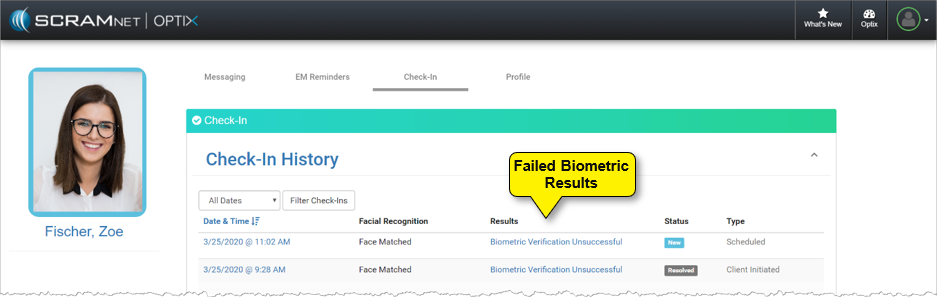
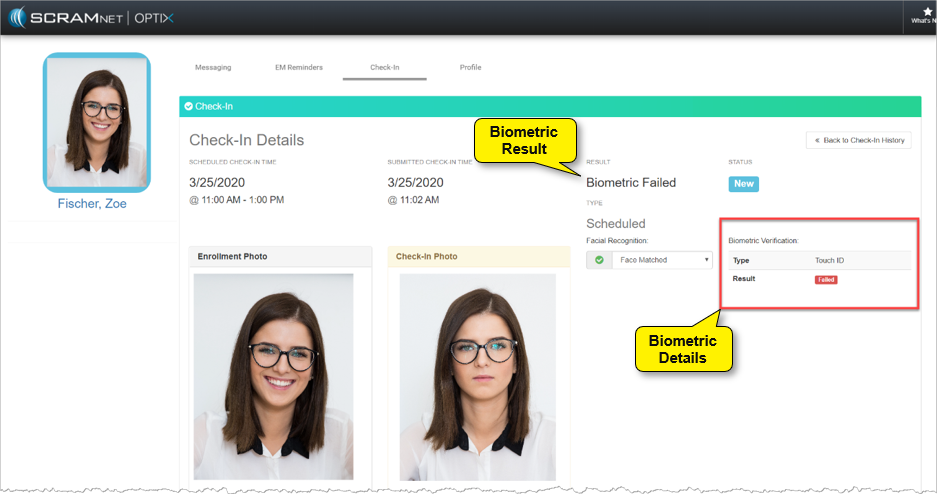
New Client Check-In Biometric Results
With the addition of Face ID and Fingerprint
authentication, you will be alerted to a failed Biometric result on the
client’s Check-In History page, as well as view the Biometric
Verification details for your client on the Check-In Details page.
Biometrics on Check-In History PageBiometrics on Check-In Details Page
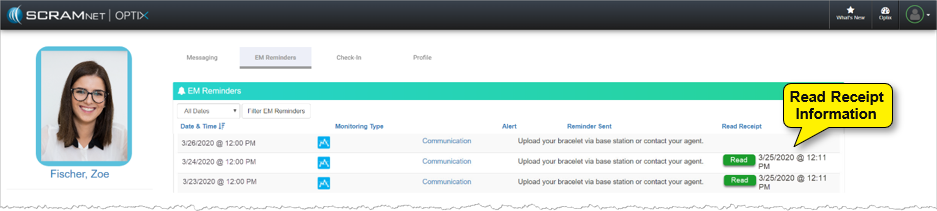
EM Reminders Read Receipt
With this new enhancement,
once a client enabled for EM Reminders opens the TouchPoint app and views the EM
Reminders notification, a Read Receipt will be visible on the EM
Reminders page for that client.
Read Receipts on EM Reminders Page
Feedback
As always, please contact SCRAM Systems Customer Services
at 1-303-785-7879 with any recommendations for system
improvements.