On January 29, 2025, SCRAM Systems will release an enhancement for your clients participating in a Remote Breath Activity. For current or new clients within your SCRAM 24/7 program, you may enable Remote Breath Courtesy Reminders, as well as enable notifications to be sent to third-party recipients.
If you don’t see the enhancement in SCRAM 24/7, please clear your cache and cookies and refresh your browser window.
New Client Setup
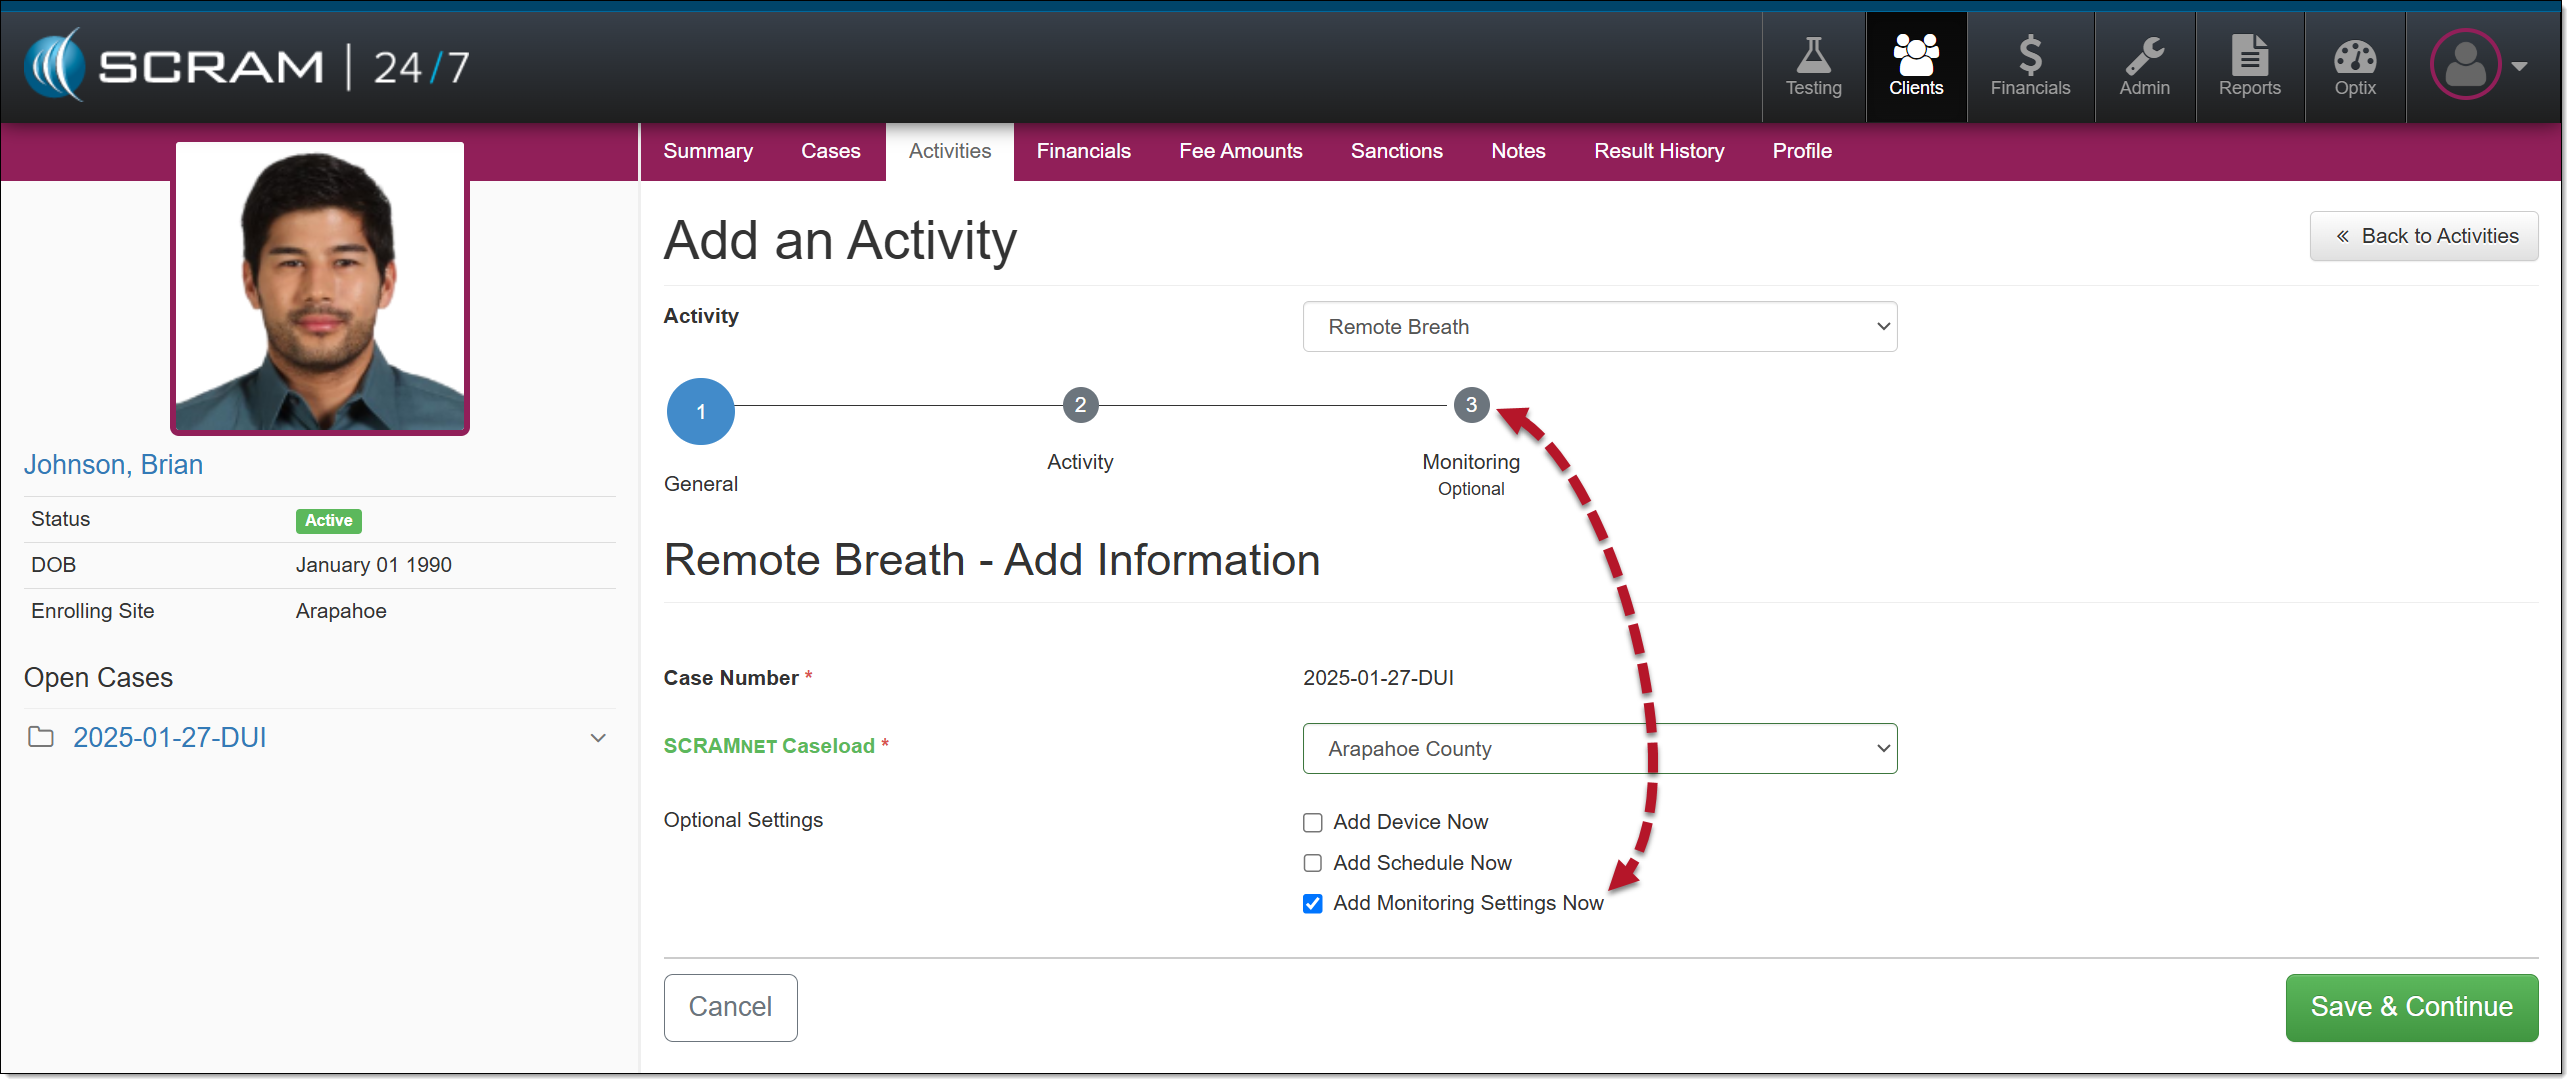
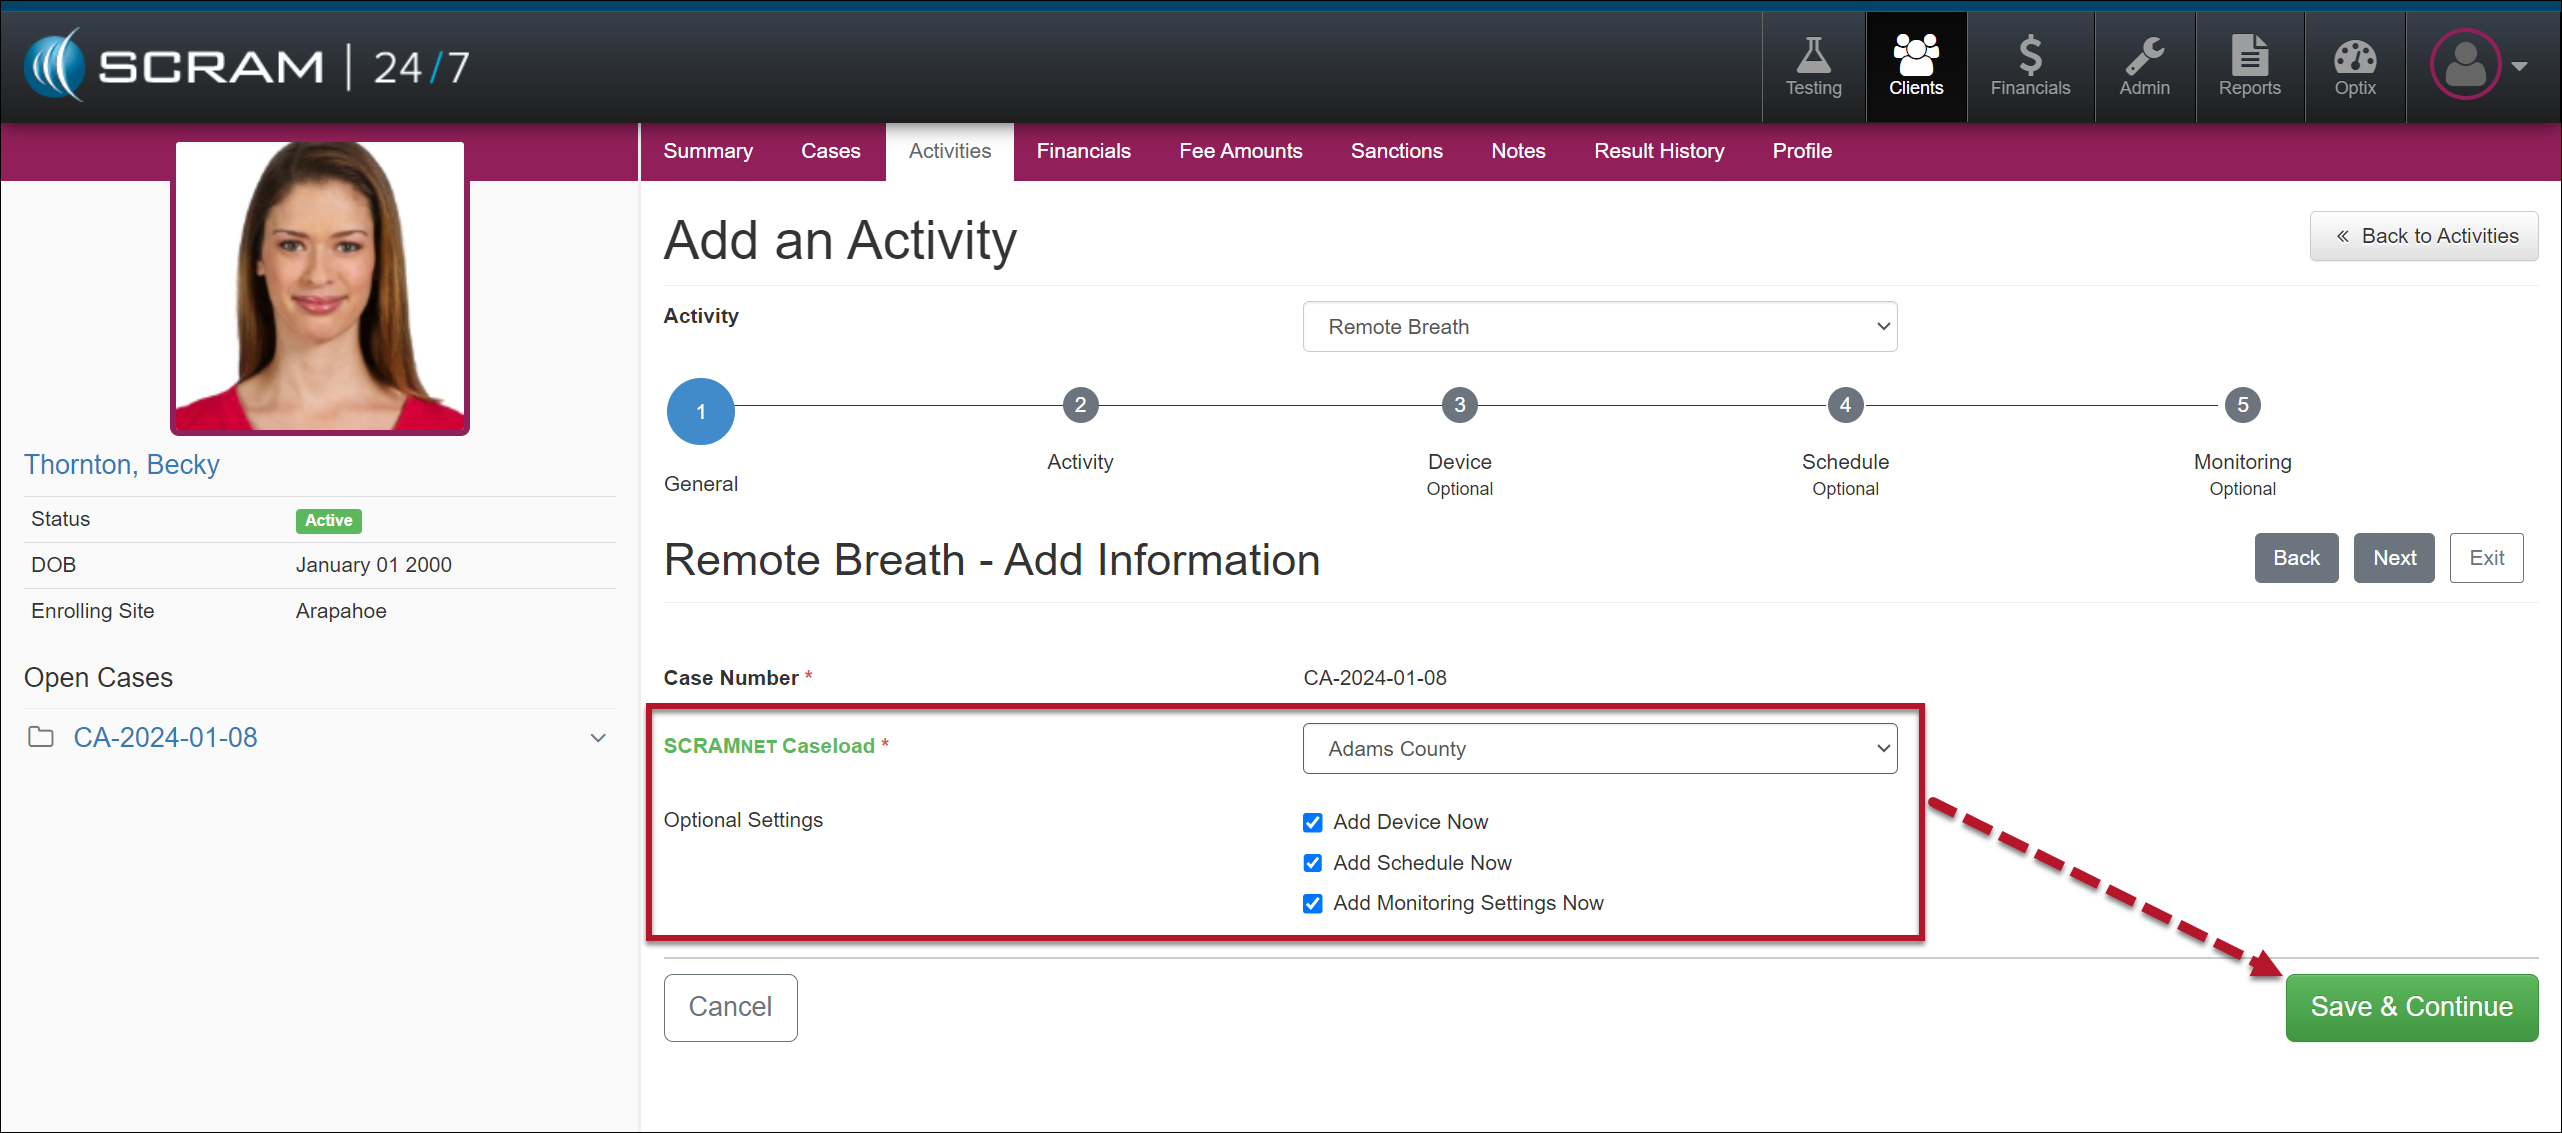
When adding a new Remote Breath Activity to your client:
To enable the monitoring settings for the client, select the checkbox next to the Add Monitoring Settings Now option and then the Save and Continue button.
Add A Remote Breath Activity
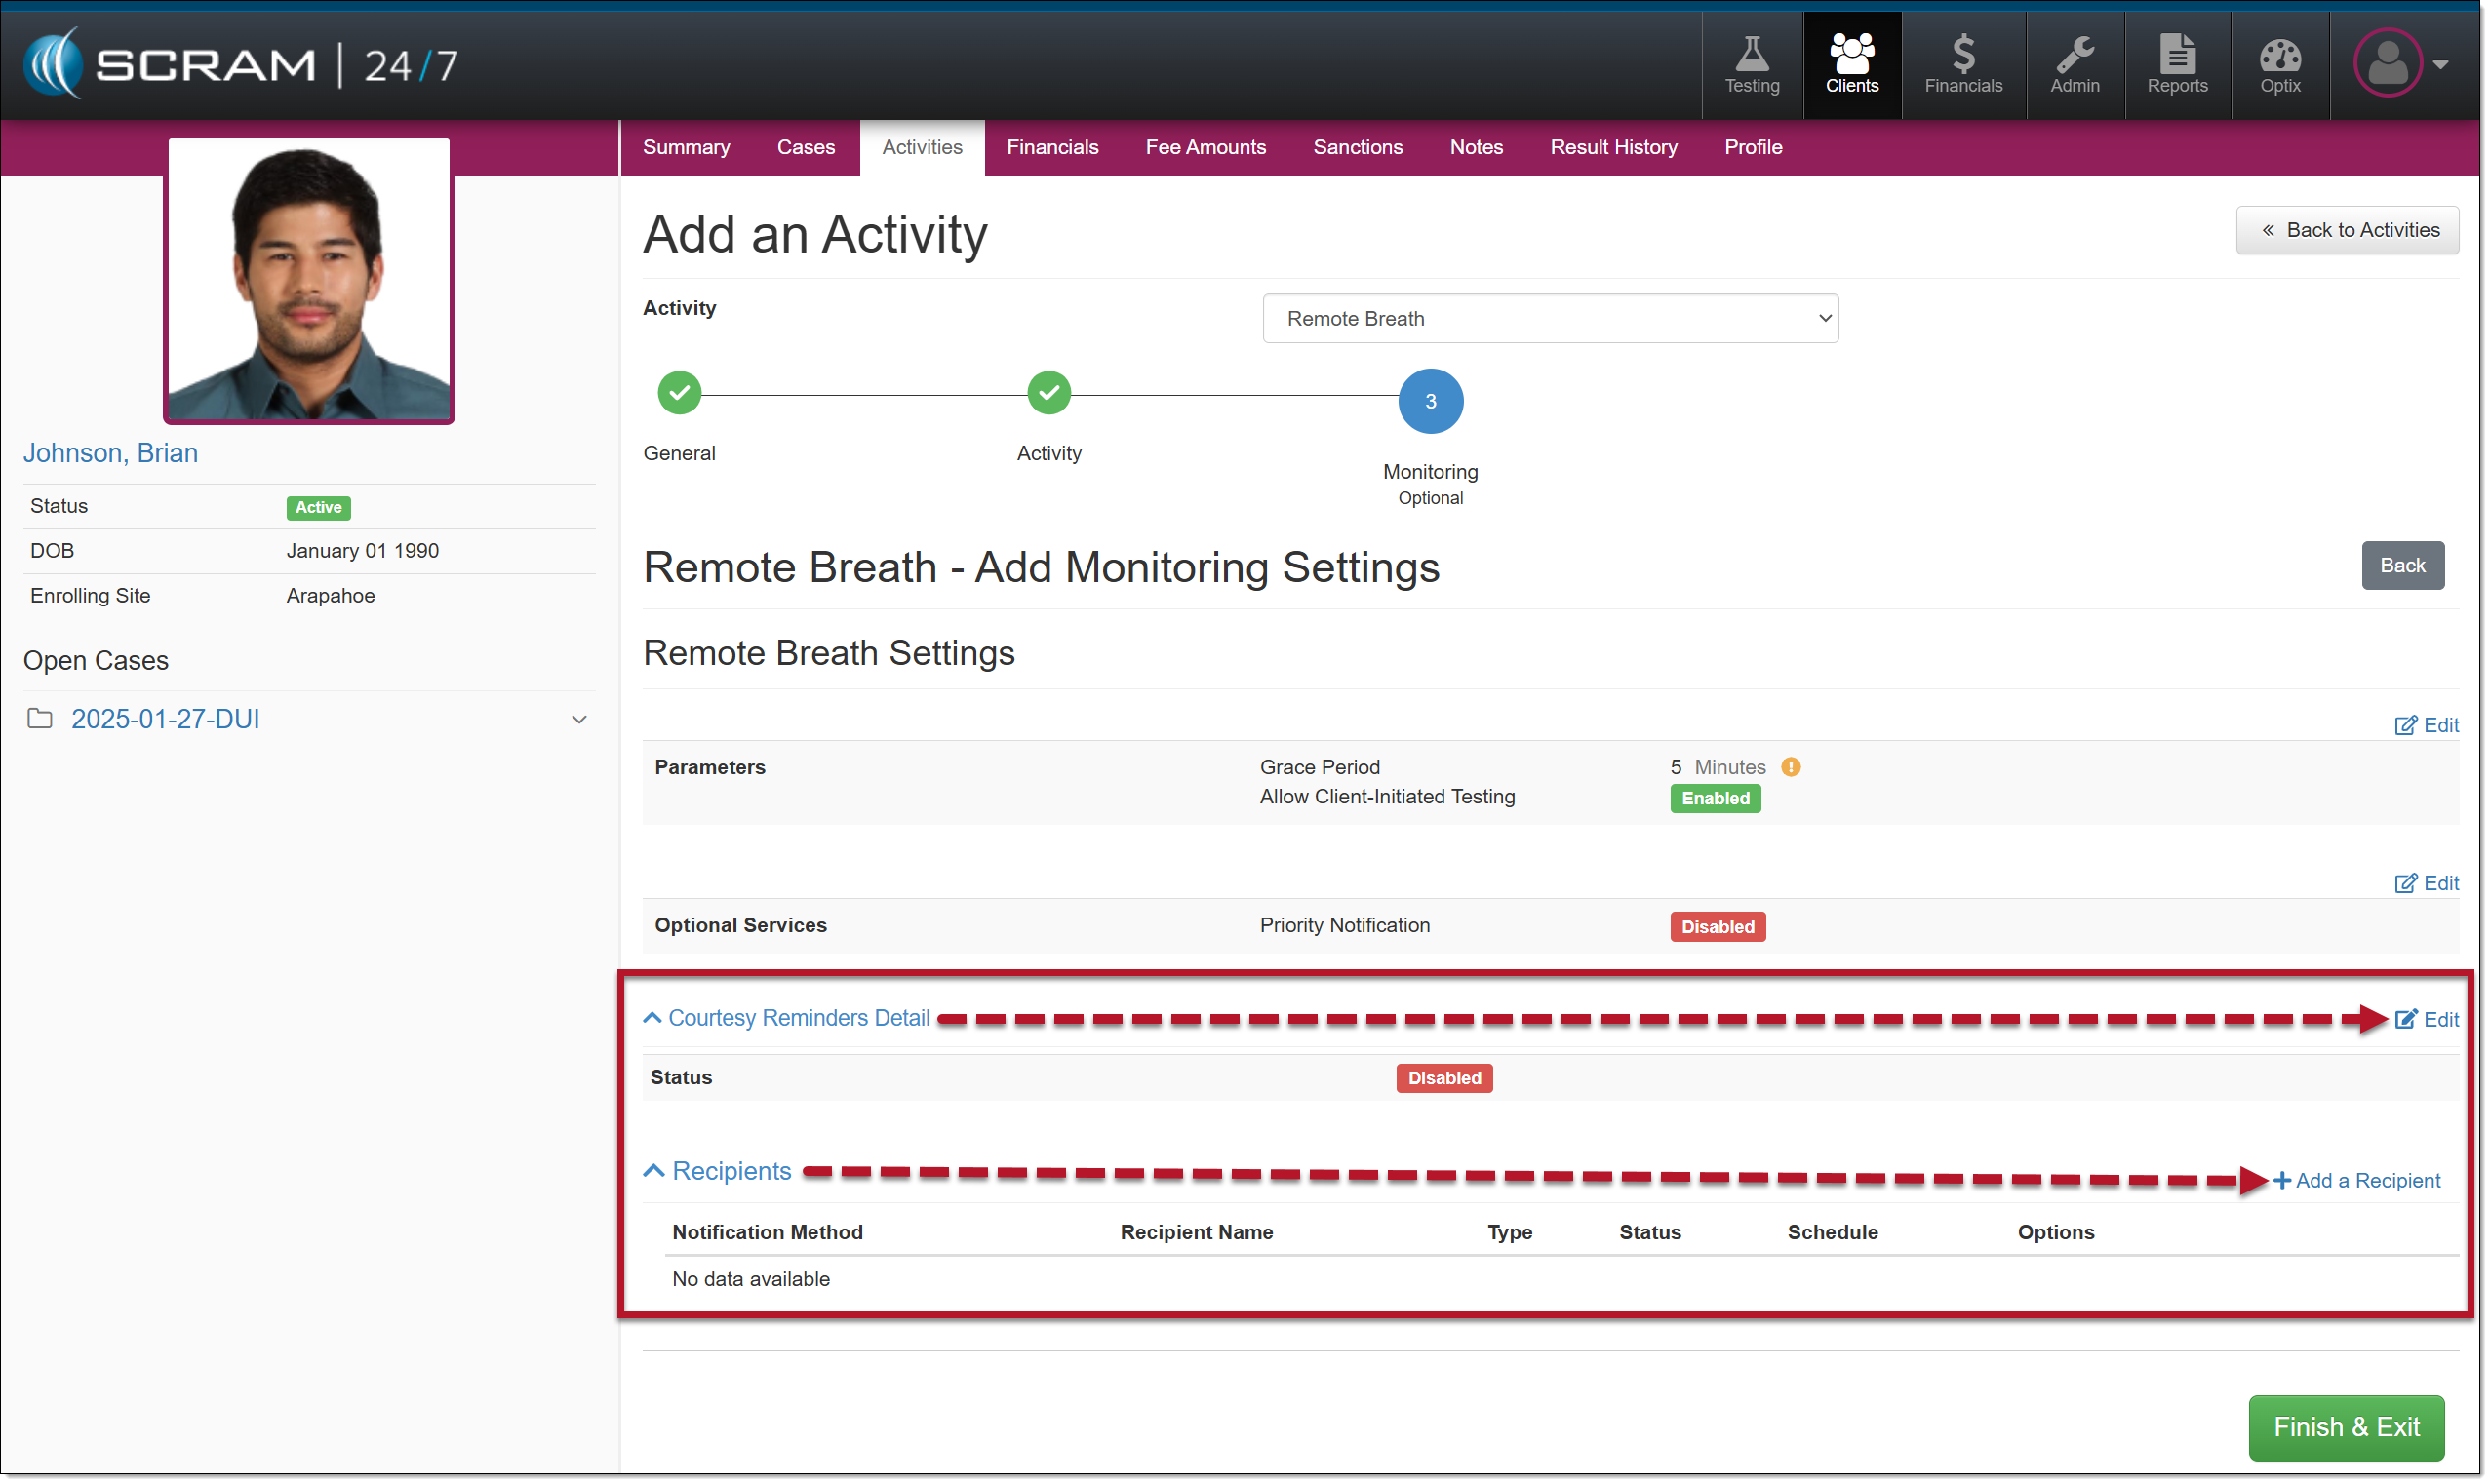
On the Monitoring step, you will enable and enter the details for client Courtesy Reminders and third-party Recipients.
Remote Breath Activity Monitoring Settings Step
Courtesy Reminders
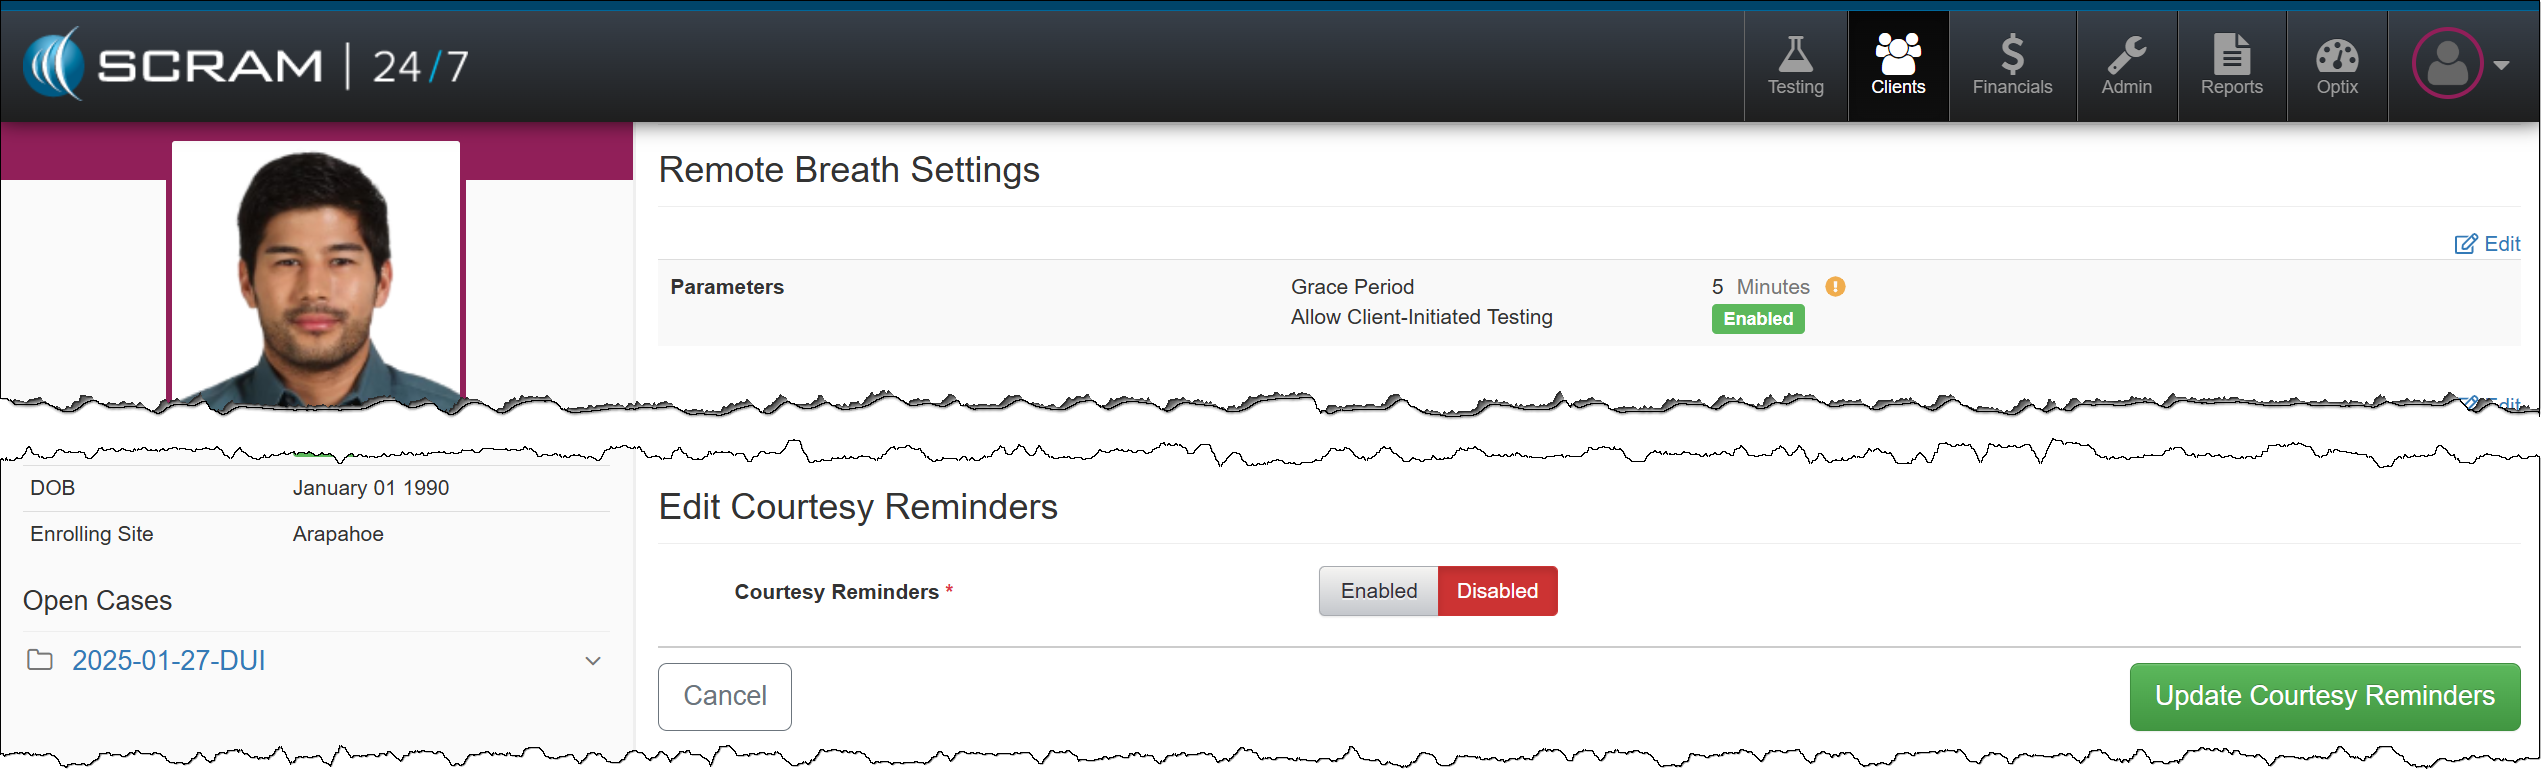
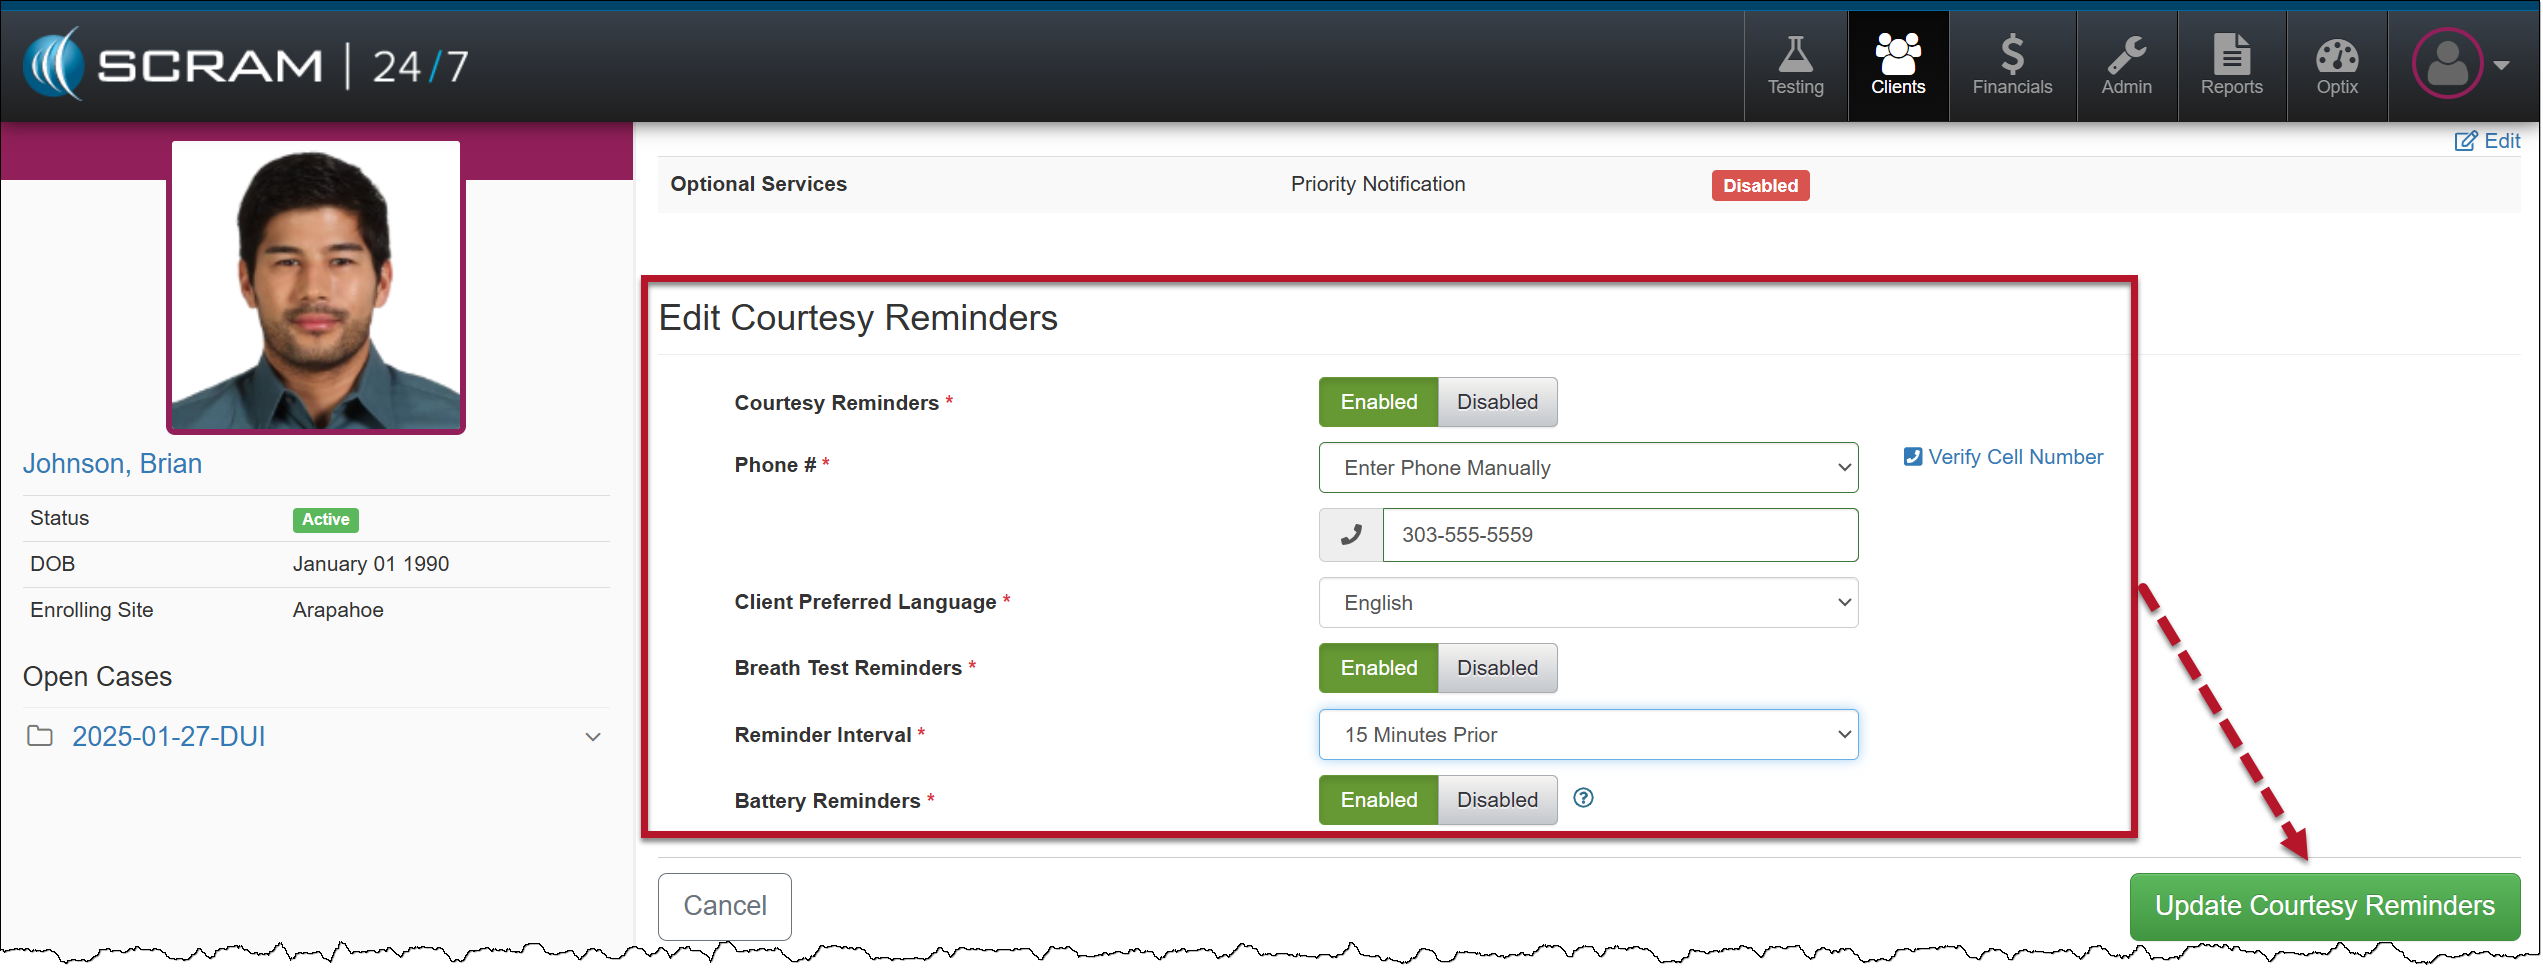
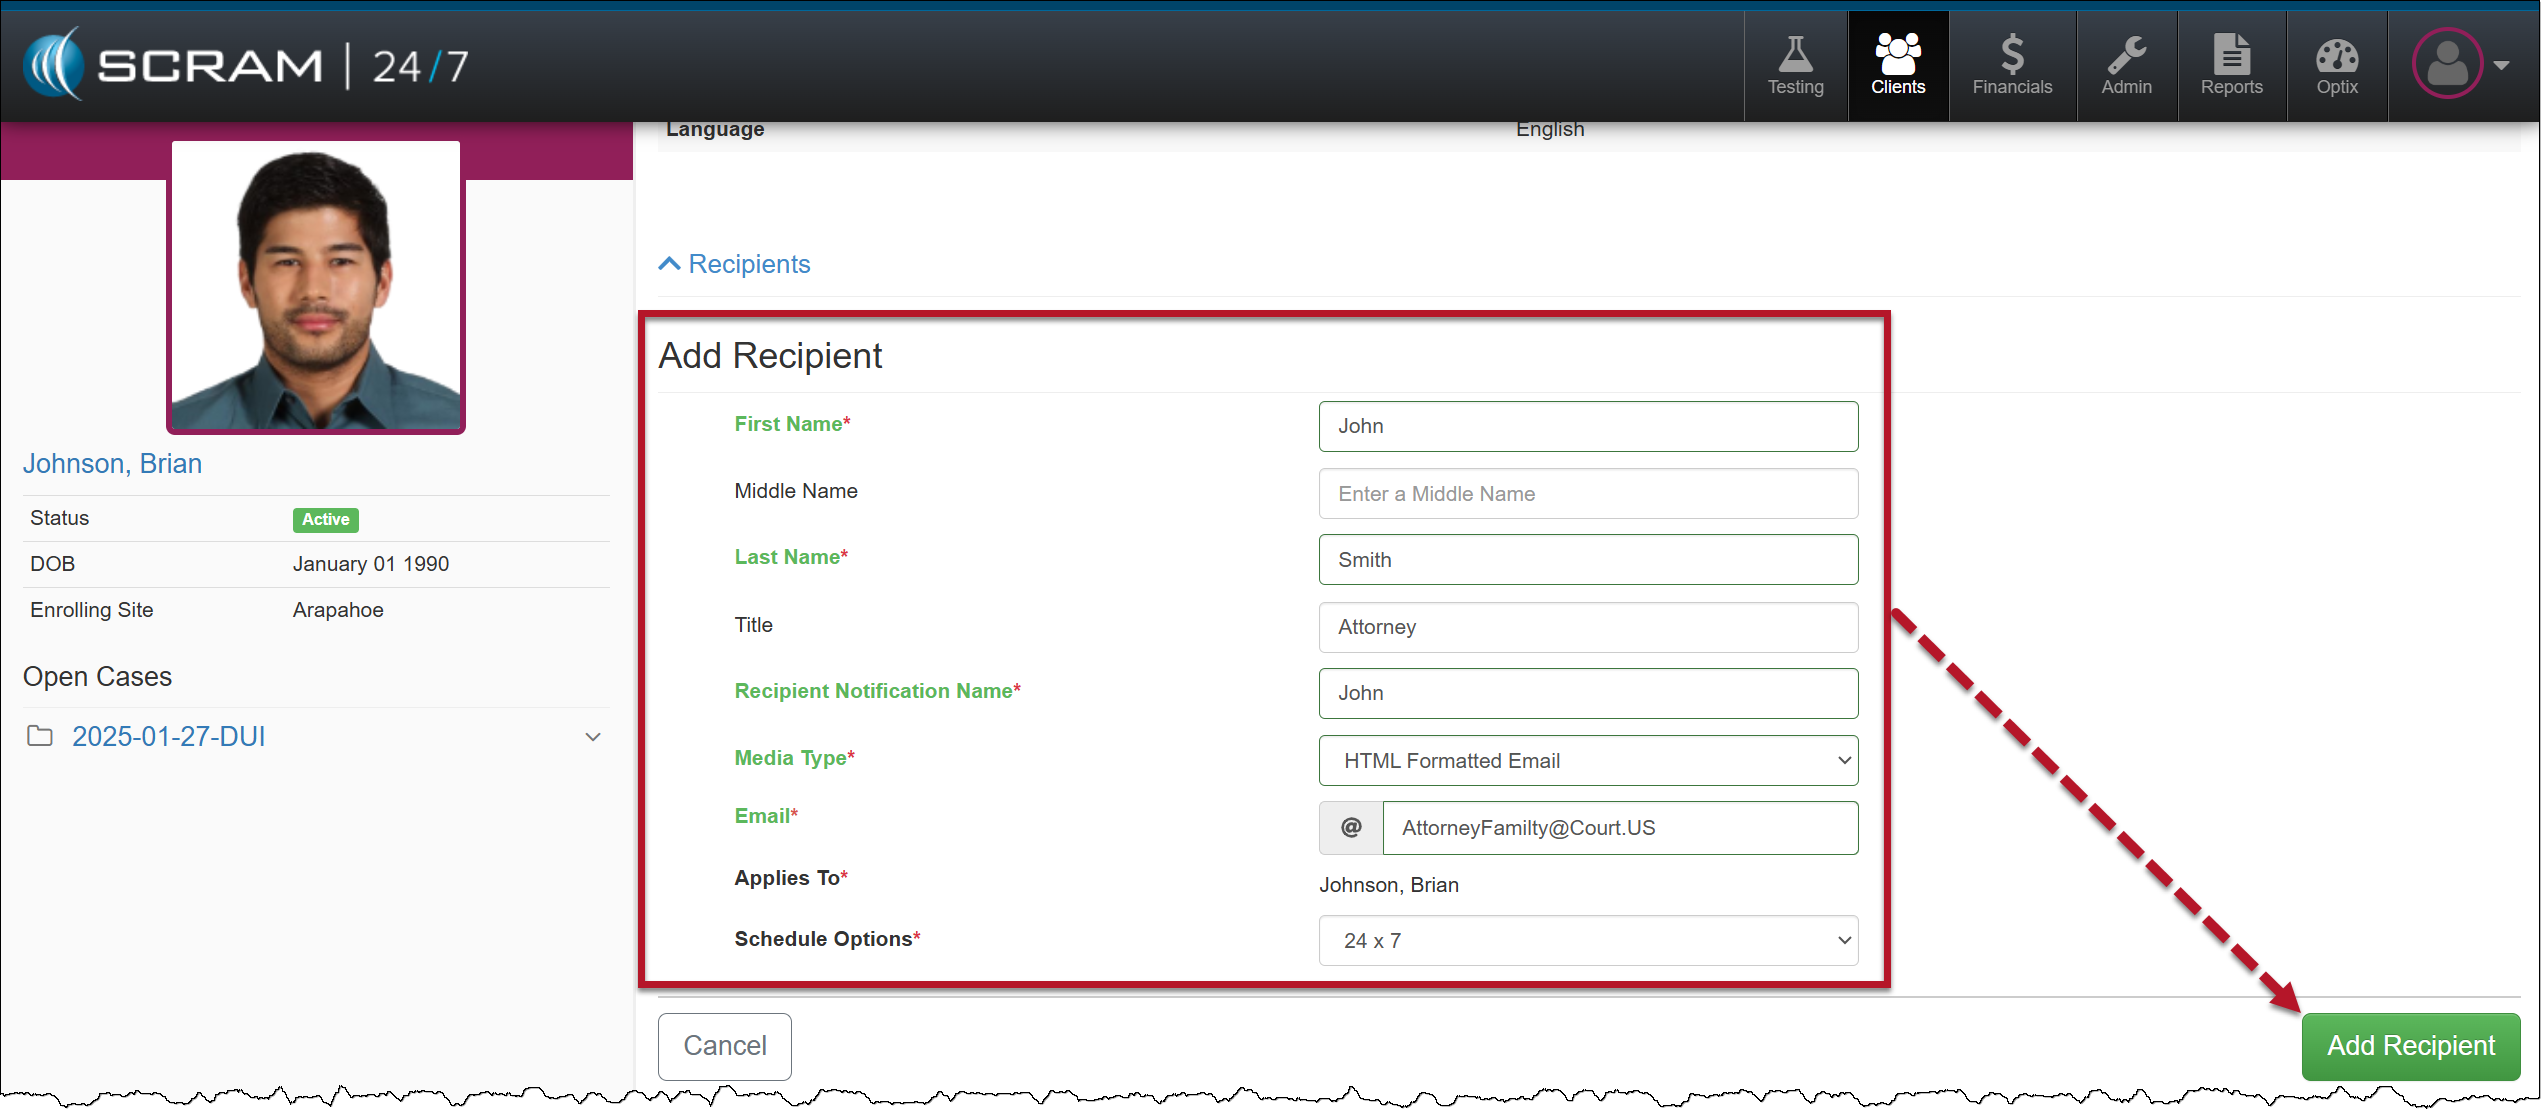
Enable Courtesy Reminders for the ClientClient’s Courtesy Reminders Details
Tip: Third-party Recipient notifications are for non-SCRAM users only. To ensure other Officers and Agents in your Program receive appropriate alerts, enable and use “Priority Notifications” instead.
Enable/Edit Active Remote Breath Activity
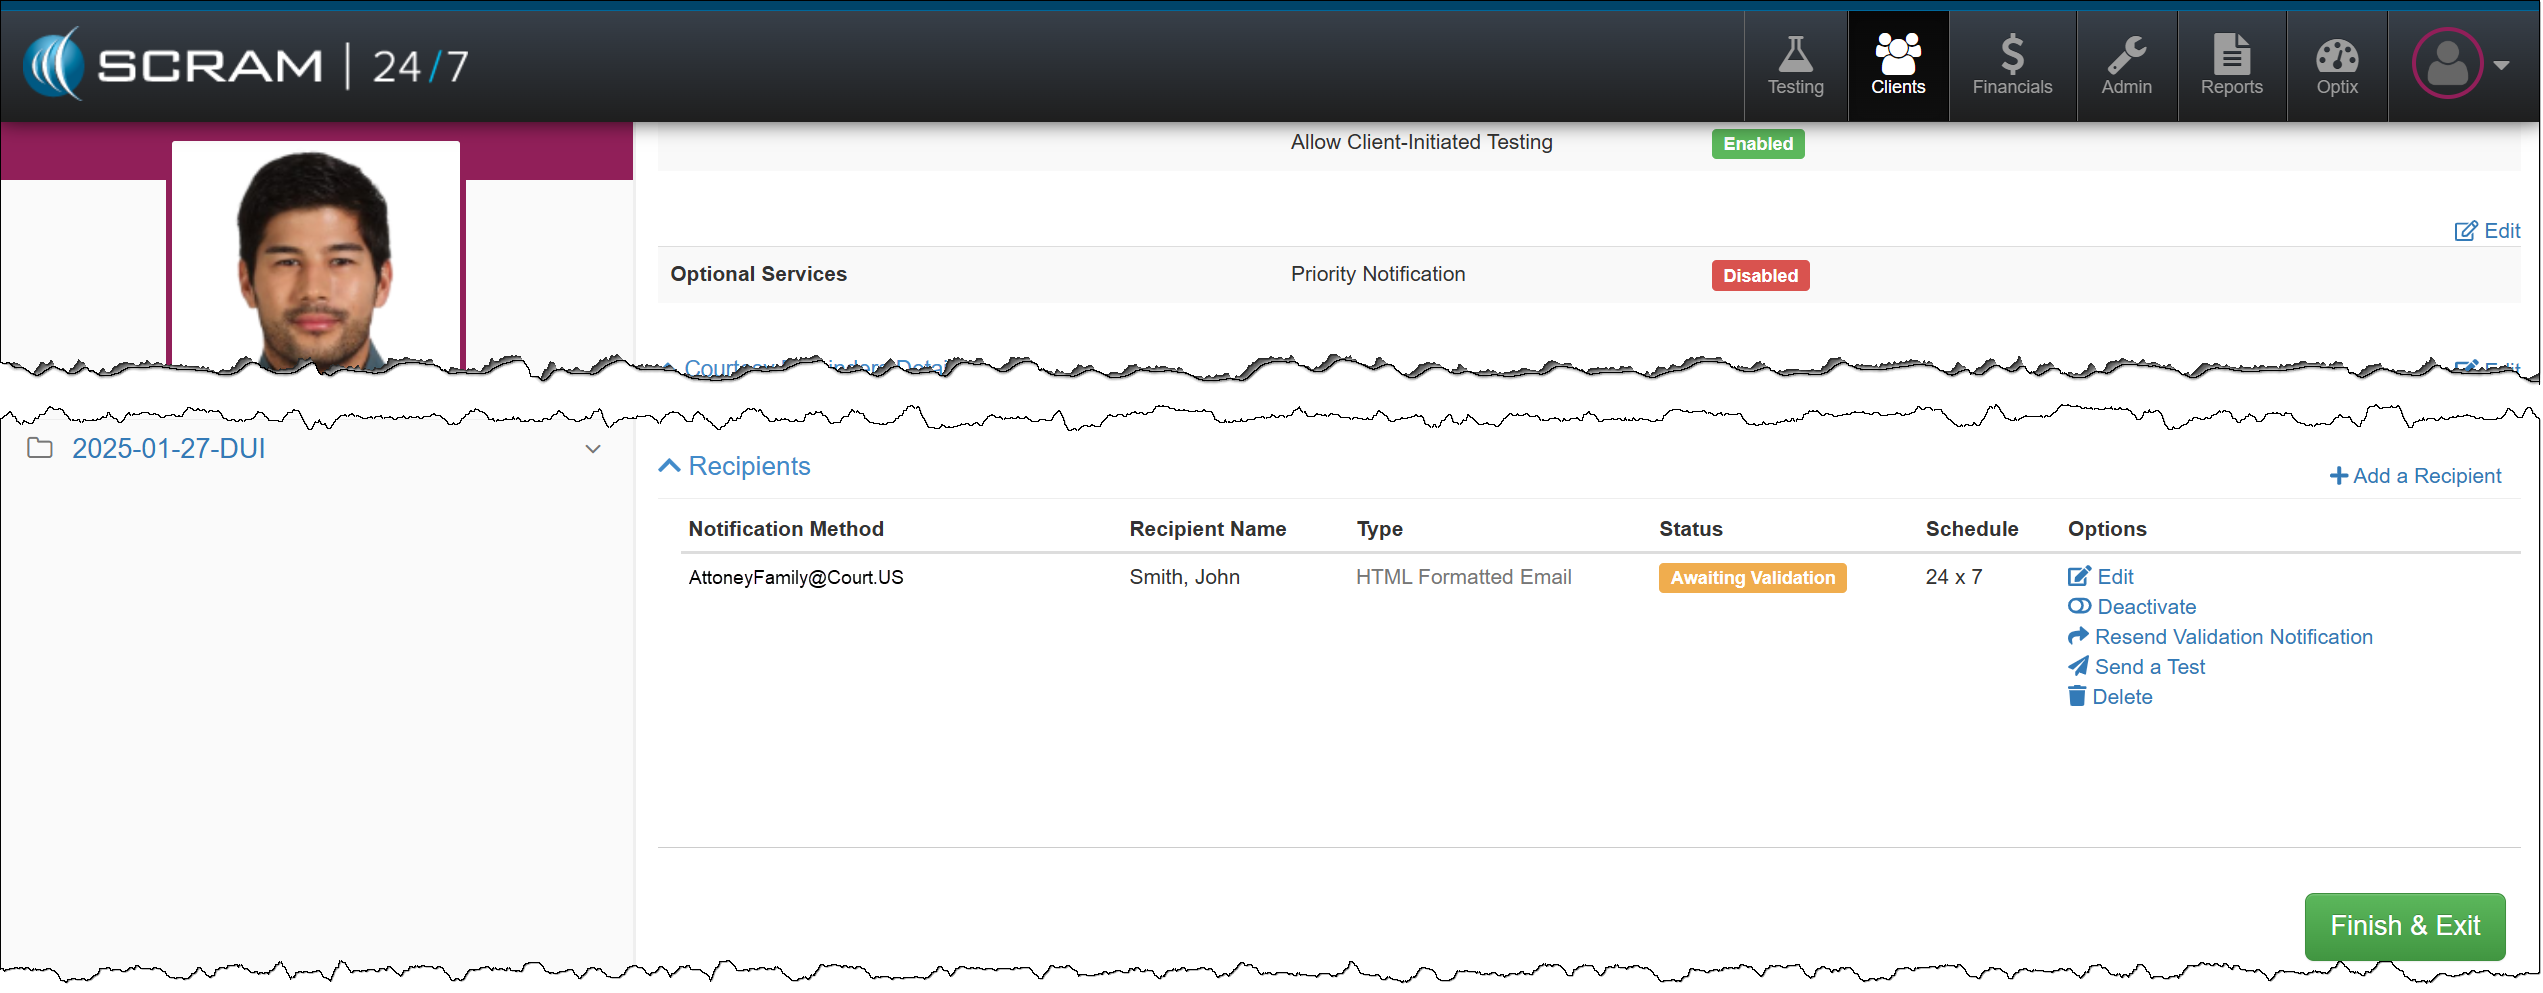
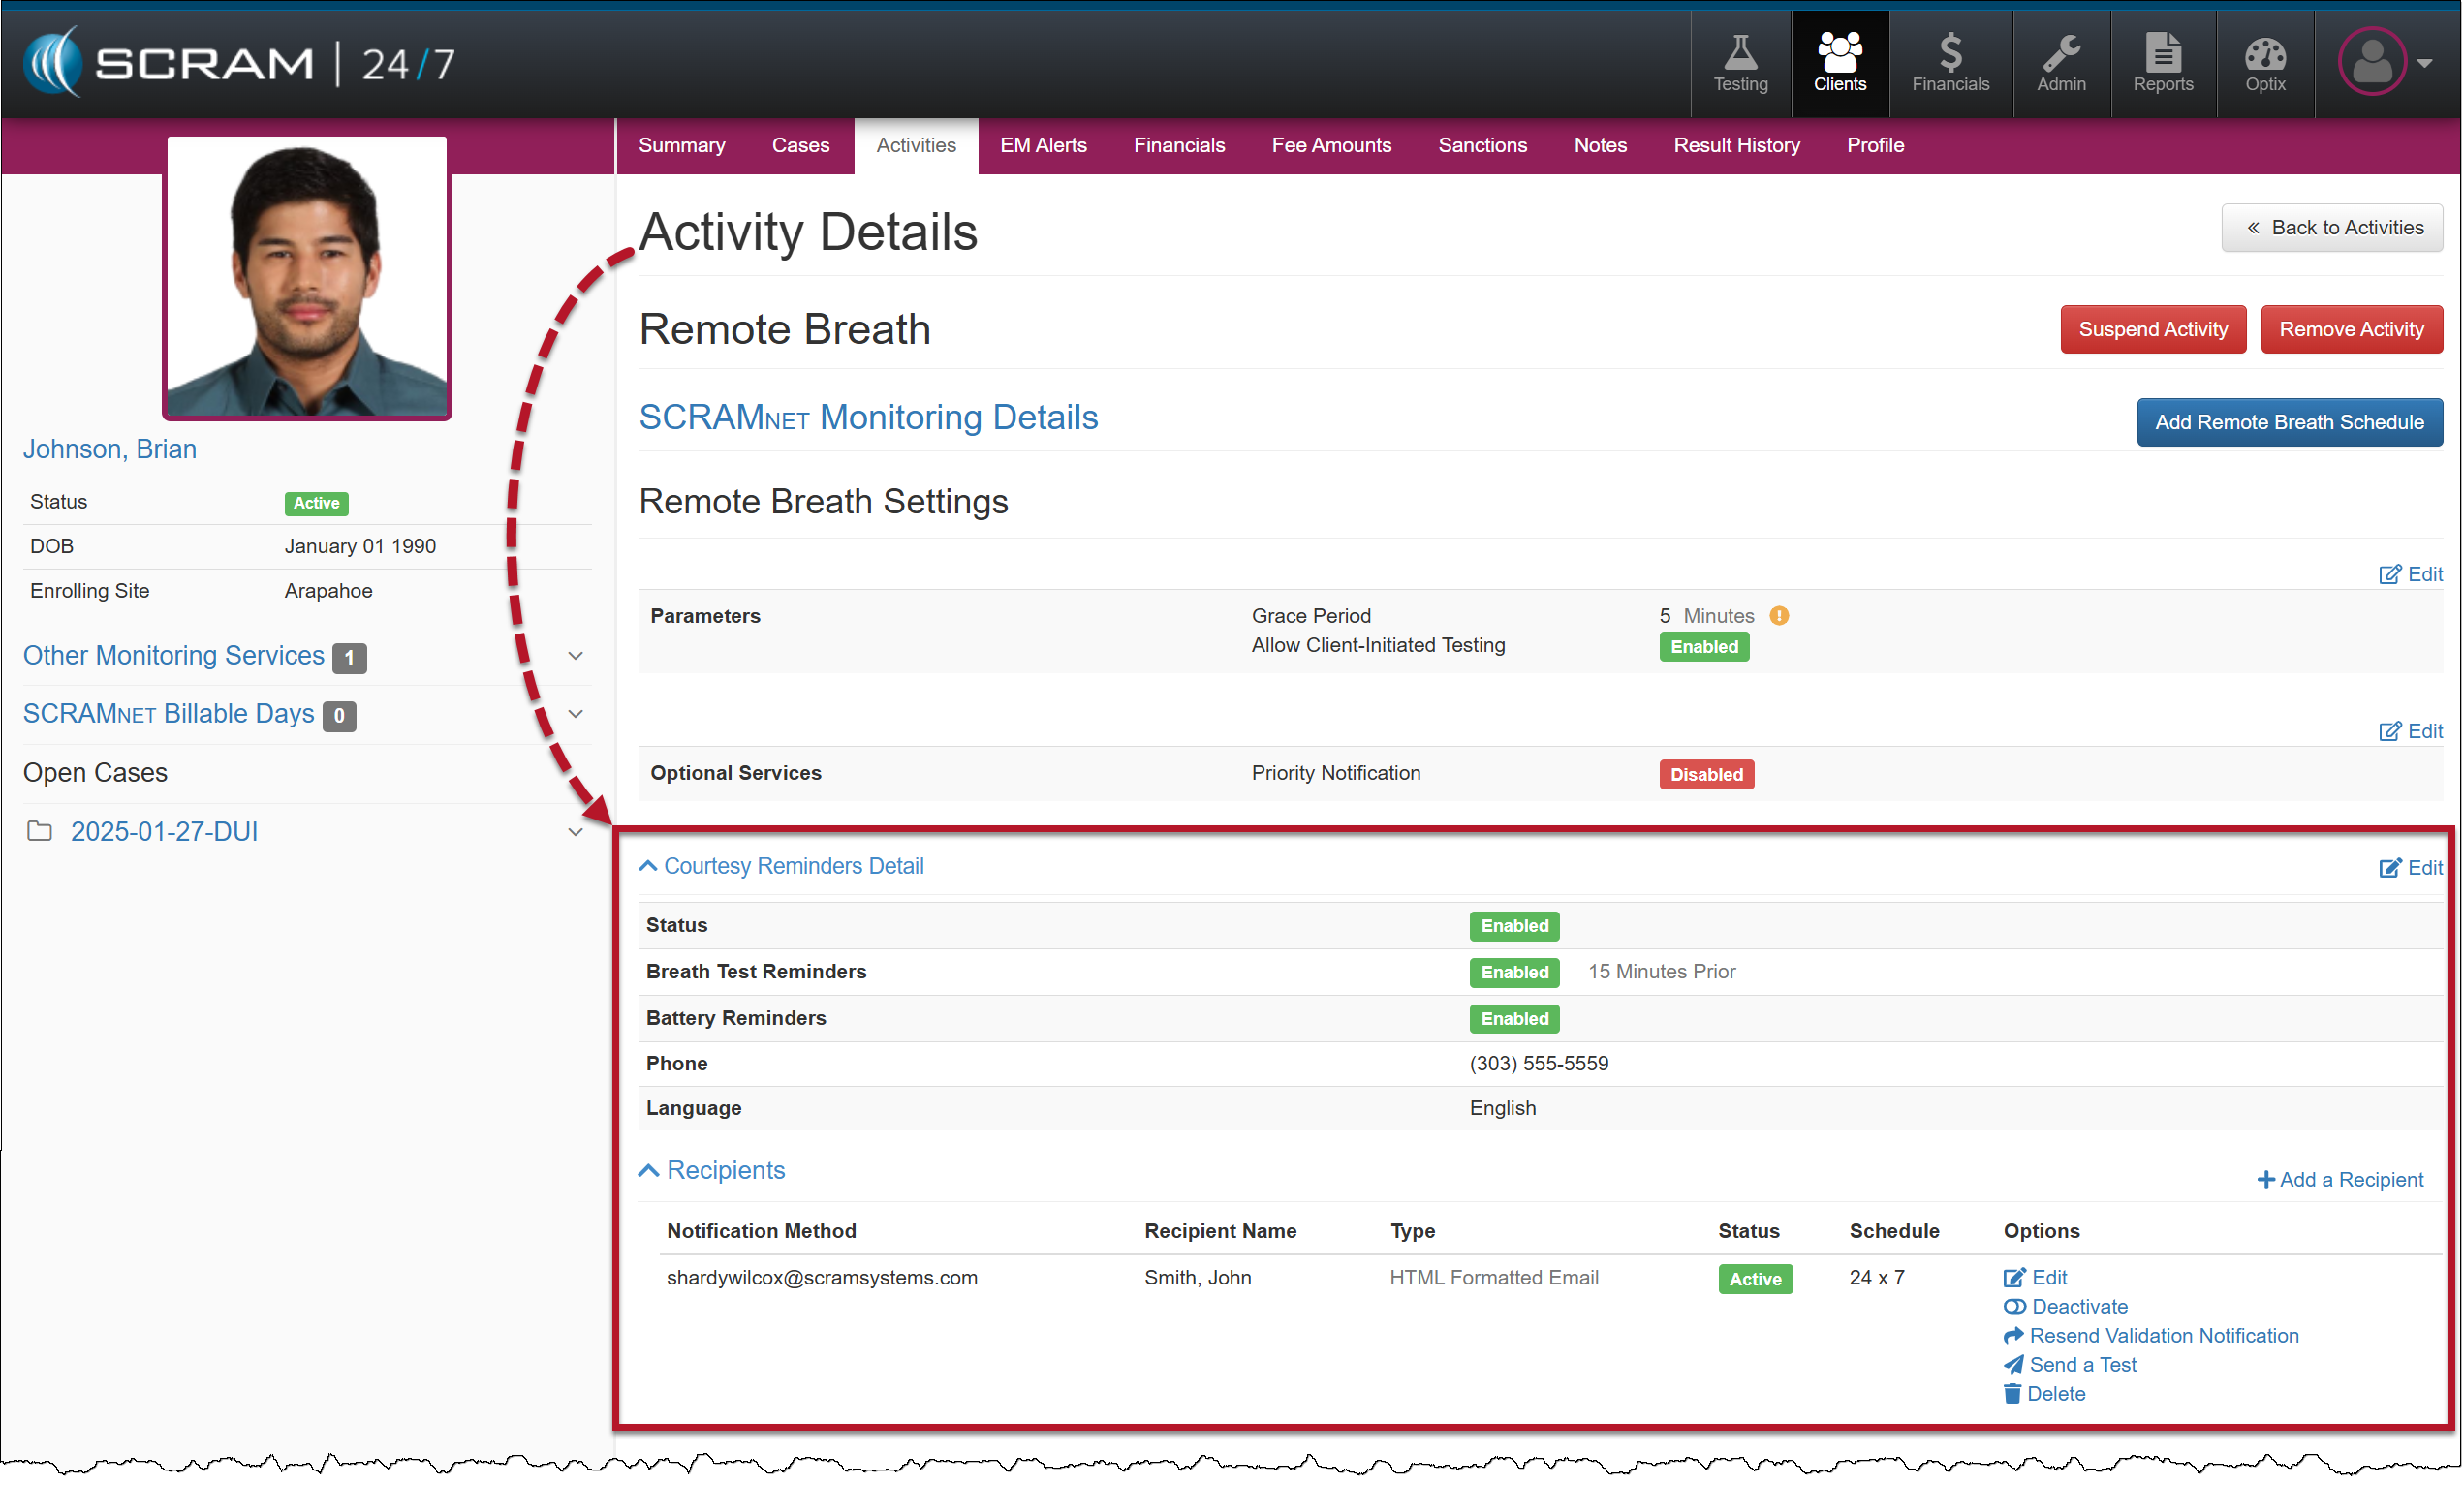
To add or edit the client’s Remote Breath Courtesy Reminders or third-party notification Recipients, select the Remote Breath Activity on the client’s Activities page, and then expand the Courtesy Reminders Detail or the Recipients heading.
On August 8, 2024, SCRAM Systems will release an enhancement to the Add Activity workflow for your SCRAM 24/7 monitoring program. When adding an EM Activity (CAM, House Arrest, Remote Breath, GPS, and TouchPoint) to your client, the “Add an Activity” workflow now includes many of the “steps” you traditionally completed in SCRAMNET, SCRAMNET GPS, and SCRAM Optix. This enhancement streamlines the client intake process.
Example: Add a Remote Breath Activity to a Client – click to enlarge
Select an EM Activity option below to learn more about the Add Activity process:
On August 8, 2024, SCRAM Systems will release an enhancement for your 24/7 monitoring program. SCRAM Systems understands that not all programs utilize “sanctions” as a part of their client monitoring program, and with this release, you may now disable the Sanctions option for your entire program.
If you don’t see the enhancement in SCRAM 24/7, please clear your cache and cookies and refresh your browser window.
Disable Sanctions
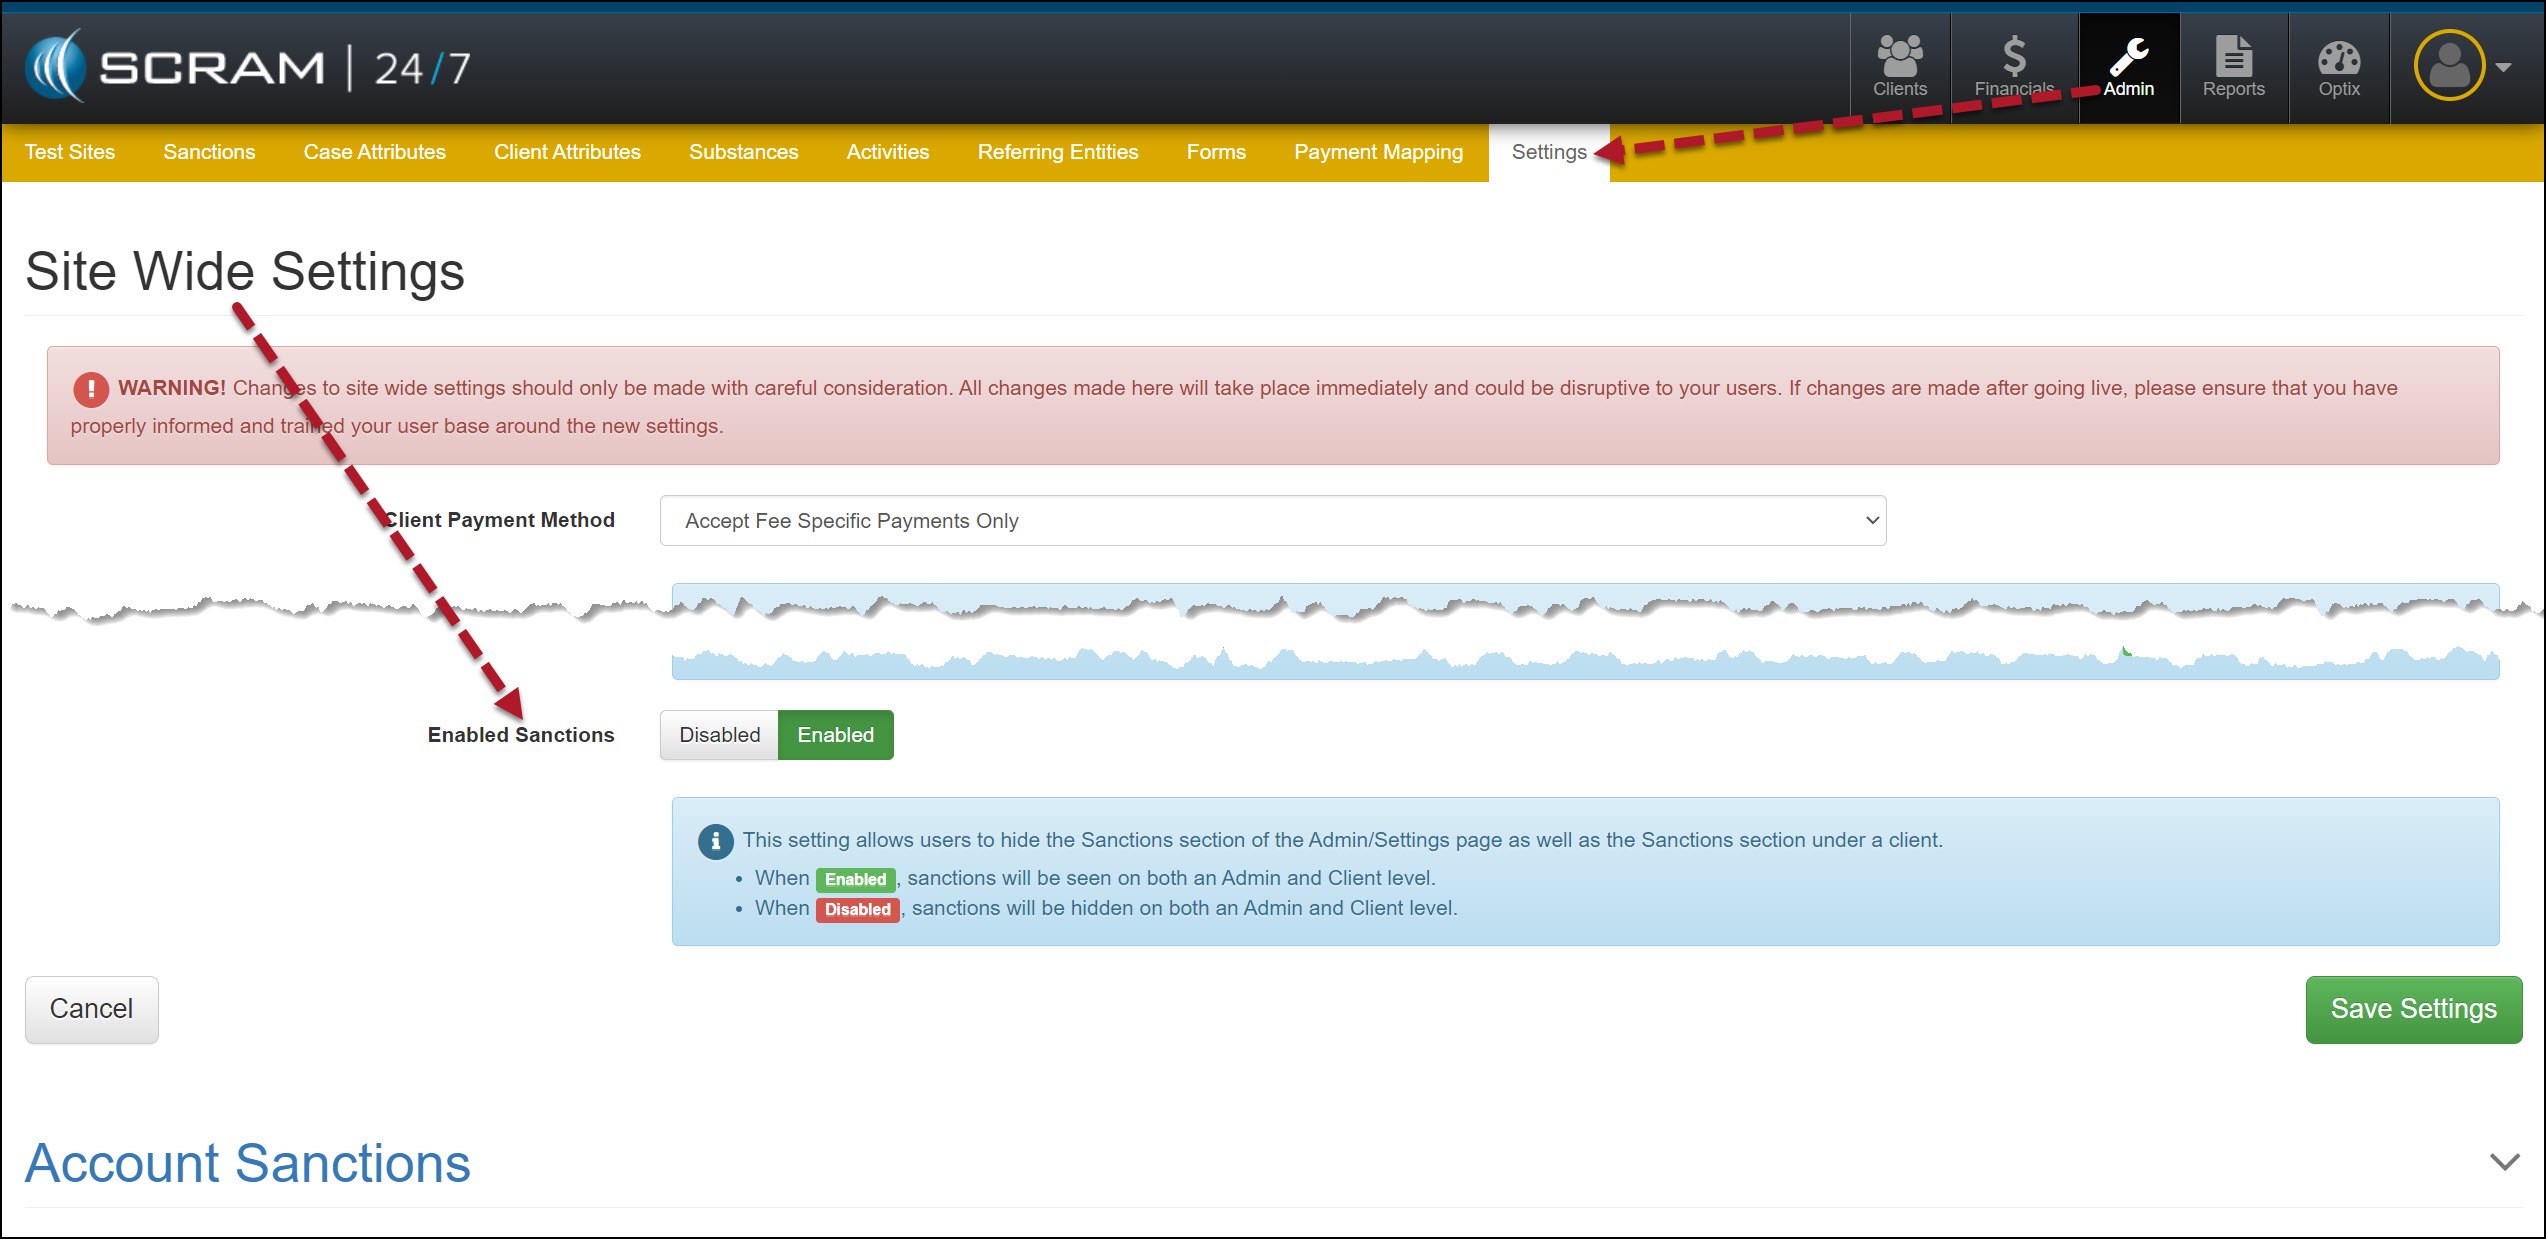
As an administrator for your program, navigate to the Settings tab on the Admin page in SCRAM 24/7.
Admin Settings page – click to enlarge
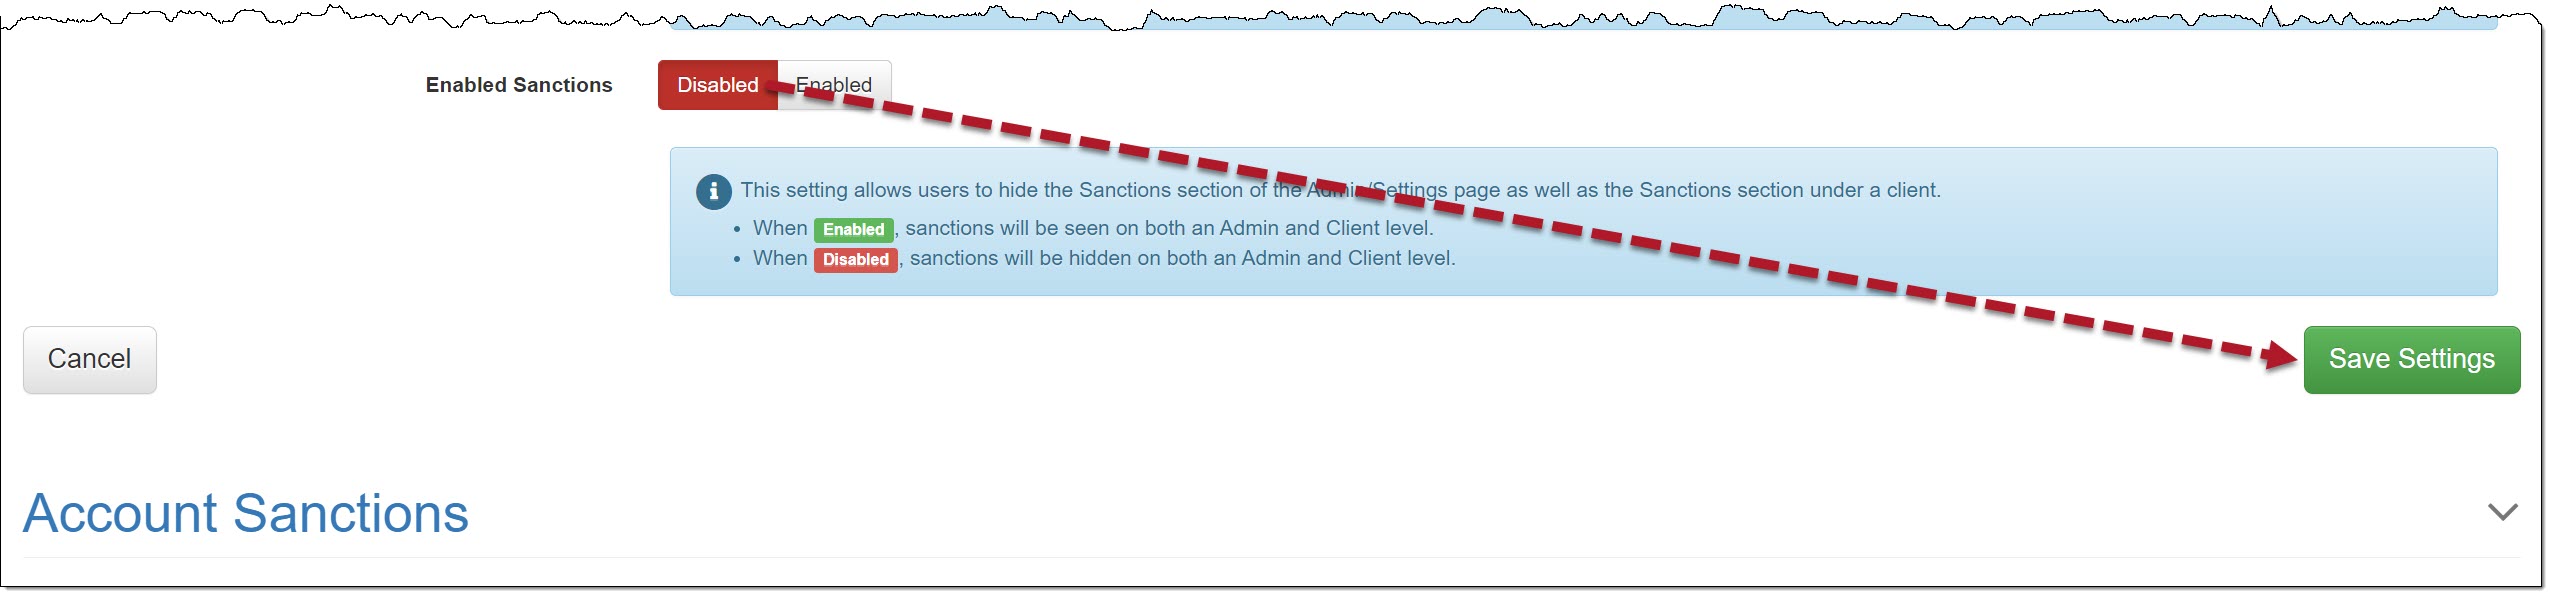
In the Site Wide Settings section, locate the “Enabled Sanctions” option, toggle the “Enabled” selection to Disabled, and then select the Save Settings button.
Enabled Sanctions Disabled Selected – click to enlarge
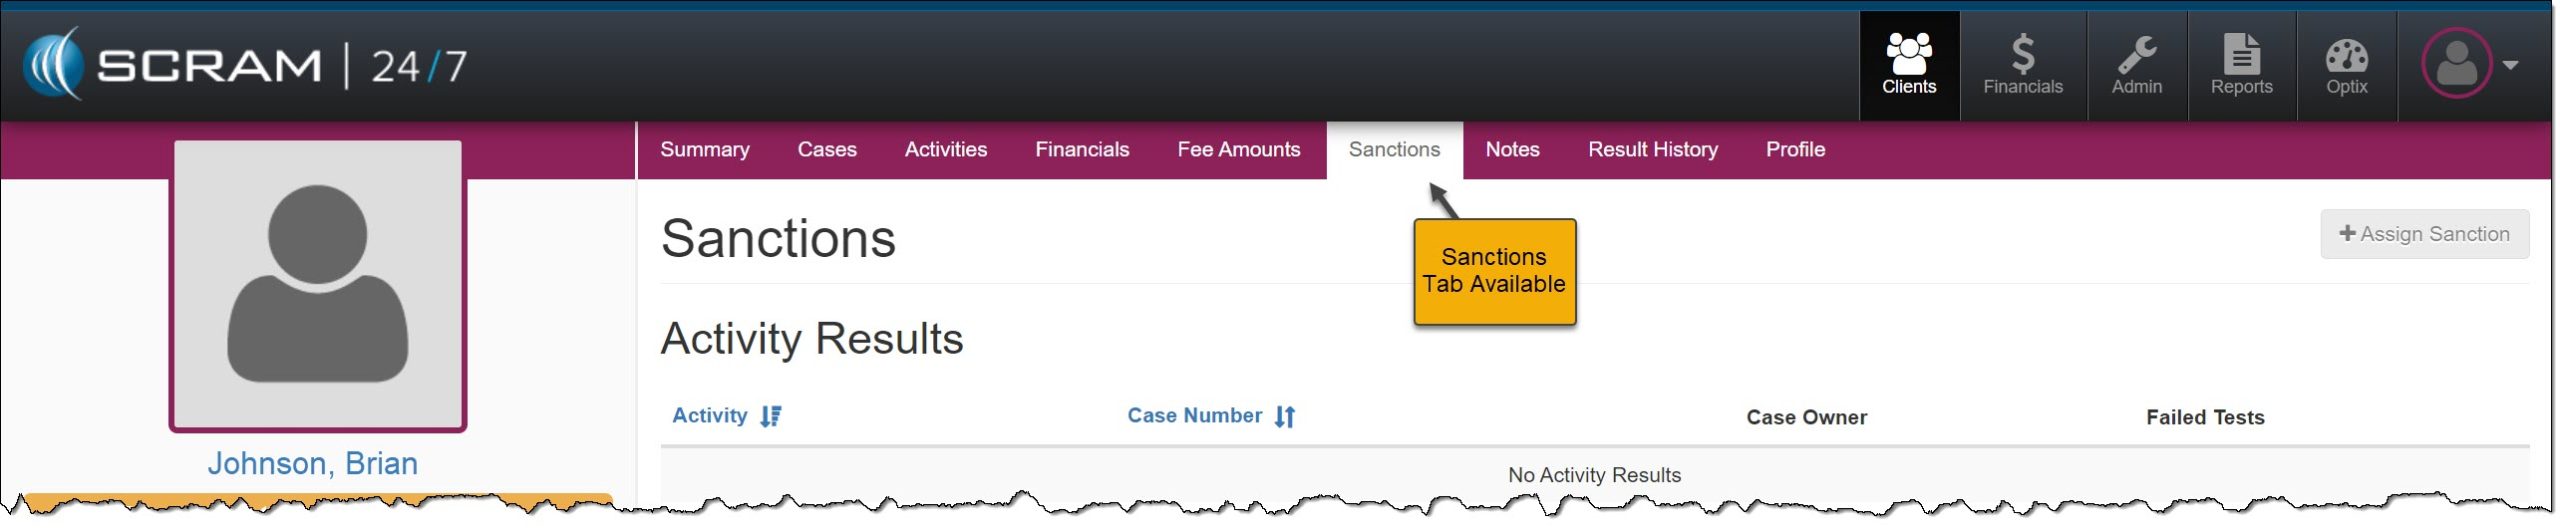
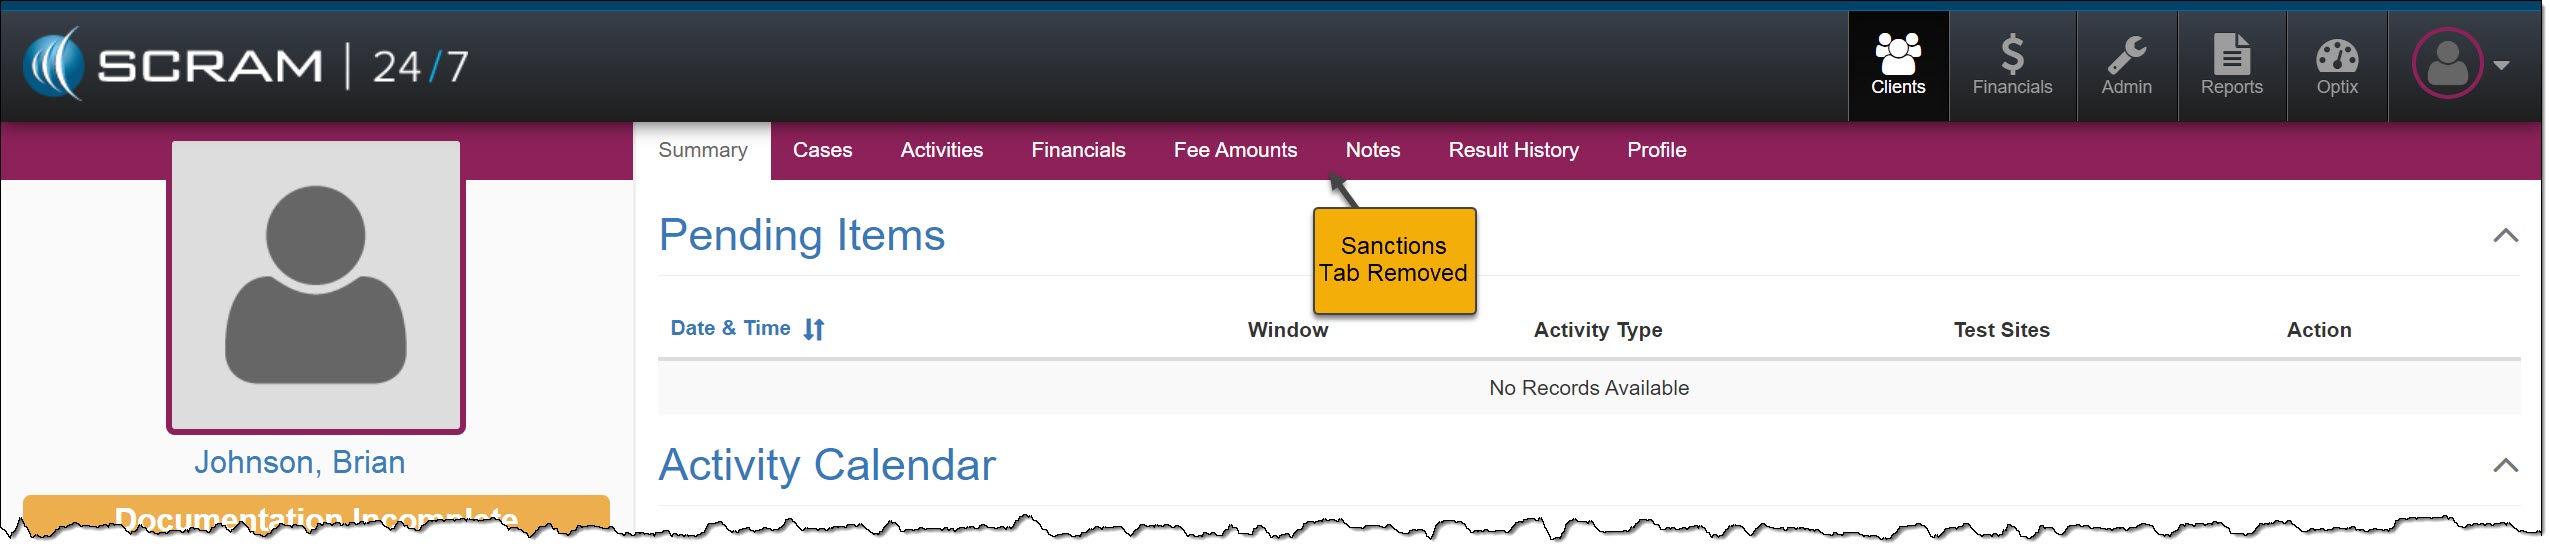
This will remove the Sanctions tab at the administrative level and will propagate throughout the site; to the client level.
Admin Level
Sanctions Tab Available – click to enlargeSanctions Tab Removed – click to enlarge
Client Level
Client Profile Page Sanctions Tab – click to enlargeClient Profile Page Sanctions Tab Removed – click to enlarge
SCRAM Systems has moved from its Mineral Avenue address in Littleton, Colorado. When conducting business with us, be sure to use the appropriate address:
RMA Address
When a Return Merchandise Authorization (RMA) is issued for one of your SCRAM Systems devices, please ensure that the return shipping address on the label reads:
SCRAM Systems (AMS) 8100 Southpark Way Littleton, CO 80120
If your return shipping labels have the old, now-obsolete Mineral Avenue address on them, please discard them and request new labels from your SCRAM Systems Account Manager or Regional Sales Manager.
Payments Address
When making a bill payment to SCRAM Systems for monitoring services, equipment purchases and rentals, or any other reason, please remit payment to the SCRAM Systems bank lockbox:
Alcohol Monitoring Systems, Inc. PO Box 561097 Denver, CO 80256-1097
Do not remit payments to the now-obsolete Mineral Avenue address or to the Southpark Way address.
On June 27, 2024, SCRAM Systems will release an enhancement that allows you to adjust and waive individual fees during the client Activity setup and on their Fee Amounts page.
If you don’t see the enhancement in SCRAM 24/7, please clear your cache and cookies and refresh your browser window.
An administrator for your program manages the Activity’s fees and determines whether or not the fee may be adjusted or waived.
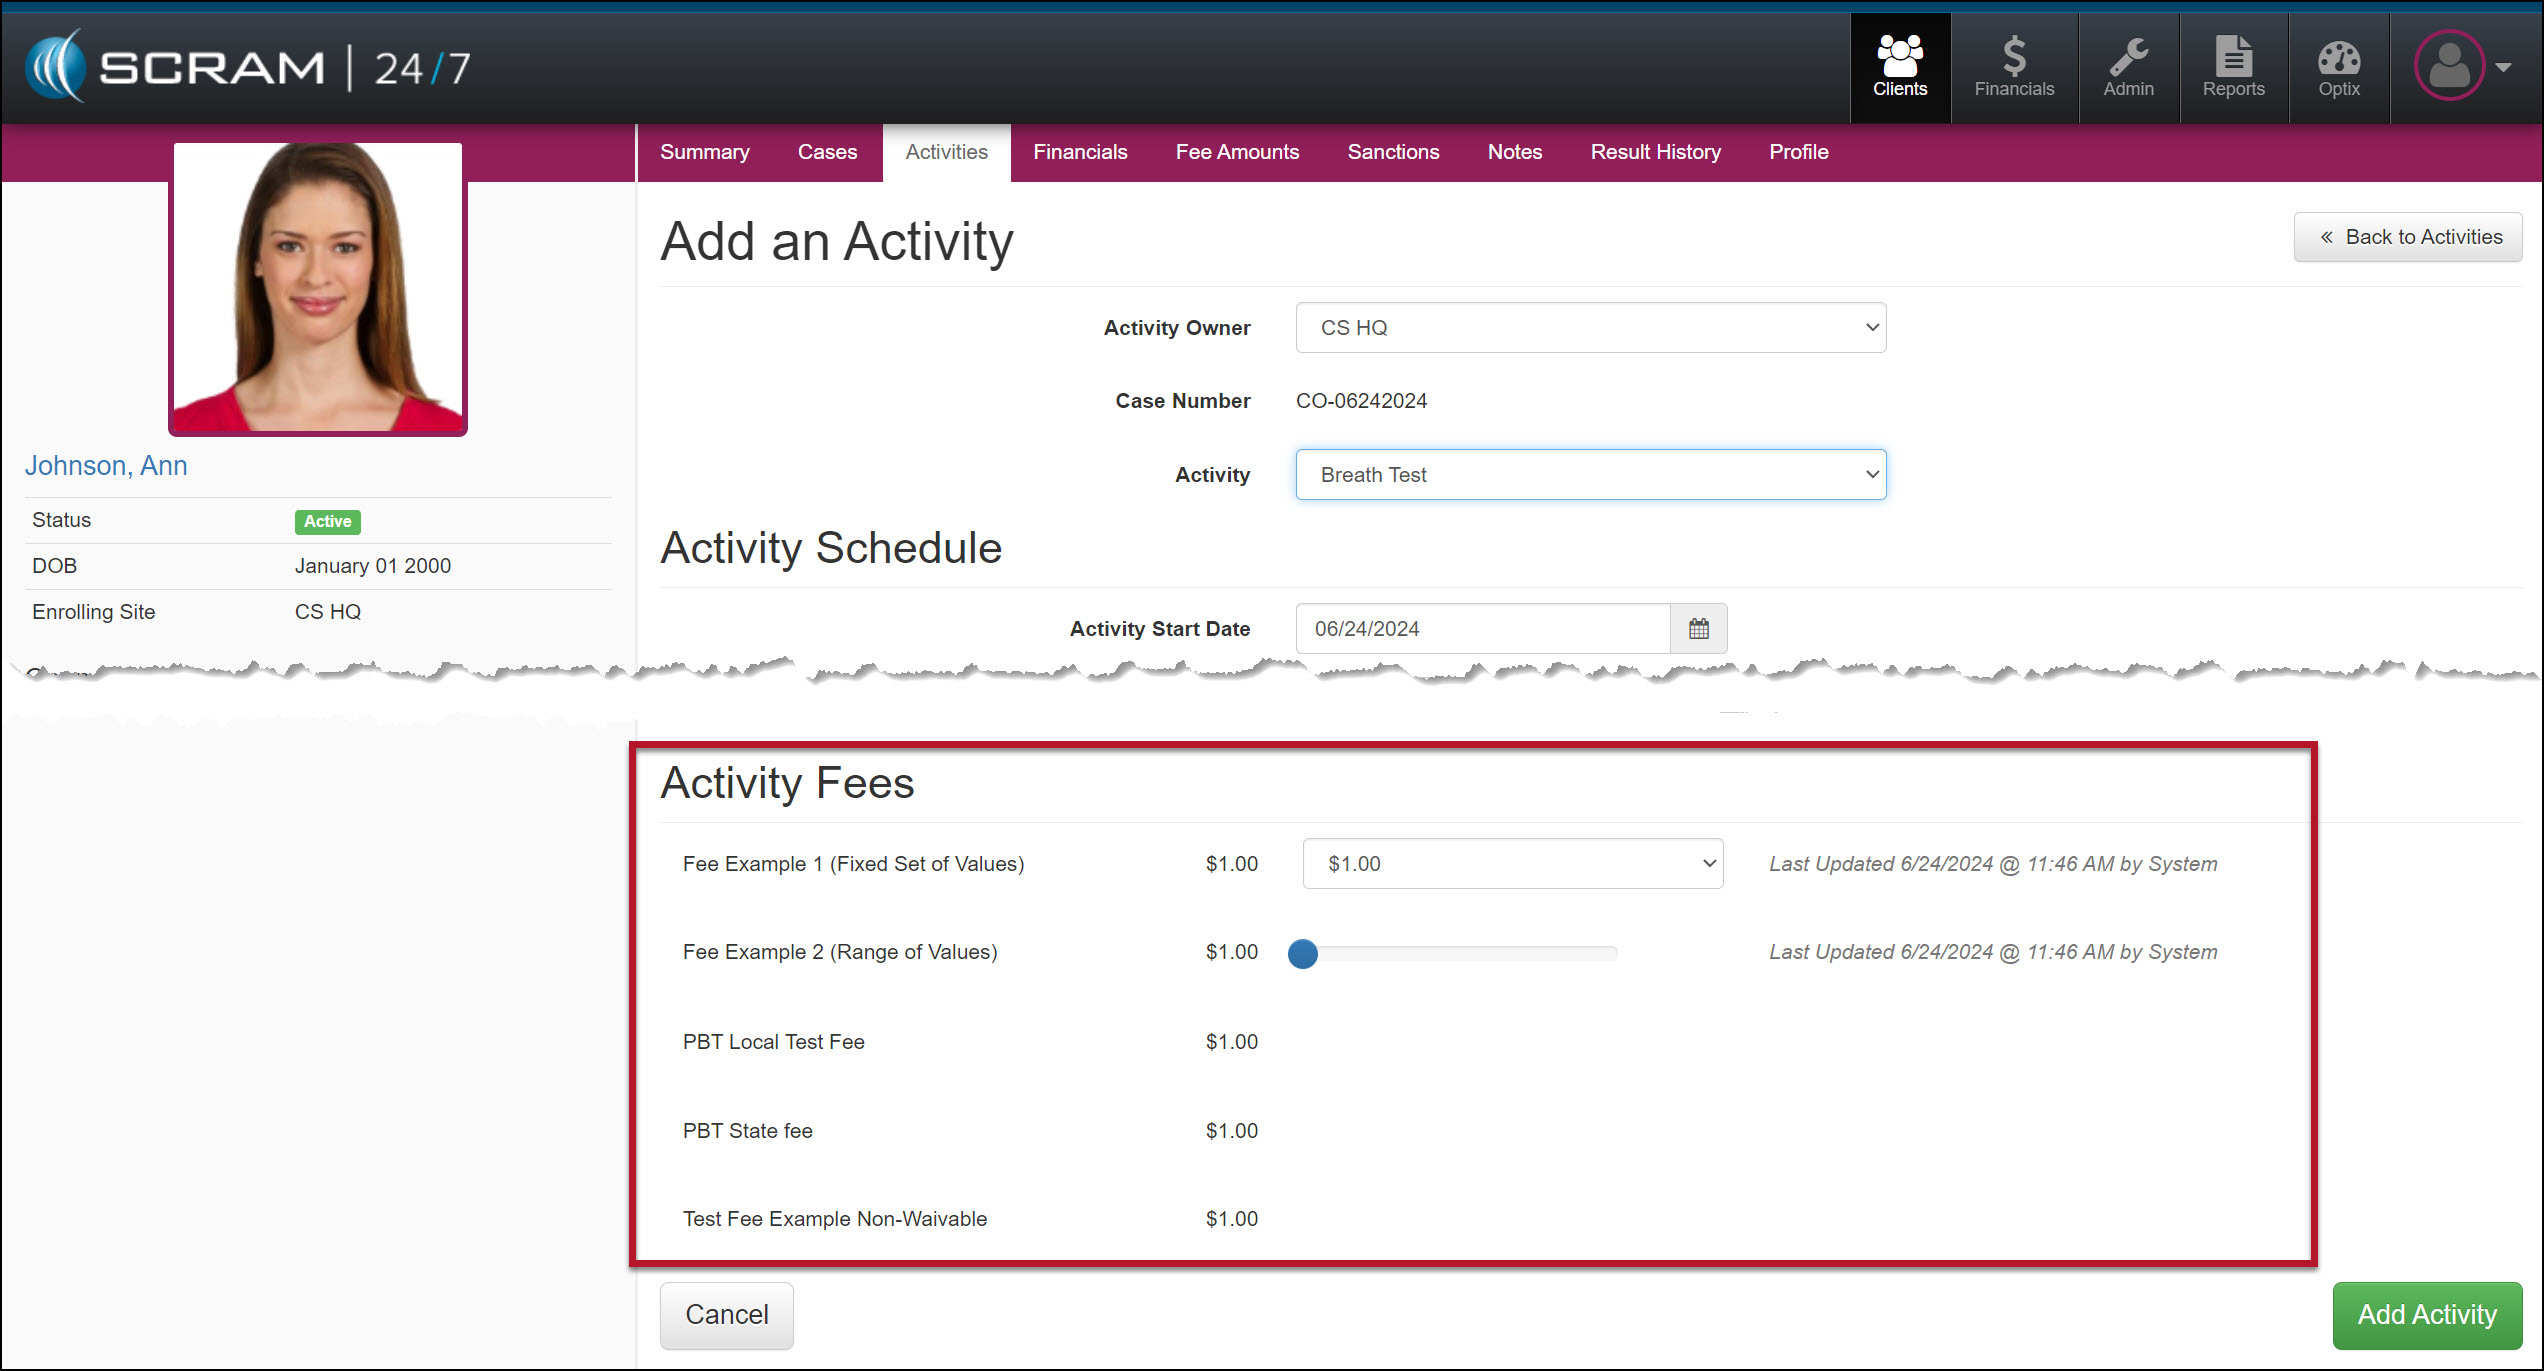
Current Add an Activity Page
Activity Fee Section – click to enlarge
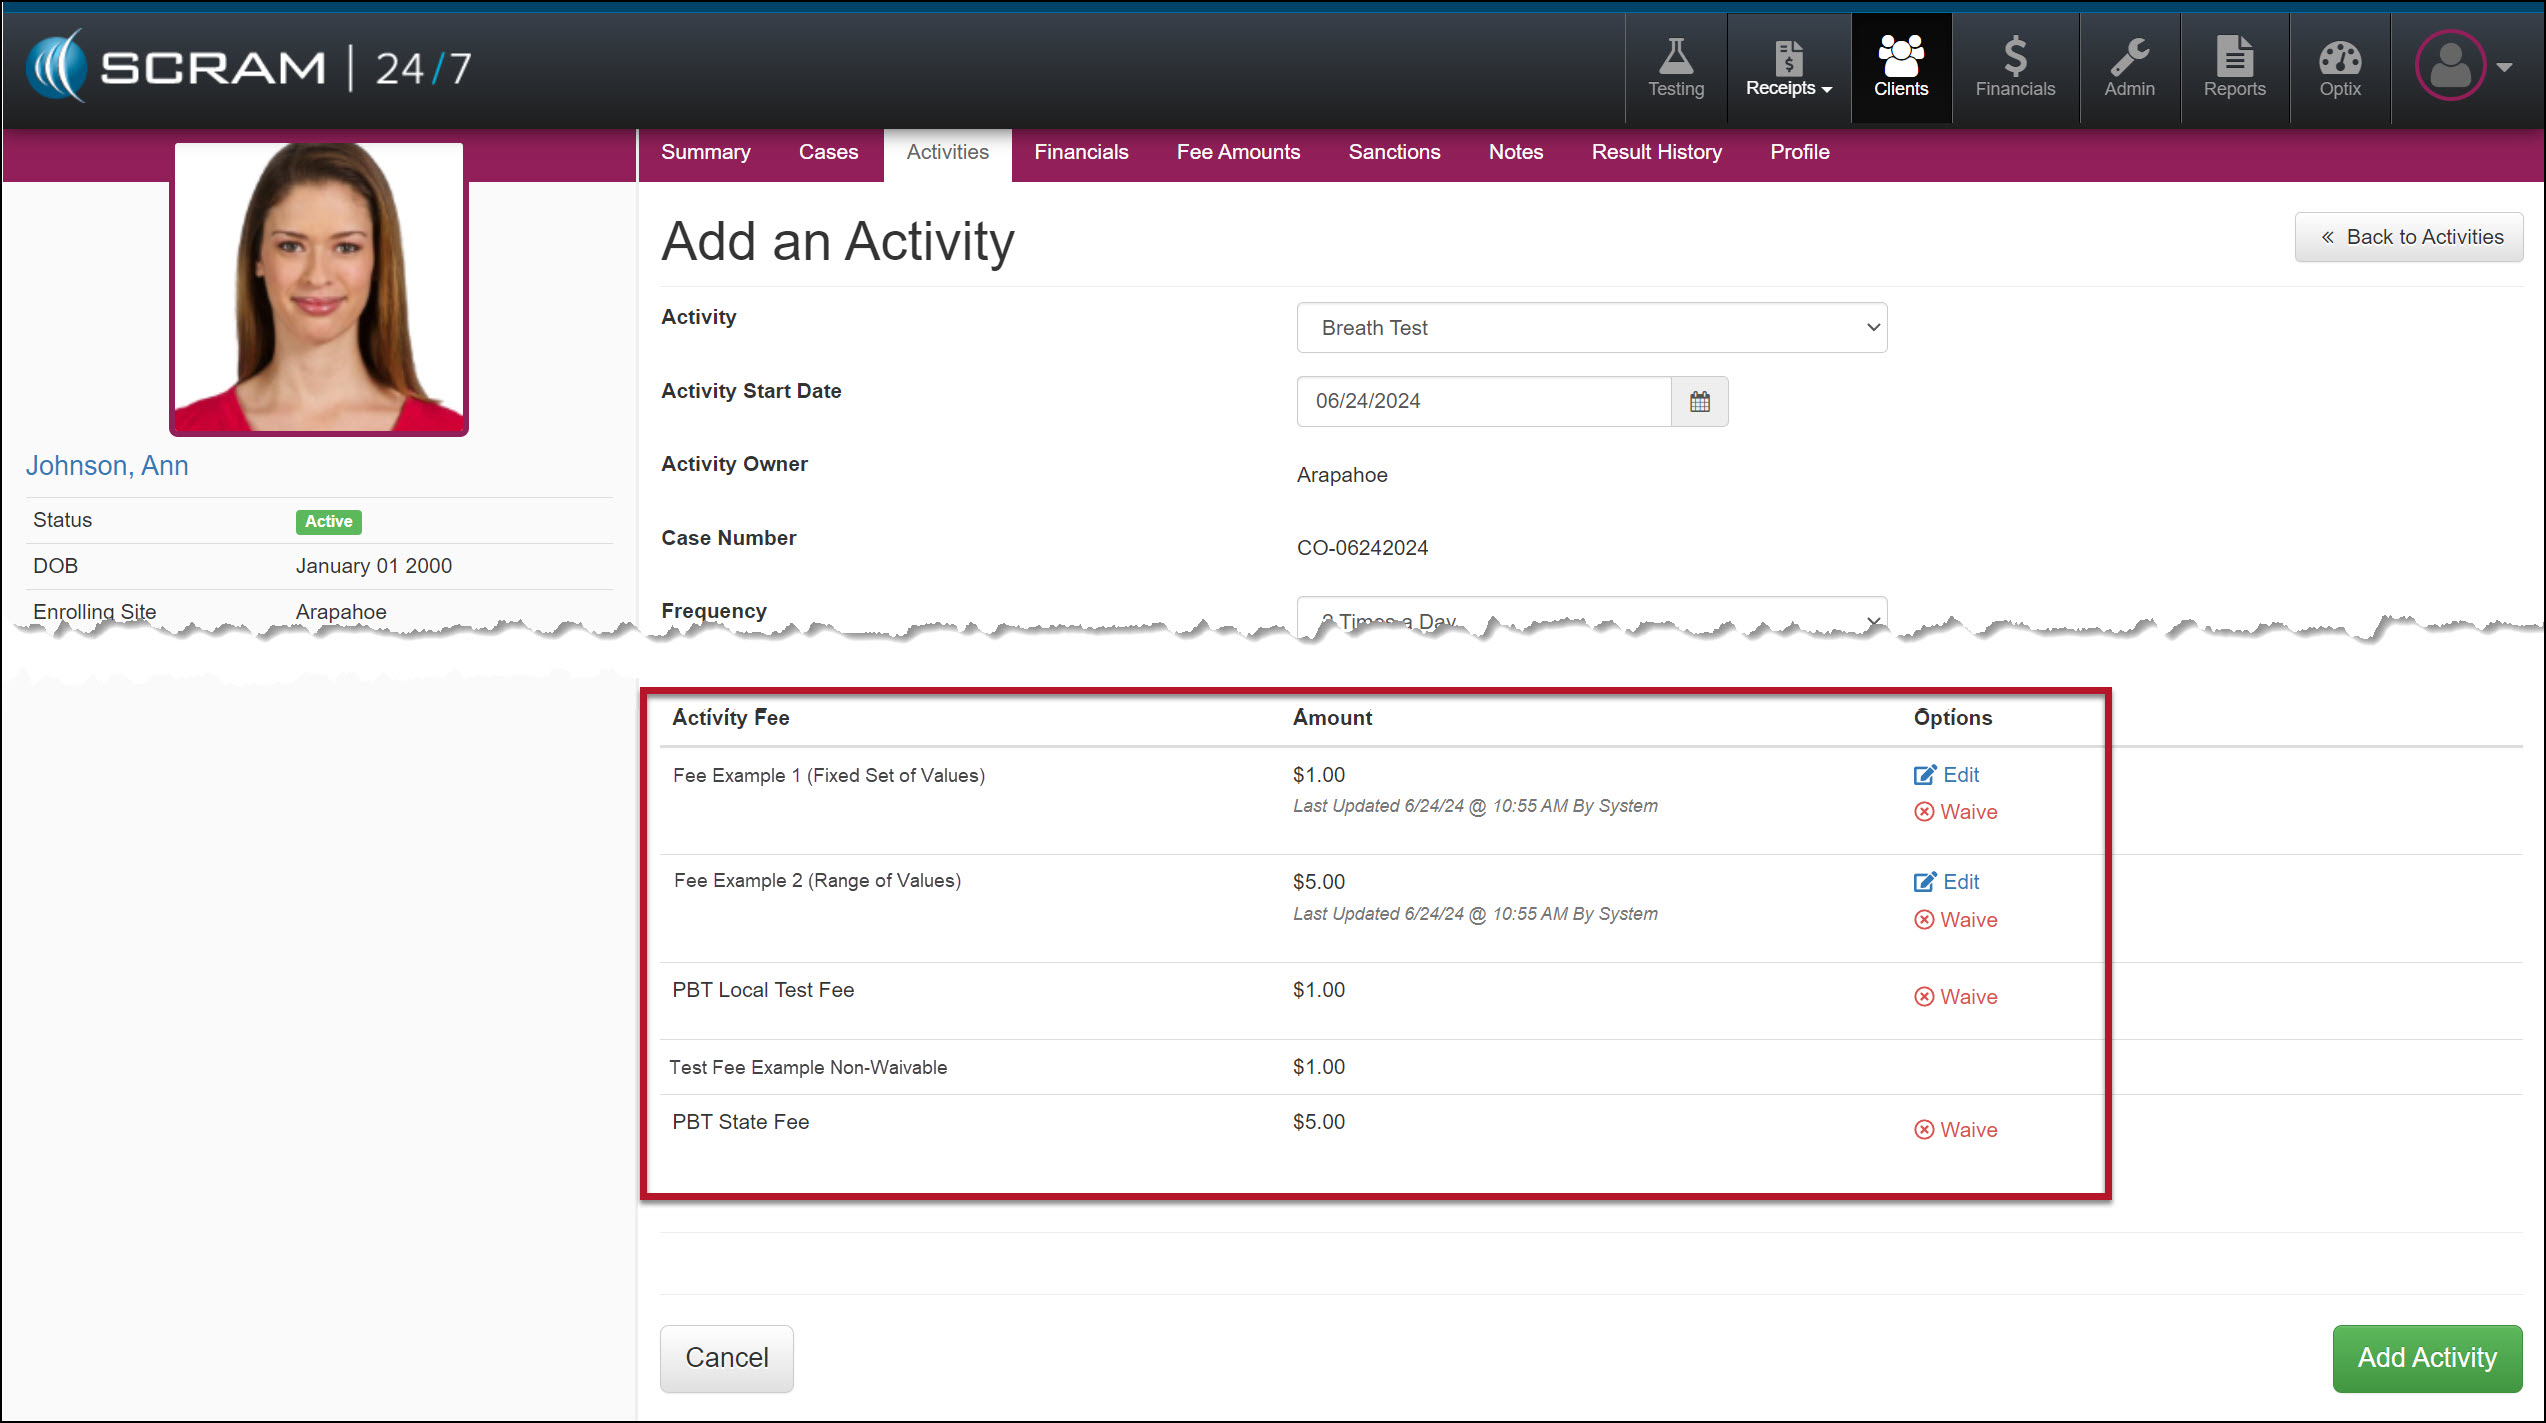
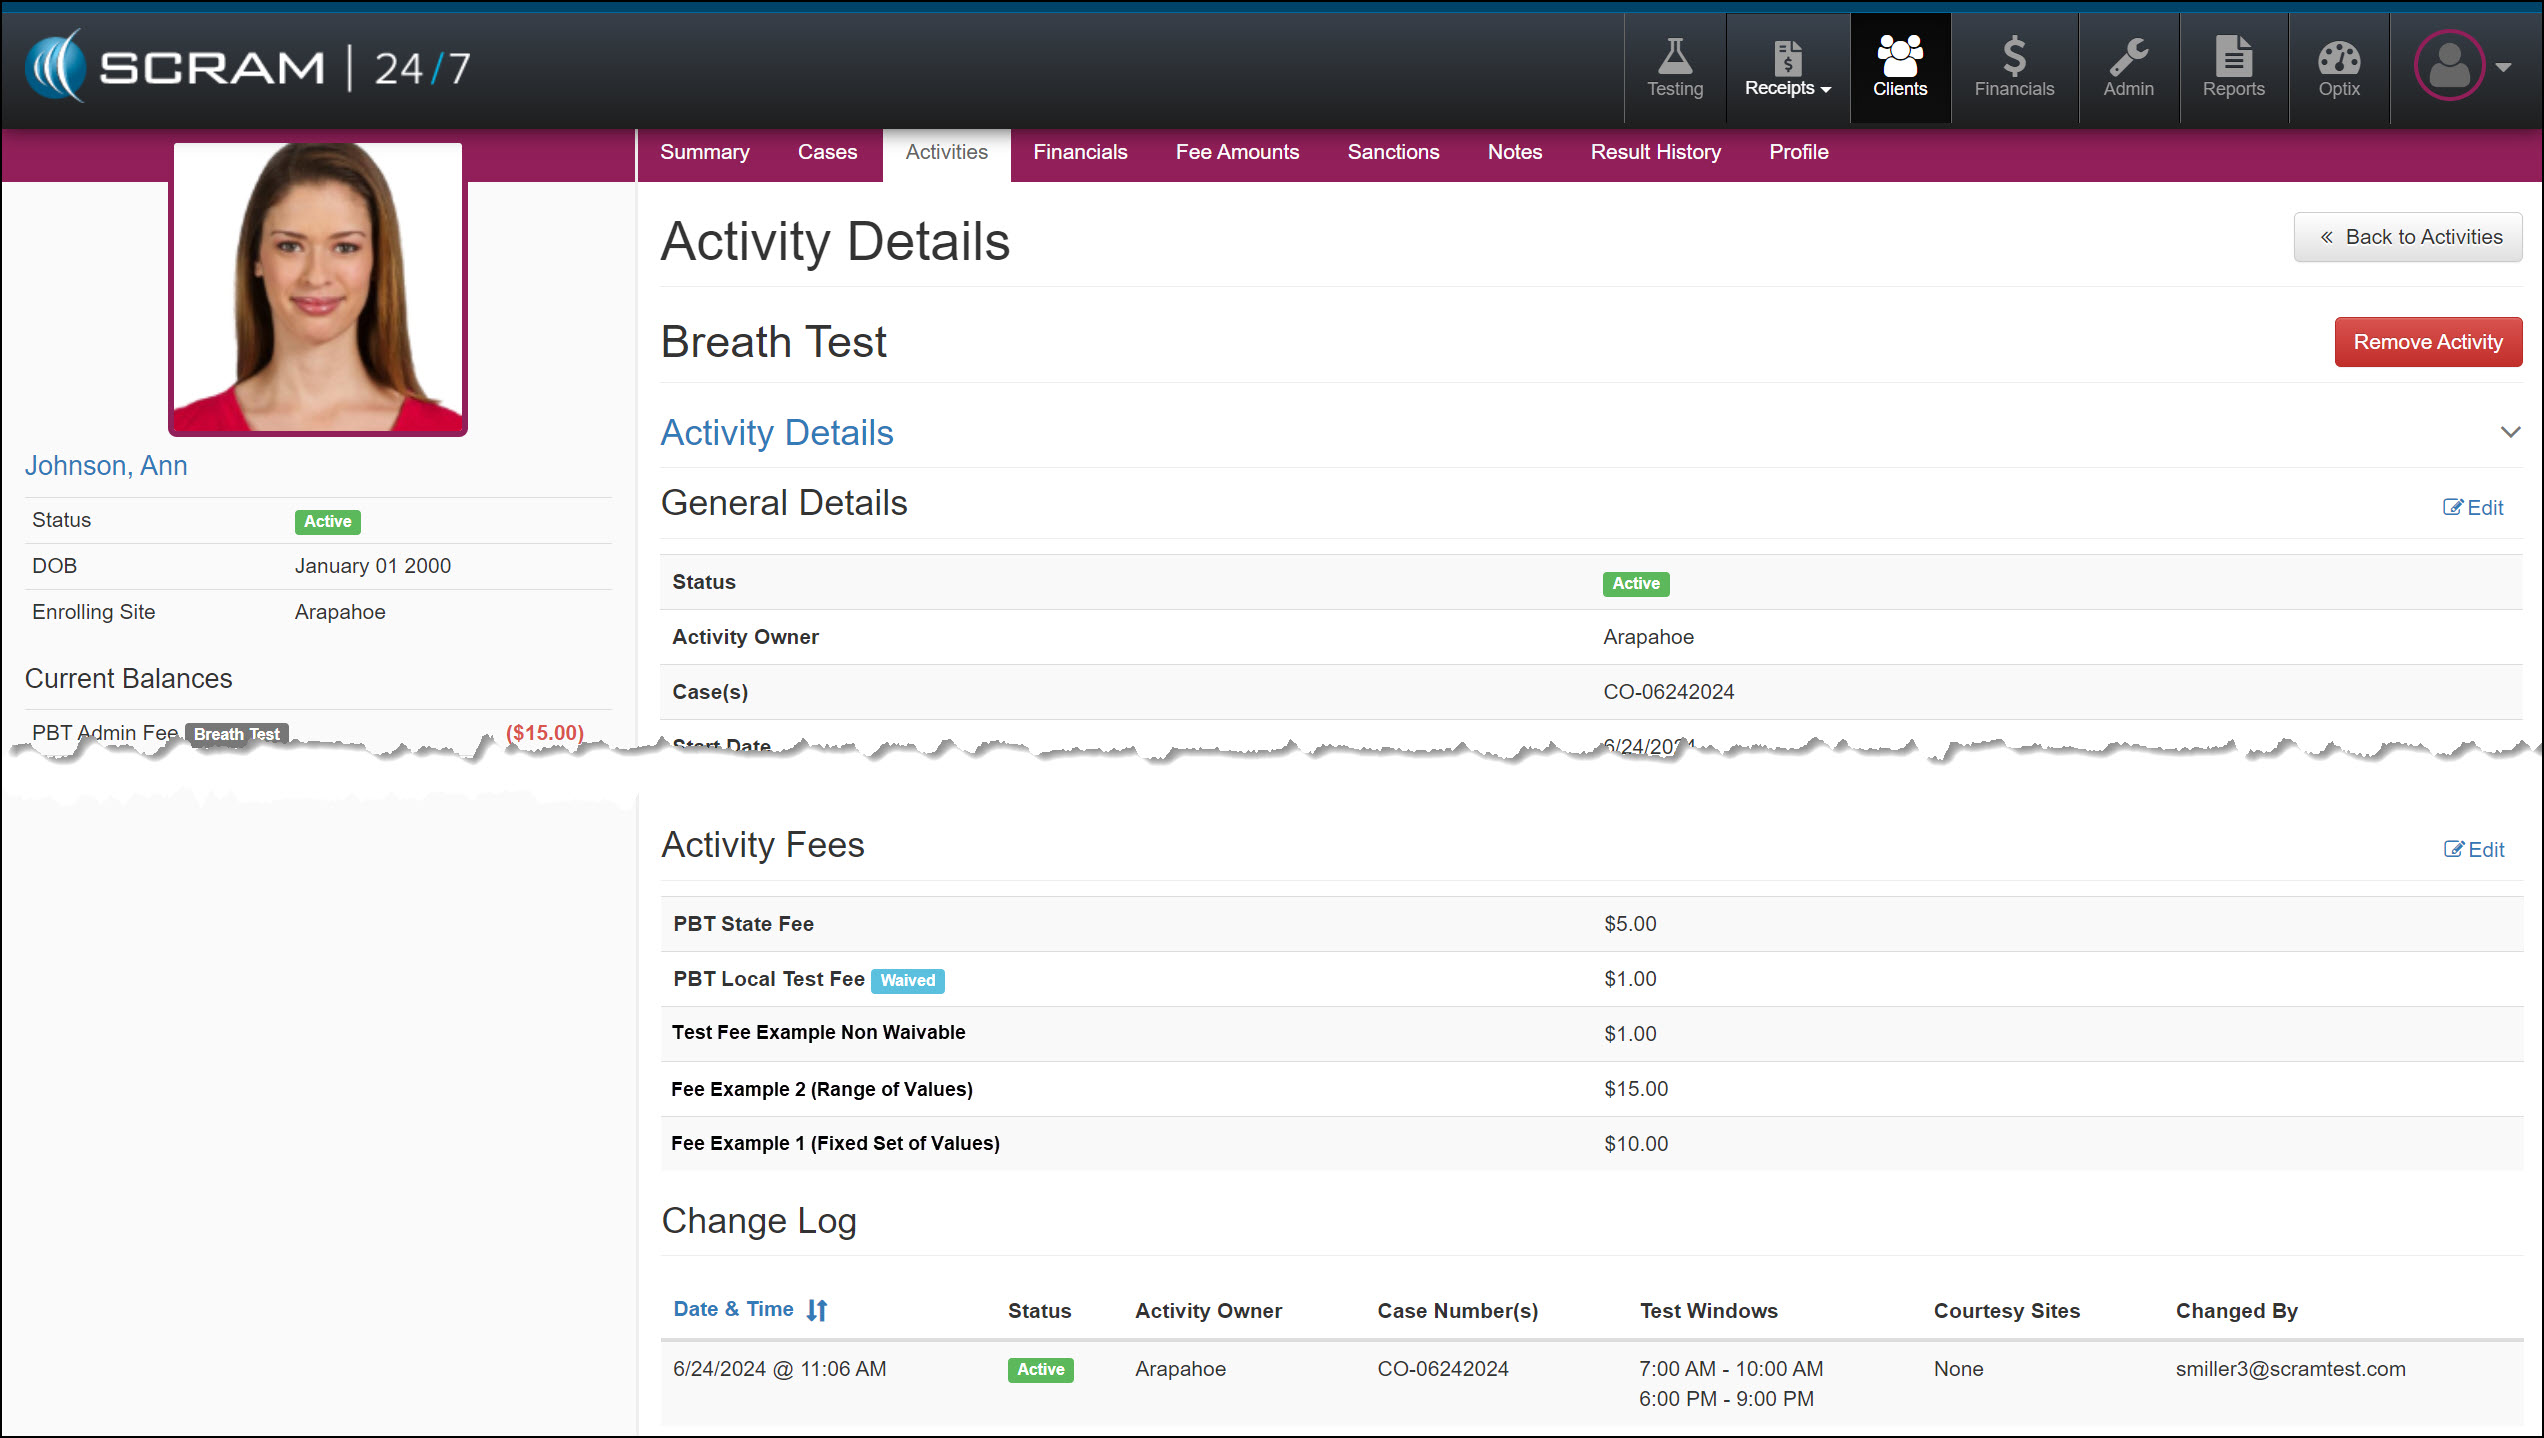
Enhanced Add an Activity Page
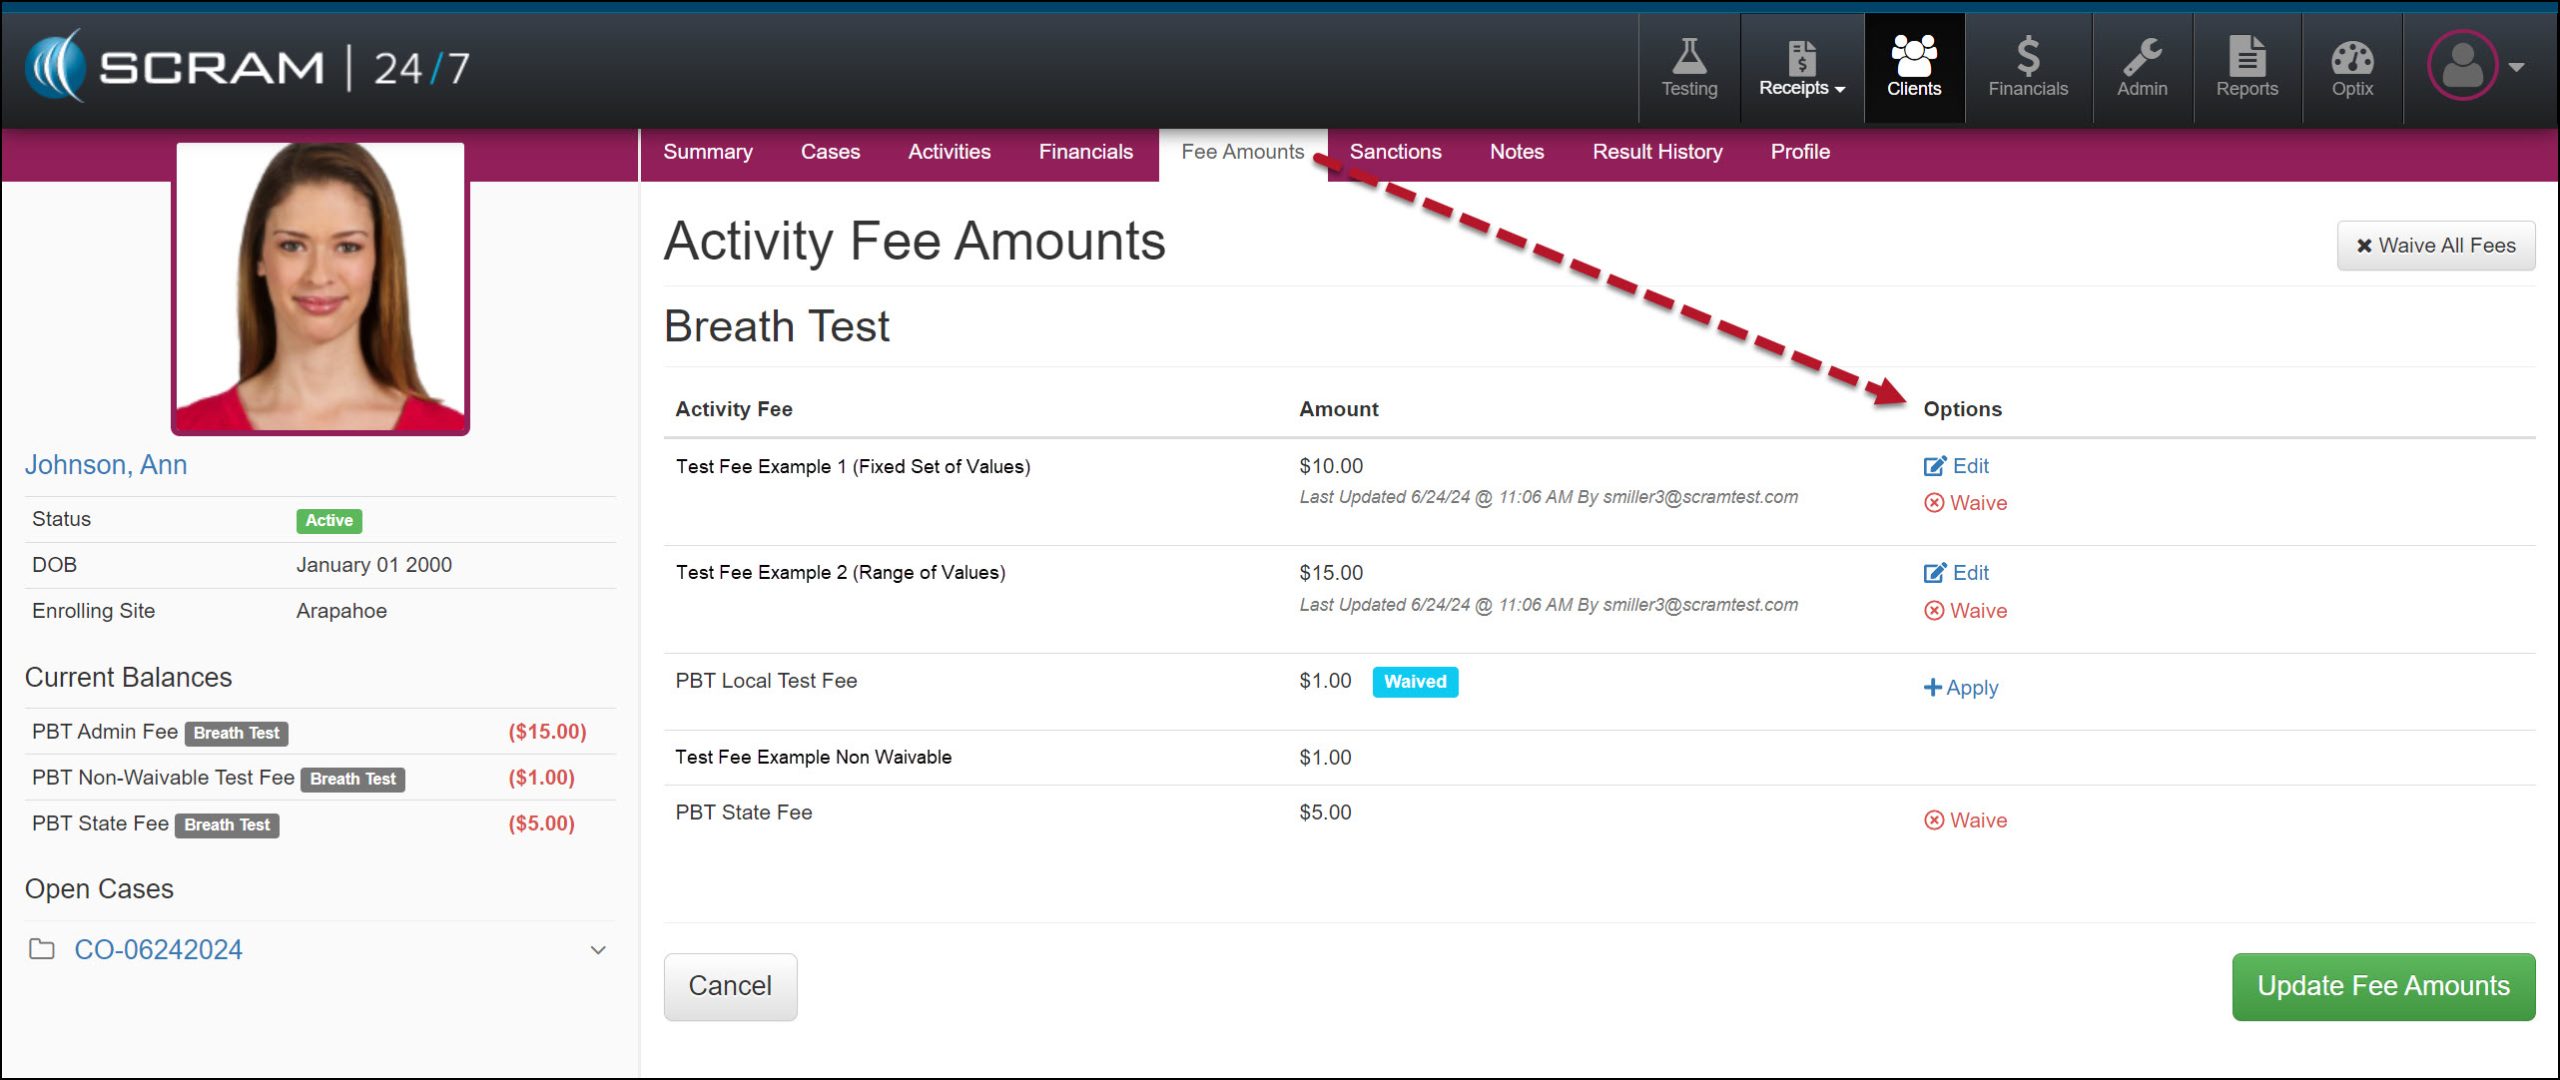
The Activity Fee section has a new “Options” column that allows you to Edit or Waive Activity fees for the client during enrollment.
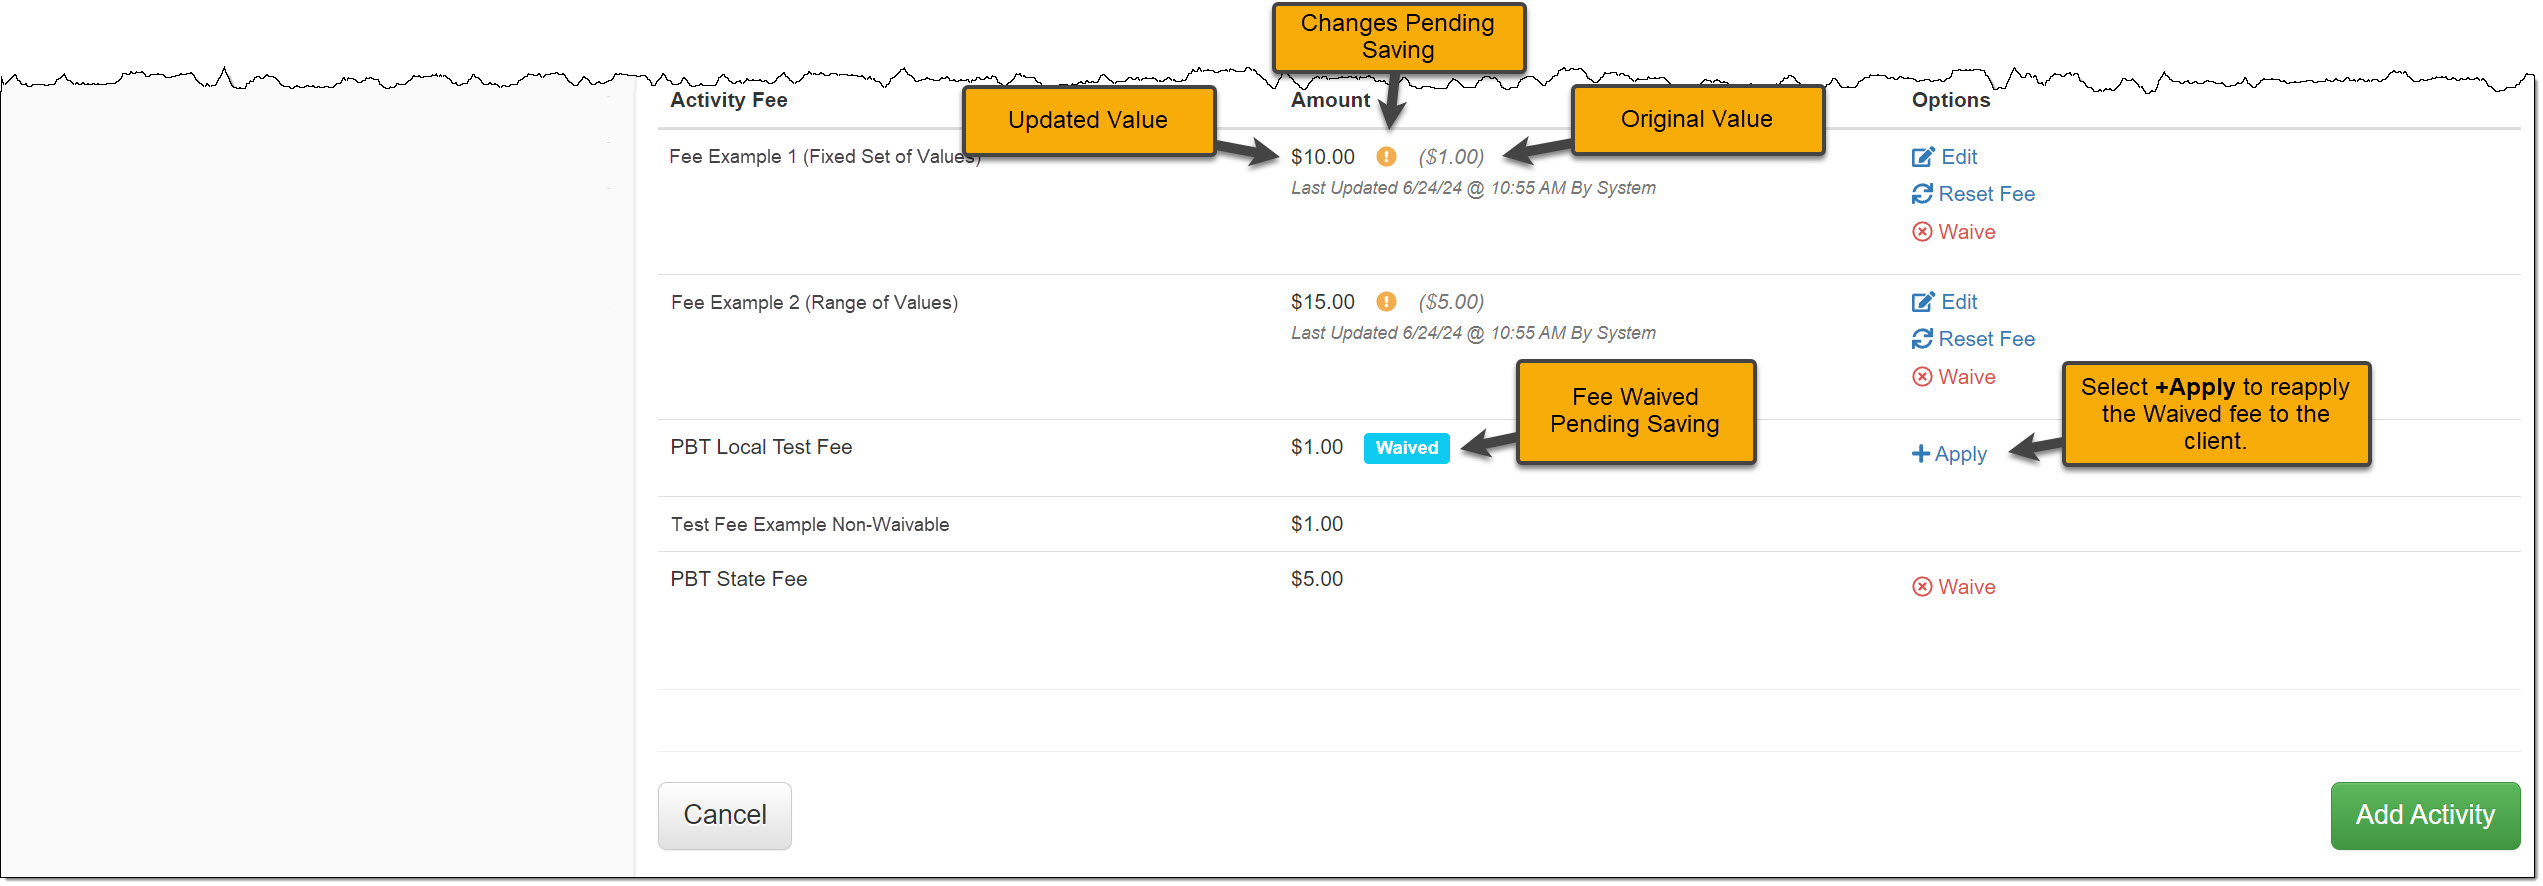
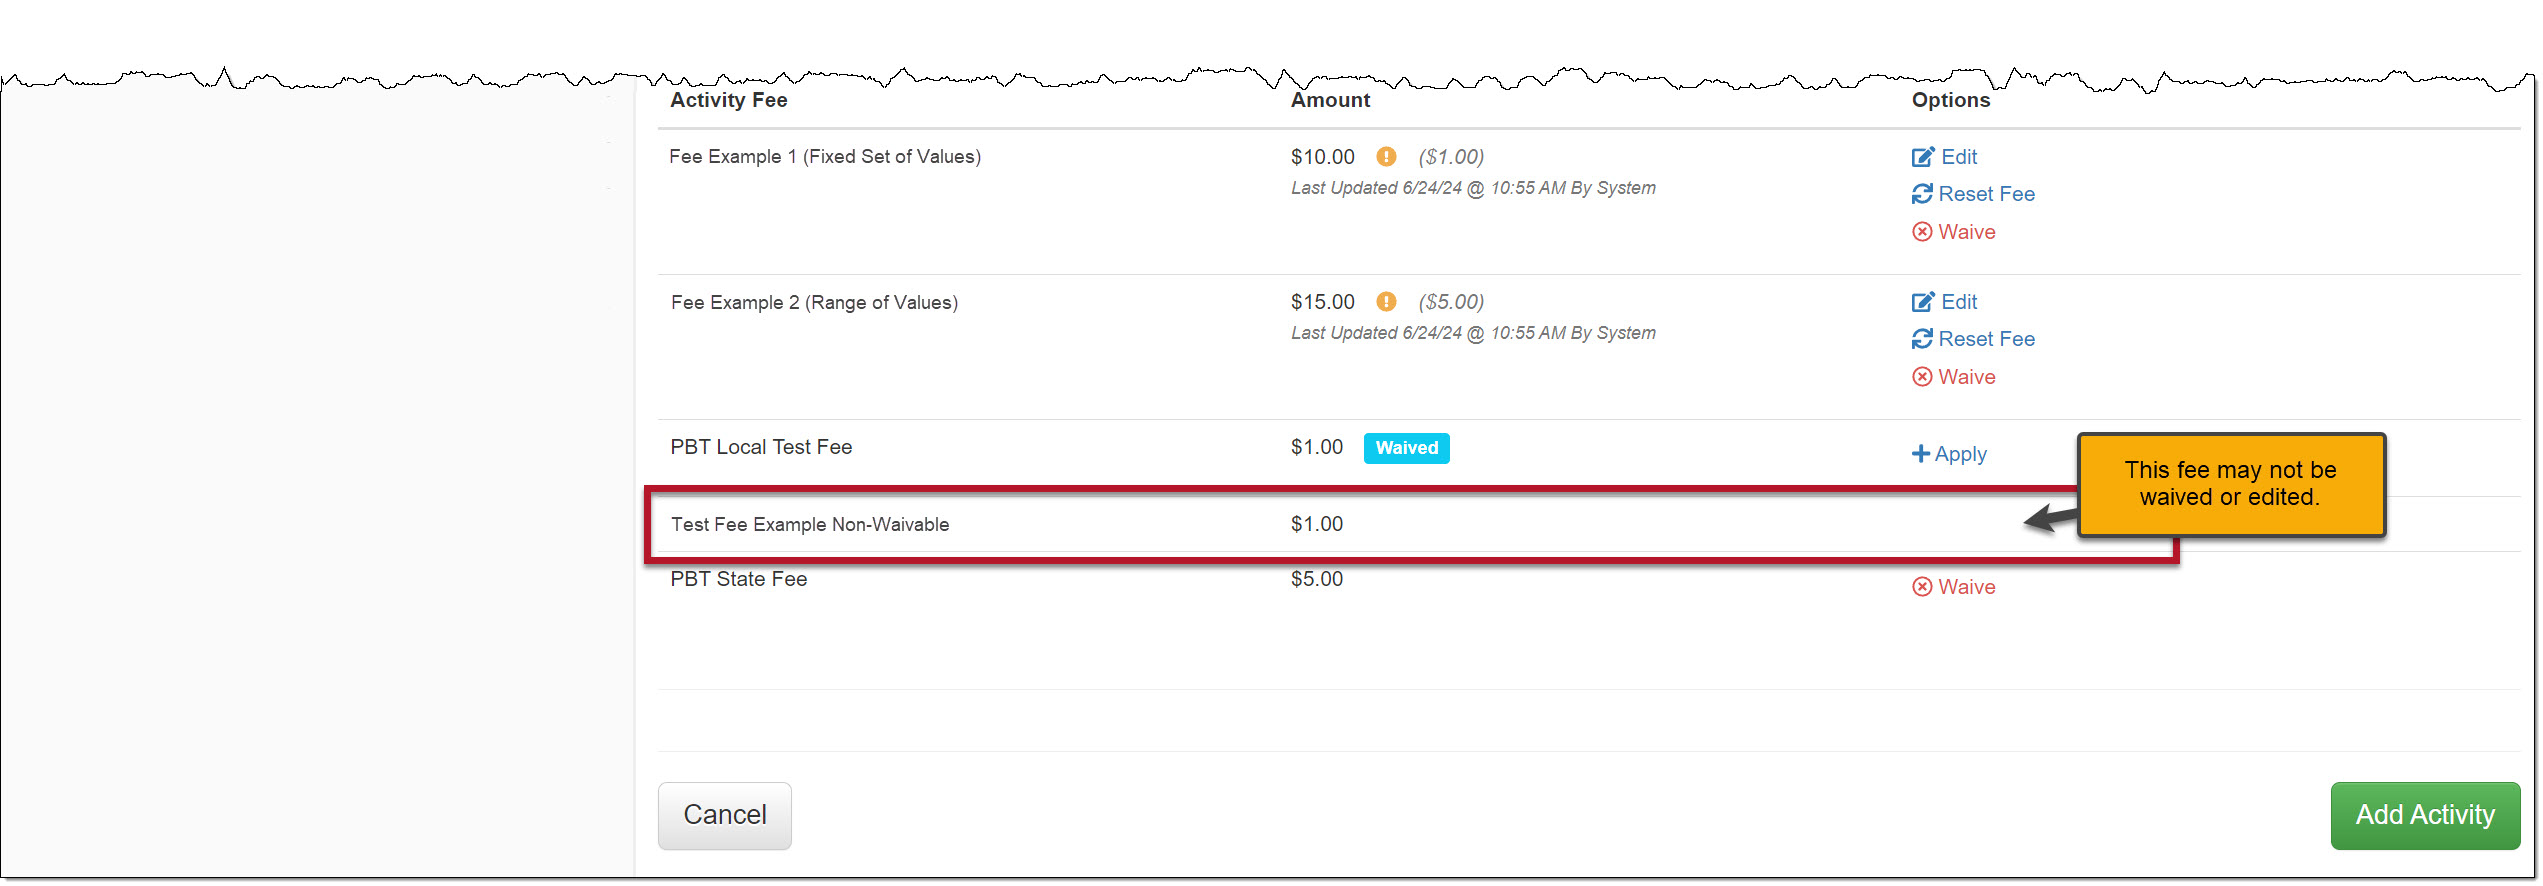
Edit and Waive Activity Fees – click to enlargeActivity Fees Updated Pending Adding the Activity – click to enlargeAn Example of an Activity Fee that Cannot be Edited or Waived During Enrollment – click to enlarge
After adjusting any Activity Fee, select the Add Activity button to save the changes.
Saved Activity Details page – click to enlarge
During the monitoring program, you may also adjust the Activity fees from the client’s Fee Amounts page.
On June 12, 2024, SCRAM Systems will unveil an enhanced Equipment RMA Request page accessible from the SCRAM Systems Help & Support page. The new design contains a significant upgrade to streamline the workflow and improve your experience.
The newly designed page includes:
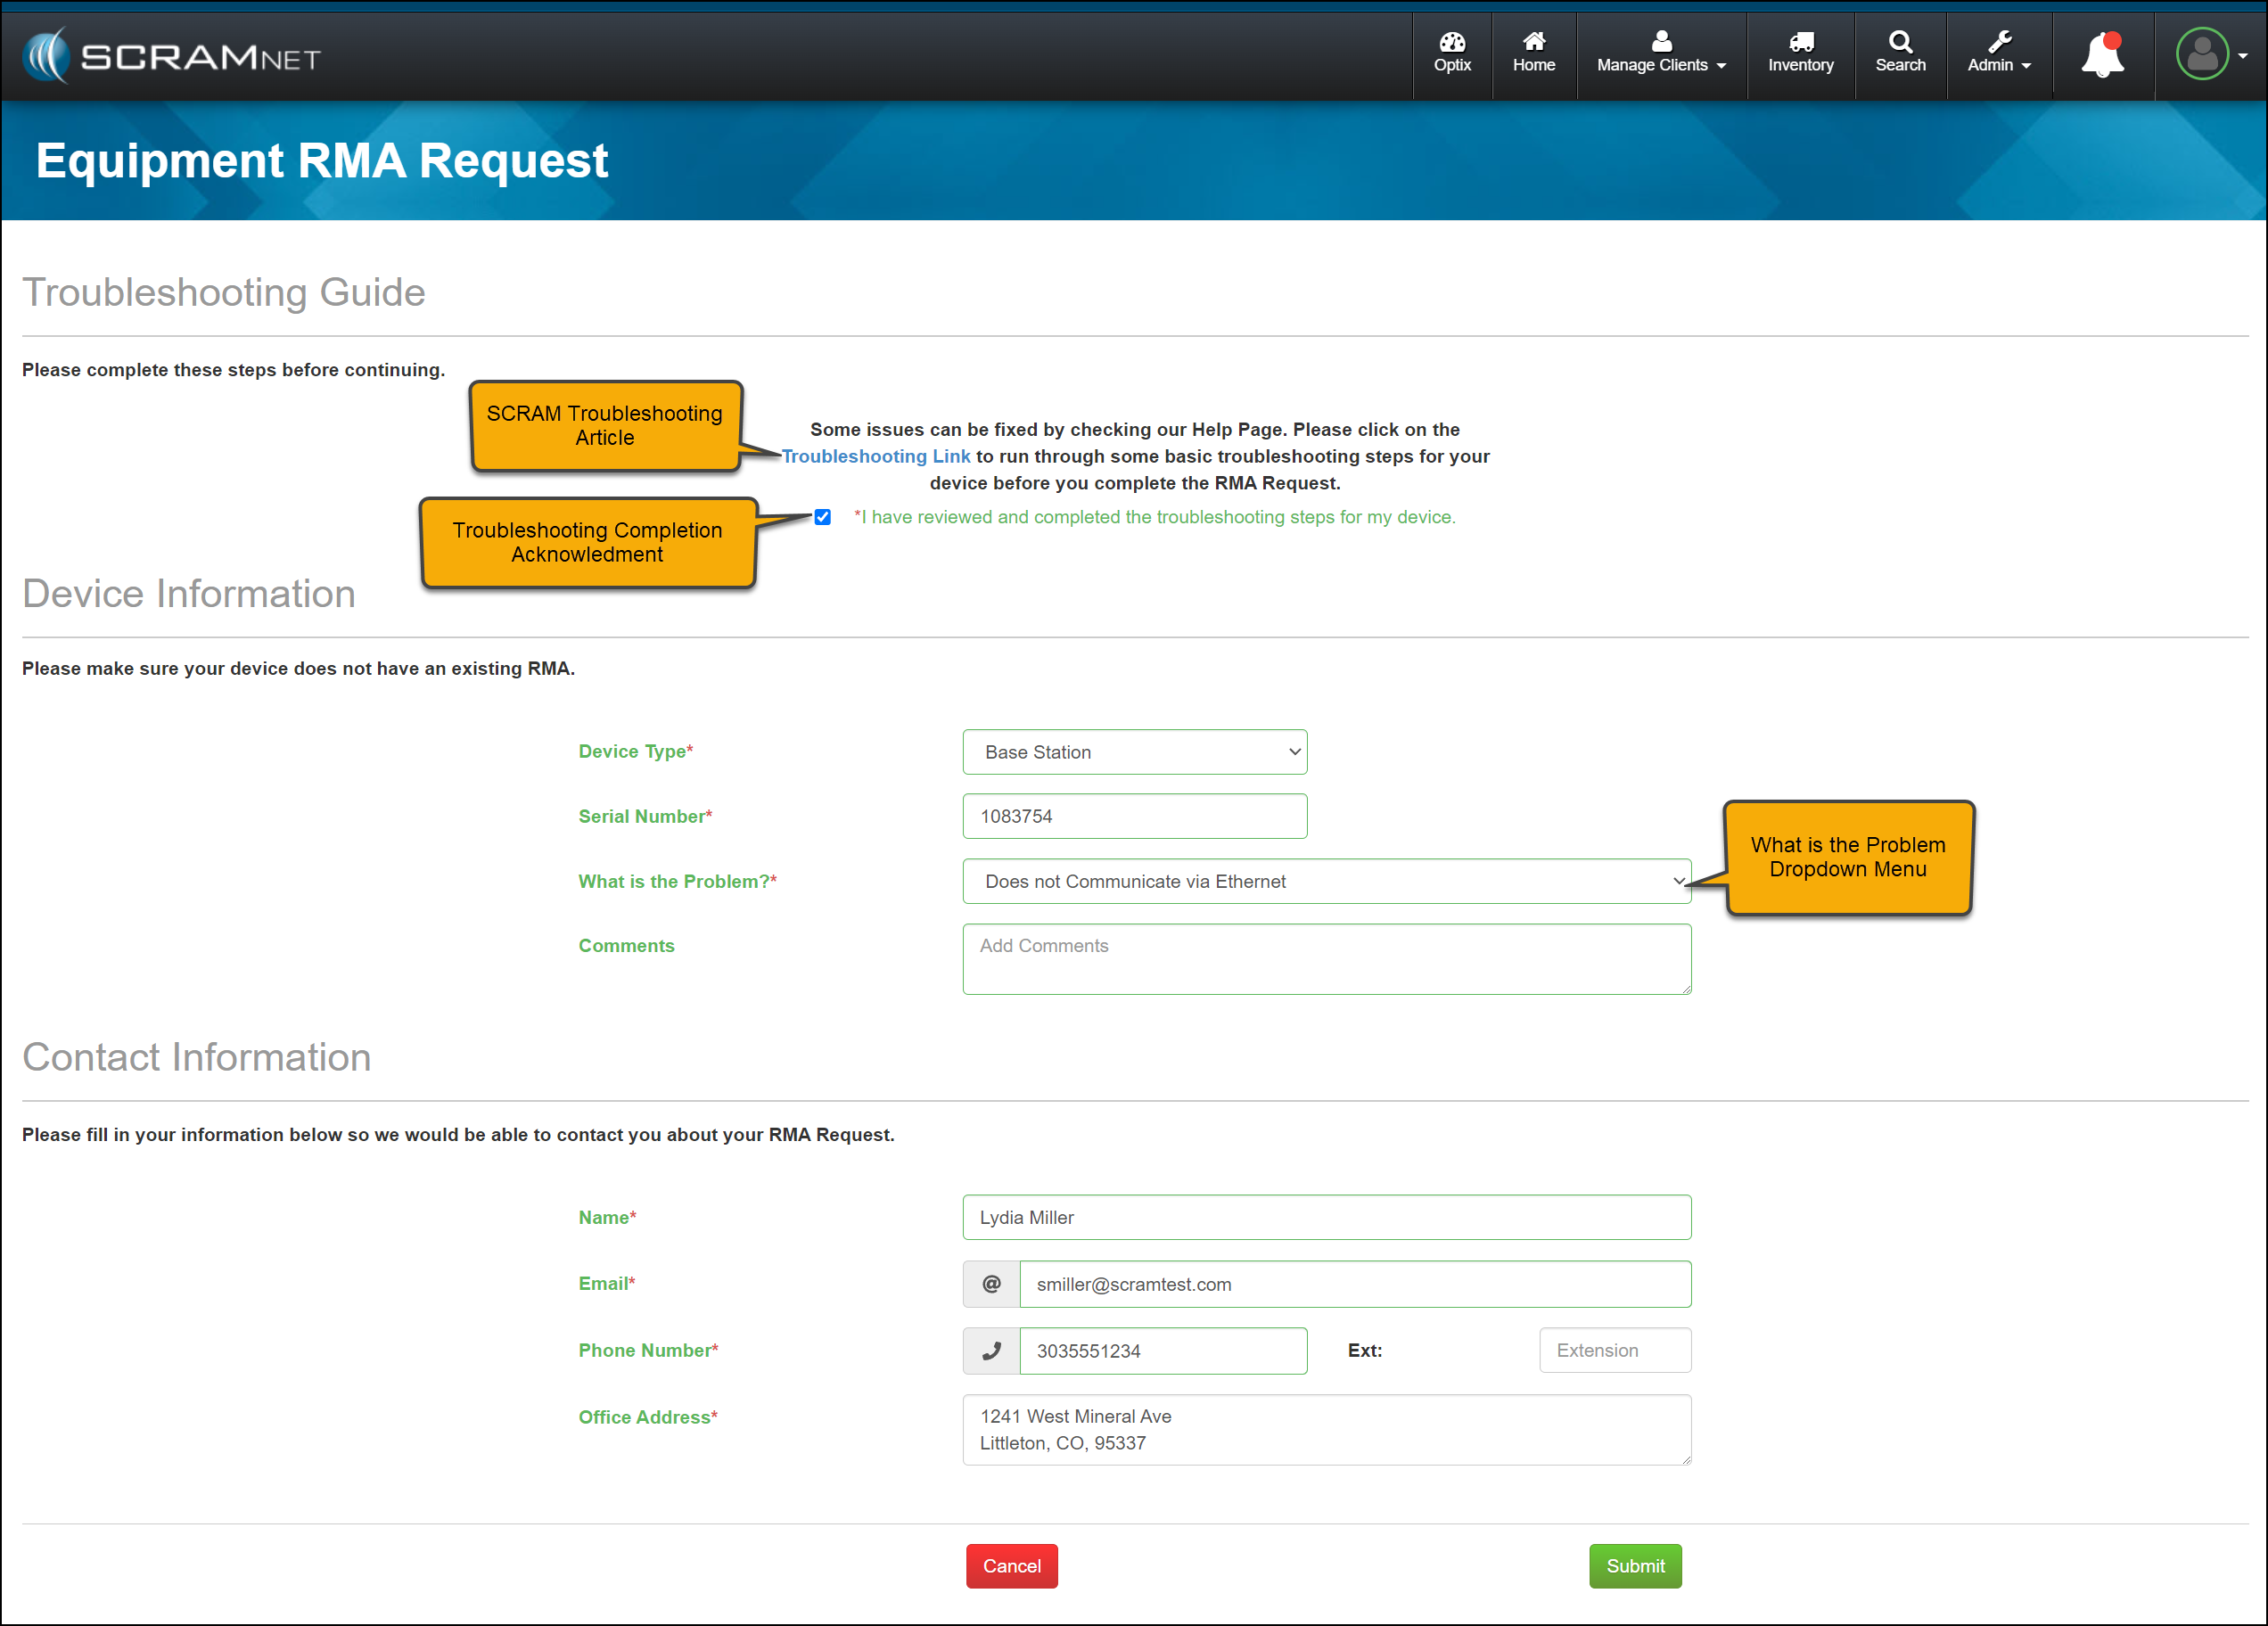
An updated single-page equipment RMA form.
A SCRAM Equipment Troubleshooting hyperlink providing quick access to basic troubleshooting. Following the troubleshooting steps may resolve the most common equipment issues, keeping functioning equipment available for client monitoring.
A troubleshooting acknowledgment checkbox confirming that troubleshooting steps have been taken before requesting an RMA for a device, thus ensuring no delay in processing the RMA request.
The Device Information section now includes a “What is the Problem?” dropdown menu to identify the specific issue quickly. The dropdown menu will also reflect the device type to customize the options available further.
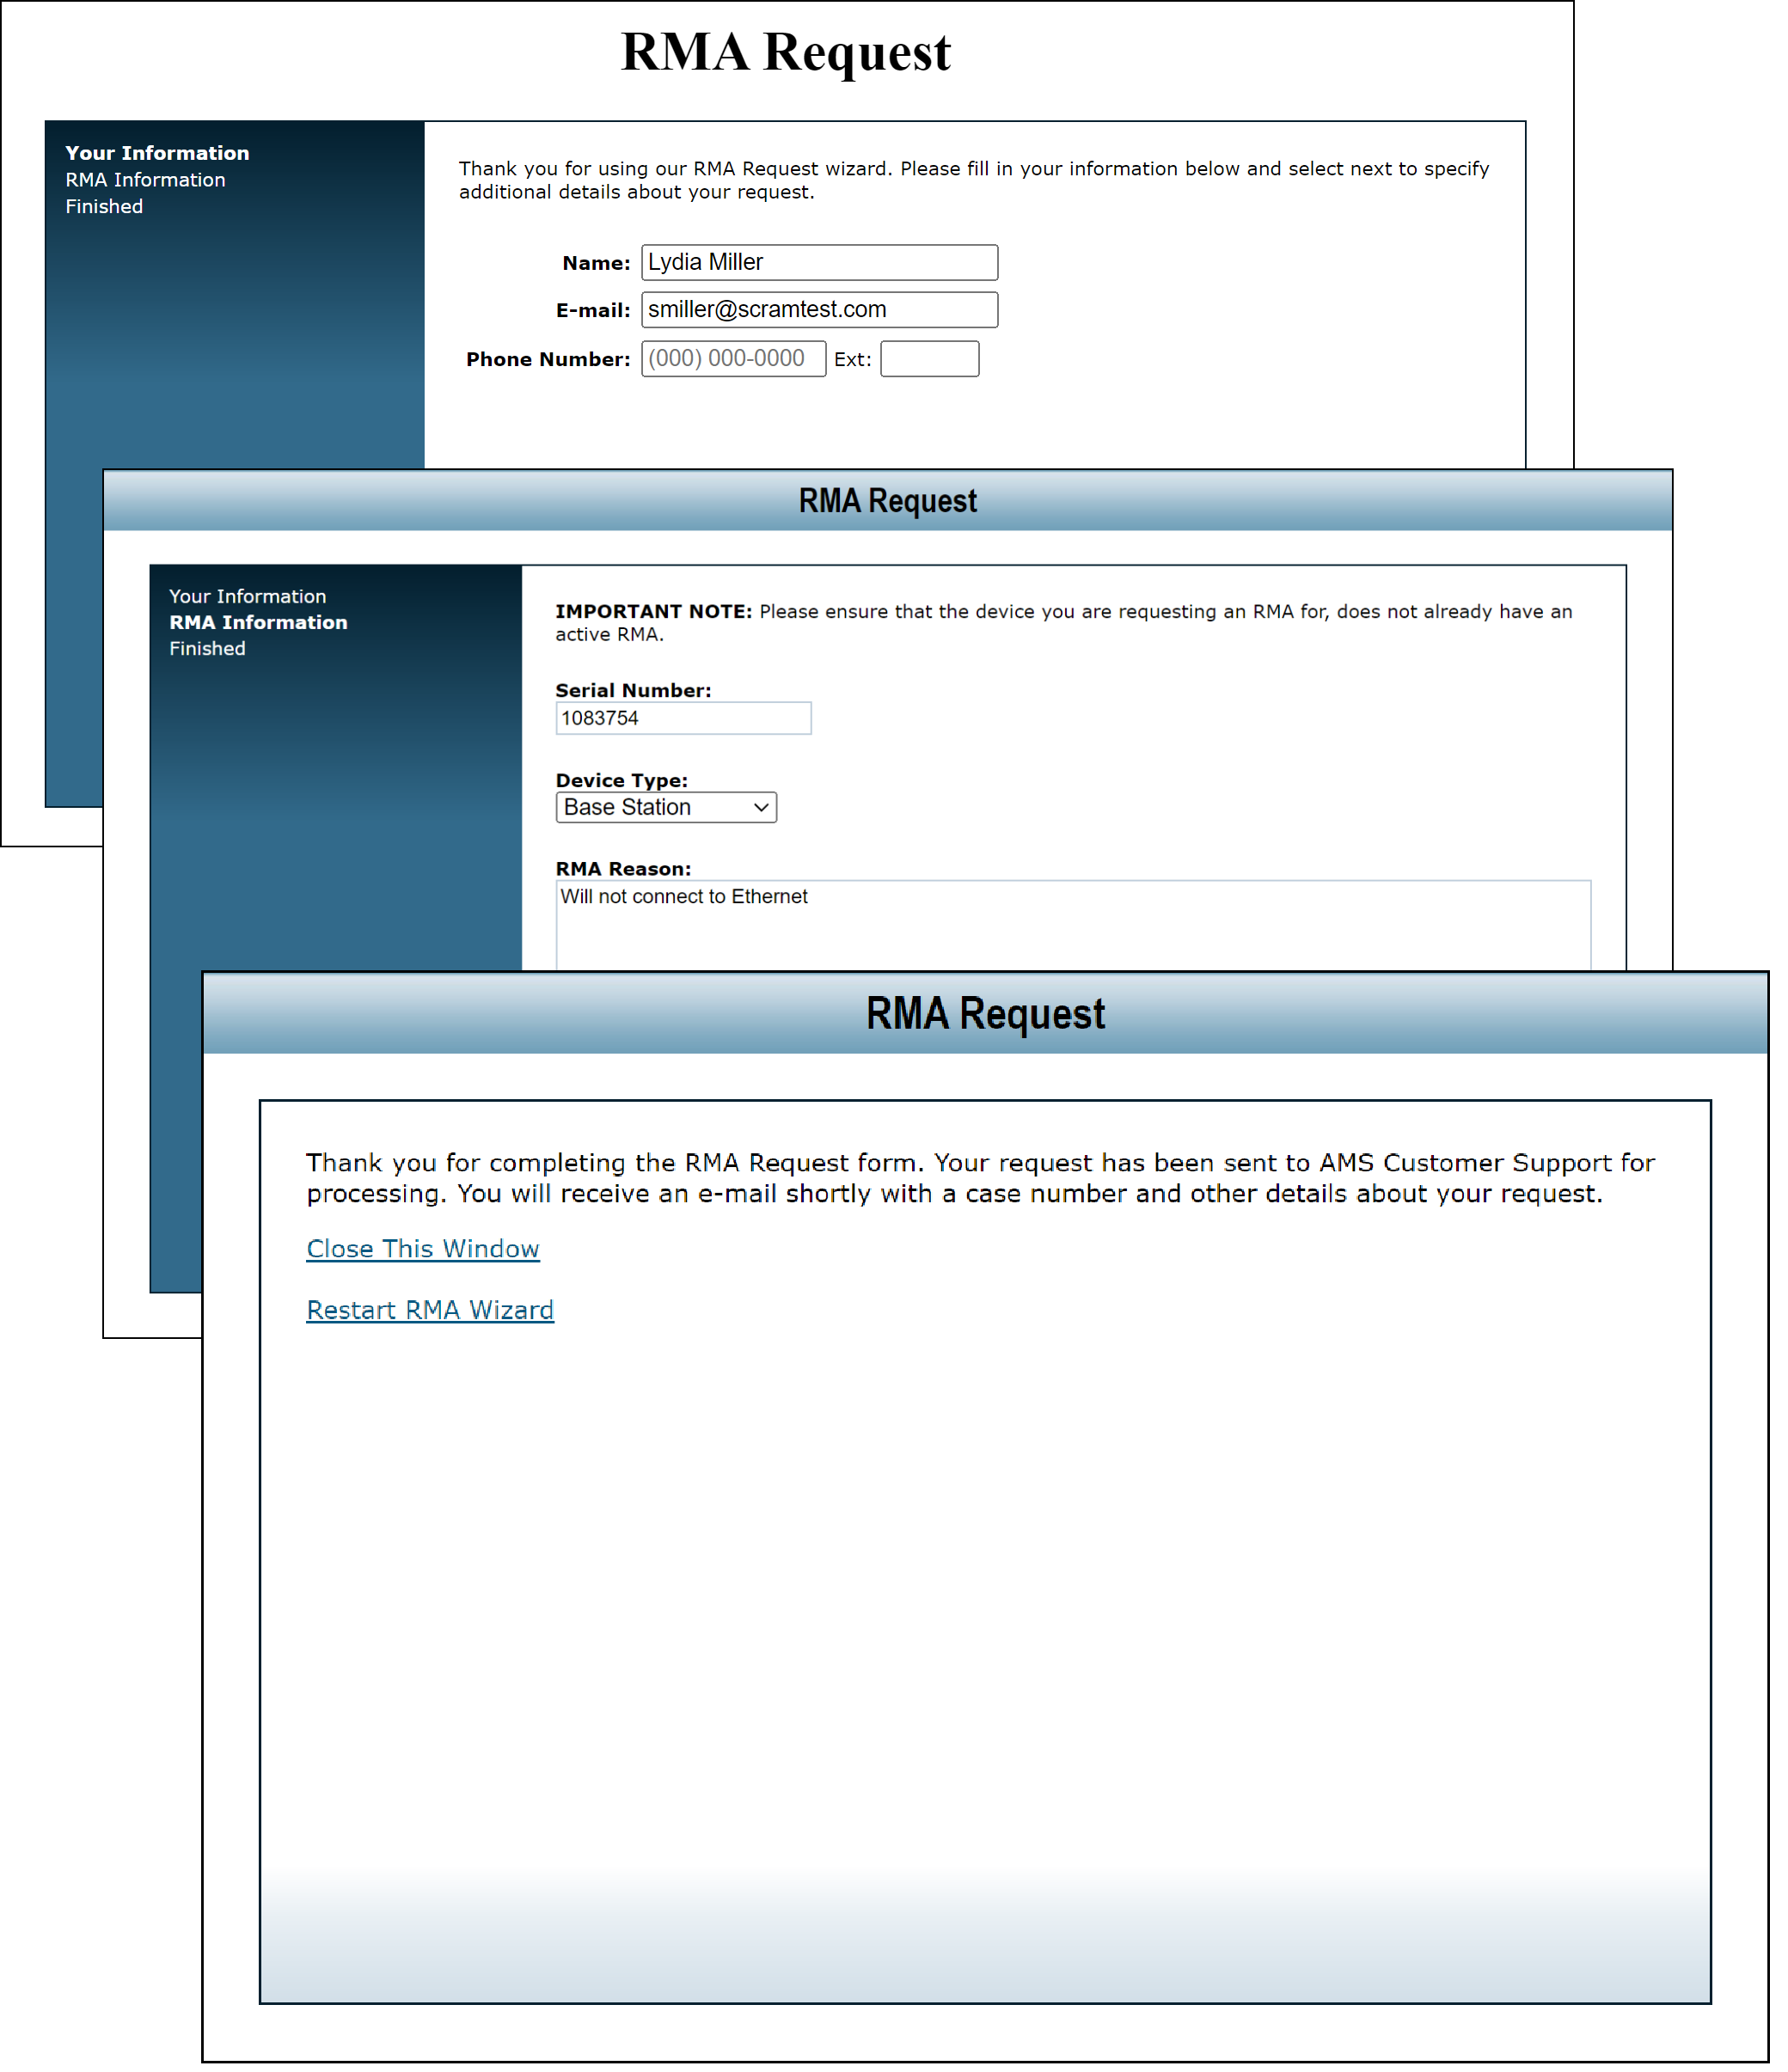
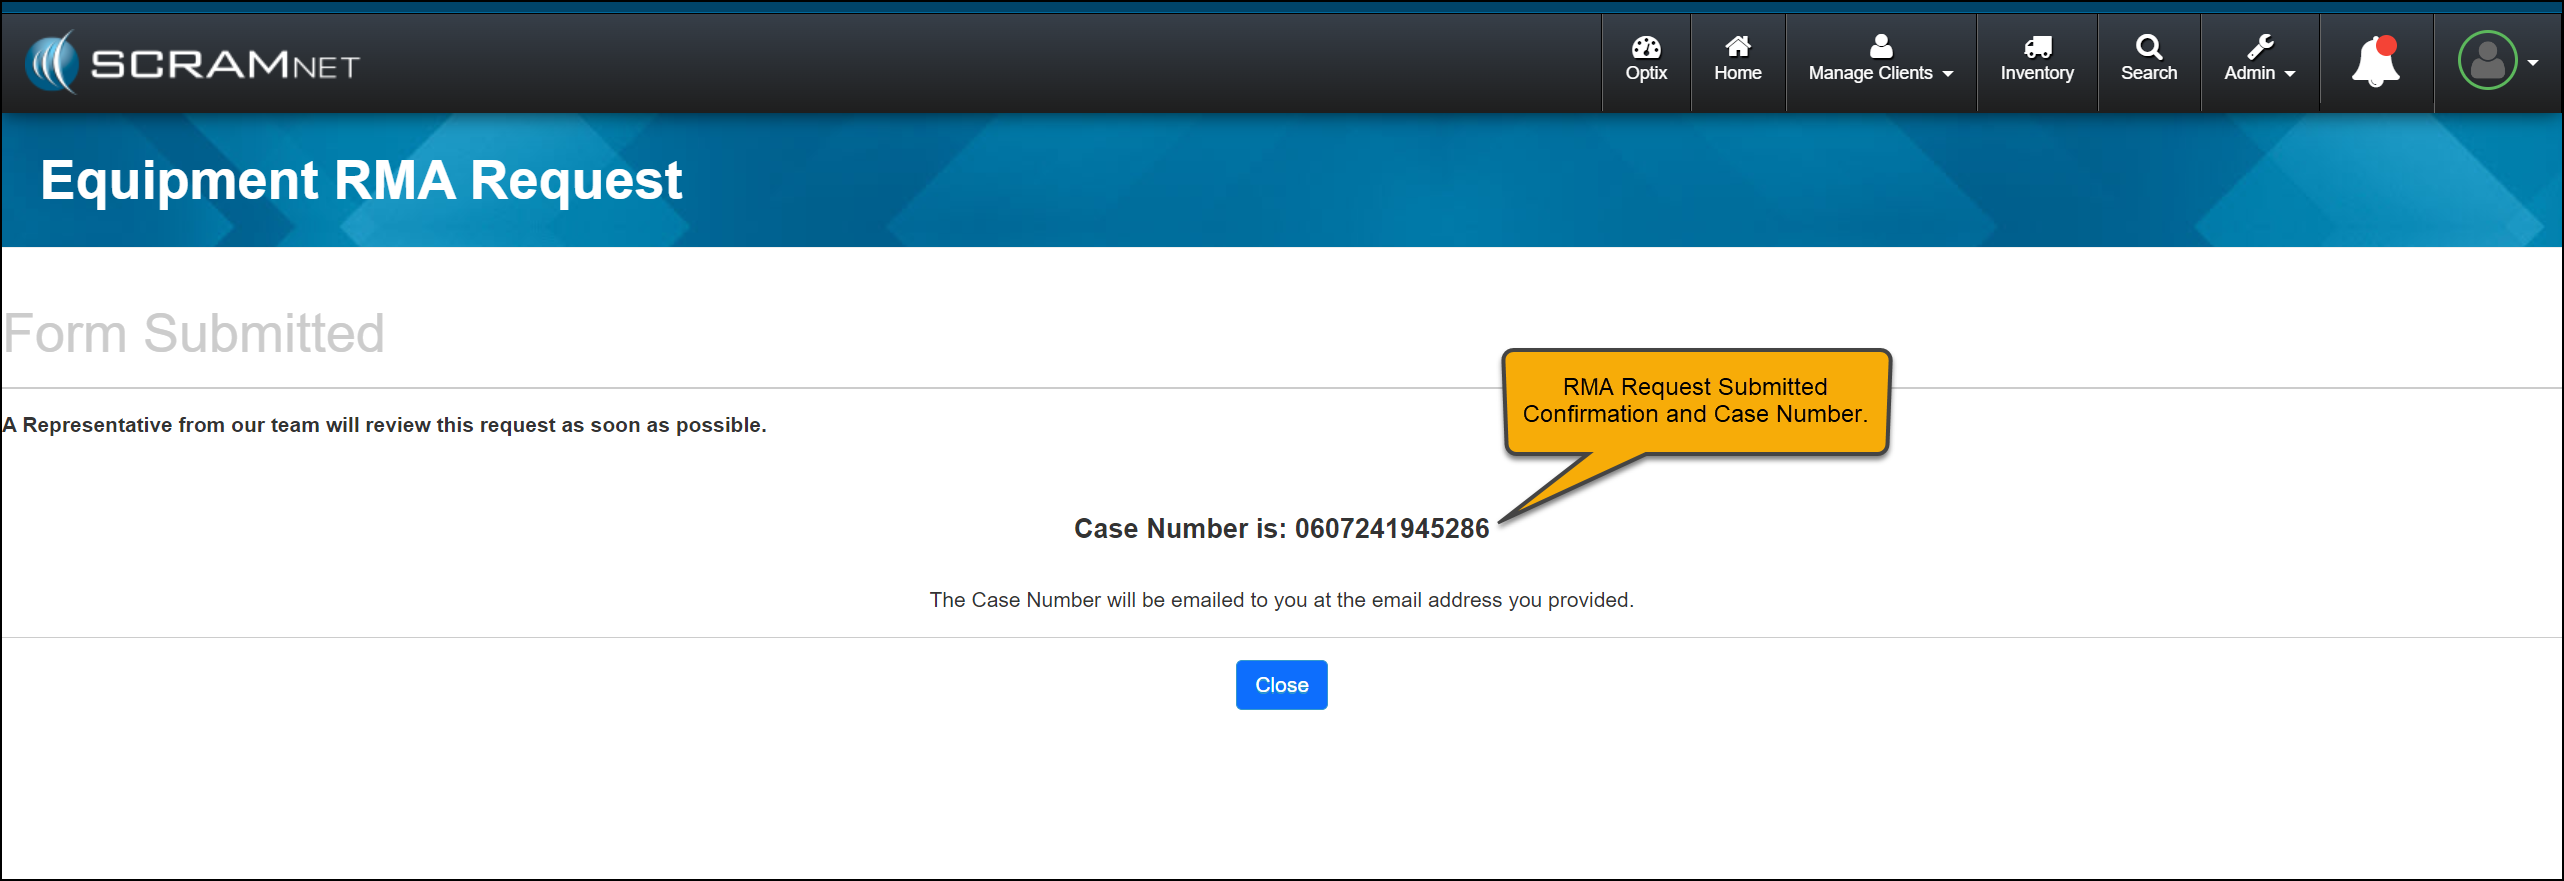
Once the RMA request has been submitted, the acknowledgment page will include the case number associated with the request for your reference.
Not seeing the enhancement in SCRAM Systems Help & Support page? Clear your cache and cookies and refresh your browser window.
Current Equipment RMA Request Page
Pre-release RMA Request page (click to enlarge)
Enhanced Equipment RMA Request Page
Equipment RMA Request page (click to enlarge)RMA Acknowledgement page with Case Number (click to enlarge)
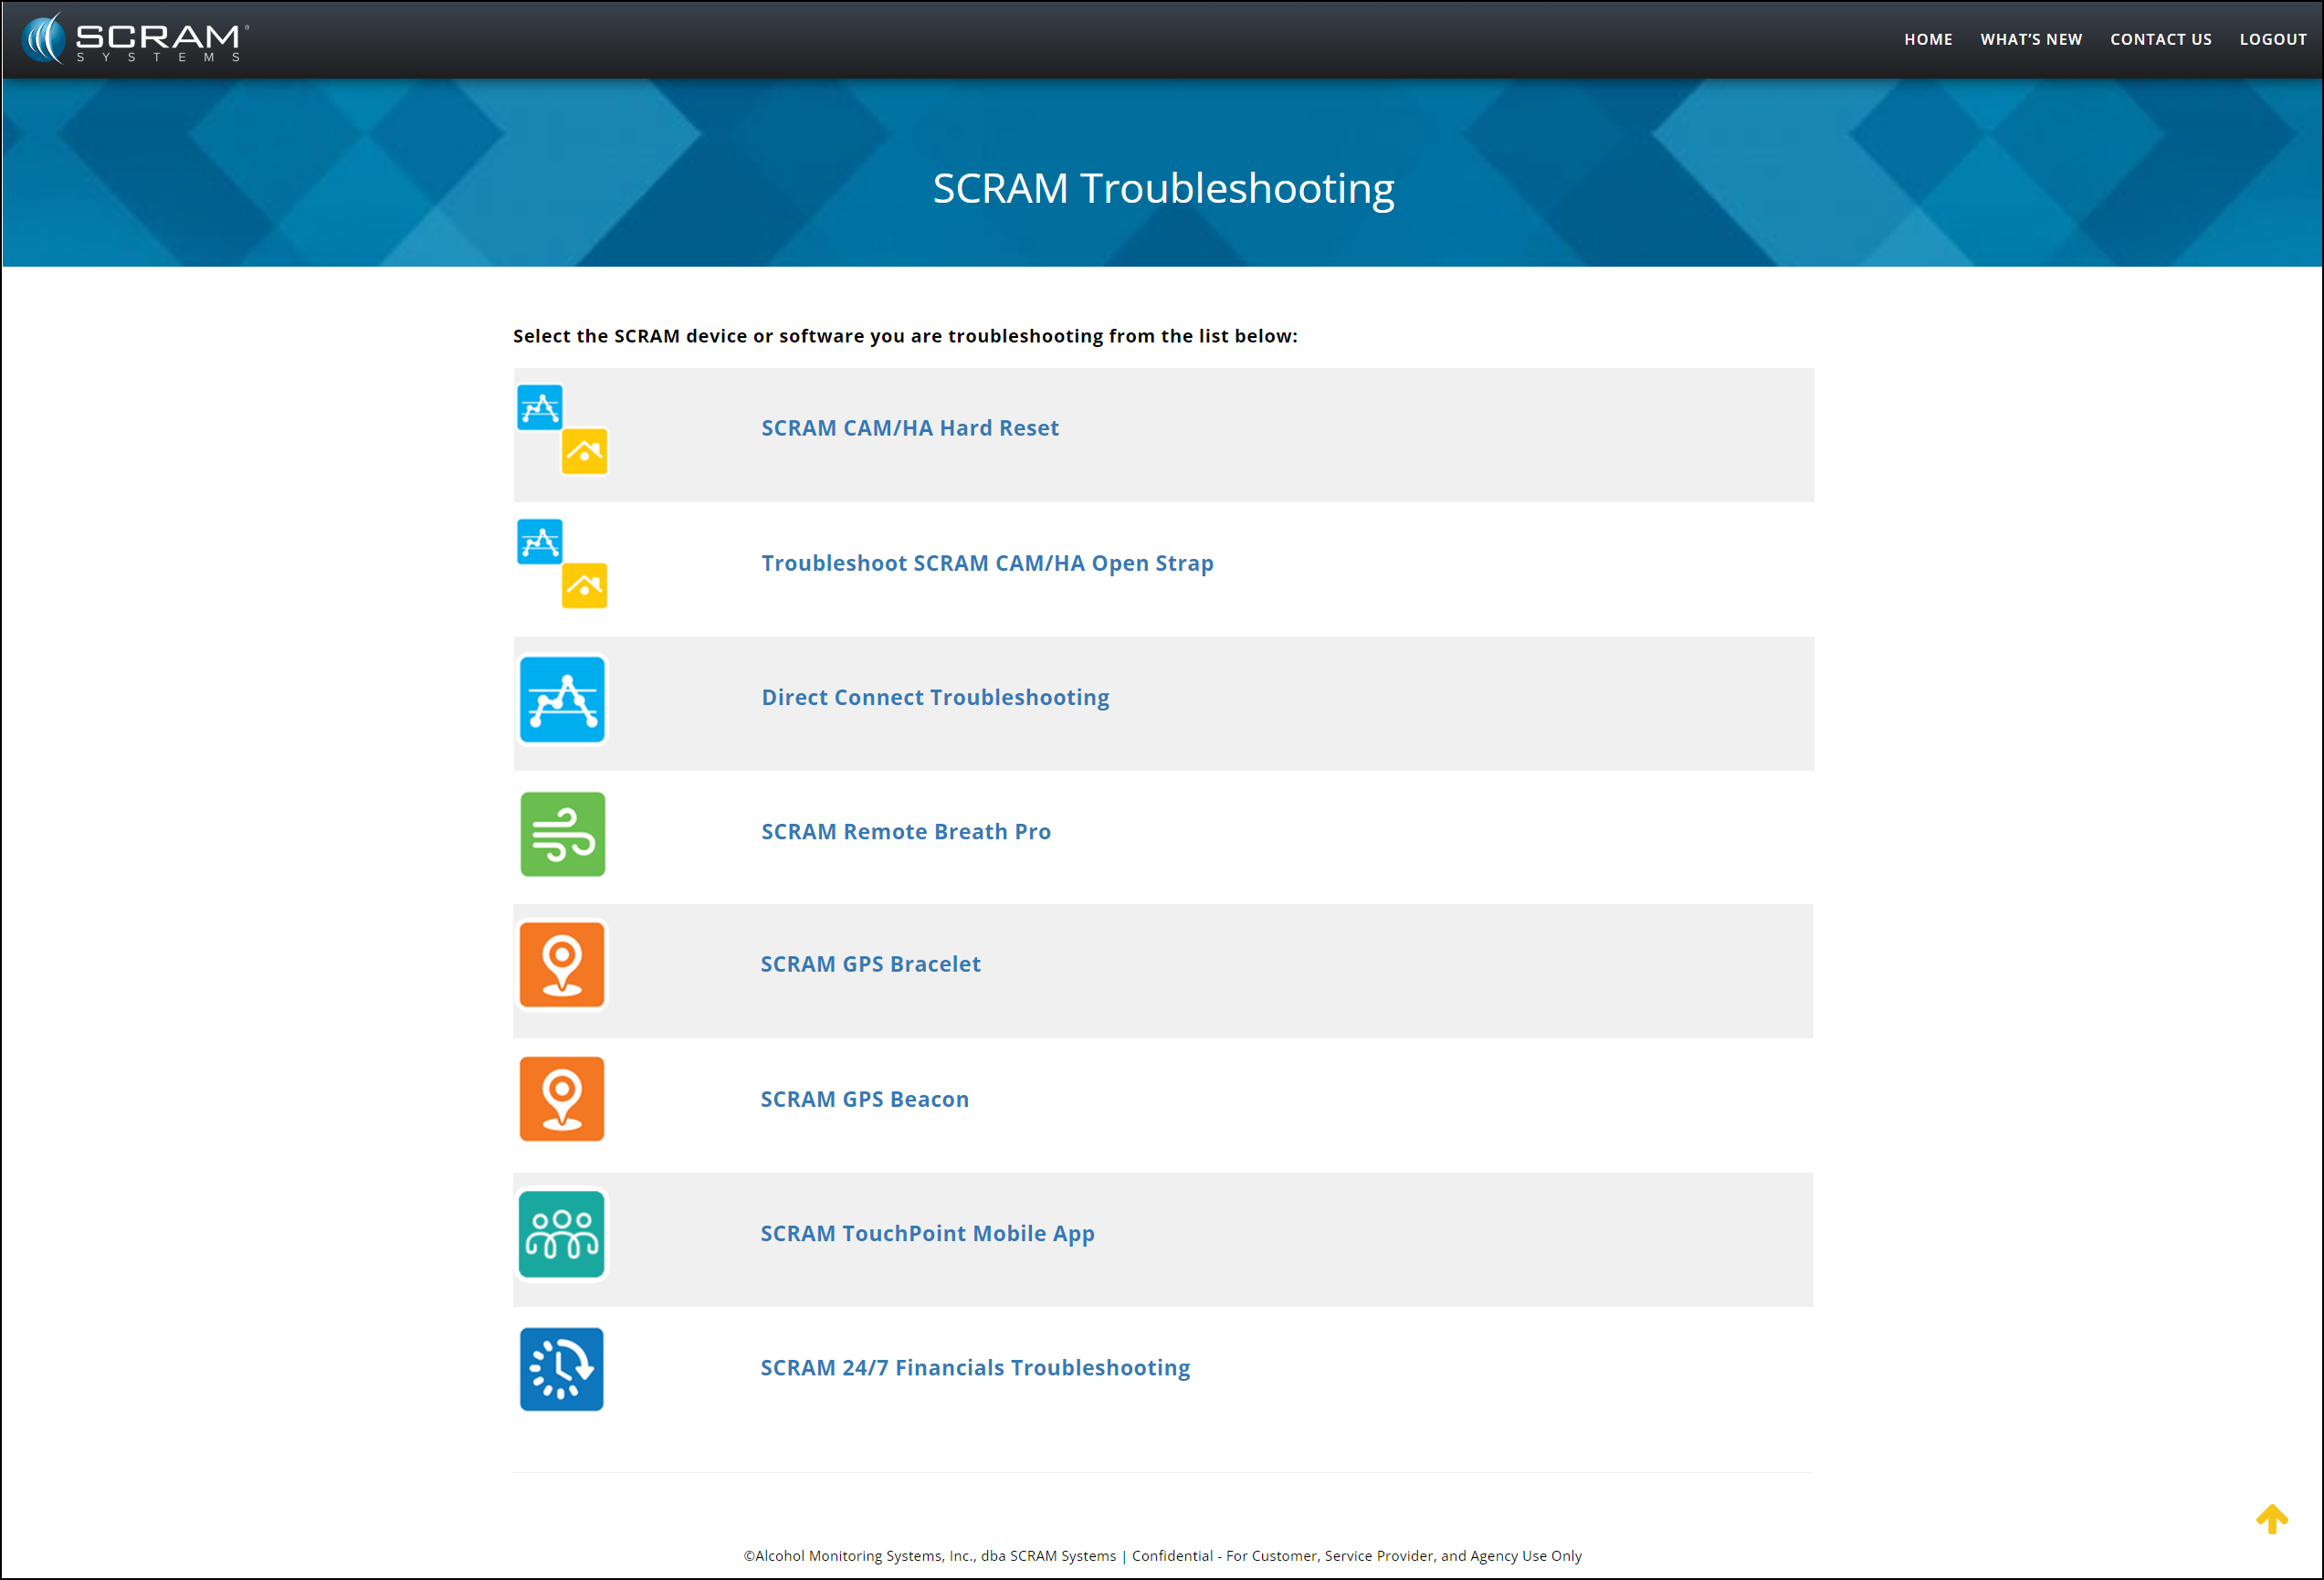
SCRAM Troubleshooting
On the SCRAM Troubleshooting article, select the product and issue to view step-by-step instructions.
SCRAM Troubleshooting Help Article (click to enlarge)
On June 12, 2024, SCRAM Systems will release multiple enhancements to SCRAM 24/7.
When viewing an activity fee, a new column displays whether the fee has been applied to all clients or will only be applied to future clients.
When deactivating an activity fee, a lock icon will be displayed next to the fee’s name when a fee is still being applied to currently active clients.
You will now have the option to flag a device as damaged when Suspending or Removing an EM Activity for the client.
The notes entered for a device being checked in as damaged will now be visible on the Device Details page in SCRAMNET.
Not seeing the enhancement in SCRAM 24/7? Clear your cache and cookies and refresh your browser window.
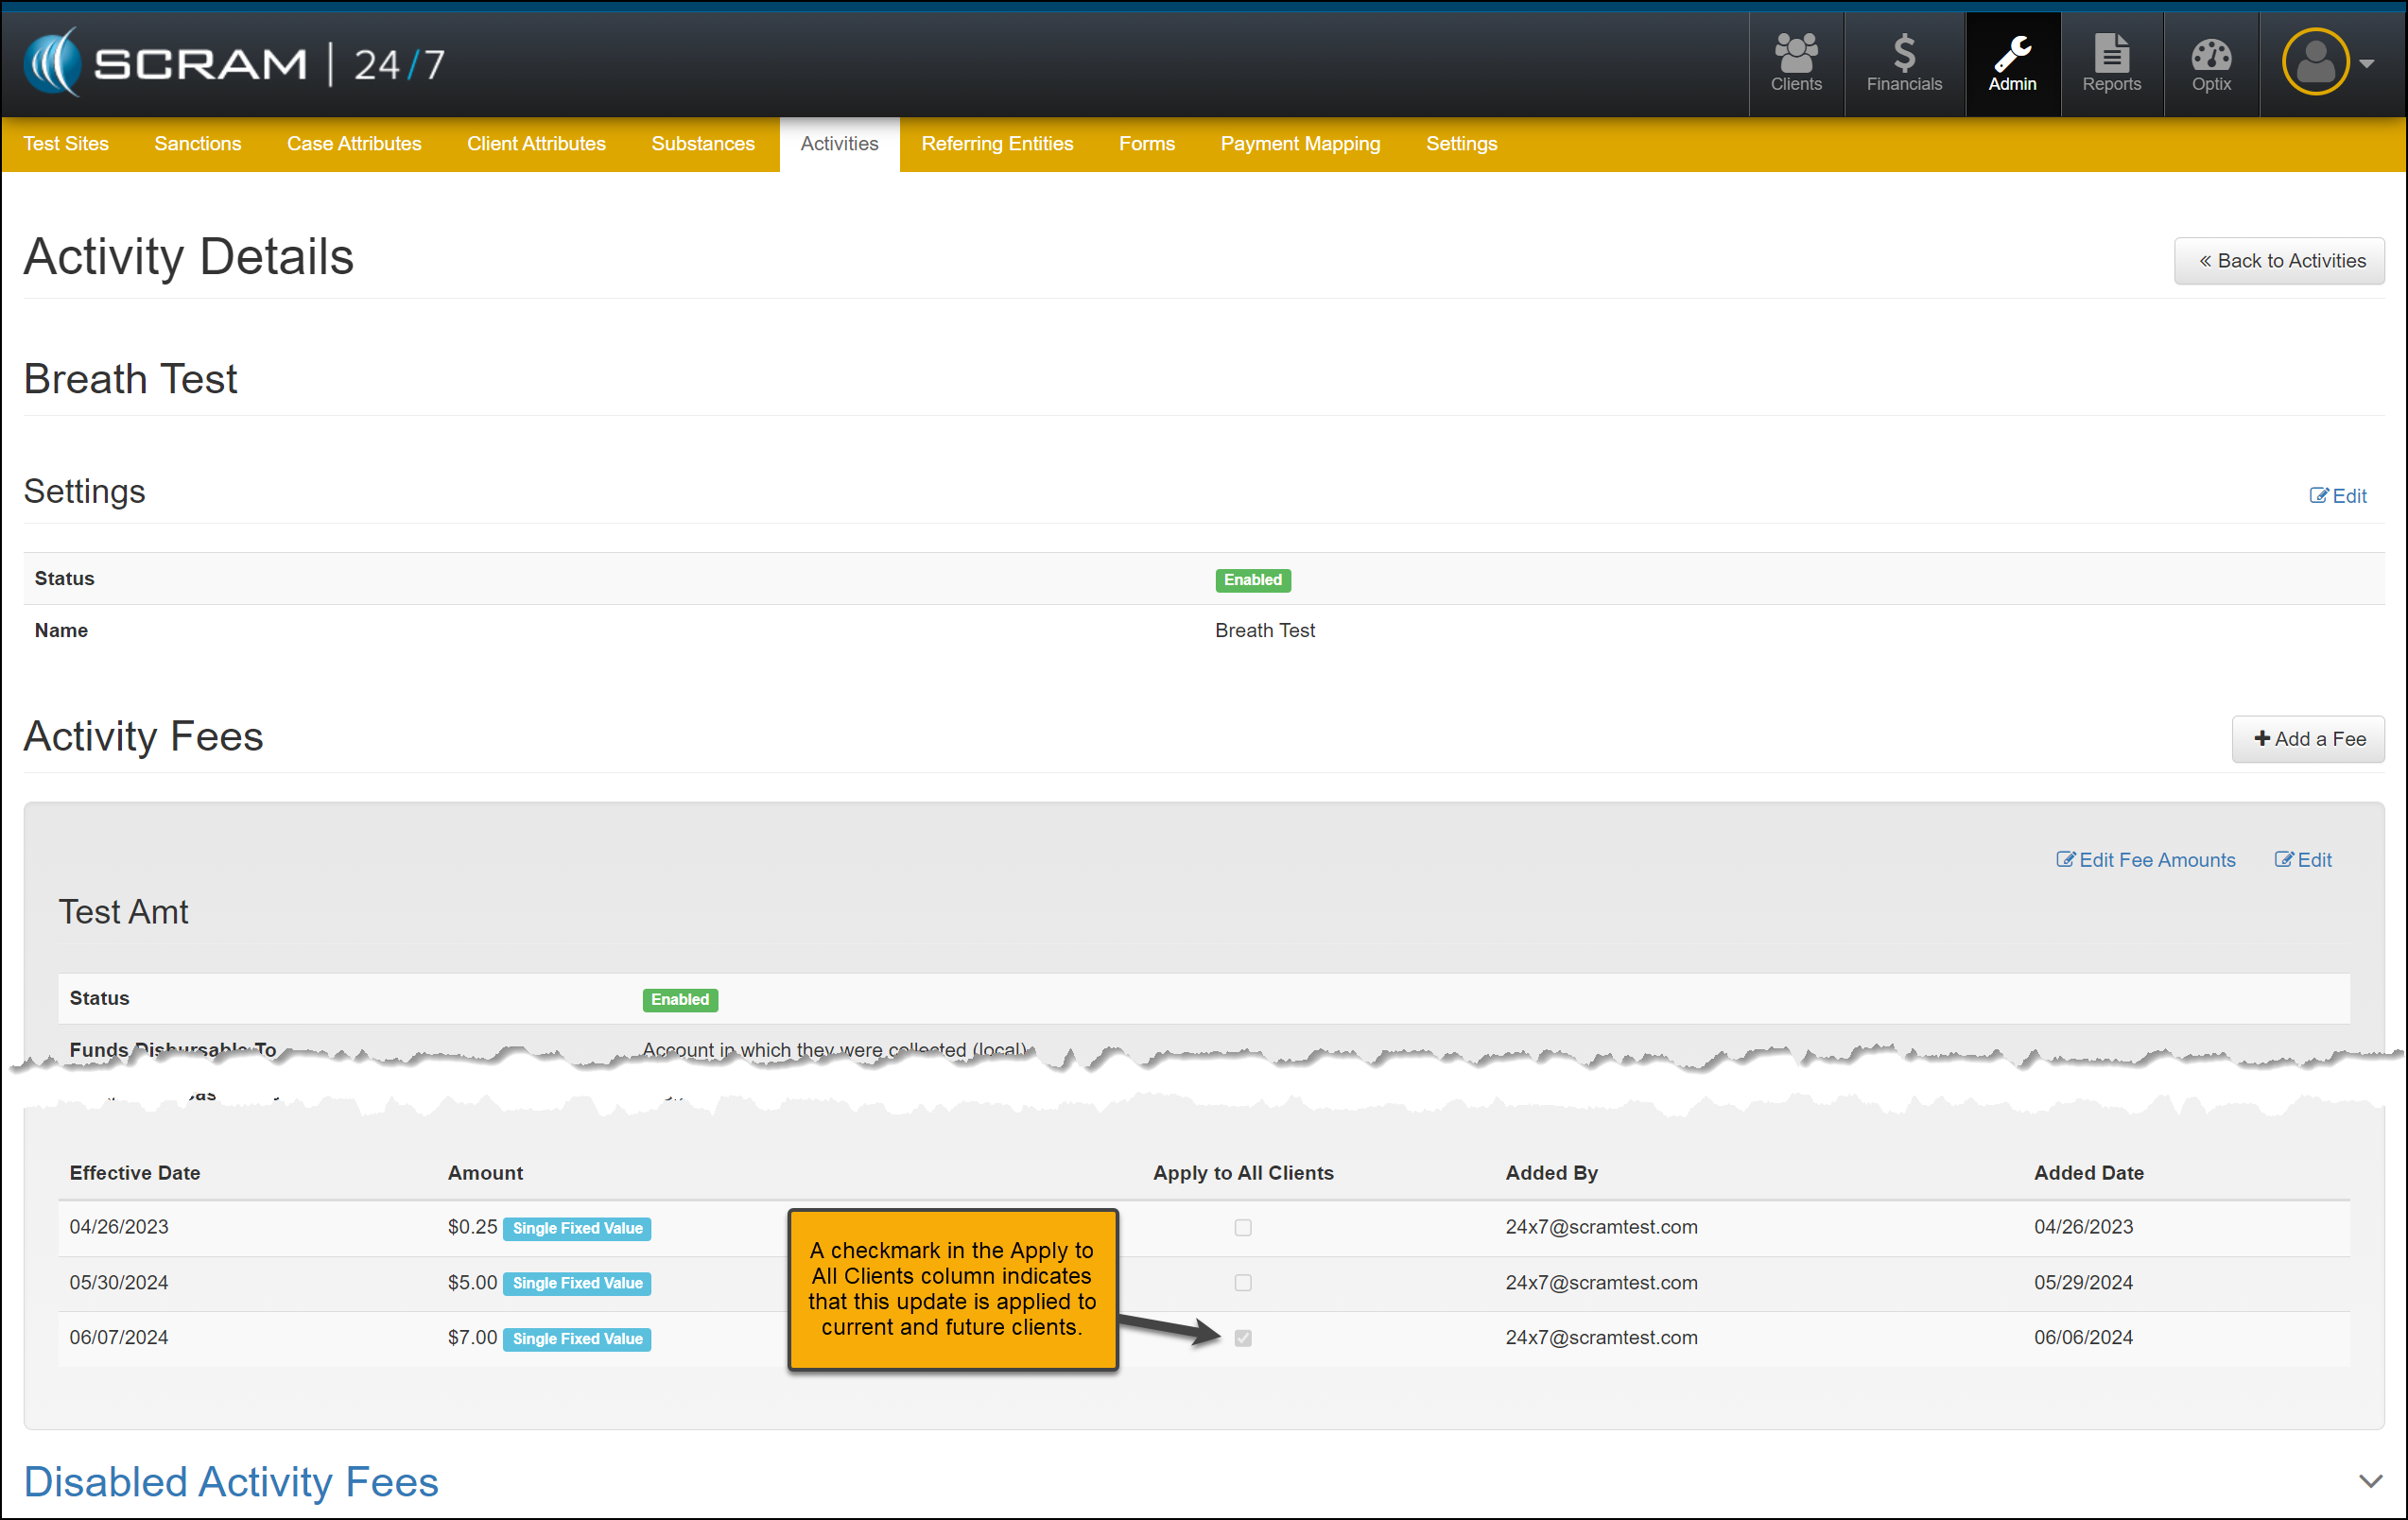
Apply to All Clients Column
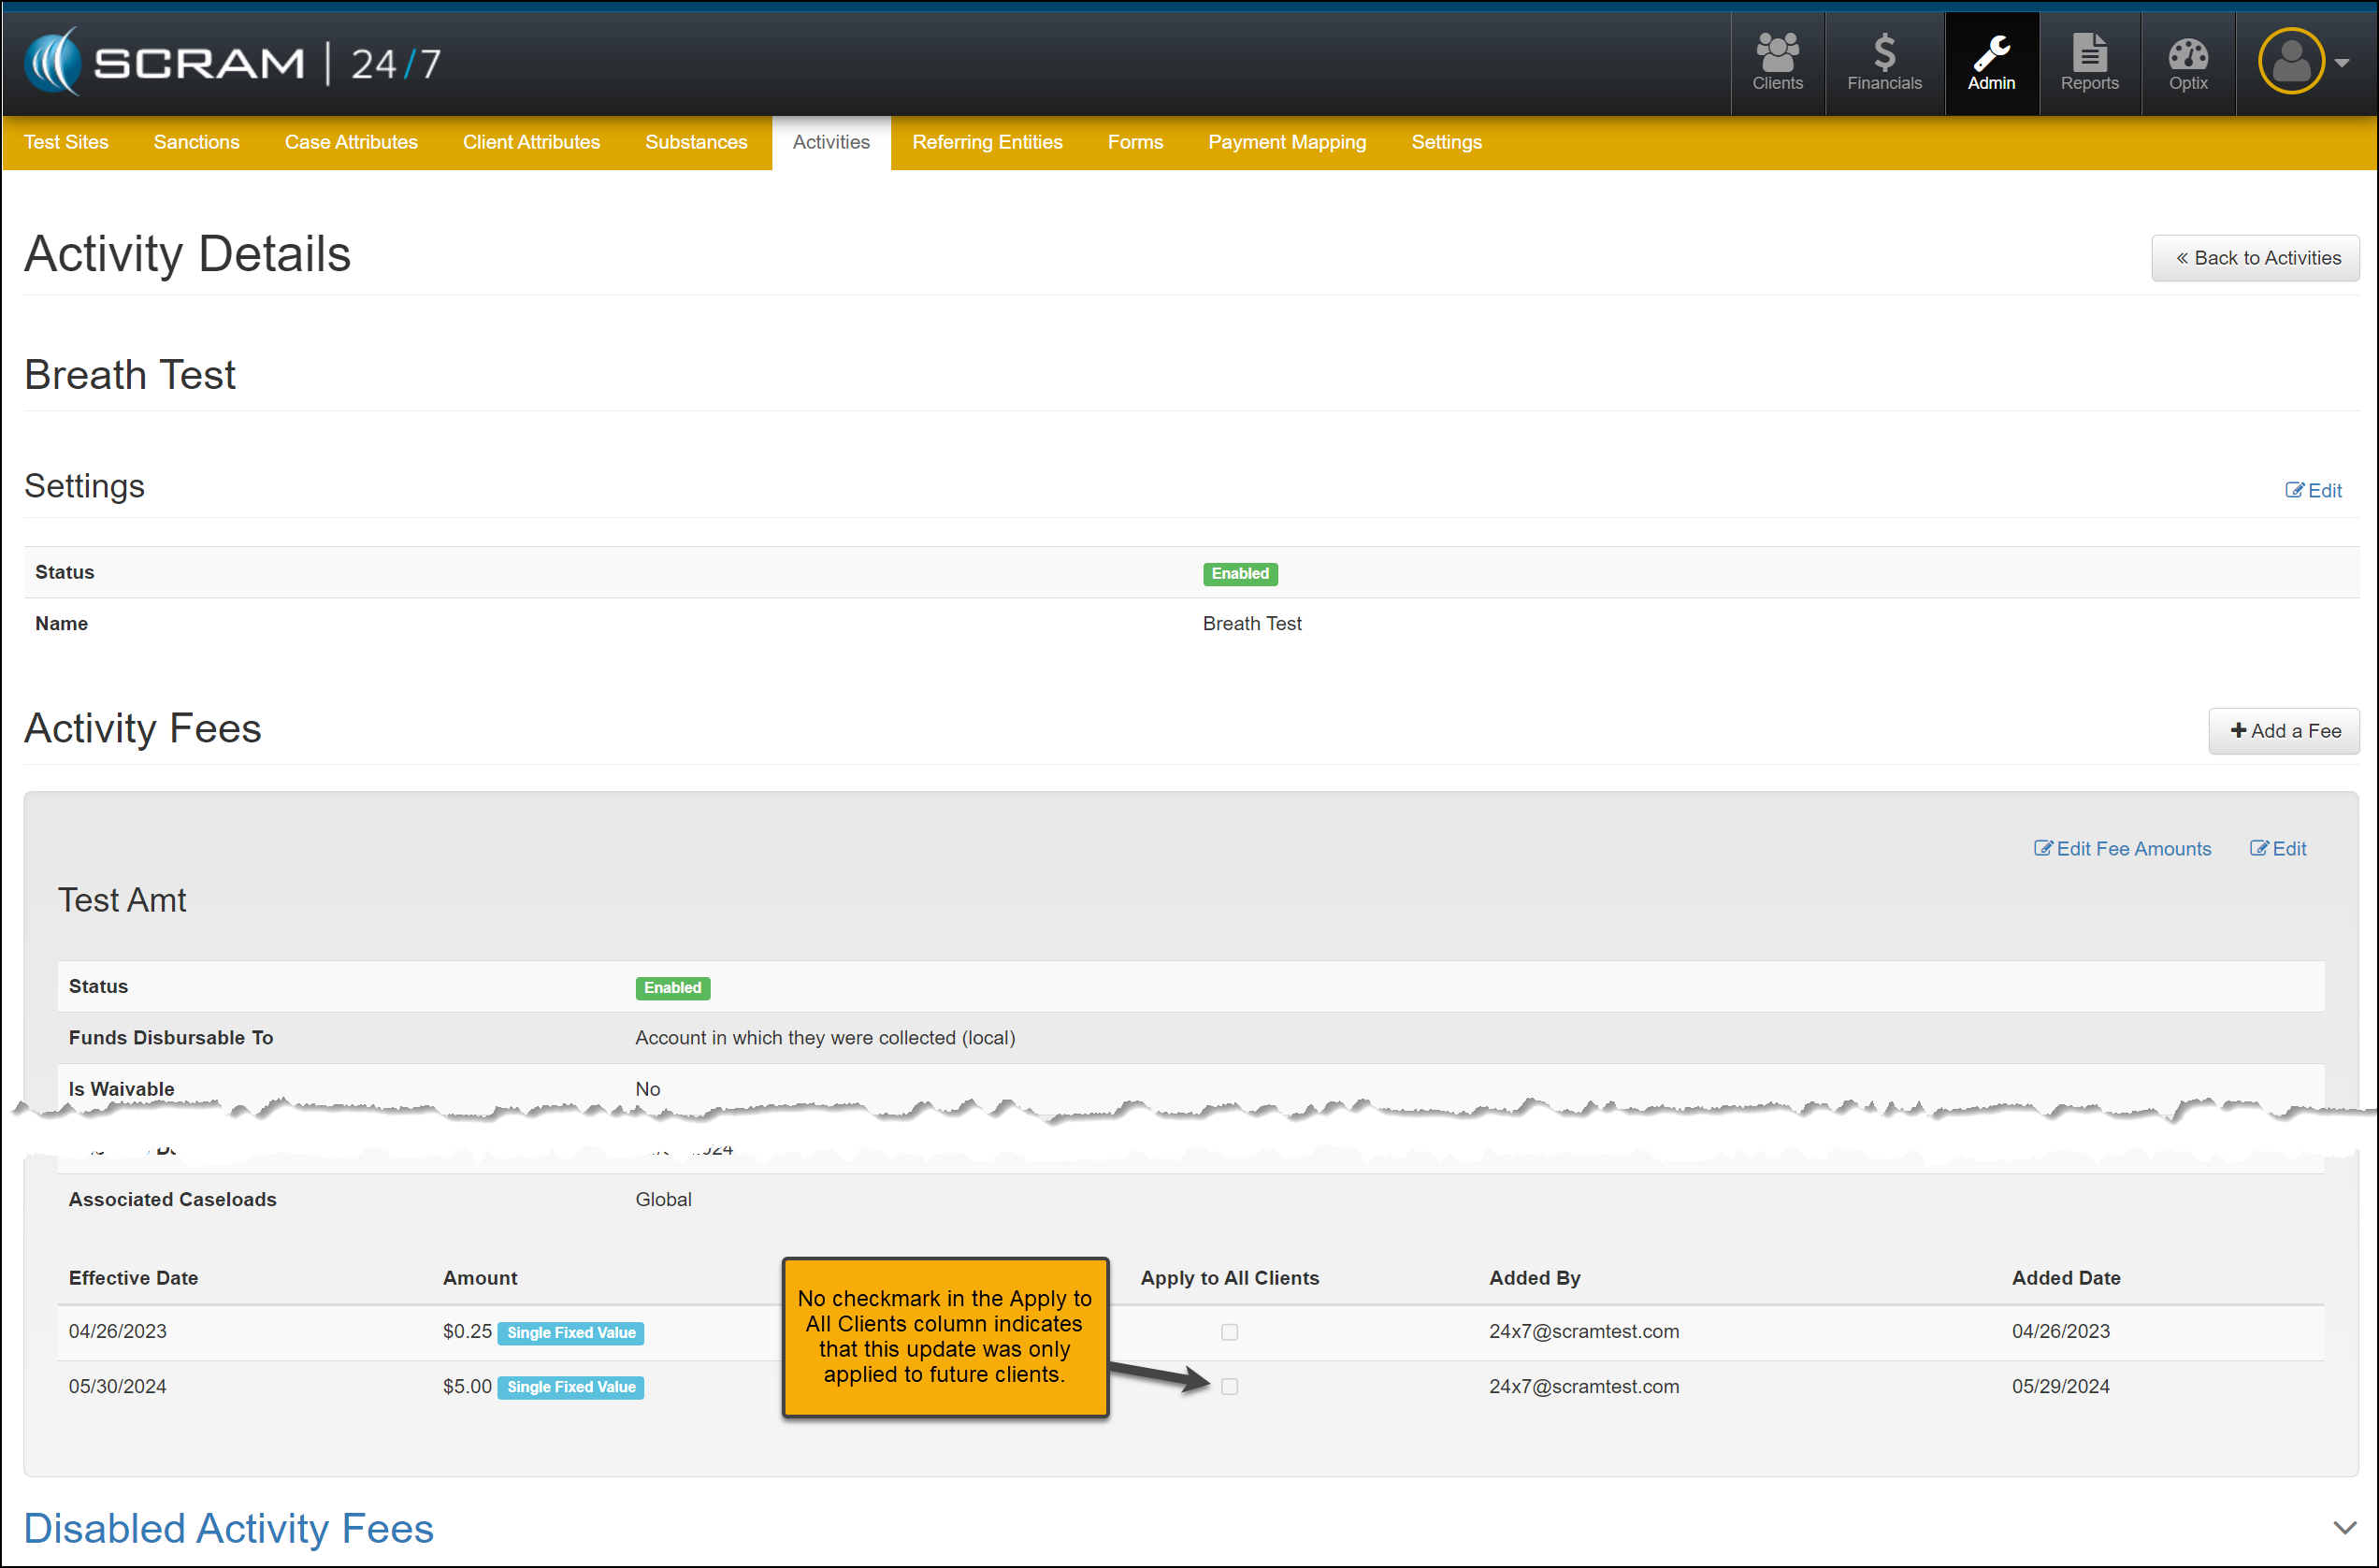
When viewing or editing an Activity’s fee, an “Apply to All Clients” column indicates whether the adjusted fee has been applied to all current and future clients or will only apply to future clients.
Activity Details page- Apply to All Clients Checkbox Not Selected (click to enlarge)
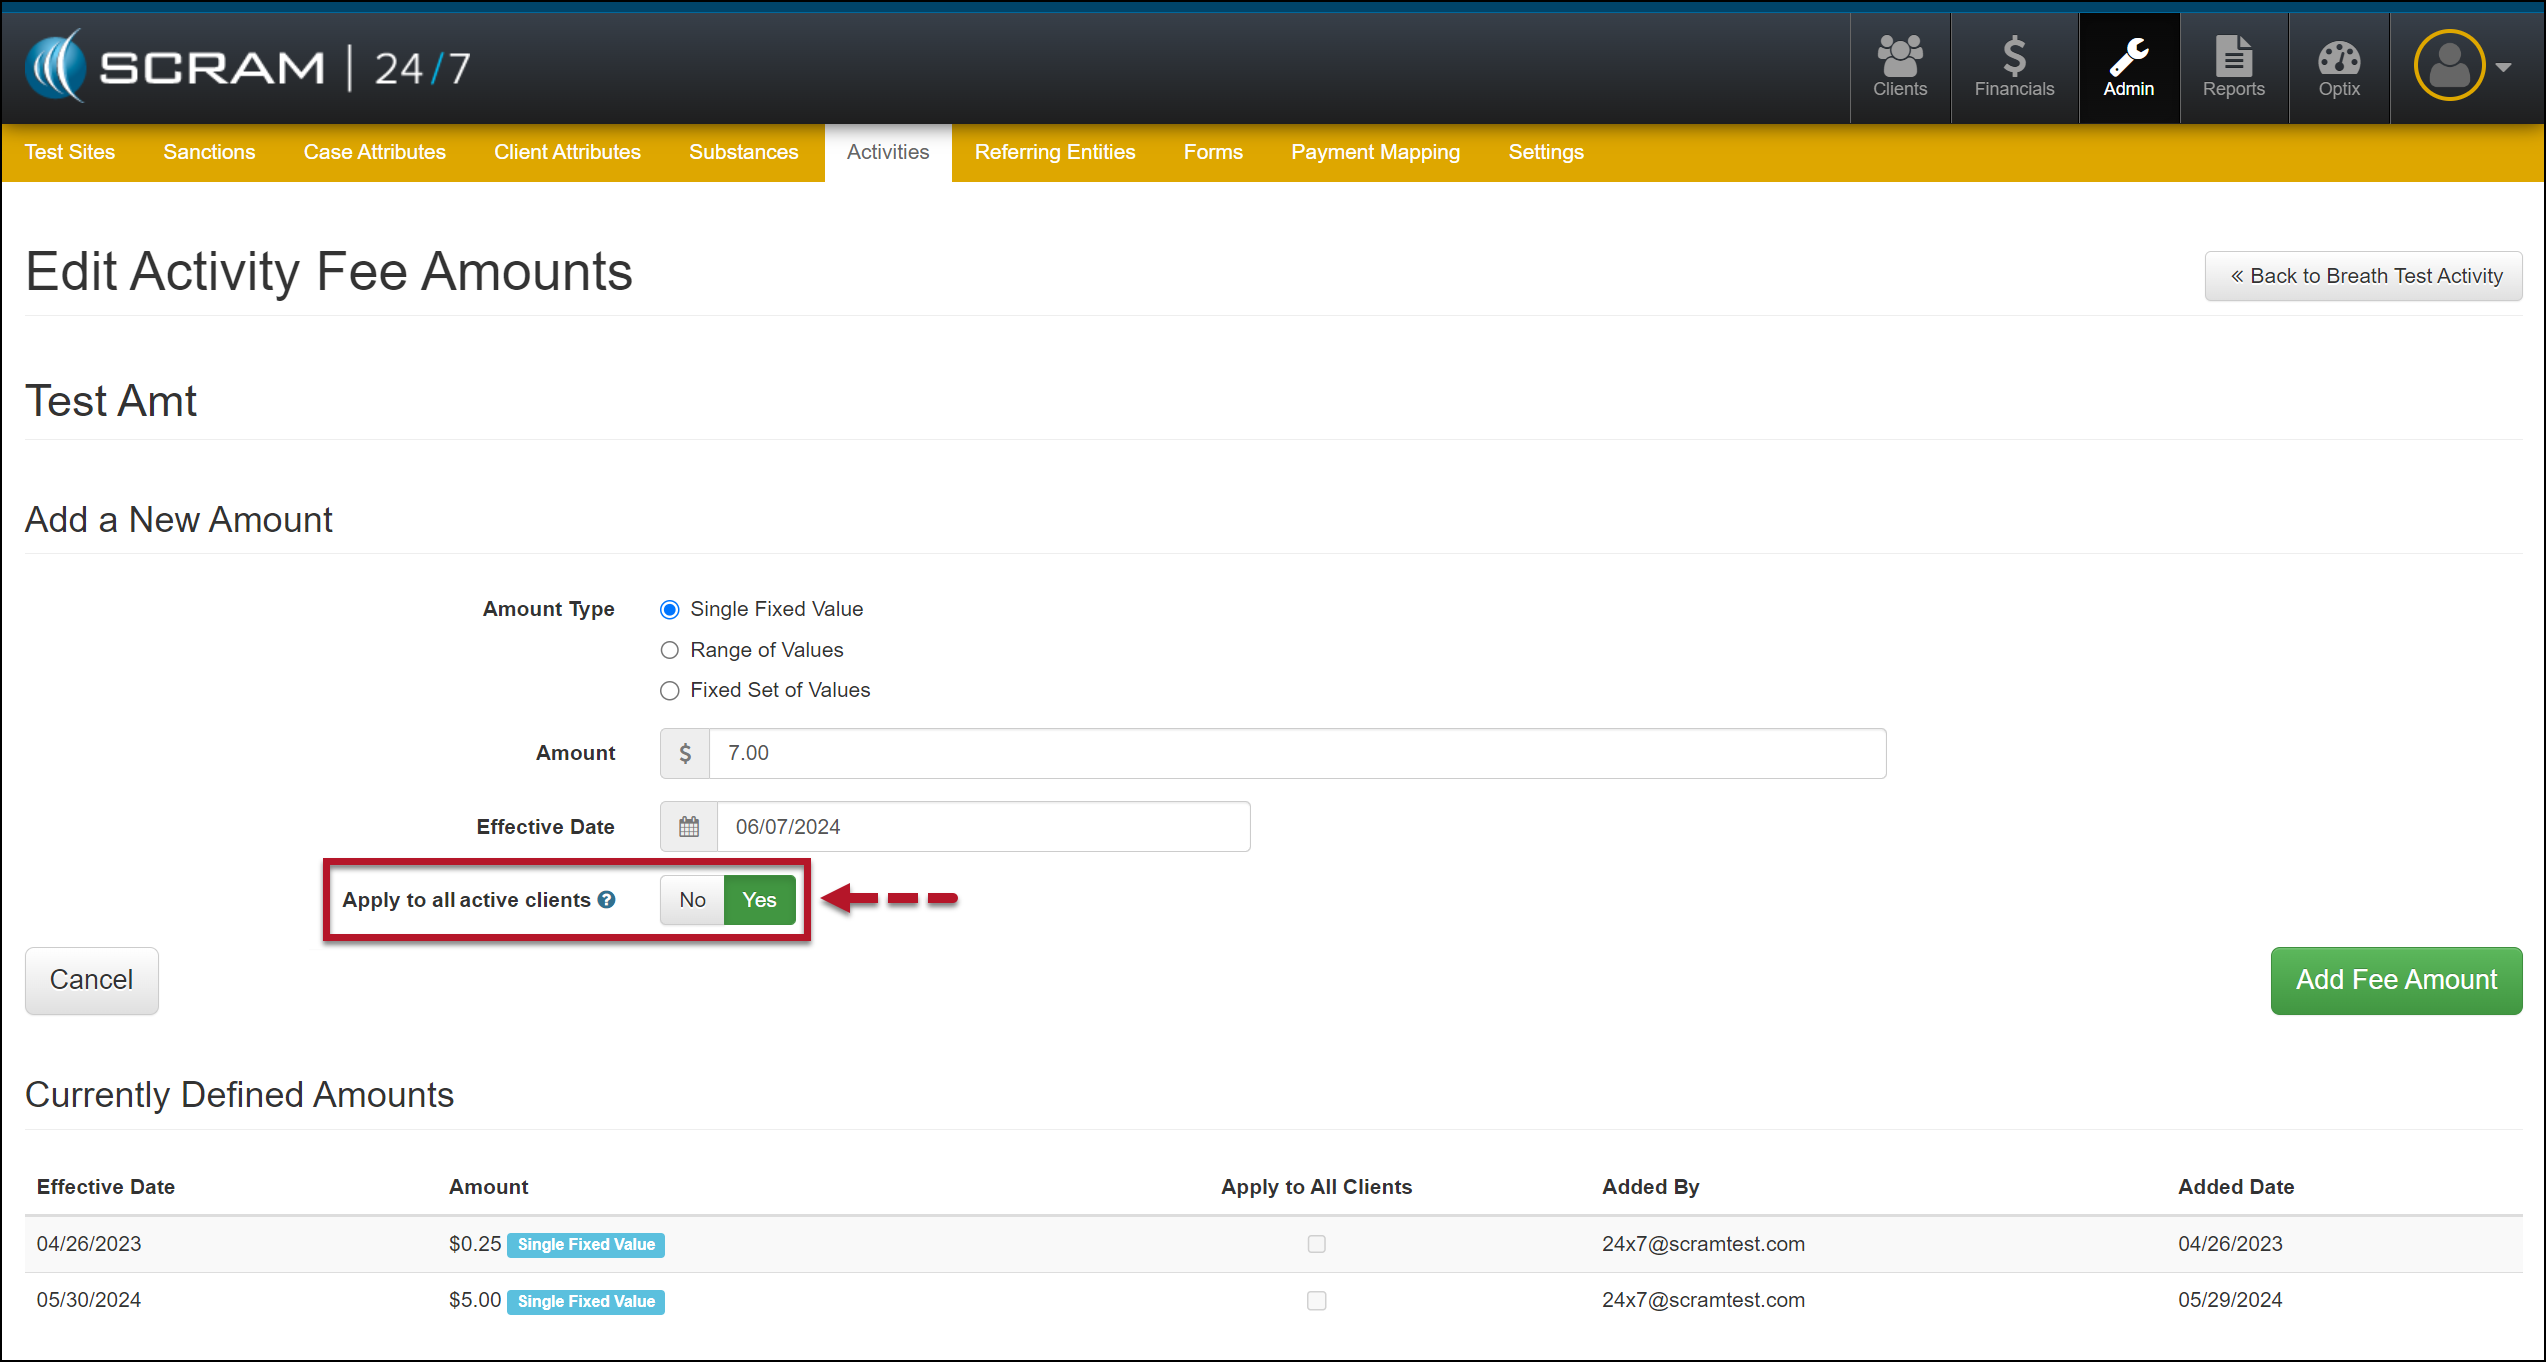
While editing a fee, when you select the “Yes” option to apply this updated fee to currently active and future clients, a checkmark will appear in the “Apply to all Clients” column.
Edit Activity Fee Amounts- “Apply to all active client” Set at Yes (click to enlarge)Activity Details page- Apply to All Clients Checkbox Selected (click to enlarge)
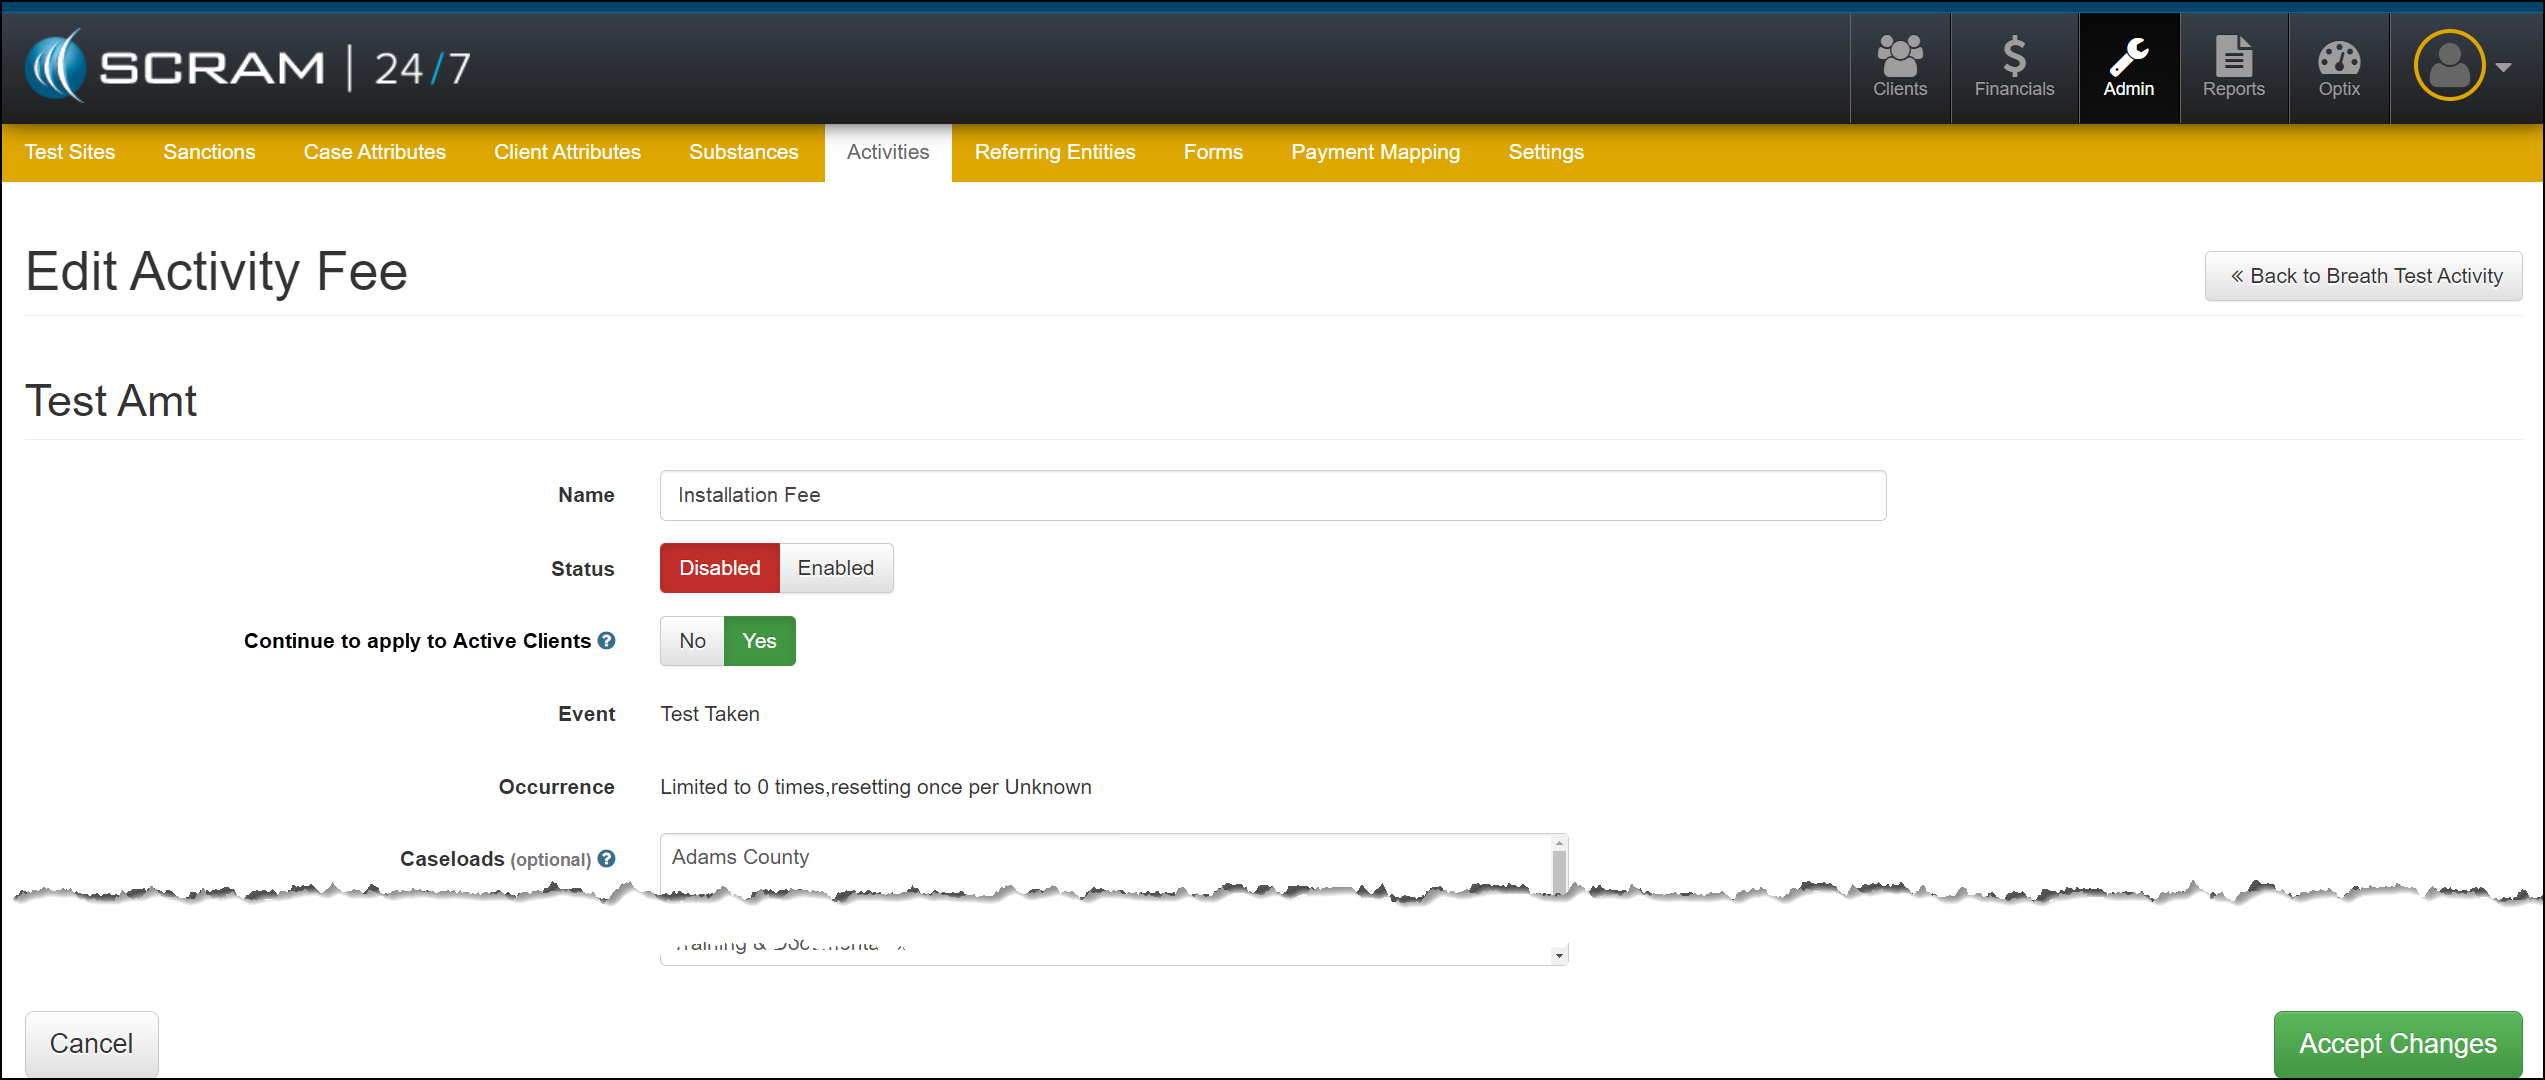
Disabled Fee Lock Icon
As fees for activities are disabled, you may continue billing or remove that fee from currently active clients.
When you select the “Yes” option to continue billing current active clients, a lock icon will appear next to the disabled fee’s name.
Edit Activity Fee (click to enlarge)Disabled Activity Fee with Lock Icon (click to enlarge)
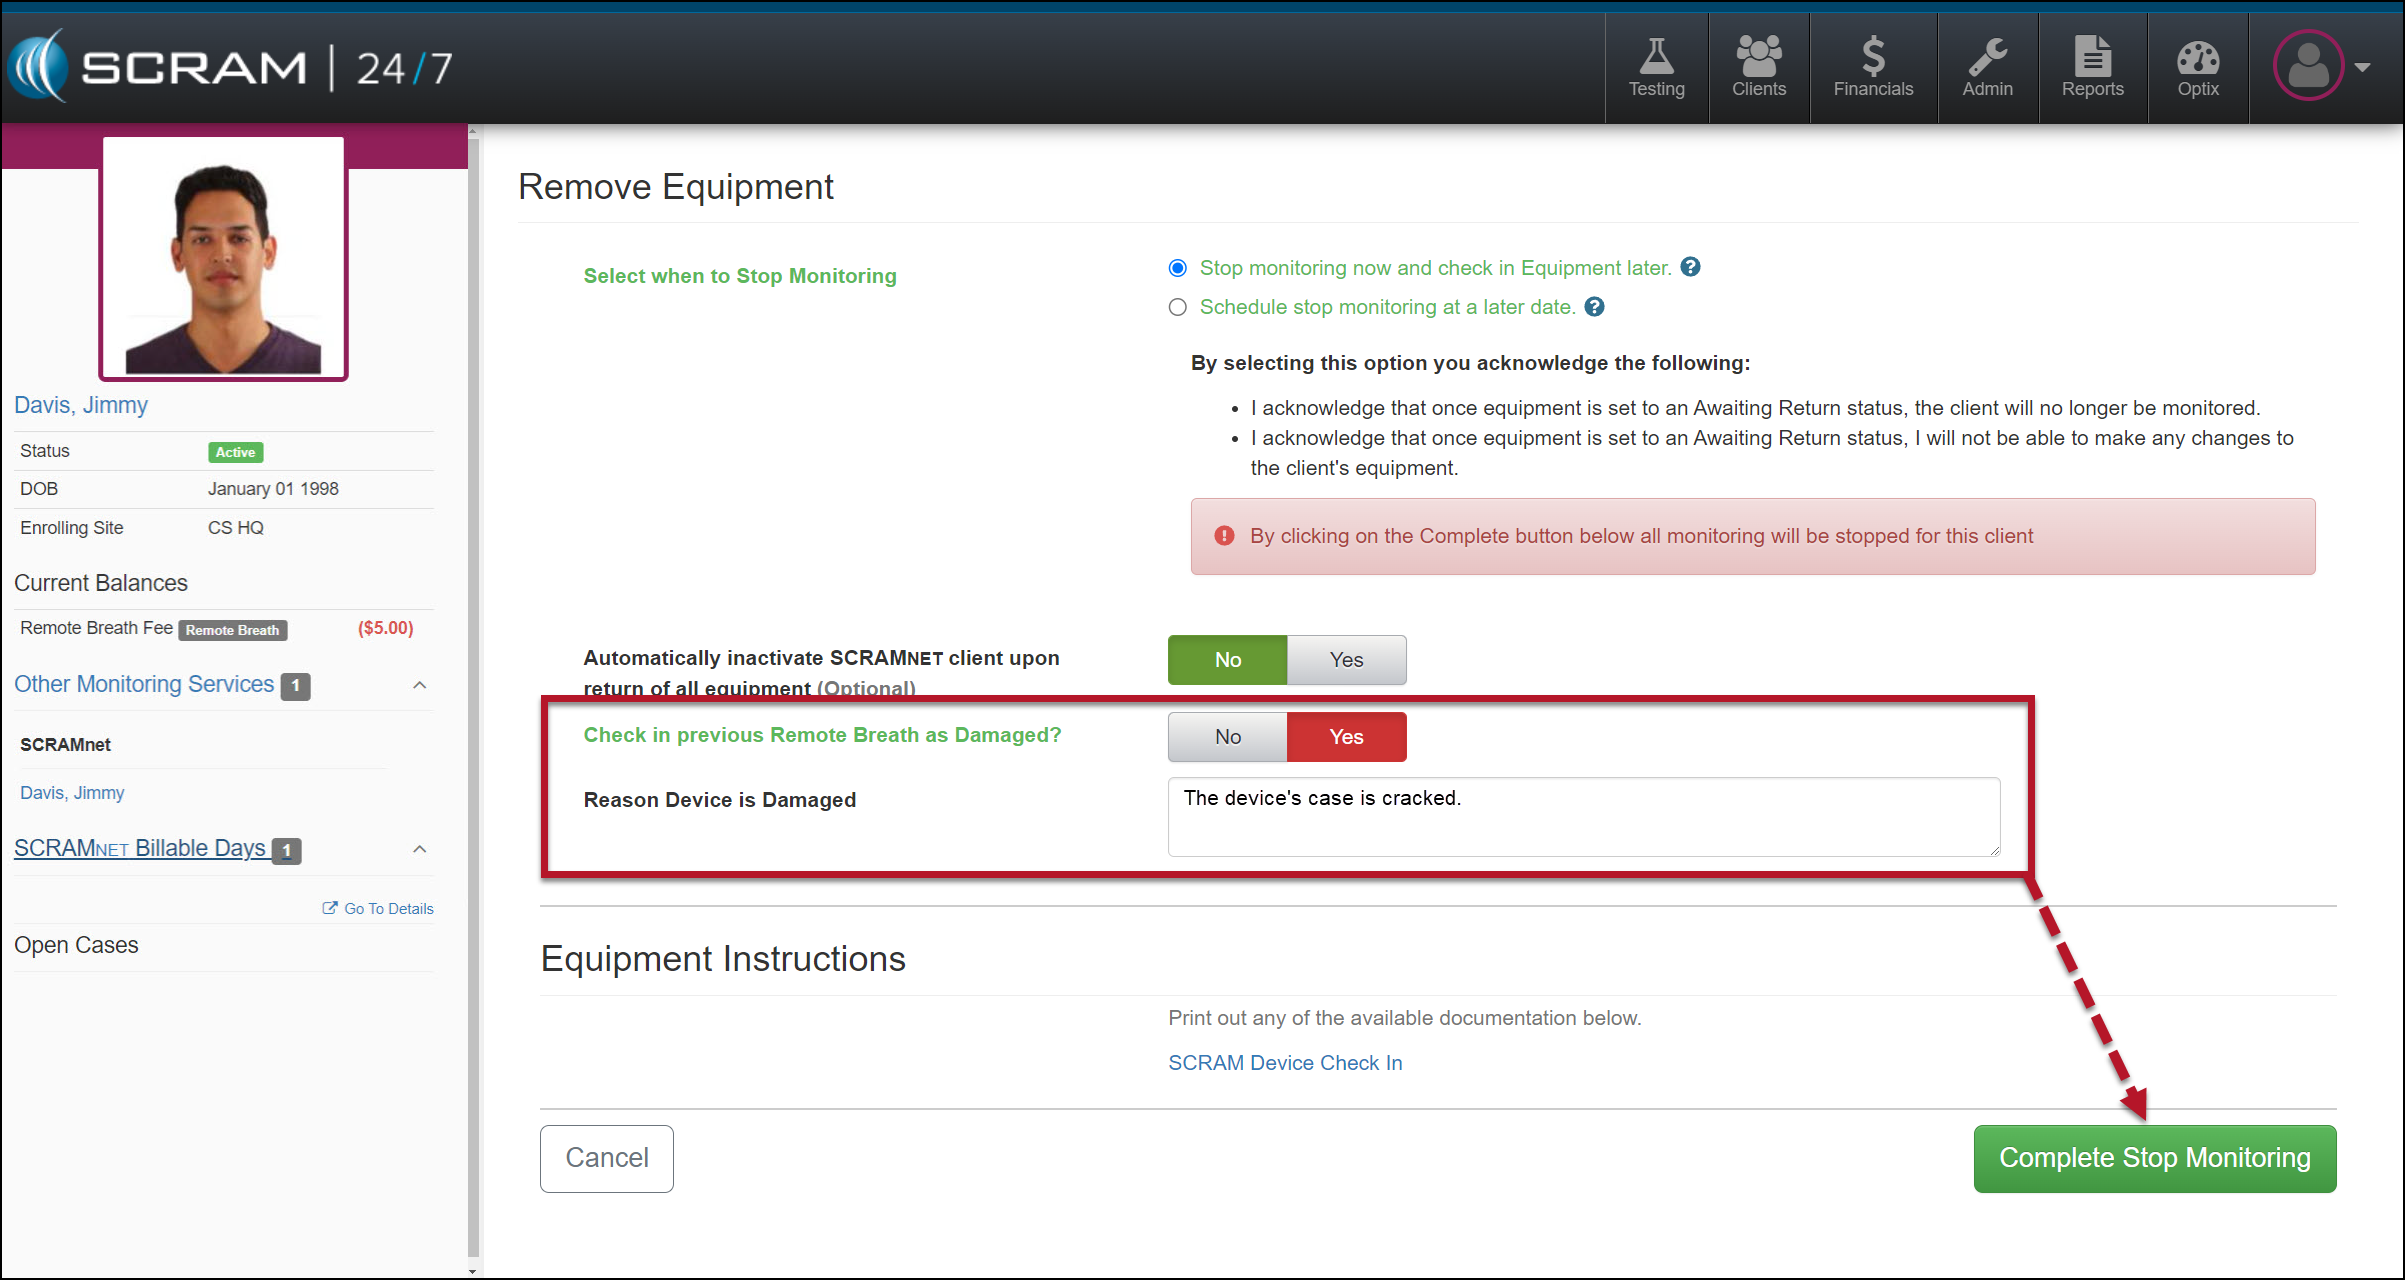
Suspend or Remove Activity and Check In Device as Damaged
When removing or suspending an Activity for your client in SCRAM 24/7, you may flag a device as damaged by setting the “Check in previous [Device type] as Damaged?” option to Yes. Once set, add a note explaining why you flagged the device as damaged, and then complete the stop-monitoring process as usual.
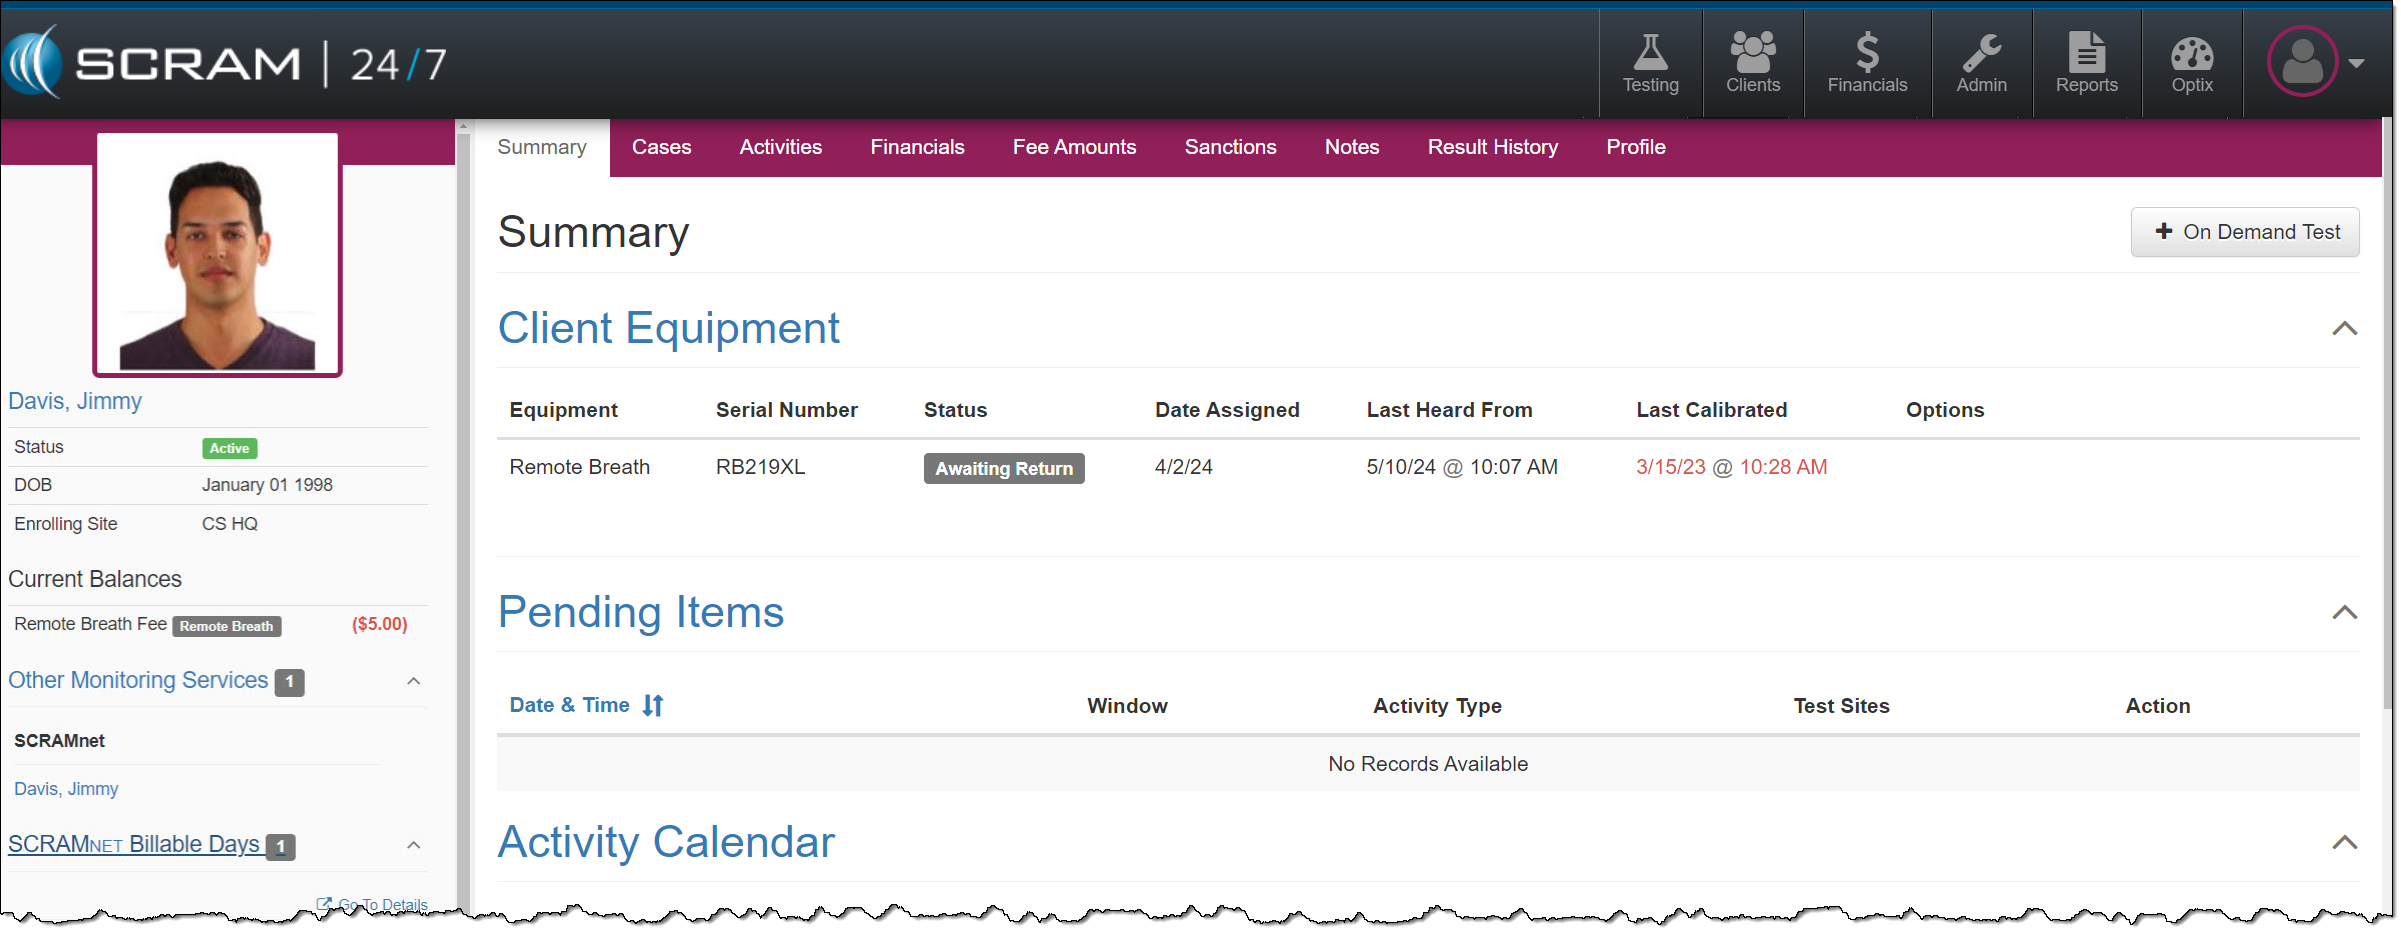
Remove Equipment page (click to enlarge)Client Summary page, Equipment Status of Awaiting Return (click to enlarge)
Once the device’s status is updated to “Awaiting Return,” complete the process of returning it to your inventory.
When scheduling the stop monitoring for a later date, you cannot flag a device as damaged.
Flagging a device as damaged on the Remove Equipment page does not automatically update its status to “In Inventory.” You must complete the check-in process.
When a device is flagged as damaged on the Replace Equipment page, it will automatically be updated to an “In Inventory” status.
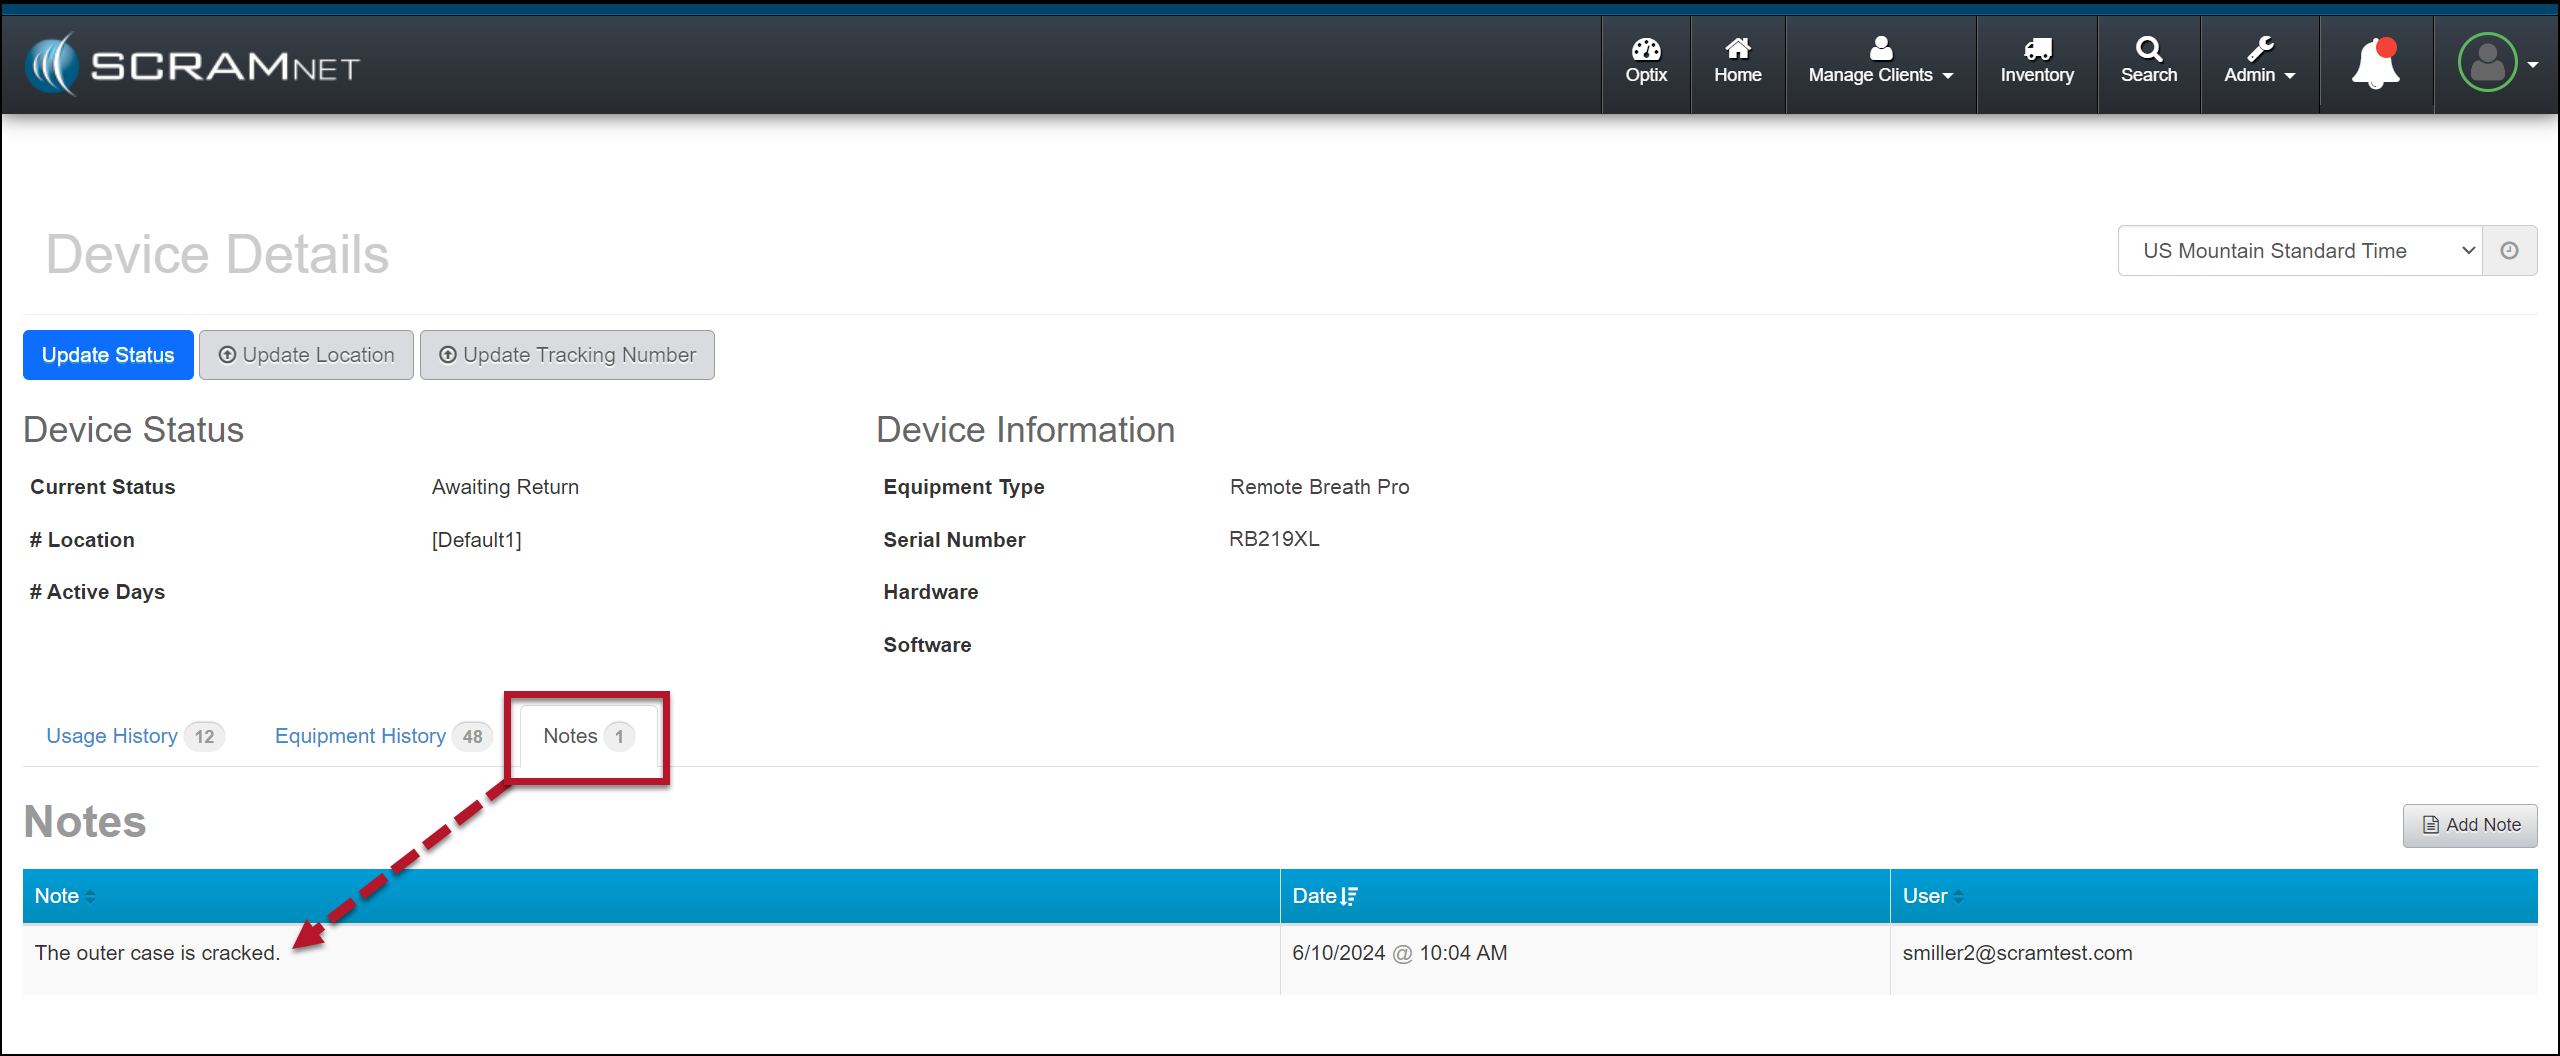
Device Details Damage Notes
Once a device has been flagged as damaged, you may view the notes associated with the damaged device on the Device Details page in SCRAMNET.
SCRAMNET Device Details page (click to enlarge)
This information is helpful to reference when troubleshooting a device or requesting an RMA.
The damage notes will remain visible on your Device Details page until the device is returned and serviced at SCRAM Systems. At that time, they will no longer be visible.
On April 10, 2024, SCRAM Systems will release an enhancement to your SCRAM 24/7 client caseload. With this enhancement, you may create and edit a client’s Remote Breath Pro’s breath testing schedule from within the SCRAM 24/7 system.
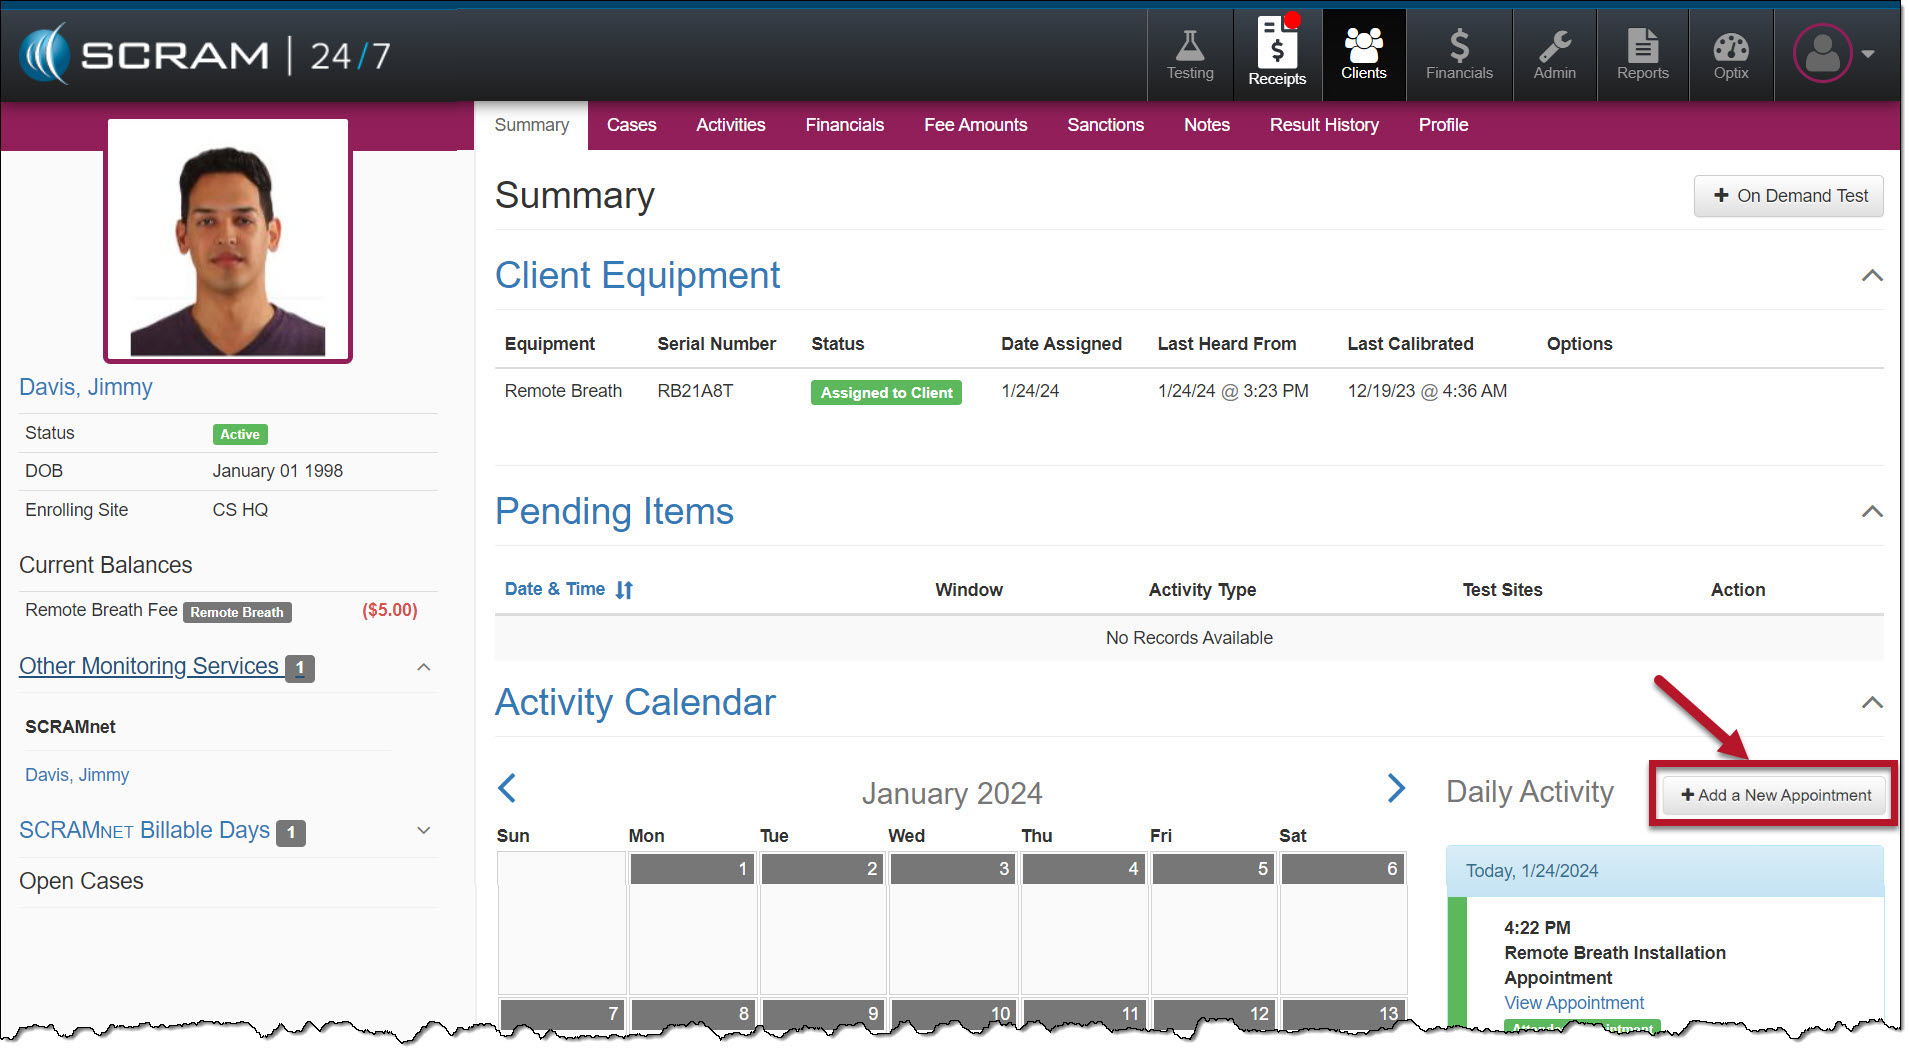
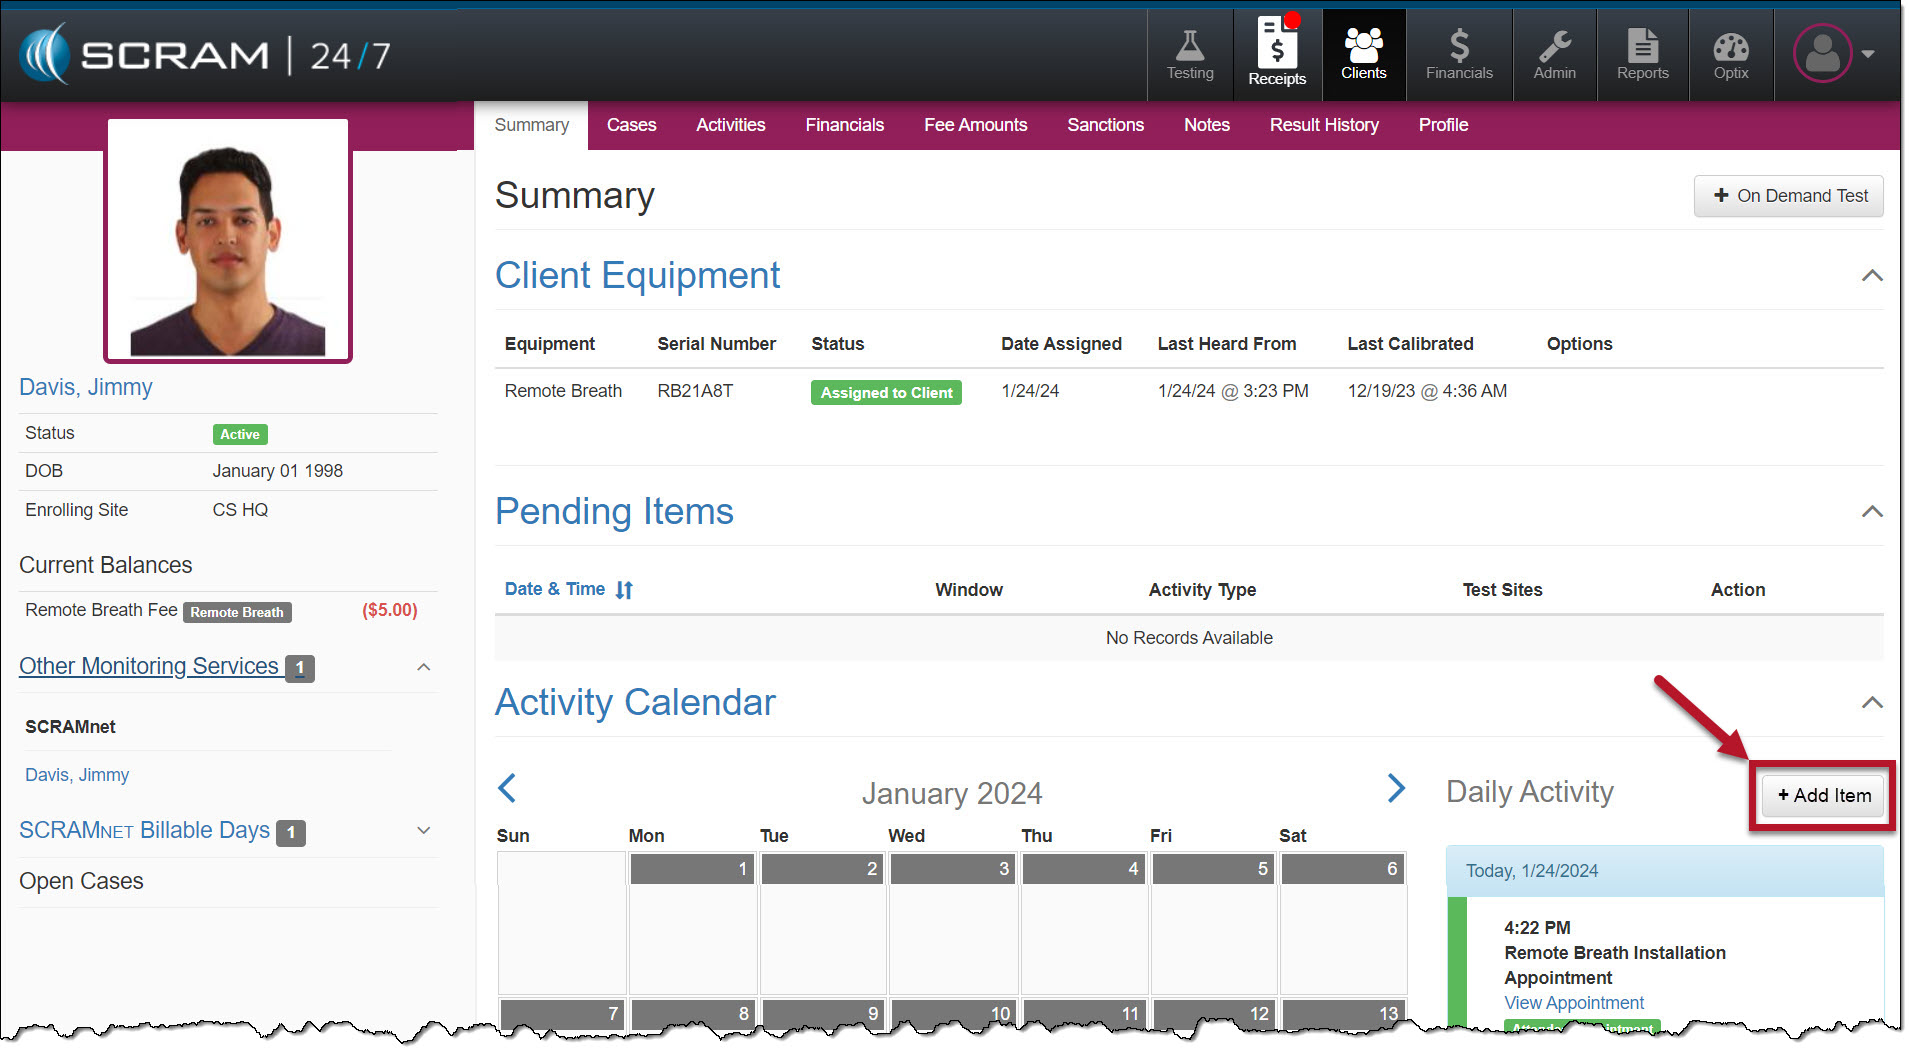
To support adding the breath testing schedule within SCRAM 24/7, the +Add New Appointment button on the client’s Summary page will be updated to “+Add Item.”
Current +Add a New Appointment Button – click to enlargeUpdated +Add Item Button – click to enlarge
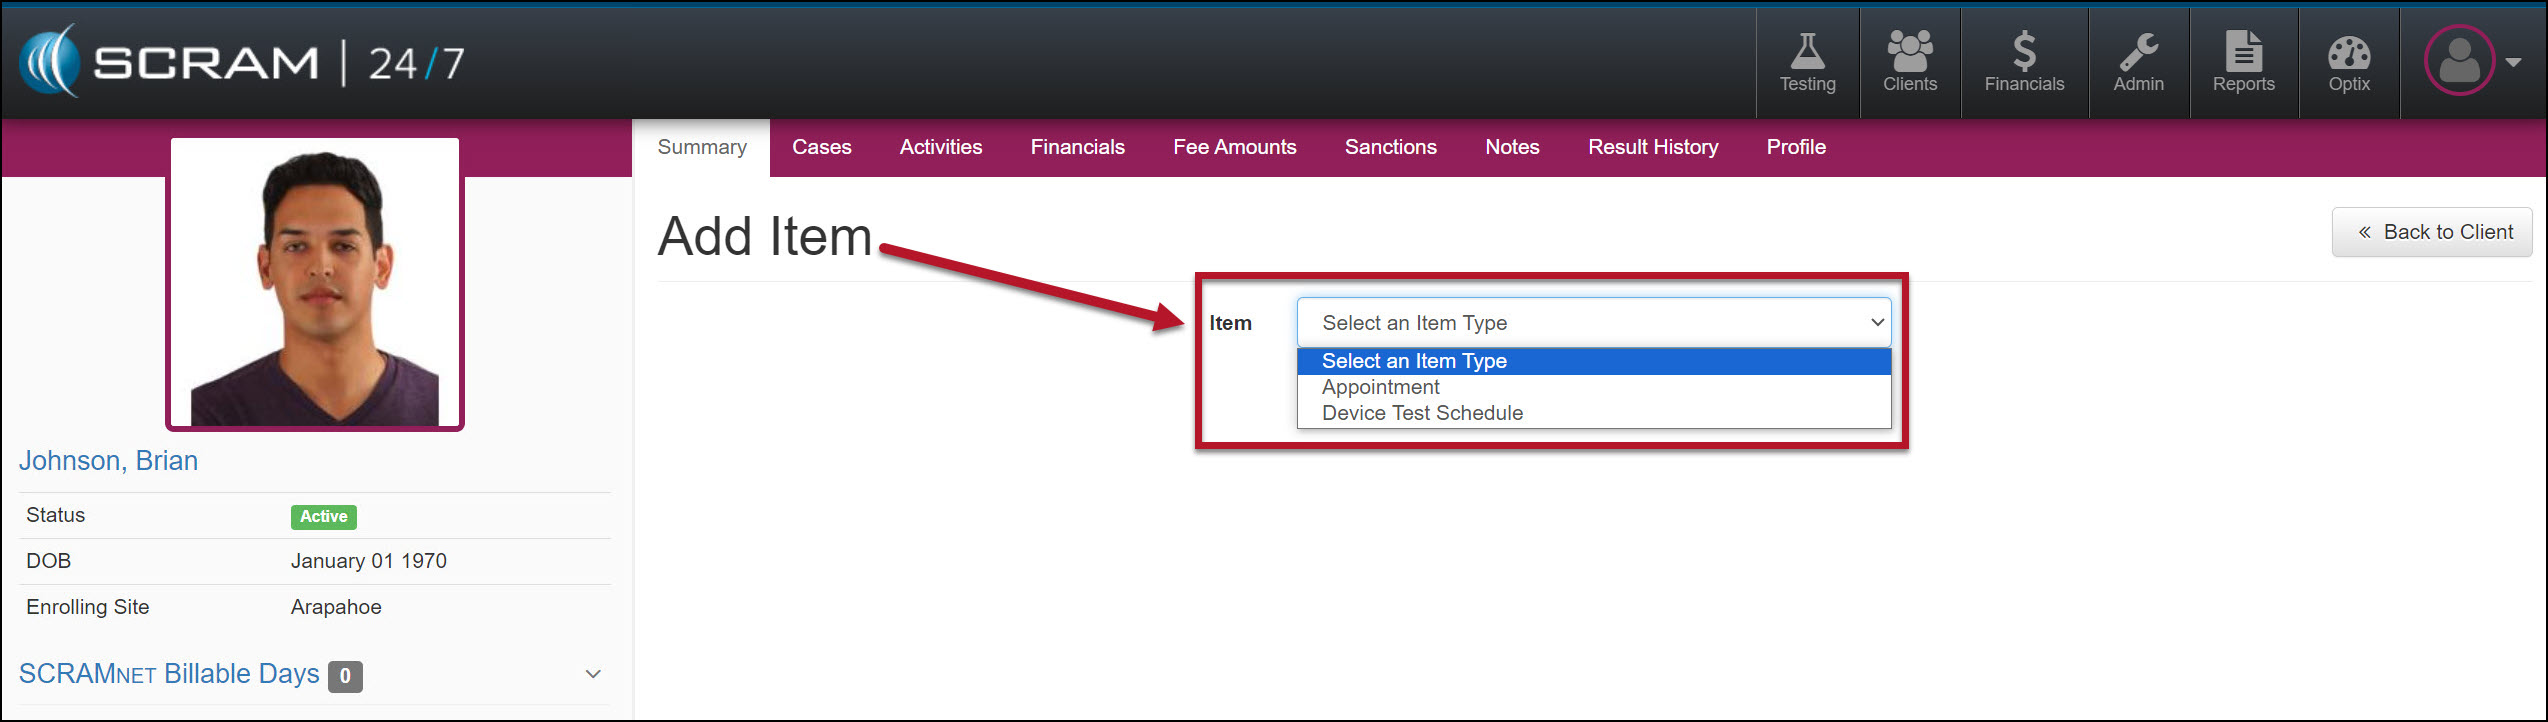
Once selected, the Add Item page will display a dropdown menu with the appropriate options based on the client’s Activities.
Add Item Dropdown Menu – click to enlarge
Breath Test Schedule
Add a Breath Test Schedule
Select the +Add Item button in the Daily Activity stream to add a breath testing schedule to the client.
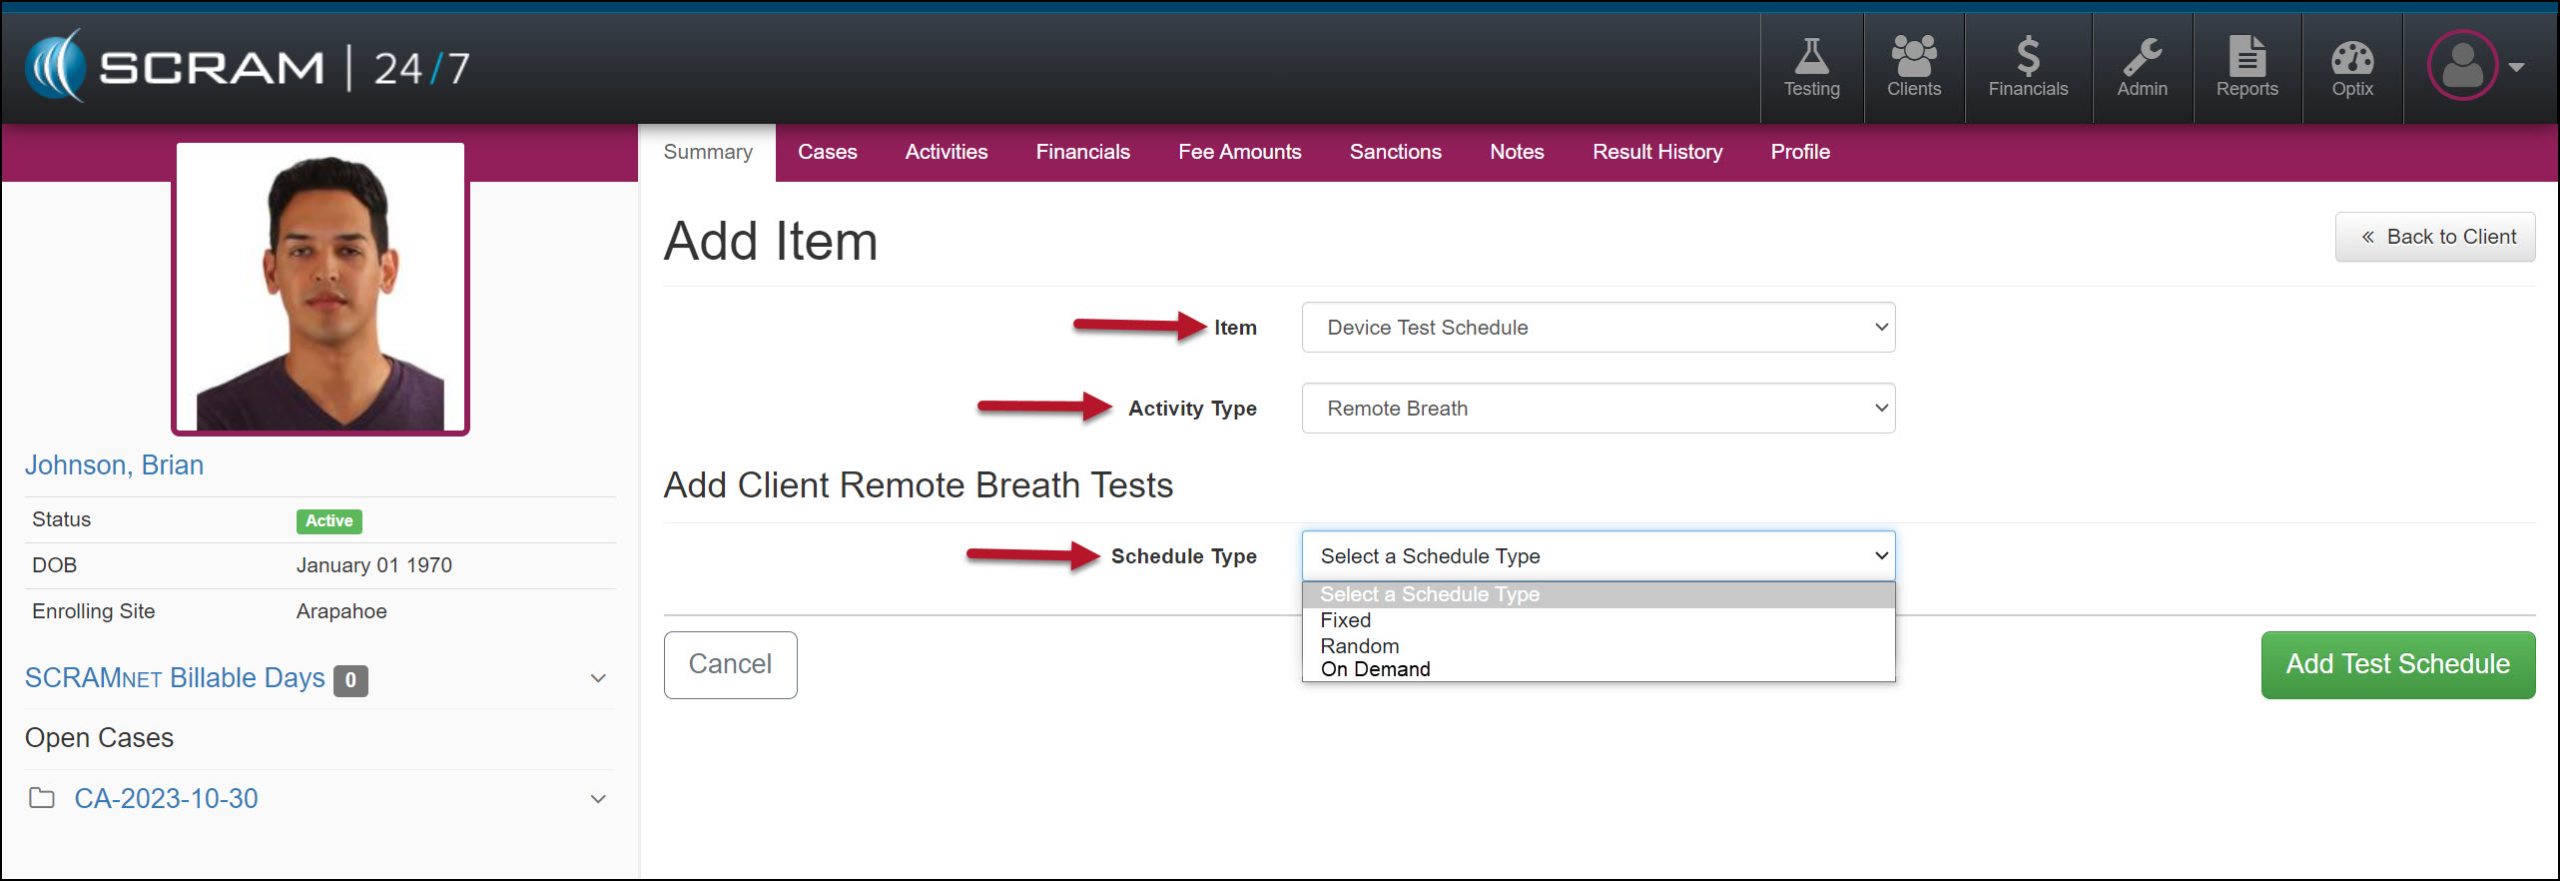
Open the Item dropdown menu on the Add Item page and select the Device Test Schedule option.
In the Activity Type dropdown, select the option of Remote Breath.
In the Add Client Remote Breath Test section, expand the Schedule Type menu and select either the Fixed or Random test option.
Add Item page, Device Test Schedule for Remote Breath – click to enlarge
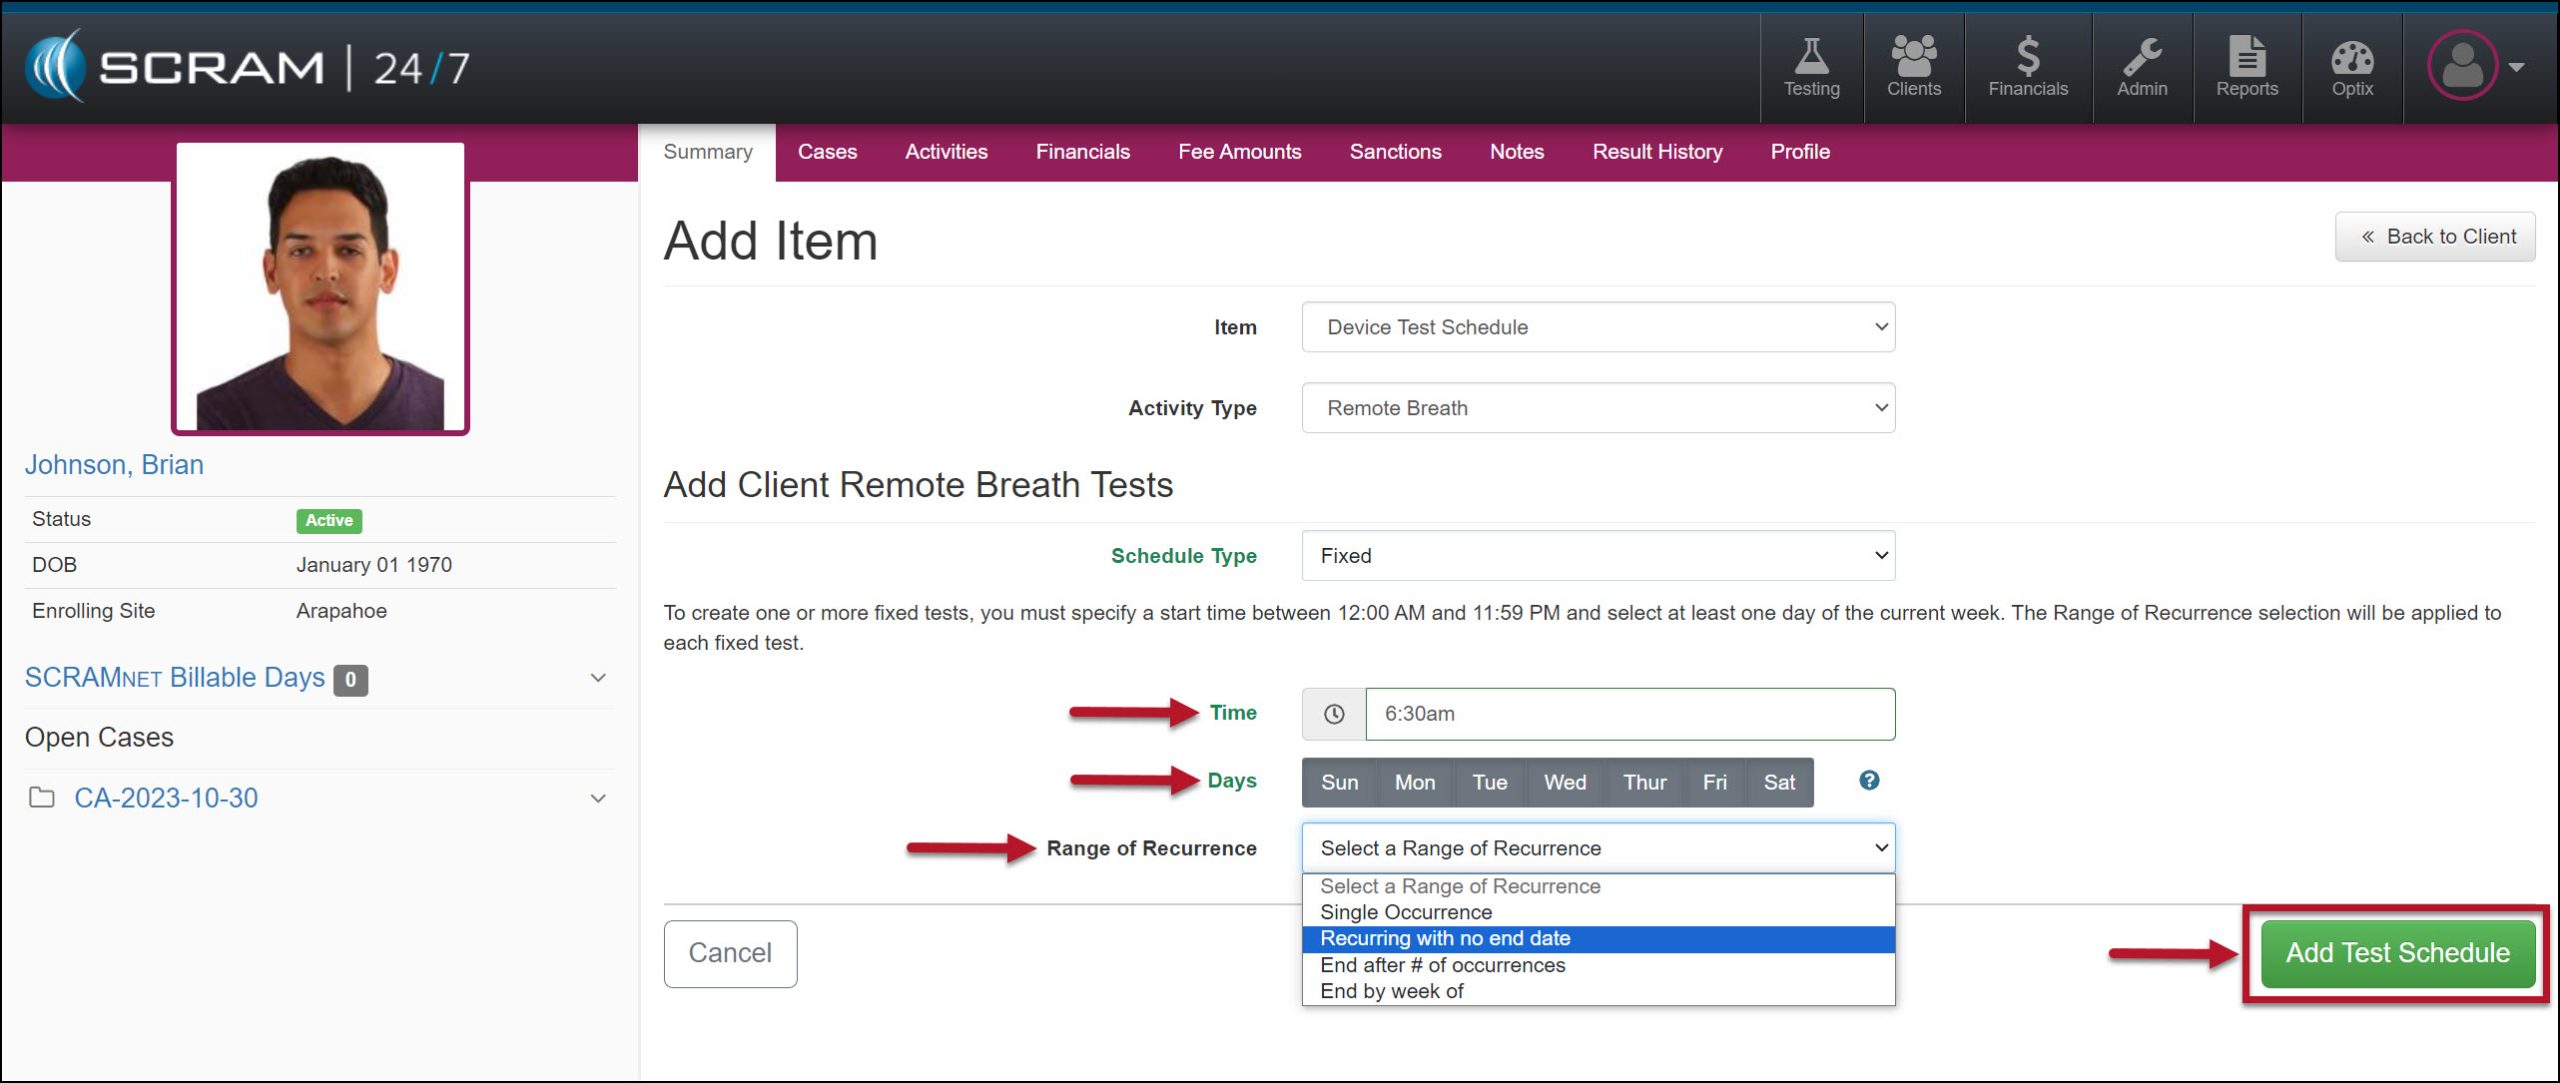
Enter the Time, Day(s) of the week, and the Range of Recurrence for the testing window.
The system will alert you if the schedule you create overlaps with another breath testing window.
Remote Breath Test Schedule Details – click to enlarge
Select the Add Test Schedule button to save the breath test schedule.
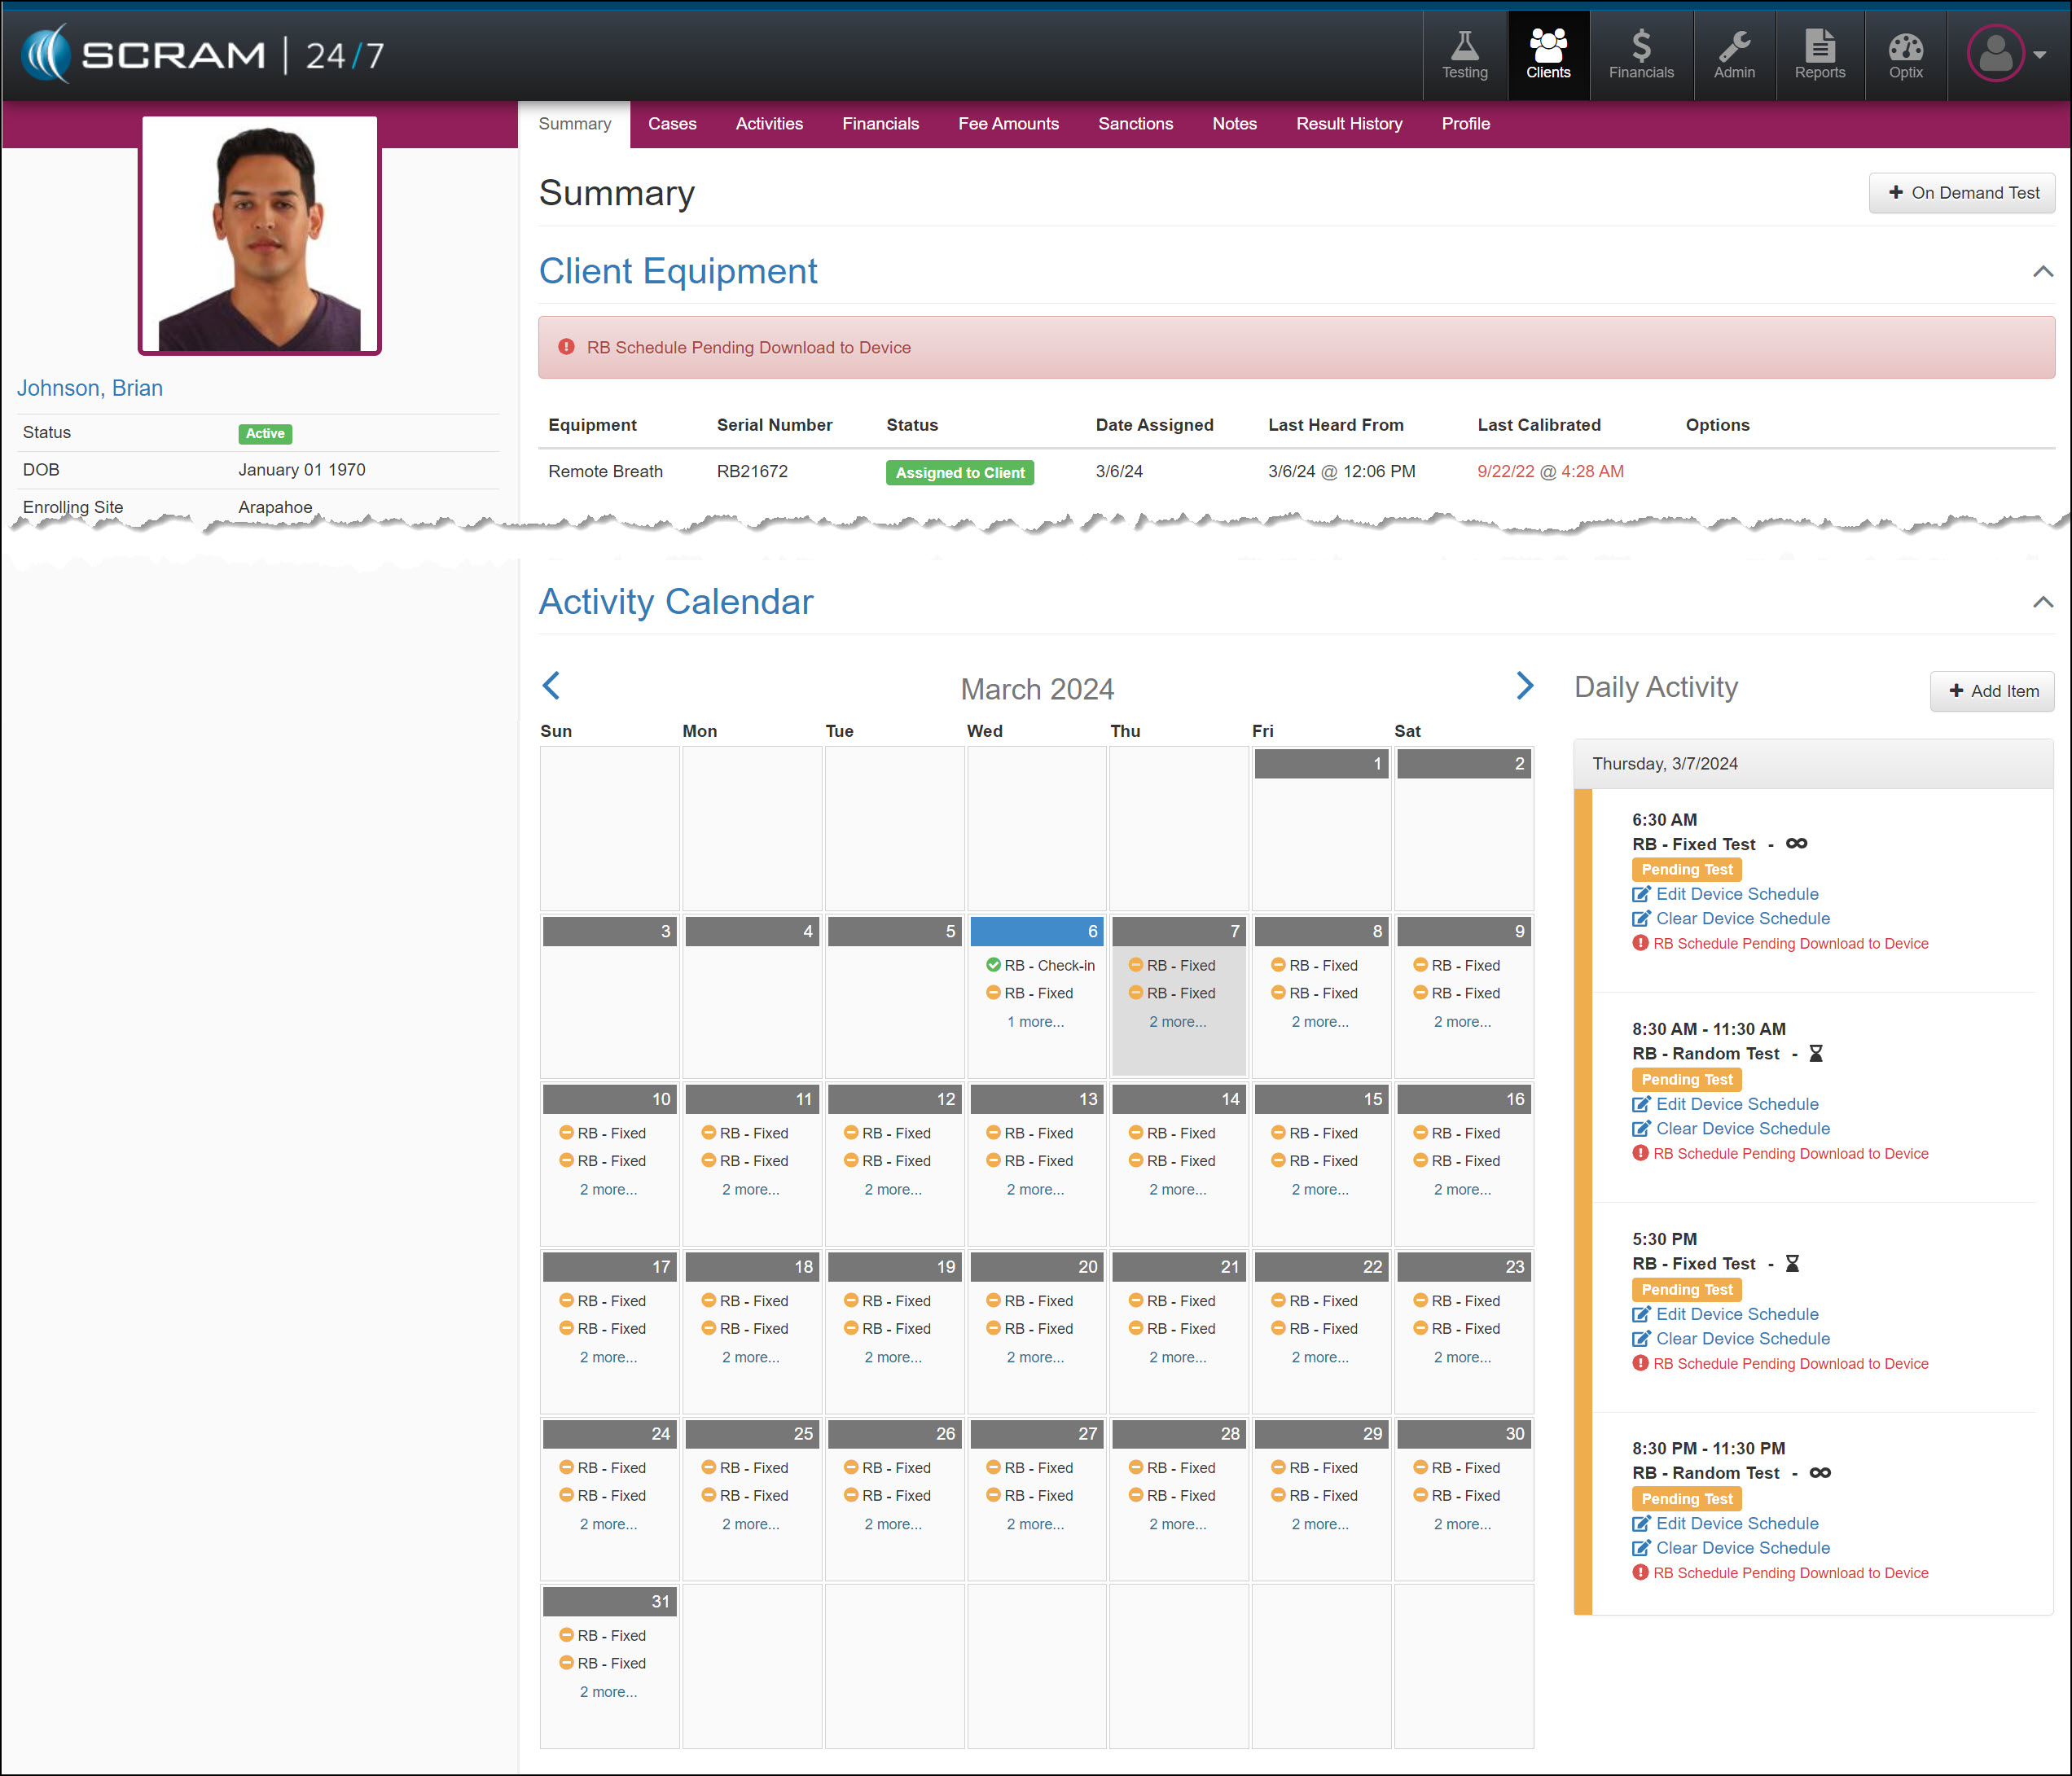
The breath testing schedule will be reflected on the client’s Summary page, Activity Calendar, and Daily Activity stream. You may add up to 12 scheduled breath tests per day until the client’s testing requirements are satisfied.
Remote Breath Schedule Pending Download to Device Banner – click to enlarge
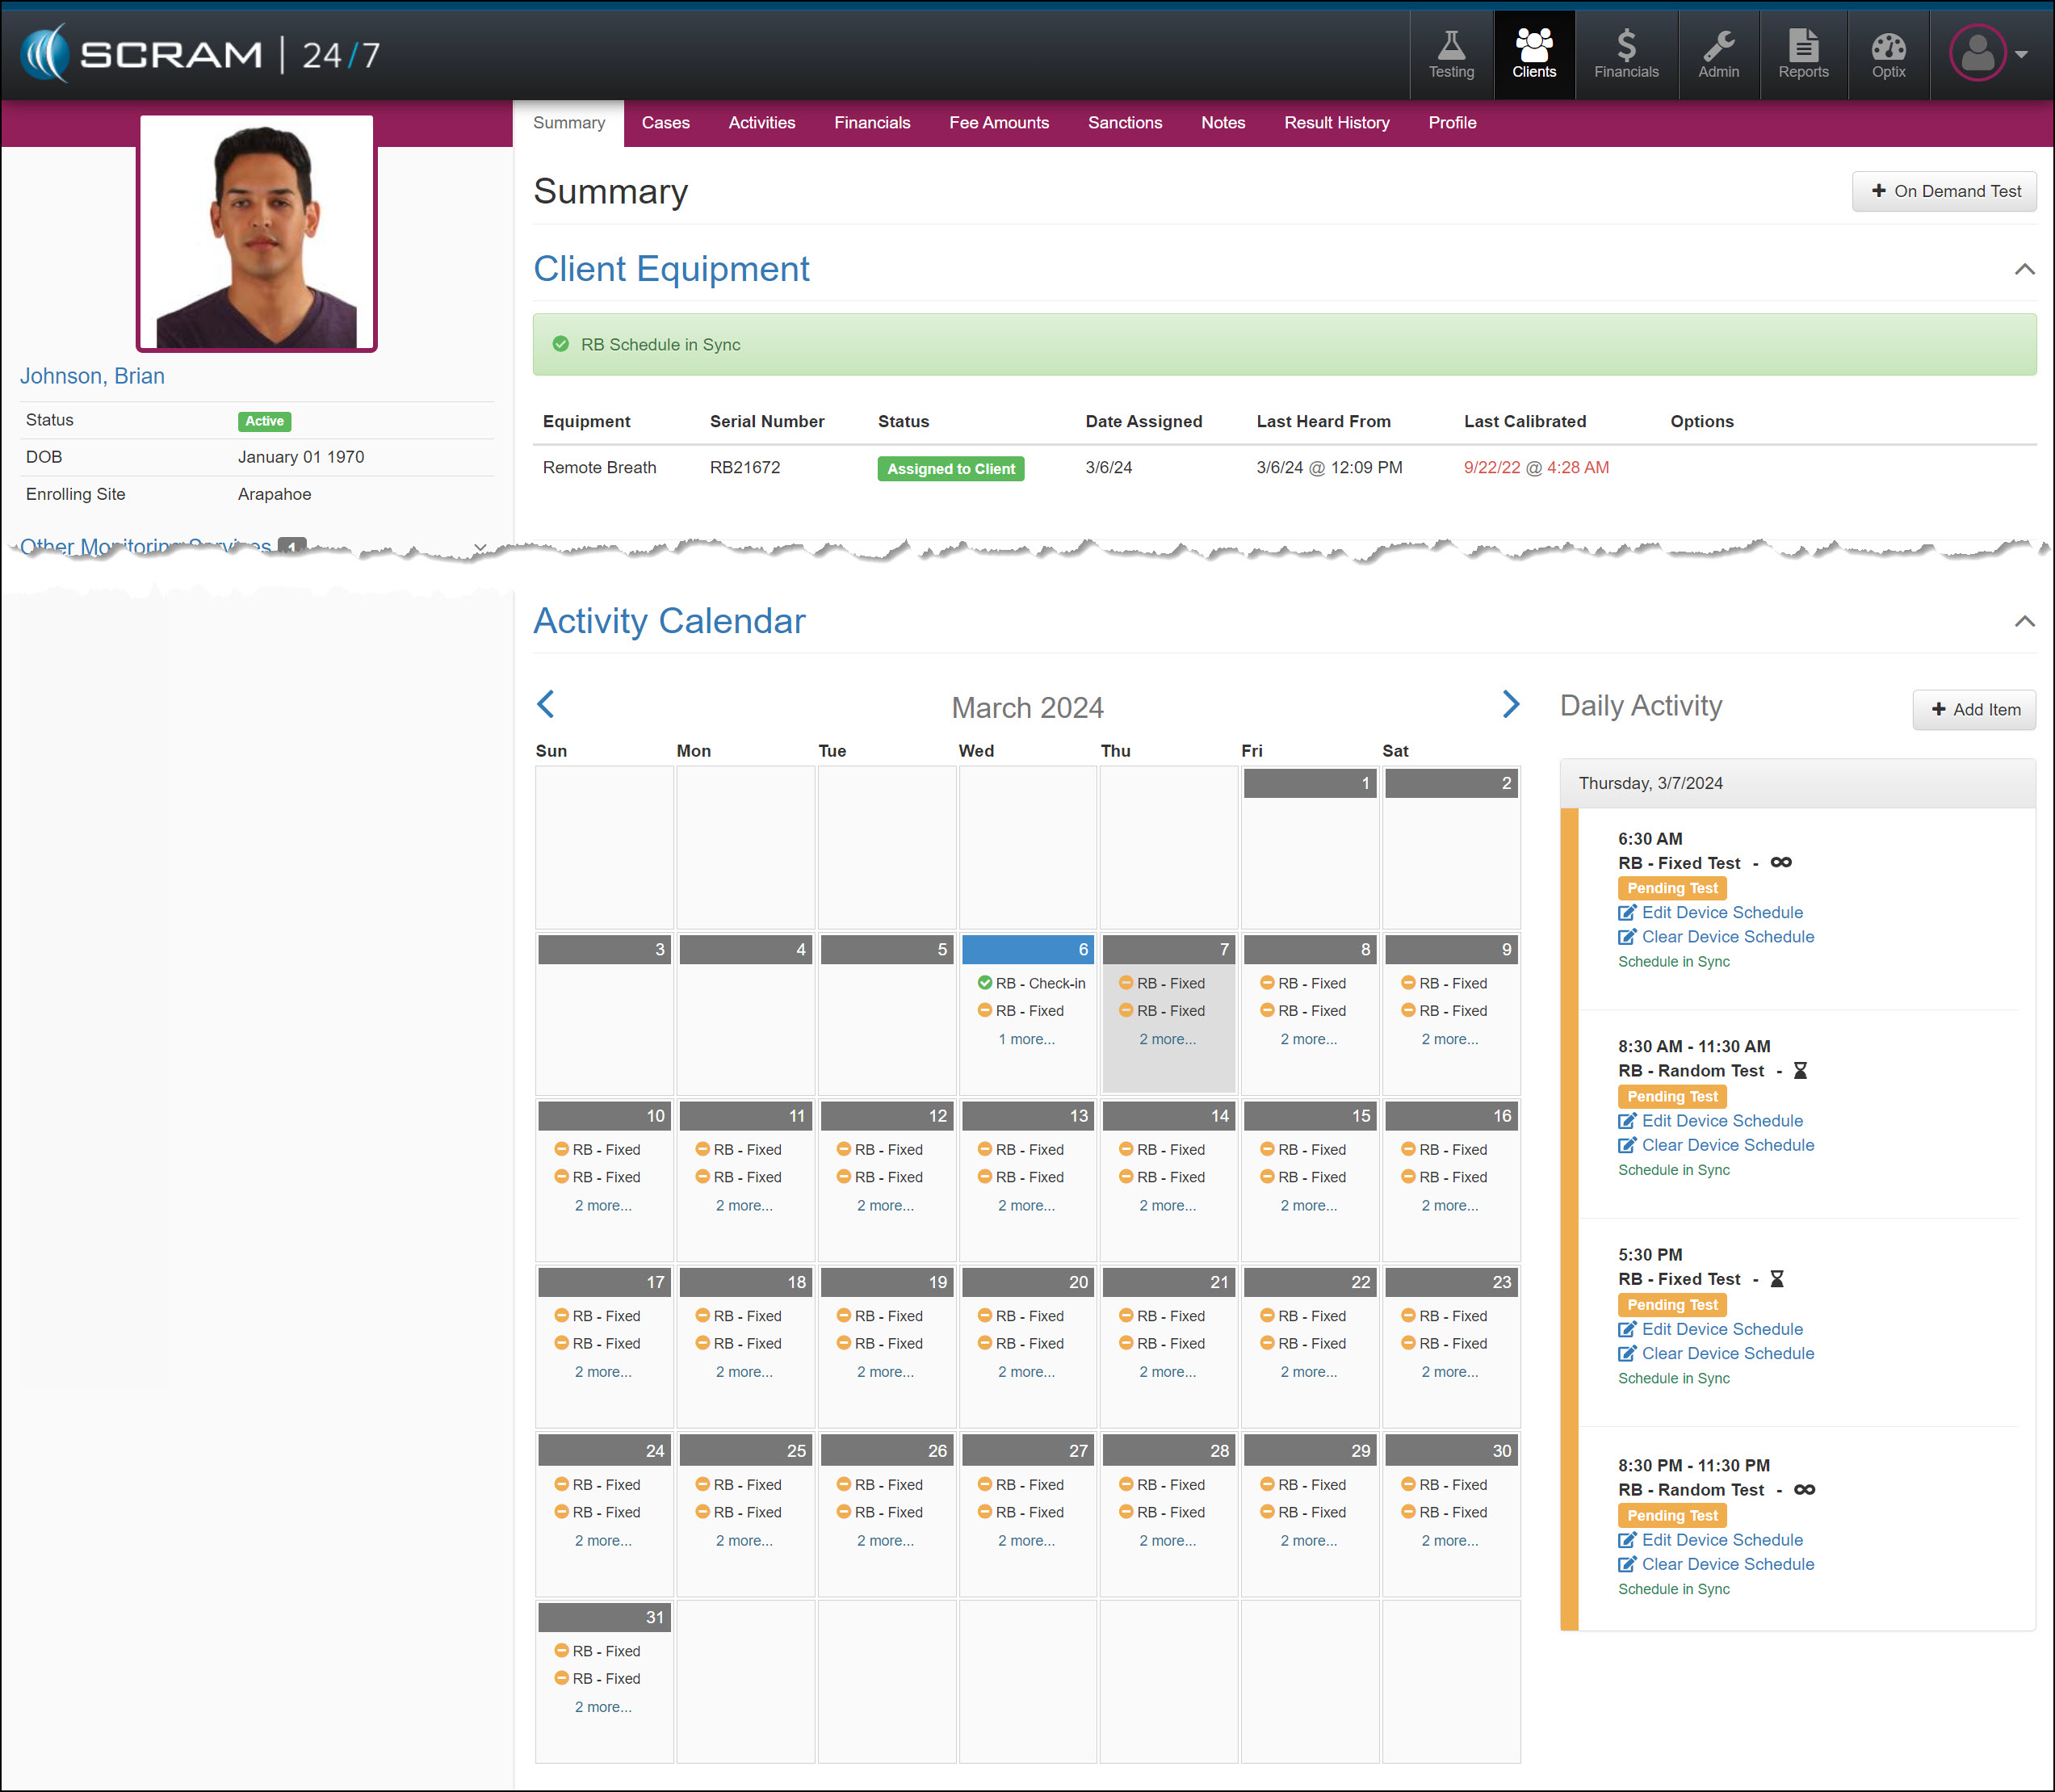
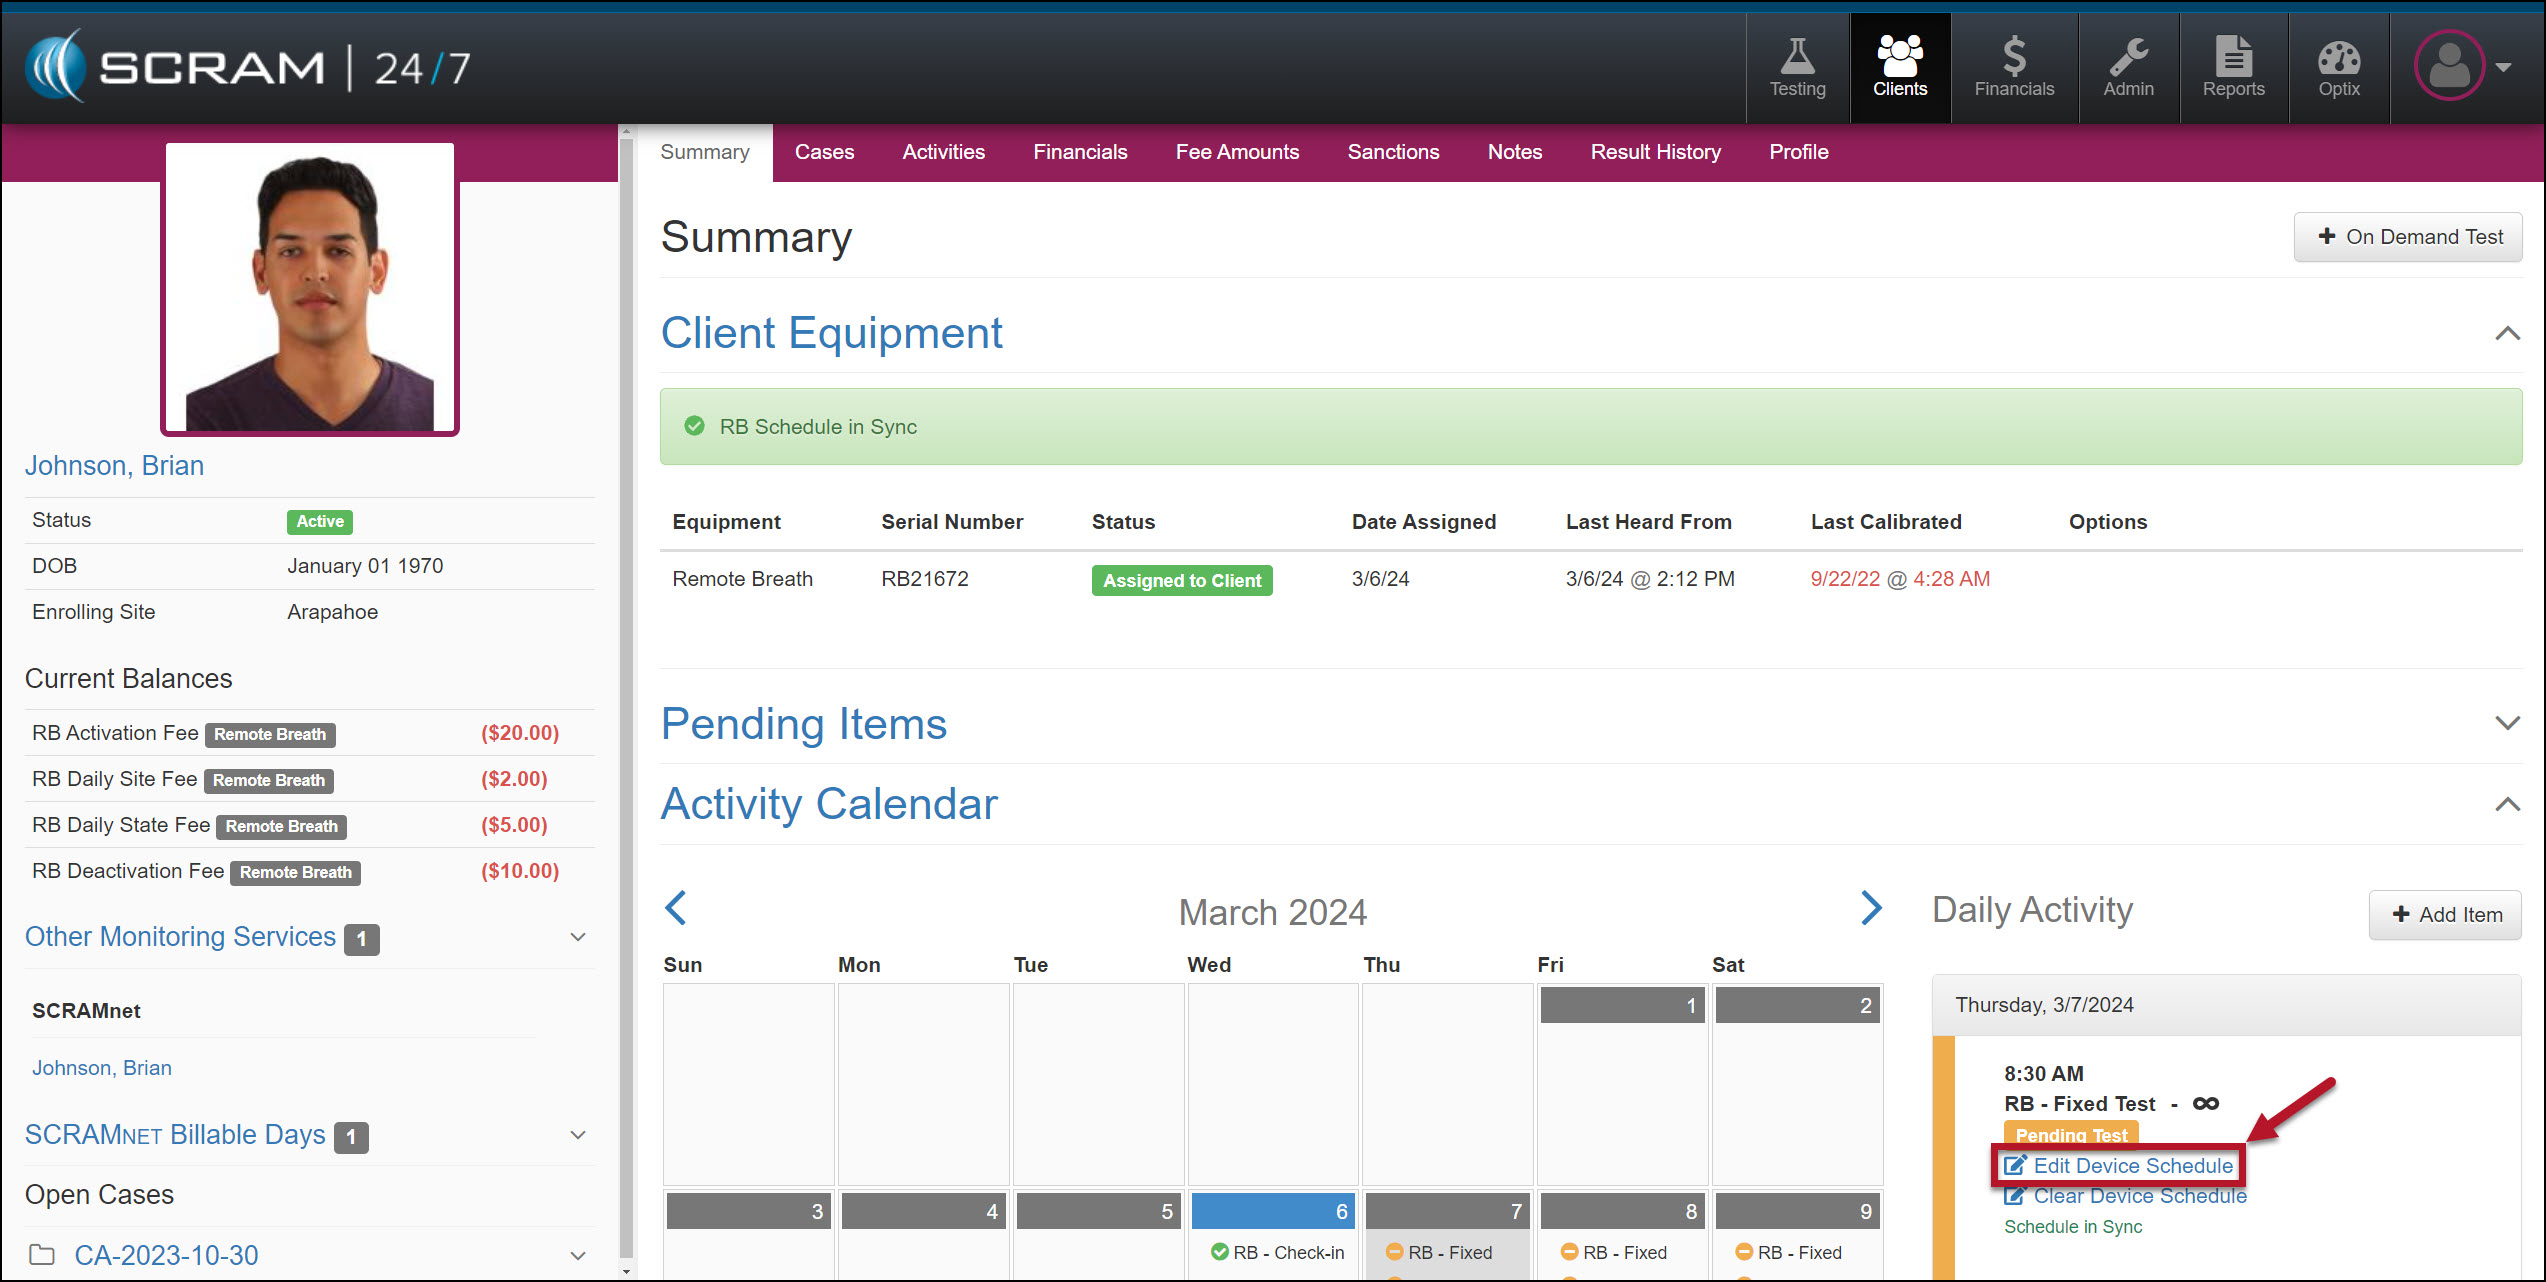
Once the schedule is communicated to the device, the RB Schedule Pending Download to Device banner and warning icon in the Daily Activity stream will update to the RB Schedule in Sync.
Remote Breath Schedule In Sync with Device Banner – click to enlarge
Tips:
Once the Remote Breath Activity has been enabled for the client, you may add the breath testing schedule regardless of the device’s assignment status. Please note that the schedule will only be visible on the Summary page once the device is in an “Assigned to Client” status.
The Activity Calendar displays only two breath tests per day. The Daily Activity stream, however, displays the entire breath testing schedule for the selected calendar date.
Once the device is in an Assigned to Client status, you may send an On-Demand breath test to the device by selecting that option on the Item dropdown menu on the Add Items page.
Scheduled Breath Test Icon Examples:
No Icon
“Single Occurrence” Fixed or Random breath test.
“Recurring with no end date” Fixed or Random breath test.
“End after # of occurrences” or “End by week of” Fixed or Random breath test.
Hover your mouse over the infinity or hourglass icons to display the date for the last occurrence of the breath test schedule.
Add a Breath Test Schedule from the Remote Breath Activity Details Page
In addition to the +Add Item button on the client’s Summary page, you may add a breath test schedule on the client’s Remote Breath Activity Details page.
Add Remote Breath Schedule on the Activity Details page – click to enlarge
Activity Calendar and Breath Test Results
Once the breath testing window has closed, the Activity Calendar will display a gray circle next to the schedule. To view the breath test results, navigate to the client’s RB Results page in SCRAMNET.
Client’s Activity Calendar Remote Breath Schedule – click to enlarge
Edit a Remote Breath Schedule
Once the RB Schedule has been added, you may have reason to edit a specific test’s timeframe and range of occurrence, or you may need to clear the current schedule entirely.
To edit a specific Pending Test schedule:
Select the EditDeviceSchedule hyperlink for a Pending Test on the client’s Summary page.
Edit Device Schedule Hyperlink – click to enlarge
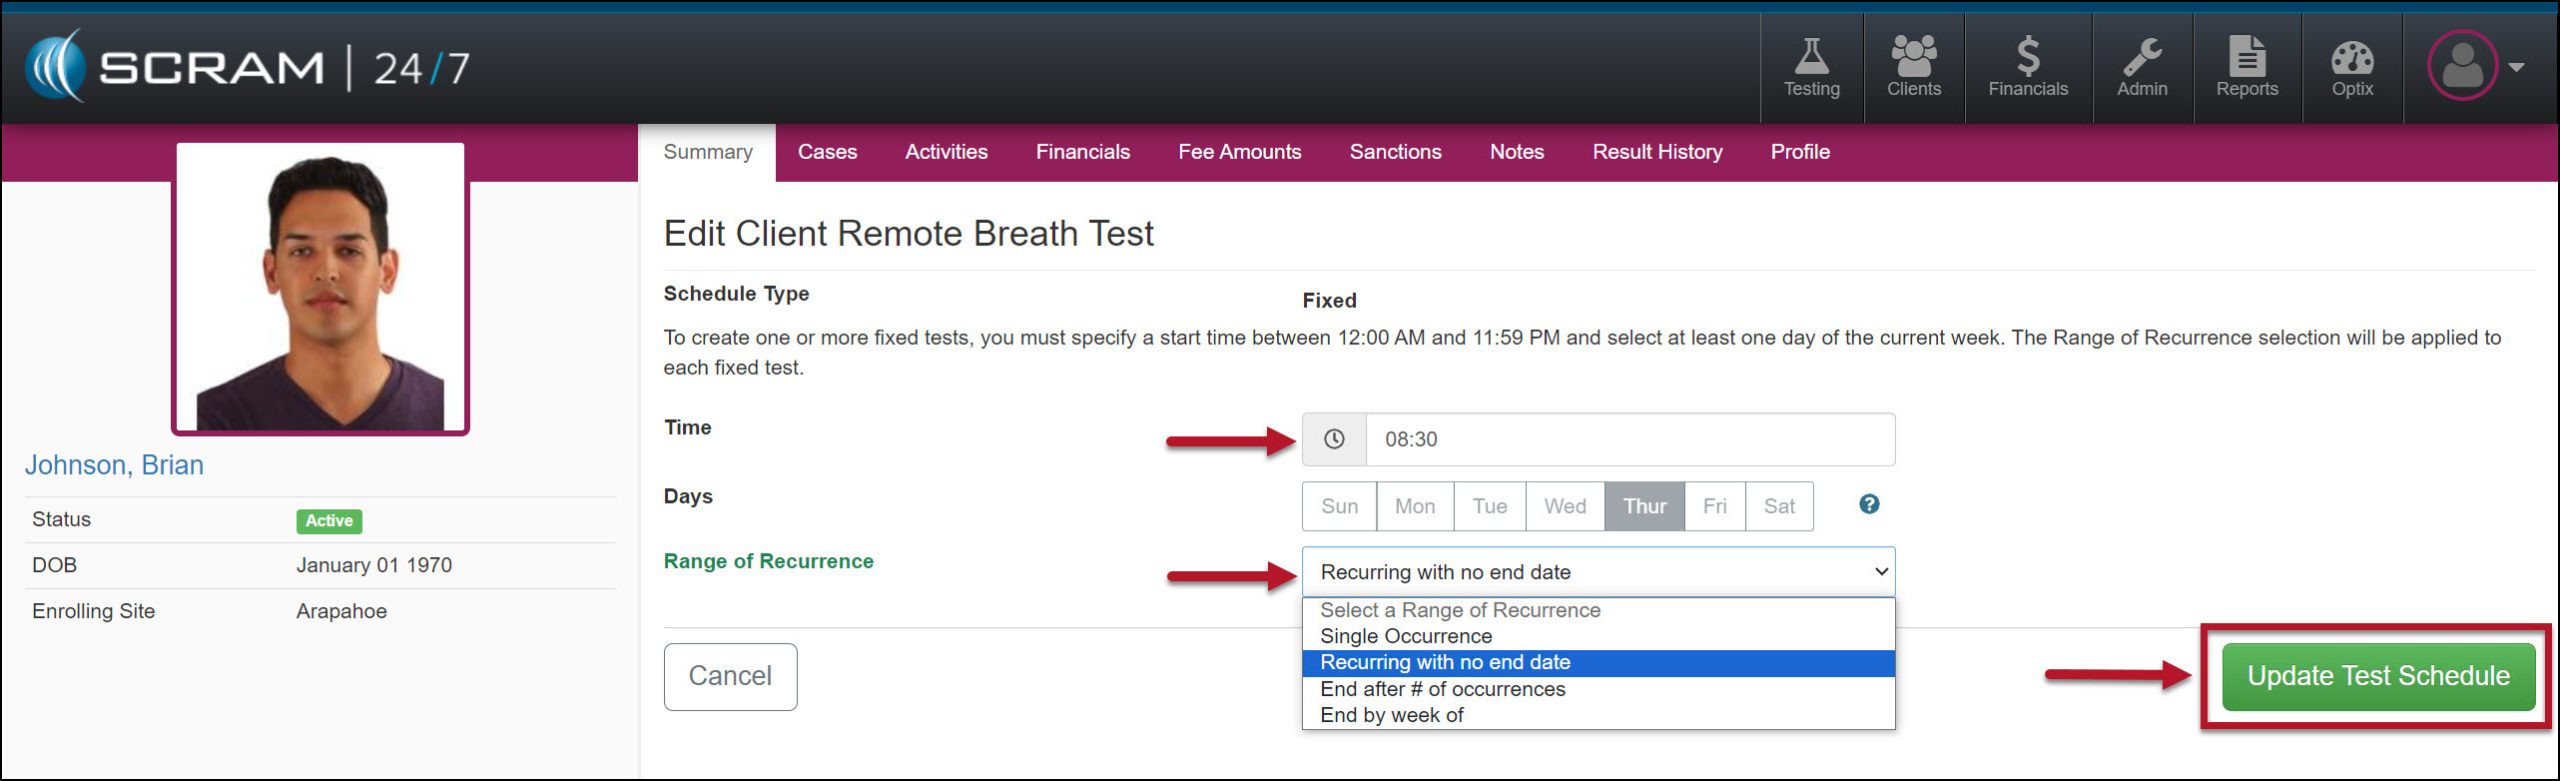
Verify you have the correct “Day” for the schedule you are editing, and then make any required updates to the Time and Range of Recurrence fields.
Edit Client Remote Breath Test Time and Range of Recurrence – click to enlarge
Select the Update Test Schedule button to save the edits.
When editing a schedule, you cannot make any changes after the test window for the schedule is closed. Additionally, when editing a series where the first test window has closed, your options on the Range of Recurrence dropdown menu will only display the available options based on the initial selection.
Clear Device Schedule
To clear the client’s entire breath test schedule:
Select the Clear Device Schedule hyperlink for any Pending Test.
Clear Device Schedule Hyperlink – click to enlarge
Enter the Clear Schedule As Of date.
Clear Client Remote Breath Test Verification page – click to enlarge
Select the Clear Test Schedule button.
Tip: To remove an individual breath test from the client’s calendar, navigate to the client’s RB Schedule page in SCRAMNET by selecting the client’s name hyperlink under the Other Monitoring Services section on the sidebar. Any changes made on the client’s RB Schedule page in SCRAMNET are reflected in SCRAM 24/7 and vice versa.
The client’s Summary page will reflect the update.
Activity Calendar Remote Breath Test Schedule Cleared – click to enlarge
Clearing the Remote Breath Schedule does NOT stop the client’s billing or device check-in. To stop the client’s billing and monitoring, you must inactivate the Activity and place the device in an “In Inventory” or “Awaiting Return” status.
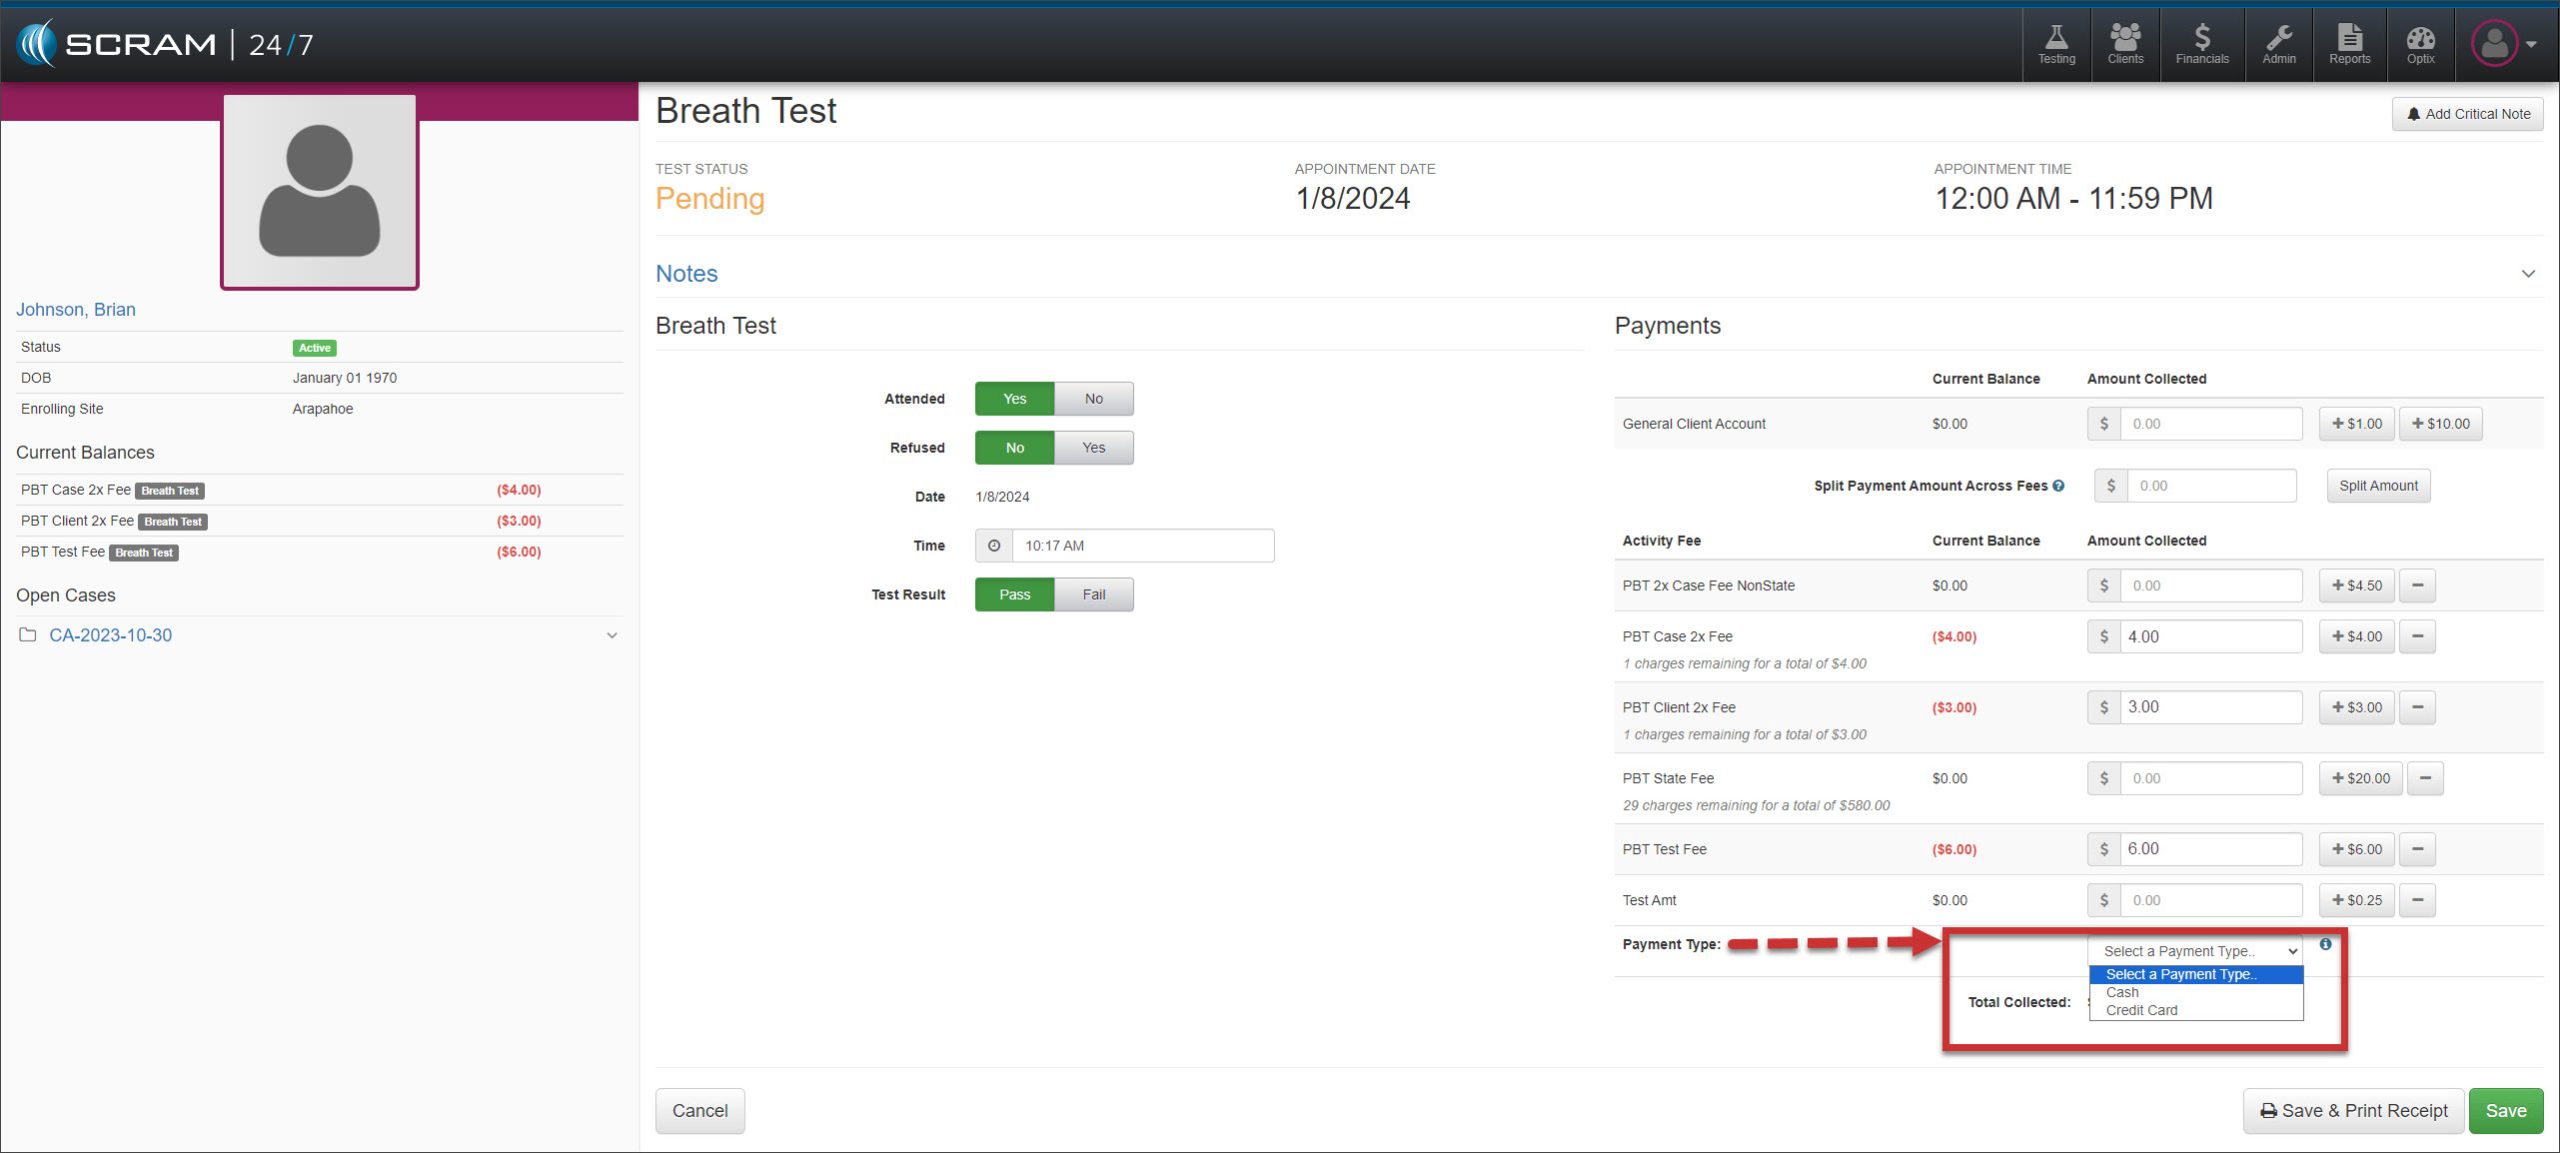
On, January 11, 2024 (updated release date), SCRAM Systems will release an enhancement to SCRAM 24/7. With this enhancement, you may note the payment method of “Credit Card” or “Cash” when recording a payment from a client.
Recording an Appointment – click to enlarge
Once the payment is saved, the client’s Financials page will reflect the payment type selected.
Client’s Financials Page – click to enlarge
When a client pays a fee using cash and a credit card, you must record separate transactions for each payment method.
The Cash payment method is the default option when no selection is made during a transaction.
Only the client’s Financials page and the Daily Client Activity report display the payment type selected.
On December 19, 2023, SCRAM Systems® will release an enhancement to the SCRAM 24/7 Mass Payment and Mass Update Receipts options. This enhancement will allow you to print a single receipt or all client payment receipts from the new Receipts dropdown menu.
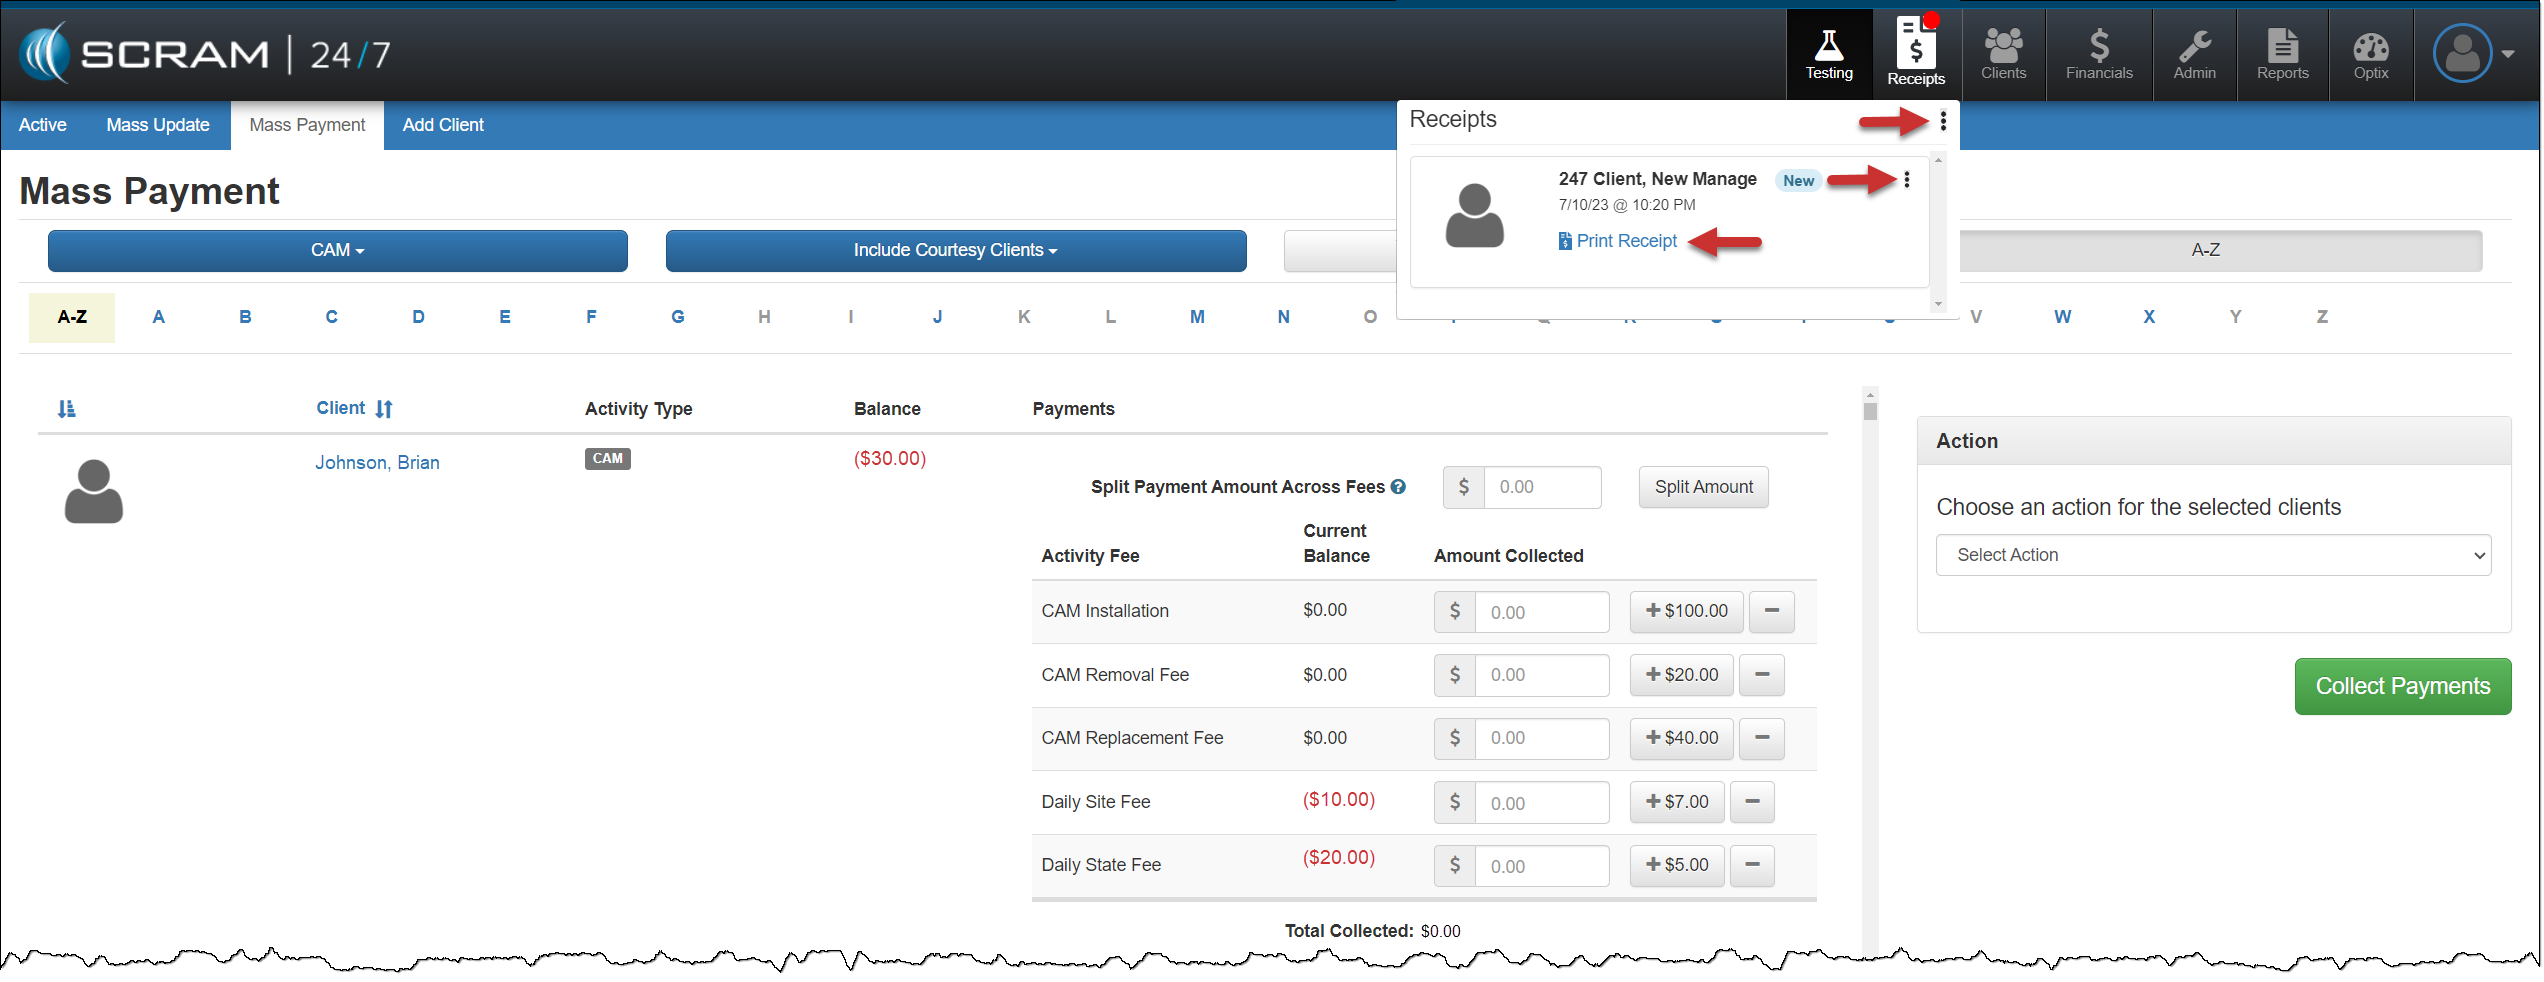
Print Receipts During Mass Payment
When you select the Collect Payments & Print Receipt option during Mass Payment processing, you may access the receipts by selecting the Receipts button.
On the Receipts dropdown:
Select the Receipts dropdown ellipsis to print or clear all receipts from the dropdown.
Select the Print Receipt hyperlink under each client’s name to print receipts one at a time.
Select the ellipsis next to the client’s name to clear the receipt from the dropdown.
Receipts – click to enlarge
A transaction record may be viewed in the “Transaction History” section of the individual client’s Financials tab.
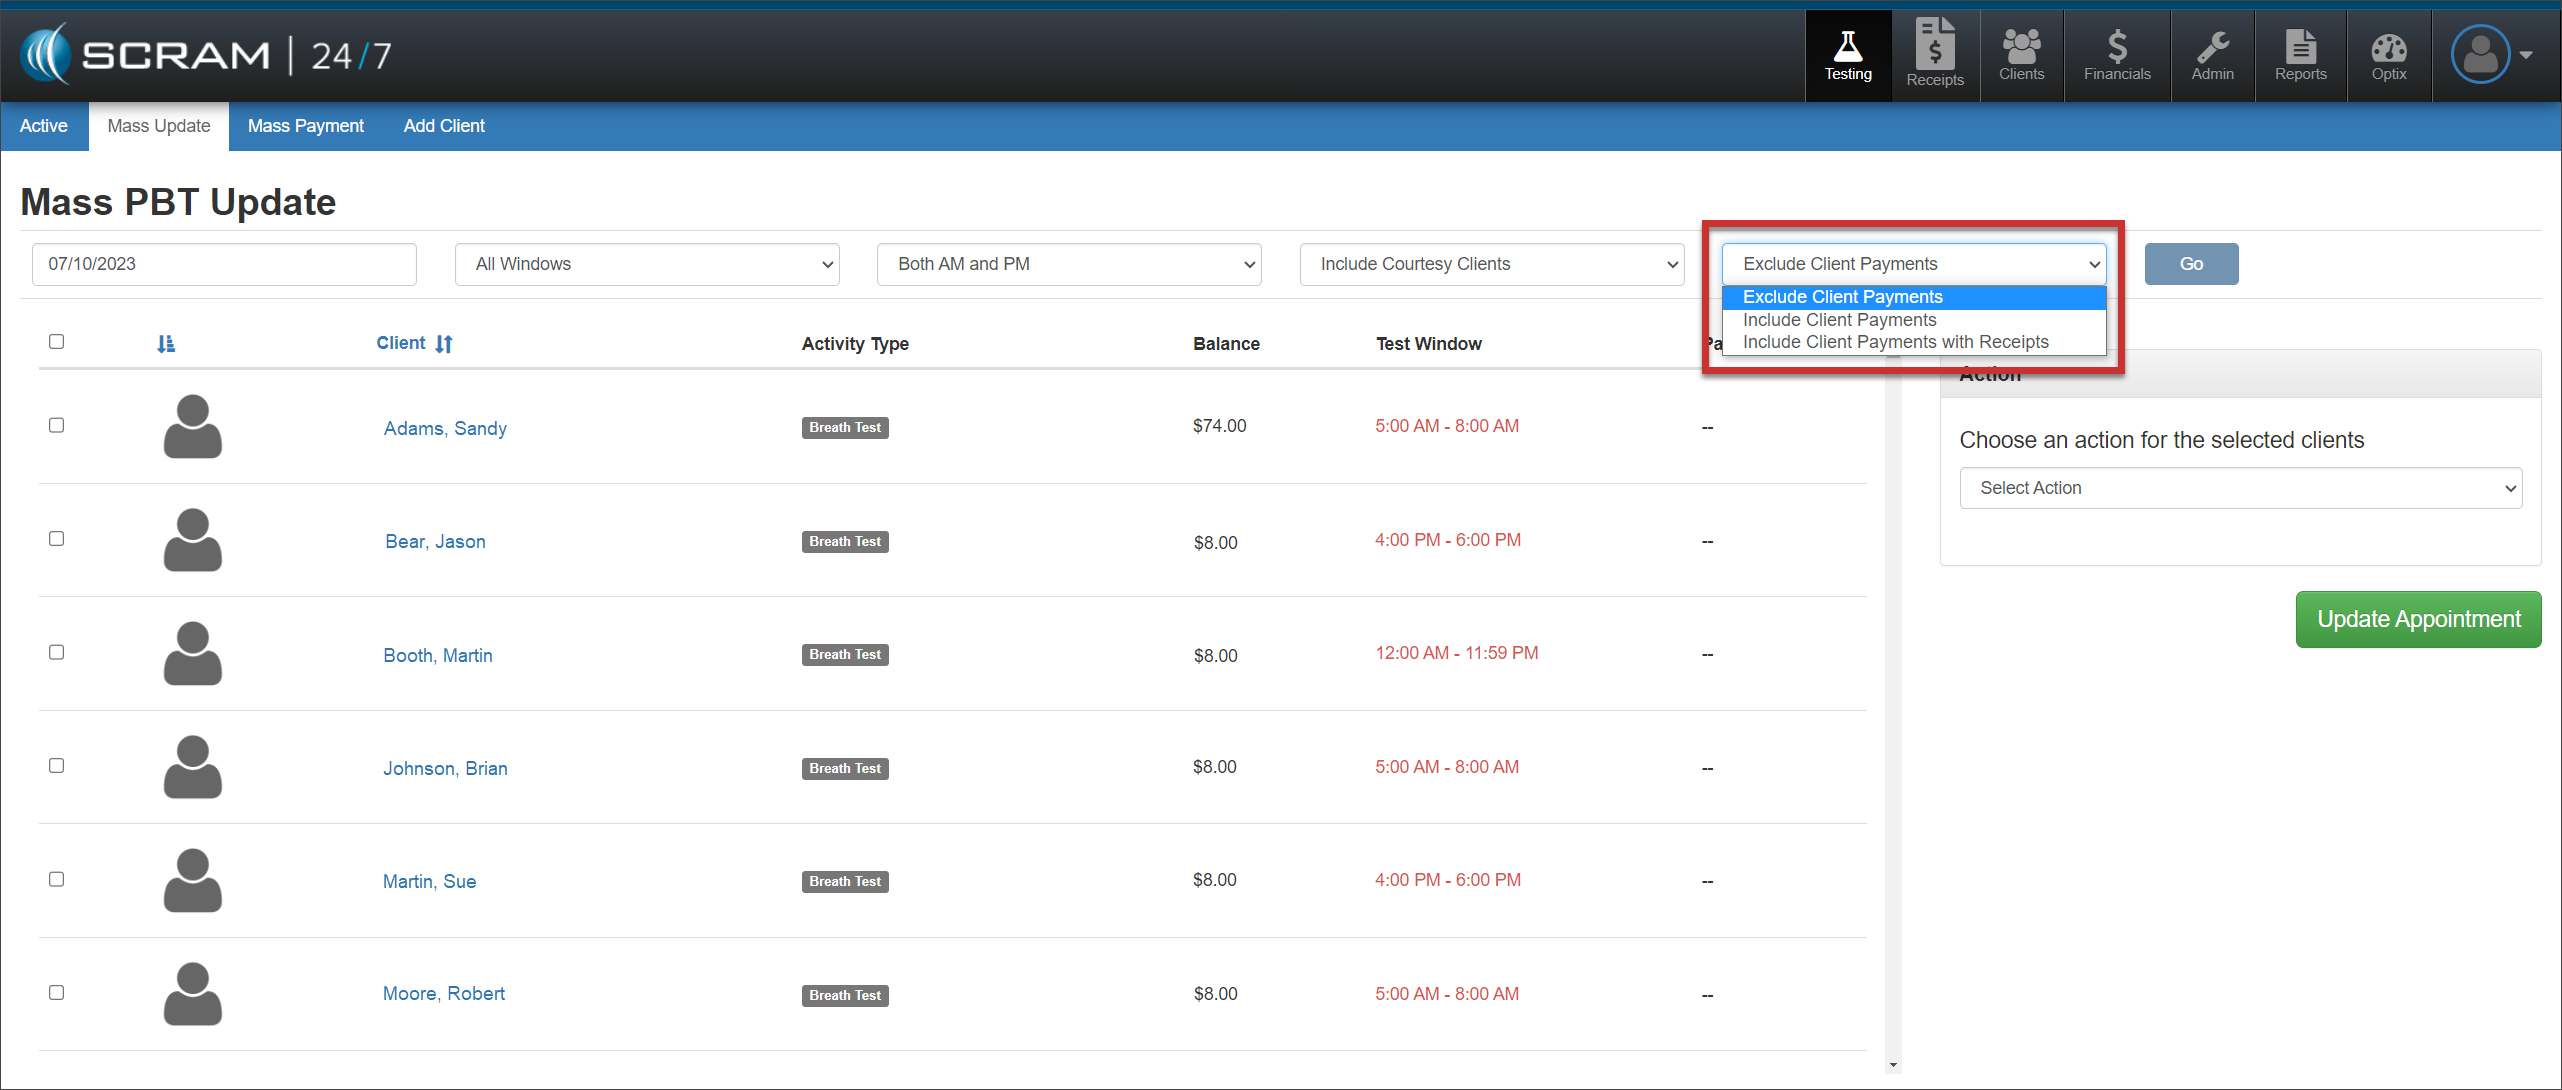
Mass Update
A new filter on the MassUpdate page allows you to include or exclude client payment and receipt options for the clients displayed.
Mass Update page – click to enlarge
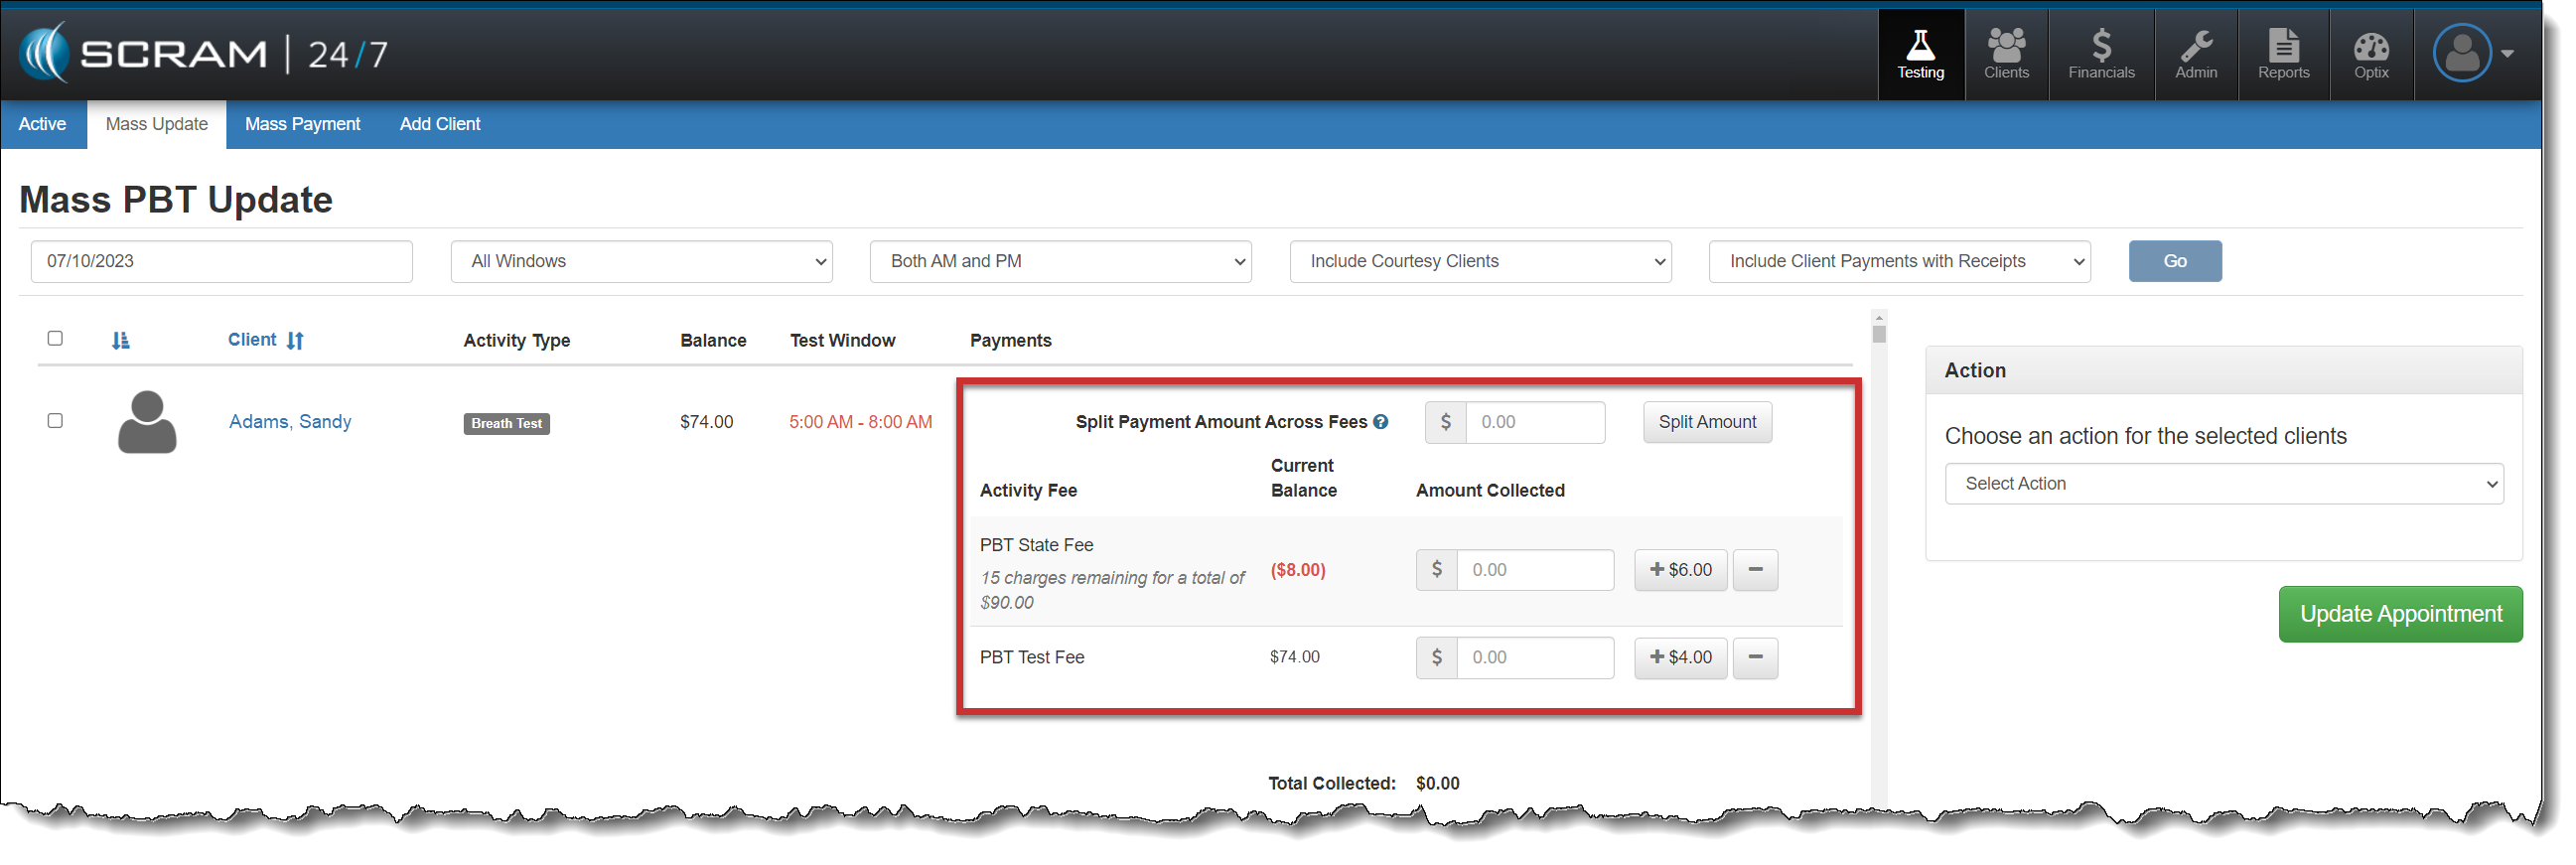
When IncludeClient Payments or Include Client Payments with Receipts is chosen, select each client for which you wish to record appointment attendance, and then enter the payment for the activity fee (if collected).
Mass Update page – click to enlarge
After recording the payments for each selected client, choose the appropriate action of either Passed or Excused for the mass update.
Once the page reloads, if the option of Include client Payments with Receipts was selected, the client receipts are available from the Receipt button.
Some tips regarding these enhancements:
When recording an individual appointment payment, the receipt is now available on the Receipts button for printing.
A print preview window will open when processing a refund, transfer, or using the Print Receipt to Date option on the client’s “Transaction History” section of their Financials page.
The receipts on the Receipts dropdown are only visible to the user who generated them.