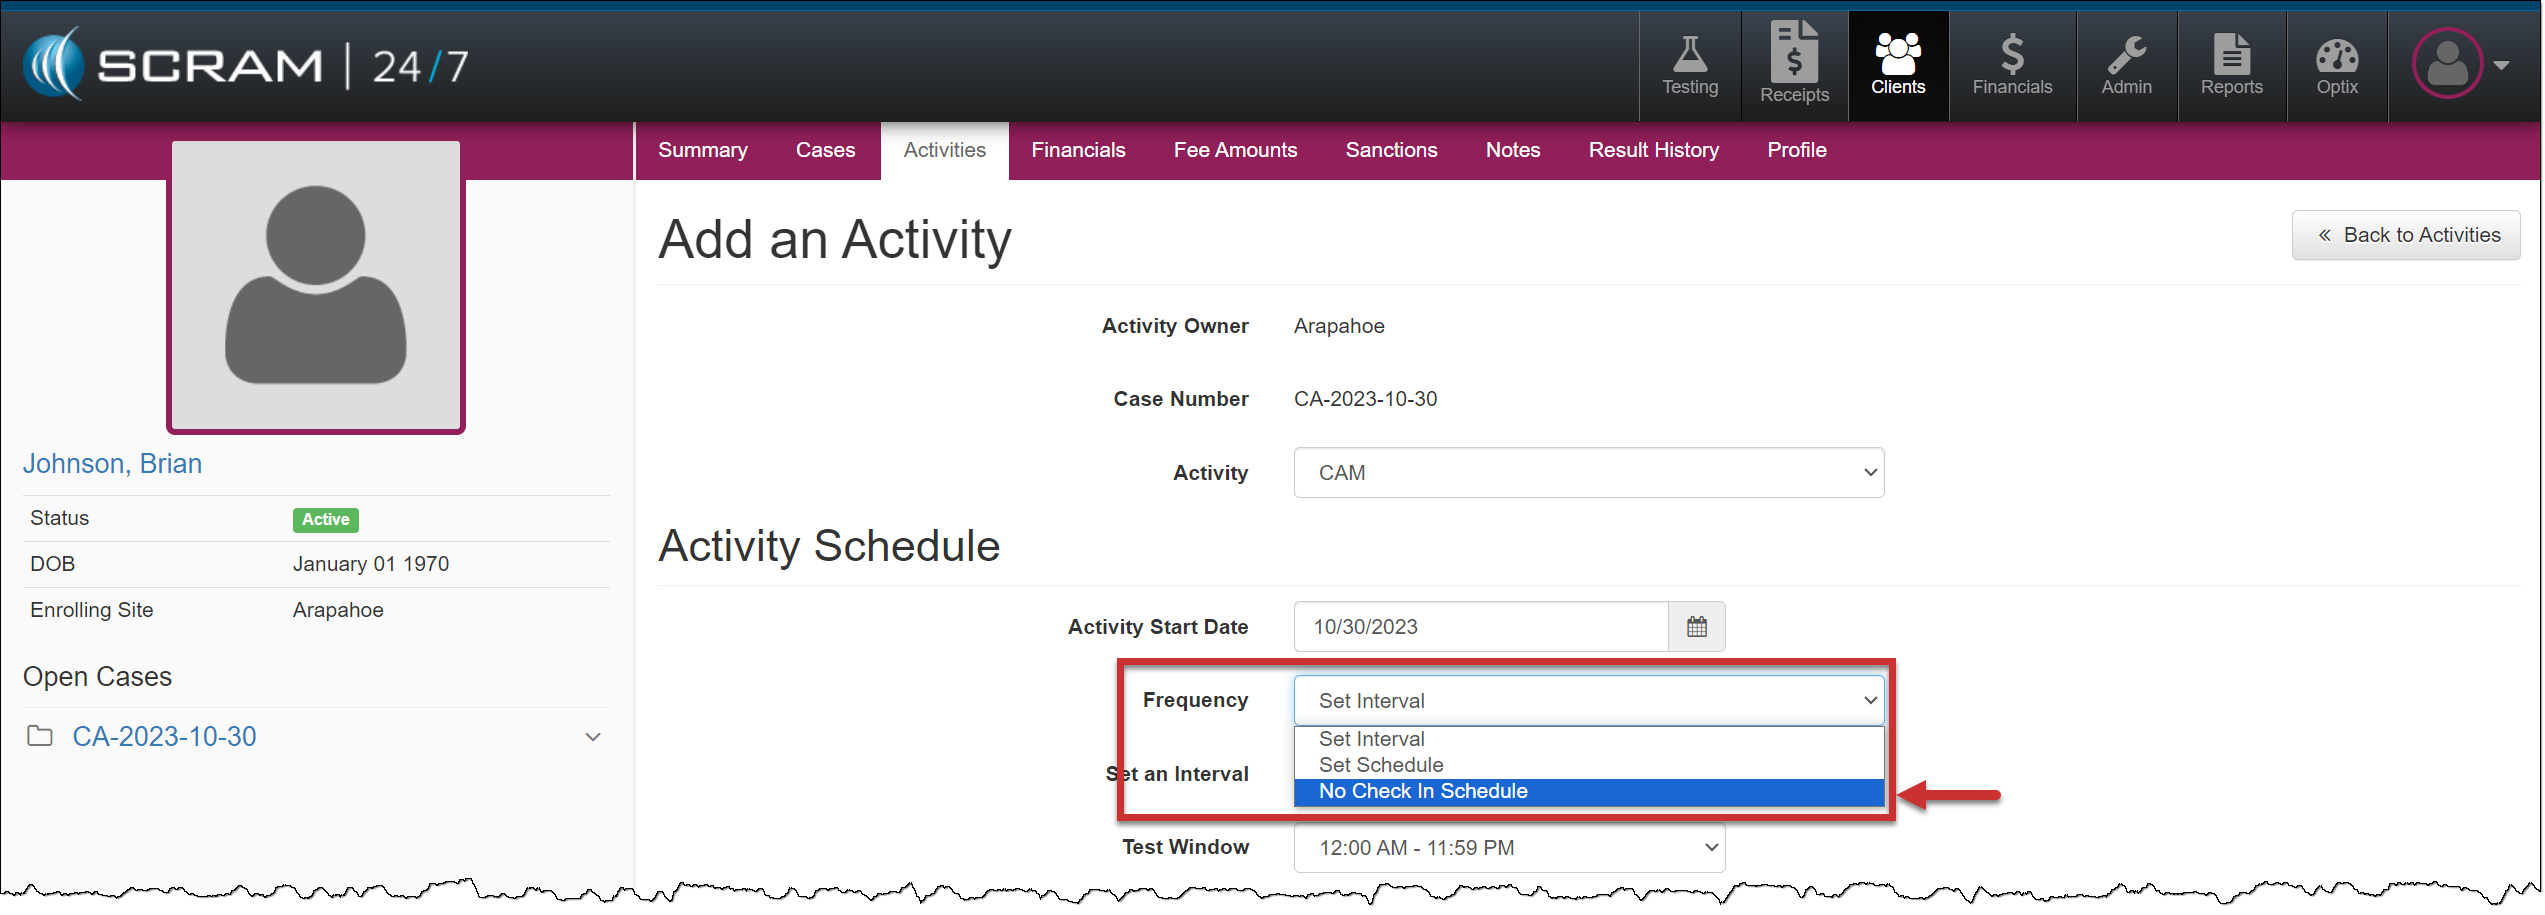
When a CAM, House Arrest, Remote Breath, or GPS Activity is added to your client for electronic monitoring in SCRAM 24/7, you must enter a scheduled check-in frequency for future appointments displayed on the client’s Summary calendar. With this enhancement, if you do not require recurring check-in appointments, you may select No Check-in Schedule from the Frequency dropdown menu for the client.
Client Add an Activity page – click to enlarge
The CAM communication schedule for data uploads is not considered a check-in appointment. When assigning the SCRAM CAM device for alcohol or house arrest monitoring, you must enter a device communication upload schedule on the equipment assignment page.
The Remote Breath testing schedule for the client is managed within SCRAMNET on the client’s RB Schedule page.
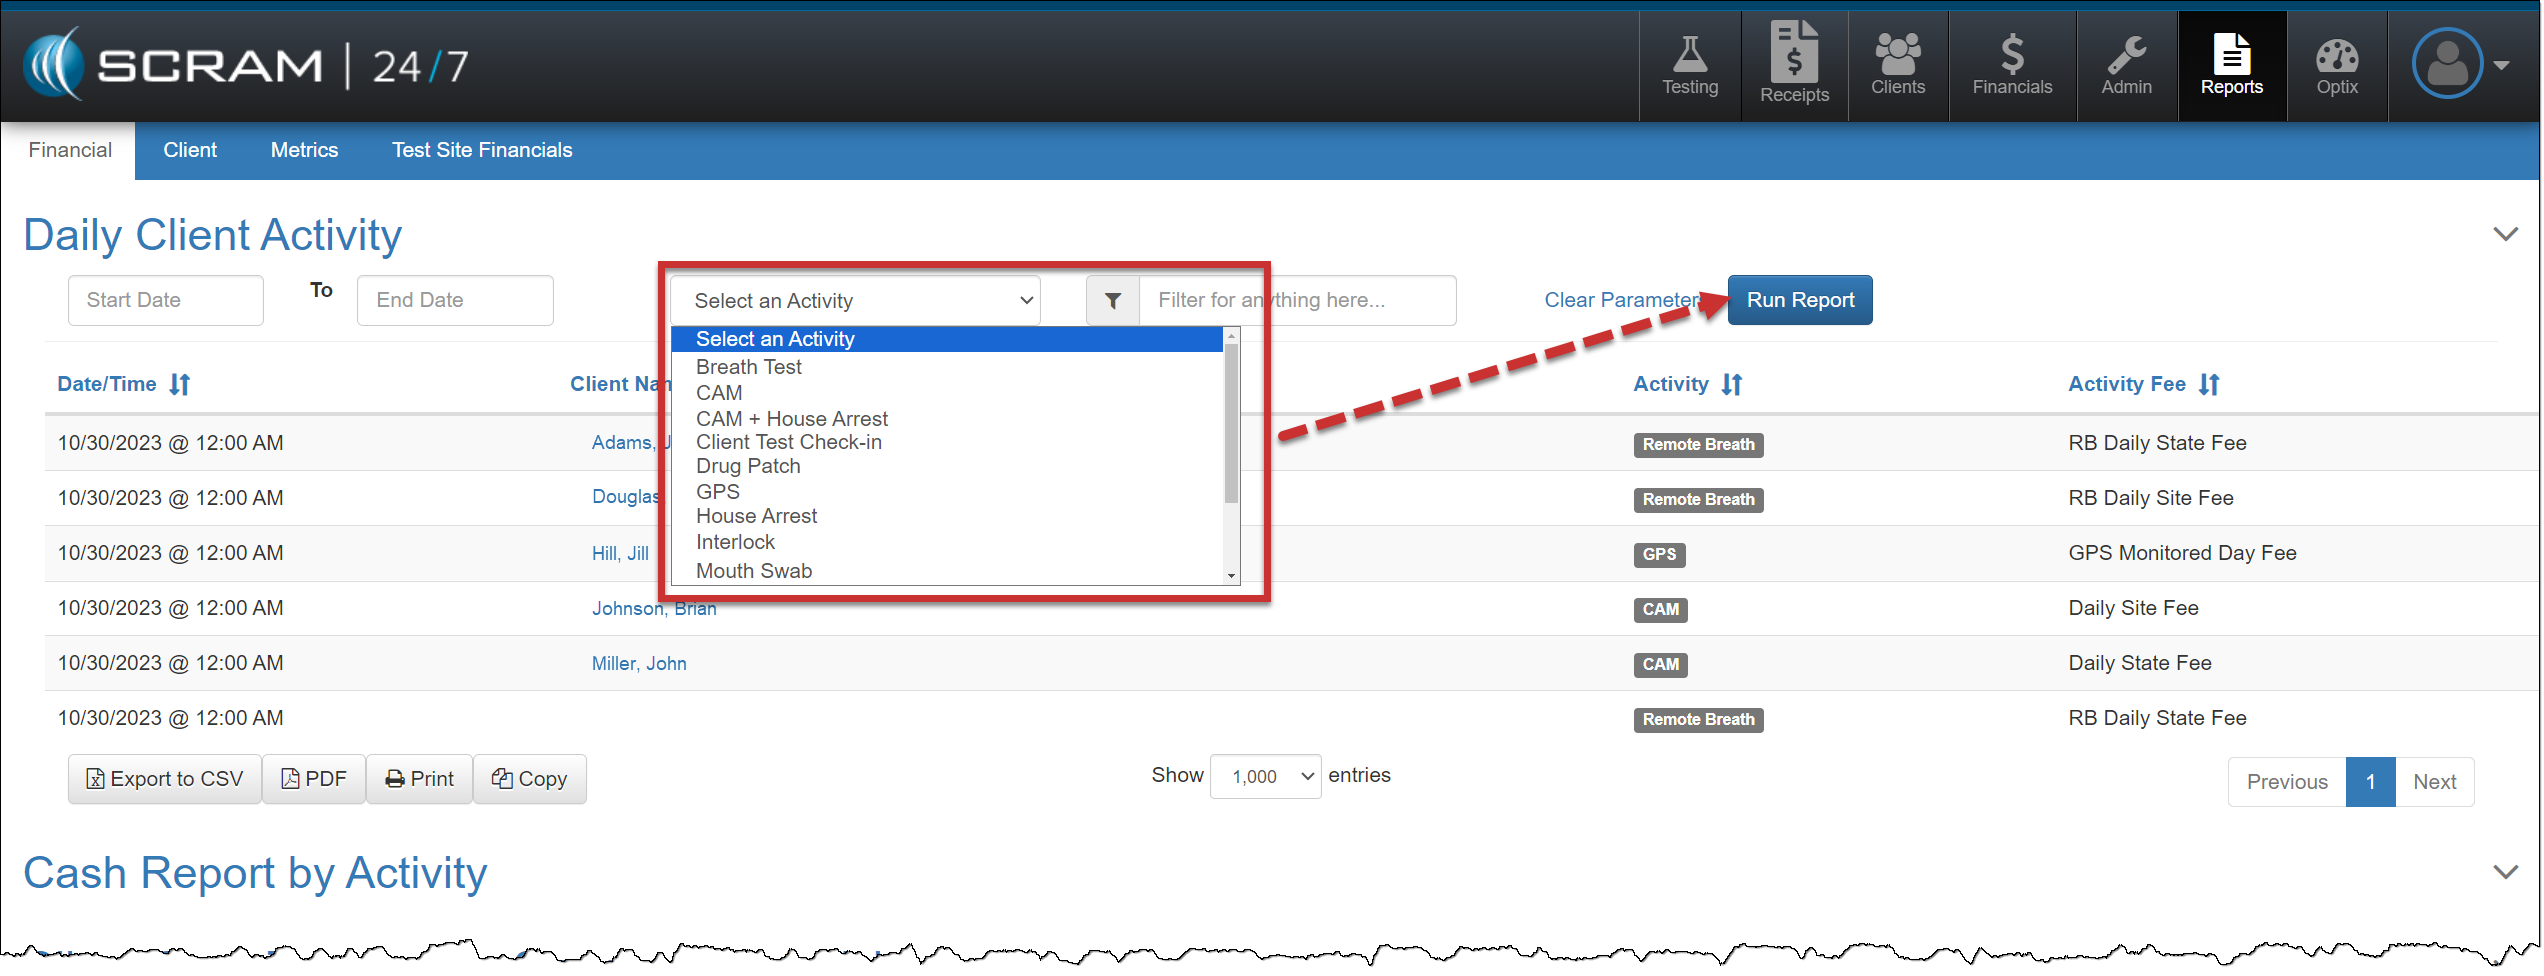
Daily Client Activity Report – New “Select an Activity” filter option
On the Financial Report page, you may customize the information displayed on the Daily Client Activity report by accessing the “Select an Activity” filter and selecting the desired activity from the dropdown menu. After choosing the report parameters, select the Run Report button to view the results.
SCRAM Systems® will be moving to QR code-based “Help” cards for nearly all of its products and services by the end of this week. The switch from static instruction cards to QR codes helps to ensure that customers – and clients – always have the most up-to-date instructions for their SCRAM Systems devices at their fingertips.
There will be two separate QR code-driven Help cards:
SCRAM Systems Device Help for customers (Service Providers and Agencies) – the blue card
SCRAM Systems User Support for clients – the white card
Quick Reference Guides will still continue to be printed for all SCRAM Systems products.
What’s a QR Code?
A QR code is a type of two-dimensional matrix barcode consisting of an array of black and white squares. QR codes are typically used for storing web addresses (URLs), which can be read by the camera on a smartphone to open a web page.
QR Code Example
How Will SCRAM Systems Use QR Codes?
Rather than including device-specific instruction cards in the boxes we ship to you, we will instead include two packs of 25 business-card-sized Help cards – one pack of customer Help cards and one pack of client Help cards – in each of our Customer Care Kits. Additional 25-card packs of each type will be available for purchase on the SCRAMNET Equipment Order Form if needed.
Help for Service Providers and Agencies
You and the other Officers, Agents, and Case Managers who are responsible for monitoring clients in your SCRAM Systems Program, can carry one of the blue customer cards with you, or post them around the office. Then whenever you need help installing or removing a device, for example, you may simply pull out the SCRAM Systems Device Help card and scan it with your smartphone:
SCRAM Systems Device Help Card – Front
SCRAM Systems Device Help Card – Back
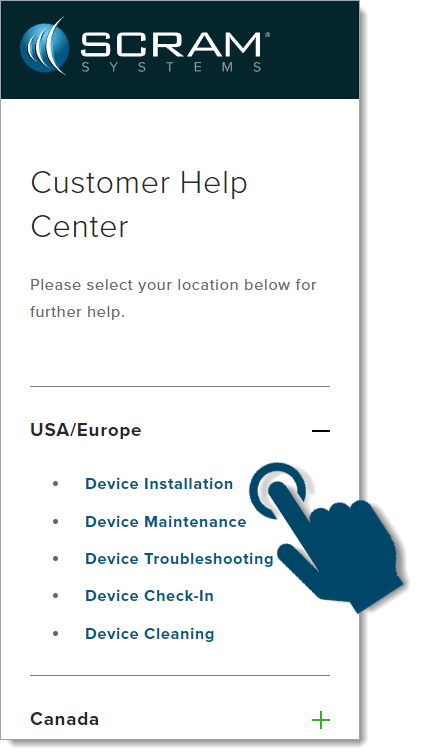
Once you scan the QR code on the card, your smartphone will launch the SCRAM Systems Customer Help Center (www.scramsystems.com/customer-help/), where you will tap on your location, and then tap on the type of Help you need:
Scan the card with your smartphone and then select your location:
Select Your Geographical Location (USA/Europe Shown)
Select the type of device help you seek:
Select the Type of Help (Device Installation Shown)
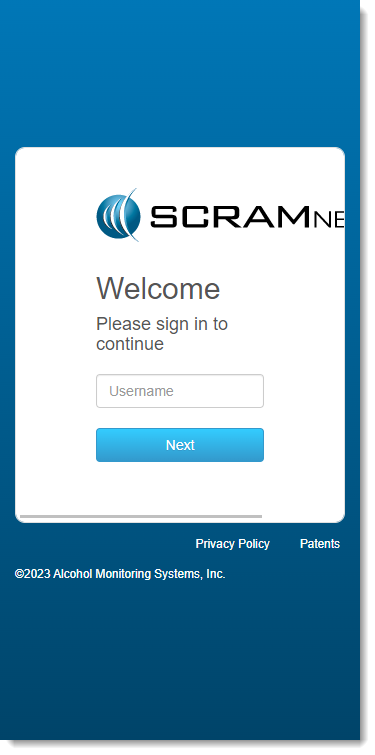
Login with your SCRAM monitoring system credentials:
Login with SCRAM Credentials
Requiring a login ensures that nobody except SCRAM Systems customers can access SCRAM Device Help.
Select the specific SCRAM Systems product for which you want help:
Select the Appropriate Product (Installation Help Example)
Help for Clients
SCRAM Systems will also be eliminating most product-specific client instruction cards, and will instead make QR code-driven SCRAM Systems User Support help cards available:
SCRAM Systems User Support Help Card – Front
SCRAM Systems User Support Help Card – Back
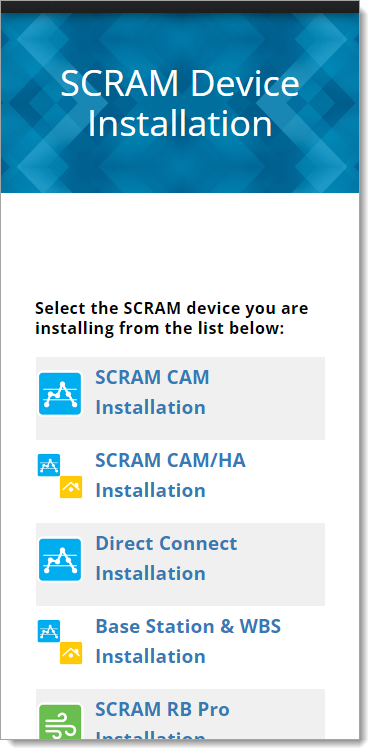
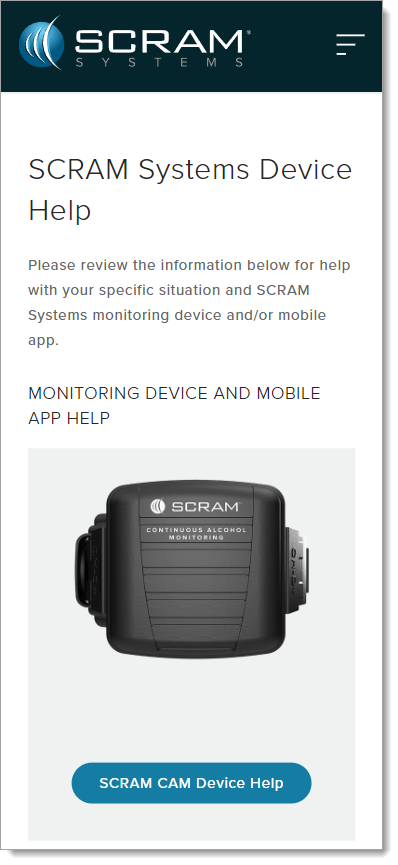
Once the client scans the QR code on the white card, their smartphone will launch SCRAM Systems Device Help for clients (www.scramsystems.com/scram-device-help/), where they may scroll through a list of SCRAM Systems devices, mobile apps, and FAQs, and simply tap on the type of help they need:
SCRAM Systems Device Help for Clients – SCRAM CAM
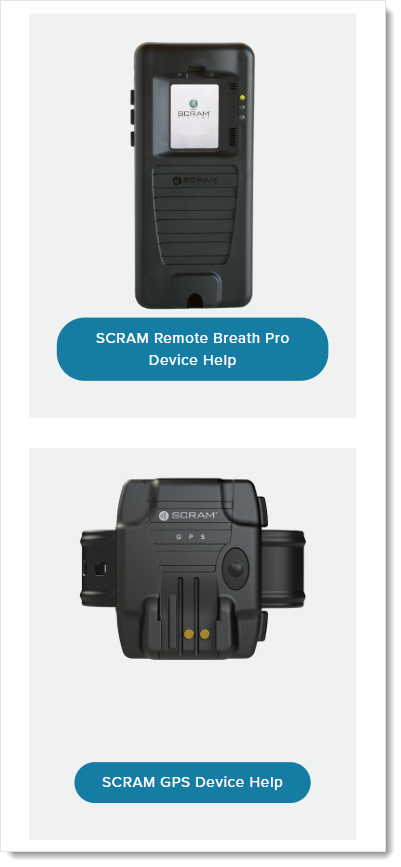
SCRAM Systems Device Help for Clients – SCRAM RB Pro & GPS
On, August 16, 2023, SCRAM Systems® will re-release enhancements to the SCRAM 24/7® system to streamline payment processing.
These enhancements will allow you to:
Enter multiple payments for your clients on the MassPayment page.
Enter multiple client payments on the MassUpdate page.
Mass Payment
To enter multiple payments for your caseload:
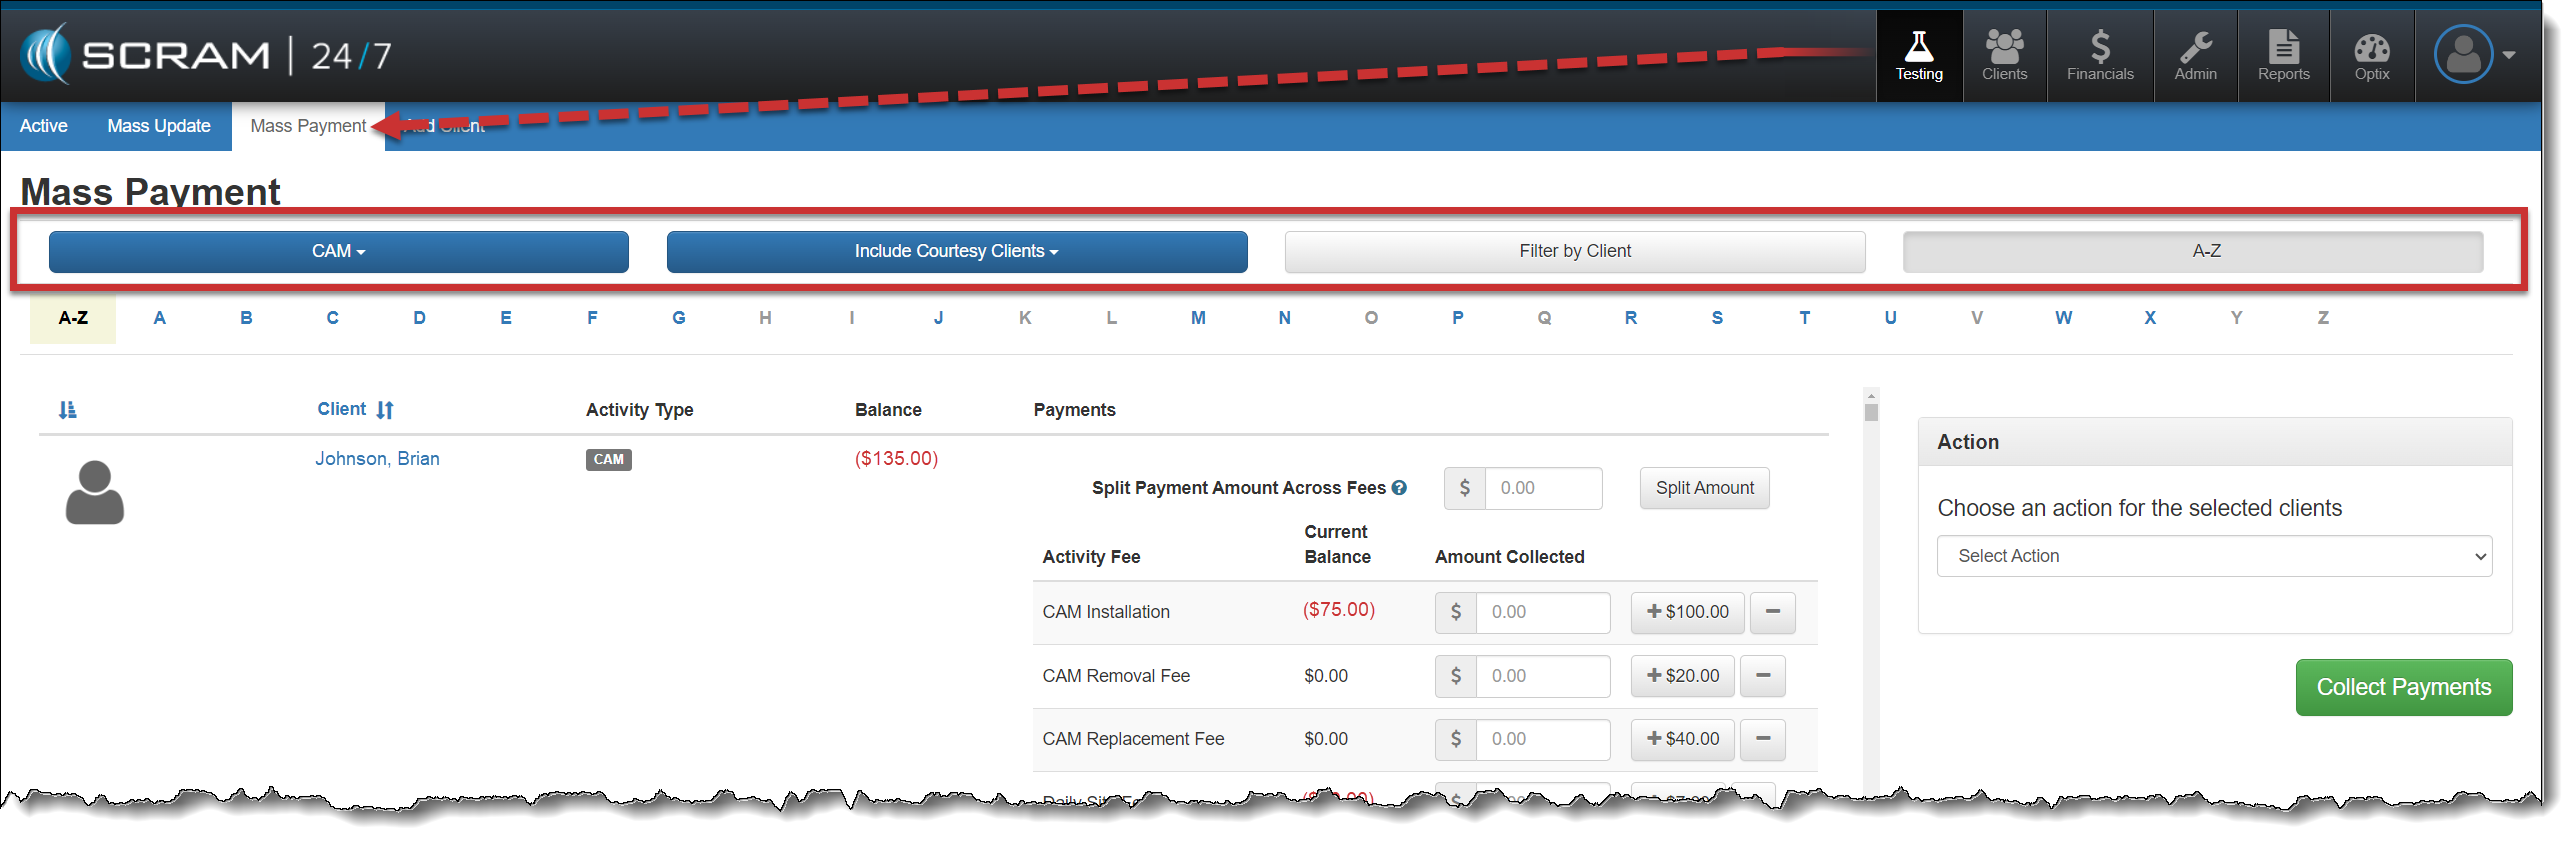
Select the Mass Payment tab from the Testing page.
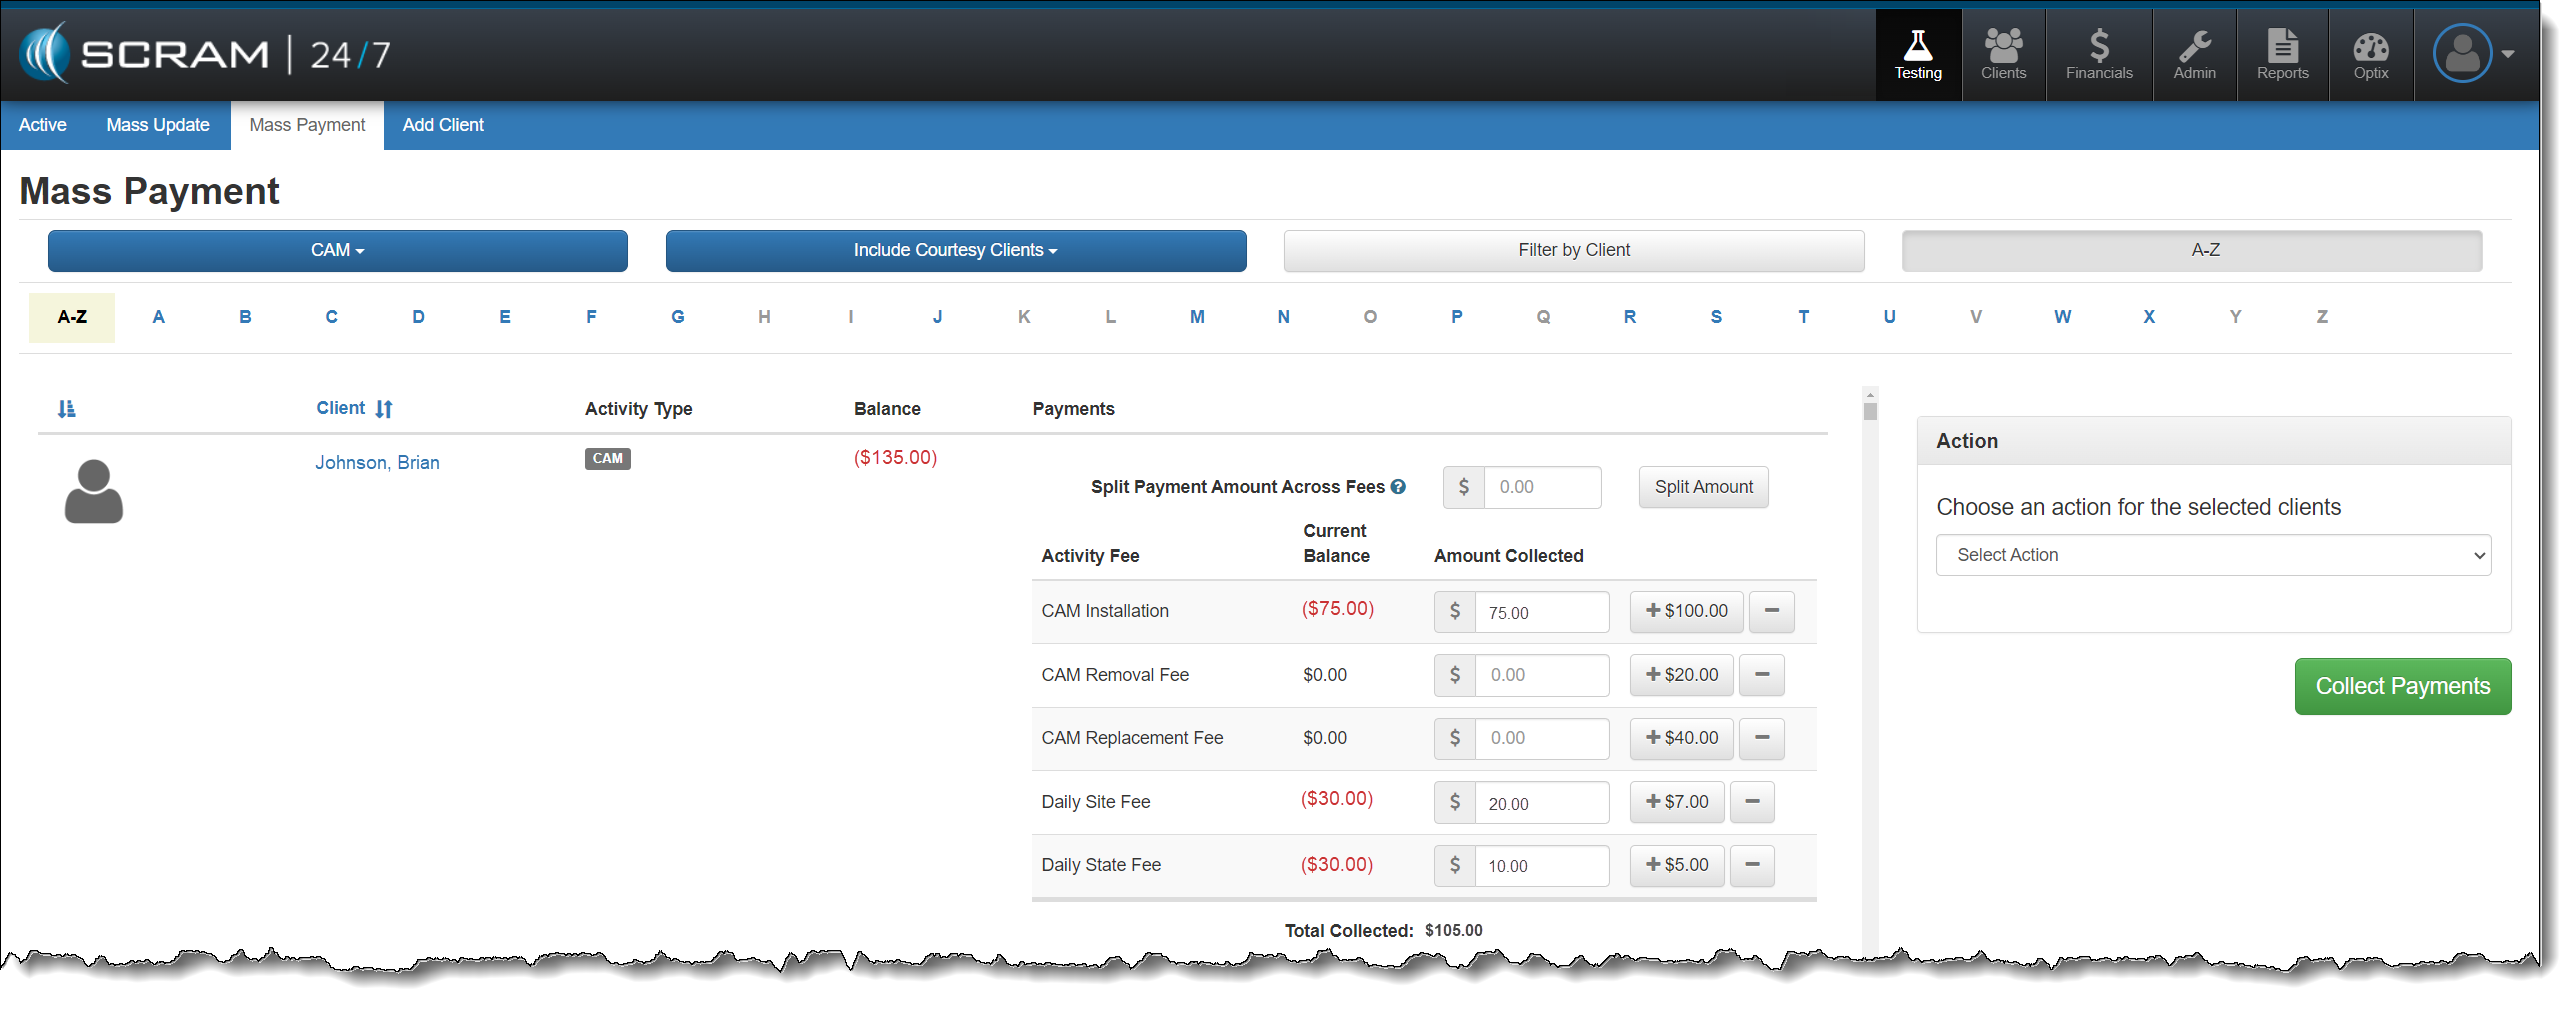
Use the available filters to customize the activity and clients displayed on the page.
Mass Payment page – click to enlarge
Locate each client you wish to enter a payment for and enter the amount collected for the activity fee.
Mass Payment page – click to enlarge
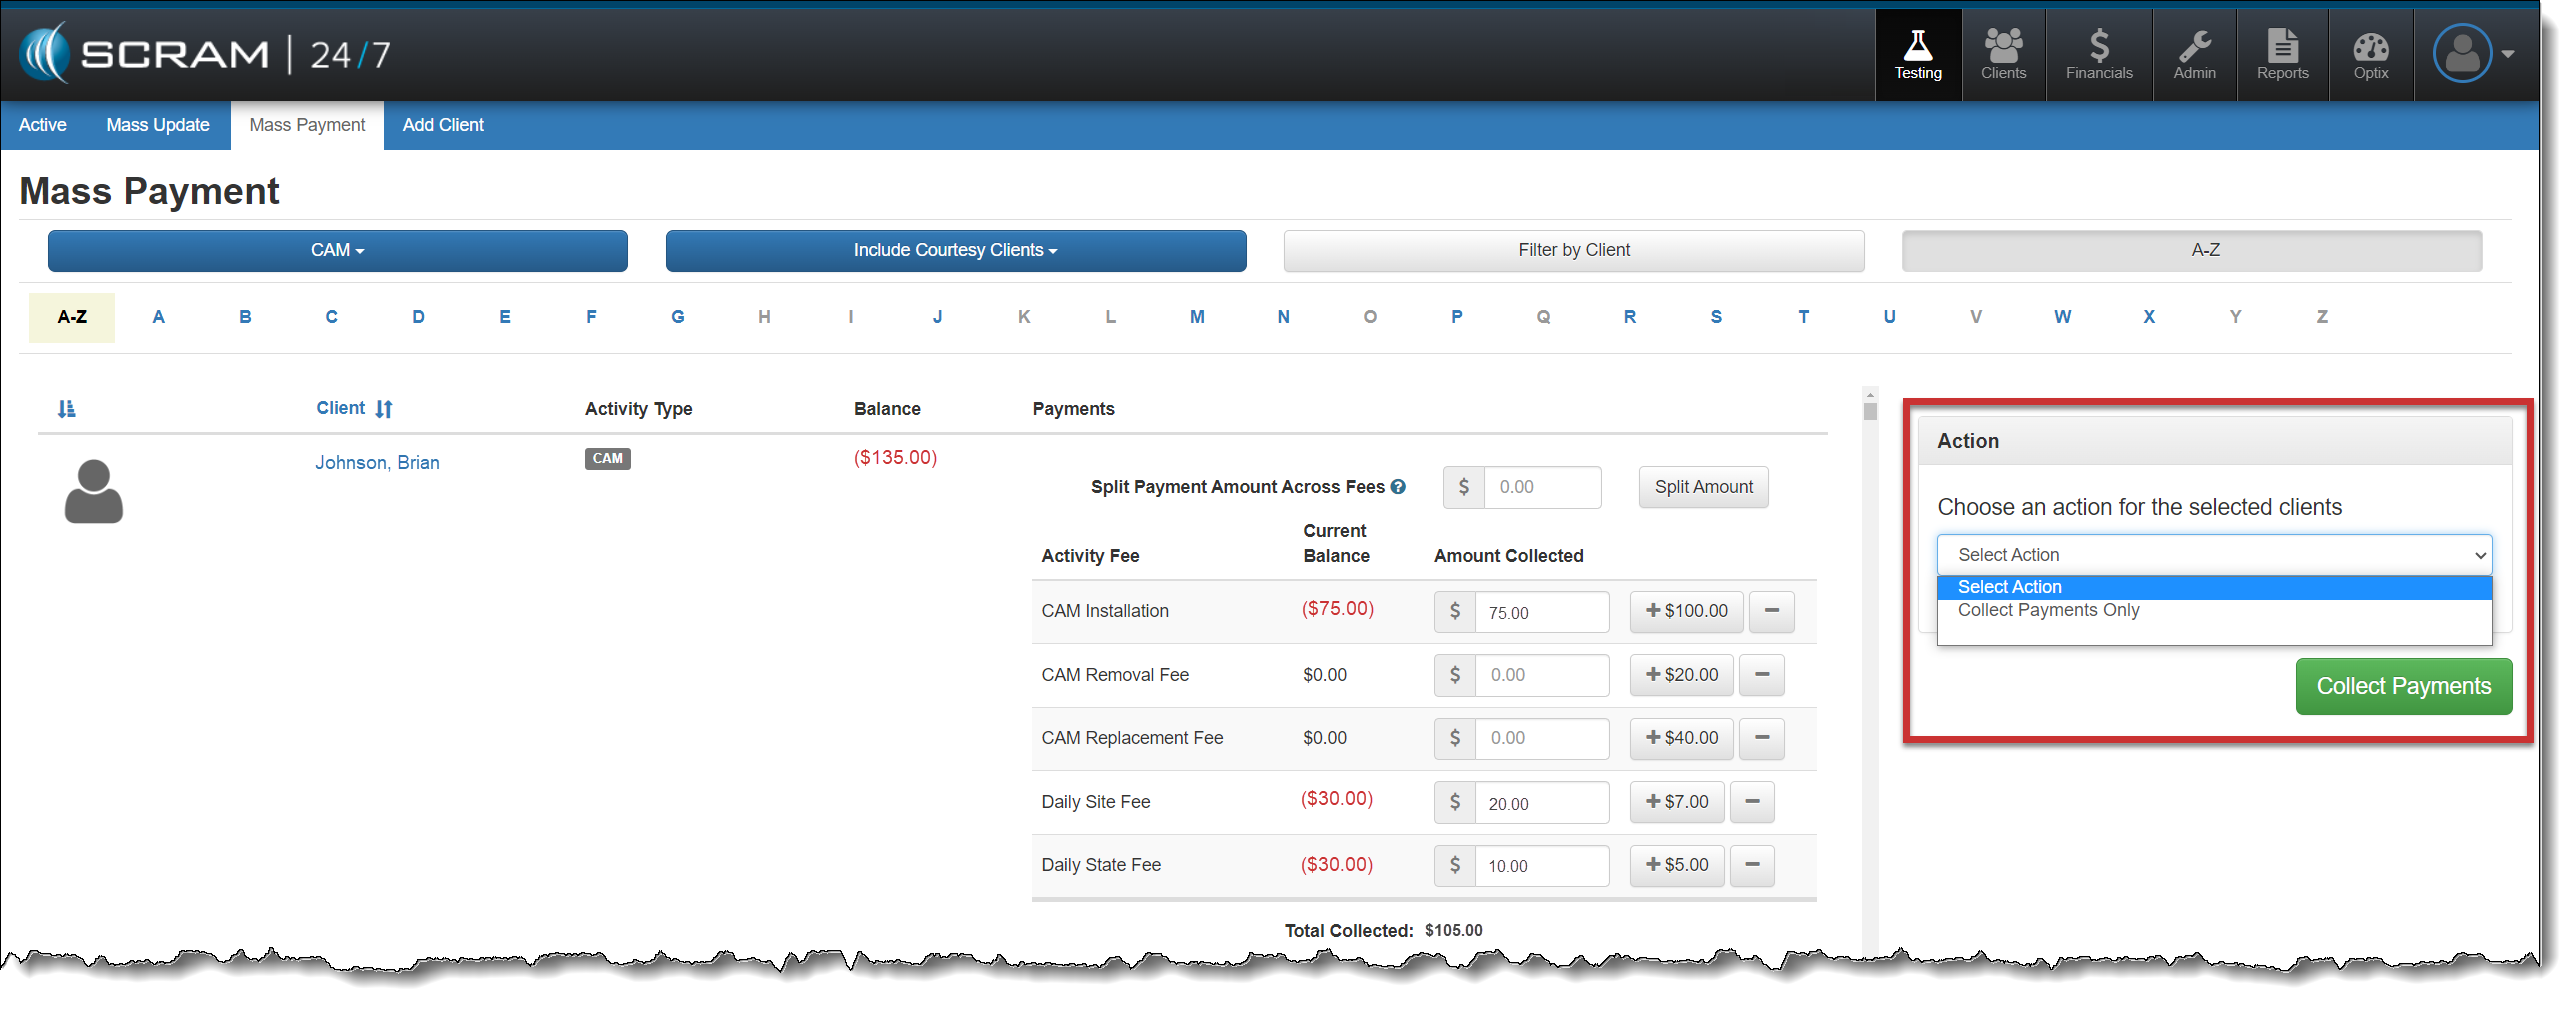
Enter the amount collected for each client, and then select Collect Payments Only from the Action dropdown menu.
Select the Collect Payments button.
Mass Payment page – click to enlarge
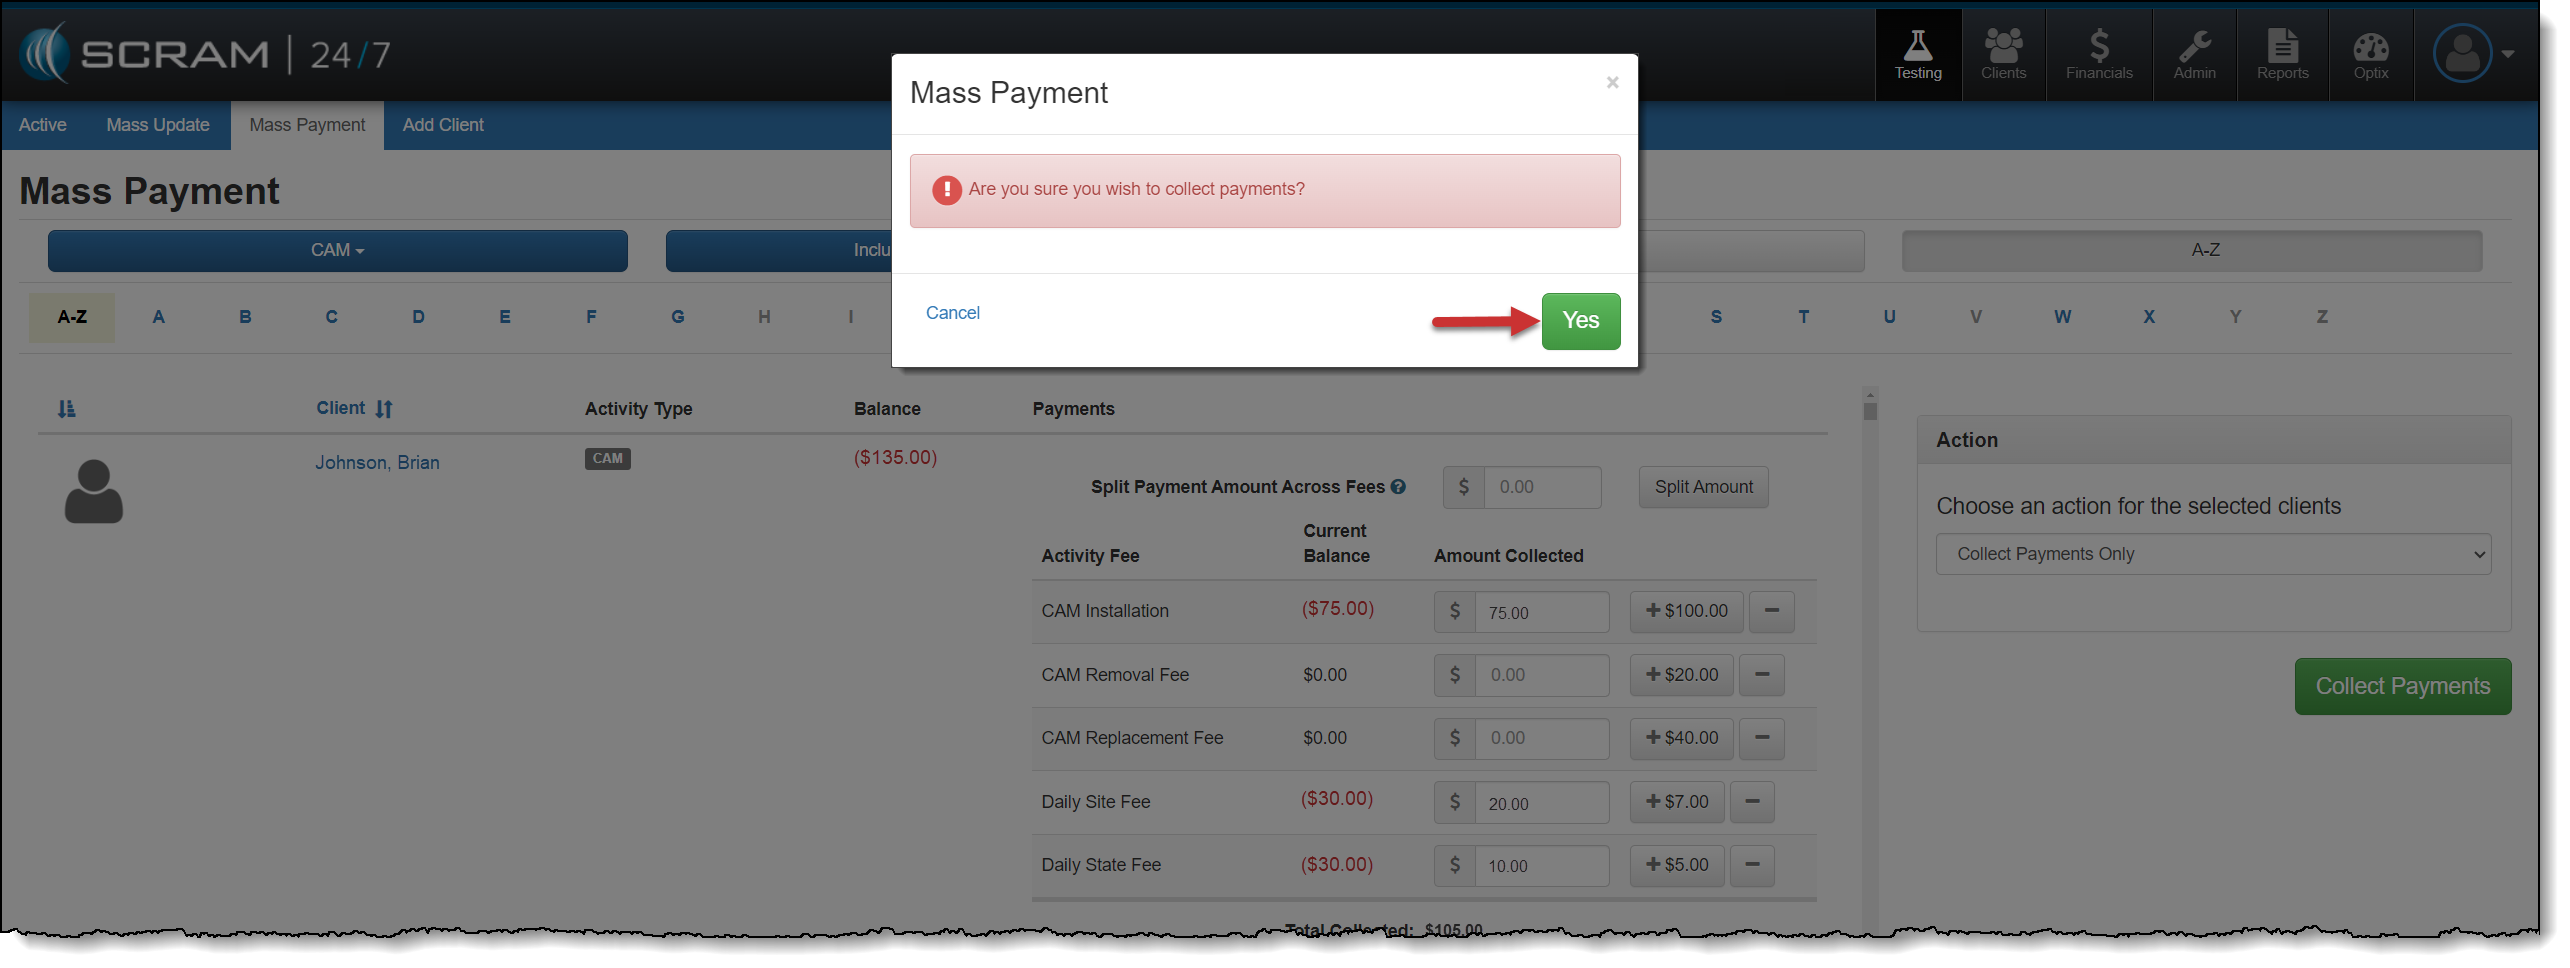
On the Mass Payment acknowledgment pop-up, select the Yes button.
Mass Payment Acknowledgment pop-up – click to enlarge
When the page reloads, you will notice a Payment Pending notice next to each client where the payment was applied. Once the payments have been processed, the new balance will be reflected for the client.
A transaction record may be viewed in the “Transaction History” section of each individual client’s Financials tab.
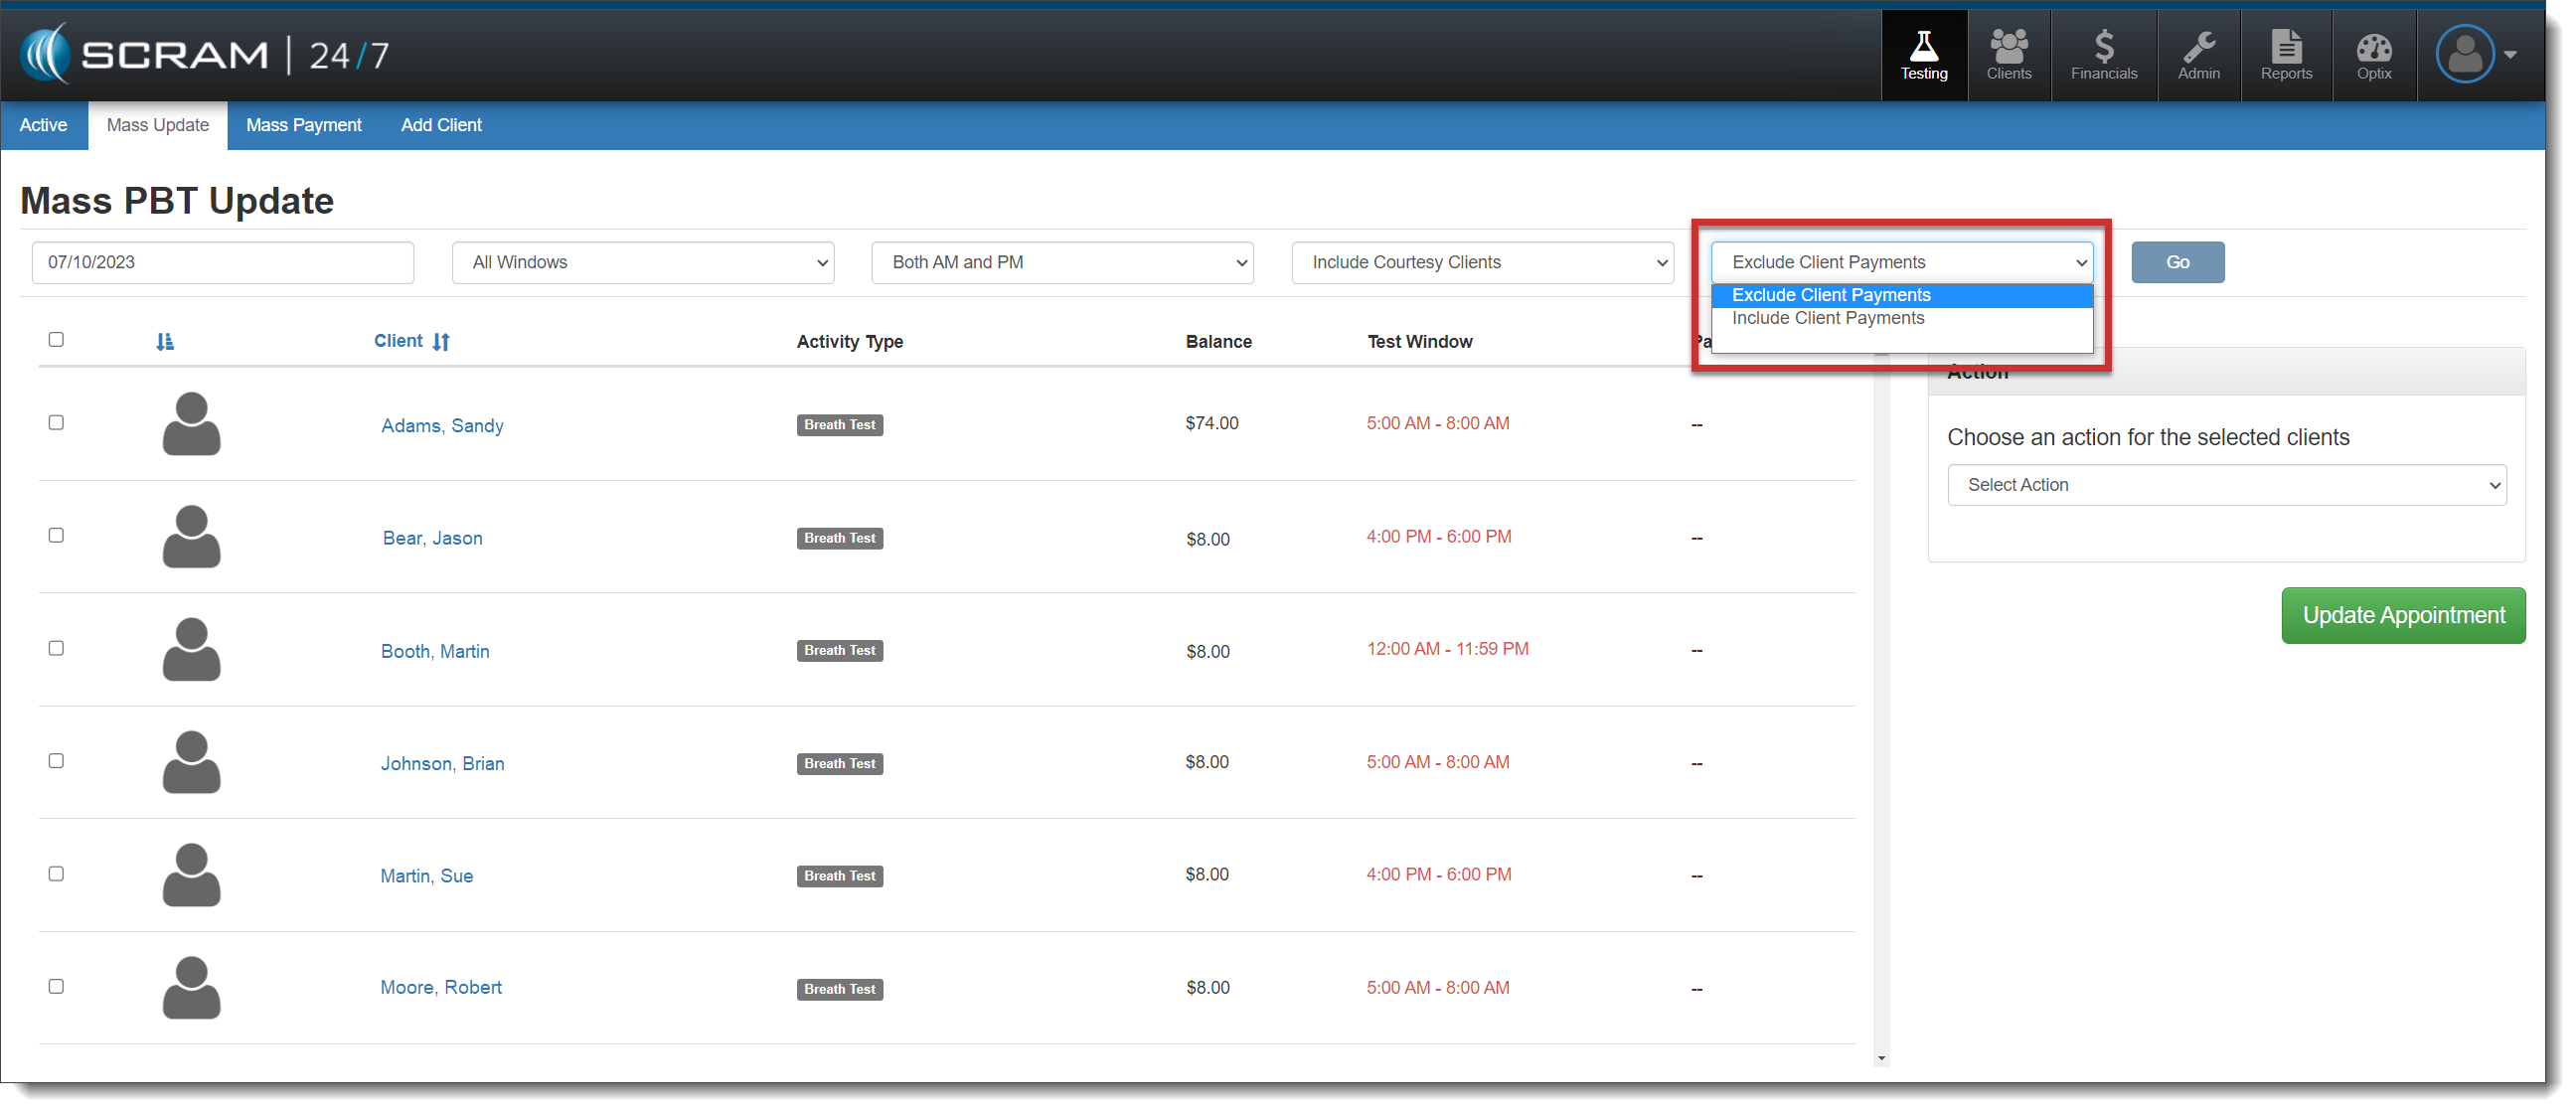
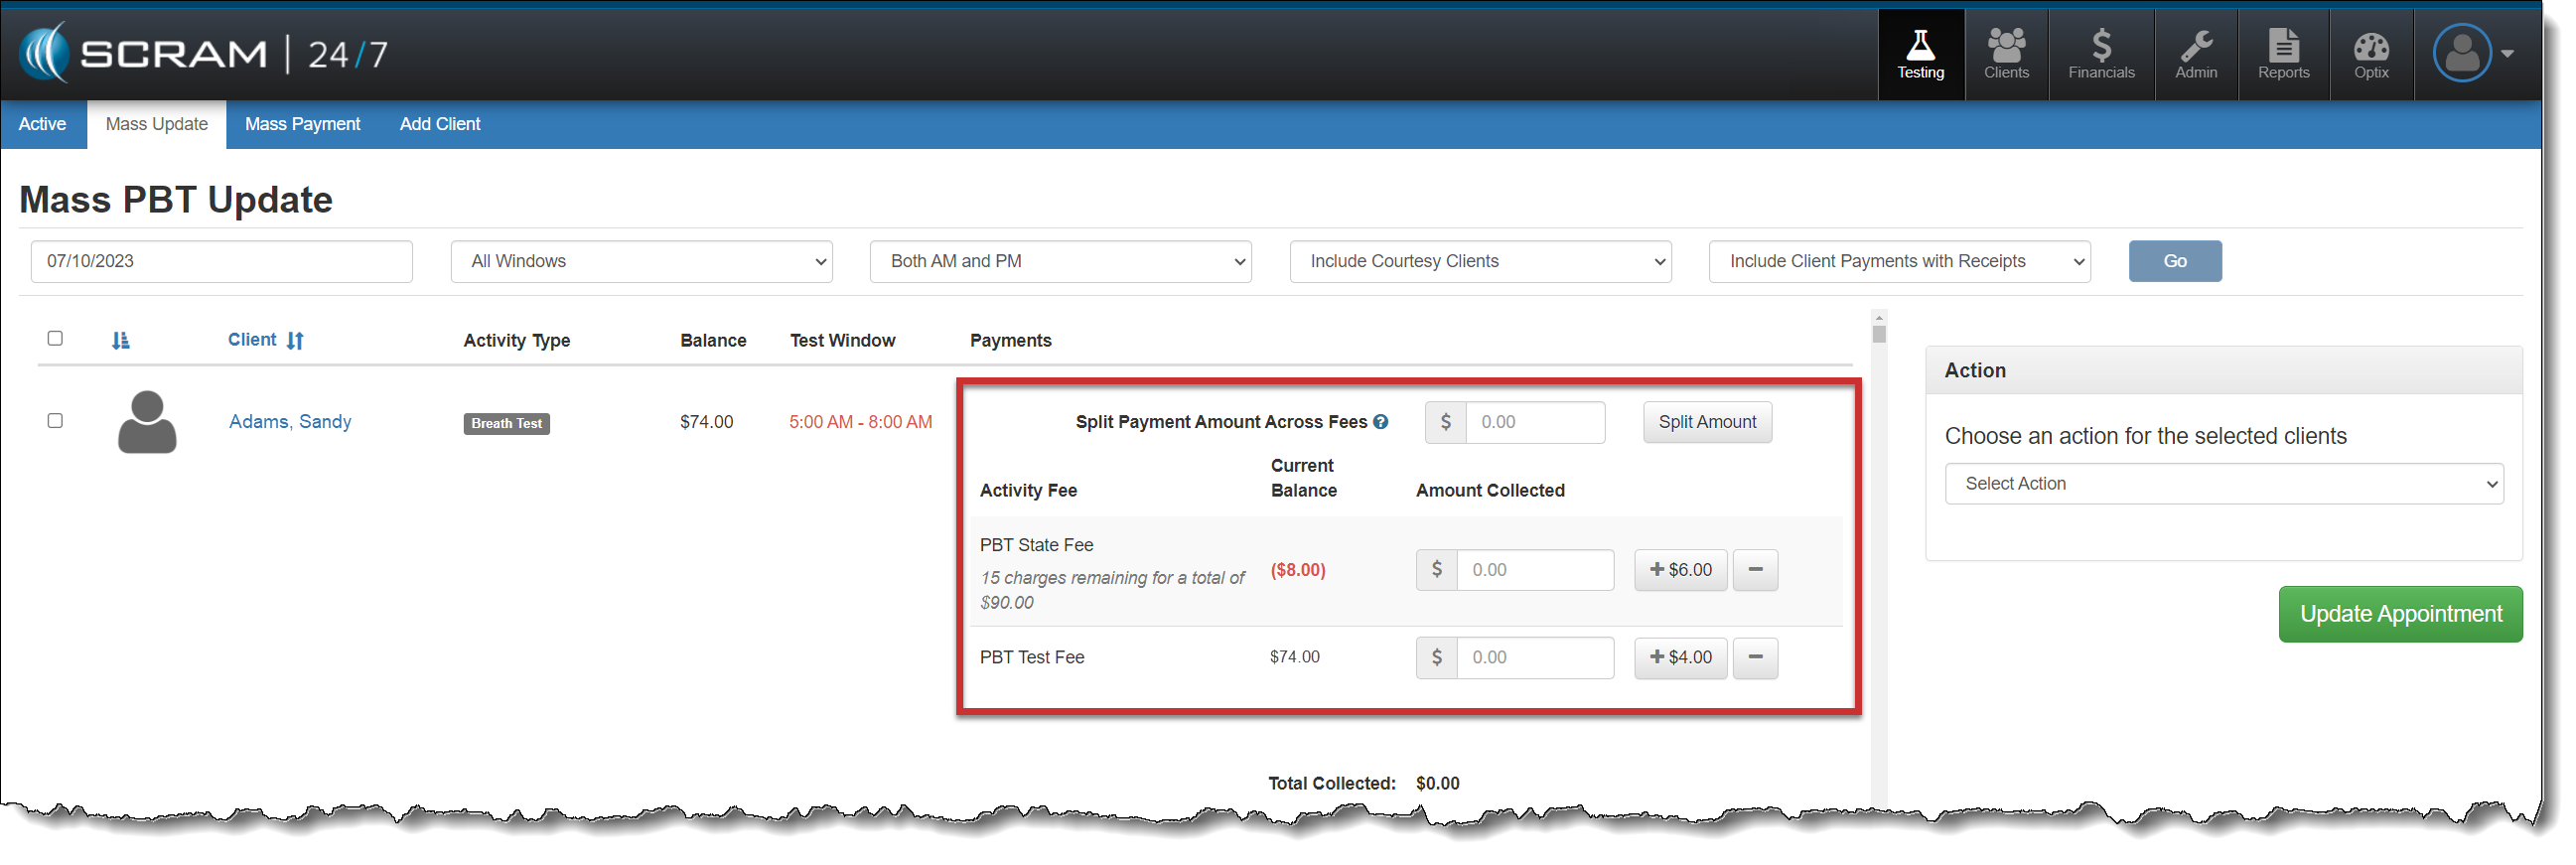
Mass Update
A new filter on the MassUpdate page allows you to include or exclude client payment options for the clients displayed.
Mass Update page – click to enlarge
When IncludeClient Payments is chosen, select each client for which you wish to record appointment attendance, and then enter the payment for the activity fee (if collected).
You are not required to record a payment for each client to record the attendance.
Mass Update page – click to enlarge
After recording the payments for each selected client, choose the appropriate action of either Passed or Excused for the mass update.
A print preview window will open when processing a refund, transfer, or using the Print Receipt to Date option on the client’s “Transaction History” section of their Financials page.
Starting this
afternoon, February 15,
2023, SCRAM Systems will release two enhancements to SCRAM
24/7.
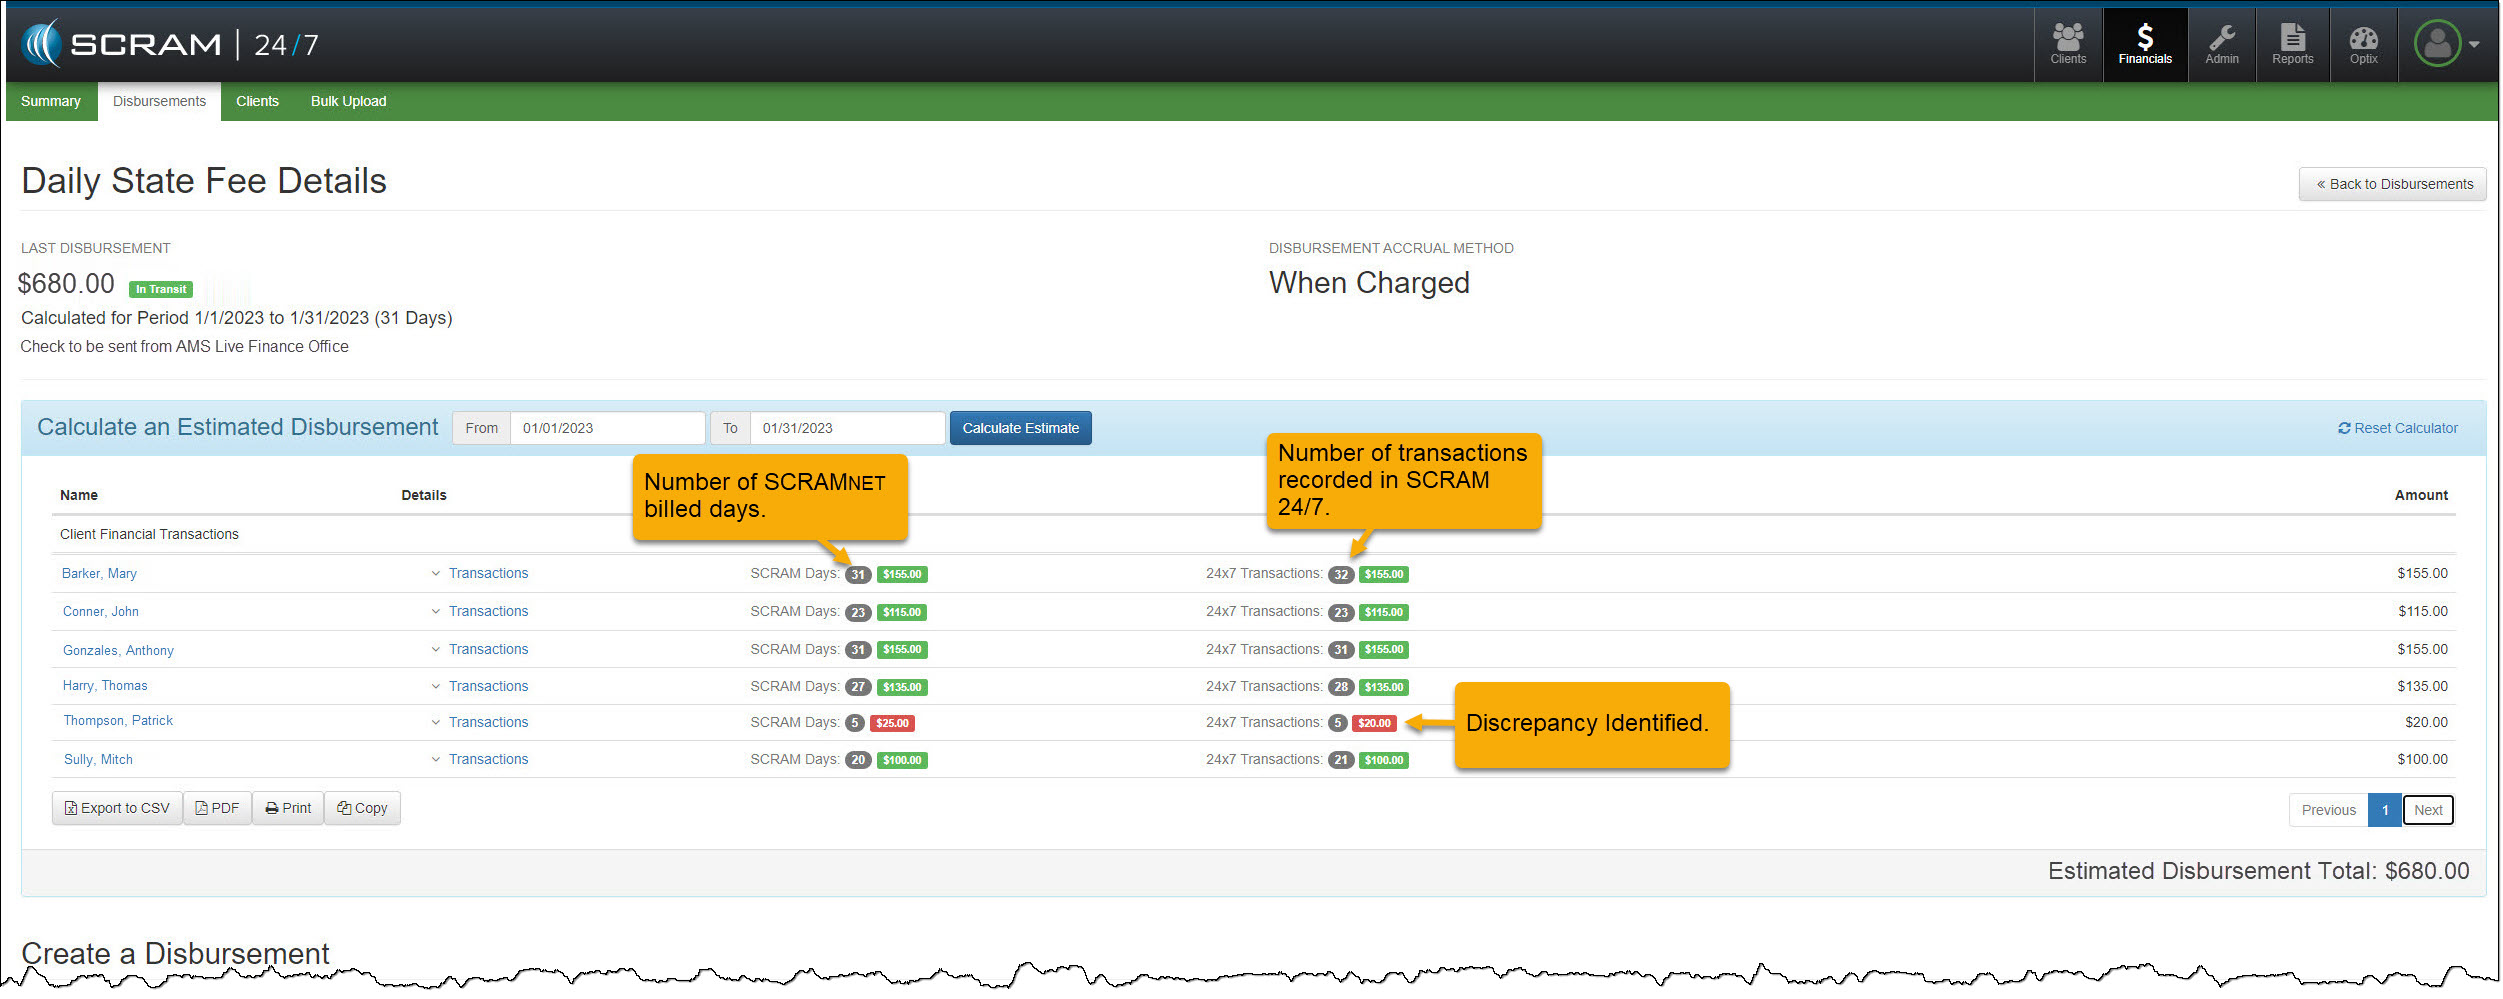
Prior to this enhancement, when a disbursement discrepancy arose,
you had to search through client transactions to pinpoint where the SCRAM
Monitoring days and the SCRAM 24/7 collected fees may be off. With this update,
you can quickly identify any discrepancy between the number of SCRAM Days billed
for the client and the amount of money collected during the selected
disbursement period.
When a SCRAM 24/7 client profile is linked to the wrong SCRAMNET client profile, you can
update it to the correct primary profile from the client’s sidebar in SCRAM
24/7.
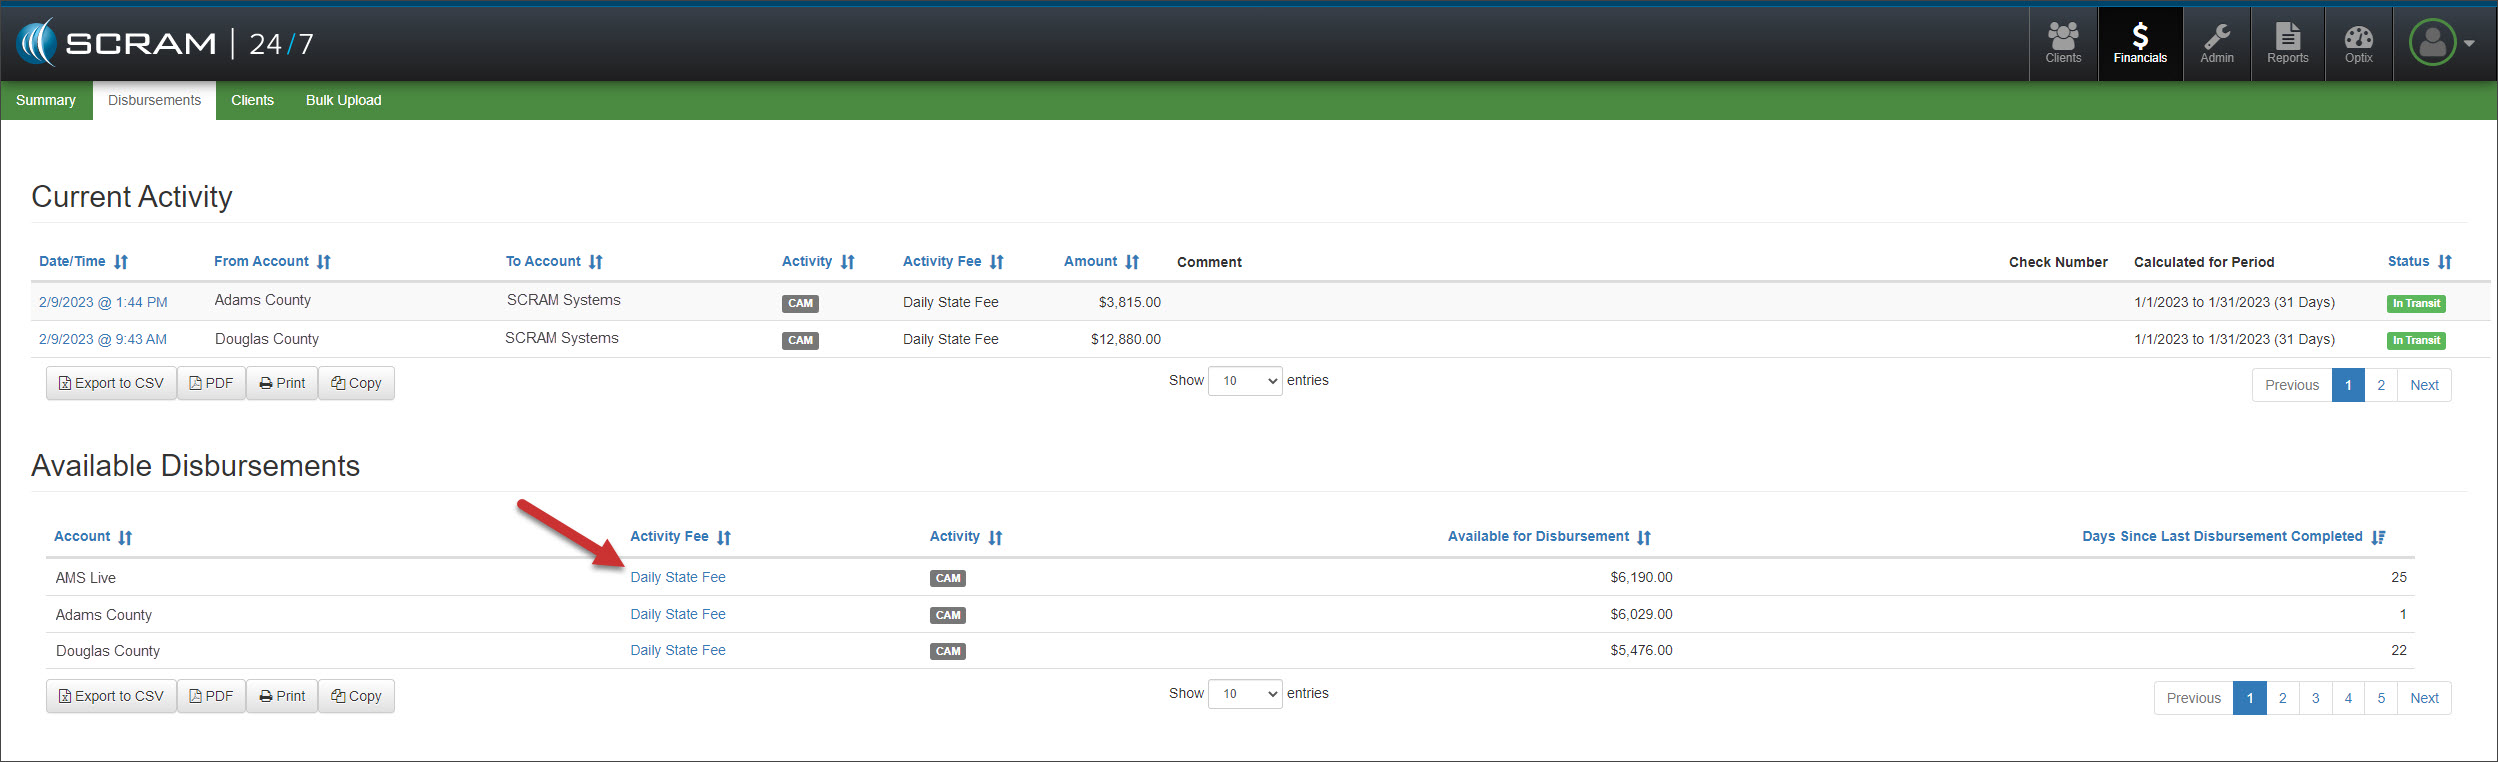
Disbursement Enhancement
On the Disbursement page, select the Activity Fee hyperlink in the Available Disbursements section for the account you would like to view.
Disbursement Page – click to enlarge
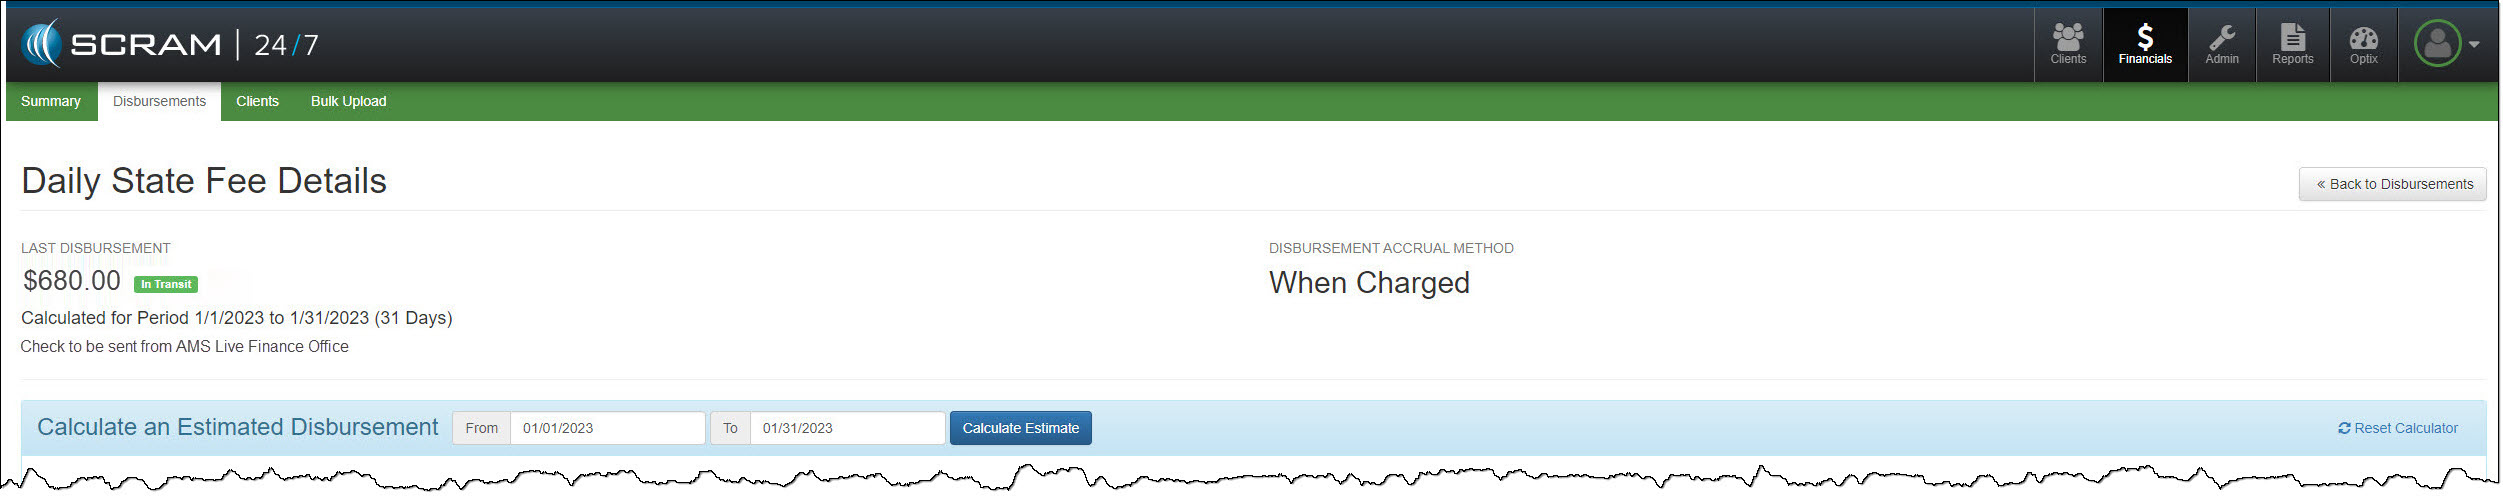
Select the disbursement timeframe and then select the Calculate Estimate button.
Activity Fee Details Page – click to enlarge
In the Client Financial Transactions section, view
the SCRAM Days billed to the client and the 24/7 Transactions total
fees collected for each client on your program during the reporting period. All
amounts in red indicate a discrepancy.
Activity Fee Details Page – click to enlarge
To view the transaction history for the client, open the Transactions section.
Activity Fee Details Page – click to enlarge
Client Profile Enhancement
Sometimes, when the client has multiple SCRAMNET profiles, the client’s SCRAM 24/7 profile can
become linked to the wrong SCRAMNET profile. With this enhancement, you can update
which SCRAMNET profile will be the client’s
primary 24/7 profile.
On the client’s sidebar in SCRAM 24/7, expand the options
located under Other Monitoring Services. Then, select the blue Use as
Primary Profile button to change the current Primary profile.
Starting this afternoon, February 1, 2023, SCRAM Systems is releasing an enhancement to SCRAM 24/7, which allows you to sync up the billable days recorded in SCRAMNET to SCRAM 24/7.
To better assist you in
identifying SCRAMNET billable days and fees not synced in SCRAM 24/7:
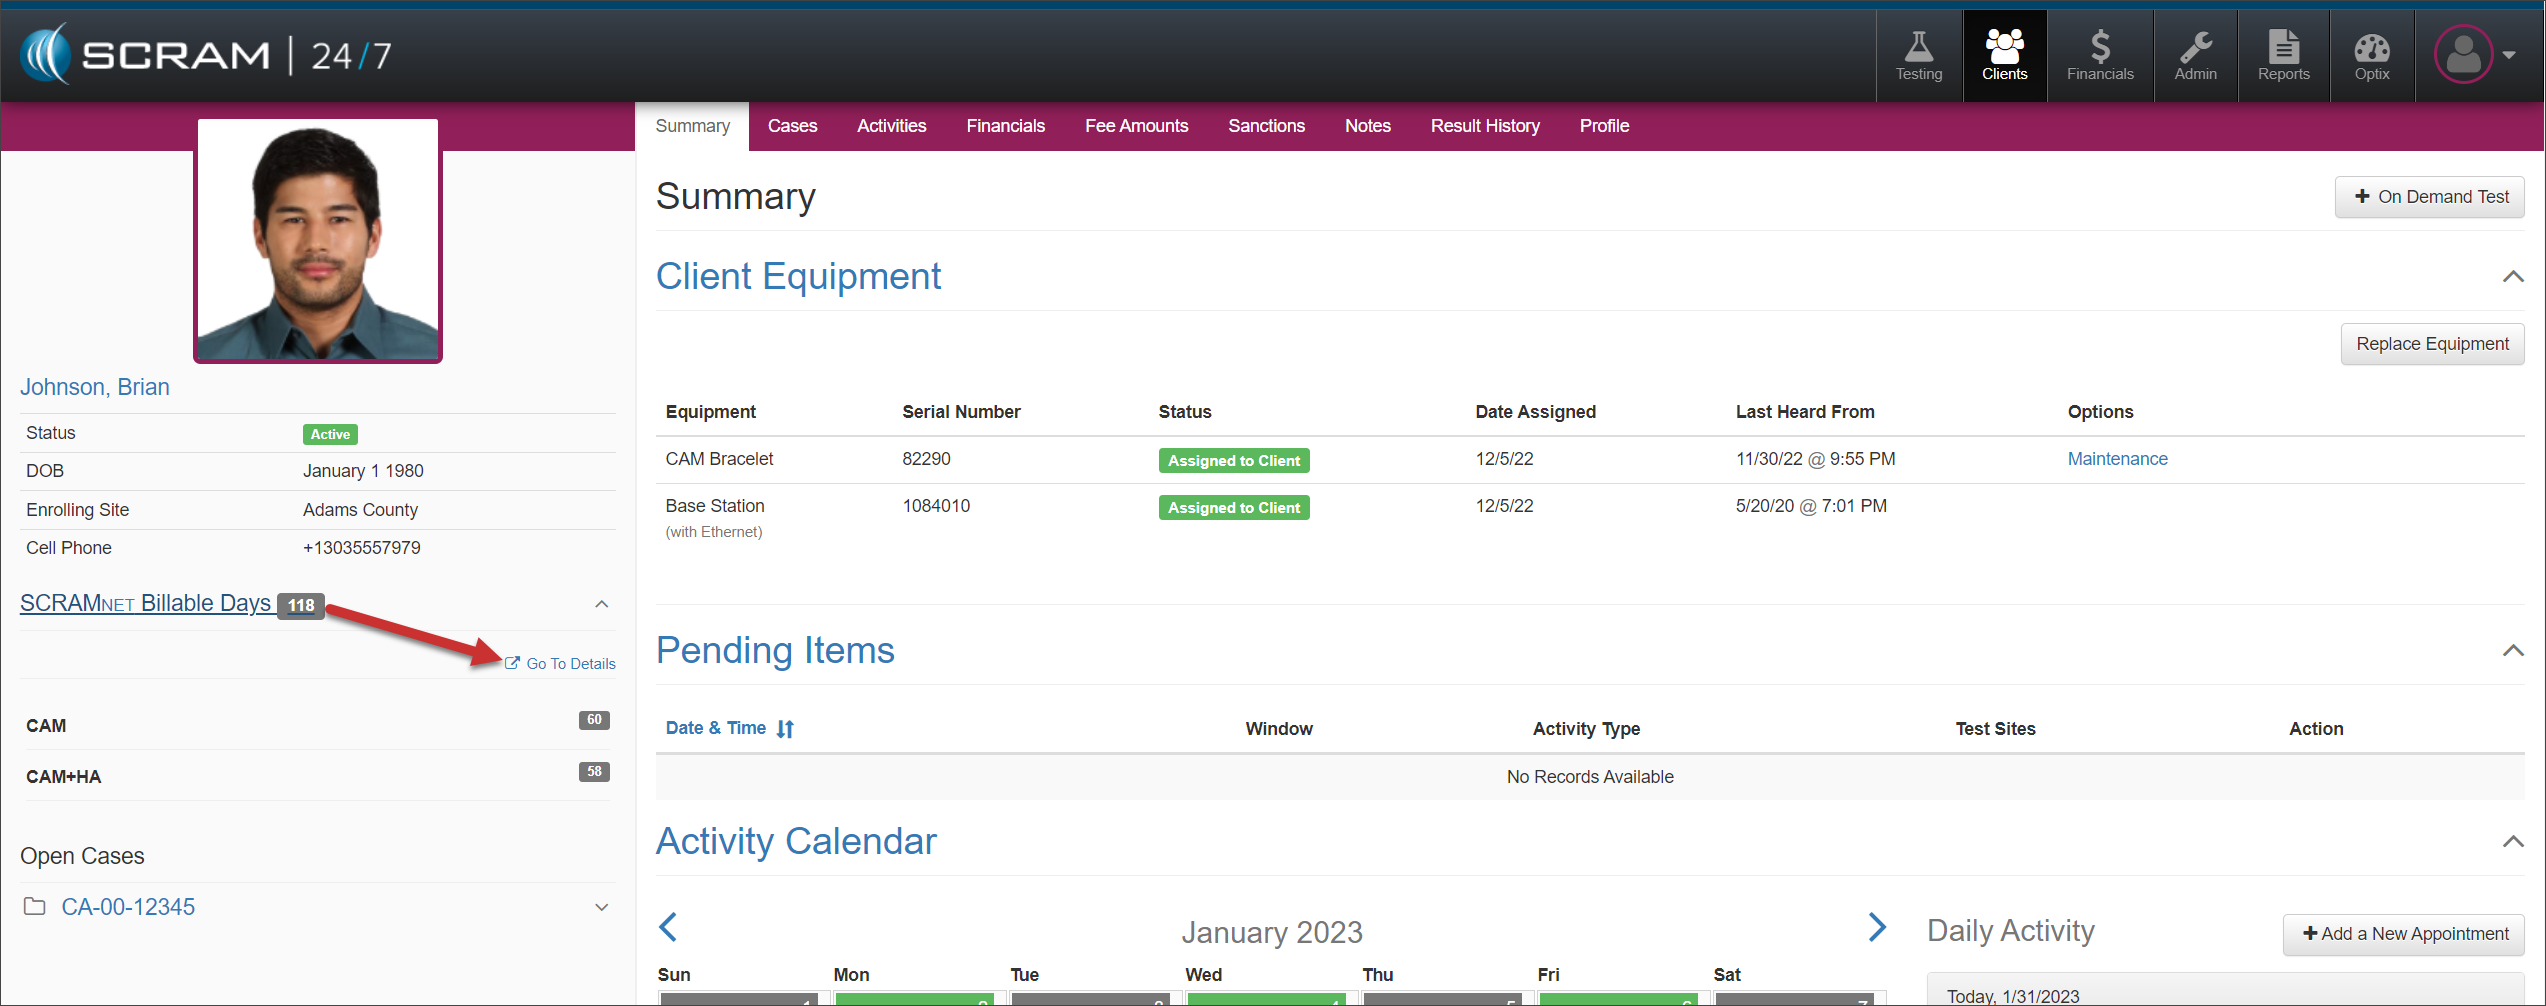
Locate the new SCRAMNET Billable Days section in the client’s sidebar
Select the Go to Details hyperlink.
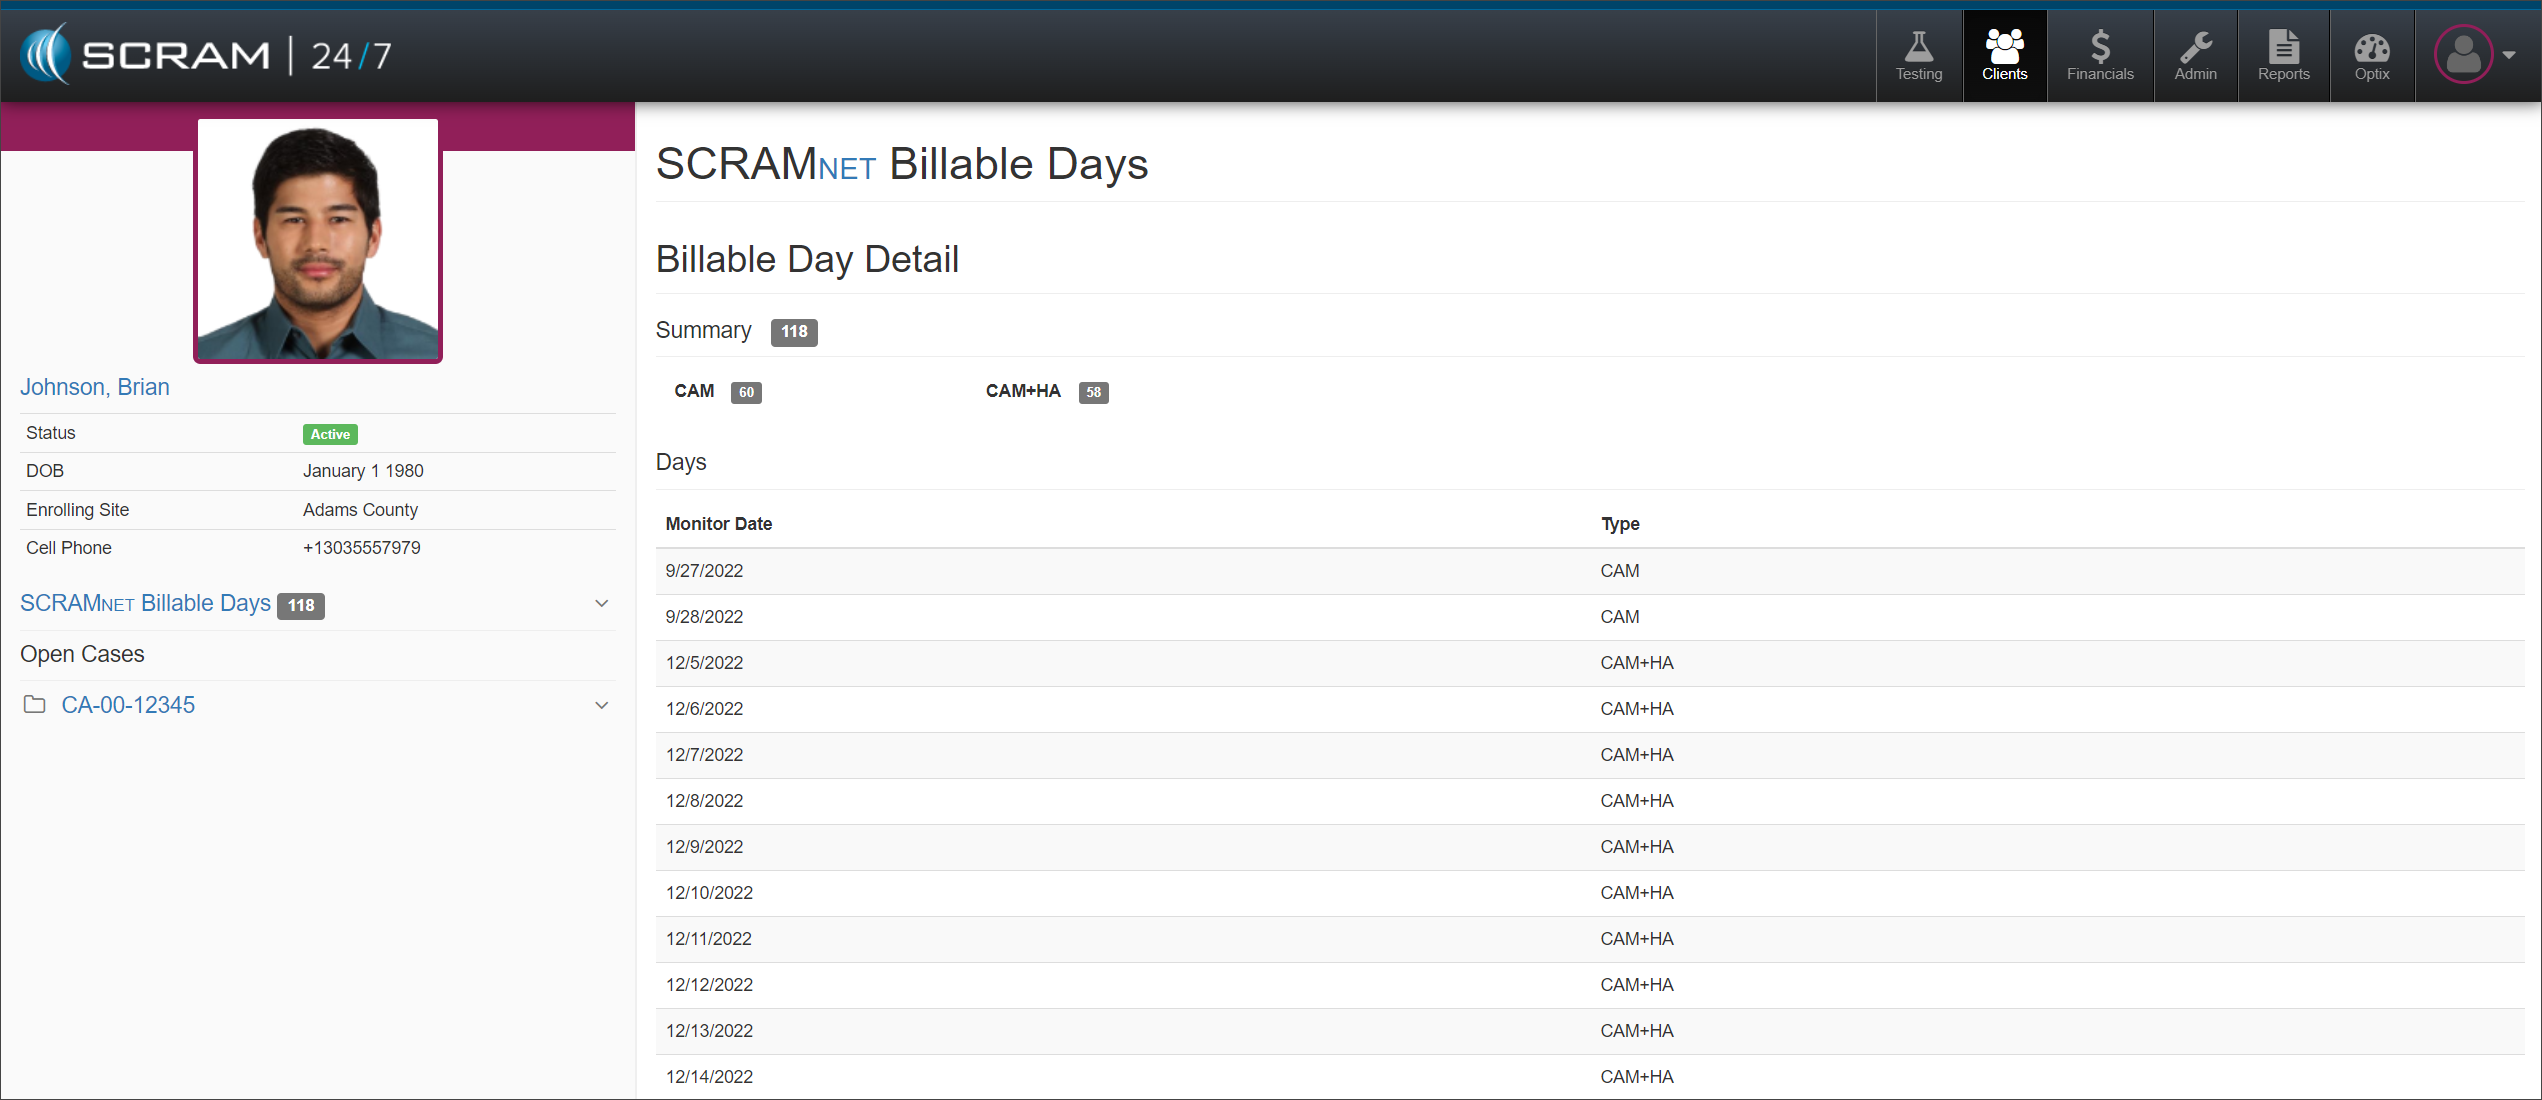
The SCRAMNET
Billable Days screen will provide a
summary of the total number of billable days recorded in SCRAMNET and a breakdown
of the specific monitoring date and monitoring type. You can then compare this
information to the Transaction History for the particular EM Activity
Daily site Fee + Daily State Fee date range.
Client Summary page – click to enlargeSCRAMNET Billable Days – click to enlarge
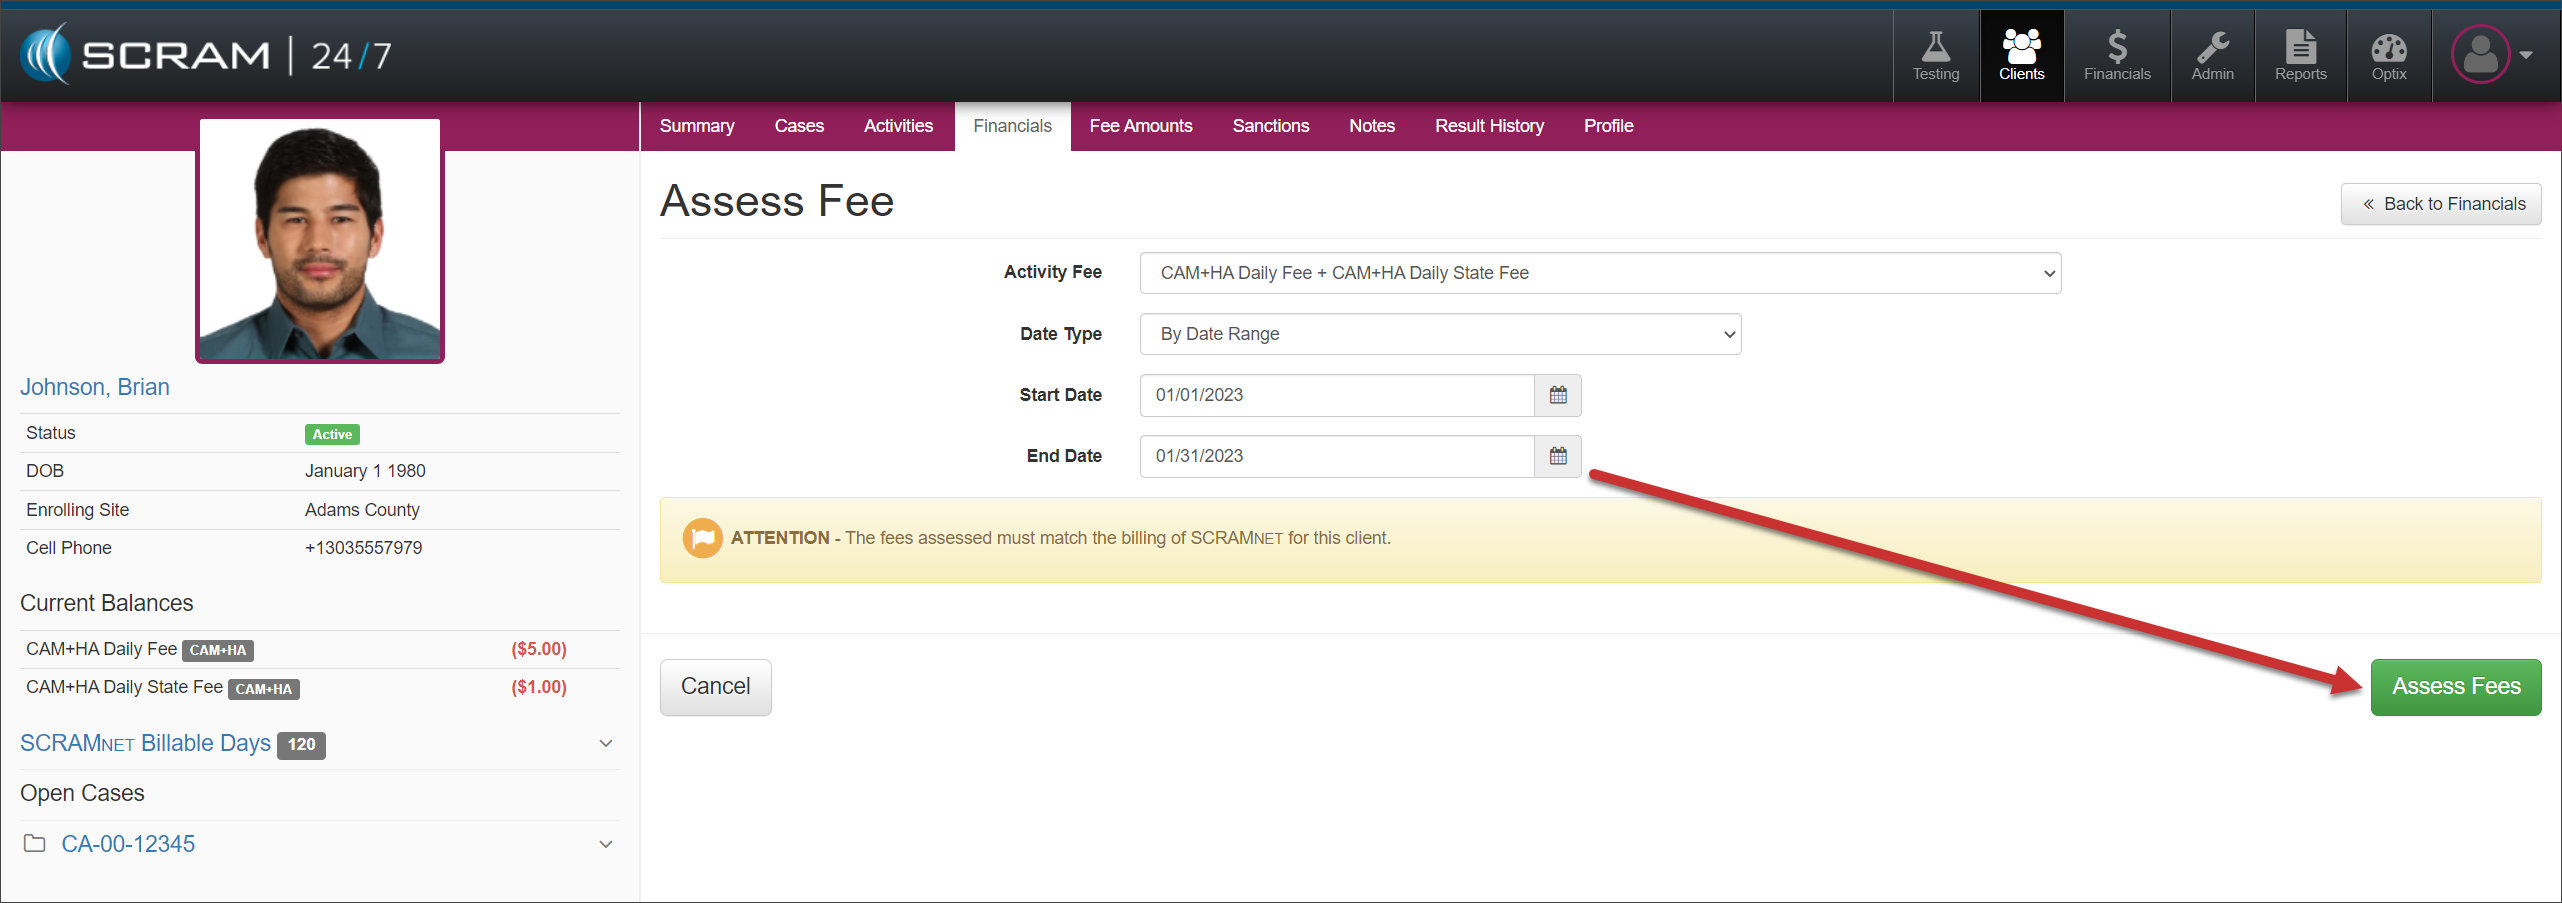
Once you have identified
a potential gap in activity fees:
Select the client’s Financials
tab.
Select the +Assess Fee button.
Select the appropriate Activity Fee
from the dropdown menu. In this example, CAM+HA Daily Fee + CAM+HA Daily
State Fee is selected.
Set the Date Type to By Date
Range and enter the potential date range for the missing activity fees.
Select the Assess Fees button.
Client Financials Page, Assess Fee – click to enlarge
All SCRAMNET billable
days not synced in SCRAM 24/7 during the date range will display in the Pending
Transactions section.
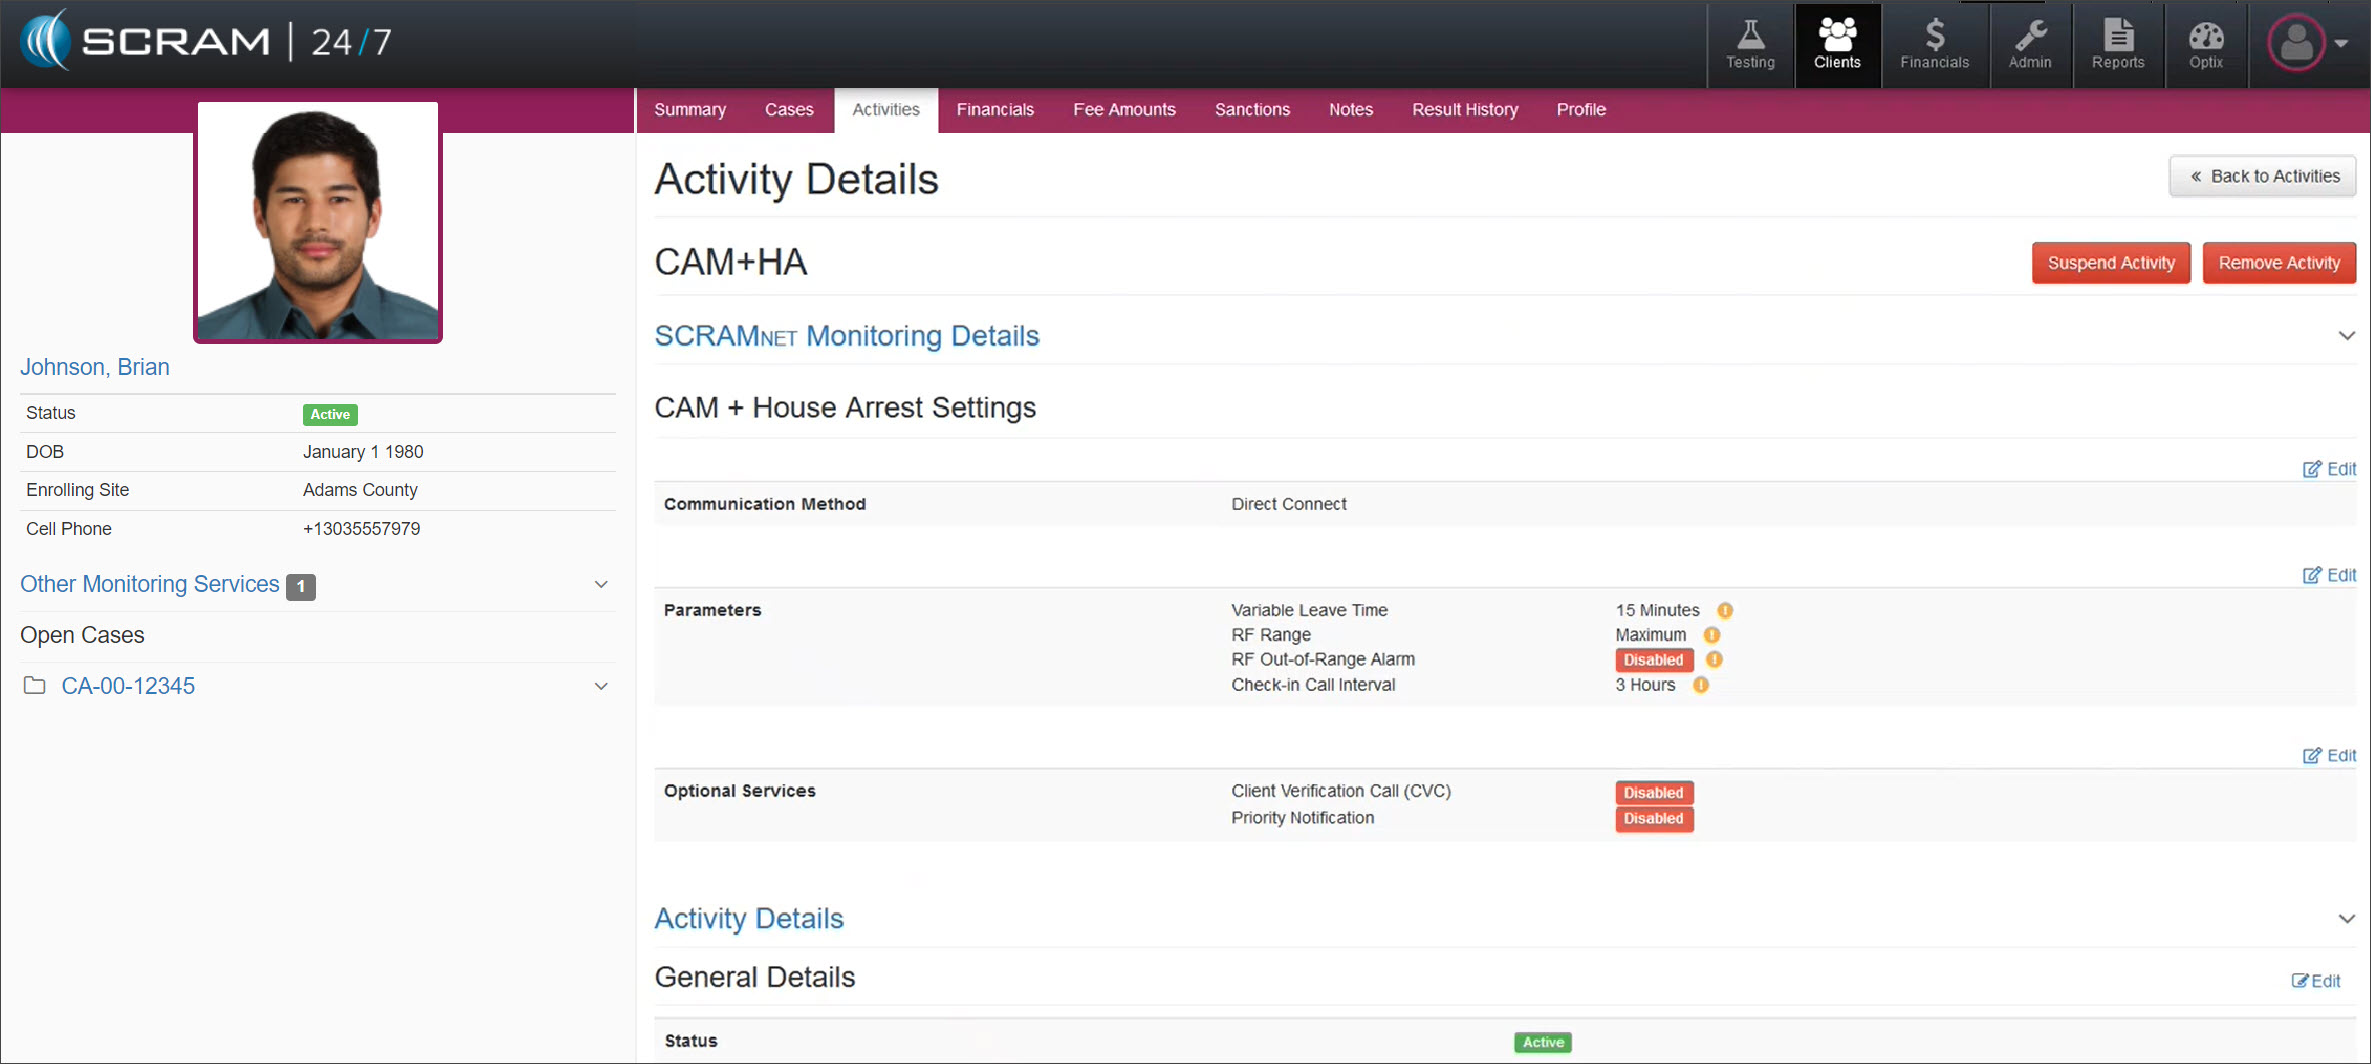
On, December 15th, 2022, SCRAM Systems® will release an enhancement to the Activity Details page for clients with CAM, CAM+HA, HA only, or Remote Breath activities. With this change, you will be able to view and edit the specific SCRAMNET Monitoring Details from within the client’s Activity Details page in SCRAM 24/7.
The
example below displays a client with an active CAM+HA activity. Notice the new SCRAMNET Monitoring
Details
section displays the “CAM+ House Arrest Settings.”
CAM+HA Activity Details page – click to enlarge
To
view or update the SCRAMNET Monitoring
Details within
SCRAM 24/7, simply select the Edit hyperlink and make your changes. Once
your changes have been made, select the Save Changes button. With this
update, any changes made to the Monitoring Details for the client will update
in both SCRAM 24/7 and SCRAMNET.
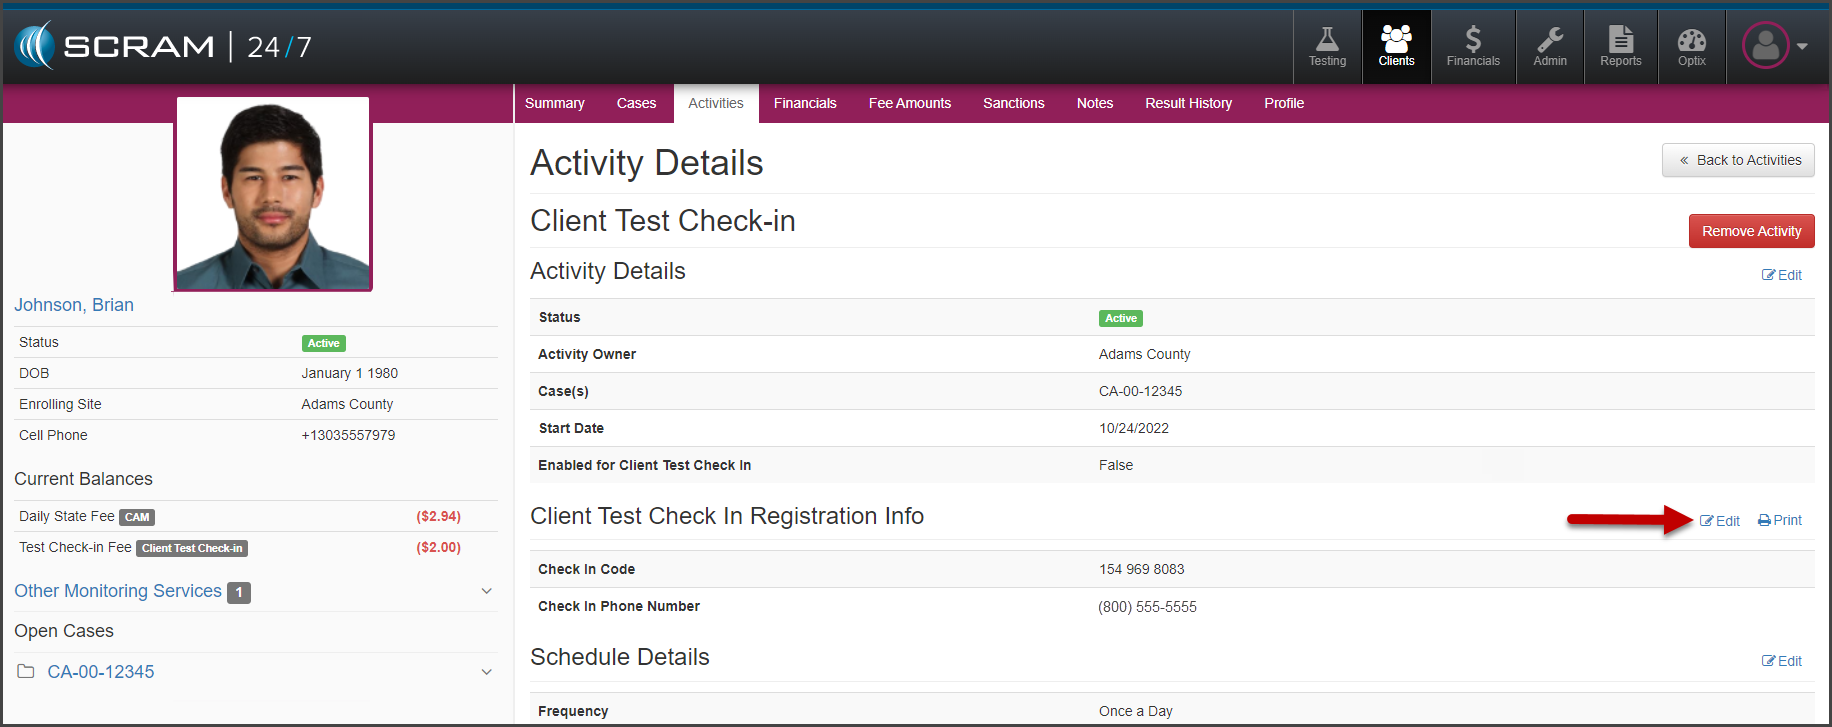
On, November 2, 2022, SCRAM Systems® will release an enhancement to the Client Test Check-In Activity. With this update, you will be able to update the Check in Code entered in the Client Test Check In Registration Information section. This unique validation code is used by the client to access the secure phone system for testing requirements each day. Client’s typically use their cellphone number as their check-in code; so the ability to edit this code is helpful when the client’s cellphone number changes.
To edit the Check-in Code:
Navigate to the client’s Activity tab in
SCRAM 24/7.
Select the Client Test Check-In activity.
Select the Edit hyperlink next to the Client
Test Check In Registration Info section.
Client’s Client Test Check-In Activity Details Page (click to enlarge)
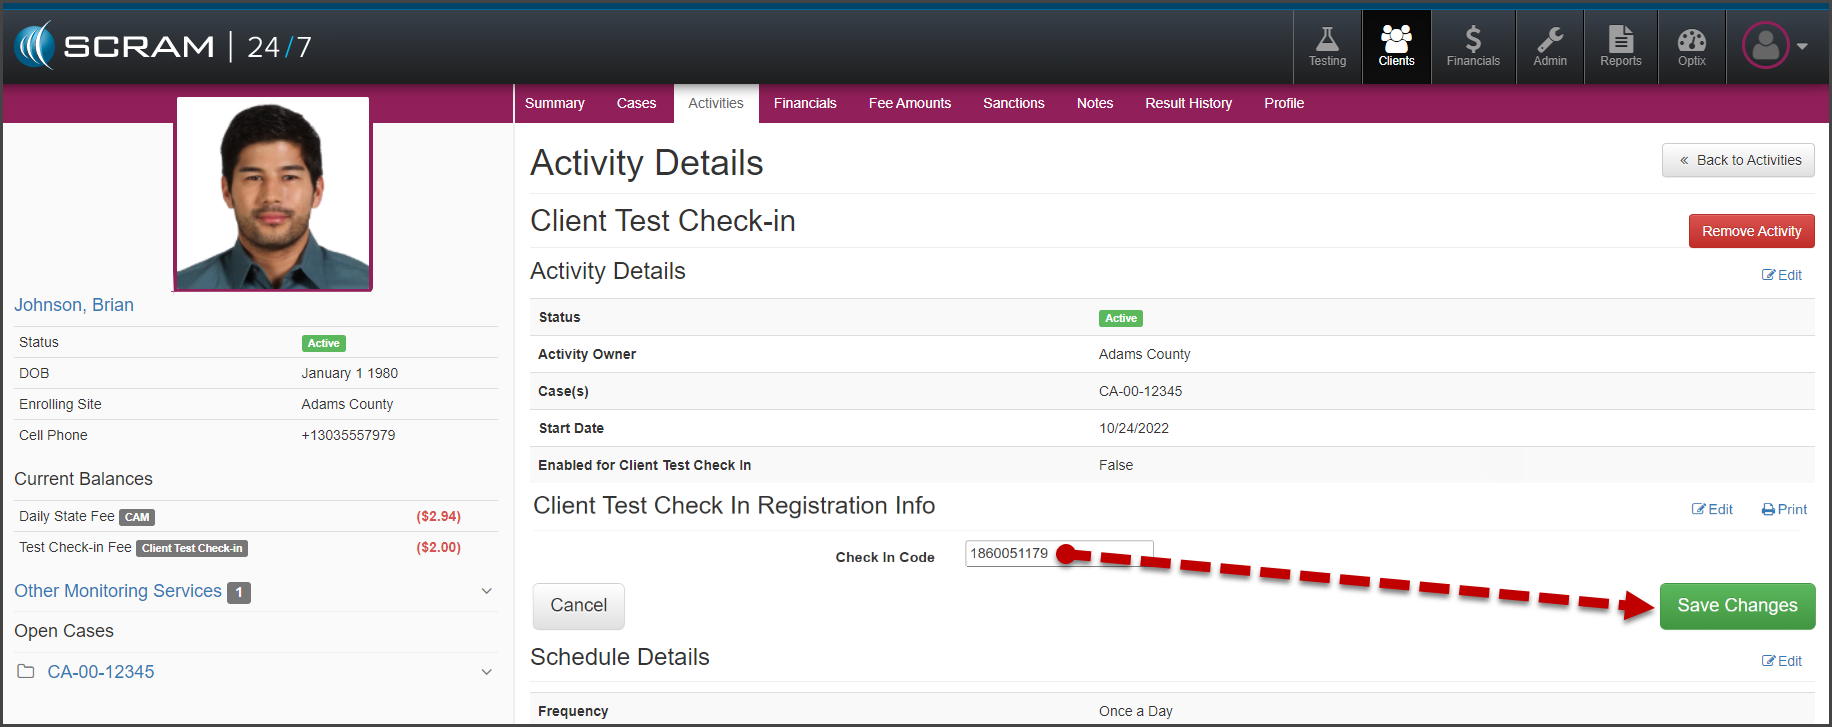
Enter in the new “Check In Code.”
Select the SaveChanges button.
Client Test Check-In Activity Details, Edit Check In Code (click to enlarge)
If needed, you may print a new copy of the SCRAM 24×7
Client Test Check-in Information sheet by selecting the Print
hyperlink.
At 11:00 AM MDT on October 12, 2022, SCRAM Systems® will release enhancements designed to streamline equipment management for your clients with CAM, House Arrest, or Remote Breath (EM) Activities. With this release, many tasks that you completed in SCRAMNET, you may now complete within SCRAM 24/7.
These enhancements allow you to:
Create the client’s profile in SCRAMNET automatically
Add and assign equipment to the client
Access the Maintenance hyperlink
Replace equipment
Stop billing and monitoring of the EM equipment in
SCRAMNET
Adding an EM Activity
Once you have created the client’s profile in SCRAM 24/7, the next step is to add the EM (CAM, Remote Breath, or House Arrest) Activity.
SCRAM 24/7 and SCRAMNET User access required.
Select the Activities tab to get started.
Select
the +Add a New Activity button.
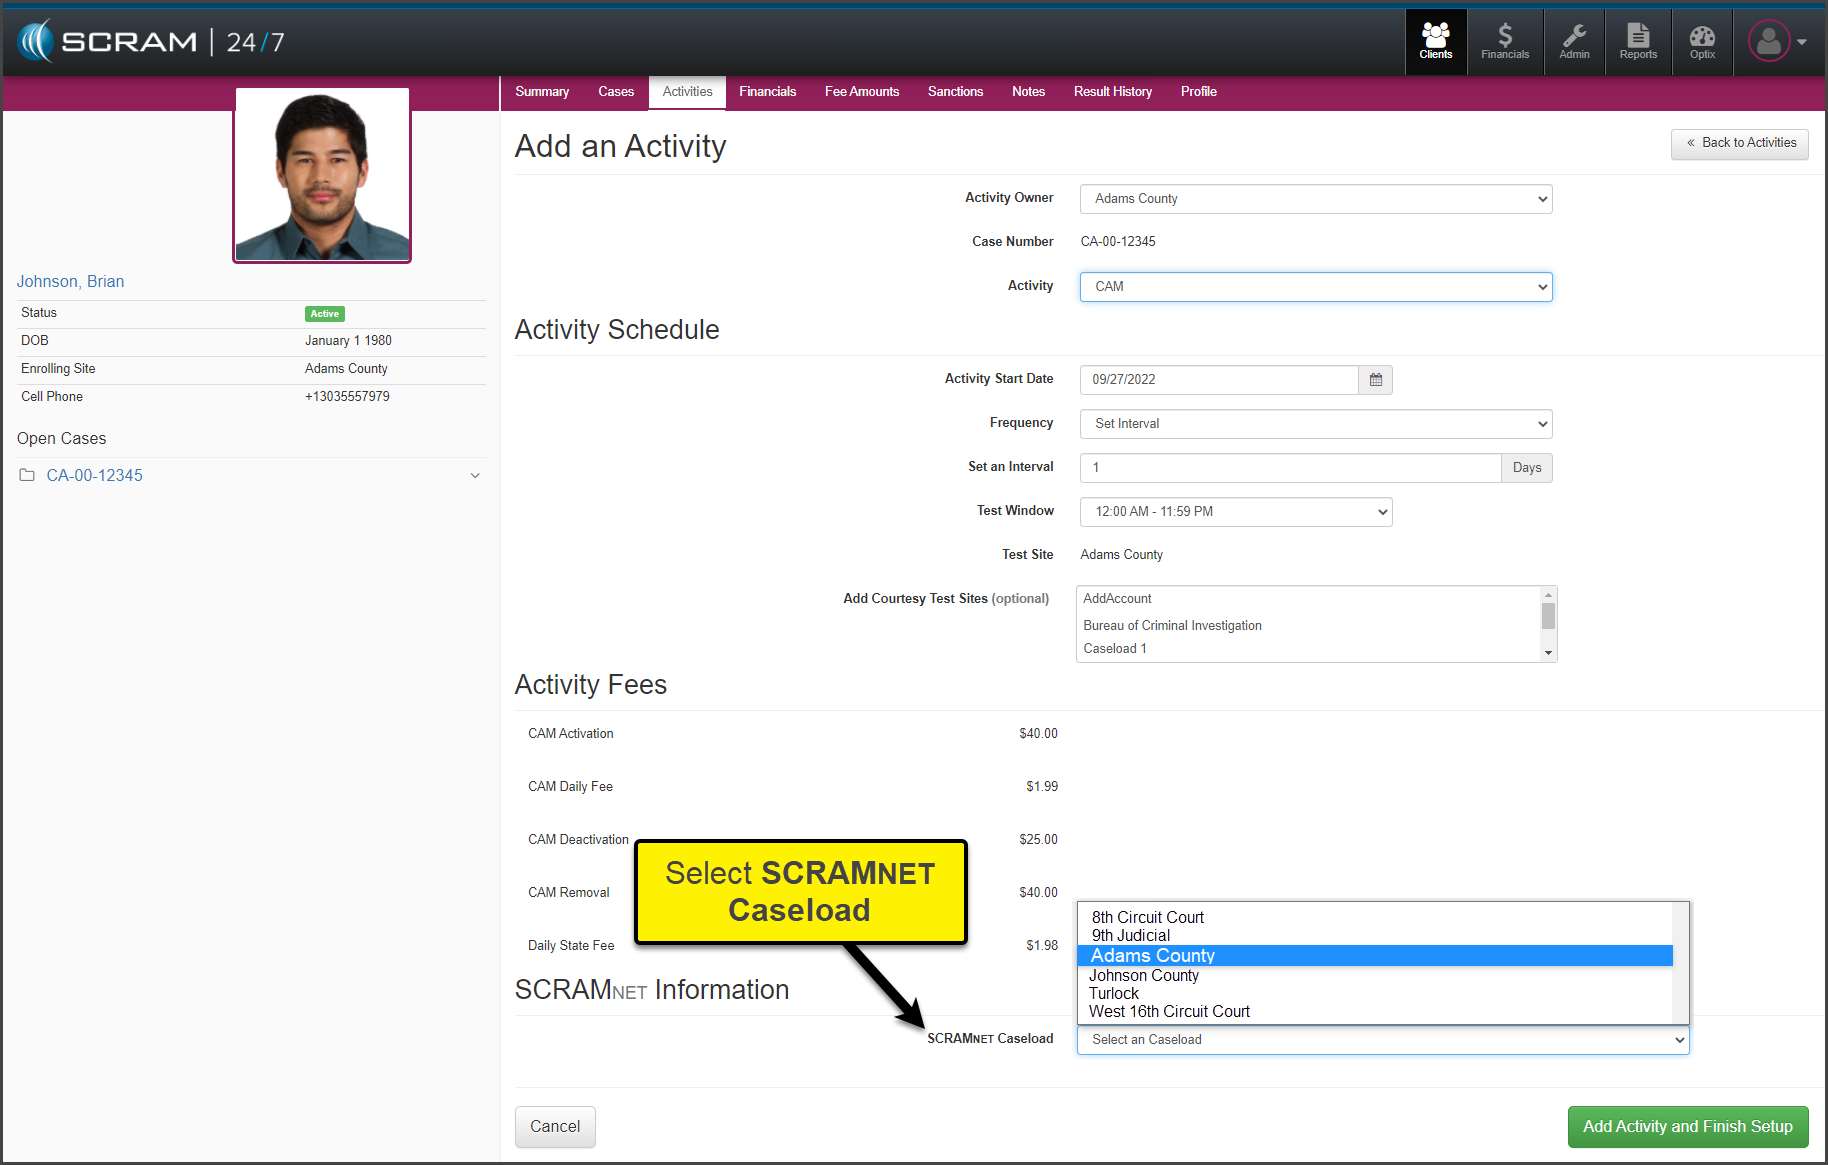
On
the Add an Activity page, open the Activity dropdown menu and
select the option of CAM, Remote Breath, or House Arrest. For this
example, CAM has been selected.
Add
the Activity Schedule details.
Verify/Enter
the Activity Fees (if applicable).
In
the SCRAMNET Information
section, select the SCRAMNET Caseload
the client will be associated to from the dropdown menu.
click to enlarge
Select
the Add Activity and Finish Setup button to save the information.
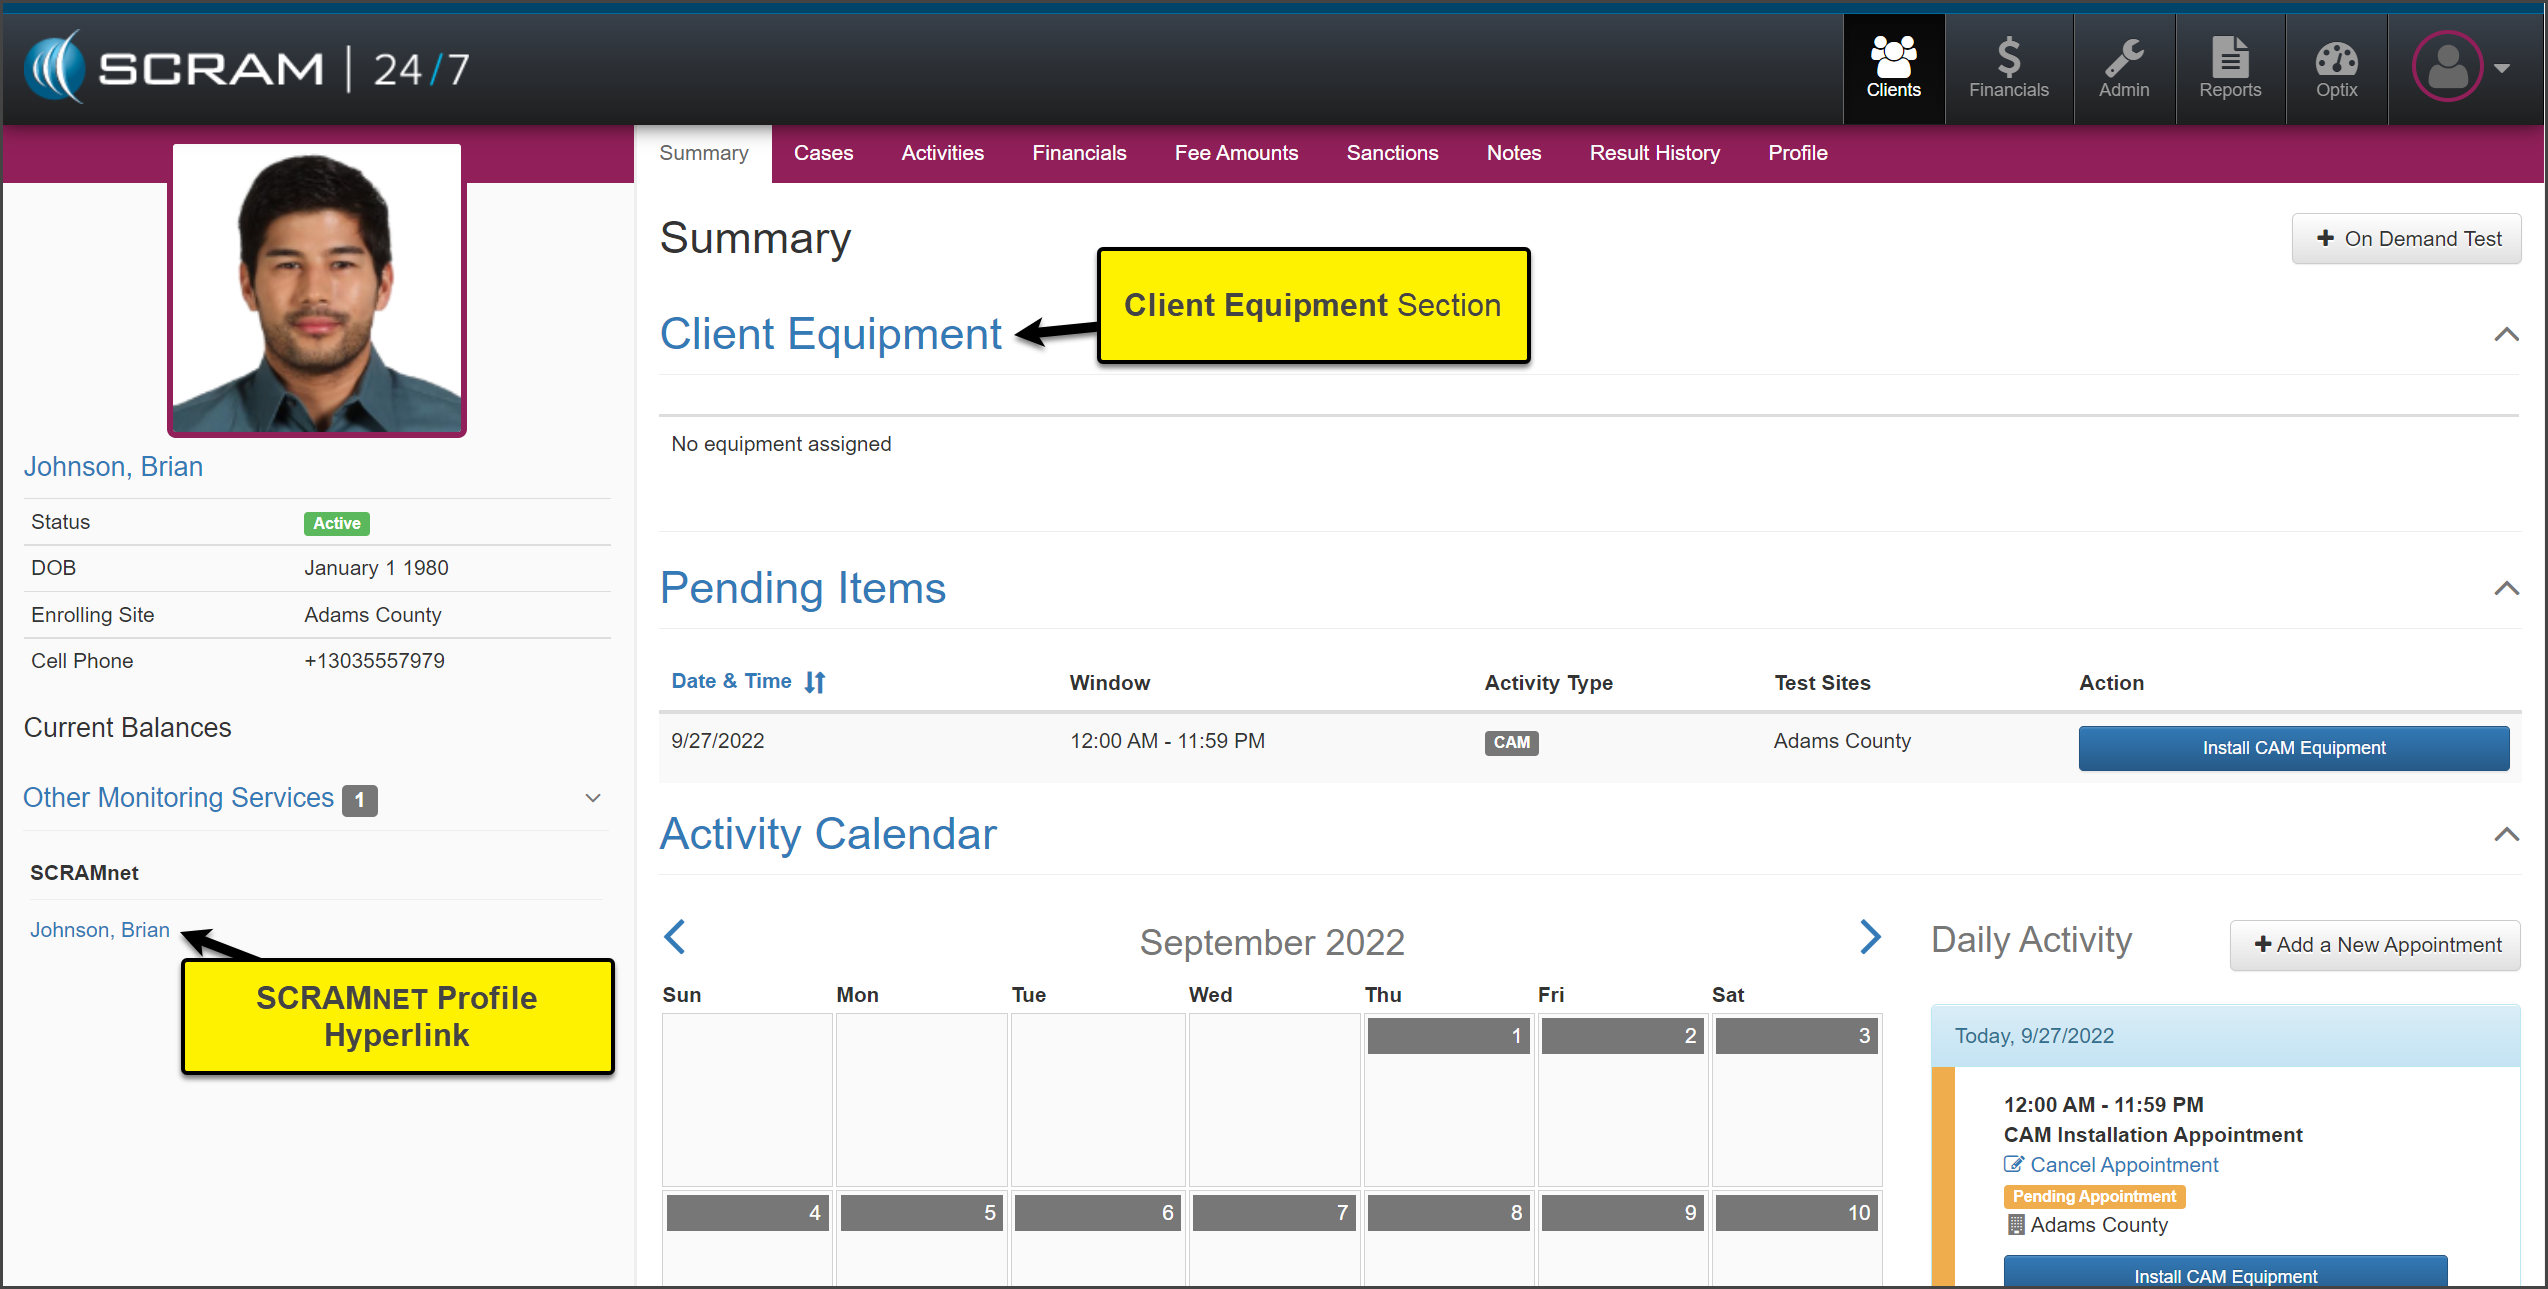
At this time, the client’s profile is automatically
created in SCRAMNET and linked to the
SCRAM 24/7 profile.
The Summary page is now
displayed. You will notice a new section entitled “Client Equipment.” Additionally,
SCRAMNET is listed under the Other
Monitoring Services on the client’s sidebar.
click to enlarge
Complete the Equipment Install Appointment
It is now time to add the equipment information and monitoring
details for the client. Within SCRAM 24/7 locate the Install (EM) Equipment
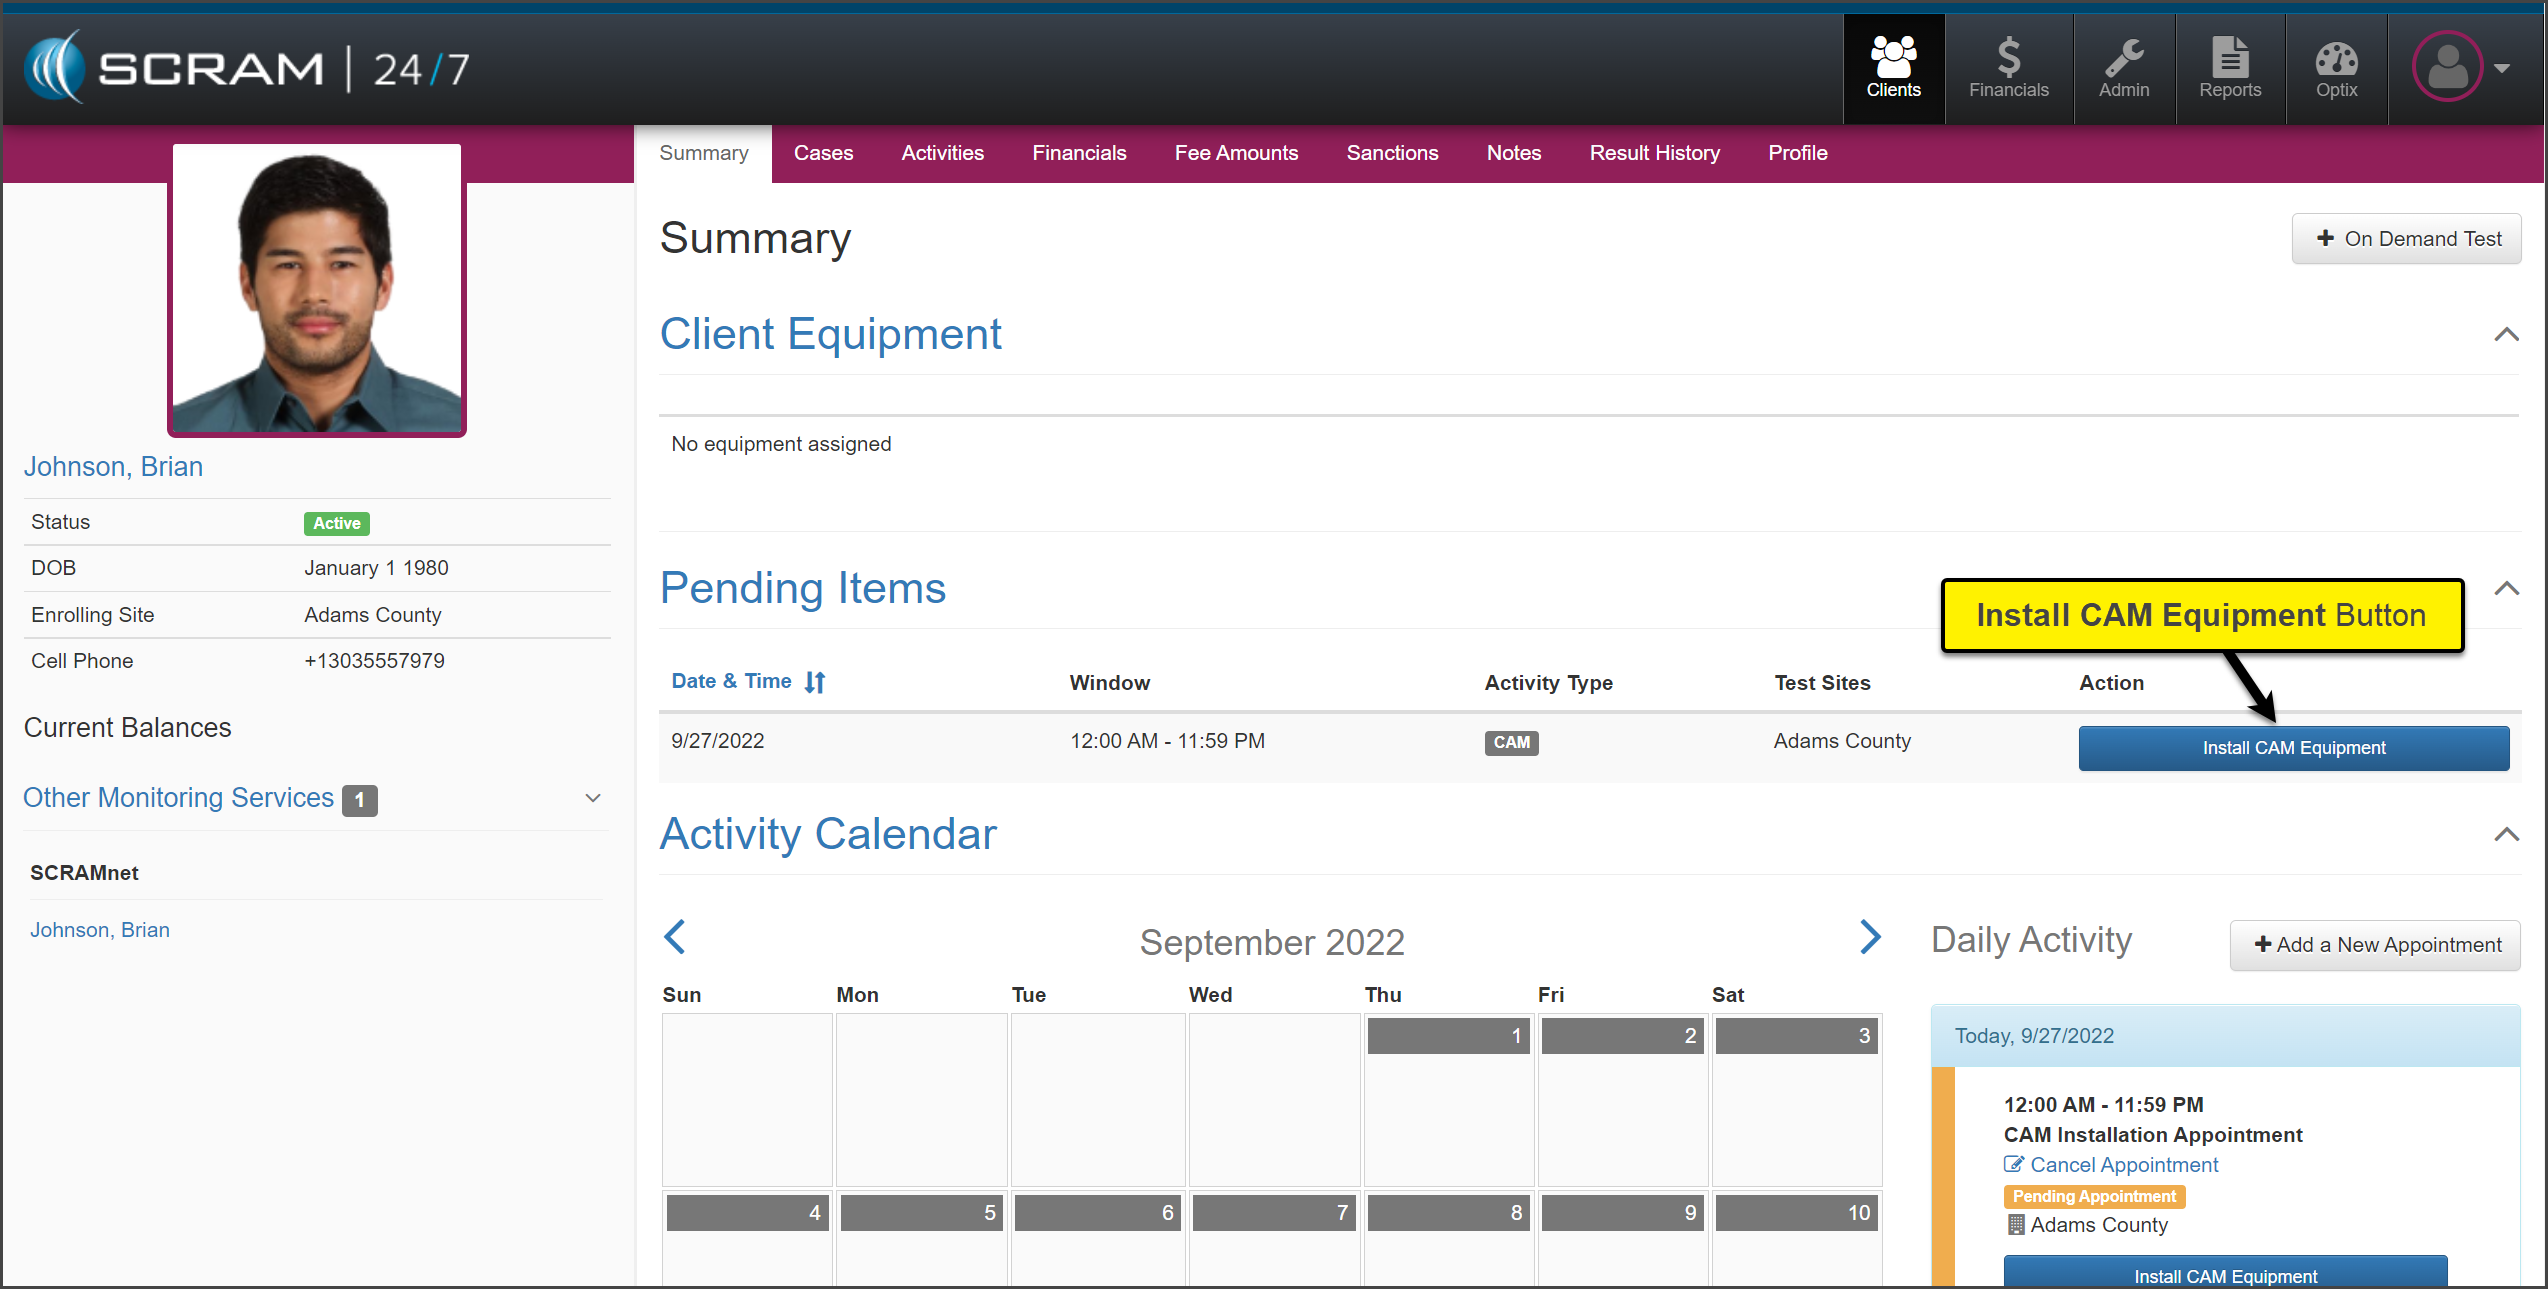
appointment under the Pending Items section on the Summary page. For
this example, CAM is the activity.
Select
the Install CAM Equipment button.
click to enlarge
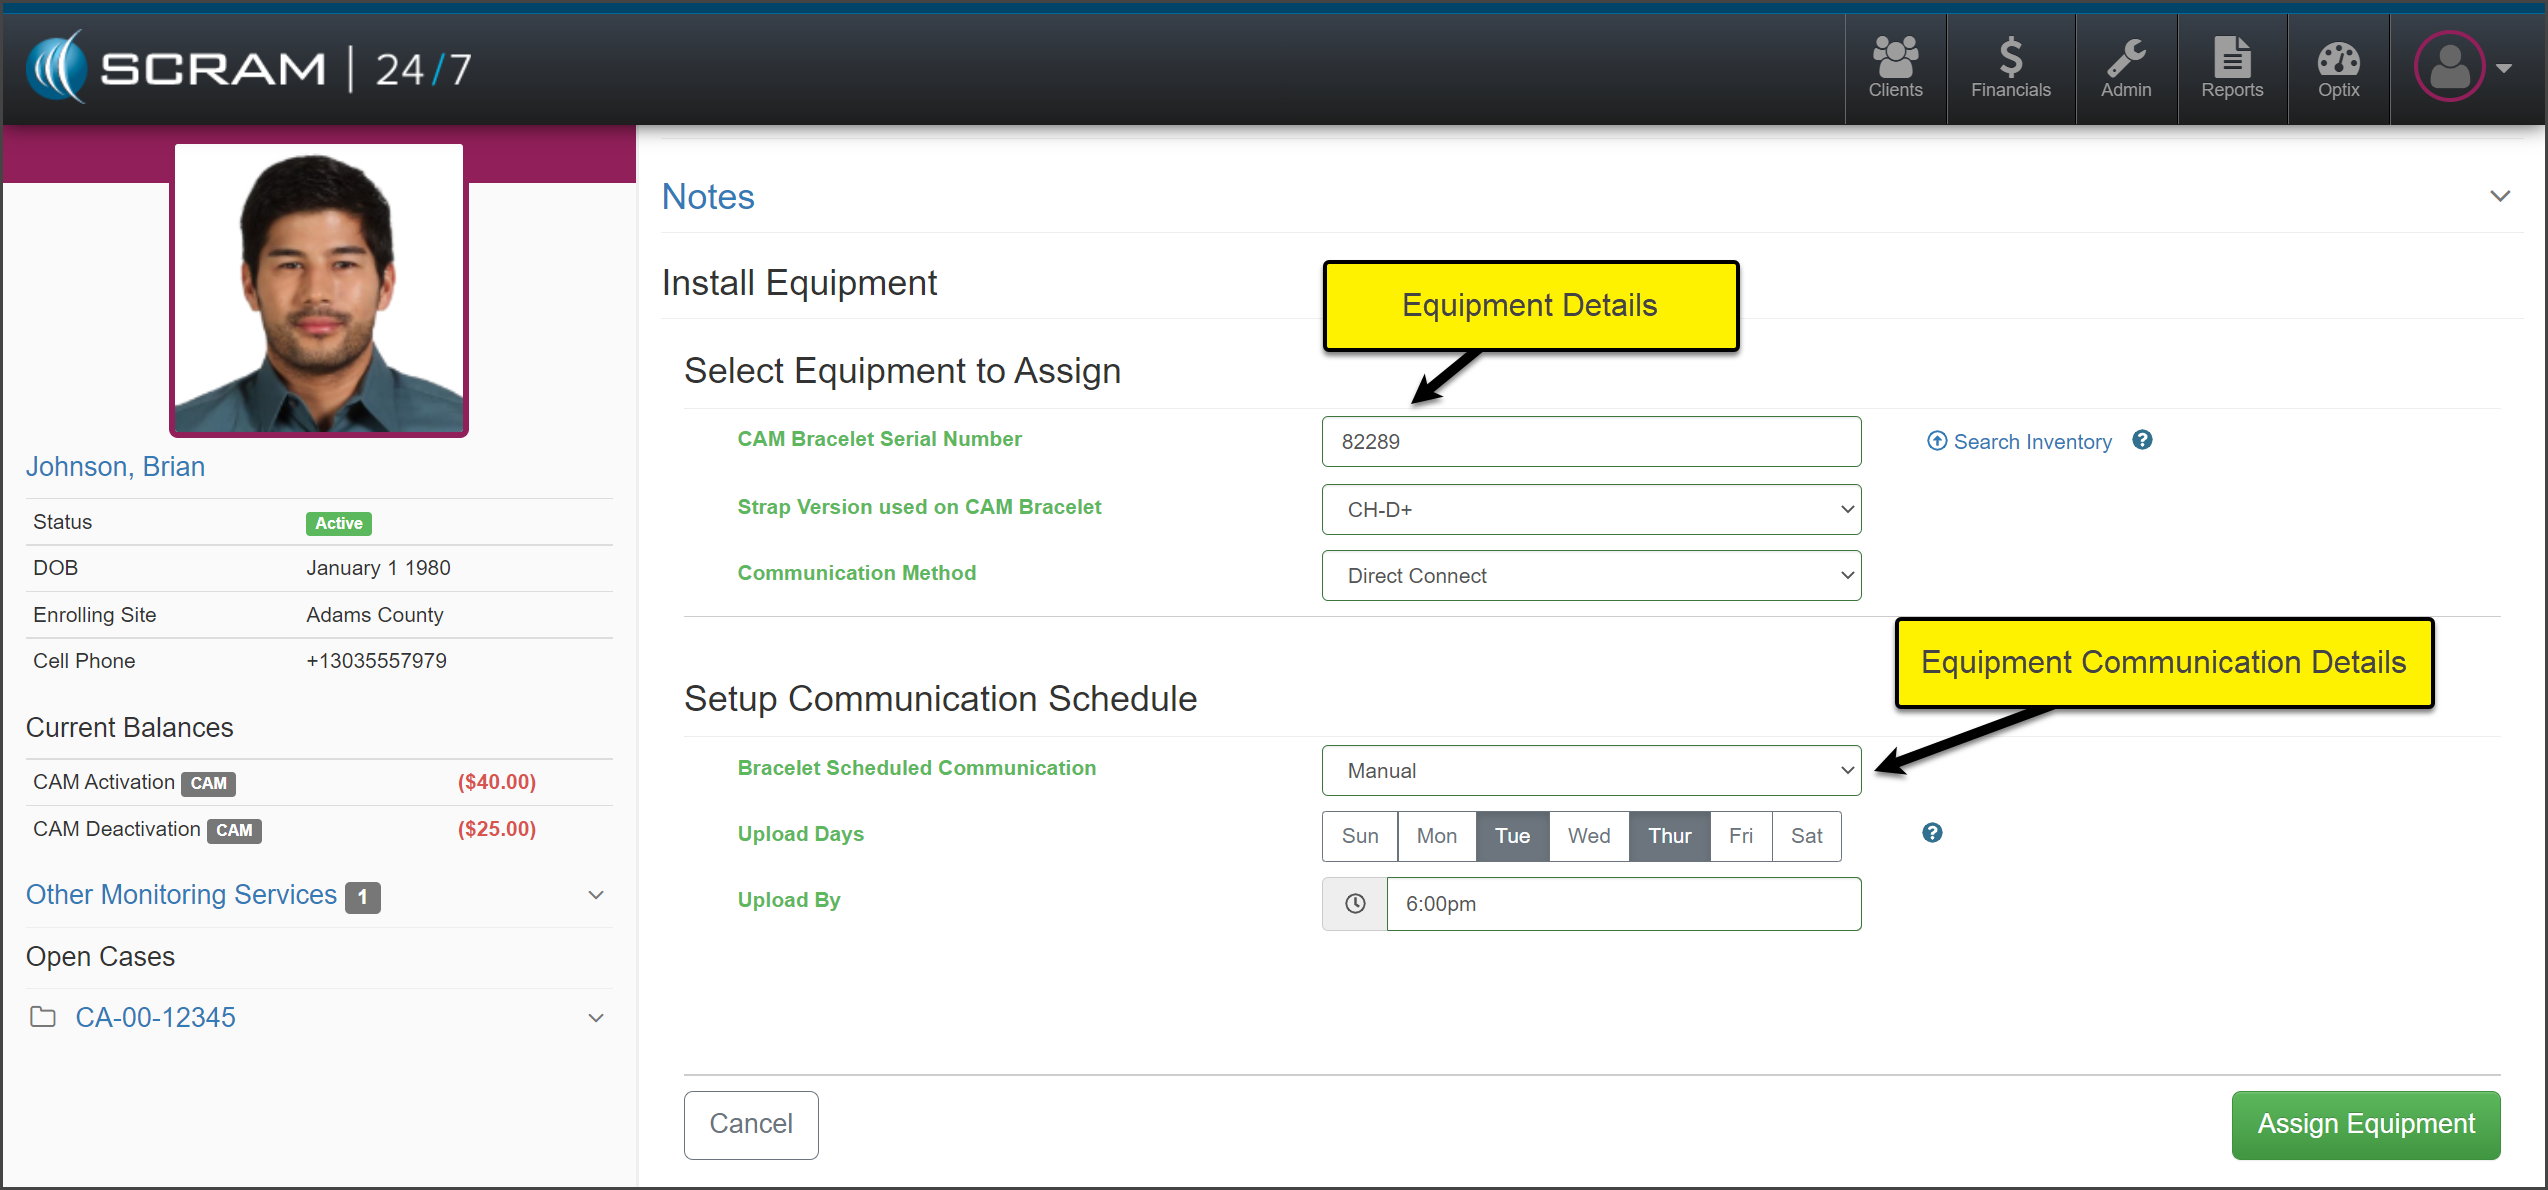
In SCRAM 24/7, on the Install Equipment page select the:
SCRAM equipment serial number(s)
Bracelet Communication method
Bracelet Communication Schedule
click to enlarge
Once
all information has been entered, select the Assign Equipment button to
save the selections.
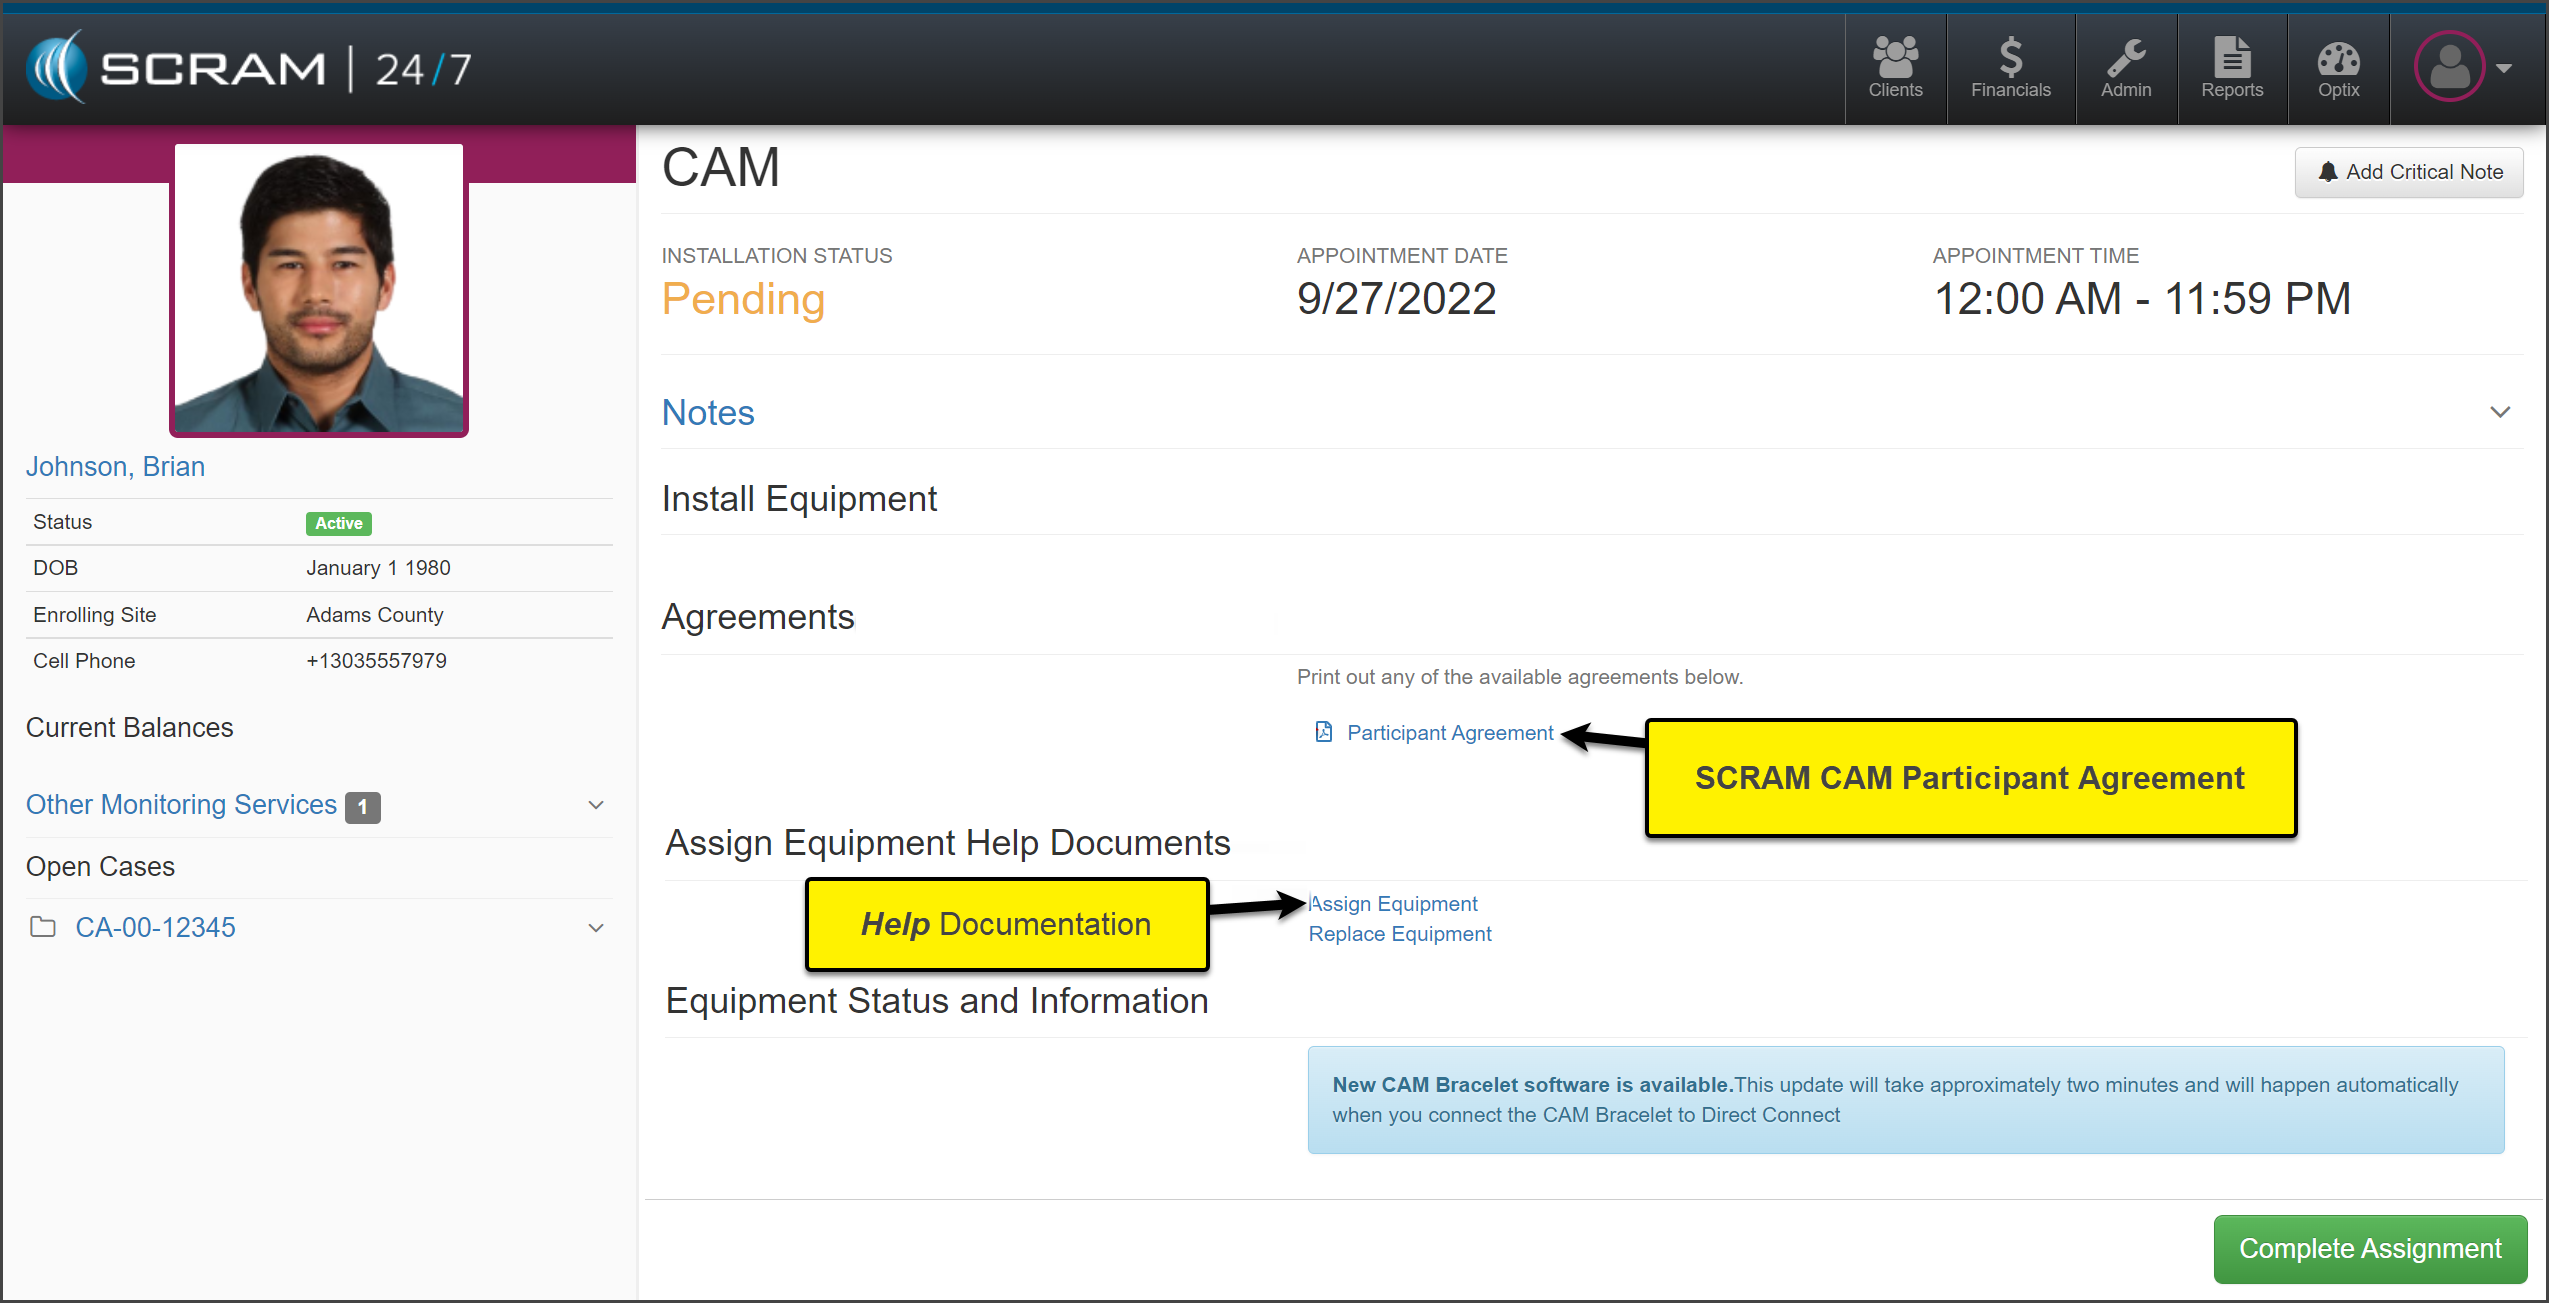
The
Participant Agreement form is available to select and print for the
client to sign. In addition, you can access the Assign Equipment Help
Document.
click to enlarge
Next,
select the Complete Assignment button to save the equipment information.
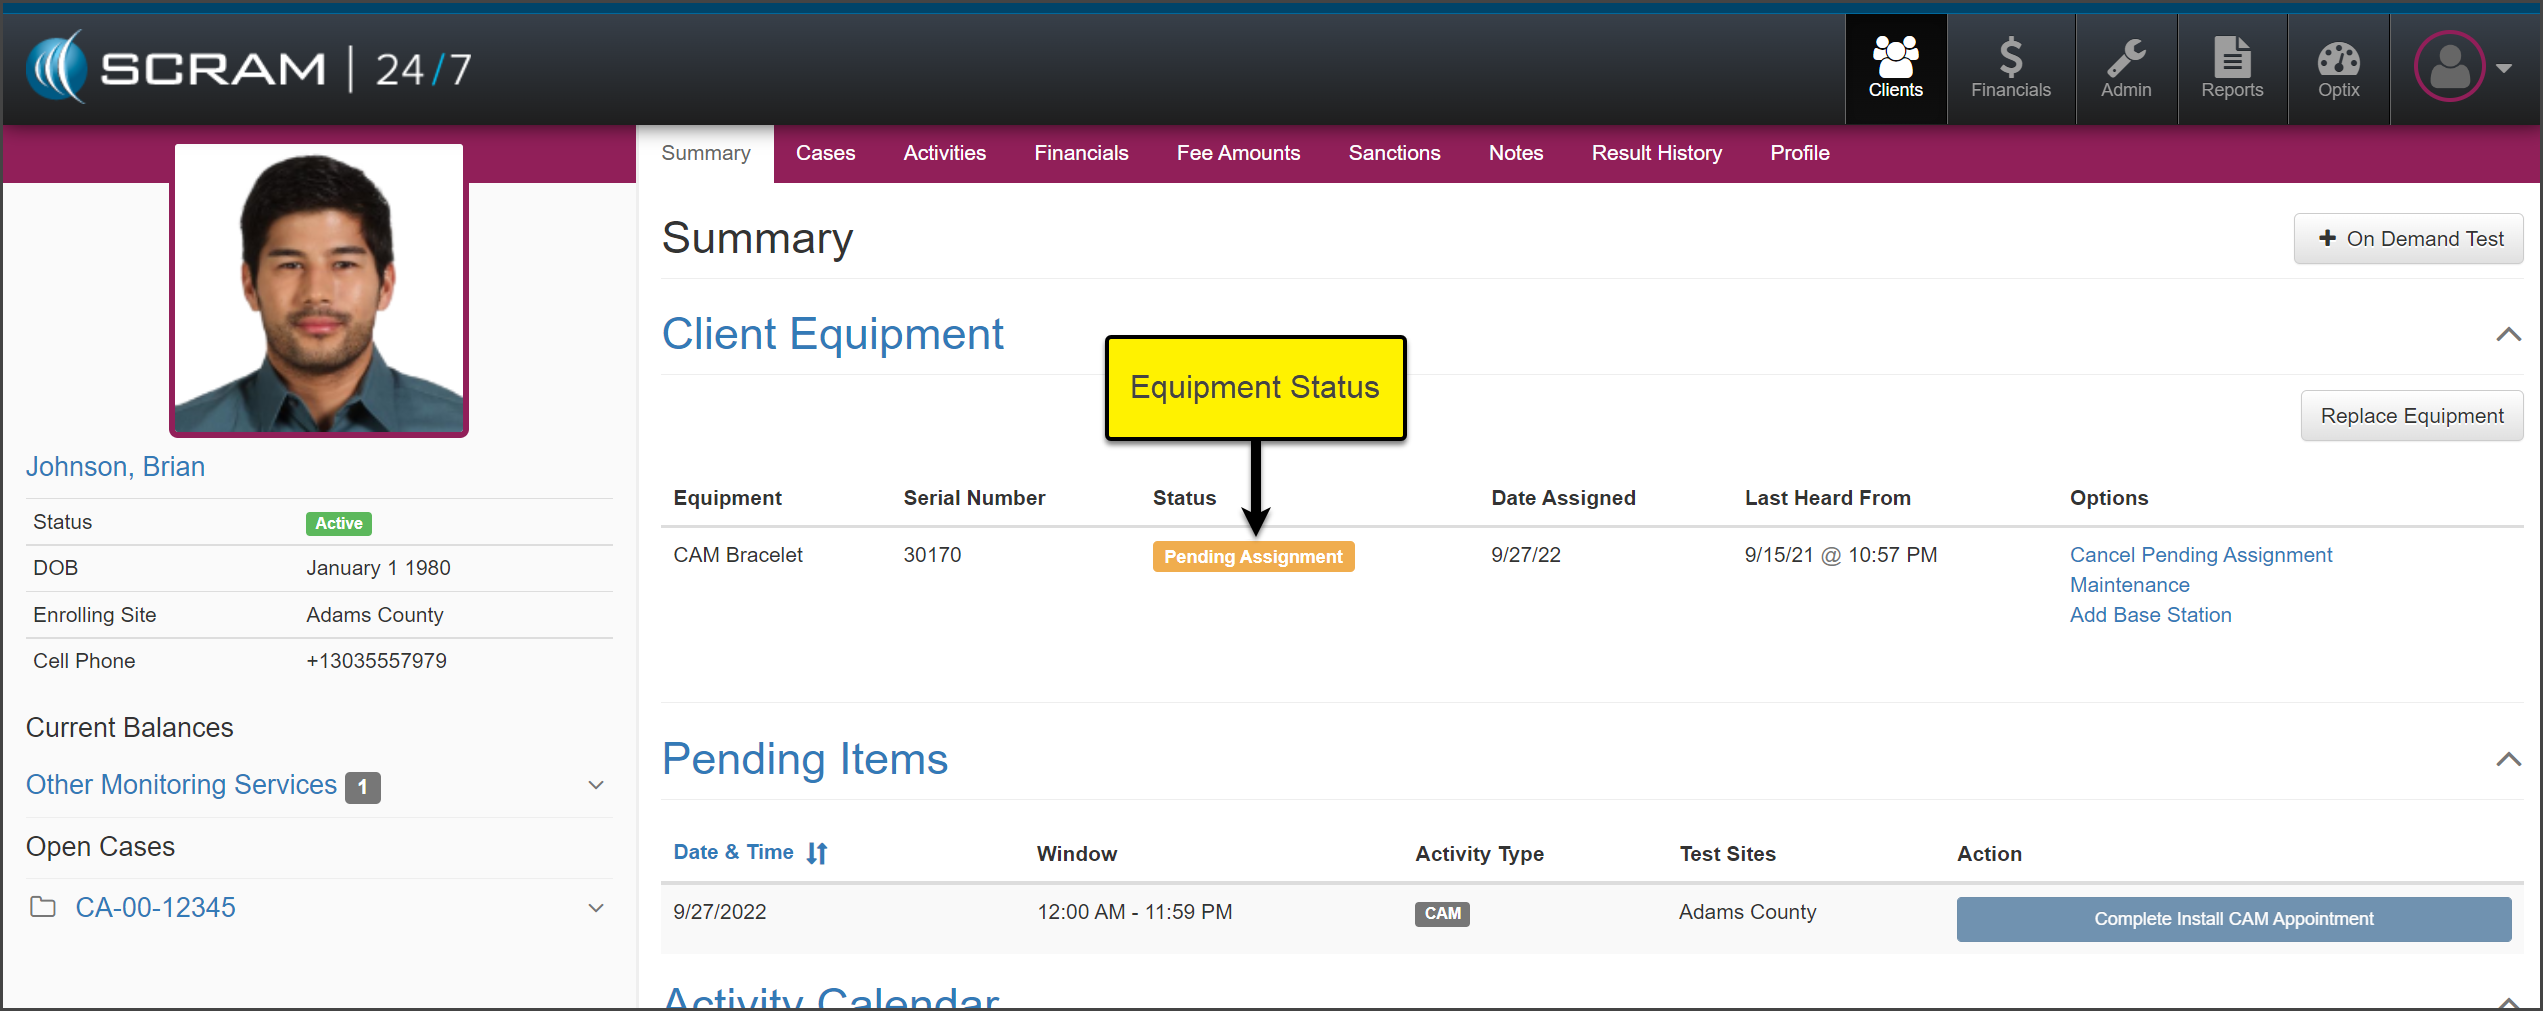
On the client’s SCRAM 24/7 Summary page, the Client
Equipment section will show the equipment status of “Pending Assignment.”
click to enlarge
Once the assignment process
is complete, the Client Equipment section will reflect the current equipment
status.
click to enlarge
Once the equipment is
assigned, the monitoring fees will be associated with the client.
To update the House Arrest and Remote Breath notification parameters or add a Remote Breath testing schedule or House Arrest leave schedule for the client, select the client’s name under the SCRAMNET services on the sidebar to open the client’s profile in SCRAMNET.
Complete Equipment Maintenance
While the client is on your monitoring program, some
equipment tasks may need to be completed. All equipment maintenance alerts are
displayed in SCRAMNET on the Workload page,
as well as sent electronically on the Daily Action Plan (DAP).
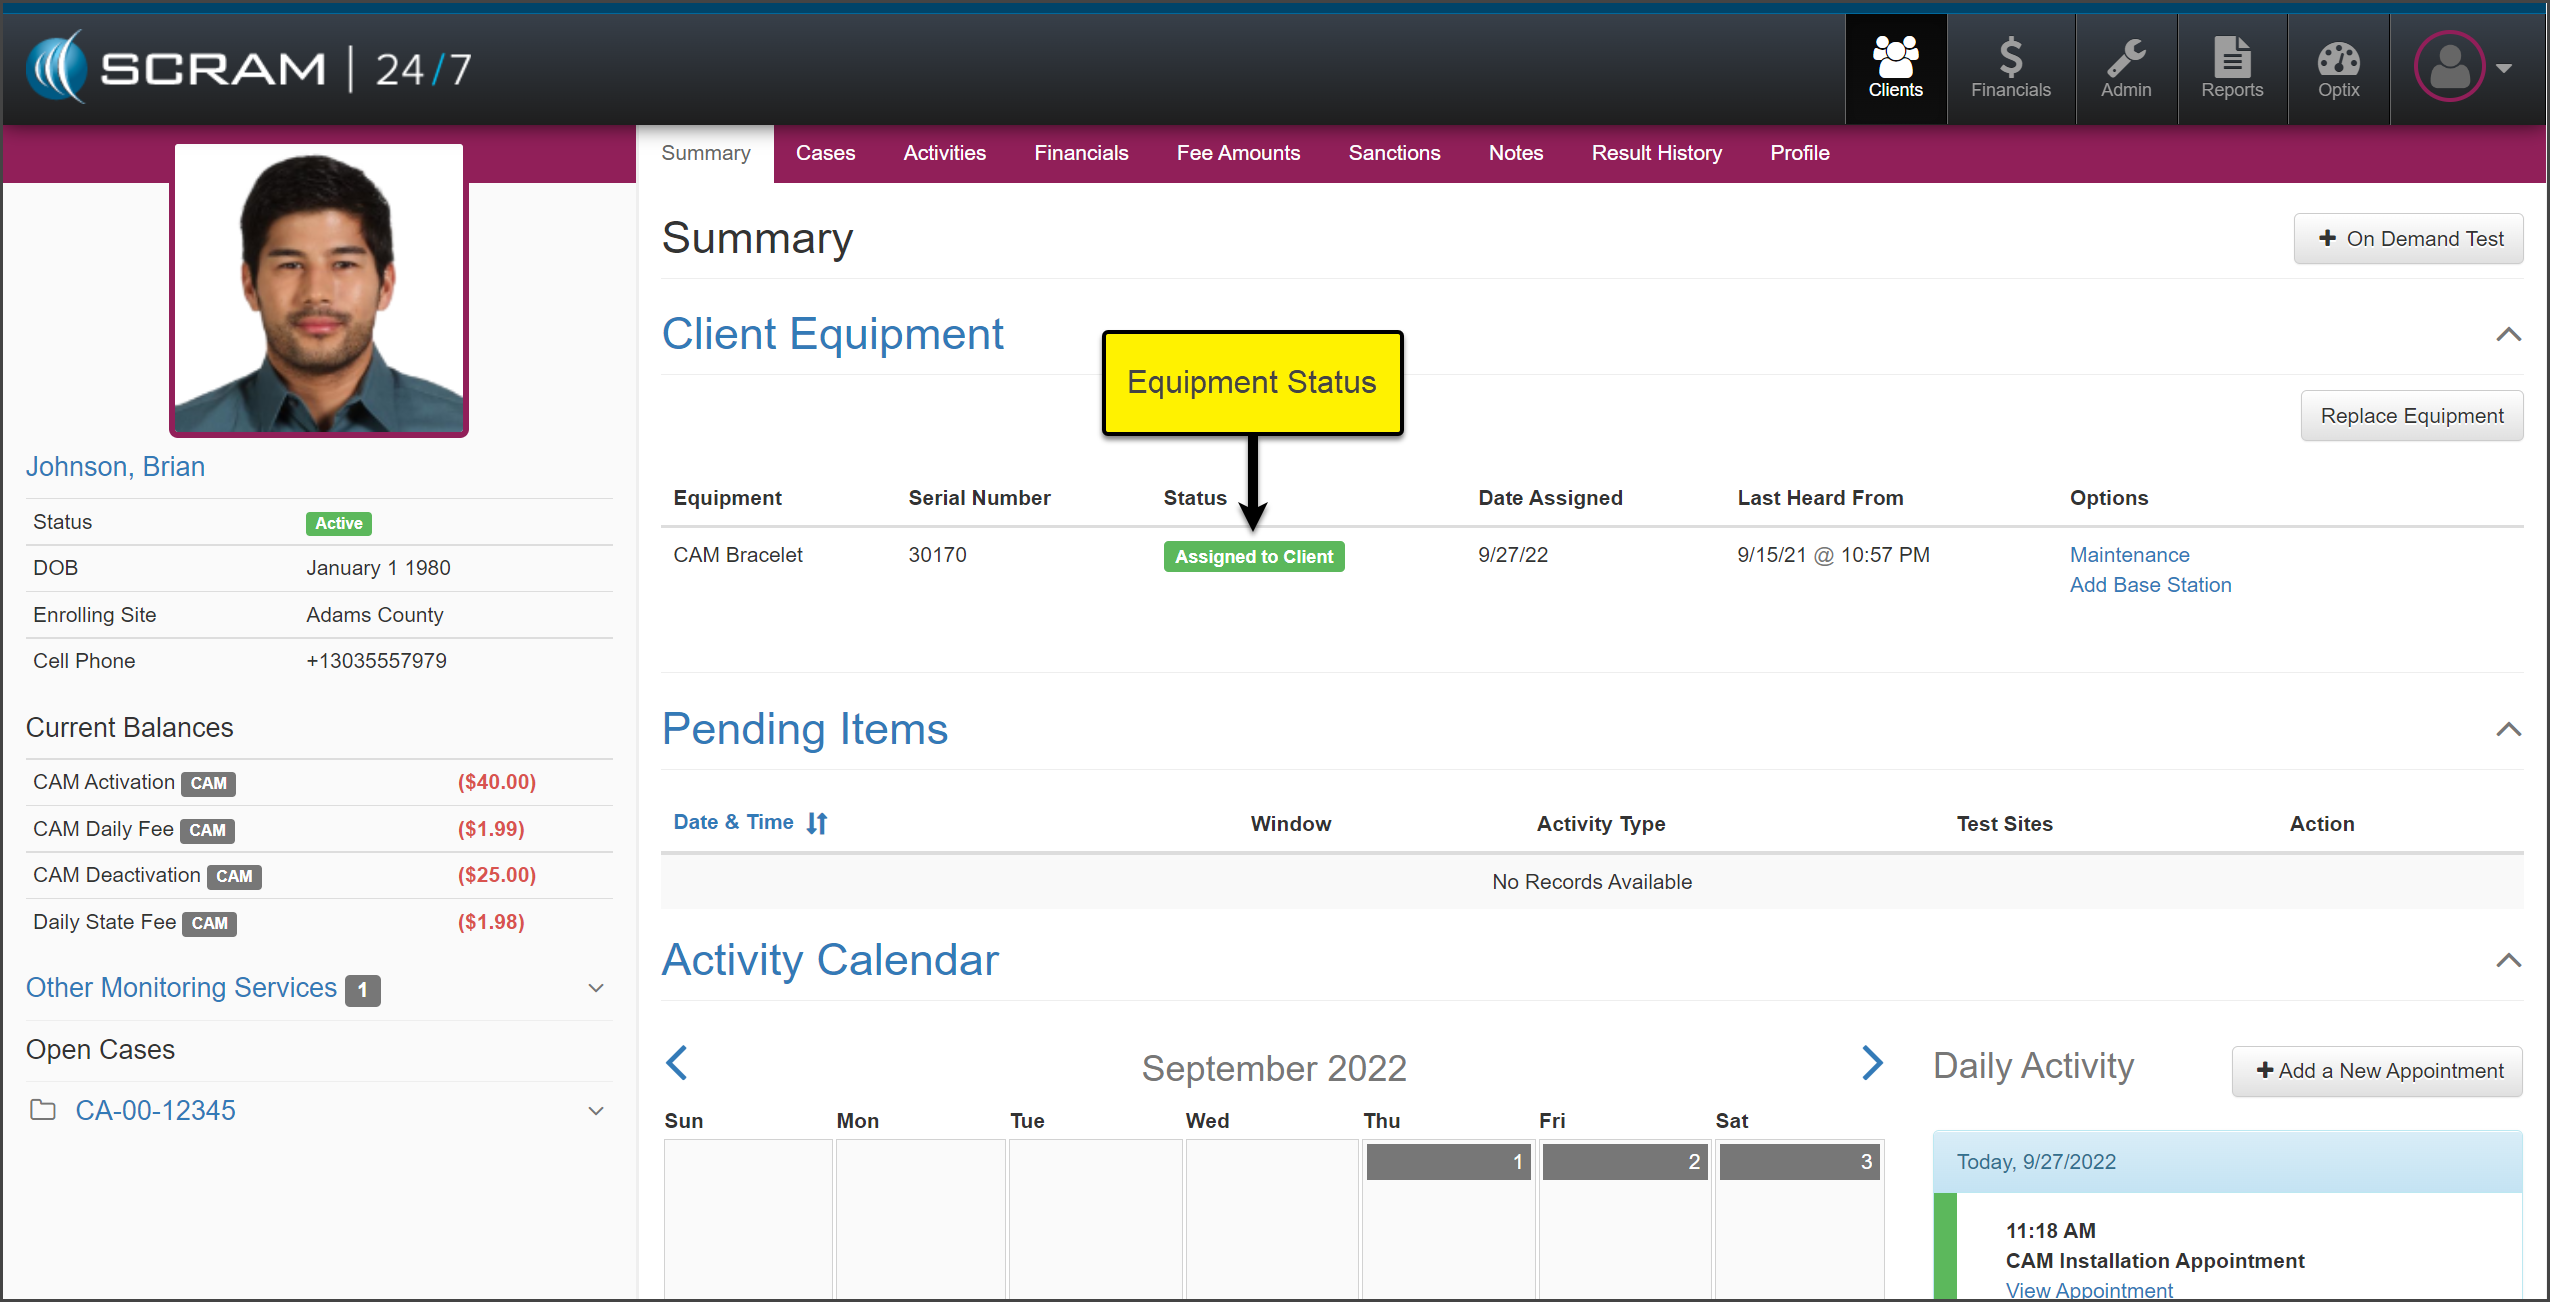
When it is time to Replace Equipment or complete a Maintenance
request (fit adjustment, Battery Faceplate Replacement, or Strap Replacement), start
on the client’s Summary page in SCRAM 24/7.
click to enlarge
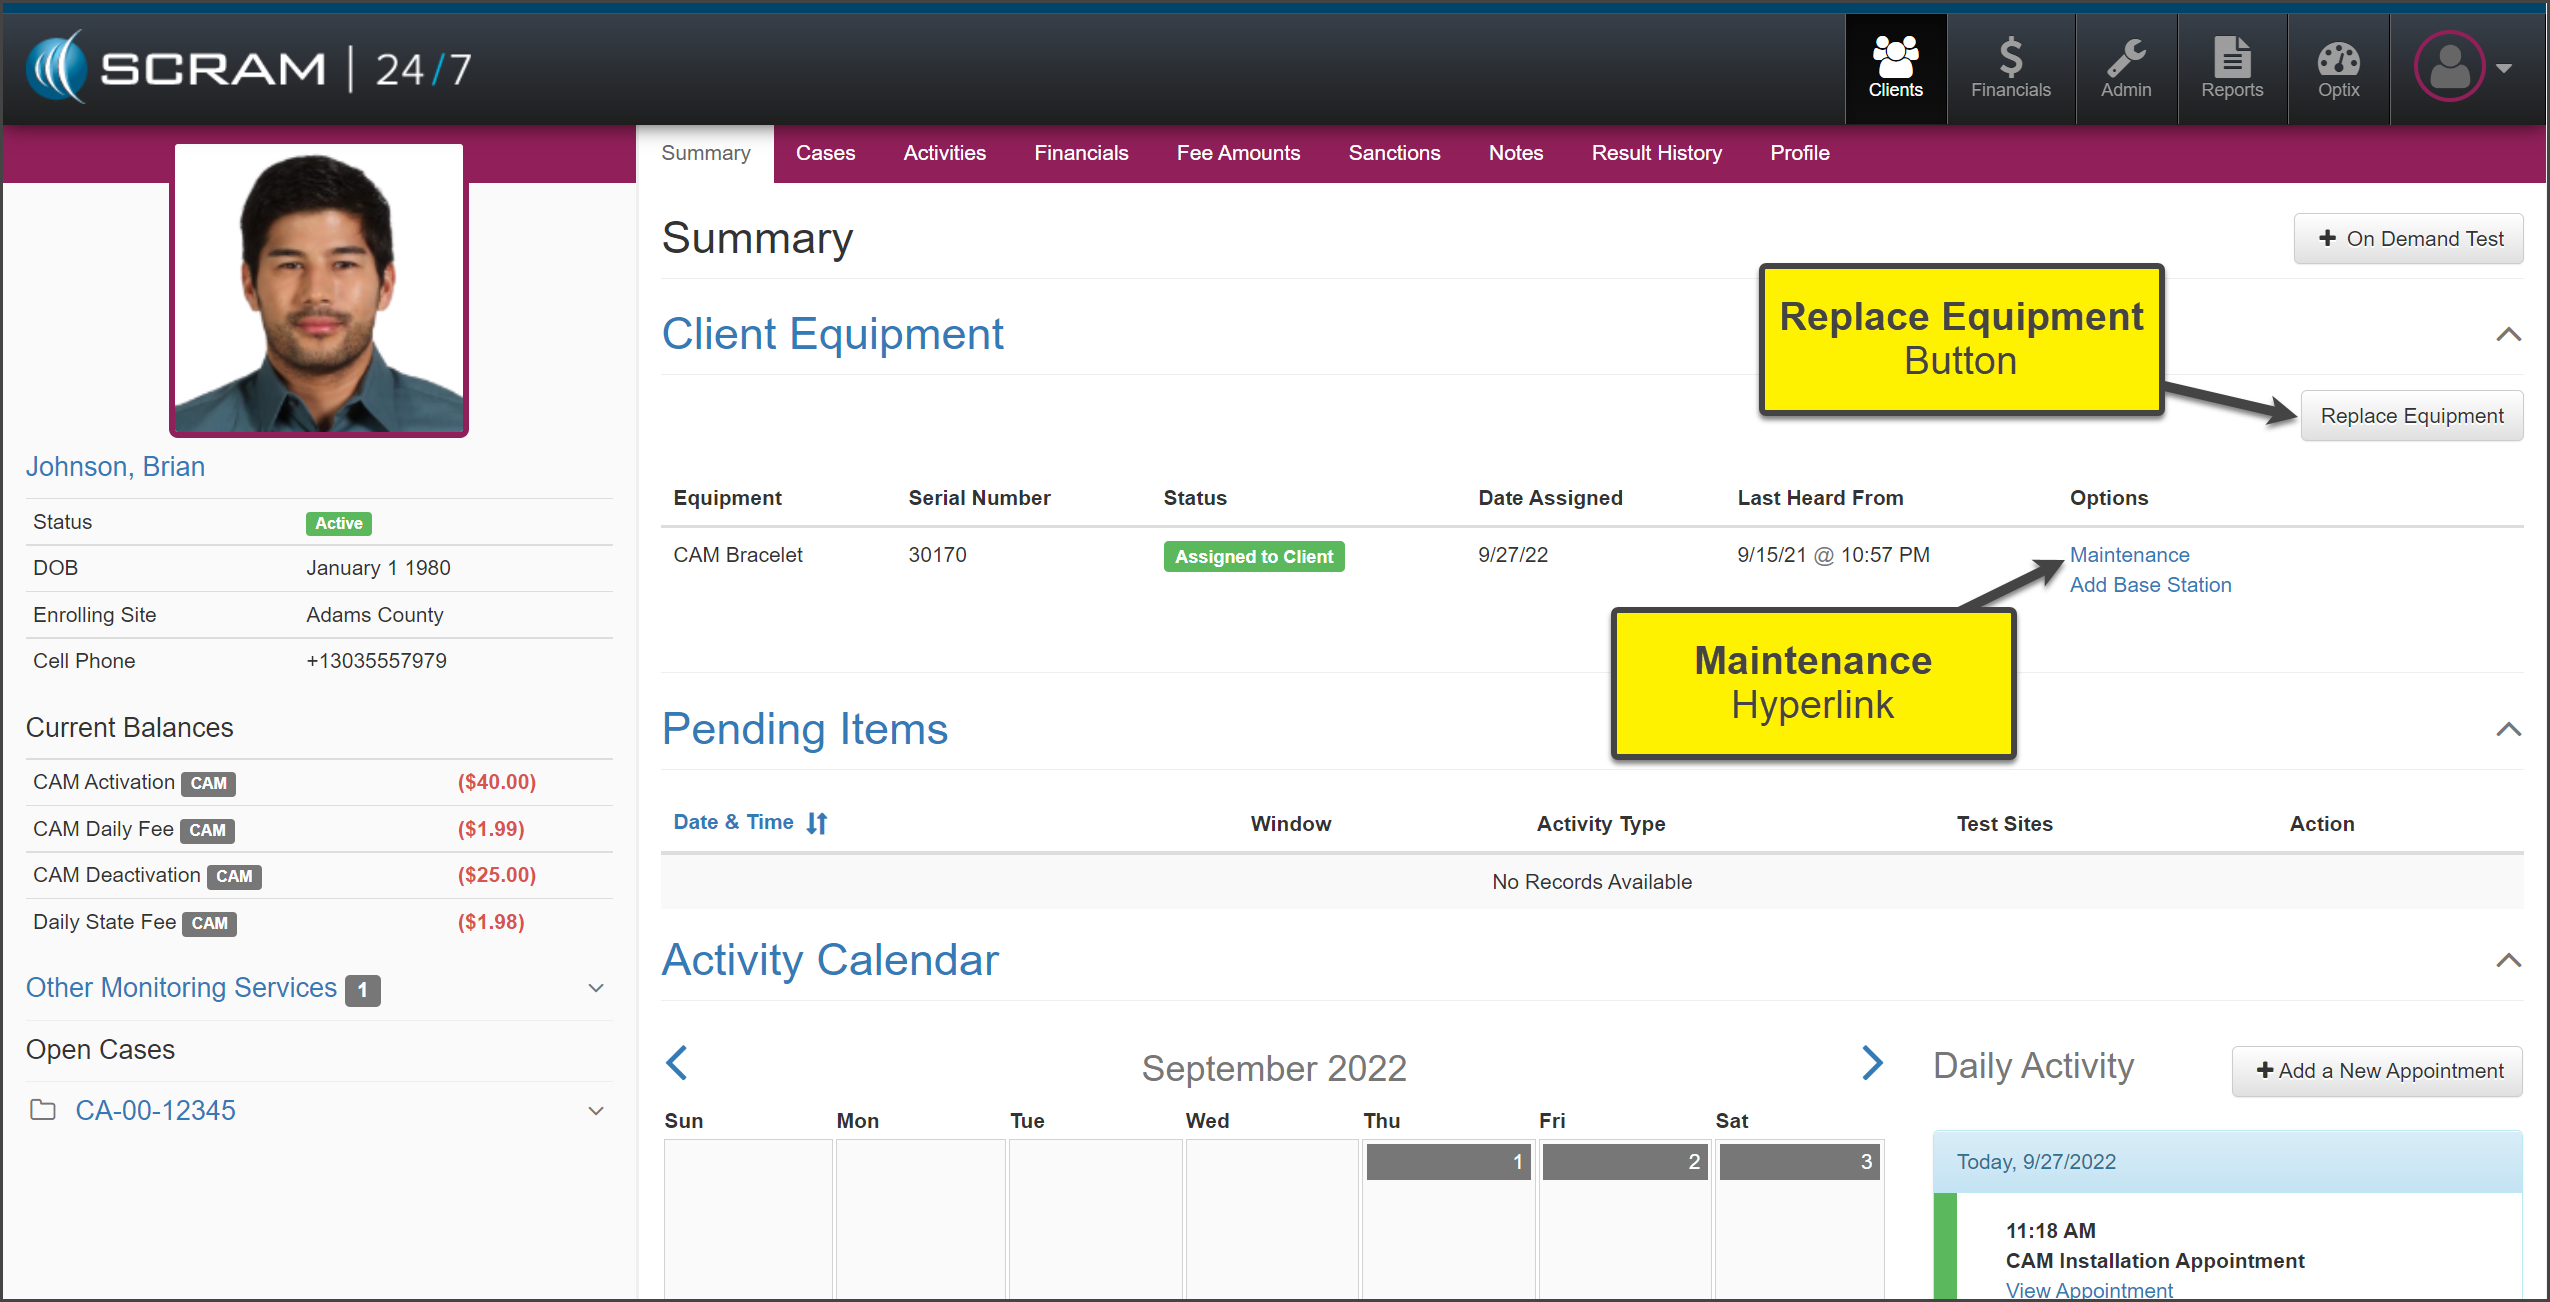
Equipment Replacement
To replace the client’s monitoring equipment:
Select the Replace Equipment button.
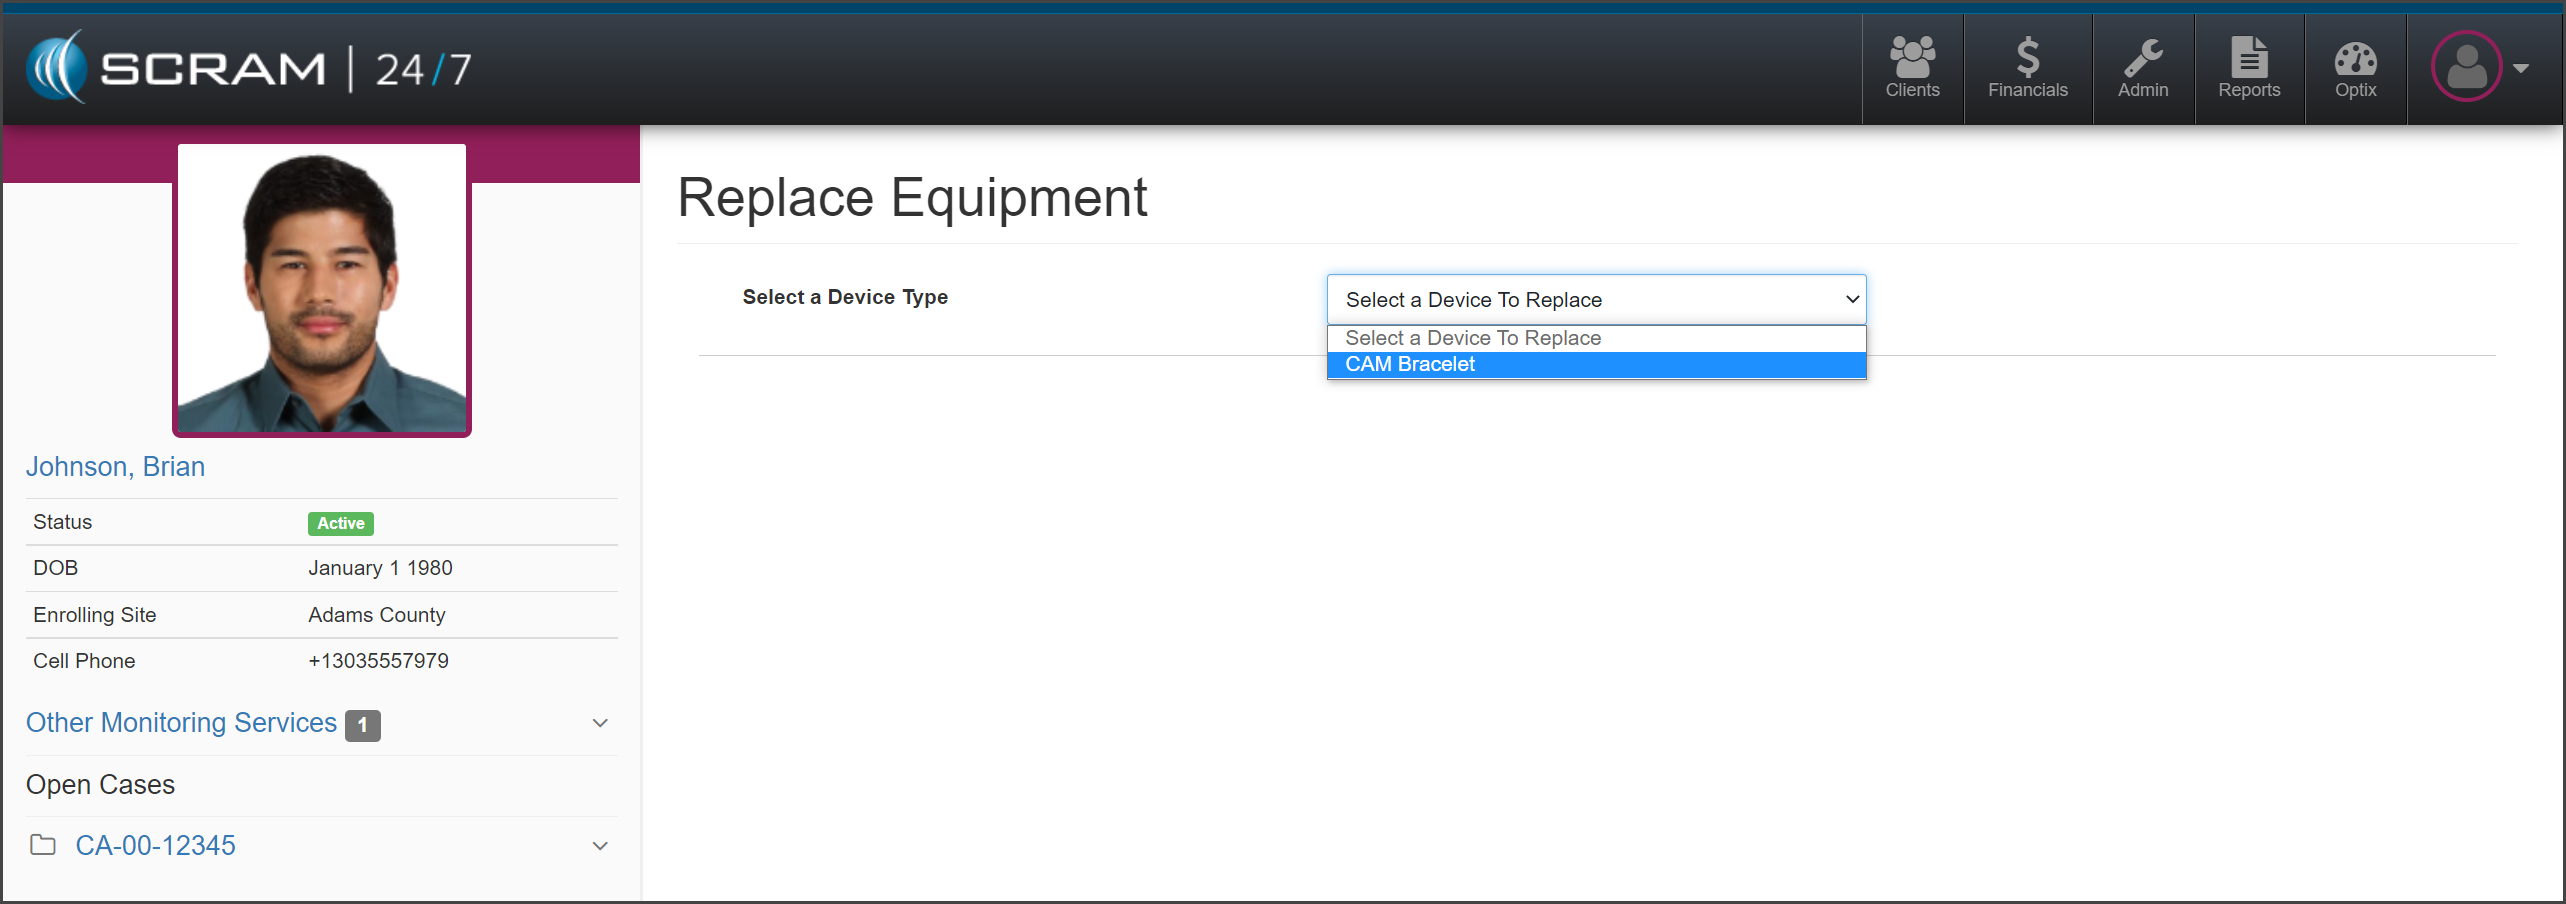
On the Replace Equipment page, “Select a
Device to Replace” from the dropdown menu. In this example the CAM Bracelet
is selected.
click to enlarge
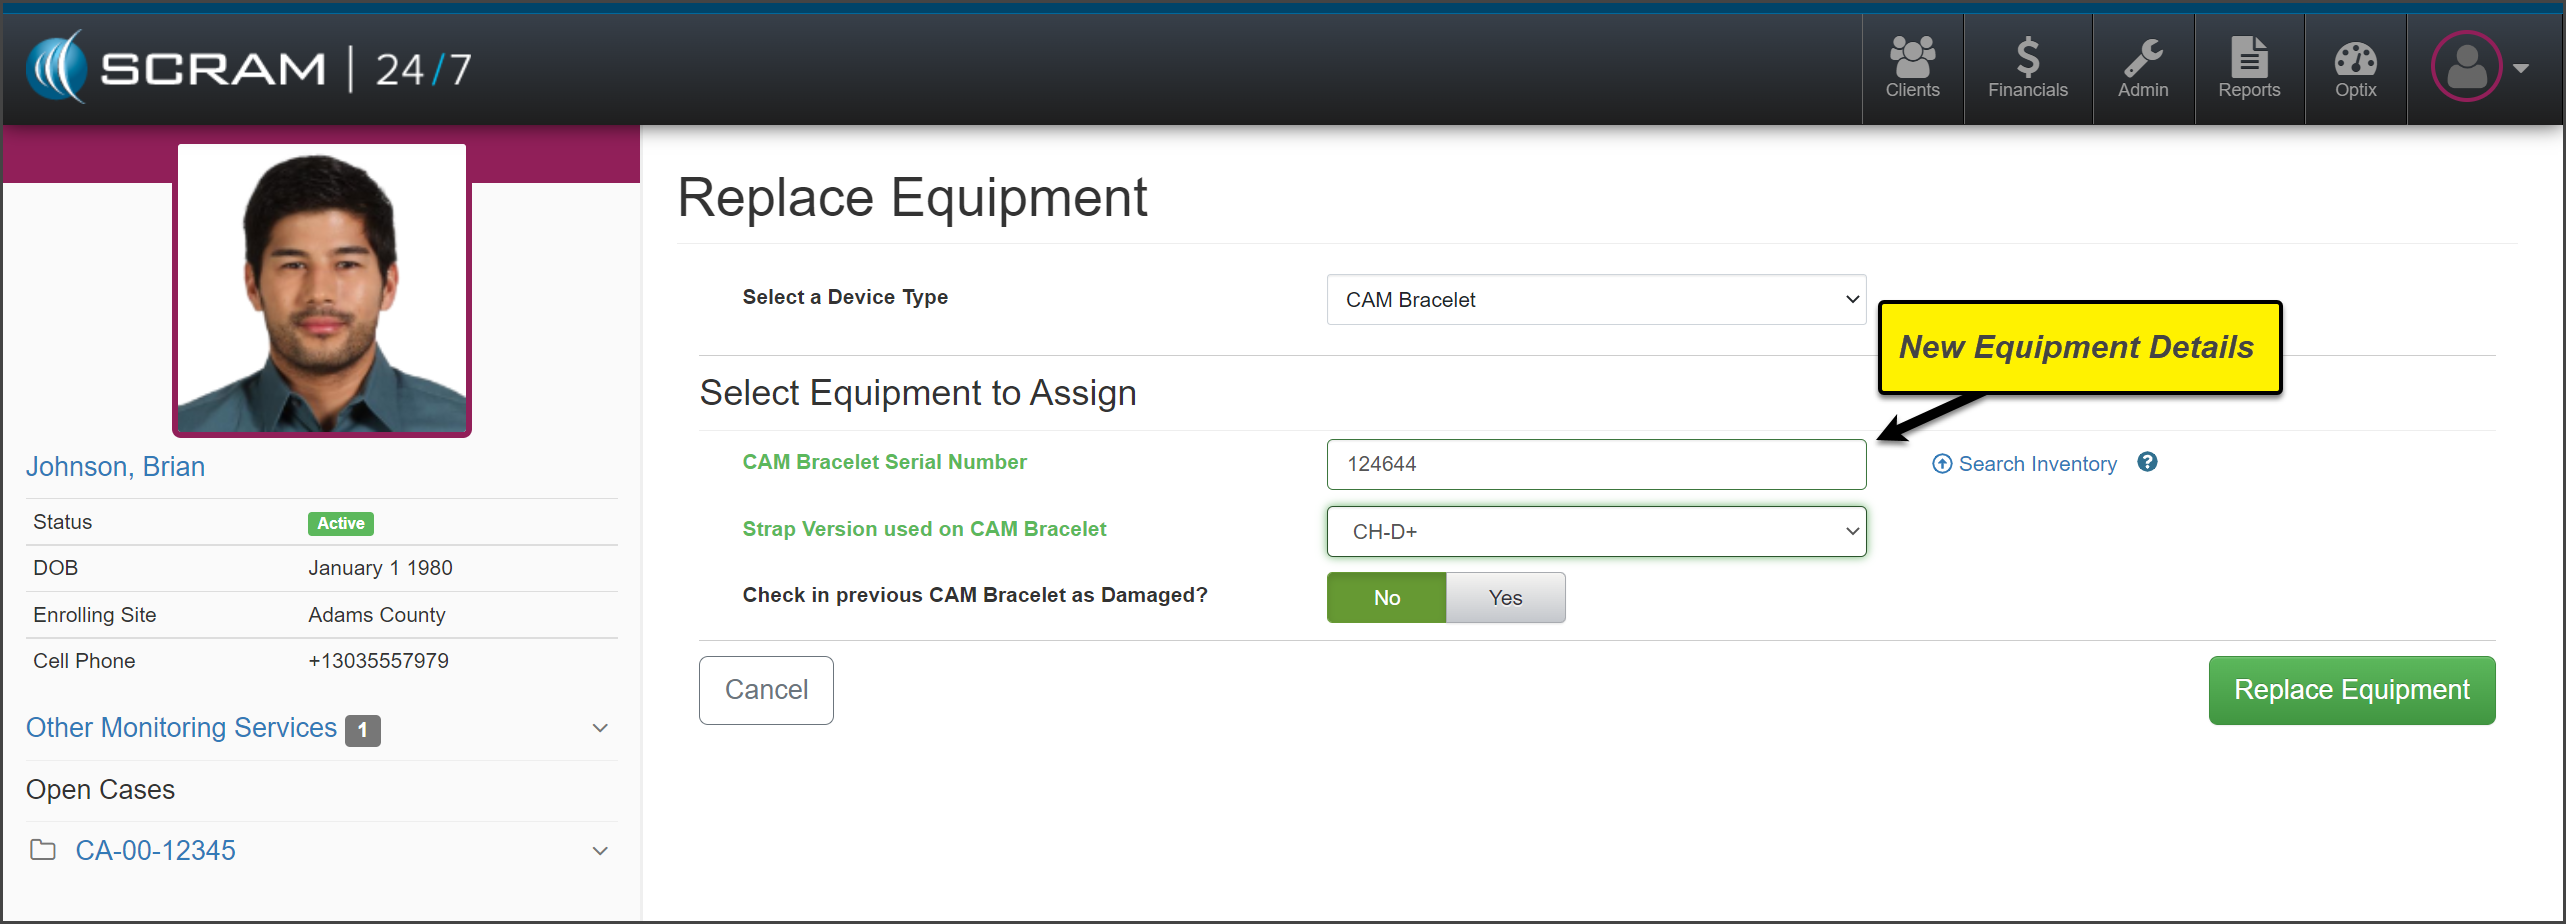
Add the new equipment information and select the
Replace Equipment button.
click to enlarge
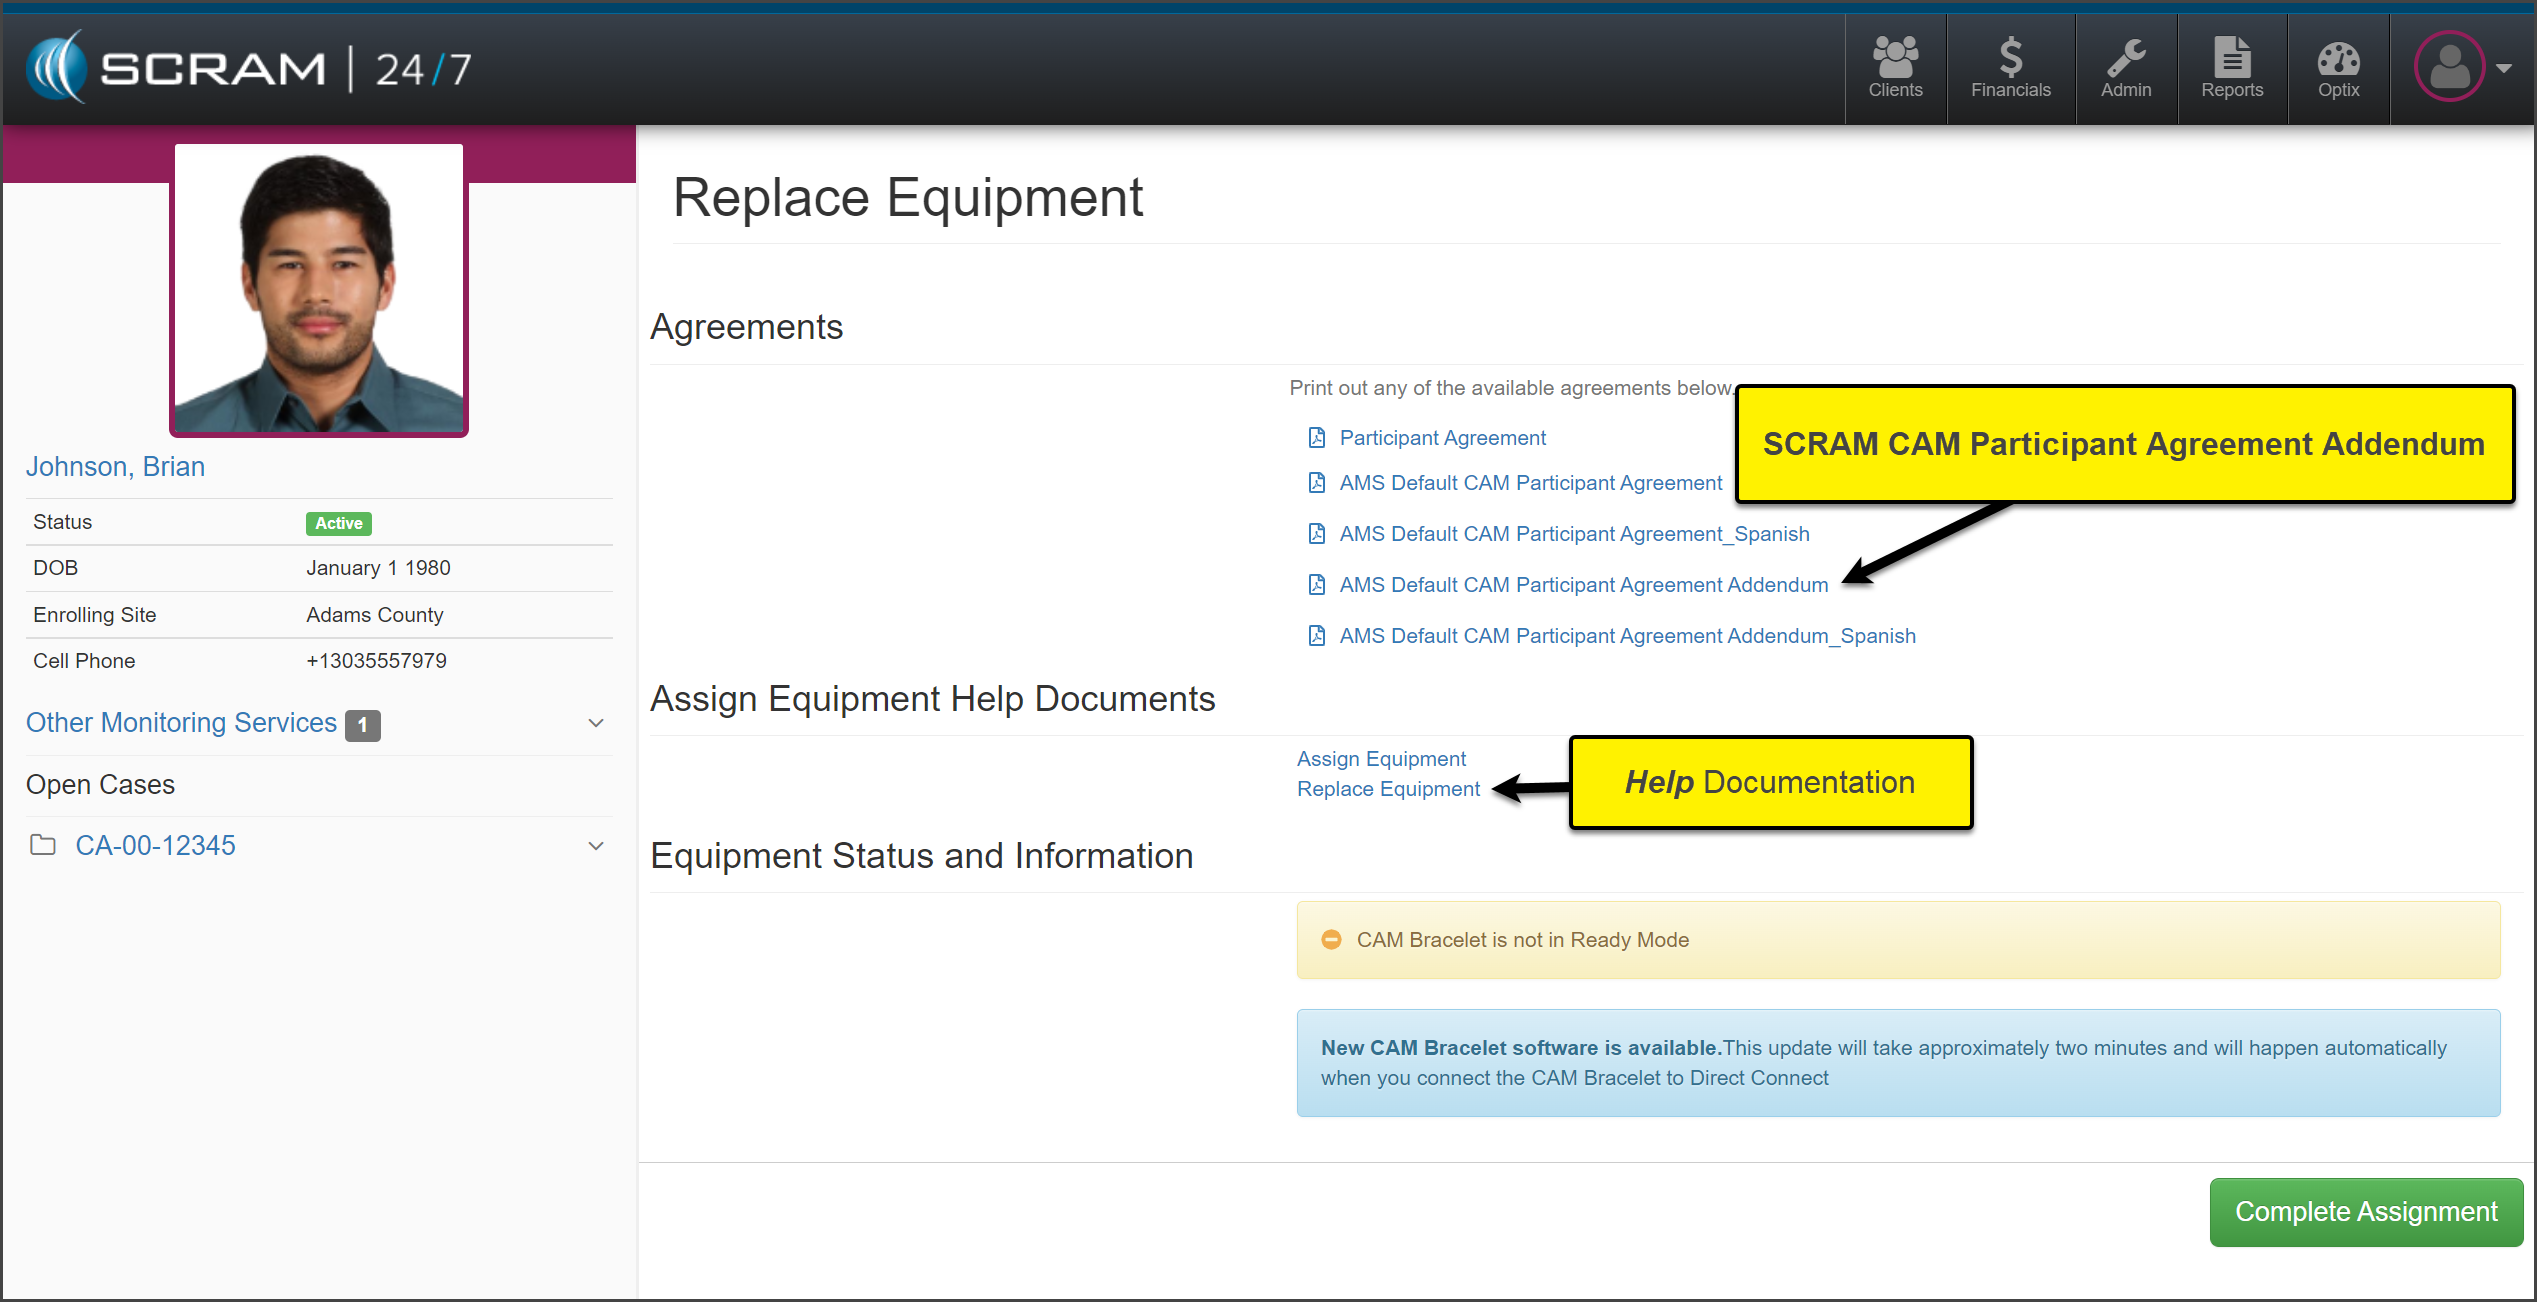
Select and print the AMS Default CAM
Participant Agreement Addendum for the client to sign and select the Complete
Assignment button.
click to enlarge
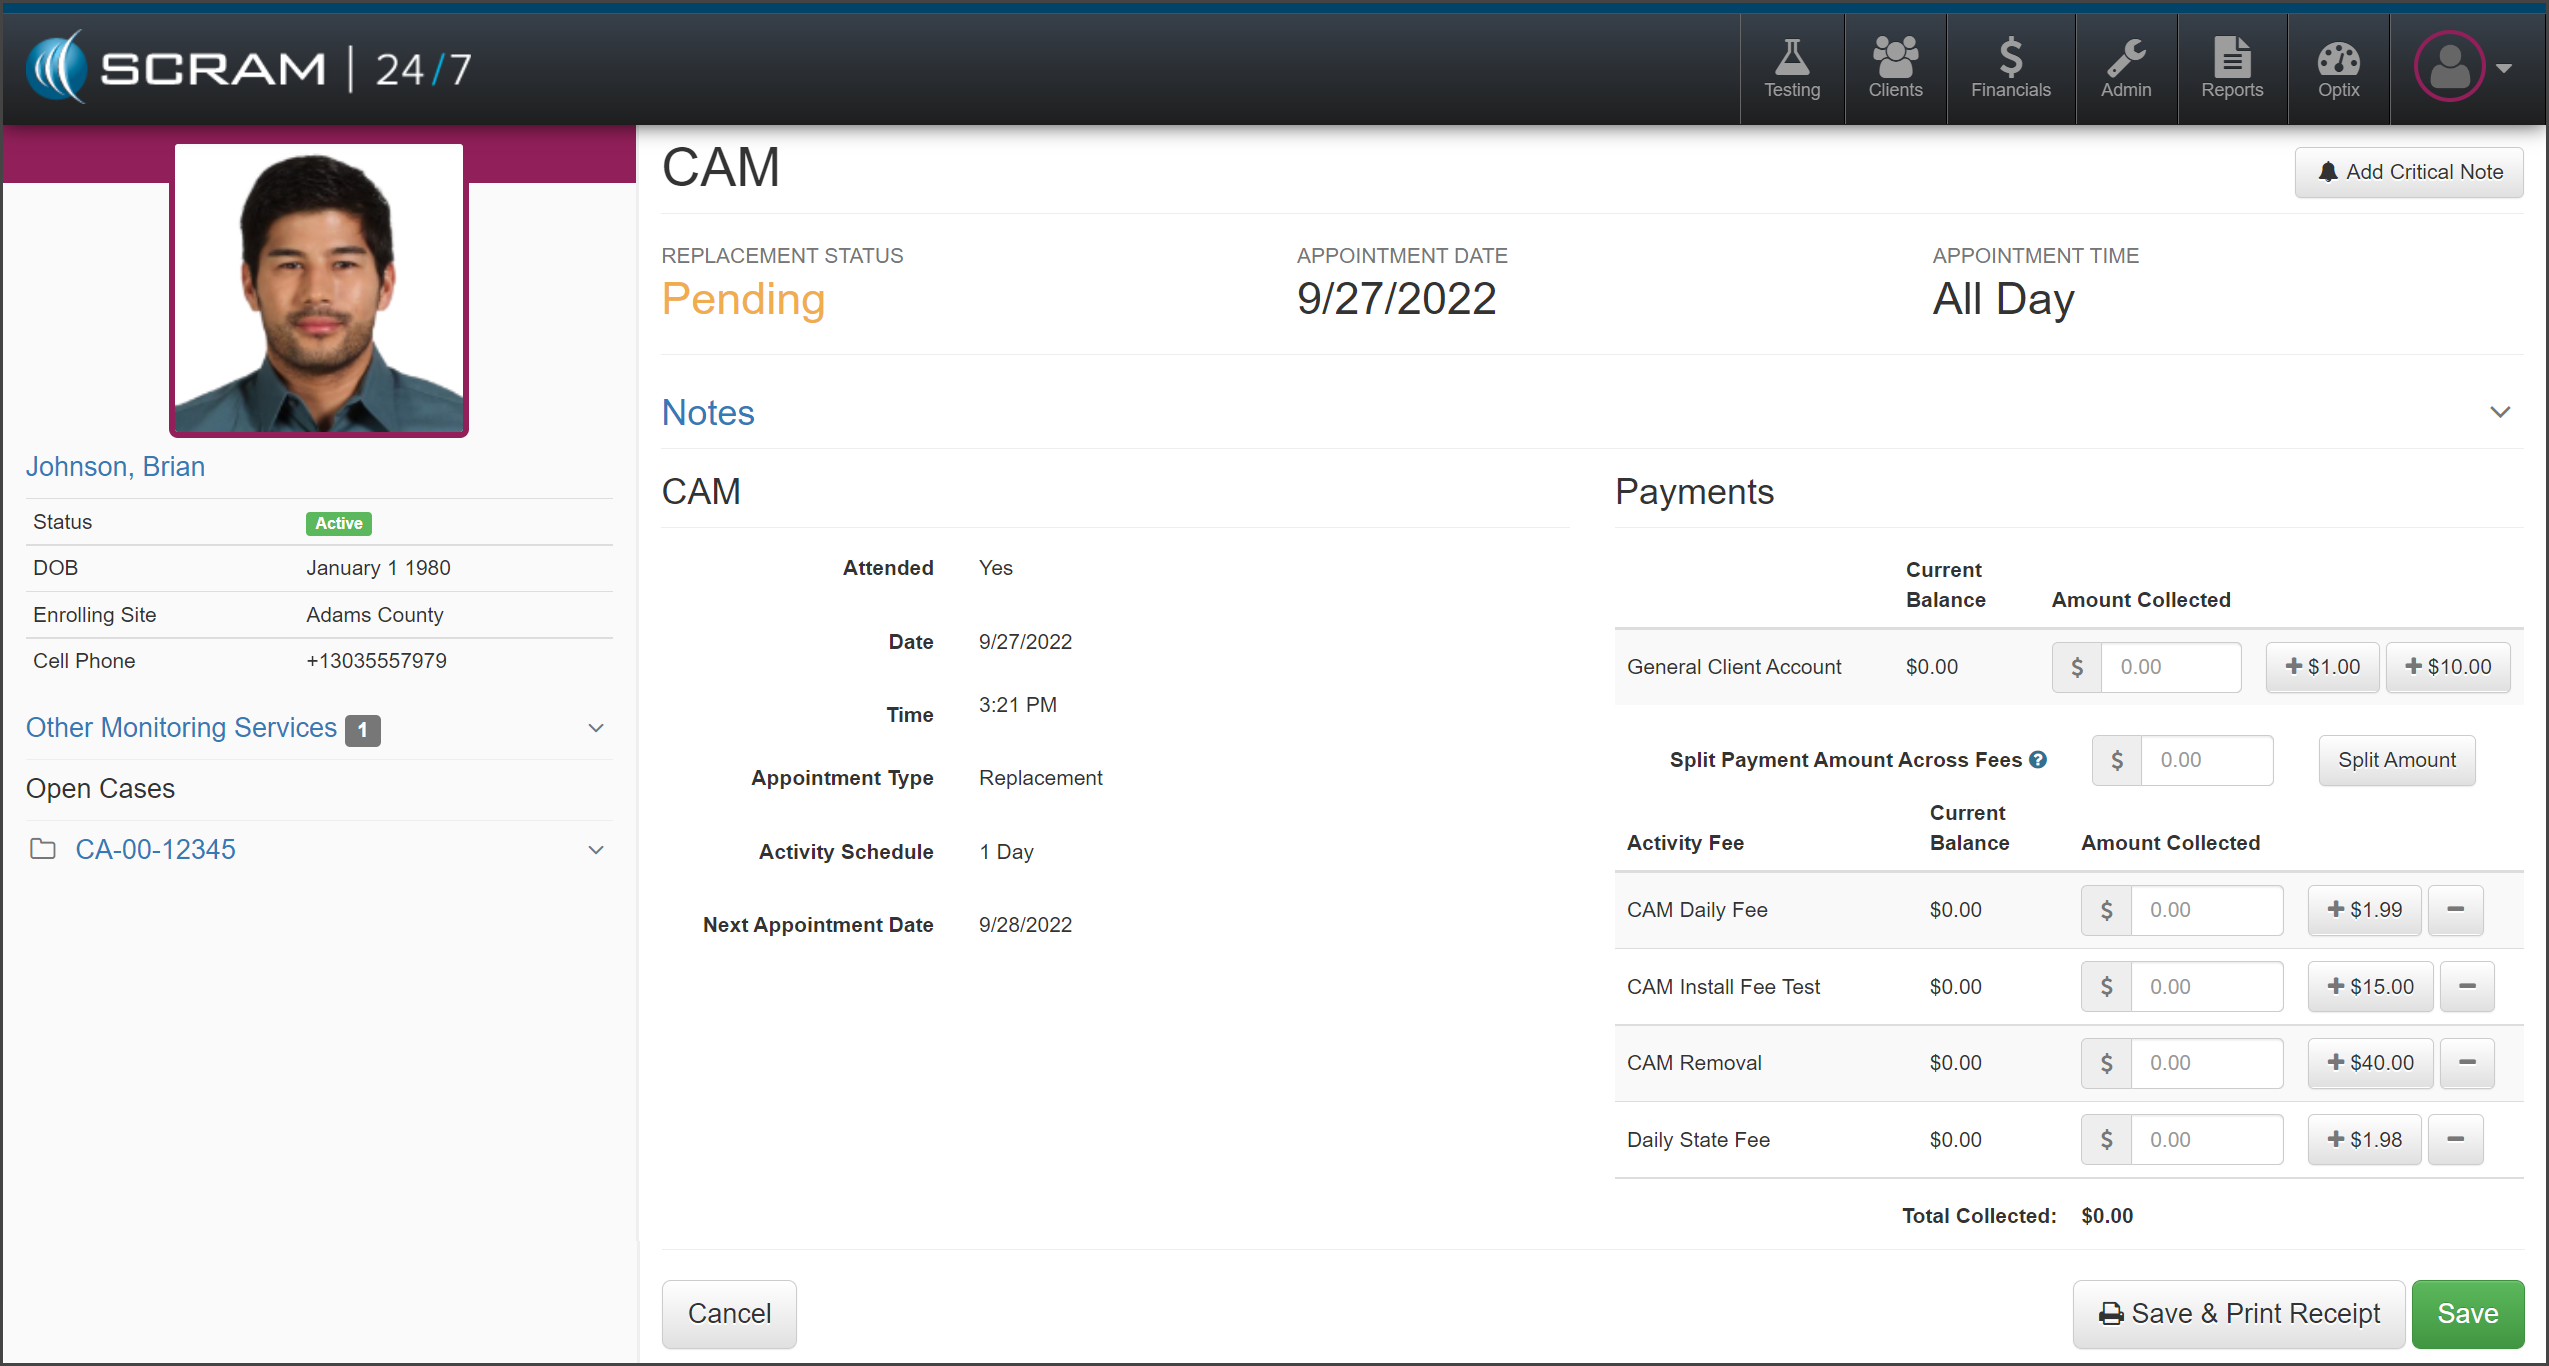
Collect any fees and select one of the Save
options.
click to enlarge
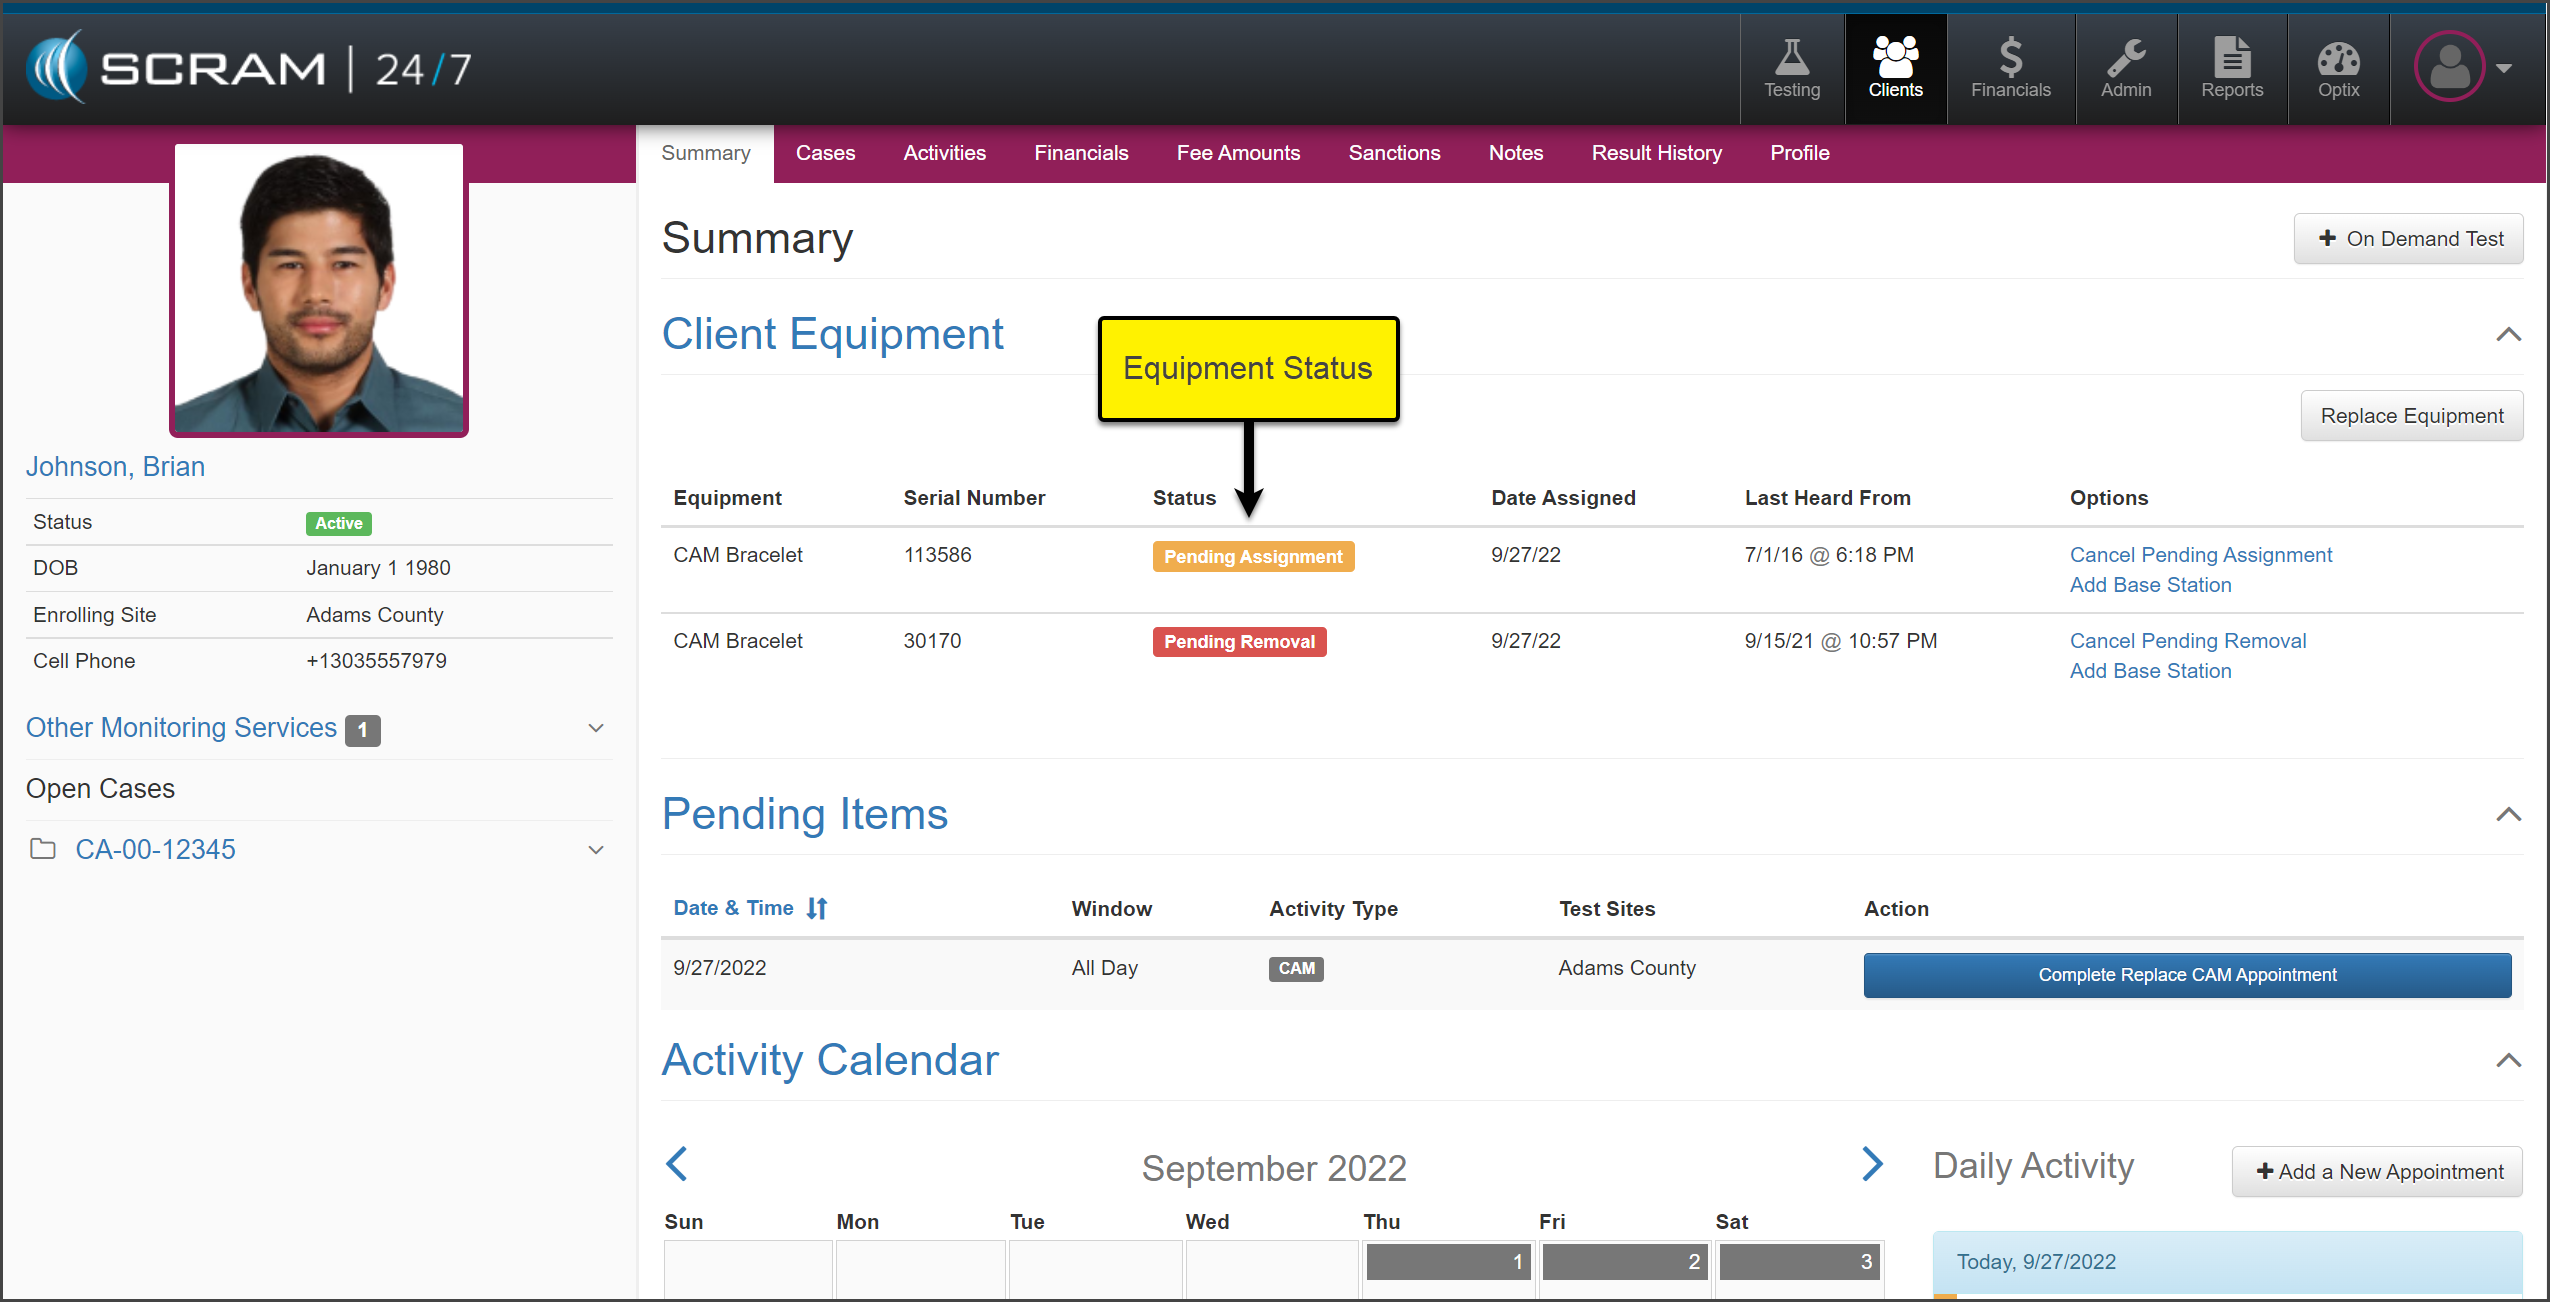
The Summary page will now display the
current equipment status.
click to enlarge
Check in the “Pending Removal” device, and
then complete the assignment of the “Pending Assignment” device.
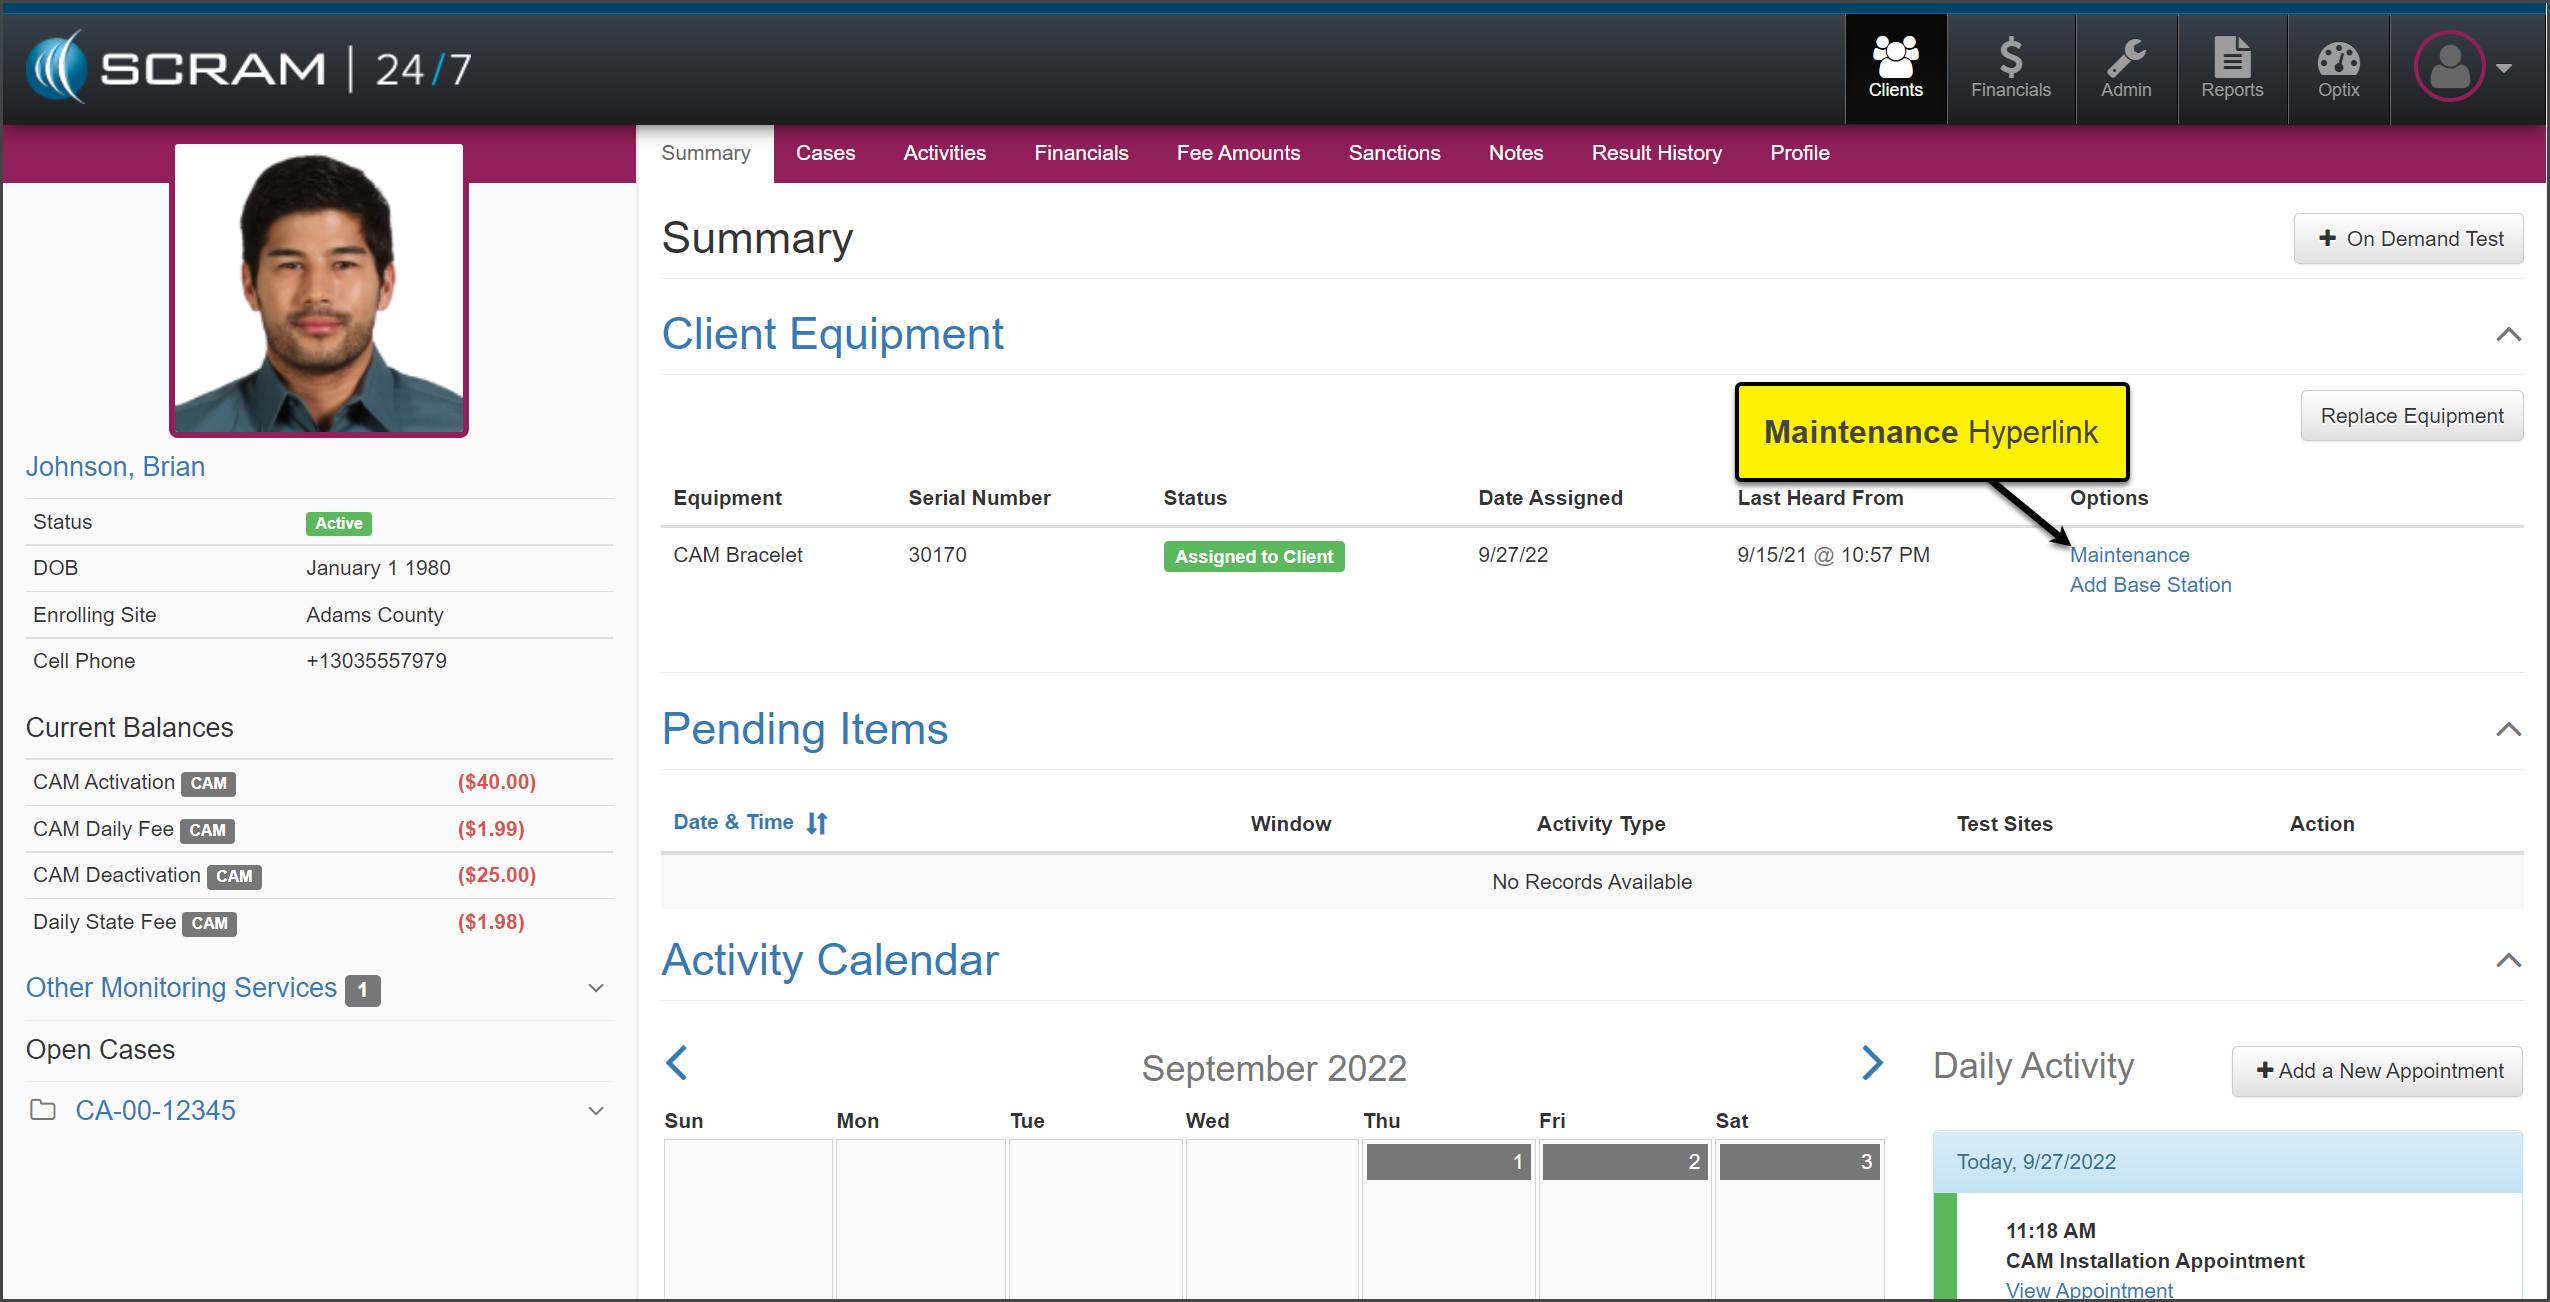
Once completed, the Summary page will display the
device status of “Assigned to Client.”
click to enlarge
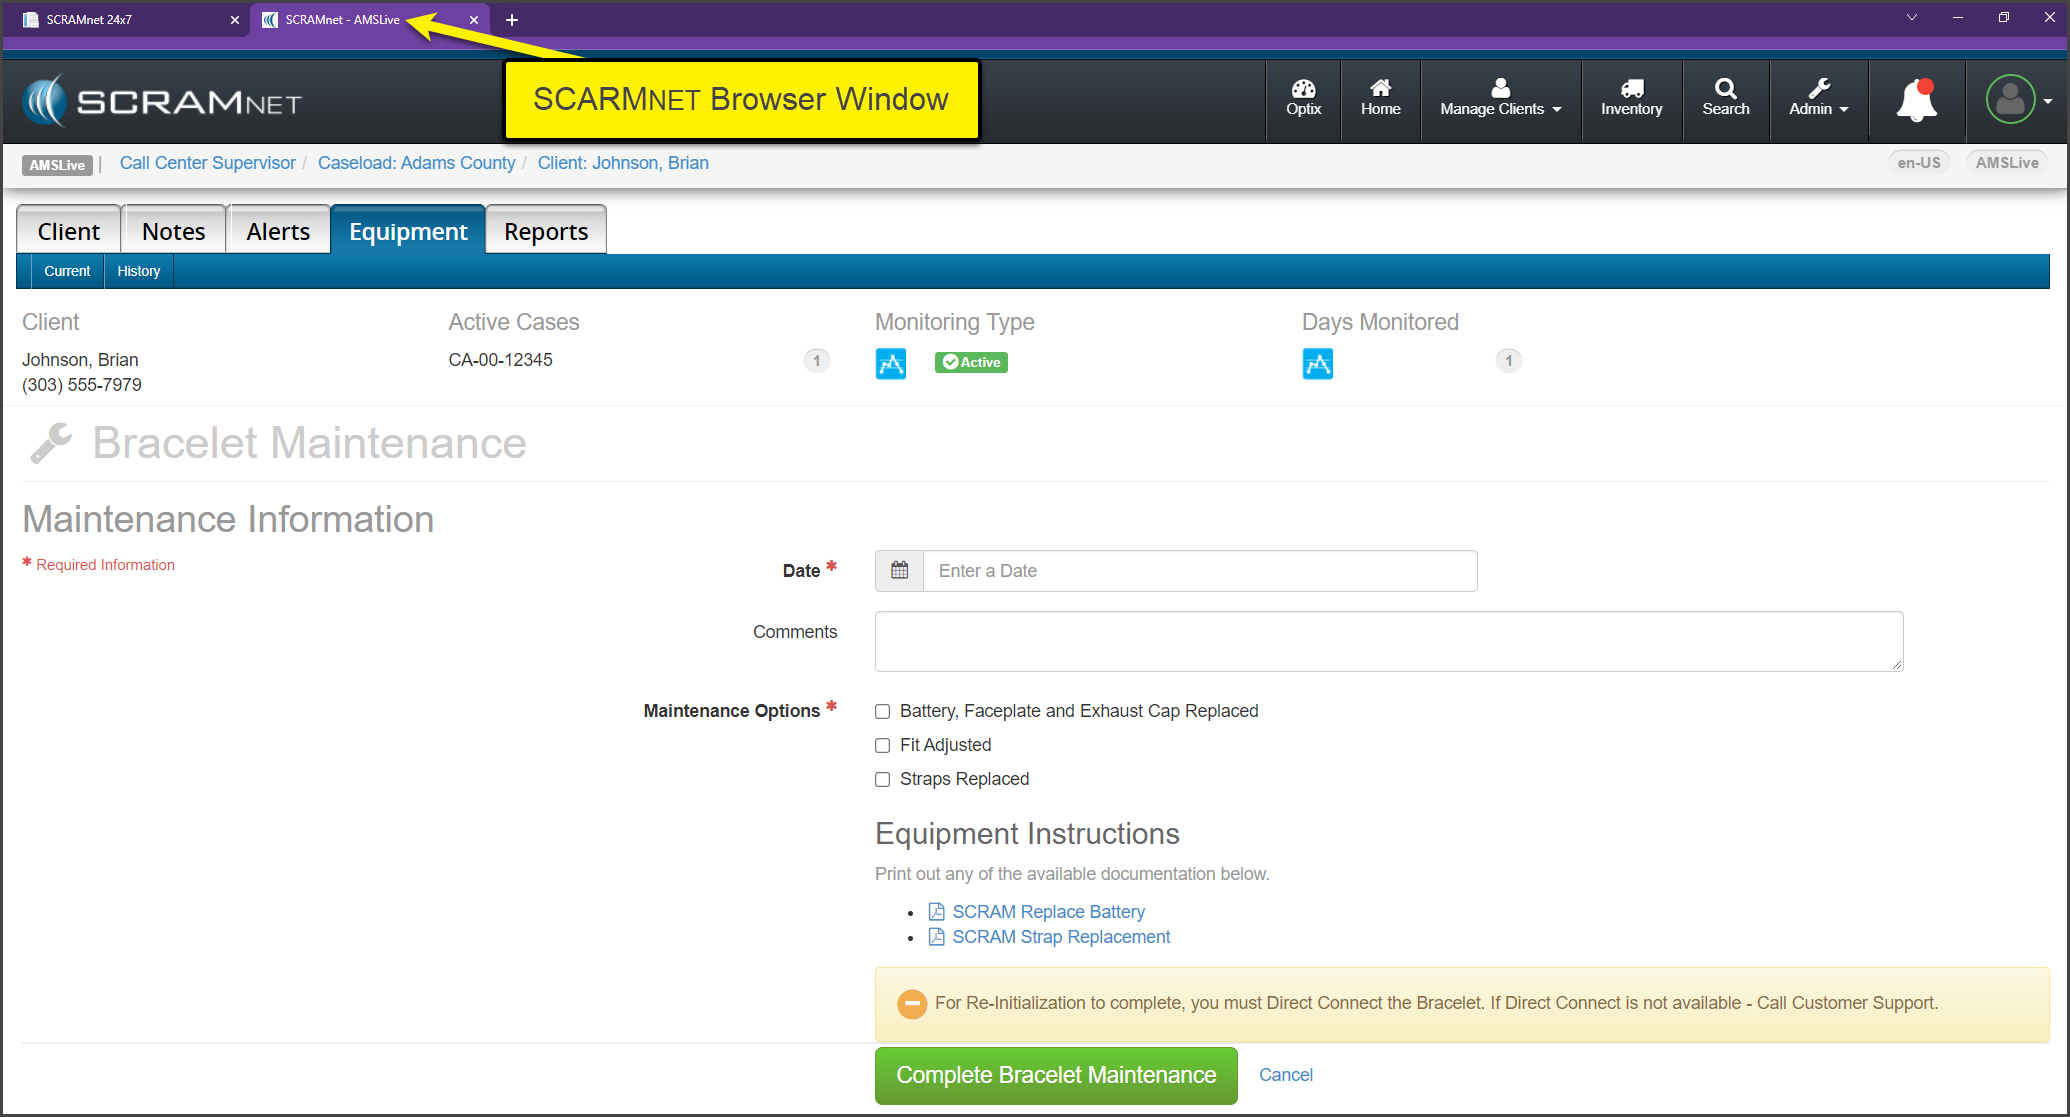
Maintenance
To complete a
required Maintenance alert, select the Maintenance hyperlink located
under the Options section on the client’s Summary page in SCRAM
24/7.
click to enlarge
A new browser
window will open displaying the Maintenance page in SCRAMNET for the client. Follow the established
process for the specific maintenance request.
click to enlarge
Once you have completed the maintenance and the final Direct
Connect, simply close the SCRAMNET
browsing window.
Remove Activity / Suspend Activity
When the billing and
monitoring of the client needs to be stopped or suspended for the client, the
equipment status will need to be updated to an “Awaiting Return” status. This will
stop the monitoring fees from generating for the client in SCRAMNET.
Remove Activity
Select the Activities tab to get started.
Select
the activity you wish to remove. In this example the Activity of CAM is
selected.
click to enlarge
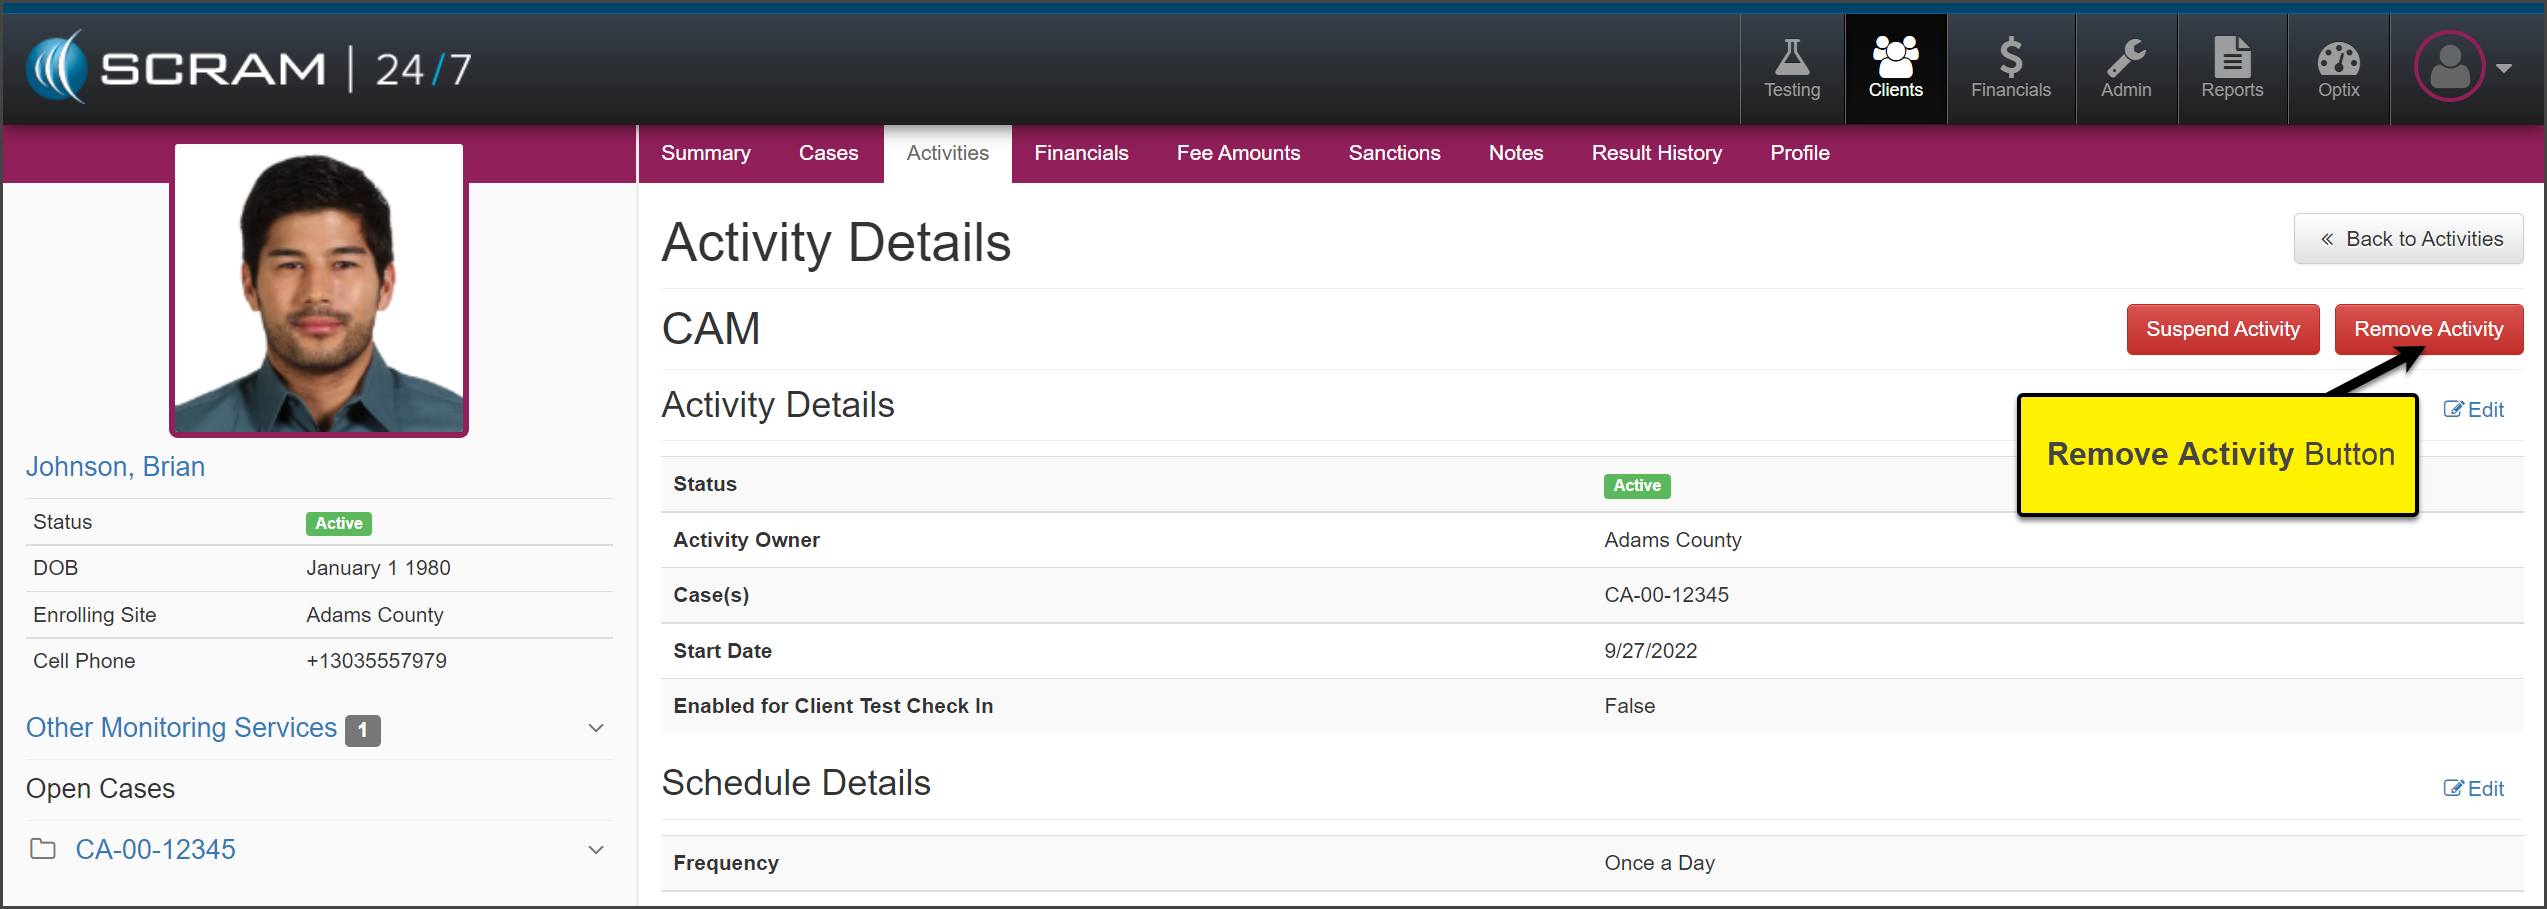
On
the Activity Details page, select the Remove Activity button.
click to enlarge
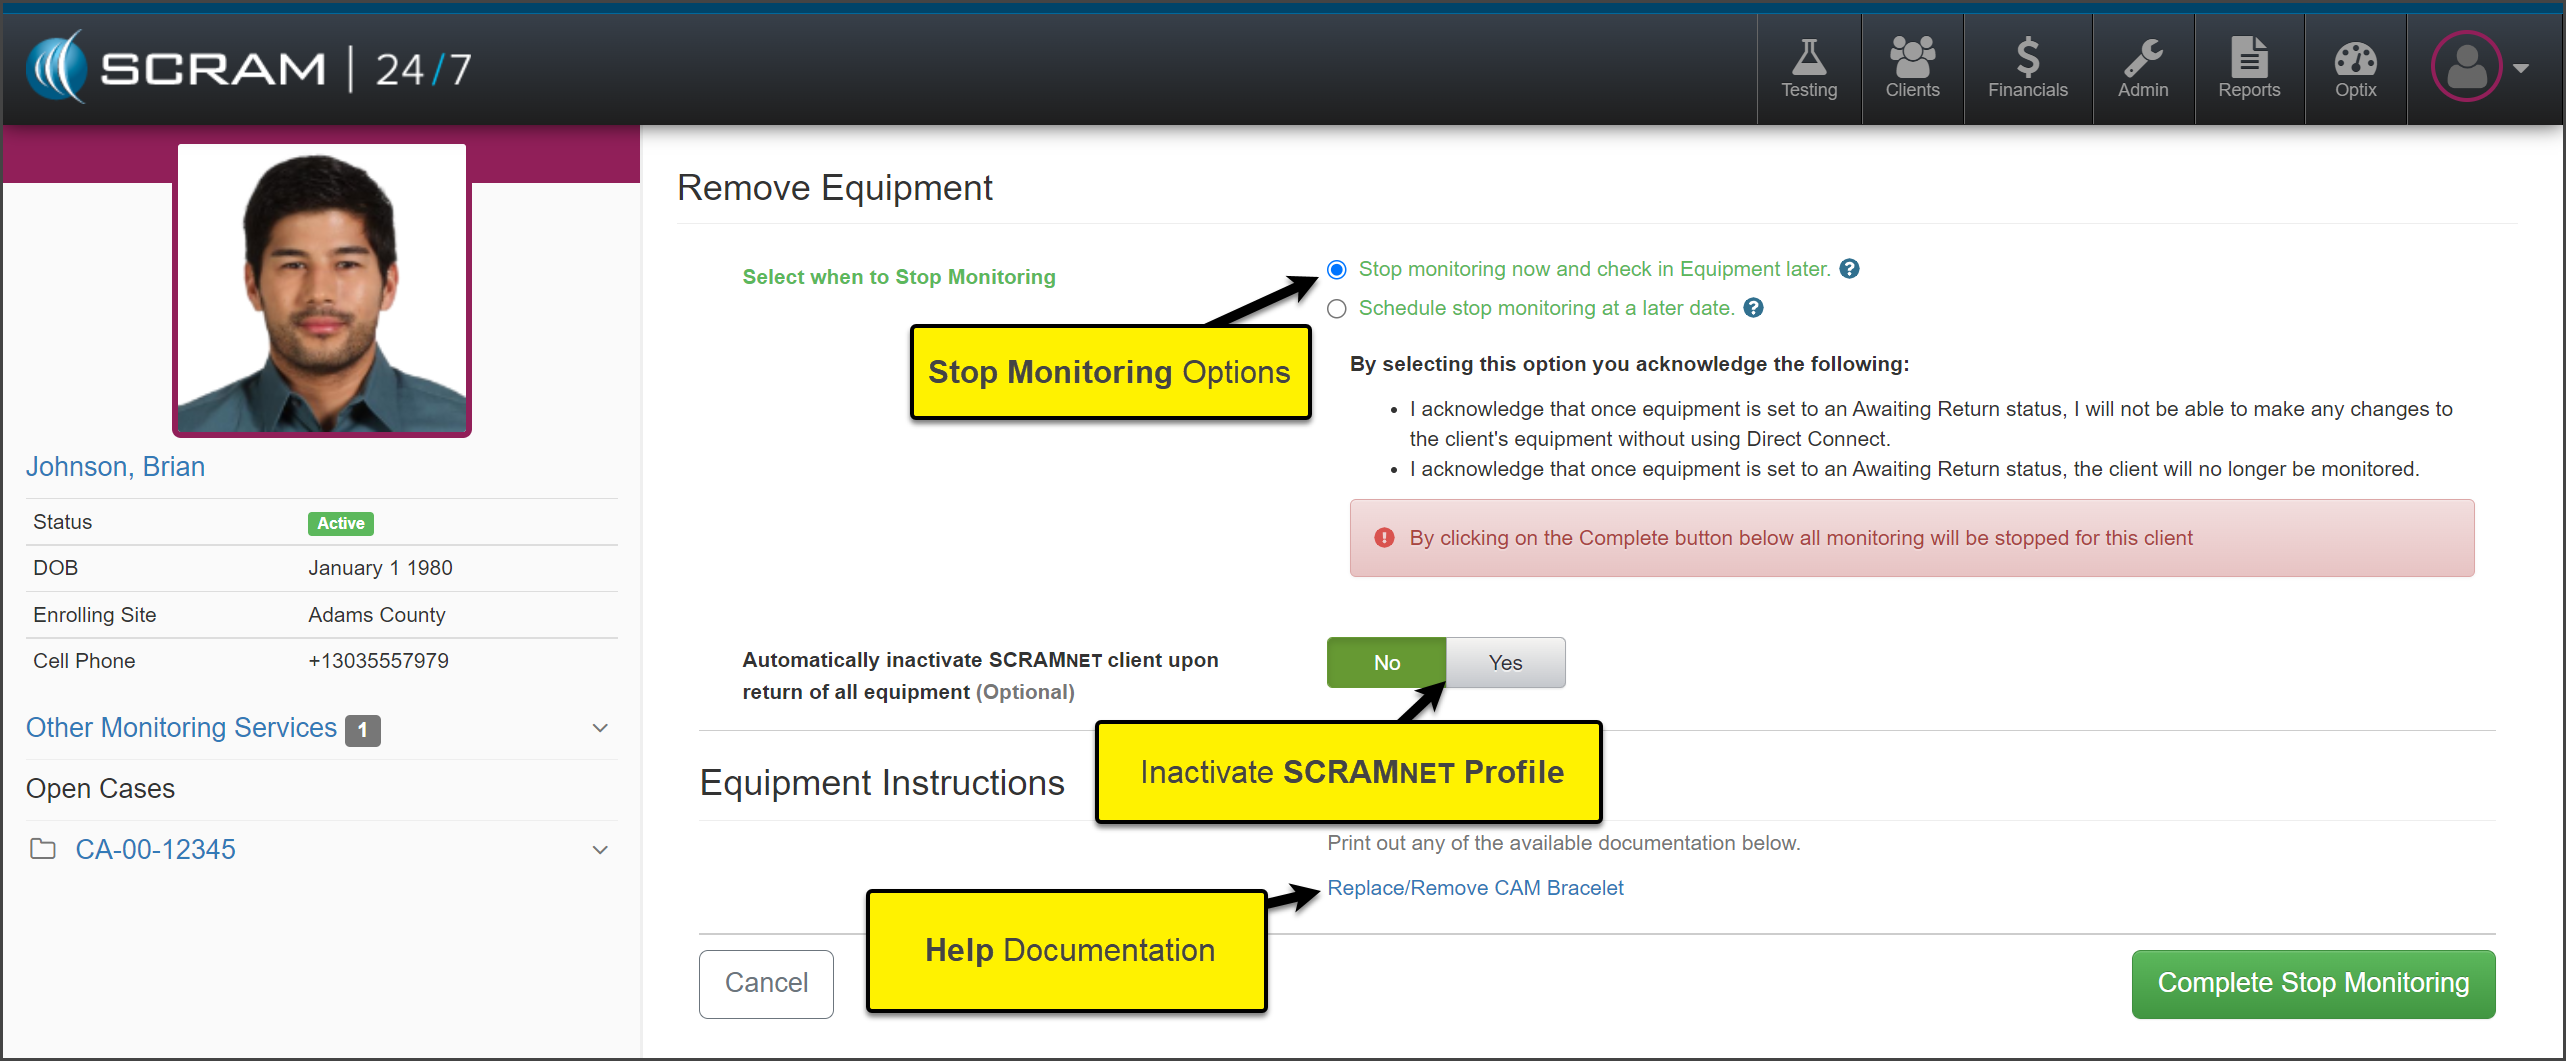
On
the Remove Equipment page, select when to Stop the Monitoring of
the client and whether to automatically inactivate the SCRAMNETprofile
once the equipment is checked in or leave the SCRAMNETprofile active.
click to enlarge
To save the selection, select the Complete Stop Monitoring button.
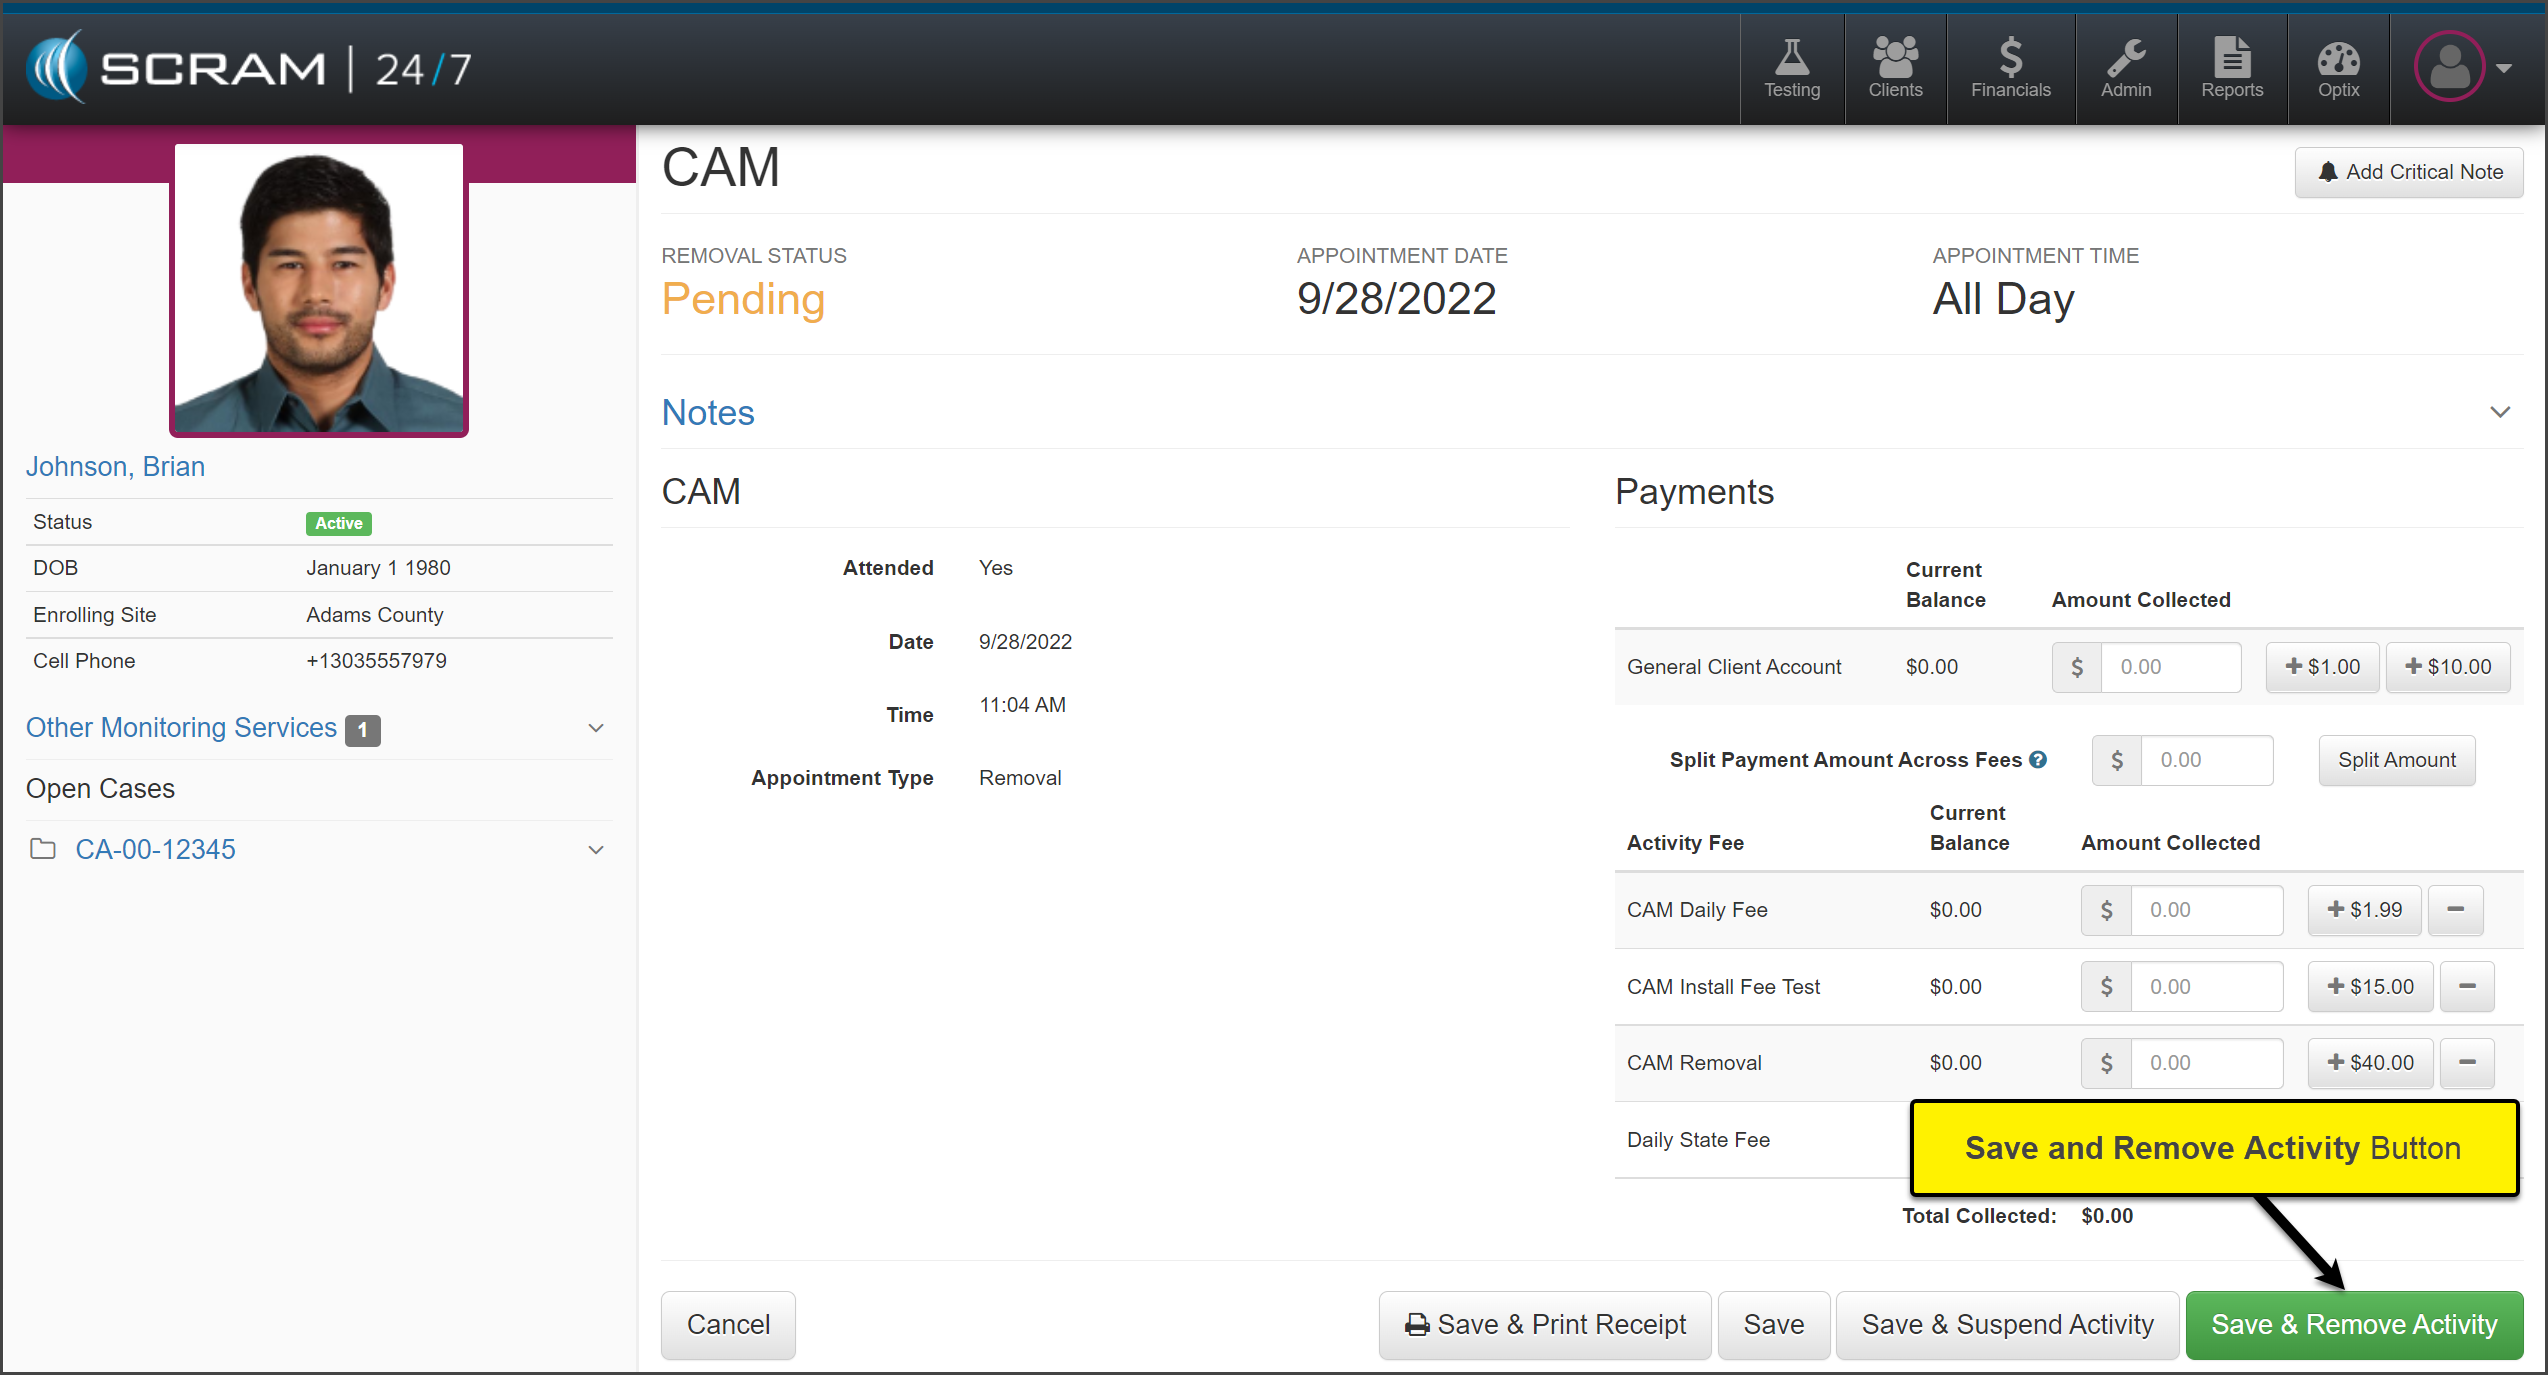
Collect any fees, and select the Save & Remove Activity button.
click enlarge
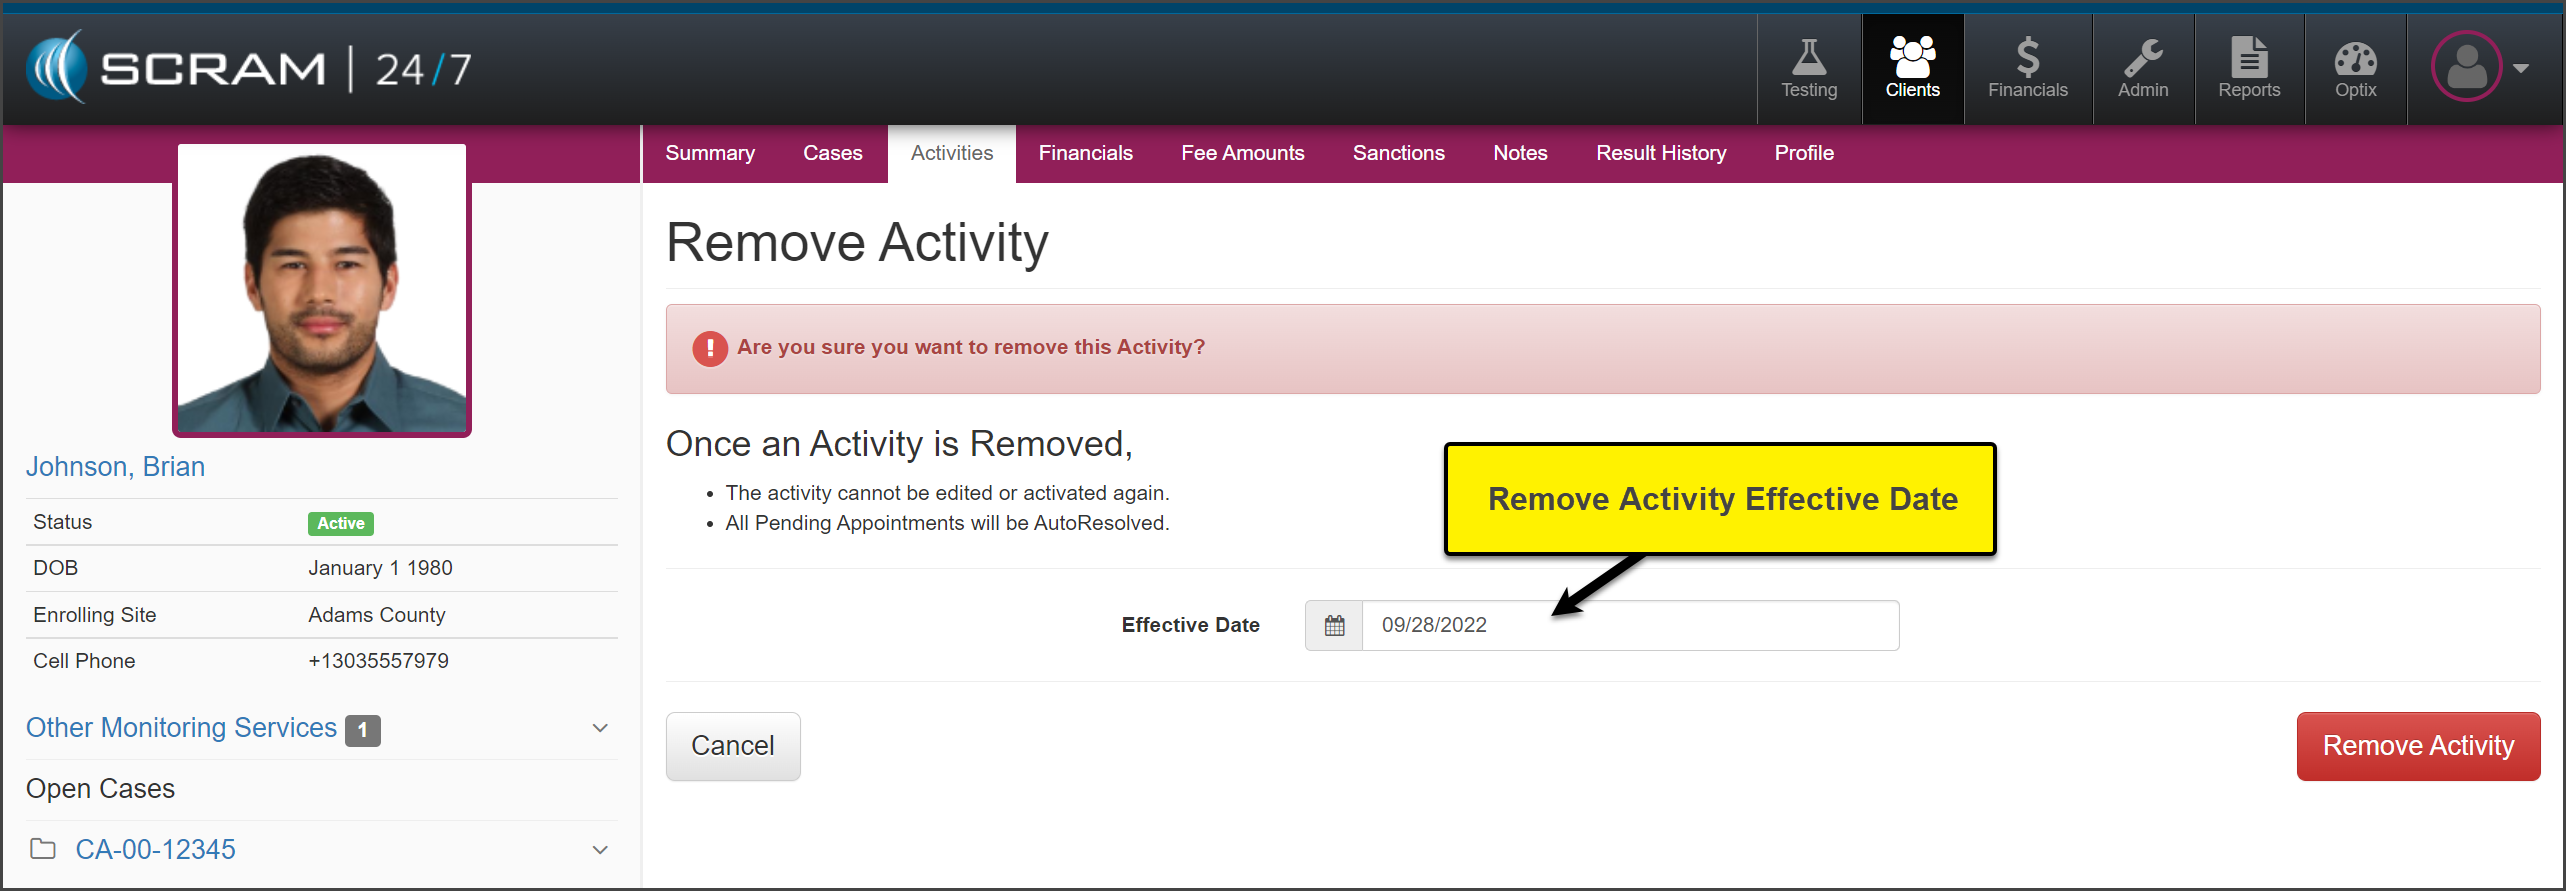
Verify the Effective Date and select the Remove Activity button.
click to enlarge
The Activity will now
display as Inactive.
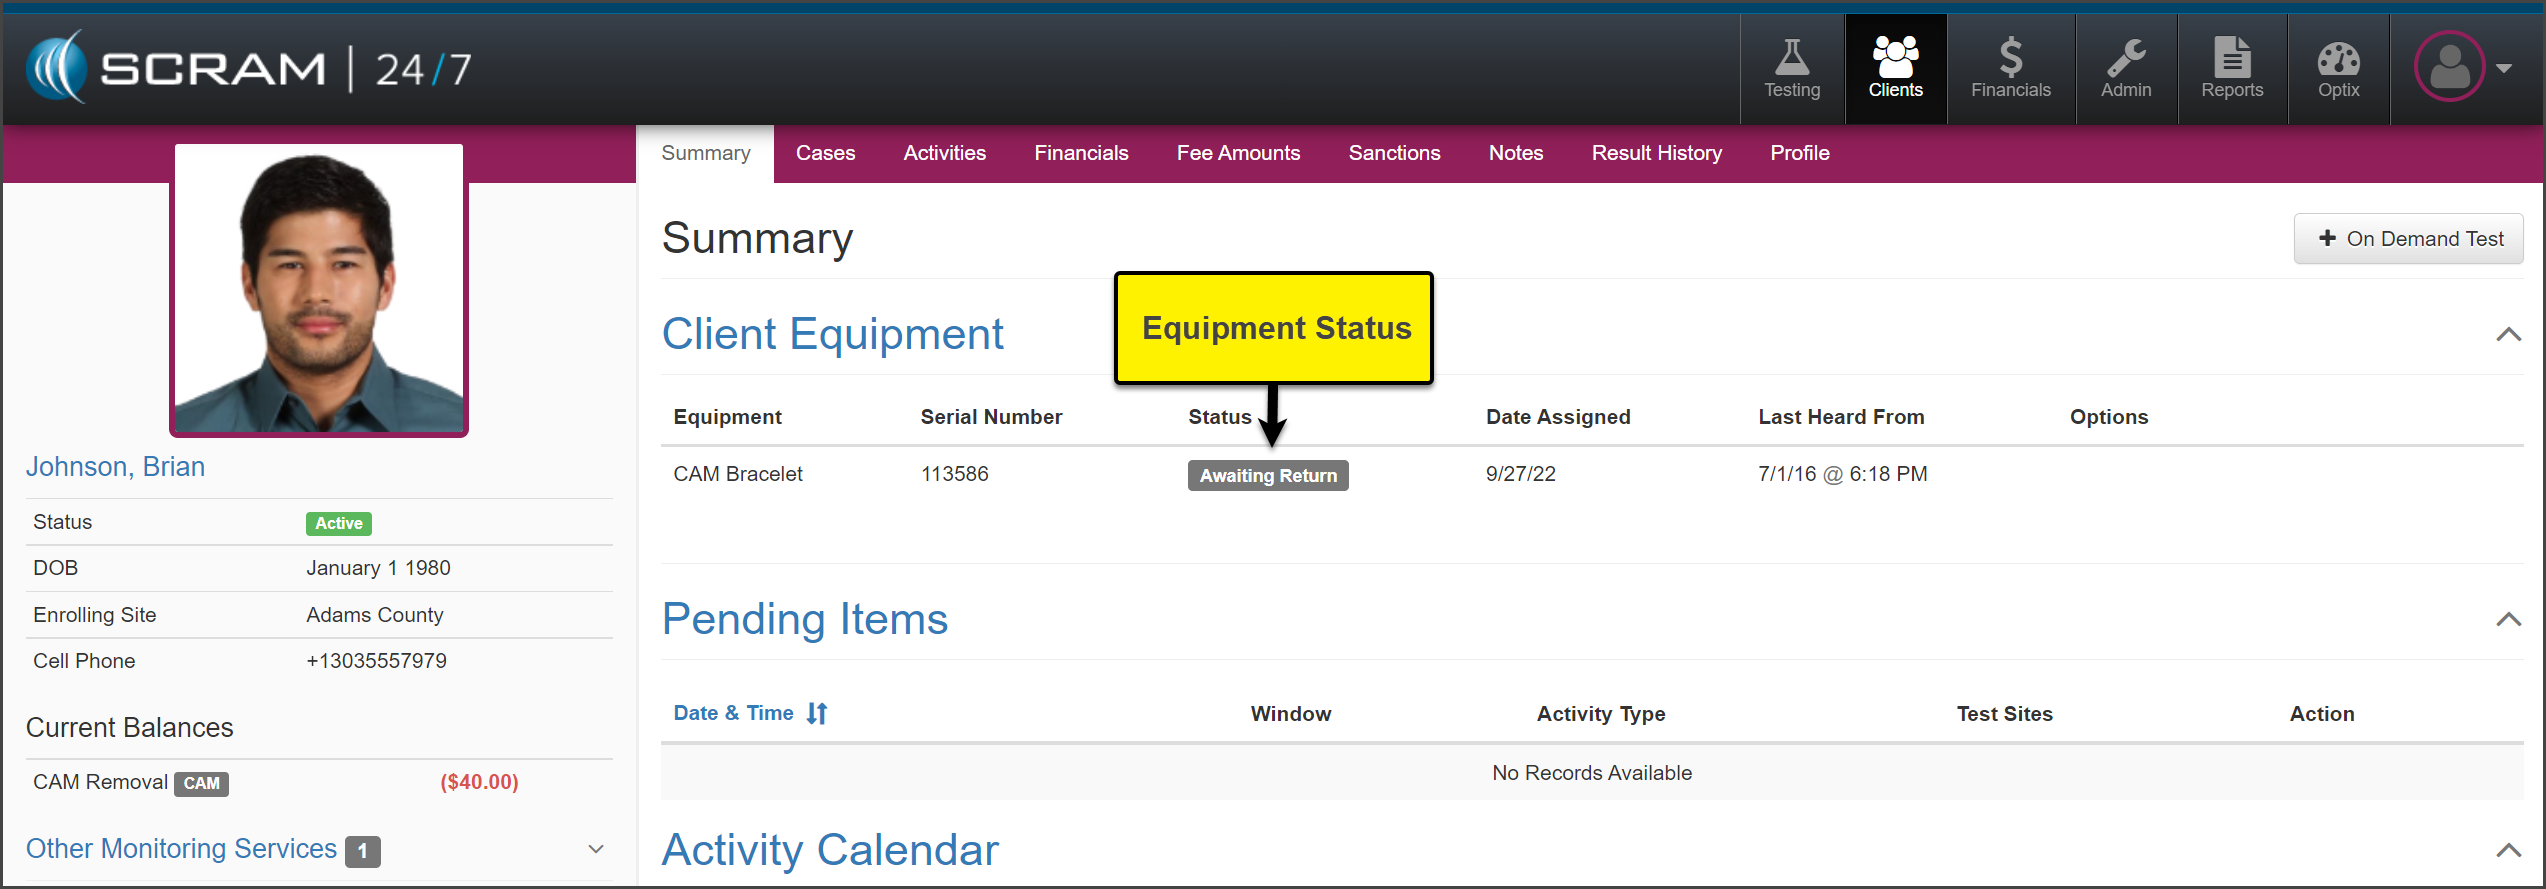
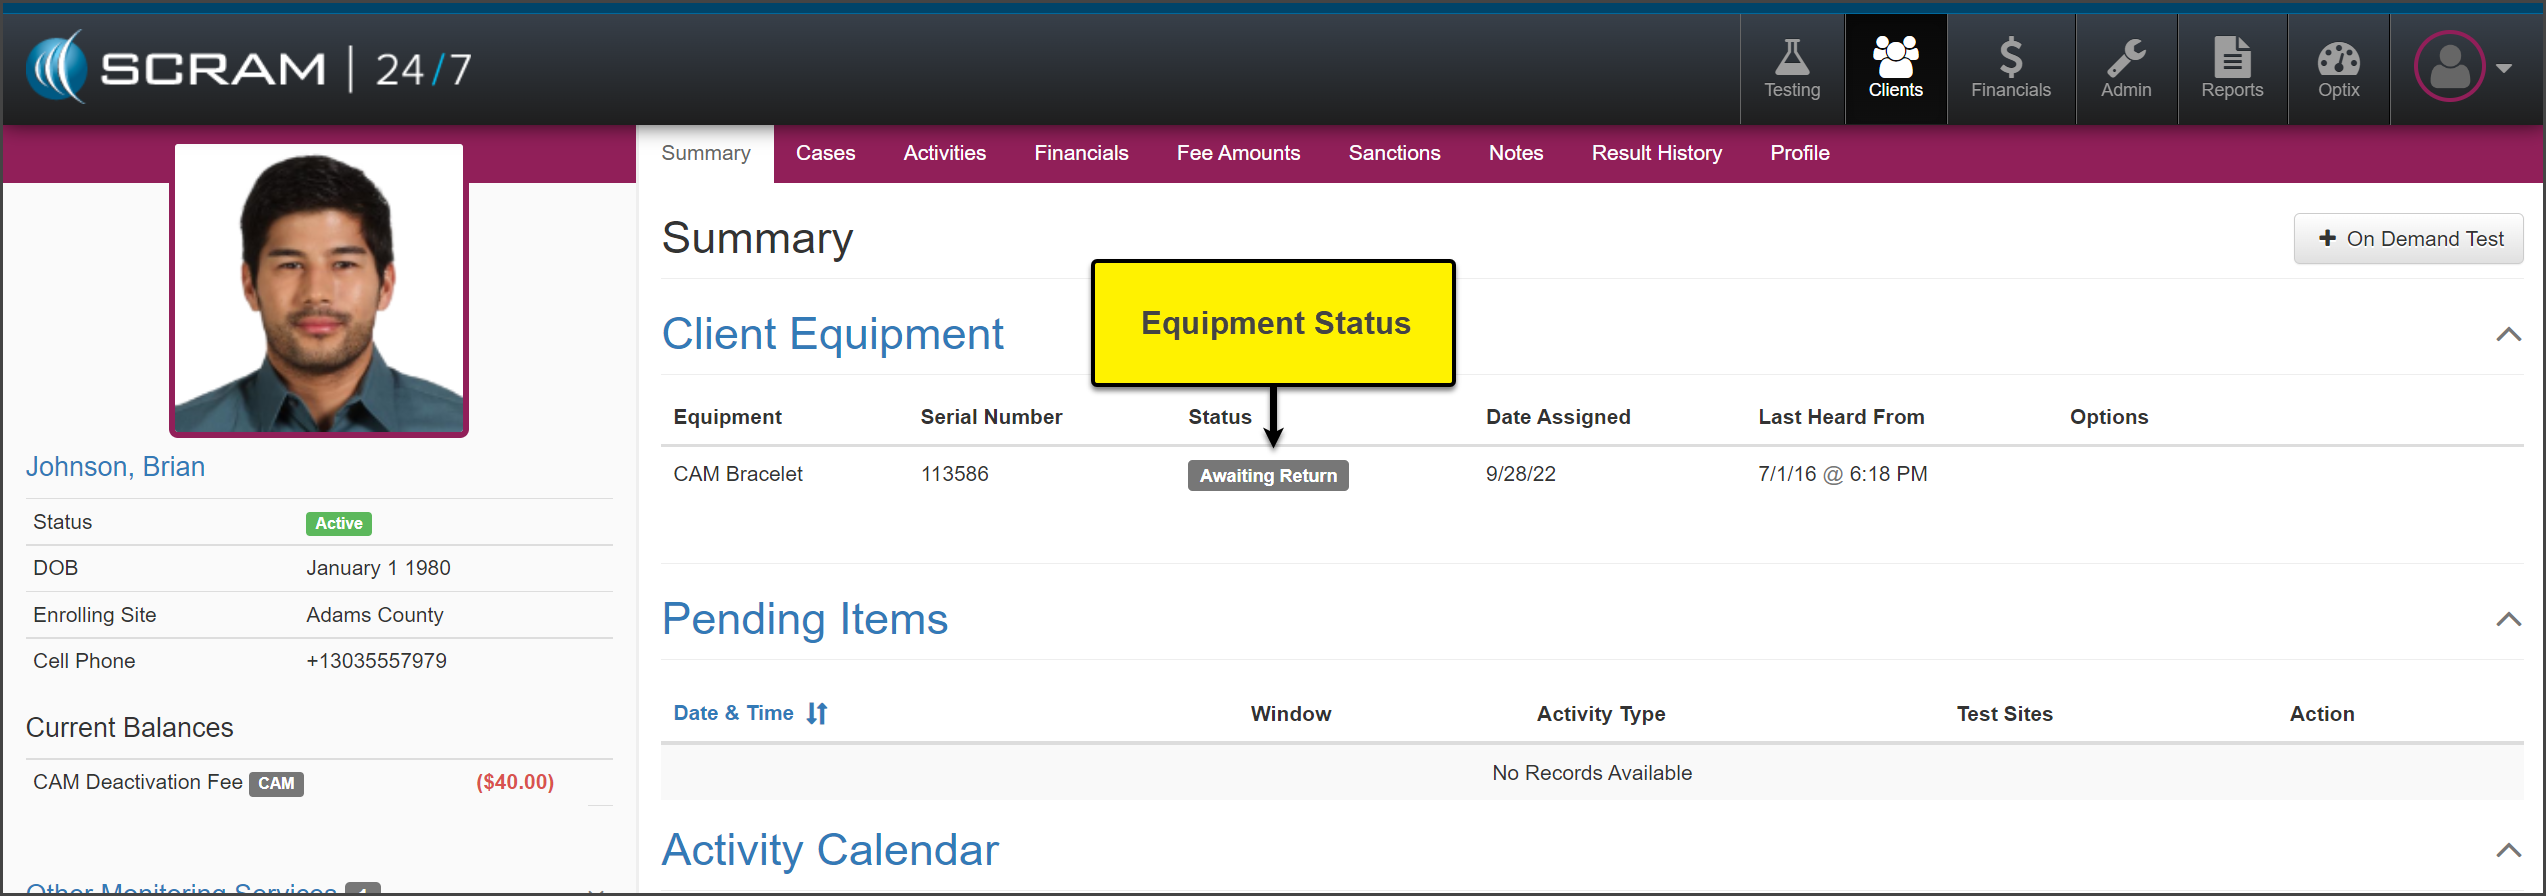
On the Summary page, the
equipment is now in an “Awaiting Return” status. Check in the equipment
following the established process.
click enlarge
Suspend Activity
Select the Activities tab to get started.
Select
the activity you wish to suspend. In this example the Activity of CAM is
selected.
click to enlarge
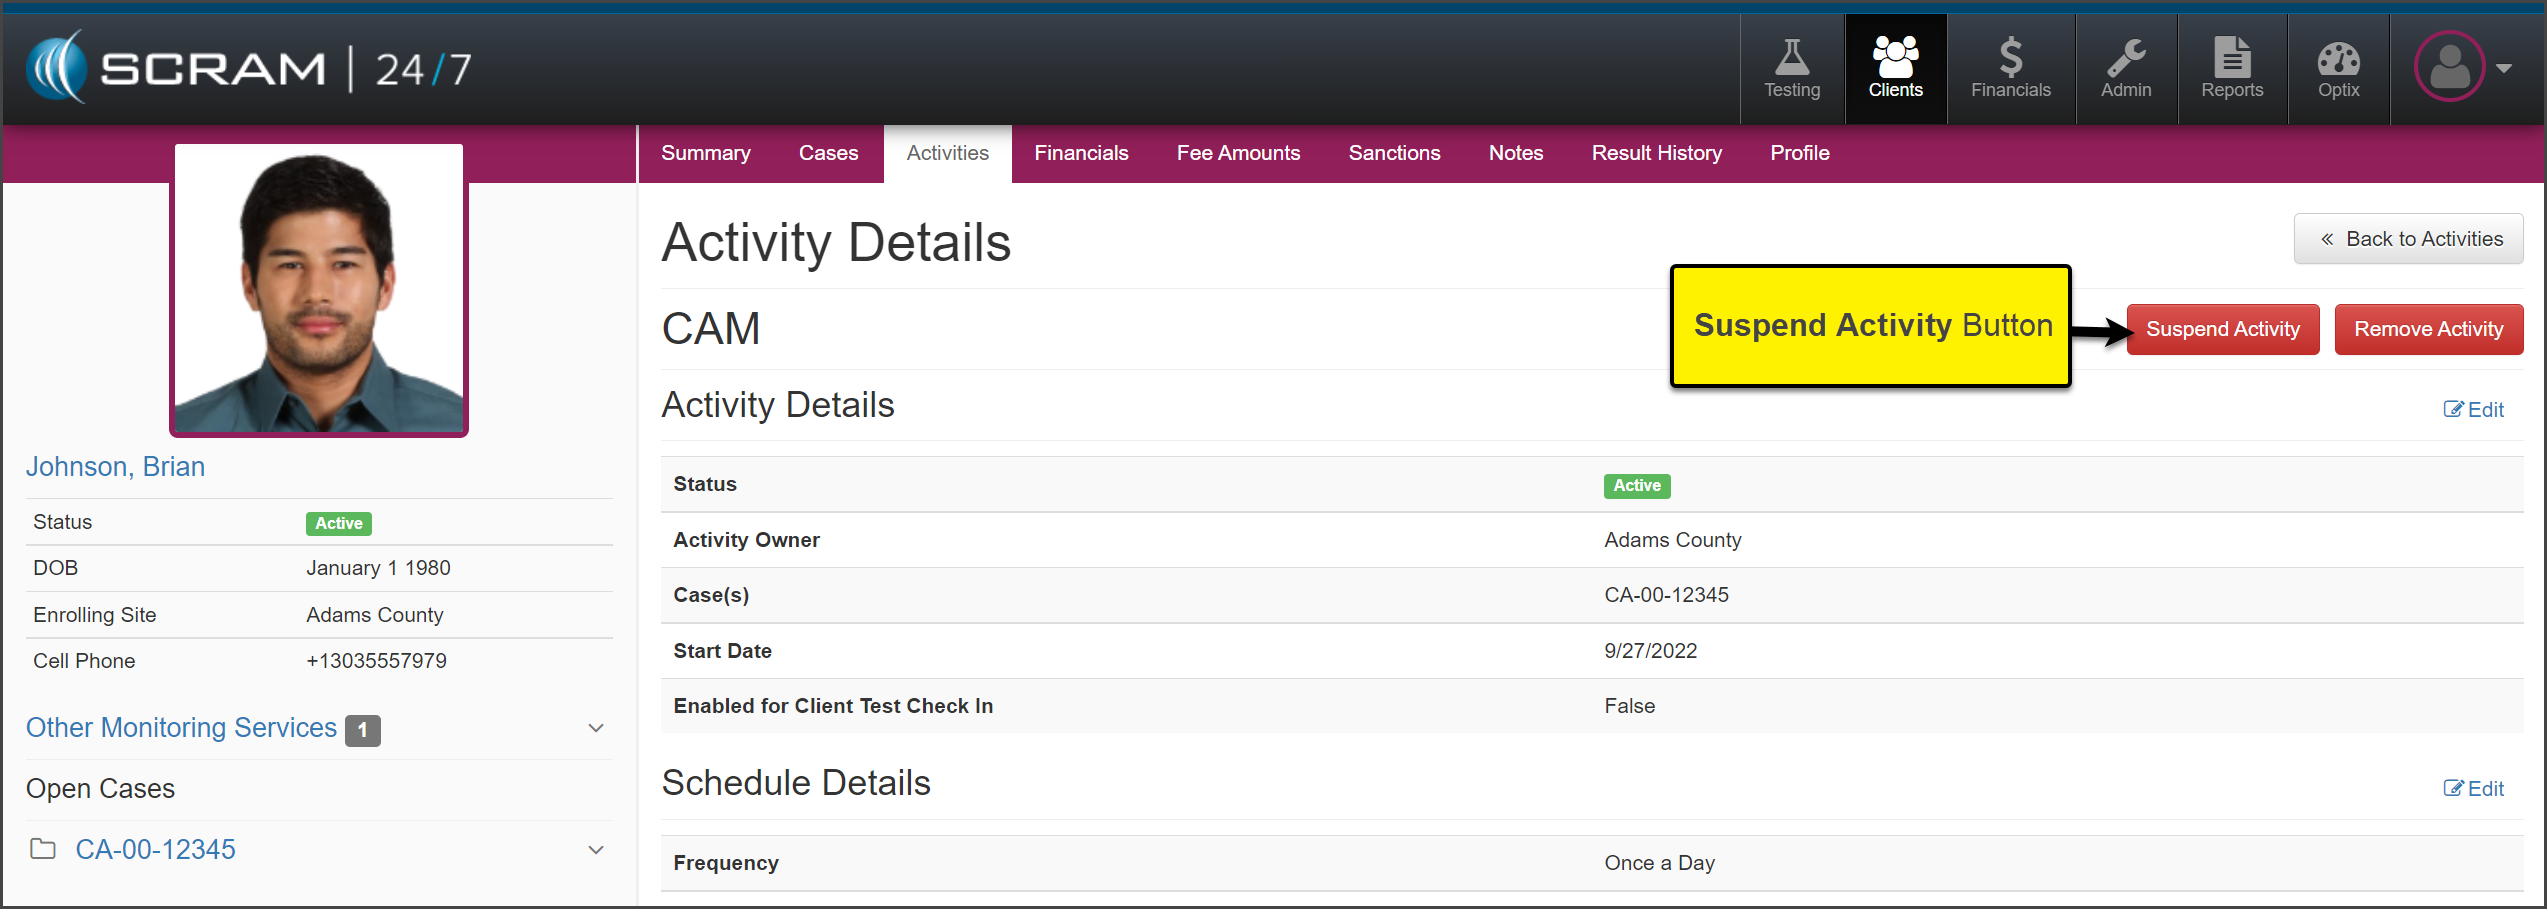
On
the Activity Details page, select the Suspend Activity button.
click to enlarge
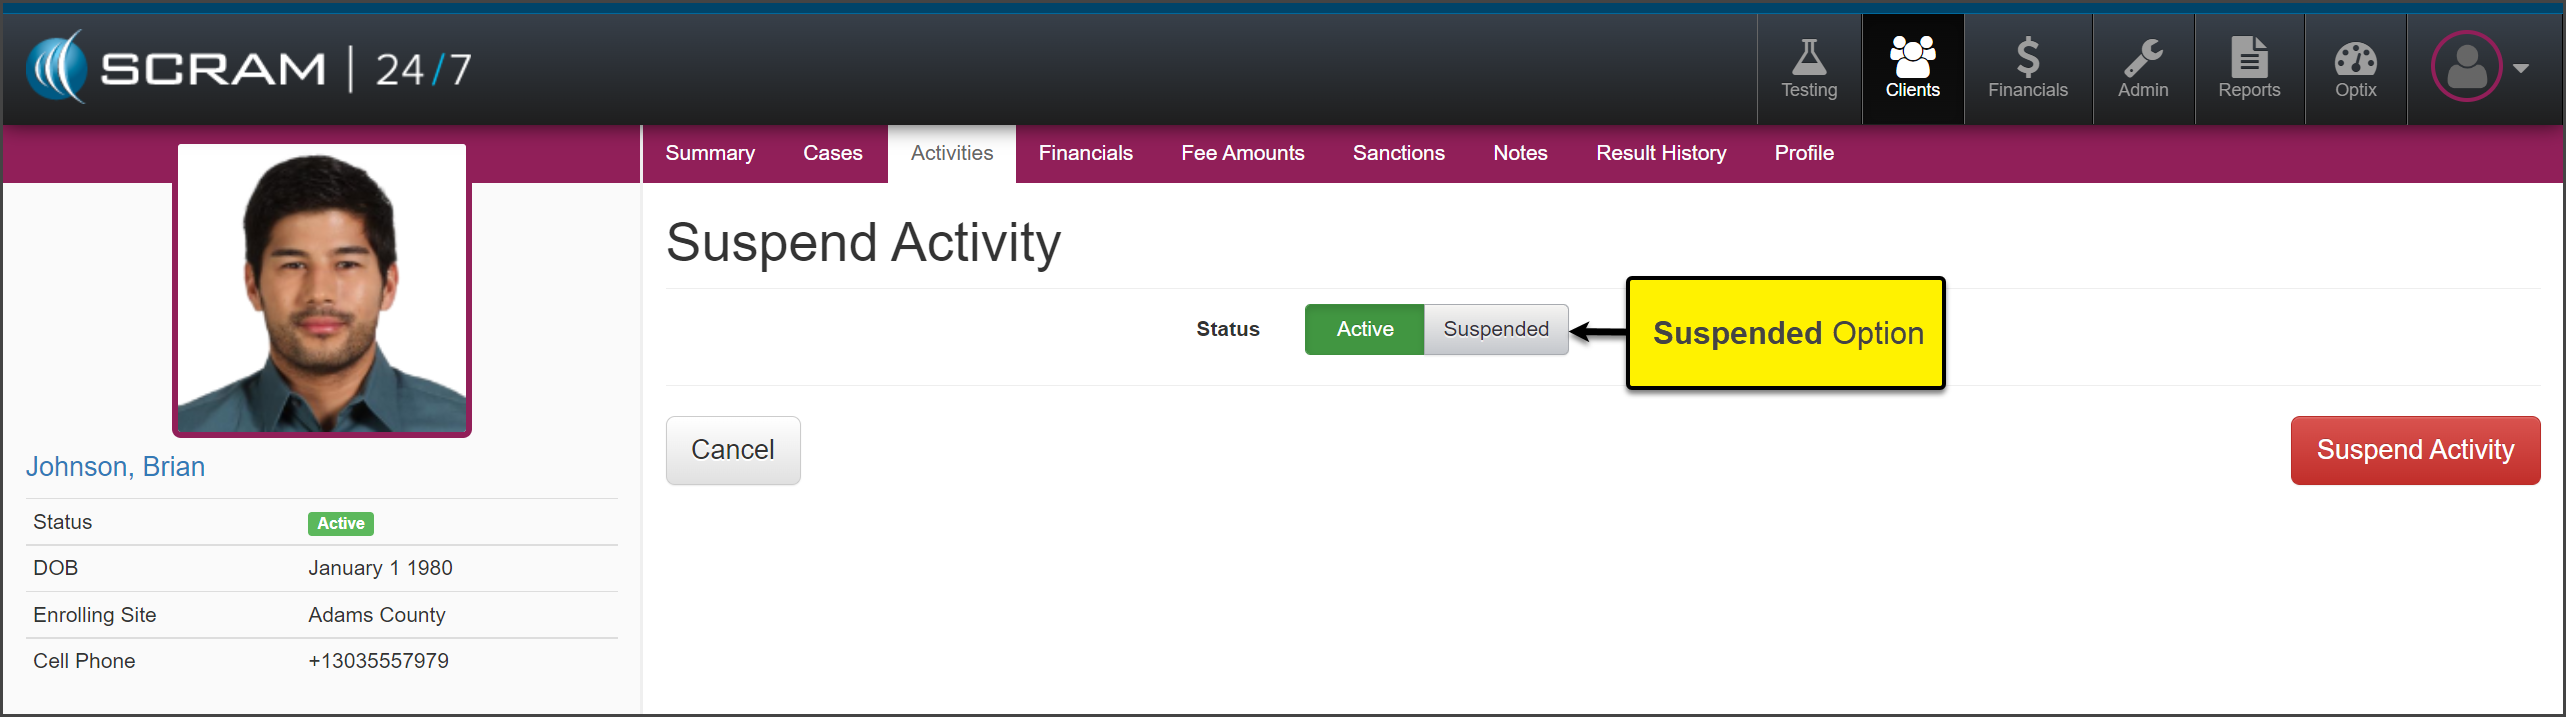
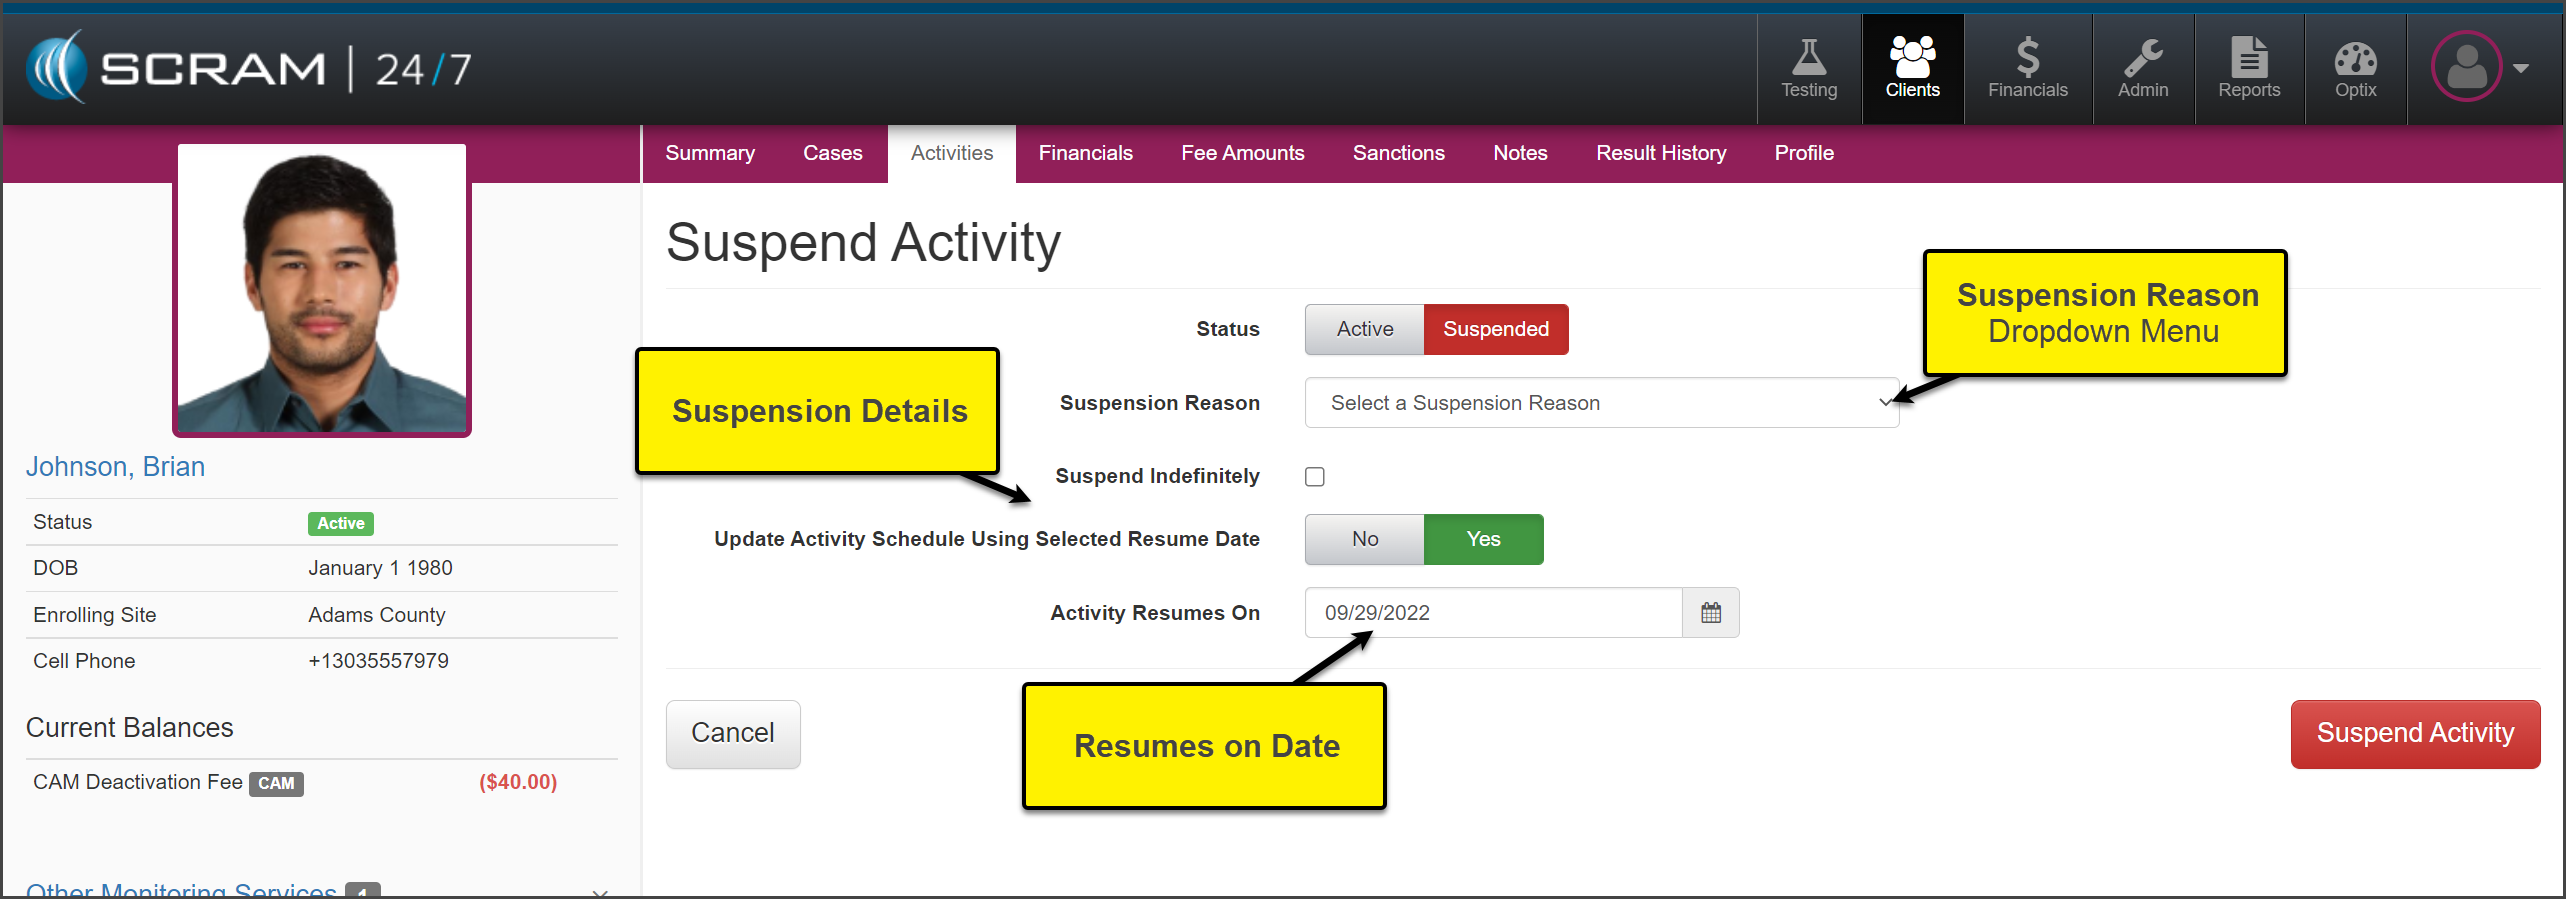
On
the Suspend Activity page, set the status to Suspended and select
the Suspend Activity button.
click to enlarge
Select
the Suspension Reason from the dropdown menu.
Select
the appropriate suspension details and verify the Activity Resumes On
date.
click to enlarge
Select
the Suspend Activity button.
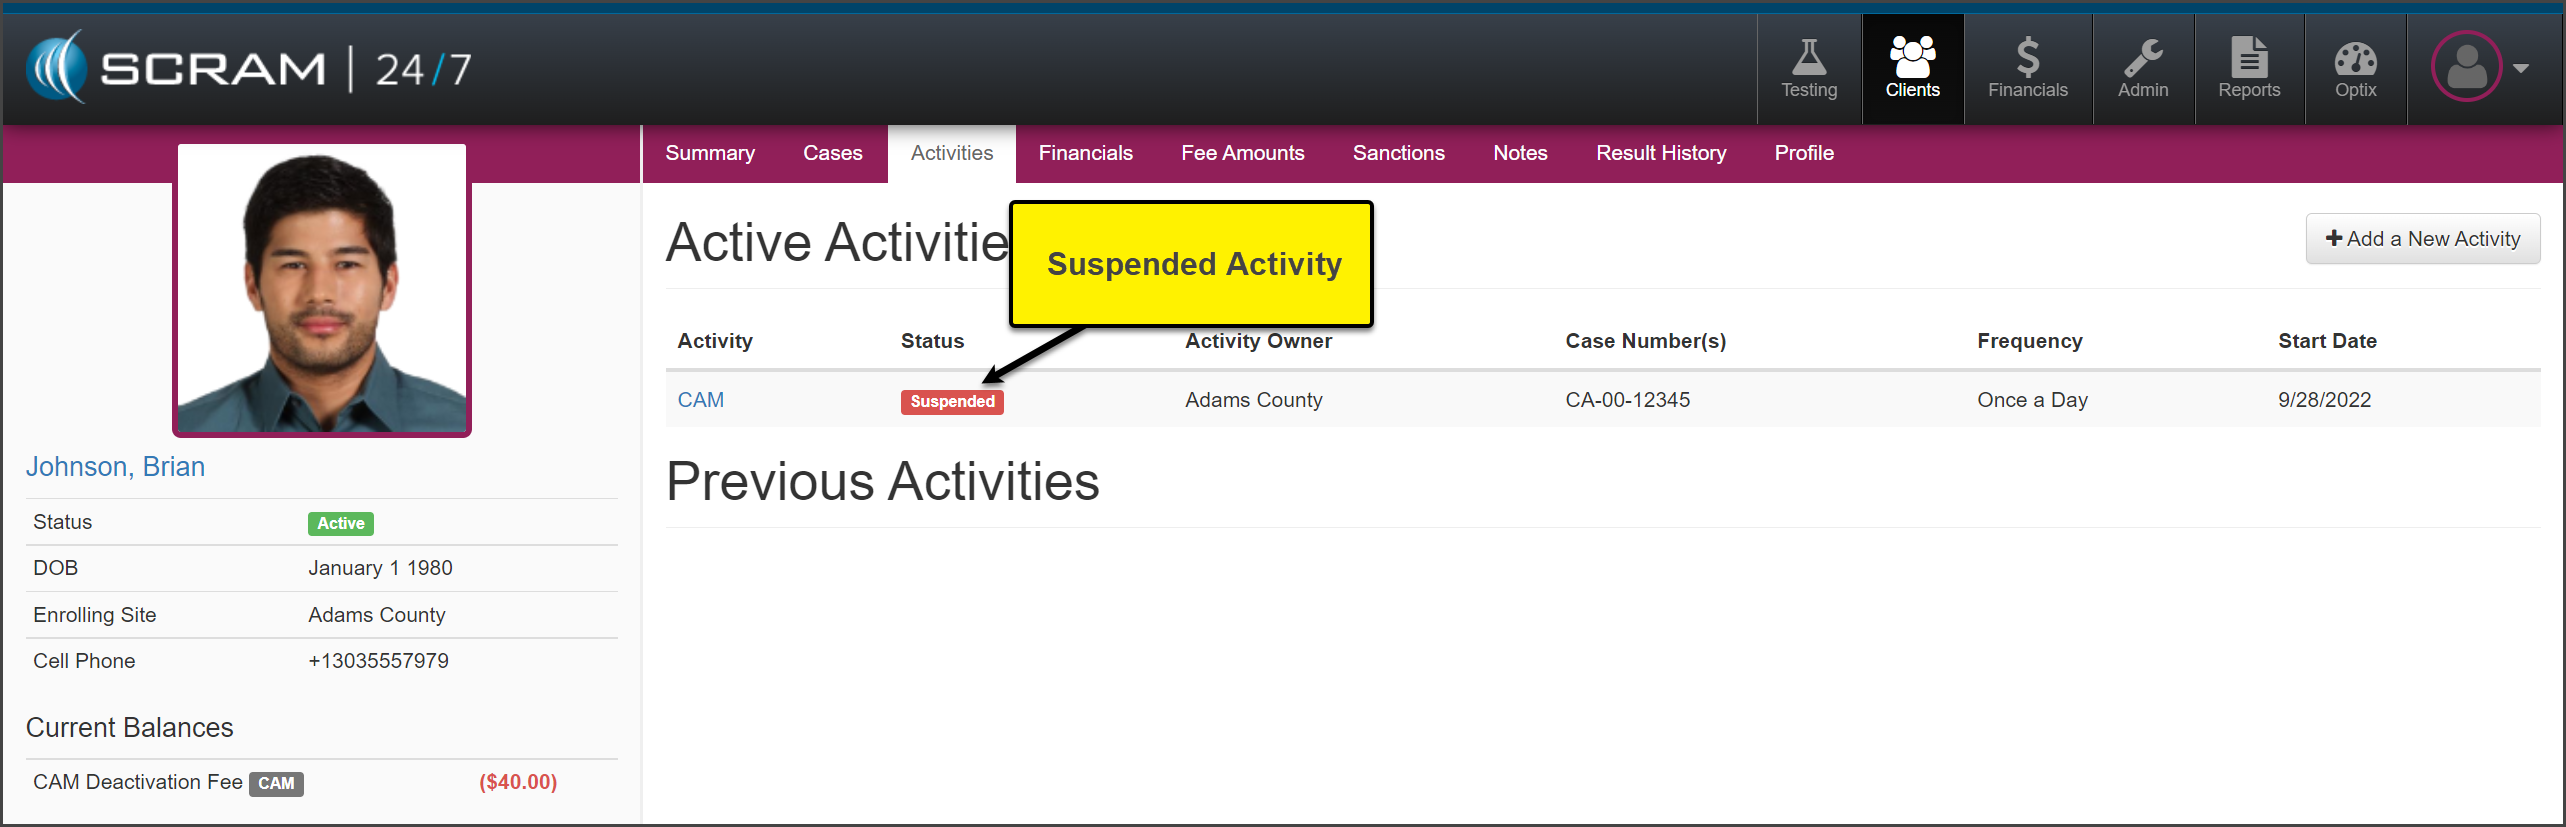
The activity will now
display as Suspended on the Activities page. On the Summary page, the equipment
is now in an “Awaiting Return” status. Check in the equipment following the
established process.
click to enlargeclick enlarge
When it is time to resume
the billing and monitoring of the client, you will assign the equipment within
SCRAM 24/7 to start the billing and monitoring.
Effective, August 11, 2022, your SCRAM 24/7 clients who
are active with the TouchPoint Activity will be able to view an Events
calendar on their TouchPoint mobile application. The events listed on the
calendar coincide with appointments associated to active Activities in SCRAM 24/7.
This provides the client visibility into future appointments, which enables
them to make plans to attend the appointments accordingly; thereby increasing
client attendance and success on their monitoring program.
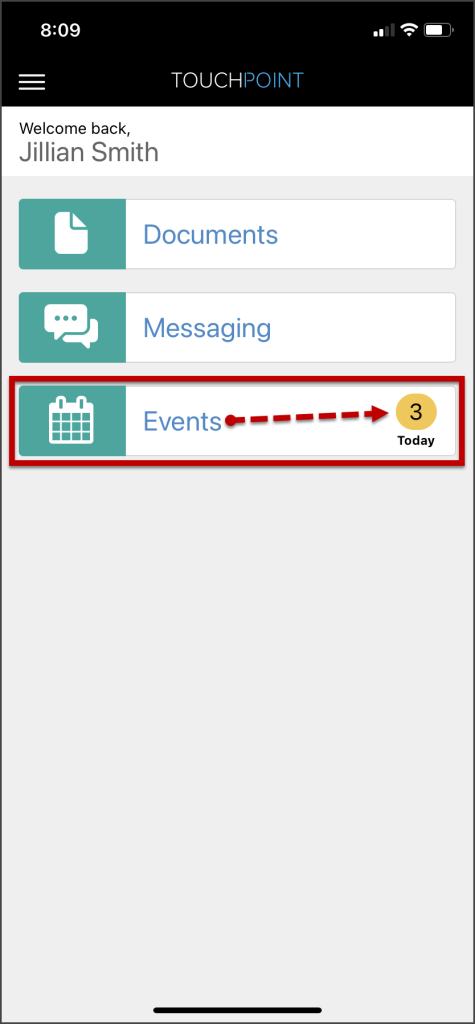
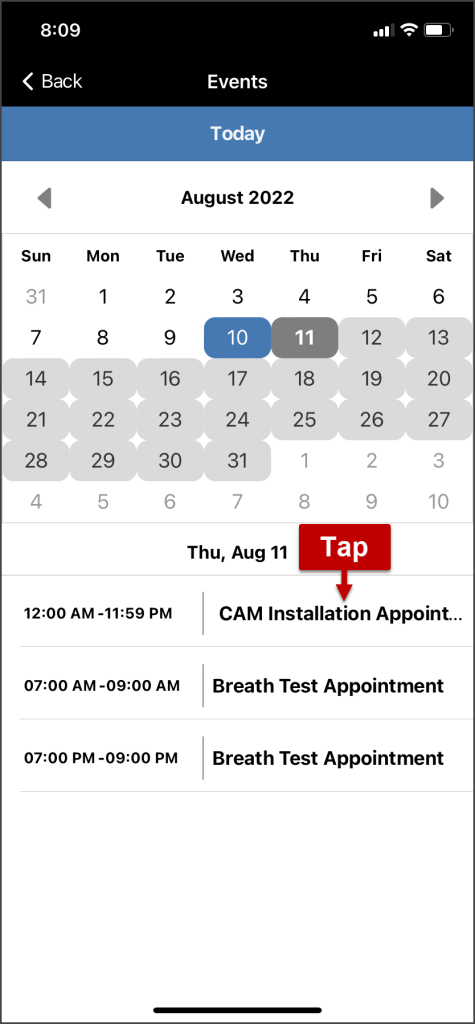
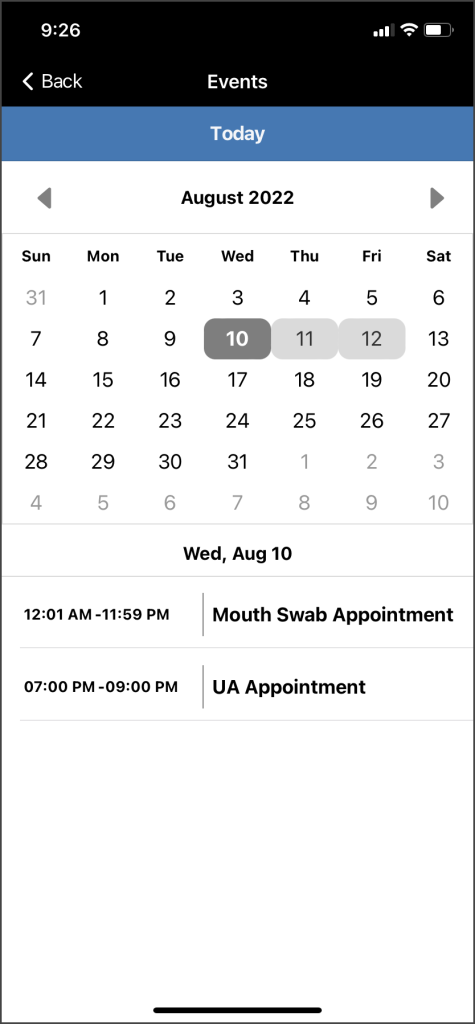
Once the client is active for the TouchPoint Activity and the mobile application has been downloaded to the client’s smartphone, an Events tile will be displayed on the TouchPoint app’s home screen. The Events tile will indicate the number of events for the current day.
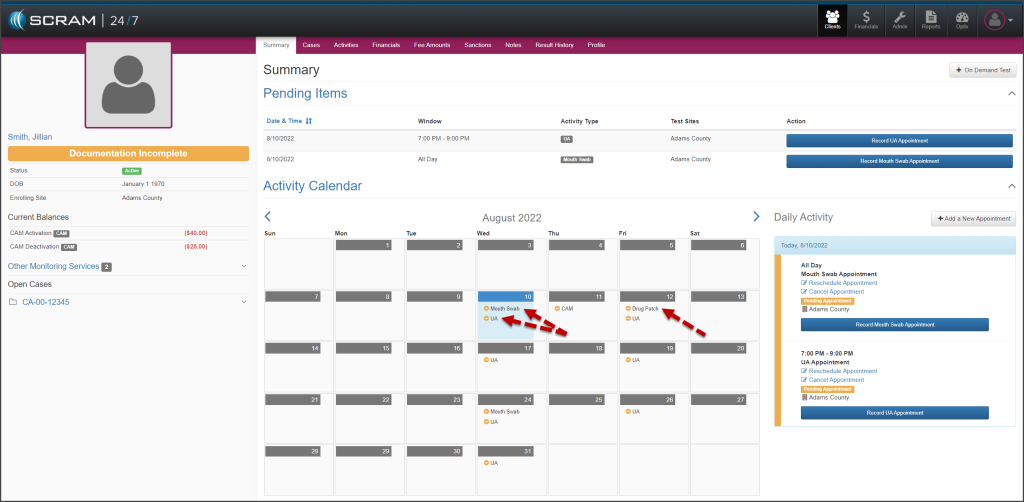
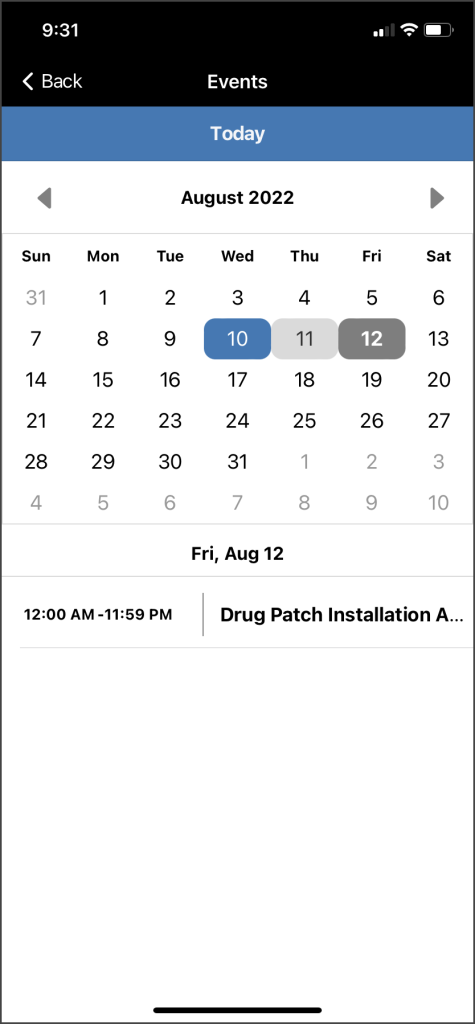
Tapping on the tile will open the calendar view. On the
calendar view screen, dates with an event are identified with a colored
background. Below the calendar, the details of the event are listed.
Light Gray – Dates with events
Dark Gray – Selected date
Blue – The current calendar date when not
selected
click to enlarge
click to enlarge
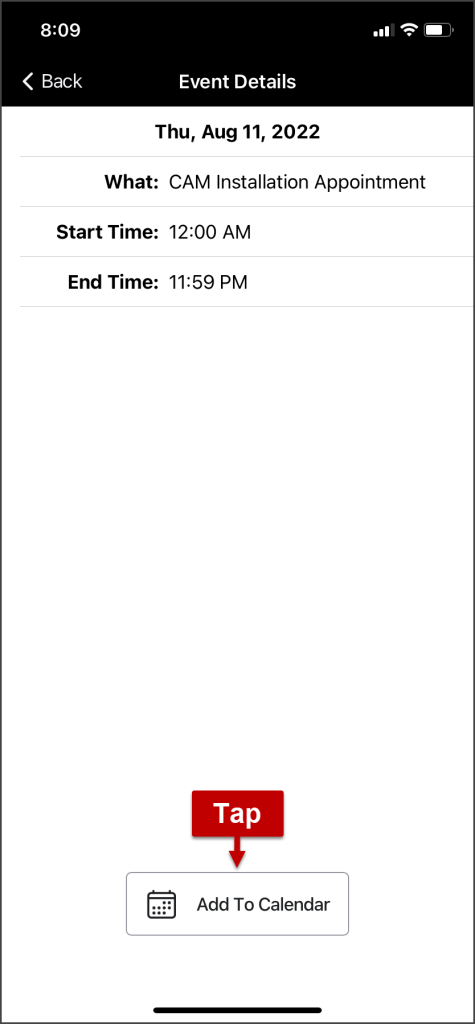
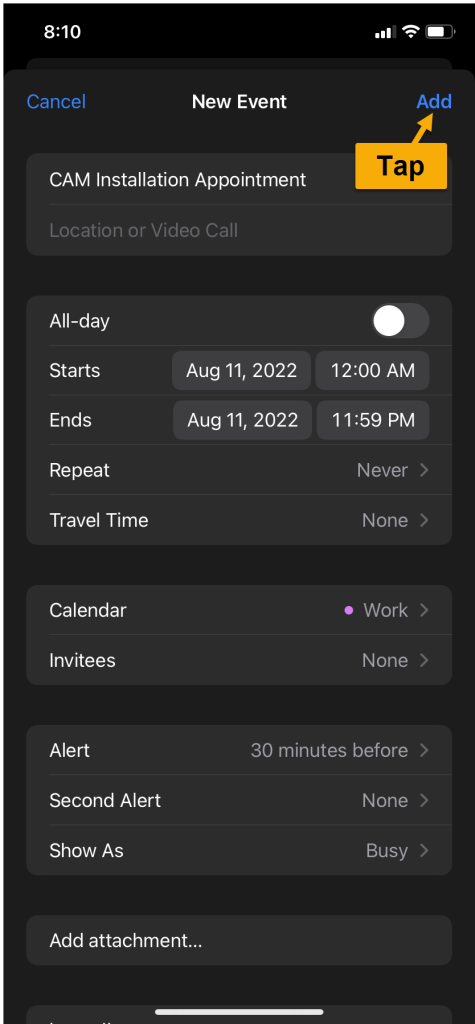
The new Events feature also allows a client to export an
event to their personal calendar on their smartphone. To accomplish this, the client
will tap the event and open the Event Details screen. Next, they will locate
and tap the Add to Calendar button. The client is then able to add the
event to their personal calendar by following their smartphone’s normal
process.
click to enlarge
click to enlarge
click to enlarge
Important Notes
Anytime there is an update made to an appointment or activity in SCRAM 24/7, the Events calendar is automatically updated.
Appointments updated in SCRAM 24/7 (and thus in the TouchPoint Events calendar), it will not automatically update on the client’s personal smartphone calendar.
A “random” test window is displayed on the Events calendar two (2) hours prior to the start of the random test window for that day.
Drug Patch, UA, and Mouth Swab appointments display a single calendar instance at a time.
Effective, July 13,2022, your SCRAM 24/7 clients can receive appointment reminder messages utilizing the SCRAM TouchPoint mobile application. Once enabled, the TouchPoint Activity is activated within SCRAM 24/7 on the client’s Activity page.
Once the client is active and the mobile application has
been uploaded to the client’s smartphone, a pair of reminder messages will be sent
24 hours and two hours prior to a scheduled client appointment or sobriety testing
window. Clients with a random test schedule will receive a message two hours
prior to the random test window.
Additionally, if an appointment or sobriety test is
cancelled, reinstated, or rescheduled, a notification message will be sent to the
client’s TouchPoint Mobile app with the updated appointment information at the
time of the change.
SCRAM TouchPoint Caseload and User Setup
Once your 24/7 program has been enabled for the TouchPoint
Activity, first you will create your TouchPoint client caseload in SCRAMNET Optix and
update or add user access before you enable the client’s TouchPoint Activity in
24/7.
The TouchPoint Setup
and Management section of the Optix and TouchPoint Help pages provides you
with the process you’ll need to follow to create a new TouchPoint caseload and establish
user access.
Use the below Help articles to complete TouchPoint setup:
How to Navigate to the manage Caseloads Page
How to add a New TouchPoint Caseload
Add/Update User Access
24/7 Client Setup
Once your SCRAM TouchPoint caseload and user access has been
established, the next step is to add the TouchPoint Activity to new or existing
clients on your 24/7 caseload.
The best practice is to setup the client’s profile in SCRAM 24/7
first, and then add the required activities.
Step one: Add TouchPoint Activity to the client in SCRAM 24/7.
Navigate to the client’s Activity tab in SCRAM 24/7.
Select the +Add a New Activity button.
From the Activity menu, select the TouchPoint option.
On the Add an Activity page, verify the activity start date, and then select the Add Activity and Finish Setup button.
You are navigated to the SCRAMNET Optix client search page. Locate the client’s profile under the Potential Duplicates list and then select the Link 24/7 to this client and add Touchpoint hyperlink.
In the Link to this profile? pop-up, select the Yes, Link to this Profile button.
You are navigated to the Add TouchPoint Client page where you will add the required information.
The Email address entered for the client is their username for the TouchPoint app on their smartphone.
On the Client successfully added to TouchPoint pop-up, select the Configure TouchPoint Services button.
Once you have selected the Configure TouchPoint Services button, you are navigated to the client’s TouchPoint profile located on SCRAMNET Optix. On the client’s Profile page:
Locate the Client Messaging section and select
the Edit hyperlink.
Select the Enabled toggle box.
Select the Save Changes button.
A temporary password is displayed on the client’s SCRAMNET Optix
Profile page under the TouchPoint Section. The client will use their email
address and the temporary password to access the app for the first time.
The first time the client logs in they will be asked to:
Create a secure password.
Review and Accept the Terms and Conditions for using the TouchPoint Mobile application.
Enable Push Notifications for the app.
Step Three: Instruct the client to download the TouchPoint app on their smartphone.
Step-by-step printable instructions (available in English and Spanish), as well as an instructional video, are available to you on the Help page in the TouchPoint Client Instructions article. The same instructions and video are available to your clients on the SCRAM TouchPoint Help page in the “SCRAM Device Help” menu on www.scramsystems.com.
TouchPoint Messaging gives you the ability to send text-style messages to an individual client or a group of clients with the Text to Allfeature. The client can then respond to messages from within the TouchPoint app and the information will be displayed on the Messaging page for that client.