archives

Tomorrow, December 4th, 2024, SCRAM Systems will release an enhancement to the Ambient VOC Detected test results.

When an excess of Volatile Organic Compounds (VOCs) – usually picked up from the device’s surroundings – is detected in the SCRAM Remote Breath Pro (RB Pro) device’s breath testing flow path, the RB Pro device prevents breath tests from being performed, and an Ambient VOC Detected alert is displayed in SCRAMNET. With this enhancement, SCRAMNET will automatically initiate flow path checks every 10 minutes for up to two hours until the flow path is clear and the client may test.

Here is the complete process:

  1. The device will generate a descending arpeggio (“uh-oh”) sound.
  2. The device’s screen will display, “REMOVE STRAW AND PLACE UNIT IN A WELL VENTILATED AREA,” followed by, “PLEASE WAIT with a 30-second count down.”
RB Pro Device Message – click to enlarge
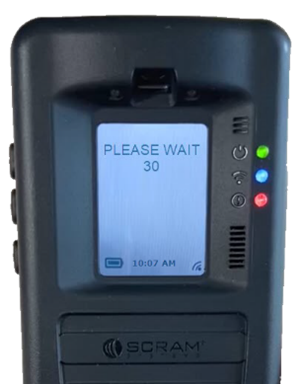
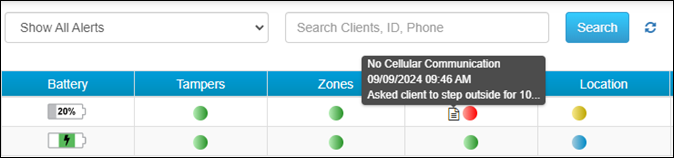
  1. The device will repeat this process automatically for two minutes. If the VOC does not clear, the device will end the current breath test process, and the screen will display “MONITORING …” At this time, an “Ambient VOC Detected” alert will be generated in SCRAMNET.
SCRAMNET Ambient VOC Detected Alert Client’s RB Results page – click to enlarge
Advise the client to take the following steps to help clear the device’s breath-testing flow path:
  1. Remove the breath tube from the device, wash it with dish soap, rinse it with water, and then thoroughly dry the breath tube before using it again. Moisture in the breath tube could impact test results.
  2. Relocate the RB Pro device to an area of fresh air that is free of chemicals (like air fresheners) and cleaning agents (including freshly cleaned countertops).
  3. Remove the device from its carrying case and place it on its side on a tabletop or other clean surface away from contaminants, with the vent on the bottom and the breath tube port unobstructed.
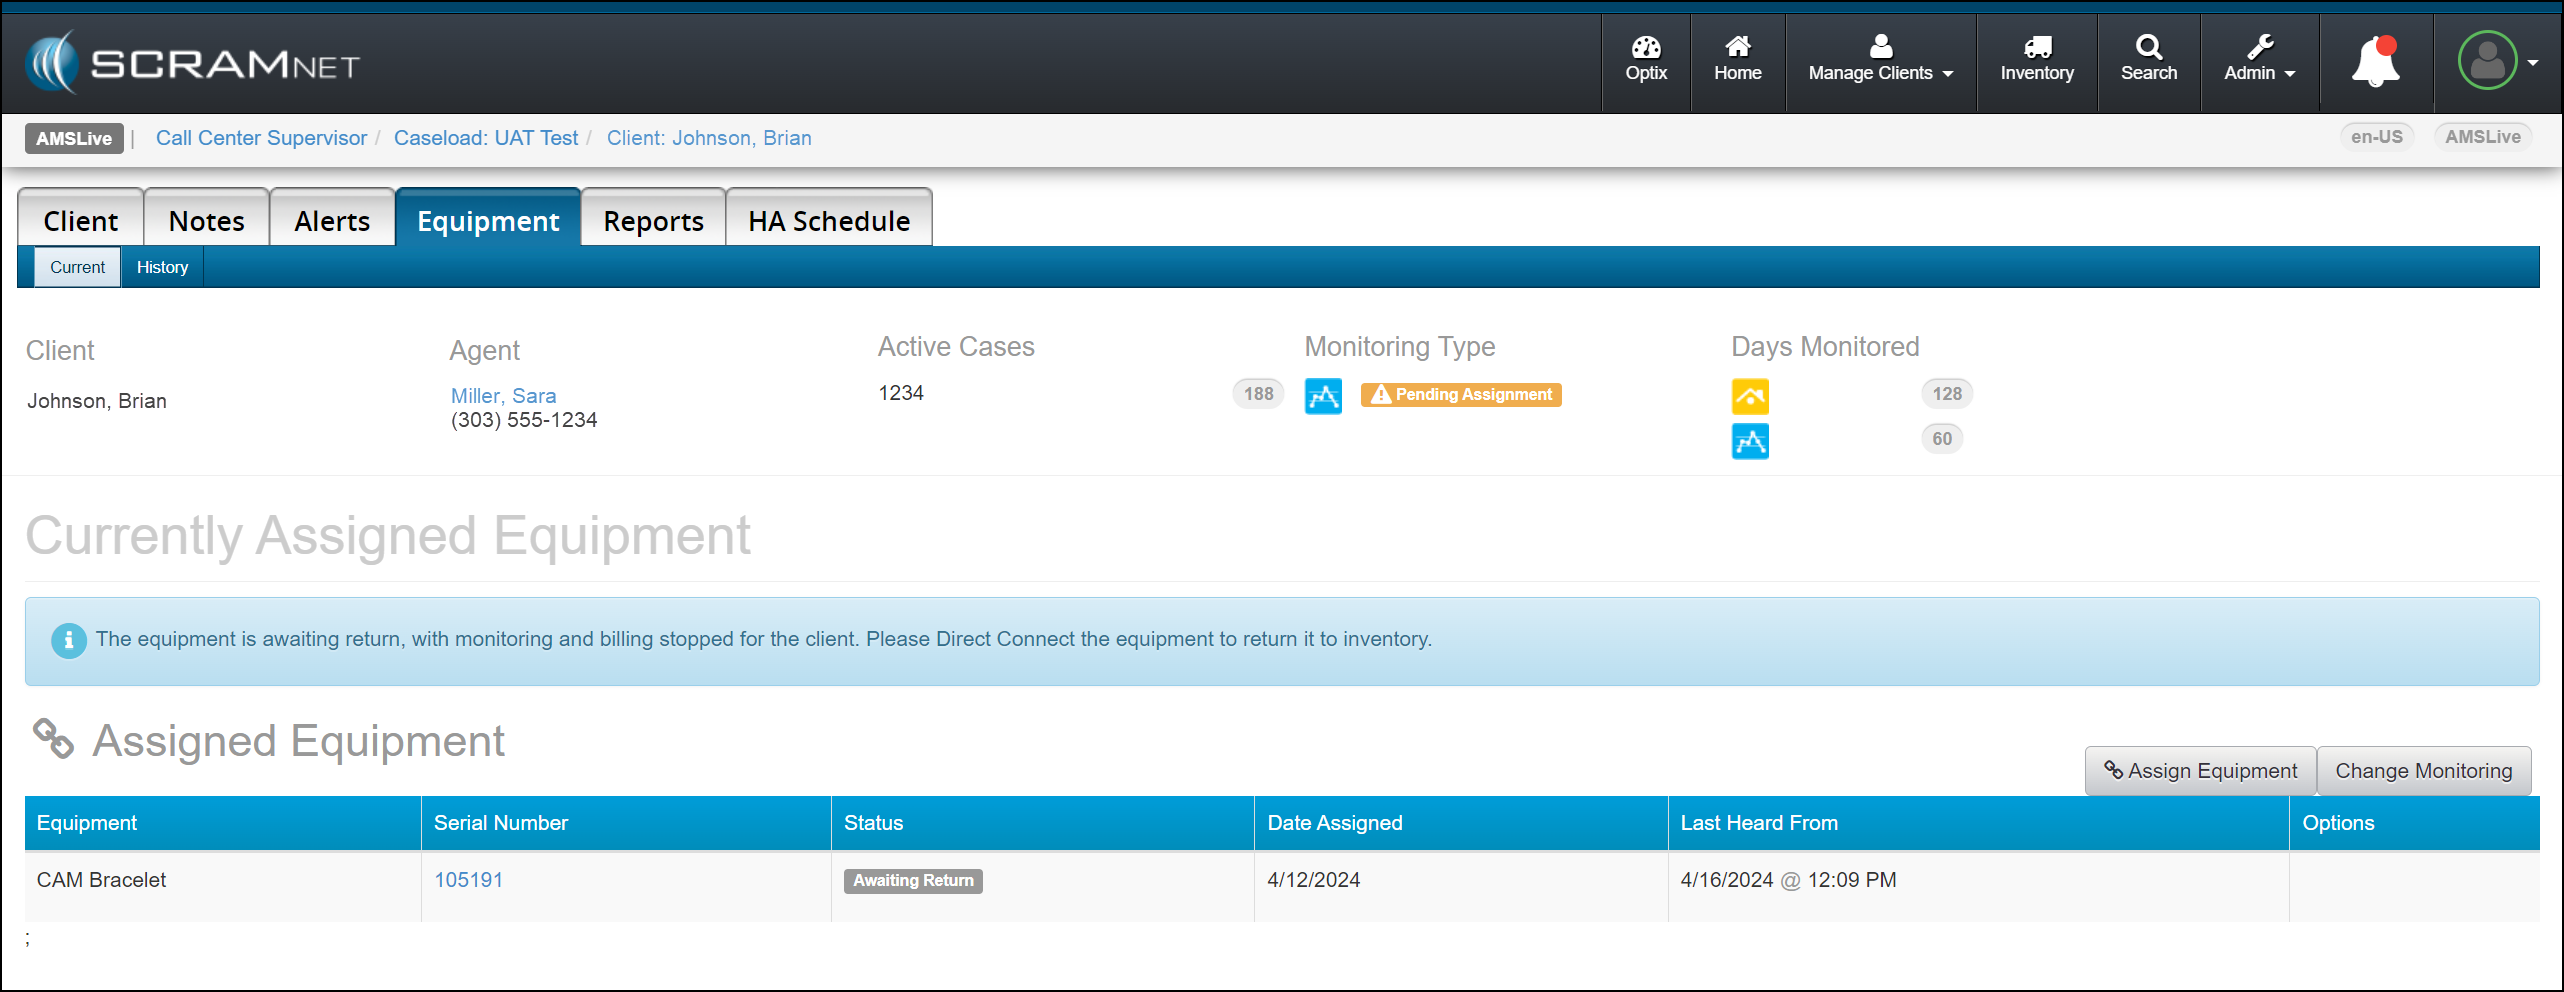
Once an Ambient VOC Detected alert has been generated:
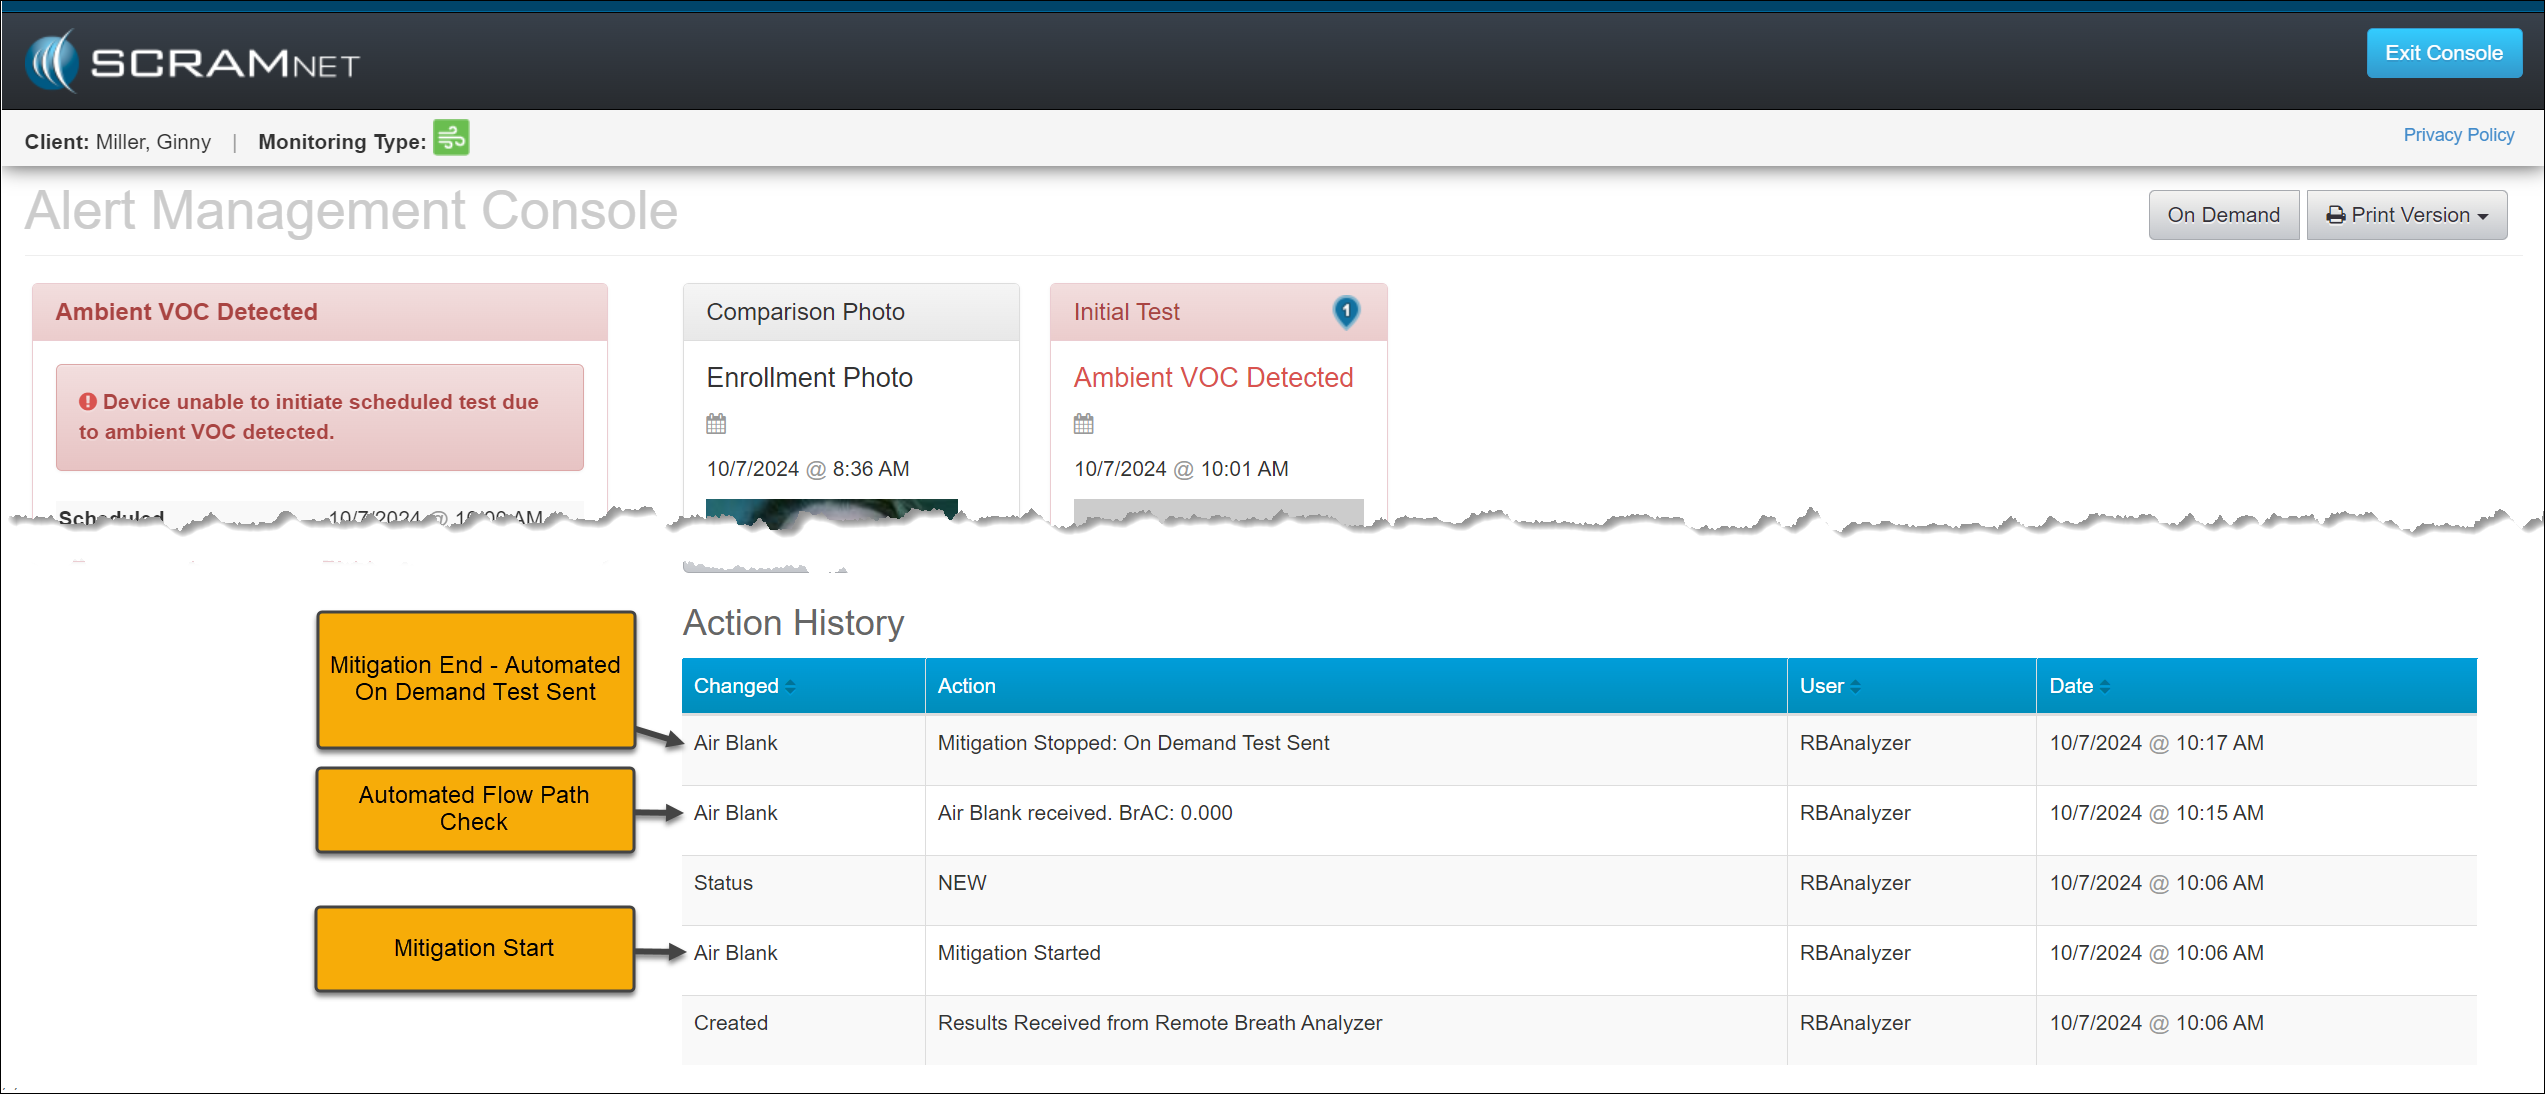
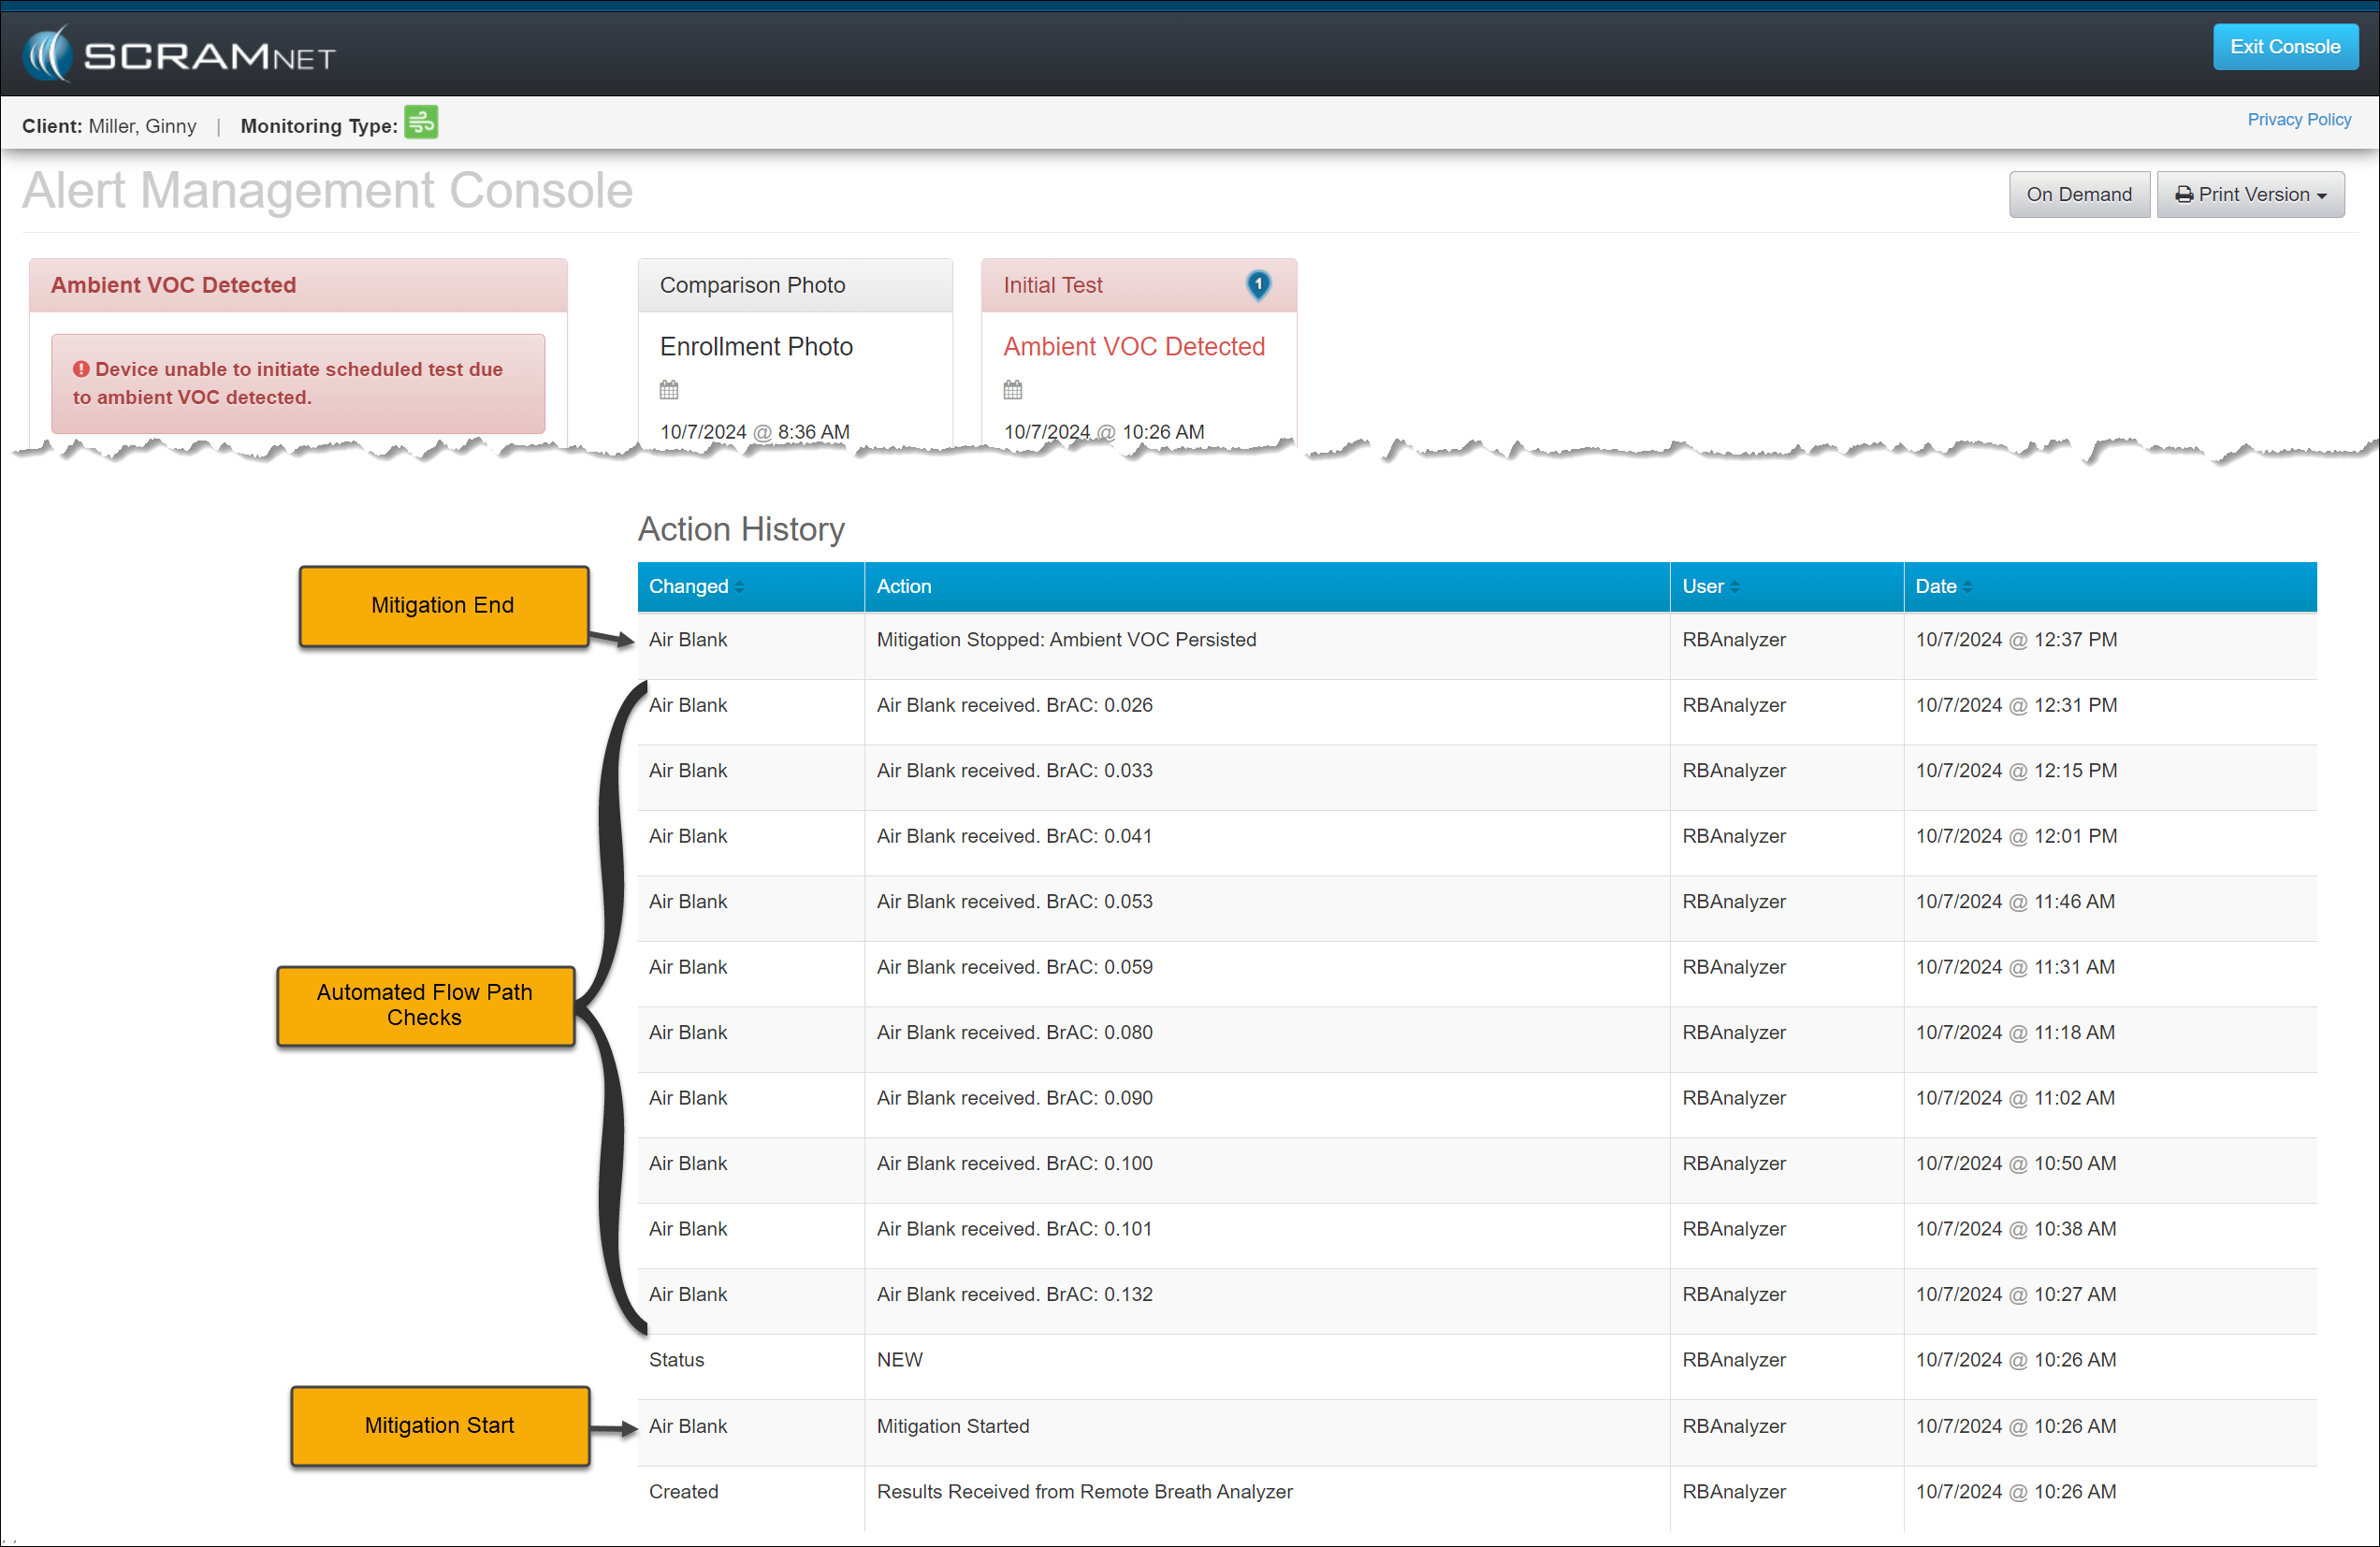
  1. SCRAMNET will record a “Mitigation Started” entry in the event’s Action History section of the Alert Management Console.
  2. SCRAMNET will automatically initiate flow path checks (Air Blank Tests) every 10 minutes for two hours. These checks will also be recorded in the event’s Action History.
  3. SCRAMNET will automatically send the device an On-Demand test once environmental ethanol (Ambient VOC) is no longer detected. The Action History will record this as a “Mitigation Stopped: On Demand Test Sent” entry.
Ambient VOC Detected Alert Management Console -click to enlarge
  1. If environmental ethanol is still detected after two hours of flow path checks, SCRAMNET will stop requesting Air Blank checks and record a “Mitigation Stopped – Ambient VOC Persisted” entry in the Action History for the event.
Ambient VOC Detected Alert Management Console -click to enlarge
WarningIf the Ambient VOC Mitigation process is interrupted by another breath test (scheduled, on-demand, or client-initiated), this event’s mitigation process is discontinued.
  • A new mitigation process will begin if the latest test request exceeds the Ambient VOC threshold.
  • If, however, the level of VOCs detected in the flow path drops below the detection threshold but is still above 0.000, then the RB Pro device will allow a breath test. So, it is possible that a client’s breath test result that interrupts the Ambient VOC Mitigation process may register a very low-level alcohol detection.
  • SCRAM Systems advises against violating clients for this very low-level alcohol detection, as the alcohol detected in the breath test could be from residual environmental VOCs still in the flow path and/or fuel cell.
NotesImportant Notes:
  • Typically, the low-level alcohol detection we see following a lengthy VOC-clearing scenario is well below the monitoring program’s Lower Level of Detection (LLOD), which is the threshold at which alerts are generated in SCRAMNET. Most monitoring programs’ LLOD threshold is 0.020 BrAC.
  • Based on SCRAM Systems internal testing, residual VOCs present in the device will not influence a BrAC value above 0.020.
  • For customers with the LLOD threshold set below 0.020, the confirmation process of initial and confirmation tests being both positive and not drastically different is still required.
  • If the LLOD threshold is set very low (0.005, e.g.), then the potential for a low-level VOC contaminant to influence both the initial and confirmation tests is increased. For these caseloads, SCRAM Systems recommends that customers allow the automated Ambient VOC Mitigation process to be completed uninterrupted.

Continue Reading

On September 26, 2024, SCRAM Systems will release an update to the client’s TouchPoint mobile application. This update relocates the Resources hyperlink from the application’s Profile screen to a Resources Tile on the Home screen for easy access.

TipsThe latest version of the TouchPoint app will be available to clients in the app stores. As a best practice, SCRAM Systems recommends that all TouchPoint app users enable their smartphones to automatically update their apps to make this process easier.

Current Resources Hyperlink Location

SCRAM TouchPoint Mobile Application Home Screen – click to enlarge
SCRAM TouchPoint Mobile Application Profile Screen – click to enlarge

Post-Release App Resources Tile

SCRAM TouchPoint Mobile Application Home Screen – click to enlarge

Visit the TouchPoint Client Resources Help article to learn more about using the Client Resources section to provide your clients with documents and other online resources within their TouchPoint app.  

Continue Reading

At 5:00 AM MDT on Tuesday, September 17, 2024, SCRAM Systems released an enhancement for SCRAMNET GPS. This enhancement allows you to view notes added to an active event on the Dashboard.

View Active Event Notes on the Dashboard

When adding an event note, you may “tag” it so it is visible on the Dashboard. This lets you quickly view the recorded actions taken to resolve the alert.

To tag an Event note:

  1. Select the Tag this note option in the Enter Event Note pop-up.
  2. Select the Save button.  
Enter Event Note Pop-Up (click to enlarge)

Once saved, the active alert is tagged, and a note icon will appear next to the alert on the Dashboard. Mouse over the note icon to view the abbreviated text of the note.

SCRAMNET GPS Dashboard Event Hover with “Tagged” Note (click to enlarge)

Continue Reading

On August 22, 2024, SCRAM Systems will release an automated electronic “Officer Notification” enhancement for your SCRAM TouchPoint caseloads. Currently, to view any activity the client completes – a Check-In pending review, unread messages from the client, electronic signatures recorded, or a new document that has been received from the client – you must navigate to the Optix Clients page and view the Actions column, or navigate to the client’s TouchPoint Profile page.

With this enhancement, you may set up email and text notifications to alert you when the client completes a specific action on their TouchPoint mobile app. These actions include:

  • Check-In Pending Review
  • Electronic Signature Completed
  • Location Services Disabled
  • Location Verification Pending Review
  • New Document
  • New Message
TipsIf you don’t see the enhancement in SCRAM Optix, please clear your cache and cookies and refresh your browser window

Caseload Setup

  1. On the Optix Dashboard, locate the TouchPoint tile and select the Go To TouchPoint button.
Optix Dashboard TouchPoint Tile – click to enlarge
  1. Select the Admin button and then the Manage Caseloads option from the dropdown menu.
Admin Manage Caseload Dropdown Menu – click to enlarge
  1. Select the TouchPoint Caseload for which you wish to enable Officer Notifications.
Manage Caseloads Page – click to enlarge
  1. On the Caseload Detail page, locate the “TouchPoint Settings” under the Monitoring Services section and select the View Settings hyperlink.
TouchPoint Caseload Detail Page – click to enlarge
  1. To enable the “Officer Notifications” in the Optional Services section, select the Edit hyperlink.
Edit TouchPoint Caseload – click to enlarge
  1. Select the checkbox next to Officer Notifications.
  2. Select the events for which you want automated notification for the entire caseload.
  3. Save the selections by selecting the Save Changes button.
Select Officer Notifications Options – click to enlarge

Officer Notifications are now enabled for your TouchPoint Caseload.

Caseload Officer Notifications Enabled – click to enlarge

Enable User Notifications

Once enabled at the Caseload level, users may then switch on notifications by adding their preferred notification methods and schedules.

  1. Navigate to the My Profile page.
  2. Locate and select the Manage Notifications hyperlink for the TouchPoint Caseload.
User Profile page TouchPoint Caseload Manage Notifications – click to enlarge
  1. Select the +Add Notification Method button.
+Add Notification Method – click to enlarge
  1. Enter the details for the notification method. In the Schedule Options section, select the Custom option to customize the timeframe for which you wish to receive electronic notification or leave it at the default of 24×7.
  2. Select the Add Notification Method button to save the notification method.
Notification Details – click to enlarge

Once saved, the user’s Manage Notifications page will display the notification method as “Awaiting Validation,” and a validation email or text message will be sent using the notification method entered.

Awaiting Validation Officer Notification Method – click to enlarge

Once received, follow the email or text instructions to validate the delivery method. Refresh the Manage Notifications page, and the notification status will update to “Active.”

Active Officer Notification Method – click to enlarge

In the Options column, use the hyperlinks to edit, deactivate, or delete the notification method. Additionally, you may select the “More Options” button and edit the notification method or send a test email or text message.  

Continue Reading

On August 8, 2024, SCRAM Systems will release an enhancement to the Add Activity workflow for your SCRAM 24/7 monitoring program. When adding an EM Activity (CAM, House Arrest, Remote Breath, GPS, and TouchPoint) to your client, the “Add an Activity” workflow now includes many of the “steps” you traditionally completed in SCRAMNET, SCRAMNET GPS, and SCRAM Optix. This enhancement streamlines the client intake process.

Example: Add a Remote Breath Activity to a Client – click to enlarge

Select an EM Activity option below to learn more about the Add Activity process:

Continue Reading

On August 8, 2024, SCRAM Systems will release an enhancement for your 24/7 monitoring program. SCRAM Systems understands that not all programs utilize “sanctions” as a part of their client monitoring program, and with this release, you may now disable the Sanctions option for your entire program.

TipsIf you don’t see the enhancement in SCRAM 24/7, please clear your cache and cookies and refresh your browser window.

Disable Sanctions

As an administrator for your program, navigate to the Settings tab on the Admin page in SCRAM 24/7.

Admin Settings page – click to enlarge

In the Site Wide Settings section, locate the “Enabled Sanctions” option, toggle the “Enabled” selection to Disabled, and then select the Save Settings button.

Enabled Sanctions Disabled Selected – click to enlarge

This will remove the Sanctions tab at the administrative level and will propagate throughout the site; to the client level.

Admin Level

Sanctions Tab Available – click to enlarge
Sanctions Tab Removed – click to enlarge

Client Level

Client Profile Page Sanctions Tab – click to enlarge
Client Profile Page Sanctions Tab Removed – click to enlarge

Continue Reading

On July 11, 2024, SCRAM Systems will release enhancements for your client Check-In and Document-sharing Caseloads. Specifically:

  • You may now eliminate the requirement for the client to answer questions during a TouchPoint Check-In.   
  • Clients may send Word and PDF documents, as well as images, by utilizing the Documents feature within the TouchPoint mobile application.
TipsThe latest version of the TouchPoint app will be available to clients in the app stores. As a best practice, SCRAM Systems recommends that all TouchPoint app users enable their smartphones to automatically update their apps to make this process easier.
TipsNot seeing the enhancement in SCRAM Optix? Clear your cache and cookies and refresh your browser window.

No Question Check-In Group

When a client is not required to answer questions during a TouchPoint check-in, you may remove that requirement for current Check-In Groups or create a new Check-In Group with the questions removed.

New Check-In Group

When creating a new Check-In Group, select the checkbox next to the statement “Check-In With No Questions” to remove all questions from the check-in.

Example: Before the checkbox is selected – click to enlarge
Example: After the checkbox is selected – click to enlarge

Edit a Current Check-In Group

To remove the questions from a current Check-in Group, select the Edit link and the checkbox next to “Check-in Group With No Questions.”

Edit current Check-In Group – click to enlarge
Check-In Saved with Updated Settings – click to enlarge

During a Check-In, once the client has selected the Check-In button within the TouchPoint mobile application and completes the Biometric verification (fingerprint or face ID), they will be prompted to take a photo and submit the check-in.

Document Sharing from the Client’s TouchPoint Mobile Application

The client may share images from their TouchPoint mobile application from the Documents Capture screen. With this update, the client may also share Word documents and PDF files from their mobile application.

Once the client has saved a document to the smartphone, on the Document Capture screen:

  1. Tap the Upload button.
  2. Tap the Files option on the dropdown menu.
  3. Search for or tap on the file to be shared.
  4. The uploaded file will be listed on the client’s My Documents screen. Select the ellipsis next to the file and tap the Share option on the dropdown menu to access it.
  5. Tap the Share file acknowledgment button.
  6. Once shared, a “success” banner will be displayed on the bottom of the screen.
click to enlarge
click to enlarge
click to enlarge
click to enlarge
click to enlarge
click to enlarge
click to enlarge
Tips
  • Supported file types include .pdf, .doc, and .docx.
  • There is a 5 MB file size maximum.
  • The client is responsible for managing their smartphone’s file storage location.

Viewing a Shared File

In SCRAM Optix, access the Received section of the Documents Capture page for the client, and then open the Action dropdown menu to download the shared file.

Received Documents Screen – click to enlarge
Action Dropdown Menu Download Option – click to enlarge
Computer’s Downloads Folder – click to enlarge

Continue Reading

On June 27, 2024, SCRAM Systems will release an enhancement that allows you to adjust and waive individual fees during the client Activity setup and on their Fee Amounts page.   

Tips
  • If you don’t see the enhancement in SCRAM 24/7, please clear your cache and cookies and refresh your browser window.
  • An administrator for your program manages the Activity’s fees and determines whether or not the fee may be adjusted or waived.

Current Add an Activity Page

Activity Fee Section – click to enlarge

Enhanced Add an Activity Page

The Activity Fee section has a new “Options” column that allows you to Edit or Waive Activity fees for the client during enrollment.

Edit and Waive Activity Fees – click to enlarge
Activity Fees Updated Pending Adding the Activity – click to enlarge
An Example of an Activity Fee that Cannot be Edited or Waived During Enrollment – click to enlarge

After adjusting any Activity Fee, select the Add Activity button to save the changes.

Saved Activity Details page – click to enlarge

During the monitoring program, you may also adjust the Activity fees from the client’s Fee Amounts page.

Fee Amounts page – click to enlarge

Continue Reading

On June 12, 2024, SCRAM Systems will unveil an enhanced Equipment RMA Request page accessible from the SCRAM Systems Help & Support page. The new design contains a significant upgrade to streamline the workflow and improve your experience.

The newly designed page includes:

  • An updated single-page equipment RMA form.
  • A SCRAM Equipment Troubleshooting hyperlink providing quick access to basic troubleshooting. Following the troubleshooting steps may resolve the most common equipment issues, keeping functioning equipment available for client monitoring.
  • A troubleshooting acknowledgment checkbox confirming that troubleshooting steps have been taken before requesting an RMA for a device, thus ensuring no delay in processing the RMA request.  
  • The Device Information section now includes a “What is the Problem?” dropdown menu to identify the specific issue quickly. The dropdown menu will also reflect the device type to customize the options available further.
  • Once the RMA request has been submitted, the acknowledgment page will include the case number associated with the request for your reference.
TipsNot seeing the enhancement in SCRAM Systems Help & Support page? Clear your cache and cookies and refresh your browser window.

Current Equipment RMA Request Page

Pre-release RMA Request page (click to enlarge)

Enhanced Equipment RMA Request Page

Equipment RMA Request page (click to enlarge)
RMA Acknowledgement page with Case Number (click to enlarge)

SCRAM Troubleshooting

On the SCRAM Troubleshooting article, select the product and issue to view step-by-step instructions.

SCRAM Troubleshooting Help Article (click to enlarge)

Continue Reading

On June 12, 2024, SCRAM Systems will release two enhancements centered around the process of checking in a device as damaged.

  1. You will now have the option to flag a device as damaged when stopping the monitoring for the client.
  2. The notes entered for a device being checked in as damaged will now be visible on the Device Details page in SCRAMNET.
TipsNot seeing the enhancement in SCRAMNET? Clear your cache and cookies and refresh your browser window.

Stop Monitoring and Check In Device as Damaged

When stopping the monitoring, for your client in SCRAMNET, you may flag a device as damaged by setting the “Check in previous [Device type] as Damaged?” option to Yes. Once set, add a note explaining why you flagged the device as damaged, and then complete the stop-monitoring process as usual.

Example of a SCRAM CAM Client in SCRAMNET
Stop Monitoring page, Device Flagged as Damaged (click to enlarge)
Client’s Equipment page Device Awaiting Return Status Displayed (click to enlarge)

Once the device status is updated to either “Pending Removal” or “Awaiting Return” based on the Stop Monitoring page selection, complete the process to return the device to your inventory.

Tips
  • SCRAM Systems recommends selecting the “Stop monitoring now and check in Equipment later” option when flagging a damaged device. This ensures billing is stopped for the client when a device cannot be checked in following the normal process.
  • When scheduling the stop monitoring for a later date, you cannot flag a device as damaged.
  • Flagging a device as damaged on the Stop Monitoring page does not automatically update its status to “In Inventory.” You must complete the check-in process to ensure billing and monitoring for the client are stopped.
  • When a device is flagged as damaged on the Replace Equipment page, it will automatically be updated to an “In Inventory” status.

Device Details Damage Notes

Once a device has been flagged as damaged, you may view the notes associated with the damaged device on the Device Details page in SCRAMNET.

Device Details Page with Notes Tab Selected (click to enlarge)

This information is helpful to reference when troubleshooting a device or requesting an RMA.

TipsThe damage notes will remain visible on your Device Details page until the device is returned and serviced at SCRAM Systems. At that time, they will no longer be visible.

Continue Reading