On June 12, 2024, SCRAM Systems will release multiple enhancements to SCRAM 24/7.
When viewing an activity fee, a new column displays whether the fee has been applied to all clients or will only be applied to future clients.
When deactivating an activity fee, a lock icon will be displayed next to the fee’s name when a fee is still being applied to currently active clients.
You will now have the option to flag a device as damaged when Suspending or Removing an EM Activity for the client.
The notes entered for a device being checked in as damaged will now be visible on the Device Details page in SCRAMNET.
Not seeing the enhancement in SCRAM 24/7? Clear your cache and cookies and refresh your browser window.
Apply to All Clients Column
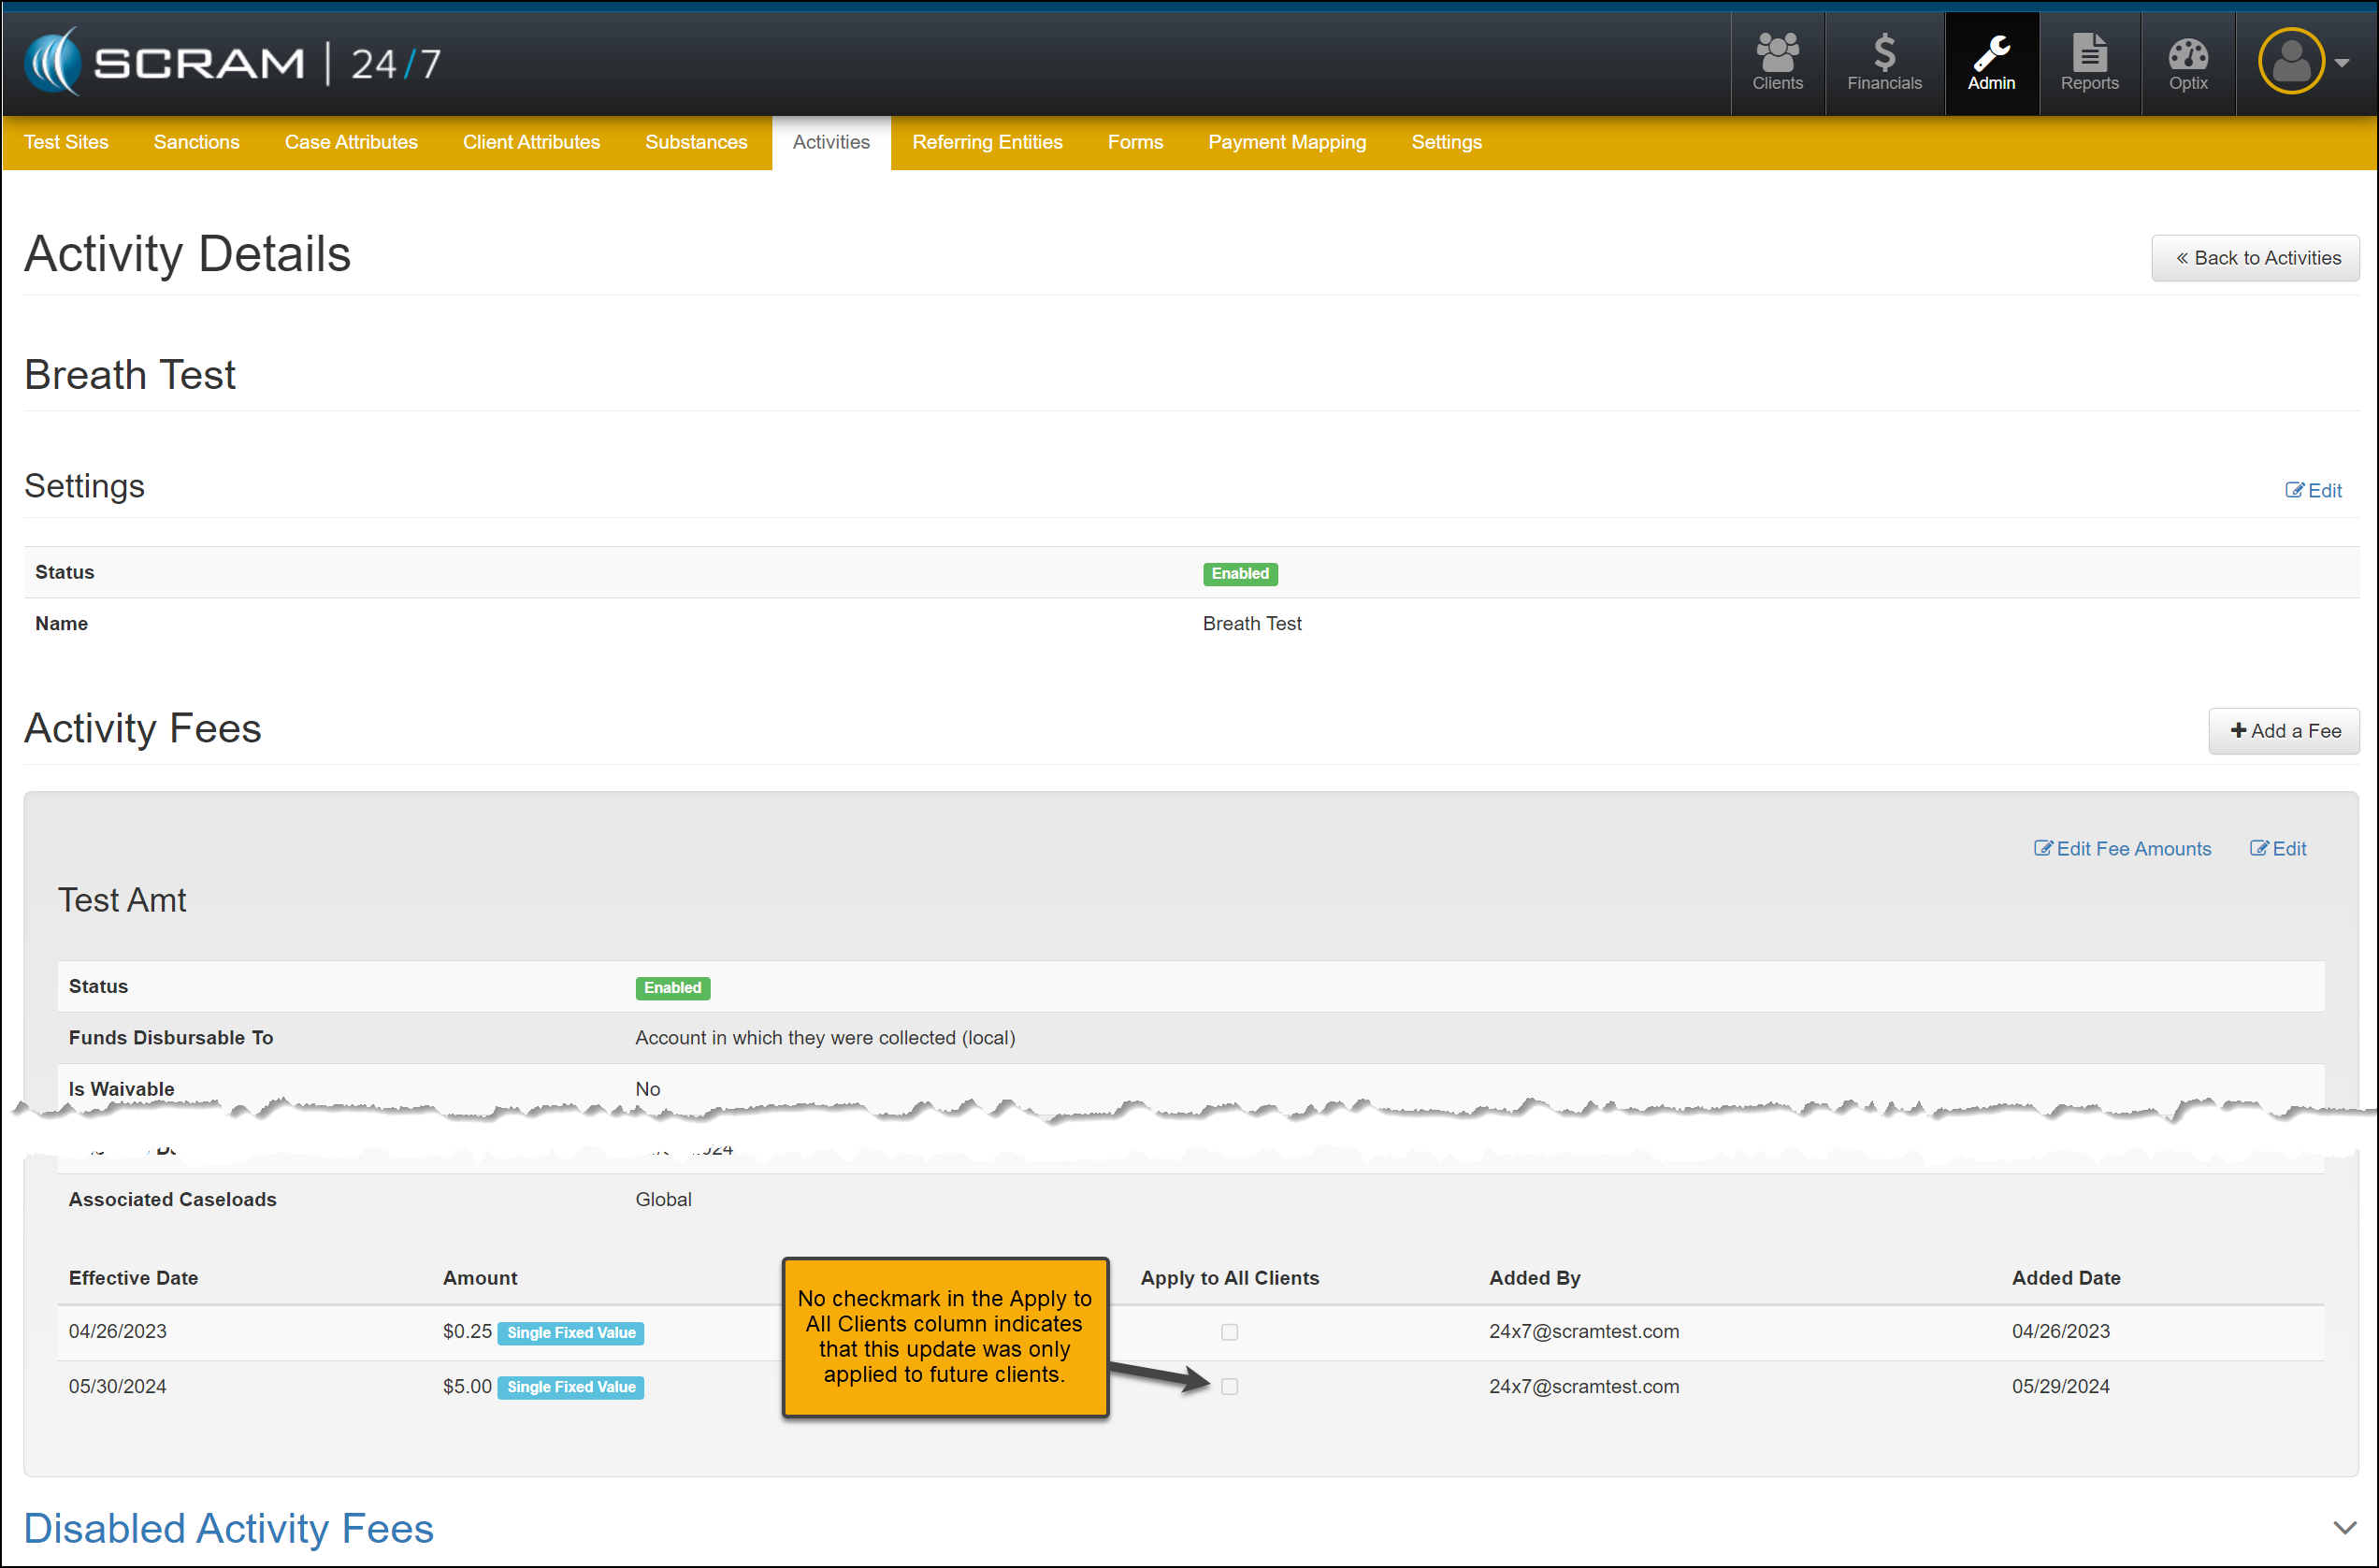
When viewing or editing an Activity’s fee, an “Apply to All Clients” column indicates whether the adjusted fee has been applied to all current and future clients or will only apply to future clients.
Activity Details page- Apply to All Clients Checkbox Not Selected (click to enlarge)
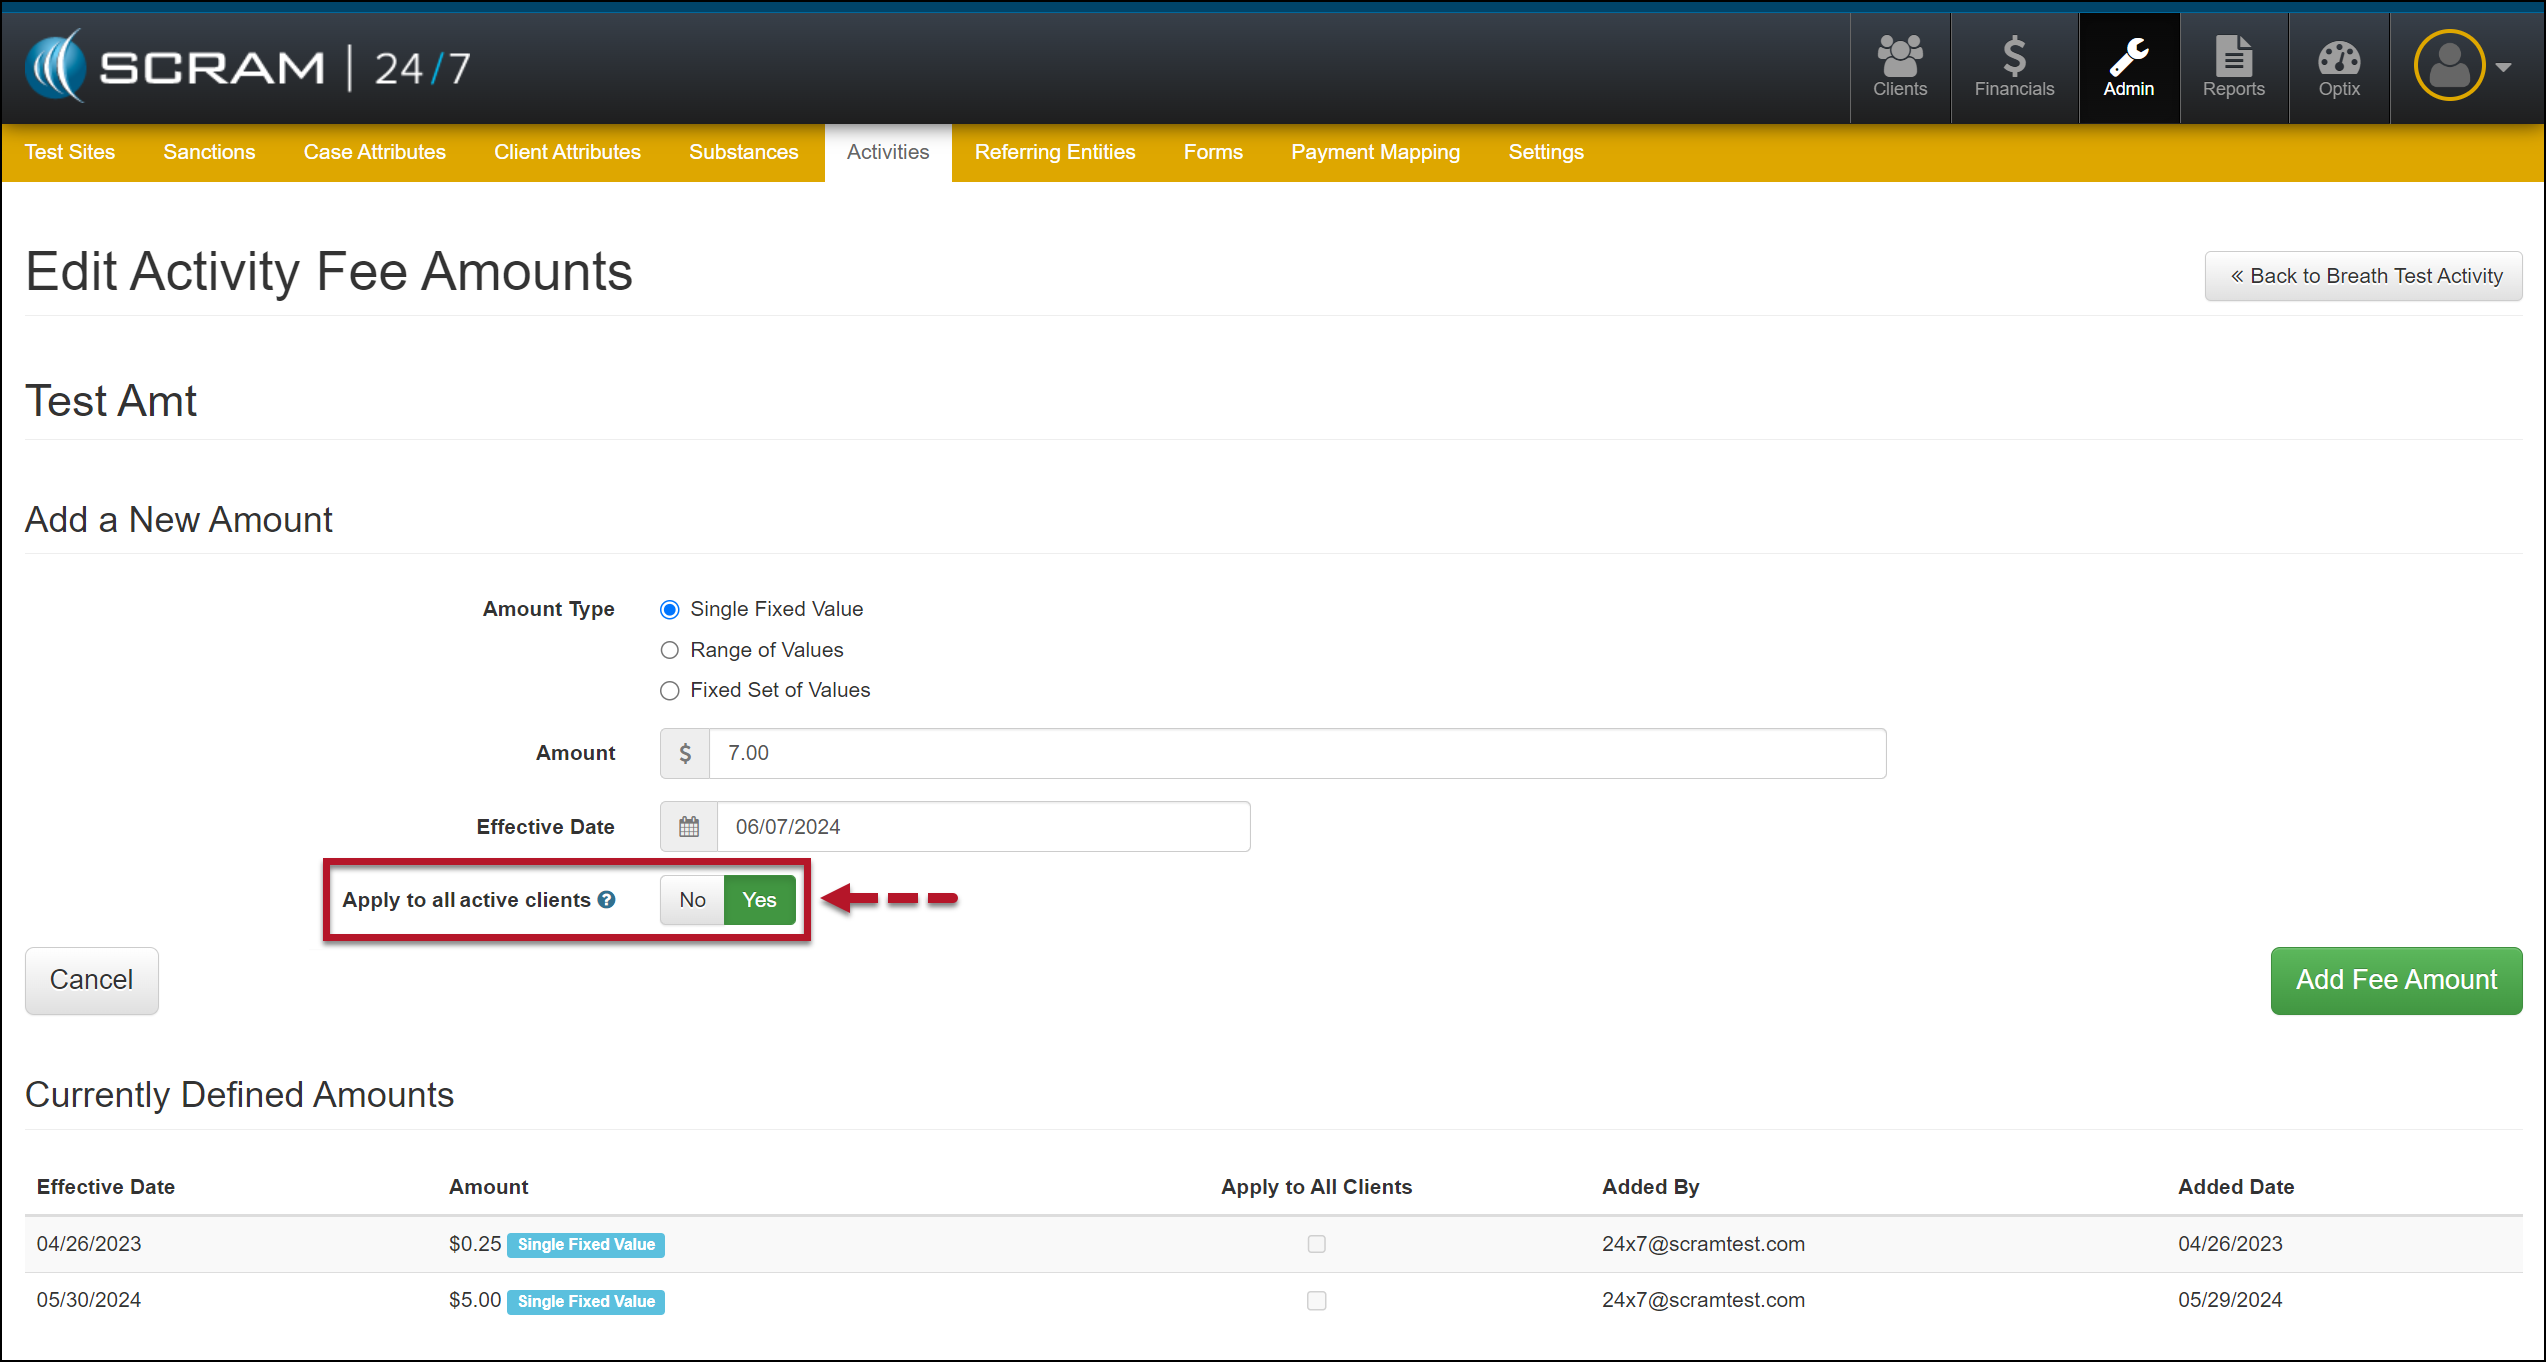
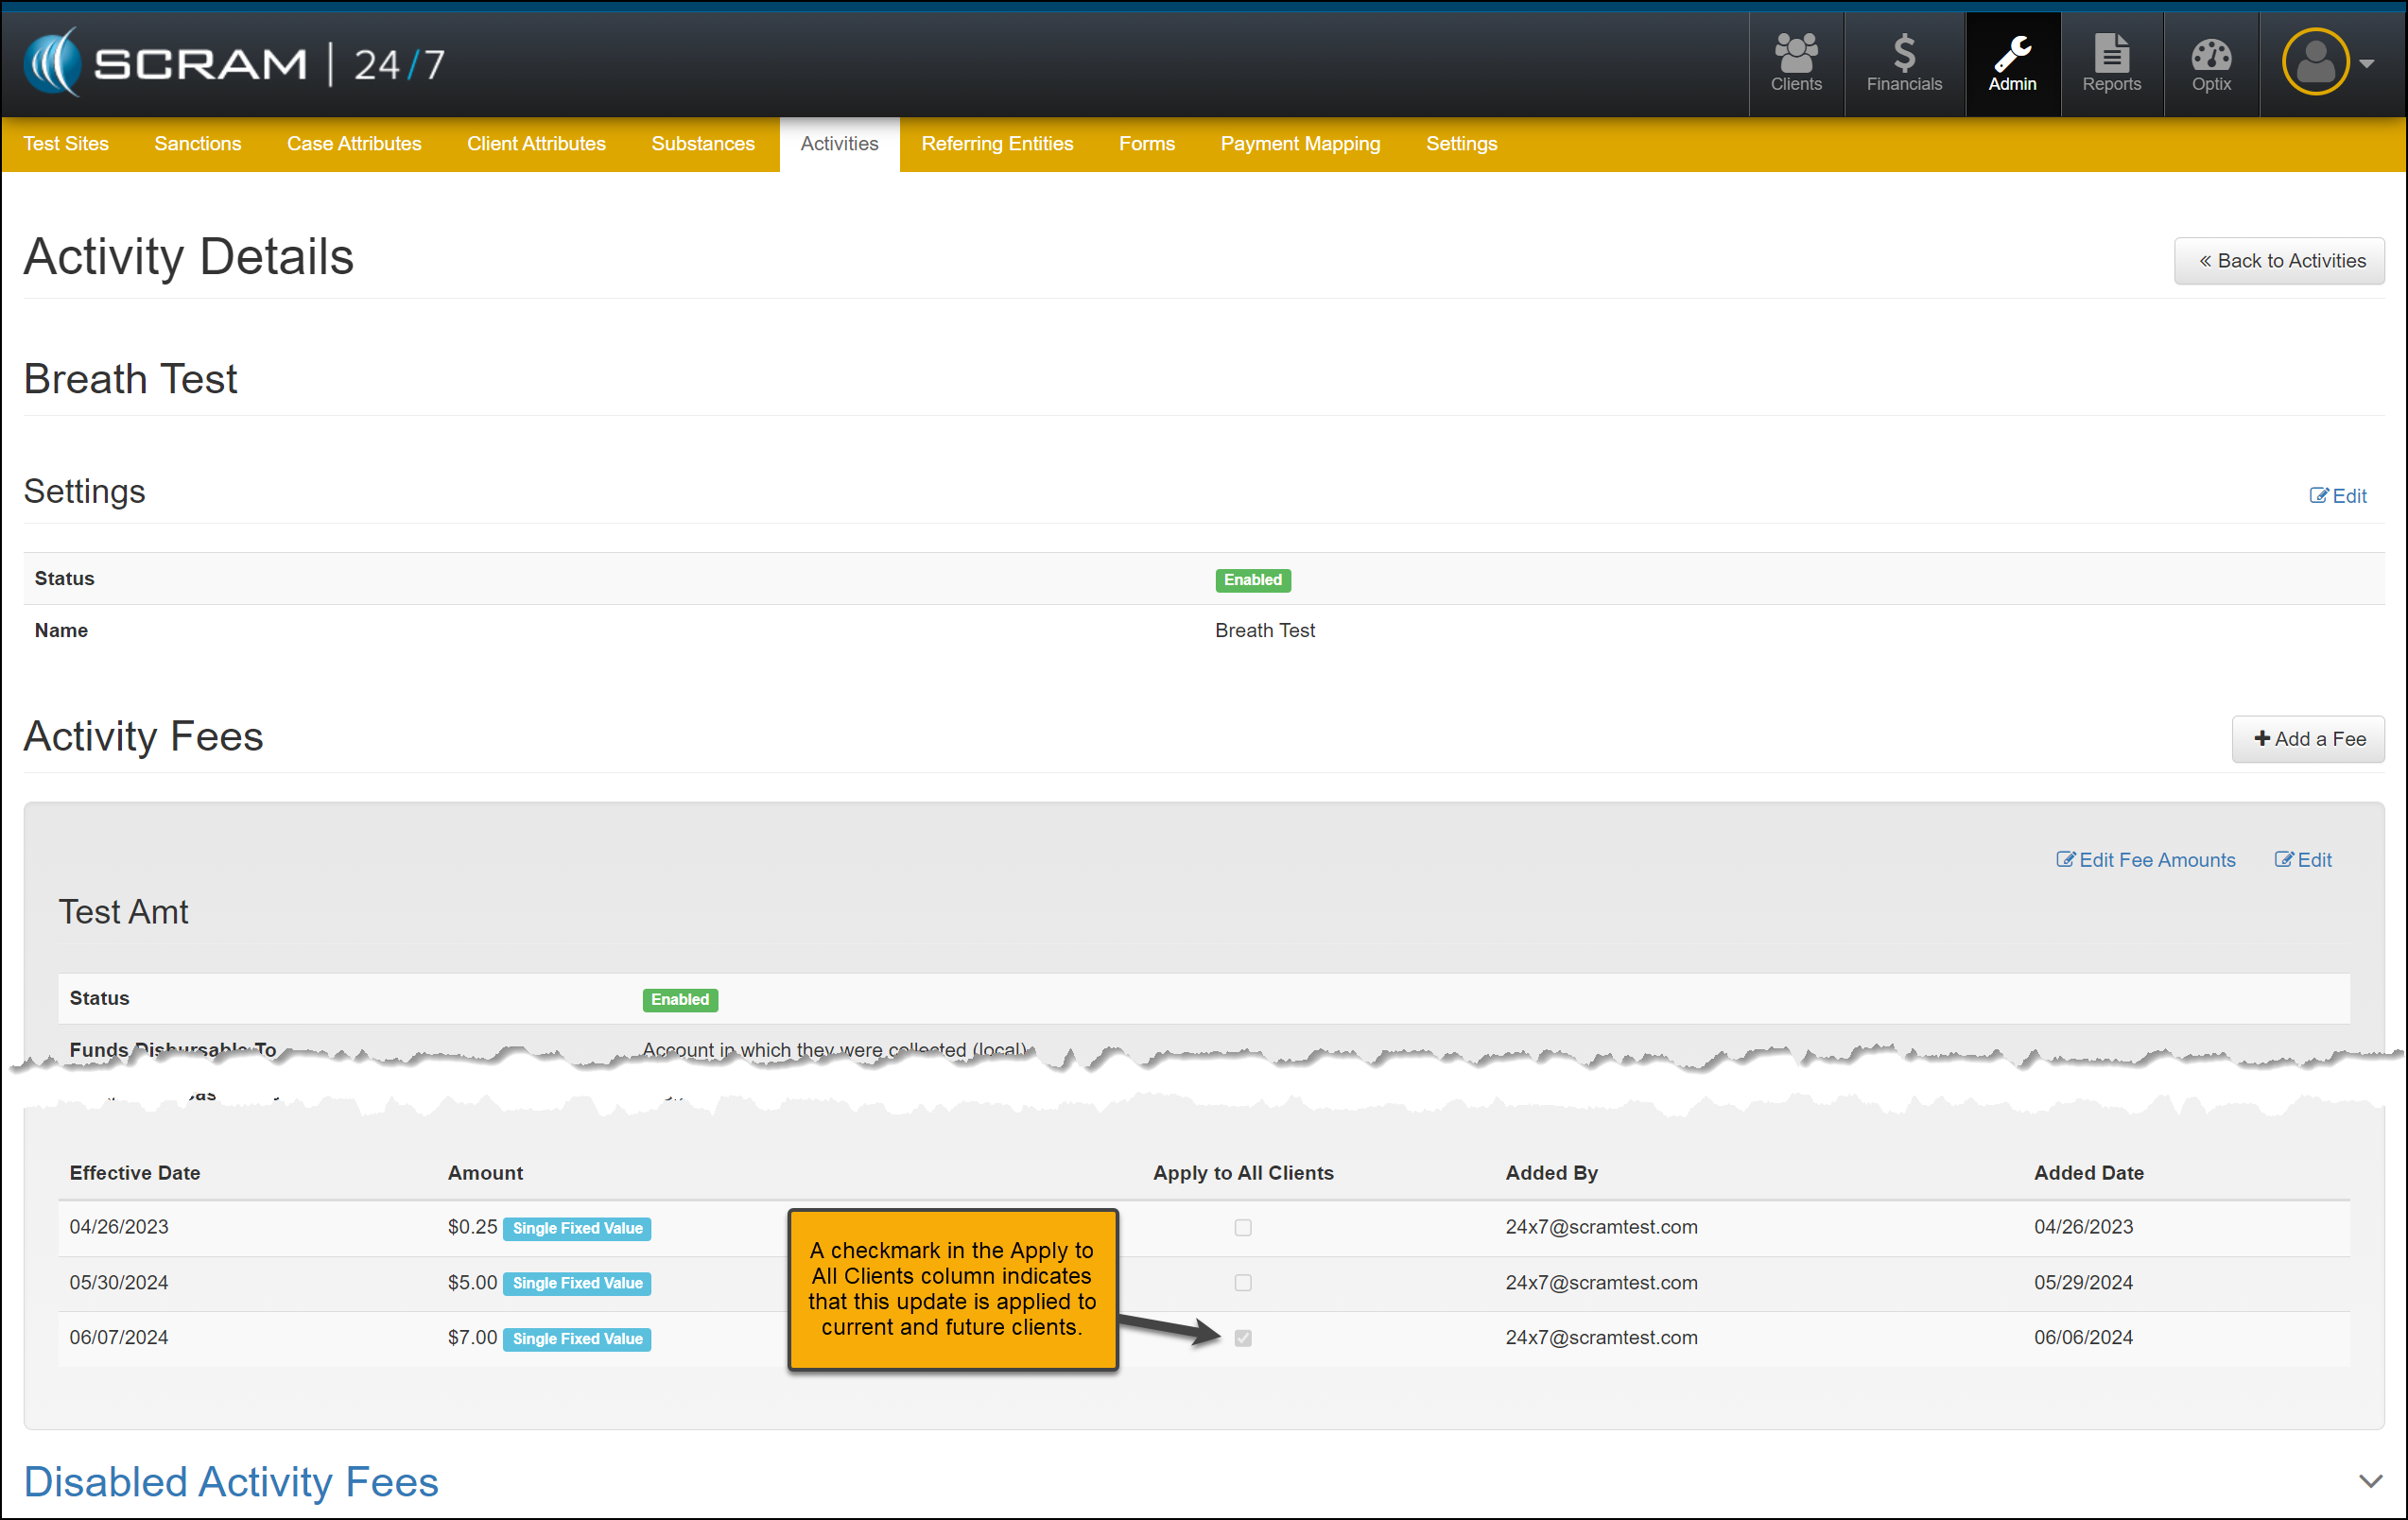
While editing a fee, when you select the “Yes” option to apply this updated fee to currently active and future clients, a checkmark will appear in the “Apply to all Clients” column.
Edit Activity Fee Amounts- “Apply to all active client” Set at Yes (click to enlarge)Activity Details page- Apply to All Clients Checkbox Selected (click to enlarge)
Disabled Fee Lock Icon
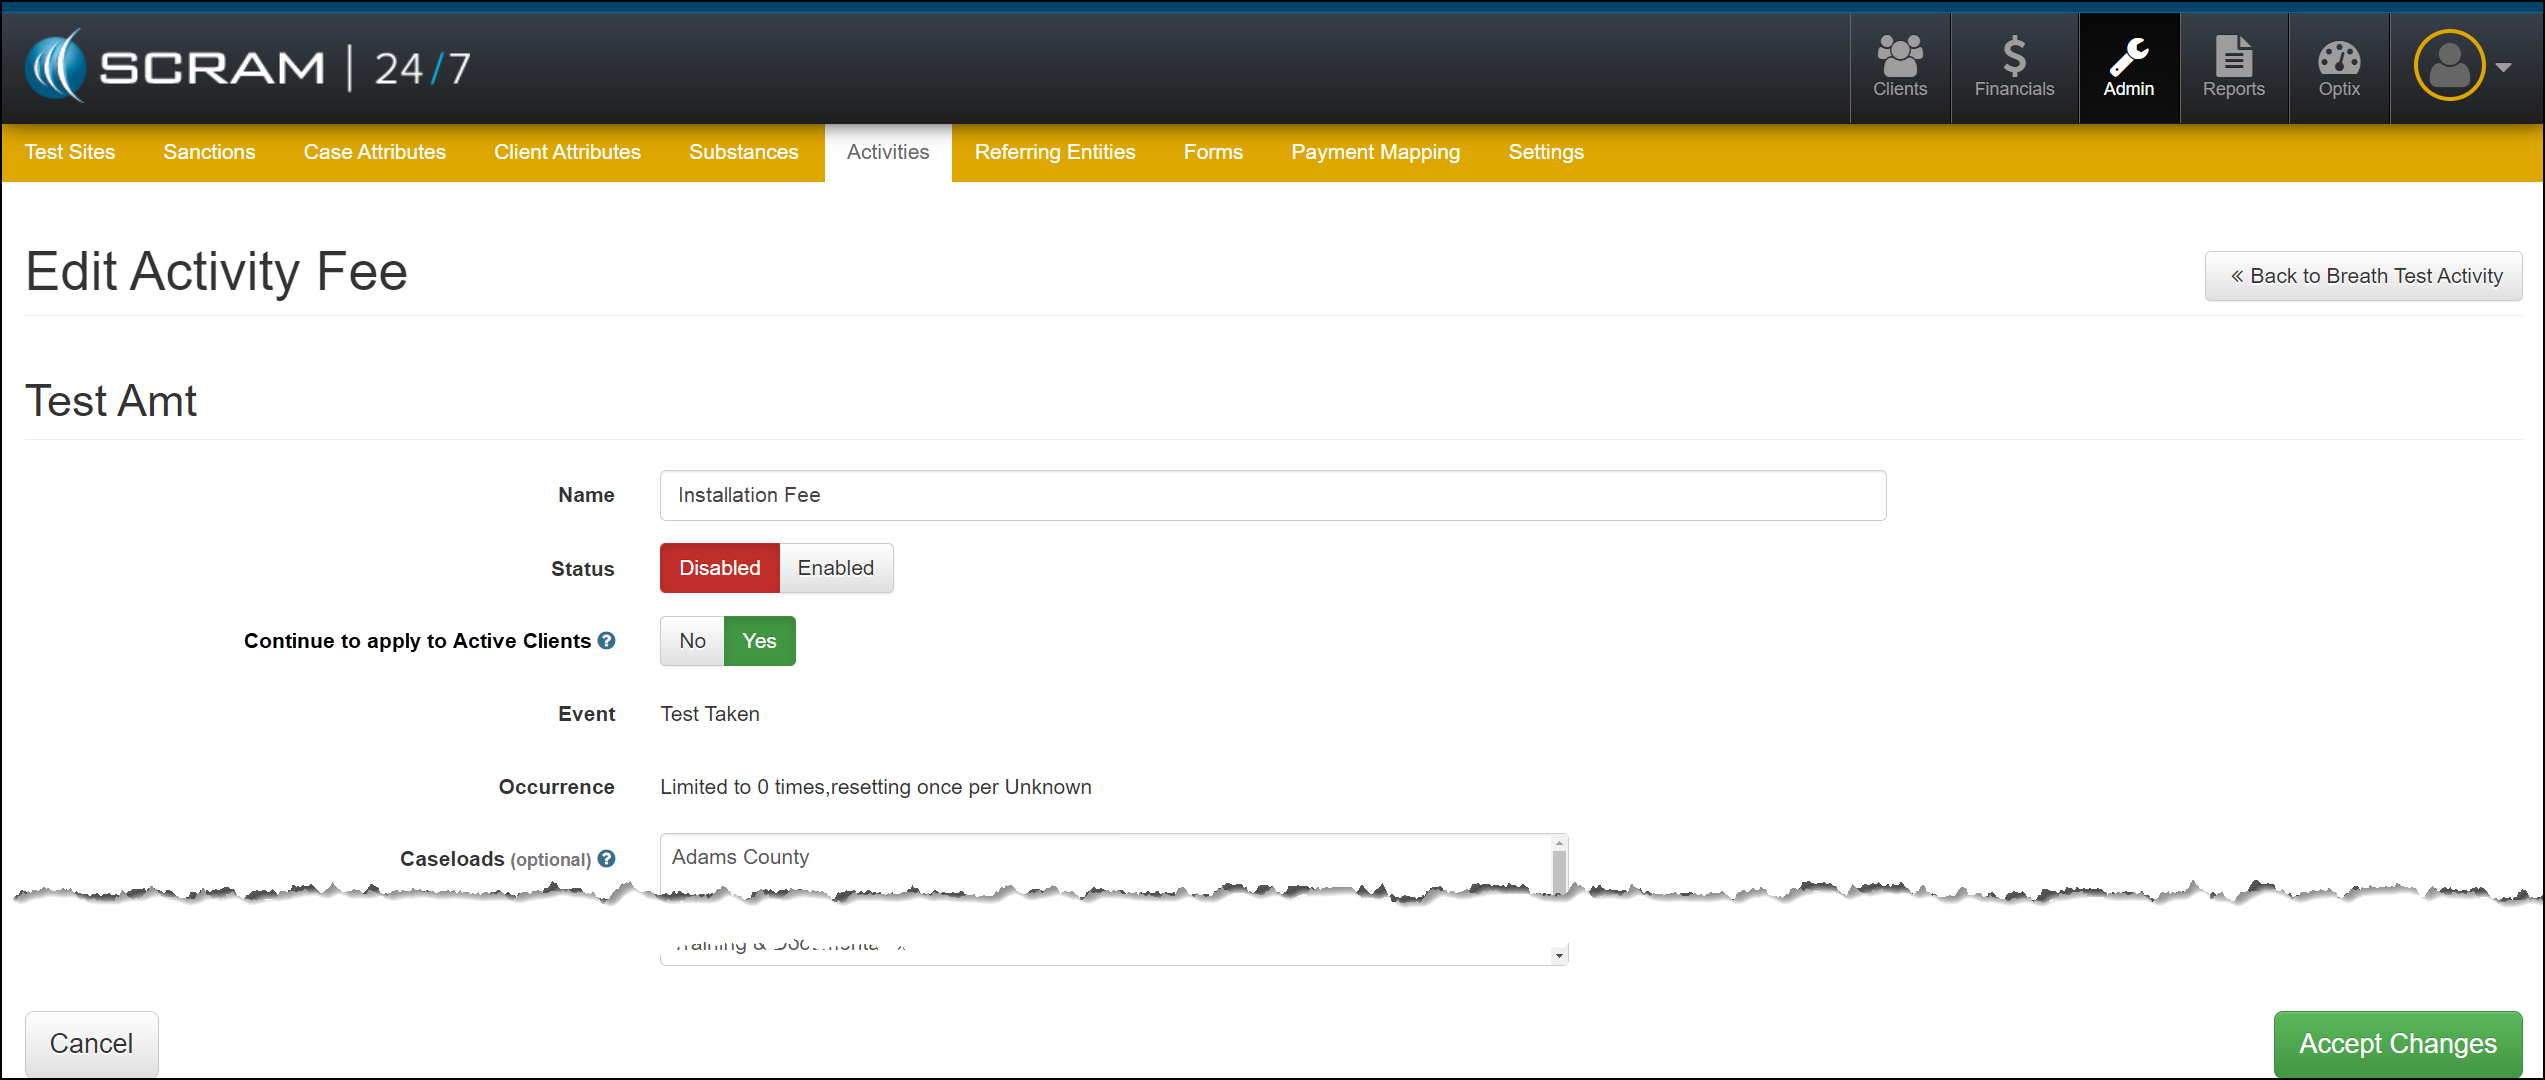
As fees for activities are disabled, you may continue billing or remove that fee from currently active clients.
When you select the “Yes” option to continue billing current active clients, a lock icon will appear next to the disabled fee’s name.
Edit Activity Fee (click to enlarge)Disabled Activity Fee with Lock Icon (click to enlarge)
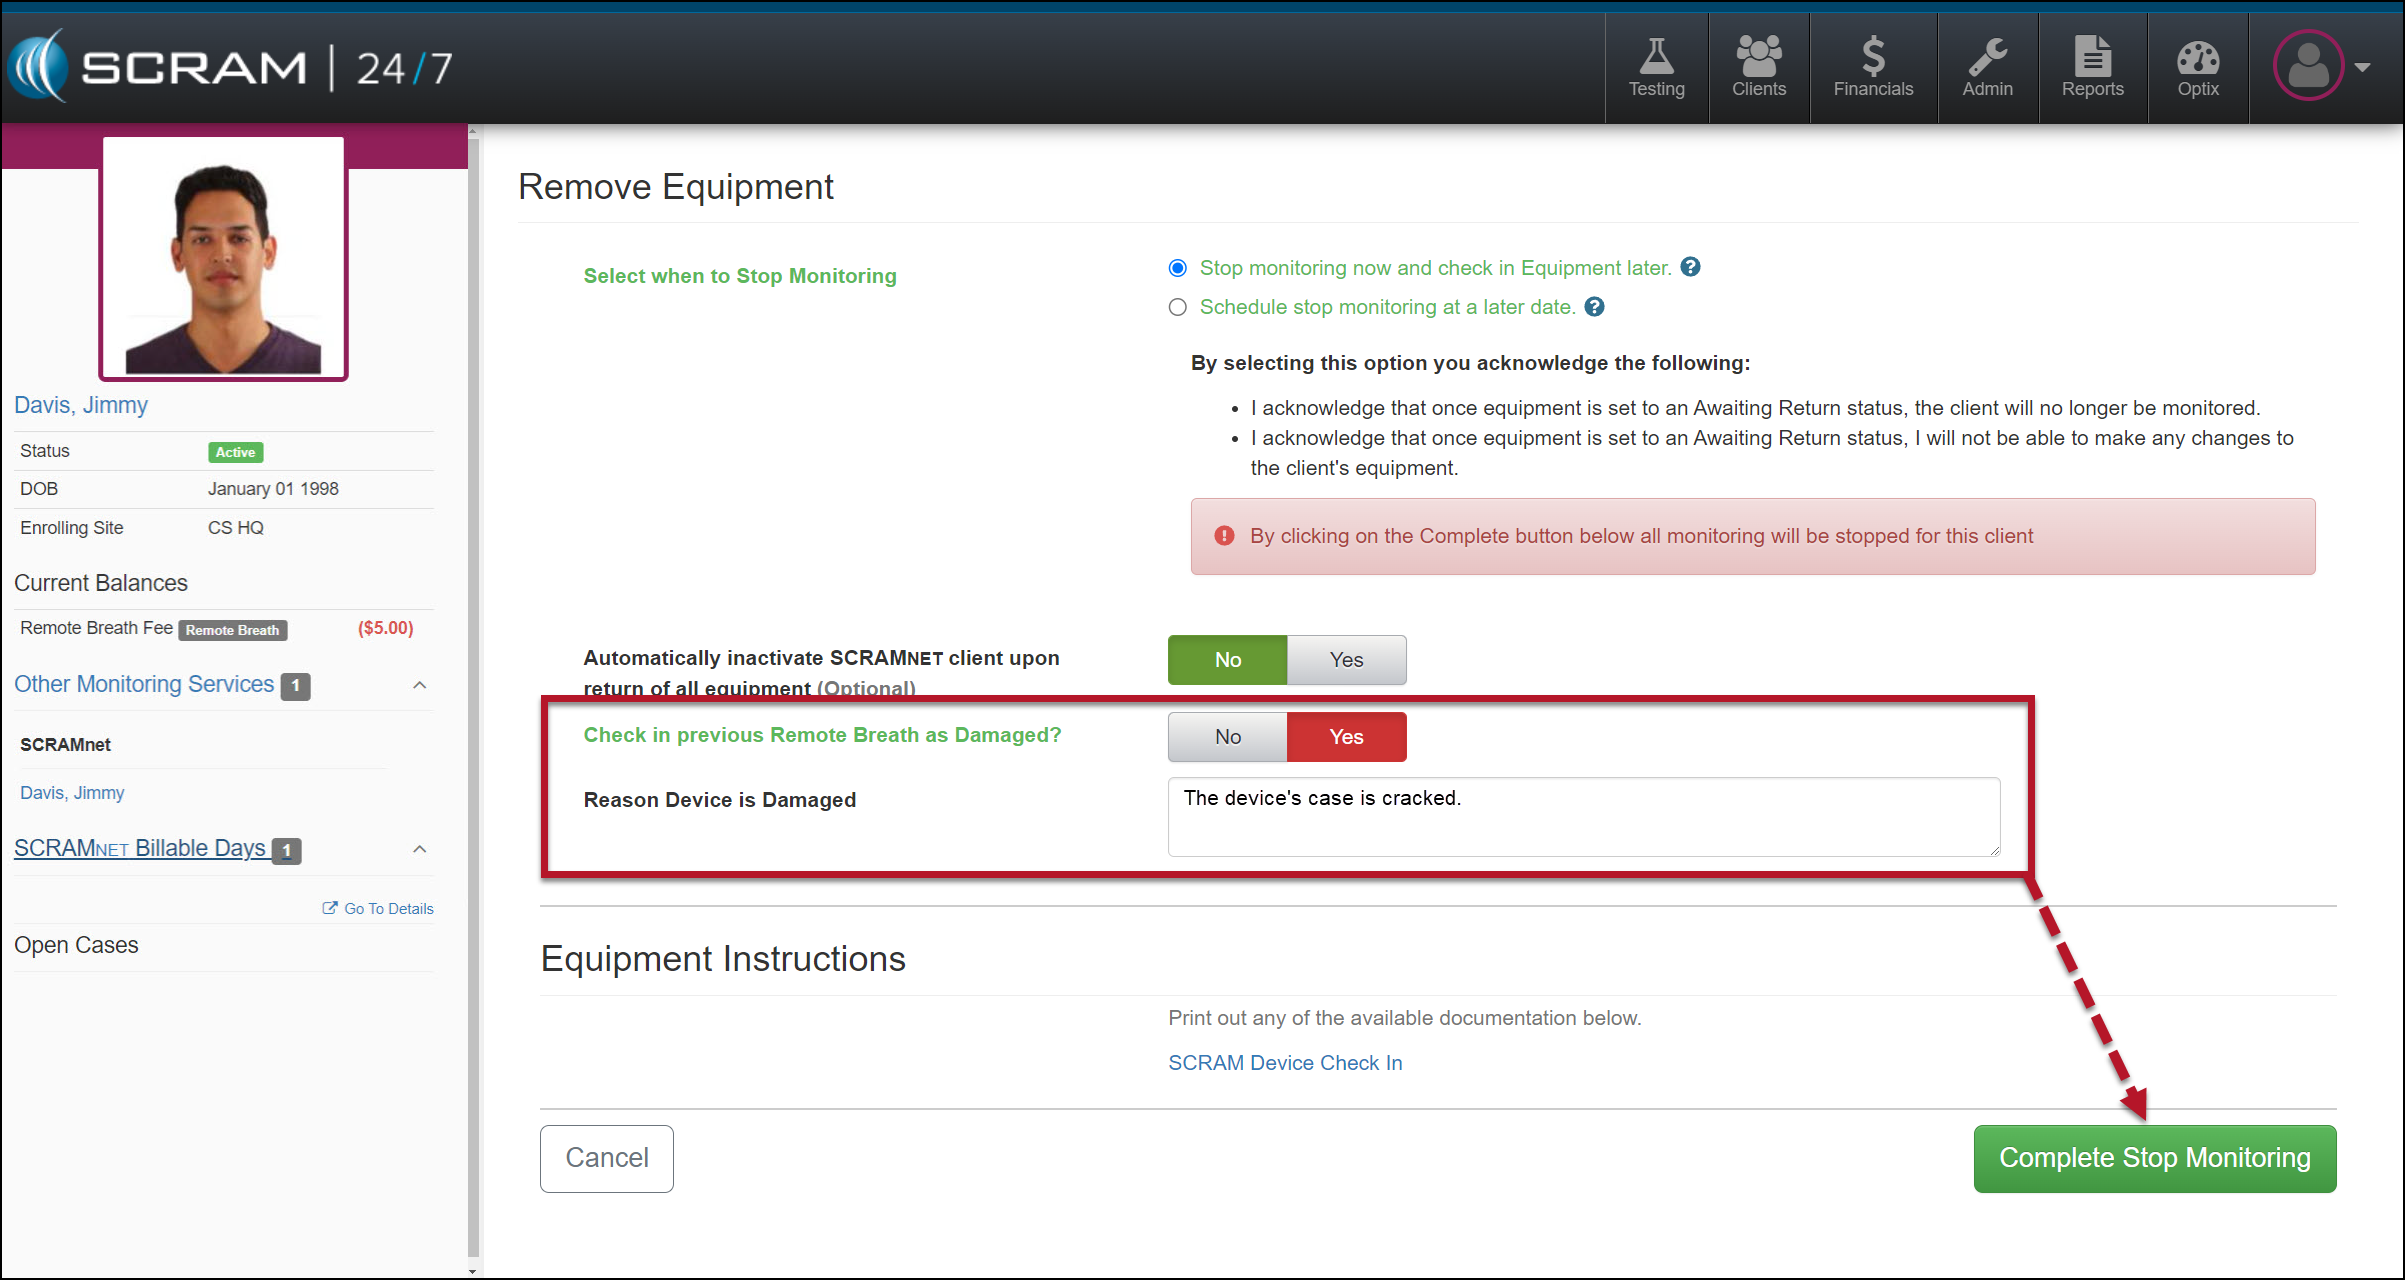
Suspend or Remove Activity and Check In Device as Damaged
When removing or suspending an Activity for your client in SCRAM 24/7, you may flag a device as damaged by setting the “Check in previous [Device type] as Damaged?” option to Yes. Once set, add a note explaining why you flagged the device as damaged, and then complete the stop-monitoring process as usual.
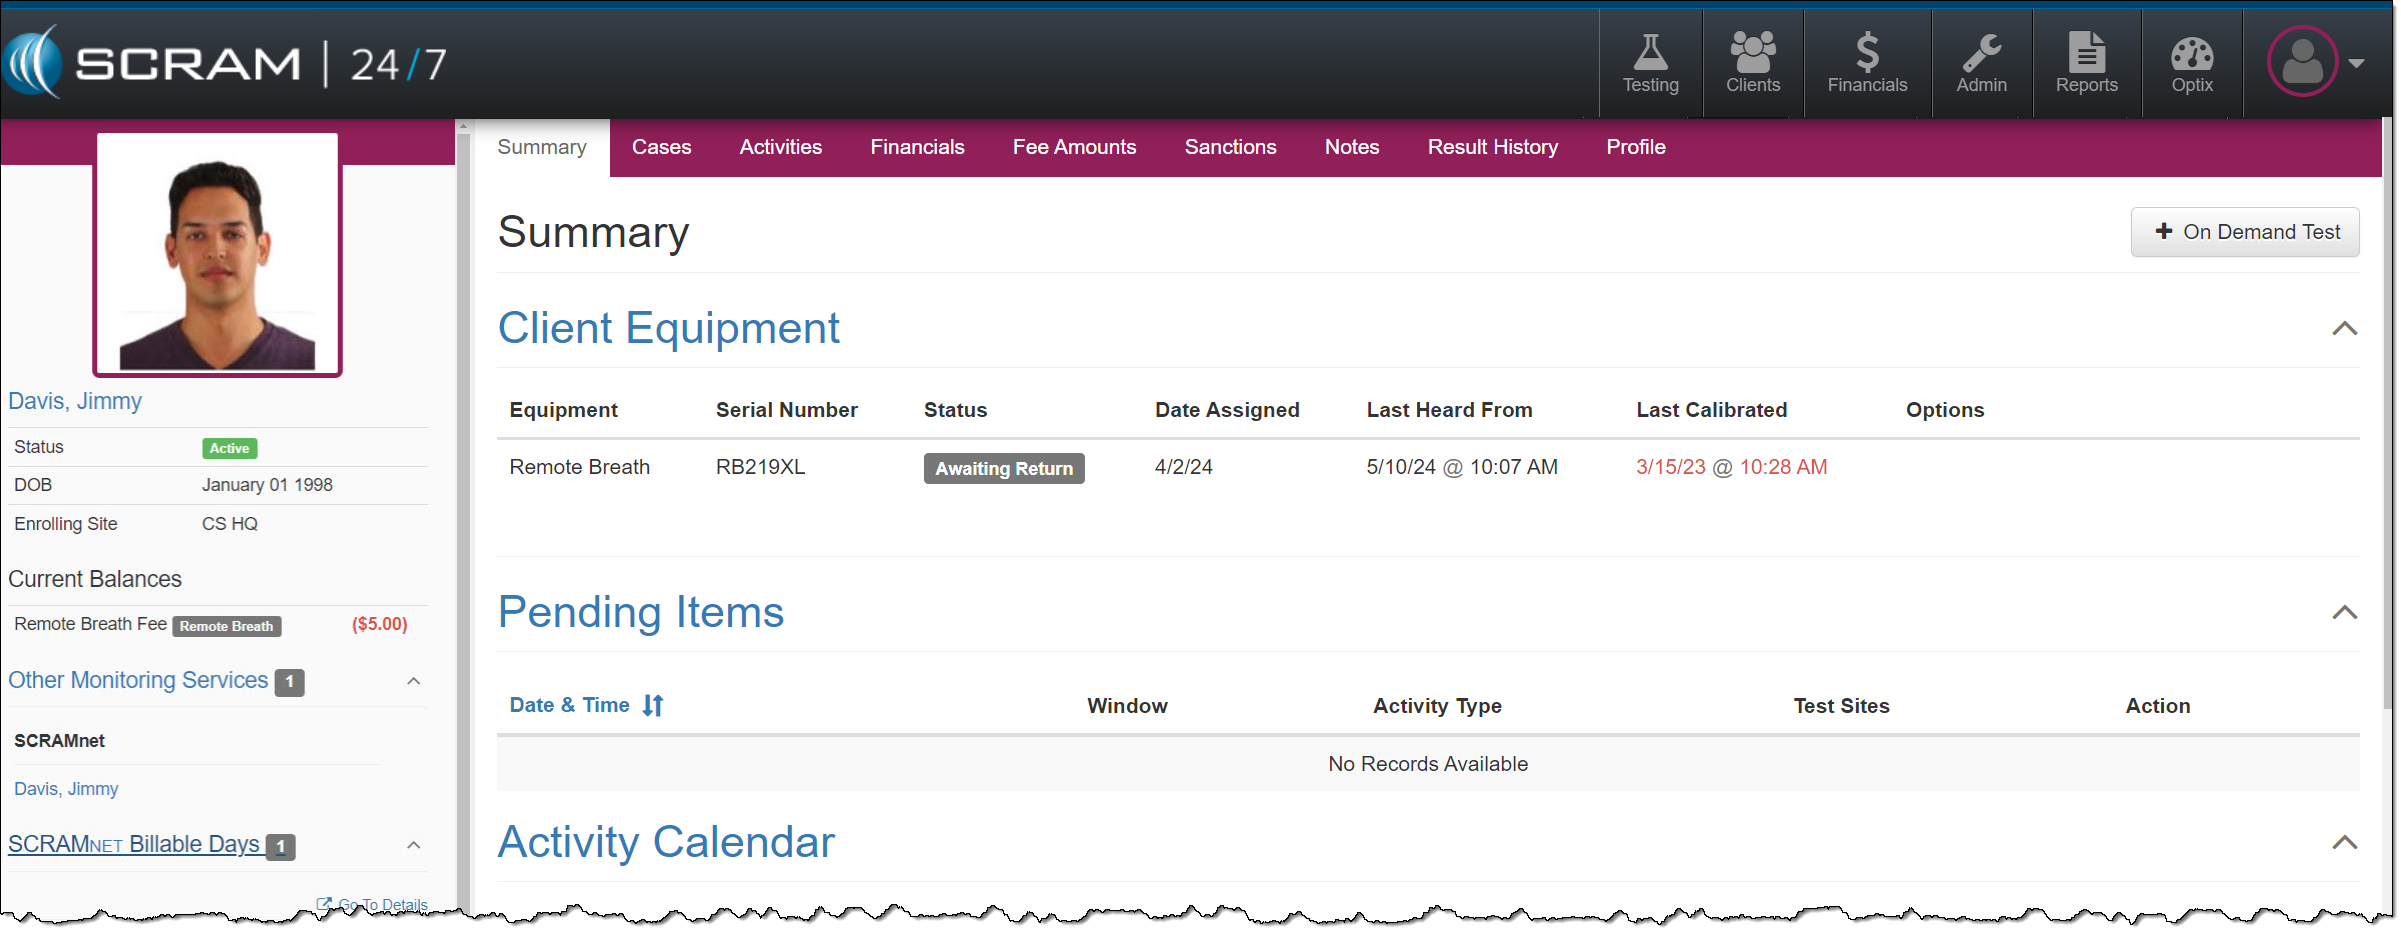
Remove Equipment page (click to enlarge)Client Summary page, Equipment Status of Awaiting Return (click to enlarge)
Once the device’s status is updated to “Awaiting Return,” complete the process of returning it to your inventory.
When scheduling the stop monitoring for a later date, you cannot flag a device as damaged.
Flagging a device as damaged on the Remove Equipment page does not automatically update its status to “In Inventory.” You must complete the check-in process.
When a device is flagged as damaged on the Replace Equipment page, it will automatically be updated to an “In Inventory” status.
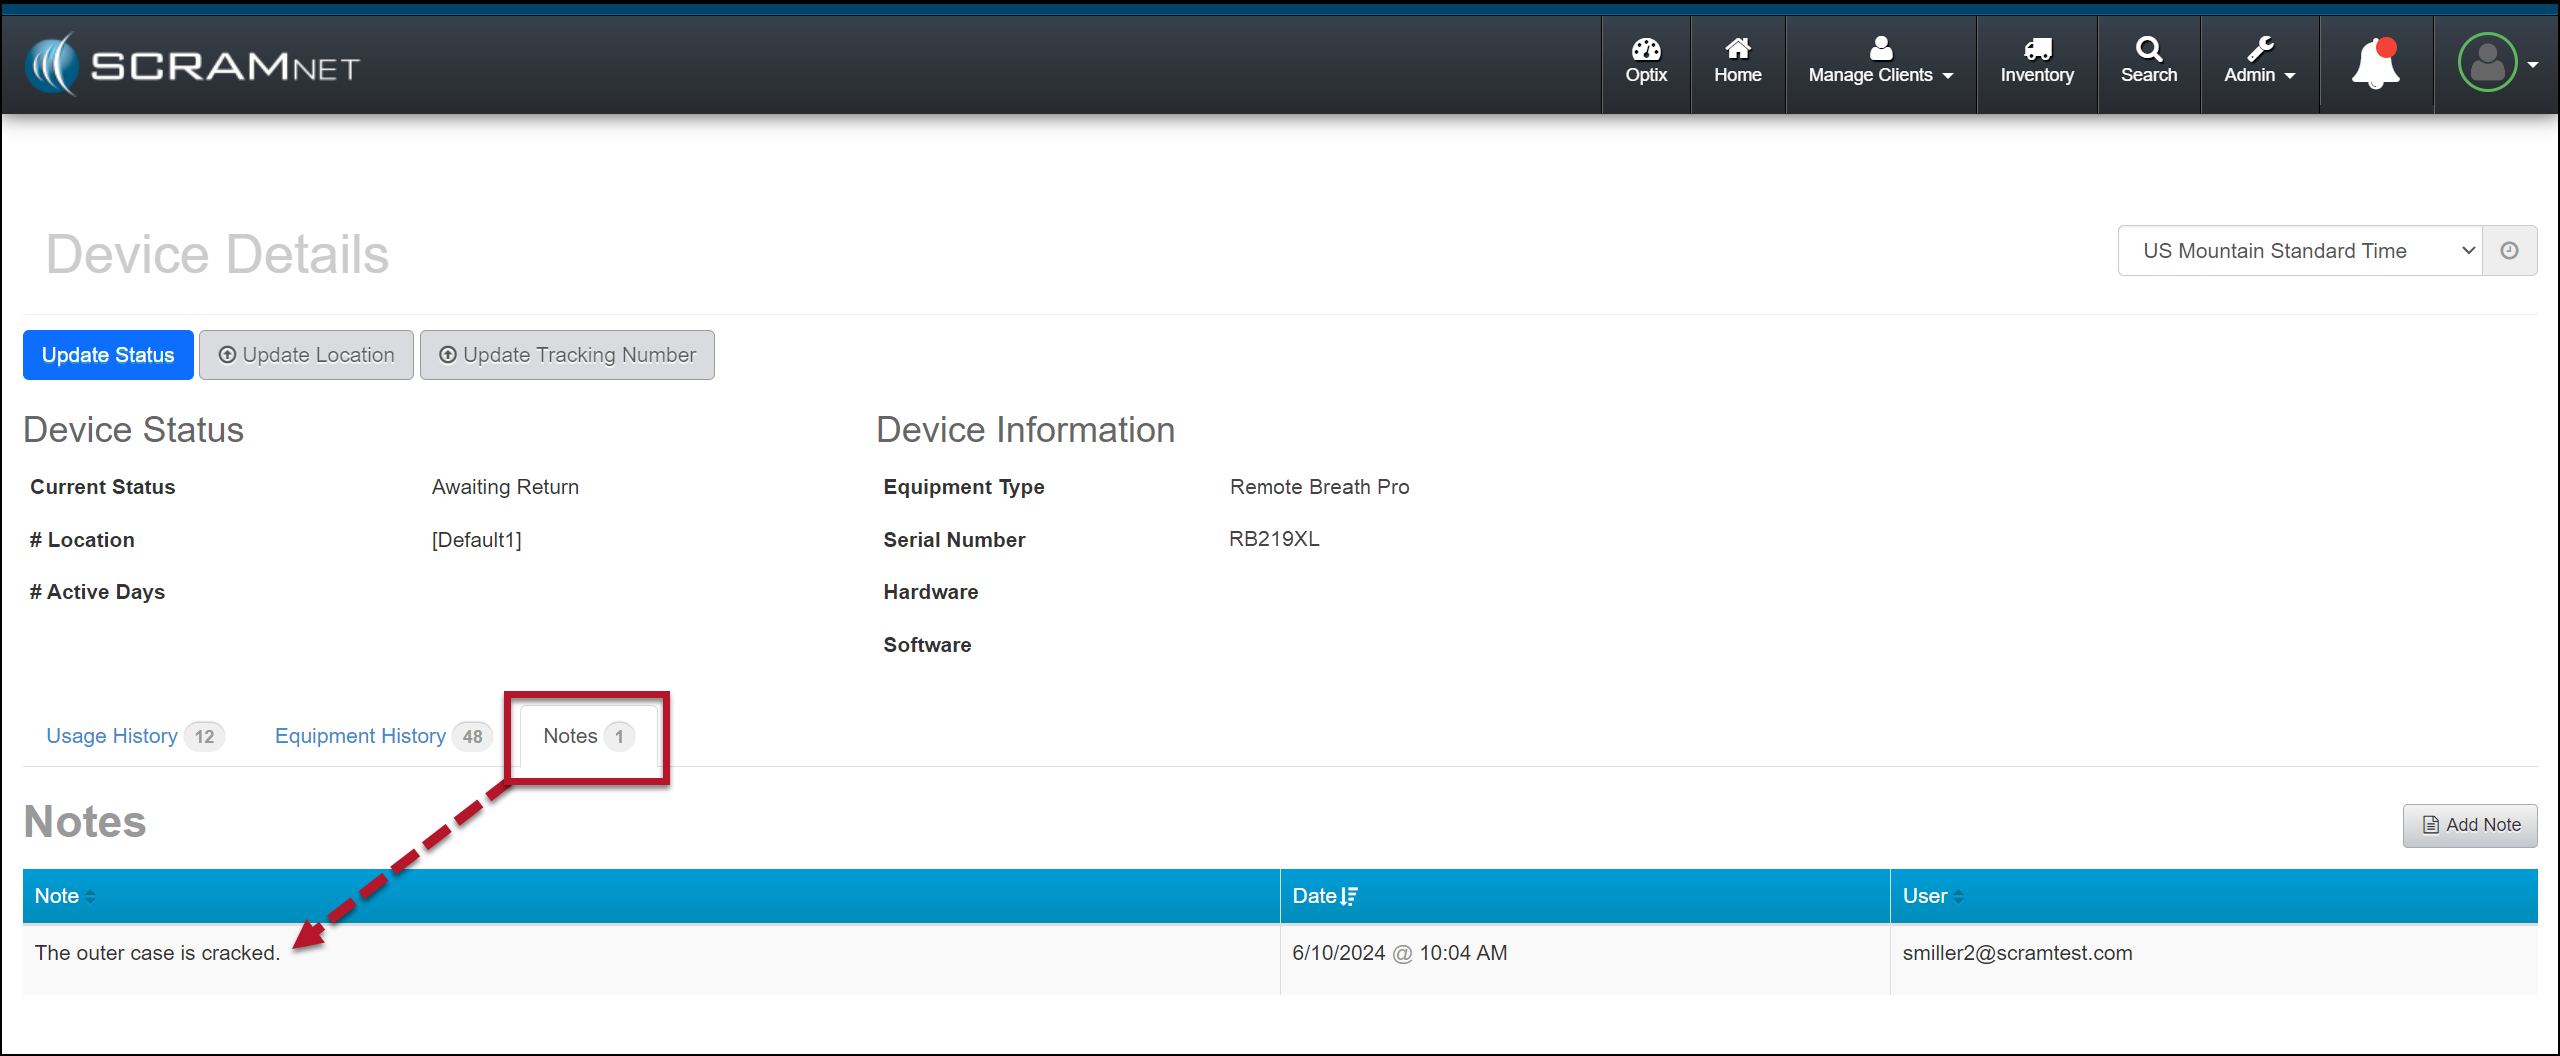
Device Details Damage Notes
Once a device has been flagged as damaged, you may view the notes associated with the damaged device on the Device Details page in SCRAMNET.
SCRAMNET Device Details page (click to enlarge)
This information is helpful to reference when troubleshooting a device or requesting an RMA.
The damage notes will remain visible on your Device Details page until the device is returned and serviced at SCRAM Systems. At that time, they will no longer be visible.
On June 6, 2024, SCRAM Systems will release three SCRAM TouchPoint Location feature enhancements:
The SCRAM Optix Location tab will display “Compliant” or “Non-Compliant” depending on the location service settings the client has chosen for the SCRAM TouchPoint Mobile app.
For clients on a Nexus Supervision Plan with Location Verification enabled, Location Records will now indicate whether the location record was captured before, during, or after the scheduled appointment.
The TouchPoint Location Verification service may now be disabled at the client level for clients who do not need to report their location as part of their monitoring program.
The latest version of the TouchPoint app will be available to clients in the app stores. As a best practice, SCRAM Systems recommends that all TouchPoint app users enable their smartphones to automatically update their apps to make this process easier.
Not seeing the enhancement in SCRAM Optix? Clear your cache and cookies and refresh your browser window.
Compliant and Non-Compliant Smartphone Location Access
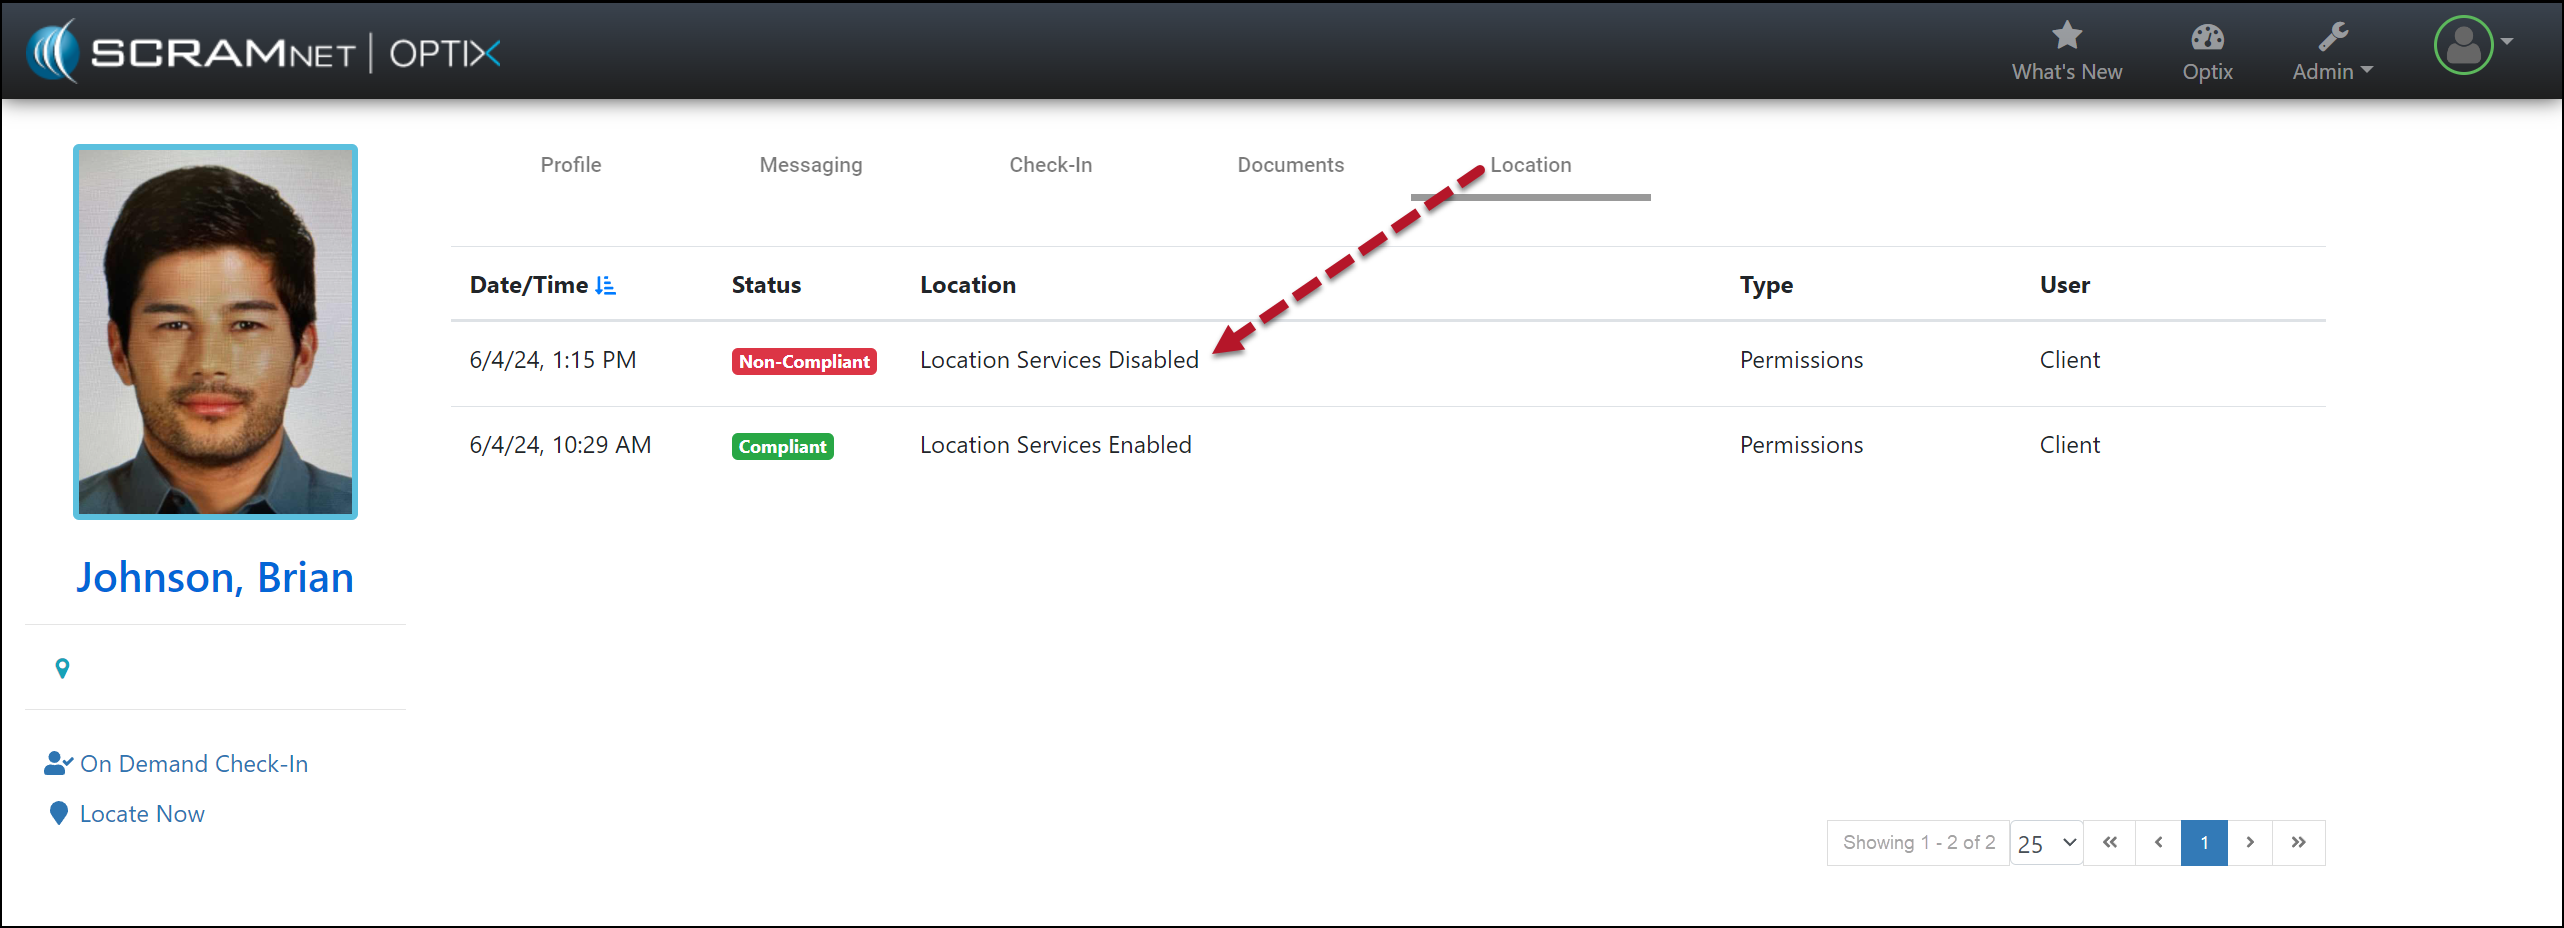
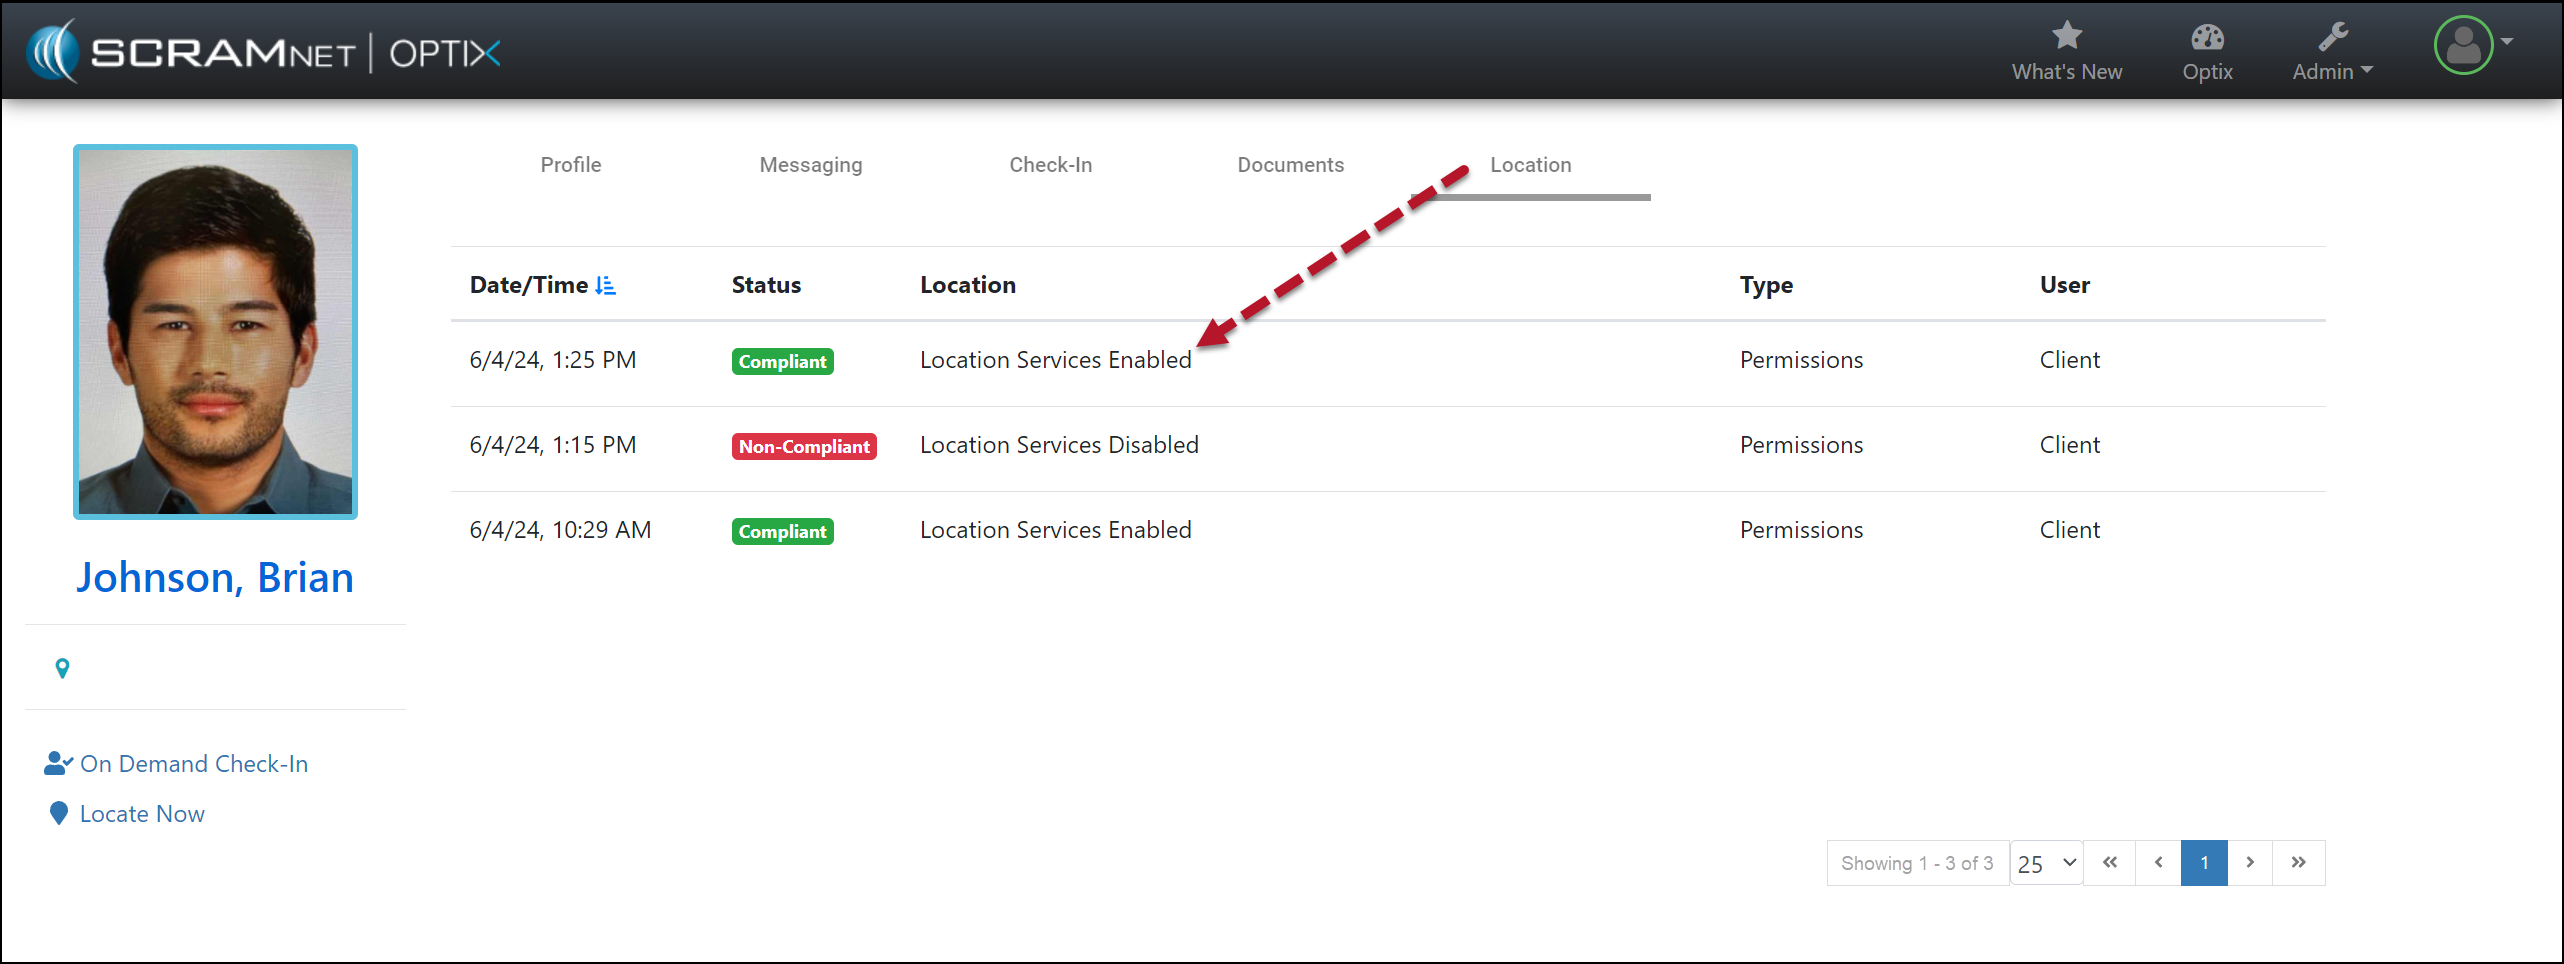
During a client’s TouchPoint monitoring program, you may now view in real-time whether or not the client has the SCRAM TouchPoint application’s location access permissions set to “Always Allow” the location data to be shared. The SCRAM TouchPoint Location tab will display “Compliant” when the client’s smartphone location permissions are set to Always Allow for the TouchPoint app, and will display “Non-Compliant” when the client has selected something other than Always Allow.
Additionally, when location services access is set to any option other than Always Allow, an event will be generated with a time and date stamp indicating when location services were disabled.
SCRAM Optix Client Location Page (click to enlarge)
As soon as the client updates the location service settings on their smartphone to “Always Allow” location access, a new event will be generated with the updated “Compliant” status.
SCRAM Optix Location Page (click to enlarge)
Android smartphones only: An event of Non-Compliant is reported within one minute of the change to the smartphone’s location service settings, however, the update from Non-Compliant to Compliant (location services enabled) may take up to 12 hours to be reported to the monitoring software.
Location Verification Notation “Prior to” and “After” an Appointment
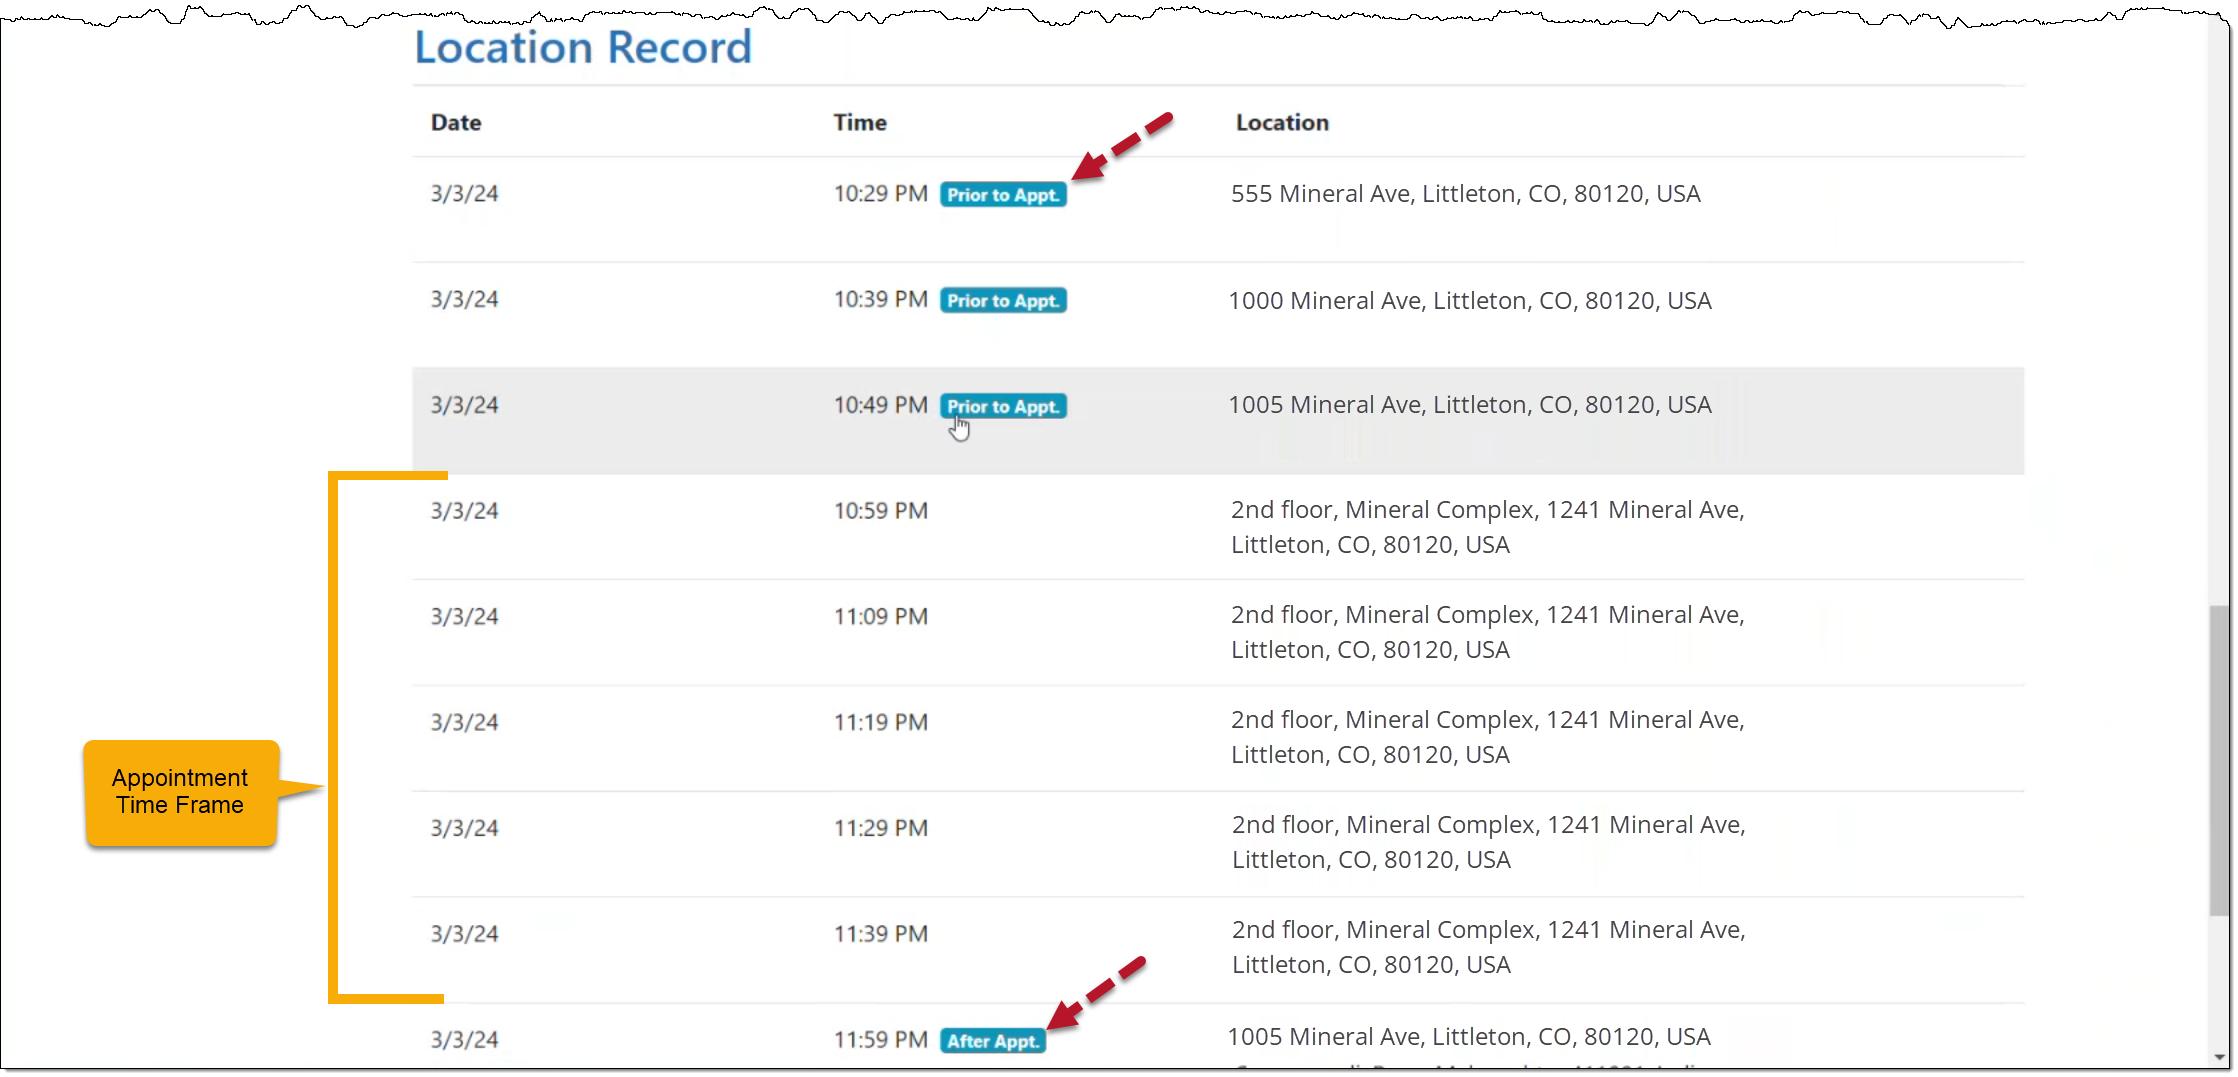
For clients on a Nexus Supervision Plan with Location Verification enabled, when accessing the Location page, the “Time” column for an individual Location Record will now clearly indicate whether the location record was captured prior to, during, or after the scheduled appointment timeframe, thus aiding in interpreting the location data presented.
When viewing the Location Record for a client’s appointment, the “Time” column displays “Prior to Appt.” for location points gathered before the appointment start time, and “After Appt.” for location points gathered after the appointment.
When there is no notation, the location points were captured within the appointment timeframe.
Client Location Record with Details of Appointment (click to enlarge)
Disable Location Verification Services
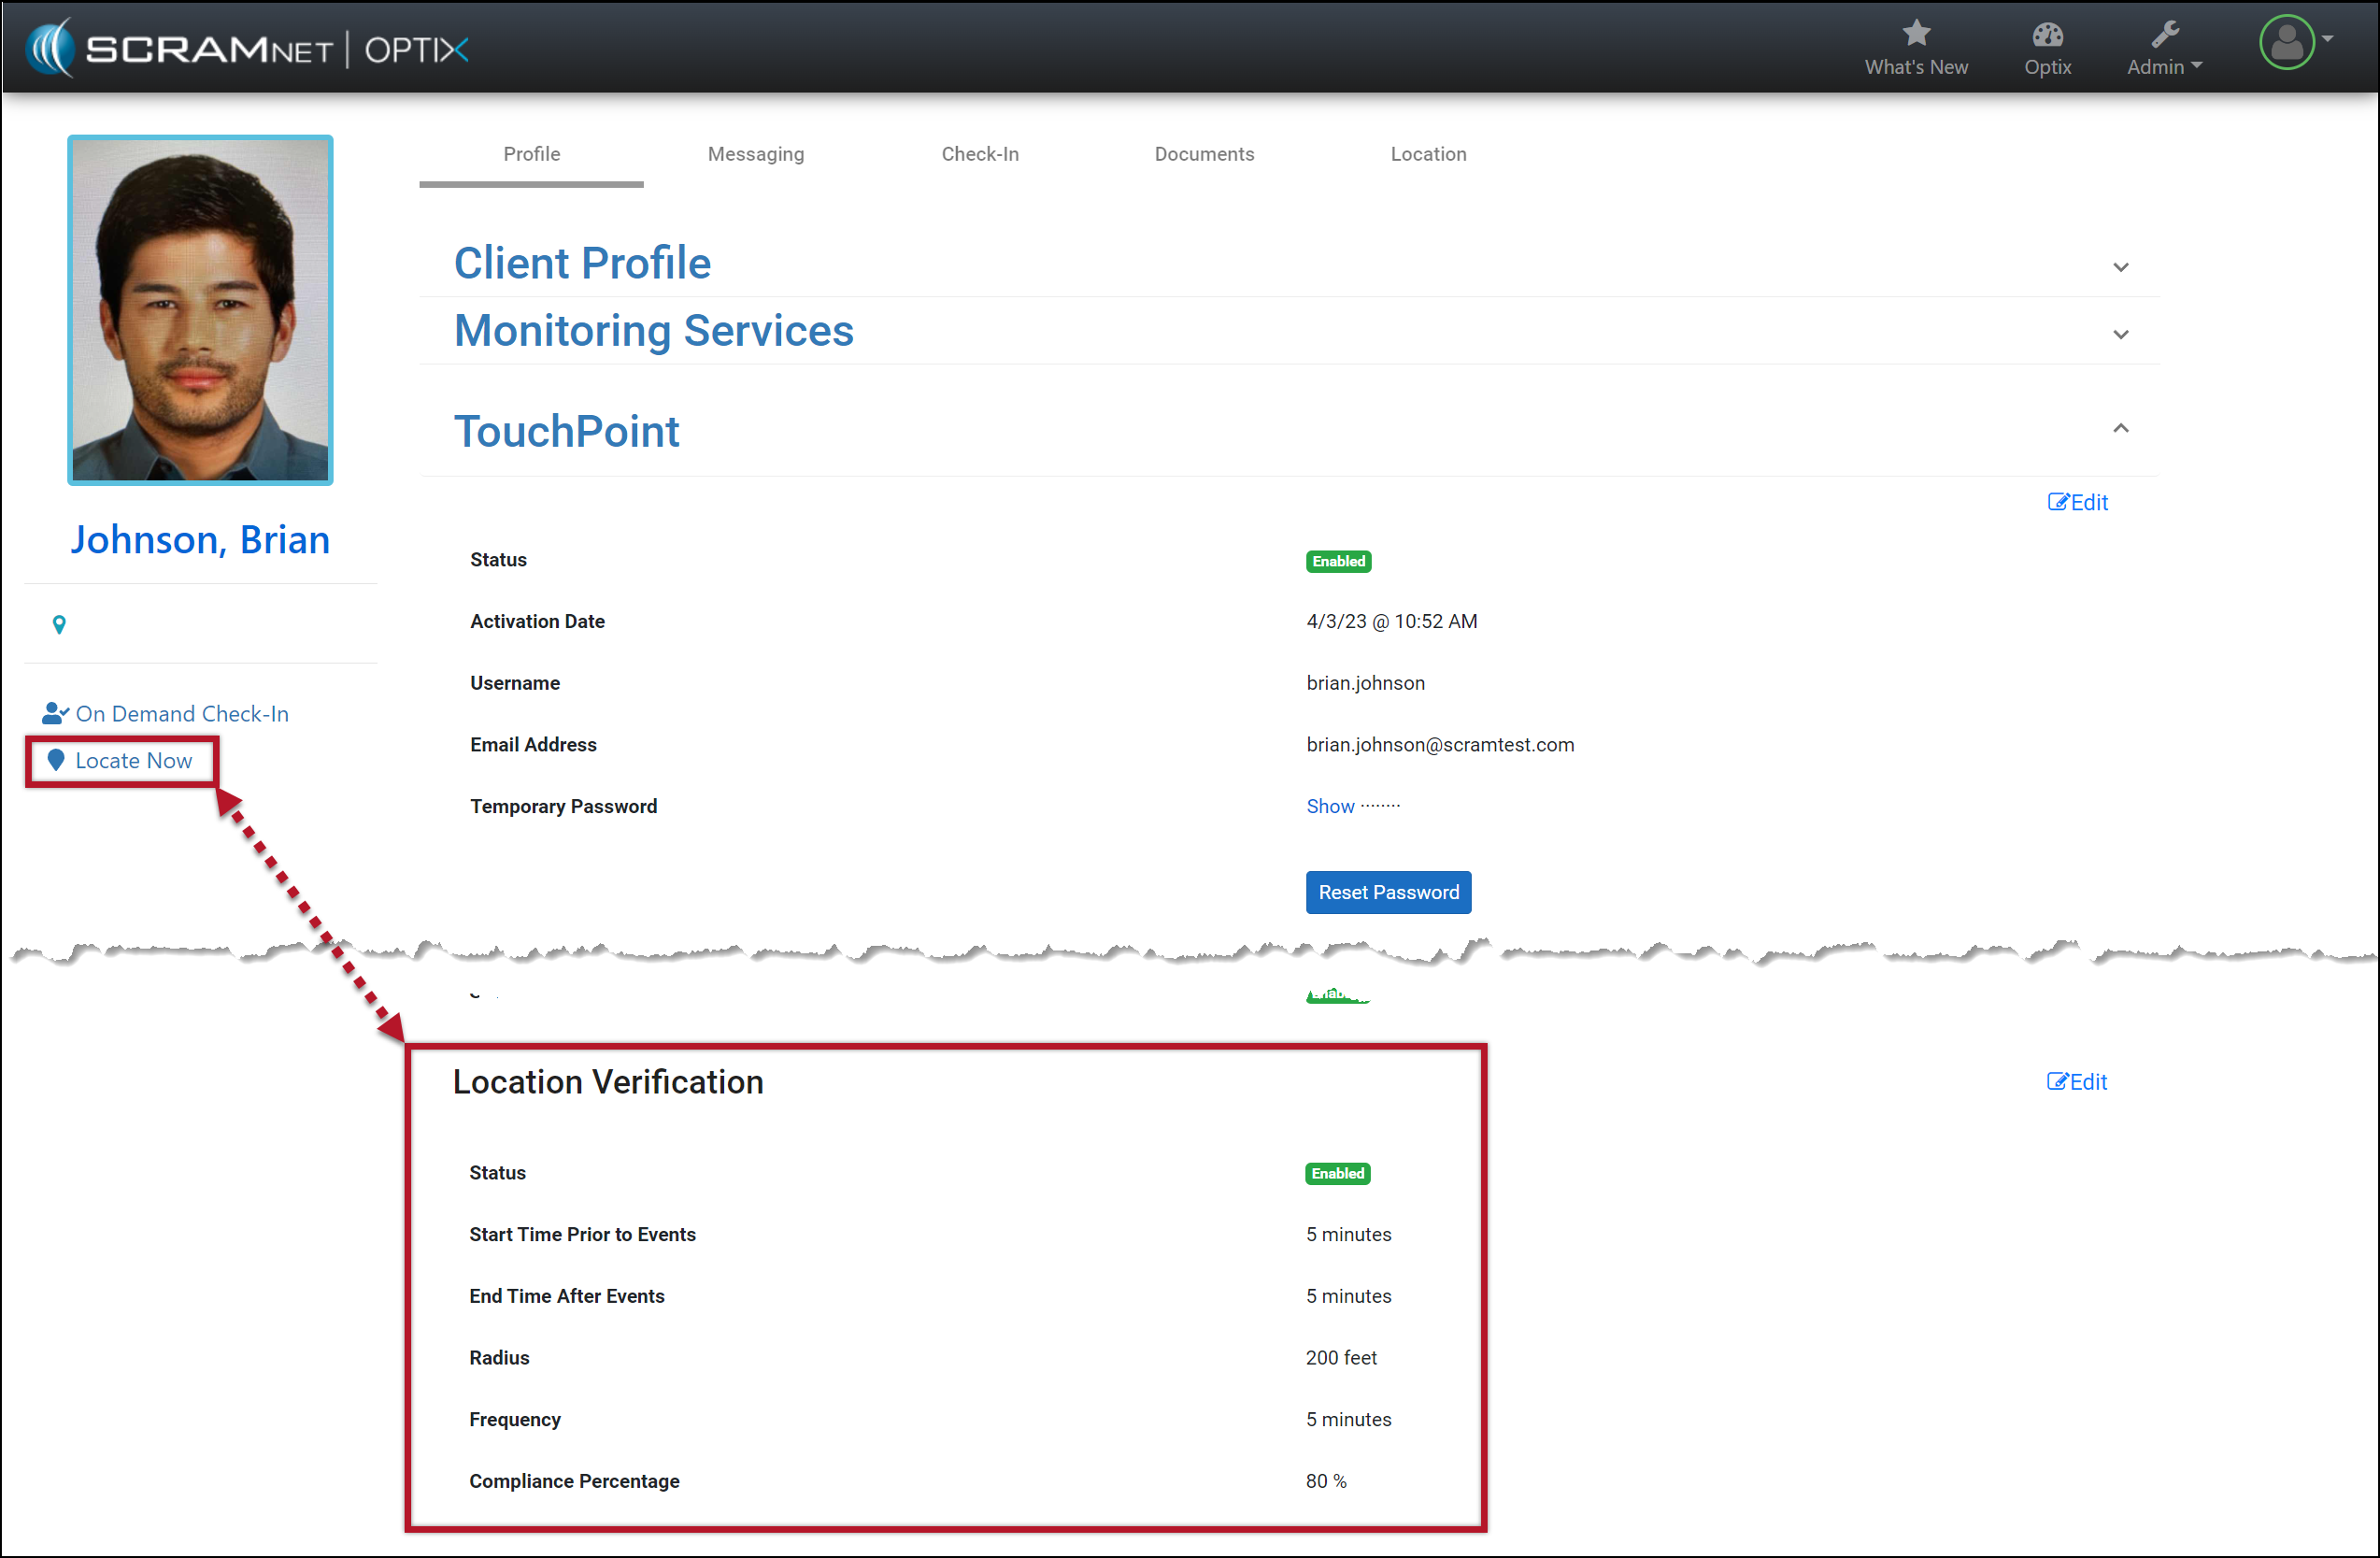
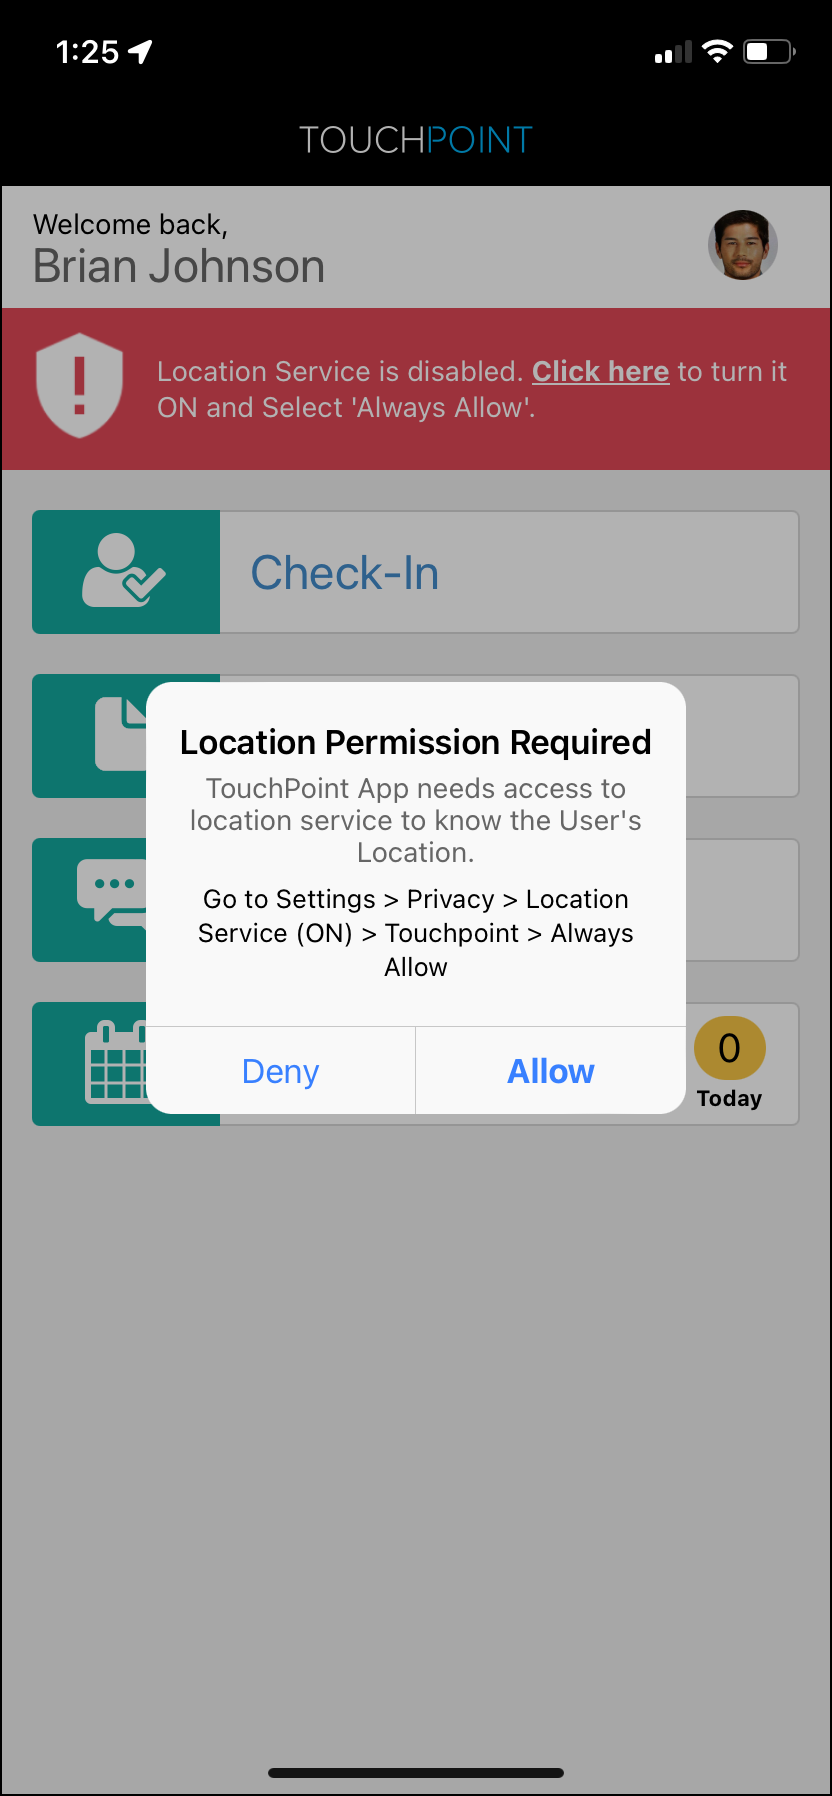
Currently, any time the client restricts access to their smartphone’s location data, the SCRAM TouchPoint application prompts the client to allow access to this data by sending push notifications, a pop-up, and a red banner within the application itself. These notifications will continue until the client updates the application’s location permissions.
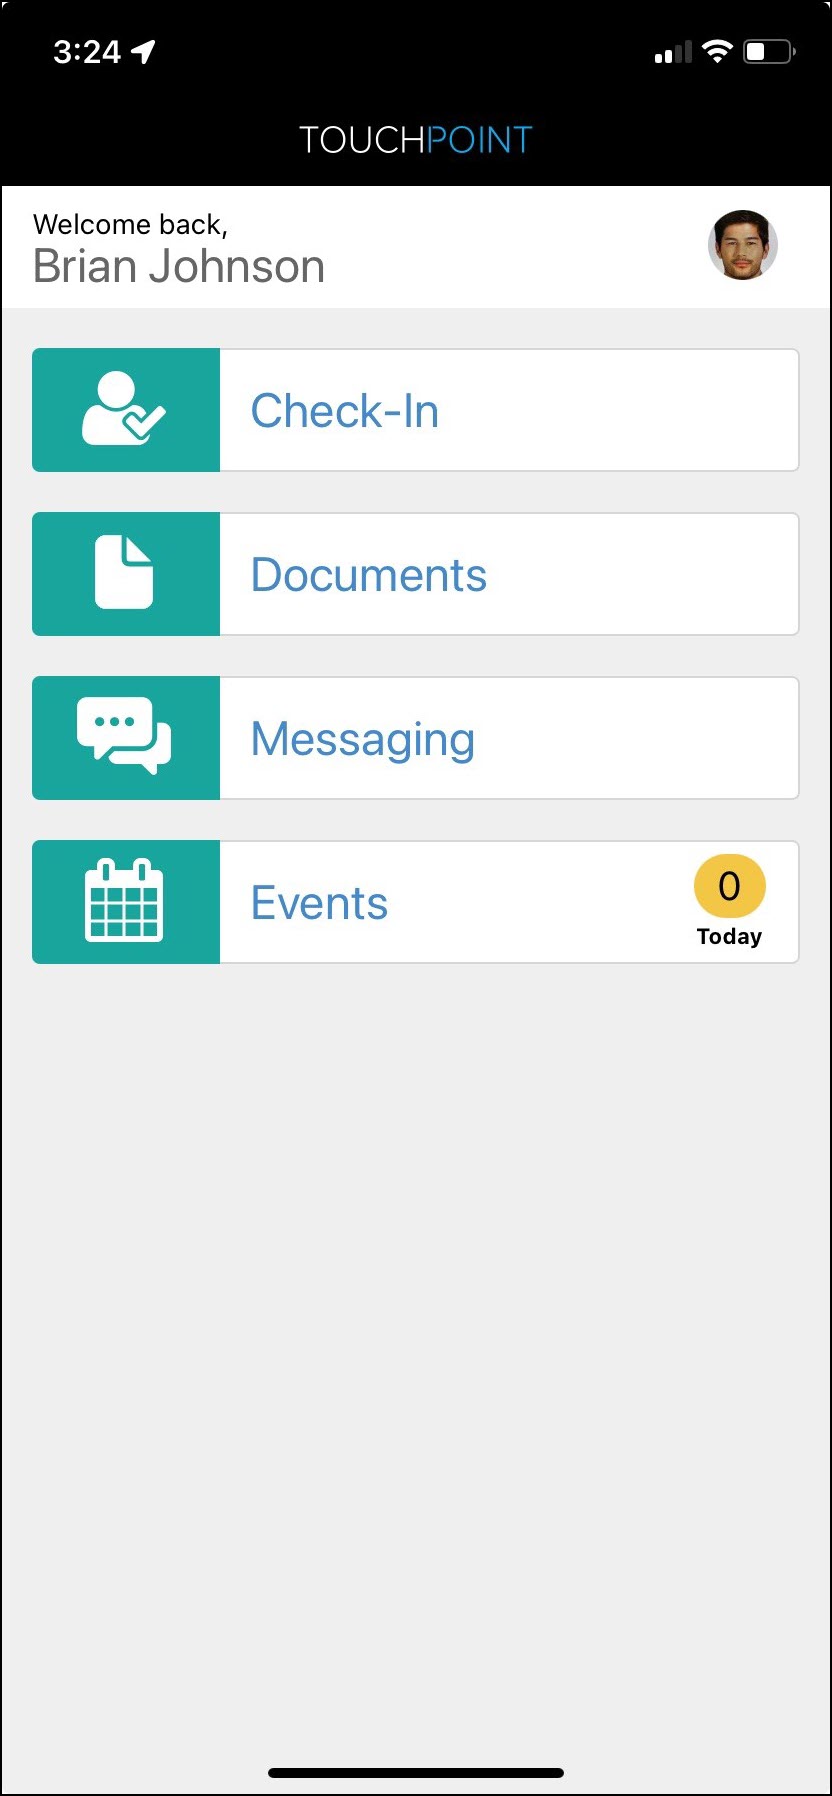
Client Location Verification Enabled (click to enlarge)
SCRAM TouchPoint Mobile App Location Permission Alert (click to enlarge)
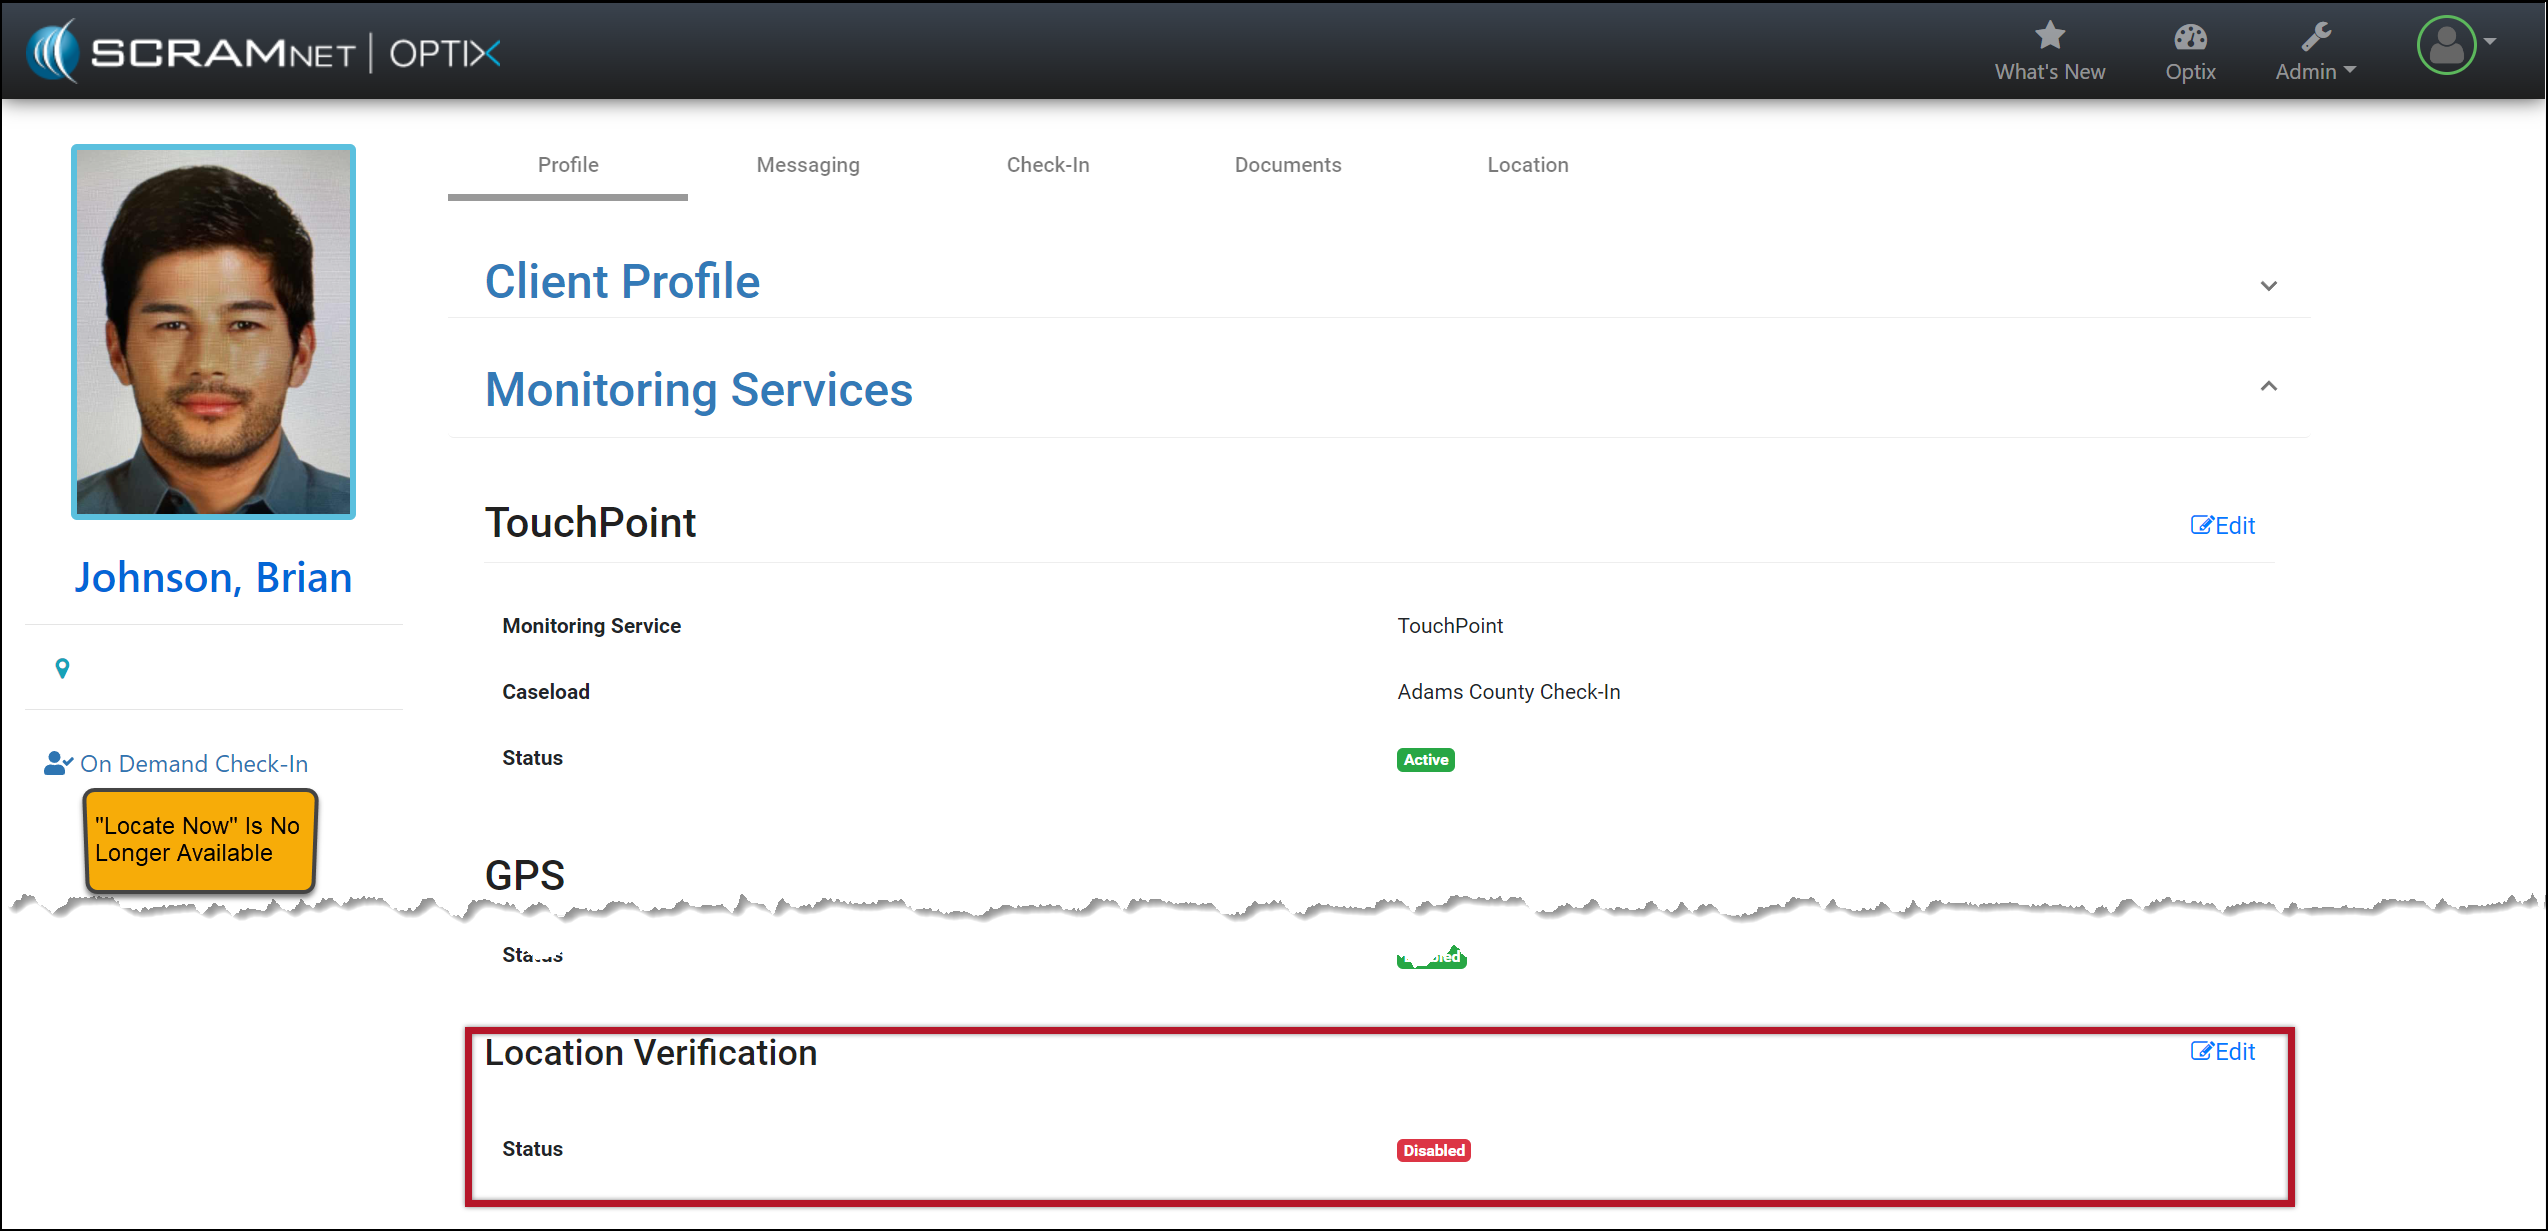
With this update, you may disable the Location Verification feature on the client’s Profile page when it is not required for client monitoring. Once disabled, regardless of the smartphone location access settings, the client will no longer be prompted to share their smartphone’s location data. Additionally, the on-demand Locate Now feature will no longer be available.
Client Location Verification Disabled (click to enlarge)
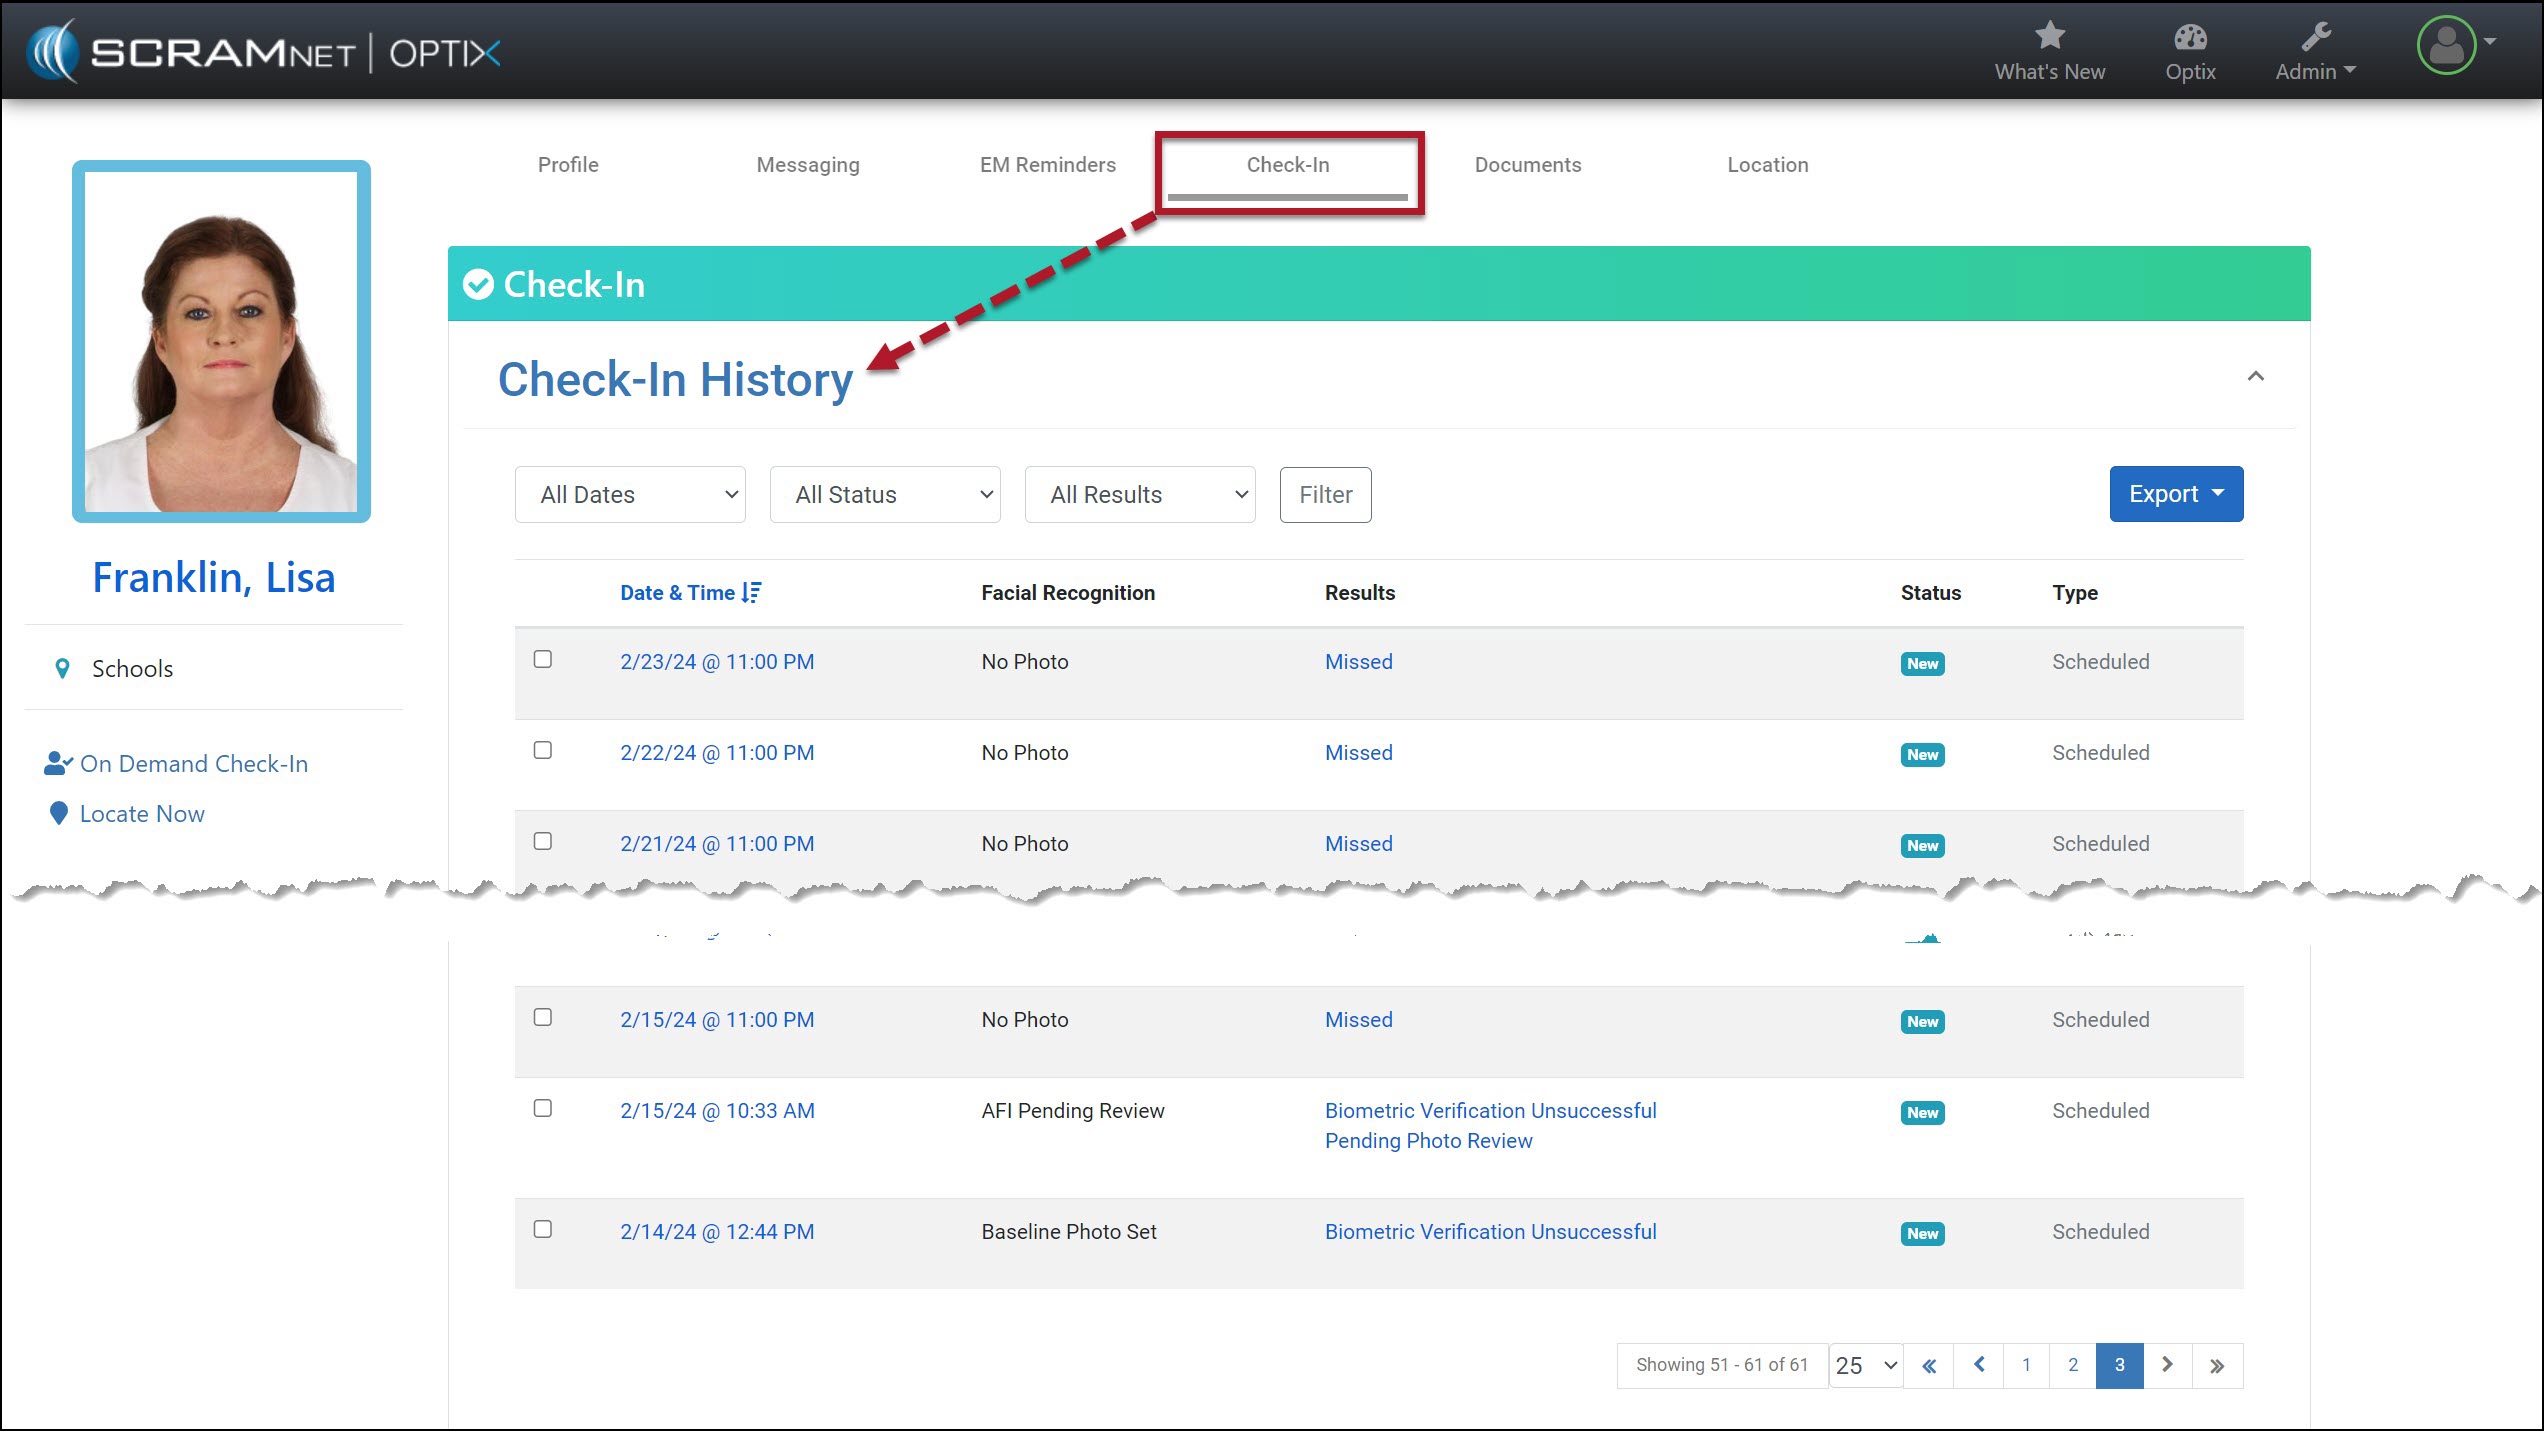
On May 16, 2024, SCRAM Systems will release an enhancement to the SCRAM TouchPoint client Check-In caseload. This enhancement allows you to select and create a PDF or print up to 25 Check-In results from the client’s Check-In History page simultaneously. This can be helpful when presenting the client’s Check-In history to the supervising authority.
Starting on the client’s Check-In History page for the client:
Client’s TouchPoint Check-In History page – click to enlarge
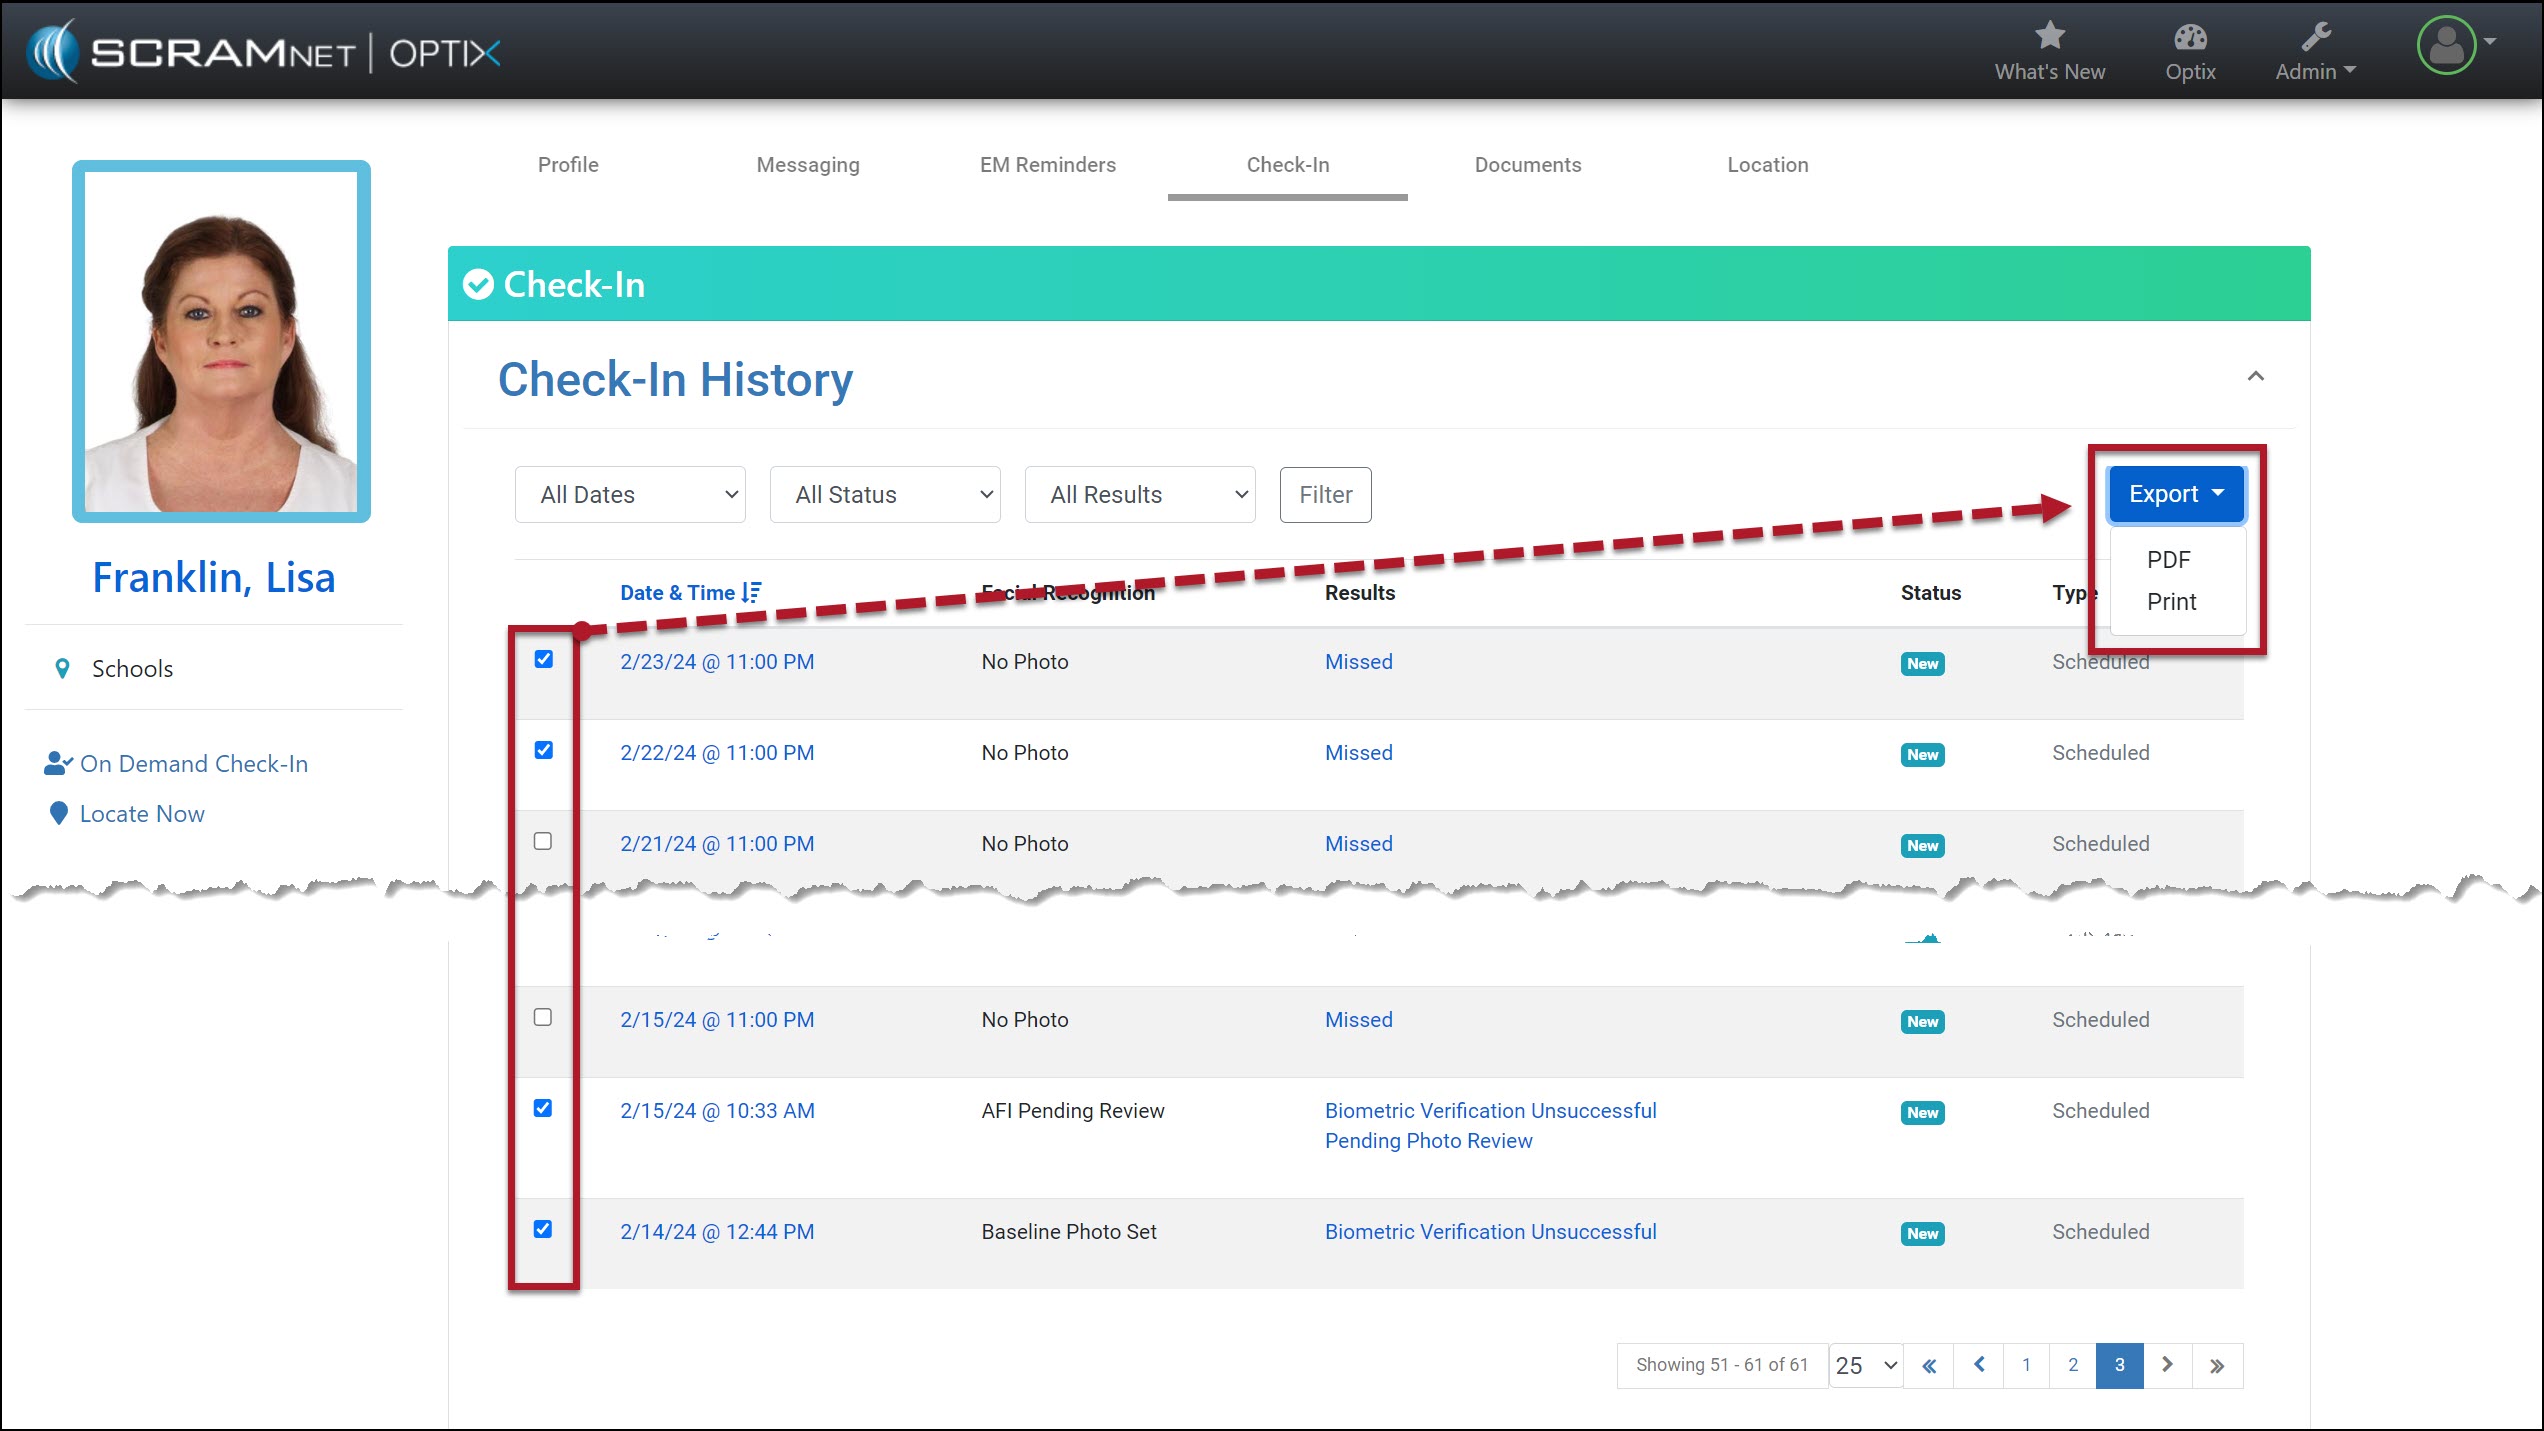
Select the checkboxes next to each Check-In you wish to print or include in a PDF (limit of 25 results).
Select the Export button and choose either the PDF or Print option.
Check-In Results selected and Export Dropdown Menu options – click to enlarge
When selecting the Check-In results to print or create a PDF, you may select up to 25 results displayed on the current page. If the results you wish to include are on multiple pages, change the number of results displayed and then make your selections.
Update Number of Results Displayed on the Page – click to enlarge
Alternatively, you may print or create a PDF for each page individually.
Each result is displayed on its own page when printing or creating a PDF. For example, if you choose 25 check-in results, the document will be at least 25 pages long.
Sample of Printed Check-In Details – click to enlarge
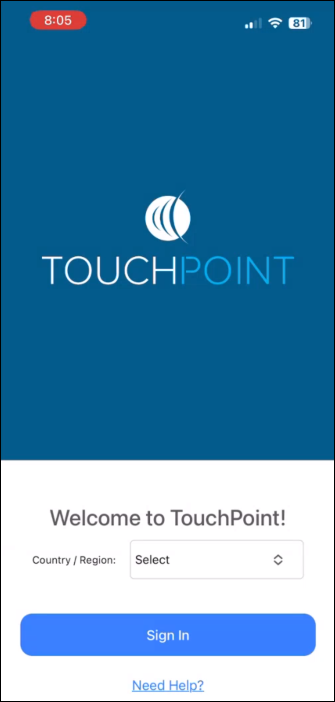
On April 25, 2024, SCRAM Systems will release an update to the SCRAM TouchPoint mobile application. With this update, the first time a new SCRAM TouchPoint client signs into their application, they will be prompted to select a Country/Region. After making their selection, they may continue with the current login process.
Current TouchPoint clients who are already signed into the app will not be required to select a Country/Region. Current users will only need to select their Country/Region if they decide to Sign Out of the app from the TouchPoint Profile screen first.
New Country / Region field
Country / Region Menu Options
Canada Selected
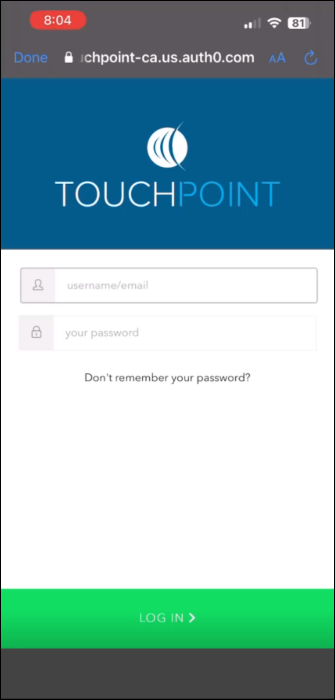
Username and Password Log In Screen
The latest version of the TouchPoint app will be available to clients in the app stores. As a best practice, SCRAM Systems recommends that all TouchPoint app users enable their smartphones to automatically update their apps to make this process easier.
Troubleshooting a Login Issue
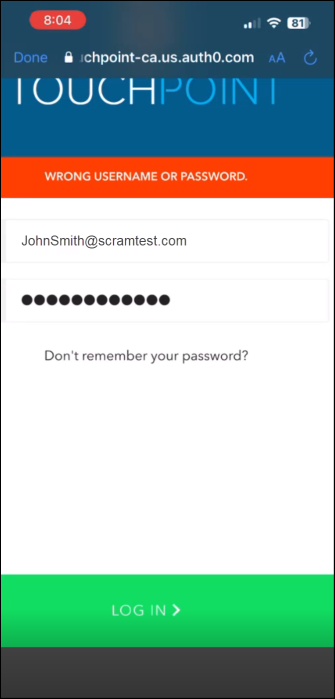
If the client selects a Country/Region not associated with their profile, their application will display a “WRONG USERNAME OR PASSWORD” banner when attempting to log in. To rectify this, have the client close the application, reopen it, and select the correct Country/Region option.
Error Message
Tips:
If the user continues to receive the error banner after choosing the correct Country/Region option, verify the user’s ID and select the “Don’t remember your password?” link.
If the client transfers from a Canadian program to a United States program or vice versa, they must uninstall and reinstall the application on their smartphone.
On April 10, 2024, SCRAM Systems will release an enhancement to your SCRAM 24/7 client caseload. With this enhancement, you may create and edit a client’s Remote Breath Pro’s breath testing schedule from within the SCRAM 24/7 system.
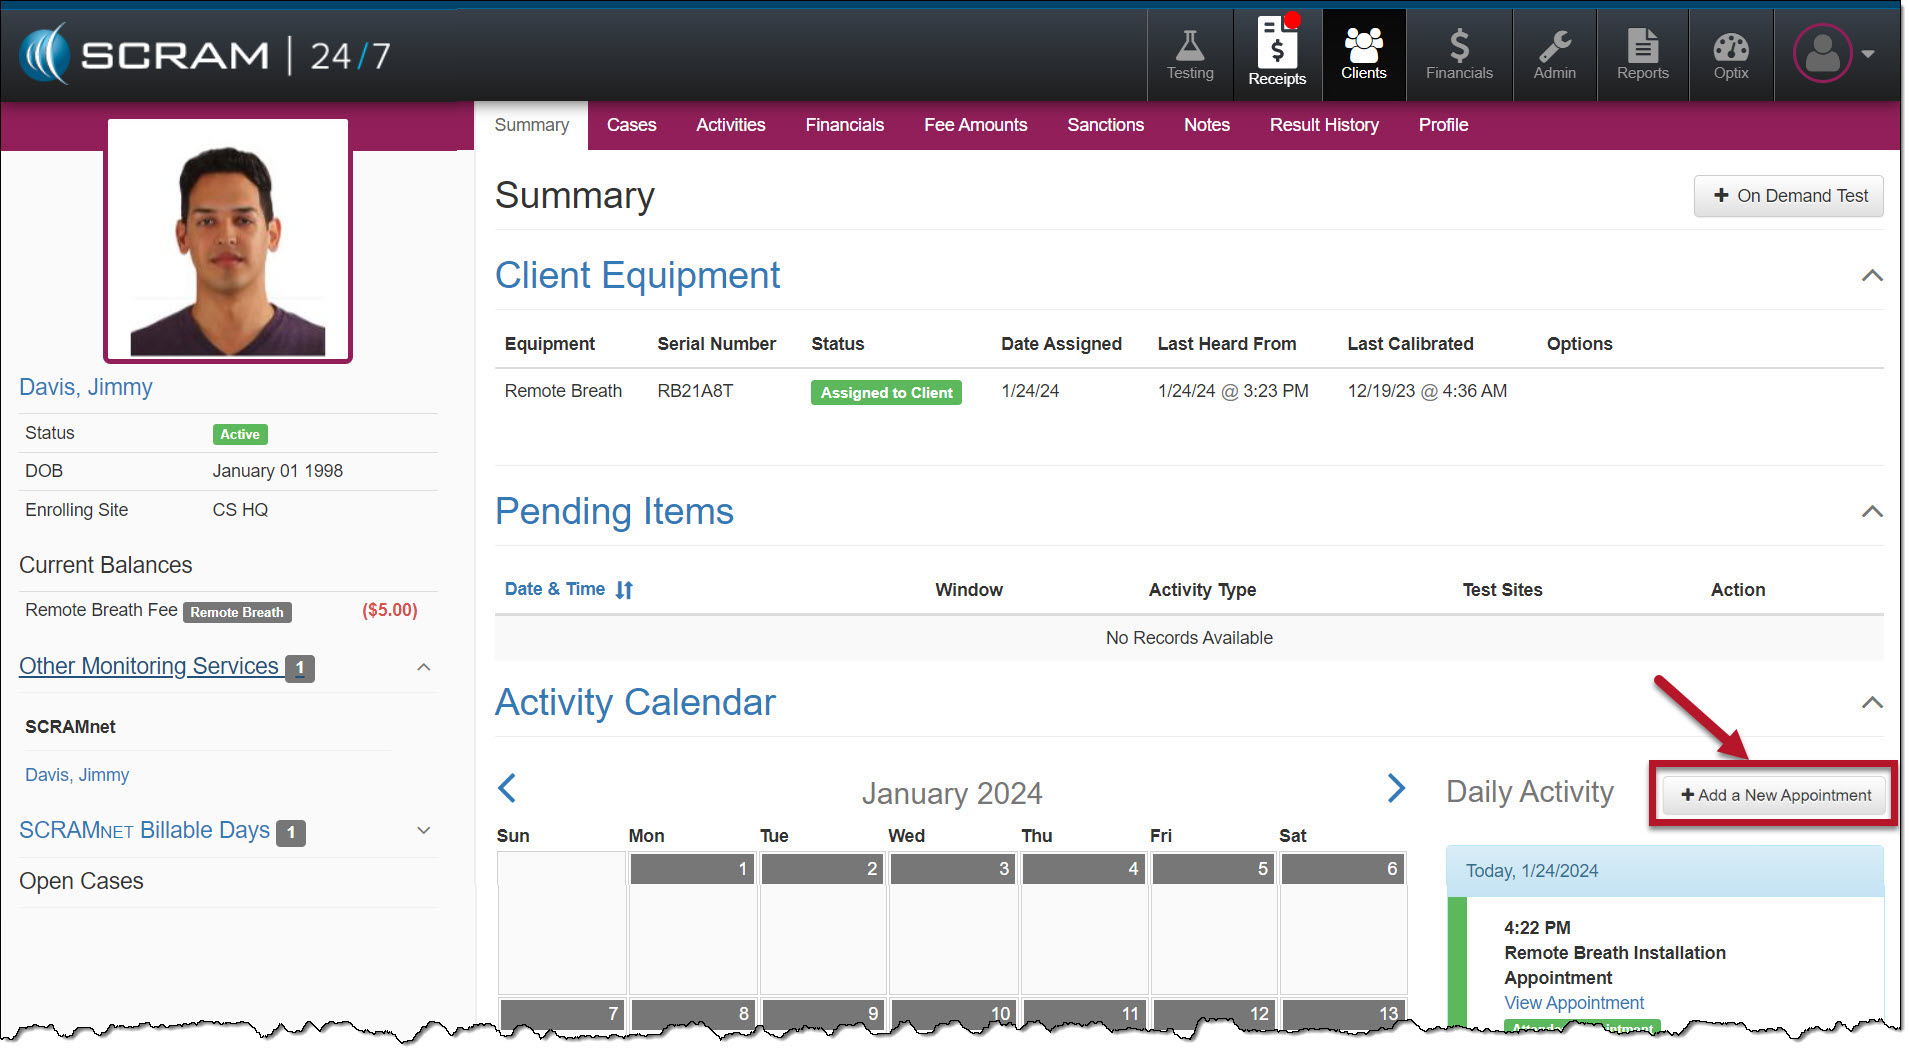
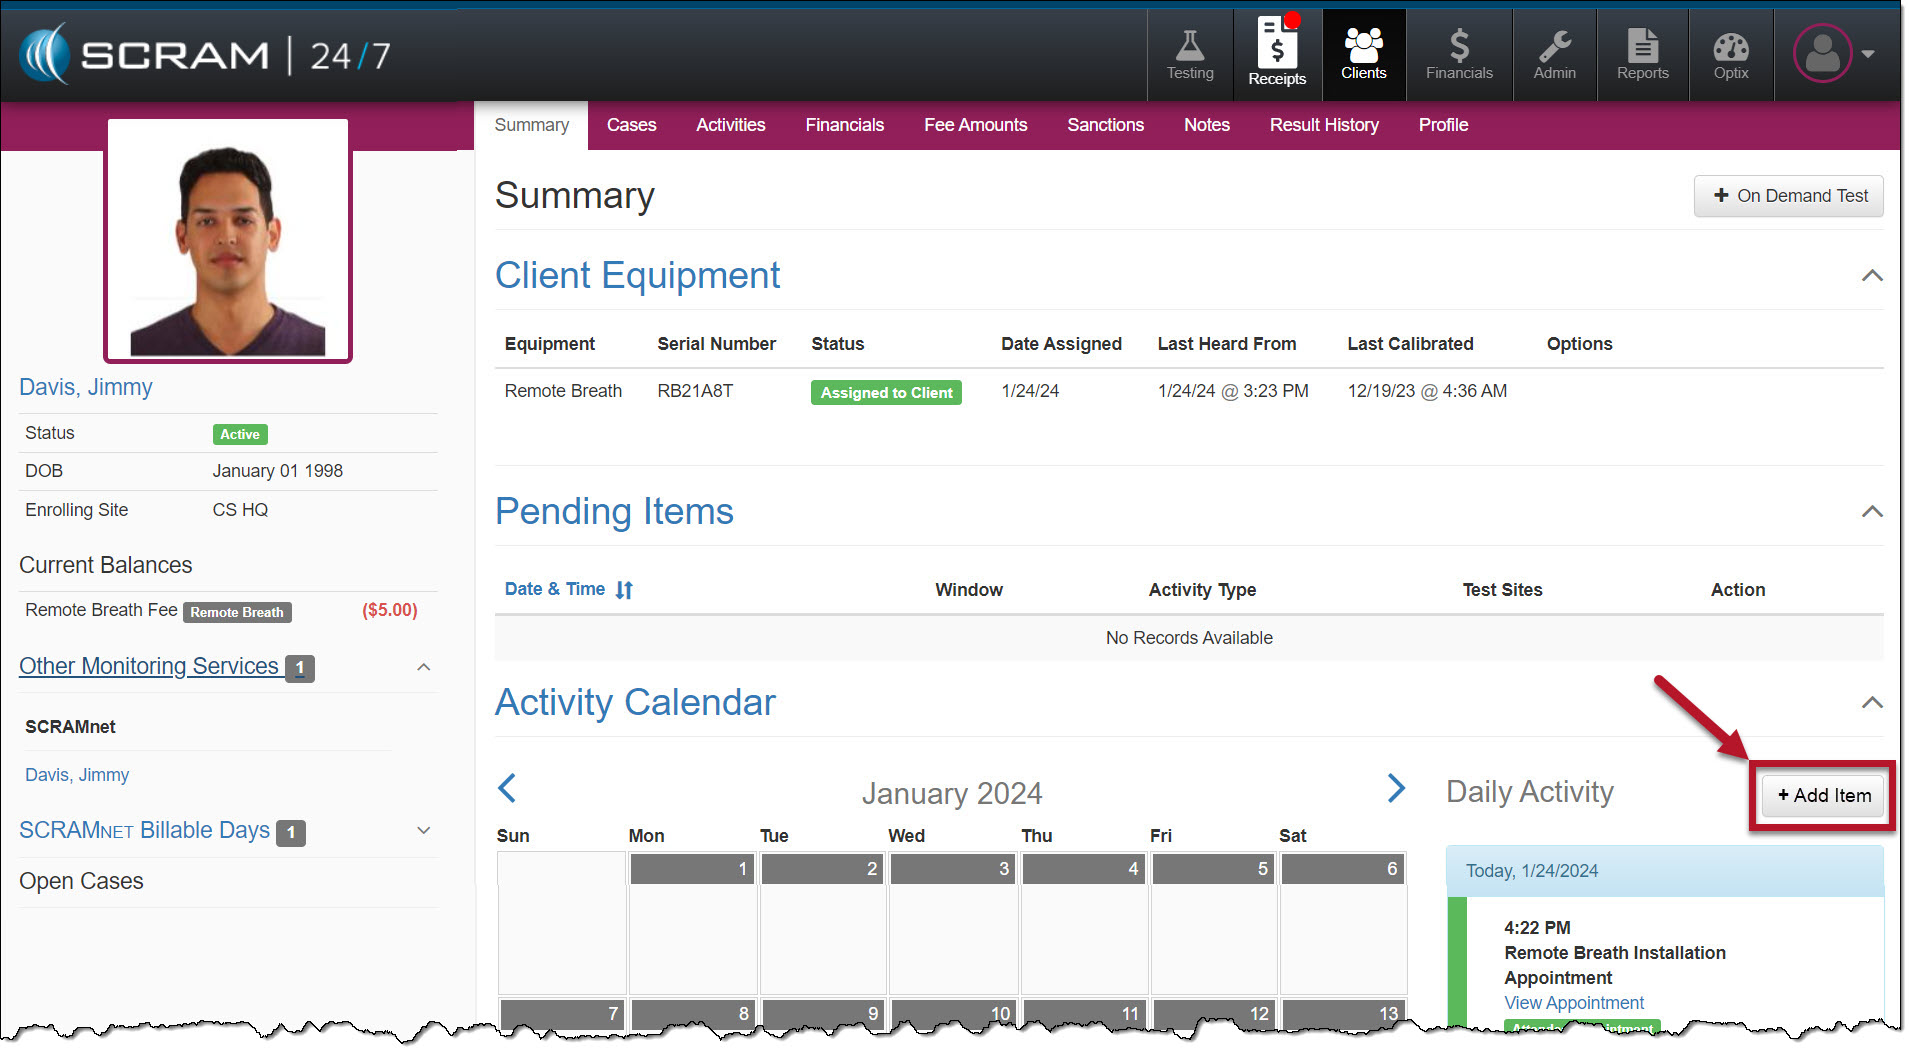
To support adding the breath testing schedule within SCRAM 24/7, the +Add New Appointment button on the client’s Summary page will be updated to “+Add Item.”
Current +Add a New Appointment Button – click to enlargeUpdated +Add Item Button – click to enlarge
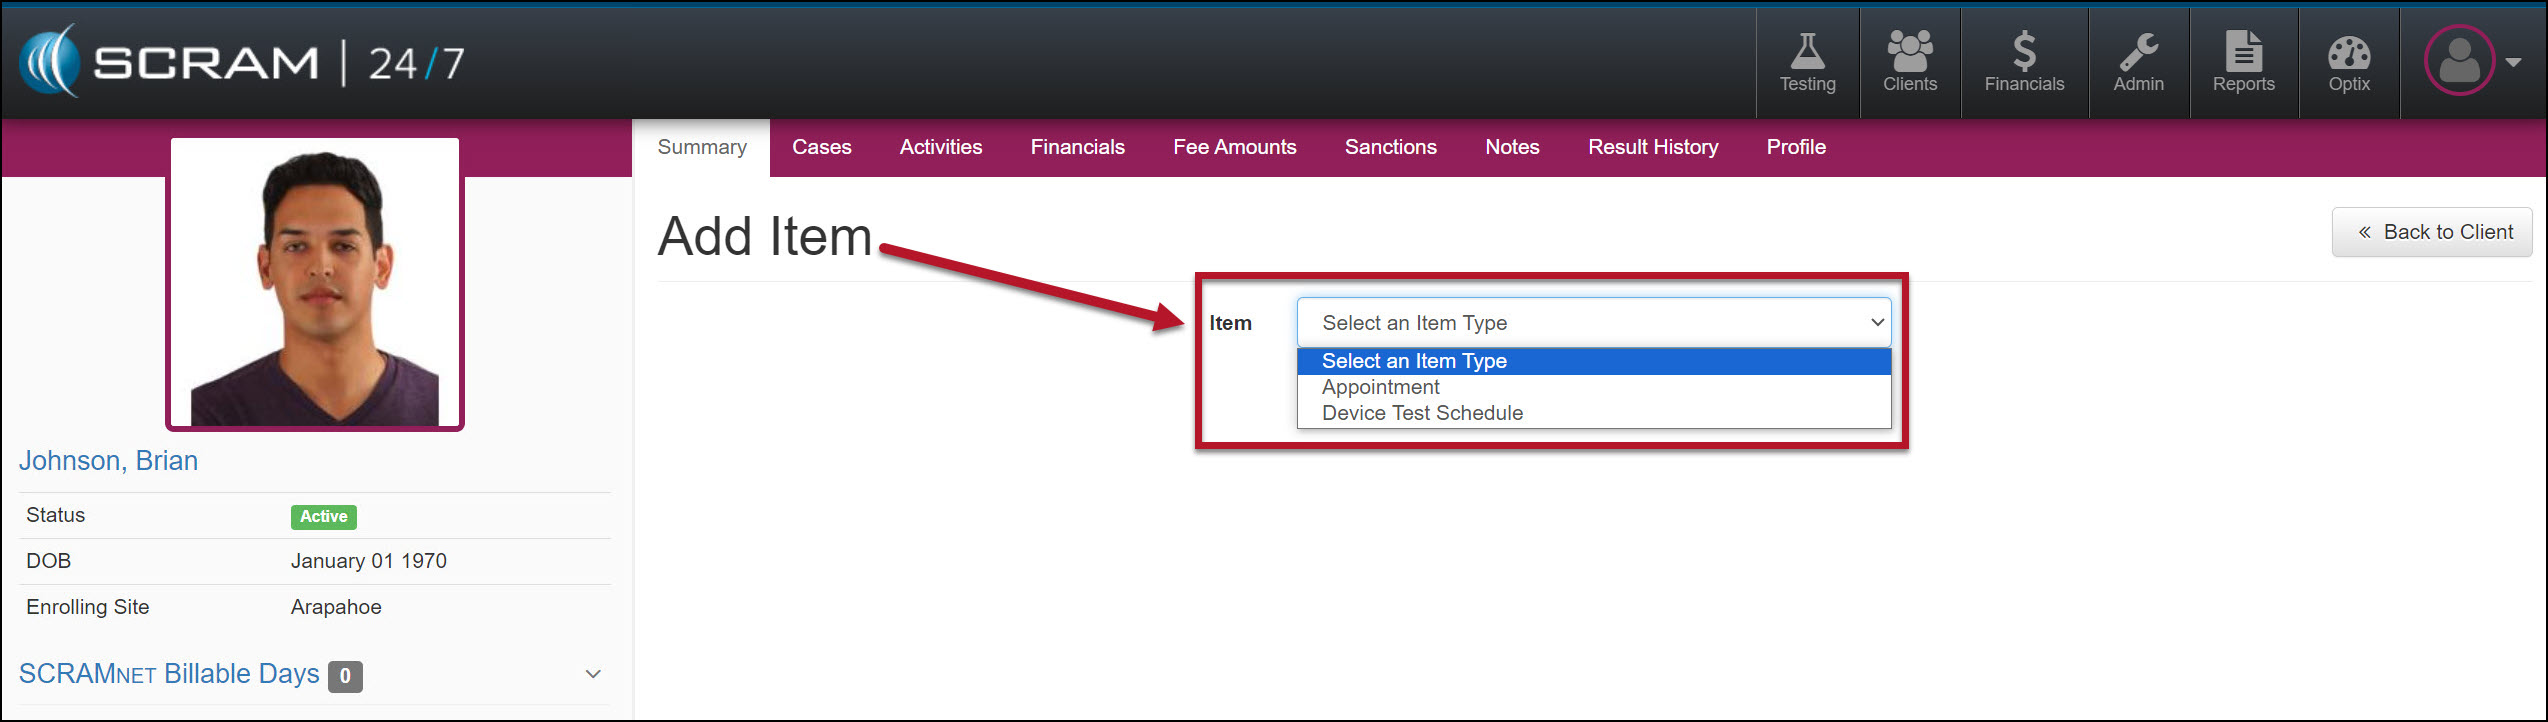
Once selected, the Add Item page will display a dropdown menu with the appropriate options based on the client’s Activities.
Add Item Dropdown Menu – click to enlarge
Breath Test Schedule
Add a Breath Test Schedule
Select the +Add Item button in the Daily Activity stream to add a breath testing schedule to the client.
Open the Item dropdown menu on the Add Item page and select the Device Test Schedule option.
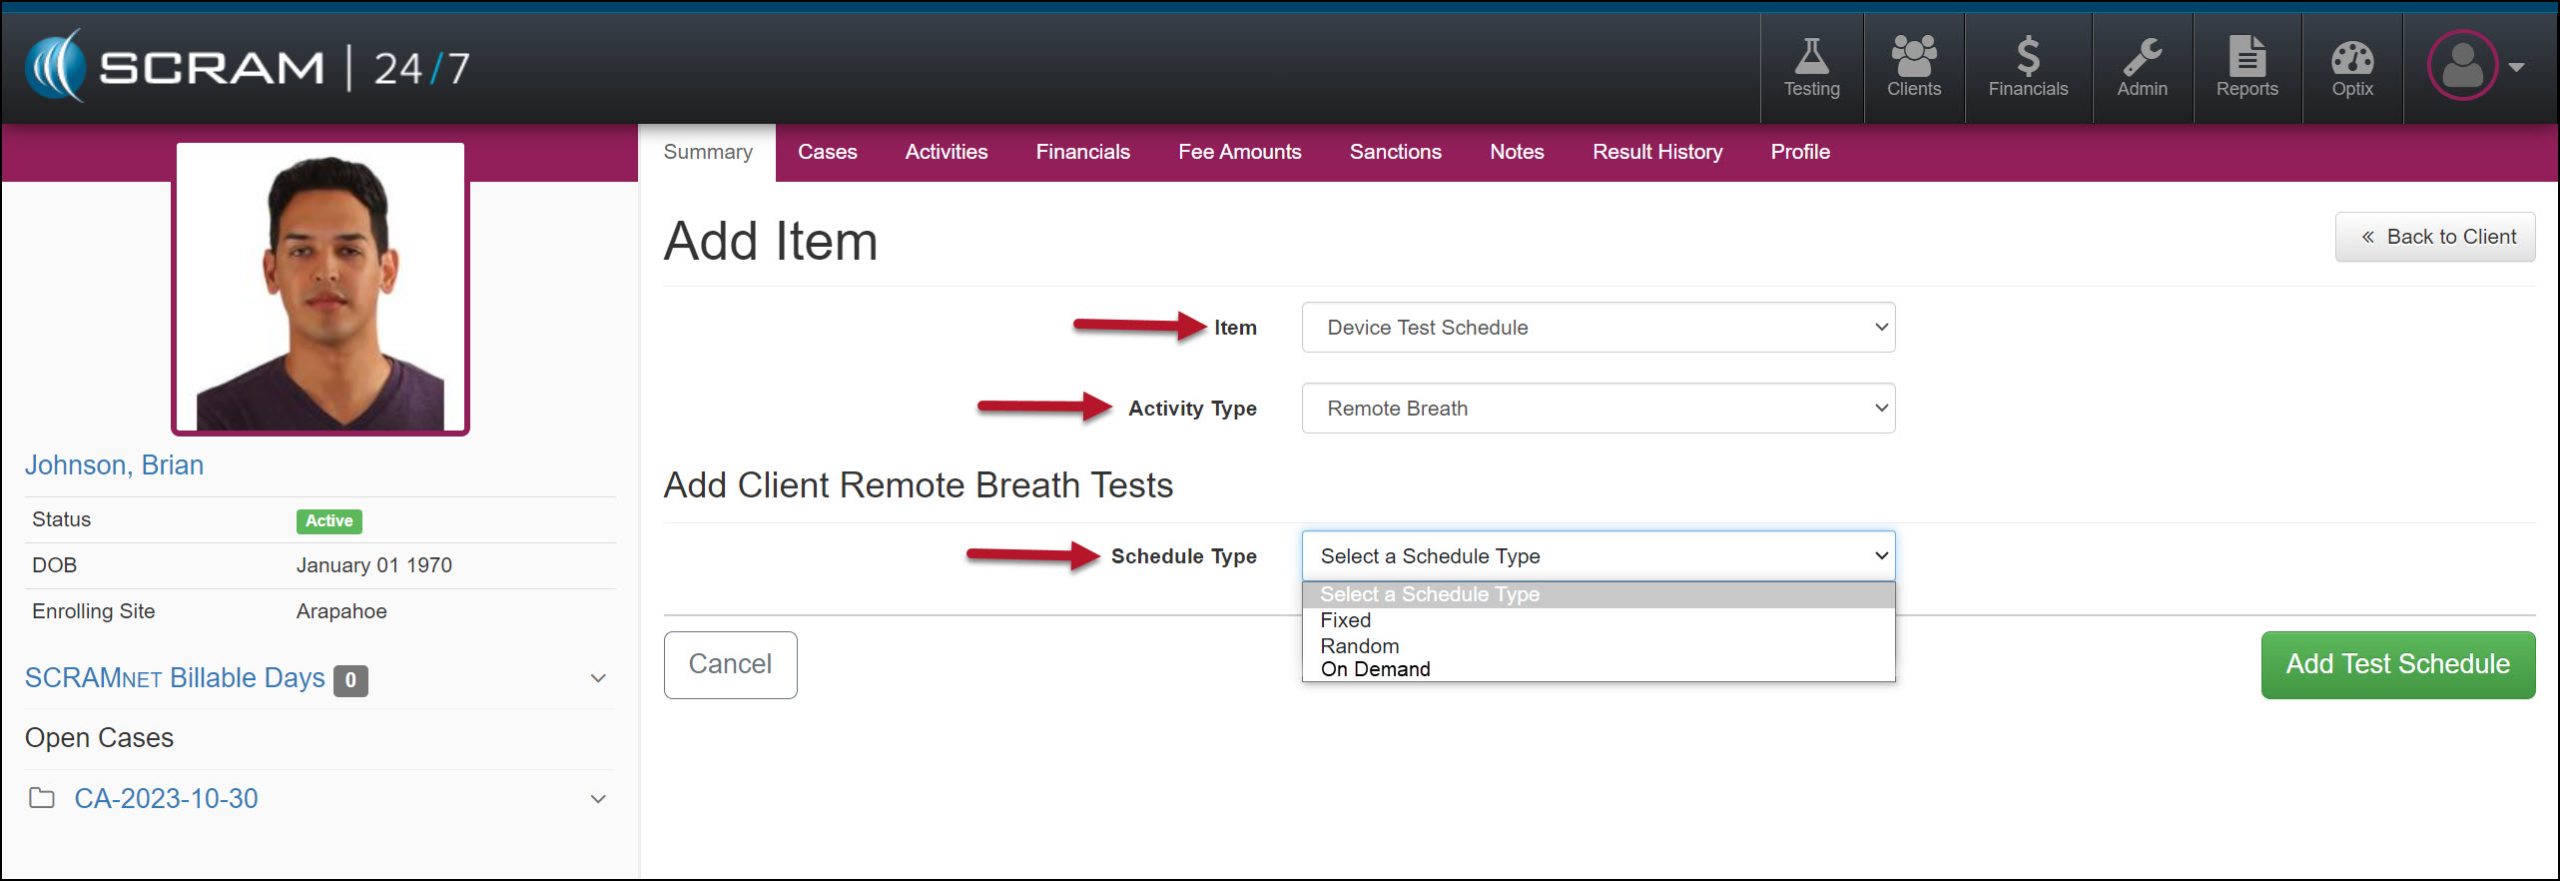
In the Activity Type dropdown, select the option of Remote Breath.
In the Add Client Remote Breath Test section, expand the Schedule Type menu and select either the Fixed or Random test option.
Add Item page, Device Test Schedule for Remote Breath – click to enlarge
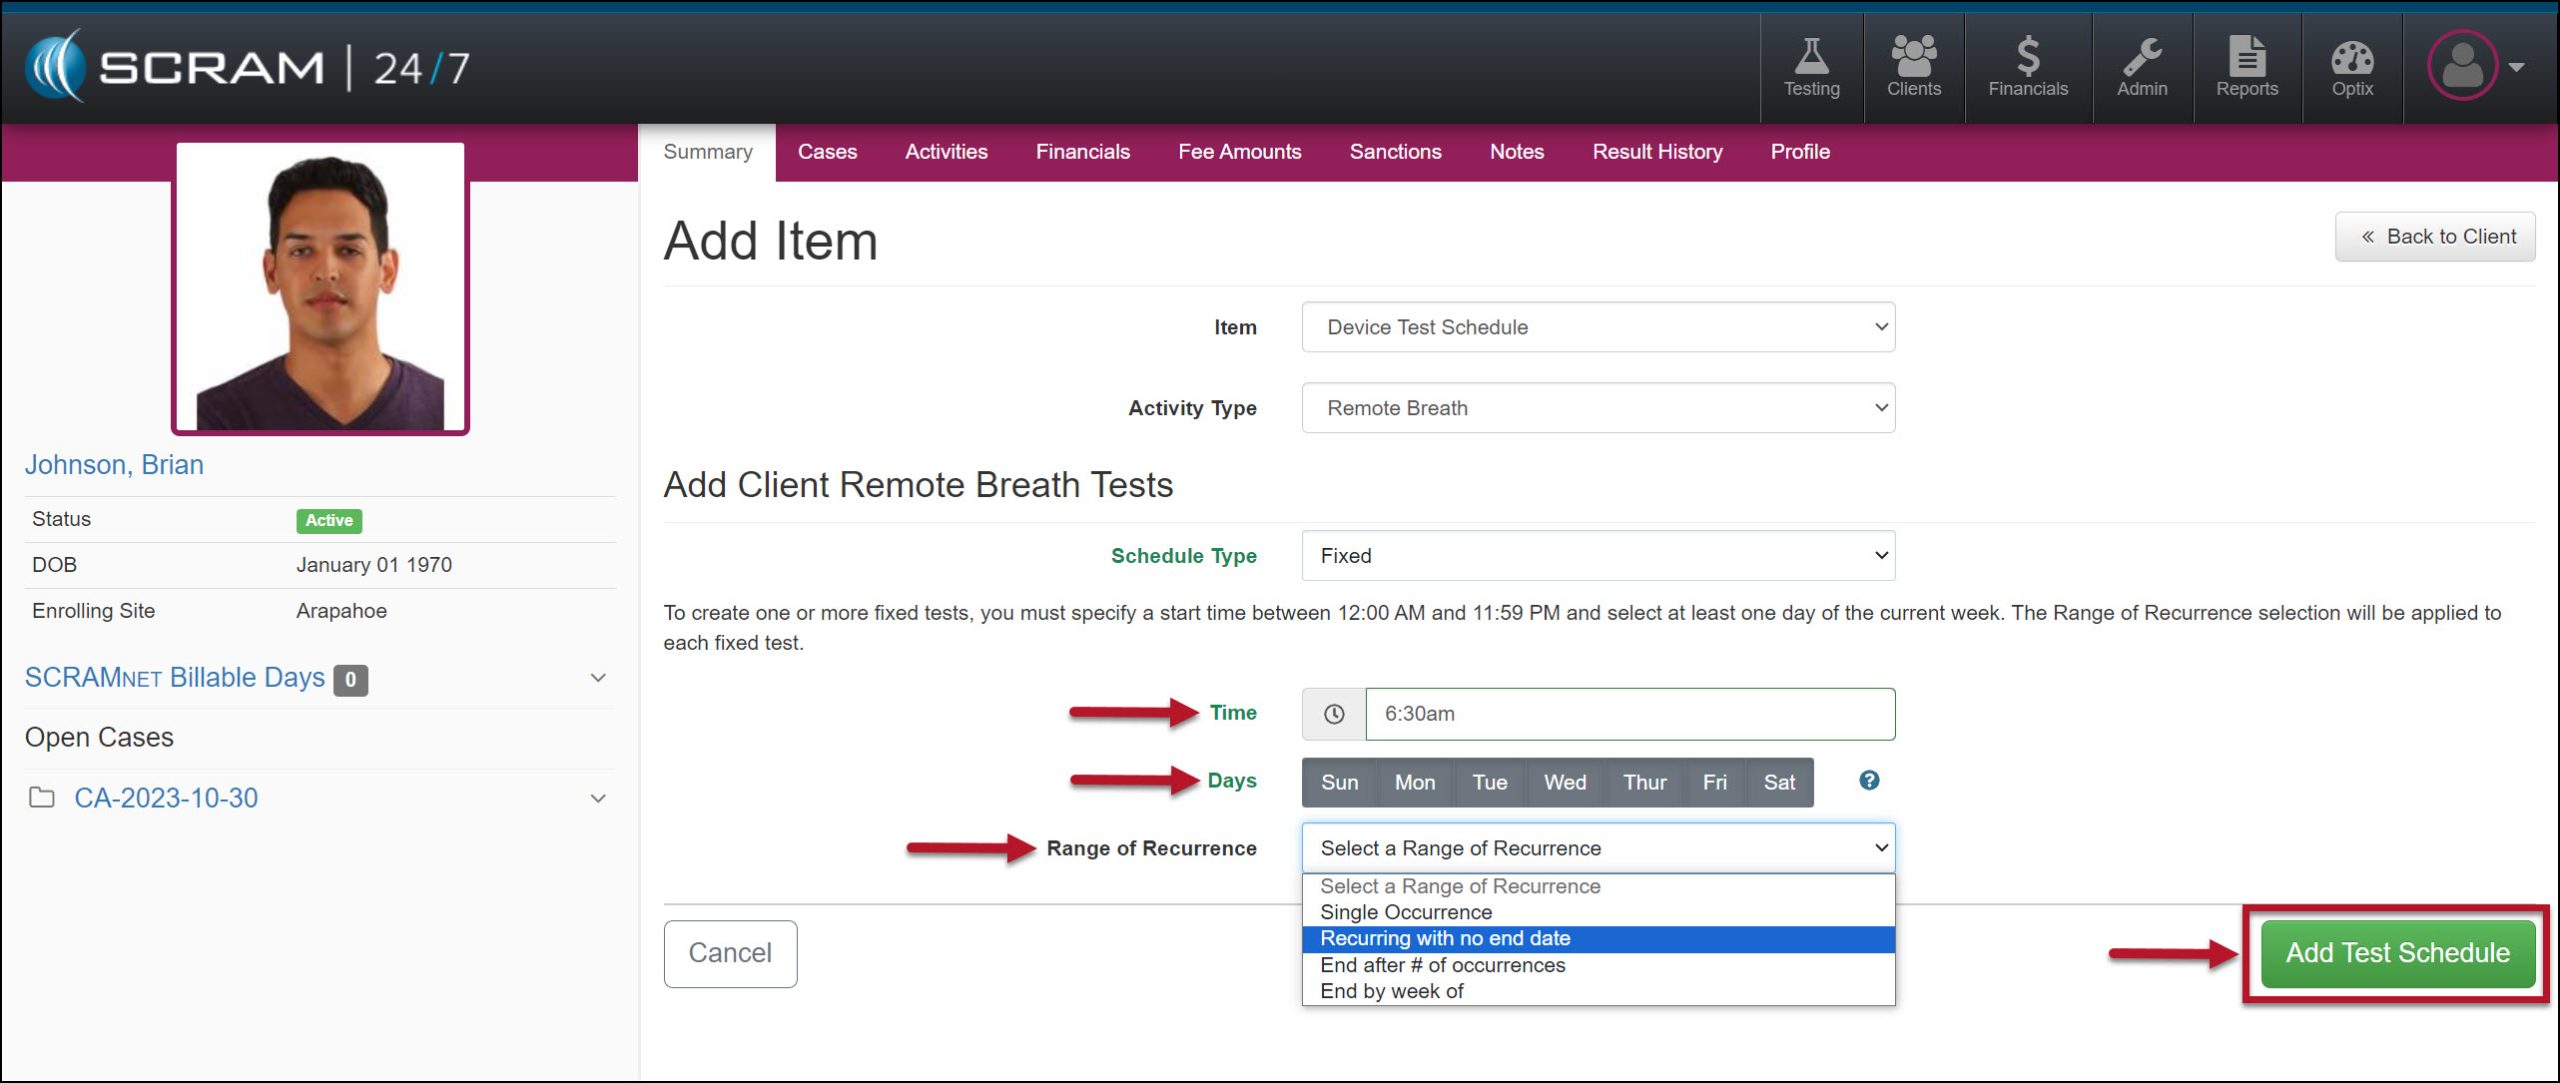
Enter the Time, Day(s) of the week, and the Range of Recurrence for the testing window.
The system will alert you if the schedule you create overlaps with another breath testing window.
Remote Breath Test Schedule Details – click to enlarge
Select the Add Test Schedule button to save the breath test schedule.
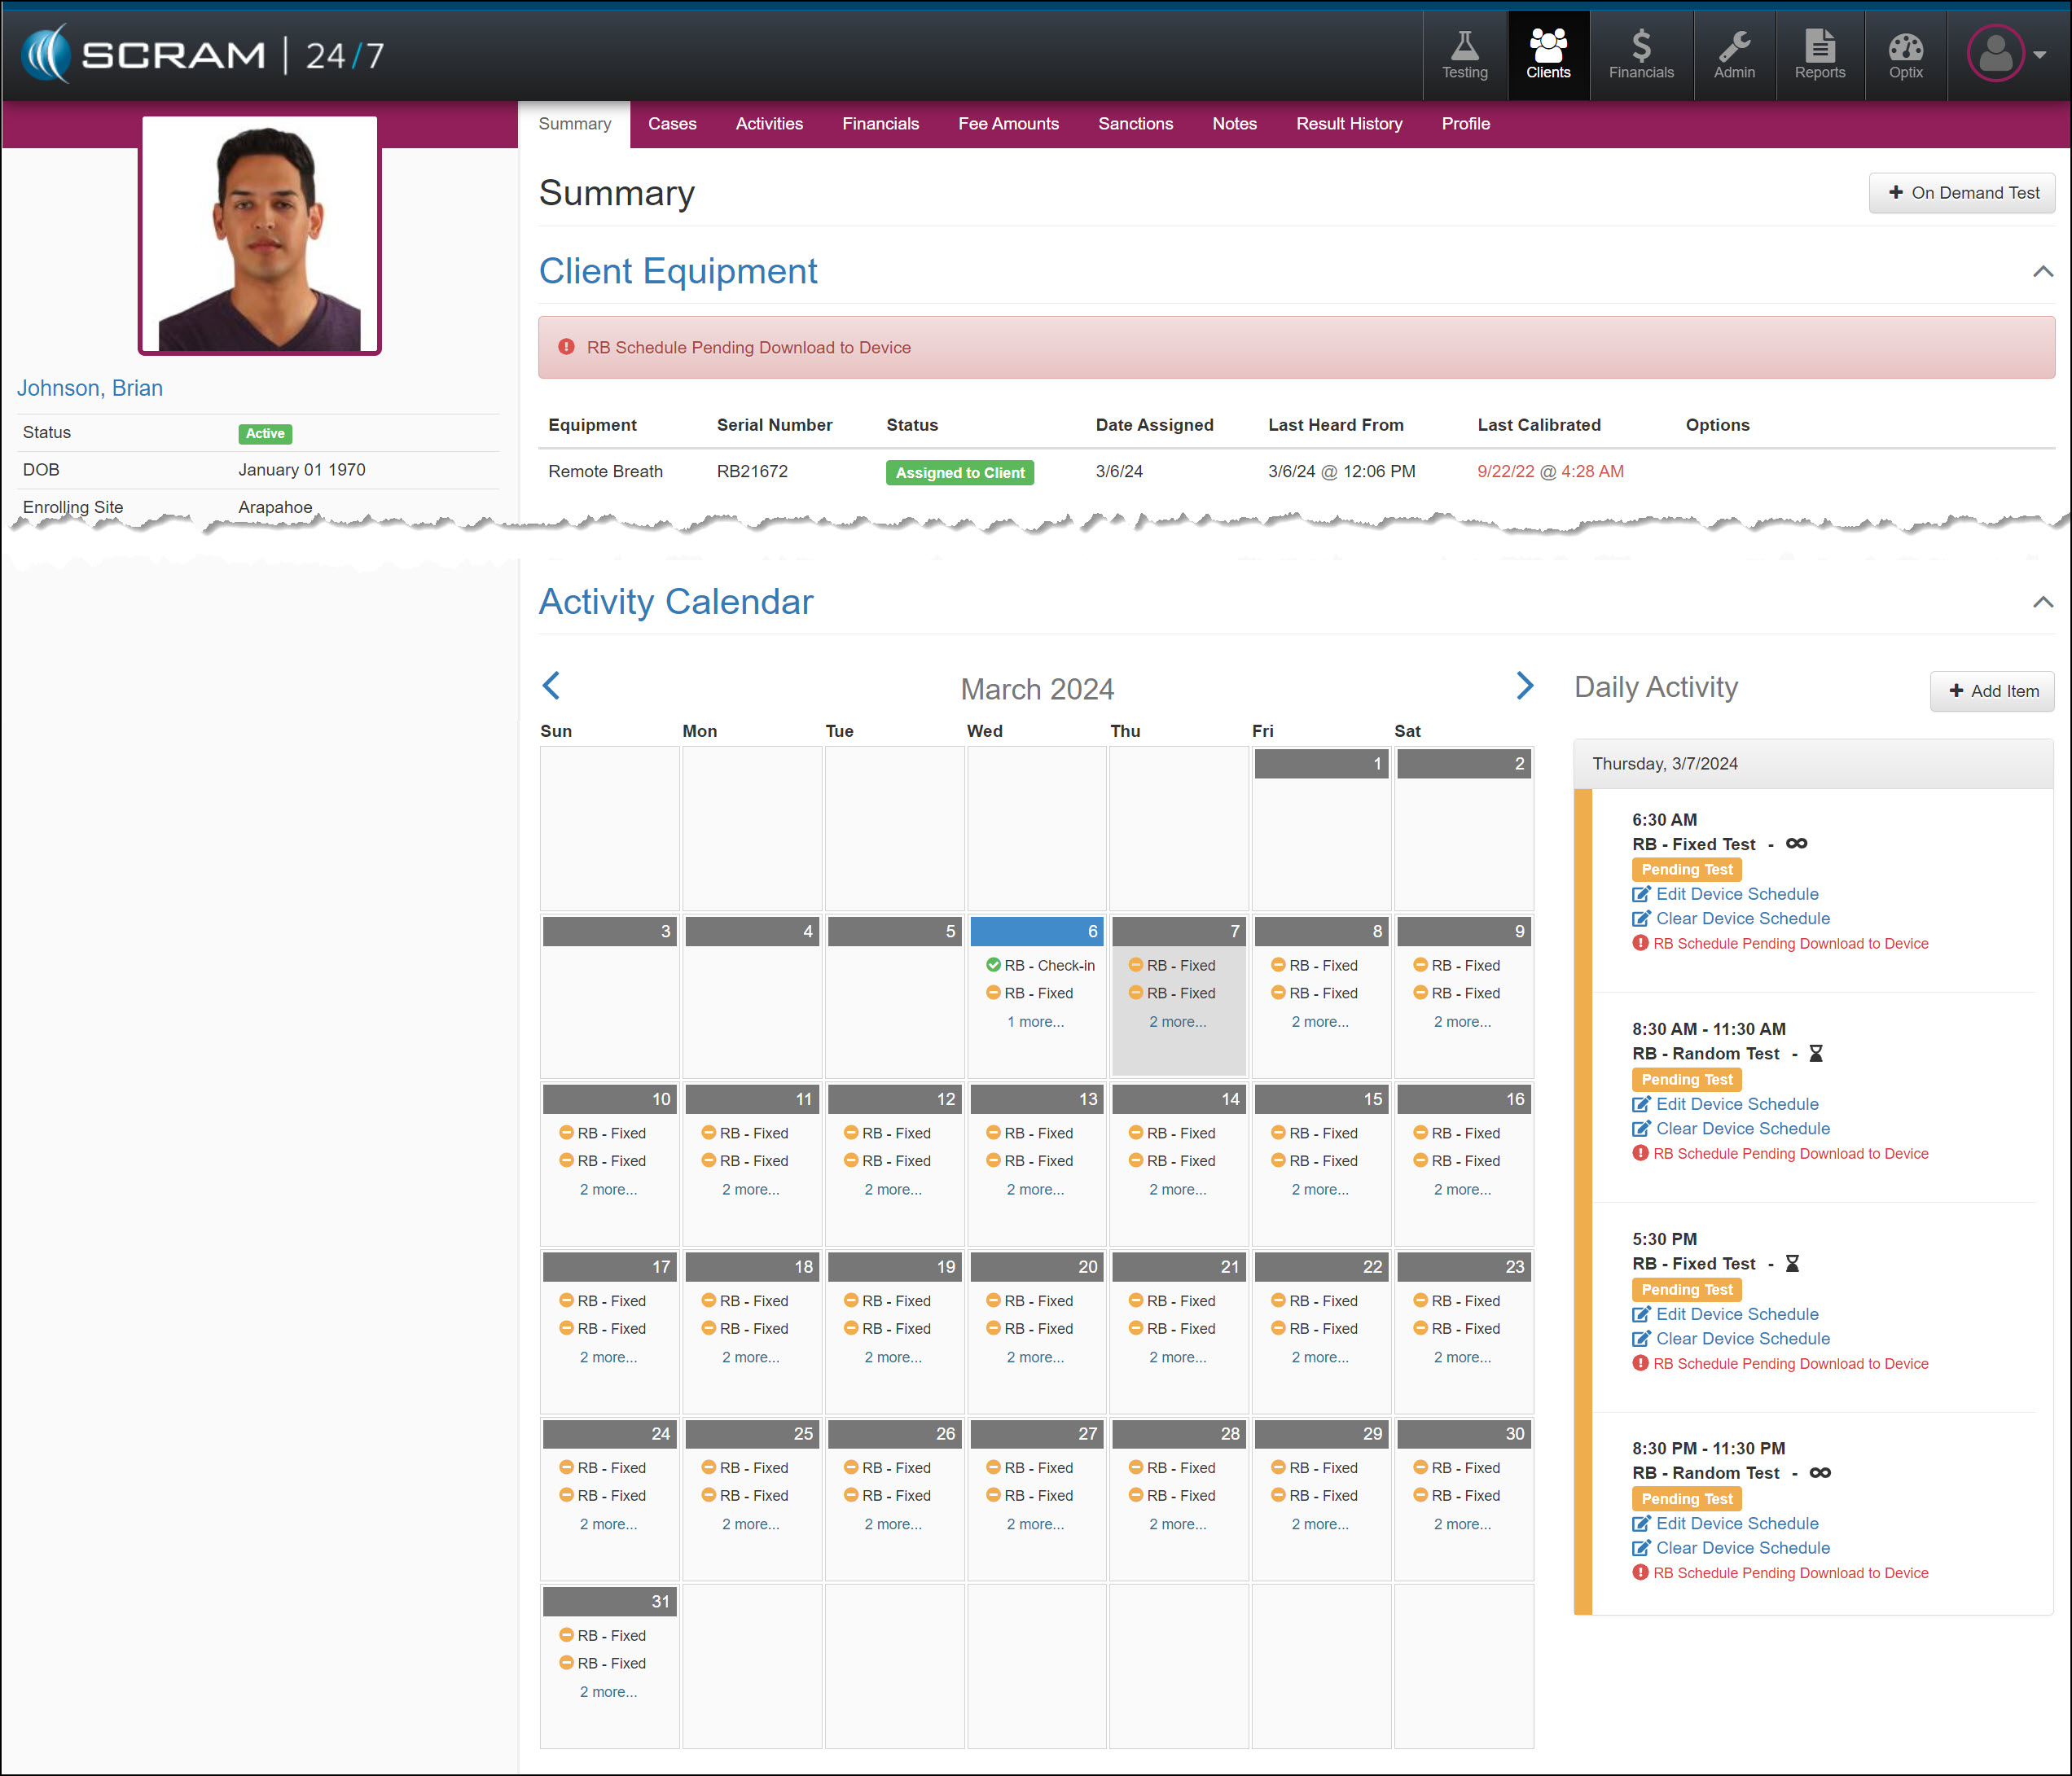
The breath testing schedule will be reflected on the client’s Summary page, Activity Calendar, and Daily Activity stream. You may add up to 12 scheduled breath tests per day until the client’s testing requirements are satisfied.
Remote Breath Schedule Pending Download to Device Banner – click to enlarge
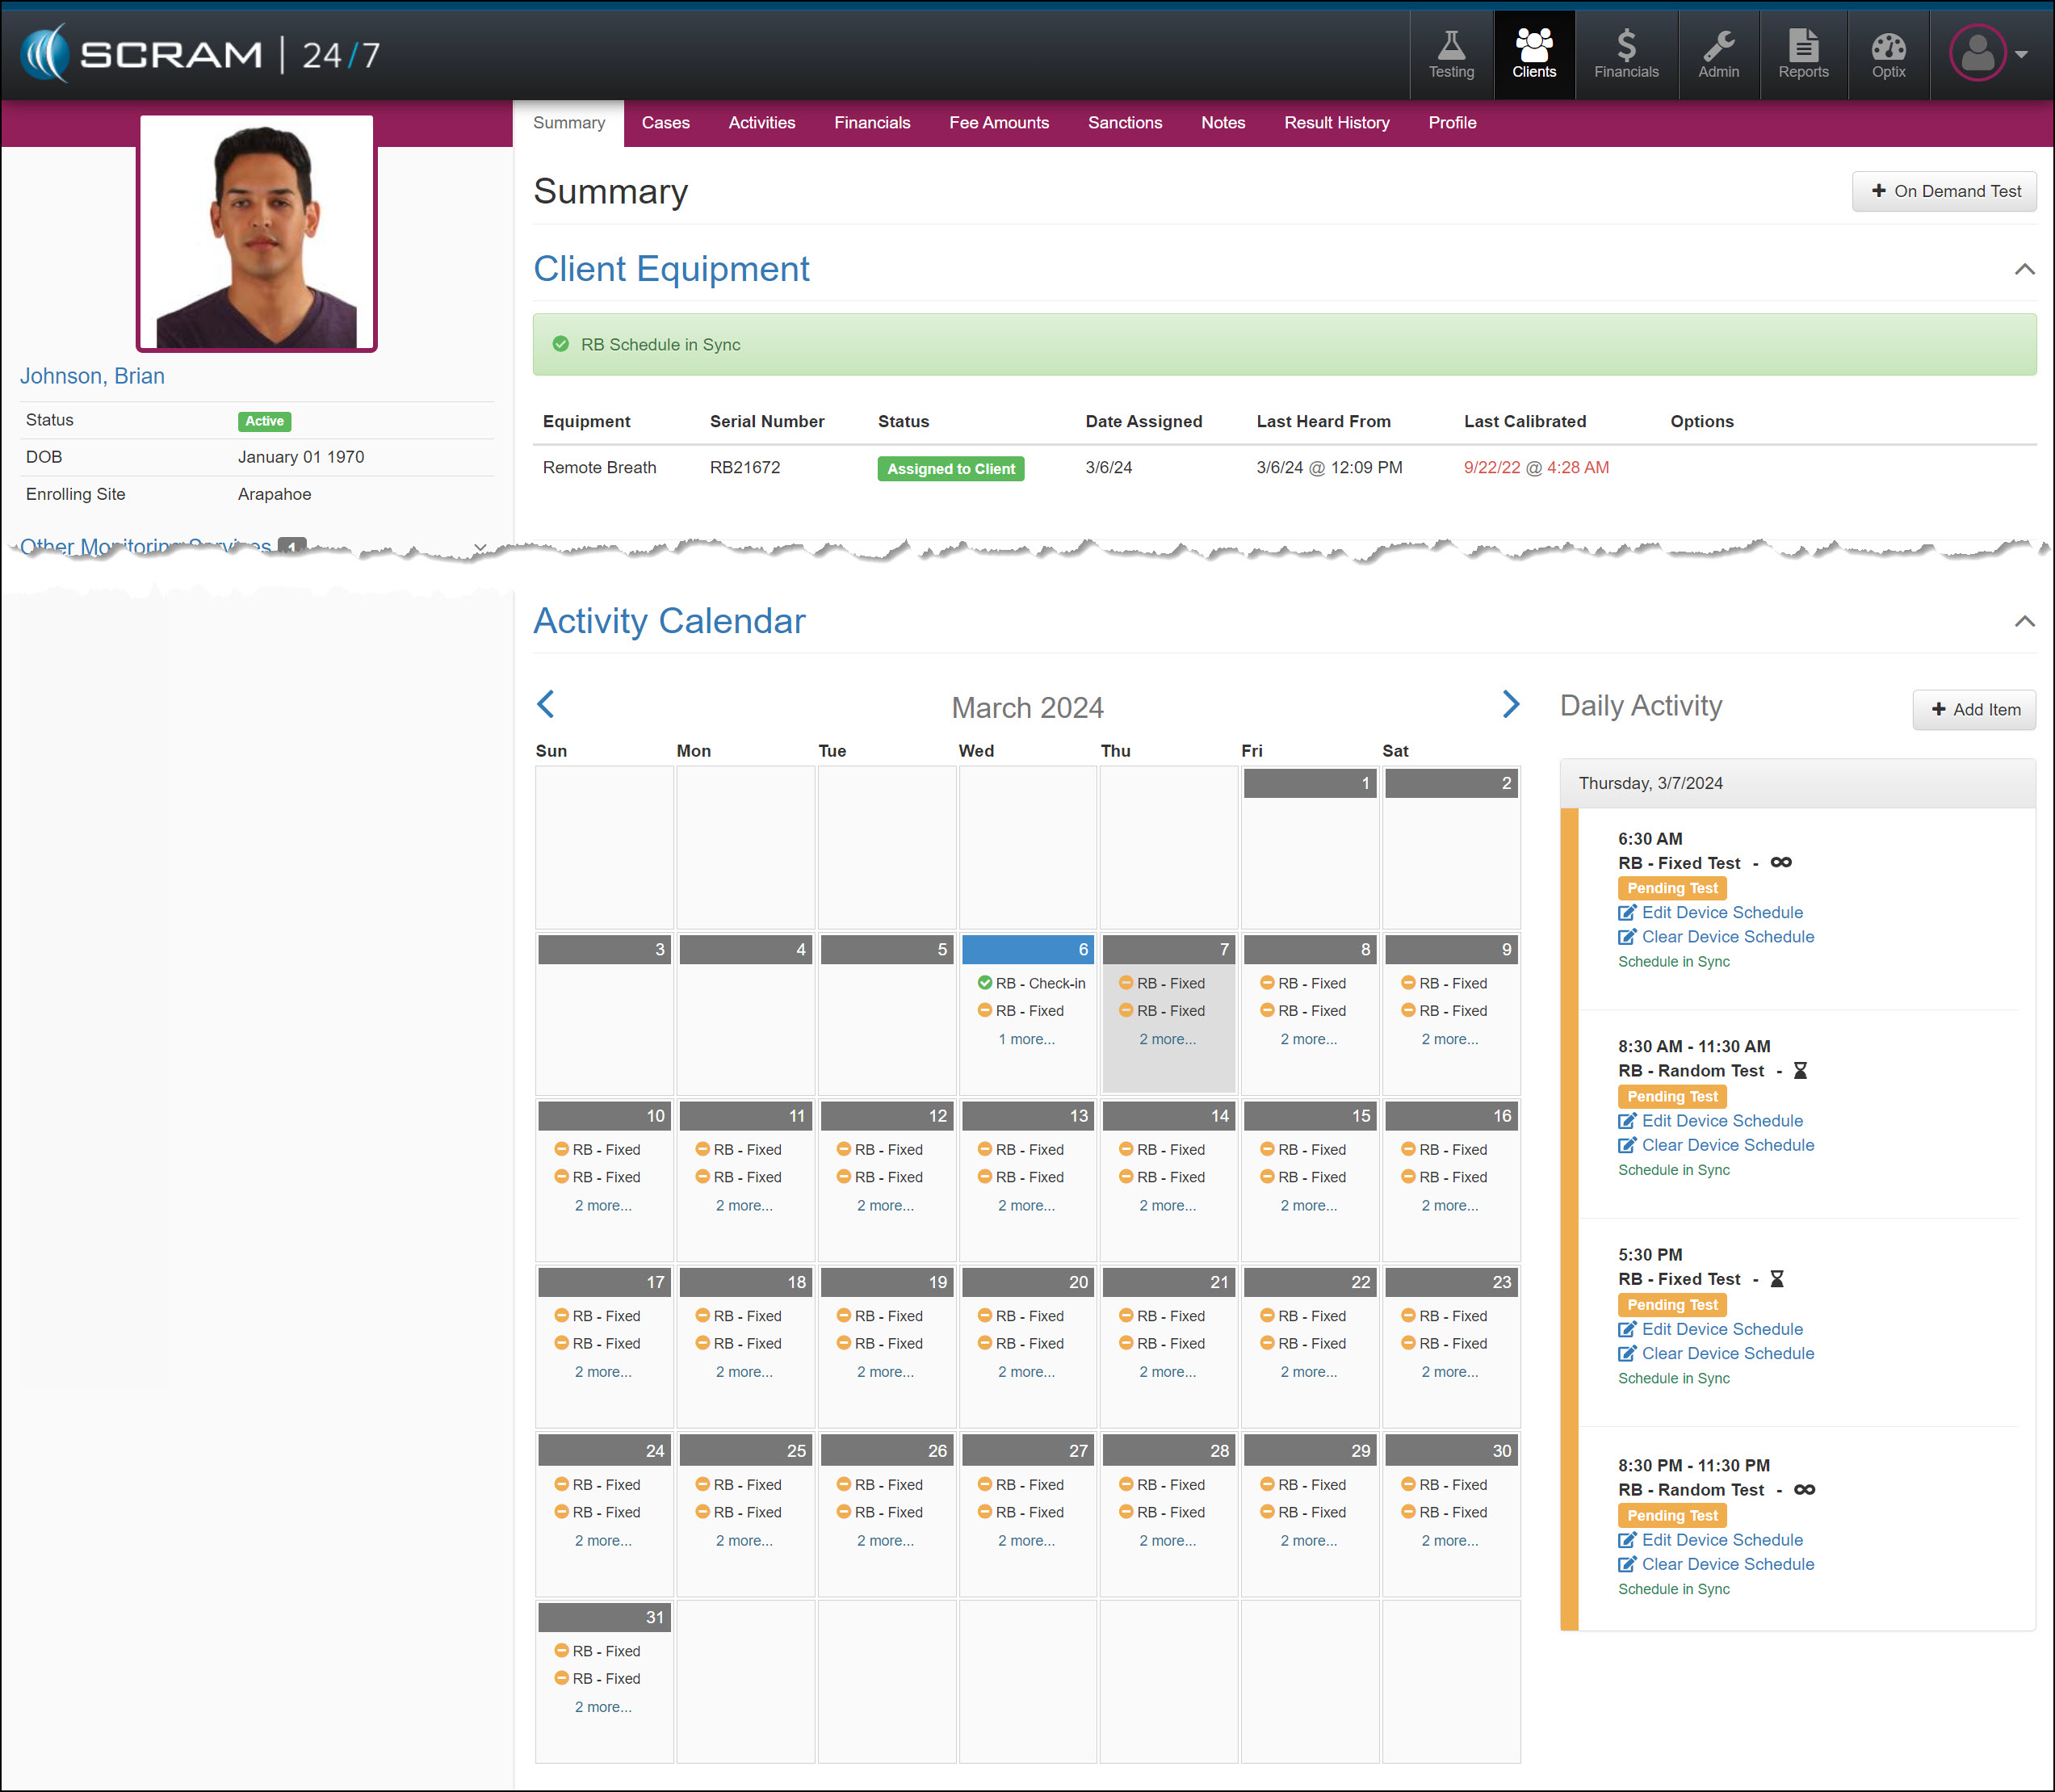
Once the schedule is communicated to the device, the RB Schedule Pending Download to Device banner and warning icon in the Daily Activity stream will update to the RB Schedule in Sync.
Remote Breath Schedule In Sync with Device Banner – click to enlarge
Tips:
Once the Remote Breath Activity has been enabled for the client, you may add the breath testing schedule regardless of the device’s assignment status. Please note that the schedule will only be visible on the Summary page once the device is in an “Assigned to Client” status.
The Activity Calendar displays only two breath tests per day. The Daily Activity stream, however, displays the entire breath testing schedule for the selected calendar date.
Once the device is in an Assigned to Client status, you may send an On-Demand breath test to the device by selecting that option on the Item dropdown menu on the Add Items page.
Scheduled Breath Test Icon Examples:
No Icon
“Single Occurrence” Fixed or Random breath test.
“Recurring with no end date” Fixed or Random breath test.
“End after # of occurrences” or “End by week of” Fixed or Random breath test.
Hover your mouse over the infinity or hourglass icons to display the date for the last occurrence of the breath test schedule.
Add a Breath Test Schedule from the Remote Breath Activity Details Page
In addition to the +Add Item button on the client’s Summary page, you may add a breath test schedule on the client’s Remote Breath Activity Details page.
Add Remote Breath Schedule on the Activity Details page – click to enlarge
Activity Calendar and Breath Test Results
Once the breath testing window has closed, the Activity Calendar will display a gray circle next to the schedule. To view the breath test results, navigate to the client’s RB Results page in SCRAMNET.
Client’s Activity Calendar Remote Breath Schedule – click to enlarge
Edit a Remote Breath Schedule
Once the RB Schedule has been added, you may have reason to edit a specific test’s timeframe and range of occurrence, or you may need to clear the current schedule entirely.
To edit a specific Pending Test schedule:
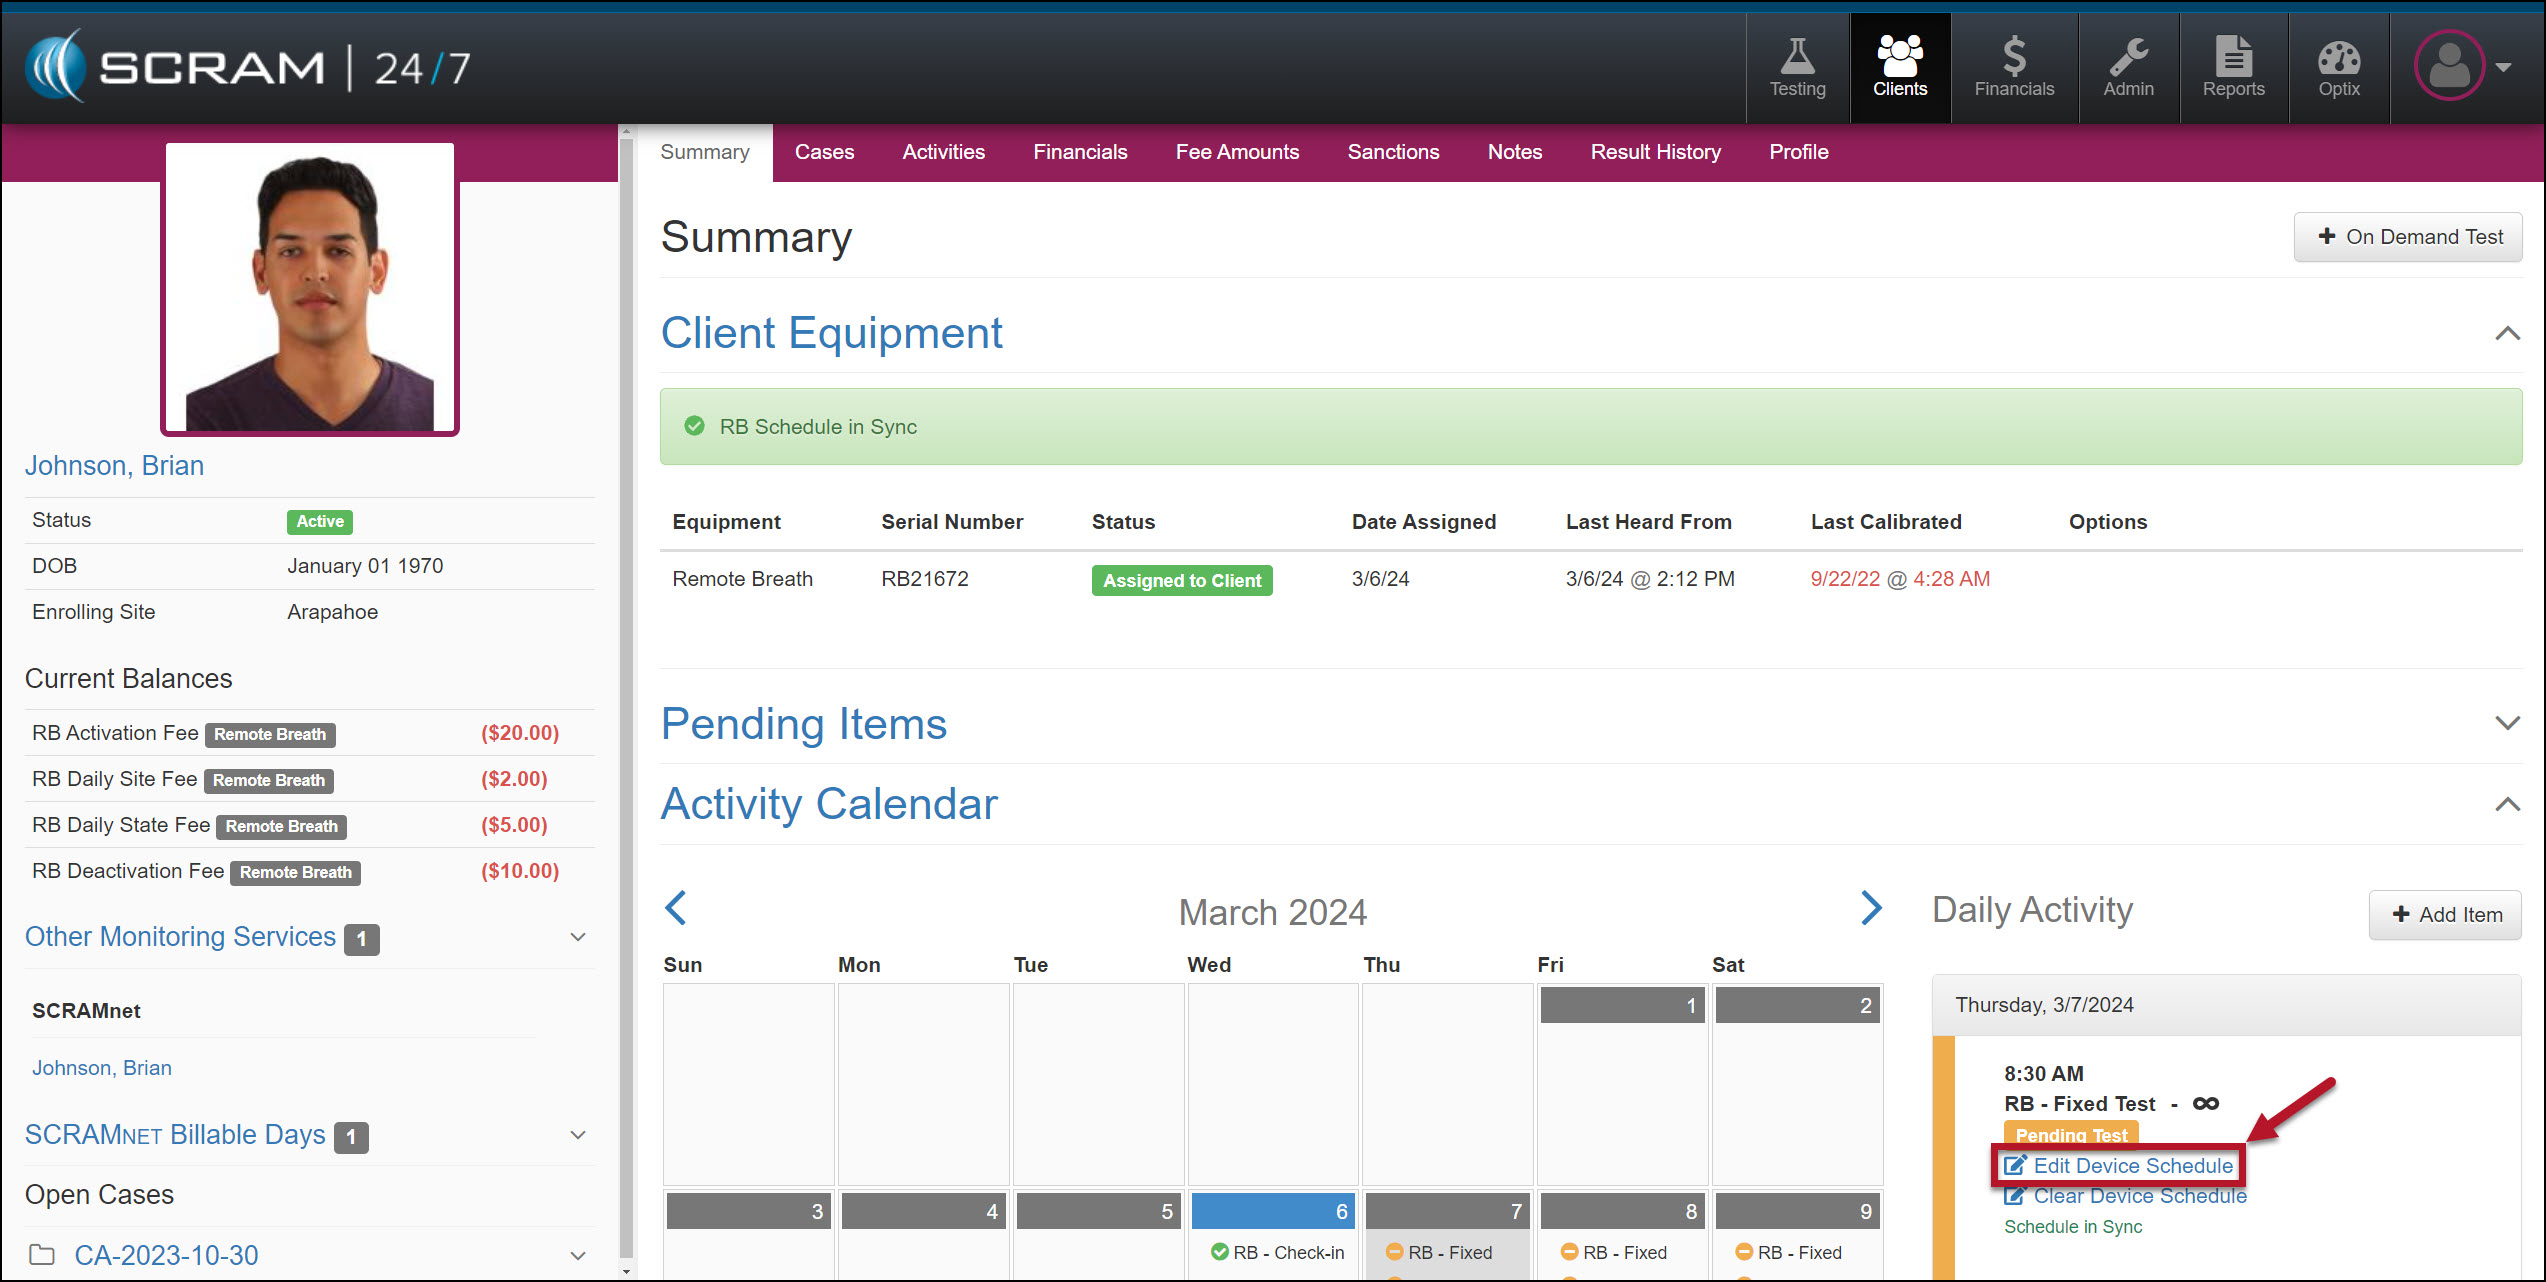
Select the EditDeviceSchedule hyperlink for a Pending Test on the client’s Summary page.
Edit Device Schedule Hyperlink – click to enlarge
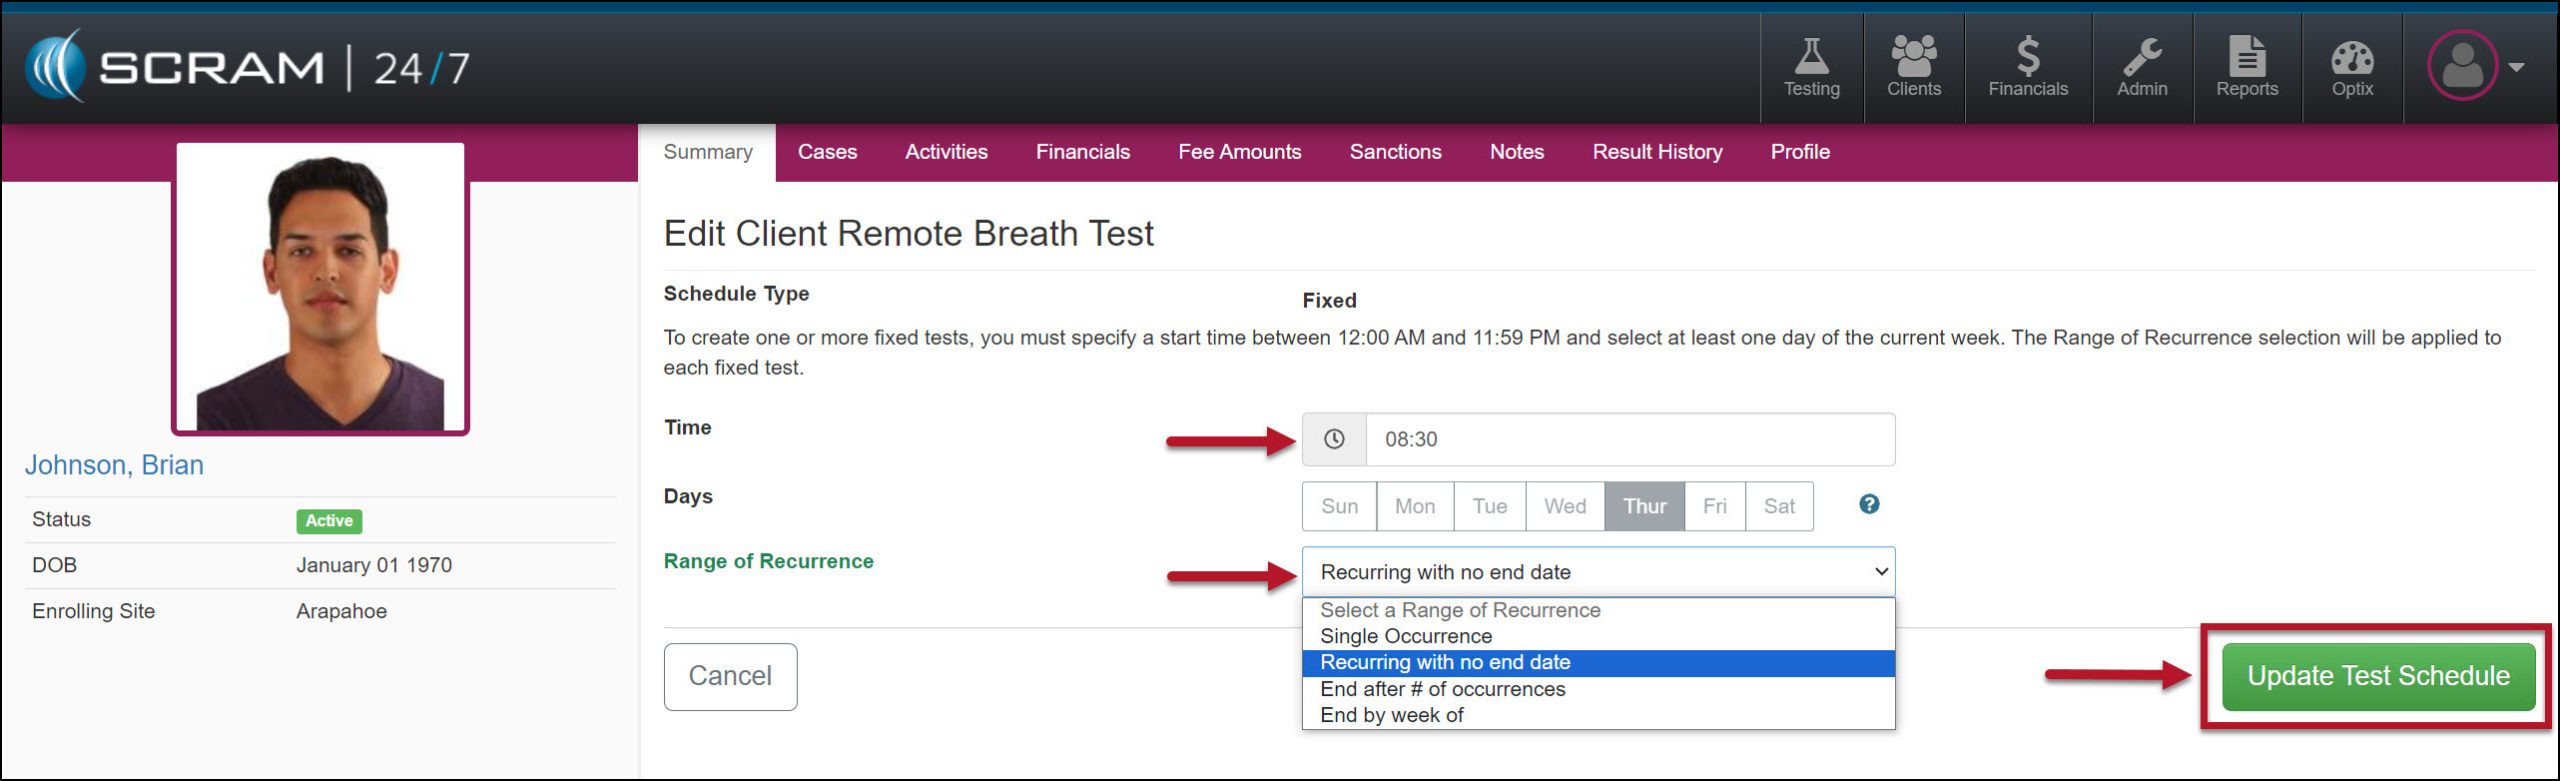
Verify you have the correct “Day” for the schedule you are editing, and then make any required updates to the Time and Range of Recurrence fields.
Edit Client Remote Breath Test Time and Range of Recurrence – click to enlarge
Select the Update Test Schedule button to save the edits.
When editing a schedule, you cannot make any changes after the test window for the schedule is closed. Additionally, when editing a series where the first test window has closed, your options on the Range of Recurrence dropdown menu will only display the available options based on the initial selection.
Clear Device Schedule
To clear the client’s entire breath test schedule:
Select the Clear Device Schedule hyperlink for any Pending Test.
Clear Device Schedule Hyperlink – click to enlarge
Enter the Clear Schedule As Of date.
Clear Client Remote Breath Test Verification page – click to enlarge
Select the Clear Test Schedule button.
Tip: To remove an individual breath test from the client’s calendar, navigate to the client’s RB Schedule page in SCRAMNET by selecting the client’s name hyperlink under the Other Monitoring Services section on the sidebar. Any changes made on the client’s RB Schedule page in SCRAMNET are reflected in SCRAM 24/7 and vice versa.
The client’s Summary page will reflect the update.
Activity Calendar Remote Breath Test Schedule Cleared – click to enlarge
Clearing the Remote Breath Schedule does NOT stop the client’s billing or device check-in. To stop the client’s billing and monitoring, you must inactivate the Activity and place the device in an “In Inventory” or “Awaiting Return” status.
On, February 29, 2024, SCRAM Systems will release two enhancements for your SCRAM Nexus Caseloads.
Add one-time, single-occurrence appointments to clients’ calendars.
While editing a Condition within a Module, an Administrator may customize whether or not that Condition will display a TouchPoint Reminder within the client’s mobile application.
Add a One-Time, Single-Occurrence Calendar Appointment
With this enhancement, once you have added a Supervision Plan to your client, you may add a one-time, single-occurrence appointment to your client’s calendar, such as the client’s next court date.
To add a one-time, single-occurrence appointment:
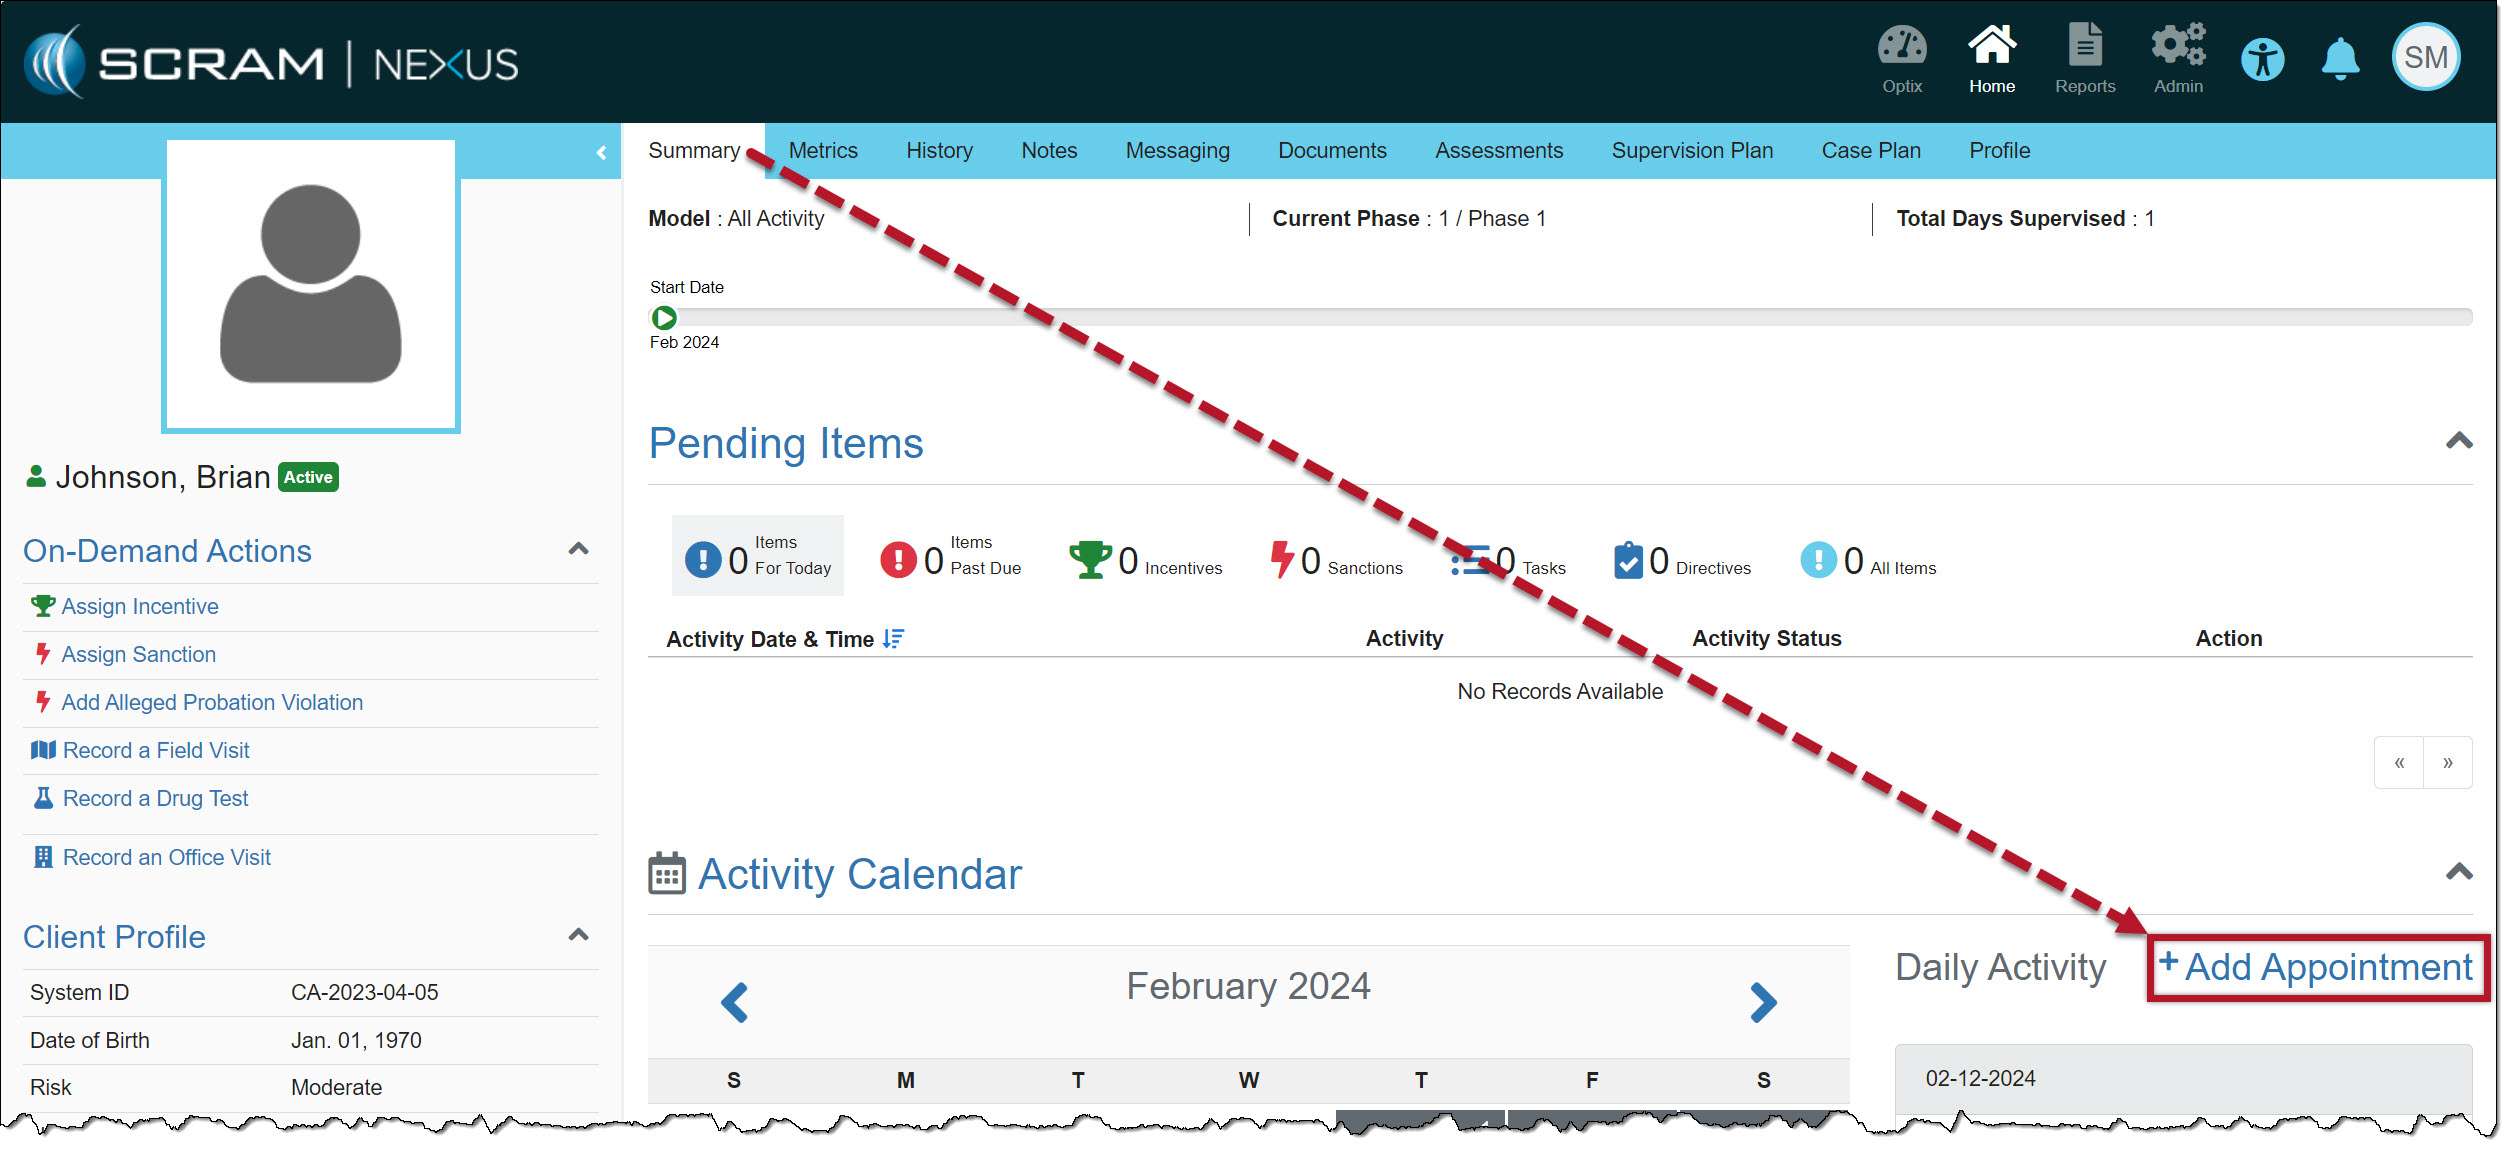
Select the +Add Appointment hyperlink on the client’s Summary page in the Daily Activity stream section.
Add a One-Time, Single-Occurrence Appointment – click to enlarge
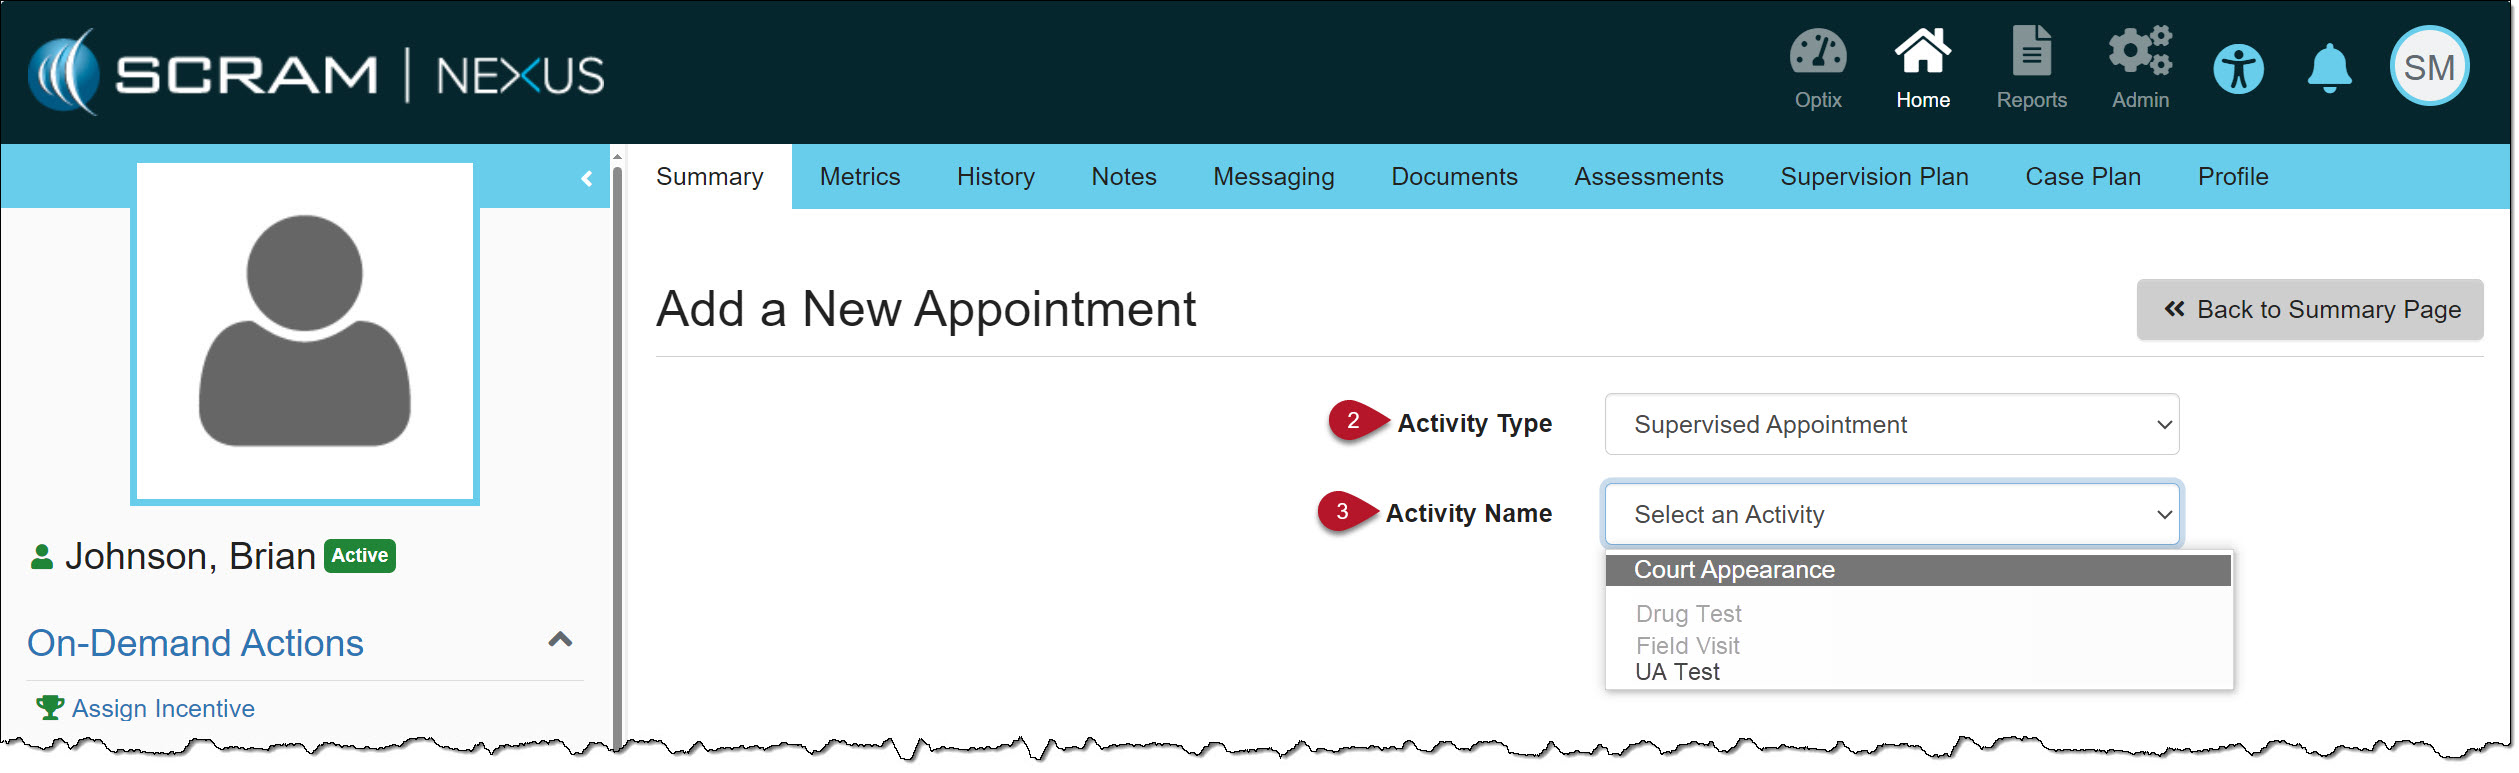
On the Add a New Appointment page, from the “Activity Type” dropdown menu, you may add any activity that is currently part of the client’s SupervisionPlan. In this example, the option of Supervised Appointment is selected.
Select the Activity Type and Name – click to enlarge
Select the “Activity Name.” You may only select an “activity” that is currently part of the client’s SupervisionPlan. In this example, the option of Court Appearance is selected.
When adding a one-time, single-occurrence appointment, you may only select from the available options on the Activity Type and Activity Name dropdown menus. If you cannot choose an option listed, then that option is not available.
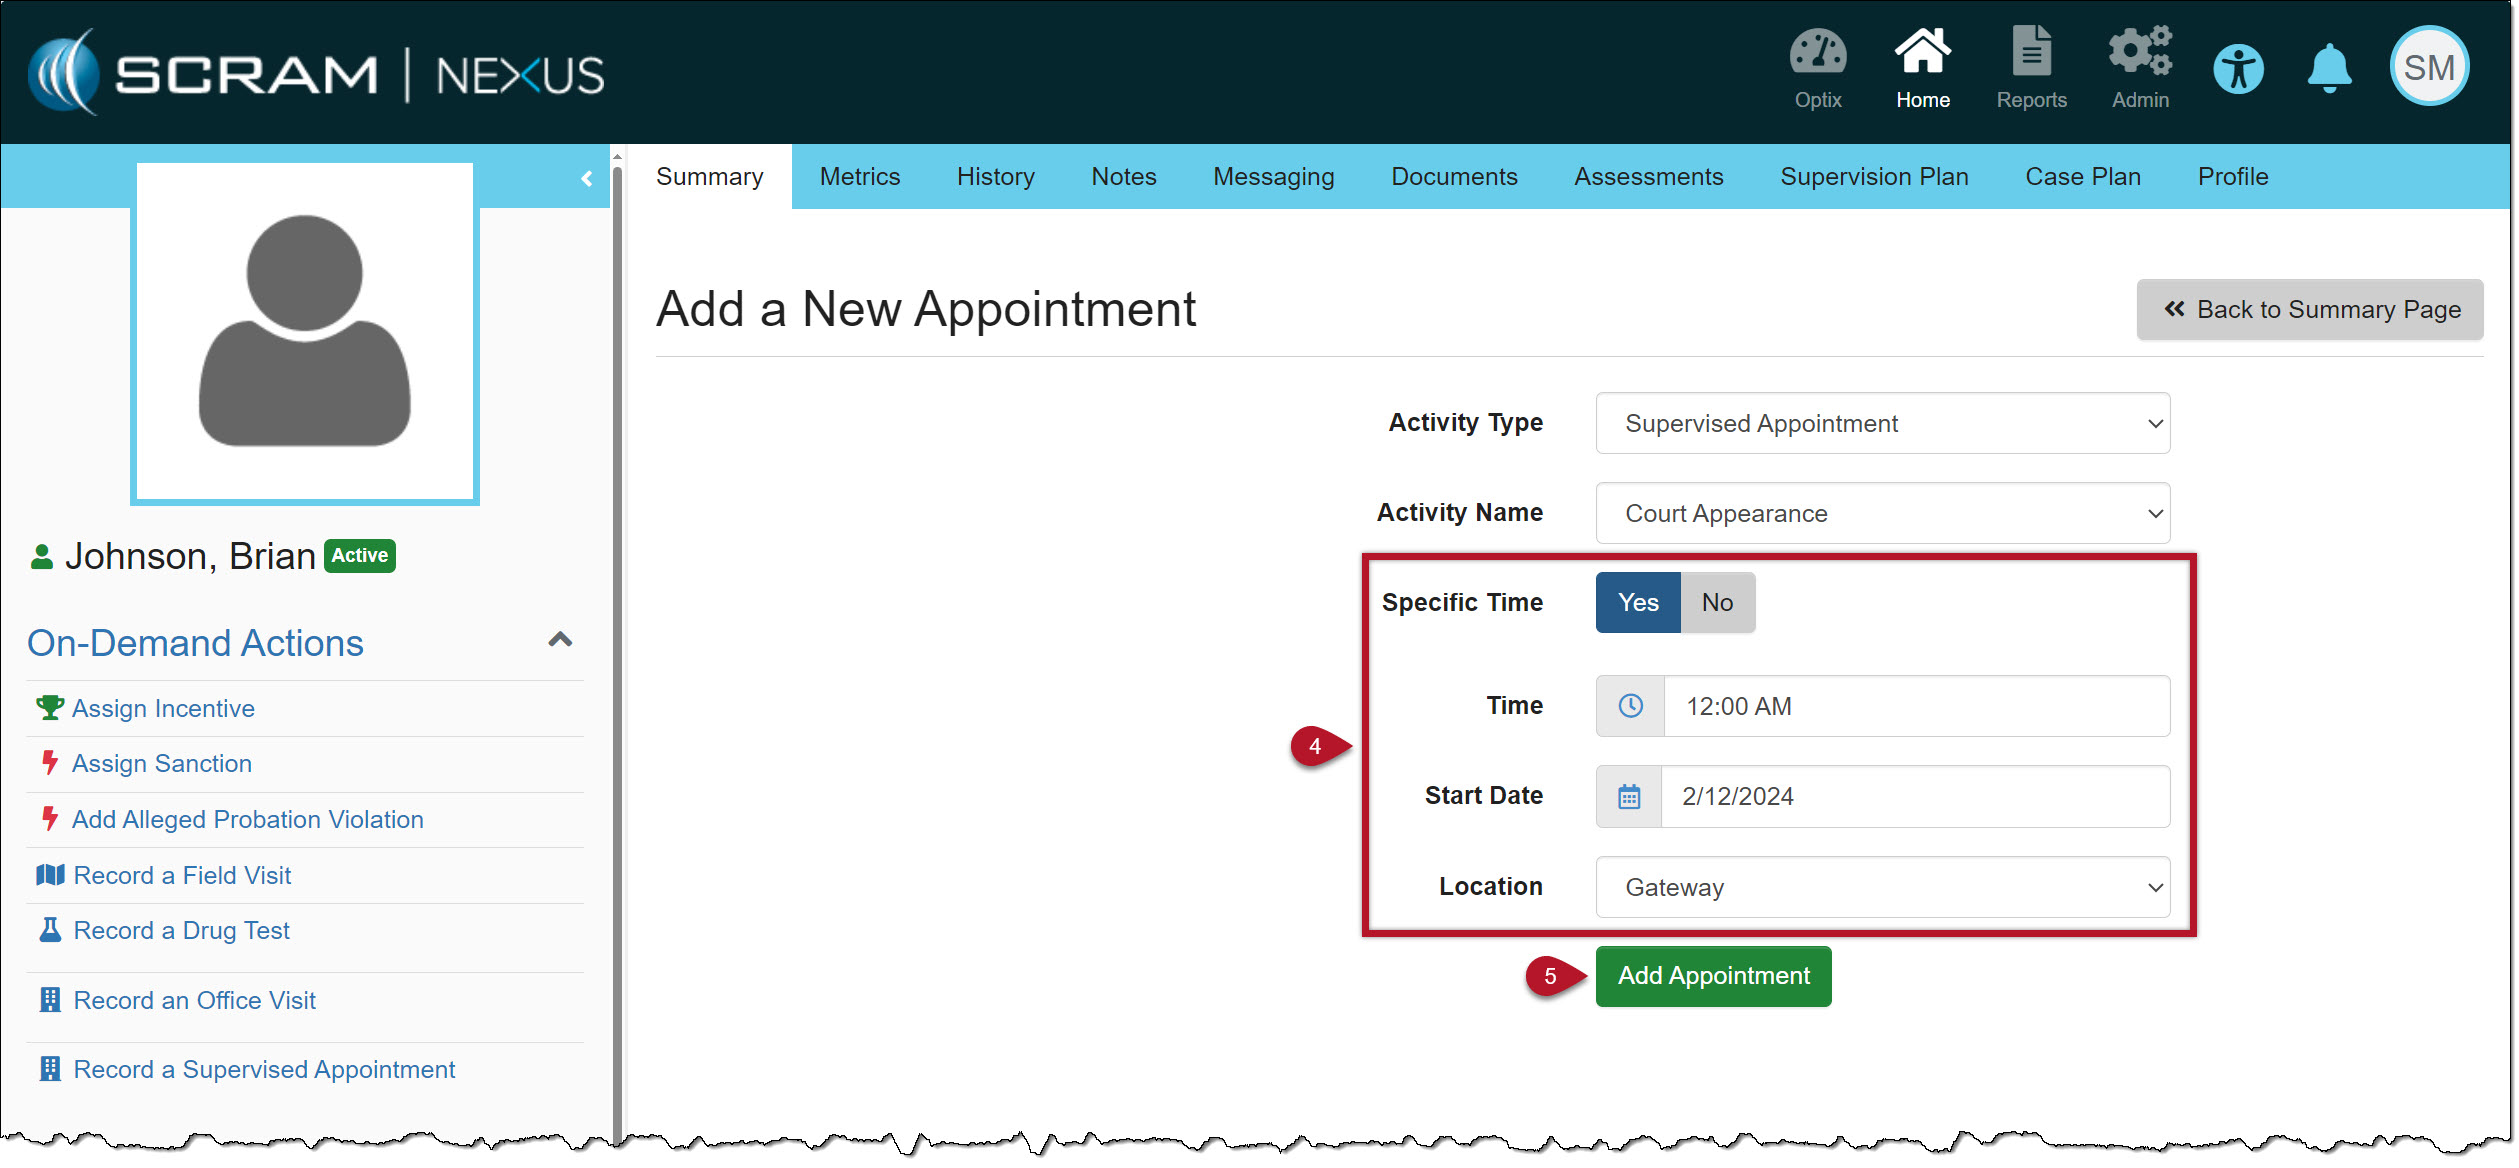
Enter the details for the one-time, single-occurrence appointment. When selecting the StartDate, you may choose a current or future date only. You are not able to select a date in the past.
To save the information, select the Add Appointment button.
Appointment Details – click to enlarge
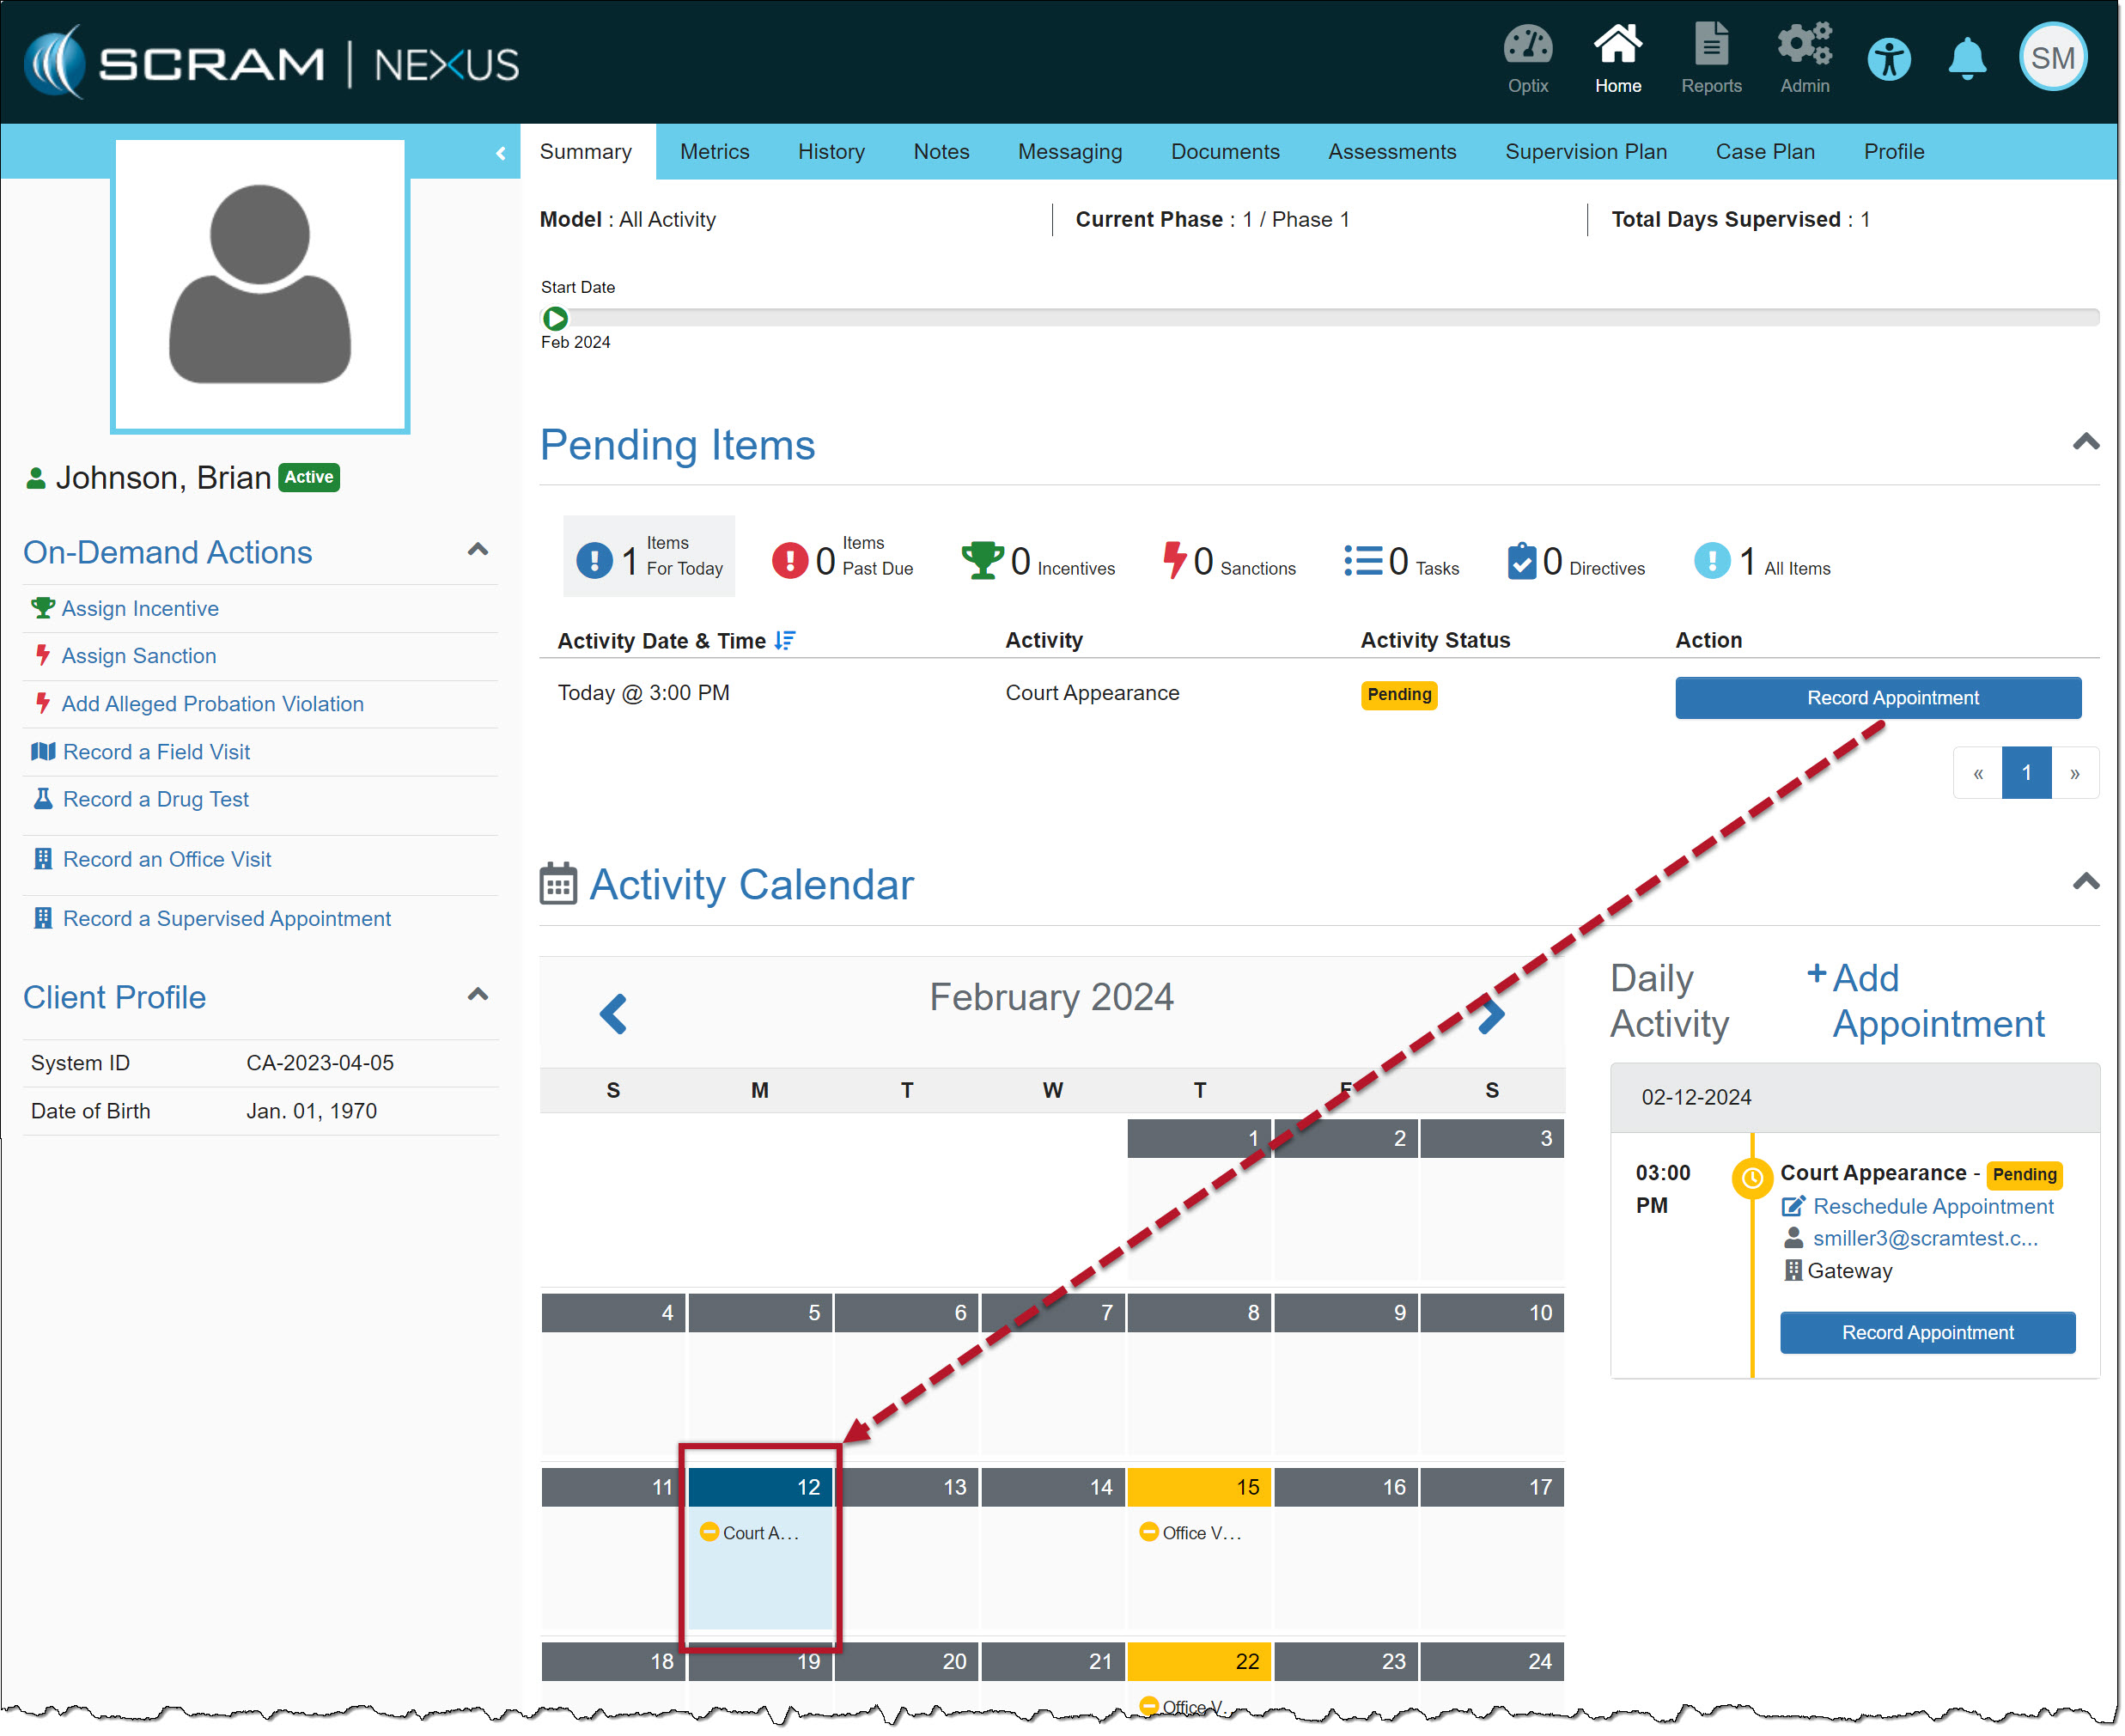
The client’s Summary page will now display the appointment.
Client’s Summary Activity Calendar – click to enlarge
Tips:
When recording the one-time, single-occurrence “Supervised Appointment,” the “Complete Appointment” tab will display a banner indicating you do not need to schedule a subsequent appointment for the client, and you may select the Complete button to finish recording the appointment.
When recording a one-time, single-occurrence “Office Visit” Appointment, the Complete Office Visit button is located on the “Notes” tab.
TouchPoint Reminders for Conditions
An Administrator may view and edit an active Condition’s TouchPoint Reminders.
To do this:
Select the Condition you want to view or edit from the Admin page in Nexus.
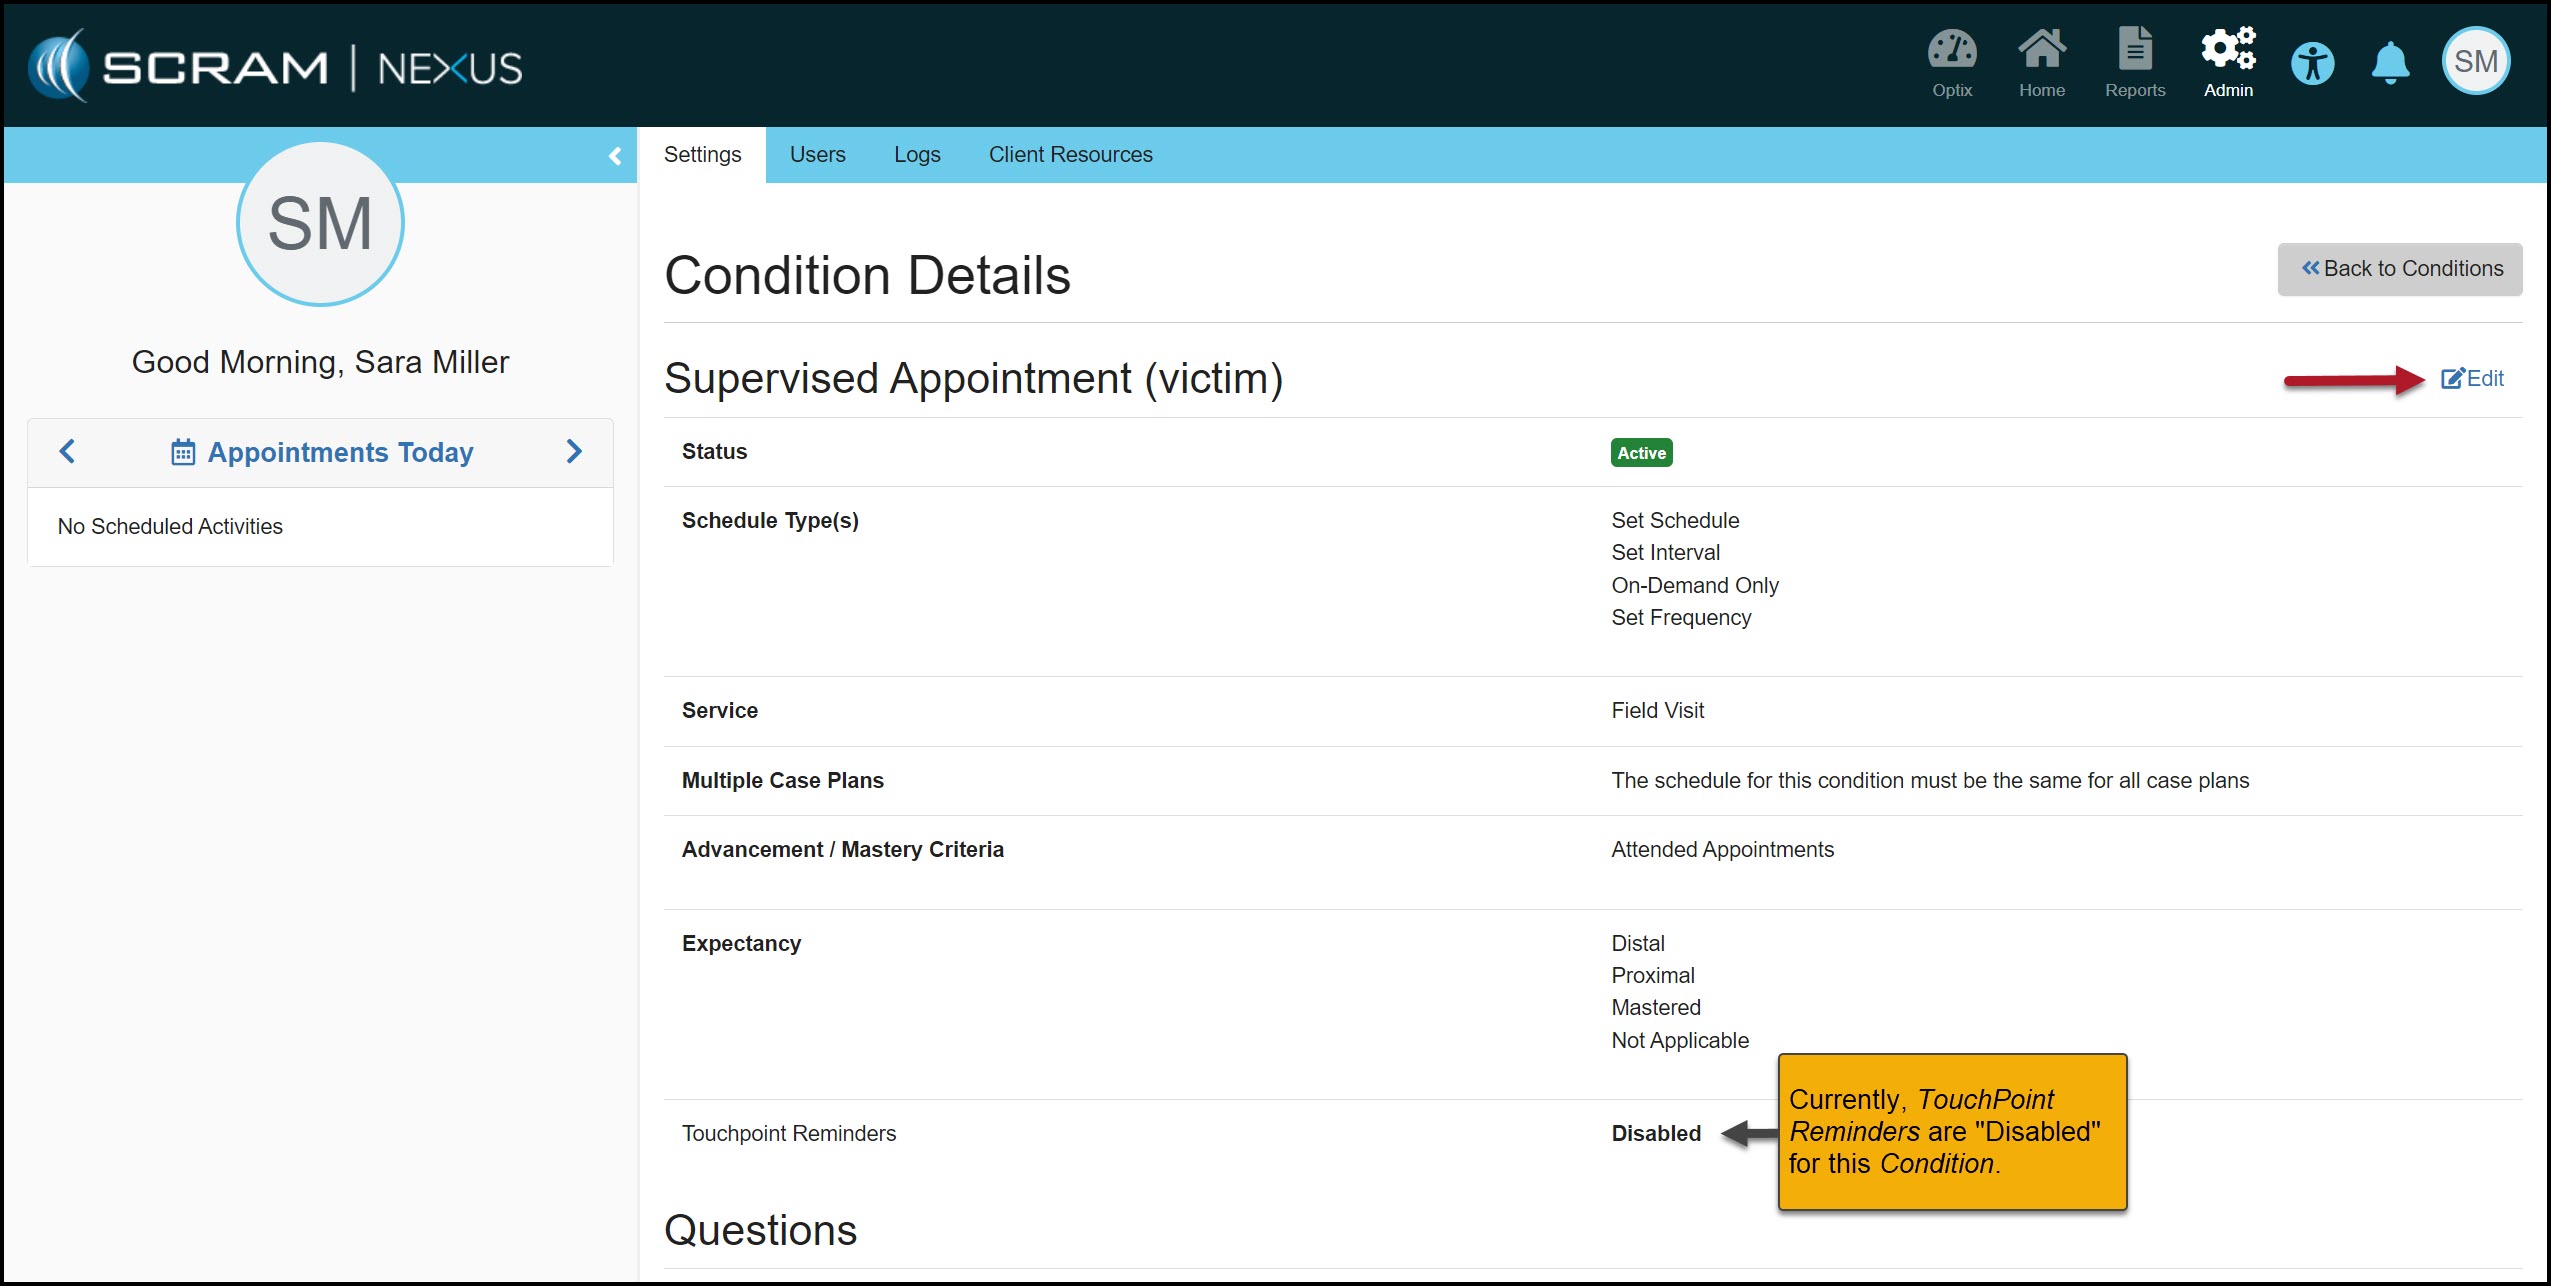
On the Condition Details page, locate the TouchPoint Reminders section to view the current settings.
Condition Details Page – click to enlarge
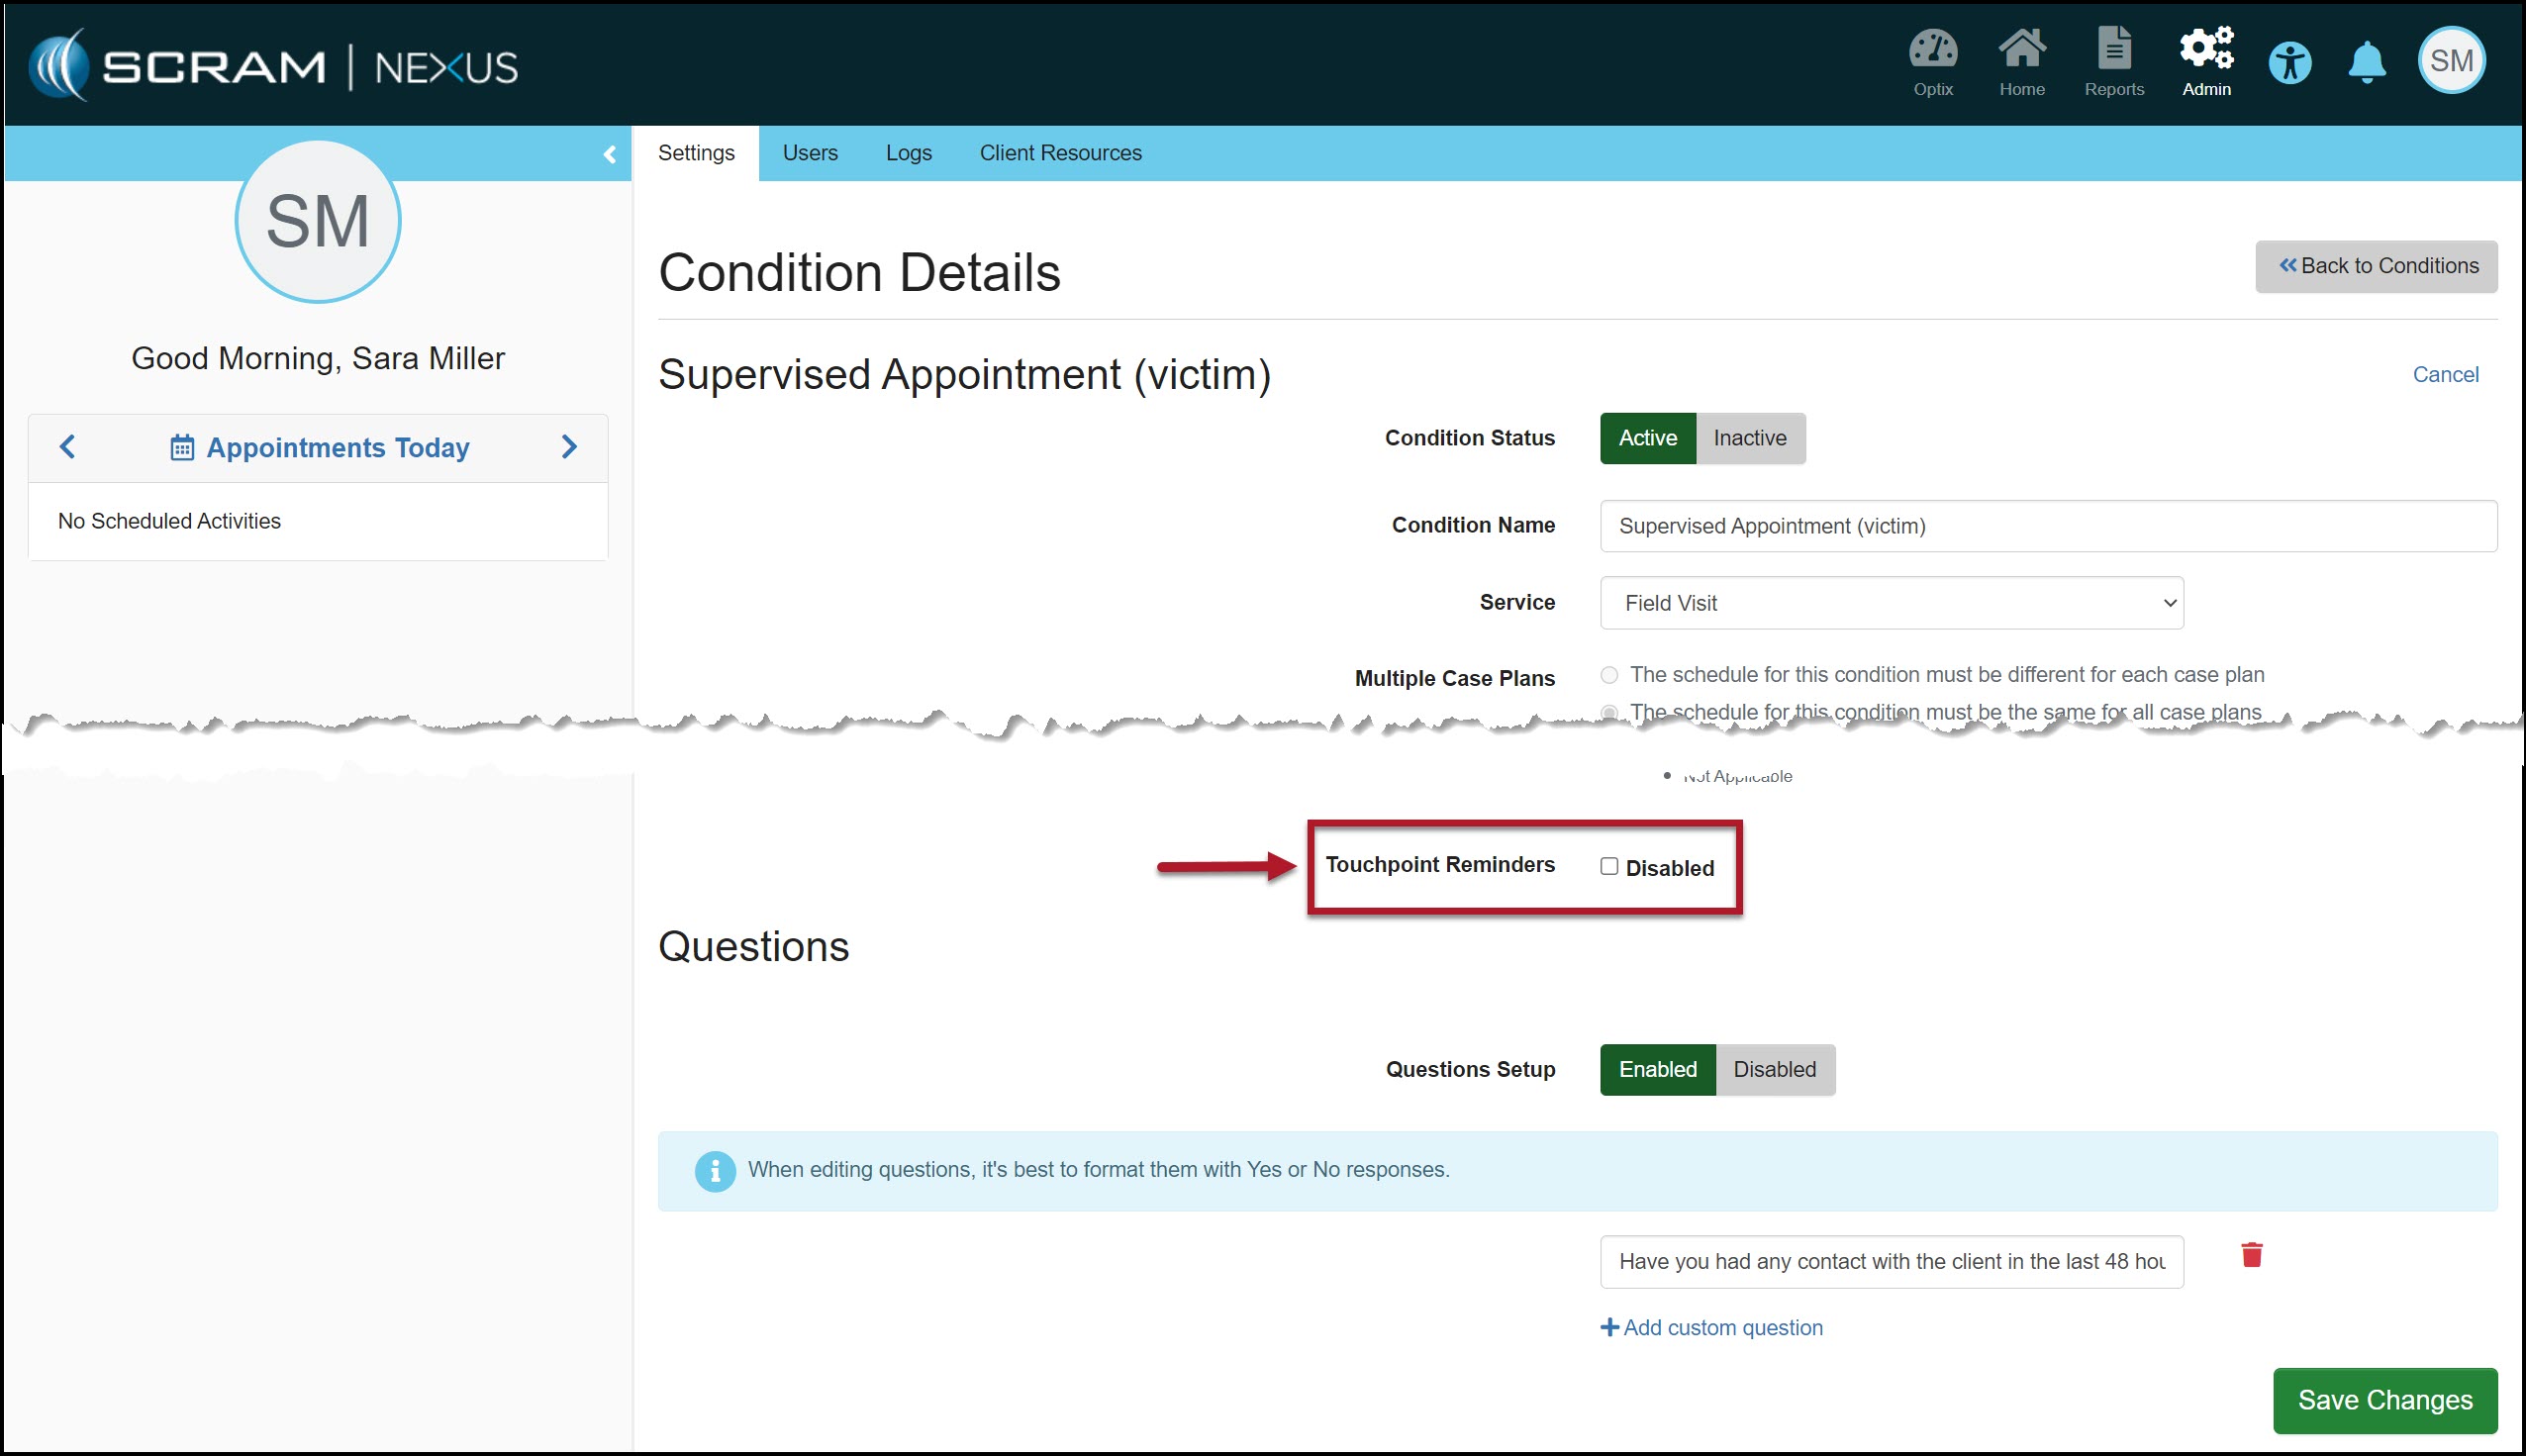
Select the Edit hyperlink and locate the Touchpoint Reminders section to edit the current setting.
Condition Details Page with TouchPoint Reminders Disabled – click to enlarge
Leave the checkbox “unchecked” to Disable the TouchPoint Reminders or “check the box” to Enable the Reminders.
TouchPoint Reminders Checkbox – click to enlarge
After making your edits, select the Save Changes button.
When a Condition is Disabled, the appointment will only display on the agent’s Activity Calendar and not within the client’s TouchPoint mobile application.
Activity Calendar with Appointment Displayed – click to enlarge
With this release, all current Conditions are automatically Enabled for TouchPoint Reminders.
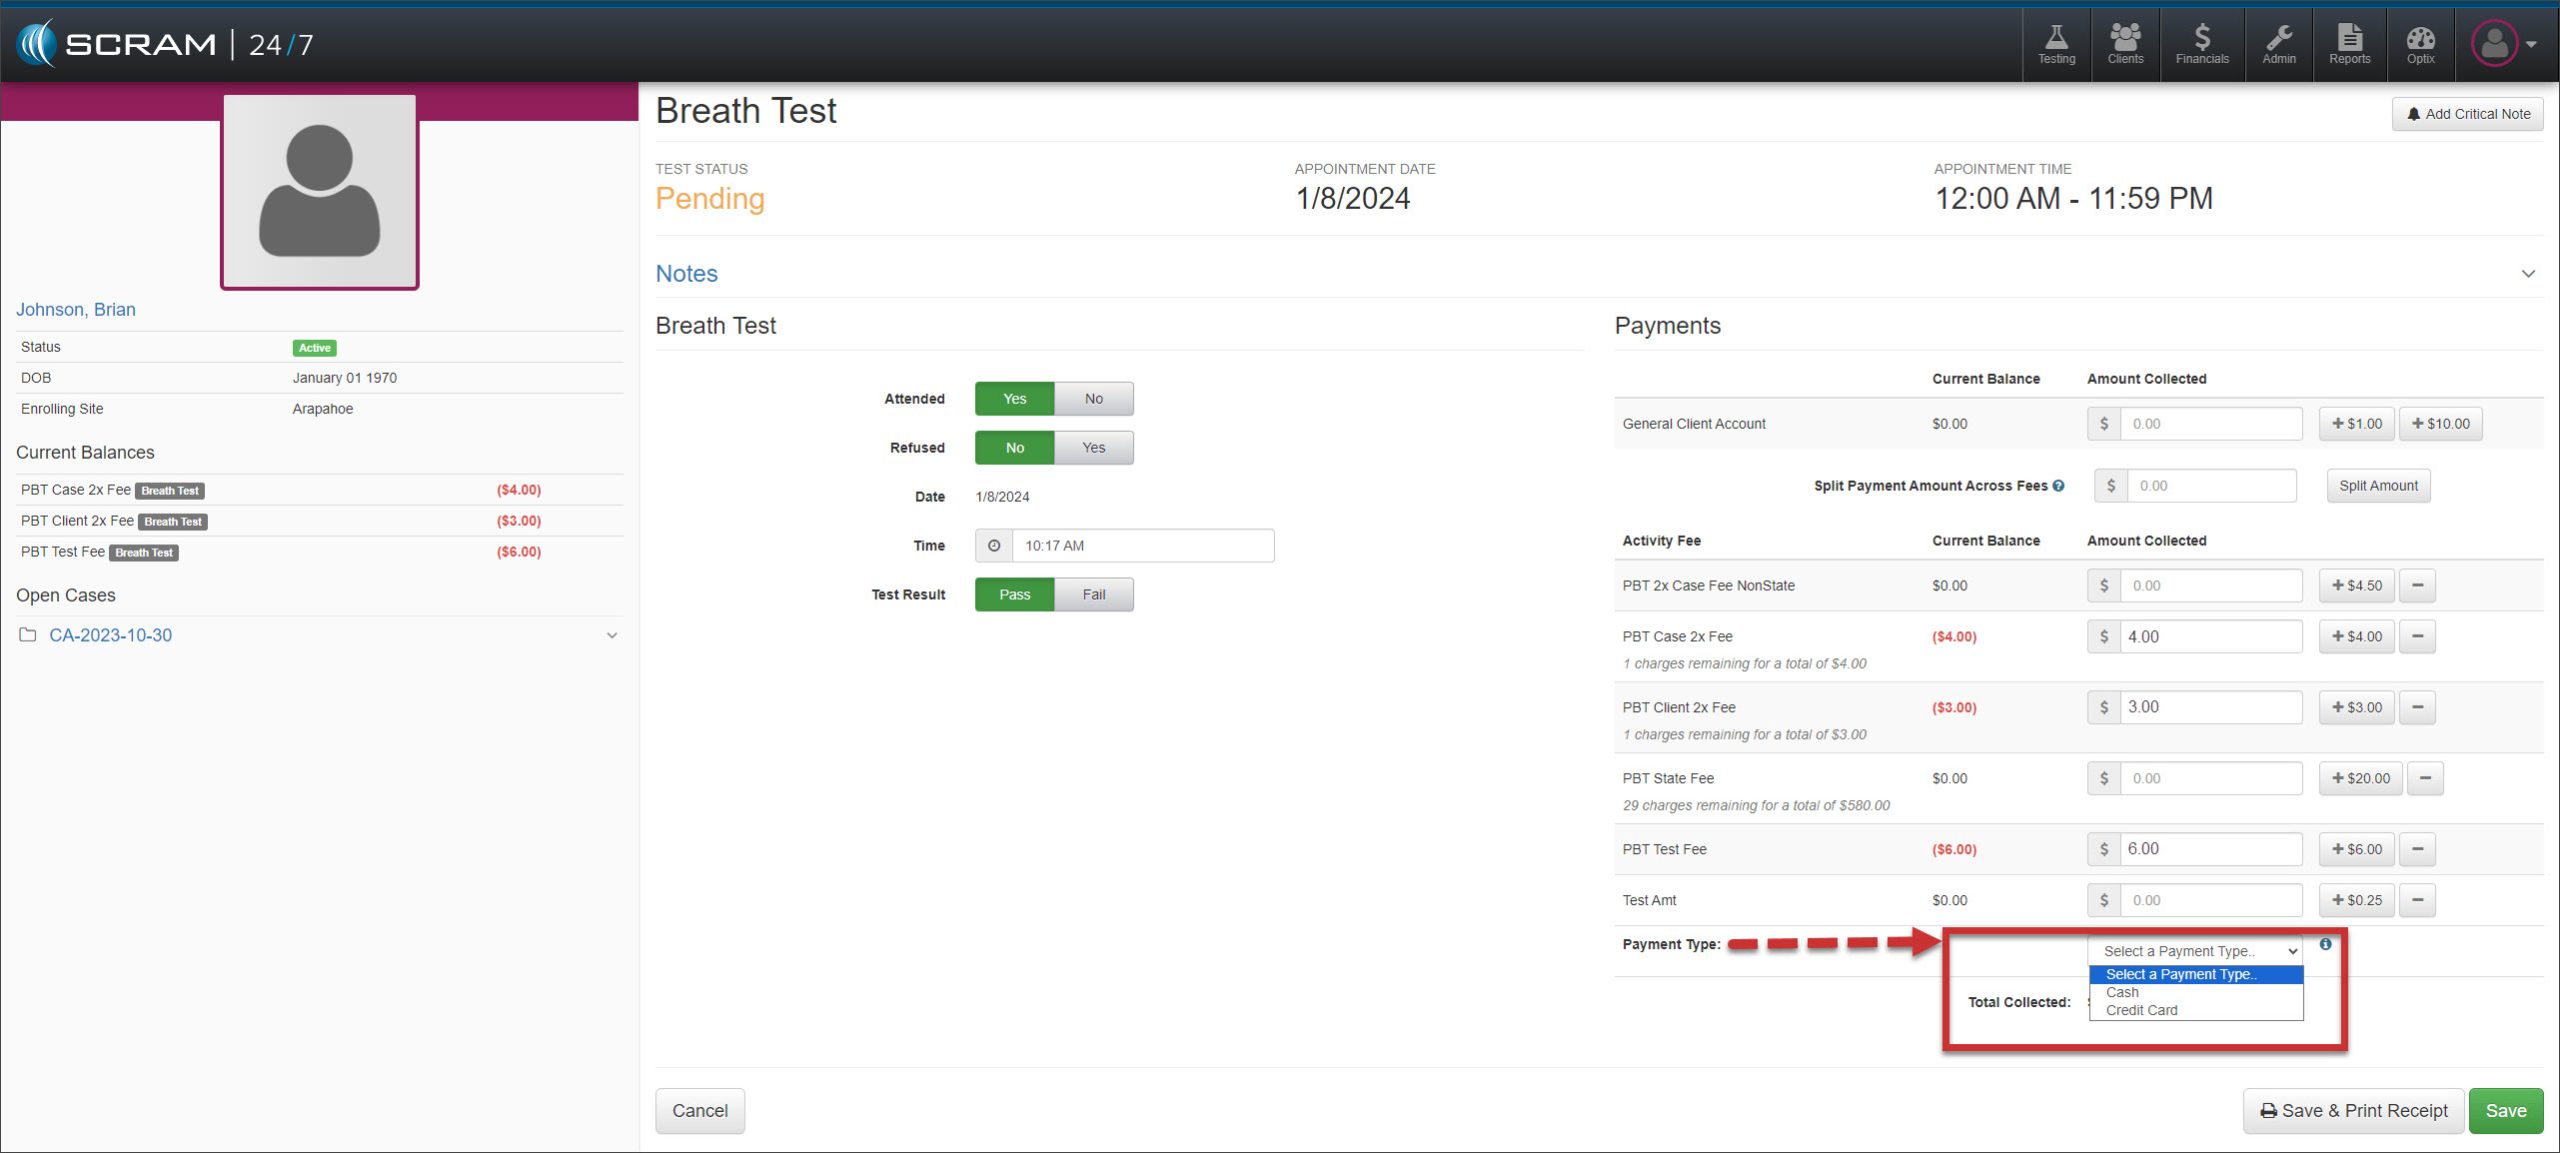
On, January 11, 2024 (updated release date), SCRAM Systems will release an enhancement to SCRAM 24/7. With this enhancement, you may note the payment method of “Credit Card” or “Cash” when recording a payment from a client.
Recording an Appointment – click to enlarge
Once the payment is saved, the client’s Financials page will reflect the payment type selected.
Client’s Financials Page – click to enlarge
When a client pays a fee using cash and a credit card, you must record separate transactions for each payment method.
The Cash payment method is the default option when no selection is made during a transaction.
Only the client’s Financials page and the Daily Client Activity report display the payment type selected.
On December 19, 2023, SCRAM Systems® will release an enhancement to the SCRAM 24/7 Mass Payment and Mass Update Receipts options. This enhancement will allow you to print a single receipt or all client payment receipts from the new Receipts dropdown menu.
Print Receipts During Mass Payment
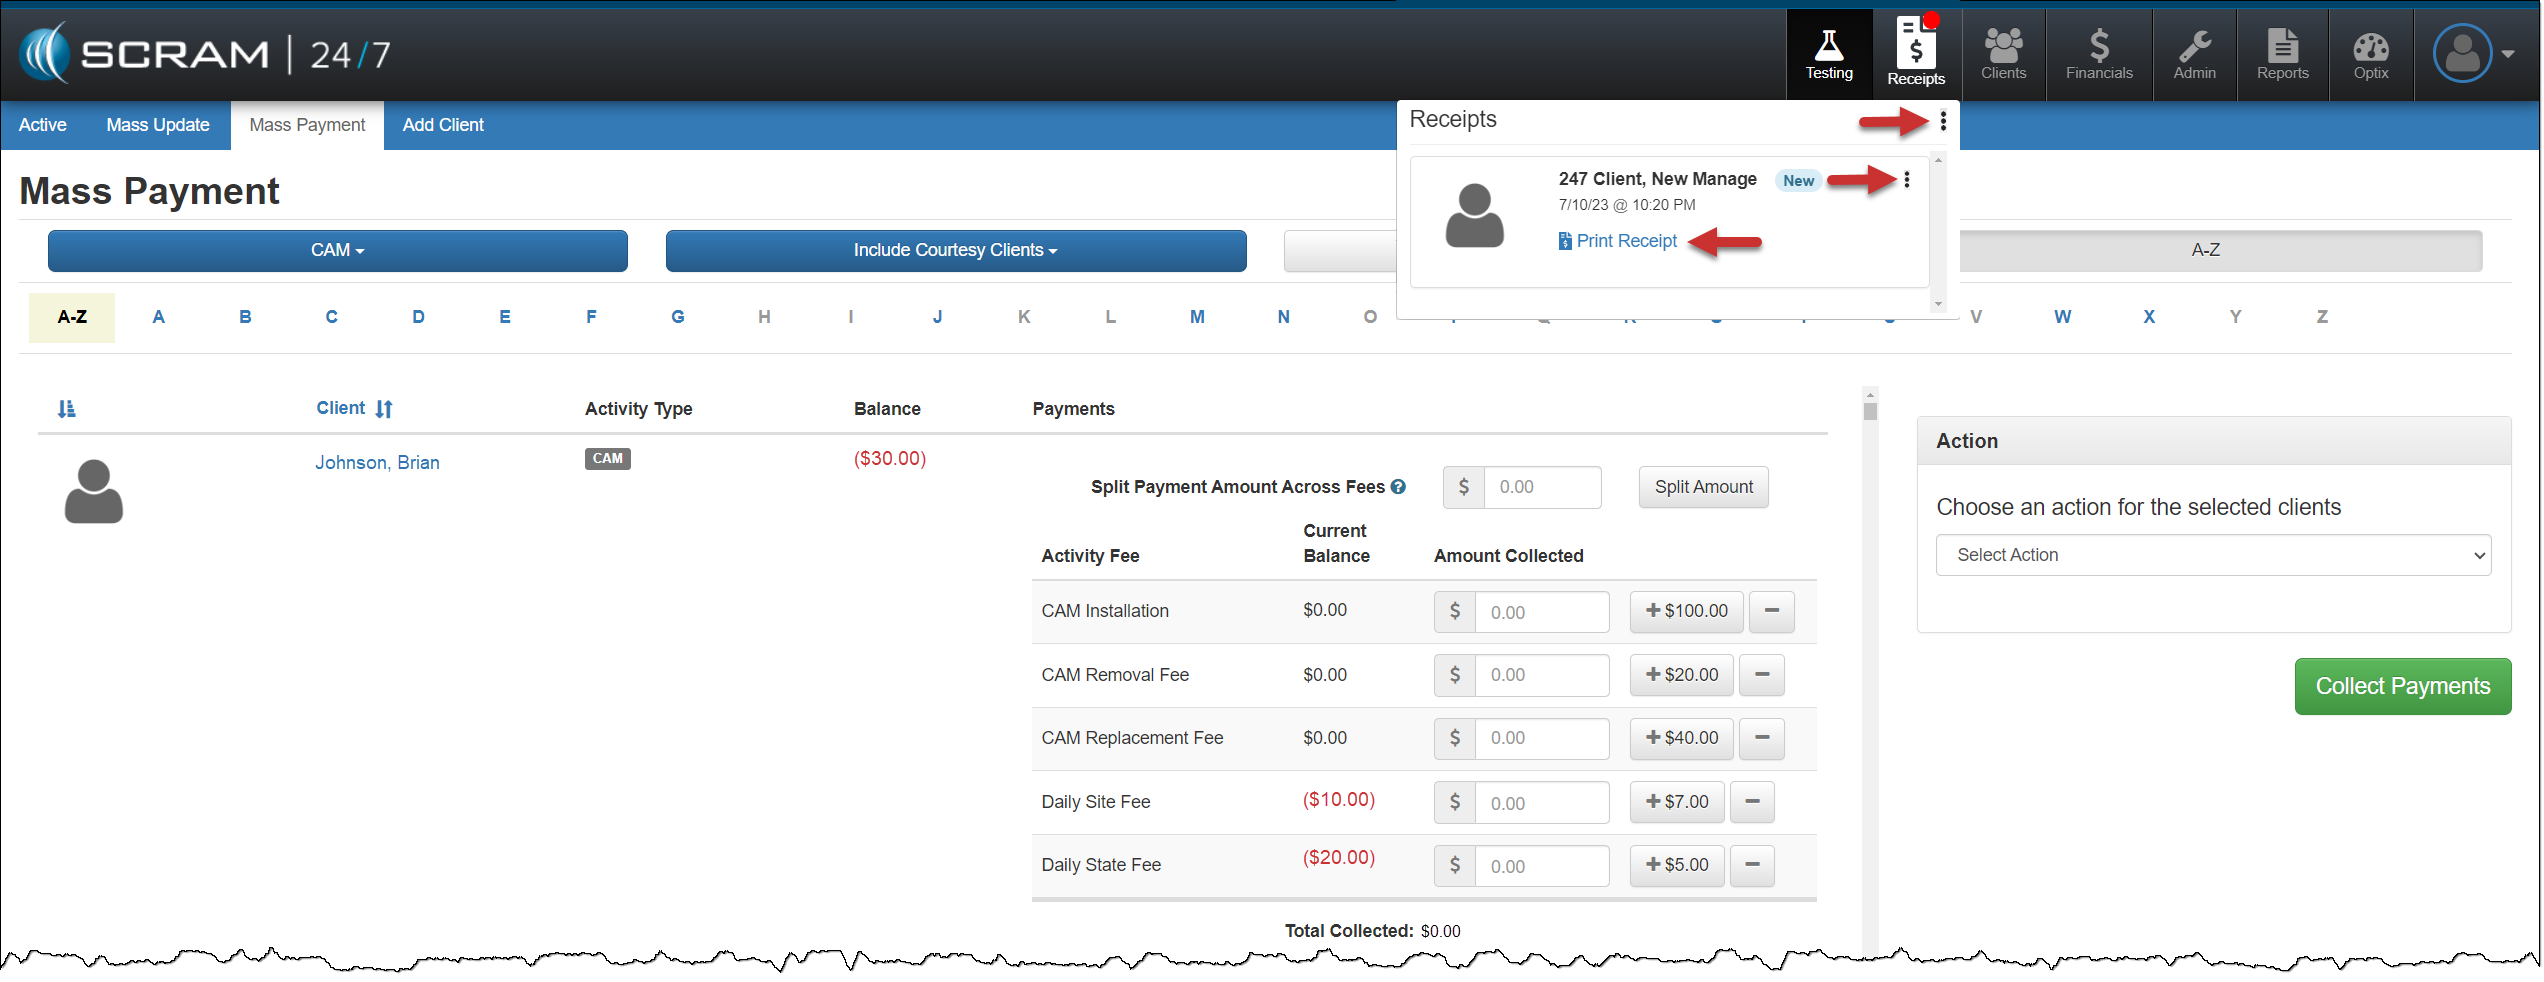
When you select the Collect Payments & Print Receipt option during Mass Payment processing, you may access the receipts by selecting the Receipts button.
On the Receipts dropdown:
Select the Receipts dropdown ellipsis to print or clear all receipts from the dropdown.
Select the Print Receipt hyperlink under each client’s name to print receipts one at a time.
Select the ellipsis next to the client’s name to clear the receipt from the dropdown.
Receipts – click to enlarge
A transaction record may be viewed in the “Transaction History” section of the individual client’s Financials tab.
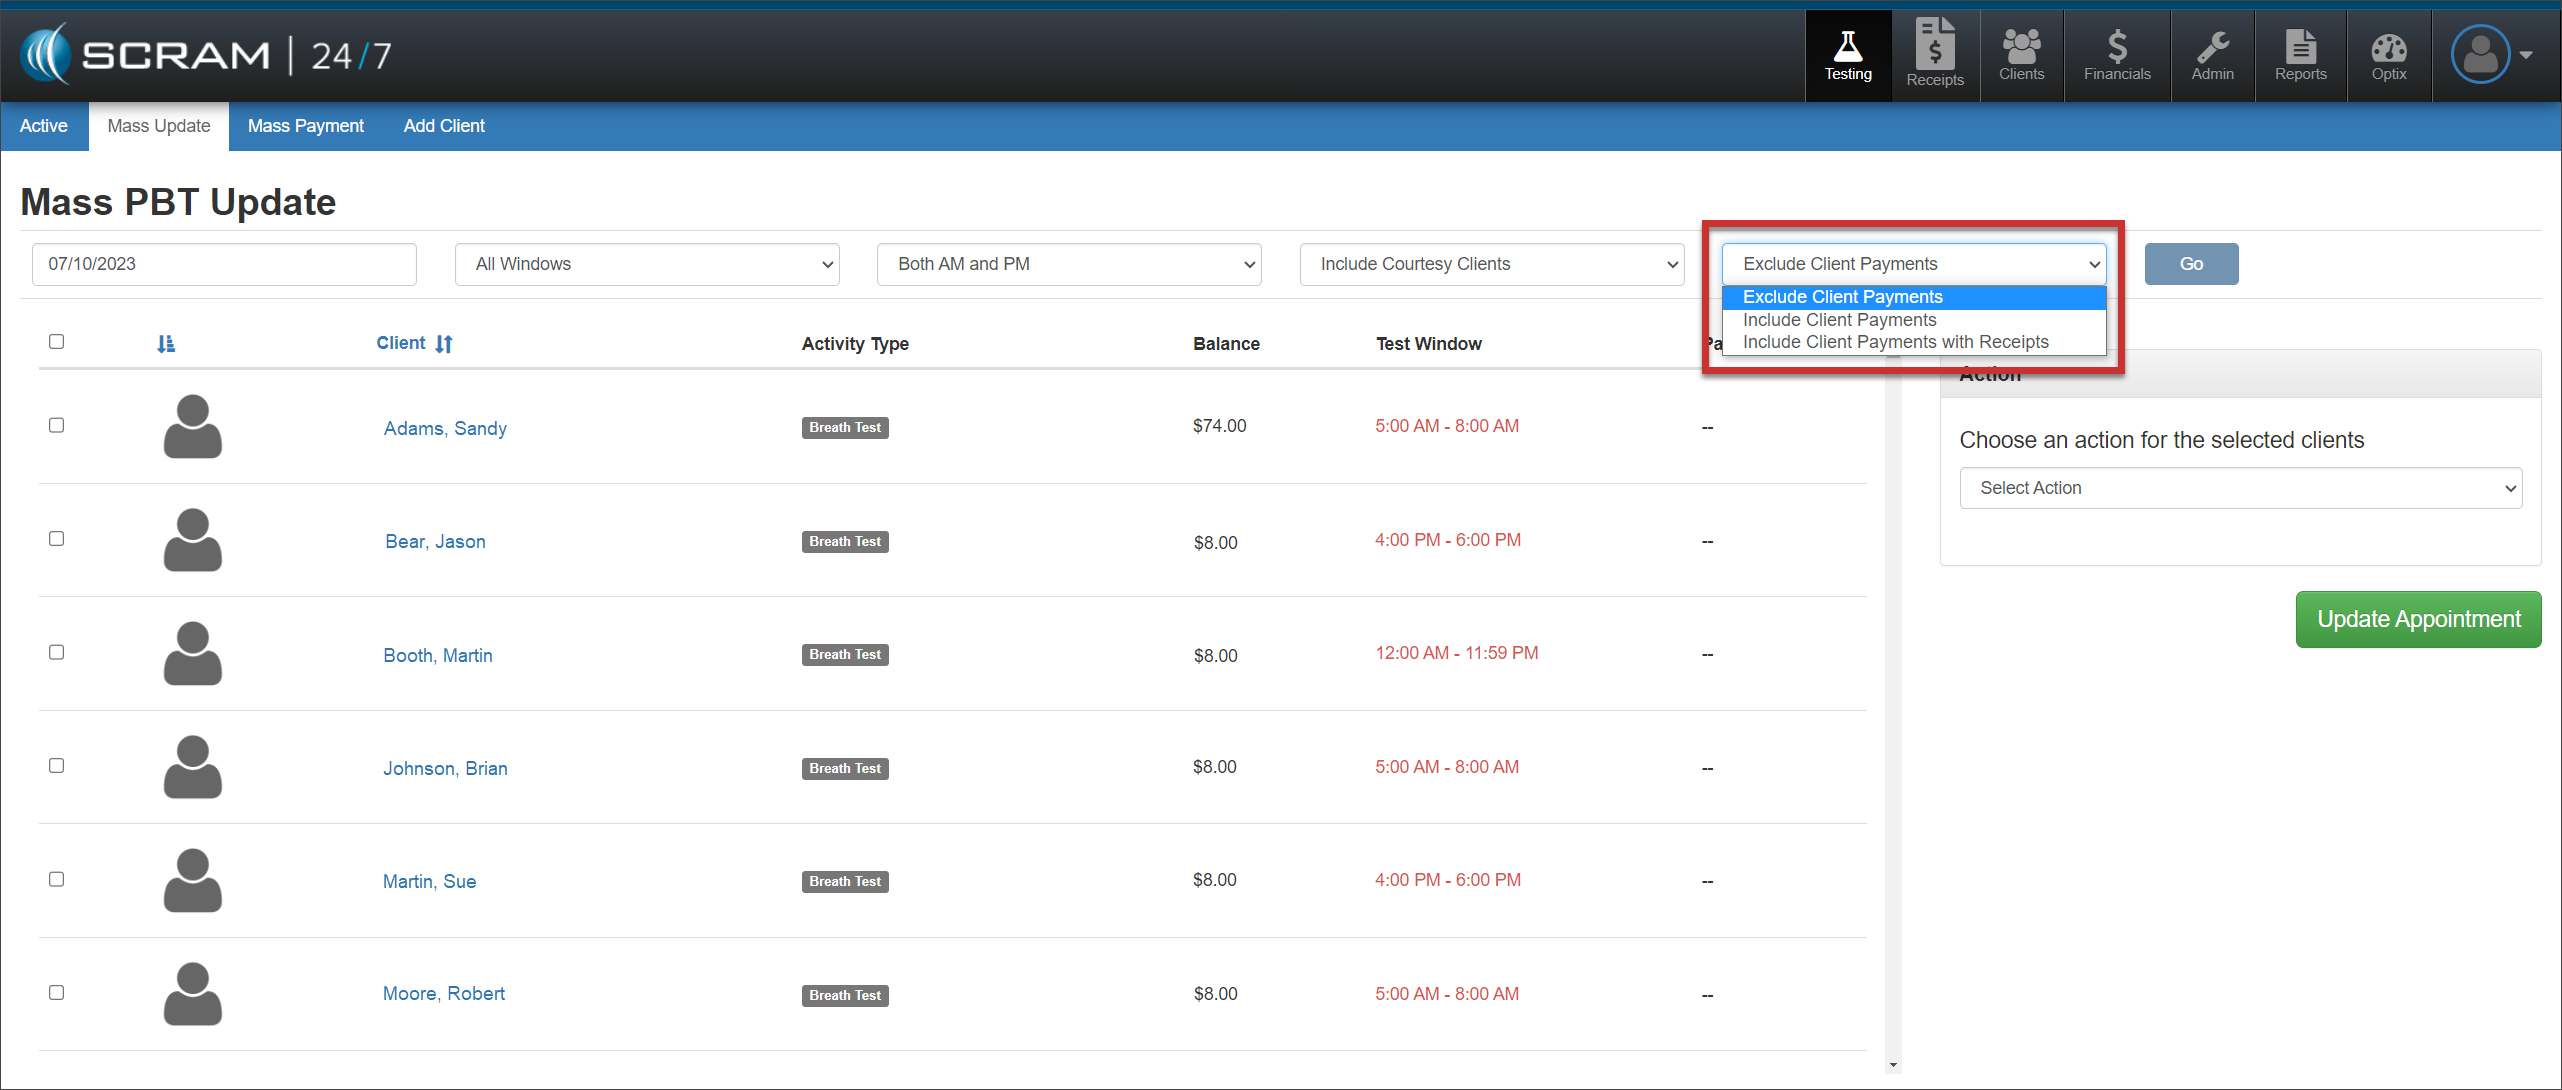
Mass Update
A new filter on the MassUpdate page allows you to include or exclude client payment and receipt options for the clients displayed.
Mass Update page – click to enlarge
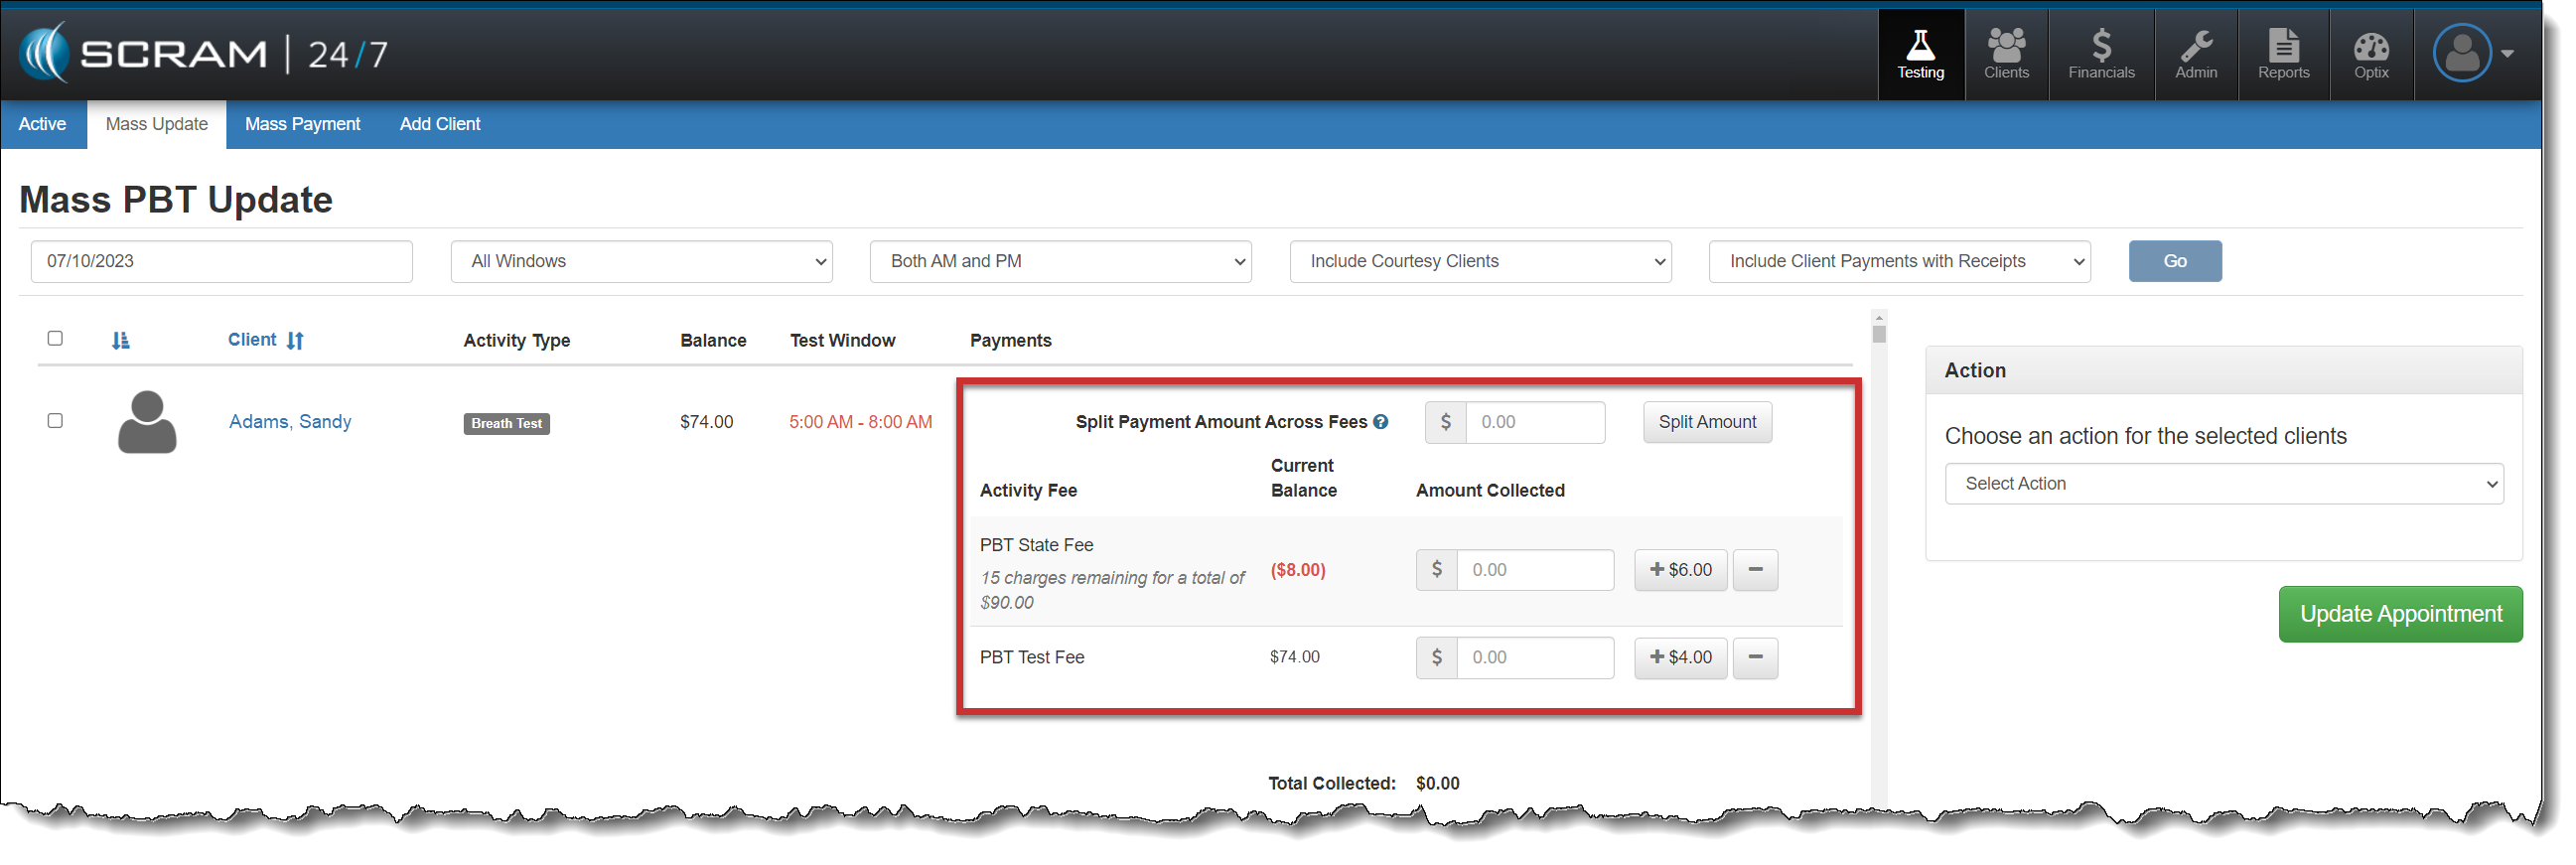
When IncludeClient Payments or Include Client Payments with Receipts is chosen, select each client for which you wish to record appointment attendance, and then enter the payment for the activity fee (if collected).
Mass Update page – click to enlarge
After recording the payments for each selected client, choose the appropriate action of either Passed or Excused for the mass update.
Once the page reloads, if the option of Include client Payments with Receipts was selected, the client receipts are available from the Receipt button.
Some tips regarding these enhancements:
When recording an individual appointment payment, the receipt is now available on the Receipts button for printing.
A print preview window will open when processing a refund, transfer, or using the Print Receipt to Date option on the client’s “Transaction History” section of their Financials page.
The receipts on the Receipts dropdown are only visible to the user who generated them.
On, November 16, 2023, SCRAM Systems will release enhancements to SCRAM Nexus. The client’s Profile page will be updated to:
Remove the TouchPoint profile information section.
+Add Vehicles, Court, and ProtectiveOrder section.
Not seeing the enhancement in Nexus? Clear your cache and cookies and refresh your browser window.
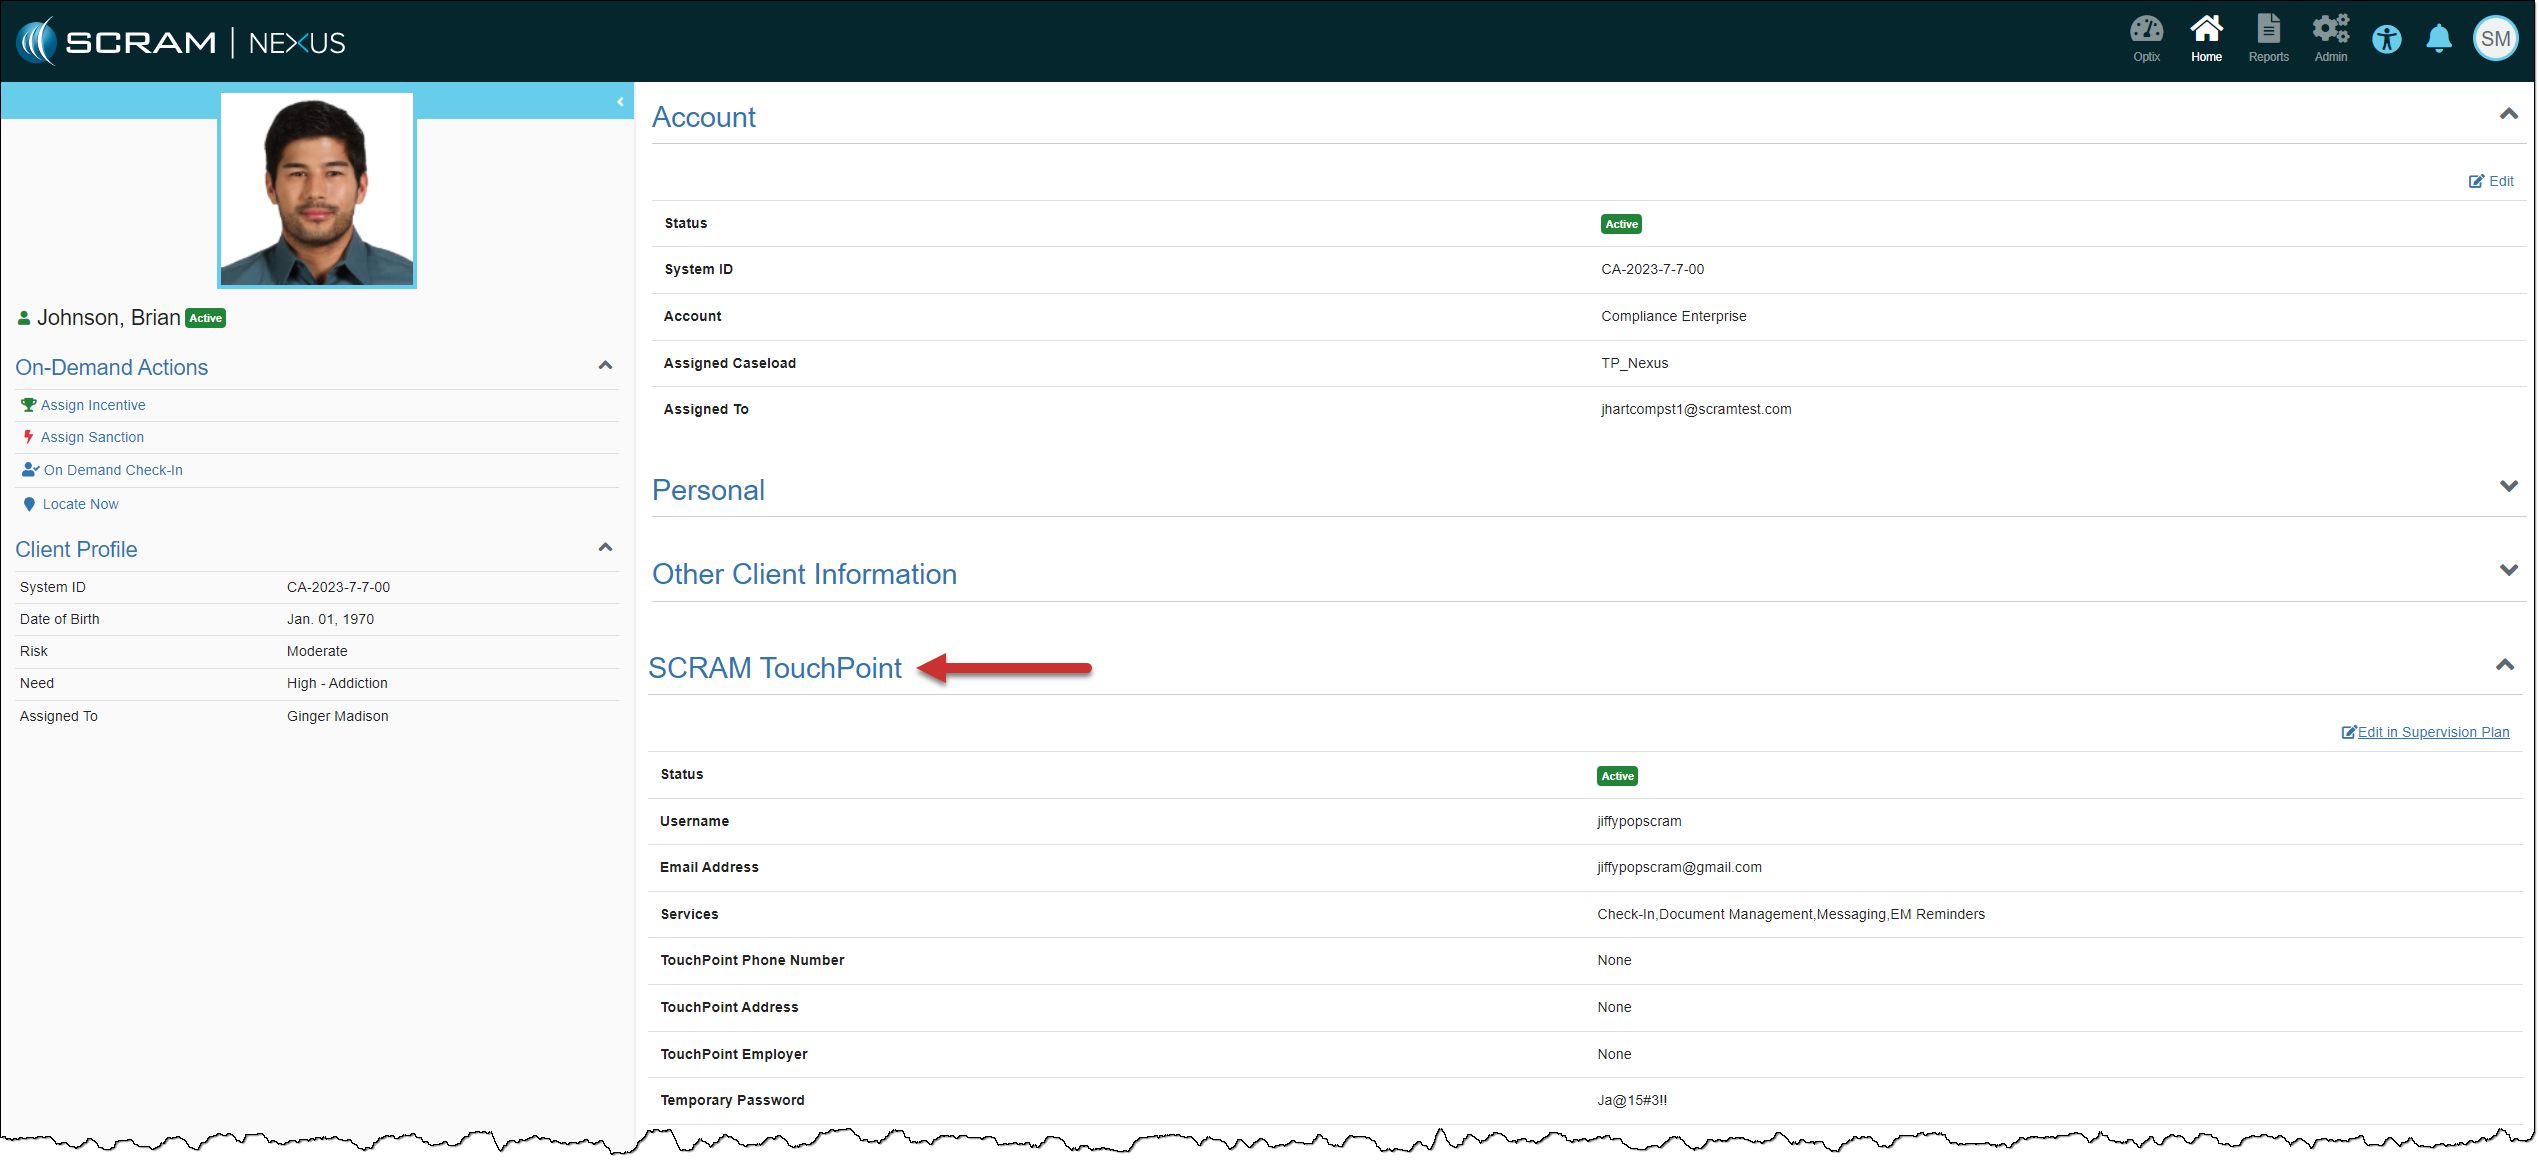
TouchPoint
The client’s TouchPoint information is currently available on both the Profile page and the Supervision Plan for the client. The duplicate information will be removed from the client’s Profile page. You may continue to access the client’s TouchPoint information within the Supervision Plan.
Current Profile Page
Nexus Client Profile page – click to enlarge
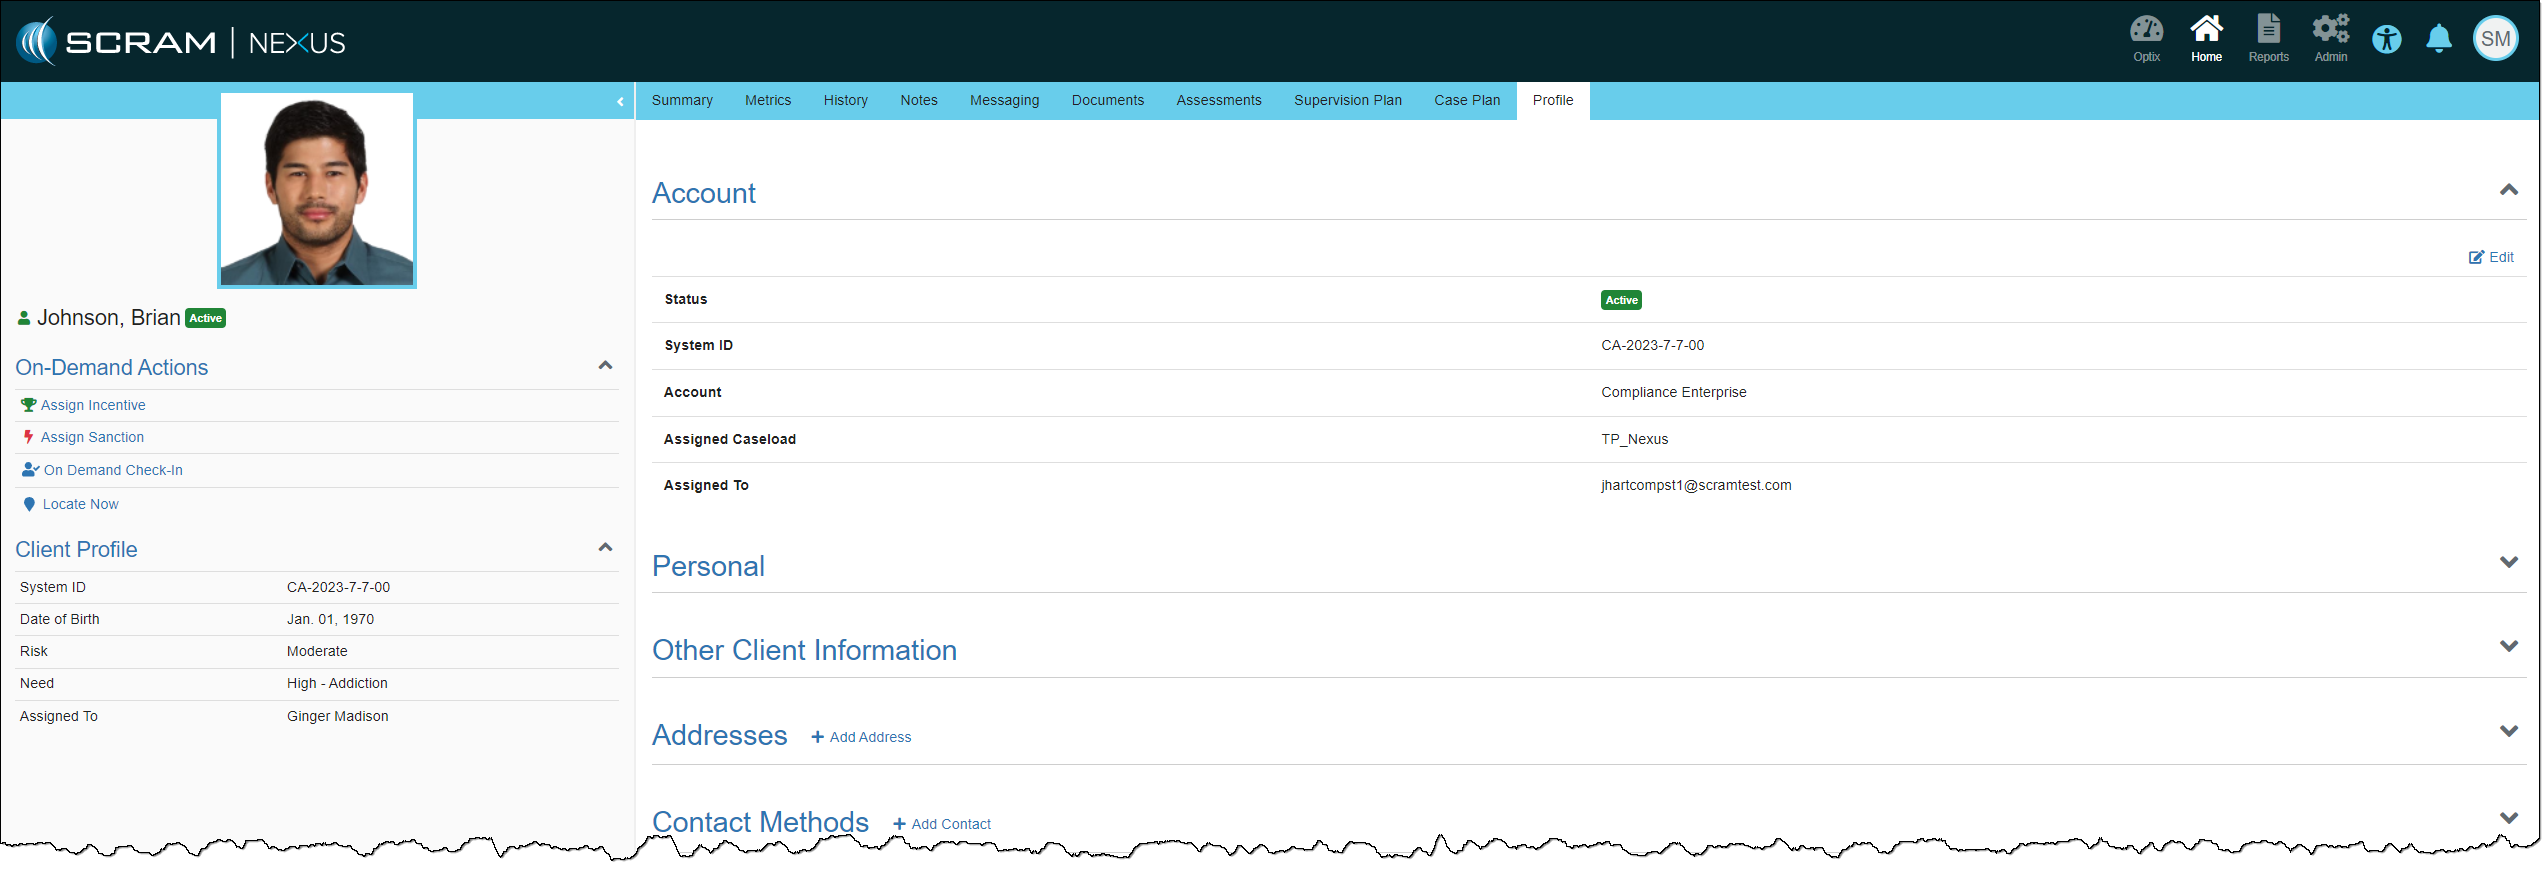
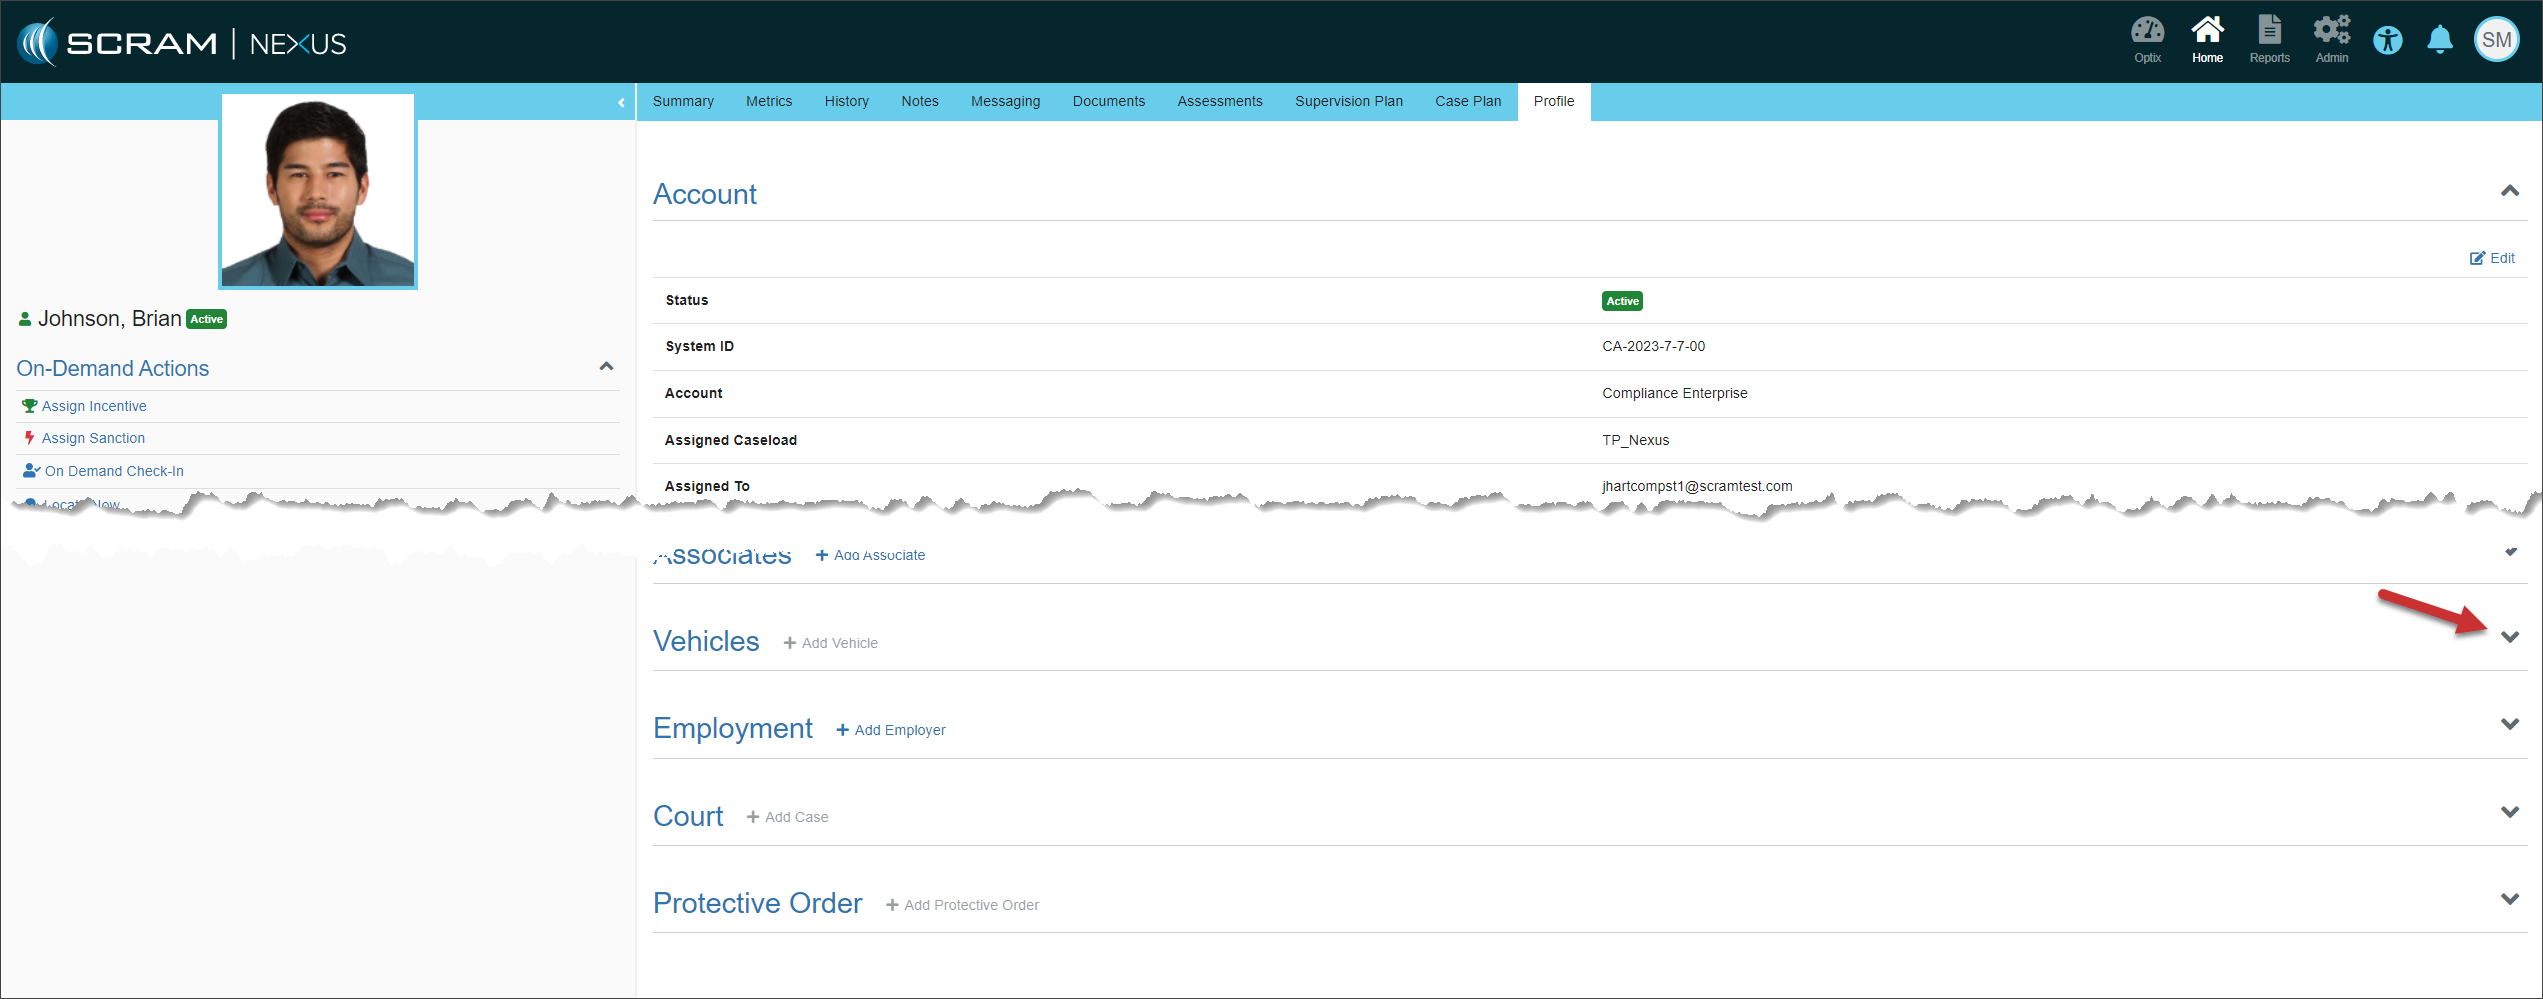
Updated Profile Page
Updated Nexus Client Profile page – click to enlarge
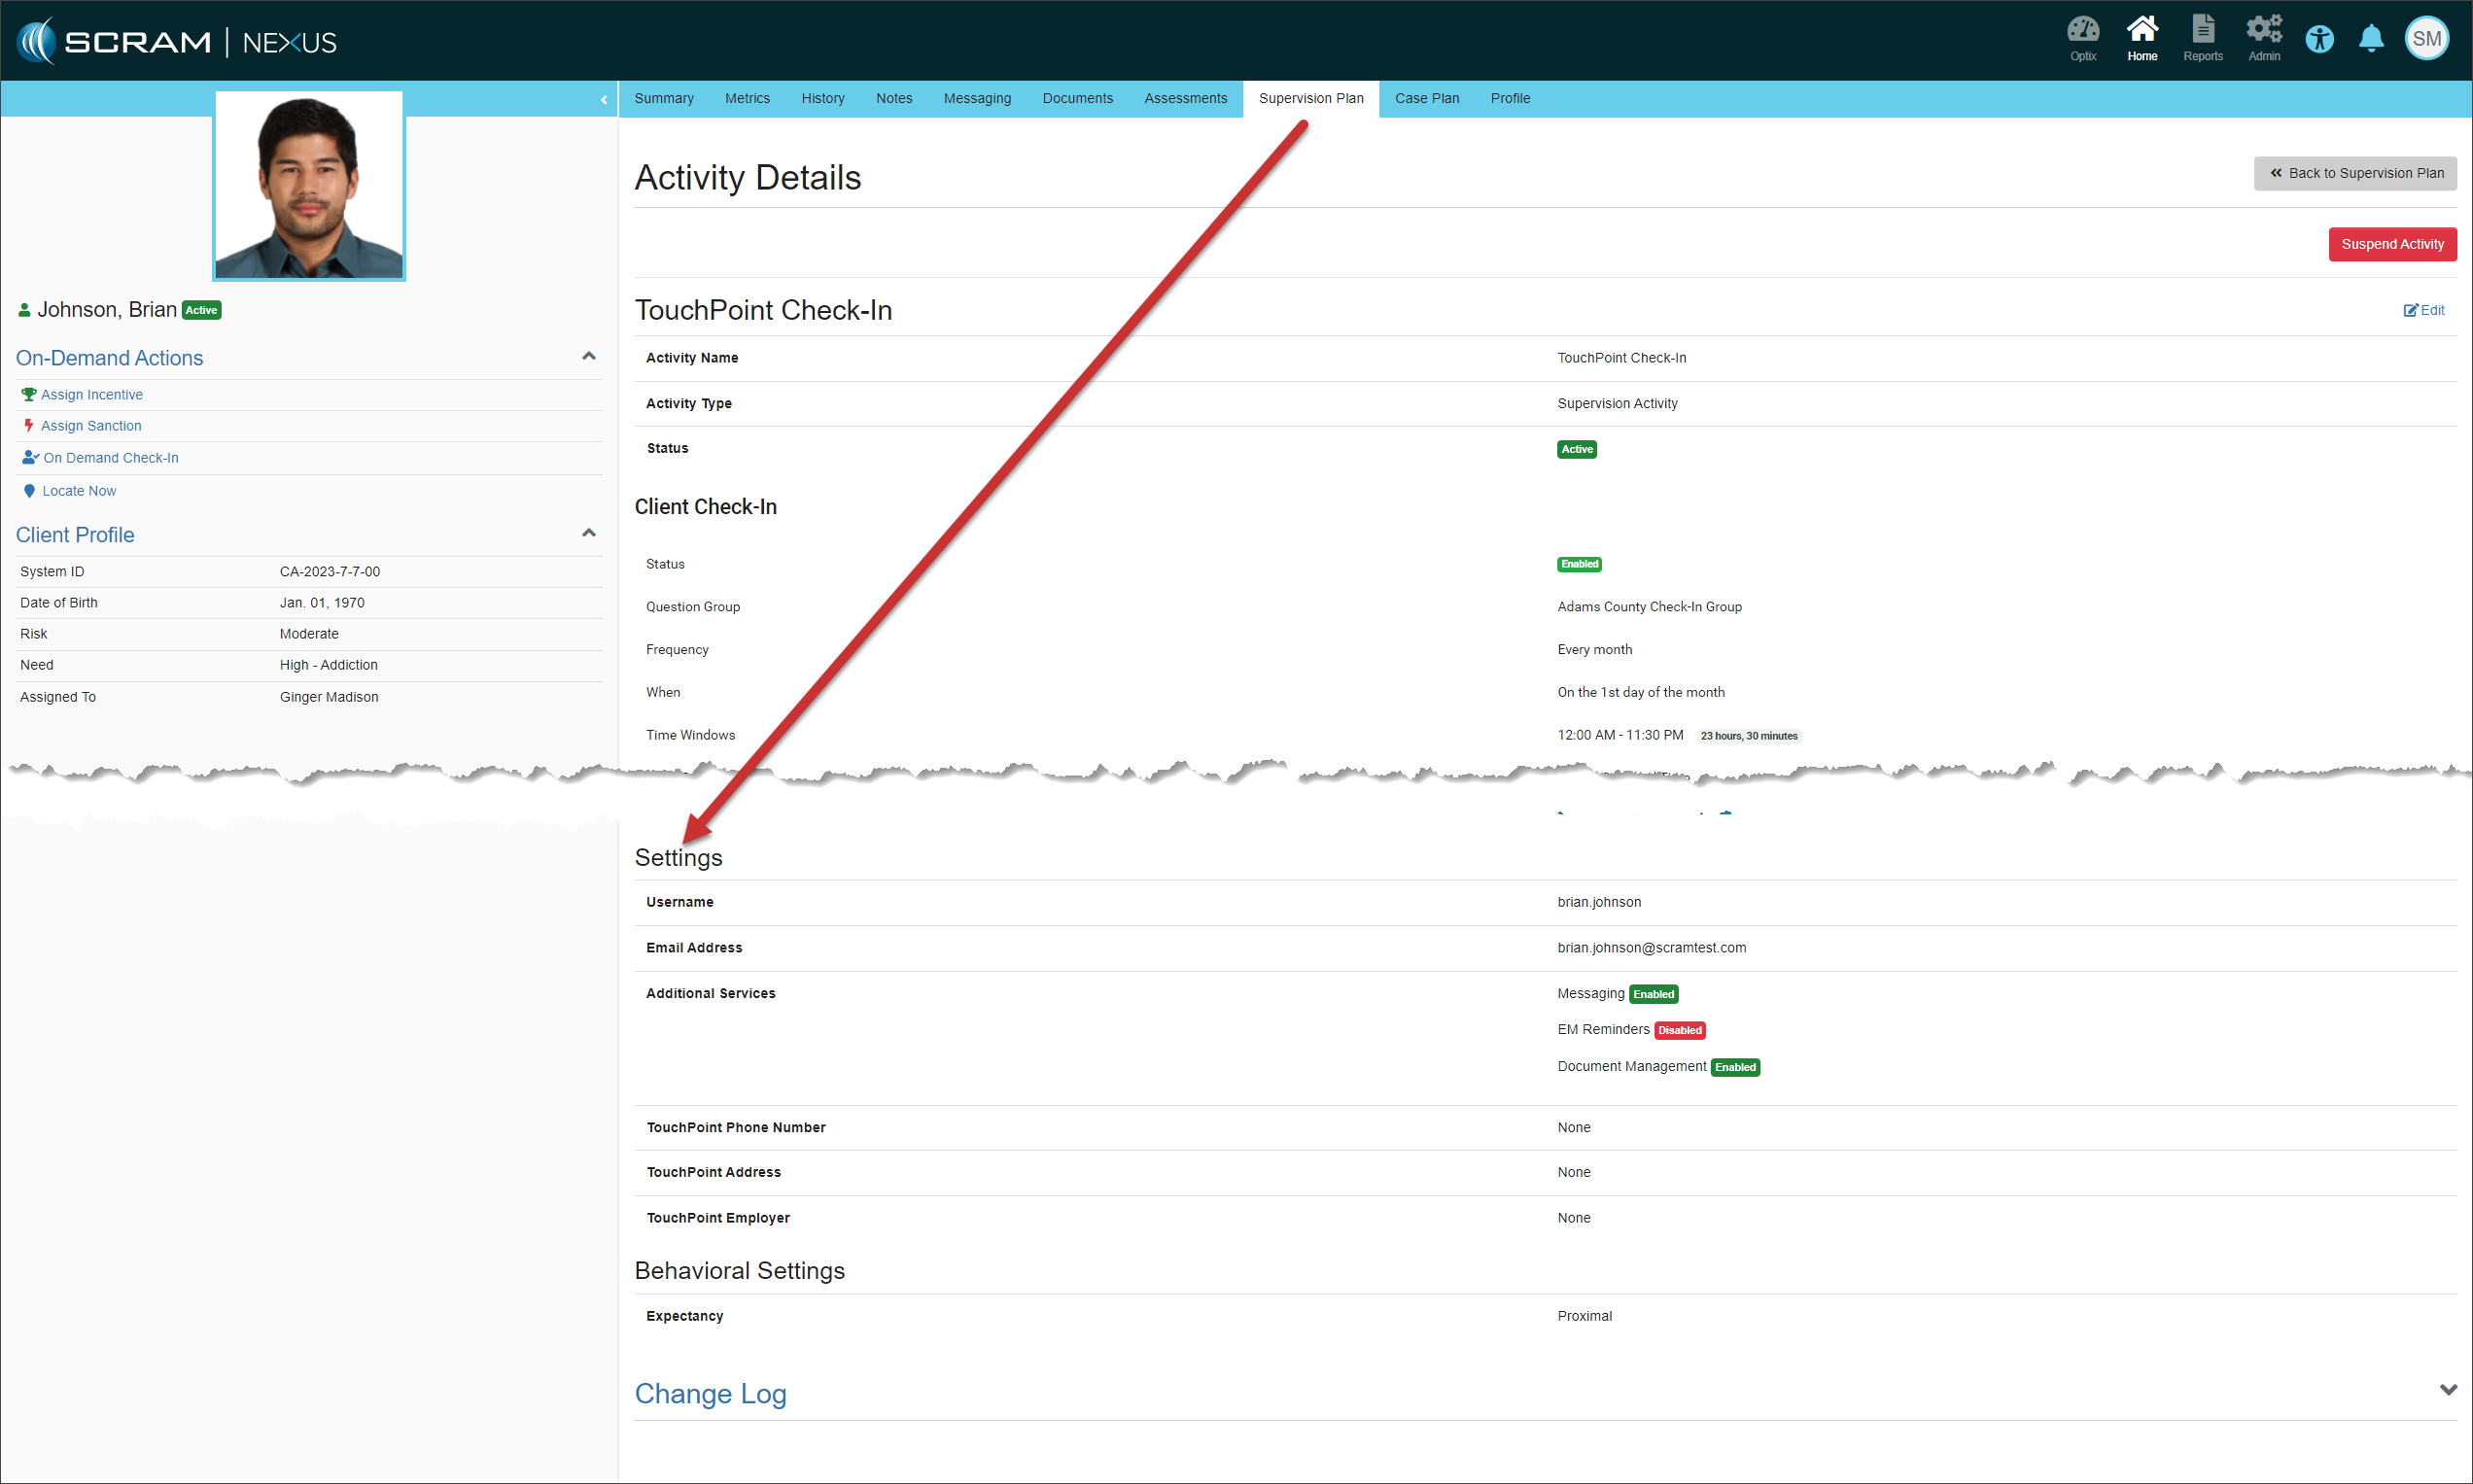
Current TouchPoint Supervision Plan Activity Details
Client TouchPoint Information in the TouchPoint Activity Details Settings – click to enlarge
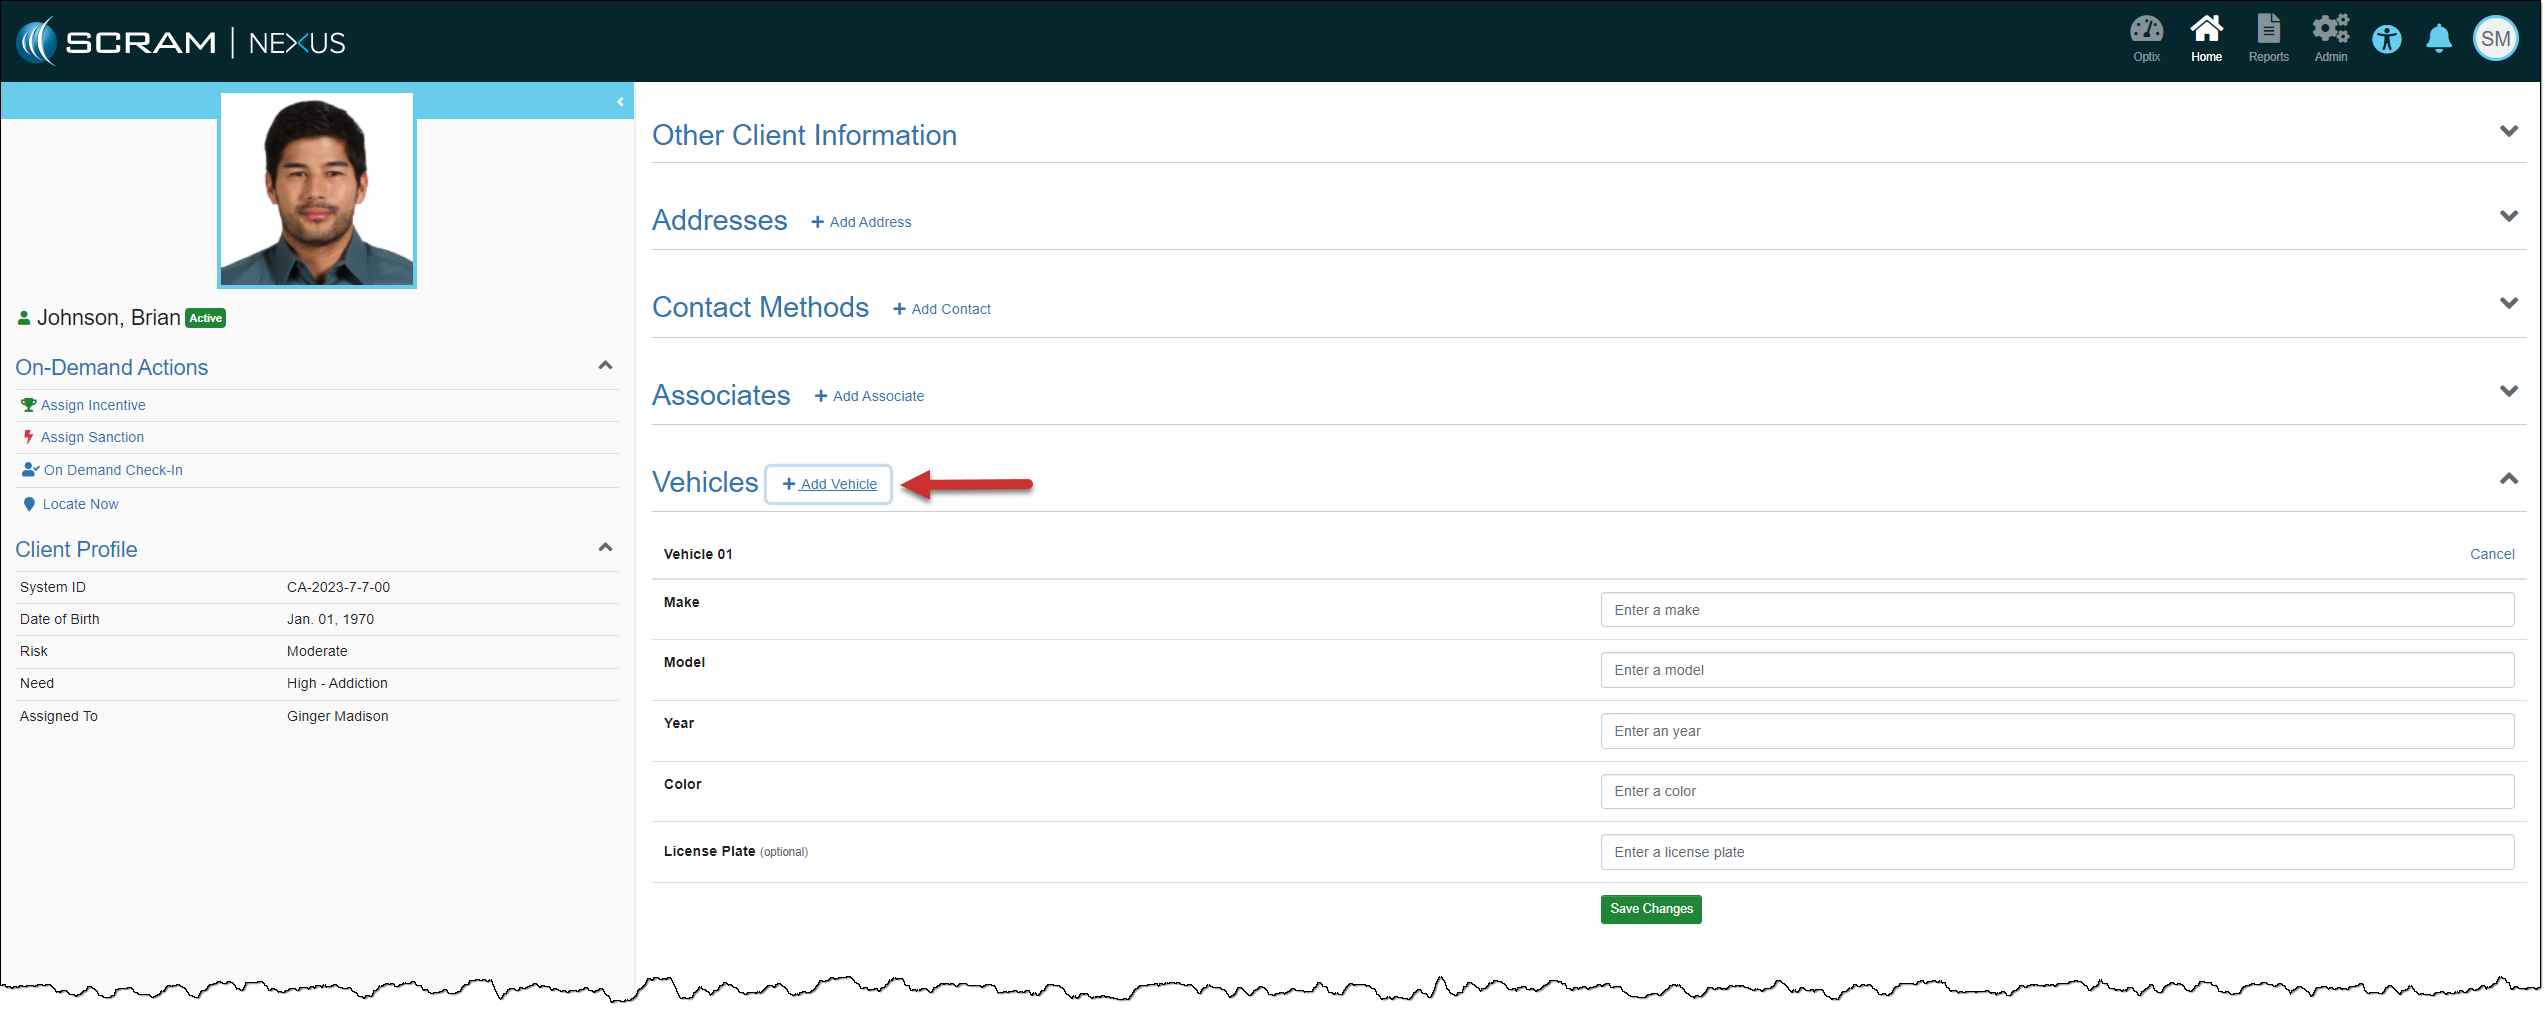
Vehicles, Court, and Protective Order Sections
To add client Vehicles, Court, and ProtectiveOrder information, you must first expand the section and then select the +Add hyperlink for each new piece of information to be added.
Client Profile page – click to enlargeAdd Vehicles section expanded – click to enlarge
On, November 15, 2023, SCRAM Systems® will release two enhancements for your SCRAMNET alcohol monitoring client caseloads.
Non-Compliance Report – Add SCRAM CAM alert readings to the report
Update to the Alert Management Console – Snooze button
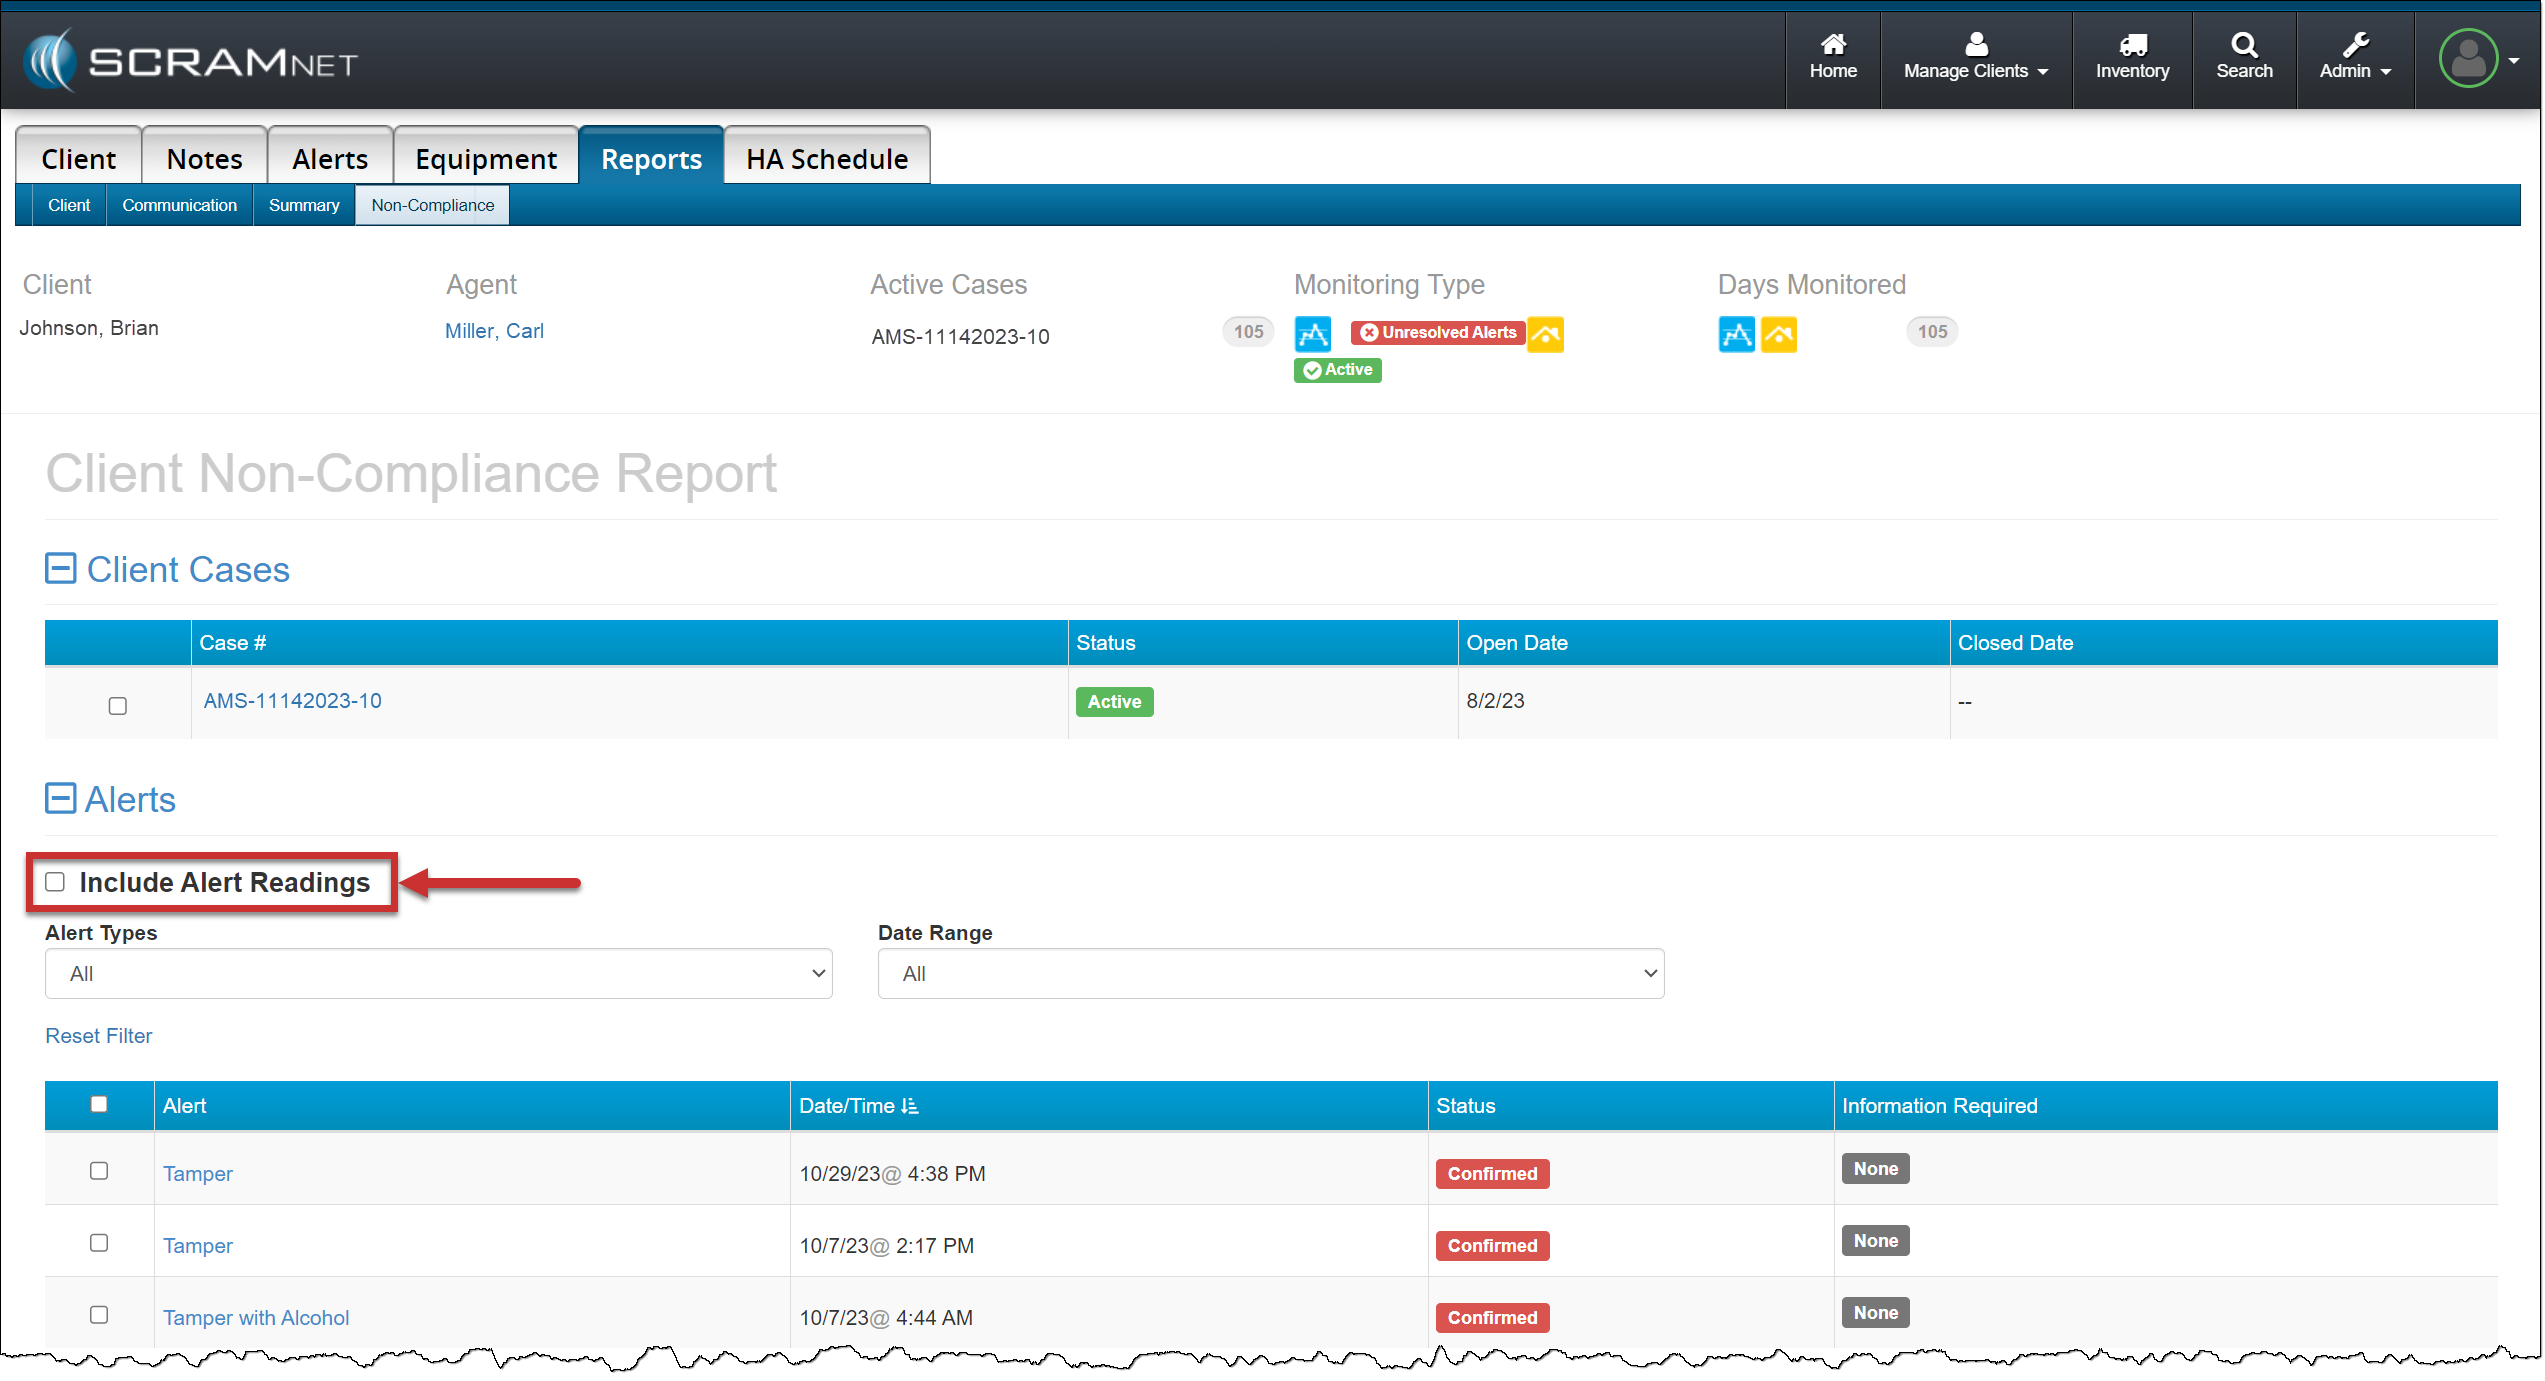
Non-Compliance Report – Include Alert Readings
When running a Non-Compliance Report for a confirmed event, you may add the table of alert readings to the report by checking the Include Alert Readings checkbox. Then select the alert or alerts to include in the report as normal.
SCRAMNET Client Reports Tab Non Compliance page – click to enlarge
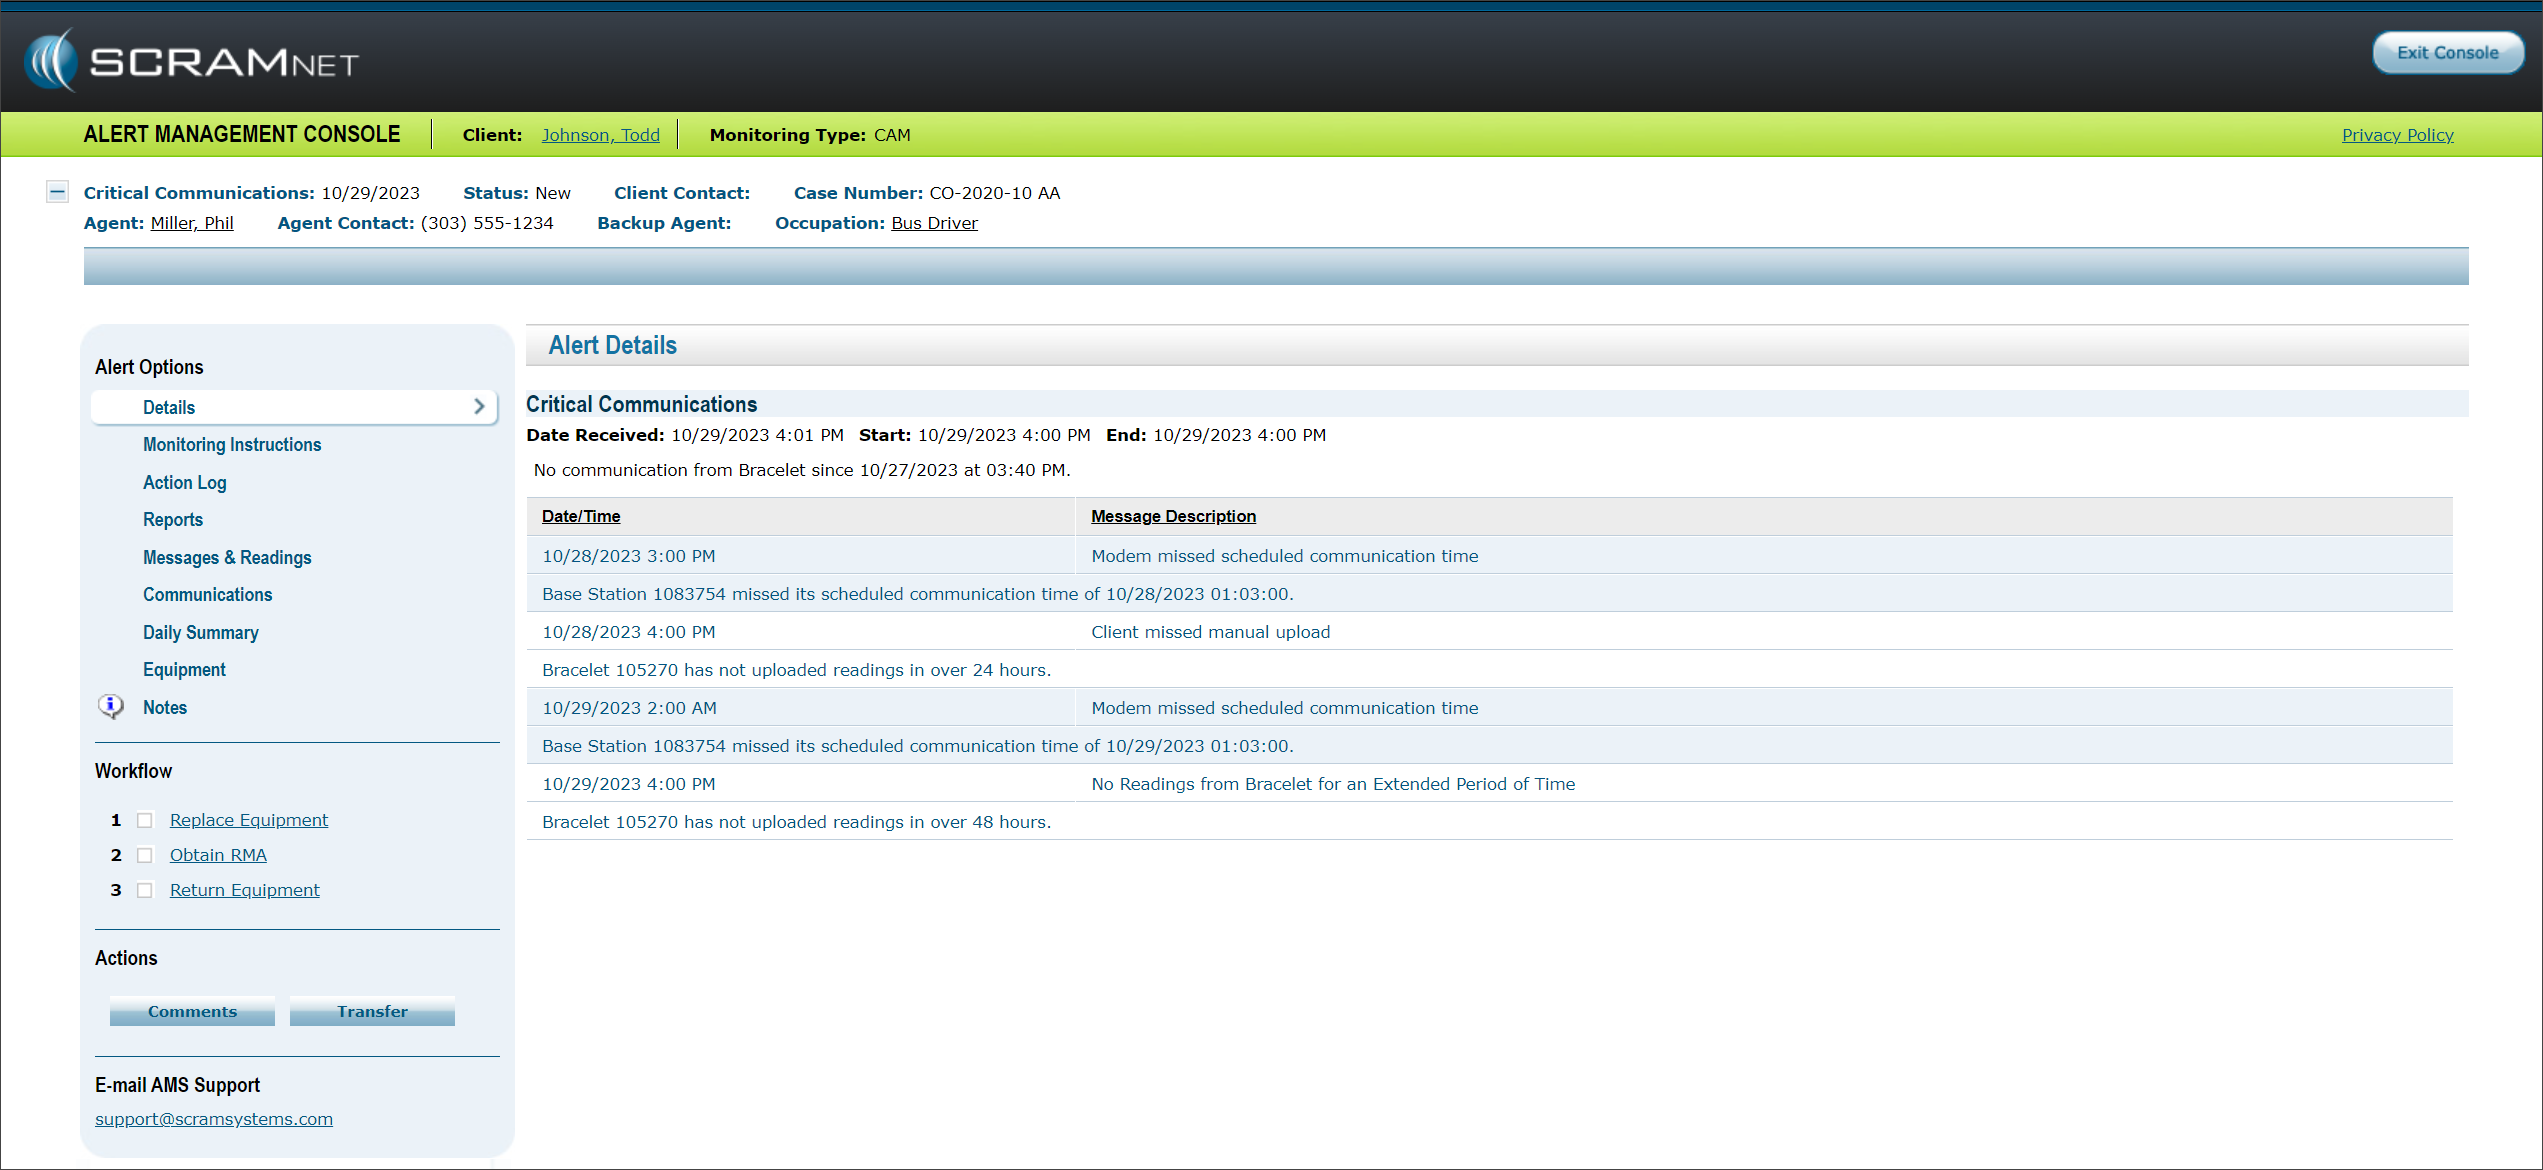
Alert Management Console – Snooze button
When you access the Alert Management Console for an alert, you may notice the absence of the Snooze button. To ensure all SCRAM CAM and SCRAM CAM + HA (House Arrest) client alerts are processed efficiently and timely, SCRAM Systems recommends you utilize the Comments and Transfer buttons to respond to requests for information or to resolve alerts. Don’t hesitate to contact your Data Analyst or Customer Service if you have questions about how to handle an alert.
Client Alert Management Console – click to enlarge