SCRAM Optix

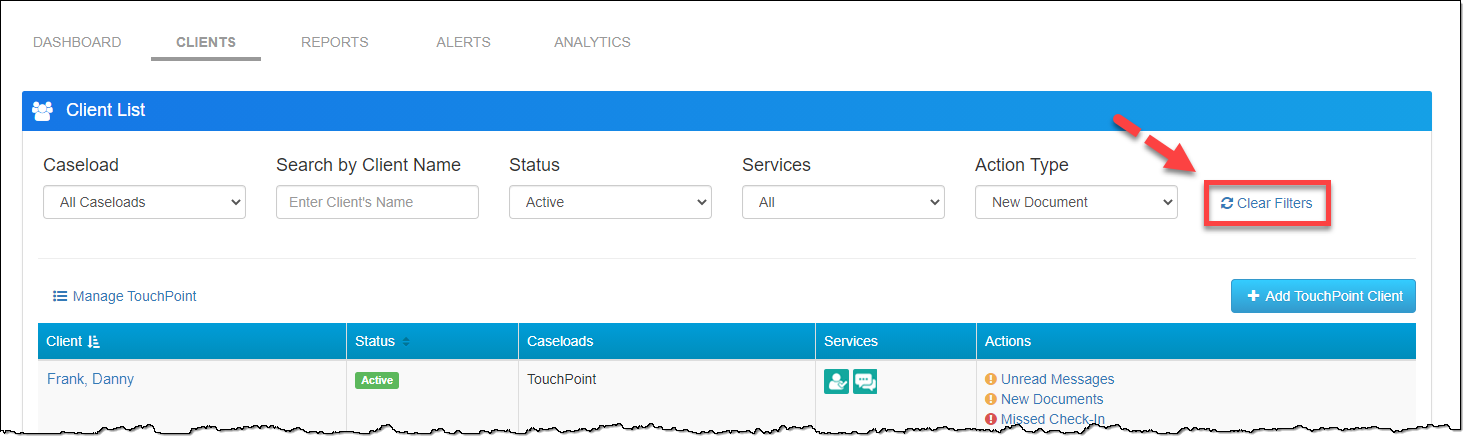
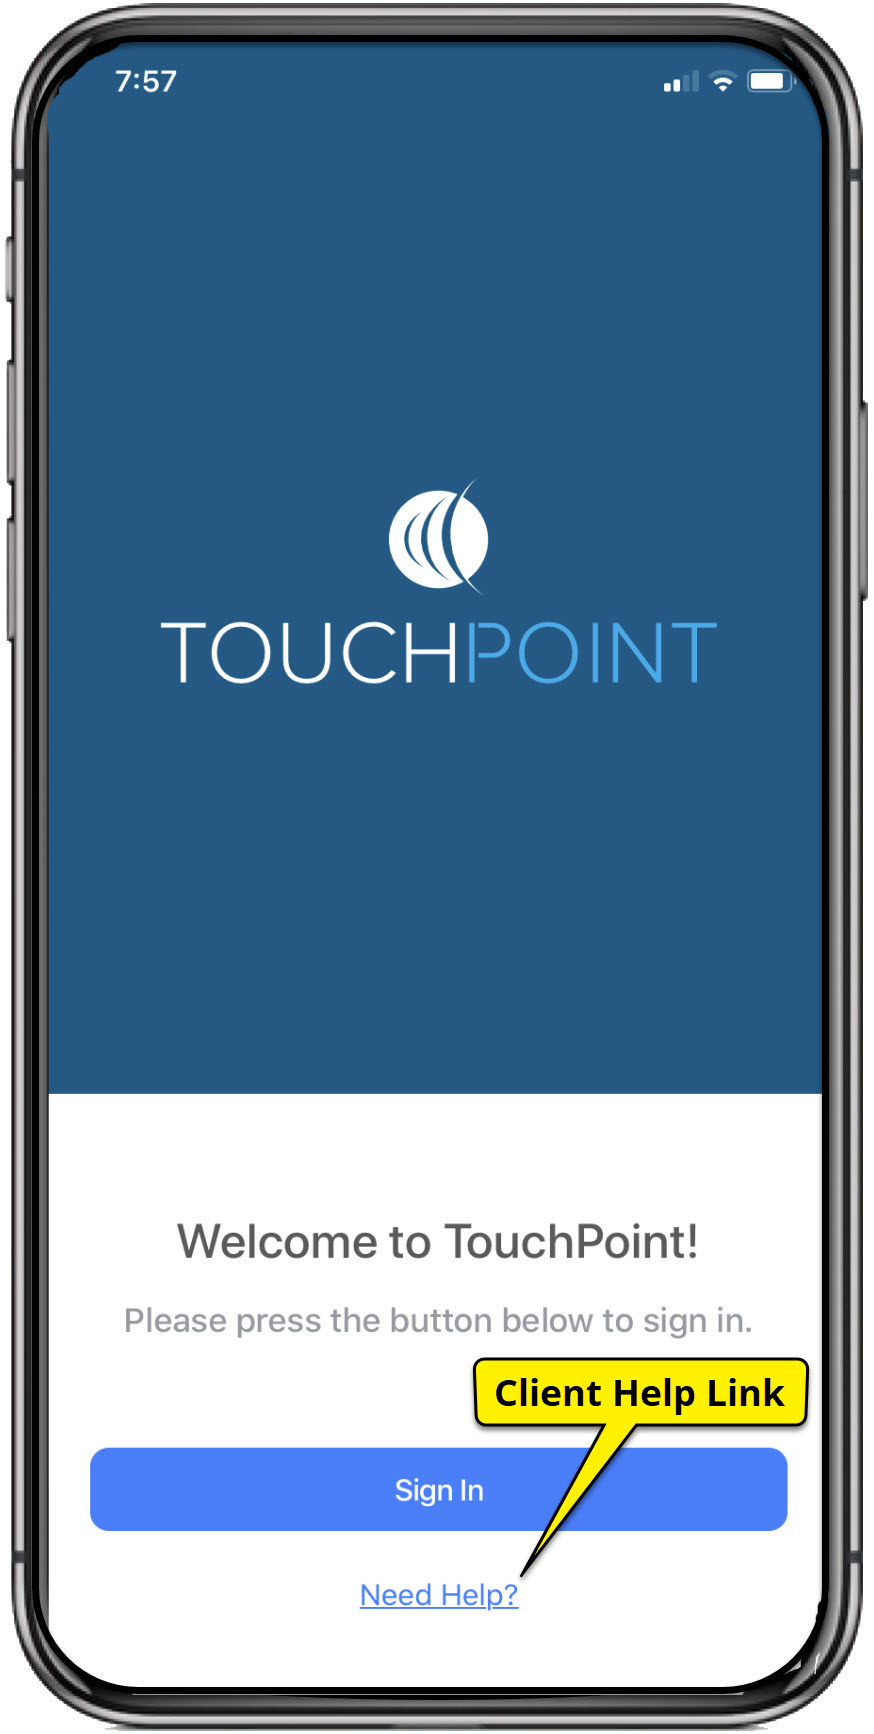
During the morning of January 25, 2024, SCRAM Systems will release the following three enhancements, which are designed to make it easier to manage your SCRAM TouchPoint™ client Check-In caseloads, to the SCRAM Optix® dashboard:

  1. Client Check-in History Pagination
  2. Client Check-in History Filtering
  3. Check-in Location Address Approximation Added to Map

Client Check-in History Pagination

To improve the performance of the SCRAM Optix dashboard, the TouchPoint client Check-in History page will now display 25, 50, or 100 check-in records at a time – and then allow you to “page through” the records – rather than loading and displaying all of the client’s check-in history all at once on one long scrolling page.

Change the Number of Check-in History Records Displayed (click to enlarge)

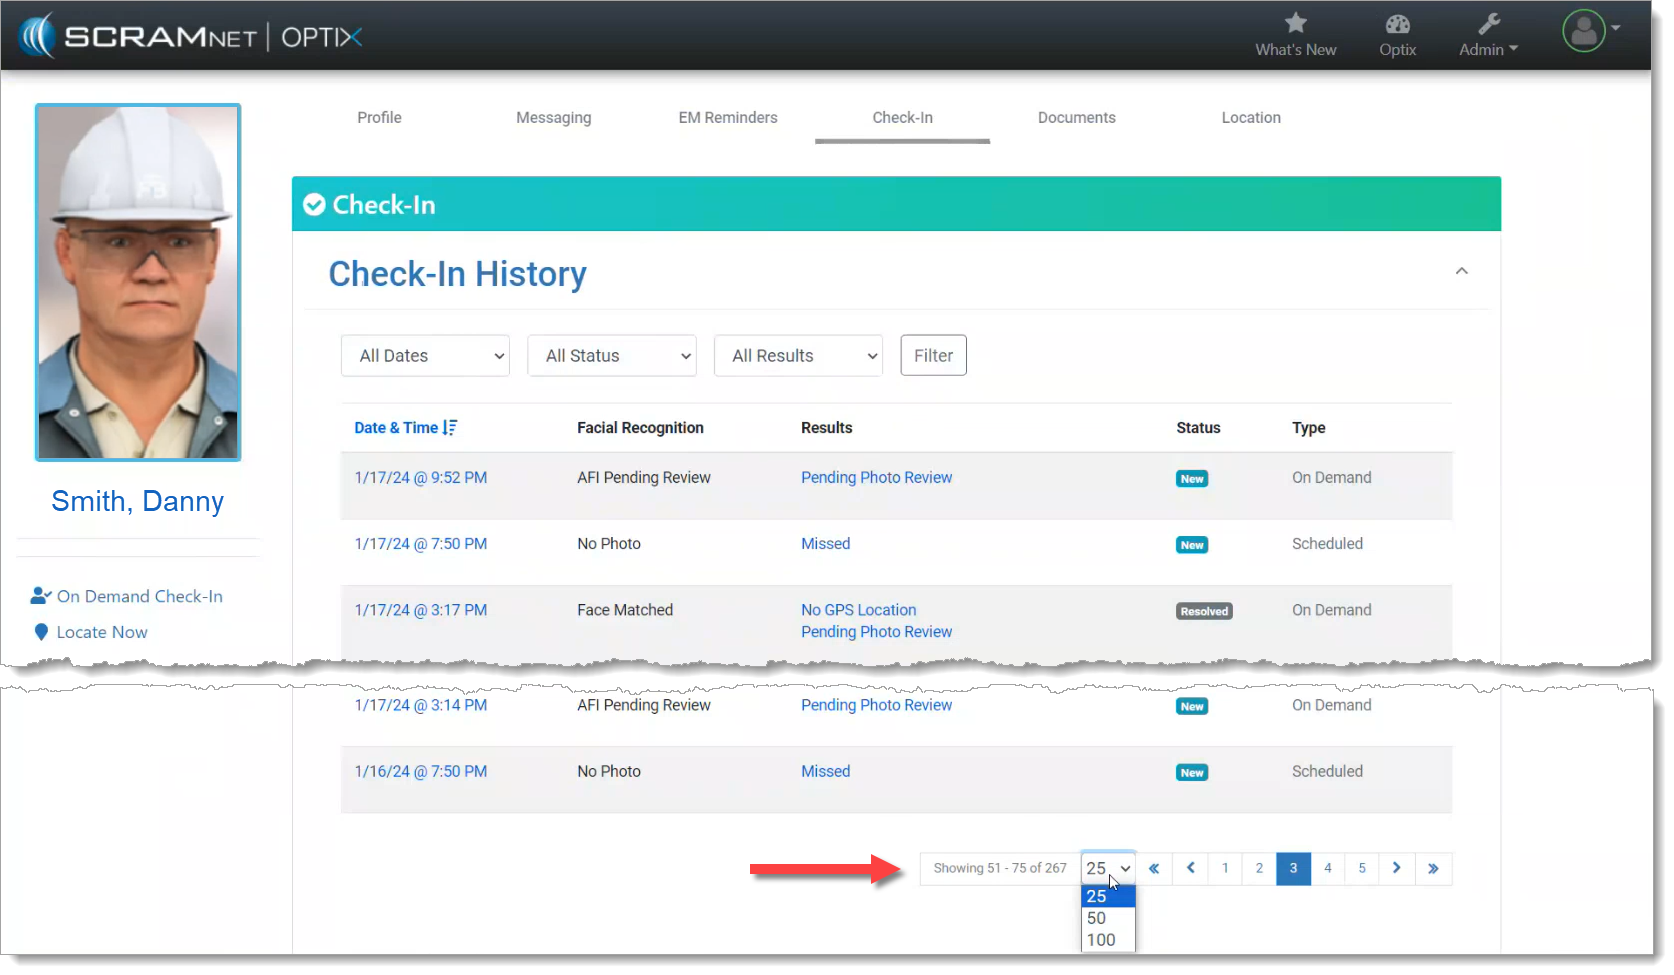
Scroll to the bottom of the page to change the number of check-in history records displayed per page, and to page through the records.

Client Check-in History Filtering

The records displayed on the client Check-in History page may also now be filtered by the Date, Status, and/or Results of the check-in. Simply choose an attribute from the filter dropdowns, and then select the Filter button to narrow down the number and type of check-in records displayed on the page.

Filter the Displayed Check-in Records (click to enlarge)
Tip
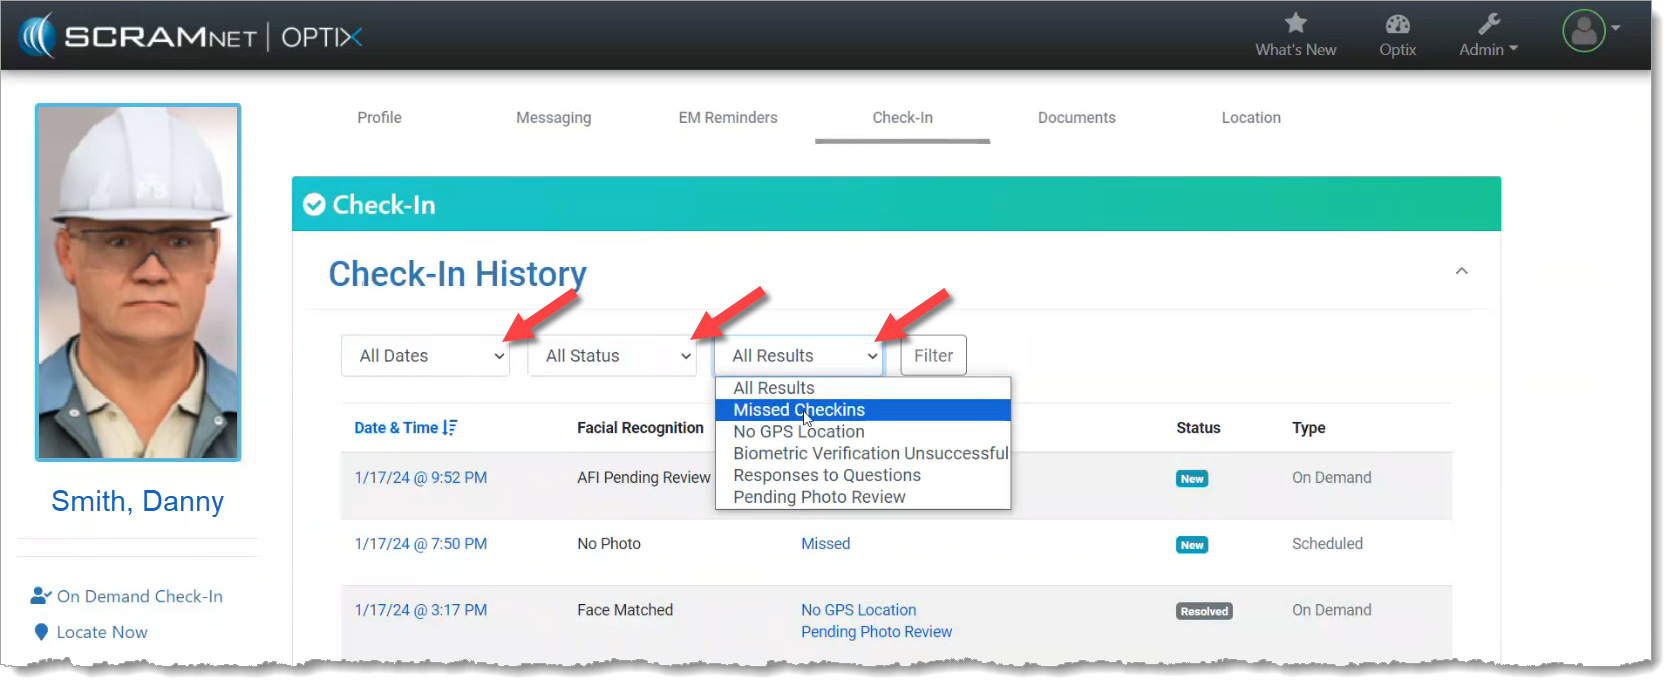
Tip: The filters only work on the records displayed on the current page; they do NOT filter all of the check-in history records. To improve your filtering results, increase the records displayed per page to 50 or 100 records and then apply your filters.

Check-in Location Address Approximation Added to Map

Once you select a single Check-In record to review, if the client’s smartphone location data was captured during the check-in, an approximate location address will be provided along with the map point.

Client’s Approximate Address at the Time of the Check-in is Provided Above the Map (click to enlarge)

Continue Reading

SCRAM Systems® will be moving to QR code-based “Help” cards for nearly all of its products and services by the end of this week. The switch from static instruction cards to QR codes helps to ensure that customers – and clients – always have the most up-to-date instructions for their SCRAM Systems devices at their fingertips.

There will be two separate QR code-driven Help cards:

  1. SCRAM Systems Device Help for customers (Service Providers and Agencies) – the blue card
  2. SCRAM Systems User Support for clients – the white card
InformationQuick Reference Guides will still continue to be printed for all SCRAM Systems products.

What’s a QR Code?

A QR code is a type of two-dimensional matrix barcode consisting of an array of black and white squares. QR codes are typically used for storing web addresses (URLs), which can be read by the camera on a smartphone to open a web page.

QR Code Example

How Will SCRAM Systems Use QR Codes?

Rather than including device-specific instruction cards in the boxes we ship to you, we will instead include two packs of 25 business-card-sized Help cards – one pack of customer Help cards and one pack of client Help cards – in each of our Customer Care Kits. Additional 25-card packs of each type will be available for purchase on the SCRAMNET Equipment Order Form if needed.

Help for Service Providers and Agencies

You and the other Officers, Agents, and Case Managers who are responsible for monitoring clients in your SCRAM Systems Program, can carry one of the blue customer cards with you, or post them around the office. Then whenever you need help installing or removing a device, for example, you may simply pull out the SCRAM Systems Device Help card and scan it with your smartphone:

SCRAM Systems Device Help Card – Front
SCRAM Systems Device Help Card – Back

Once you scan the QR code on the card, your smartphone will launch the SCRAM Systems Customer Help Center (www.scramsystems.com/customer-help/), where you will tap on your location, and then tap on the type of Help you need:

  1. Scan the card with your smartphone and then select your location:
Select Your Geographical Location (USA/Europe Shown)
  1. Select the type of device help you seek:
Select the Type of Help (Device Installation Shown)
  1. Login with your SCRAM monitoring system credentials:
Login with SCRAM Credentials
InformationRequiring a login ensures that nobody except SCRAM Systems customers can access SCRAM Device Help.
  1. Select the specific SCRAM Systems product for which you want help:
Select the Appropriate Product (Installation Help Example)

Help for Clients

SCRAM Systems will also be eliminating most product-specific client instruction cards, and will instead make QR code-driven SCRAM Systems User Support help cards available:

SCRAM Systems User Support Help Card – Front
SCRAM Systems User Support Help Card – Back

Once the client scans the QR code on the white card, their smartphone will launch SCRAM Systems Device Help for clients (www.scramsystems.com/scram-device-help/), where they may scroll through a list of SCRAM Systems devices, mobile apps, and FAQs, and simply tap on the type of help they need:

SCRAM Systems Device Help for Clients – SCRAM CAM
SCRAM Systems Device Help for Clients – SCRAM RB Pro & GPS

Continue Reading

The Analytics tab on the SCRAM Optix dashboard provides you with a wealth of interactive data visualizations that display client and program activity and performance statistics for your department’s usage of SCRAM technology. Based on your licensed products, a series of report templates may be accessed via the Available Reports dropdown menu. Check back often – new reports are being added all the time!

Continue Reading

New reports have been added to Optix Analytics to help optimize how you use TouchPoint to meet the needs of your community. These reports have been designed to provide you with a high-level overview of the performance of your SCRAM TouchPoint® program. This information can be used to measure check-in compliance and to track utilization of the TouchPoint-enabled services provided by your monitoring program.

There are three TouchPoint reports available to you within Optix Analytics:

  1. Check-In Overview: This report provides you with the total number of active TouchPoint clients, as well as a breakdown of clients by TouchPoint-enabled services.
  2. Check-In Table: This report provides you with similar information to the Check-In Overview, but presents the data in a table rather than on a chart. This report also displays the verification method used by the client’s smartphone, and whether or not the check-in passed verification.
  3. Check-In Heat Map: This report provides you with a visual of the geographical locations from which the greatest concentration of your clients submit their TouchPoint check-ins.

Visit the TouchPoint Reports help page to learn more about these new reports.

Continue Reading

SCRAM Systems® provides enhancements and updates to the SCRAM TouchPoint™ Mobile application on a continual basis. These updates improve the functionality and usability of the application for your client. Once an update is available in the Apple App store and the Google Play store, the next step is to have the client update the application on their smartphone.

An app update can be completed in two ways.

  • Automatic application updates (Recommended)
  • Manual application updates

As a best practice, we recommend you encourage your clients to enable automatic app updates – this ensures they are always using the latest version of the TouchPoint app.

Setup Automatic Application Updates

iPhone

  1. On the client’s smartphone, tap the Settings icon.
  2. On the Settings screen, tap the iTunes & App Store option.
  3. Under the Automatic Downloads section, ensure the App Updates option is enabled.   
iPhone home screen Settings icon iPhone settings screen iPhone Settings screen

Click on any image to enlarge it.

Android

  1. On the client’s smartphone, swipe up on the Home screen.
  2. Tap the Play Store icon.
  3. On the Google Play store screen, tap the menu icon in the search field.
  4. Locate and tap the Settings option.
  5. Tap the Auto-update apps option.
  6. In the Auto-update apps window, select the option of,
    • Over any network (Data charges may apply)
    • Over Wi-Fi only
  7. After making the selection, tap Done.
Android app screen Play Store app Android Google Play screen menu Android Google Play store screen
Android Settings screen Auto-Update appsAndroid Auto Update apps window options  

Click on any image to enlarge it.

Manual Application Update

iPhone

Once an update to the TouchPoint application is available, the App Store icon will display a red badge.

Instruct the client to:

  1. Tap the App Store icon.
  2. Tap their profile icon.
  3. Under the Available Updates heading, locate the SCRAM TouchPoint app.
  4. Tap the Update button. 

As a best practice, we recommend you encourage your clients to enable automatic app updates – this ensures they are always using the latest version of the TouchPoint app.

iPhone Home screen App Store icon iPhone App screeniPhone App update screen

Click on any image to enlarge it.

Android

  1. Swipe up on the Home screen and tap the Play Store icon.
  2. On the Google Play store screen, tap the menu icon in the search field.
  3. Tap the My apps & games option.
  4. Under the Updates Available section, locate the SCRAM TouchPoint app and tap the Update button.

As a best practice, we recommend you encourage your clients to enable automatic app updates – this ensures they are always using the latest version of the TouchPoint app.

On the My apps screen, tap the Turn on button to enable automatic app updates.

Android app screen Play Store app Android Google Play screen menu Android Google Play store screen
Android My apps screen update availableAndroid My apps screen  

Click on any image to enlarge it.

Feedback

Please contact SCRAM Systems Customer Service with any recommendations for system improvements.

Continue Reading

On February 4, 2021, SCRAM Systems® will be releasing two new enhancements to the Clients page in SCRAMNET Optix™ to support a focused management of the notifications generated by your SCRAM TouchPoint™ client caseload.

  1. New Action Type dropdown filter
  2. New Clear Filters link  

Action Type Filter

Use the Action Type filter menu to select the specific notification type you are looking for. Once you have selected the desired notification type, the Actions column will dynamically update and reflect all clients with that specific notification type. You can also combine the new Actions Type filter with any of the other dropdown filters available at the top of the page

SCRAM Optix Clients page
Click to enlarge

Clear Filters

The Clear Filters link will reset all the filters to the default settings when selected.   

SCRAM Optix Clients page
Click to enlarge

Feedback

As always, contact SCRAM Systems Customer Service with any recommendations for system improvements.

Continue Reading

On December 17, 2020, SCRAM Systems® will release the new transfer client feature in SCRAM OPTIX™ for your SCRAM TouchPoint™ caseloads. With this new feature, you will be able to transfer a TouchPoint client to a new TouchPoint caseload for monitoring.  Here is how it works.

Once a TouchPoint client has been added into the system, you are able to transfer the client to a new TouchPoint caseload by selecting the Edit link next to the Monitoring Services on the client’s OPTIX Profile page.

TouchPoint Client Profile page
Click image to enlarge
TouchPoint Client Profile page

To view step-by-step instructions on how to transfer a client to a new caseload, click here.

TouchPoint Caseload Management

To ensure you can transfer a client from one caseload to another, the services enabled for the caseload the client will be transferred into must be identical to the services enabled in the caseload the client is currently in. This is true even if the client is not enabled for all the available services.

As a best practice, SCRAM Systems recommends you enable all TouchPoint services for all of your TouchPoint caseloads. Keeping the services consistent across all caseloads ensures there will not be any issues when you transfer a client to a different TouchPoint caseload for monitoring.

TouchPoint Manage Monitoring Service Settings page
Click image to enlarge

To view information on creating a TouchPoint caseload or how to update a current caseload, click here.

Feedback

As always, please contact SCRAM Systems Customer Service with any recommendations for system improvements.

Continue Reading

On Thursday, October 15, 2020, SCRAM Systems® will reveal a new OPTIX Analytics tab in SCRAM OPTIX®. Our new, advanced OPTIX Analytics reports will provide you with a series of interactive data visualizations that deliver a graphical status of your program’s inventory, clients’ monitoring and compliance status, and trends over time.

OPTIX Analytics page
OPTIX Analytics

Selecting a data field within each tile, dynamically updates the information displayed for the report. 

Analytics Current Inventory Report

To learn more about the specific information available within each report, visit the Analytics section located on the OPTIX Help page.

OPTIX Help page, Analytics section

Feedback

As always, please contact SCRAM Systems Customer Service with questions or recommendations for system improvements.

Continue Reading

Effective September 22, 2020, SCRAM Systems® will release four new updates for your SCRAM TouchPoint™ caseload. Updates included in this release:

  1. A New TouchPoint Tile Icon
  2. New Document Shared Confirmation Banner
  3. New Notification Badge for a Received Document in the SCRAM TouchPoint App
  4. New SCRAM TouchPoint Client Self Help Link

New TouchPoint Tile

The TouchPoint tile on the SCRAM OPTIX® Dashboard has a new icon. The administrative functionality remains the same. Click on the Go To TouchPoint button within the tile, to open the Manage TouchPoint page. From here, access the Manage Check-In information and the Messaging Text to All feature.

Optix Dashboard with TouchPoint Tile highlighted
OPTIX Dashboard TouchPoint Tile (click to enlarge)

New Document Shared Confirmation Banner

On the client’s Document page, once you have uploaded a document and then selected the Share option, a green Document Shared verification banner will display on the top of the screen confirming you have successfully shared the document with your client.

Client's Documents Page
Client’s Documents Page (click to enlarge)

New Notification Badge for a Received Document in the SCRAM TouchPoint App

After sharing a document from the client’s Document page in SCRAMNET OPTIX, the Documents tile within the client’s app will display a red notification badge. In addition, when the client taps the Documents tile, the Received tab will also display a red notification badge alerting them to a new document shared by you.

SCRAM Client TouchPoint App Documents Tile highlighted SCRAM TouchPoint Documents Received Tab

SCRAM TouchPoint App Client Self Help

Your TouchPoint clients can now access the Client TouchPoint Installation document, video installation instructions and Frequently Asked Questions document by selecting the Need Help? link located on the email entitled Verify Your Email Address, and on the SCRAM TouchPoint app Sign In screen.

Tap the Need Help? link, to open the support page where the documents and video can be found.

TouchPoint Verify Email SCRAM TouchPoint App Sign In SCRAM Systems TouchPoint Client Help

Feedback

As always, please feel free to contact SCRAM Systems Customer Services at 1-303-785-7879 with any recommendations for system improvements.

Continue Reading

Effective September 3, 2020, SCRAM Systems® has improved access to the Manage TouchPoint page with the addition of a new SCRAM TouchPoint™ tile on the SCRAM OPTIX® Dashboard.

Optix Dashboard with TouchPoint tile highlighted

Click on the Go To TouchPoint button within the tile, to open the Manage TouchPoint page. From here, access the Manage Check-In information and the Messaging Text to All feature.

Additional updates to the Manage TouchPoint page include:

  • The top banner will now display as SCRAM TouchPoint.
  • An Optix icon will provide a smooth transition back to the OPTIX Dashboard.
  • An Add Client button navigates you directly to the Create New TouchPoint Profile page.  
Manage TouchPoint page with Manage Check-In tab displayed

Feedback

As always, please feel free to contact SCRAM Systems Customer Services at 1-303-785-7879 with any recommendations for system improvements.

Continue Reading