At 5:00 AM MDT on Thursday, March 21, 2024, SCRAM Systems is introducing an enhancement to SCRAMNET GPS that will allow you automatically center client location points on the map while in Pursuit Mode.
During the 15-minute deployment, you may not be able to access SCRAMNET GPS, but messages from the SCRAM GPS device will continue to be processed uninterrupted.
Center Client Location Points on the Map While in Pursuit Mode
While in Pursuit Mode, location points can sometimes drop outside of the viewable map area and the map must be adjusted to see the point. With this update, each location point is automatically centered on the map. This feature can be toggled on and off as needed. For example, to focus the map on a specific area, the feature can be disabled so that the next point from the locator will not adjust the map.
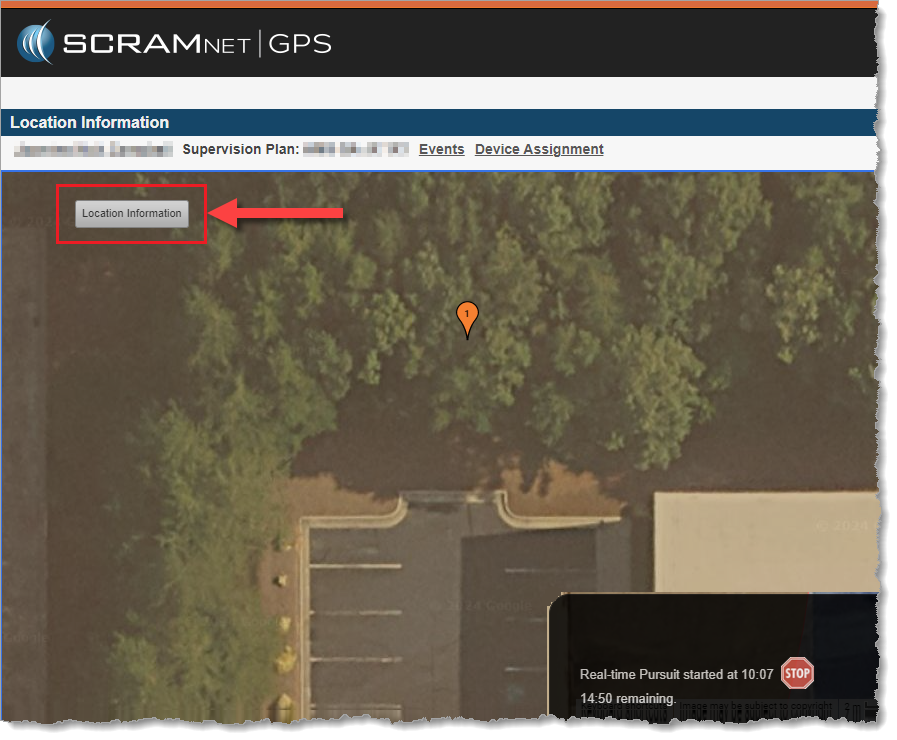
To toggle automatic centering of the map, click the Location Information button on the top left of the map to expand the Location Information dialog window:
Select the Location Information Button
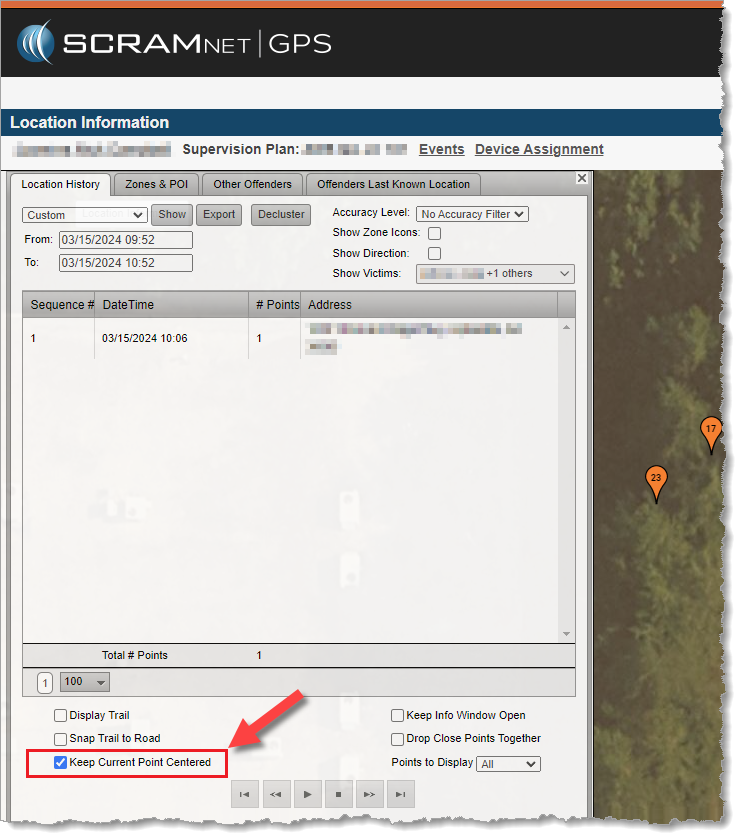
Then uncheck Keep Current Point Centered. When this checkbox is unchecked, the map will remain in its current position and zoom level.
Uncheck the “Keep Current Point Centered” Checkbox
On March 1, 2024, SCRAM Systems® will release an updated SCRAM Remote Breath Participant Agreement in the SCRAMNET® monitoring system. This updated Agreement better represents the current Remote Breath Pro (RB Pro) Device and better protects your organization and its agents.
What is Changing
Product evolution, feedback from customers, and input from our own internal legal team led us to make the following improvements in our RB Agreement:
References to the now-obsolete first generation Remote Breath “Classic” Device have been removed.
Terminology used throughout the Agreement is more clearly defined in the opening paragraphs.
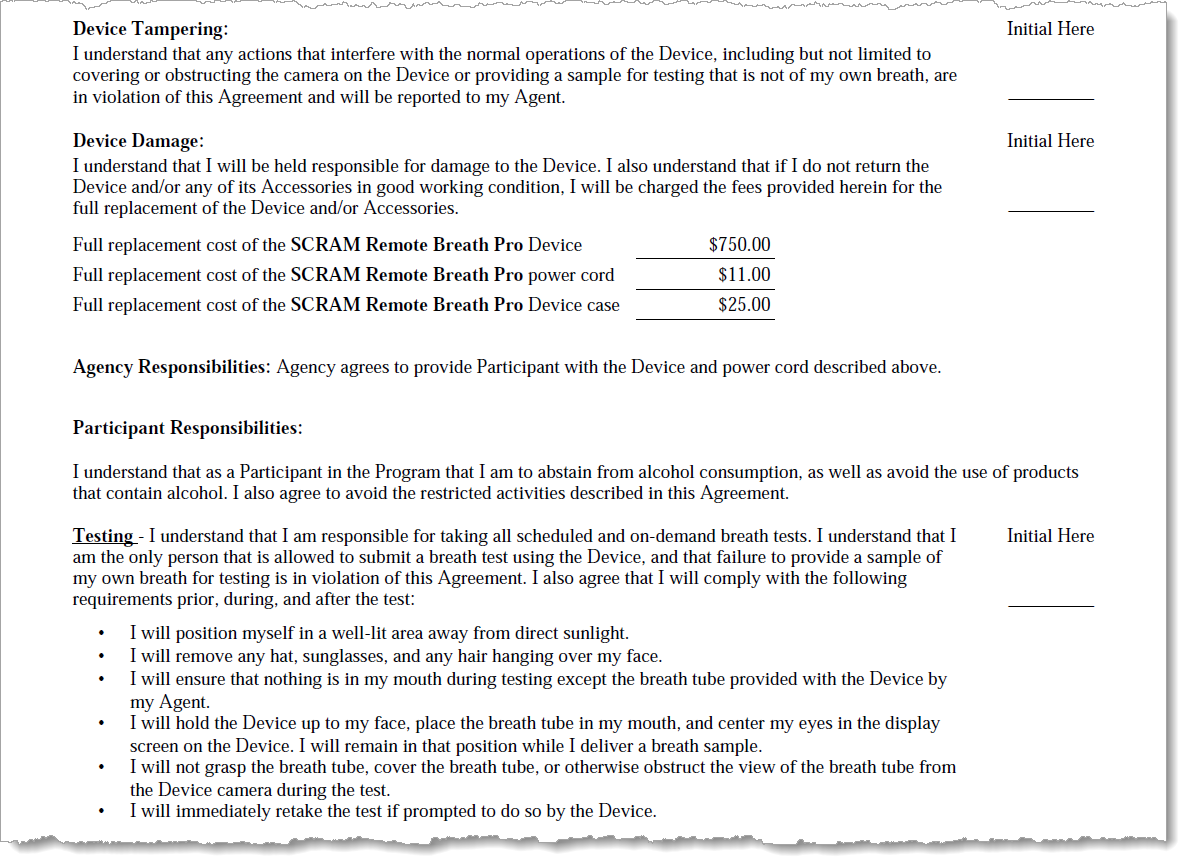
Language that explicitly describes what qualifies as “Device Tampering” and how it is a violation of the Agreement has been added.
The Participant Responsibilities – Testing section has been bolstered to discourage clients from (a) placing anything in their mouths except the breath tube supplied with the RB Pro Device and (b) grasping or otherwise obstructing the camera’s view of the breath tube while performing a breath test.
Updated RB Participant Agreement Excerpt (click to enlarge)
Who is Impacted
All Remote Breath customers who access and print their Remote Breath Participant Agreements from SCRAMNET will see the updated Agreement take effect March 1st. If your organization uses a customized version of the RB Agreement, your customizations will be “ported over” to the updated Agreement and made available in SCRAMNET as they are today.
If you are unsure about the type of Remote Breath Participation Agreement used by your organization, ask your supervisor or program administrator.
An extremely small number of customers have made major material changes to their versions of the RB Participant Agreement. Those customers will be contacted by their SCRAM account representative to discuss options for making the update to the newer Agreement language.
At 5:00 AM MT on Thursday, February 29, 2024, SCRAM Systems® introduced two new device inventory statuses, “Awaiting Return” and “Pending Removal,” in SCRAMNET GPS®.
When to Use the New Statuses
Two new inventory statuses will now be available to help better track device inventory:
Awaiting Return: This status indicates the device has been unassigned and removed from the client’s ankle, but the device must be retrieved from another location (the county jail or a satellite office, e.g.) before it can be placed back into inventory.
Pending Removal: This status indicates the device has been unassigned but is still on the client’s ankle and is pending removal during a future appointment with the client.
Note: Once the GPS device has been unassigned – and before it is placed into either one of these new statuses – billing stops.
Devices in these two statuses cannot be assigned to the next client because they are not yet in inventory. Use the Devices tab in Account Settings to receive these devices into inventory so they can be assigned to a client.
Access the ‘Devices’ Tab from Account Settings (click to enlarge)
How to “Unassign” a SCRAM GPS Device
Devices can be unassigned in the following ways:
Unassign the device from the Device Assignment page
Manually inactivate the client from the Client Profile page
Manually inactivate the client from the Manage Clients dialog
Automatically inactivate the client from the End of Service setting
Unassign a Device from the Device Assignment Page
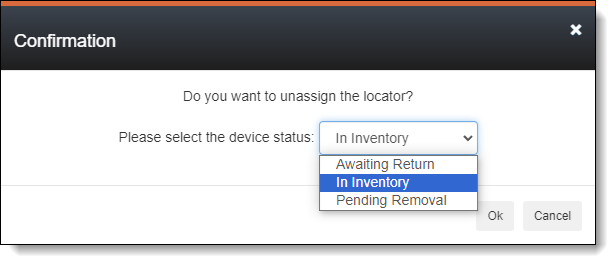
When unassigning a device from the Device Assignment page, a prompt is displayed confirming the unassignment. This prompt has been updated to allow setting the inventory status. The Device Inventory Status dropdown menu defaults to “In Inventory.”
Device Status Dropdown Menu in Unassign Confirmation Dialog (click to enlarge)
Manually Inactivate the Client from the Client Profile Page
Clients can be manually inactivated from the Client Profile page, and this action unassigns the GPS device. The Inactivation Reason confirmation dialog allows you to set the Device Inventory Status.
Manually Inactivate from the Client Profile Page (click to enlarge)
Note: This dialog may look different for you depending on the account-level setting: Allow assignment of inactivation statuses.
Manually Inactivate the Client from the Manage Clients Dialog
Clients can be manually inactivated from the Manage Clients dialog, and this action unassigns the GPS device. The same Inactivation Reason confirmation dialog as above is shown and allows you to set the Device Inventory Status.
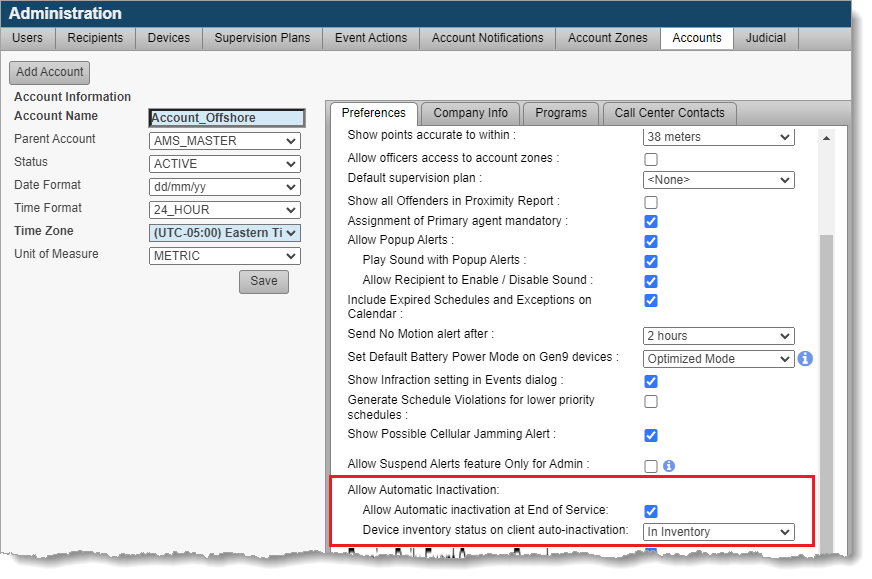
Automatically Inactivate the Client from the End of Service Setting
Clients can automatically be inactivated when their end of service date is reached if this feature is enabled in the Account Settings page. Additionally, the preferred inventory status can be set for clients who are automatically inactivated.
Automatic Inactivation Inventory Status Settings (click to enlarge)
Tracking “Awaiting Return” and “Pending Removal” Inventory Statuses
Use the Admin > Account Settings > Devices tab to track devices Awaiting Return and Pending Removal, and to receive them into inventory.
Access the ‘Devices’ Tab from Account Settings (click to enlarge)
Filter devices using the Inventory Status dropdown menu and, optionally, Print the report. Select the appropriate device and click Device Received to change the device’s inventory status to “In Inventory;” so it can be assigned to another client.
Tracking Awaiting Return and Pending Removal Inventory Statuses (click to enlarge)
Tip: For those devices in Pending Removal status, use the Last Assigned To column to see the name of the client who is still wearing the device.
On February 9, 2024, SCRAM Systems will release Version 6 of its Health and Safety Notice for SCRAM Systems Products. This updated version will automatically append itself to the end of your SCRAM-Approved Participant Agreements (the Agreements you download and print from SCRAMNET), and will also be available separately for download from the SCRAM Systems website.
The SCRAM Systems product line has evolved significantly over the years, and this update brings the Health and Safety Notice up to date with the current line of EM devices. Upon review of the updates by a third-party Human Factors and Safety Evaluation firm, it was determined that the Health and Safety Notice will now be separated into two pages.
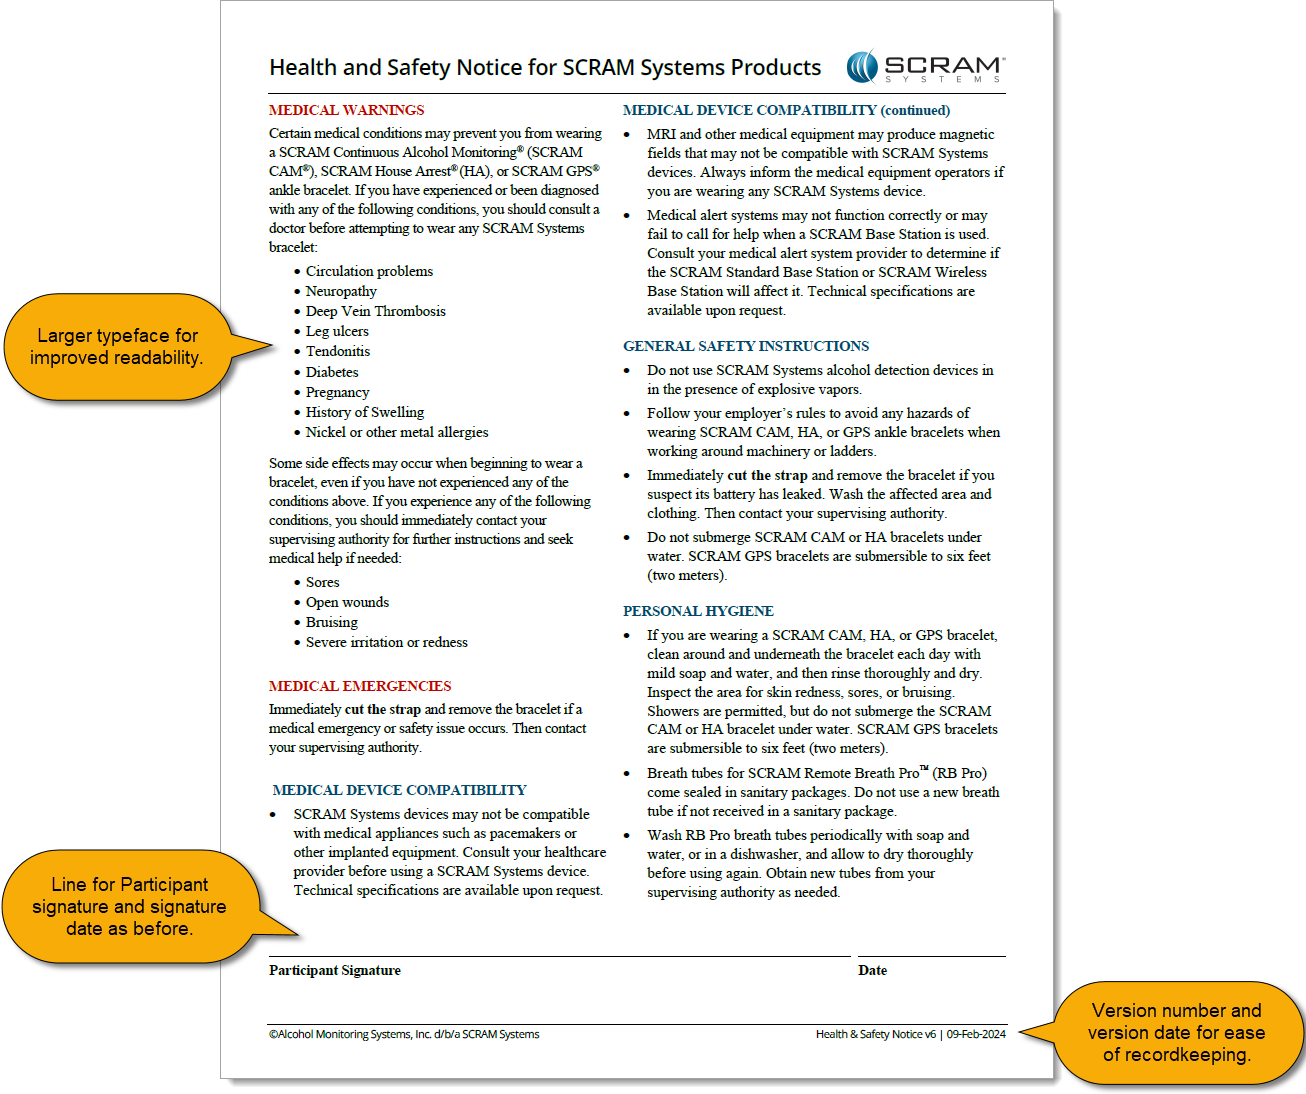
Page 1: Participant Warnings and Instructions
The first page will continue to house medical warnings, general safety instructions, and personal hygiene recommendations targeted towards the client, and as before will require the client’s signature:
Health and Safety Notice v6 pg 1 (click to enlarge)
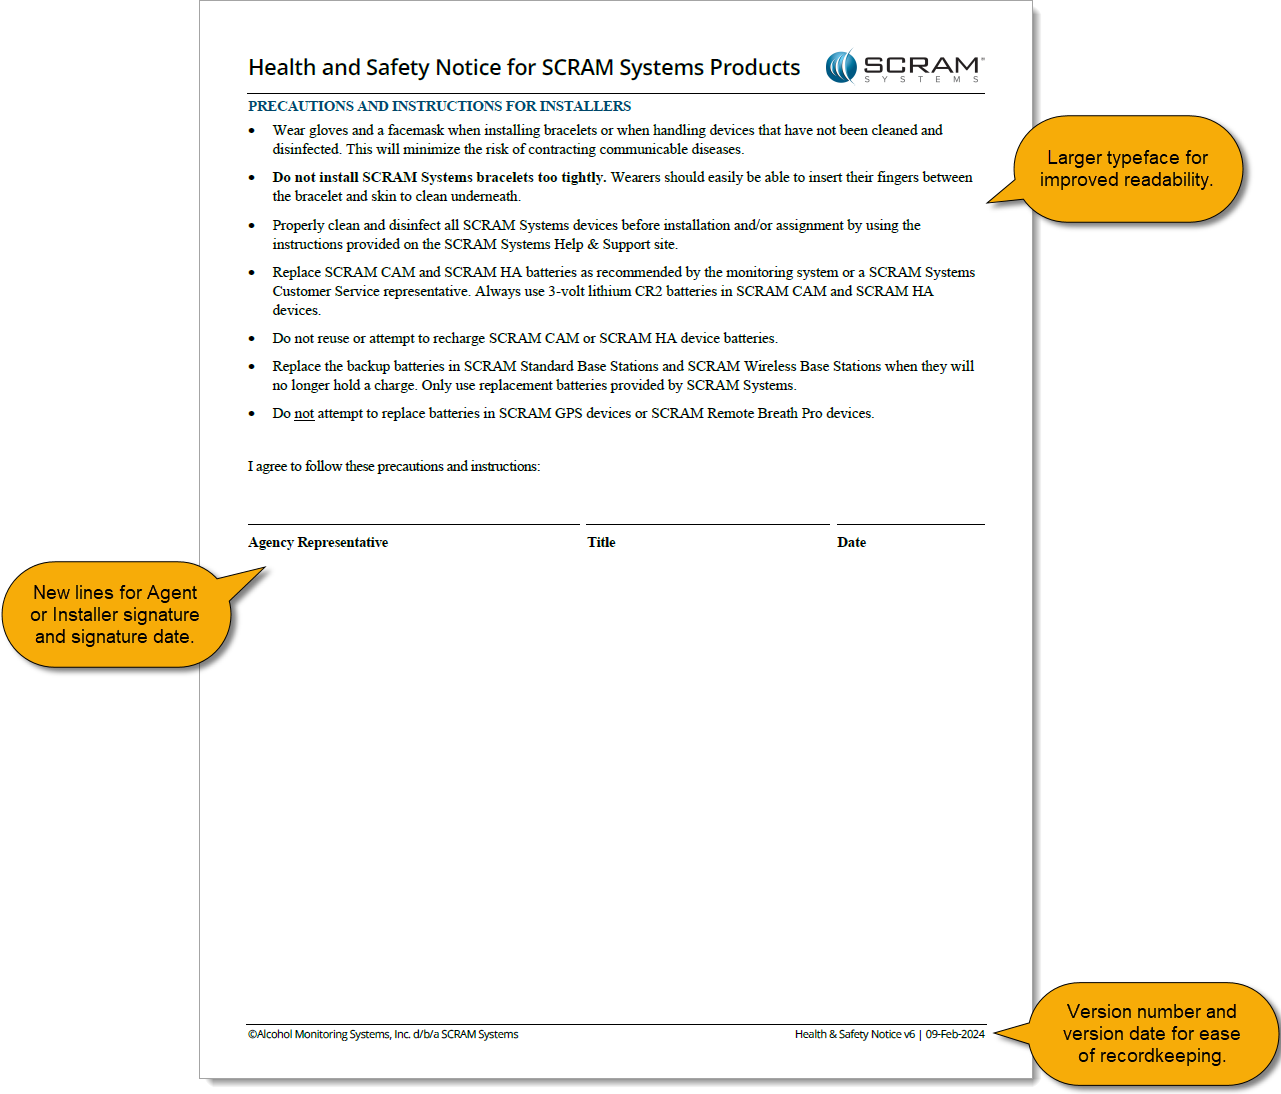
Page 2: Installer Precautions and Instructions
The second page relocates the “PRECAUTIONS AND INSTRUCTIONS FOR INSTALLERS” section from the first page, and adds a new “Agency Representative” signature line to be signed by the installer at the time of installation:
Health and Safety Notice v6 pg 2 (click to enlarge)
This update to the Health and Safety Notice for SCRAM Systems Products provides greater clarity to both your clients and your agents, and provides greater legal protection to your agents and your overall monitoring program.
During the morning of January 25, 2024, SCRAM Systems will release the following three enhancements, which are designed to make it easier to manage your SCRAM TouchPoint™ client Check-In caseloads, to the SCRAM Optix® dashboard:
Client Check-in History Pagination
Client Check-in History Filtering
Check-in Location Address Approximation Added to Map
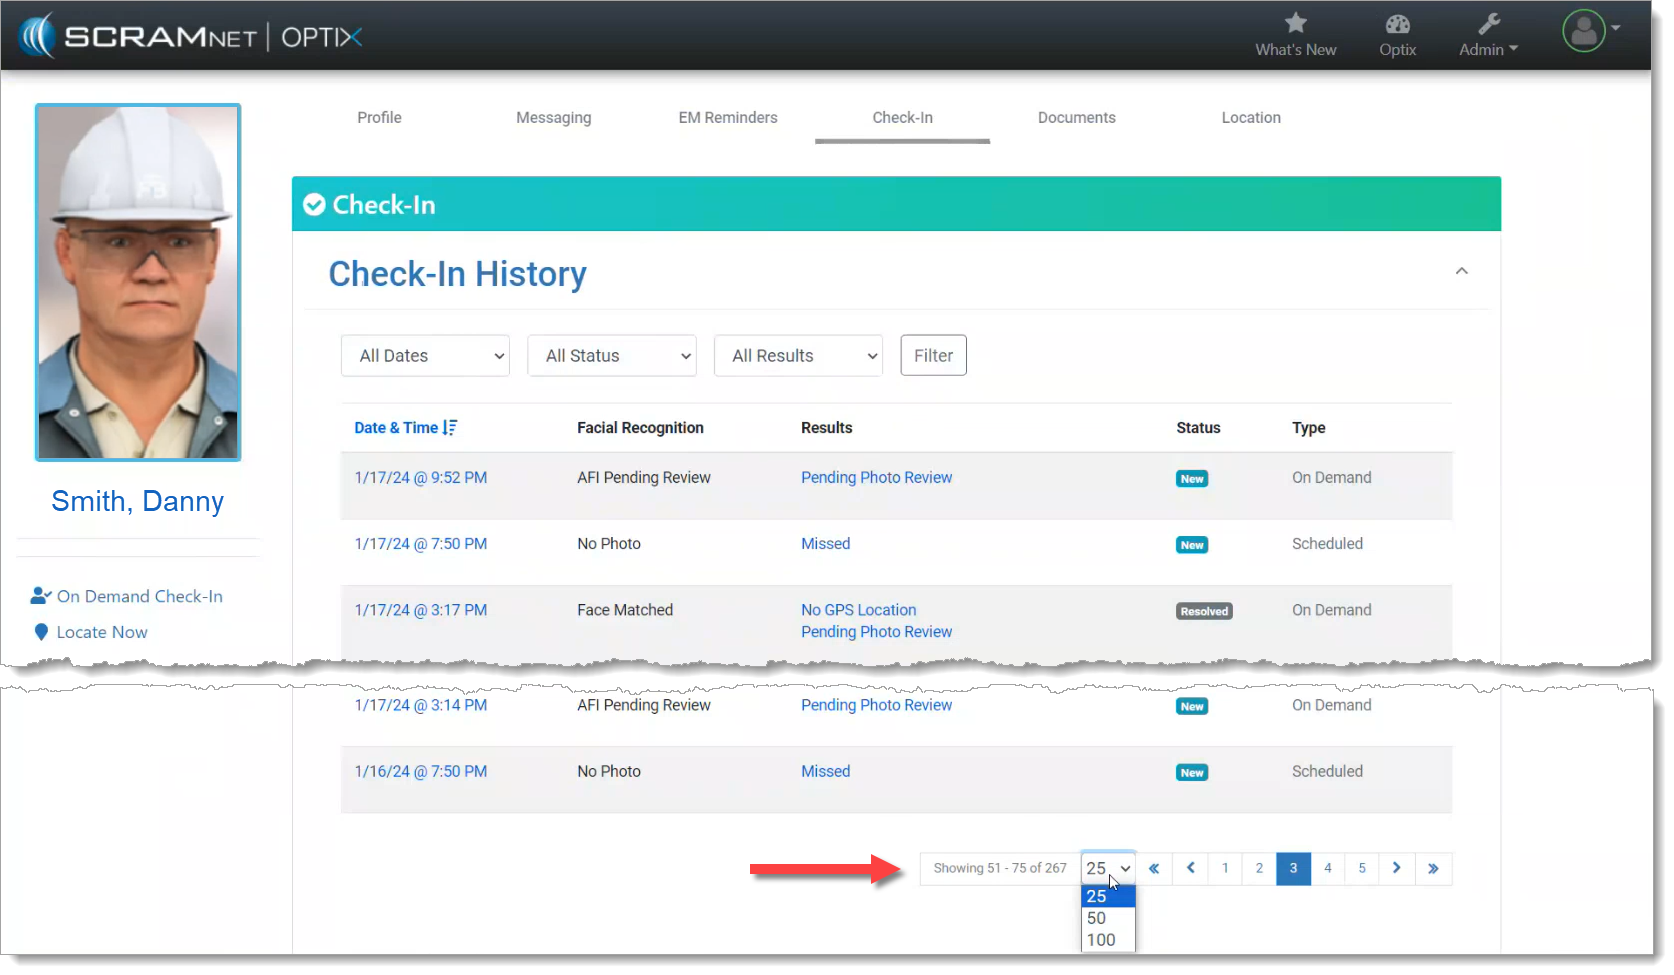
Client Check-in History Pagination
To improve the performance of the SCRAM Optix dashboard, the TouchPoint client Check-in History page will now display 25, 50, or 100 check-in records at a time – and then allow you to “page through” the records – rather than loading and displaying all of the client’s check-in history all at once on one long scrolling page.
Change the Number of Check-in History Records Displayed (click to enlarge)
Scroll to the bottom of the page to change the number of check-in history records displayed per page, and to page through the records.
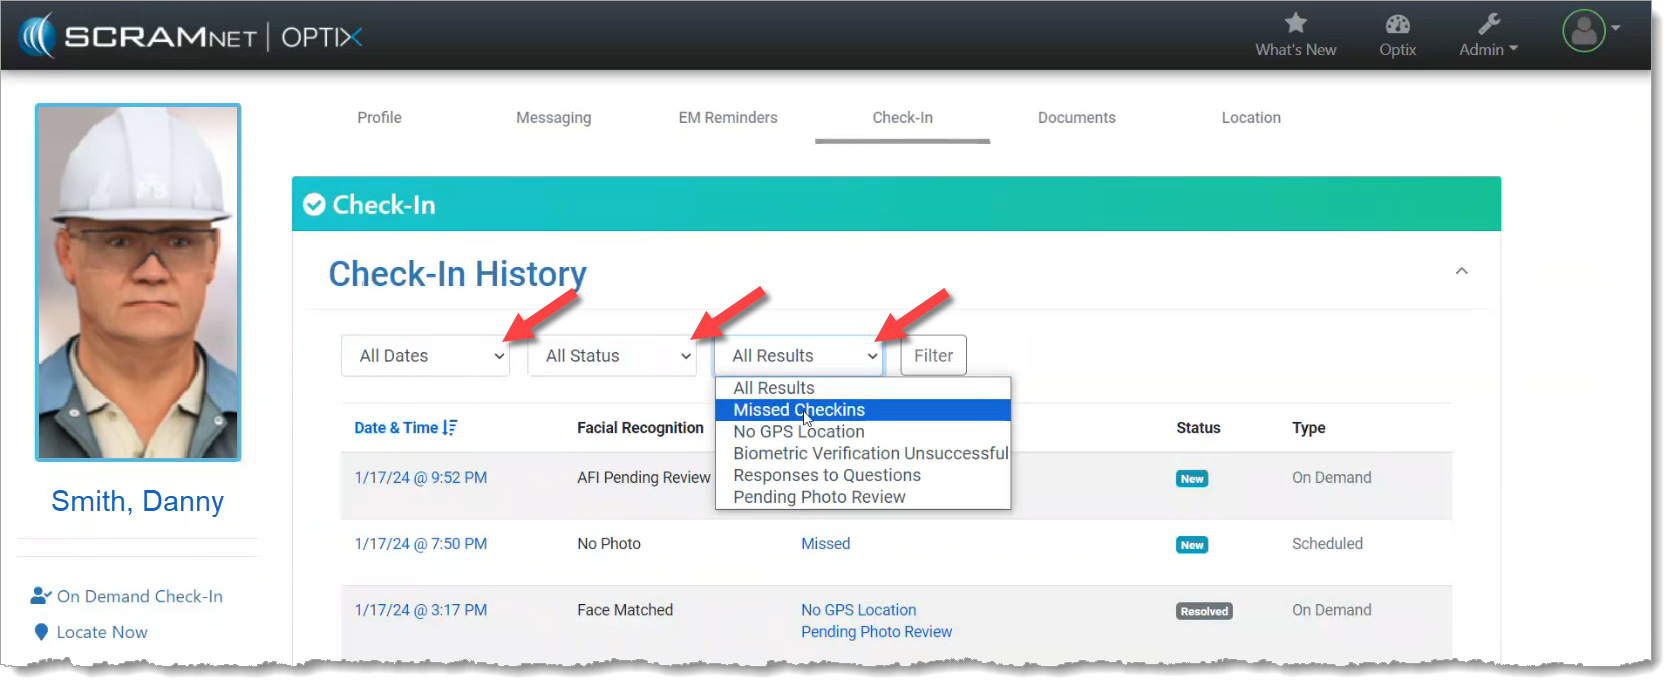
Client Check-in History Filtering
The records displayed on the client Check-in History page may also now be filtered by the Date, Status, and/or Results of the check-in. Simply choose an attribute from the filter dropdowns, and then select the Filter button to narrow down the number and type of check-in records displayed on the page.
Filter the Displayed Check-in Records (click to enlarge)
Tip: The filters only work on the records displayed on the current page; they do NOT filter all of the check-in history records. To improve your filtering results, increase the records displayed per page to 50 or 100 records and then apply your filters.
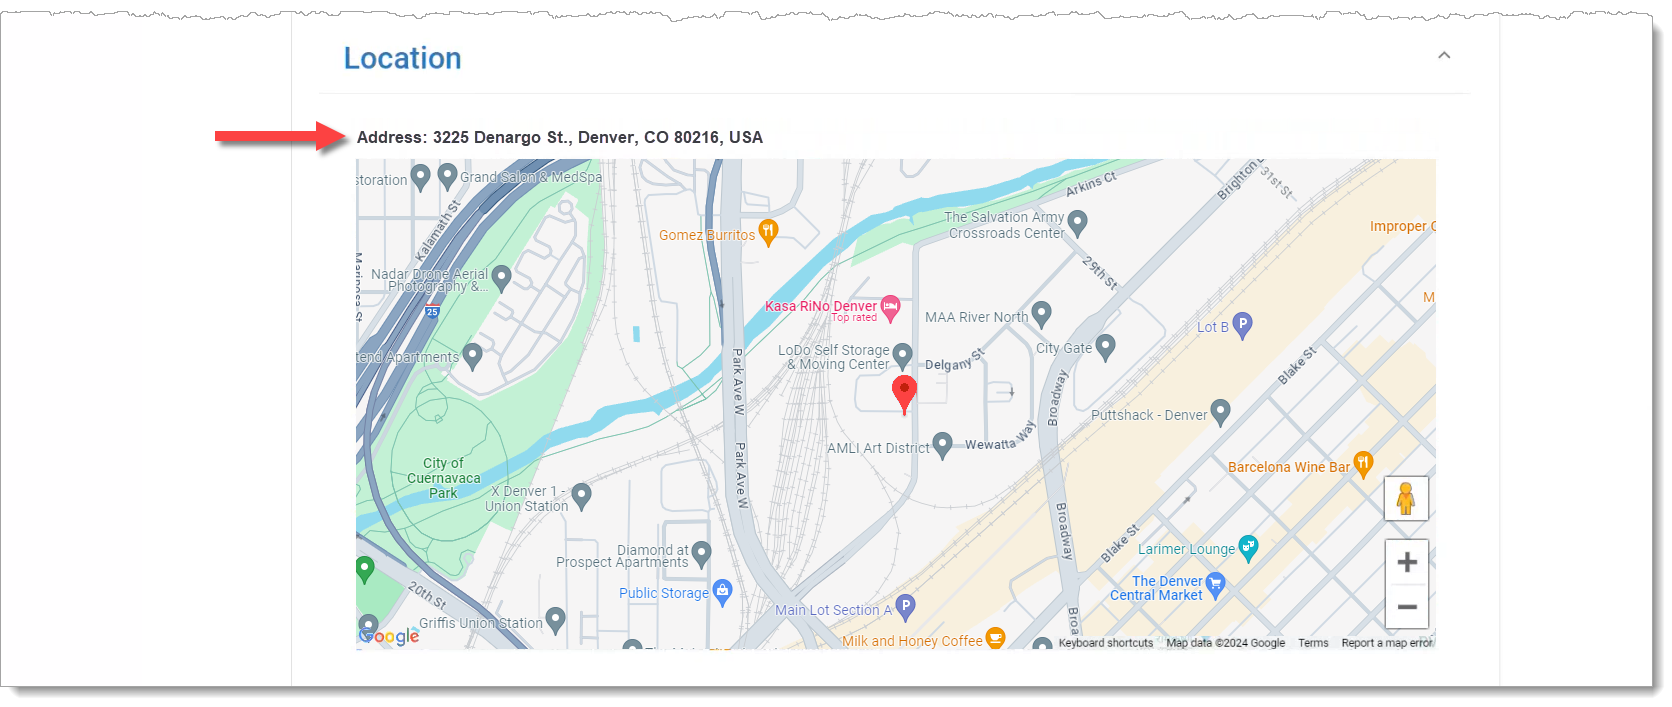
Check-in Location Address Approximation Added to Map
Once you select a single Check-In record to review, if the client’s smartphone location data was captured during the check-in, an approximate location address will be provided along with the map point.
Client’s Approximate Address at the Time of the Check-in is Provided Above the Map (click to enlarge)
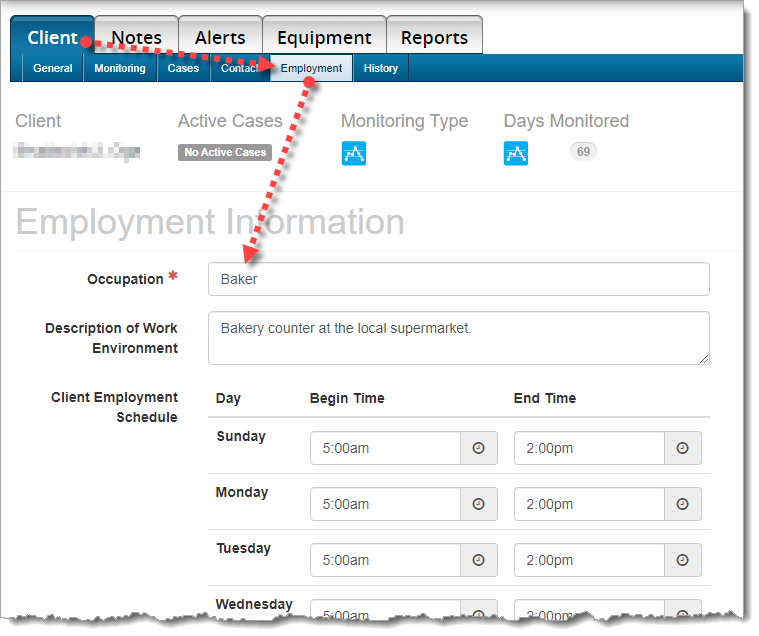
When current employment information is entered in the Occupation field in SCRAMNET, our Data Analysts are better able to determine the client’s actions and environment during an alert. This will save time and frustration for both you and your client by reducing the number times you must contact your client to determine their actions during the time period of the alert.
To Update Employment Information:
Choose the Client tab, then the Employment sub-tab. Please update the client’s occupation, description of the work environment, and most importantly, the client’s work schedule.
Employment Information on the ‘Employment’ sub-tab (click to enlarge)
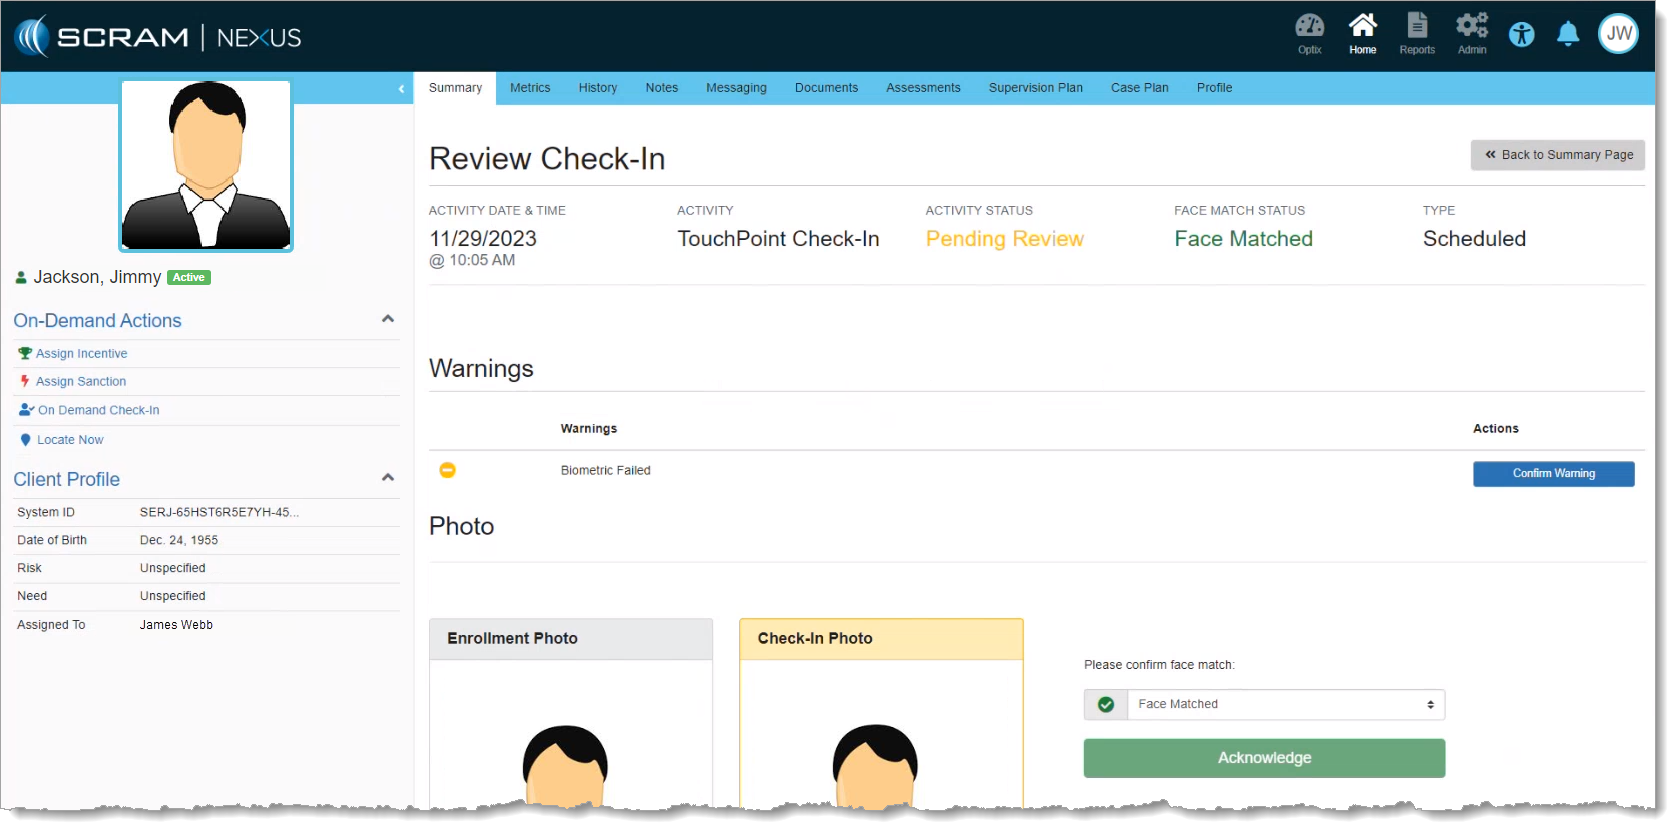
Effective the evening of December 7, 2023, SCRAM Systems will release the following enhancement to the SCRAM Nexus TouchPoint Mobile Check-In process.
After a client completes a TouchPoint Check-In and the Activity is in “Pending Review” status, the current process is to access the Review Check-In page for the client and either confirm the face match or indicate a circumvention. Prior to this release, it was easy to overlook if there were additional failures – like “Biometric Failed” or “No GPS Location” – associated with the Check-In, as these Warnings appeared lower on the page; below the Photo section.
Warnings Moved to Top of Page
With this release, Warnings are moved to the top of the Review Check-In page – above the Photo section – where you may confirm them more easily:
Review Check-In Page – Warnings and Photo (click to enlarge)
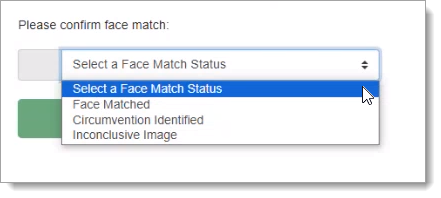
Additionally with this enhancement, if the Check-In Photo passes SCRAM Systems’ Automated Facial Intelligence (AFI) comparison with the Enrollment Photo, then the Please confirm face match dropdown menu will default to “Face Matched,” and you will not be required to take any additional action with regard to the Check-In Photo.
If, however, the Check-In Photo fails AFI, you will be required to select a Face Match status from the dropdown menu and then select Acknowledge:
Select Face Match Status From Dropdown and ‘Acknowledge’ (hidden beneath dropdown menu above)
SCRAM Systems recently made a change to some existing tamper logic to better refine the actionable alerts you have to handle in your SCRAM CAM alcohol monitoring programs. Through extensive review, it was determined that only a very small percentage of tampers were meeting the previously-defined “downward” criteria, which indicate a potential tamper due to a 17% (or greater) drop in the IR voltage below the established baseline.
Since the majority of these alerts were not confirmable, there should be no disruption to your alert volumes. However, you may see a reduction in the number of resolved tamper alerts that were previously visible on the client profile. The Non-Compliance Report tamper criteria verbiage will also be updated to reflect this change.
Please reach out to Customer Service with any questions about this change.
On Thursday, November 16, 2023, SCRAM Systems introduced the following three new features in SCRAMNET GPS:
New Alert – Possible Cellular Jamming
Client ‘Notes’ Dialog Includes Notes Up to One Year Old
Beacon Schedules Support Schedule Exceptions
New Alert – ‘Possible Cellular Jamming’
The cellular communications module in the SCRAM GPS device can detect the presence of another device that is creating a radio frequency (RF) disturbance in the cellular signal of the SCRAM GPS device. If this RF disturbance in the cellular signal subsequently causes a loss of communication between the SCRAM GPS device, the cell tower it was registered to at the time, and an adjacent cell tower, then a Possible Cellular Jamming alert will generate.
The appearance of a Possible Cellular Jamming alert in SCRAMNET GPS does not necessarily mean the client intentionally blocked the cellular signal. It simply indicates that there was RF interference present, and that interference caused the SCRAM GPS device to lose contact with the cellular network. The RF disturbance could have been created by anything in the surrounding environment that emits radio frequencies.
Switching it On and Off
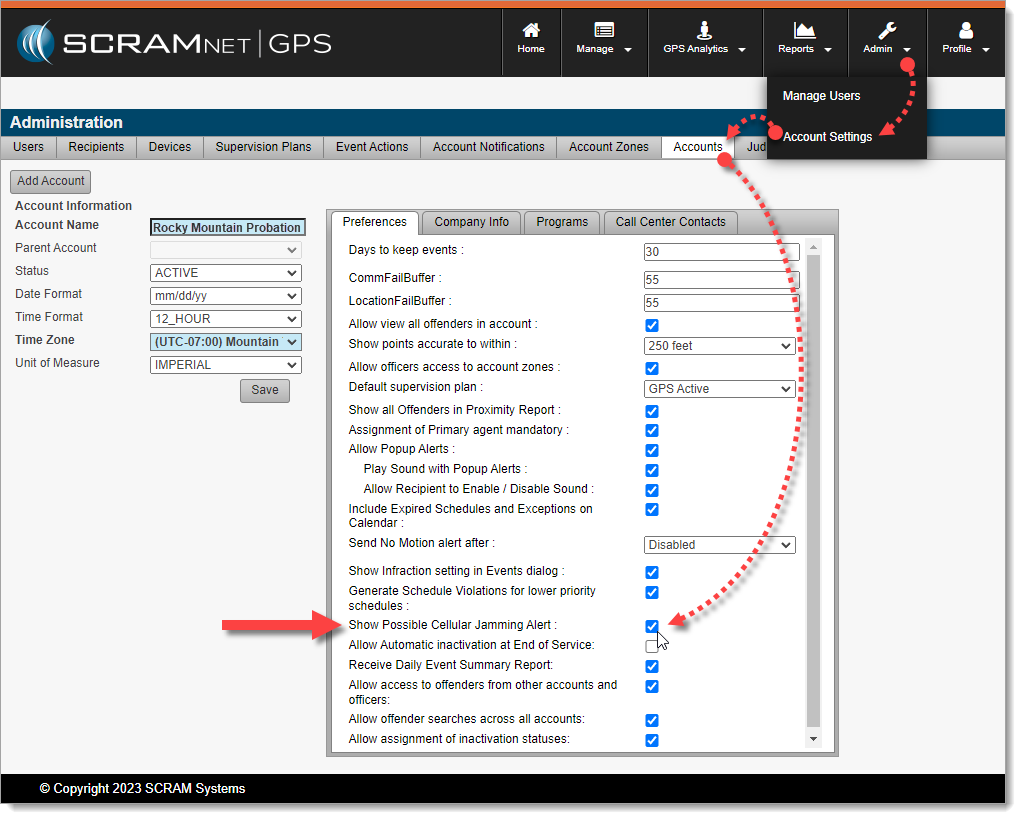
Enable or disable this alert by accessing it in the Account Settings dialog (Admin > Account Settings > Accounts (tab) > Show Possible Cellular Jamming Alert):
Enable/Disable Possible Cellular Jamming Alerts in GPS Administration (click to enlarge)
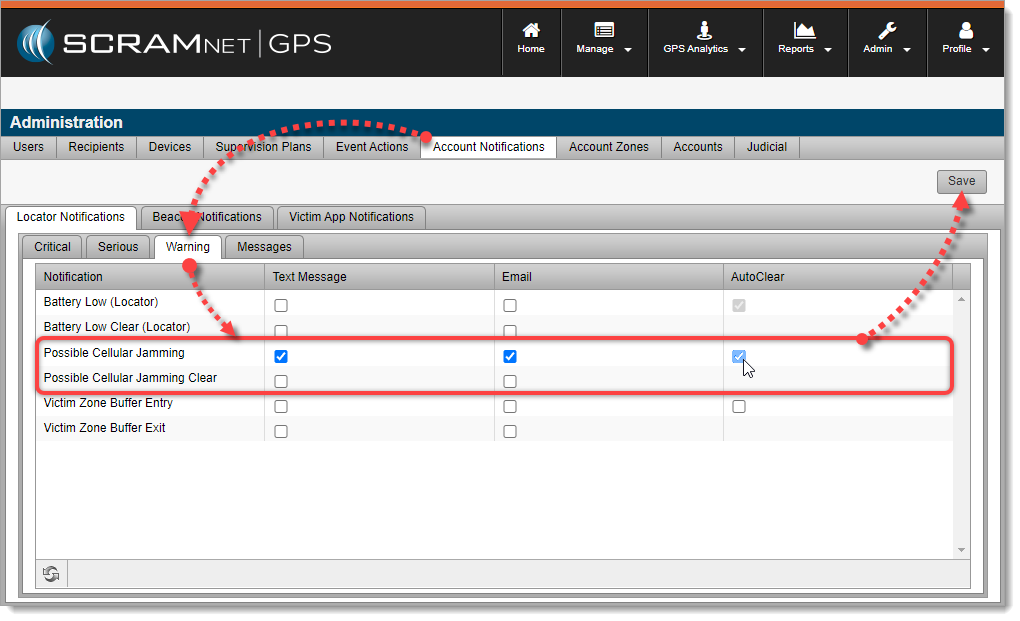
Once enabled, SCRAMNET GPS Account Administrators may configure the AutoClear settings in the Account Notifications dialog (Admin > Account Settings > Account Notifications (tab) > Locator Notifications (tab) > Warning (tab):
Possible Cellular Jamming Alert Notification Settings (click to enlarge)
When AutoClear is checked, the alert will automatically clear when the corresponding clear event is received.
Receiving Client Notifications
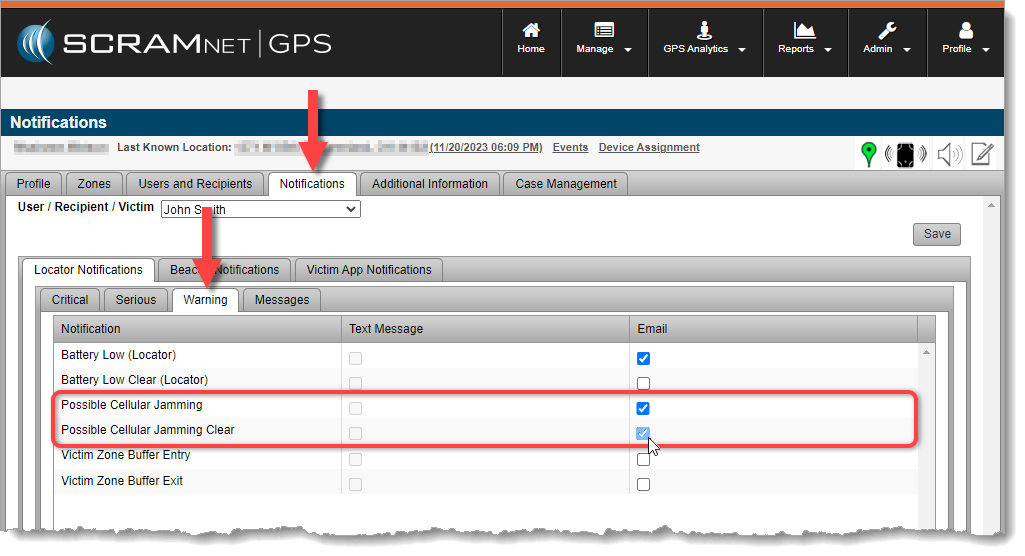
Once the Possible Cellular Jamming alert is enabled, you may subscribe Users, Recipients, and/or Victims to receive notifications by activating them via the Notifications tab on the Client Profile.
Enable Client Notifications for Users, Recipients, and Victims (click to enlarge)
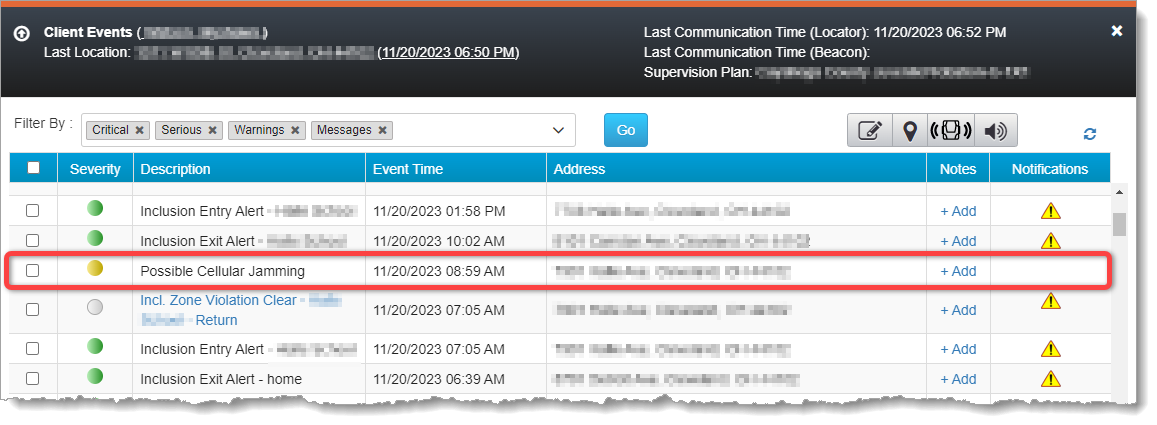
The Possible Cellular Jamming alert will also appear on the Client Events dialog along with all other enabled events and alerts:
Possible Cellular Jamming Alert on the Client Events Dialog (click to enlarge)
The SCRAM GPS device will send a corresponding clear event when the disturbance has cleared, however, Officers & Agents may also manually clear the event.
Troubleshooting
To troubleshoot a Possible Cellular Jamming alert, try calling the client on the client’s mobile phone while the Possible Cellular Jammingalert is still active (red). If the call will not connect (goes immediately to voicemail, e.g.), then it is possible that cellular signals in the client’s vicinity are being blocked and further investigation may be warranted.
If you are able to reach the client, ask the client to move to another position at least 35 feet from their current position. If the alert clears (yellow) and does not re-generate when the client returns to their original position, then it may have been caused by random RF interference. If the alert clears, but then re-generates once the client returns to their original position, then further investigation may be warranted.
If you notice a pattern of the Possible Cellular Jamming alert generating in the same geographical location for a client repeatedly, then – depending on the nature of the location where the alert generates and whether or not you would expect a high level of RF interference in that environment – further investigation may be warranted.
Client ‘Notes’ Dialog Includes Notes Up to One Year Old
The Client Notes dialog includes Event notes up to one year old. Previously, notes only up to three months old were displayed. To access the Client Notes dialog, click the Notes button on the Client Profile Summary dialog:
Access Notes from the Client’s Profile Summary (click to enlarge)
Beacon Schedules Support Schedule Exceptions
Schedule Exceptions can now be created for Beacon Schedules to allow clients outside of beacon range for approved reasons.
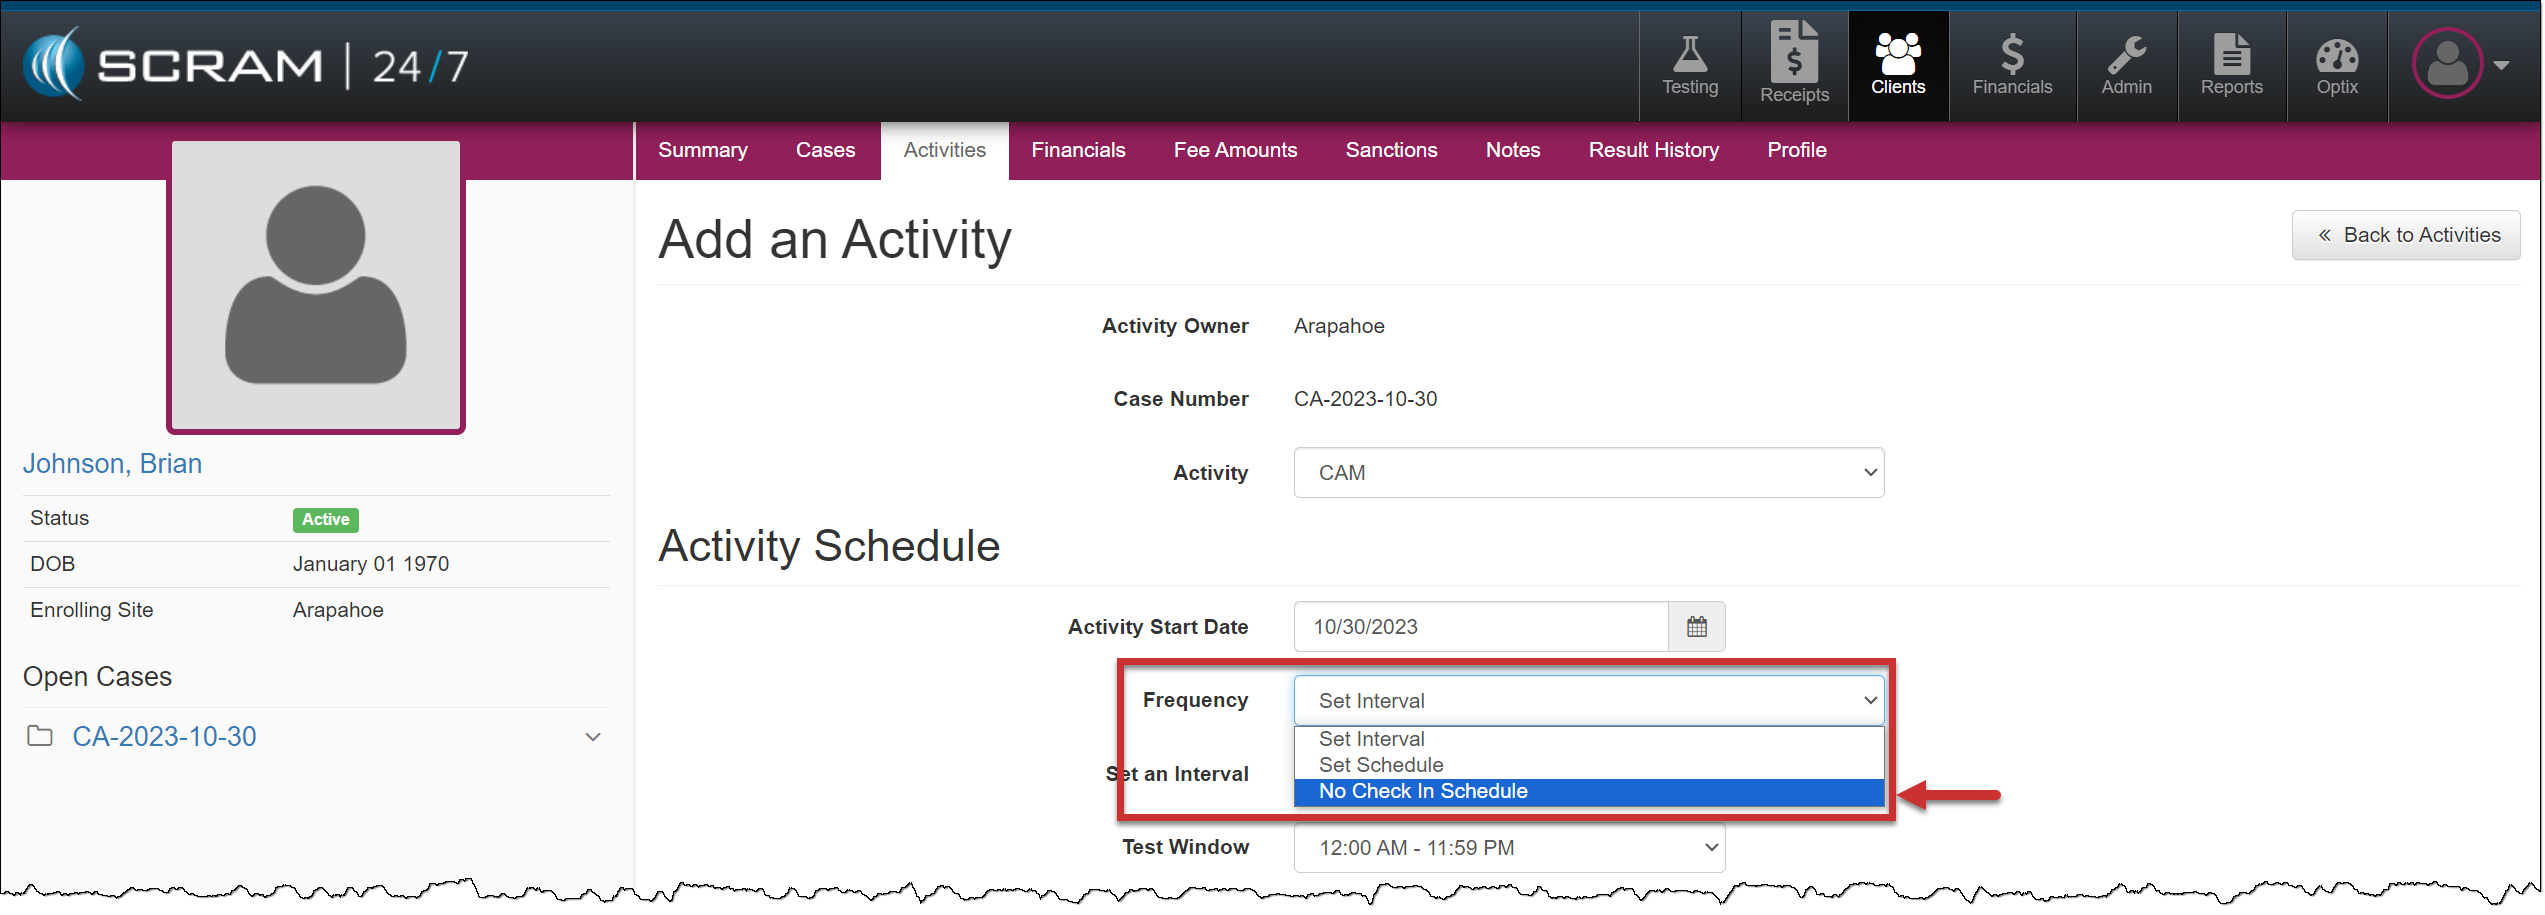
When a CAM, House Arrest, Remote Breath, or GPS Activity is added to your client for electronic monitoring in SCRAM 24/7, you must enter a scheduled check-in frequency for future appointments displayed on the client’s Summary calendar. With this enhancement, if you do not require recurring check-in appointments, you may select No Check-in Schedule from the Frequency dropdown menu for the client.
Client Add an Activity page – click to enlarge
The CAM communication schedule for data uploads is not considered a check-in appointment. When assigning the SCRAM CAM device for alcohol or house arrest monitoring, you must enter a device communication upload schedule on the equipment assignment page.
The Remote Breath testing schedule for the client is managed within SCRAMNET on the client’s RB Schedule page.
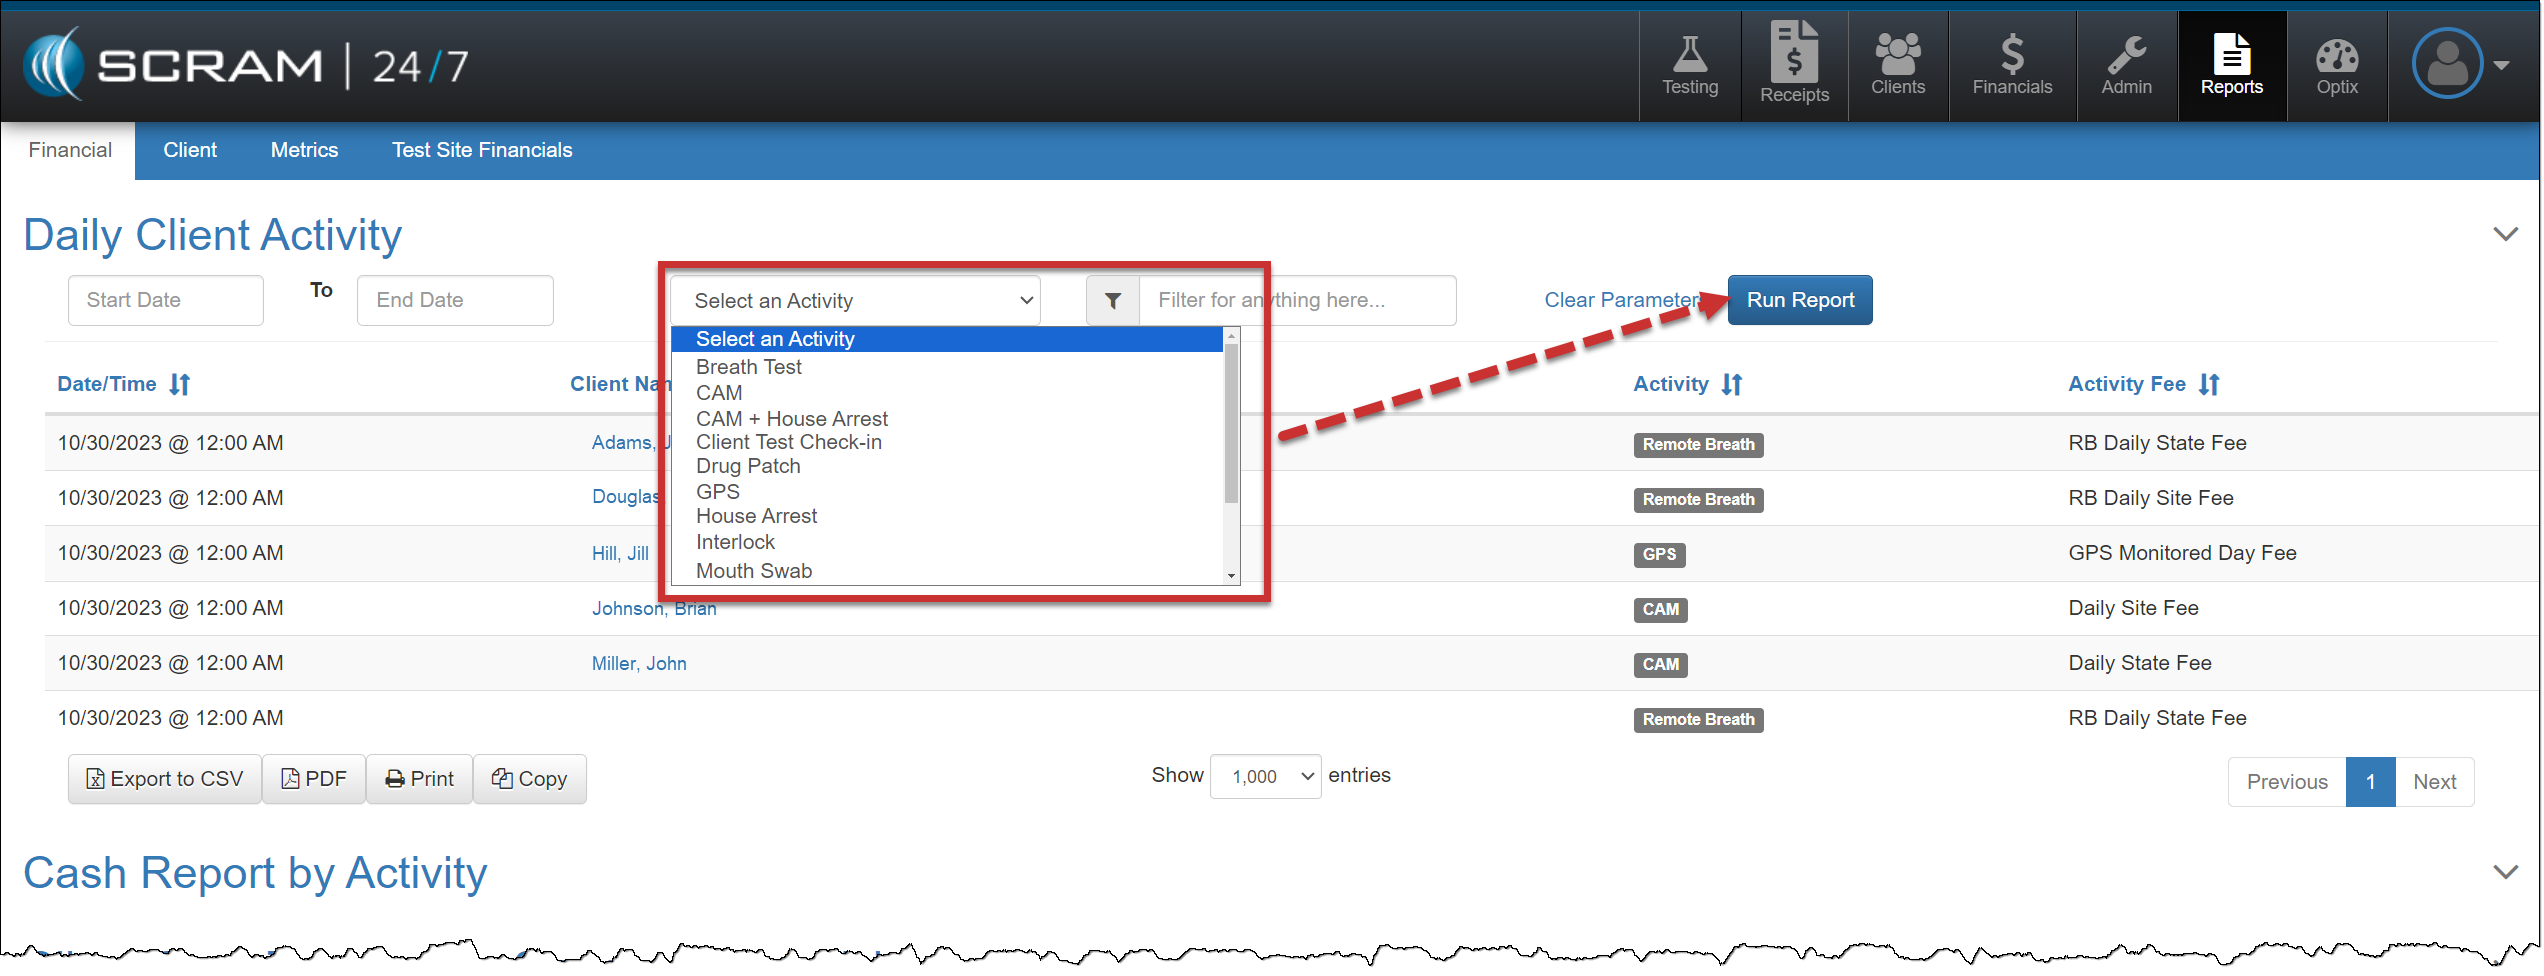
Daily Client Activity Report – New “Select an Activity” filter option
On the Financial Report page, you may customize the information displayed on the Daily Client Activity report by accessing the “Select an Activity” filter and selecting the desired activity from the dropdown menu. After choosing the report parameters, select the Run Report button to view the results.