During the 15-minute deployment, you may not be able to access SCRAMNET GPS, but messages from the SCRAM GPS device will continue to be processed uninterrupted.
Pursuit Mode Enhancement
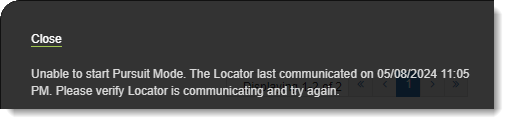
Currently, if an agent attempts to start Pursuit Mode for a client whose device has active No Communication or No Location alerts, SCRAMNET GPS fail to start Pursuit Mode, without informing the agent why Pursuit Mode will not start. With this change, the agent will be notified that Pursuit Mode is unable to start, and provide a reason why:
“Unable to Start Pursuit Mode” Message
New Entry and Exit Alert Default Settings for Inclusion Zones
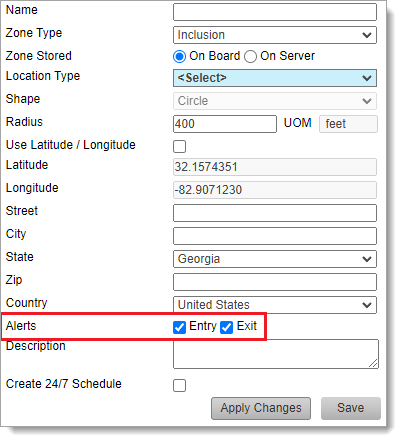
When creating an Inclusion Zone, SCRAMNET GPS automatically generates Entry and Exit alerts for the zone. If the user does not want Entry or Exit events, they must manually uncheck these settings before saving the zone:
Entry and Exit Alerts are Selected (Checked) by Default
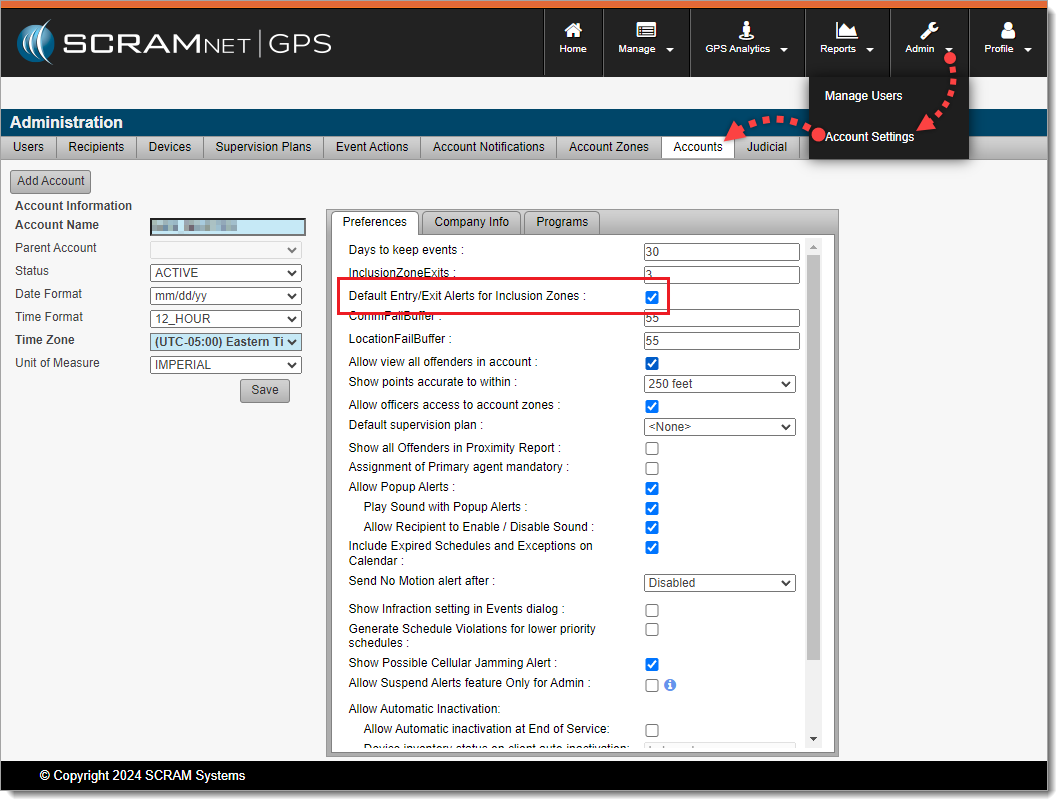
With this enhancement, Administrators may choose the default behavior when creating Inclusion Zones by navigating to Admin > Account Settings > Accounts (tab) > Preferences (sub-tab) to set the Default Entry/Exit Alerts for Inclusion Zones behavior. By default, this setting is selected (checked) to match existing behavior:
Admins May Choose the Default Entry/Exit Alert Behavior for Inclusion Zones (click to enlarge)
New “Deceased” Reason for Client Inactivation
If your program uses client “Inactivation Statuses” (reasons for inactivation), with this release agents may select “Deceased” as the reason for setting a client’s Status to Inactive:
Agents May Now Select “Deceased” as the Reason Setting Client Status to Inactive. (click to enlarge)
This reason is in line with the American Probation and Parole Association’s National Standards for Community Supervision. To activate this feature in SCRAMNET GPS, a program Administrator must navigate to Admin > Account Settings > Accounts (tab) > Preferences (sub-tab) and then select (check) Allow Assignment of Inactivation Statuses.
‘Device History Report’ Now Available to Officer Role
SCRAMNET GPS users in the Officer role may now run the Device History Report. This report was previously available only to Admin users. This report can be run for a specific device, or client, to see the assignment and unassignment history.
Enhancements to the SCRAM GPS Monitoring Center
For SCRAM Systems customers who use our SCRAM GPS Monitoring Center service, it allows them to define Service Level Agreements, and Standard Operating Procedures for addressing SCRAM GPS alerts. The Monitoring Center can be managed directly by the customer or by SCRAM Systems specialists. The following enhancements have been added to the service:
Notes may be updated to Monitoring Center tickets without closing or suspending the ticket. As many notes as needed may be added to the ticket without changing its status.
The Monitoring Center Dashboard shows the name of the Agent who last updated the ticket. This is useful for follow up with the agent when you have additional questions.
The Monitoring Center now surfaces Neutral Zone Entry and Neutral Zone Exit events.
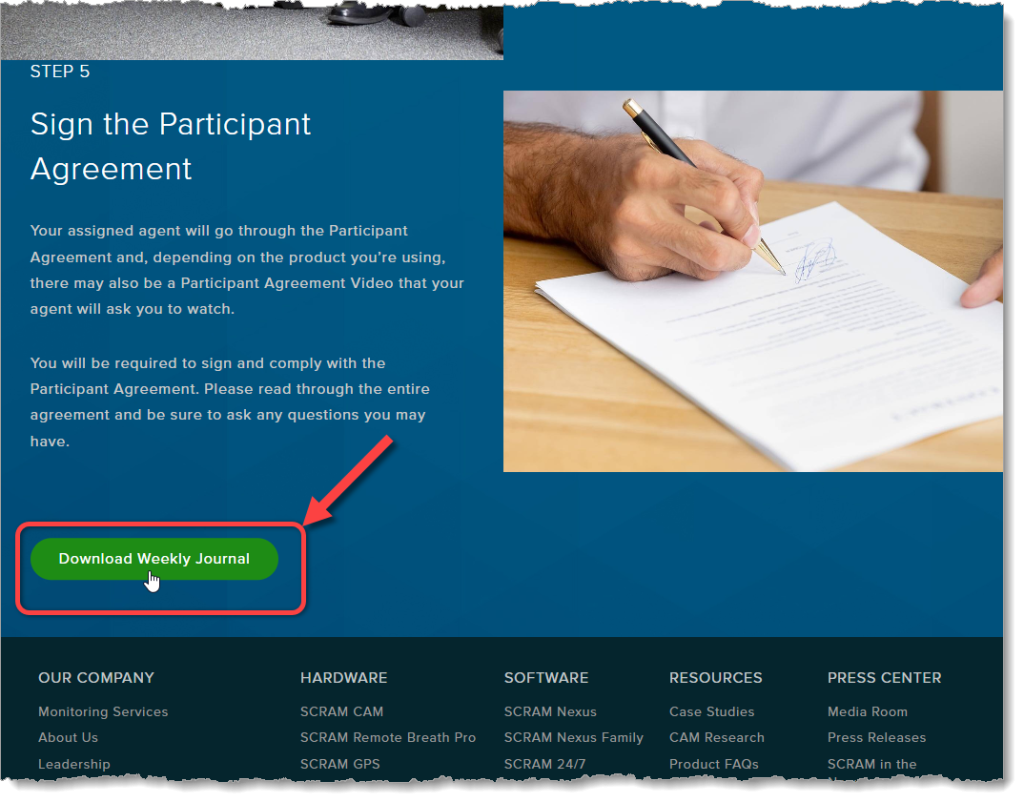
As part of our ongoing effort to improve the experience for our customers, agents, officers, and clients, we at SCRAM Systems have developed a simple weekly journal page that clients may download and print to help them keep track of their daily activities while they are participating in the SCRAM Systems Monitoring Program.
Where to Find It
In addition to being available to customers, agents, and officers on the SCRAM Systems Help & Support homepage under the “Quick Links” heading, the simple two-page (one page front-and-back) PDF download is also available directly to clients on our public website (www.scramsystems.com) on the Getting Started page under the SCRAM Device Help dropdown menu:
Select ‘Getting Started’ from the SCRAM Device Help Menu
At 5:00 AM MDT on Thursday, June 27, 2024, SCRAM Systems released an enhancement to the SCRAMNET GPS Suspend Alerts feature.
Suspend Alerts
The Suspend Alerts feature in SCRAMNET GPS is used to suspend alerts from appearing on the Dashboard and to pause notifications from being sent for specific clients during a specified time period. This is useful when you know alerts will be generated and there is no need for supervising authorities to take any action. For example, a client in the hospital might generate ‘No Communication’ and ‘No Location’ events while admitted, due to the hospital building’s impaired environment, but the client’s location and condition is known; so there is no need to take action.
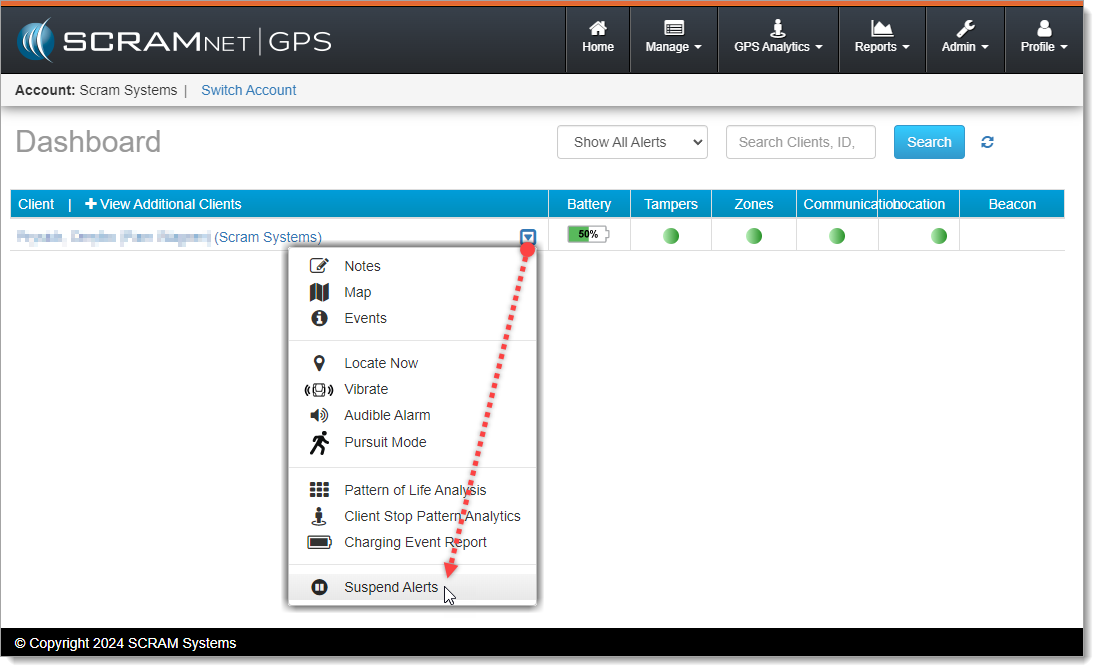
Alerts can be suspended by selecting Suspend Alerts from the context dropdown menu next to the client’s name on the SCRAMNET GPS Dashboard:
Select ‘Suspend Alerts’ from the Dropdown Menu (click to enlarge)
Prior to this release, SCRAMNET GPS offered two options for suspending alerts:
Suspend All Alerts – During the suspension period, alerts do not show on the dashboard, notifications are not sent, and tickets are not generated for the GPS Monitoring Center.
Suspend Alerts to Call Center Only – During the suspension period, tickets will not be generated for the GPS Monitoring Center; however, the alerts are shown on the dashboard, and notifications are still sent.
The ‘Suspend Alerts to Call Center Only’ option is only visible to accounts using the GPS Monitoring Center service.
Simplified Process for Enabling Suspend Alerts
Previously, to suspend alerts users had to first toggle the Enable Suspend Alerts button to ON before selecting the suspension timeframe. With this release, the toggle button has been removed. Users may configure the suspension directly without first setting the button to ON.
The Toggle is Gone, but the Badge Remains
Although the toggle is gone, the ON / OFF badge in the Suspend Alerts tab is still used to indicate at a glance if a suspension is active, without having to click into the tab.
Suspend Alerts by Dashboard Column
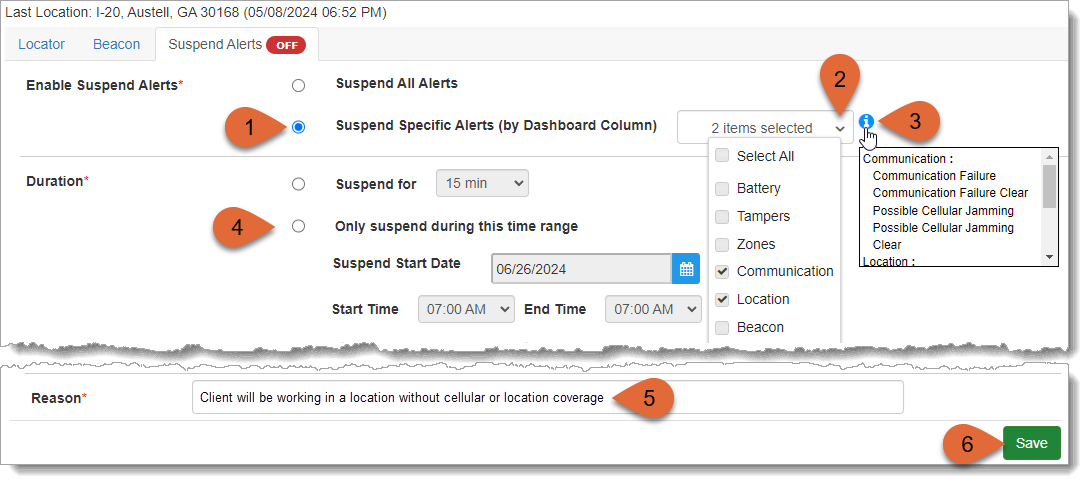
Thursday’s release introduced a third Suspend Alerts option in addition to the two described above: Suspend Specific Alerts (by Dashboard Column). This option supports suspending specific alerts that appear in the columns on the SCRAMNET GPS Dashboard. This is useful when you want to suspend some alerts, but don’t want to suspend all alerts. For example, you could suspend ‘No Communication’ and ‘No Location’ events, but leave ‘Tamper’ events active. To use this new feature:
Select the Suspend Specific Alerts (by Dashboard Column) radio button
Then select the desired Dashboard columns from the dropdown menu
Hover over the Information icon to see which specific alerts apply to the selected columns
Select the appropriate Duration for the alert suspension(s)
Add a Reason for the alert suspension
Save your new alert suspension schedule
New ‘Suspend Specific Alerts’ Feature (click to enlarge)
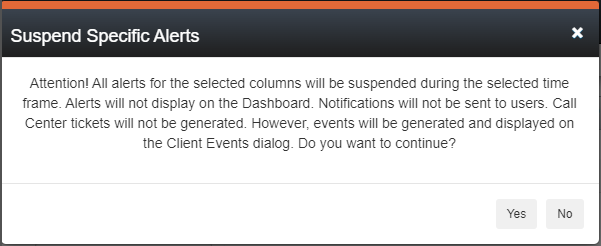
Upon selecting Save, the Suspend Specific Alerts dialog window will appear:
‘Suspend Specific Alerts’ Dialog Window
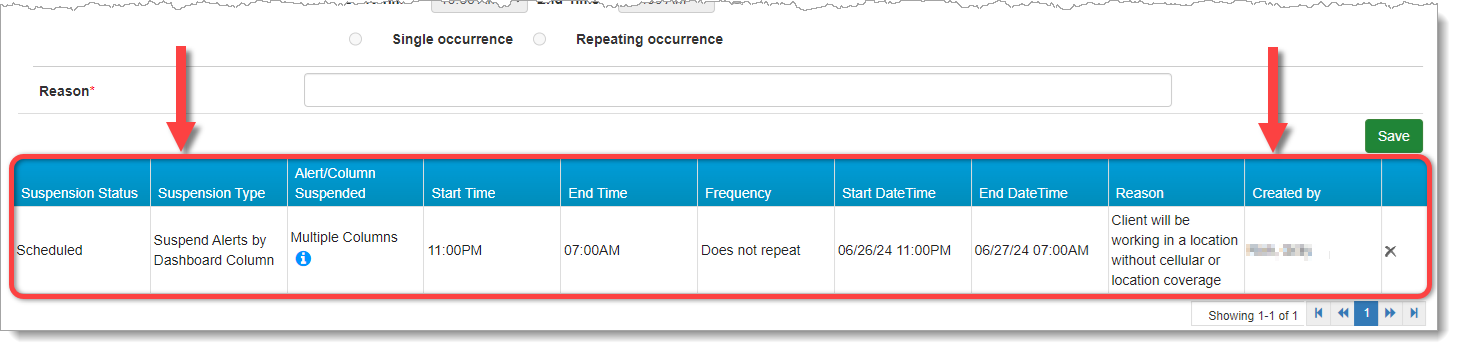
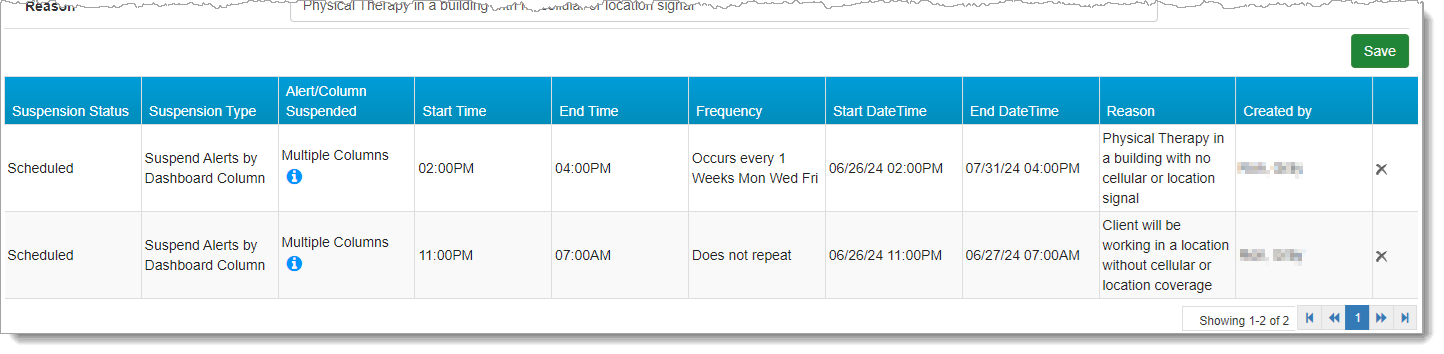
Select Yes on the dialog window to confirm your new alert suspension schedule. It will appear in a table beneath the Save button at the bottom of the page:
GPS Suspension Status: Scheduled (click to enlarge)
Schedule Multiple Suspensions
Additionally, Suspend Alerts by Dashboard Column supports multiple and recurring suspensions. To schedule multiple suspensions:
Select Only suspend during this time range
Set the Suspend Start Date, Start Time, End Time, and Suspend End Date
Then click Save
Schedules may be for overnight, or may last longer than 24 hours. Please note, however, that no part of a scheduled suspension can overlap with any other scheduled suspension. For example:
Start Date
Start Time
End Date
End Time
Result
June 26
11:00 PM
June 27
7:00 AM
This is an overnight schedule and will end the next morning
June 26
11:00 PM
June 30
7:00 AM
The suspension will start June 26 at 11:00 PM and continue until June 30 at 7:00 AM
Schedule Recurring Suspensions
Scheduled suspensions can be recurring. For example, alerts can be suspended every day for the next five days, or every Monday, Wednesday, and Friday. When creating the suspension select the Repeating Occurrence radio button to reveal the Frequency options. Then select the desired Frequency:
Recurring Alert Suspension (click to enlarge)
Once you Save the alert suspension schedule(s) and select Yes to confirm in the dialog window, the recurring suspension(s) will appear the table at the bottom of the page:
Recurring Suspensions Schedule (click to enlarge)
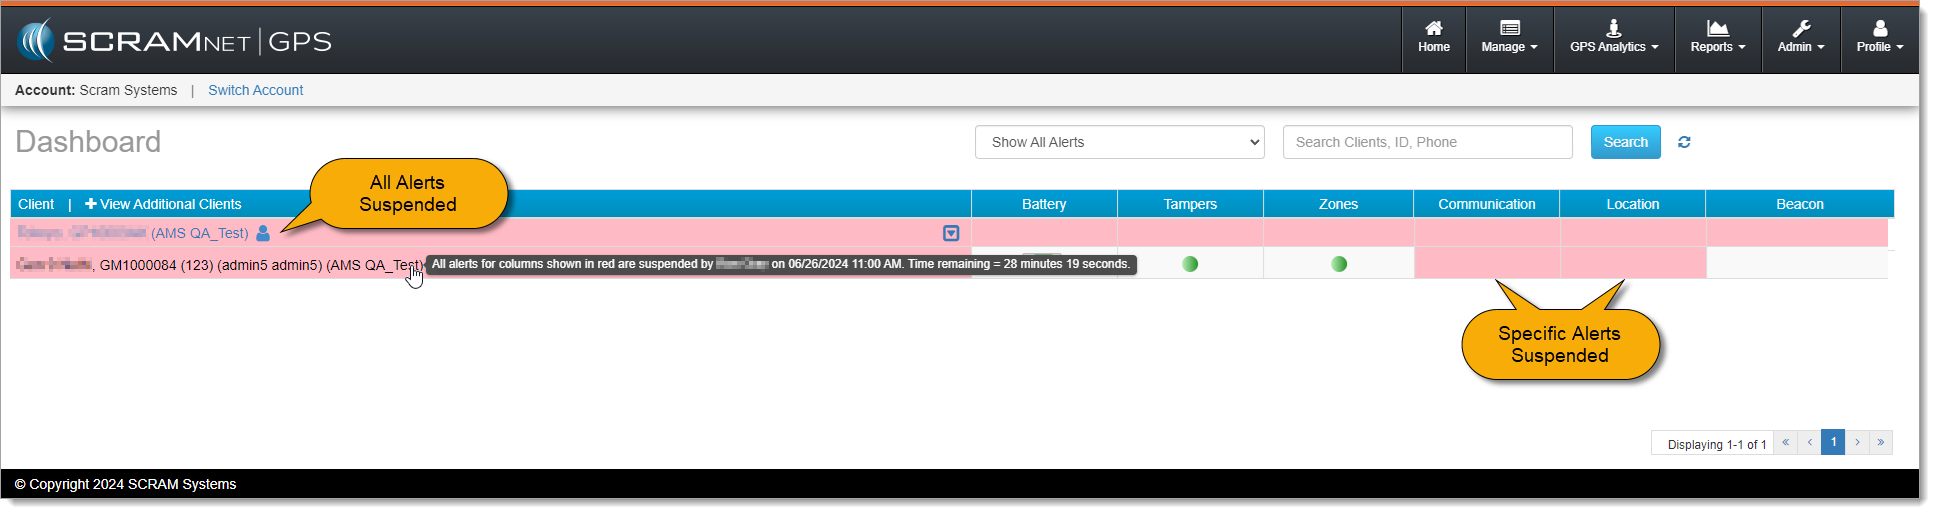
How Suspensions Appear on the Dashboard
The Dashboard visually indicates if all alerts are suspended or if only alerts for specific columns are suspended. Suspended columns are highlighted in red. Alerts for other columns will continue to appear and function normally. Mouse over the client’s name to see details of the alert suspension:
SCRAMNET GPS Dashboard with Suspensions (click to enlarge)
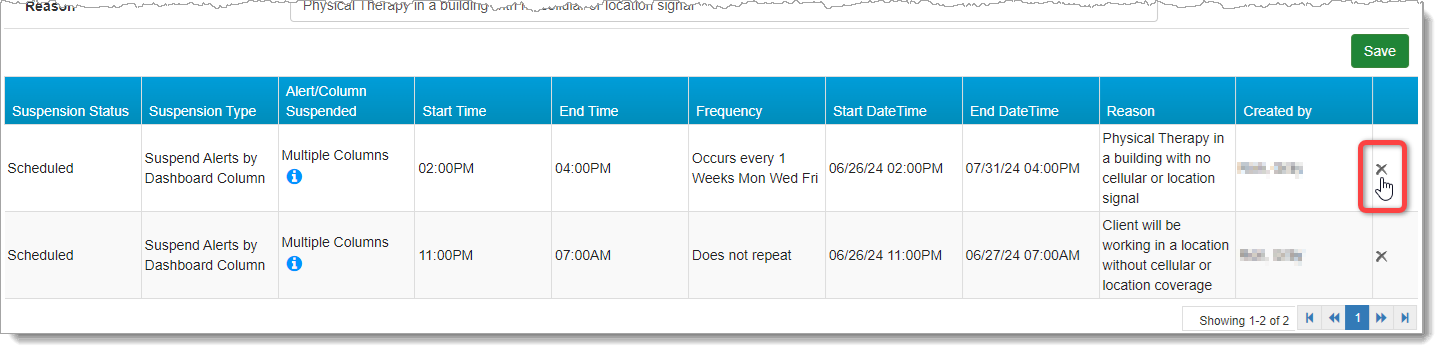
Delete Active or Scheduled Suspensions
To delete an “Active” or “Scheduled” suspension, simply select the Delete (x) icon at the far right of the row you wish to delete:
Delete Suspension (click to enlarge)
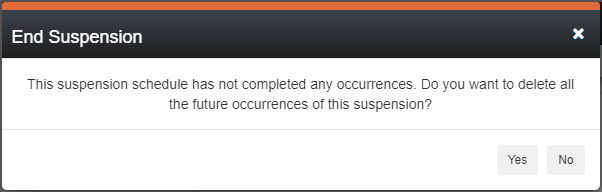
Deleting an active or scheduled suspension deletes the entire series, as indicated in the End Suspension dialog window.
‘End Suspension’ Dialog Window
Select Yes to confirm you wish to end the alert suspension series.
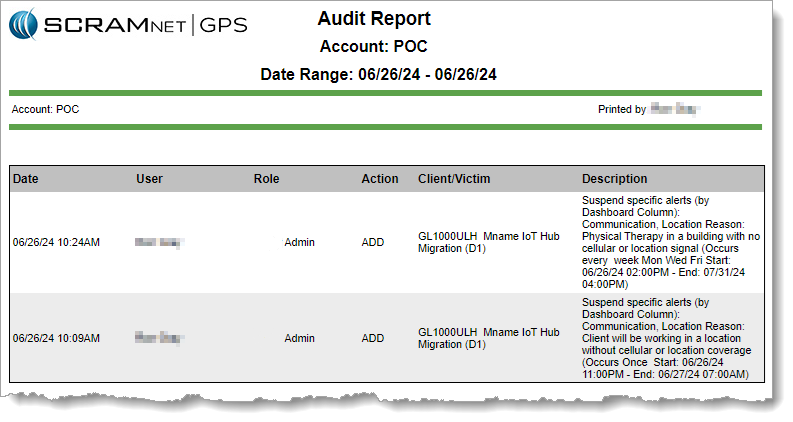
Auditing
Audit entries are added to the Audit Report when schedules are created, deleted, become active, or end.
GPS Audit Report with Suspensions (click to enlarge)
When a Return Merchandise Authorization (RMA) is issued for one of your SCRAM Systems devices, please ensure that the return shipping address on the label reads:
Alcohol Monitoring Systems 8100 Southpark Way Littleton, CO 80120
If your return shipping labels have the old Mineral Avenue address on them, please discard them and request new labels from your SCRAM Systems Account Manager or Sales representative.
At 5:00 AM MDT on Thursday, May 23, 2024, SCRAM Systems released two enhancements to SCRAMNET GPS:
Two new features that clarify client location points on the map while in Pursuit Mode.
MC Customers Only – A new checkbox added to the Client Profile for future use.
Pursuit Mode Enhancements
While in Pursuit Mode, the SCRAM GPS device acquires and transmits location points every 15 seconds. The high frequency of location point acquisition and transmission during Pursuit Mode can sometimes lead to confusing map results; specifically:
Location points failing to appear on map when expected, or
Multiple location points appearing on the map at the same time.
New features have been added to Pursuit Mode to help clarify each of these two occurrences.
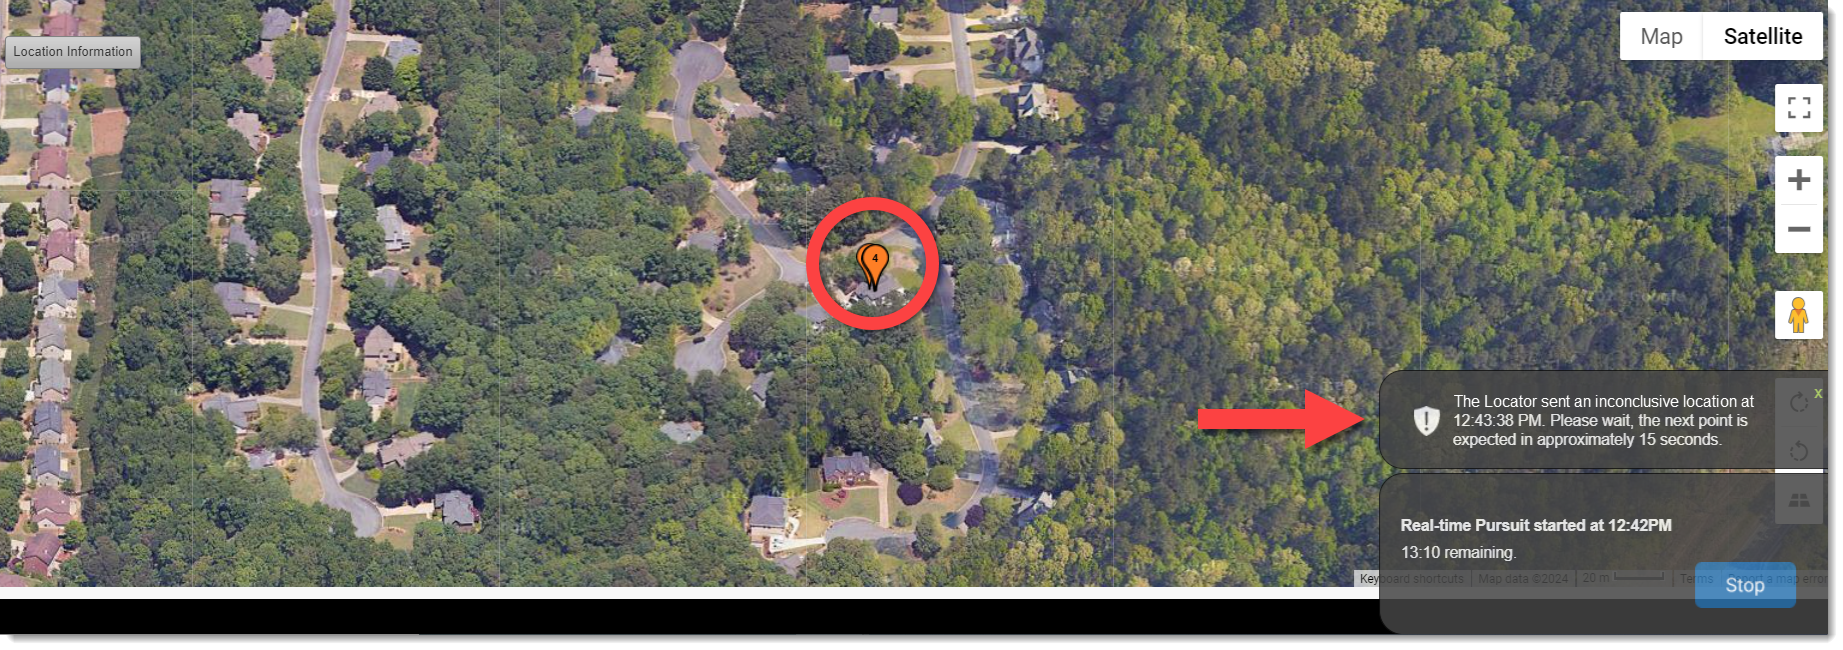
Location Point Message
Due to the rapid acquisition and transmission of location points during Pursuit Mode, there is an increased possibility that the Locator (SCRAM GPS device) will sometimes send a location point to the monitoring system more quickly than it can be verified. When the SCRAMNET GPS monitoring system receives an unverified location point, it labels it as “inconclusive” and cannot display it on the map.
With this release, SCRAMNET GPS will display a 10-second message which explains, “The Locator sent an inconclusive location,” the exact time the inconclusive location was sent, and to expect the next location point in approximately 15 seconds (see arrow below).
SCRAMNET GPS Pursuit Mode Enhancements (click to enlarge)
Location Point Auto-Sequencing
During Pursuit Mode, there is also an increased possibility that the SCRAMNET GPS monitoring system will receive multiple location points at the same time. This can be confusing when viewed on the map because the sequence of the points is unknown.
With this release, when the monitoring system receives multiple location points at once, each point will automatically be sequenced and separated by one second when displayed on the map in SCRAMNET GPS (see circle above).
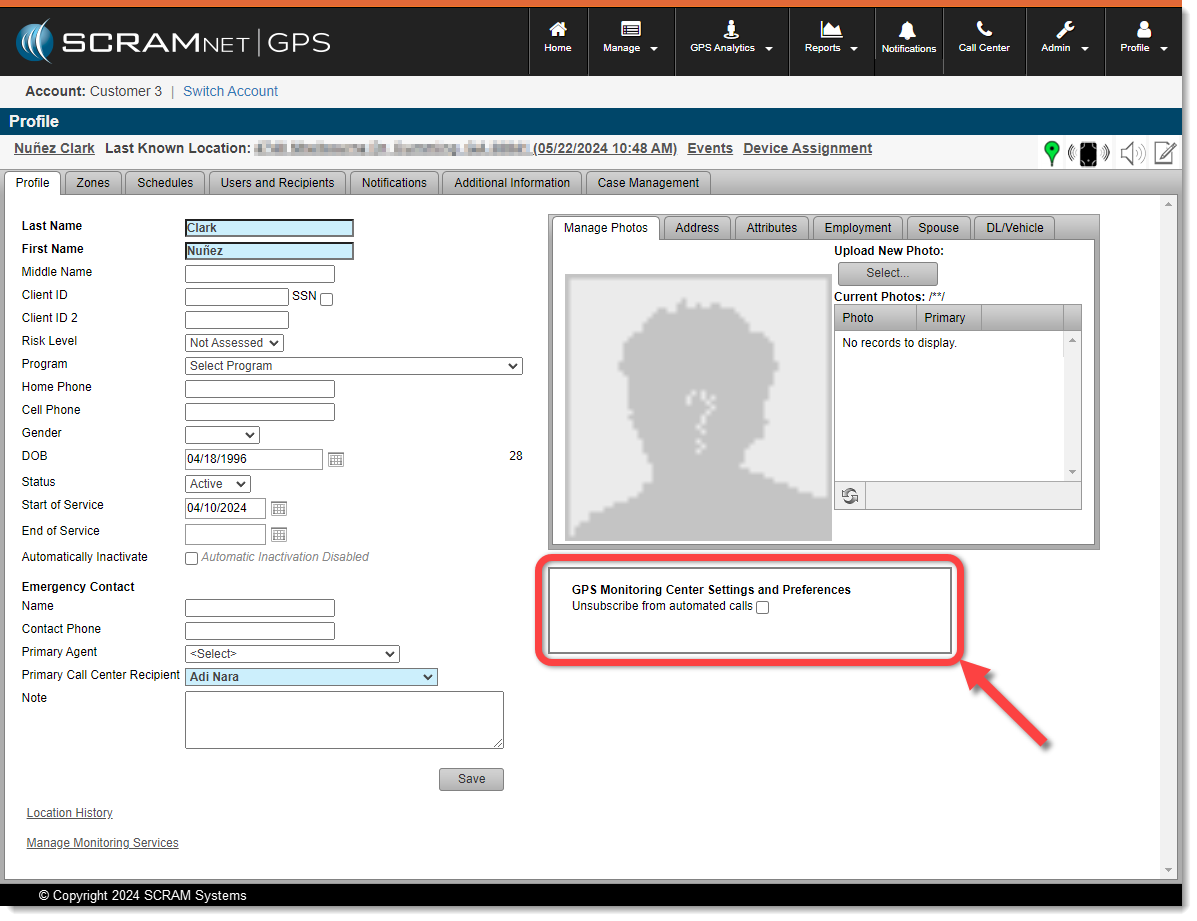
New Client Profile Checkbox – Future Use
When accessing the Profile tab for clients, SCRAM GPS Monitoring Center customers may notice a new “GPS Monitoring Center Settings and Preferences” section beneath the client photo.
New “GPS Monitoring Center Settings and Preferences” Section (click to enlarge)
This new section and checkbox support a future SCRAM GPS Monitoring Center feature that is currently entering beta testing, and the checkbox does not impact anything at this time.
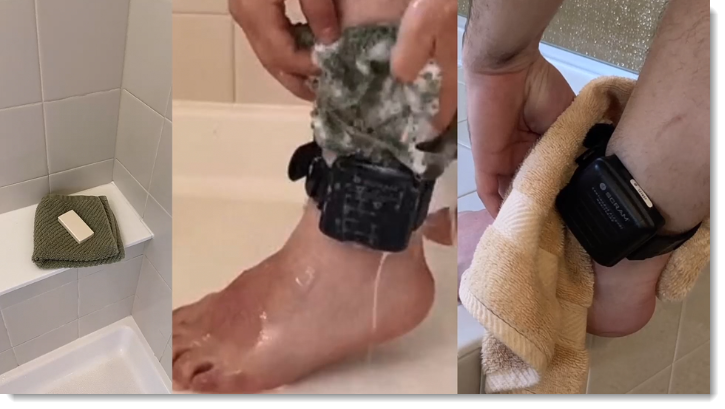
To help decrease the possibility of skin irritation, rashes, or infections developing on your SCRAM CAM clients’ ankles, encourage them to exercise a daily cleansing routine. SCRAM Systems strongly recommends clients follow these steps to wash their ankles under and around the device:
Apply soap to a clean, damp washcloth and wash your ankle by inserting the washcloth between the device and your skin, and then removing it.
Repeat the motion until all areas between the device and your ankle have been washed.
When you are done cleaning your ankle, rinse the area off to remove the soap.
Lastly, use a dry washcloth or towel to thoroughly dry underneath and around the device.
Wash the skin around the ankle with a washcloth, rinse, and dry the area completely
WARNINGS:
The device should not be submerged under water – showers are recommended.
If your client has a specific health condition or concern, be sure they discuss it with you, their supervising authority, and/or a medical practitioner.
At 11:00 PM MDT on April 30, 2024, SCRAM Systems® will release a firmware update to the SCRAM Remote Breath Pro (RB Pro) device, which will result in multiple enhancements to your Remote Breath client Caseloads.
Firmware Download Tips:
SCRAM Systems recommends you power on and update the firmware on your inventory devices before you assign them to clients.
It will take up to 15 minutes for the device to download and install the firmware update.
You and your clients may see the RB Pro device power cycle itself several times during the download and installation process. This is normal behavior.
If it is taking longer than 30 minutes to download and install the firmware update, then follow these tips for troubleshooting Extended Firmware Download Times
Currently, when the device prompts the client to provide a breath sample, it will “wake up,” provide visual instructions on screen, an audible tone, and a solid red light to alert the client that it is time to give a breath sample. The screen will continue to display the instructions and an audible alert sound until the client completes the breath test or the Grace Period expires. If the client does not provide a breath sample in a timely manner, this causes the device to consume a lot of its battery power.
With this update – to conserve power and extend battery life between charges – if the client is not actively blowing into the breath tube 30 seconds after the initial breath test alert, then the screen will “sleep.” All three of the green, blue, and red indicator lights will remain on. Specifically, the red light remains on to remind the client a breath test is pending.
Red Light Remains On While in Sleep Mode When a Test is Pending
At set intervals throughout the Grace Period, the device’s screen will “wake up” and produce an audible tone to remind the client to complete the breath test as well.
When the client sees a solid red light on the device, with or without on-screen instructions, this indicates a pending breath test. If the screen is asleep, instruct the client to press one of the buttons on the side of the device to “wake” it, and then follow the on-screen prompts.
When the device’s battery level is Low or Critically Low, the red indicator light flashes continuously and does not stay solid to signify a pending breath test. Instruct the client to press one of the buttons on the side of the device if the screen is asleep, follow the on-screen prompts to complete a breath test, and then connect the device to a charging cable.
Once a breath test has been requested for the client, and before the RB Pro prompts the client to “Align Eyes,” the device will complete a VOC (Volatile Organic Compound) flow path check. When the device detects a VOC in the breath flow path, “Remove Straw and Place Unit In Well Ventilated Area” will be displayed on the screen:
RB Pro Device Displays ‘Remove Straw and Place Unit In Well Ventilated Area’
Instruct the client to follow the on-screen instructions by having the client:
Remove the breath tube from the device.
Relocate the RB Pro device to an area of fresh air and free of chemicals (like air fresheners) and cleaning agents (including freshly cleaned countertops).
Ensure the RB Pro device is not in its carrying case. Place the device on its side on a tabletop or other clean surface away from contaminants, with the vent and breath tube port unobstructed.
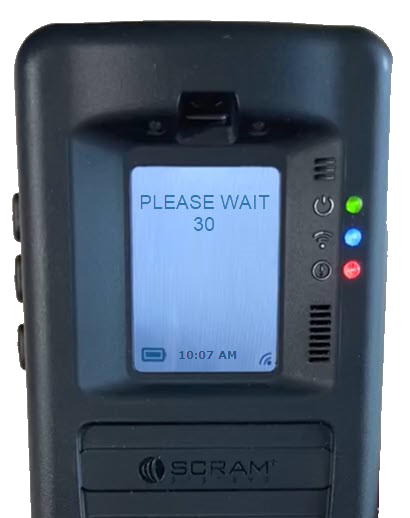
After a period of time, the RB Pro’s screen will update to “Blow Again” and the device will complete a second VOC flow path check.
If VOCs are still detected, the screen will update to “Please Wait,” then “Remove Straw and Place Unit In Well Ventilated Area” for an additional period of time…
RB Pro Device Displays ‘Remove Straw and Place Unit In Well Ventilated Area’ Again
…followed by “Please Wait” with a timed countdown:
RB Pro Device Displays ‘Please Wait’ and Counts Down
At the end of the countdown, the device will complete another VOC flow path check.
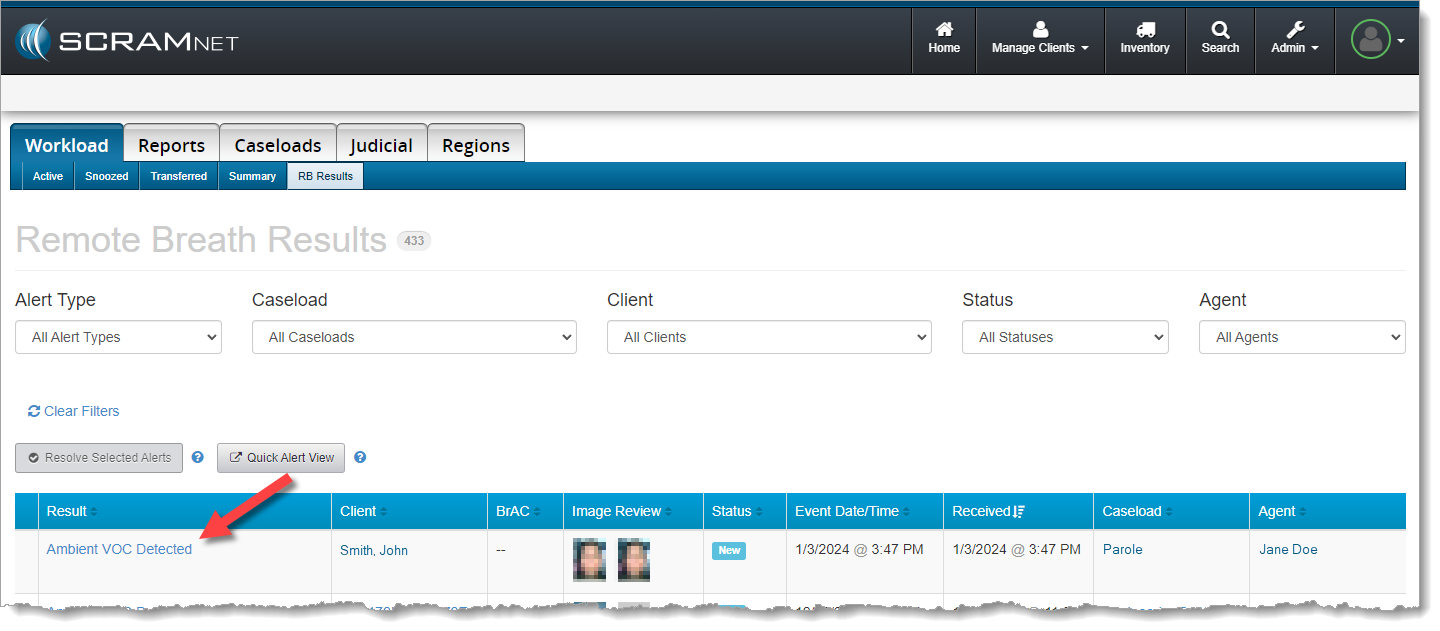
After three to four attempts (depending on the level of VOCs detected), if VOCs are still being detected, the screen will update to “Monitoring.” In SCRAMNET, an “Ambient VOC Detected“ result will be displayed on the client’s RB Results page.
‘Ambient VOC Detected’ on RB Alerts Page in SCRAMNET (click to enlarge)
When the client is set up for Test to Zero, an On-Demand test will be sent – automatically – 20 minutes after the “Ambient VOC Detected” test result is received in SCRAMNET.
New “Stop Blowing” Message
When a breath test is requested, if the client is actively blowing into the device without being prompted, a new “Stop Blowing” message will be displayed on the device’s screen. The client should follow the on-screen instructions when providing a breath sample.
RB Pro Device Displays ‘Stop Blowing’
Additional Usability Improvements
RB Pro Indicator Lights
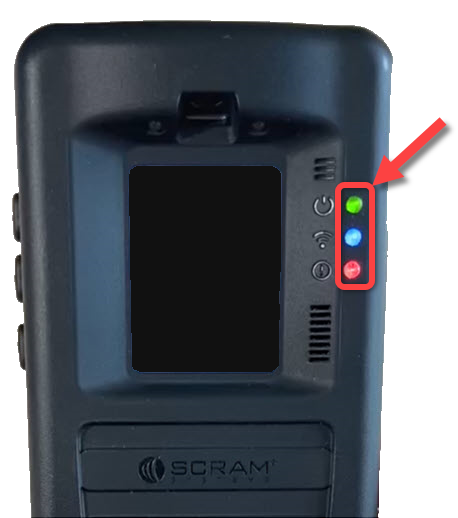
Currently, when an RB Pro is in “sleep” mode, the green, blue, and red lights to the right of the RB Pro display screen will turn off. With this firmware update, the lights will remain on, even during sleep.
Indicator Lights Remains On Even While in Sleep Mode
In addition to the lights remaining on, the blue and red lights will display as solid or flashing, based on the device’s current status. Indicator light statuses are:
Green Light: Active, assigned device
Solid Blue Light: Connected to a Data or Wi-Fi Network
Flashing Blue Light: Establishing a Data or Wi-Fi Network Connection
No Blue Light: No Data or Wi-Fi Network Connection
Solid Red Light: Breath Test Required
Slow Flashing Red Light: Low Battery
Quick Flashing Red Light: Critically Low Battery
Periodically, the screen will wake up when the device is in sleep mode. This occurs during communication with SCRAMNET, or when an indicator light’s status changes. The client should be instructed to follow on-screen prompts when appropriate.
Wi-Fi Sleep Mode
With this update, the device will now go to sleep during inactive periods while connected to a Wi-Fi network. This will extend the battery life between charges while connected to Wi-Fi.
Internal testing has revealed that – thanks to this firmware update – battery life more than doubled as compared to the current battery life of an RB Pro device connected to a Wi-Fi network. Regardless of this improvement, the client should still be instructed to connect the device to a charging cable whenever possible to ensure proper device operation.
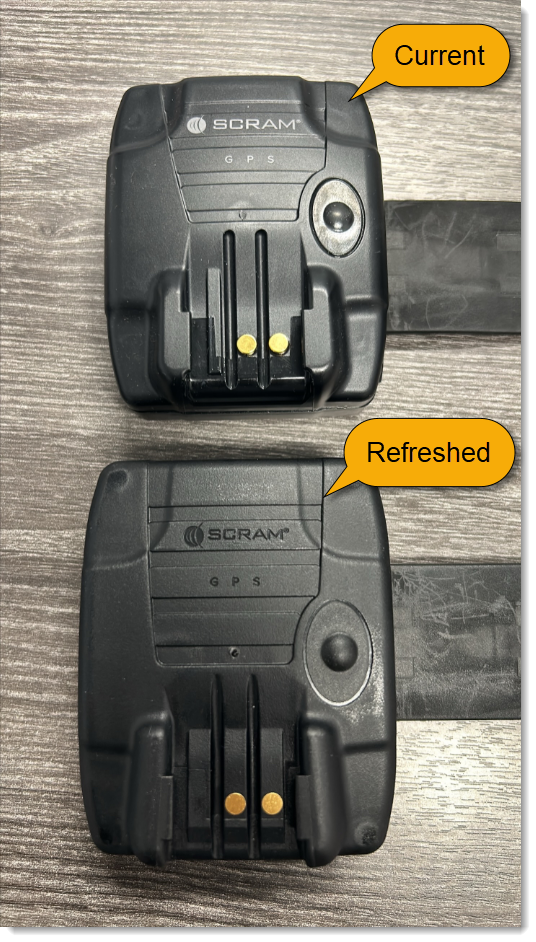
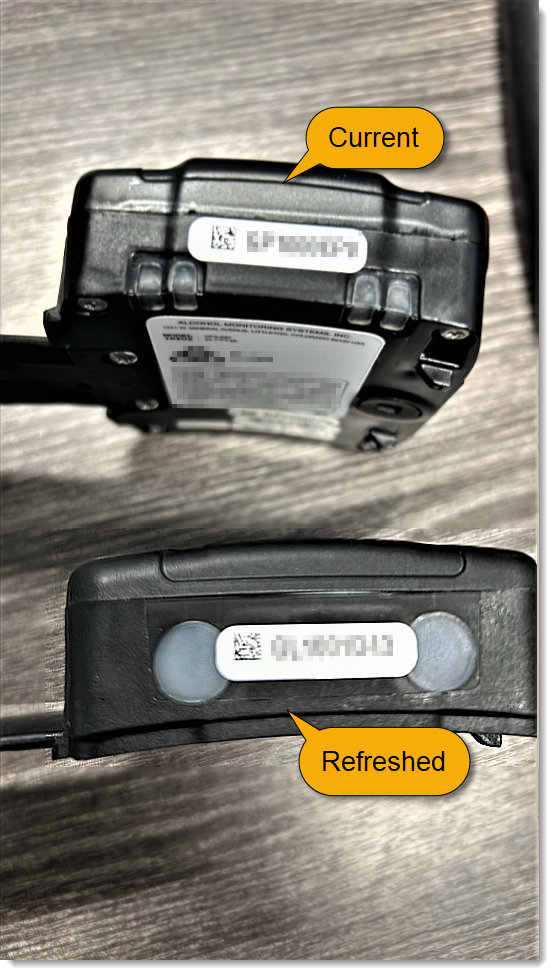
Beginning the week of April 15th, you may notice a slight difference in the look of the SCRAM GPS devices that ship to you from SCRAM Systems. We made a minor change in the plastics used on the outer casing of our current line of SCRAM GPS devices, and this change in plastics resulted in some minor aesthetic differences.
Comparison: Front
GPS Device Front Comparison
Comparison: Top
GPS Device Top Comparison
Internals Unchanged
The internal hardware and firmware of the “refreshed” SCRAM GPS device, as well as its overall behavior remain unchanged, and the new outer casing still uses the same strap and backplate as before; so no additional action is needed on your part to integrate the devices into your inventory.
When it is time to discharge a client from the SCRAM CAM program, be sure you have a clear understanding of the status in which you should place the equipment.
Awaiting Return
If the bracelet or base station is NOT on-hand, select Stop Monitoring and complete the Stop Monitoring process to set the status to Awaiting Return. This status ends the monitoring program and stops the billing associated with it. The bracelet will remain in this status until it is checked in or until 30 days elapses, at which time it will automatically move to Lost status.
Pending Removal
If you will be completing the Stop Monitoring process with the client in person and the equipment is on-hand, select Stop Monitoring and complete the Stop Monitoring process to set the status to Pending Removal. This status prepares the bracelet for final connection with the Direct Connect device and application, and monitoring and billing both continue until the Direct Connect process is complete and the bracelet moves to In Inventory status.
At 1:00 PM MDT today, March 21, 2024, SCRAM Systems® will introduce a new Location Verification feature in the SCRAM Nexus® caseload management system. Working in conjunction with the SCRAM TouchPoint™ client smartphone app, the Location Verification feature will provide officers, agents, and case managers with useful information regarding a client’s whereabouts during Supervised Appointment Activities.
This article is for Nexus/TouchPoint Administrators as well as Officers. If you are an Officer-only user, you may skip to the Officer process.
Enable Location Verification for Your TouchPoint Caseloads
Before the new Location Verification feature can be used, a Nexus/TouchPoint Administrator will need to enable the feature for your caseloads. As an Administrator:
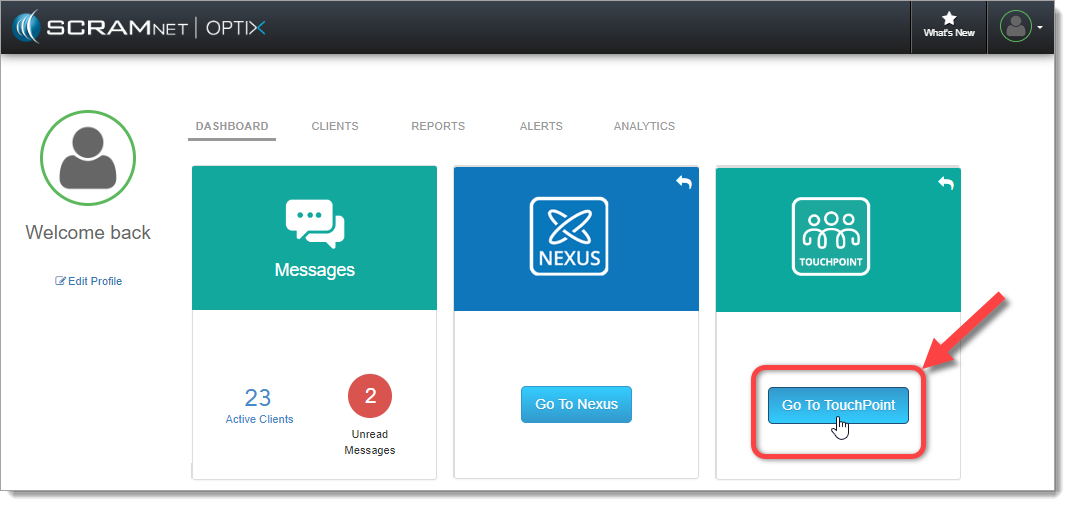
Access the SCRAM Optix TouchPoint Facility:
Open the SCRAM Optix TouchPoint Facility (click to enlarge)
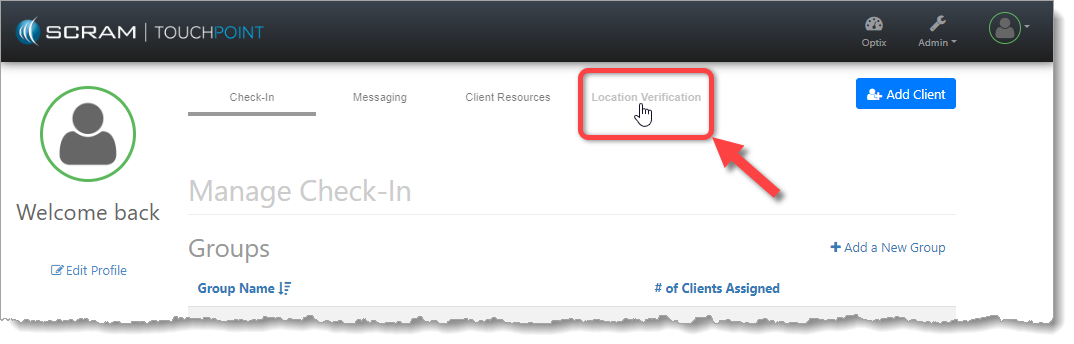
Select the New Location Verification Tab:
Select the New Location Verification Tab (click to enlarge)
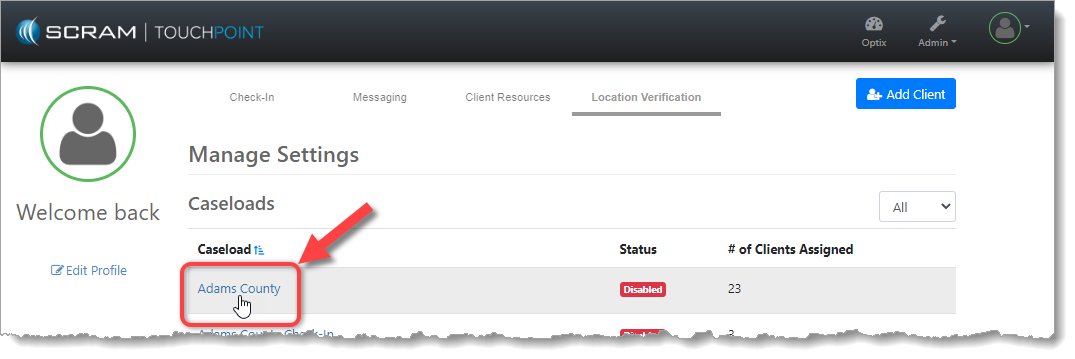
Select the Caseload You Wish to Enable:
Select the TouchPoint Caseload You Wish to Enable (click to enlarge)
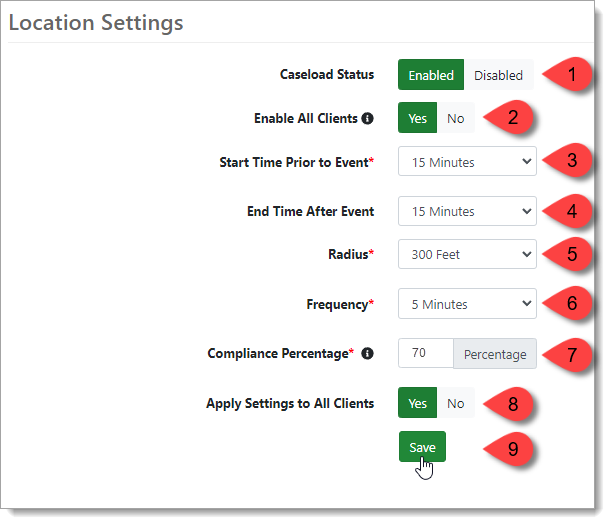
Enable Location Verification and Establish Settings:
Please see the corresponding numbered pointers in the image below.
Toggle the Caseload Status to Enabled. This will reveal the rest of the options.
Select Yes to enable Location Verification services for all client profiles in the Caseload. If No is selected, all clients will have Location Verification services disabled in their profiles and will have to be enabled individually.
Begin tracking the client’s smartphone location between 0 and 30 minutes (in five-minute increments) prior to the Supervised Appointment’s scheduled start time.
Continue tracking the client’s smartphone location between 0 and 30 minutes (in five-minute increments) after the Supervised Appointment’s scheduled end time.
Set the “Compliance Radius” for Supervised Appointment locations. This establishes the distance (200 to 500 feet in 100-foot increments) from the center of the verified location address within which the client will be considered at the address and in attendance at the appointment.
Enable Location Verification and Select the Desired Options (click to enlarge)
Set the frequency (every 1, 5, or 10 minutes) at which client smartphone location information should be collected.
Set the acceptable “Compliance Percentage.” The Compliance Percentage is the number of actual client smartphone location data points collected from within the Radius, divided by the number of location points expected during the Supervised Appointment time period.
Example: If we collect location points from the client’s smartphone every five minutes, and the client is scheduled for a 30-minute appointment, then we would expect to collect seven location points inside the Radius of the appointment address for the duration of the appointment. But, if the client runs late to the appointment, and the appointment ends early, then, even though the client was in compliance, we may only collect five out of the expected seven location points within the Radius, which is only 71% of the expected points. Keep this in mind when setting the Compliance Percentage.
Select Yes to apply these Location Verification settings to all clients in the Caseload.
Save the Location Verification settings.
Enable Location Verification for Your SCRAM Nexus ‘Conditions’
The Location Verification feature is only available to Supervised Appointment Condition Types, however, the feature must be enabled for each Condition before it can be used. As an Administrator:
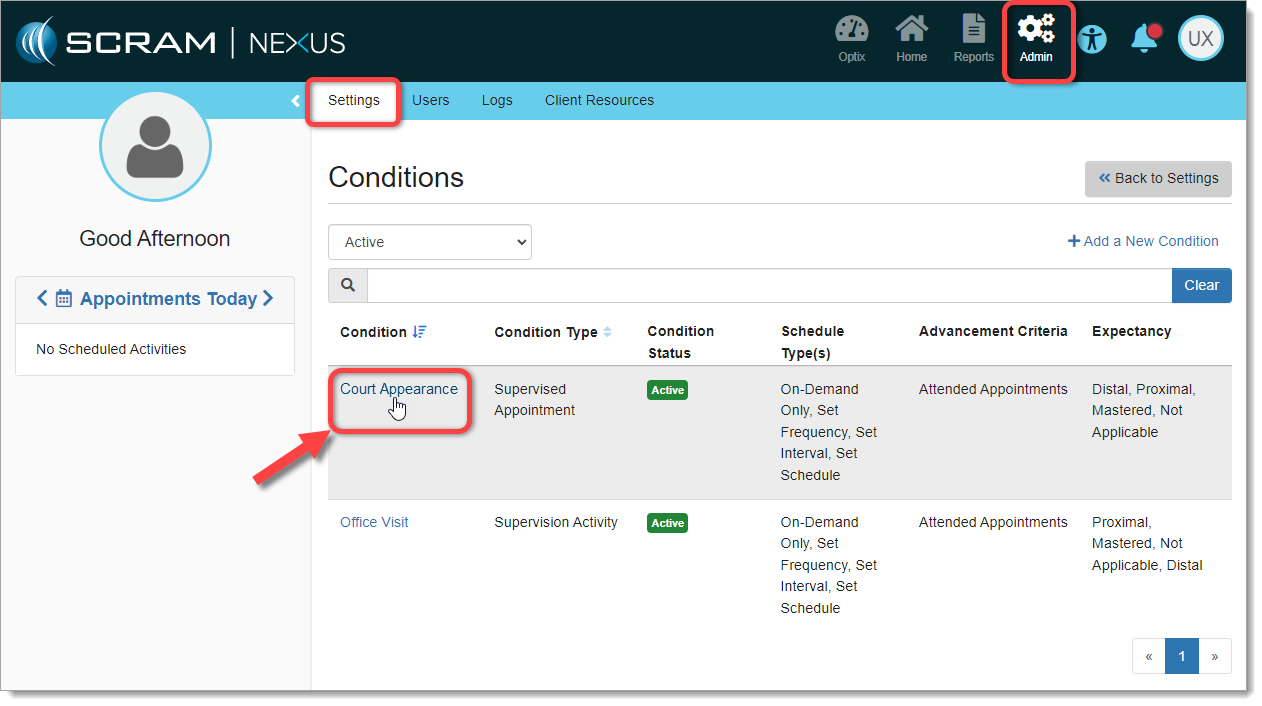
Access Admin > Settings > Conditions and Select the Condition to Enable:
Nexus Admin Selects a ‘Condition’ to Enable (click to enlarge)
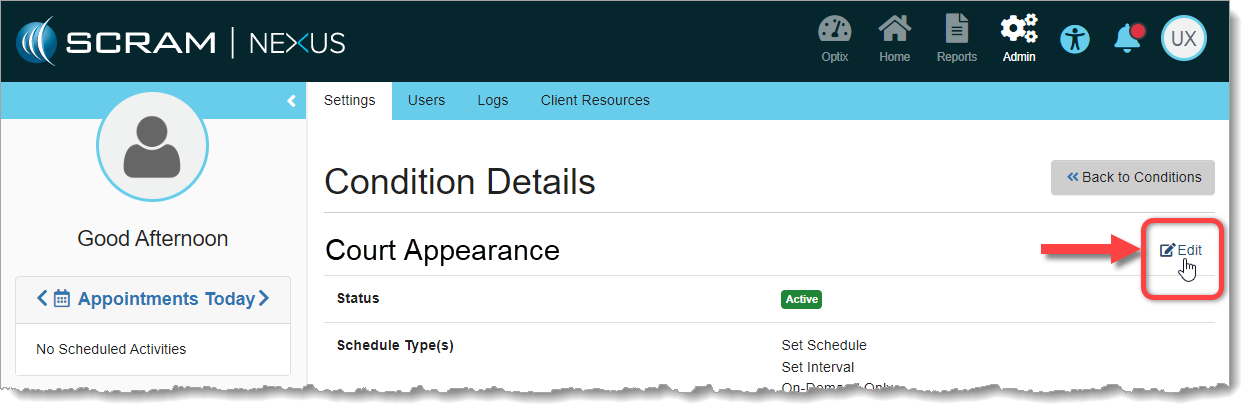
Select ‘Edit’ on the Condition Details Page:
Edit the Condition (click to enlarge)
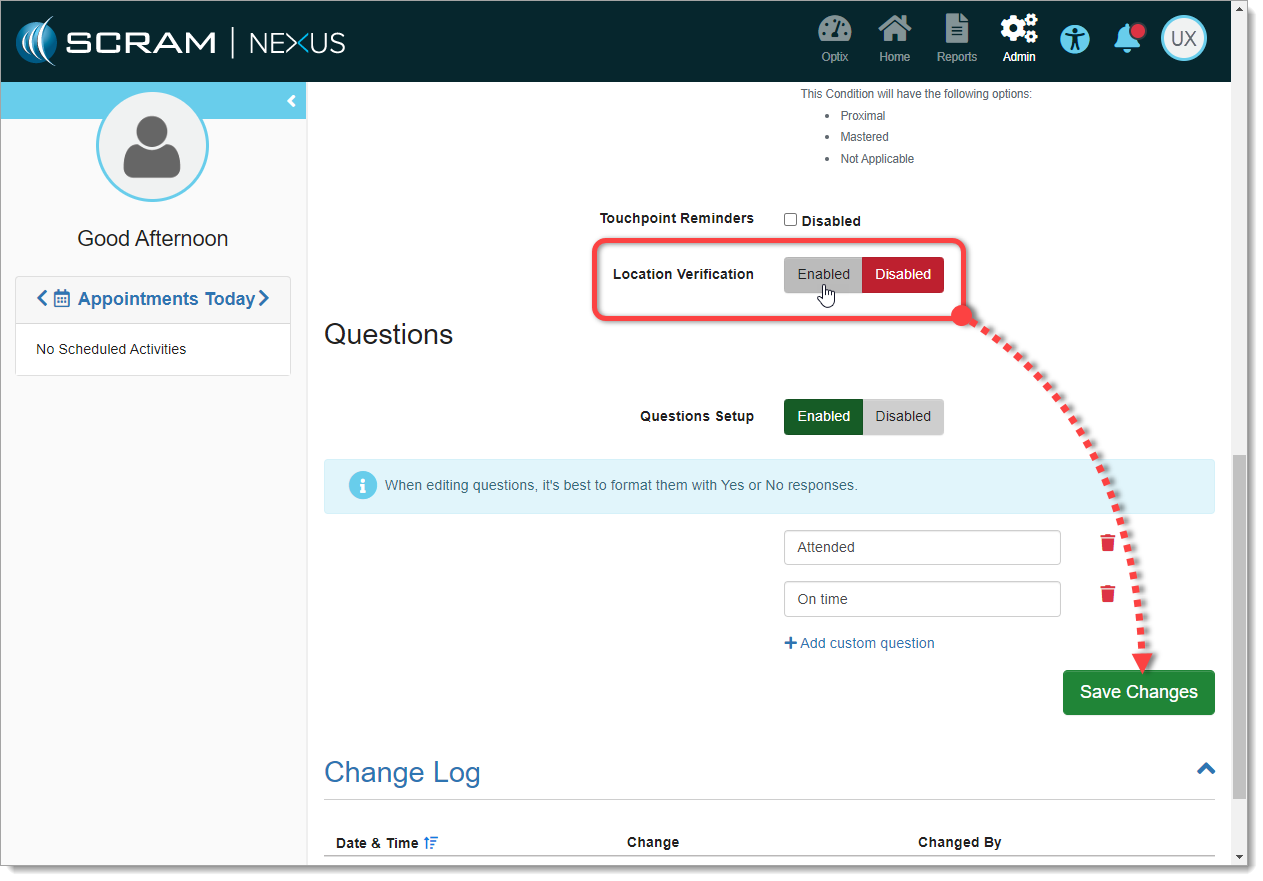
Scroll Down to the New ‘Location Verification’ Toggle
Select Enable and then Save Changes:
Enable Location Verification and Save Changes (click to enlarge)
Your Condition is now enabled for Location Verification. Repeat the process for each Condition you wish to enable.
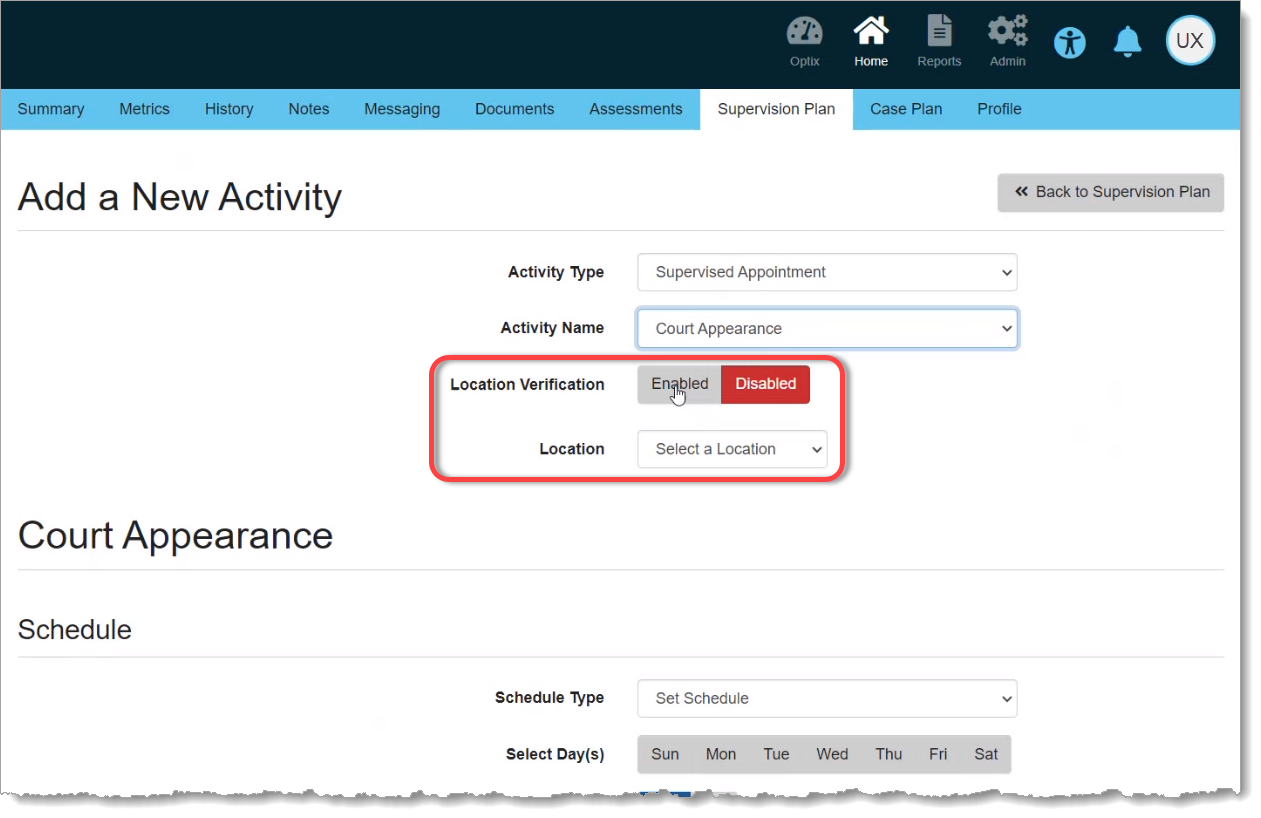
Enable Location Verification for a Supervised Appointment Activity
The Location Verification feature is only available on Supervised Appointment Activity Types. Your SCRAM Nexus/TouchPoint Administrator must first enable Location Verification for your TouchPoint Caseloads, as well as enable it for the appropriate Supervised Appointment Activities.
Once enabled, when you Add or Edit a Supervised Appointment Activity, a new Location Verification toggle switch will be available to you. Simply Enable the feature for your Activity, select a verified Location where the appointment will take place, and proceed as normal:
Enabling Location Verification on a New ‘Supervised Appointment’ Activity for a Client (click to enlarge)
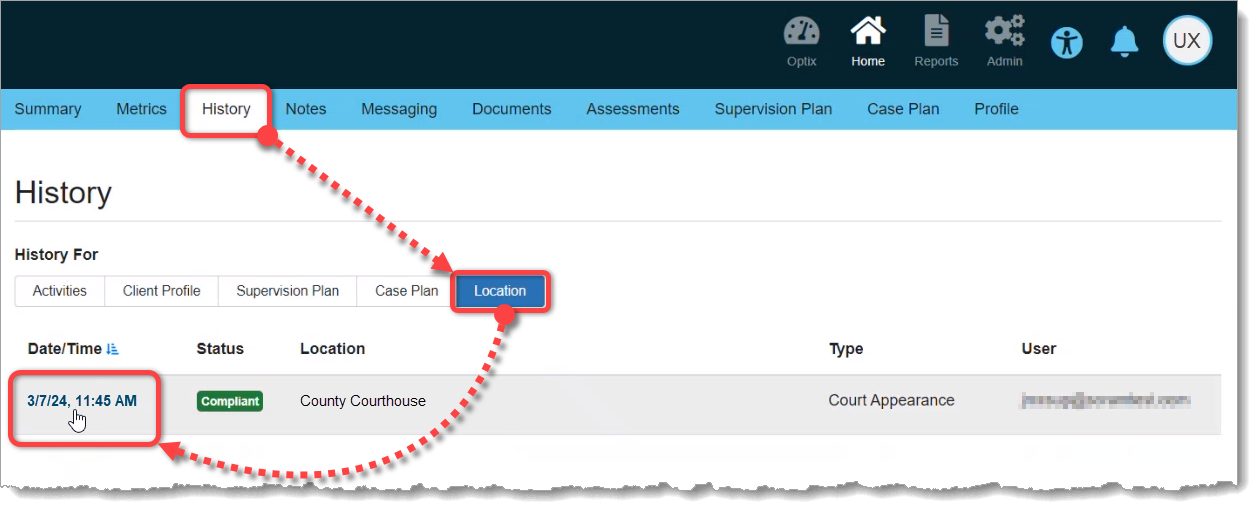
After the Supervised Appointment
Once the scheduled appointment time has passed, you can check for compliance by accessing the the client’s History tab. Then select the Location button for an “at-a-glance” look at the client’s Supervised Appointment status and location. For detailed location information, select the Date/Time link for the appointment in which you are interested:
Access the Client History Tab to View Appointment Location Information (click to enlarge)
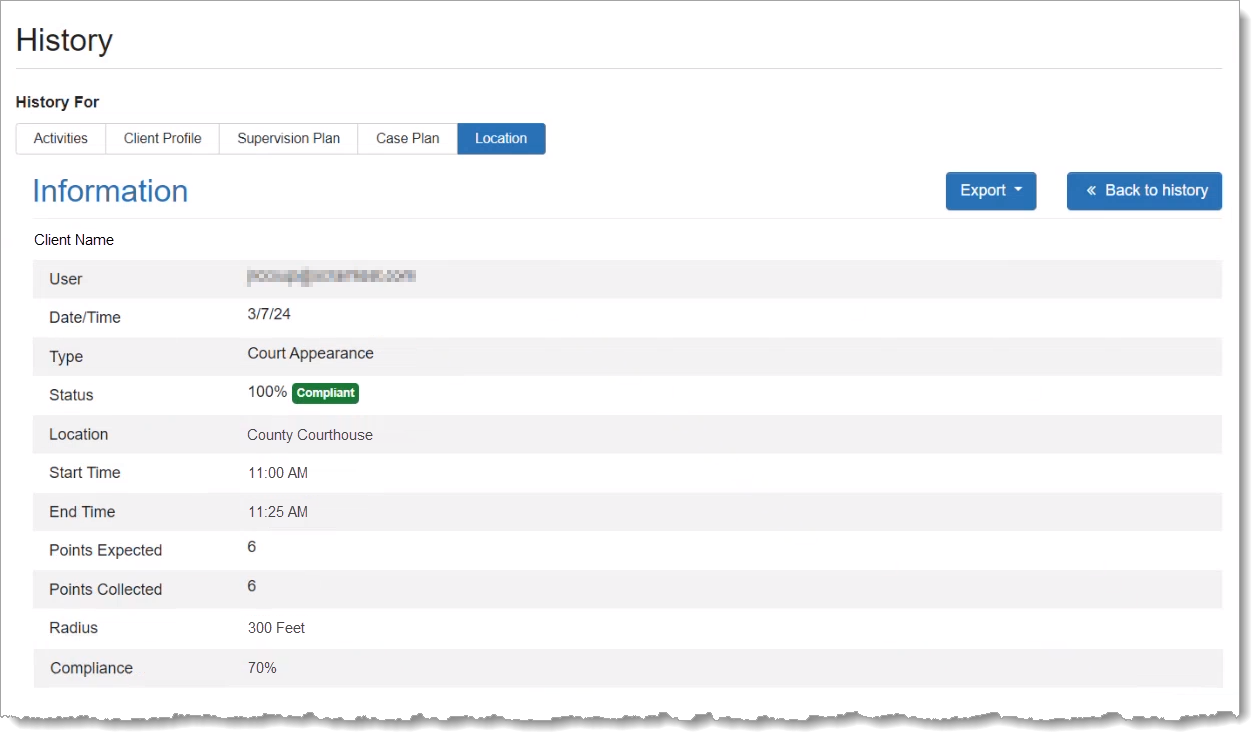
The Location section of the detail page provides a breakdown of the client’s appointment compliance status as calculated by collecting location points from the TouchPoint app on the client’s smartphone during the time of the appointment:
Supervised Appointment Detail – Information Section (click to enlarge)
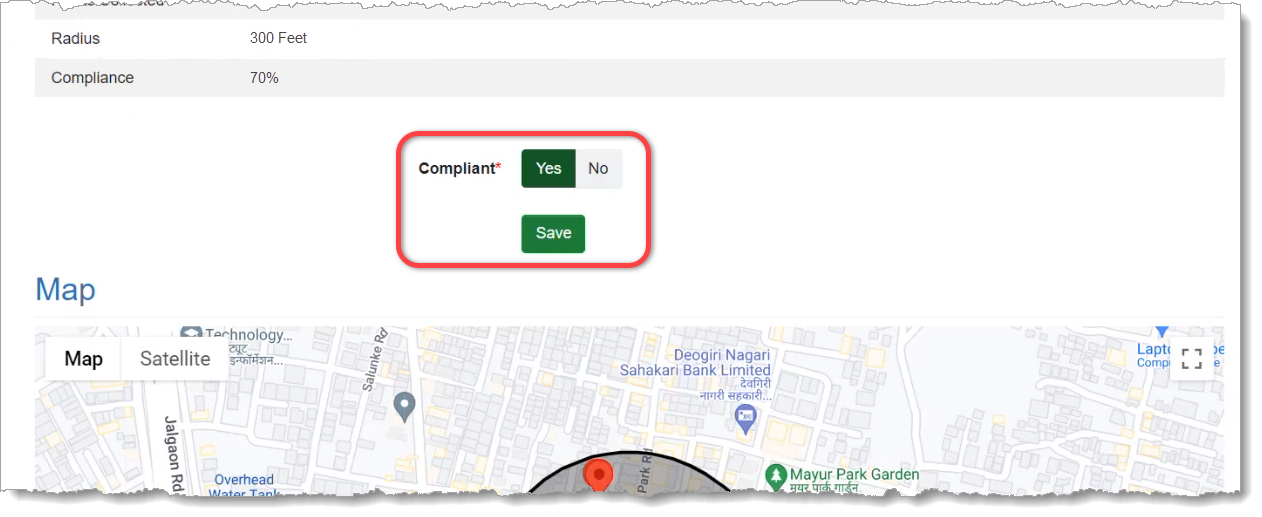
Scroll down the Location section to access the Compliant toggle switch, which allows you to override the automatic compliance calculation if needed:
Supervised Appointment Detail – Compliance Override Toggle (click to enlarge)
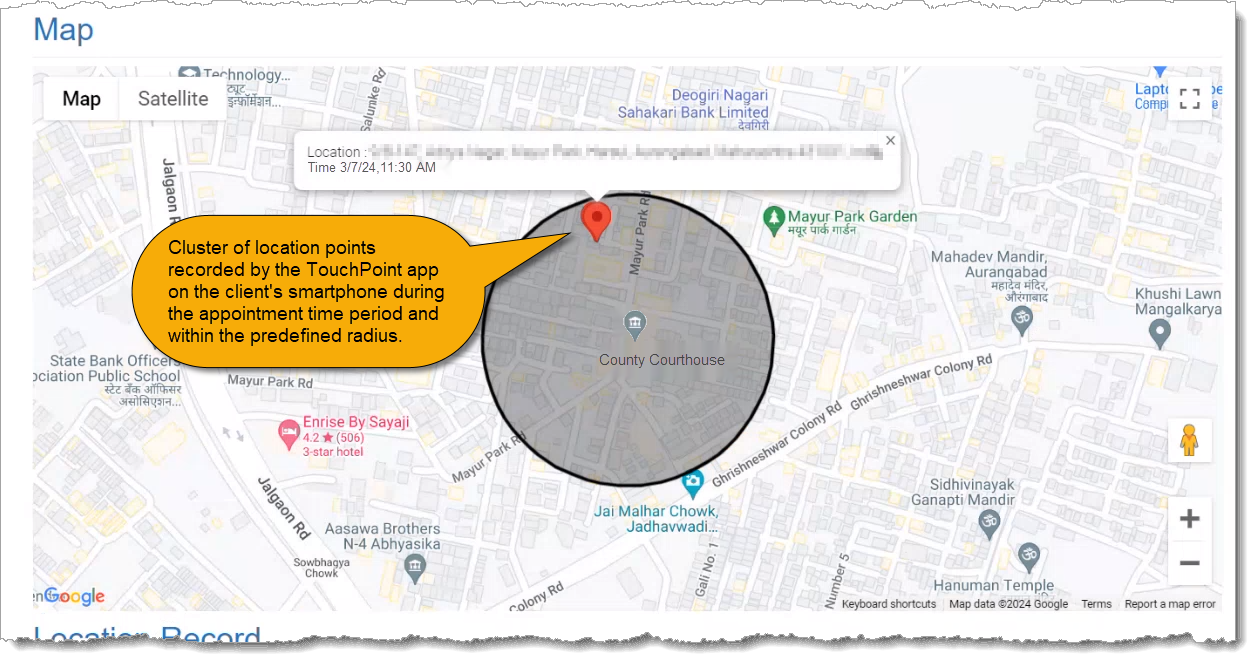
Scroll further down the detail page to reveal the Map, which displays the location points collected during the Supervised Appointment Activity and where they fall within the location’s “Compliance Radius.” The Compliance Radius is the predefined distance (from 200 to 500 feet) from the center of the verified location address, within which the client is considered at the address and in attendance at the appointment:
Supervised Appointment Detail – Map Section (click to enlarge)
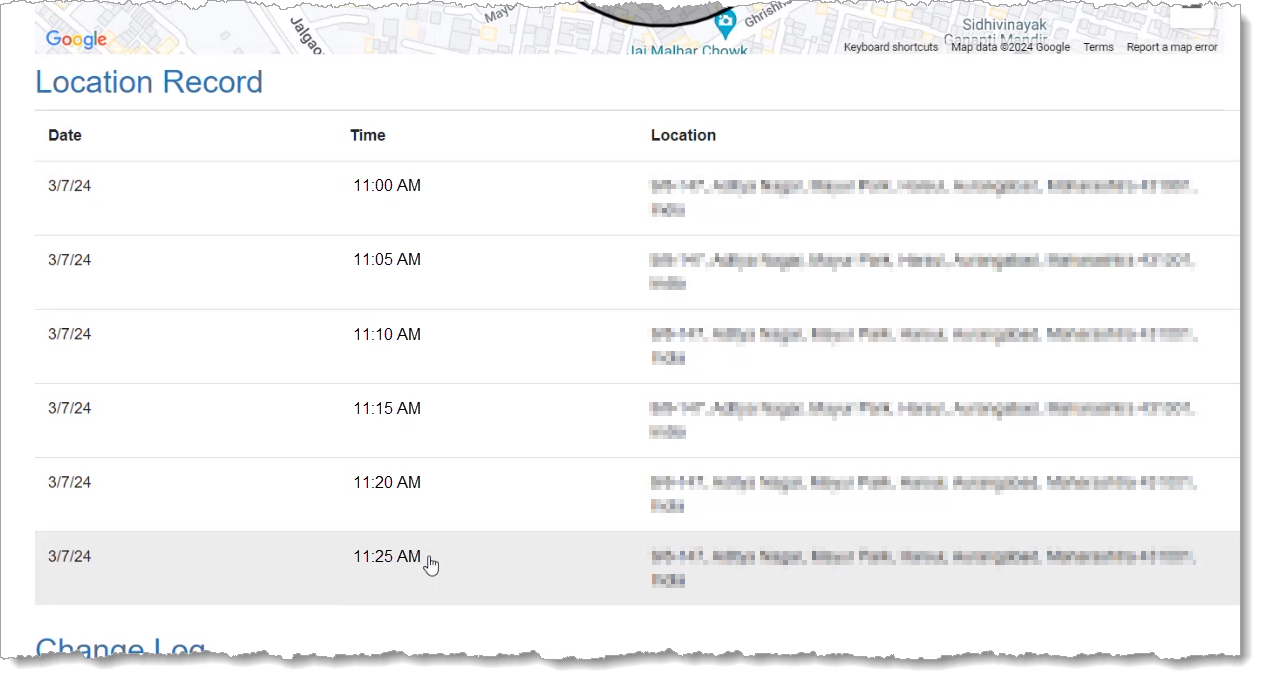
Below the Map you will find the Location Record, which is a matrix of the location points displayed on the Map, including the date, time, and address from which each point was collected from the client’s TouchPoint smartphone app:
Supervised Appointment Detail – Location Record (click to enlarge)
COMING SOON: An update scheduled for the near future will make the Location Information available on the Supervised Appointment Activity itself, as well as on the client’s History tab.