During your client’s TouchPoint monitoring program, you may wish to save documents related to the client’s profile in SCRAM Optix. These documents may include court-specific files, time cards, or other important documents. In addition to saving documents, you may share files with the client, require client eSignatures, receive files from the client via the TouchPoint app, and then download shared files received from the TouchPoint app to your computer. In short, the Documents feature offers a centralized location for client file storage and facilitates easy management.
This article contains information to:
Upload a file
Before uploading a file to the client’s Documents page, it must be accessible on your computer. Sometimes, you may have to scan the document to your computer, download the file from another site, or you may have to locate an electronic copy of a file sent from the client or a judicial entity.
Supported file types include:
Getting started:
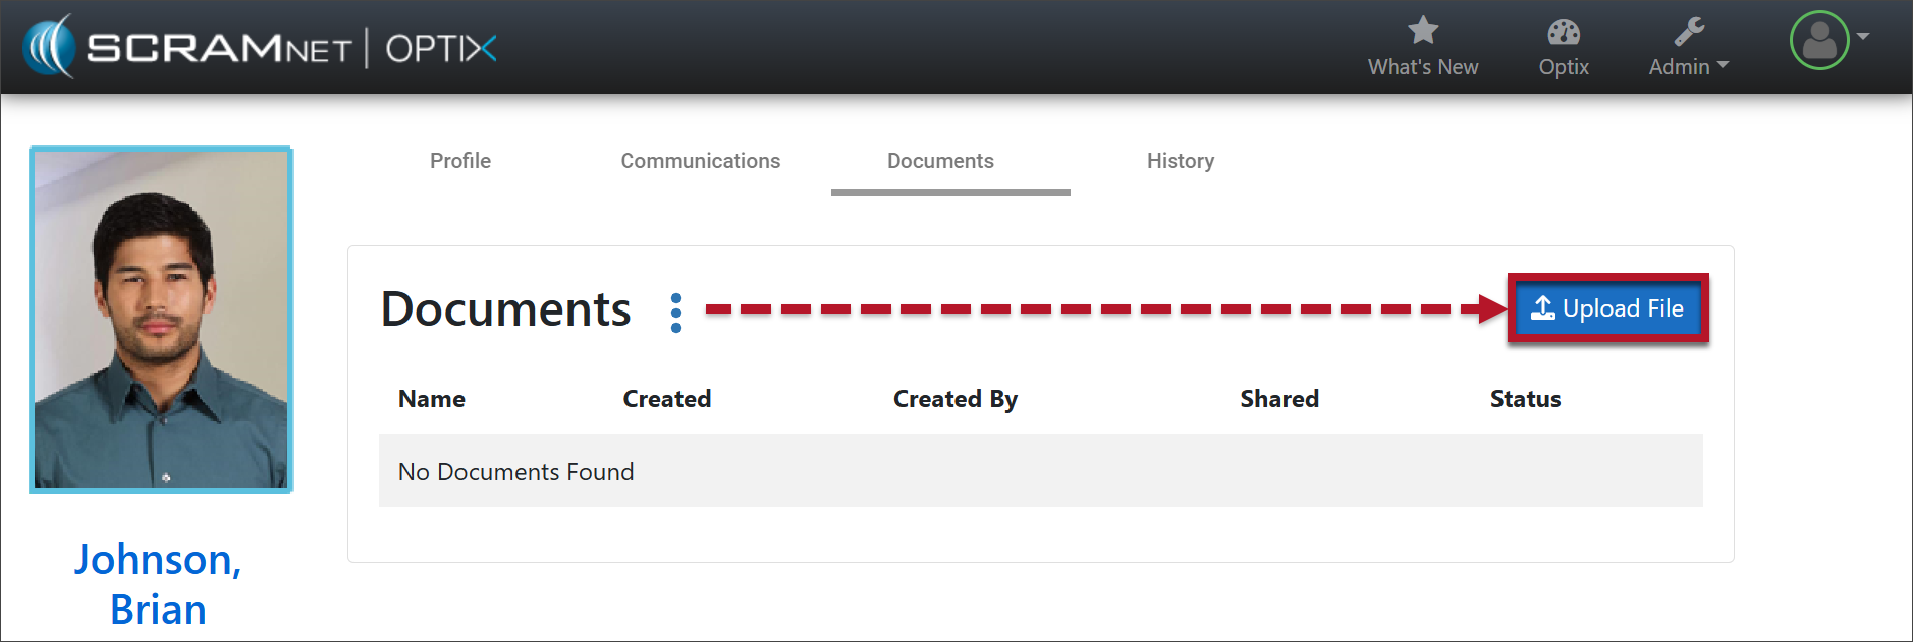
In this first example, we will save a file to the client’s Optix profile for our records. The file for this example is on our Desktop, and we will not share the document with the client now.
- Navigate to the Documents tab for the client and select the Upload File button.
TouchPoint Documents – Upload File (click to enlarge)
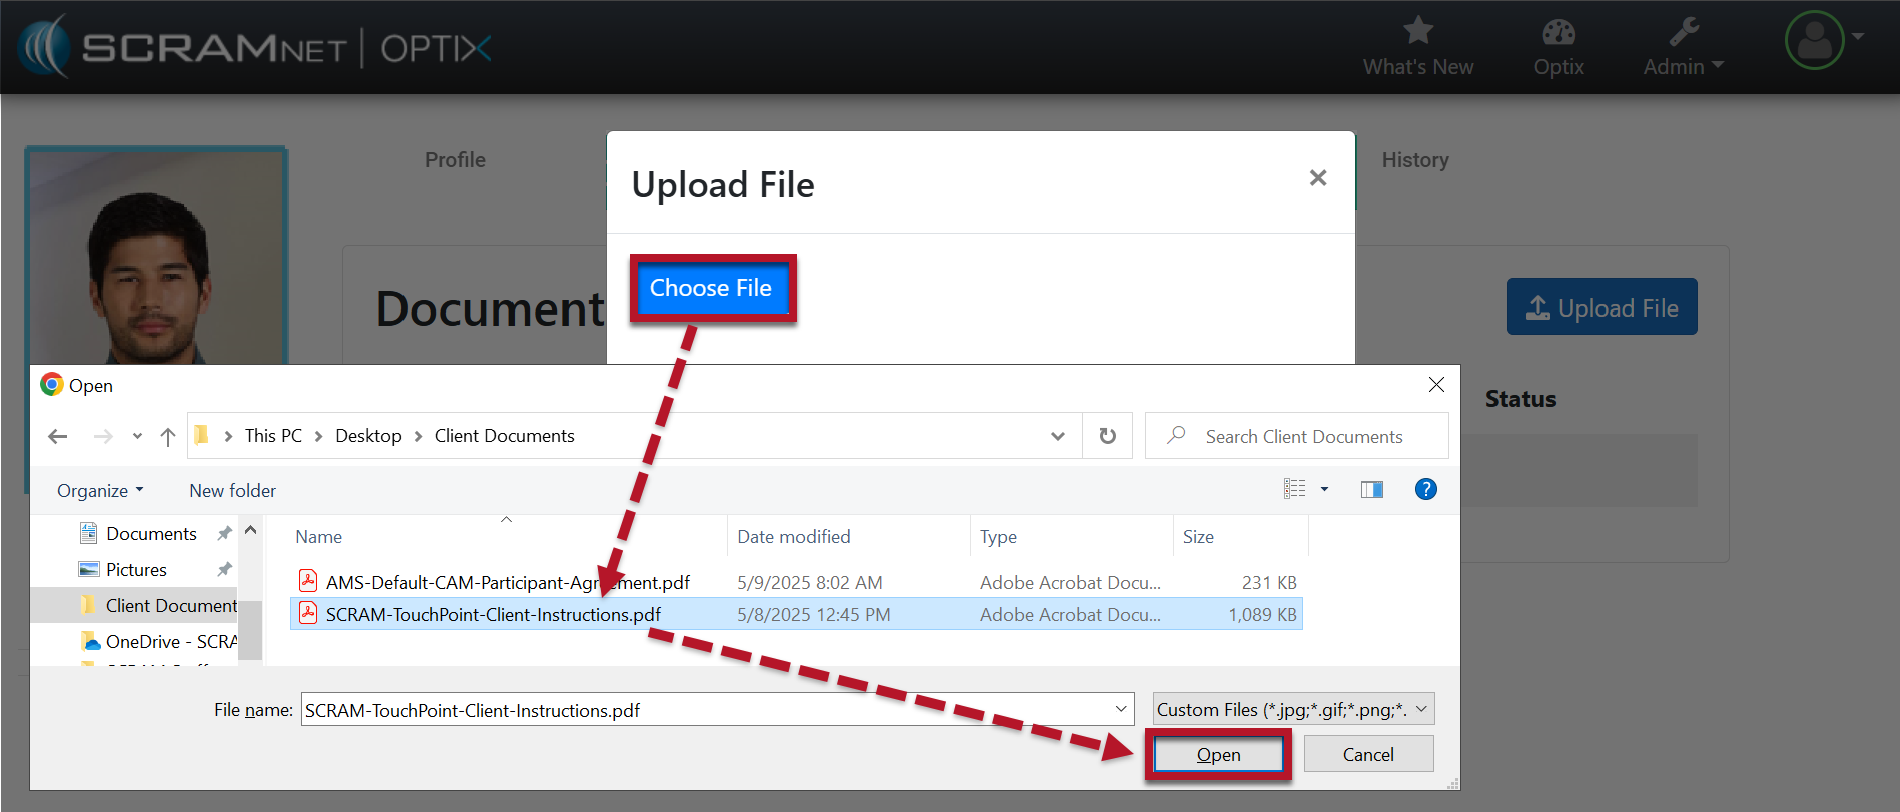
- On the Upload File pop-up, select the Choose File button.
- Select the location where the file is located and then select the file.
- You may double-click the file name, or
- Single-click the file name and then select the Open button.
Select File to Upload (click to enlarge)
- Once selected, the file will be displayed in the pop-up. A green circle will appear when the file is ready to upload. At this time, select the Save button.
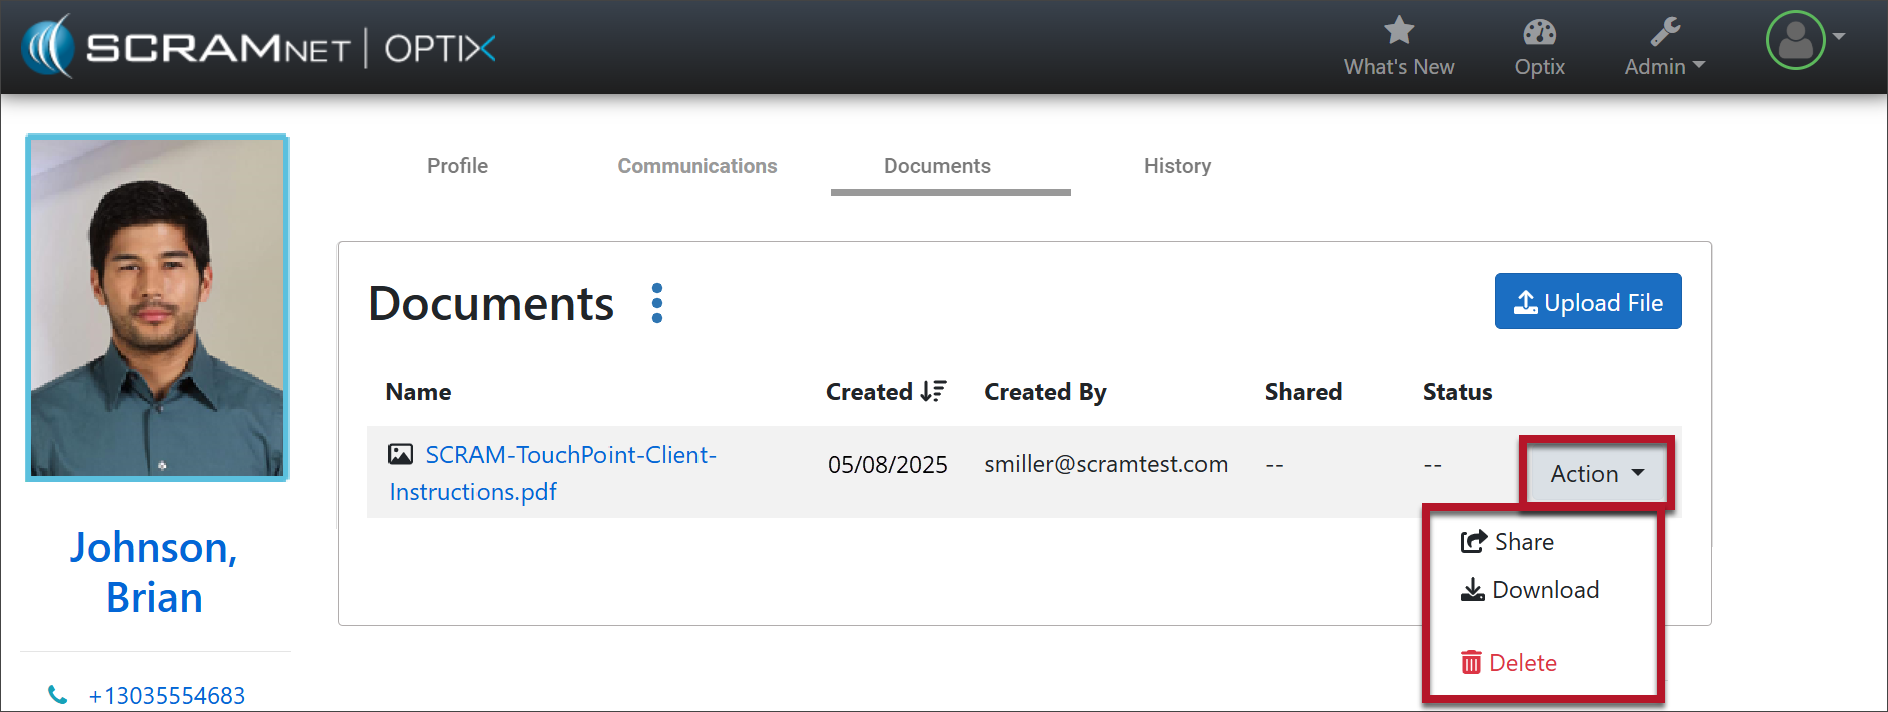
The file is now displayed on the Documents page under the Documents heading with a date stamp and the user’s information. From now on, all users accessing the client’s profile will have access to the file.
File Management
Once a file is available on the client’s Documents page, you may access the Action dropdown menu to:
- Open a Document Preview pop-up window for a quick look at the file without having to download it
- Share it with the client via their TouchPoint app
- Download the document to your computer
- Request an e-signature by selecting the Required eSignature, or
- Select the Delete option to remove it from the Documents list
| Tip: When you utilize the Download option, the file is downloaded to your computer’s Downloads folder. Contact Customer Service or your IT department for assistance locating the downloaded image. |
View a Document Preview
Select the file’s name hyperlink to open a Document Preview window.
Share a File with the SCRAM TouchPoint Mobile Application
If you have uploaded a file to the client’s Documents page in SCRAM Optix that does not require a client e-signature, and you are ready to share the file with the client’s SCRAM TouchPoint app on their smartphone, then do the following:
To share a file:
- Open the Action dropdown menu next to the file you want to share.
- On the dropdown menu, select the Share option.
Once shared with the client’s SCRAM TouchPoint app, the shared date and a Pending status are displayed.
TouchPoint Documents page (click to enlarge)
At this time, the client will receive a push notification on their smartphone to alert them that a new document is available to be viewed.
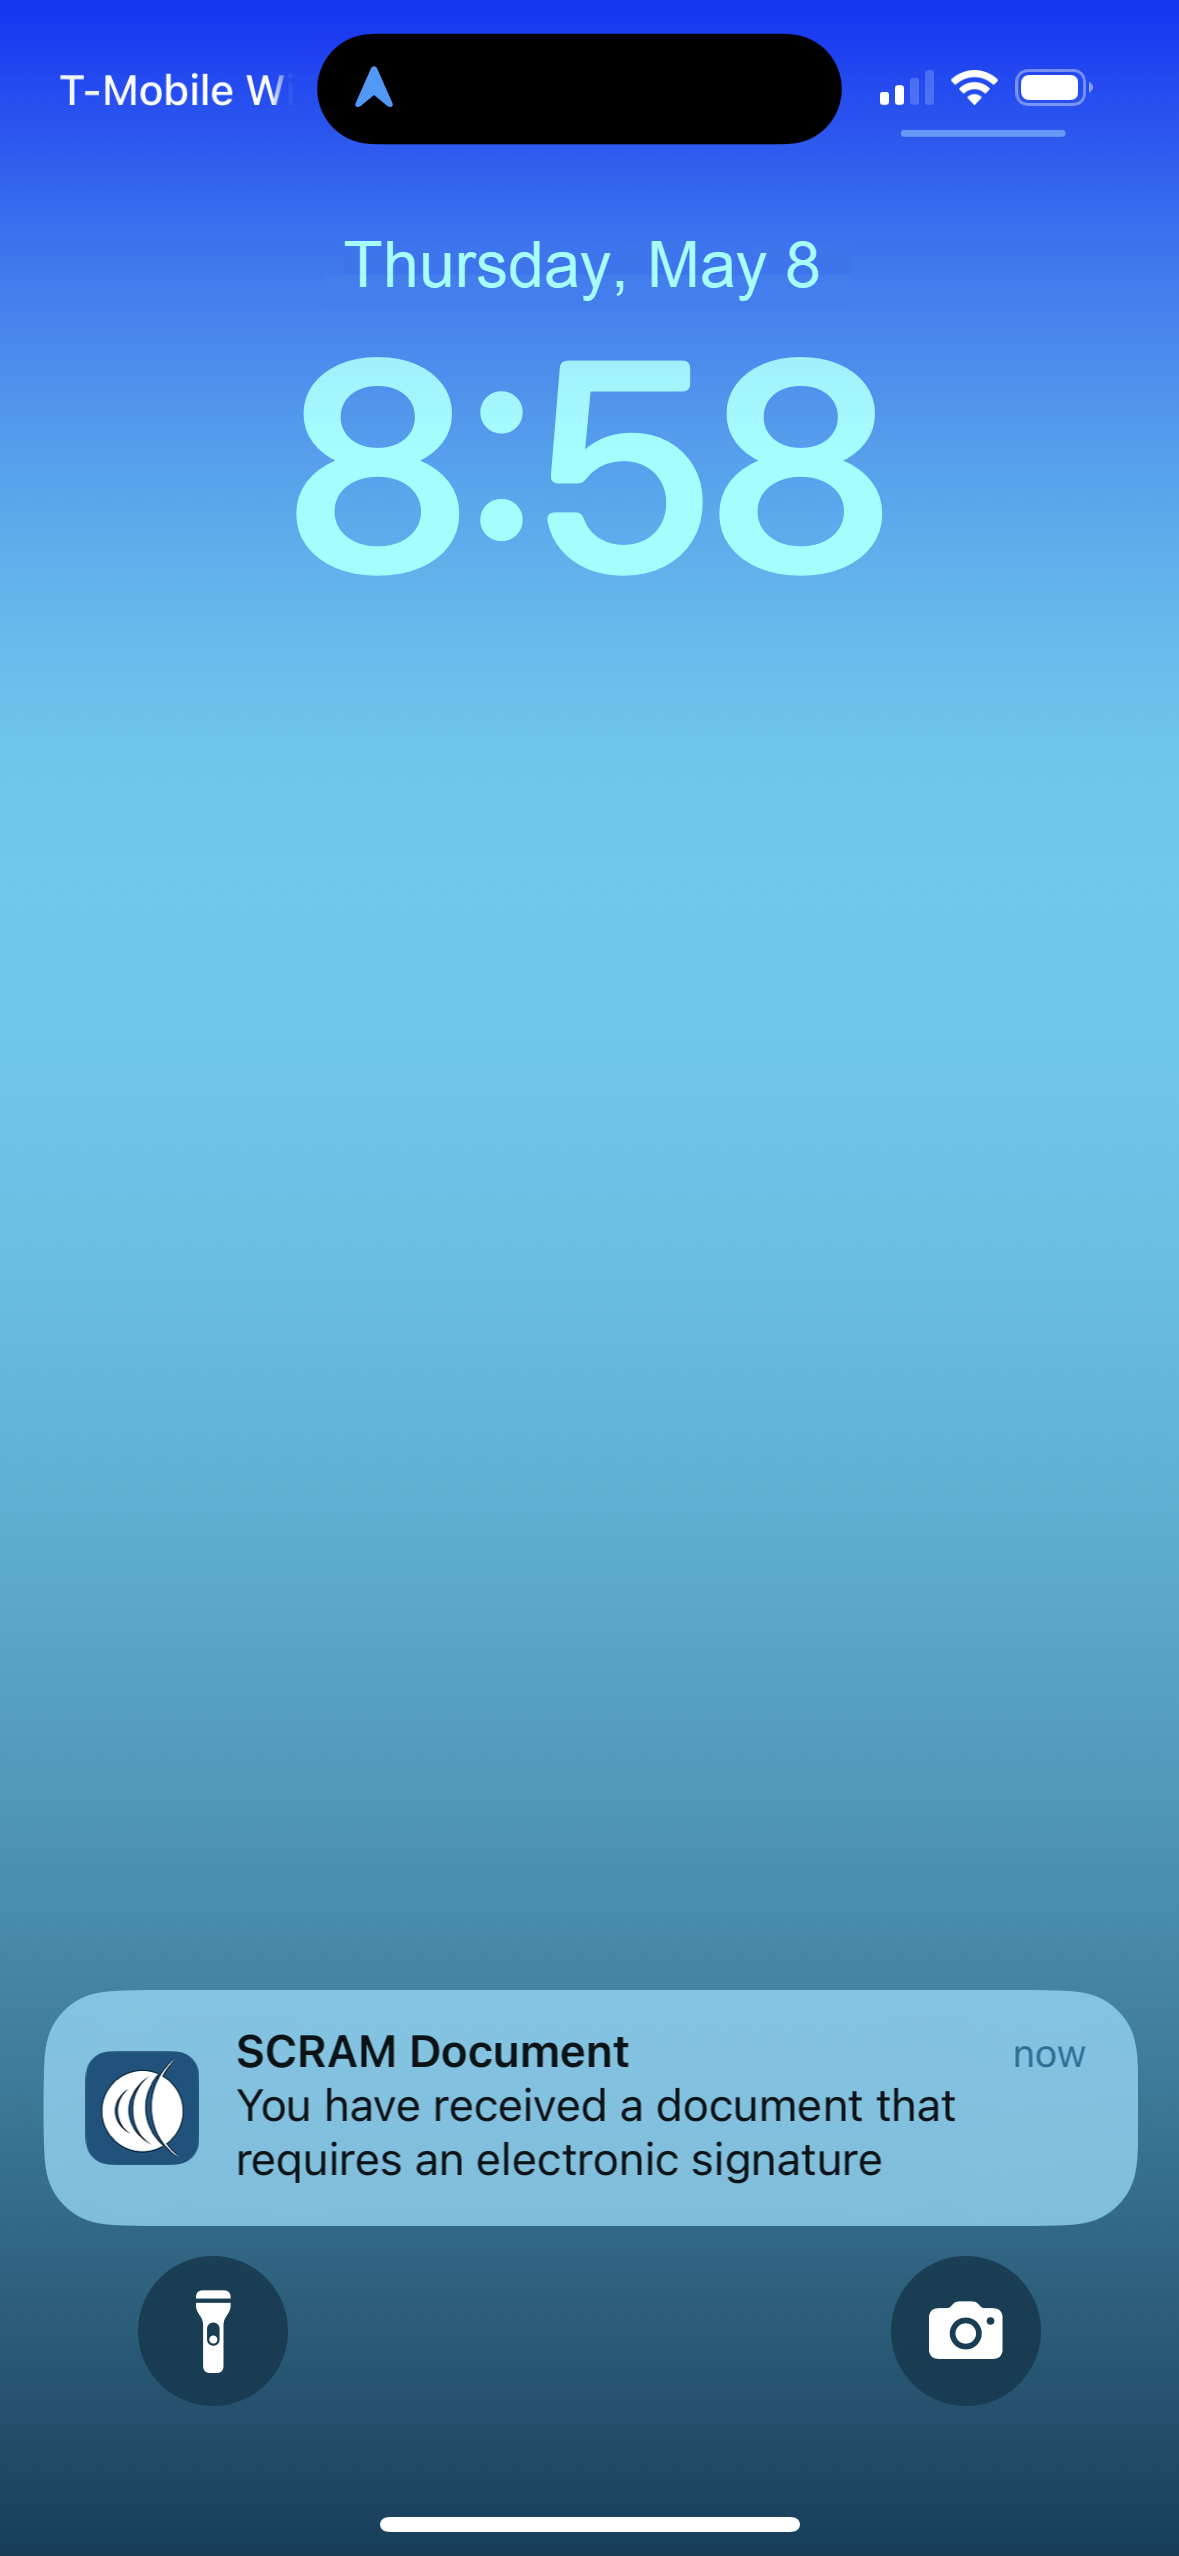
Document is Available Notification
Once viewed by the client, the status will update to Viewed.
Require an eSignature
When you upload a file requiring the client to complete an e-signature and select that option on the Upload File pop-up, the file is automatically shared with the SCRAM TouchPoint app.
Once the client has viewed and e-signed the document, the status will update to Signed.
| You may require a client e-signature for current and past files on the client’s Documents tab when available. Access the Action dropdown menu and select the Require eSignature option. The client will be notified and instructed to follow the instructions to complete the e-signature.
If the Require eSignature option is unavailable, the client will have already completed that task. |
Locate a Deleted File
Once a file has been deleted from the Documents page, you may view it, download it, or restore it from the Trash Bin if necessary. To do this:
- Select the Trash Bin option from the “More” options ellipsis.
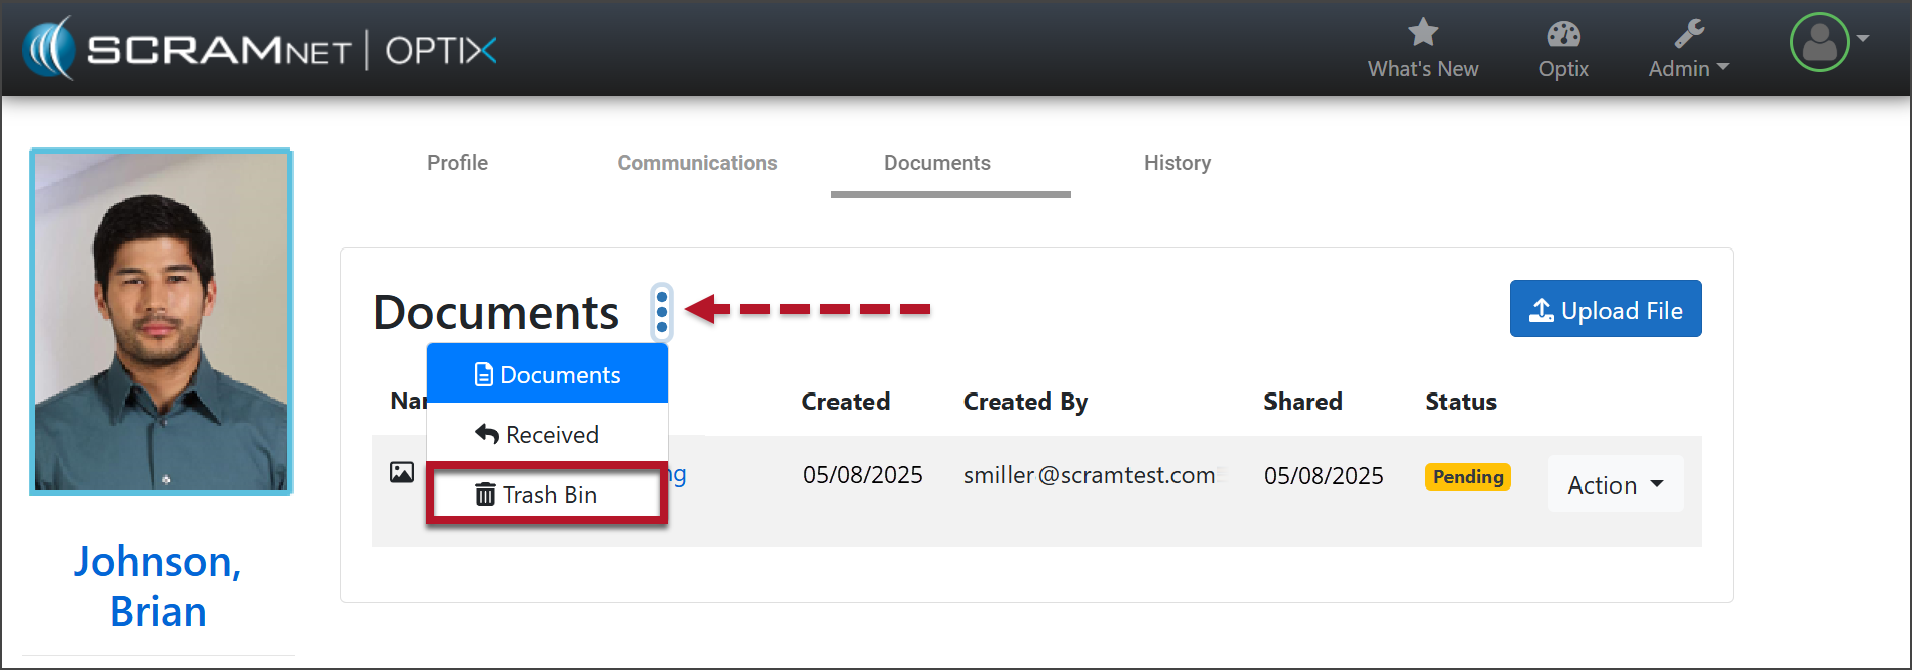
“More” Ellipsis (click to enlarge)
- Open the Action dropdown menu next to the file and select the appropriate action.
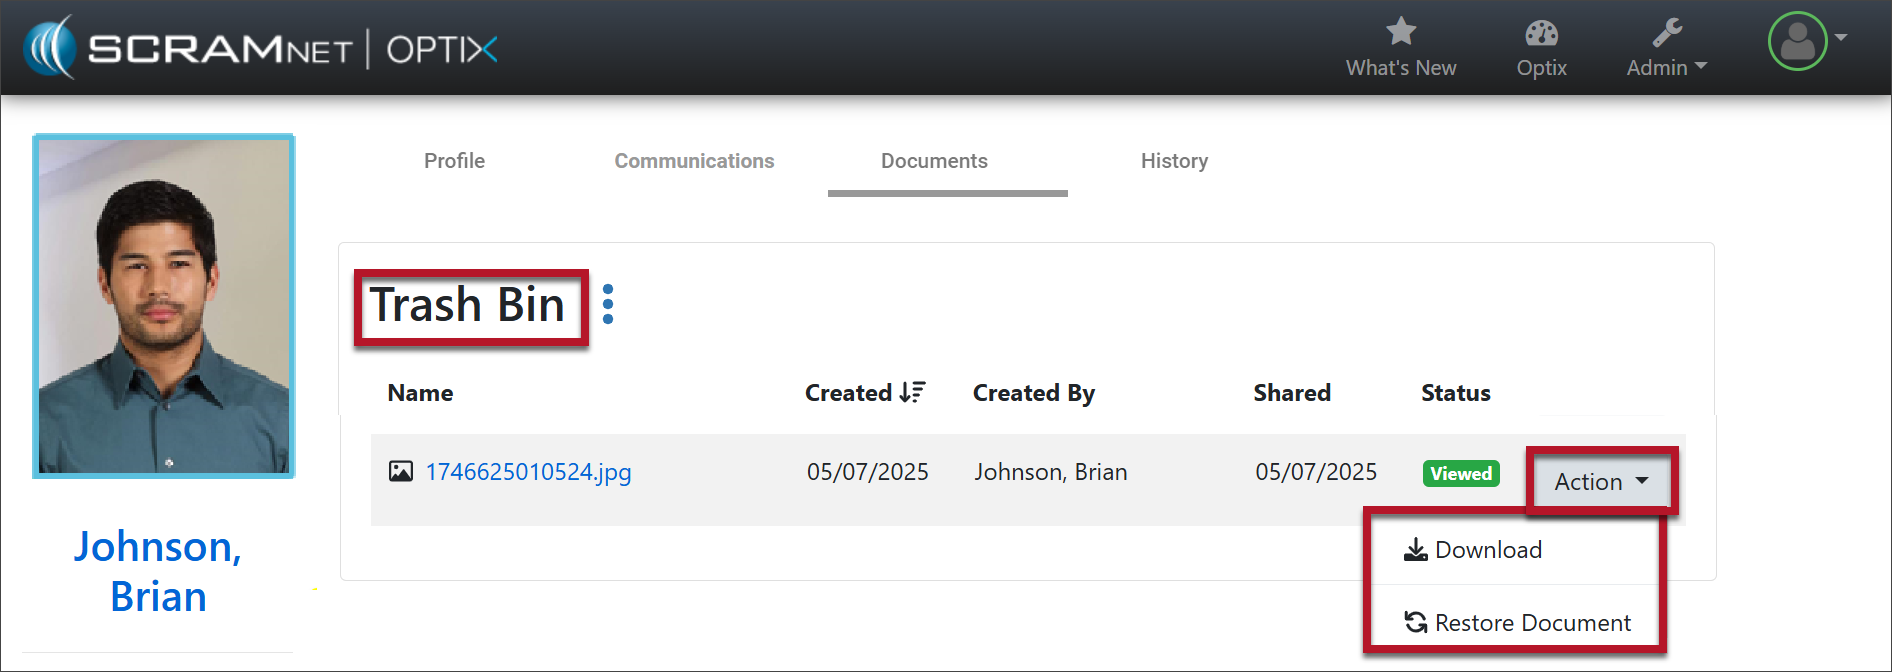
Documents Trash Bin (click to enlarge)
Received File Notification
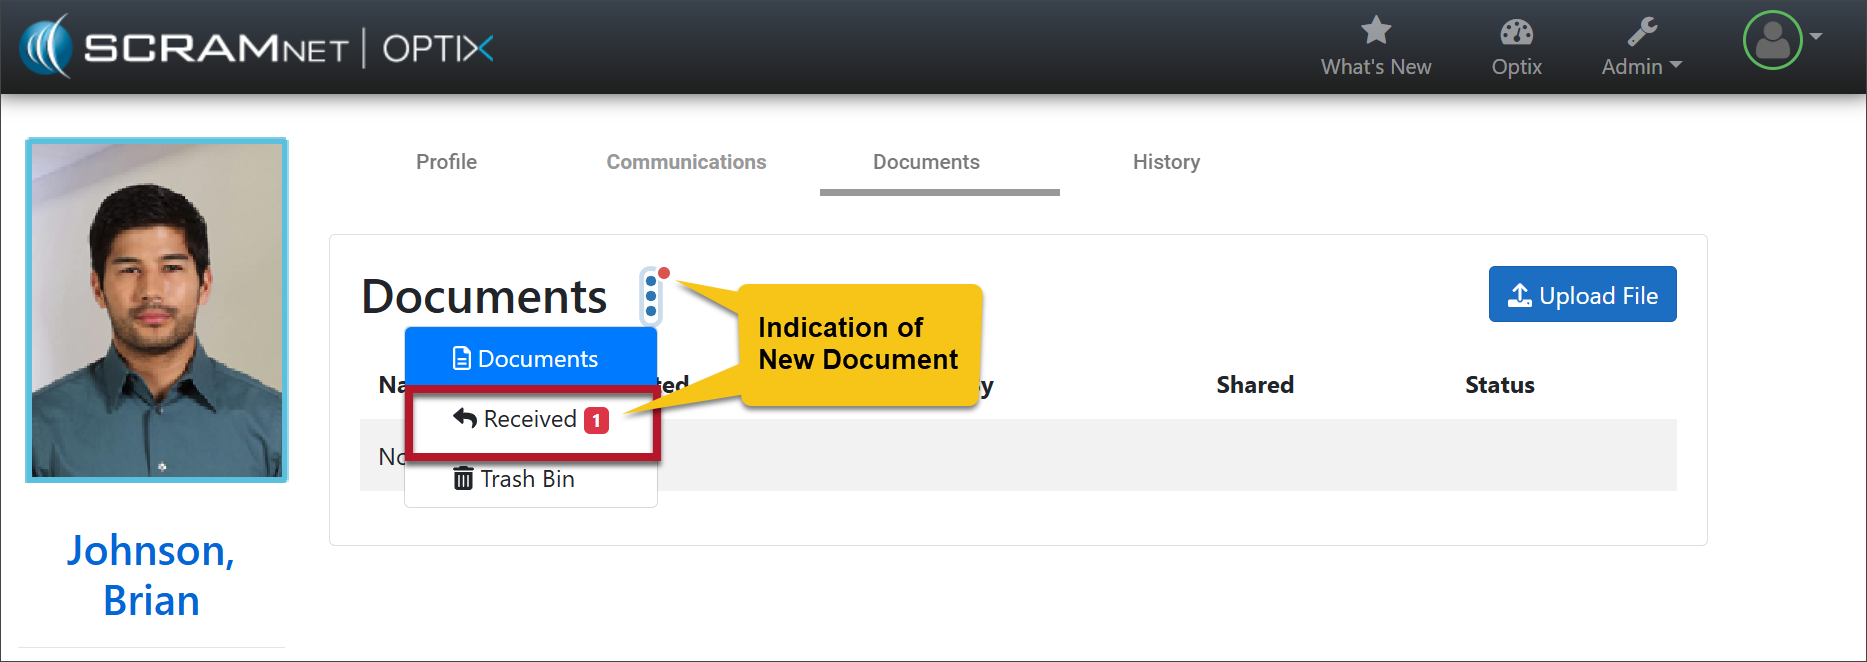
The client may send documents and images directly from their mobile application to their Documents page in SCRAM Optix, thus streamlining the delivery, receiving, and saving of documents to the client’s SCRAM Optix Profile.
When a client uploads and shares a file or document from their SCRAM TouchPoint app, a red alert badge is displayed on the Received button on the Documents page.
To navigate to the Received page:
- Select the “More” menu indicated with the ellipsis.
- Choose Received.
TouchPoint Documents page (click to enlarge)
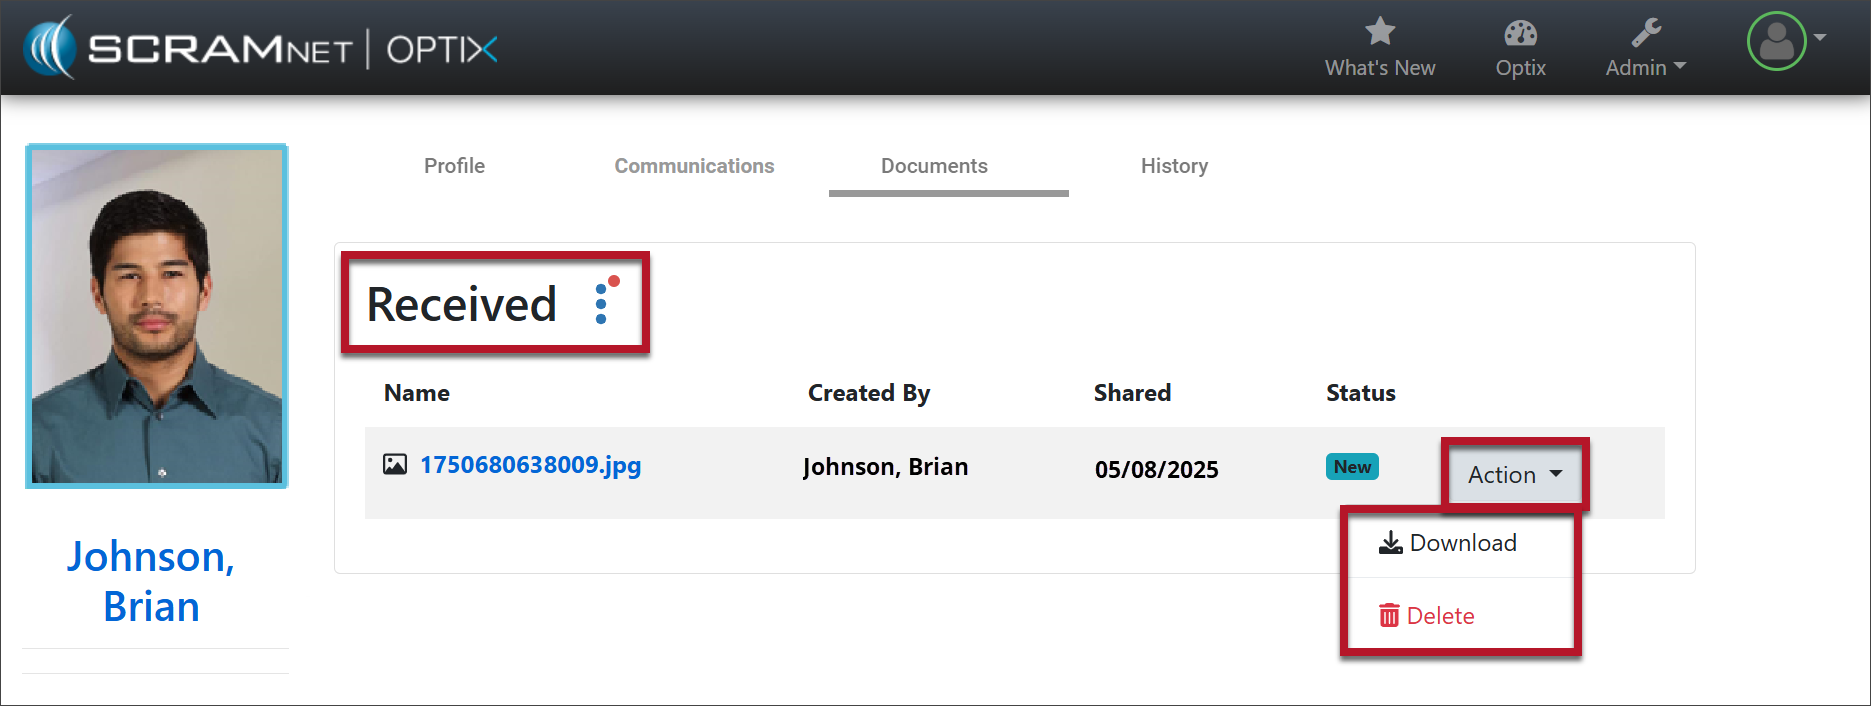
On the Received page, each document image will display:
- The image name.
- New images are displayed in bold type and have a New icon next to them.
- Viewed images are displayed as normal hyperlinked text.
- The Created By information: This will display the client’s name.
- The Shared date: This column represents the date the client shared the image of the document from the TouchPoint app.
- Action button: The Action menu options include:
- Download: Download the image directly to your computer.
- Delete: This action will move the document from the Received list to the Trash Bin. Deleting a shared document or image from the system, does not delete the document or image from the client’s documents tile in the TouchPoint app.
TouchPoint Received page (click to enlarge)
| Select the file name hyperlink to open the Document Preview pop-up window, which will update the file’s status from New to Viewed. | |
| For step-by-step client instructions, visit the TouchPoint Client Instructions Help article, or direct the client to the Using SCRAM TouchPoint article on www.scramsystems.com. |