Software

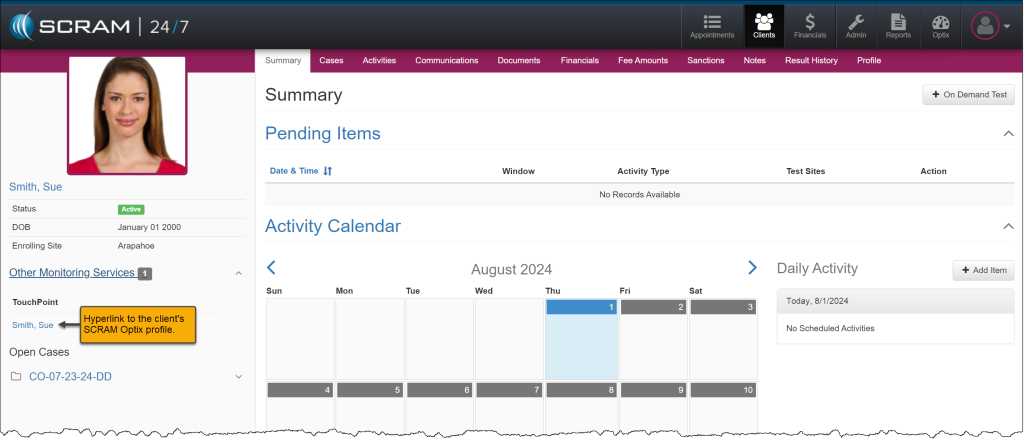
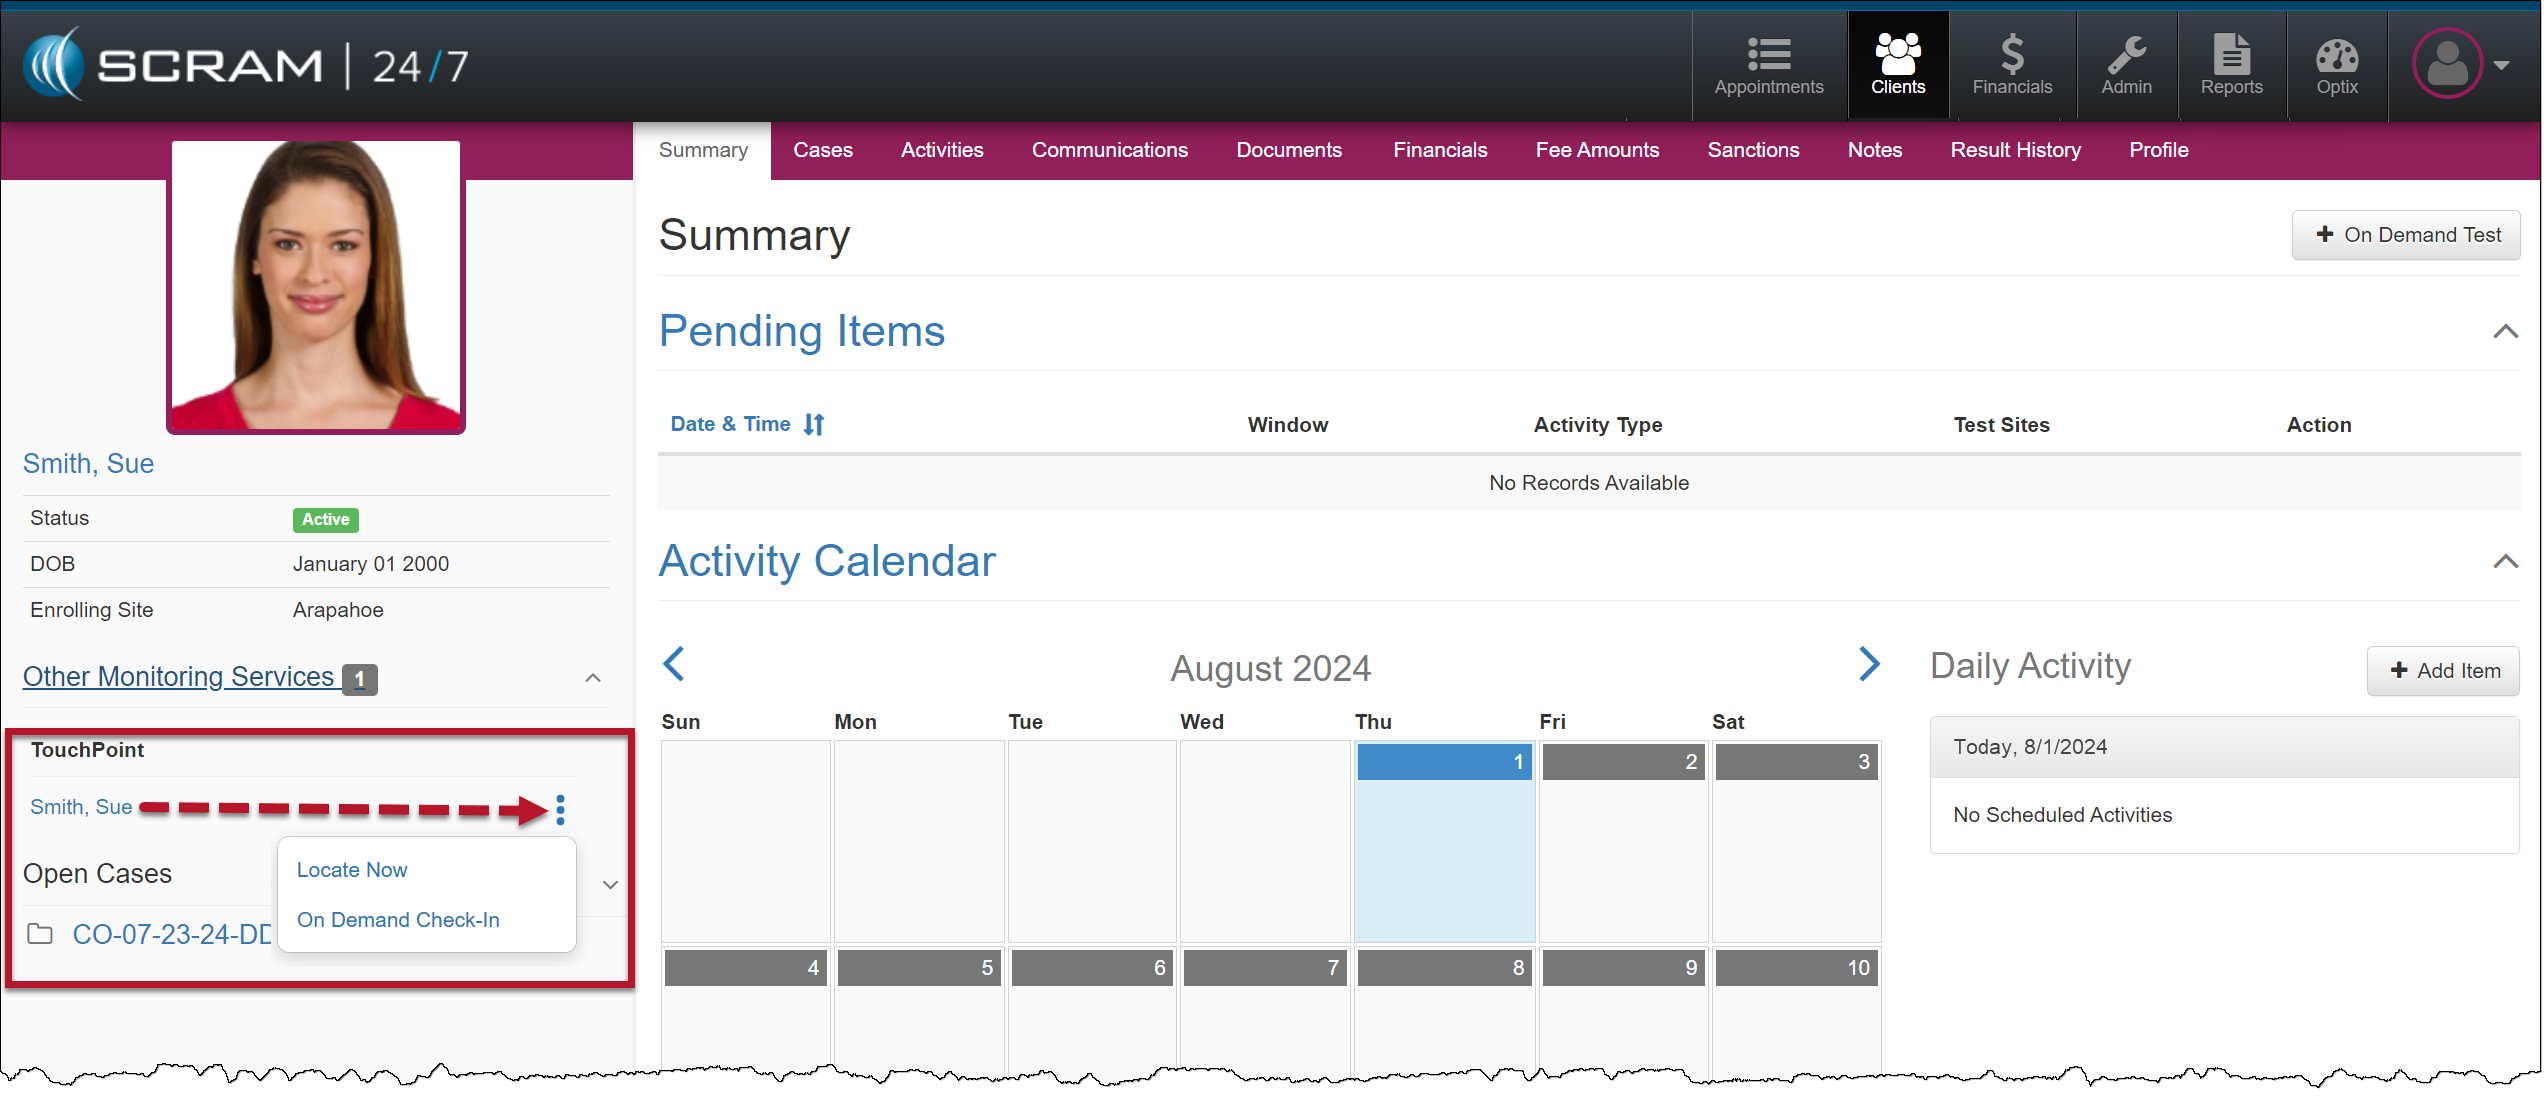
On December 17,th, 2025, SCRAM Systems will release a new Notifications “bell” button in SCRAM 24/7. This Notification dropdown window displays new messages sent from your clients who have a TouchPoint Activity with Messaging enabled. With this feature, you may view, clear, mark messages as read, or respond to your clients’ messages from within SCRAM 24/7. All actions completed within the Notifications dropdown window are reflected on the client’s Communication tab and within their SCRAM Optix TouchPoint profile.

Notifications in SCRAM 24/7

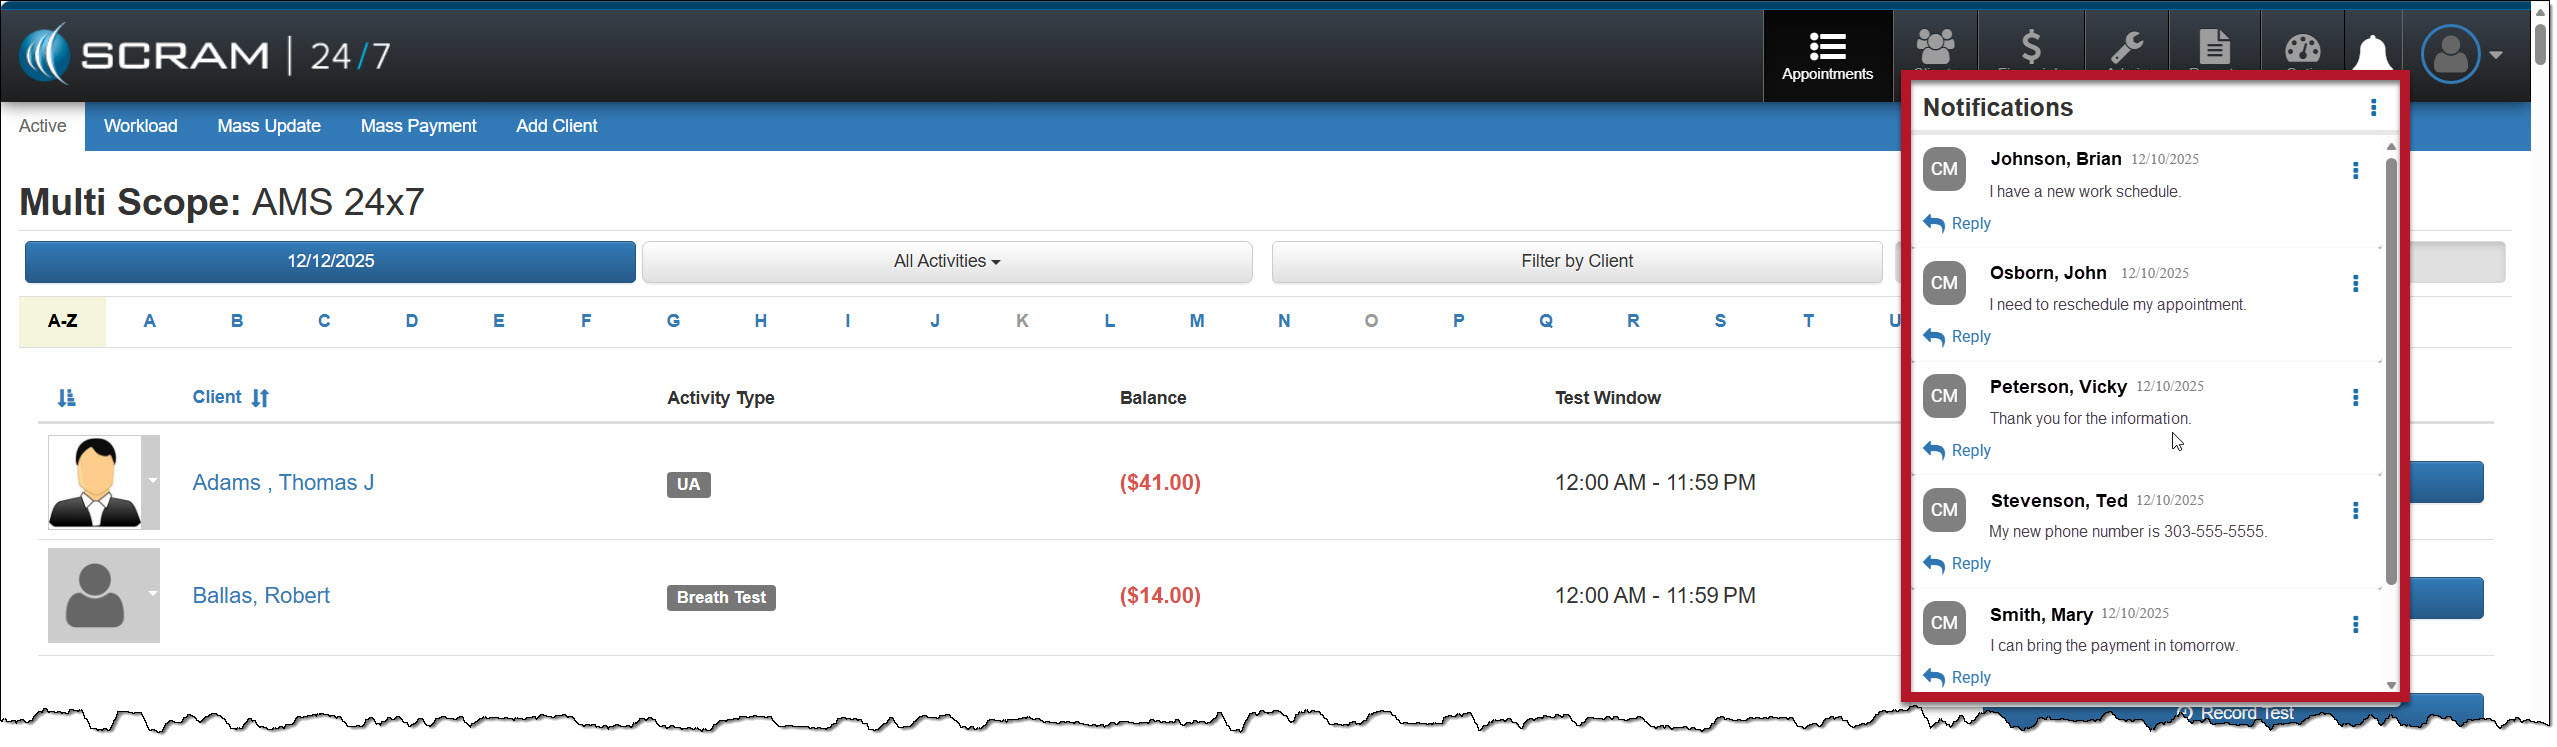
When your client sends a new message via their SCRAM TouchPoint mobile app, the Notifications button in SCRAM 24/7 will display a red badge. To view the message, select the button.

Notifications “Bell” Button – click to enlarge

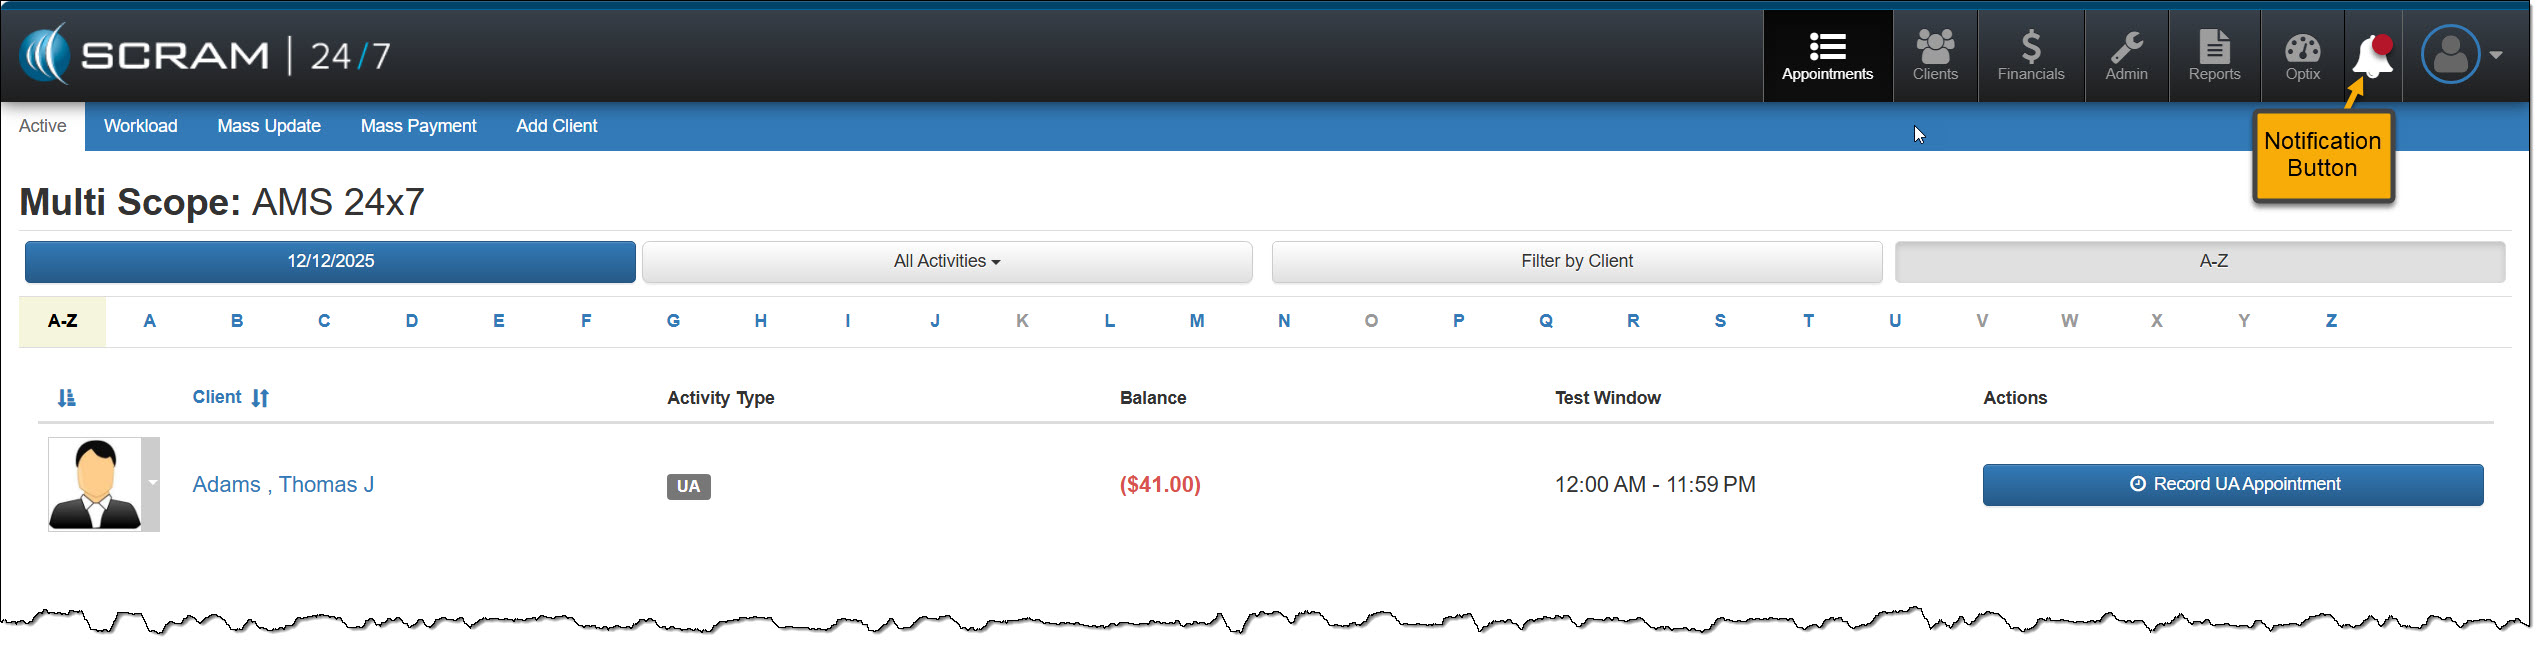
On the Notifications dropdown window, the client’s name, date, and message are displayed.

Notifications Dropdown Window – click to enlarge

Managing the Notifications Window

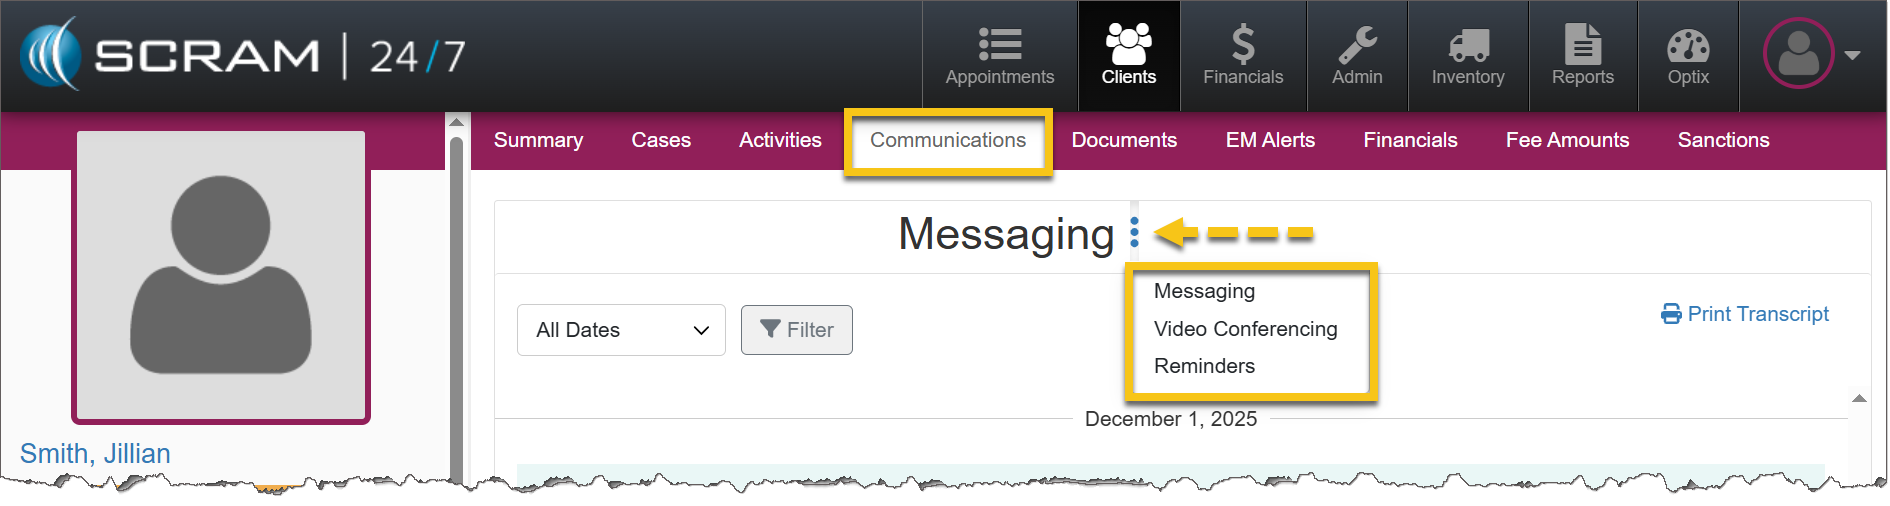
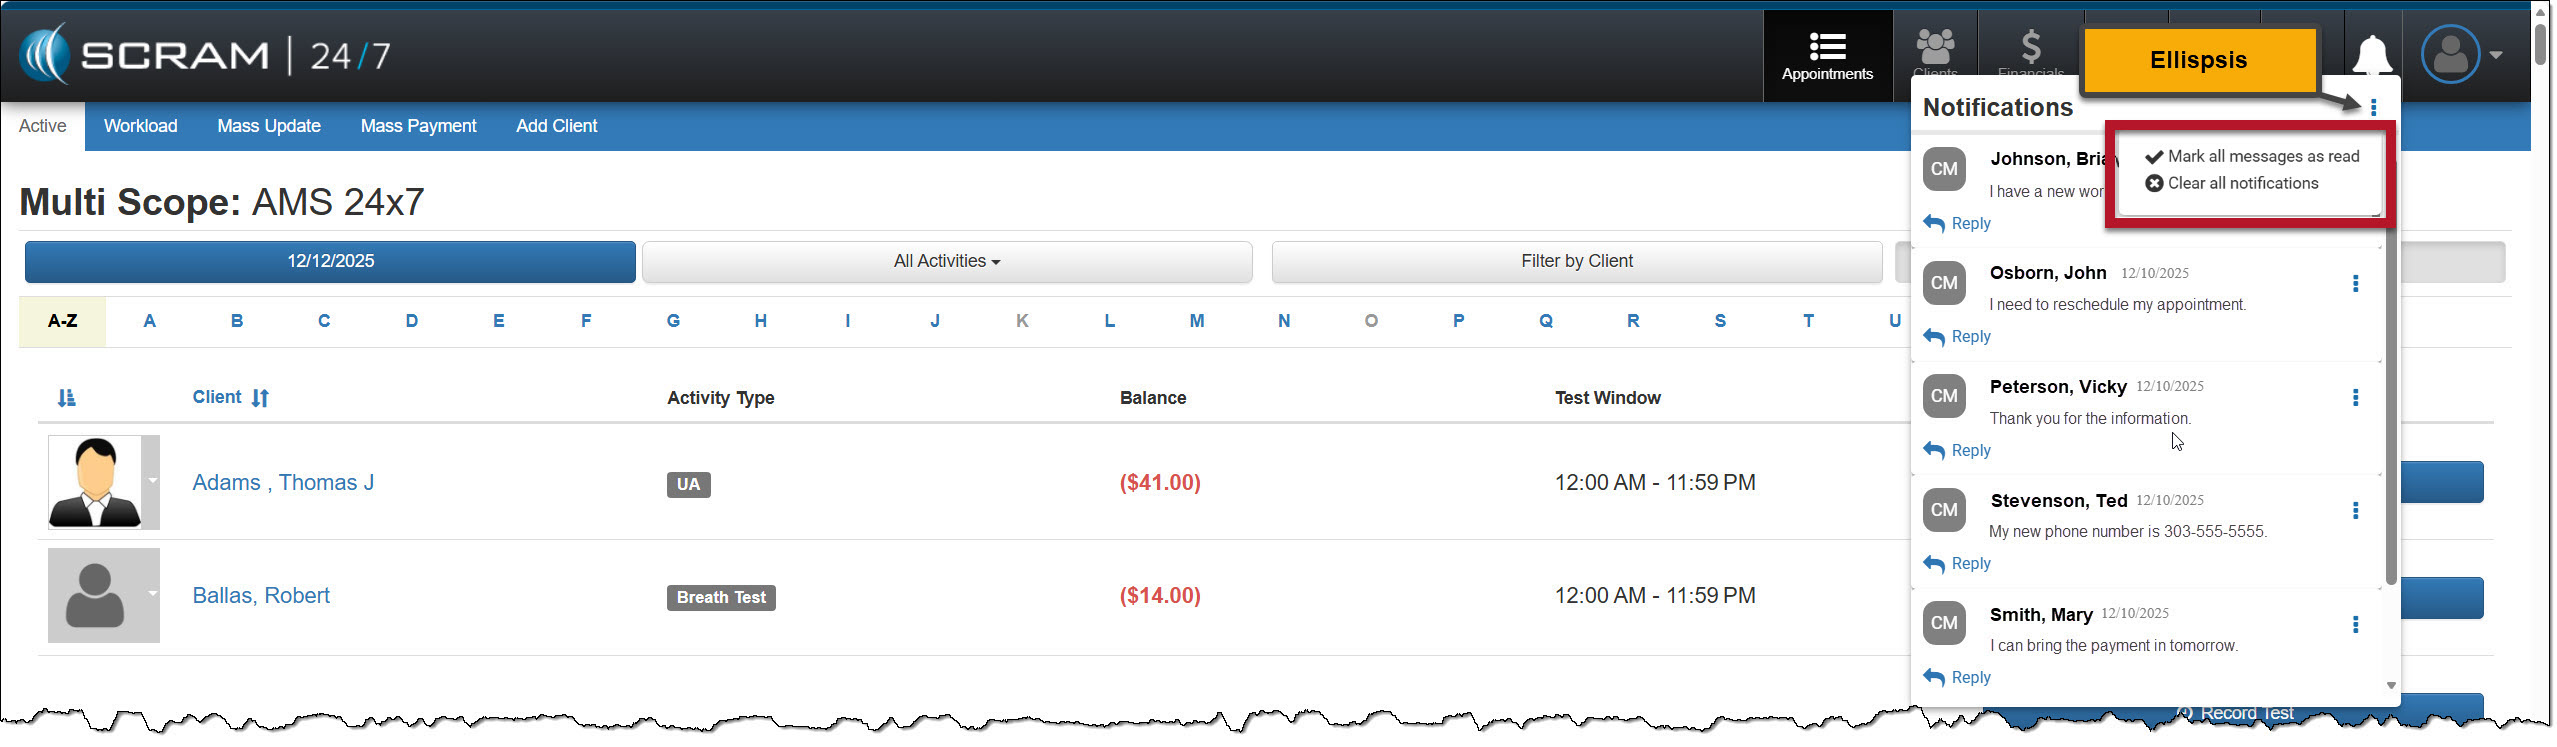
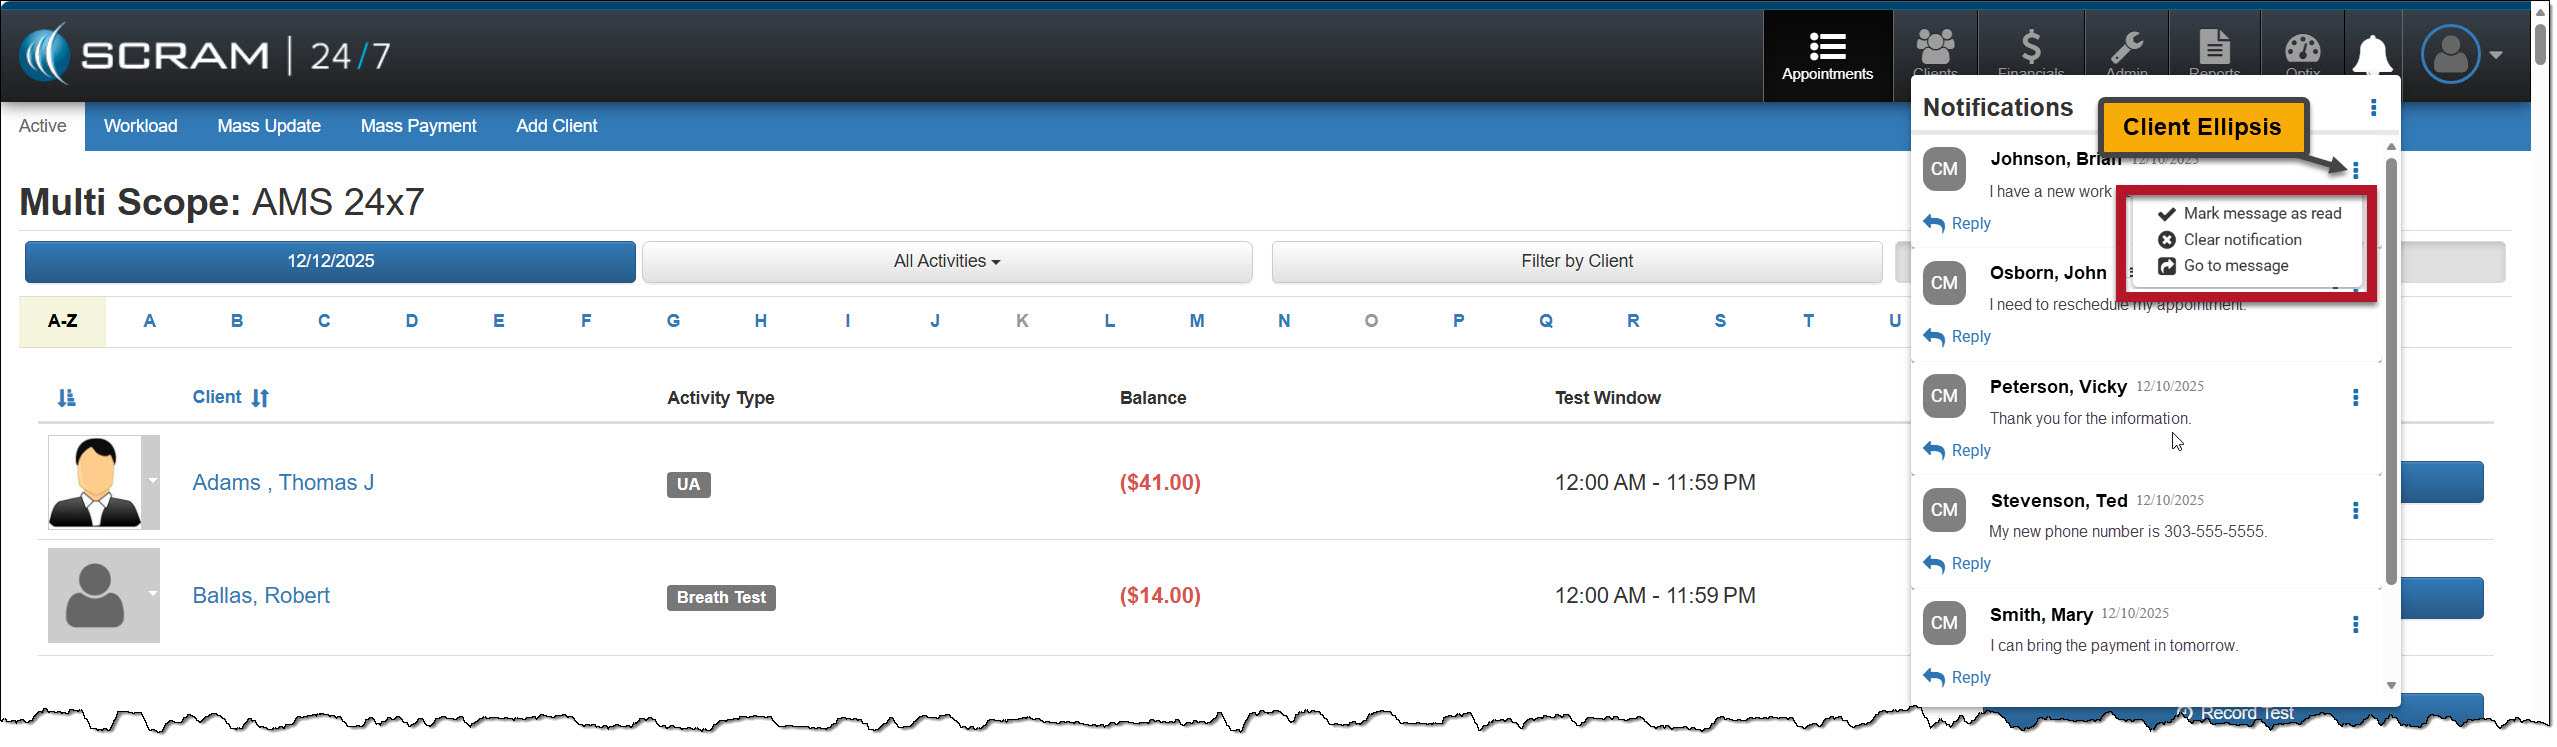
Selecting the ellipsis next to the Notifications heading at the top of the dropdown window, or next to the client’s name, will display a menu with following options:  

  • Mark all messages as read, or mark a message as read: When selected, the message will be removed from the Notifications window. On the client’s Communication Messaging page in SCRAM 24/7 and their Optix TouchPoint Messaging page, the message will display as Read for the client.
  • Clear all Notifications or Clear Notification: When selected, this option clears all messages from the Notifications window in SCRAM 24/7. This does not mark the message as Read on the client’s Communication Messaging page in SCRAM 24/7 and their Optix TouchPoint Messaging page; it simply clears the message from the Notifications window.
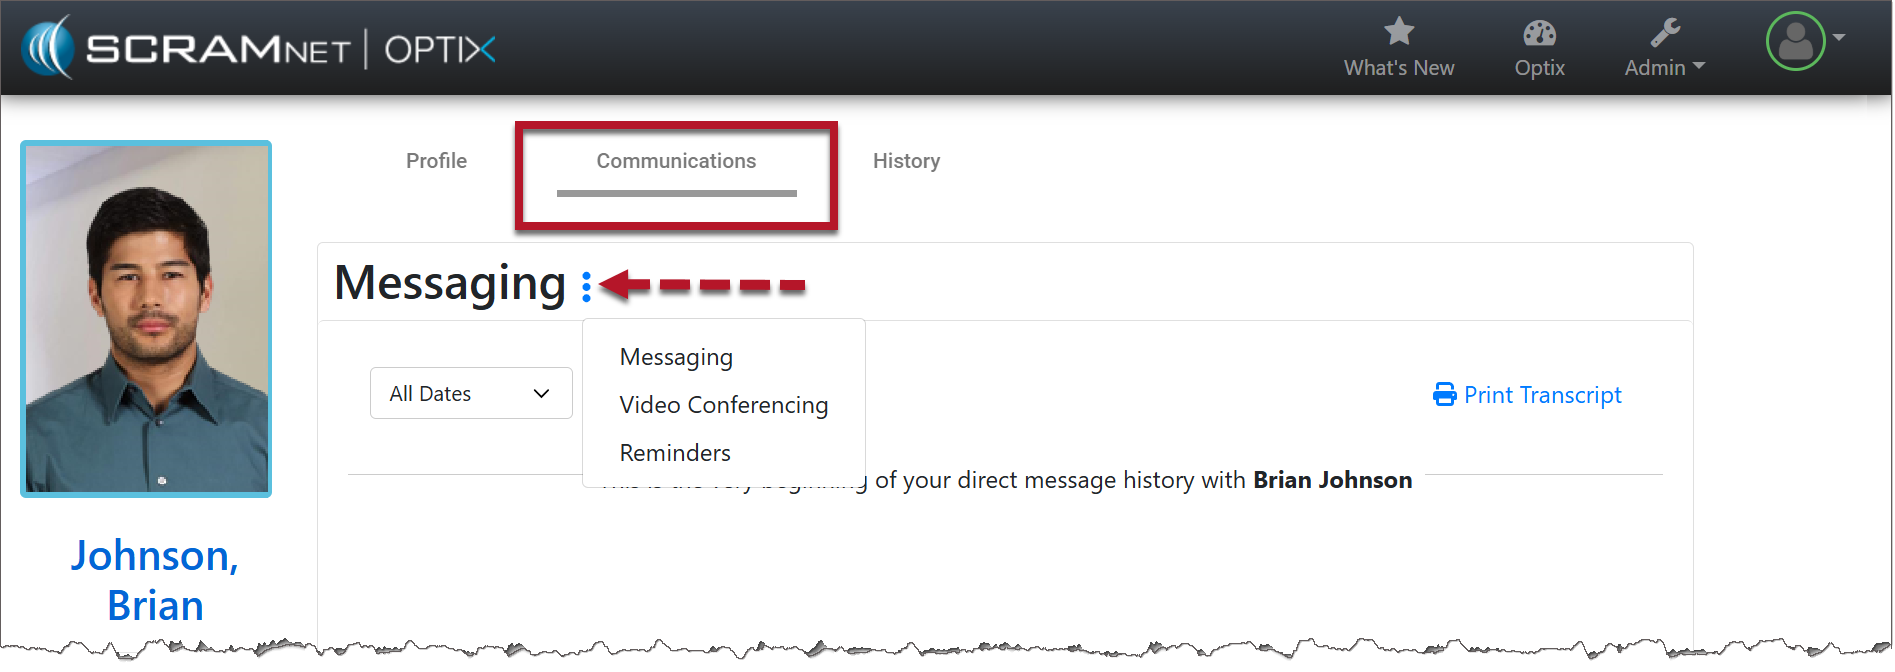
  • Go to Message: This option will open a new tab that displays the client’s Optix TouchPoint Messaging page. This action will clear the message from the Notifications window.

Option One

Mark all messages as read or clear all notifications by selection the ellipsis to the right of the Notifications heading.

Mark all messages as read – click to enlarge

Option Two

Manage each message individually by selecting the ellipsis next to the message.

Manage each message individually – click to enlarge

Reply

Click the Reply hyperlink to respond to the client’s message. After entering a response, select the Send button.

Select the Reply link – click to enlarge
Input your message and then select Send – click to enlarge

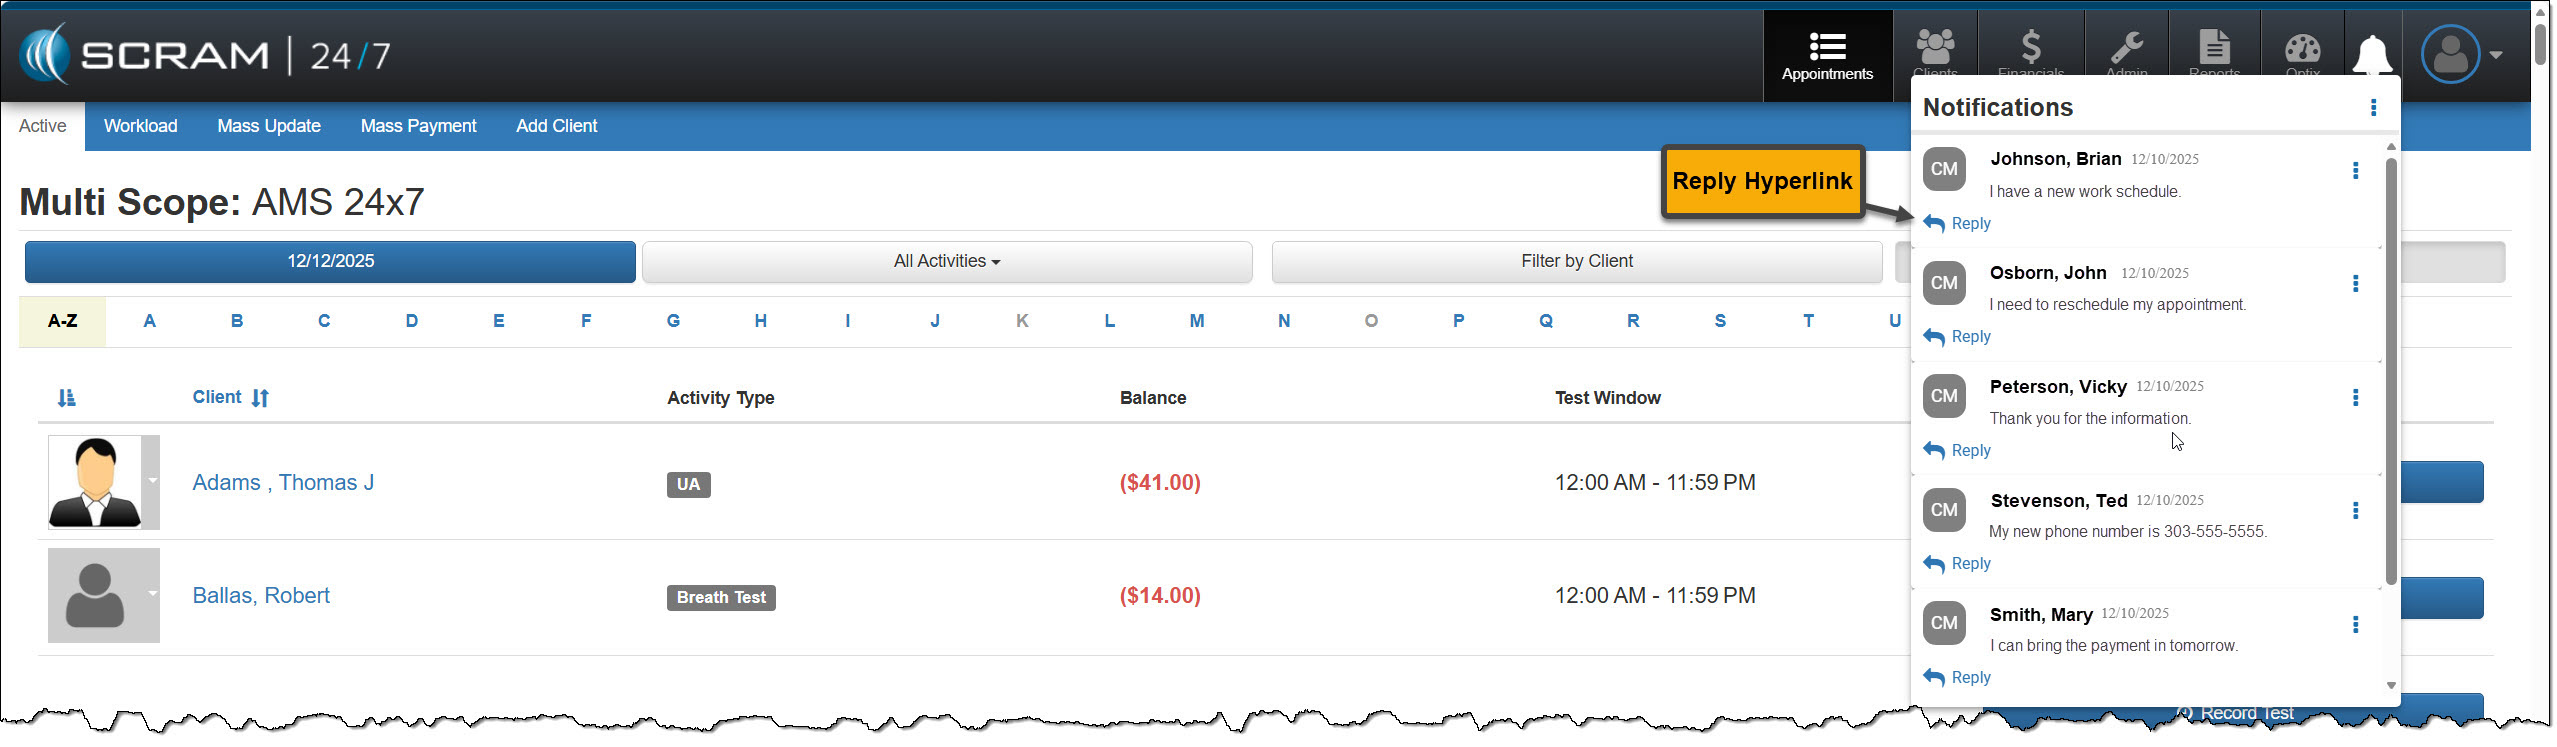
The message will no longer be displayed in the Notifications window.

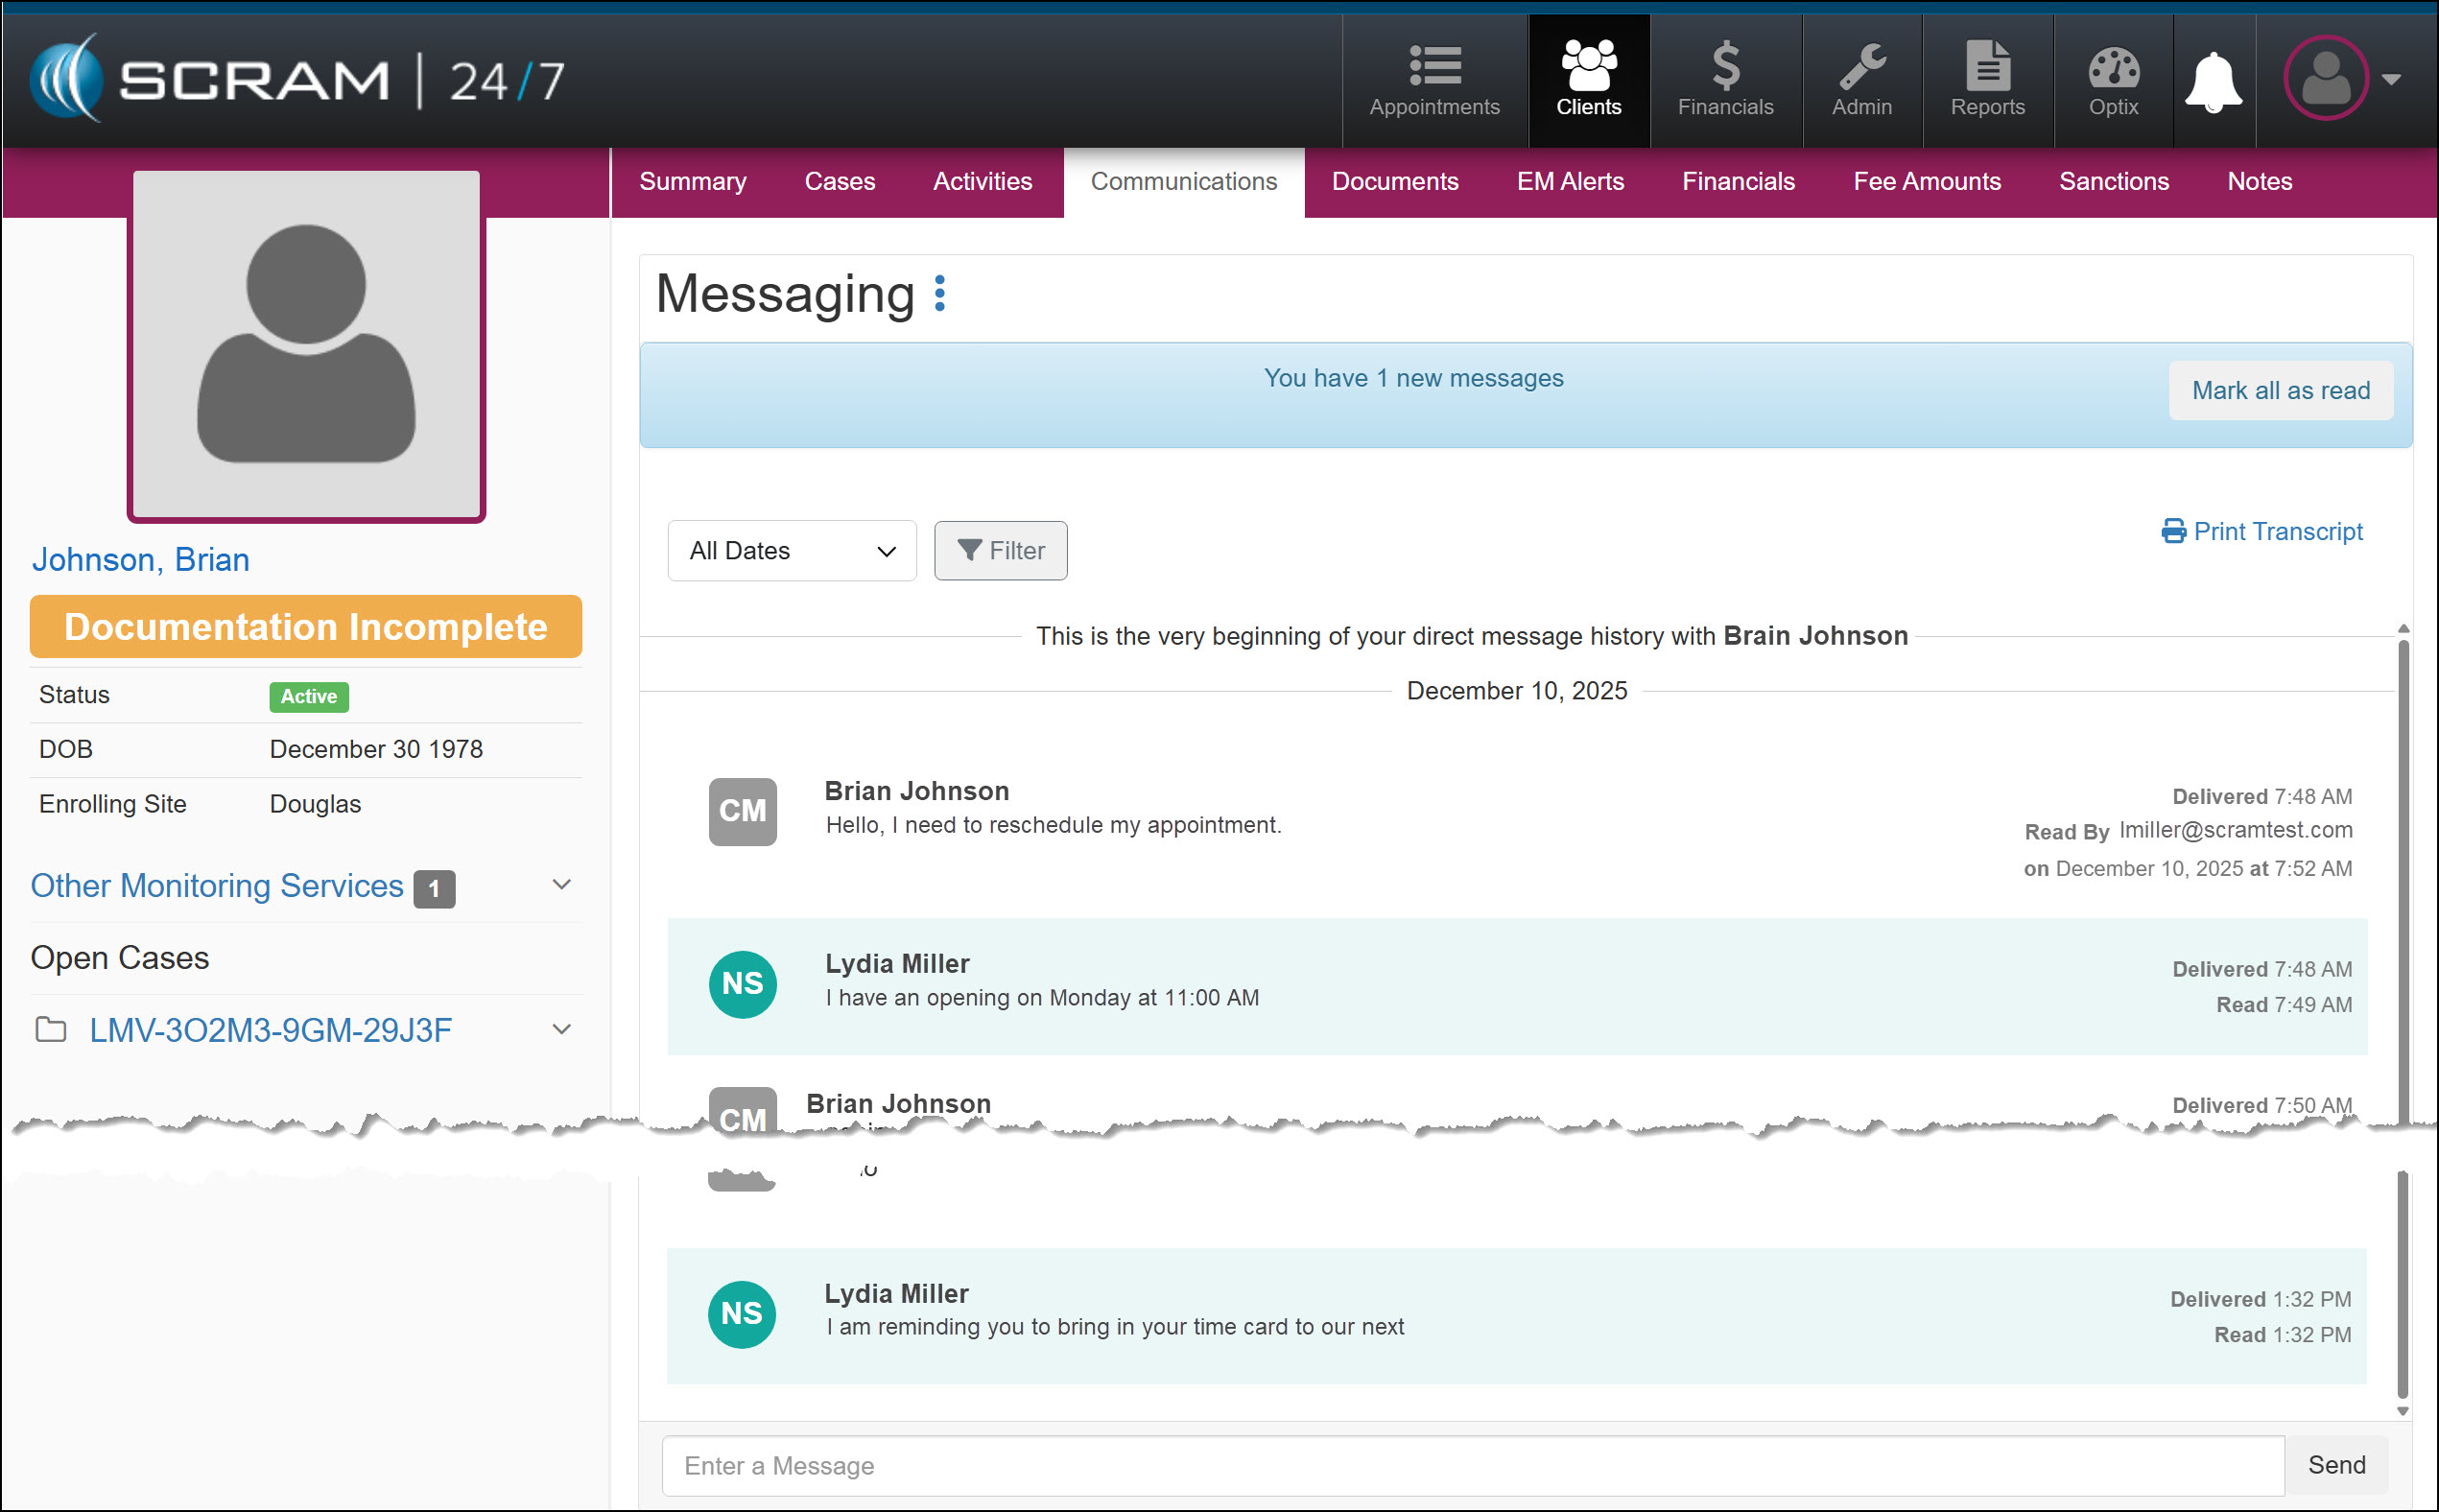
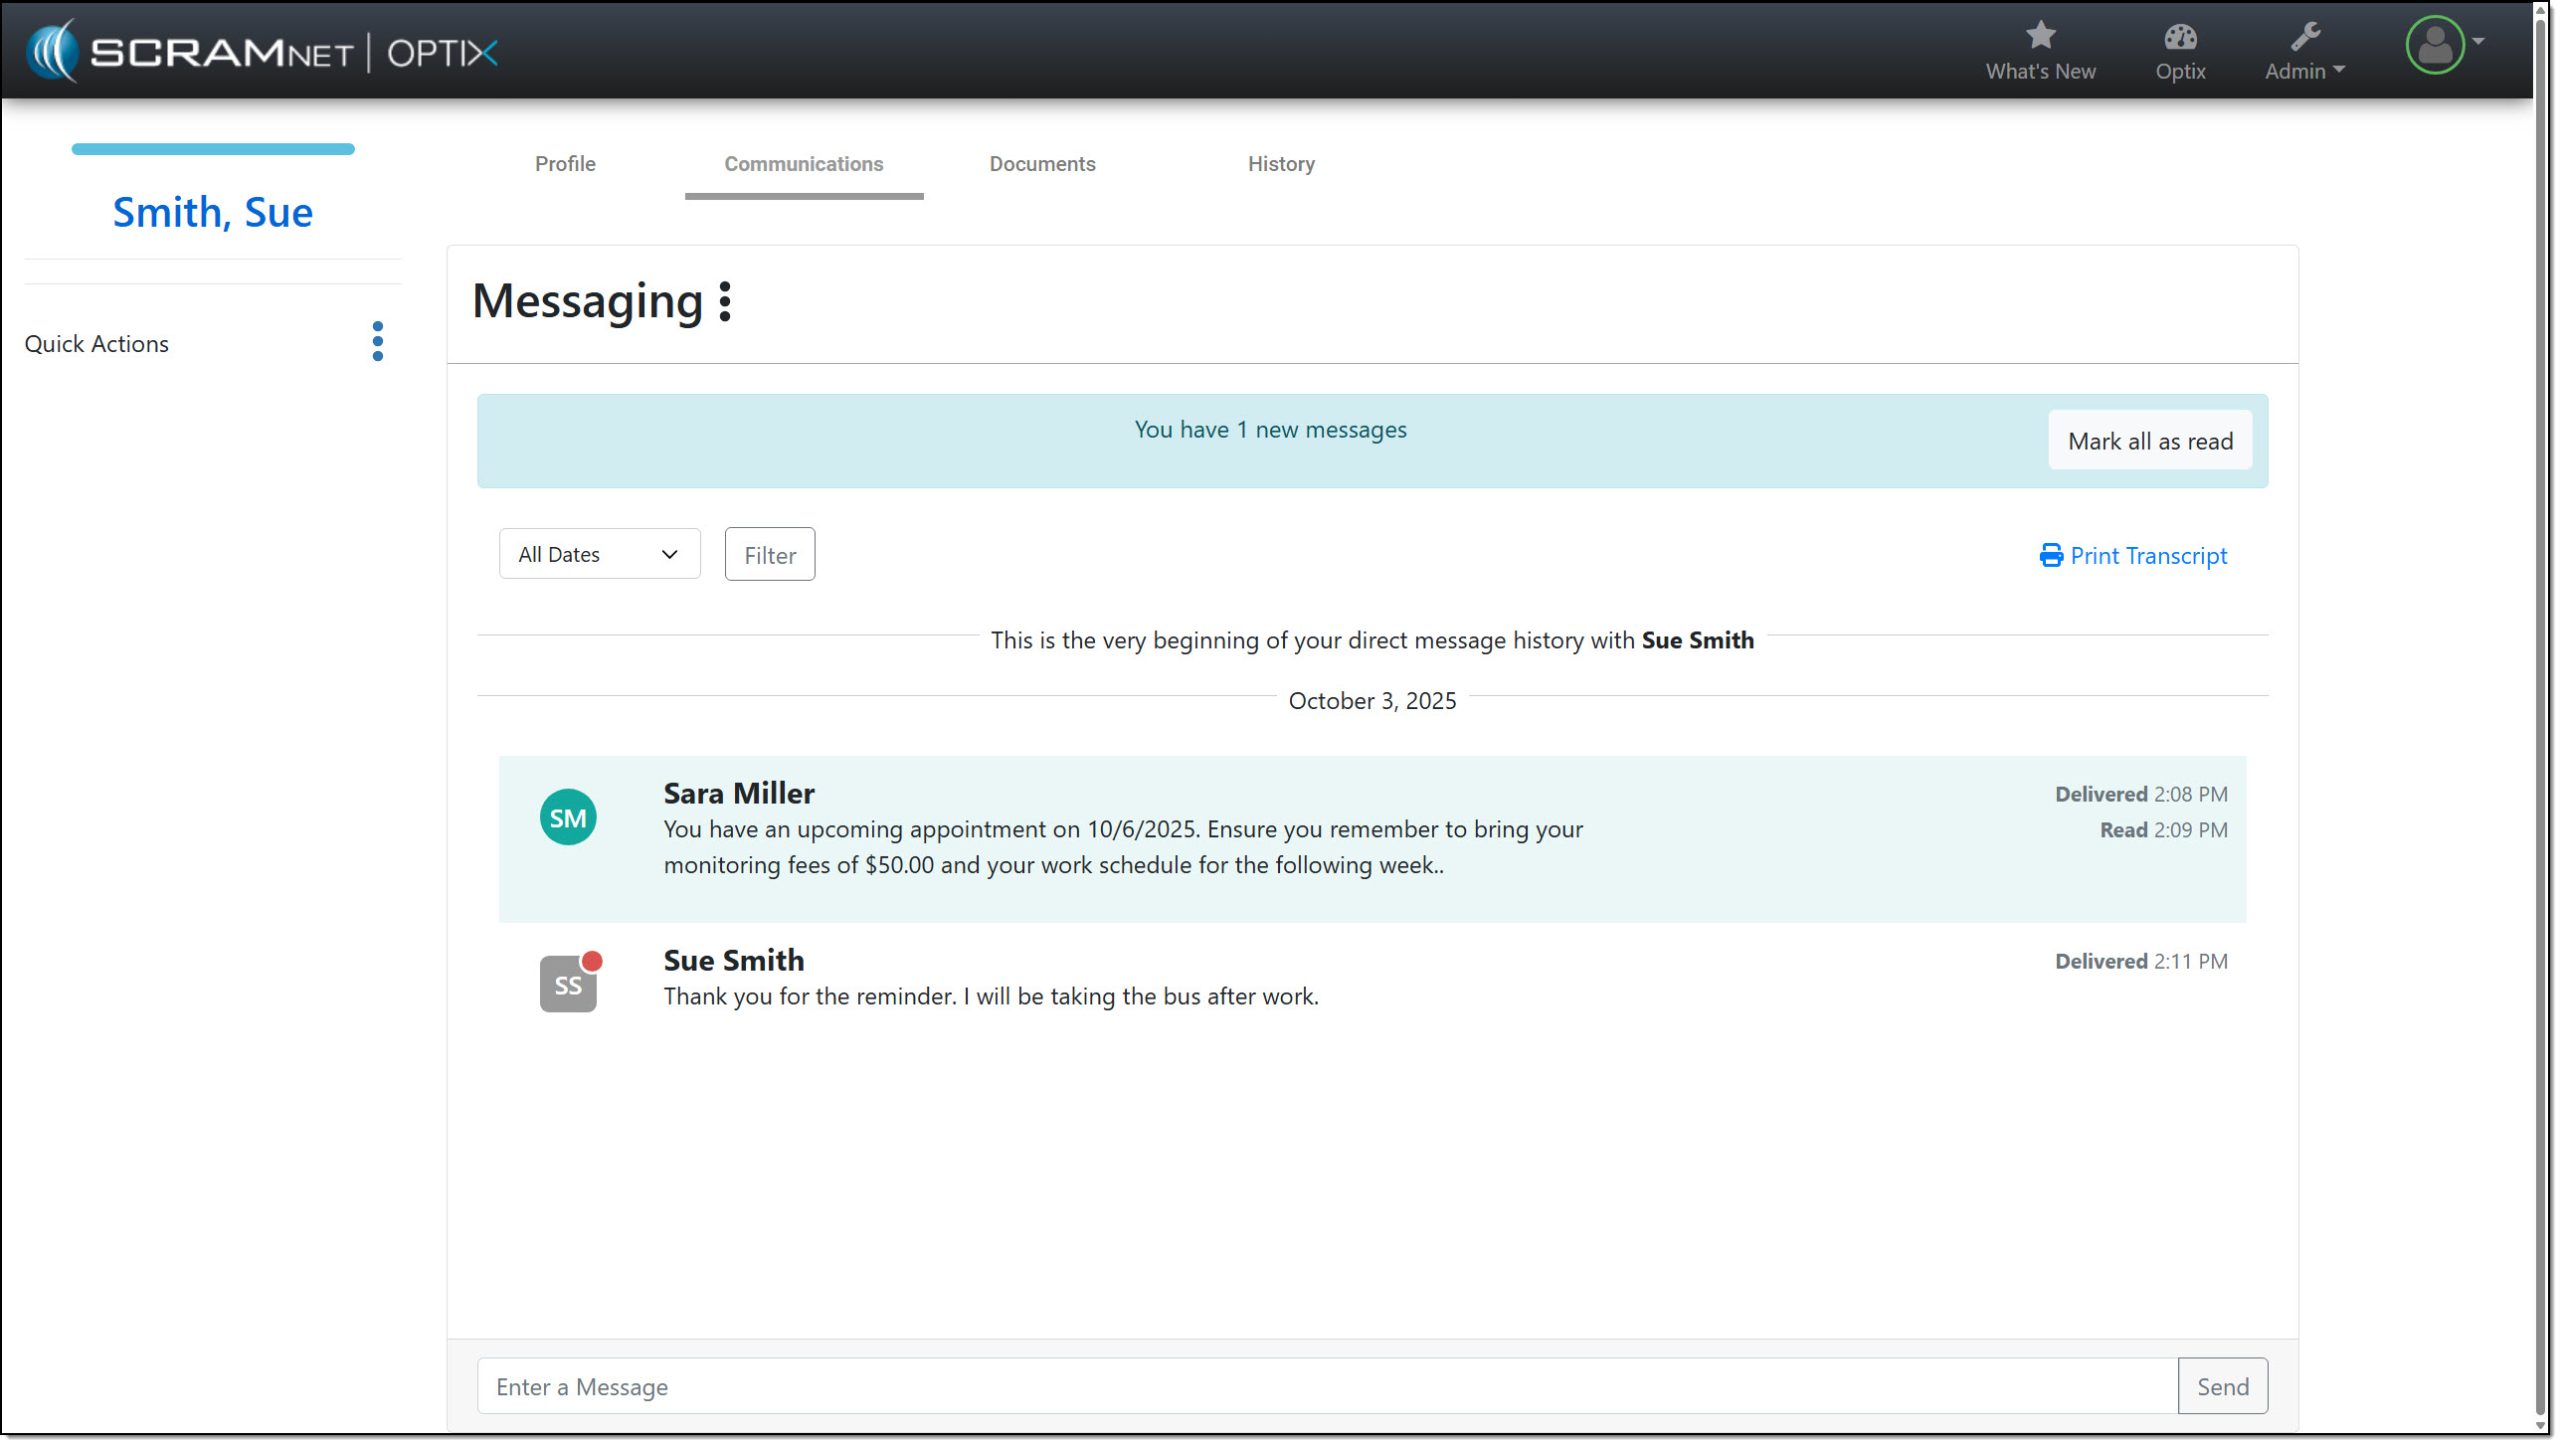
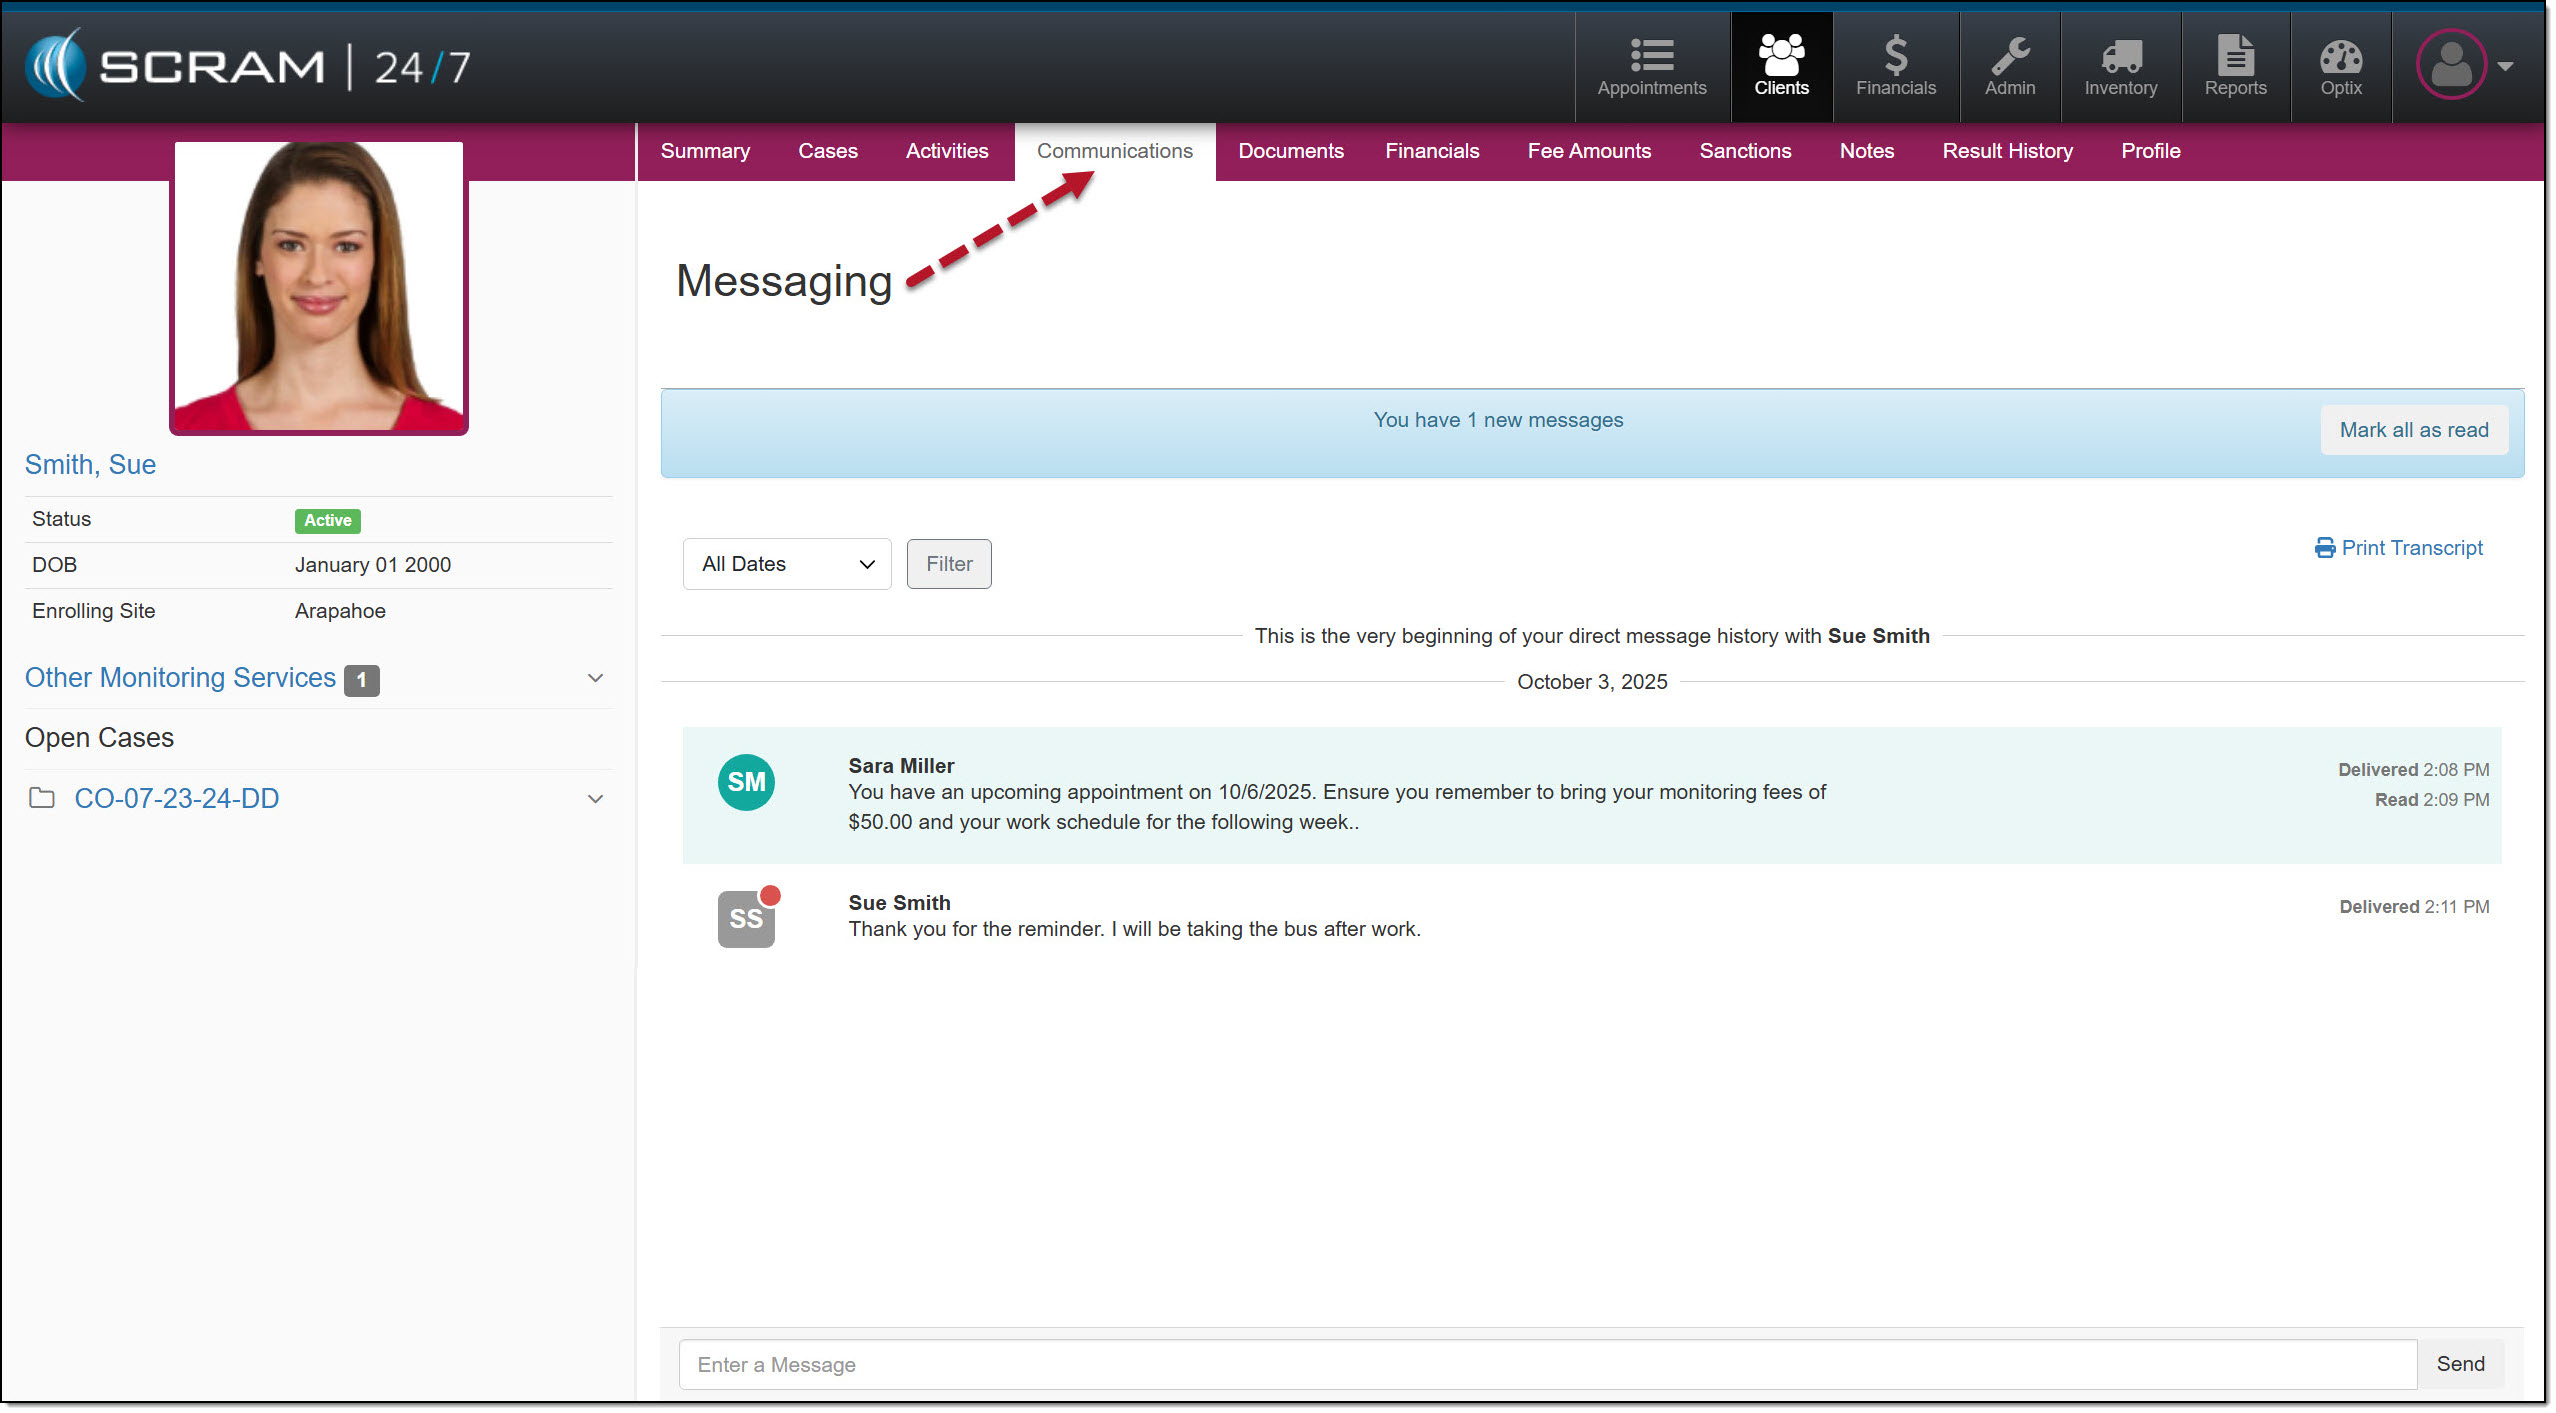
On the client’s Communications / Messaging page, the message will be marked as Read, and the user’s response will be displayed.

The client’s Communications / Messaging page – click to enlarge

Continue Reading

On December 11, 2025, SCRAM Systems will release an enhancement for your SCRAM 24/7 and TouchPoint Monitoring programs. With this update, 24/7 users may view the historical activity for the services connected to TouchPoint Activity communication. TouchPoint users will find Electronic Monitoring Reminders, Messaging, and Video Conferencing in one consolidated place under the Communications tab in Optix.

SCRAM 24/7 Communications Tab

In a previous update, SCRAM Systems enabled 24/7 users to complete all messaging functions within SCRAM 24/7 without navigating to Optix. With a recent update, users are able to view the historical activity associated with services connected to TouchPoint Activity communication.

  1. The Communications tab becomes available once the TouchPoint activity has been added. If TouchPoint has never been added, this tab will not appear.
  2. After the TouchPoint activity has been added – whether it remains active or has been disabled – the Communications tab will continue to display historical activity for Messaging, Video Conferencing, and Reminders.
  3. Service availablility determines whether users may interact with each option in the dropdown menu. For example, if Messaging is not enabled, users may view historical messages, but may not send new messages.
Information If Video Conferencing has not been enabled for the account, that option will not display.
Communications Tab in SCRAM 24/7 (click to enlarge)
Information Would you like to learn more about the benefits of the SCRAM TouchPoint Mobile application? Contact your Account Manager for details on getting started.

Optix Communications Tab

With this enhancement, users will find a consolidated view of communication and monitoring information under the Communications tab. This tab will contain:

  • Electronic Monitoring Reminders
  • Messaging
  • Video Conferencing

Enable the Service(s)

The Communications tab is available once any of the services is enabled.

Client Profile Page in Optix (click to enlarge)

Communications Tab

  1. Select the Communications tab.
  2. Open the More (ellipsis) menu next to Messaging.
  3. Select the desired service.
    • If the services are later disabled, users may still view the historical activity associated with those features. However, they will no longer be able to interact with the service or perform any new actions.
Information If Video Conferencing has not been enabled for the account, that option will not display.
Communications Tab in Optix (click to enlarge)
Information Your account must be enabled for video conferencing for these instructions to work. Contact your SCRAM Systems Account Representative if you are interested in activating this service.

Continue Reading

At 5:00 AM MST on Tuesday, November 4, 2025, SCRAM Systems will release an enhancement that will give you more duration options for suspending client alerts.

Information During the 15-minute deployment, you may not be able to access SCRAMNET GPS, but messages from the SCRAM GPS device will continue to be processed uninterrupted.

New, Longer Suspension Durations

Three, four, and five-hour durations have been added to the “Suspend for” dropdown menu. These expanded durations may be useful in situations where your client is scheduled to be in a location for a relatively long time that is normally “off limits,” or is an impaired communications environment.

3 hrs, 4 hrs, and 5 hrs are now available alert suspension durations (click to enlarge)

Please visit the Suspend Event Notification article in SCRAM GPS Help for detailed instructions on how to use this feature.

Continue Reading

On October 15th, 2025, SCRAM Systems will release multiple enhancements for your SCRAM 24/7 Monitoring program.

These enhancements are:

  1. New “Appointments” button replaces the “Testing” button.
  2. A Documents page for your client caseloads.
  3. A Communications page within SCRAM 24/7 for clients utilizing the Messaging feature with their TouchPoint Activity.
  4. Touchpoint Activity “Quick Actions” dropdown menu.

Appointments

With this release, the current main navigation button of “Testing” will be updated to “Appointments” to more accurately represent the activities that may be required for clients during their monitoring program.

Appointments Main Navigation Option – click to enlarge

Documents

Currently, during your client’s monitoring program, you may associate and save documents relating to a specific case on the Cases tab. Depending on the client, there may be occasions when the client has multiple cases and documents. This enhancement will add a dedicated Documents tab for each client in SCRAM 24/7, providing centralized management of client documents.

Documents Tab with saved document – click to enlarge

Once the Documents enhancement is released, all current documents saved on the Cases tab will automatically be relocated to the client’s Documents tab for easy access. From there, you may upload or download files, select the document’s hyperlink to view it in a preview window, or delete it.

Documents Tab Upload and Download options – click to enlarge
Documents Preview – click to enlarge

An additional benefit of this Documents enhancement for clients utilizing the TouchPoint Activity and the SCRAM TouchPoint Mobile application is that you may take advantage of all the benefits of the Documents service without navigating to the client’s Optix Profile. This includes:

  • sharing documents directly with the client through the SCRAM TouchPoint Mobile application,
  • requiring client e-signatures, and
  • generating “Read” date and time stamps on shared documents.
TouchPoint Activity Share Document with Client’s app – click to enlarge
TouchPoint Activity Document View Status- click to enlarge
TouchPoint Activity Document Signed Status – click to enlarge

Additionally, the client may send documents and images directly from their mobile application to their Documents page in SCRAM 24/7, thus streamlining the delivery, receiving, and saving of documents to the client’s SCRAM 24/7 Profile.

TouchPoint Activity Document Received from Client’s App- click to enlarge

Communications

Currently, after adding the TouchPoint Activity and enabling the Messaging feature for your client, you must navigate to the client’s Optix TouchPoint profile to send, view, and print a history of messages.

Hyperlink to View Client’s Optix Profile – click to enlarge
Optix Communication, Messaging page for Client – click to enlarge

With this enhancement, you may complete all messaging tasks from within SCRAM 24/7.

SCRAM 24/7 Communication, Messaging Client page – click to enlarge

TouchPoint Activity “Quick Actions” Options

Once a TouchPoint Activity has been enabled for your SCRAM 24/7 client, to utilize the on-demand features like “Locate Now” or to request an “On Demand Check-in,” you would navigate to the client’s Optix profile using the client’s name hyperlink located in the Other Monitoring Services section under the “TouchPoint” heading.

Hyperlink to View Client’s Optix Profile – click to enlarge

With this enhancement, you may now access and launch these features within SCRAM 24/7 by opening the Quick Actions dropdown menu.

Quick Action Dropdown Menu – click to enlarge
Tips
  • Would you like to learn more about the benefits of the SCRAM TouchPoint Mobile application? Contact your Account Manager for details on getting started.
  • Not seeing the enhancement in SCRAM 24/7? Clear your cache and cookies and refresh your browser window.

Continue Reading

On October 15, 2025, SCRAM Systems will release an enhancement for your SCRAM TouchPoint caseload. This enhancement consolidates the one-touch action hyperlinks into a Quick Actions dropdown menu and allows room for additional Quick Actions to be added in the future..  

Information The options available on the “Quick Actions” dropdown menu will reflect the current SCRAM TouchPoint features enabled for the client.
Current View of the Quick Actions Hyperlinks – click to enlarge
Quick Actions Consolidated Dropdown Menu – click to enlarge

Continue Reading

Thursday, October 9, 2025, at 5:00 a.m. MDT, SCRAM Systems will release two new features for your SCRAMNET GPS caseloads and the SCRAM Ally (Victim Notification) application.

The enhancements are:

  • Pattern of Life “Sort by Primary Agent” Filter option
  • SCRAM Ally application, County/Region option for Canada Victim Users
Information During the 15-minute deployment, you may not be able to access SCRAMNET GPS, but messages from the SCRAM GPS device will continue to be processed uninterrupted.

Pattern of Life “Sort by Primary Agent” Filter option

Use the “Sort By Primary Agent” to customize the Activity view within the Pattern of Life Analysis data.. 

Patter Of Life Analysis – click to enlarge

Updated Country/Region Selection for Ally

The first time the victim accesses the SCRAM Ally app on their smartphone, the victim must select one of the following options: US, Canada, or Australia/NZ for the app to operate correctly.

SCRAM Ally app County/Region selections – click to enlarge
Important! IMPORTANT: Activation of the Victim Notification service requires a contract amendment. If you are interested in the service, please contact your SCRAM Systems Account Manager or Sales Representative.

Continue Reading

On 10/2/2025, SCRAM Systems will release an enhancement for your SCRAM Nexus caseload. This enhancement allows users to record a client’s Education and Military Experience directly within the Profile section.

Information If you don’t see the enhancement in SCRAM Nexus, please clear your cache and cookies and refresh your browser window.

Access the Client’s Profile Page

  1. Select the client’s name hyperlink from the Clients tab on the Home page.
Home Page, Clients Tab
  1. From the client’s Summary page, open the Profile tab.
Client’s Summary Page

Add Education Information

  1. On the Profile page, scroll to the Education section and select the Education heading to expand it.
Profile Tab, Education heading
  1. Select the +Add Education link.
  • The related question and answer options will display.
  • Some questions will trigger additional fields. For example, toggling Yes for “Is the client currently enrolled in school?” reveals optional follow-up questions.
  • Enter the relevant client information.
  • Fields marked Optional may be left blank.
  1. Select Save Changes to add the information to the client’s Profile.
+Add Education Link

Add Military Education

  1. Select the Military heading to expand it.
  2. Select the +Add Military link.
  • The first question will display: Does the Client have a Military History?
  • If Yes is selected, additional fields will appear for you to complete.
  • If No is selected, choose Save Changes to record the response.
  • Fields marked Optional may be left blank.
  1. Select Save Changes to add the information to the client’s Profile.
Military Heading

View Changes

Any edits or additions will appear in the History tab, Client Profile.

History for Client Profile Page

Continue Reading

At 5:00 AM MDT on Thursday, September 18, 2025, SCRAM Systems will introduce a new third option to the Participant Agreement Acknowledgement during device assignment in SCRAMNET GPS.

Information During the 15-minute deployment, you may not be able to access SCRAMNET GPS, but messages from the SCRAM GPS device will continue to be processed uninterrupted.

Device Assignment Enhancement

In June of 2025, SCRAM Systems released an enhancement in SCRAMNET GPS that requires you to make a “Participant Agreement Acknowledgement.” The addition of this acknowledgement to the enrollment process grew out of a need for better recordkeeping. This acknowledgement is simply a record of which Agreement was used at the time of enrollment and does not impact the level of court support you receive from SCRAM Systems.

Originally, you were presented with two choices. With this release you will now have three options from which to choose:

  1. The SCRAM GPS Participant Agreement, available on the SCRAM Systems Help and Support Site will be used for this client.
  2. A customized or provider/agency specific GPS Participant Agreement will be used for this client.
  3. NEW! A combination of customized or provider/agency specific and SCRAM Systems participant agreement documents will be used for this client.
The new ‘Participant Agreement Acknowledgement’ section on the Device Assignment page in SCRAMNET GPS (click to enlarge)

First Option

Customers who use the SCRAM Systems-provided SCRAM GPS Program Participant Agreement and Health & Safety Notice, which is available for download from SCRAM Systems Help & Support, will choose the first option, “The SCRAM GPS Participant Agreement, available on the SCRAM Systems Help and Support Site will be used for this client.” This option indicates that you are using the default SCRAM GPS Participant Agreement that was developed by SCRAM Systems and is currently available in SCRAM GPS Help.

Once you have chosen an option, a more detailed explanation of the choice you have made will appear, along with a link to the SCRAM GPS Participant Agreement documents on GPS Help:

Participant Agreement Acknowledgement Option 1 chosen (click to enlarge)

Second Option

Customers who use their own monitoring program participation agreements, which they have developed in-house, independent of SCRAM Systems, and are NOT accessed from SCRAM Systems Help & Support, should choose the second option, “A customized or provider/agency specific GPS Participant Agreement will be used for this client,” as shown below:

Participant Agreement Acknowledgement Option 2 chosen (click to enlarge)

Third Option

Customers who use their own monitoring program participation agreements, which they have developed in-house and independent of SCRAM Systems, but combine it with the SCRAM Systems Health & Safety Notice, should select the third Participant Agreement Acknowledgement option.

Participant Agreement Acknowledgement Option 3 chosen (click to enlarge)
ImportantIf you are unsure about the type of monitoring program participation agreement used by your organization, ask your supervisor or program administrator.

Completing the Device Assignment

Once you have chosen the appropriate Participant Agreement Acknowledgement, then Apply Changes and continue with the device assignment process as usual.

TipTip: Regardless of which option you select, SCRAM Systems recommends you print two copies of the Participant Agreement and have the client and agent sign both copies – one copy for your records and one copy for the client’s records.

Audit Report

The Participant Agreement Acknowledgement selection made will be reflected in the Audit Report. This ensures a comprehensive and auditable history of agreement usage for each device assignment.

Continue Reading

If you have been on the SCRAM GPS Help site recently, you have probably noticed that many of the help articles have been moved to new locations within the site, as indicated by a moving truck icon followed by a link to the article’s new location.

An example of the moving truck icon followed by a description of where the article has moved and a hyperlink to the article.
Moving Truck Example

We are in the process of redesigning the site to bring it in line with our other SCRAM products and services help sites.

How it Was

Previously, SCRAM GPS help was organized in a couple of different ways. There was a Getting Started section, which covered a wide array of SCRAM GPS-related device and monitoring software setup topics, followed by a series of monitoring system or individual device-specific help sections, which only covered topics related to the monitoring system or one specific device. This hybrid design created many duplicate articles. For example, the Add Client article was covered in both the Getting Started and the SCRAMNET GPS sections. Similarly, the SCRAM GPS Bracelet Installation article could be found in both the Getting Started and GPS Bracelet sections.

A help structure with a varying flow and duplicate articles is difficult to maintain and lends itself to potential article content mismatches. To improve the user experience, we decided to change the overall structure and flow of the site, and in so doing remove the duplicate articles.

How it Will Be

Moving forward, the SCRAM GPS Help portion of the SCRAM Systems Help & Support site will be organized in much the same way as the SCRAM CAM, HA, and RB portions of the site are organized. The help topics will be organized into a “client’s lifecycle on the program” flow, from Getting Started to Client Discharge. Between those two bookends will be topics like Client Management, Caseload Management, and Equipment Maintenance. A Program Administration section will round out the GPS Help topics.

The SCRAM GPS Help articles you’ve come to depend on will be – or already are – in the process of moving to these new top-level sections. We’ll even be adding some new help articles along the way. The “moving truck” will be there to guide you through the changes. Once the new structure is completely in place and we have given everyone a chance to update their help article bookmarks, we will “park” the moving trucks.

Thank You

Thank you for your patience during this redesign and transition. It will be worth it in the end.

Continue Reading

On September 3rd, 2025, SCRAM Systems will release multiple enhancements focusing on Alcohol and Tamper alerts that require maintenance activities after analysis to resolve them.

These enhancements include:

  • Five new Maintenance Alerts
  • Updates to the Alert Management Console

New Maintenance Alerts

Currently, once a Data Analyst completes their review, the next step for some alerts requires a maintenance activity to be completed to close them. To improve efficiency in both identifying and taking the required actions to resolve these alerts, SCRAM Systems will introduce new alerts that will appear in the Scheduled Maintenance section on the Workload page. Each alert will include the specific actions required to resolve the alert and to ensure proper client monitoring. These new alerts and required actions are:

  • Removal without Reinitialization – Removal without re-initialization – CLIENT IS NOT BEING MONITORED.  Need to meet with client to perform a re-initialization.  First, utilize the Maintenance Link.  Second, reinstall bracelet to the proper fit.  Third, perform a direct connect.  Once the bracelet receives the required initialization this alert will auto resolve, and monitoring can begin. Click the Maintenance button below to begin the process.
  • Fit Check Requested – Fit check – First, utilize the Maintenance Link.  Second, inspect client’s bracelet to ensure a proper fit.  If the bracelet is not fit properly, please remove and reinstall to the proper fit.  Third, perform a direct connect.  Once the bracelet receives the new initialization this alert will auto resolve.  Click the Maintenance button below to begin the process.
  • Assigned Off Body – Assigned off body – CLIENT IS NOT BEING MONITORED.  Need to meet with client to perform a re-initialization.  First, utilize the Maintenance Link.  Second, inspect client’s bracelet to ensure a proper fit.  If the bracelet is not fit properly, please remove and reinstall to the proper fit.  Third, perform a direct connect.  Once the bracelet receives the new initialization, this alert will auto resolve.  Click the Maintenance button below to begin the process.
  • Battery Replacement Required – Battery Replacement Required – First, utilize the Maintenance Link and select the “Battery, Faceplate and Exhaust Cap Replaced” option.  Second, remove the bracelet.  Clean the battery contacts using a dry, fine-bristled brush and wipe clean using the microfiber cloth.  Install a new battery and faceplate, ensuring you hear four audible clicks.   Third, perform a direct connect.  Once the bracelet receives the new initialization this alert will auto resolve.  Click the Maintenance button below to begin the process.
  • Alcohol detected at Install – Alcohol detected at install. This could be attributed to prior consumption of alcohol, product use, or environmental contaminants. Waiting for alcohol to dissipate and reach zero for long enough to allow the required initialization to complete.  Once the bracelet receives the required initialization this alert will auto resolve, and monitoring can begin.

To keep your monitoring program running smoothly, ensure you are managing the alerts displayed in the Scheduled Maintenance section daily. 

Alert Management Console

In addition to the five new alert types, we have made a couple of updates to the Alert Management Console (AMC).

  1. Upon opening the AMC, you will note a new alert banner that will display any required maintenance items that need your immediate attention for client monitoring.
  2. When a maintenance task is needed, a new Maintenance button is available for you to access and complete the required maintenance tasks.
Example of the Alert Management Console with Maintenance Banner- click to enlarge

Handling the New Alert Types

Let’s walk through an example of an alert so you can better understand the workflow.

Data Analysis

  1. A “Tamper” alert is generated and displayed in the Tamper section of the Workload page.
  2. The Data Analyst completes their analysis of the data and determines that a fit check is required.
  3. The Data Analyst will generate a “Fit Check” alert that is displayed in the Scheduled Maintenance section on the Workload page and then will resolve the “Tamper” alert, thus removing it from the Tamper section.

Your Tasks

  1. Expand the Scheduled Maintenance section and select the Fit Check alert.
  2. Complete the required actions.
  3. Once all required actions are completed and recorded in SCRAMNET, the system will automatically resolve the alert.

Day-to-Day Operations

Overall, this update will improve your efficiency by providing a centralized location for all alerts that require maintenance actions to be completed to ensure client monitoring. Additionally, once the appropriate actions have been completed on your part and recorded in the system, the alerts are auto-resolved, eliminating the requirement to “Transfer” an alert back to your Data Analyst, thus removing alerts from your Workload page more efficiently.

If you have any questions or concerns, contact your Data Analyst or Customer Service.

Continue Reading