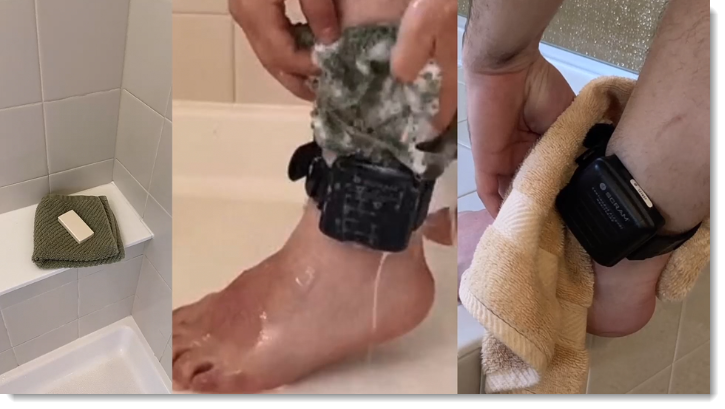
To help decrease the possibility of skin irritation, rashes, or infections developing on your SCRAM CAM clients’ ankles, encourage them to exercise a daily cleansing routine. SCRAM Systems strongly recommends clients follow these steps to wash their ankles under and around the device:
Apply soap to a clean, damp washcloth and wash your ankle by inserting the washcloth between the device and your skin, and then removing it.
Repeat the motion until all areas between the device and your ankle have been washed.
When you are done cleaning your ankle, rinse the area off to remove the soap.
Lastly, use a dry washcloth or towel to thoroughly dry underneath and around the device.
Wash the skin around the ankle with a washcloth, rinse, and dry the area completely
WARNINGS:
The device should not be submerged under water – showers are recommended.
If your client has a specific health condition or concern, be sure they discuss it with you, their supervising authority, and/or a medical practitioner.
When it is time to discharge a client from the SCRAM CAM program, be sure you have a clear understanding of the status in which you should place the equipment.
Awaiting Return
If the bracelet or base station is NOT on-hand, select Stop Monitoring and complete the Stop Monitoring process to set the status to Awaiting Return. This status ends the monitoring program and stops the billing associated with it. The bracelet will remain in this status until it is checked in or until 30 days elapses, at which time it will automatically move to Lost status.
Pending Removal
If you will be completing the Stop Monitoring process with the client in person and the equipment is on-hand, select Stop Monitoring and complete the Stop Monitoring process to set the status to Pending Removal. This status prepares the bracelet for final connection with the Direct Connect device and application, and monitoring and billing both continue until the Direct Connect process is complete and the bracelet moves to In Inventory status.
On February 9, 2024, SCRAM Systems will release Version 6 of its Health and Safety Notice for SCRAM Systems Products. This updated version will automatically append itself to the end of your SCRAM-Approved Participant Agreements (the Agreements you download and print from SCRAMNET), and will also be available separately for download from the SCRAM Systems website.
The SCRAM Systems product line has evolved significantly over the years, and this update brings the Health and Safety Notice up to date with the current line of EM devices. Upon review of the updates by a third-party Human Factors and Safety Evaluation firm, it was determined that the Health and Safety Notice will now be separated into two pages.
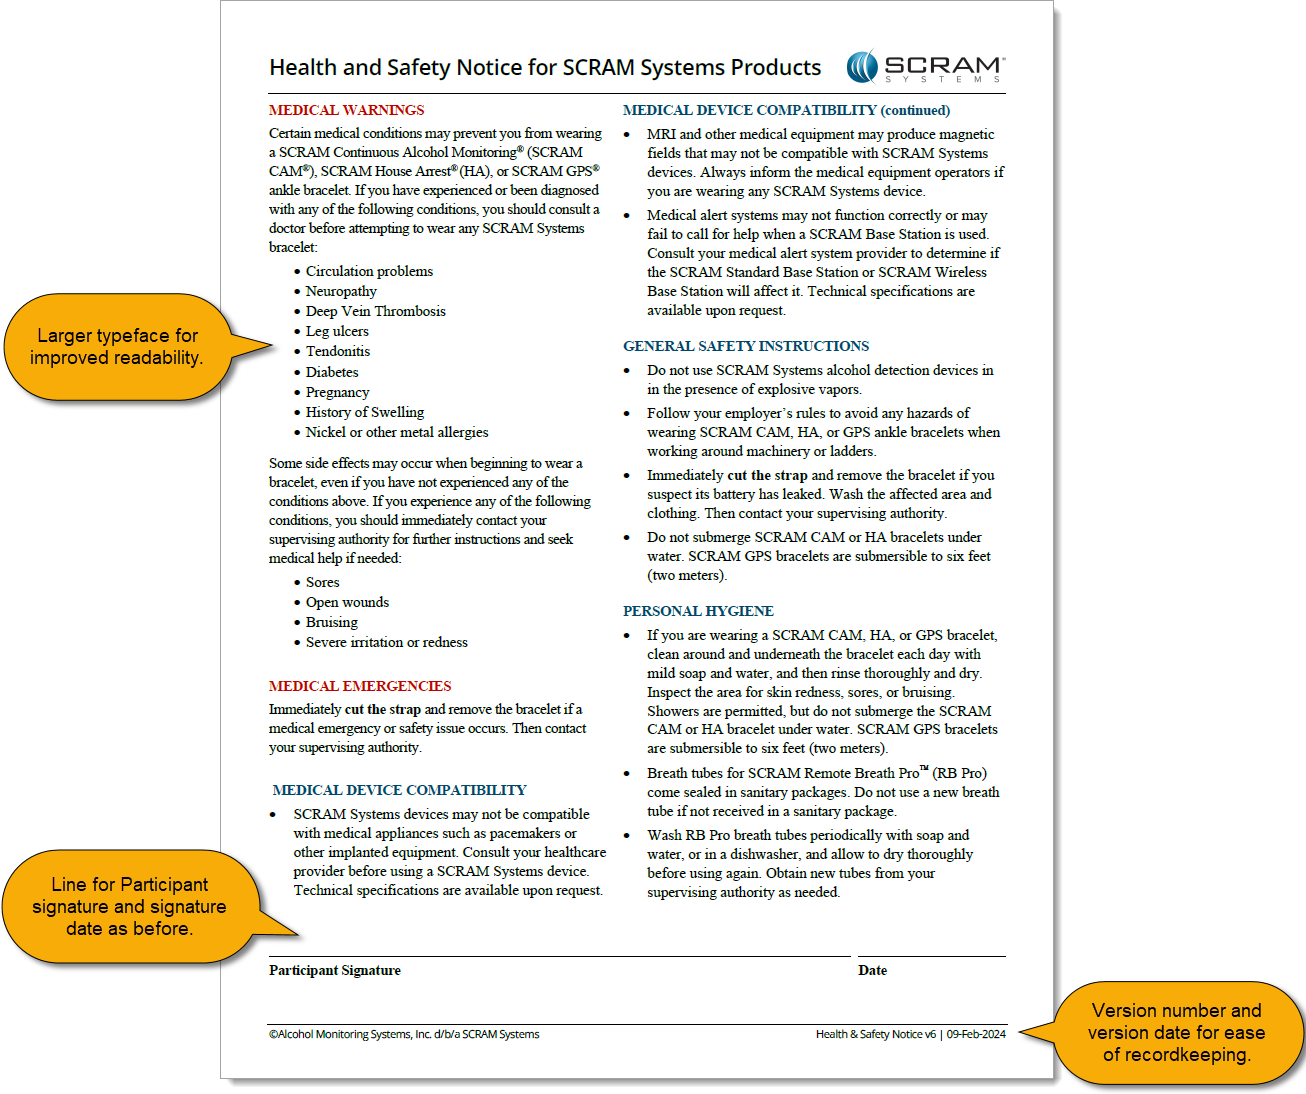
Page 1: Participant Warnings and Instructions
The first page will continue to house medical warnings, general safety instructions, and personal hygiene recommendations targeted towards the client, and as before will require the client’s signature:
Health and Safety Notice v6 pg 1 (click to enlarge)
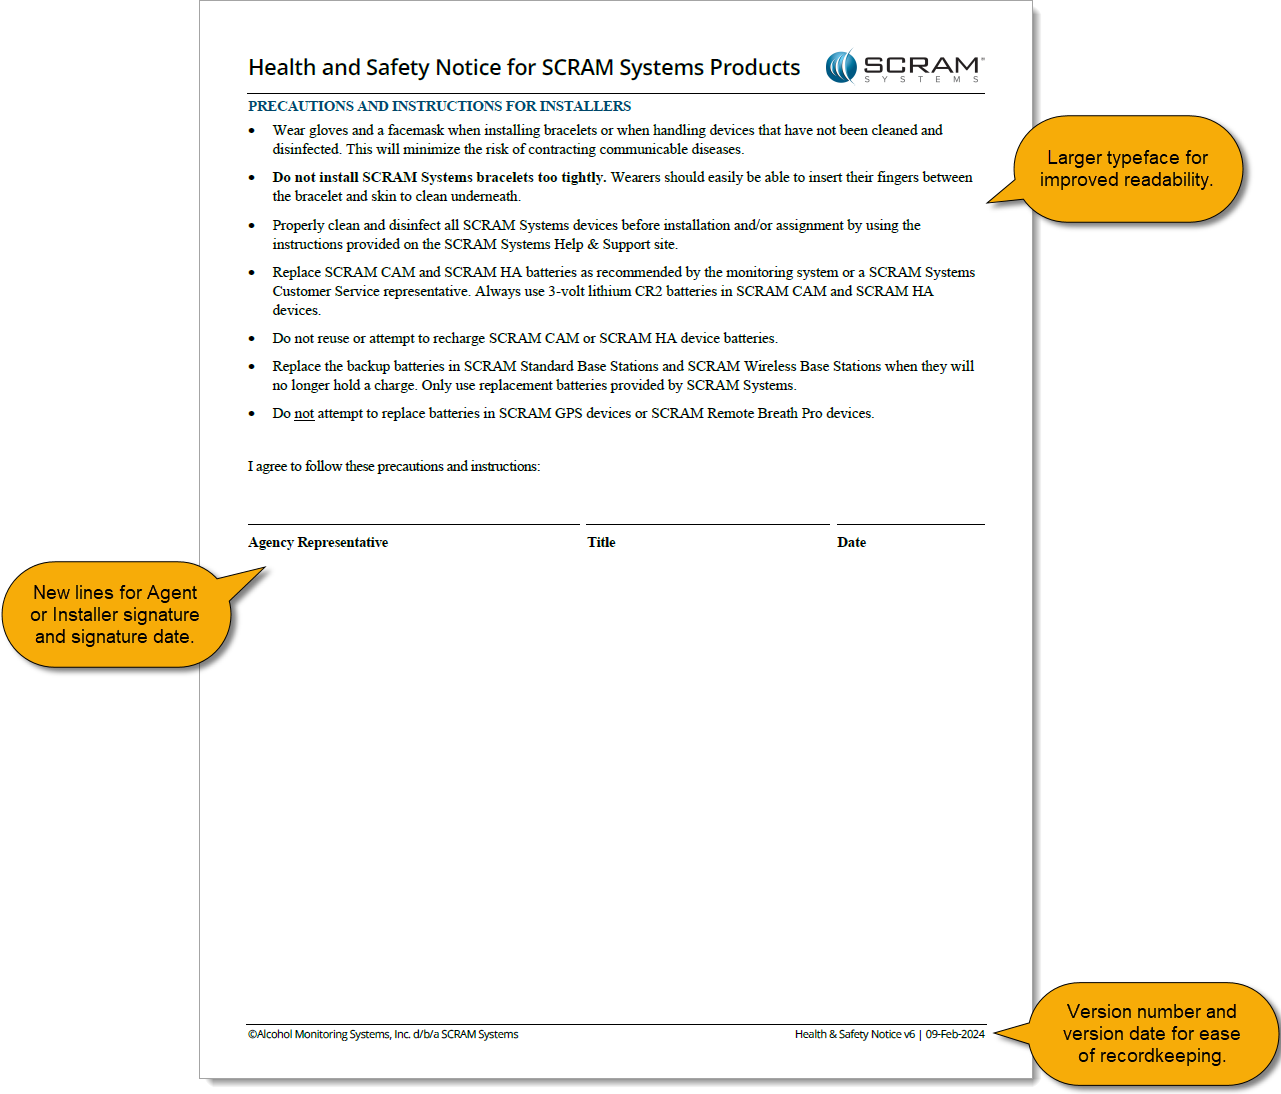
Page 2: Installer Precautions and Instructions
The second page relocates the “PRECAUTIONS AND INSTRUCTIONS FOR INSTALLERS” section from the first page, and adds a new “Agency Representative” signature line to be signed by the installer at the time of installation:
Health and Safety Notice v6 pg 2 (click to enlarge)
This update to the Health and Safety Notice for SCRAM Systems Products provides greater clarity to both your clients and your agents, and provides greater legal protection to your agents and your overall monitoring program.
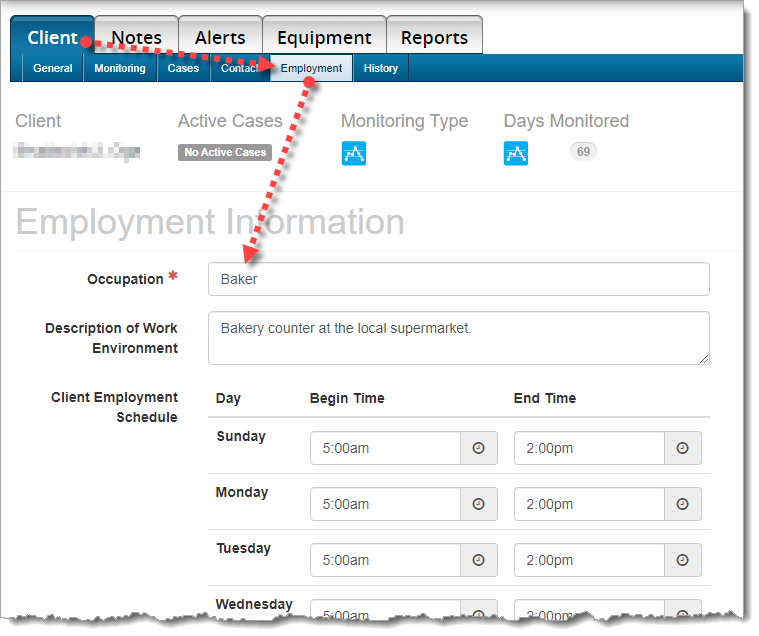
When current employment information is entered in the Occupation field in SCRAMNET, our Data Analysts are better able to determine the client’s actions and environment during an alert. This will save time and frustration for both you and your client by reducing the number times you must contact your client to determine their actions during the time period of the alert.
To Update Employment Information:
Choose the Client tab, then the Employment sub-tab. Please update the client’s occupation, description of the work environment, and most importantly, the client’s work schedule.
Employment Information on the ‘Employment’ sub-tab (click to enlarge)
SCRAM Systems recently made a change to some existing tamper logic to better refine the actionable alerts you have to handle in your SCRAM CAM alcohol monitoring programs. Through extensive review, it was determined that only a very small percentage of tampers were meeting the previously-defined “downward” criteria, which indicate a potential tamper due to a 17% (or greater) drop in the IR voltage below the established baseline.
Since the majority of these alerts were not confirmable, there should be no disruption to your alert volumes. However, you may see a reduction in the number of resolved tamper alerts that were previously visible on the client profile. The Non-Compliance Report tamper criteria verbiage will also be updated to reflect this change.
Please reach out to Customer Service with any questions about this change.
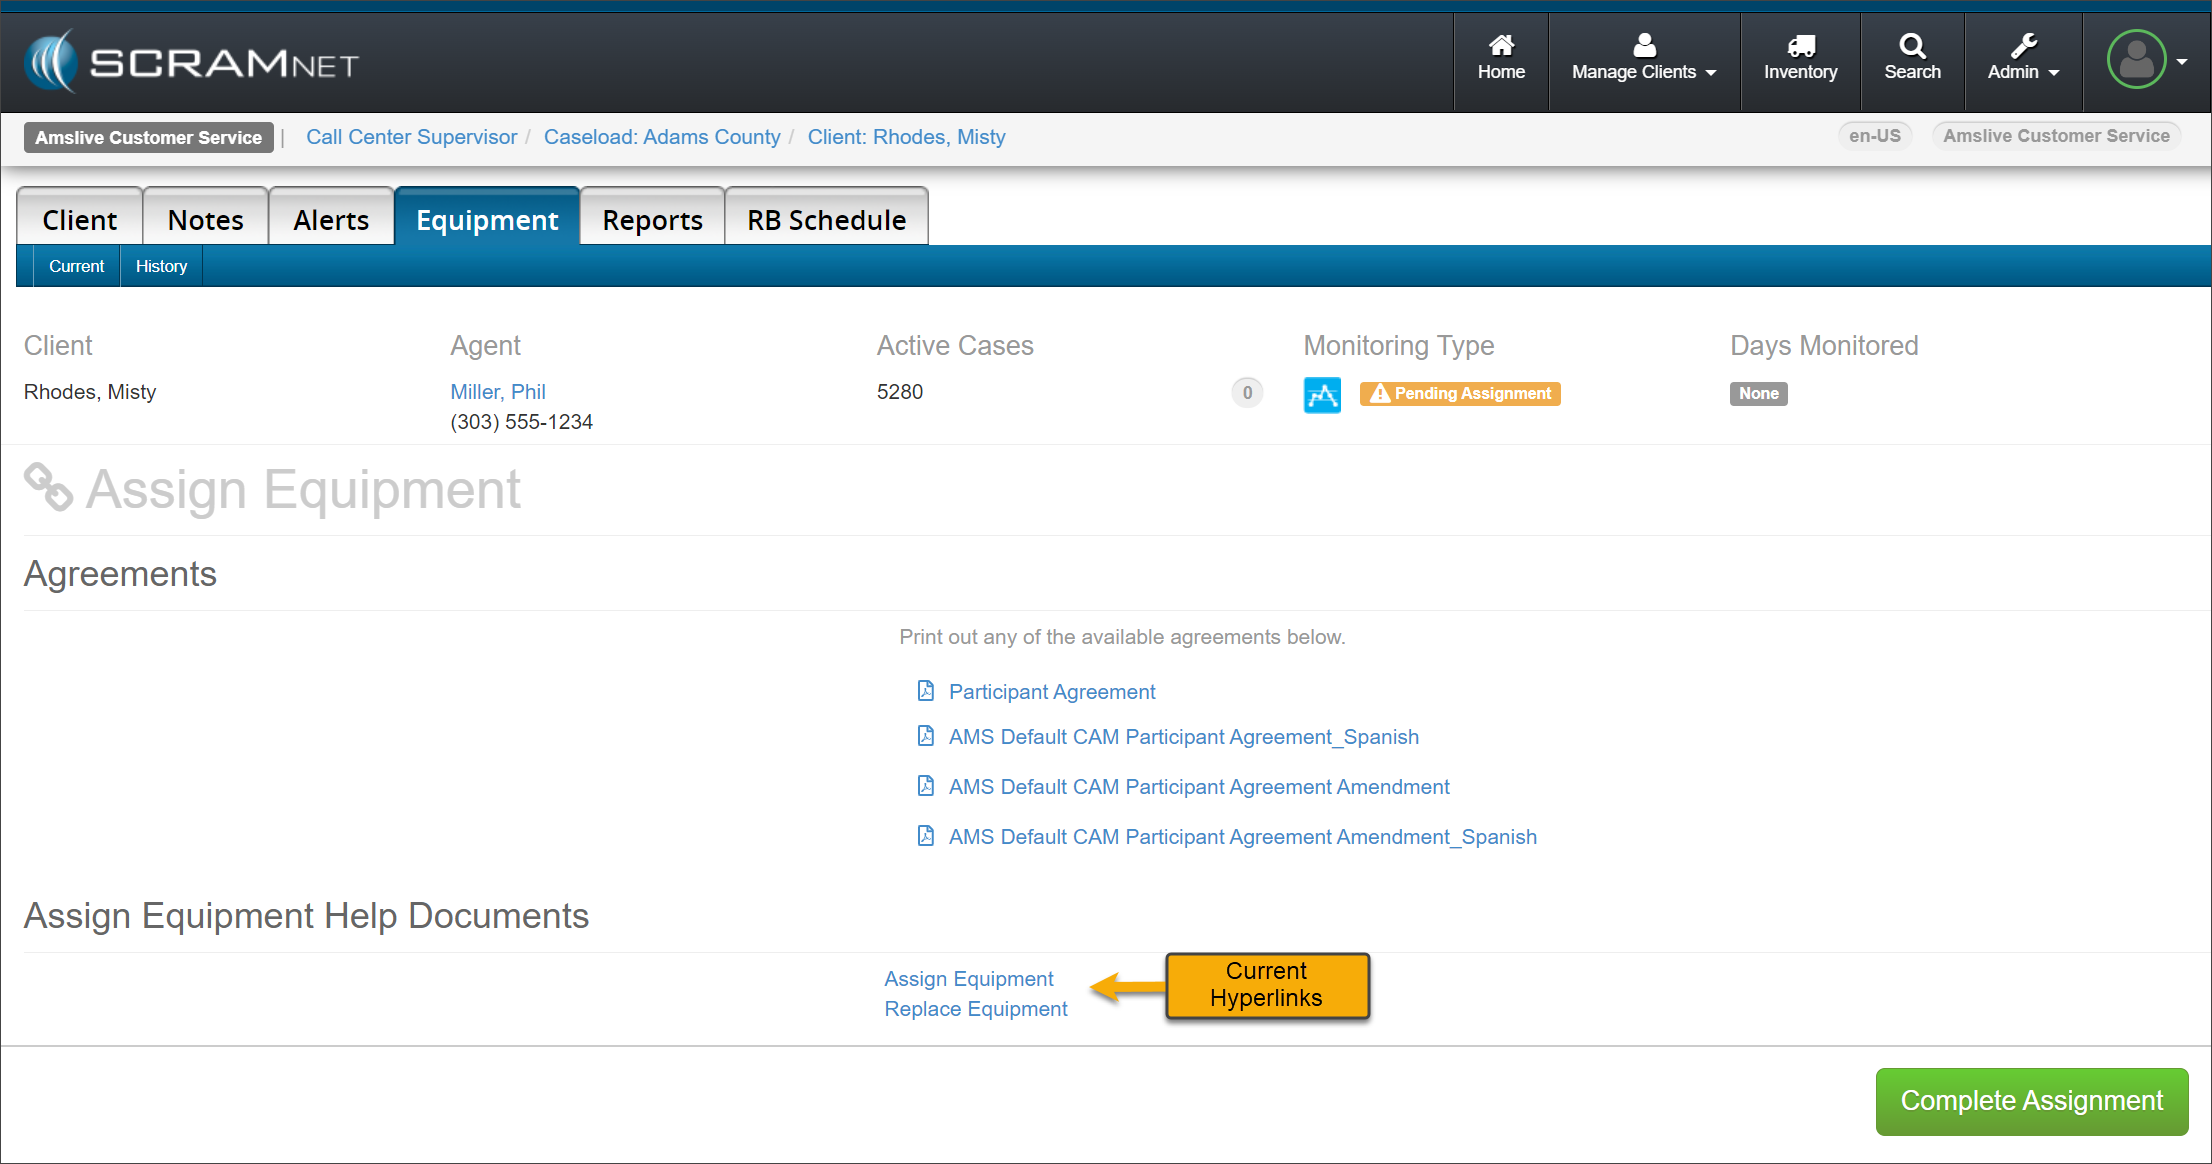
On November 1, 2023, SCRAM Systems® will release an enhancement for your SCRAMNET client caseloads. The “Assign Equipment Help Documents” hyperlinks will be updated on the Assignment, Maintenance, and Stop Monitoring pages.
Current Assign Equipment Help Document Hyperlinks – click to enlarge
The Help Documents hyperlinks will display SCRAM Device Installation, SCRAM Device Maintenance, and SCRAM Device Check-In based on the current equipment activity.
New Assign Equipment Help Document Hyperlinks – click to enlarge
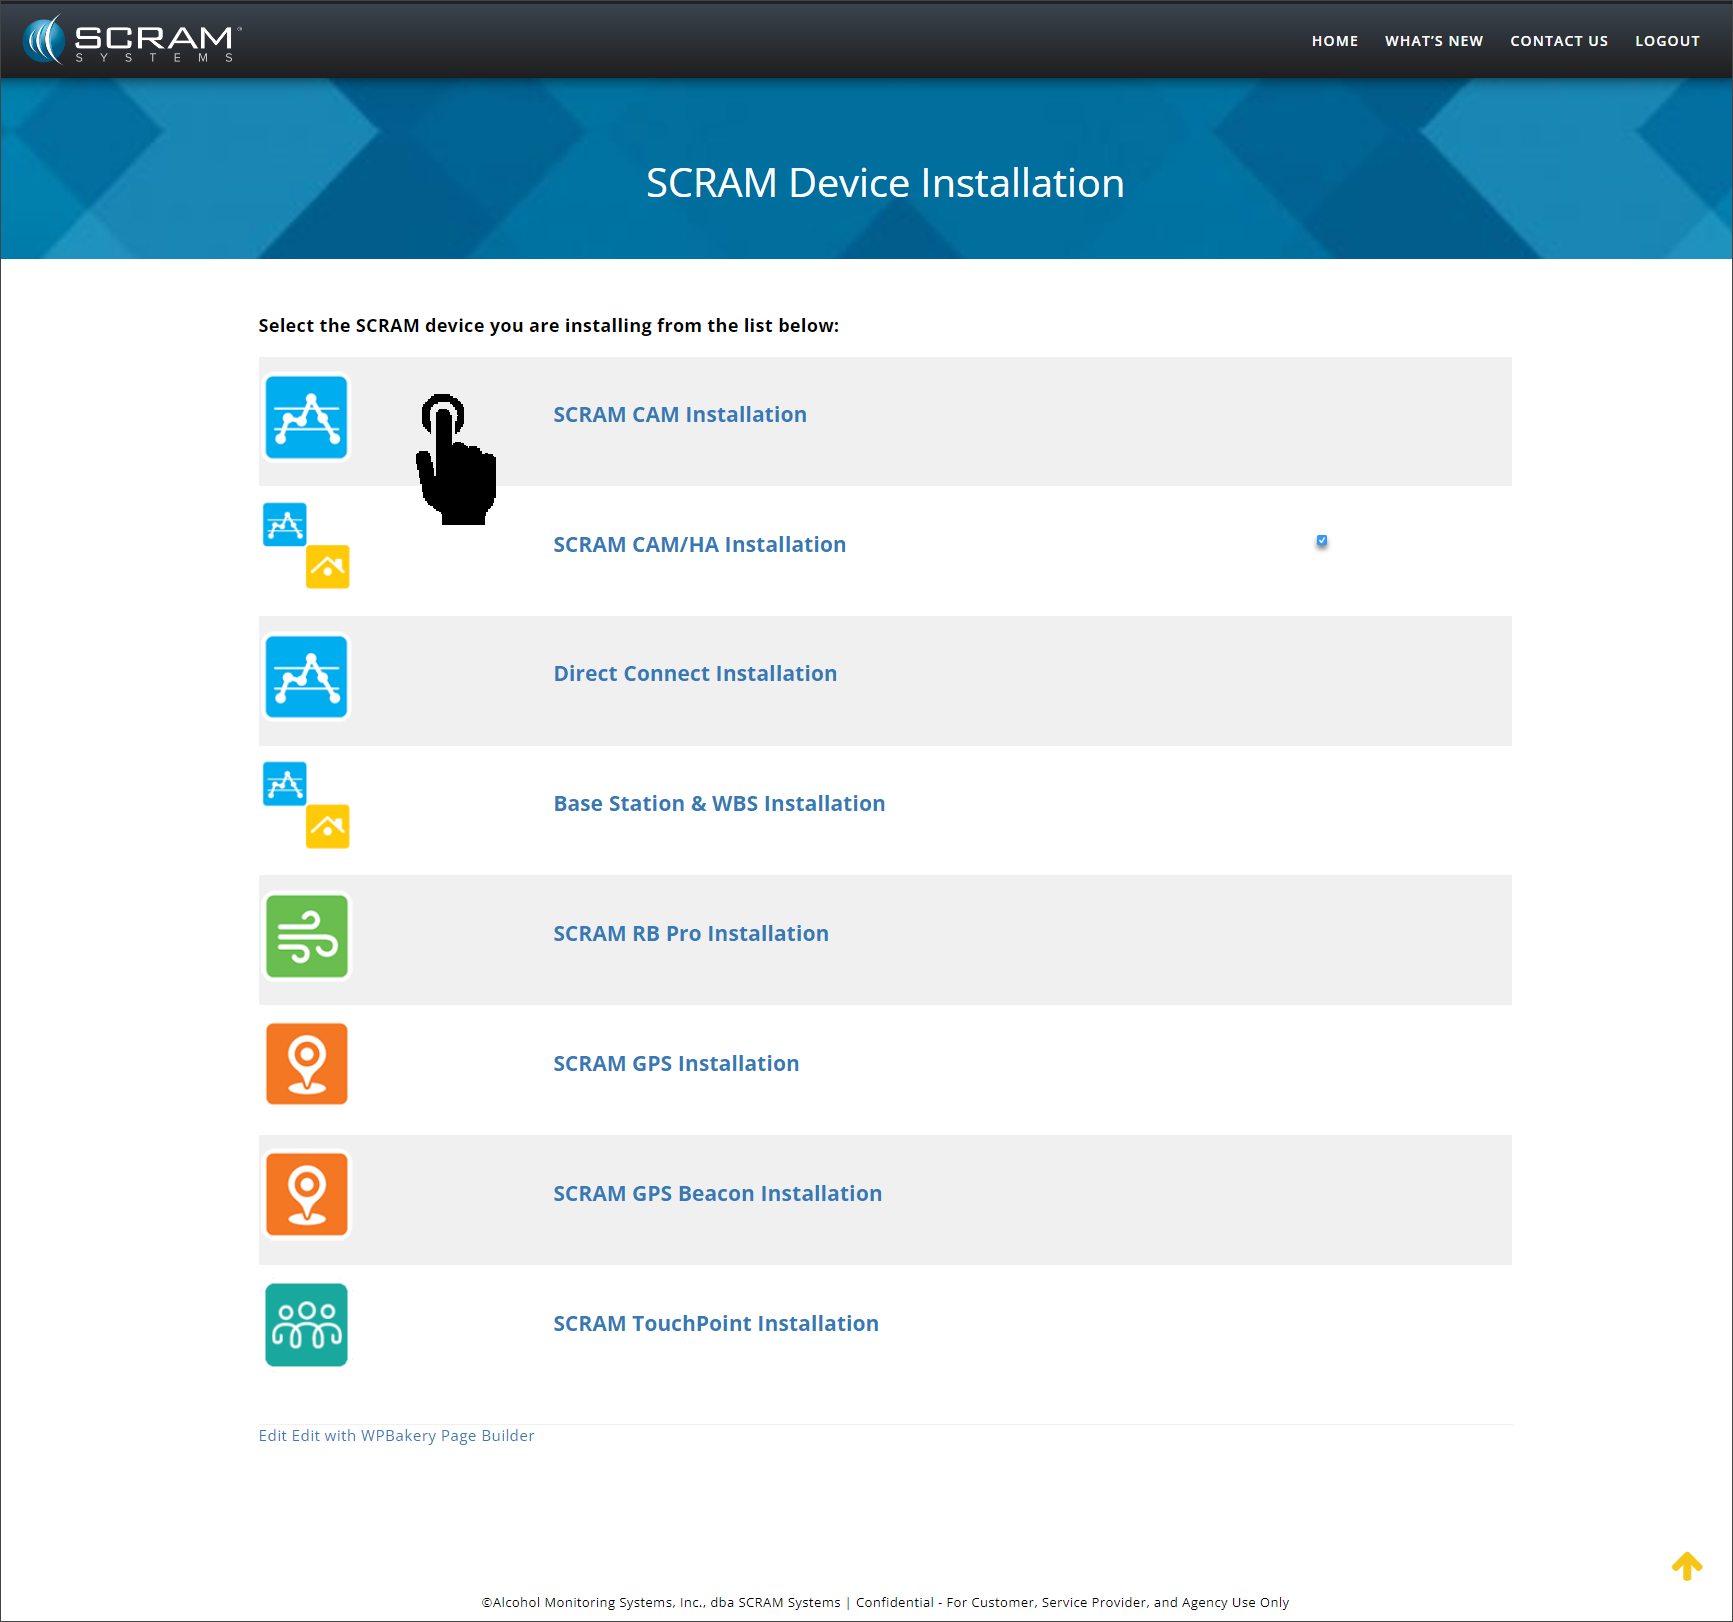
Selecting the hyperlink will open the specific device activity Help landing page. The landing page will display a list of SCRAM’s monitoring technologies from which to choose. For example, select the SCRAM CAM Installation hyperlink…
SCRAM Device Installation Help Article – click to enlarge
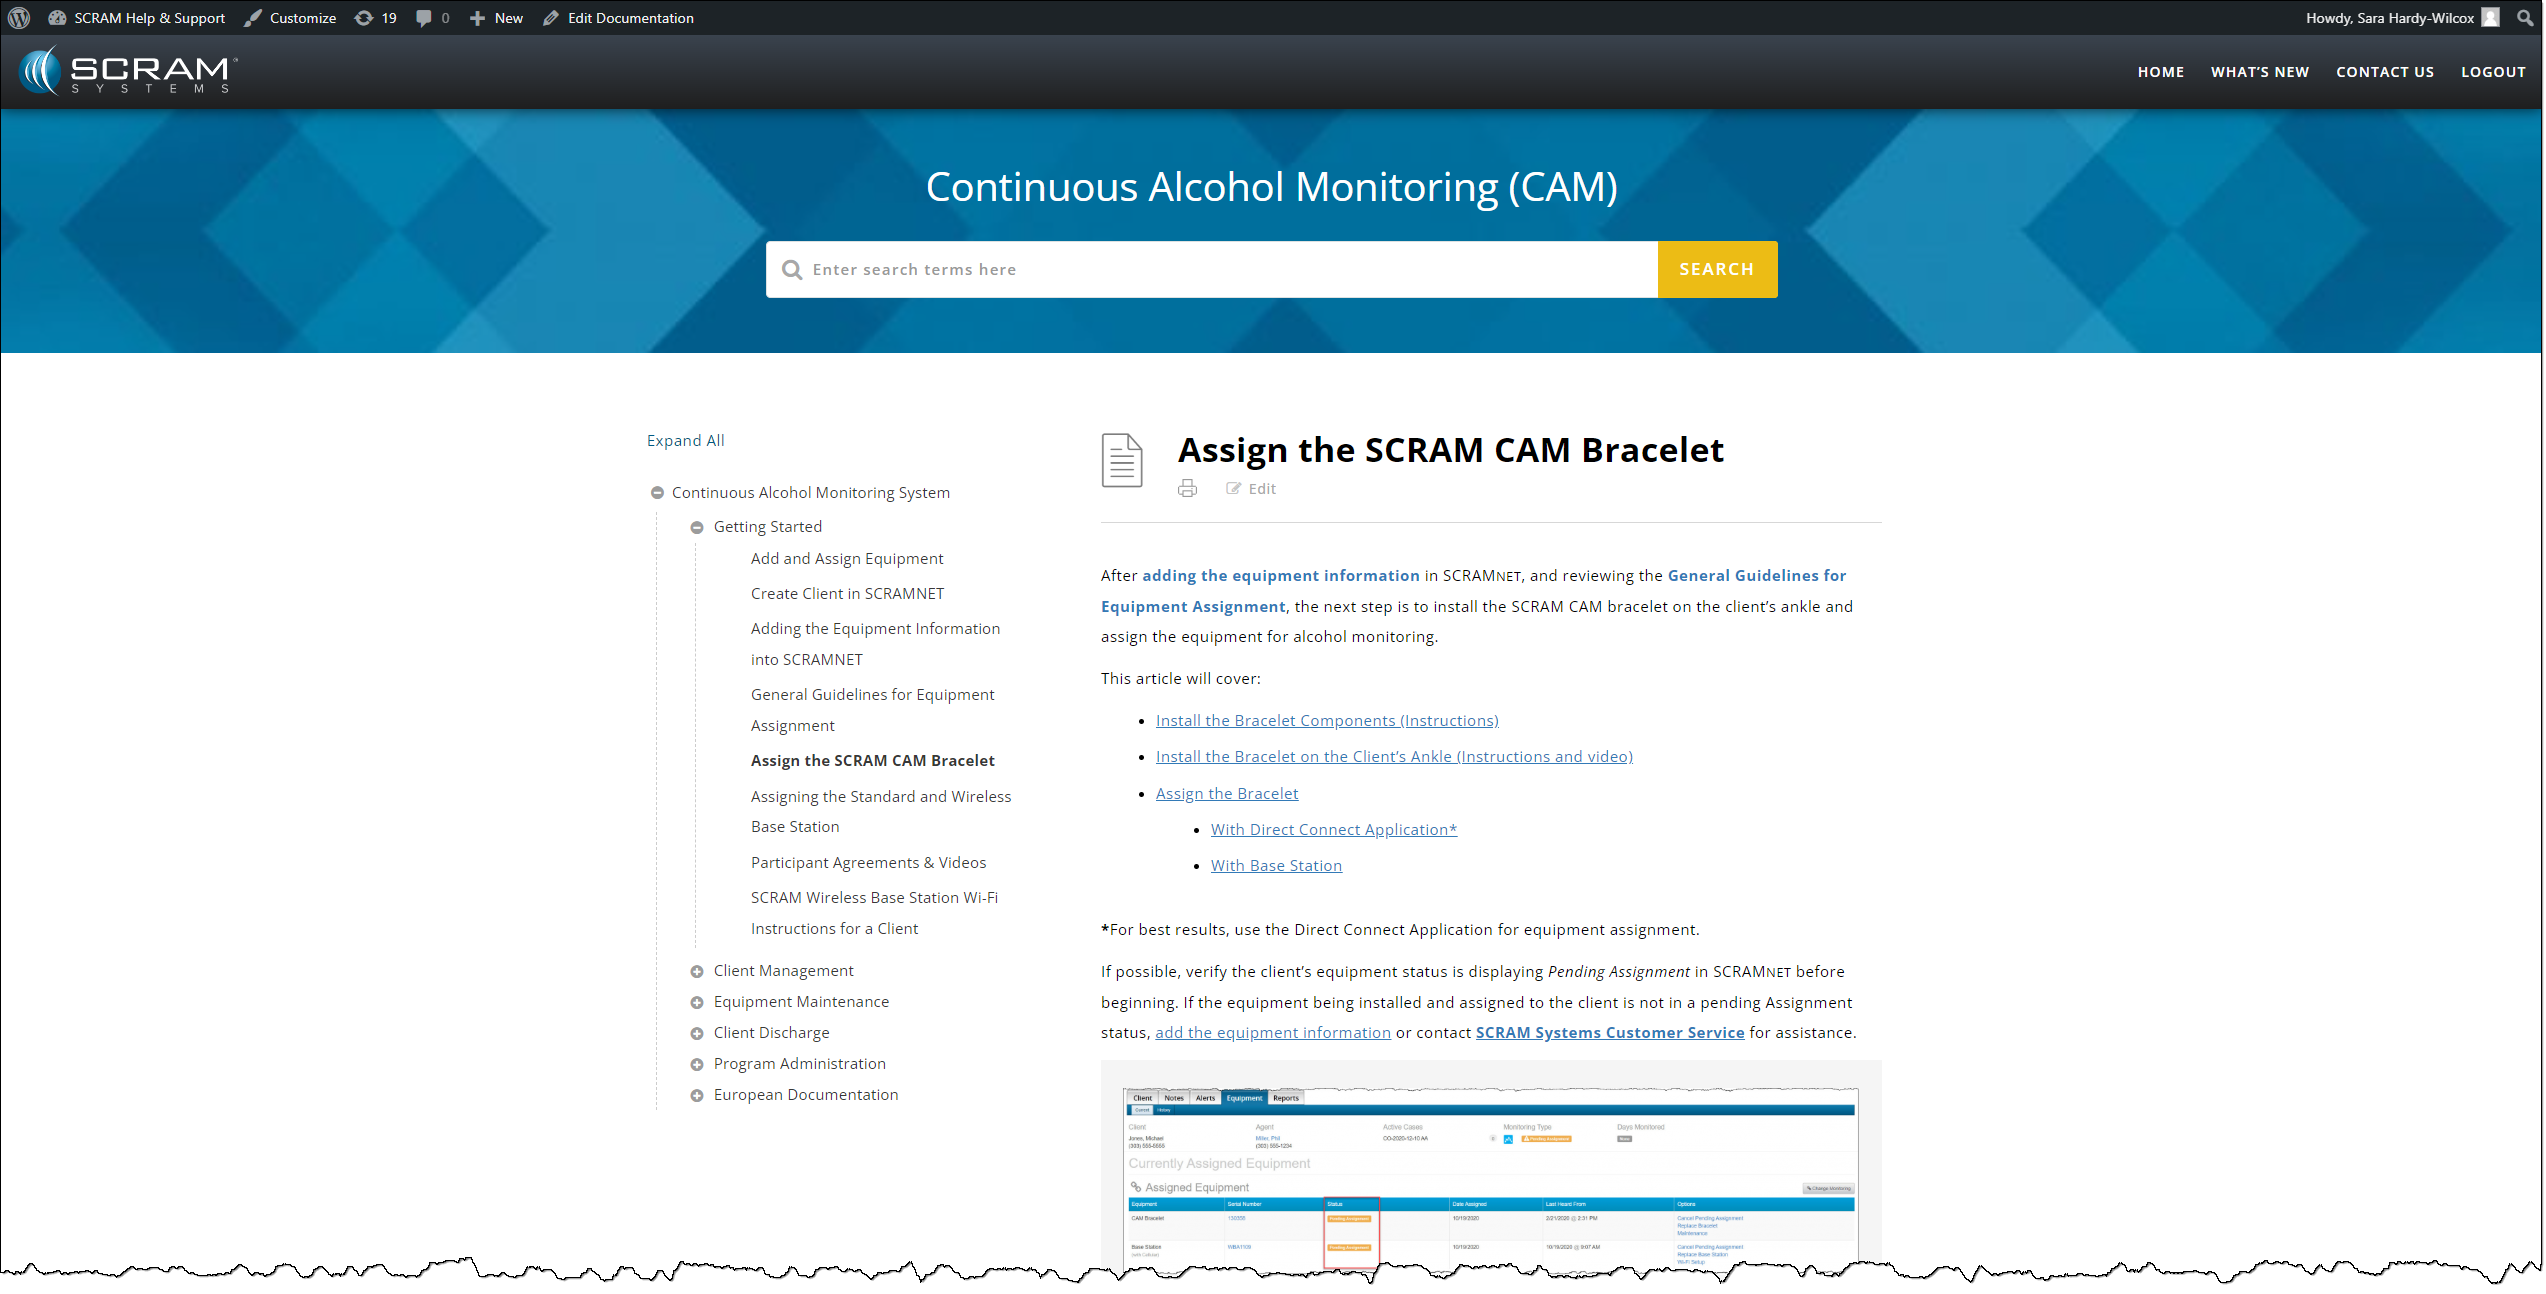
…to access step-by-step instructions on assigning the SCRAM CAM Bracelet to your client.
Assign the SCRAM CAM Bracelet Help Article – click to enlarge
If your client reports that their SCRAM Wireless Base Station (WBS) is beeping incessantly, that is an indicator of one of three possibilities:
The WBS device has been unplugged from its wall outlet
There is a power outage in the client’s home (or a tripped breaker on the WBS wall outlet circuit)
The WBS device has lost its cellular connection to SCRAMNET
Once the power-related possibilities (1 & 2) are eliminated, that means the WBS has lost its connection to the cellular wireless network and SCRAMNET.
Switch to Wi-Fi
If your client’s in-home wireless router supports Wi-Fi Protected Setup (WPS) connections, which is usually indicated by a “WPS” button on the front of the router, you can get the WBS to reconnect to SCRAMNET by instructing your client to switch their WBS from cellular to Wi-Fi connectivity.
Here’s how to instruct your client:
On the front of the base station, repeatedly press-and-release the button to scroll through a list of nearby wireless networks until the Network Name (SSID) of your wireless router appears on the LCD screen.
Once the correct network name is displayed, press-and-hold the button until the base station’s LCD screen displays: PRESS WPS BUTTON ON ROUTER AND WAIT
Press the WPS button on your router and then check the LCD display on the front of the base station. After a few minutes the LCD screen on the base station should update from NONE to WIFI.
Your client may need to repeat these steps a couple of times before the WBS connects to the router successfully.
If your client’s WBS is connected to the cellular network, but you or your client would like to switch to Wi-Fi anyway (for a more reliable connection, e.g.), have your client visit the SCRAM CAM Client Help Portal and download the printable Wi-Fi setup instructions for clients.
Once the Wi-Fi connection is successfully established, the WBS display will show “MONITORING” and the device will begin relaying stored data from the SCRAM CAM bracelet. Notifications and alerts will then begin populating in SCRAMNET for the client.
SCRAM Systems® will be moving to QR code-based “Help” cards for nearly all of its products and services by the end of this week. The switch from static instruction cards to QR codes helps to ensure that customers – and clients – always have the most up-to-date instructions for their SCRAM Systems devices at their fingertips.
There will be two separate QR code-driven Help cards:
SCRAM Systems Device Help for customers (Service Providers and Agencies) – the blue card
SCRAM Systems User Support for clients – the white card
Quick Reference Guides will still continue to be printed for all SCRAM Systems products.
What’s a QR Code?
A QR code is a type of two-dimensional matrix barcode consisting of an array of black and white squares. QR codes are typically used for storing web addresses (URLs), which can be read by the camera on a smartphone to open a web page.
QR Code Example
How Will SCRAM Systems Use QR Codes?
Rather than including device-specific instruction cards in the boxes we ship to you, we will instead include two packs of 25 business-card-sized Help cards – one pack of customer Help cards and one pack of client Help cards – in each of our Customer Care Kits. Additional 25-card packs of each type will be available for purchase on the SCRAMNET Equipment Order Form if needed.
Help for Service Providers and Agencies
You and the other Officers, Agents, and Case Managers who are responsible for monitoring clients in your SCRAM Systems Program, can carry one of the blue customer cards with you, or post them around the office. Then whenever you need help installing or removing a device, for example, you may simply pull out the SCRAM Systems Device Help card and scan it with your smartphone:
SCRAM Systems Device Help Card – Front
SCRAM Systems Device Help Card – Back
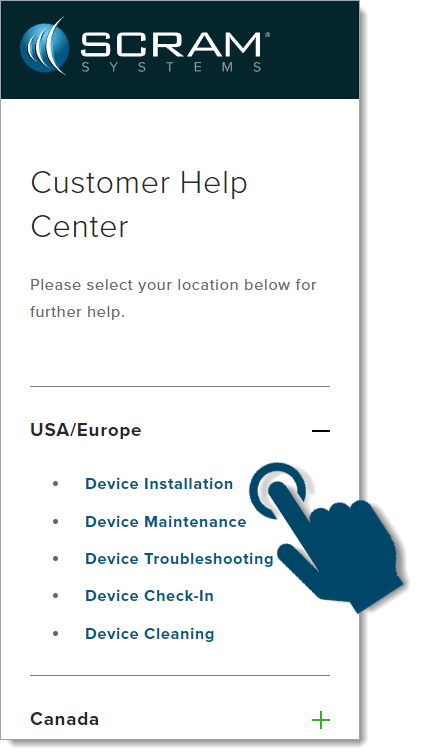
Once you scan the QR code on the card, your smartphone will launch the SCRAM Systems Customer Help Center (www.scramsystems.com/customer-help/), where you will tap on your location, and then tap on the type of Help you need:
Scan the card with your smartphone and then select your location:
Select Your Geographical Location (USA/Europe Shown)
Select the type of device help you seek:
Select the Type of Help (Device Installation Shown)
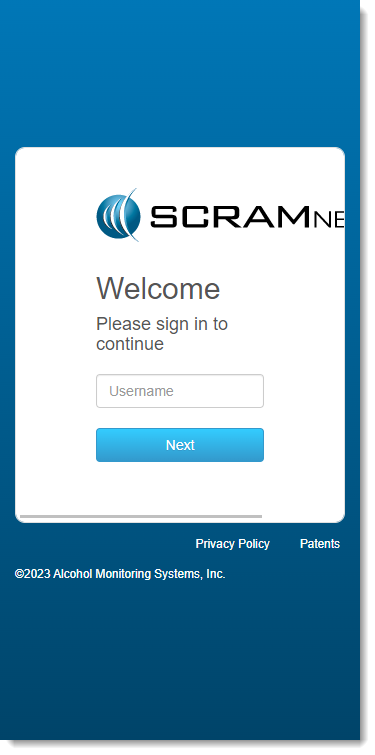
Login with your SCRAM monitoring system credentials:
Login with SCRAM Credentials
Requiring a login ensures that nobody except SCRAM Systems customers can access SCRAM Device Help.
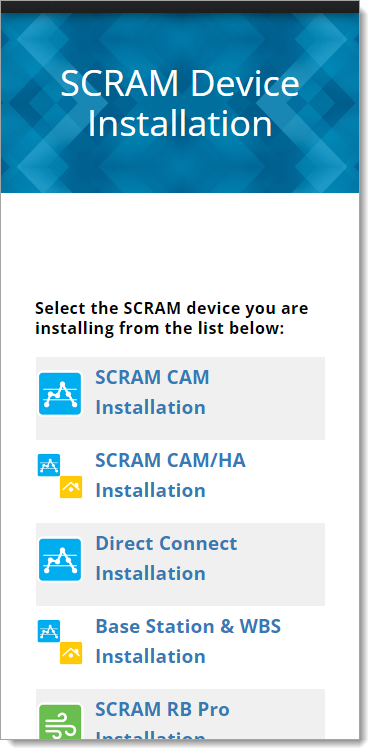
Select the specific SCRAM Systems product for which you want help:
Select the Appropriate Product (Installation Help Example)
Help for Clients
SCRAM Systems will also be eliminating most product-specific client instruction cards, and will instead make QR code-driven SCRAM Systems User Support help cards available:
SCRAM Systems User Support Help Card – Front
SCRAM Systems User Support Help Card – Back
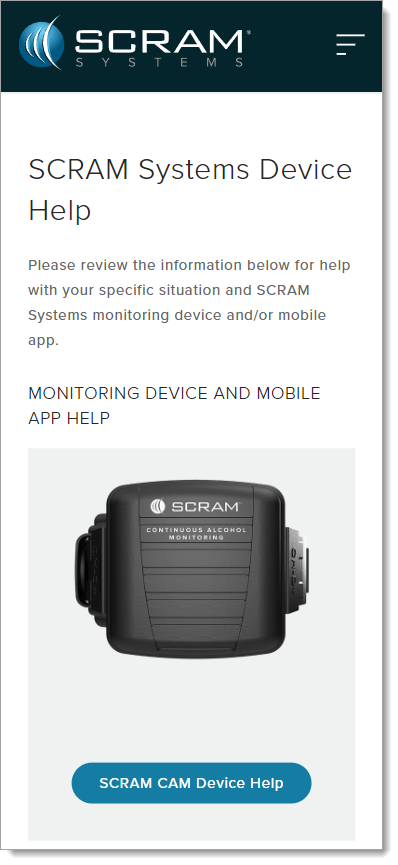
Once the client scans the QR code on the white card, their smartphone will launch SCRAM Systems Device Help for clients (www.scramsystems.com/scram-device-help/), where they may scroll through a list of SCRAM Systems devices, mobile apps, and FAQs, and simply tap on the type of help they need:
SCRAM Systems Device Help for Clients – SCRAM CAM
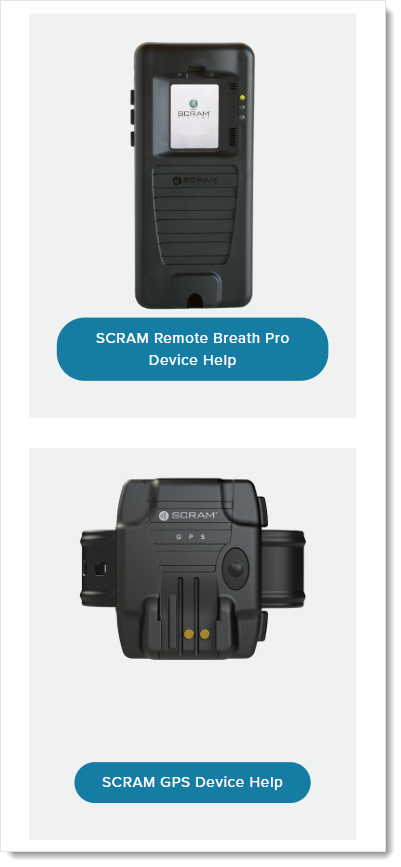
SCRAM Systems Device Help for Clients – SCRAM RB Pro & GPS
On the afternoon of August 9, 2023, SCRAM Systems® released two Participant Agreement-related enhancements in the SCRAMNET® monitoring system.
A new Participant Agreement Acknowledgement during device assignment
Updated language in the SCRAM CAM, SCRAM HA, and SCRAM CAM+HA Participant Agreements
These enhancements are designed to better protect your organization and its agents.
SCRAMNET Device Assignment Enhancement
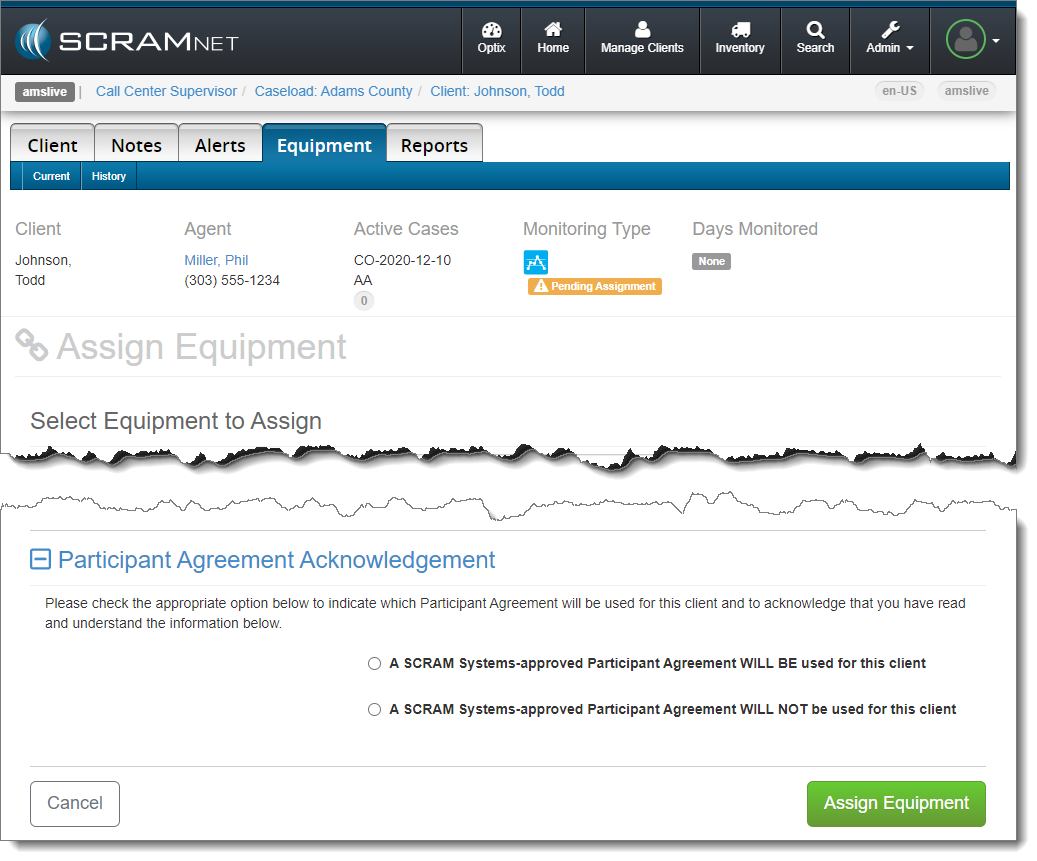
When it is time to assign equipment after adding your client to SCRAMNET, before you may continue with the assignment process, you will have to make a “Participant Agreement Acknowledgement.” The addition of this acknowledgement to the enrollment process grew out of a need for better recordkeeping. It is simply a record of which Agreement was used at the time of enrollment and does not impact the support you receive from SCRAM Systems.
You will be presented with two choices:
A SCRAM Systems-approved Participant Agreement WILL BE used for this client
A SCRAM Systems-approved Participant Agreement WILL NOT be used for this client
Participant Agreement Acknowledgement on the SCRAMNET Assign Equipment Page – click to enlarge
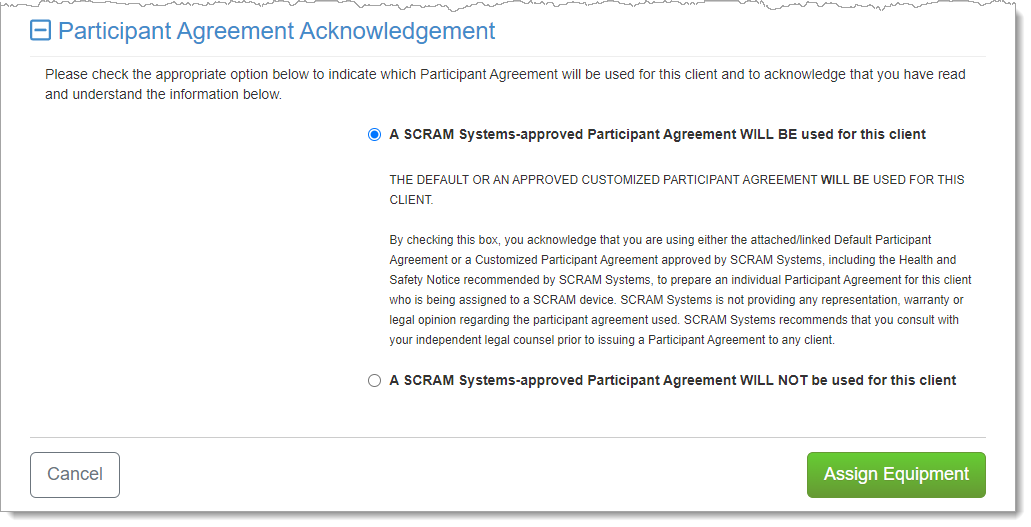
“The vast majority of SCRAM Systems customers will choose the first option…”
The vast majority of SCRAM Systems customers will choose the first option, “A SCRAM Systems-approved Participant Agreement WILL BE used for this client.” This option indicates that you are using a Participant Agreement that is currently available to you as a link in the SCRAMNET monitoring system.
Once you have chosen an option, a more detailed explanation of the choice you have made will appear:
First PA Acknowledgement Chosen – click to enlarge
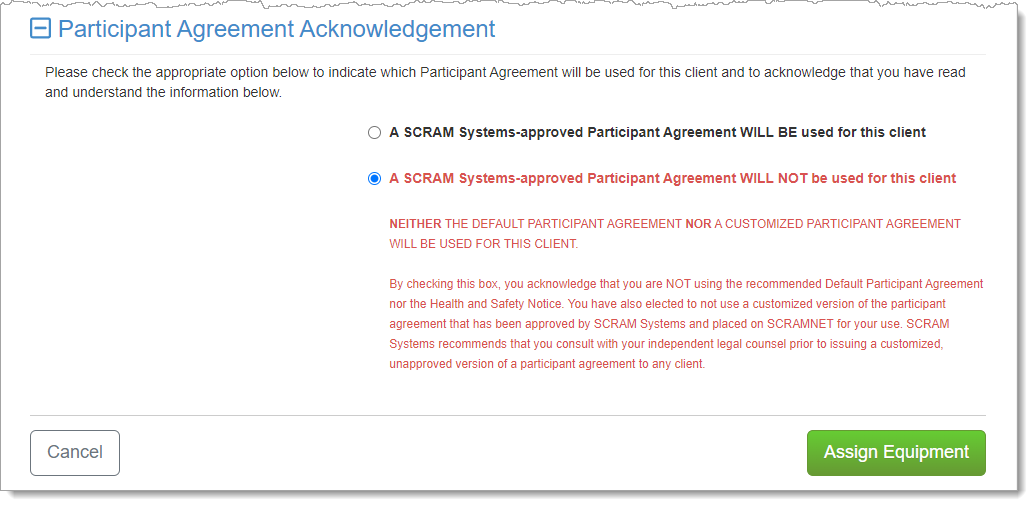
Customers who use their own monitoring program participation agreements, which they have developed in-house, independent of SCRAM Systems, and are NOT stored on or accessed from SCRAMNET, should choose the second option:
Second PA Acknowledgement Chosen – click to enlarge
If you are unsure about the type of monitoring program participation agreement used by your organization, ask your supervisor or program administrator.
Completing the Device Assignment – Option 1
If you chose the “SCRAM Systems-approved” Participant Agreement Acknowledgement (first option), then a page with links to the available Agreements will appear, as per the established process.
Complete Assignment Page with Participant Agreement Links – click to enlarge
Print two copies (one for your records and one for the client) of the Participant Agreement and then select Complete Assignment.
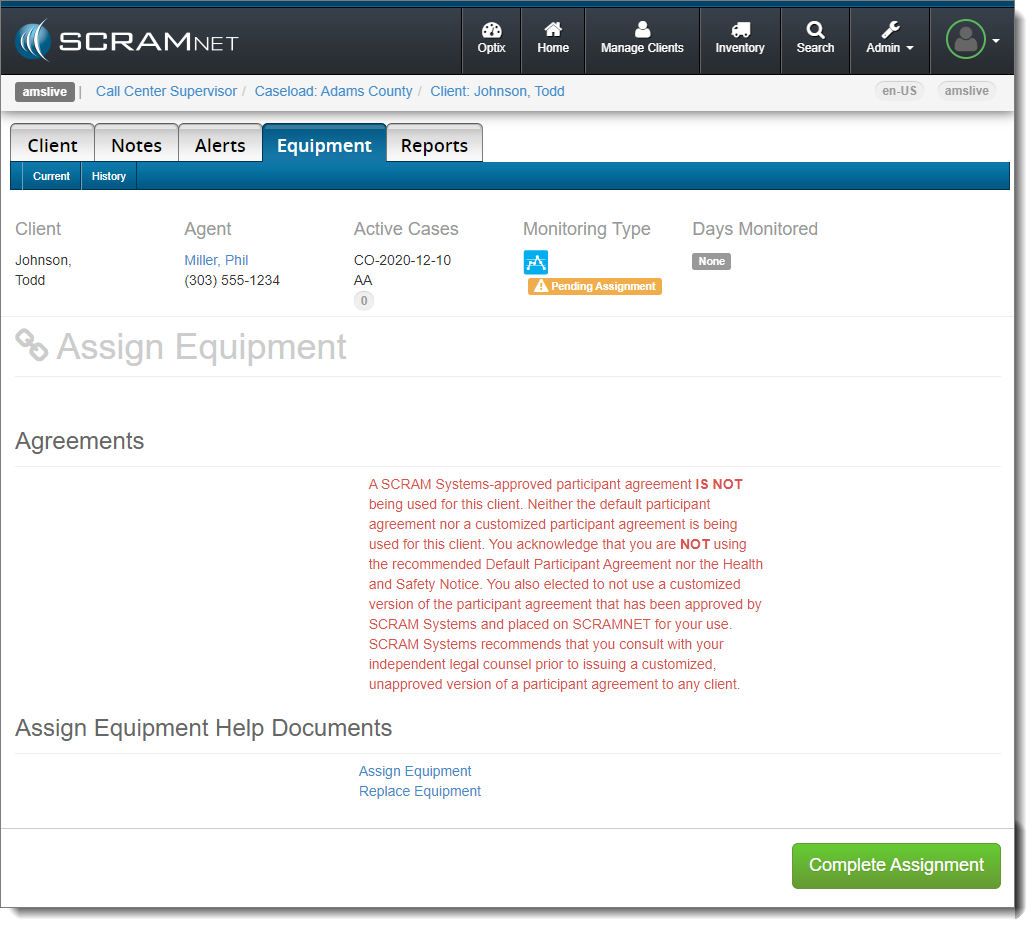
Completing the Device Assignment – Option 2
If you chose the “NOT SCRAM Systems-approved” Participant Agreement Acknowledgement (second option), then the following page will not include links to any Agreements, and will instead display language that confirms your choice to NOT use a SCRAM Systems-approved Agreement.
Complete Assignment Page With Participant Agreement Disclaimer – click to enlarge
Provide the client with a copy of your program’s participation agreement from wherever it is housed in your organization’s internal storage resource as you normally would, and then select the Complete Assignment button to continue with the device assignment.
Participant Agreement Updates
In addition to the Participant Agreement Acknowledgement enhancement, the SCRAM CAM, SCRAM House Arrest (HA), and SCRAM CAM+HA Program Participant Agreements have been updated. Feedback from customers as well as our own Judicial Services team led us to make the following improvements in our Agreements:
Terminology used throughout the Agreements is more clearly defined in the opening paragraphs.
The description of how the Device monitors your Program Participants was clarified throughout.
Language that explicitly requires clients to maintain Internet service in their homes if required for Base Station operation was added.
Language that explicitly describes what qualifies as “Tampering” and how it is a violation of the Agreement has been clarified.
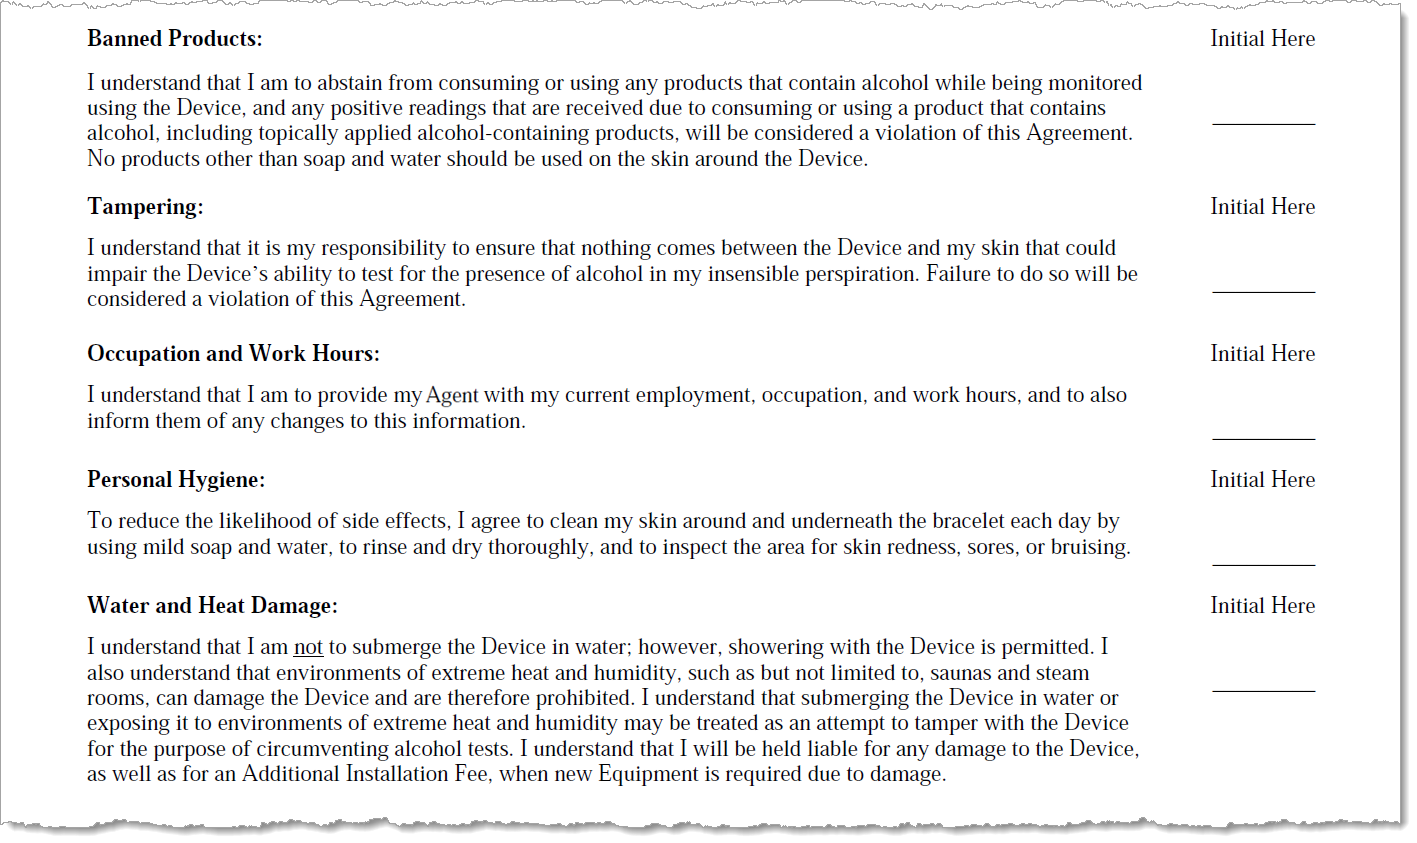
The “Swimming and Bathing” section has been replaced by a “Water and Heat Damage” section, which now also includes prohibitions regarding saunas and steam rooms.
New and Updated Participant Agreement Language – CAM Examples (click to enlarge)
Customers who have made minor customizations to their Agreements (equipment pricing only, e.g.) will see the new language appear in their custom Participant Agreements automatically.
Customers who have worked with SCRAM Systems to make material changes to the language within their Participant Agreements (altered or added new paragraphs with specific language) will need to work with their SCRAM Systems Account Managers or Sales Managers to request the updates; they will NOT occur automatically.
On June 14, 2023, SCRAM Systems will release enhancements to aid you when adding an Agent, Priority Notification, and Daily Summary email methods to your SCRAMNET Caseloads. With this enhancement, you may simultaneously add the Agent or Notifications to one or multiple Caseloads. Additionally, this enhancement eliminates the requirement for duplicate contact information entries for the same user within SCRAMNET.
As an Administrator with “Manage User” or Manage Caseloads” permissions, once the user’s profile has been created, you may add them as an Agent, as well as add their Priority Notification and Daily Summary Report delivery methods to one or more caseloads from the user’s Profile page.
Manage Agents
Add a New User as an Agent to One or More Caseloads
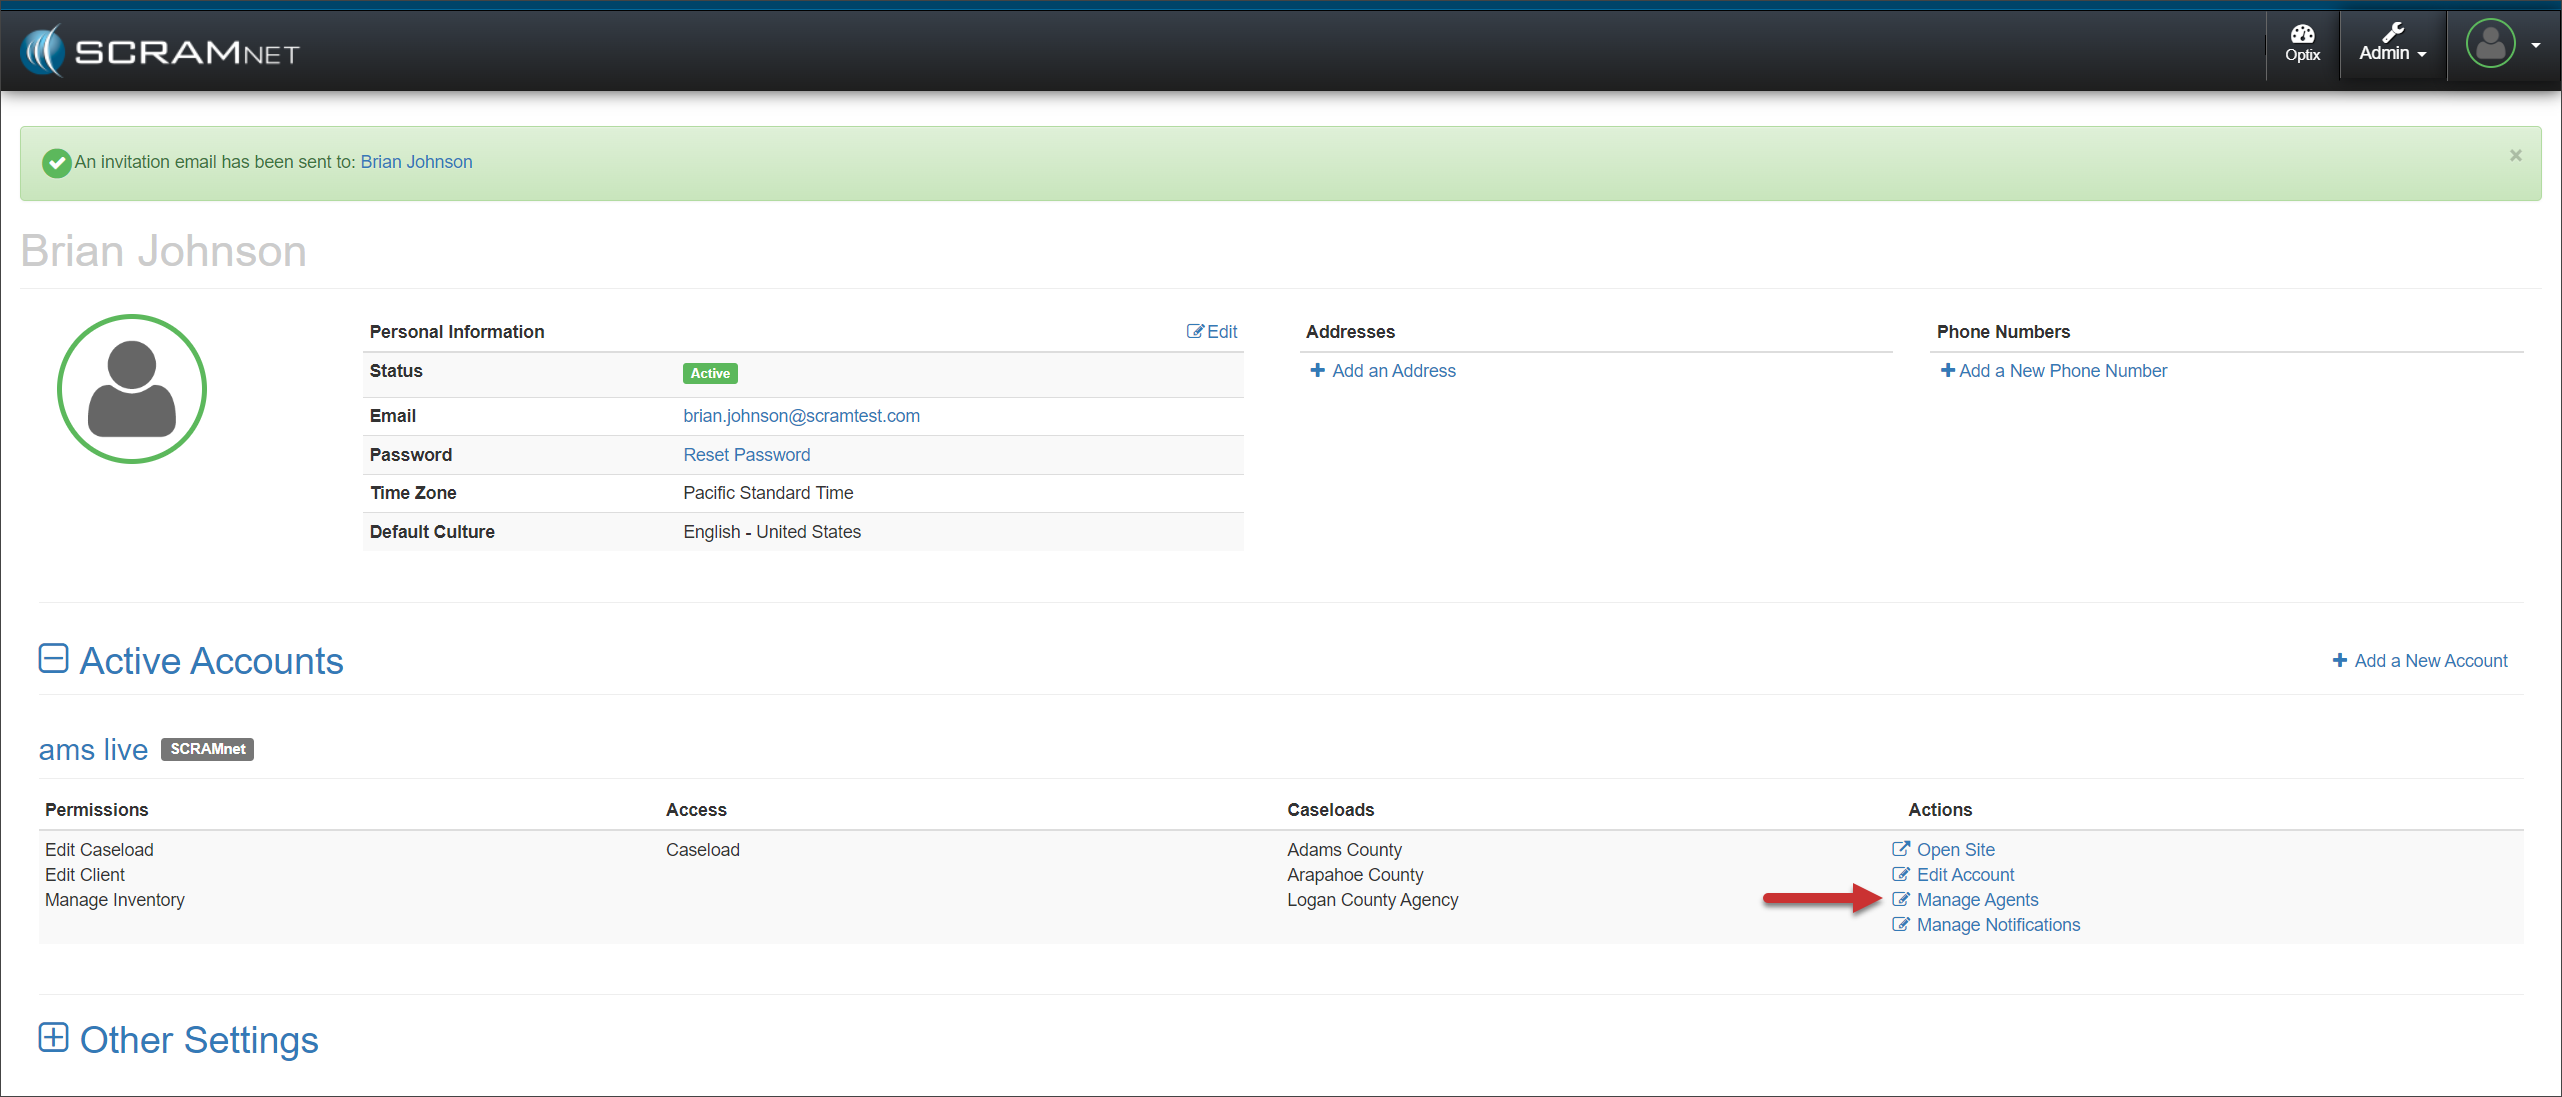
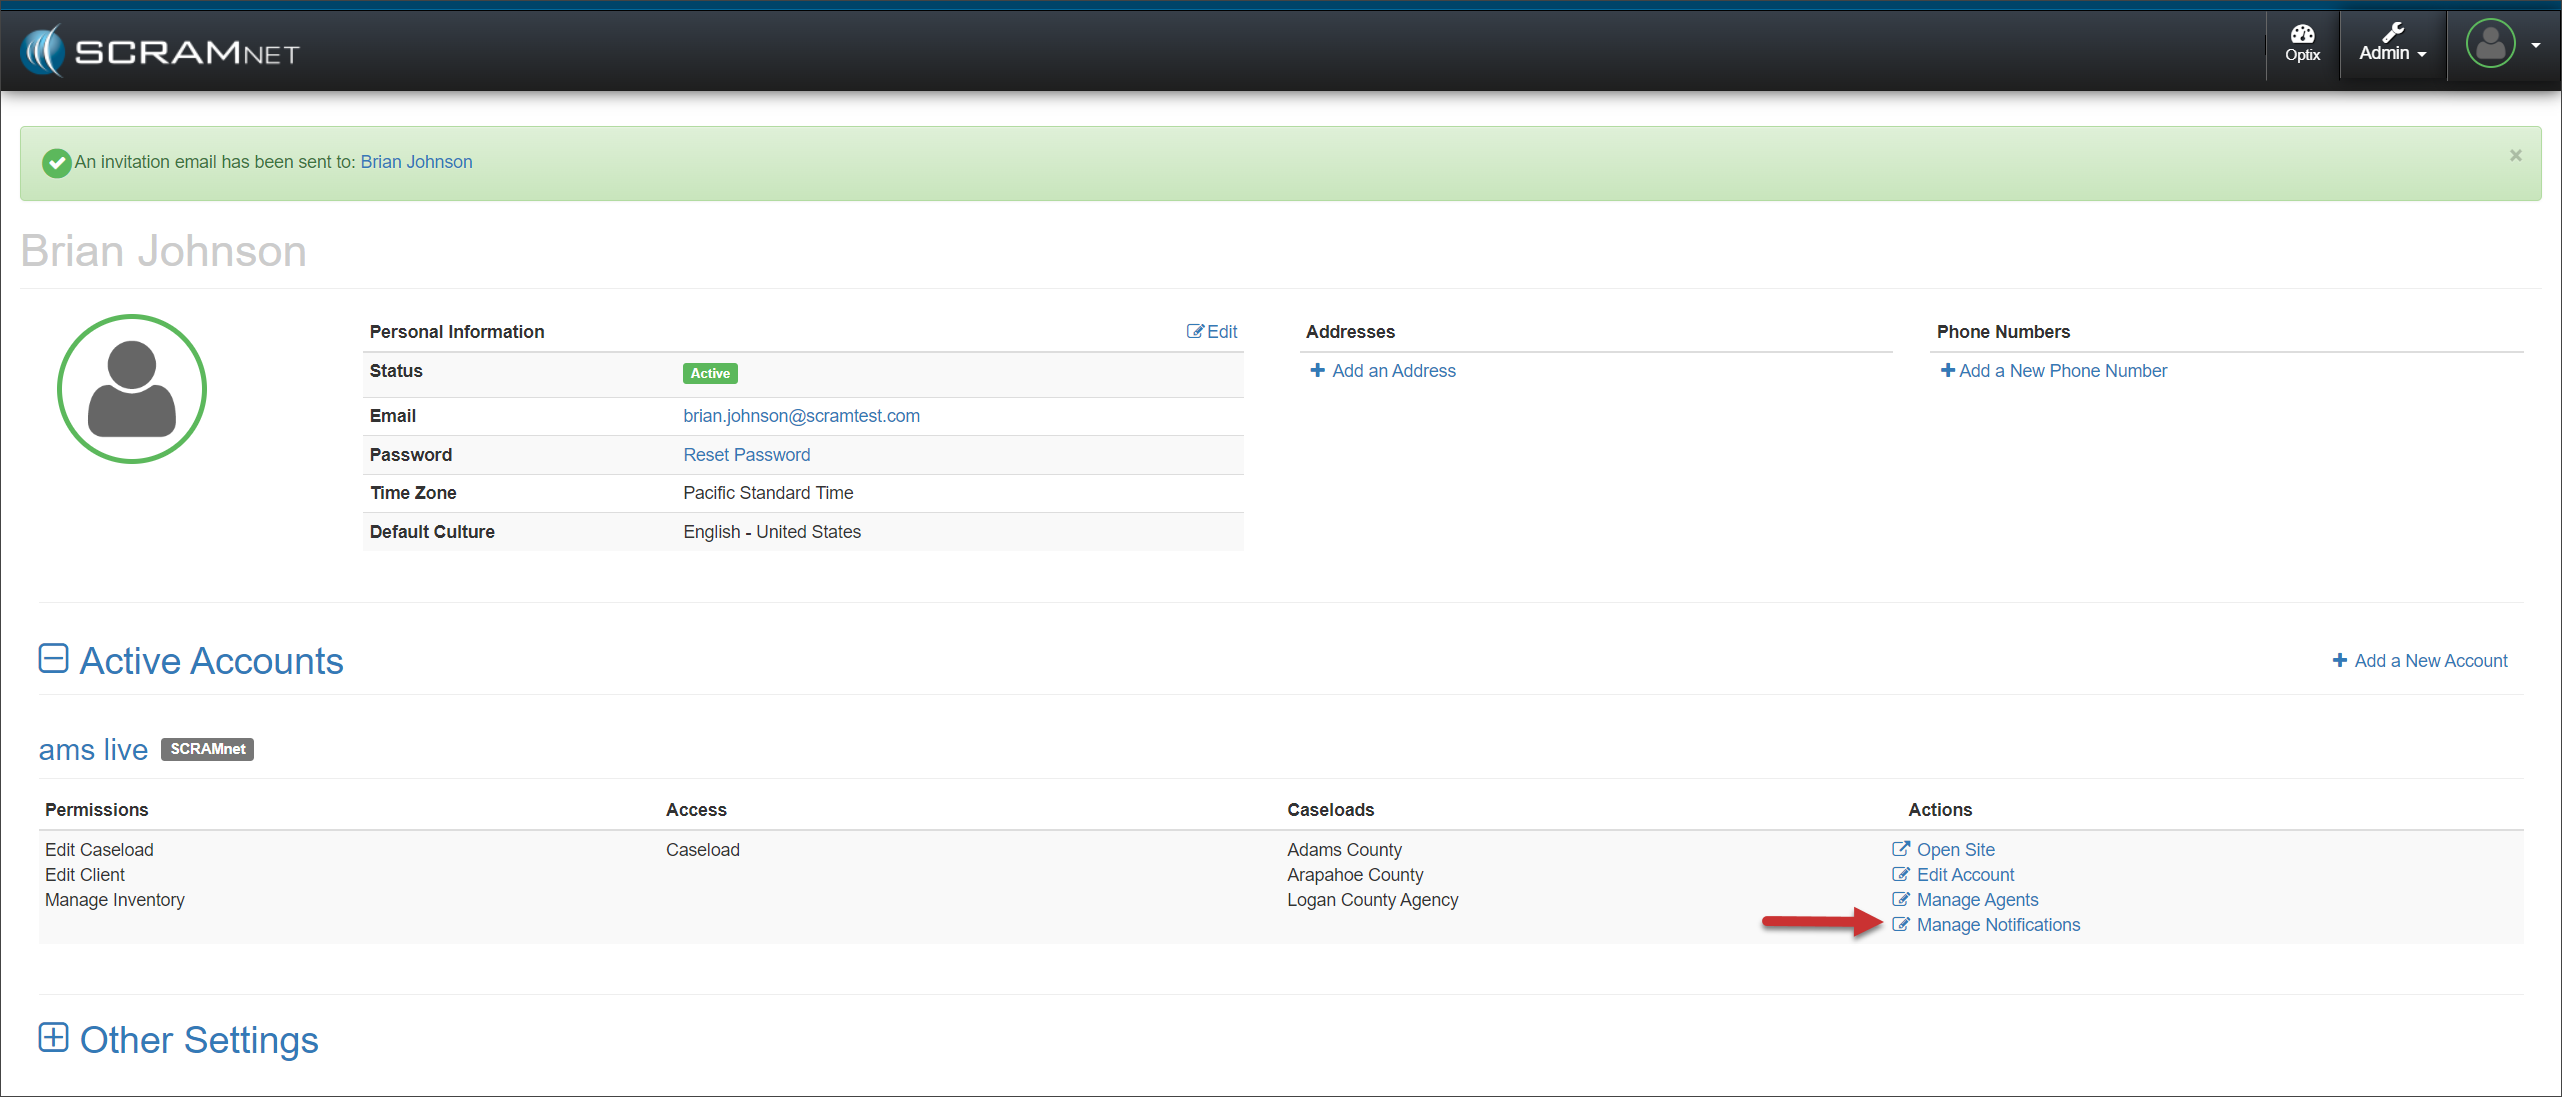
Once you have created the new user from the Manage Users page, access the user’s Profile page to locate their SCRAMNET Active Account settings; then select the Manage Agents hyperlink found under the “Actions” column.
User Profile Page – click to enlarge
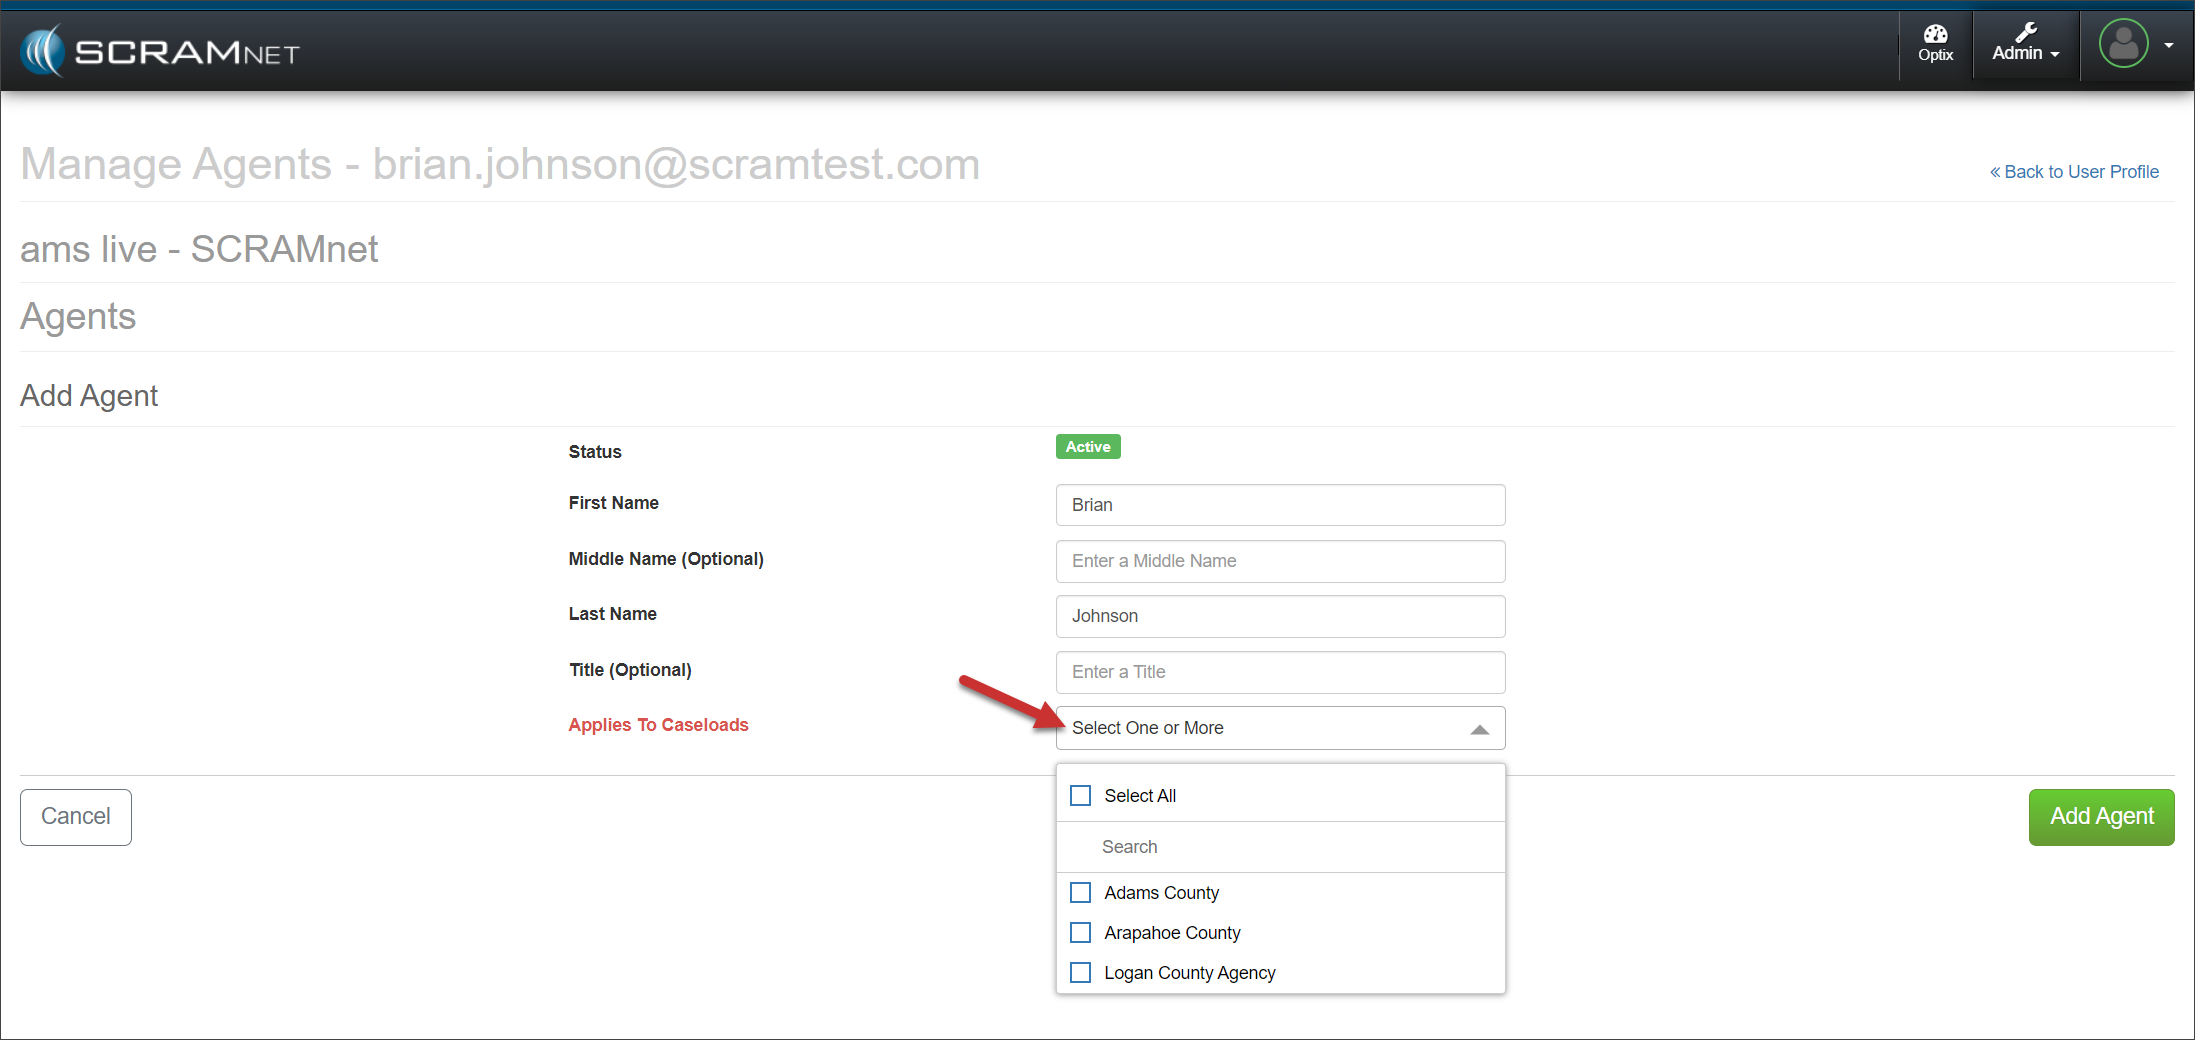
On their Manage Agents page, select the +Add Agent button.
Select the one or more Caseloads in which the user will be an Agent from the Select one or More dropdown menu.
Manage Agents Page – click to enlarge
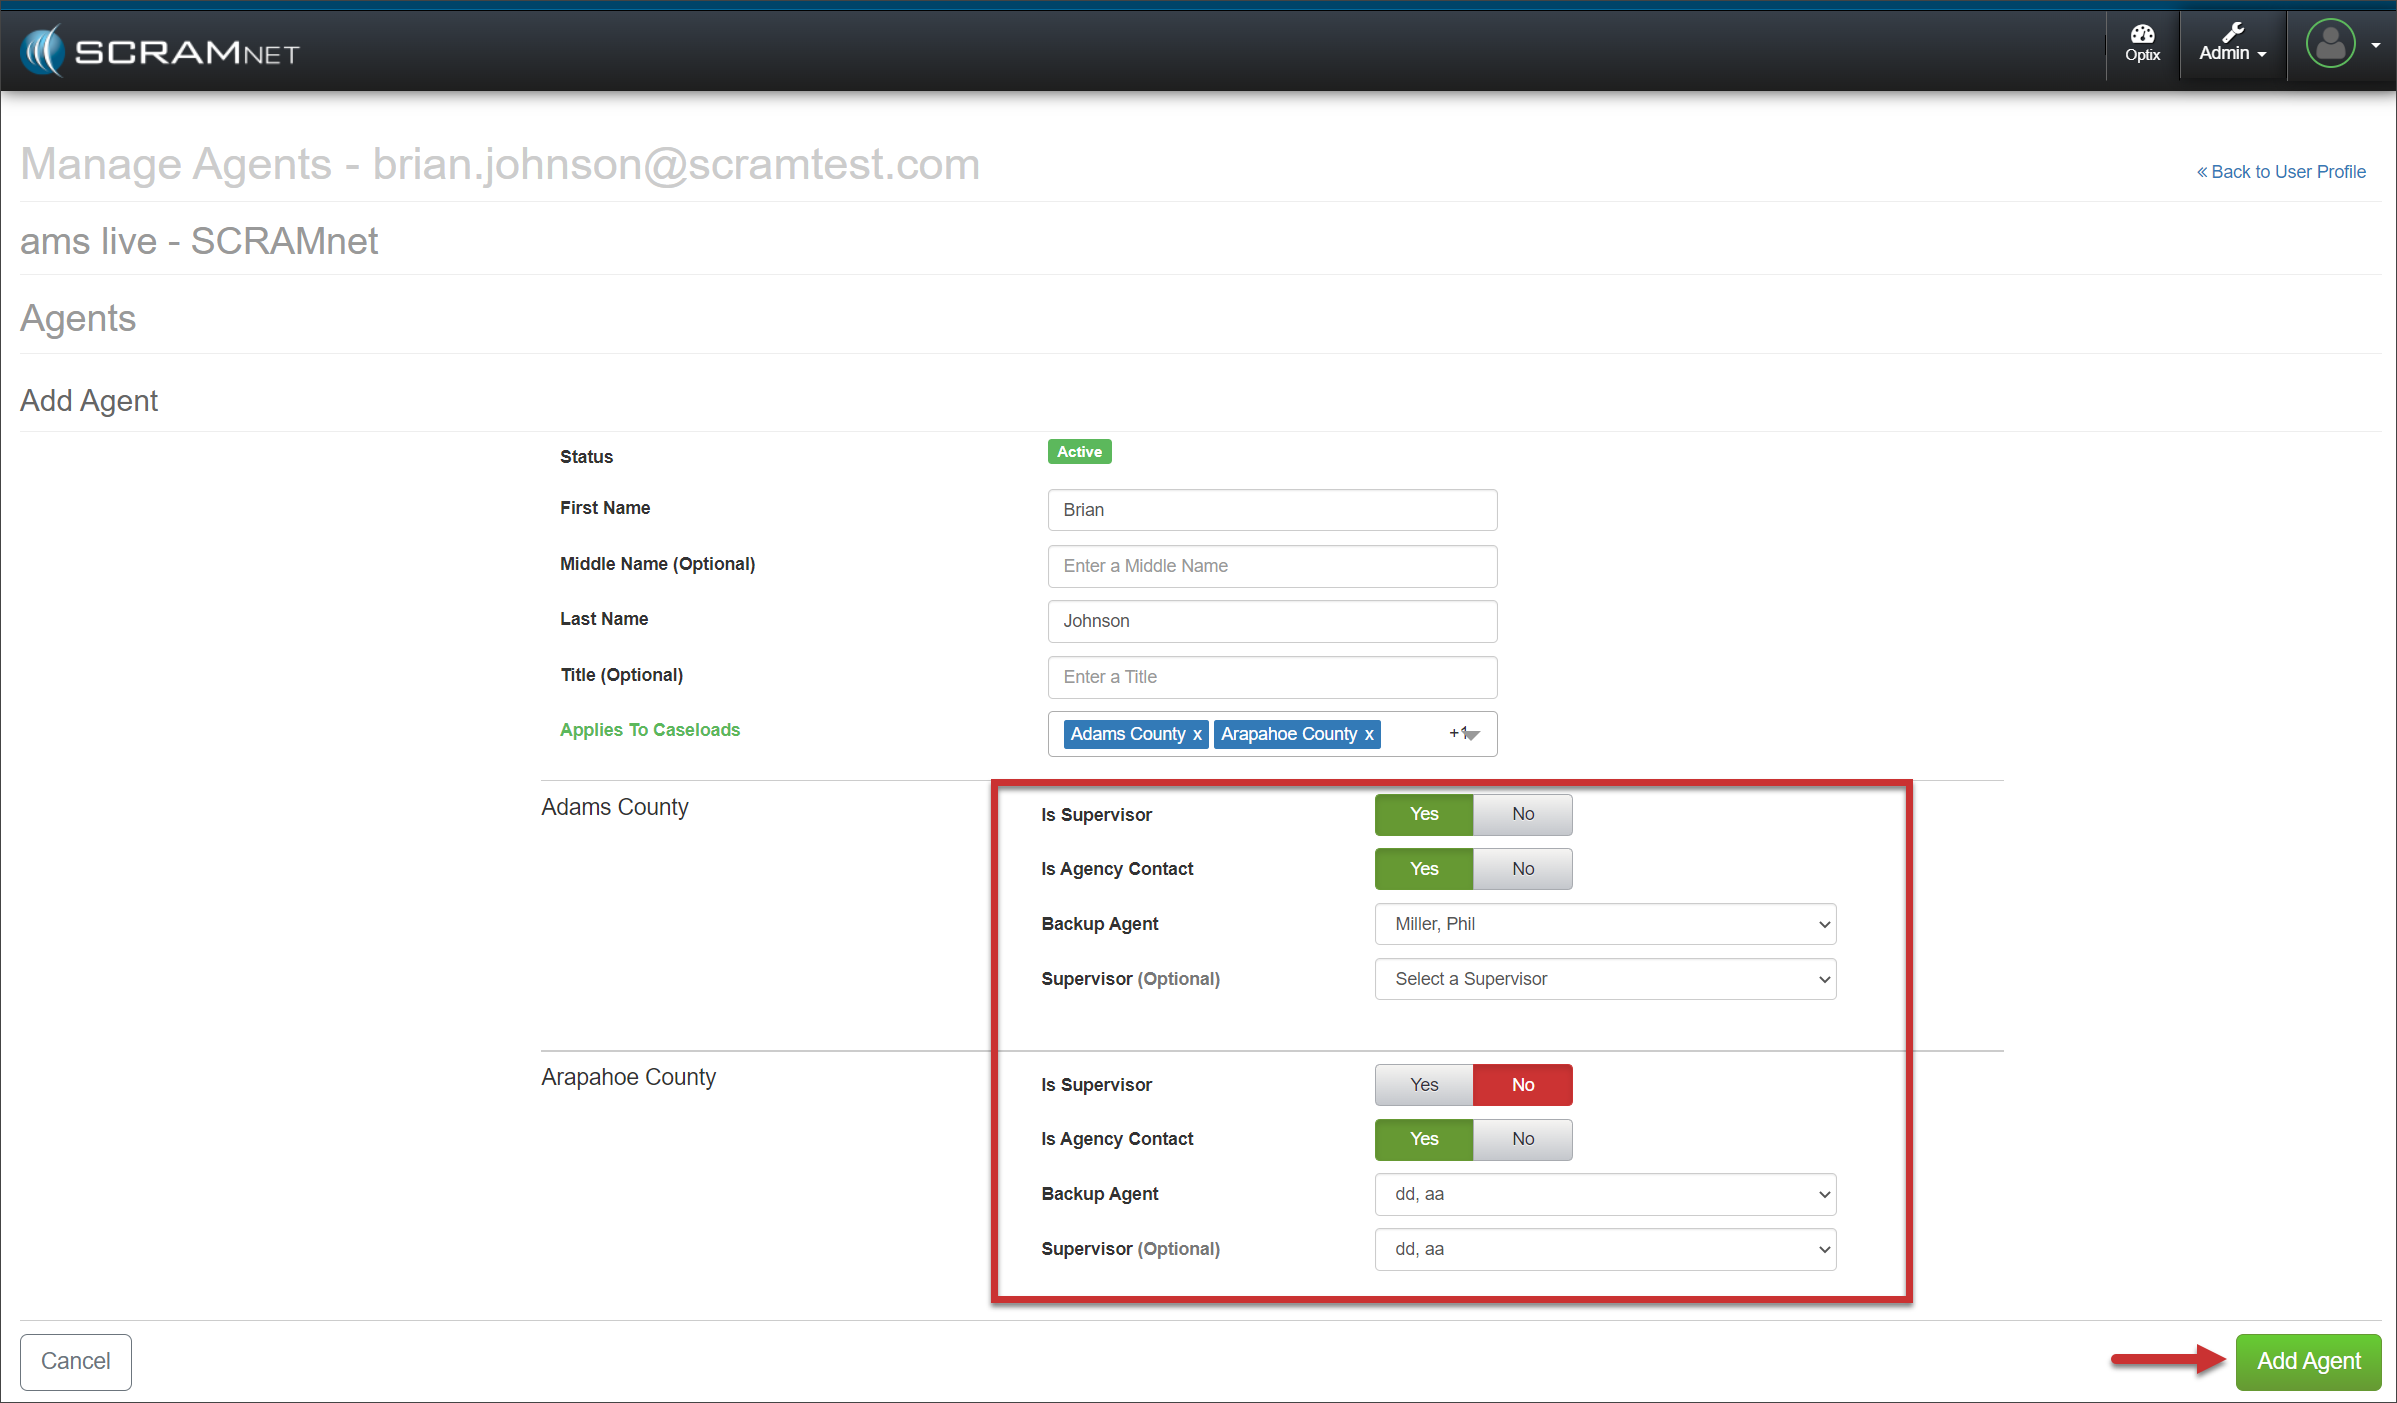
Select the appropriate options for each Caseload chosen and then select the +Add Agent button.
Manage Agents Page – click to enlarge
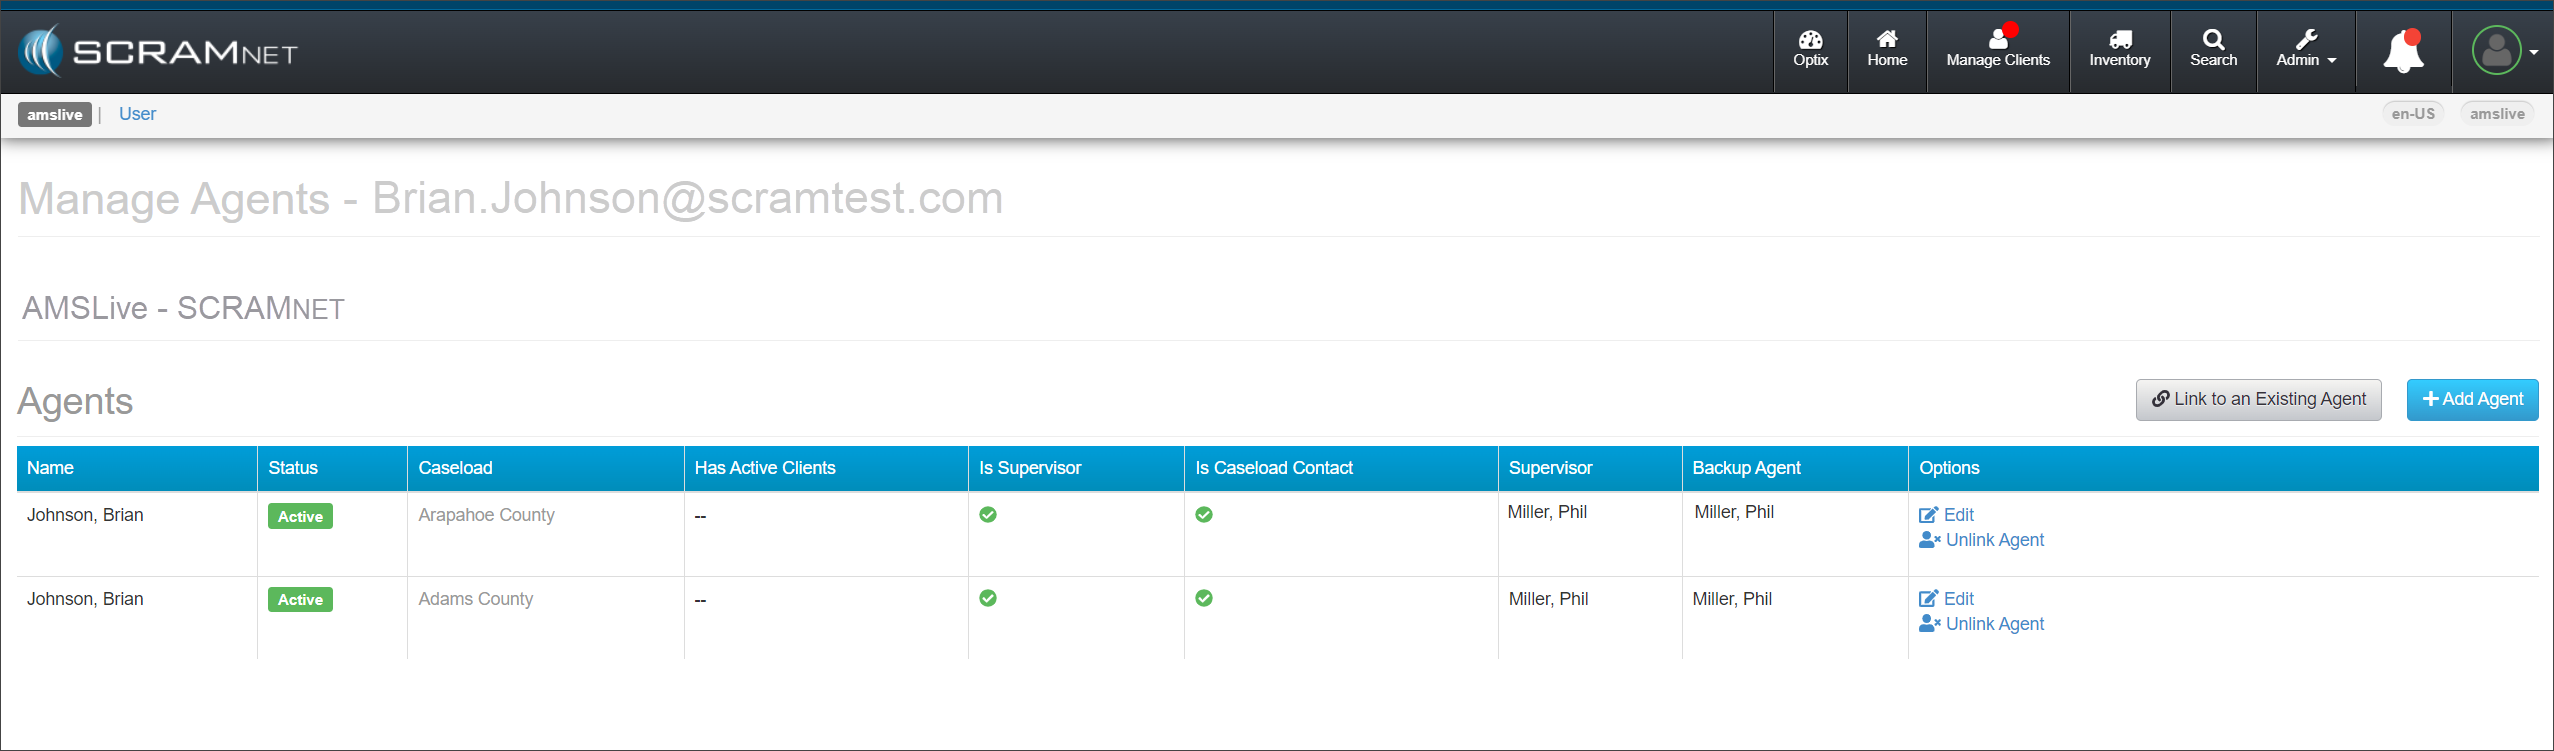
The Manage Agents page for the user will now display all the Caseloads associated with them.
Manage Agents Page – click to enlarge
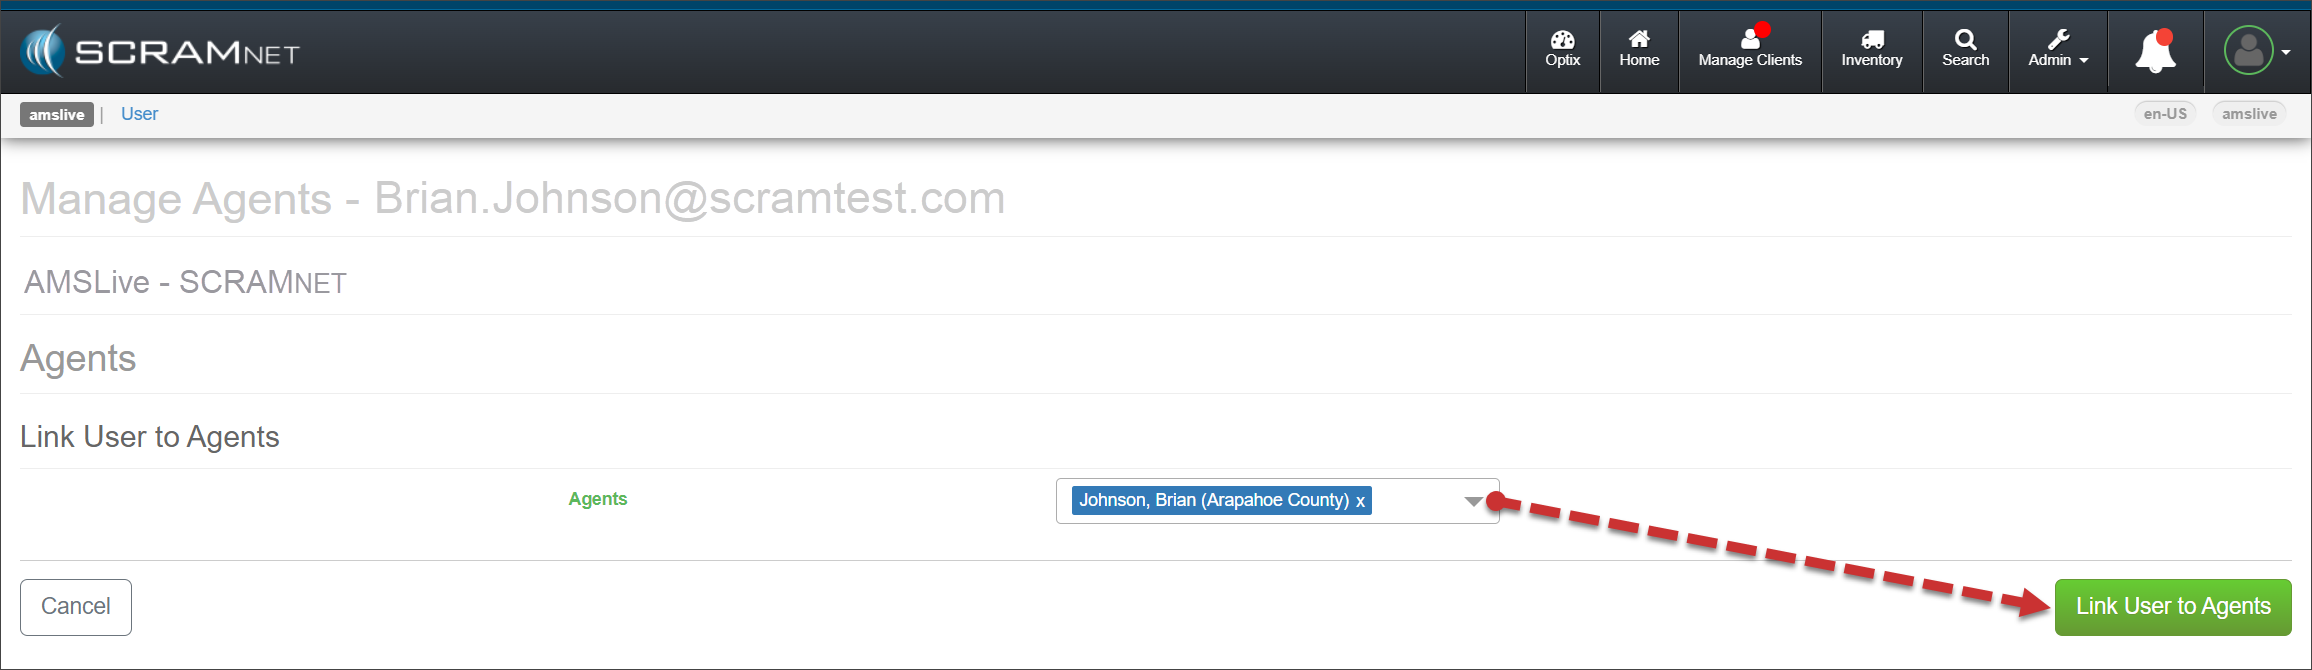
You may link an existing caseload to a user. To do this:
Select the Link to an Existing Agent button on the Manage Agents page for the user.
Open the Agents dropdown menu and select each instance of the agent listed.
Select the Link User to Agents button.
Manage Agents Page – click to enlarge
The user’s Manage Agents page will display each Caseload associated with that user.
Manage Notifications
Set up a New User for Priority Notifications and Daily Summary Reports
Select the Manage Notifications hyperlink under the Actions column for their SCRAMNET account.
User Profile Page – click to enlarge
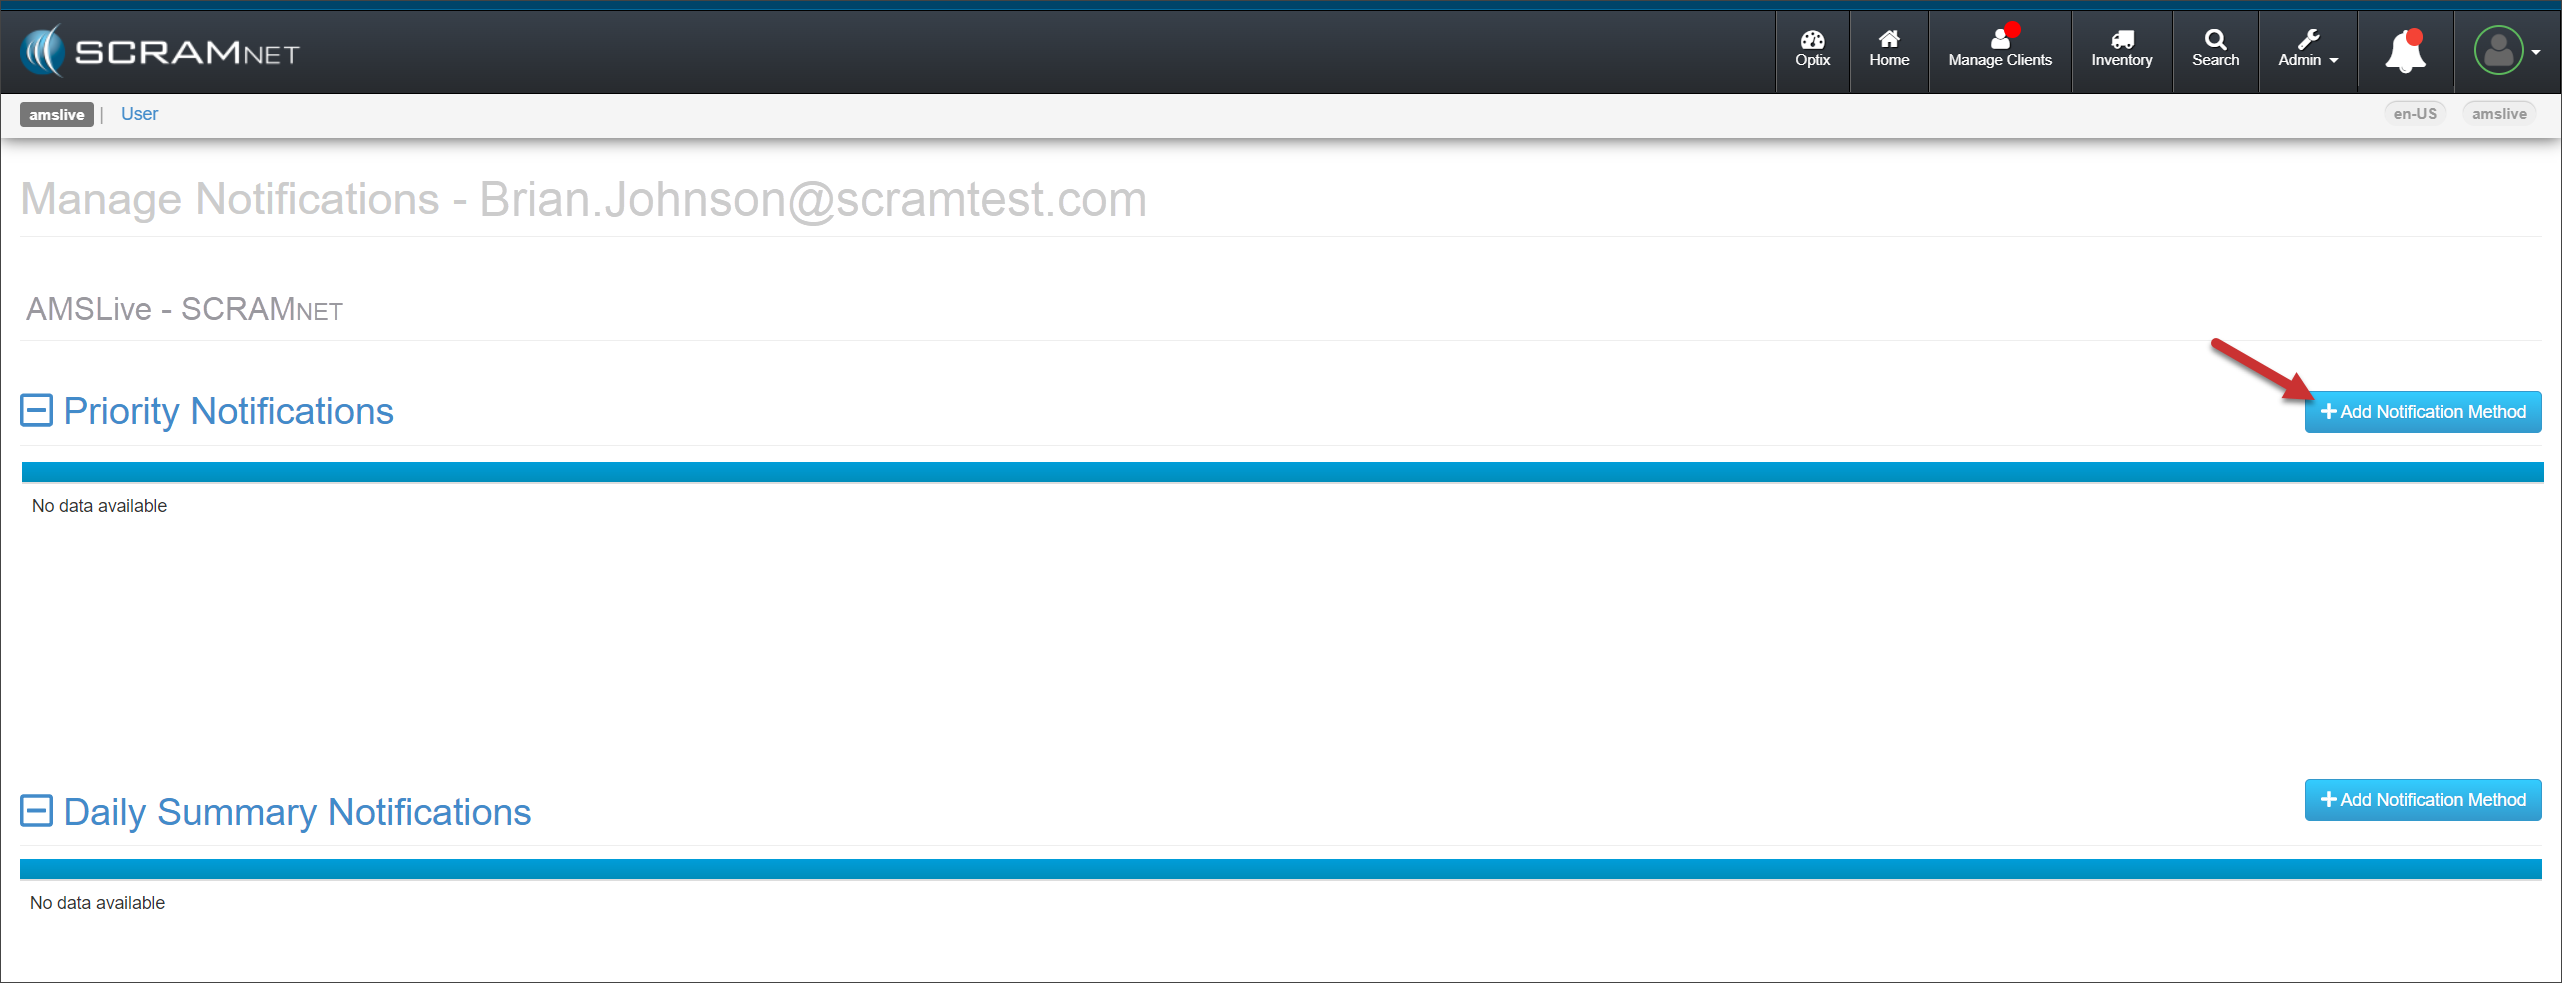
On the Manage Notifications page for that user, select the +Add Notification Method button in the Priority Notification section.
Manage Notifications Page – click to enlarge
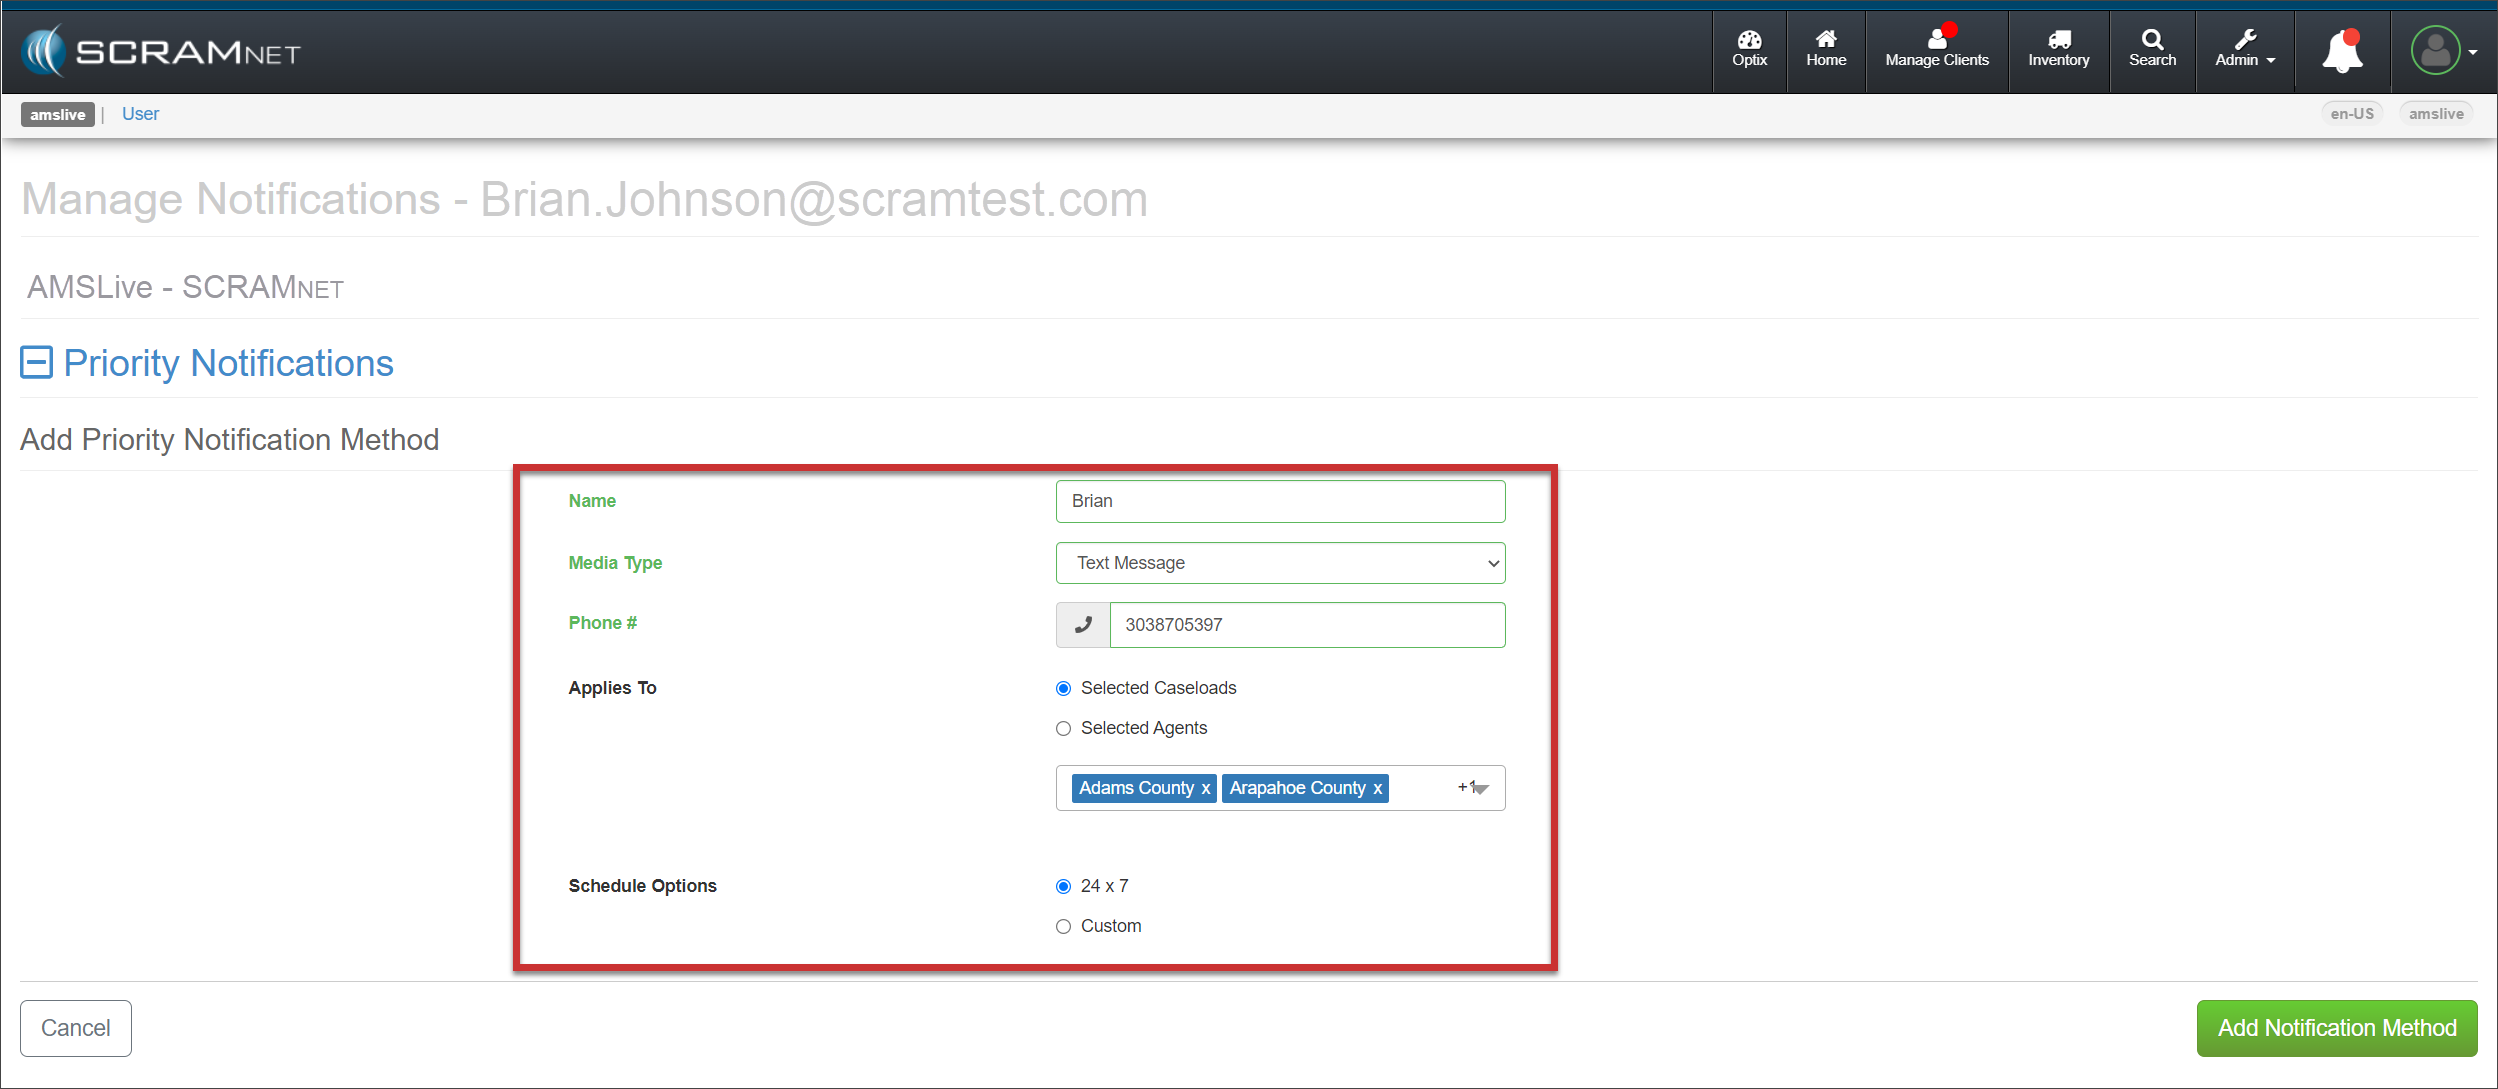
Add the details for the Priority Notification Method.
You may select one or more Caseloads to associate with this notification method.
The scheduling options chosen for this notification method will apply to each Caseload selected.
Manage Notifications Page – click to enlarge
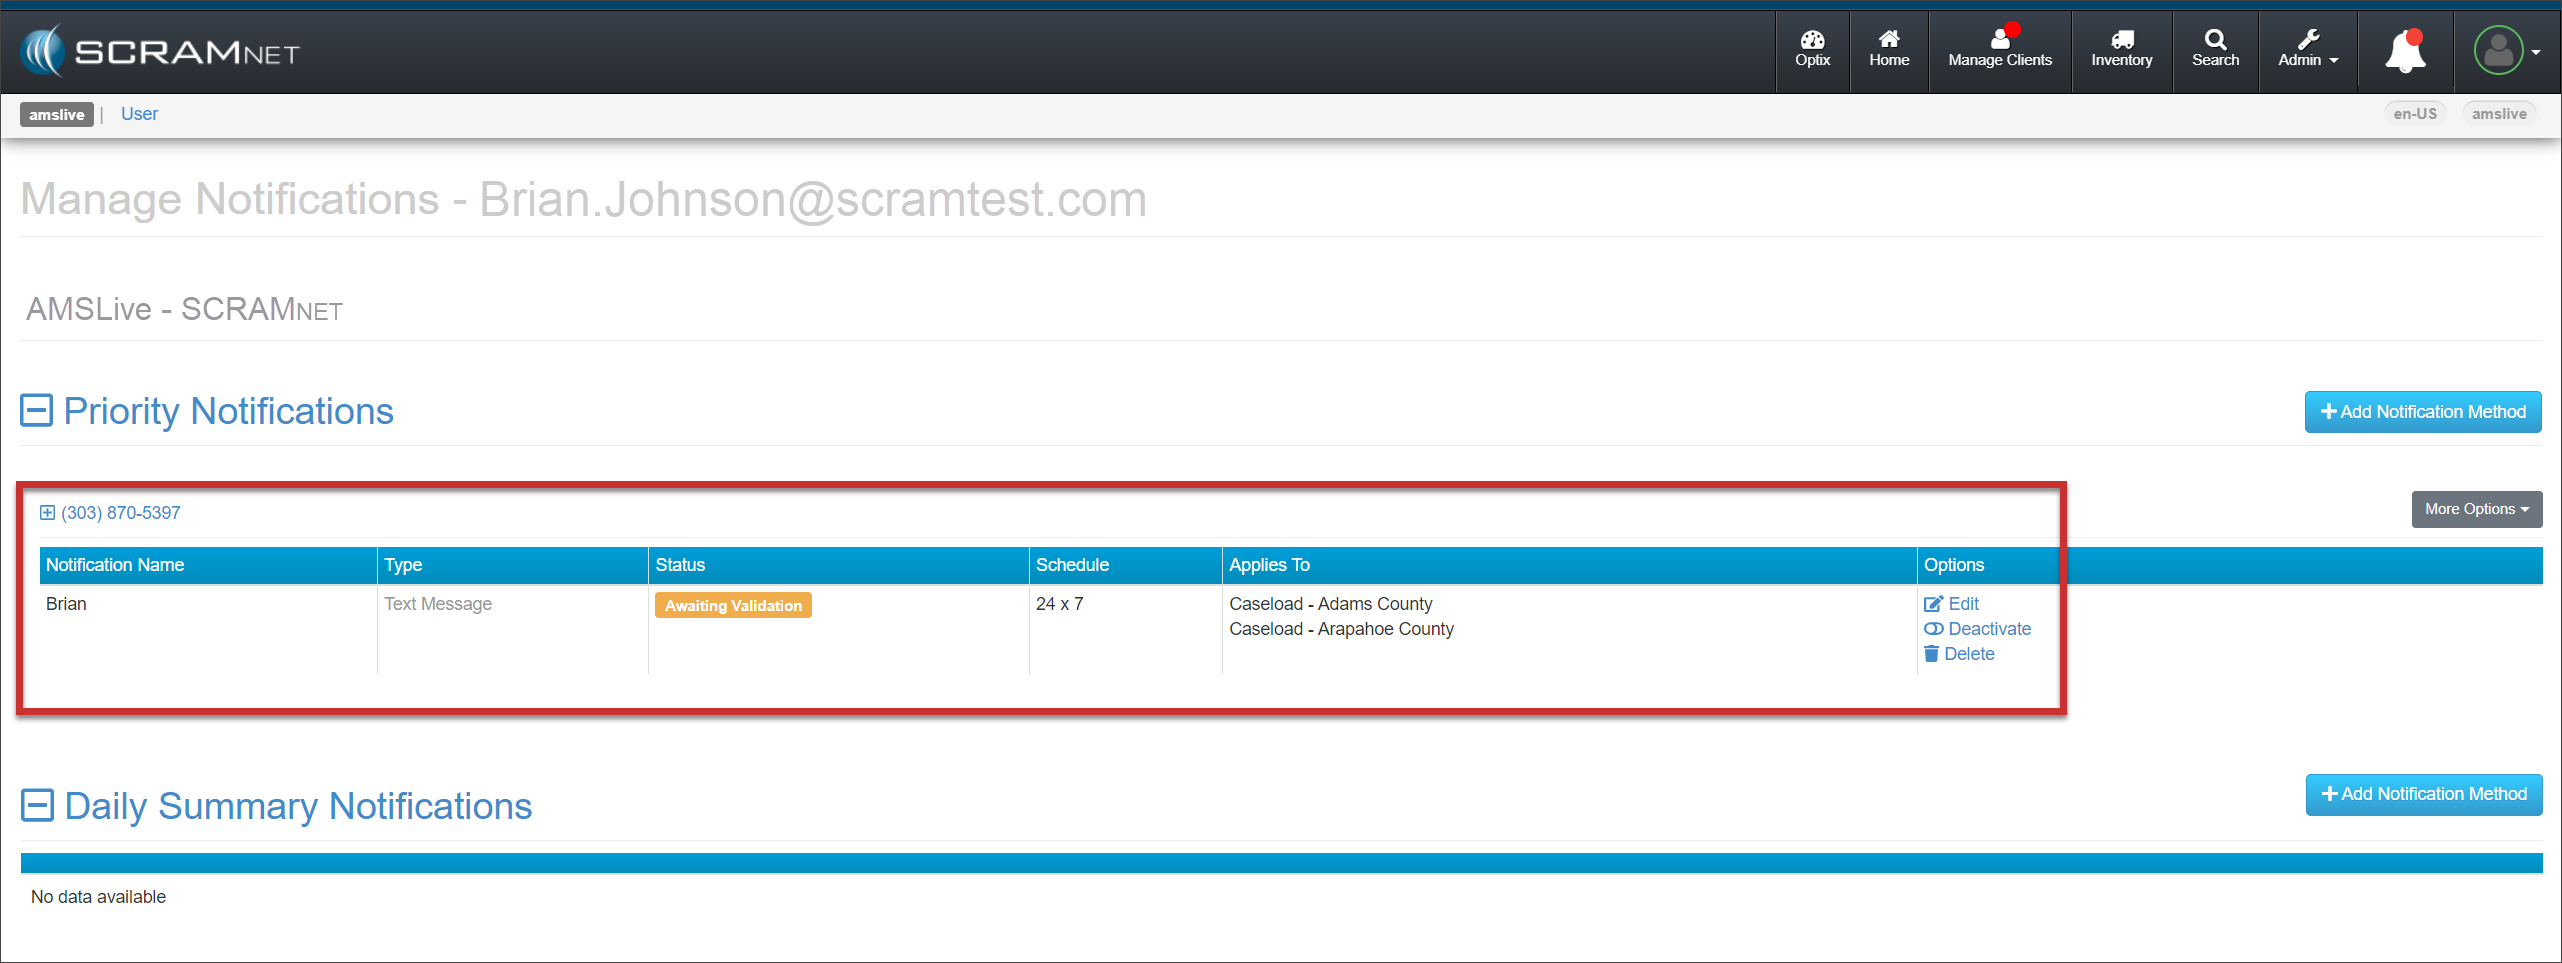
Select the Add Notification Method button to save the information and send the Validation Code via the Media Type selected. The notification method is displayed on the page with each Caseload associated with that notification method.
Manage Notifications Page – click to enlarge
Once the user receives the validation code, have them:
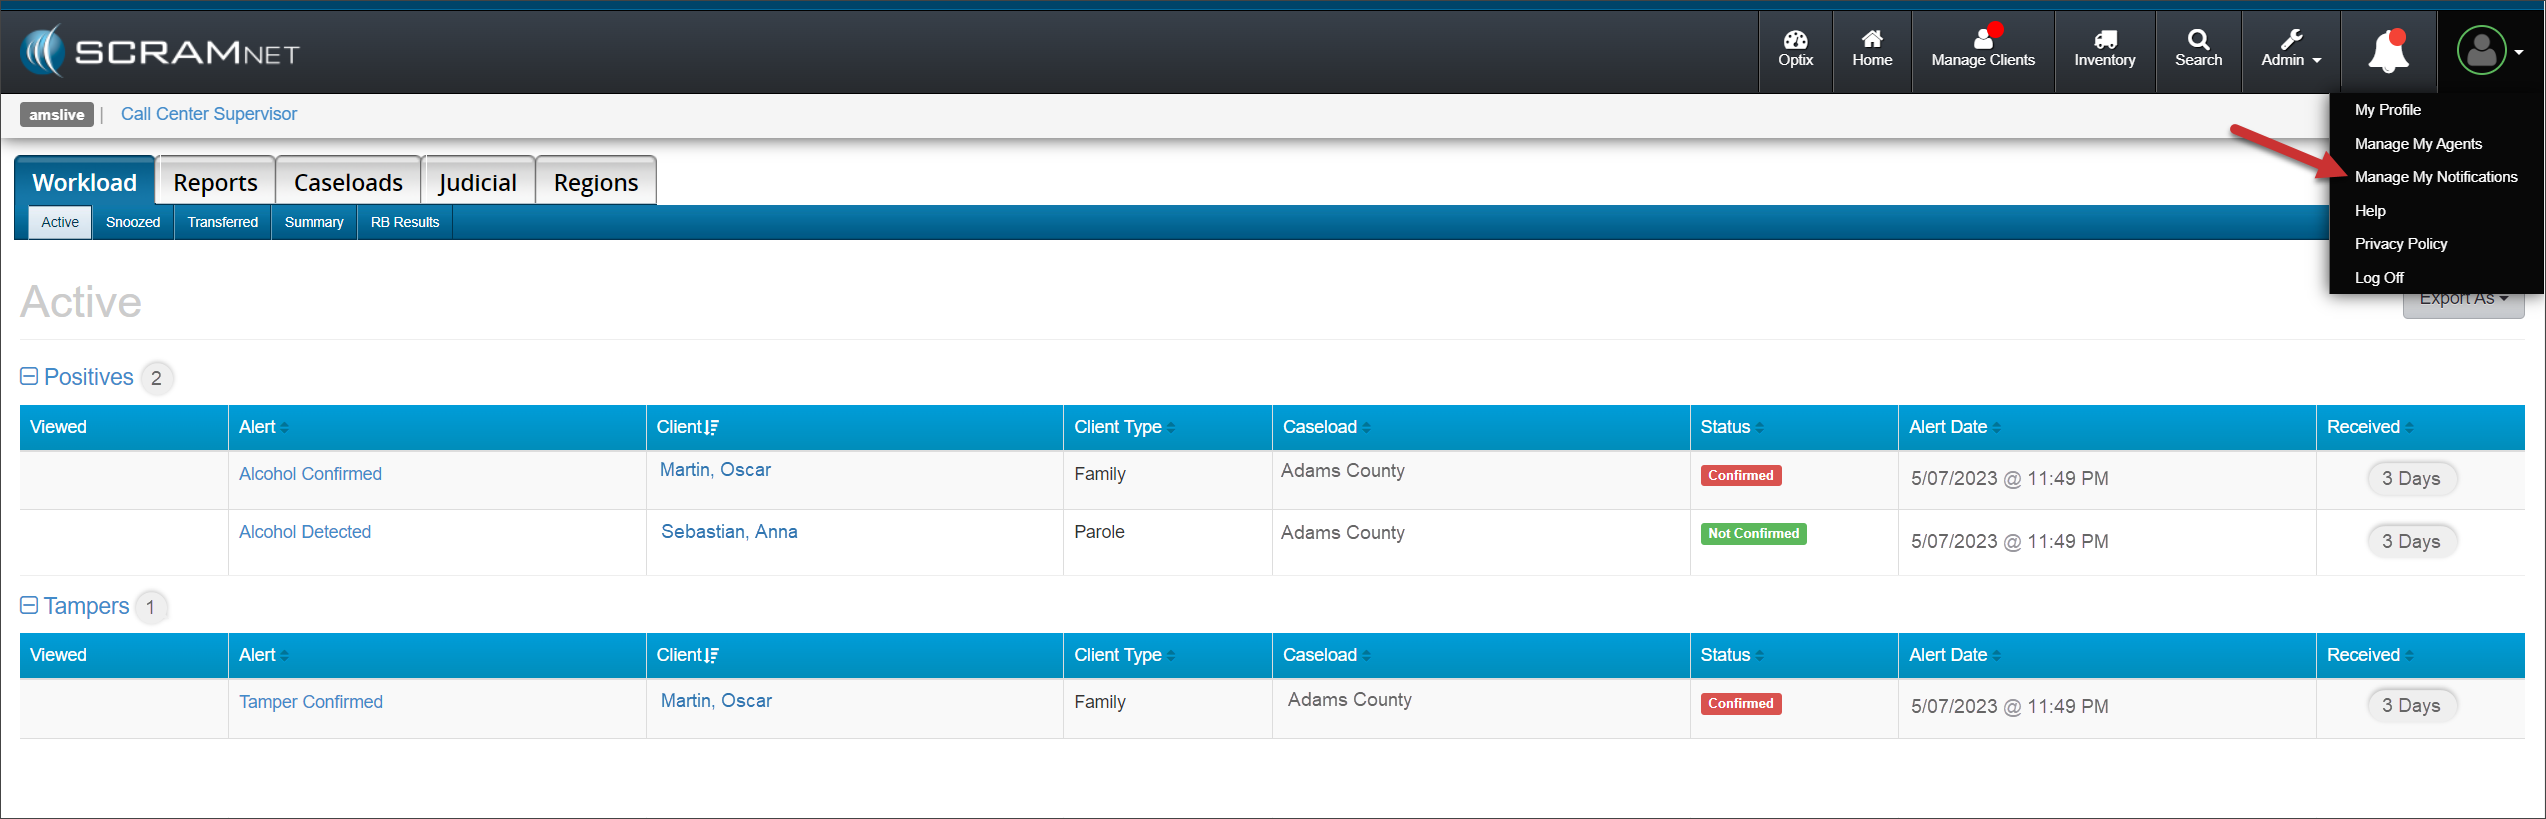
Select “Manage My Notifications” from their Profile dropdown menu in SCRAMNET.
Workload Page – click to enlarge
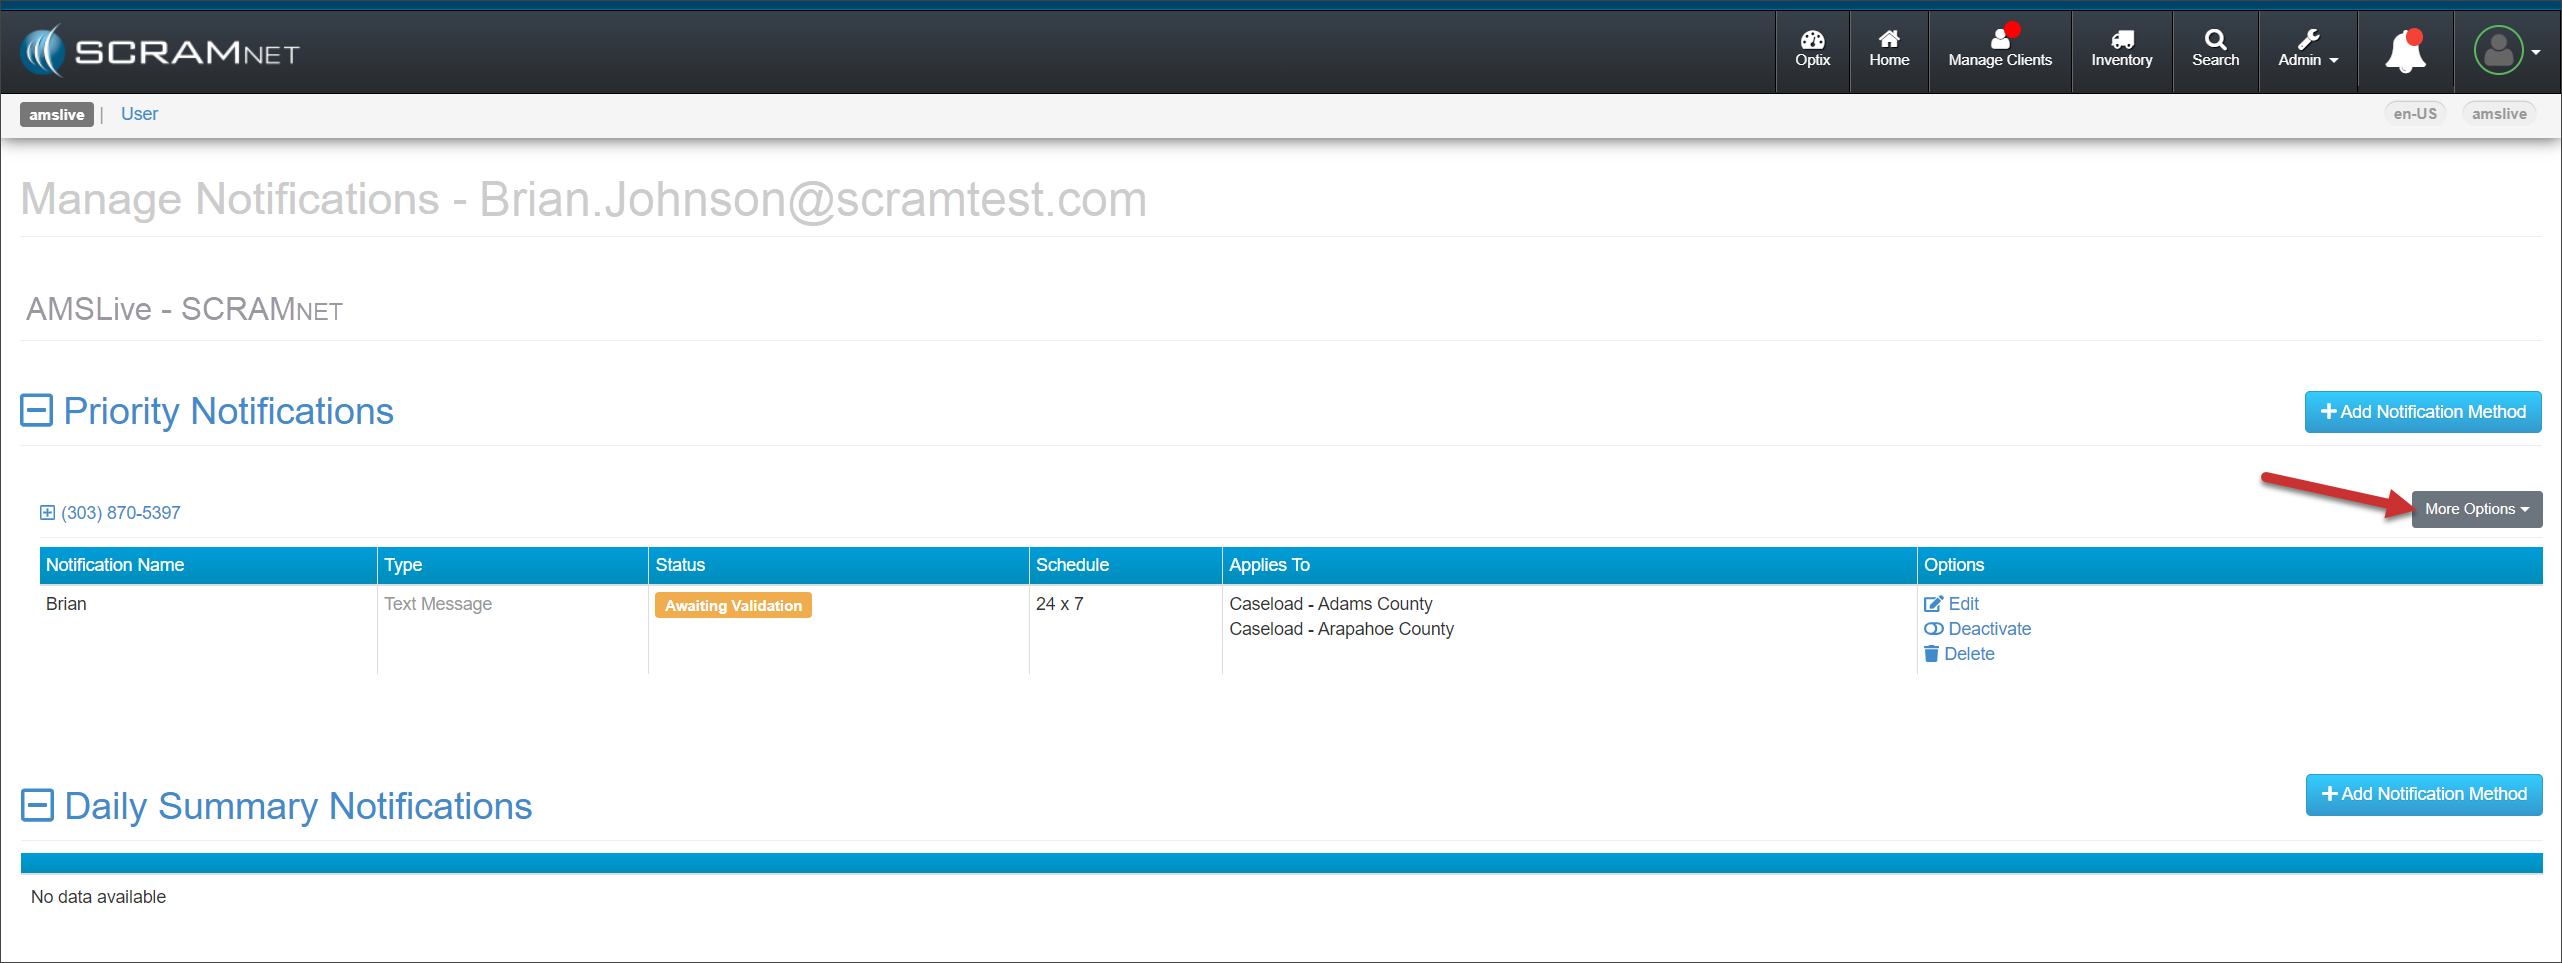
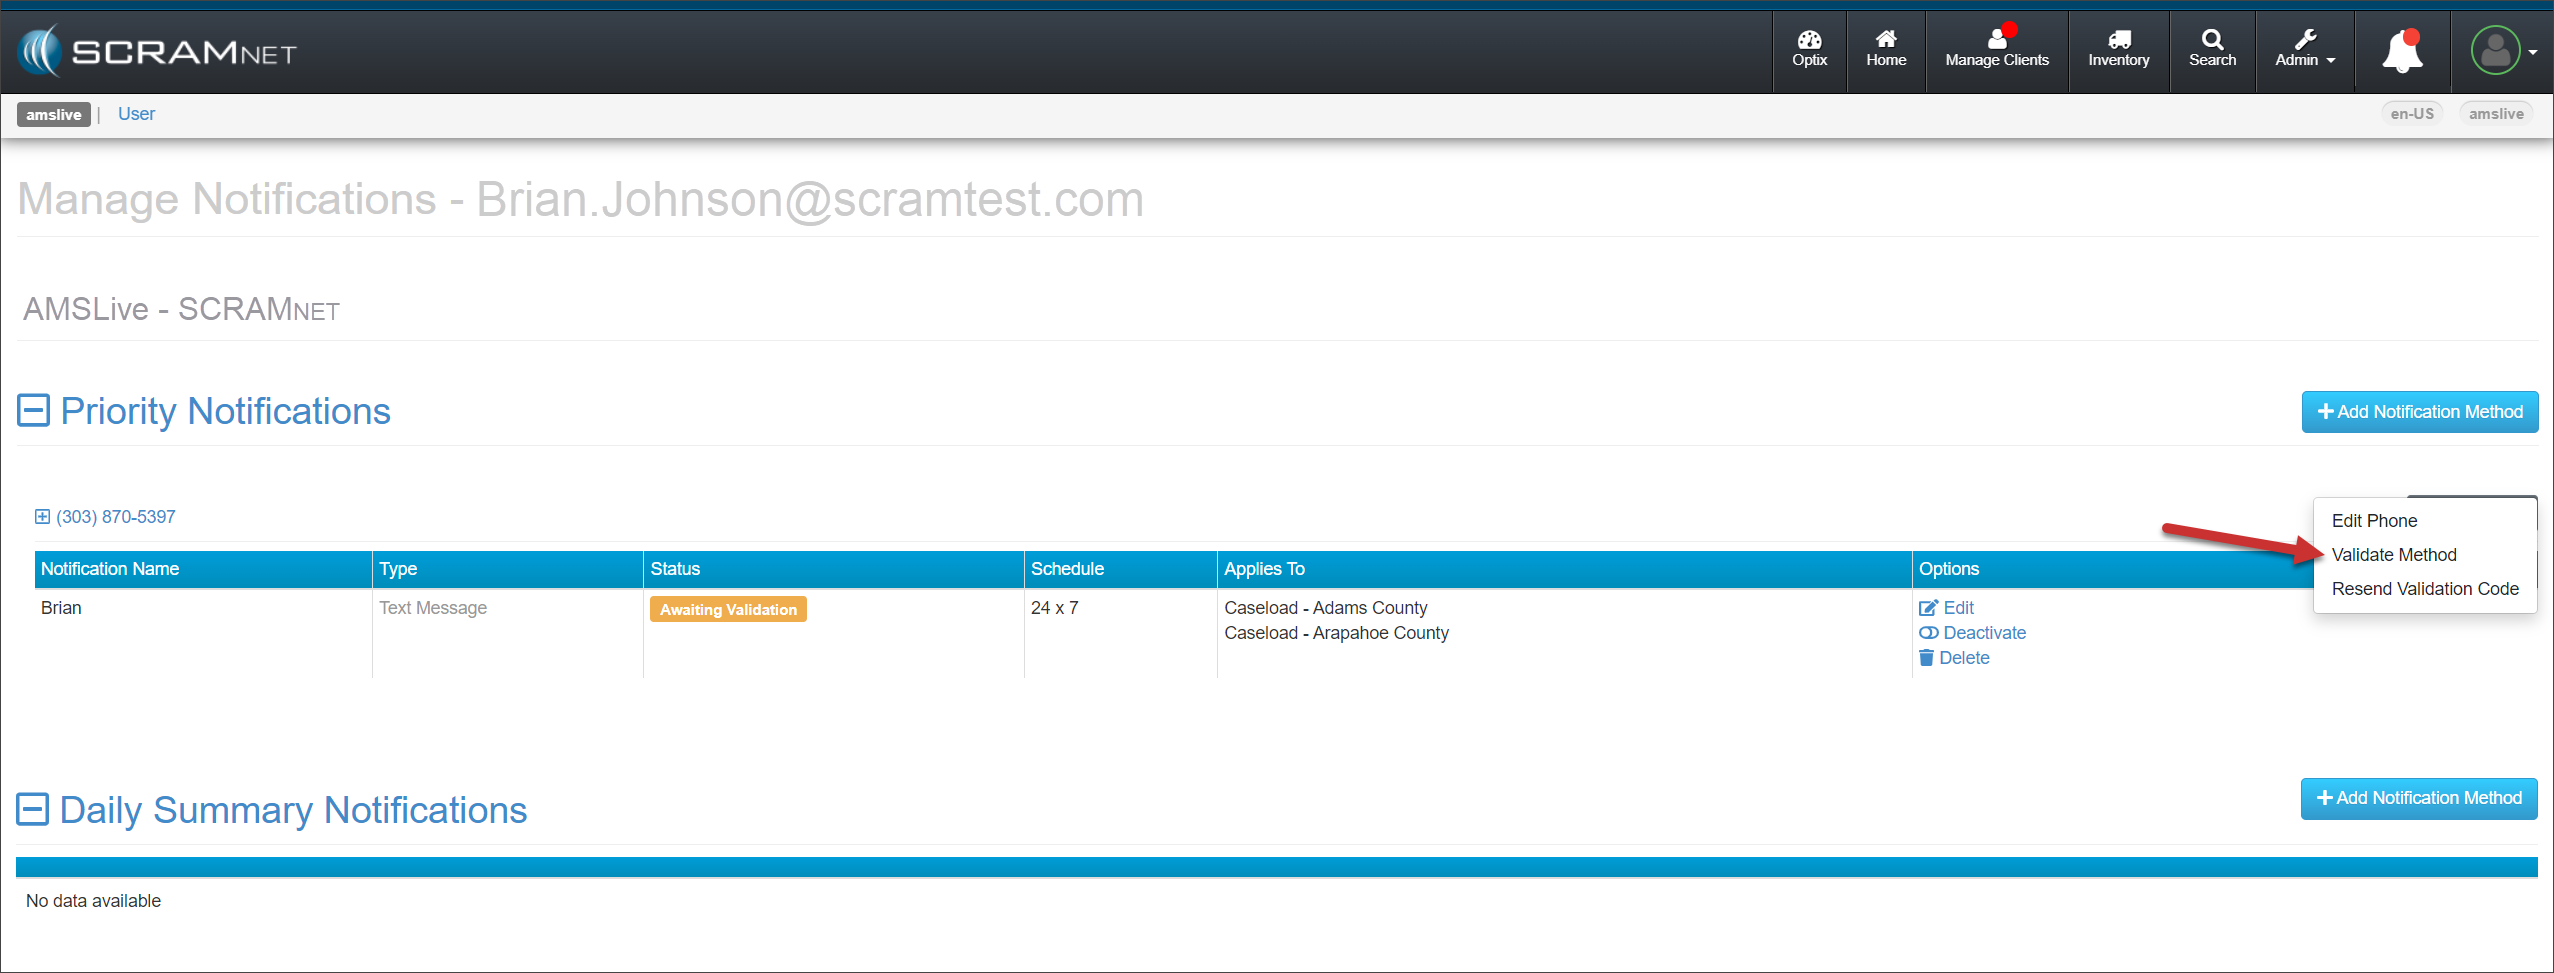
On their Manage Notifications page, locate Priority Notifications and open the More Options dropdown menu.
Manage Notifications Page – click to enlarge
Select “Validate Method” from the More Options dropdown menu.
Manage Notifications Page – click to enlarge
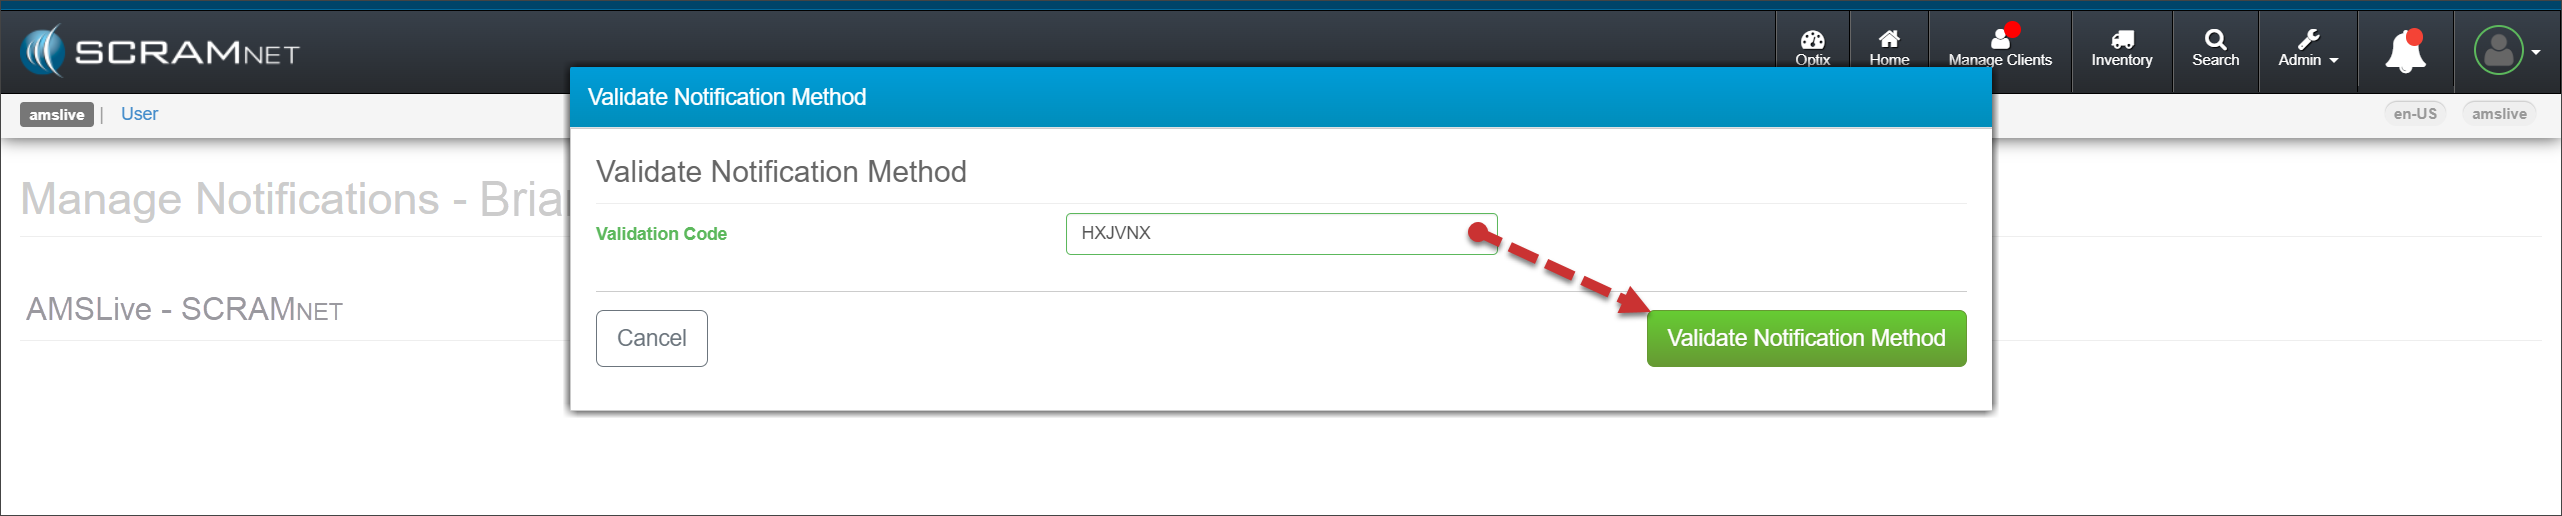
Enter the Validation Code you sent to them via the Media Type you selected, and then select the ValidateNotification Method button.
Validate Notification Method Pop-Up – click to enlarge
Repeat this process to create and validate Daily SummaryReport delivery methods for the user.
Based on their access level and permissions, users may accomplish all of the above tasks by accessing their Profile icon, selecting the “Manage My Agents” or “Manage My Notifications” options from the dropdown menu, and then following the process of entering their information and delivery methods.
You may continue to manage agents and notification methods from the Agents and Monitoring tabs within an individual Caseload.