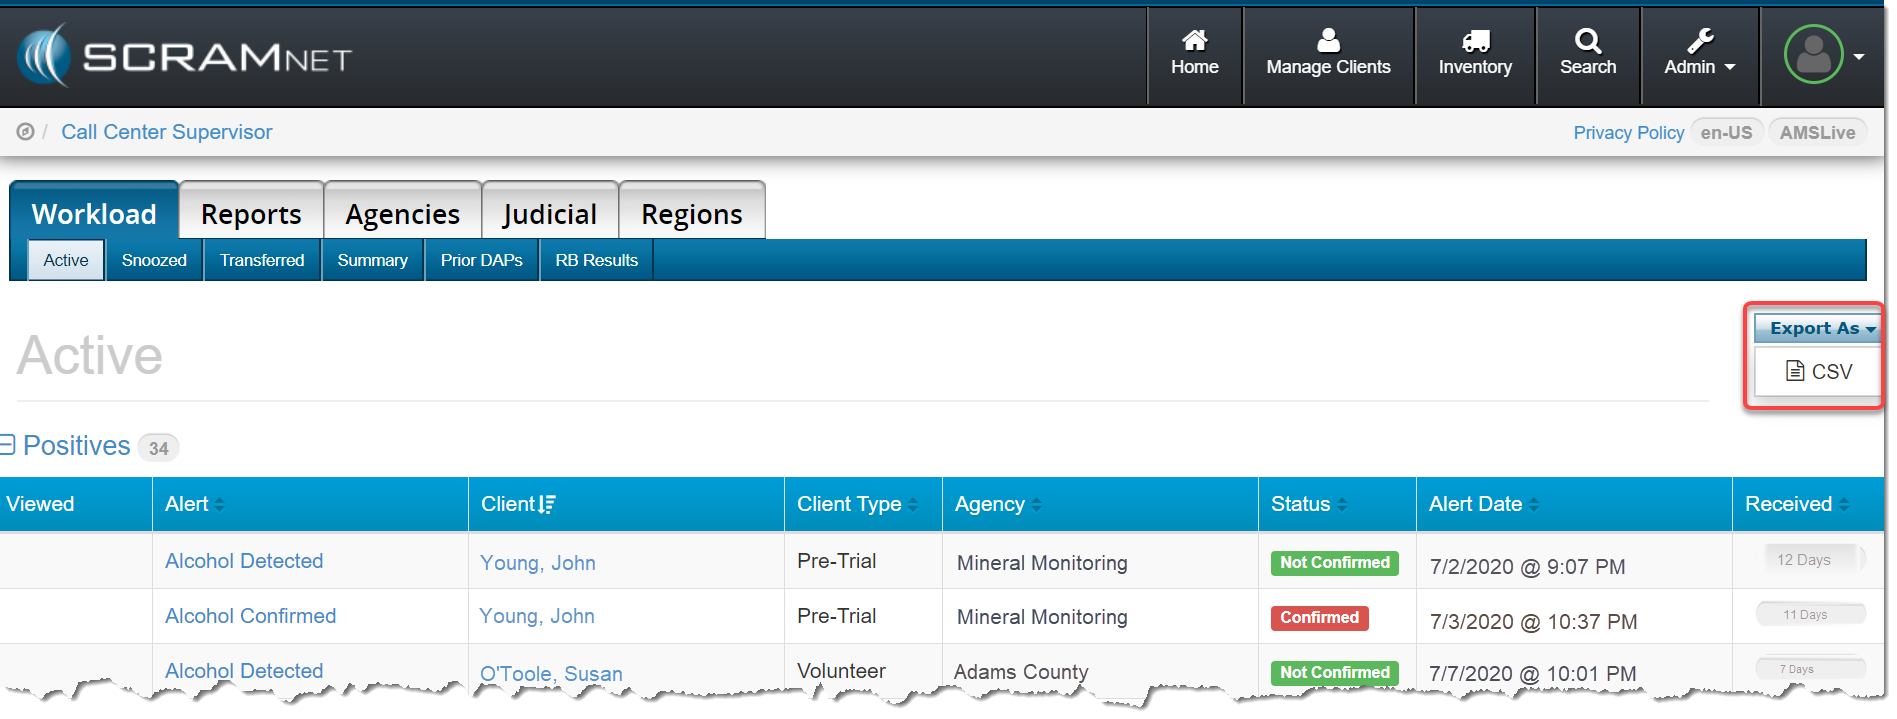
With this release, you can now export the data that appears on any Workload page in SCRAMNET® to a.csv-format spreadsheet file. To do this, click the Export As button then click the “CSV” option.
Reminder: A Workload page can be viewed in the following areas in SCRAMNET:
Call Center (Service Provider)
Region
Location
Caseload
Agent
Once the .csv file is downloaded to your computer, you can open the file in any popular spreadsheet editing program and easily modify the list as needed. Any comments entered for the case will appear in the “Comments” column.
At 9:30 PM MDT on July 13, 2020, SCRAM Systems® will introduce several new enhancements to the SCRAM Nexus® caseload management system that make it easier to use. These enhancements include:
A new Pending Intake status and associated filter for client management
New “Alert” and “Success” banners
Updated labels on the Office Visit screen tabs
An increase to the ‘Note’ size to 10,000 characters
The ability to change past appointment dates
A new “My Staff” view on the Supervisor Report tab (for supervisors)
New ‘Pending Intake’ Status
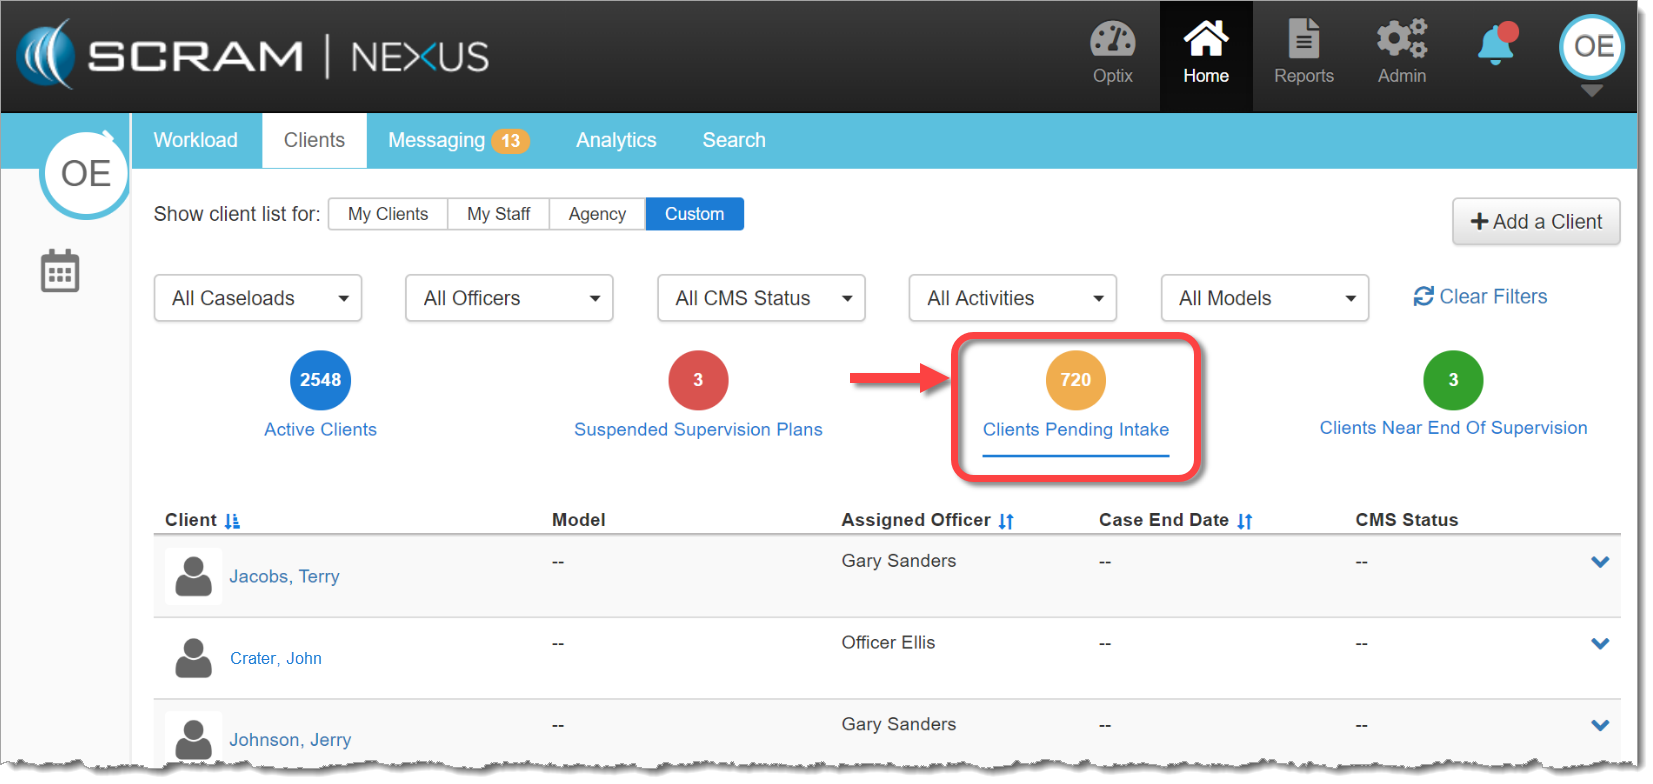
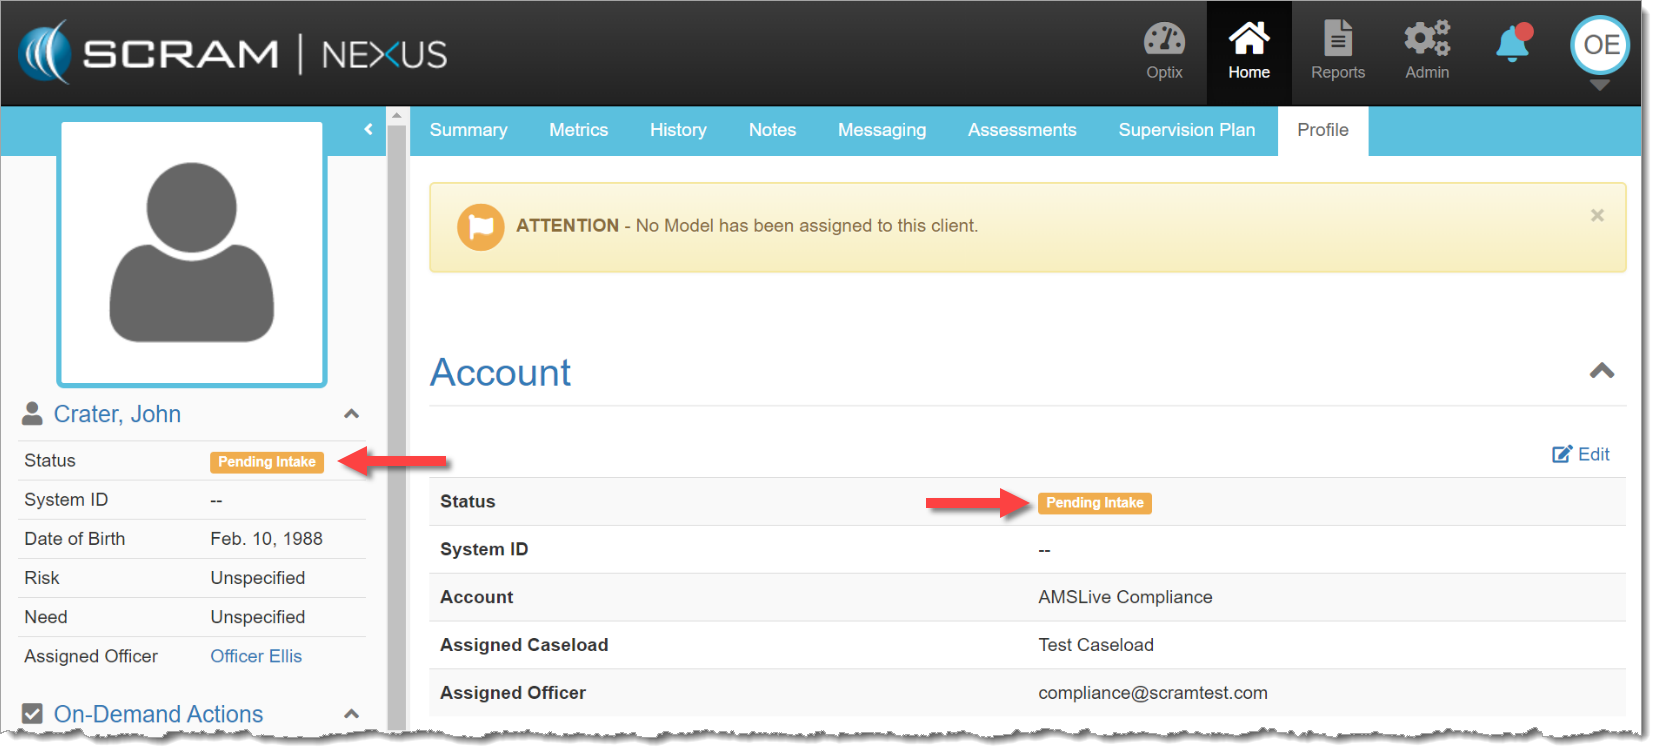
Clients who are active in Nexus but not assigned to a model will now be listed as ‘Pending Intake,’ and will be separate from active clients who are being monitored, as well as inactive clients who are no longer being supervised. This helps officers organize their clients and better represents the status of each client. This new status will appear both as a filter on the officer’s Clients tab, as well as a status on client’s Profile tab.
Clients Pending Intake filter on Clients tab (click to enlarge)Pending Intake status on client Profile tab (click to enlarge)
New “Alert” and “Success” Banners
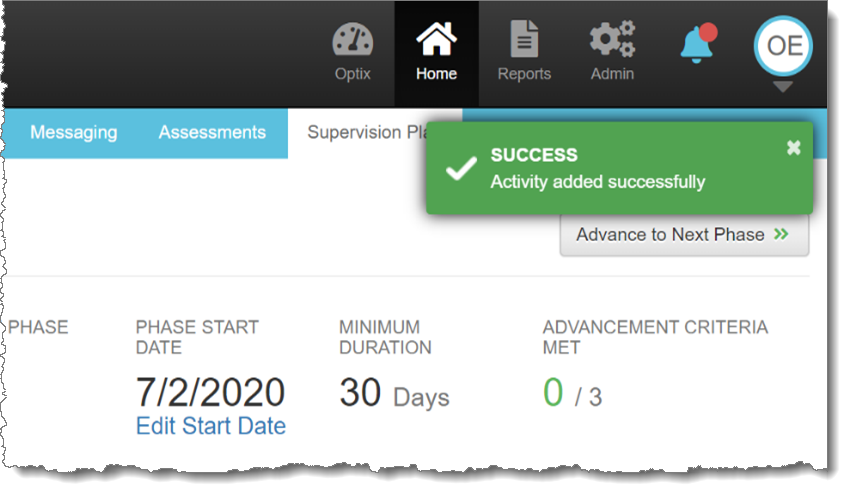
New Alert and Success banners will display in the top-right corner of the screen after an action is completed. Alert (or Error) banners will disappear automatically after 30 seconds. Success banners will show for five seconds before disappearing automatically. Hovering your mouse pointer over either banner will cause them to remain on-screen longer.
Alert / Error banner
Success banner
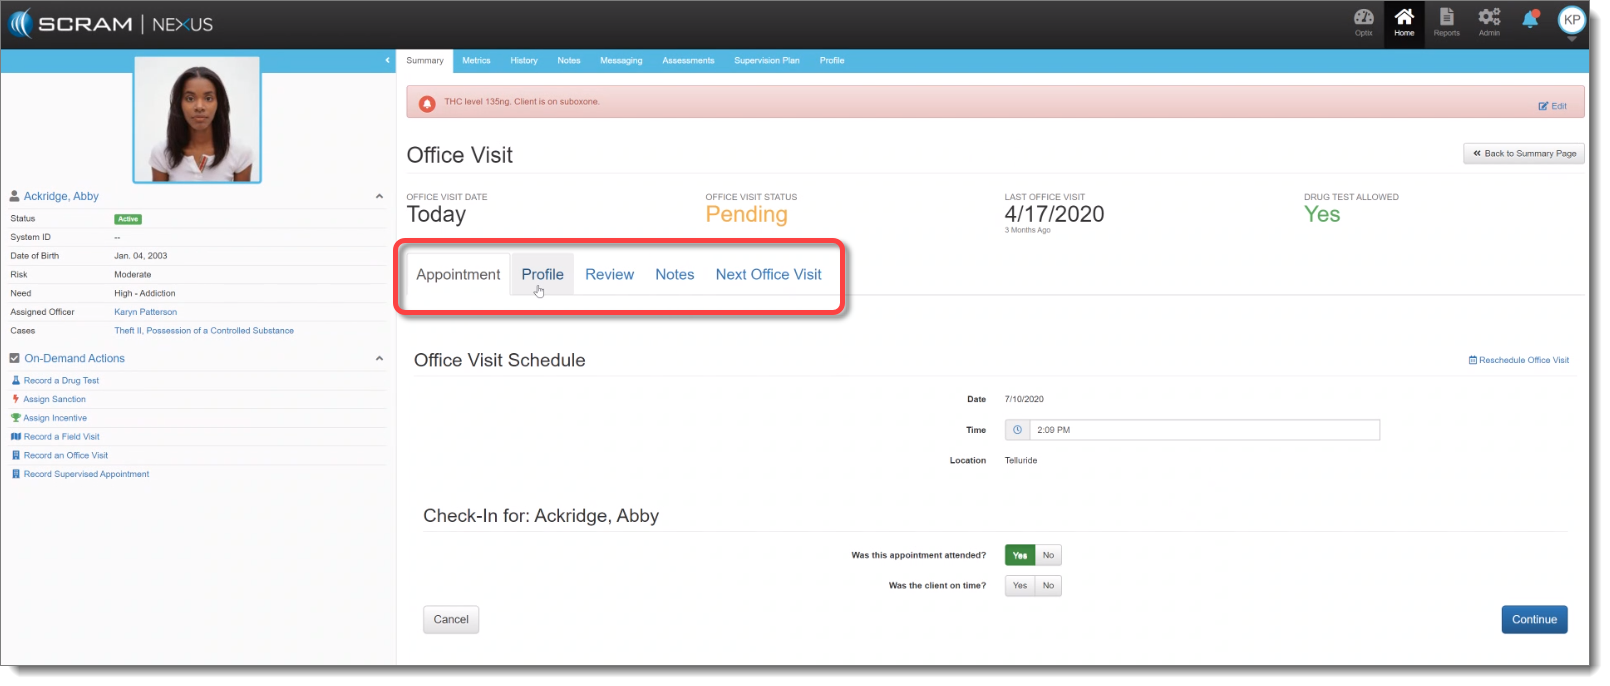
Updated Tabs on the Office Visit Screen
The tab labels on the Office Visit screen now align better to the structure of an actual office visit.
Updated tab labels (click to enlarge)
The updated tabs are:
Appointment: Allows you to select attendance options.
Profile: Provides option to review and edit client information with the client.
Review: Shows list of pending client actions as well as “Activity Progress.” Will surface items completed since last visit.
Notes: Provides officer open text box to capture meeting narrative as well as displays prior notations made for that client.
Next Office Visit: Automatically populates with the scheduled next appointment date, though all the fields are editable, so the client and officer can confirm or reschedule a different time for the next meeting
Additional Client Enhancements:
Longer Notes – up to 10,000 characters in length – are now supported in Nexus. This includes notes on Activities, Treatment Provider Notes, Sanction/Incentive Notes, and General Notes. Critical Notes are still limited to 500 characters.
Record/Change past appointment dates: When an officer records an on-demand appointment (Drug Test, Office Visit, Supervised Appointment, Sanction, or Incentive) the officer may select any date for that appointment between Jan 1, 1900 and today’s date.
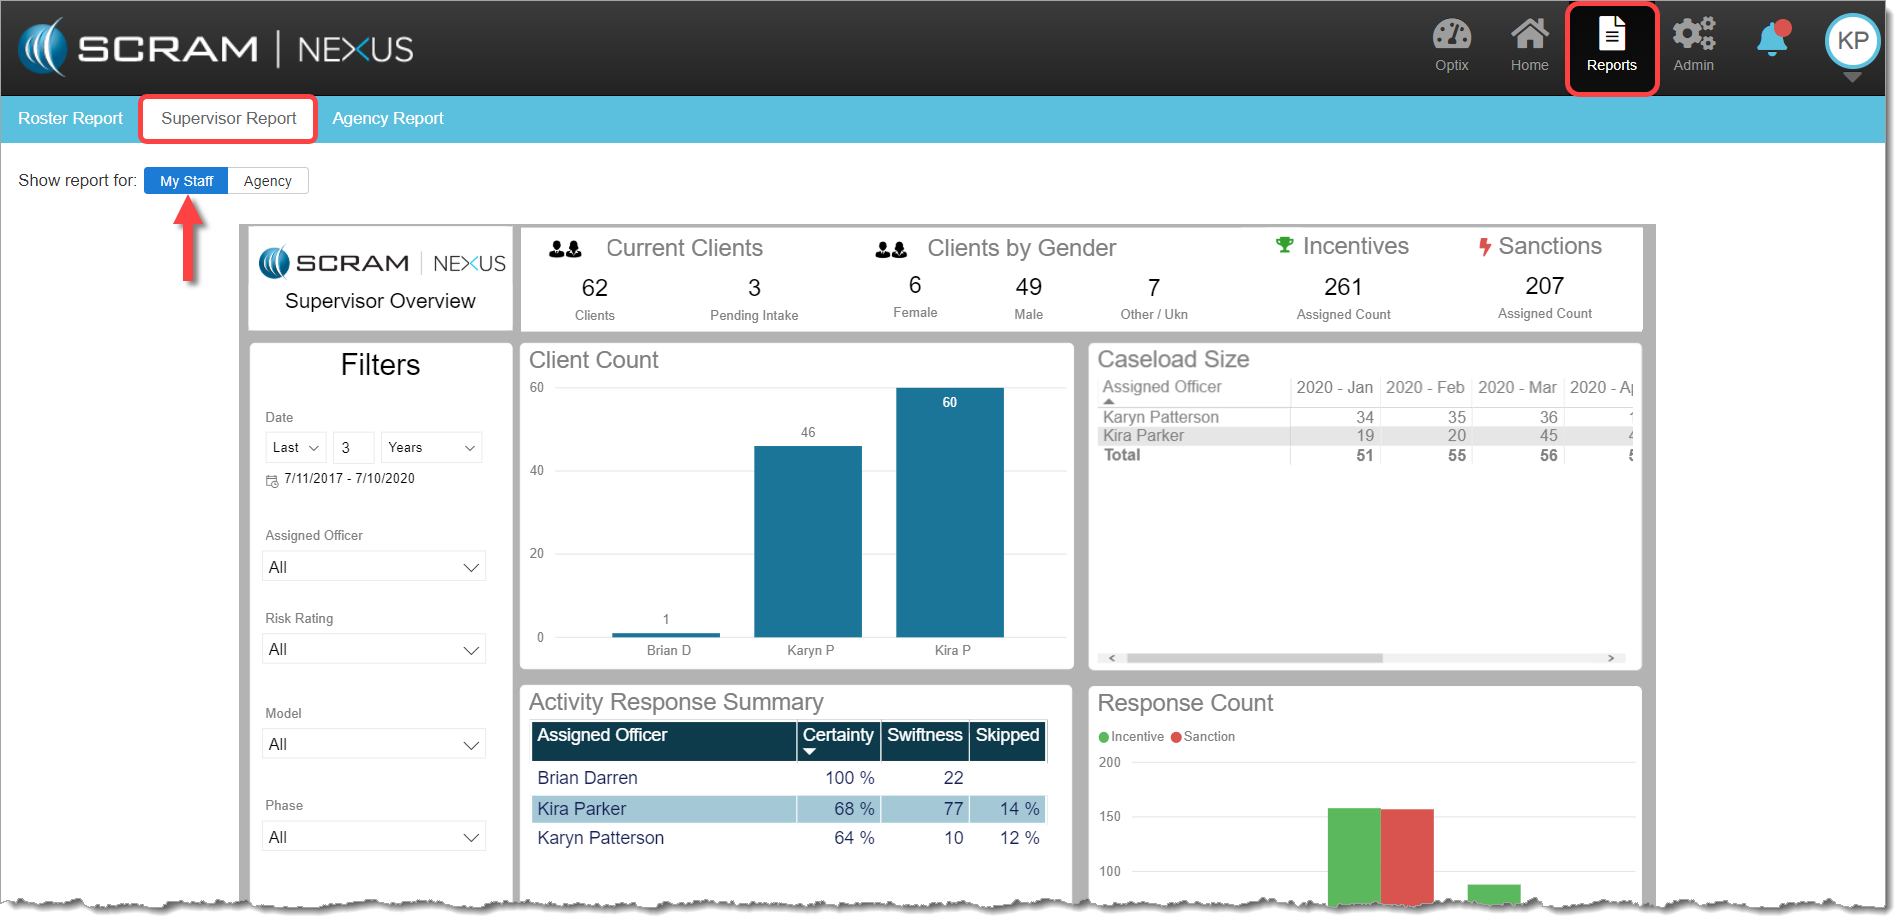
New ‘My Staff’ View on the Supervisor Report
Supervisors who access the Supervisor Report will now have a My Staff view that will filter the officer data to show only their direct reports . If a Supervisor wishes to see more data than their immediate staff, the Supervisor can go to the ‘Agency’ view and data will be displayed for all officers.
My Staff view (click to enlarge)
Feedback
Please contact our Customer Service department at 1-303-785-7879 if you have questions or recommendations for system improvements.
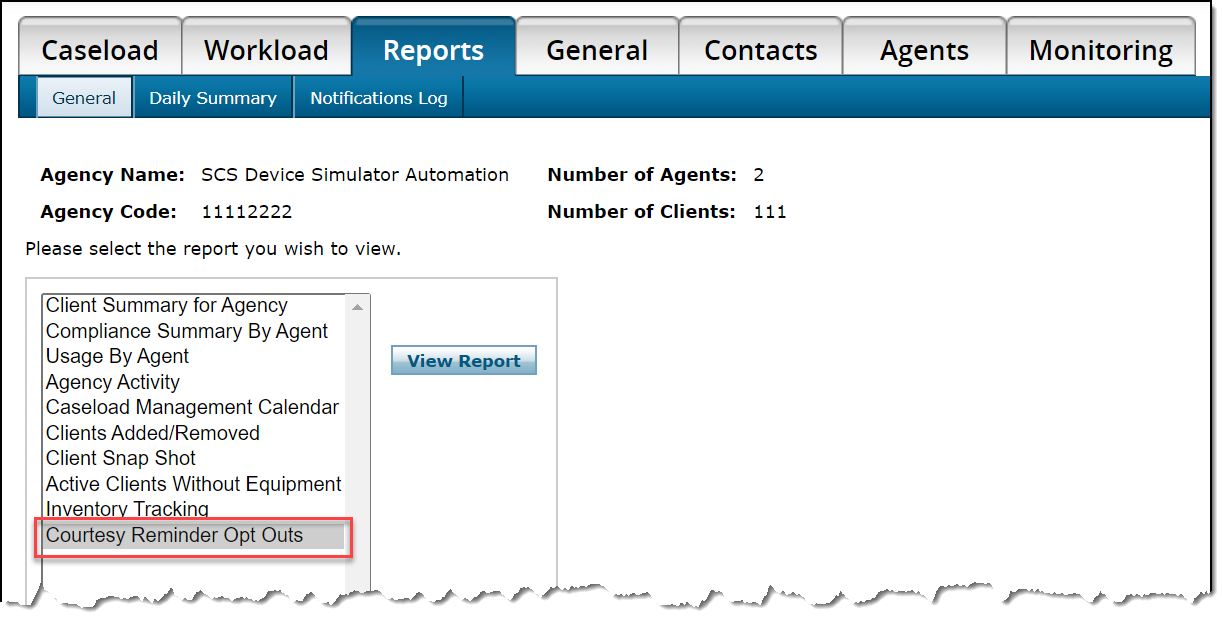
A new Courtesy Reminder Opt Outs report is now available for each caseload in SCRAMNET®. This report lists all SCRAM Remote Breath® clients who elected to opt out of receiving courtesy reminders that assist those clients with performing each breath test at the scheduled time.
To access the report:
Access the caseload in SCRAMNET.
Click the Reports tab.
Select the Courtesy Reminder Opt Outs option in the left report list.
Click the View Report button.
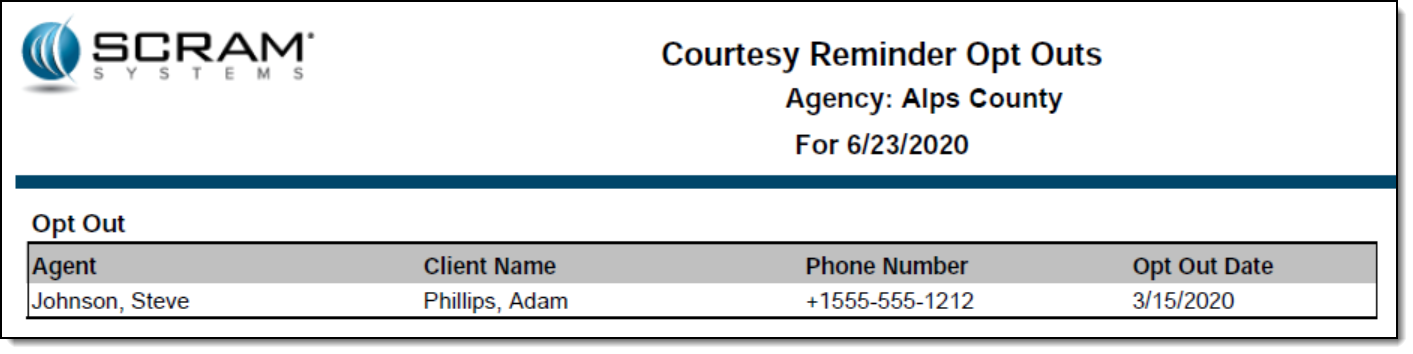
All active SCRAM Remote Breath clients in the caseload who have ever opted out of receiving courtesy reminders will appear on the report.
The second page of the report will list each client with an associated phone number that resulted in an “Undeliverable” message being generated when a courtesy reminder was sent.
Feedback
As always, please feel free to contact SCRAM Systems Customer Services at 1-303-785-7879 with any recommendations for system improvements.
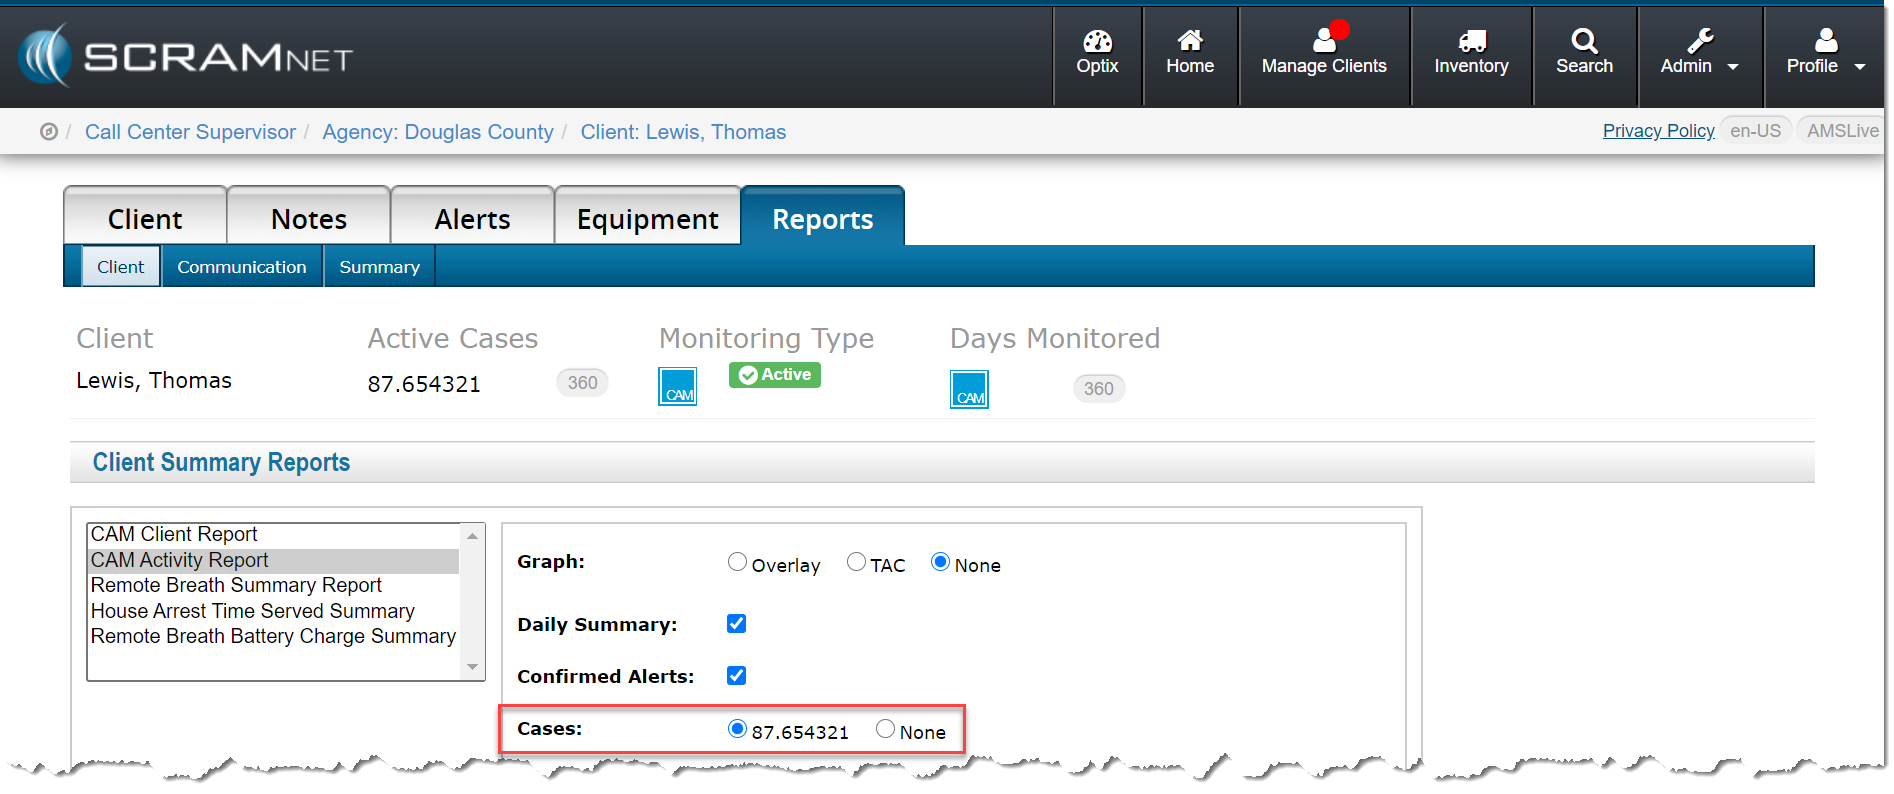
Today’s release allows you to include the case number assigned to a client when running a CAM Activity report in SCRAMNET®. To do that:
Locate the client in SCRAMNET.
Click the Reports tab.
Select the CAM Activity Report option in the left report list.
As shown below, you now have the option to select a case.
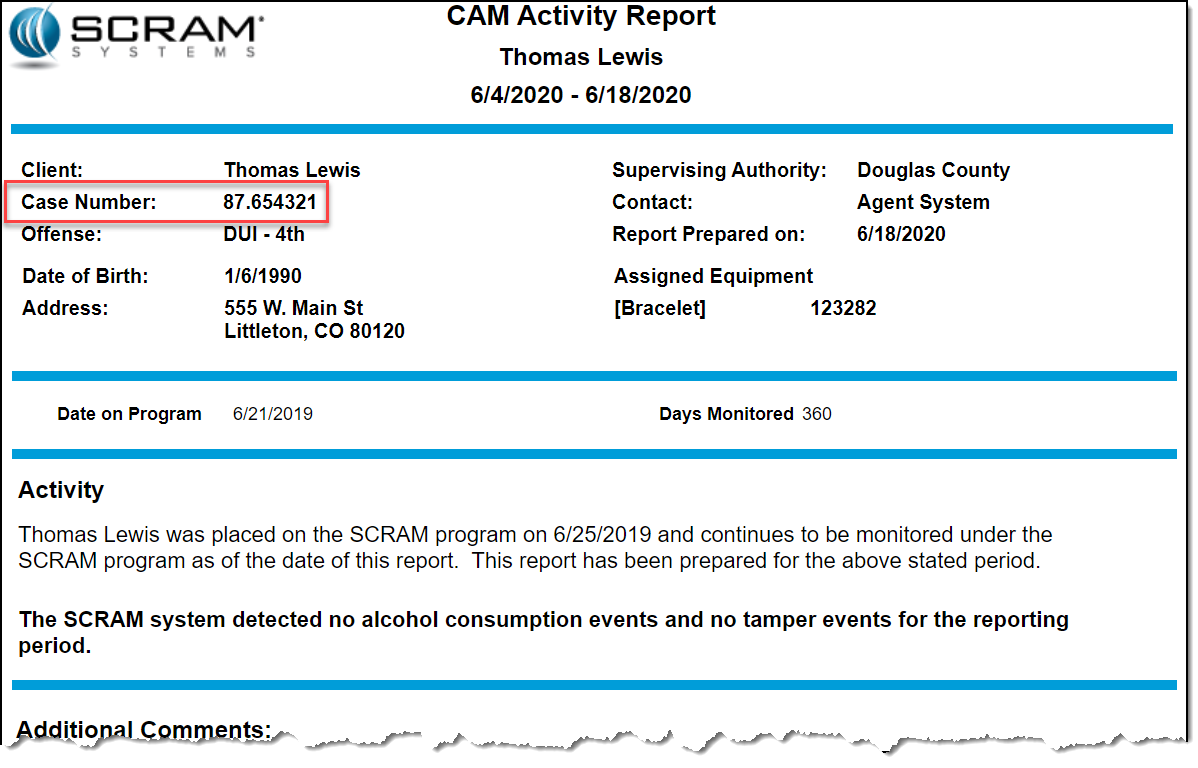
With the selection made, the case number appears in the top area when you run the report.
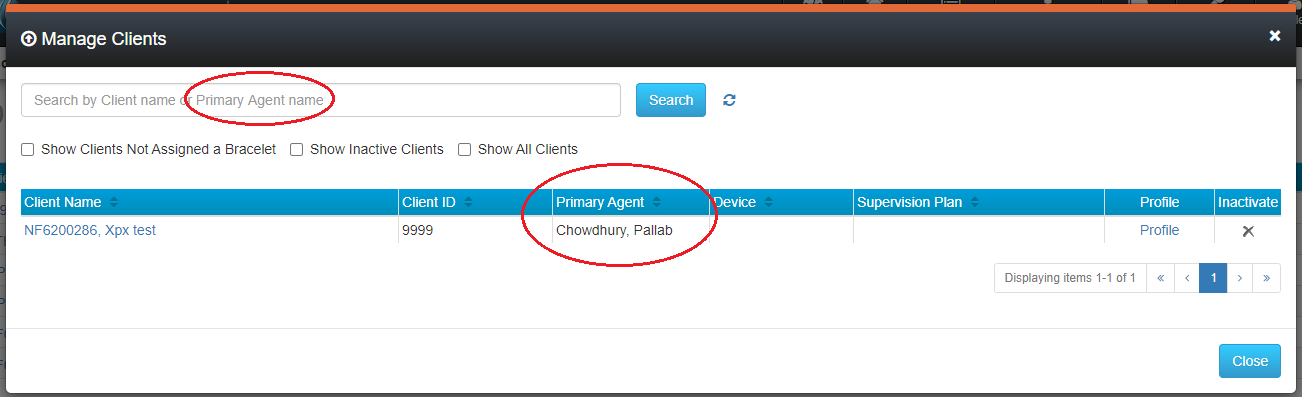
Two new features have been added to the Manage Clients pop up. To access the pop up, select the Manage->Clients top menu option. The Primary Agent assigned to a client will be listed in the Manage Clients pop up window, as shown below. Additionally, you may search clients by Primary Agent.
To search clients by Primary Agent, enter all or part of the Primary Agent’s first or last name in the search bar and click the Search button.
Move Clients Between Sub Accounts
Designated users can now move clients between sub accounts. While clients are being moved, all messages from the SCRAM GPS® bracelet continue to be processed, and the client continues to be monitored. Moving a client from one sub account to another also moves all historical data associated with that client to the new sub account. No reference to the client remains in the prior account. The following conditions apply:
Only users in the Admin role can move clients
Clients can only be moved within accounts in which the Admin user has access
Clients can only be moved within the account’s hierarchy
SCRAM Systems released enhancements for the SCRAM TouchPoint™ mobile application to the Apple App Store and the Google Play store on Monday, March 30, 2020. Corresponding enhancements were released for the SCRAMNET Optix™ platform on the same day. The enhancements are as follows:
Client Check-In Face ID and Fingerprint
Verification (in the TouchPoint app)
Client Check-In Biometric Results (Optix)
EM Reminders Read Receipt (Optix)
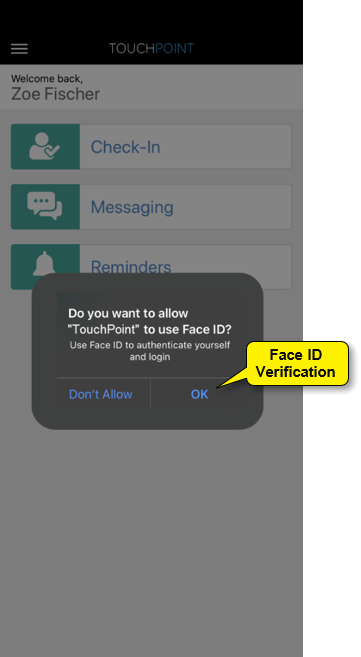
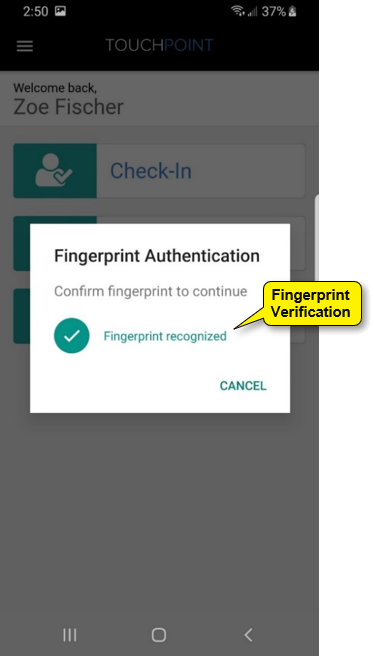
New Client Check-In Face ID and Fingerprint ID Verification
In order to begin each TouchPoint Client Check-In, clients will be required to provide a passed Face ID or Fingerprint ID, if this feature is supported by their phones (see flyer entitled SCRAM TouchPoint Supported Smartphones). The pass/failed outcome is based on the security setting for each individual’s smartphone. Clients will need to ensure the app is updated to enable this feature.
iPhone: Face ID or Fingerprint ID
Android: Fingerprint ID Only
If clients are unable to provide a passed Face ID or Fingerprint
verification after 3 to 5 attempts, they are still able to complete the
check-in by tapping the Cancel option. This will result in a Biometric
Verification Unsuccessful result.
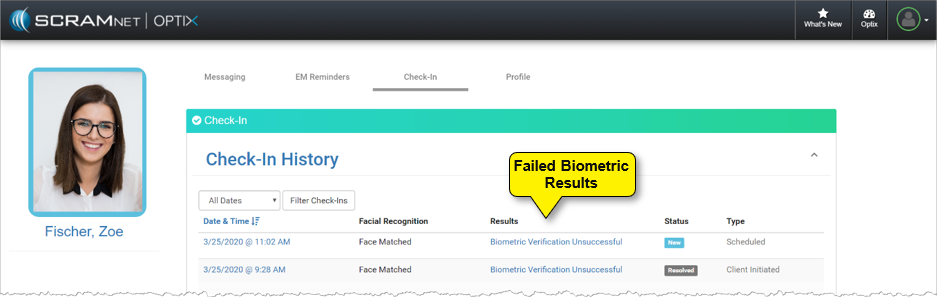
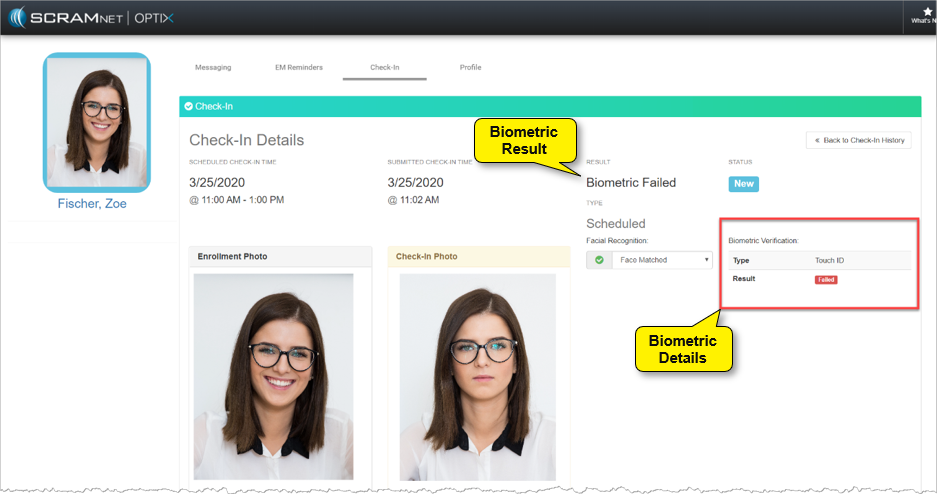
New Client Check-In Biometric Results
With the addition of Face ID and Fingerprint
authentication, you will be alerted to a failed Biometric result on the
client’s Check-In History page, as well as view the Biometric
Verification details for your client on the Check-In Details page.
Biometrics on Check-In History PageBiometrics on Check-In Details Page
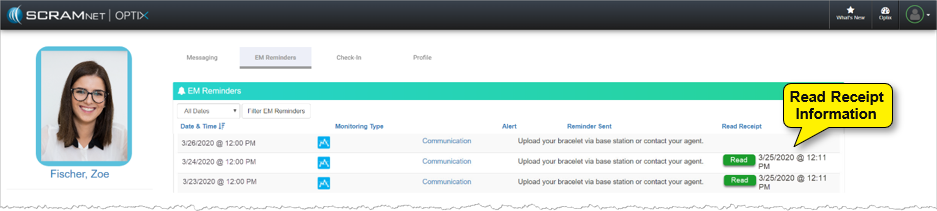
EM Reminders Read Receipt
With this new enhancement,
once a client enabled for EM Reminders opens the TouchPoint app and views the EM
Reminders notification, a Read Receipt will be visible on the EM
Reminders page for that client.
Read Receipts on EM Reminders Page
Feedback
As always, please contact SCRAM Systems Customer Services
at 1-303-785-7879 with any recommendations for system
improvements.
The following enhancements have been introduced to help you manage Account Zones more easily:
Make Account Zones available in sub accounts
Page through Account Zones
Sort Account Zones
Search Account Zones
Display Account Zones on the map
Make Account Zones Available in Sub Accounts
Users can now make Account Zones available in sub accounts without having to recreate the zones in the sub account. To make an Account Zone available in a sub account:
Navigate to the Account Zones tab (Admin > Account Settings > Account Zones tab). Note that the catalog headings now also display a number badge that allows you to see, at a glance, how many items fall into each filtered category.
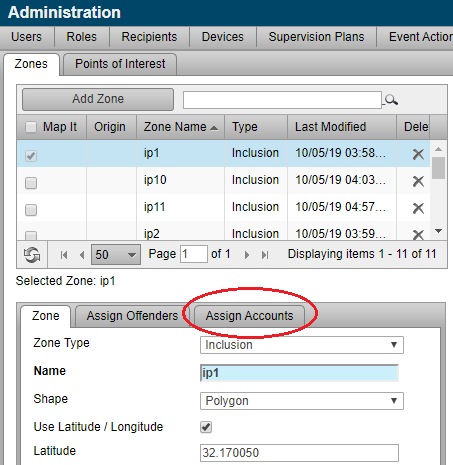
Click the Assign Accounts tab and select the sub accounts in which this zone will be available.
Click the Save button. The current zone is now available in the selected sub accounts. Account Zones made available in sub accounts are “linked” instead of copied. The original zone in the parent account is referred to as the “parent zone.” The linked zone in the sub account is referred to as a “linked” or “child” zone. This means:
Changes to the parent zone are automatically reflected in the linked child zones.
Linked/child zones cannot be edited. Instead, users must edit the parent zone.
A parent zone cannot be deleted if it is linked to a zone in a subaccount, and that linked/child zone is assigned to clients. In this scenario, users must navigate to the sub account and remove clients from the linked child zone.
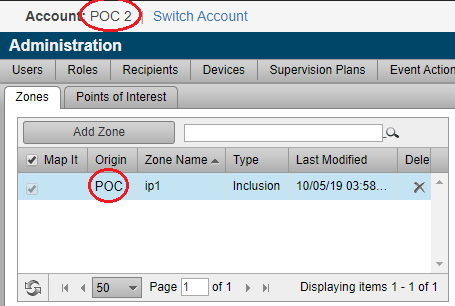
Linked/child zones are identified in the Origin column. Hover your mouse pointer over the origin name to see the parent account where the parent zone resides. The example below shows the Account Zones in sub account POC 2. Zone Name ip1 is a child zone managed in the parent account POC.
Page Through Account Zones
Some customers have thousands of Account Zones, such an Exclusion Account Zone for all schools, that may result in an increase in the time needed to display the zones on screen. To ensure the zones appear quickly, we’ve separated the list of zones into pages. The default is to display 50 zones per page, but you can choose the number of zones displayed per page by selecting the it from a dropdown menu. You may also advance to the next page or return to the previous page, or jump to a specific page number.
Sort Account Zones
To locate zones more quickly, you can now click the column header to sort zones by Zone Name, Type, or Last Modified. Clicking the column header again reverses the sort order direction. A direction indicator in the column header indicates if zones are sorted in ascending or descending order.
Search Account Zones
Another way to locate zones more quickly is to search for zones. Use the Search text box to search by Zone Name, or by partial Zone Name. For example, typing “P” will search all Zone Names that start with the letter “P.”
Search does NOT support full wildcard searches. For example, performing a search using “*p*” will NOT result in listing all zones that include a “p” in the name.
Display Account Zones on the Map
All Account Zones can now be displayed on the map at the same time. Use this feature to see all zones at the same time to ensure proper coverage. To display a zone on the map, check its corresponding check box in the Map It column. To remove the zone from the map, uncheck the box.
Enhancements to Client Zones Management
The following enhancements have been introduced to help you manage zones at the client level more easily:
Page through Zones
Sort Zones
Display Zones on the map
Distinguish between client zones, account zones, and linked zones
These features function in the same way as the Account Zones described above.
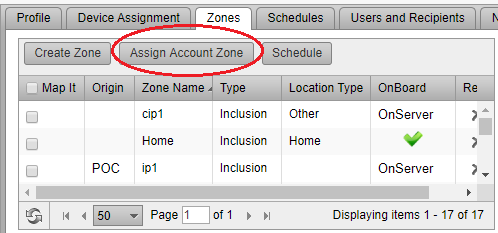
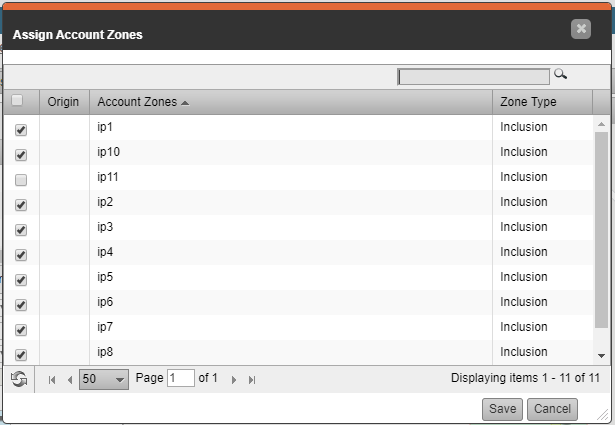
The same features have also been added to the Assign Account Zones popup dialog. On the client’s Profile page, click the Assign Account Zone button to open the Assign Account Zones pop up:
Added to this pop up is:
Pagination
Sorting
Search
New Report – Schedule Exceptions by Day
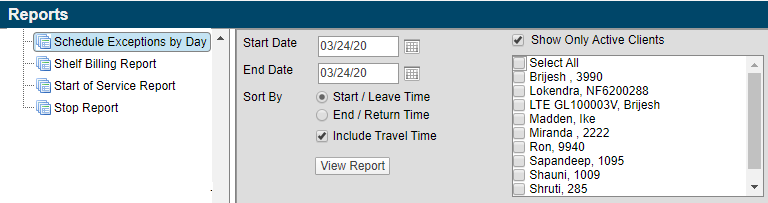
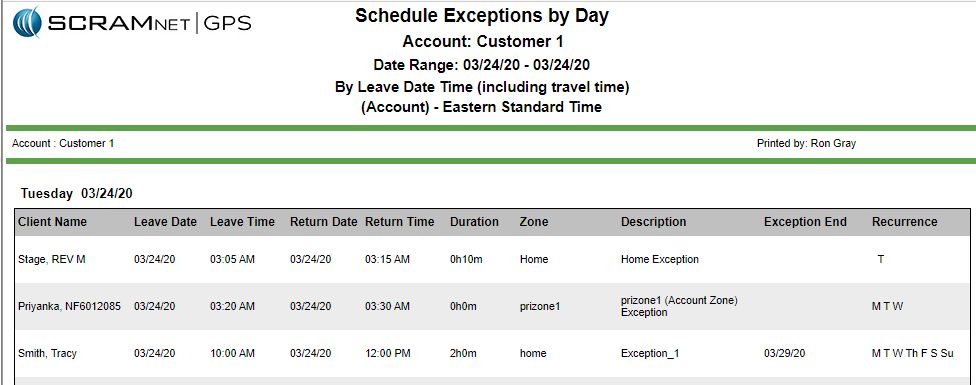
The new Schedule Exceptions by Day report lists all schedule exceptions for selected clients, that will either begin or end on a given day. The exceptions are listed in order of occurrence, either by when the exception starts or when it ends. This report may be useful for work release programs by allowing the customer to print a list of all clients, sorted by when the client will be leaving for work. The sort order can be reversed to see when clients will be returning from work.
To run the report, click the Reports main menu option then select the Schedule Exceptions by Day node.
Filters available include:
Start Date & End Date – Lists all schedule exceptions that occur in the given date range. Each day is separated by a page break. The start date can be up to one year ago. The maximum allowable report duration is seven days.
Sort By – The report can be sorted by the start of the schedule exception, or the end of the exception. When the report is sorted by end/return time, the columns on the report are altered so that the return time column is before the start time.
Include Travel Time – When this filter is selected, any travel time assigned to the schedule exception is used when sorting the report. For example, if a schedule exception begins at 3:00 PM, and allows one hour of travel time, it will appear on the report as 2:00 PM, representing the time that the client will leave. Similarly, if the schedule exception ends at 5:00 PM and allows one hour of travel time, the exception will appear on the report as ending at 6:00 PM.
Show Only Active Clients – When this filter is selected, only clients with “Active” status are displayed. When the filter is unchecked, only clients with an “Inactive” status are displayed.
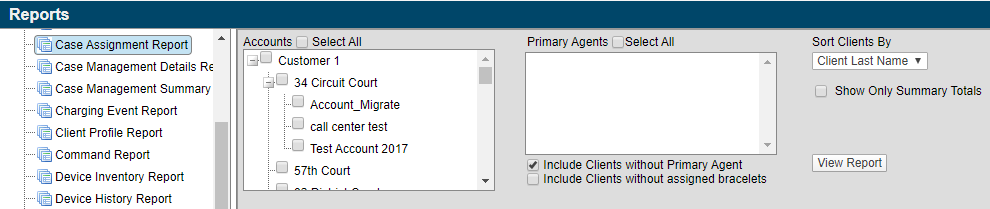
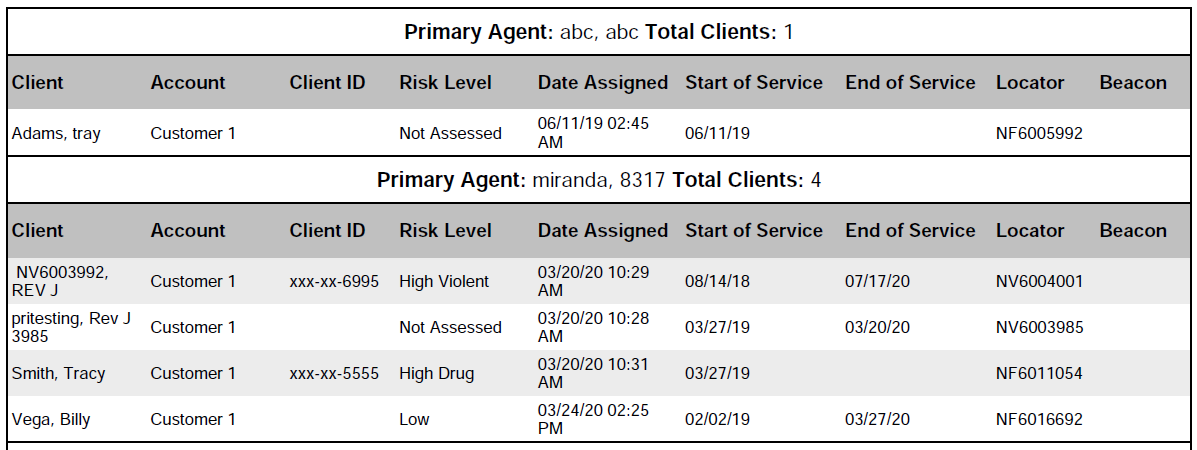
Modified Report – Case Assignment Report
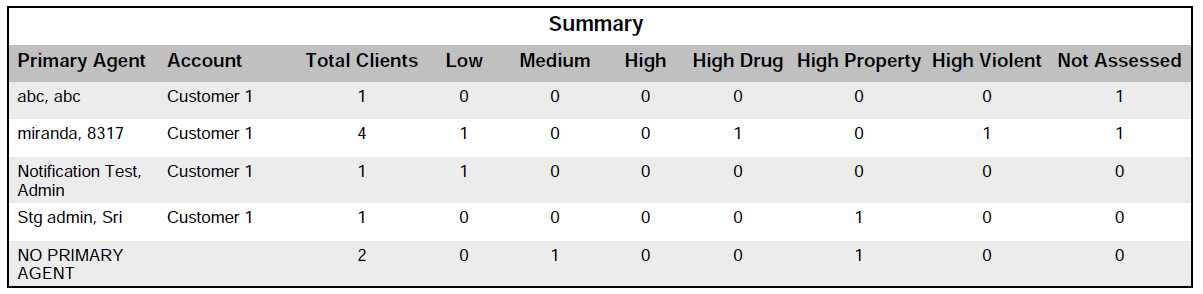
The existing Case Assignment report has been updated to include the client’s risk levels. Use this report to view each primary agent’s caseload. The report includes a summary section that shows the total number of clients, by risk level, for each primary agent. The report also includes a details section that lists each client.
To run the report, click the Reports main menu option then select the Case Assignment Report node.
Filters available include:
Accounts – Select the account(s) being included in the report.
Primary Agents – Select the primary agents being included in the report.
Include Clients without Primary Agent – Select this check box to group clients who do not have a primary agent assigned.
Include Clients without Assigned Bracelets – Select this check box to include clients without an assigned bracelet.
Sort Clients By – Clients can be sorted by client last name or by their risk level.
Show Only Summary Totals – Select this check box to only print the summary section of the report. The summary section displays the total number of assigned clients but does not list each client.
Microsoft Corporation discontinued support of
older versions of its Internet Explorer (IE) browser on January 12, 2016, which
impacted IE 10 and older versions. Although IE 11 is still being supported,
Microsoft itself is phasing out IE 11 in favor of a browser that better
supports today’s modern web capabilities.
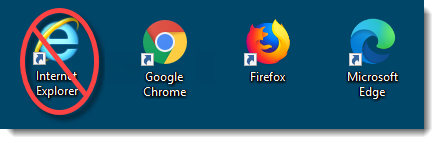
The SCRAM Systems platform utilizes leading-edge web technologies to deliver comprehensive and informative data and reports that enable you to monitor clients efficiently and effectively. Effective March 9, 2020, SCRAM Systems will no longer develop content or provide technical support for any version of IE. Instead, for the best possible experience utilizing SCRAM Systems’ monitoring platforms, we recommend switching to the Google Chrome, Mozilla Firefox, or Microsoft Edge browsers.
Browser icons
Please contact our Customer Service department at 1-303-785-7879 if you have questions or concerns regarding this change.
SCRAM Systems understands how important it is for you to keep your monitoring devices in your available inventory. Keeping units on-site and functional saves precious time and money for your monitoring business. To help you keep your SCRAM devices operating at peak performance; our engineers have researched and developed a series of recommended cleaning and maintenance procedures that enable you to get the most out of your SCRAM equipment investment.
SCRAM CAM and House Arrest Bracelet Deep Cleaning (Between Clients)
The Schedule Exceptions reports have been modified to display entries in chronological descending order by exception start date. There are two ways to view schedule exceptions:
The GPS Monitoring Center is an application that allows either SCRAM Systems or you, the customer, to manage alerts in a Call Center environment. The following events can now be configured and managed in the GPS Monitoring Center: