Enhancements/changes included are:
- Enhancements to Account Zones Management
- Enhancements to Client Zones Management
- New Report – Schedule Exceptions by Day
- Modified Report – Case Assignment Report
Enhancements to Account Zones Management
The following enhancements have been introduced to help you manage Account Zones more easily:
- Make Account Zones available in sub accounts
- Page through Account Zones
- Sort Account Zones
- Search Account Zones
- Display Account Zones on the map
Make Account Zones Available in Sub Accounts
Users can now make Account Zones available in sub accounts without having to recreate the zones in the sub account. To make an Account Zone available in a sub account:
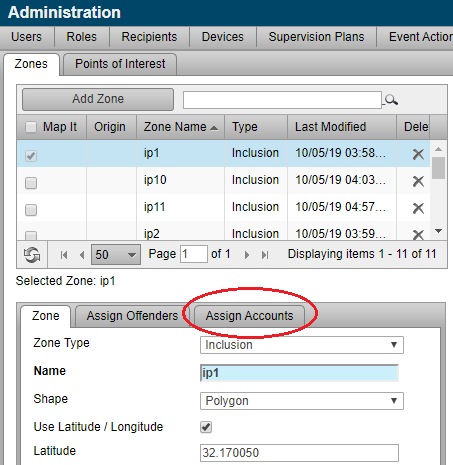
- Navigate to the Account Zones tab (Admin > Account Settings > Account Zones tab).
Note that the catalog headings now also display a number badge that allows you to see, at a glance, how many items fall into each filtered category. - Click the Assign Accounts tab and select the sub accounts in which this zone will be available.
- Click the Save button.
The current zone is now available in the selected sub accounts. Account Zones made available in sub accounts are “linked” instead of copied. The original zone in the parent account is referred to as the “parent zone.” The linked zone in the sub account is referred to as a “linked” or “child” zone. This means:- Changes to the parent zone are automatically reflected in the linked child zones.
- Linked/child zones cannot be edited. Instead, users must edit the parent zone.
- A parent zone cannot be deleted if it is linked to a zone in a subaccount, and that linked/child zone is assigned to clients. In this scenario, users must navigate to the sub account and remove clients from the linked child zone.
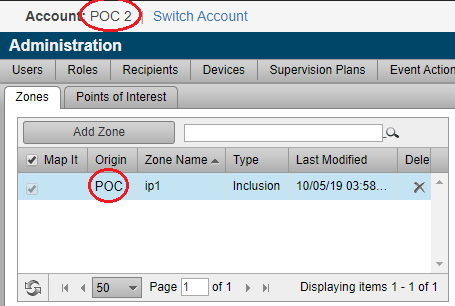
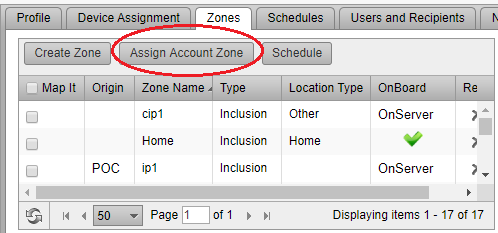
Linked/child zones are identified in the Origin column. Hover your mouse pointer over the origin name to see the parent account where the parent zone resides. The example below shows the Account Zones in sub account POC 2. Zone Name ip1 is a child zone managed in the parent account POC.
Page Through Account Zones
Some customers have thousands of Account Zones, such an Exclusion Account Zone for all schools, that may result in an increase in the time needed to display the zones on screen. To ensure the zones appear quickly, we’ve separated the list of zones into pages. The default is to display 50 zones per page, but you can choose the number of zones displayed per page by selecting the it from a dropdown menu. You may also advance to the next page or return to the previous page, or jump to a specific page number.
Sort Account Zones
To locate zones more quickly, you can now click the column header to sort zones by Zone Name, Type, or Last Modified. Clicking the column header again reverses the sort order direction. A direction indicator in the column header indicates if zones are sorted in ascending or descending order.
Search Account Zones
Another way to locate zones more quickly is to search for zones. Use the Search text box to search by Zone Name, or by partial Zone Name. For example, typing “P” will search all Zone Names that start with the letter “P.”
Search does NOT support full wildcard searches. For example, performing a search using “*p*” will NOT result in listing all zones that include a “p” in the name.
Display Account Zones on the Map
All Account Zones can now be displayed on the map at the same time. Use this feature to see all zones at the same time to ensure proper coverage. To display a zone on the map, check its corresponding check box in the Map It column. To remove the zone from the map, uncheck the box.
Enhancements to Client Zones Management
The following enhancements have been introduced to help you manage zones at the client level more easily:
- Page through Zones
- Sort Zones
- Display Zones on the map
- Distinguish between client zones, account zones, and linked zones
These features function in the same way as the Account Zones described above.
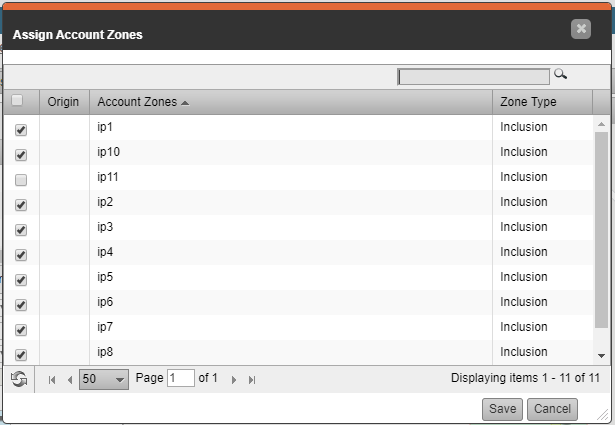
The same features have also been added to the Assign Account Zones popup dialog. On the client’s Profile page, click the Assign Account Zone button to open the Assign Account Zones pop up:
Added to this pop up is:
- Pagination
- Sorting
- Search
New Report – Schedule Exceptions by Day
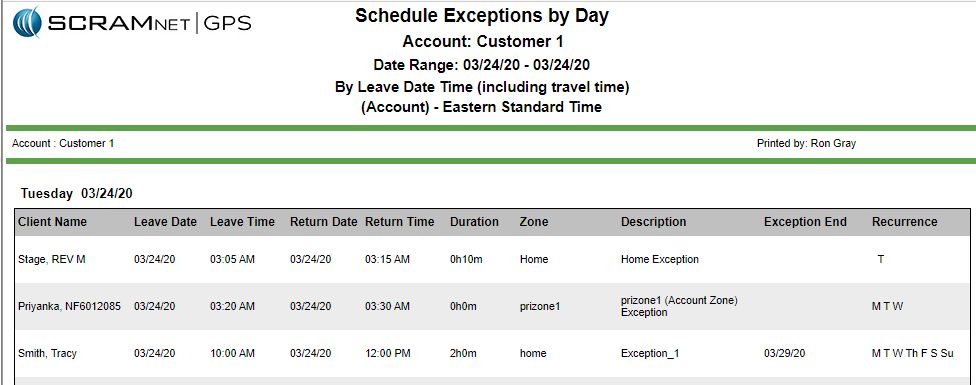
The new Schedule Exceptions by Day report lists all schedule exceptions for selected clients, that will either begin or end on a given day. The exceptions are listed in order of occurrence, either by when the exception starts or when it ends. This report may be useful for work release programs by allowing the customer to print a list of all clients, sorted by when the client will be leaving for work. The sort order can be reversed to see when clients will be returning from work.
To run the report, click the Reports main menu option then select the Schedule Exceptions by Day node.
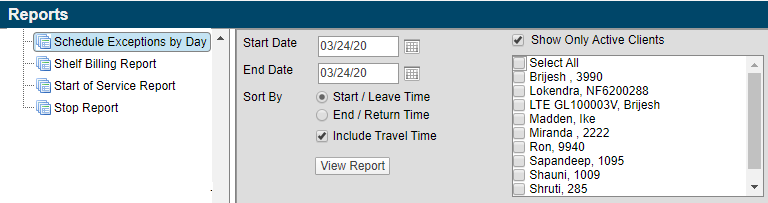
Filters available include:
- Start Date & End Date – Lists all schedule exceptions that occur in the given date range. Each day is separated by a page break. The start date can be up to one year ago. The maximum allowable report duration is seven days.
- Sort By – The report can be sorted by the start of the schedule exception, or the end of the exception. When the report is sorted by end/return time, the columns on the report are altered so that the return time column is before the start time.
- Include Travel Time – When this filter is selected, any travel time assigned to the schedule exception is used when sorting the report. For example, if a schedule exception begins at 3:00 PM, and allows one hour of travel time, it will appear on the report as 2:00 PM, representing the time that the client will leave. Similarly, if the schedule exception ends at 5:00 PM and allows one hour of travel time, the exception will appear on the report as ending at 6:00 PM.
- Show Only Active Clients – When this filter is selected, only clients with “Active” status are displayed. When the filter is unchecked, only clients with an “Inactive” status are displayed.
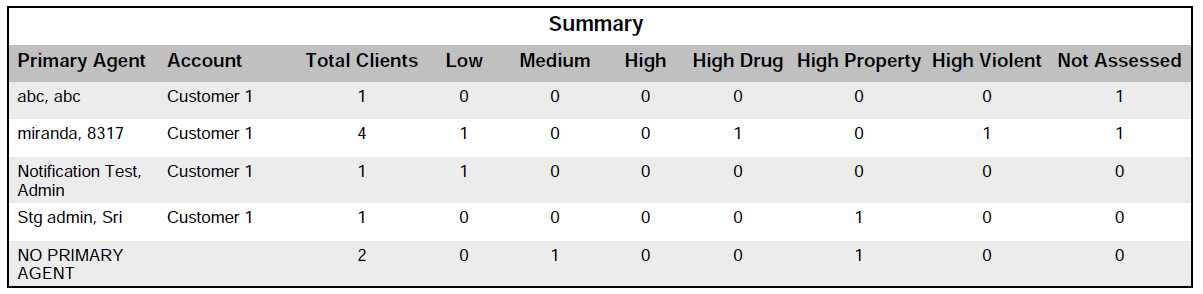
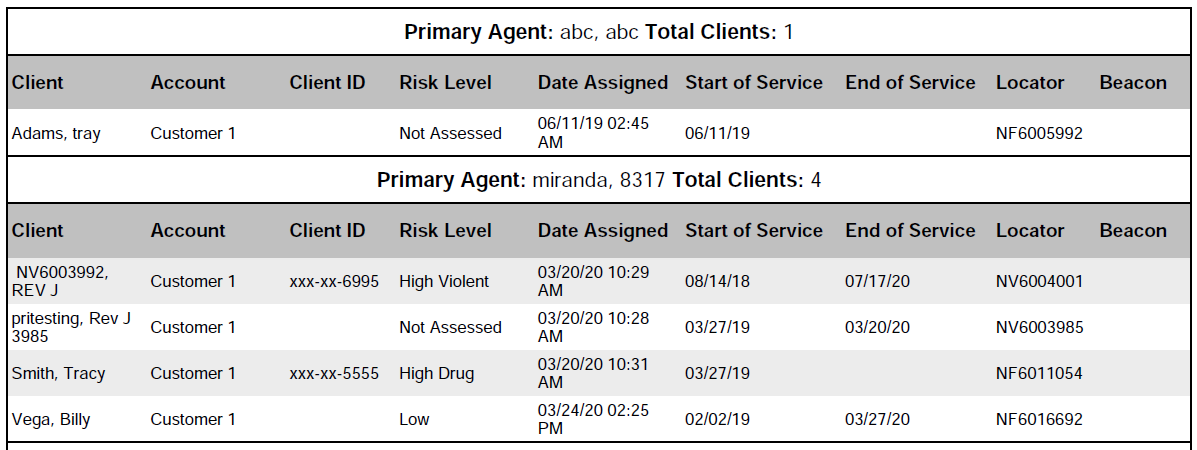
Modified Report – Case Assignment Report
The existing Case Assignment report has been updated to include the client’s risk levels. Use this report to view each primary agent’s caseload. The report includes a summary section that shows the total number of clients, by risk level, for each primary agent. The report also includes a details section that lists each client.
To run the report, click the Reports main menu option then select the Case Assignment Report node.
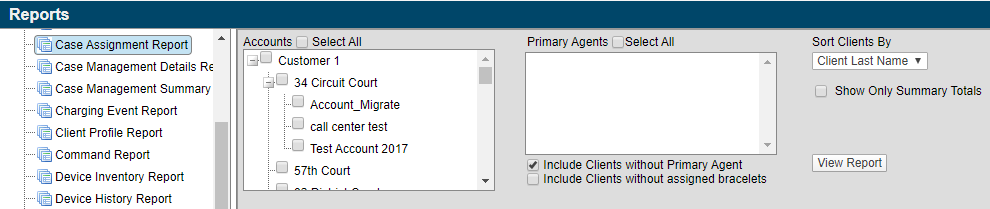
Filters available include:
- Accounts – Select the account(s) being included in the report.
- Primary Agents – Select the primary agents being included in the report.
- Include Clients without Primary Agent – Select this check box to group clients who do not have a primary agent assigned.
- Include Clients without Assigned Bracelets – Select this check box to include clients without an assigned bracelet.
- Sort Clients By – Clients can be sorted by client last name or by their risk level.
- Show Only Summary Totals – Select this check box to only print the summary section of the report. The summary section displays the total number of assigned clients but does not list each client.