SCRAMNET

On March 4, 2021, SCRAM Systems® will release a new Notifications Window in SCRAMNET®. This Notification Window displays new messages sent from your SCRAM TouchPoint™ client caseload. With this feature you can view, clear, mark messages as read, or respond to your clients’ messages from within SCRAMNET. All actions completed within the Notifications Window are reflected on each client’s TouchPoint Messaging page.

Notifications in SCRAMNET

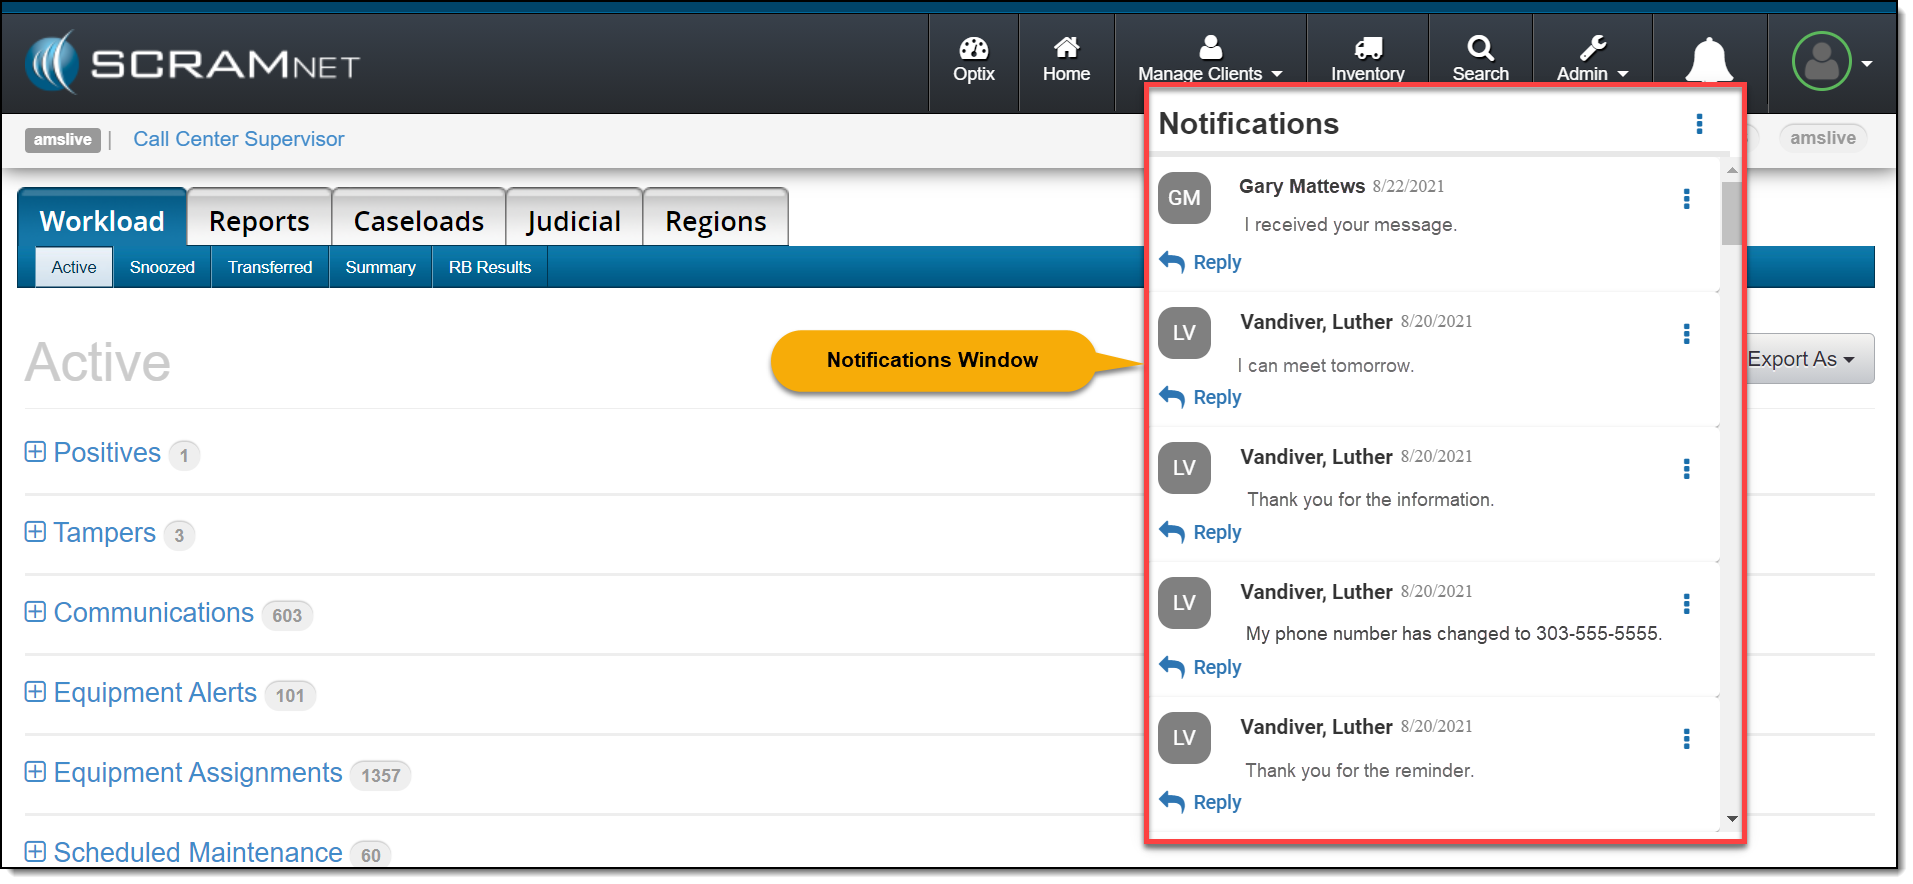
When a new message is sent by your client through the SCRAM TouchPoint app, the Notifications button in SCRAMNET will display a red badge. To view the message, click the button.

click to enlarge

On the Notifications Window, the client’s name, date, and message is displayed.

click to enlarge

Managing the Notifications Window

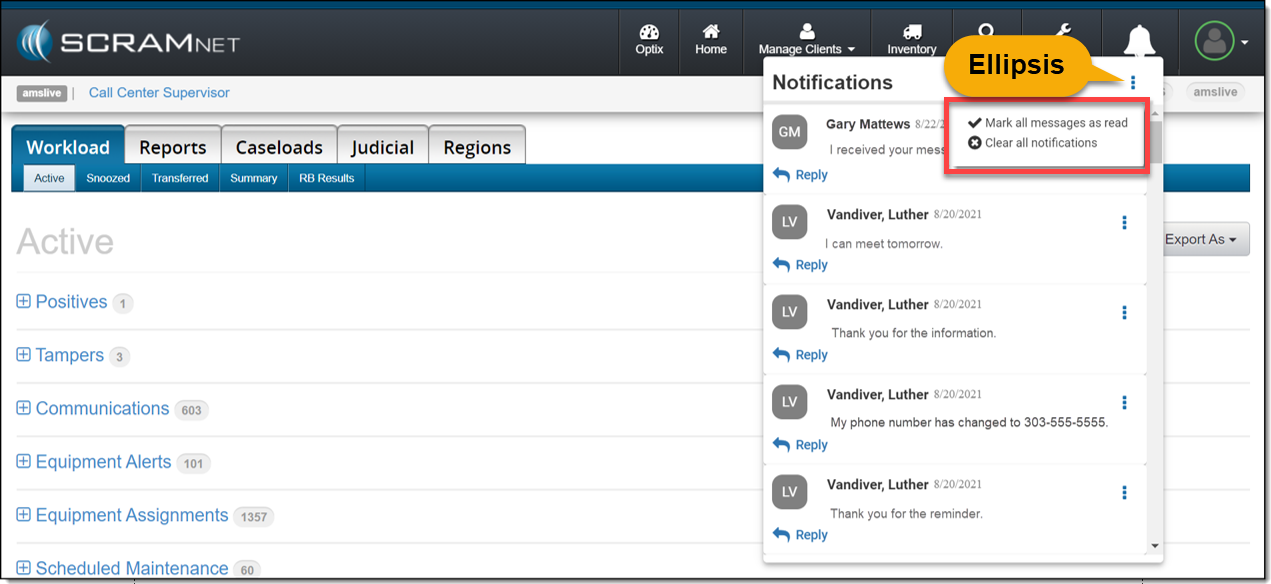
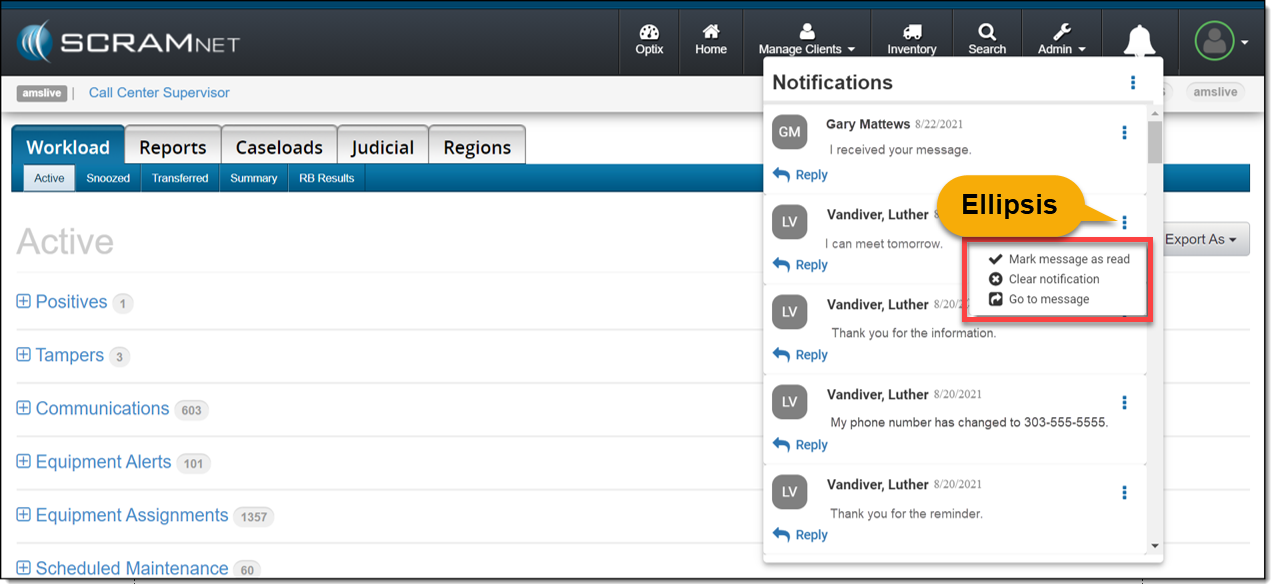
Selecting the ellipsis next to the Notifications heading or next to the client’s name will display a menu with following options:  

  • Mark all messages as read or Mark message as read: When selected, the message will be cleared from the Notifications Window. On the client’s TouchPoint Messaging page, the message will display as Read for the client.
  • Clear all Notifications or Clear Notification: When selected, this option will clear the message from the Notifications Window in SCRAMNET. This does not mark the message as Read on the client’s TouchPoint Messaging page; it simply clears the message from the Notifications Window.
  • Go to Message: This option will open a new tab that displays the client’s TouchPoint Messaging page. This action will clear the message from the Notifications Window.

Option One

Mark all messages as read or clear all notifications by selection the ellipsis to the right of the Notifications heading.

click to enlarge

Option Two

Manage each message individually by selection the ellipsis next to the message.
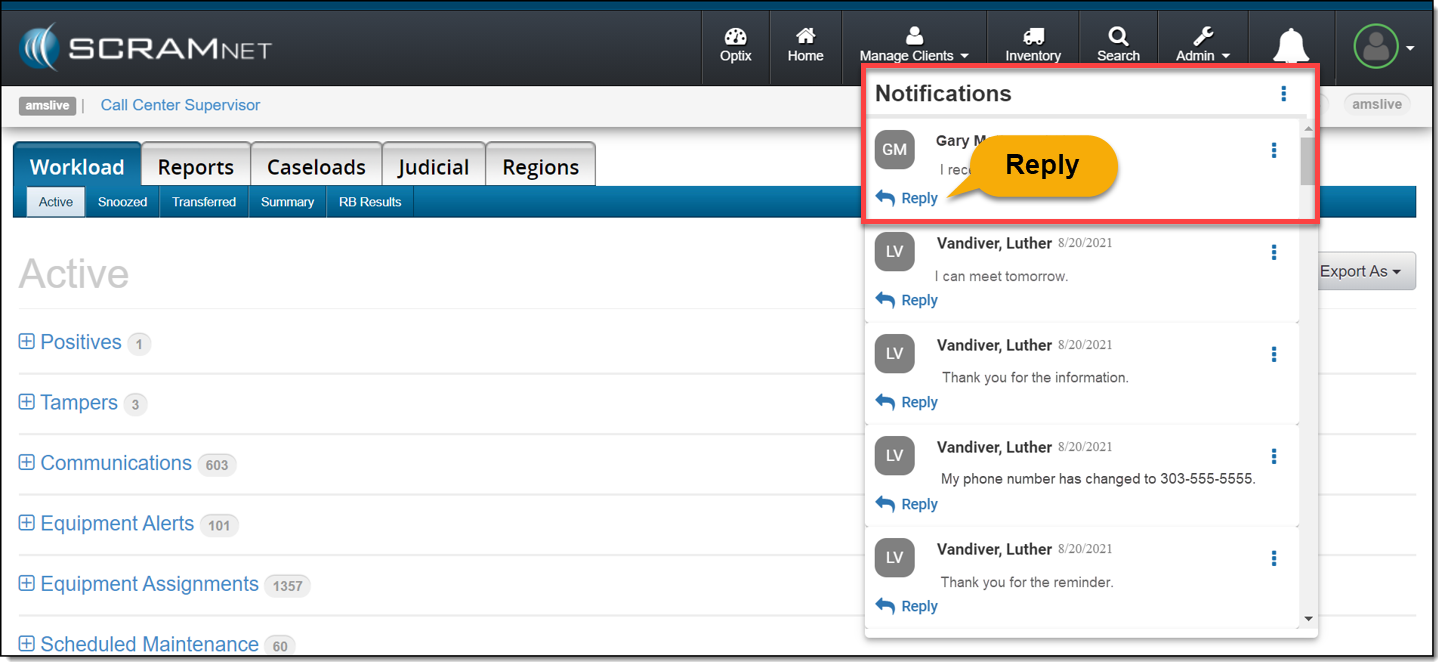
click to enlarge

Reply

Click the Reply link to respond to the client’s message. After entering a response, click the Send button.

click to enlarge
click to enlarge

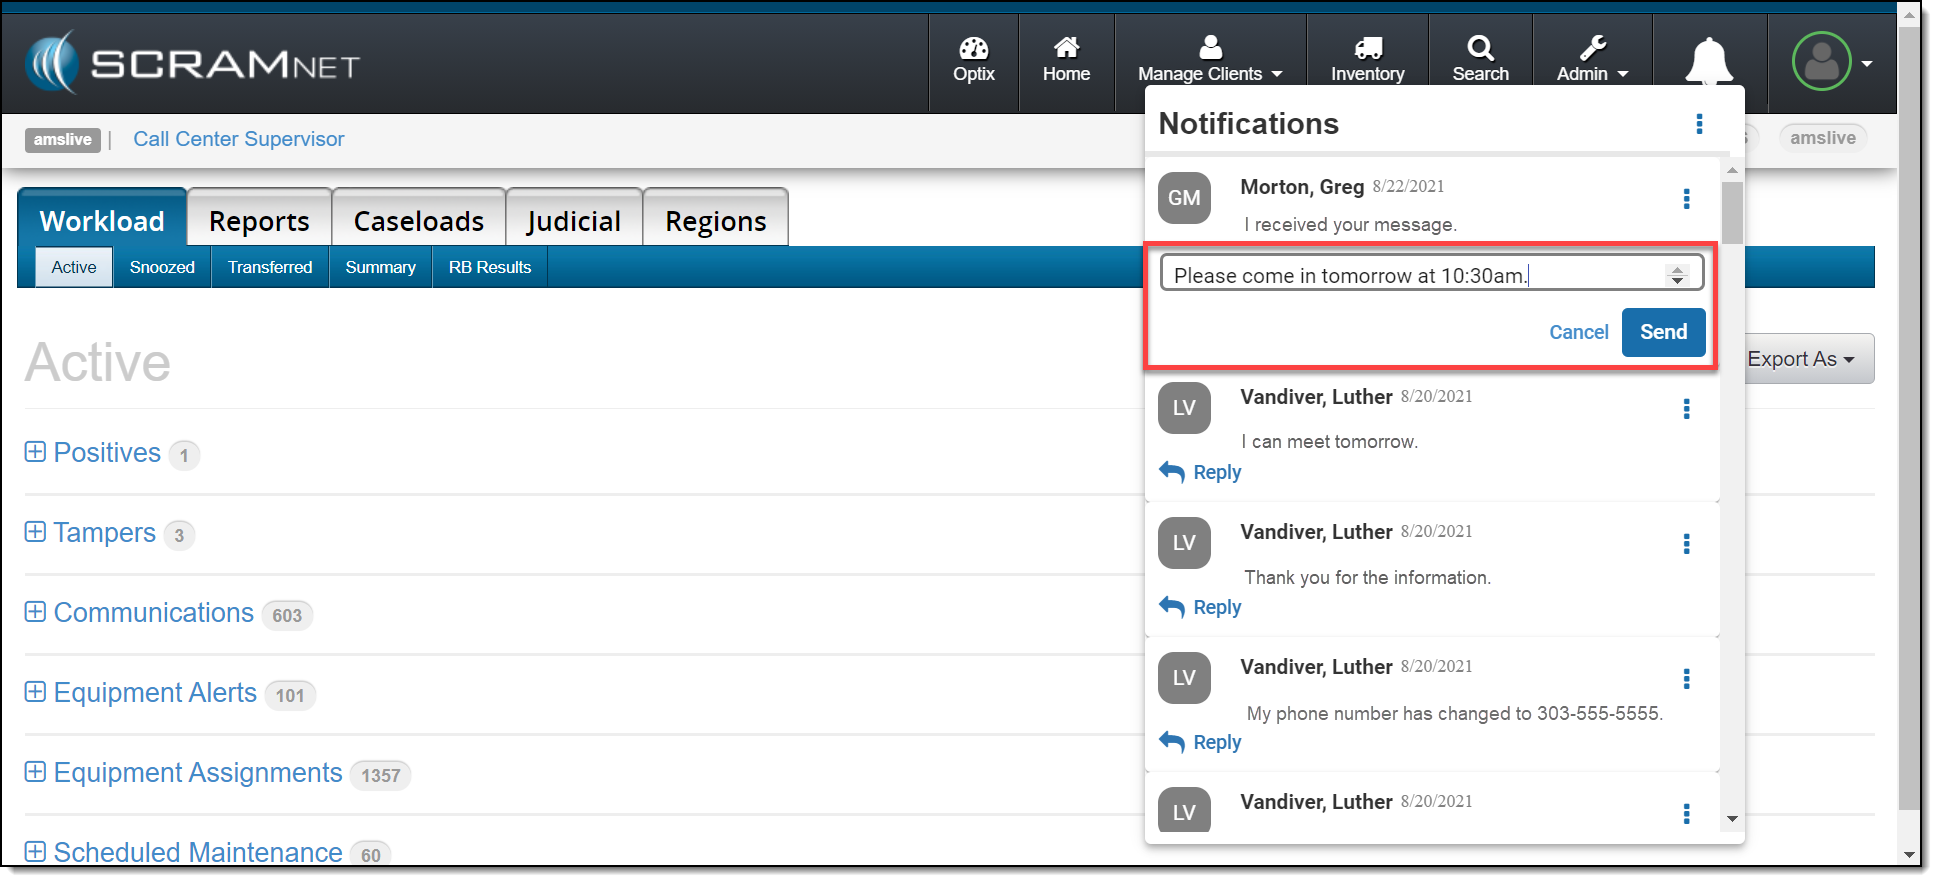
The message will no longer be displayed in the Notifications Window.

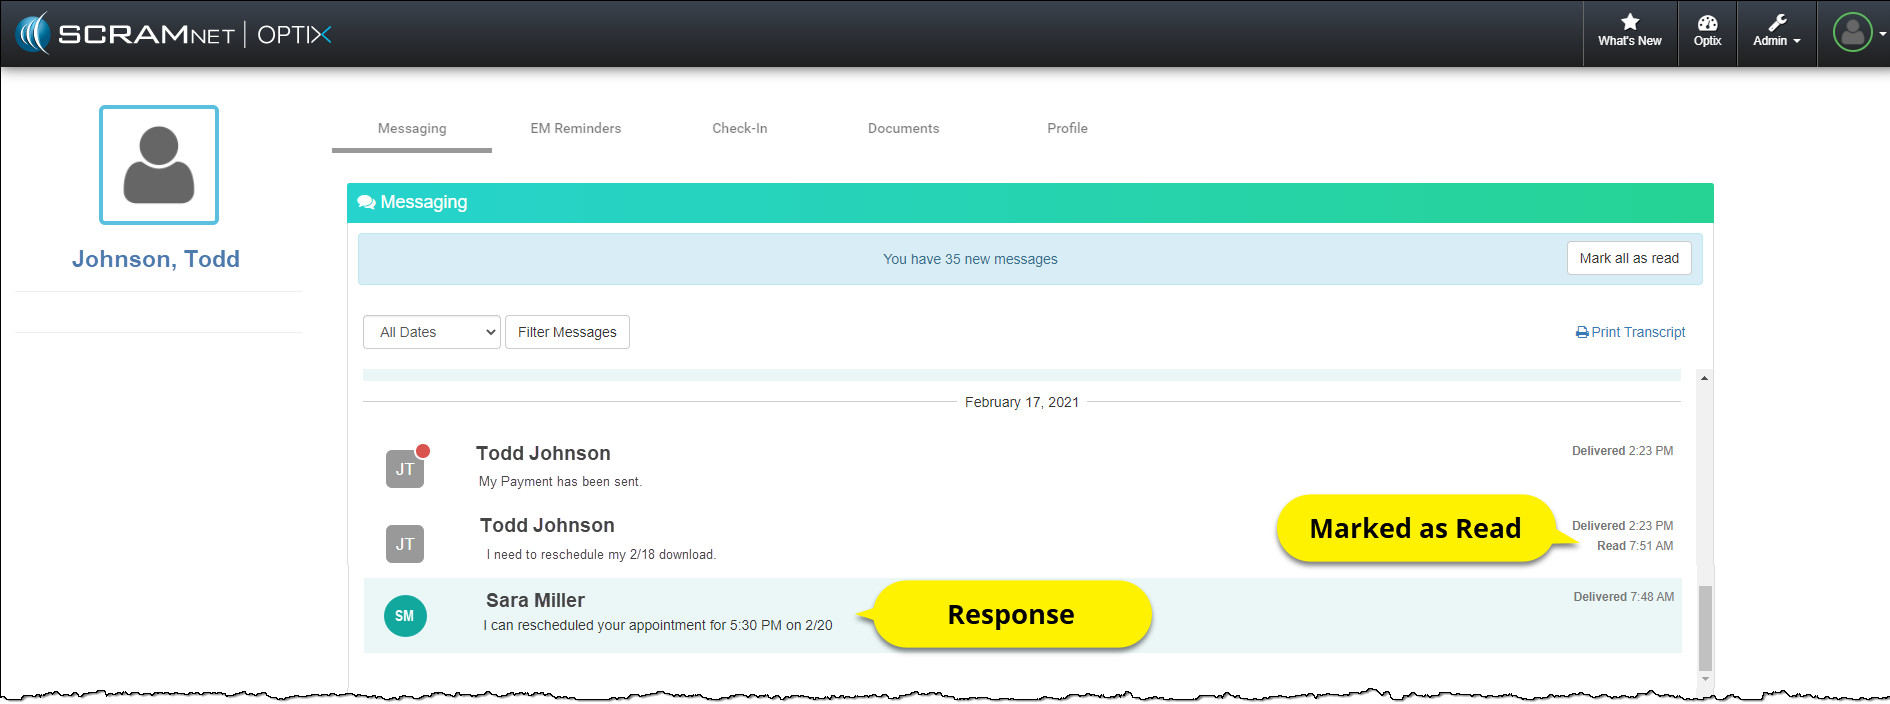
On the client’s TouchPoint Messaging page, the message will be marked as Read and the response sent by the user will be displayed.

Client Messaging page
click to enlarge

Feedback

As always, please contact SCRAM Systems Customer Service with any recommendations for system improvements.

Continue Reading

On February 18, 2021, SCRAM Systems® will be releasing a new inventory report available on the Reports tab in SCRAMNET®. The Inventory for Date report reflects the equipment location and status on a specific date. This report is helpful when determining your inventory count and availability for any given past day.

Filter the report by:

  • Equipment Type
  • Location
  • Date
SCRAMNET Report tab Inventory sub tab
click to enlarge

The report will display the number of devices in each status, number of devices with an RMA, and the total number of operational devices for the selected date.

Inventory for date report
click to enlarge

The report can be exported into several formats including excel, and .csv files.

SCRAM Inventory For Date report
click to enlarge

Feedback

As always, please contact SCRAM Systems Customer Service with any recommendations for system improvements.

Continue Reading

On February 18, 2021, SCRAM Systems® will release a new option on the Stop Monitoring and Change Client Status pages in SCRAMNET®. This new option will allow you to inactivate/disable a SCRAMNET client and their linked SCRAM TouchPoint™ profile simultaneously.  

Inactivate the SCRAMNET Client Profile

Option One:

In SCRAMNET click the Stop Monitoring button on the client’s Equipment page.   

SCRAMNET Equipment page
click to enlarge

On the Stop Monitoring page, you have the option to automatically inactivate the client upon return of all equipment. When this option is updated to Yes, you now have the option to disable the client’s linked TouchPoint profile at the same time. Next to the TouchPoint Status option, simply toggle the Enabled option to Disabled and click the Complete Stop Monitoring button.

SCRAMNET Equipment page Stop Monitoring Options
click to enlarge

Option Two:

When inactivating the client’s SCRAMNET profile from the Status section, click the Edit link on the Client page.

SCRAMNET Client page
click to enlarge

On the Change Client Status page, toggle the TouchPoint Status from Enabled to Disabled. To complete the process, click the Inactivate Client button.

SCRAMNET Client page Change Client Status options
click to enlarge

The SCRAMNET client profile is inactivated and the client’s TouchPoint profile and any enabled services are automatically disabled.

Feedback

As always, please contact SCRAM Systems Customer Service with any recommendations for system improvements.

Continue Reading

Update Client Employment Information in the ‘Occupation’ Field

When current employment information is entered in the Occupation field in SCRAMNET, we are able to better determine the client’s actions and environment during an alert. This will save time and frustration for both you, and your client by reducing the number of calls you make to question your client’s actions.

To Update Employment Information:

Choose the Client tab,  then choose the Employment sub-tab. Please update the client’s occupation, description of the work environment, and most importantly, the client’s work schedule.

Employment Information

Continue Reading

Every customer has unique operational needs and SCRAM Systems strives to meet those needs whenever possible. To this end, we are expanding the types of alerts that you can choose to include in the Daily Action Plan (DAP) that you receive each morning. In addition to the CAM alerts that are included by default, the Remote Breath (RB) alerts displayed on the RB Results page can also be included on the DAP.

RB Alerts on the Daily Action Plan Report

Potential Time-Saver

Adding Remote Breath alerts enables you to use the DAP as a starting point to address CAM and RB alerts that require some type of action on your part. This allows you to easily see the RB alerts you need to work before logging into SCRAMNET, which saves you precious processing time.

Something to Consider: 500 Max

If you are interested in activating this new feature, please note that a maximum of 500 RB alerts can appear on the DAP. If your RB Results page has not been managed for some time and you have a high number of alerts, you may want to reduce the alert count to a more manageable level before enabling this feature on the DAP report.

If you elect to enable this feature and there are more than 500 alerts listed on the RB Results page, only the most recent 500 alerts will be included in the DAP. As you work alerts and they drop off the DAP report, older alerts will “backfill” the completed ones overnight each night, until all the outstanding alerts on the RB Results page have been addressed.

Activate Feature (Administrator only)

To activate this feature so RB alerts appear on the DAP, an administrator must access the Setup DAP page in SCRAMNET and select the Include Remote Breath Alerts check box, as shown below.

Continue Reading

Awaiting Return vs. Pending Removal

When it is time to discharge a client from the SCRAM CAM program, be sure you have a clear understanding of the status in which you should place the equipment.

Awaiting Return

If the bracelet or base station is NOT on-hand, select Stop Monitoring and complete the Stop Monitoring process to set the status to Awaiting Return. This status ends the monitoring program and stops the billing associated with it. The bracelet will remain in this status until it is checked in or until 30 days elapses, at which time it will automatically move to Lost status.

Pending Removal

If you will be completing the Stop Monitoring process with the client in person and the equipment is on-hand, select Stop Monitoring and complete the Stop Monitoring process to set the status to Pending Removal. This status prepares the bracelet for final connection with the Direct Connect device and application, and monitoring and billing both continue until the Direct Connect process is complete and the bracelet moves to In Inventory status.

More Help

For more detailed Client Discharge instructions please visit the Check In SCRAM CAM Bracelet help article on SCRAM Systems Help & Support.

Continue Reading

As you know, when a SCRAM CAM® Bracelet and Wireless Base Station (WBS) are checked in without you having one or both devices in hand, you set the status of those devices to “Awaiting Return.” However, because the WBS continues to communicate via a wireless network with SCRAMNET®, the device automatically sets its status to “In Inventory” the next time it communicates, which requires you to manually change the status back to “Awaiting Return.”

With this release, the WBS will no longer communicate when set to the “Awaiting Return” status. Consequently, the WBS will stay in that status until you retrieve the device and manually change the status to “In Inventory” yourself, or 30 days elapses at which time the device status is automatically set to “Lost.”

To allow you to manually set a returned WBS to “In Inventory”, a new Move to Inventory link will appear on the client’s Equipment page when the device is set to “Awaiting Return”, as shown below. When you click the link, the device is returned to inventory and is removed from the client’s Equipment page.

Continue Reading

CAM Client Interactions – Best Practices

Below are some helpful tips to assist your team in maintaining the integrity of your monitoring program. Please contact SCRAM Customer Service for questions or if any assistance is needed.

Document, Document, Document

We recommend agents document each and every client interaction* – whether in-person or over the phone – in SCRAMNET®. This will promote clarity when preparing client updates.
*Examples include bill payments, maintenance, phone discussions, etc.

Inspect the Equipment

Each time the client is in the office, regardless of the reason, inspect the bracelet.

  • Wake bracelet with magnet until you see the green light illuminate to ensure the bracelet powers up.
  • Check the fit of the bracelet to ensure it is properly tethered and is not loose enough to slide over the heel of the foot.
  • Visually inspect bracelet body, straps, and buckle for pry marks, scratches, and/or signs of tamper or removal.
  • Move tamper clips side-to-side with your fingers to ensure they are still securely fastened and have no visible signs of removal.

Alerts & Maintenance

Check the Alerts tab in SCRAMNET to see if client has any pending alerts that require additional information.

If the client will be away for an extended period, consider performing maintenance on the device to avoid near-future maintenance alerts from generating.

To properly reinitialize the bracelet:

  1. Be sure to use the Maintenance link on the Equipment page first,
  2. Perform physical maintenance second, and
  3. Direct Connect the bracelet on the client’s leg last

Continue Reading

New and Improved Help and Support

SCRAM Systems® is pleased to announce the arrival of its new consolidated SCRAM Systems Help & Support Home page! Effective Thursday September 10th at 1:00 PM MDT, regardless of which SCRAM monitoring system you are using, you can get help and support for all SCRAM Systems products, services, and software – in one place!

Screen capture of help being selected from the scram net profile drop down menu.
Select Help from the Profile dropdown menu (click to enlarge)


Easy Access

Once on the SCRAM Systems Help & Support Home page, you’ll have easy access to systems help, resources, forms, and videos.

Screen capture of the SCRAM Systems Help and Support landing page
SCRAM Help & Support Home (click to view all)


One-Stop Shop

There’s no need to change which SCRAM monitoring system you’re accessing to get Help; just click the Help & Support Home link at the top of any page to get access to help for all your SCRAM products and software.

Screen capture of the Home link from a scram net GPS page
Select the Home link from any page to return (click to enlarge).


Searchable Across Products

Not quite sure where to start? Enter a few words into the Search field at the top of the page to reveal the most relevant help topics and then select the most appropriate article.

Enter some keywords and then select the appropriate article (click to enlarge).


Feedback

Please contact our Customer Service department at 1-303-785-7879 if you have questions about about the new and improved SCRAM Help & Support Home page, or if you have recommendations for improvements.

Continue Reading

SCRAM Systems® is committed to providing a website that is accessible to the widest possible audience, regardless of circumstance and ability.

As our first step, SCRAM has added an Accessibility icon to the bottom left side of your screen in SCRAMNET®.  

Select the Accessibility icon to view the Accessibility Adjustments menu. From here, select the appropriate Accessibility options to customize SCRAMNET to make it easier for you to use.

SCRAMNET Workload page with Accessibility Icon highlighted and Accessibility adjustments menu

Remove the Accessibility Icon

To remove the icon from view, simply click on the icon and select the Hide Interface button. You will be prompted to Accept responsibility for hiding the interface. Once accepted, the screen will refresh and the icon will no longer appear. If you clear your internet browser’s browsing history, temporary files (cache), and cookies, then the Accessibility icon will reappear.

Feedback 

As always, please feel free to contact SCRAM Systems Customer Services at 1-303-785-7879 with any recommendations for system improvements. 

Continue Reading