Pursuit Mode in SCRAMNET GPS is often used in critical scenarios where quick access to information can be crucial. For this reason, the status messages displayed to the user while starting and running Pursuit Mode have been updated to provide status messages in a more timely fashion. These messages will be useful if there are delays starting Pursuit Mode.
Example: “Unable to Start Pursuit Mode” Message
Threshold Points Allowed for Exclusion Zones
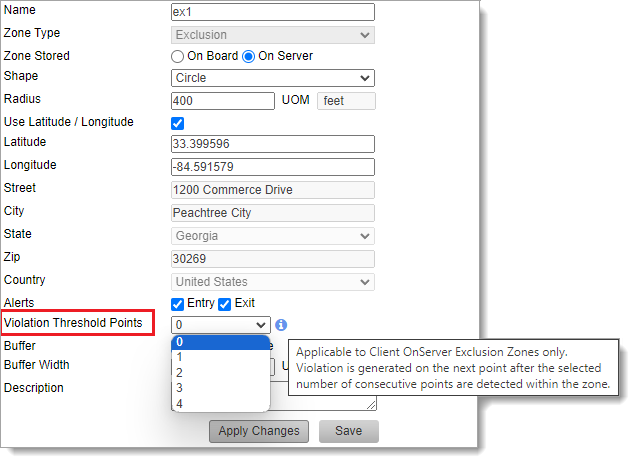
Users can now allow up to four location points inside an Exclusion Zone before generating a violation. This may be useful to allow a client to briefly pass through an Exclusion Zone without generating a violation.
Enabling GPS Violation Threshold Points in Admin (click to enlarge)
For OnServer Exclusion Zones, set the number of Violation Threshold Points to allow up to four location points inside the zone before generating the violation. The violation will be generated on the subsequent (fifth, e.g.) point.
Tip: Each time the Violation Threshold Points value is changed, an entry is logged in the SCRAMNET GPS Audit Report.
SCRAM Systems has moved from its Mineral Avenue address in Littleton, Colorado. When conducting business with us, be sure to use the appropriate address:
RMA Address
When a Return Merchandise Authorization (RMA) is issued for one of your SCRAM Systems devices, please ensure that the return shipping address on the label reads:
SCRAM Systems (AMS) 8100 Southpark Way Littleton, CO 80120
If your return shipping labels have the old, now-obsolete Mineral Avenue address on them, please discard them and request new labels from your SCRAM Systems Account Manager or Regional Sales Manager.
Payments Address
When making a bill payment to SCRAM Systems for monitoring services, equipment purchases and rentals, or any other reason, please remit payment to the SCRAM Systems bank lockbox:
Alcohol Monitoring Systems, Inc. PO Box 561097 Denver, CO 80256-1097
Do not remit payments to the now-obsolete Mineral Avenue address or to the Southpark Way address.
During the 15-minute deployment, you may not be able to access SCRAMNET GPS, but messages from the SCRAM GPS device will continue to be processed uninterrupted.
Pursuit Mode Enhancement
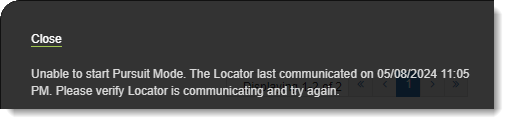
Currently, if an agent attempts to start Pursuit Mode for a client whose device has active No Communication or No Location alerts, SCRAMNET GPS fail to start Pursuit Mode, without informing the agent why Pursuit Mode will not start. With this change, the agent will be notified that Pursuit Mode is unable to start, and provide a reason why:
“Unable to Start Pursuit Mode” Message
New Entry and Exit Alert Default Settings for Inclusion Zones
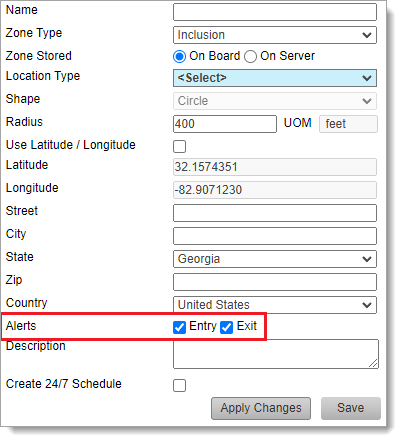
When creating an Inclusion Zone, SCRAMNET GPS automatically generates Entry and Exit alerts for the zone. If the user does not want Entry or Exit events, they must manually uncheck these settings before saving the zone:
Entry and Exit Alerts are Selected (Checked) by Default
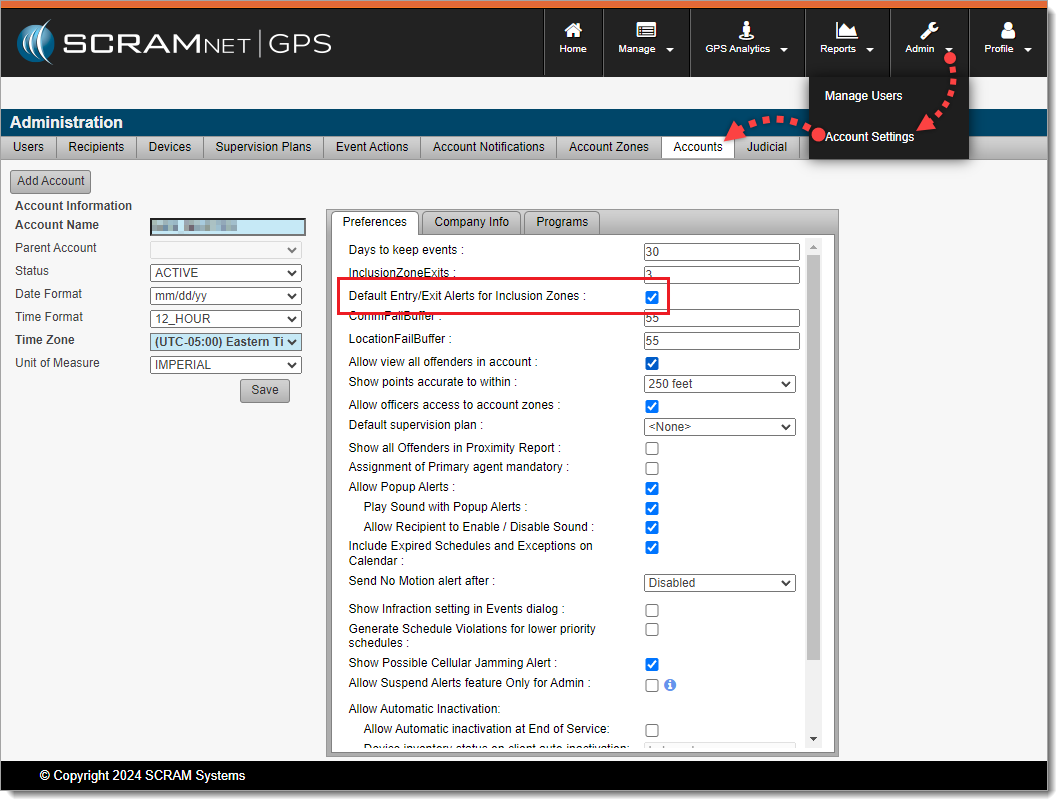
With this enhancement, Administrators may choose the default behavior when creating Inclusion Zones by navigating to Admin > Account Settings > Accounts (tab) > Preferences (sub-tab) to set the Default Entry/Exit Alerts for Inclusion Zones behavior. By default, this setting is selected (checked) to match existing behavior:
Admins May Choose the Default Entry/Exit Alert Behavior for Inclusion Zones (click to enlarge)
New “Deceased” Reason for Client Inactivation
If your program uses client “Inactivation Statuses” (reasons for inactivation), with this release agents may select “Deceased” as the reason for setting a client’s Status to Inactive:
Agents May Now Select “Deceased” as the Reason Setting Client Status to Inactive. (click to enlarge)
This reason is in line with the American Probation and Parole Association’s National Standards for Community Supervision. To activate this feature in SCRAMNET GPS, a program Administrator must navigate to Admin > Account Settings > Accounts (tab) > Preferences (sub-tab) and then select (check) Allow Assignment of Inactivation Statuses.
‘Device History Report’ Now Available to Officer Role
SCRAMNET GPS users in the Officer role may now run the Device History Report. This report was previously available only to Admin users. This report can be run for a specific device, or client, to see the assignment and unassignment history.
Enhancements to the SCRAM GPS Monitoring Center
For SCRAM Systems customers who use our SCRAM GPS Monitoring Center service, it allows them to define Service Level Agreements, and Standard Operating Procedures for addressing SCRAM GPS alerts. The Monitoring Center can be managed directly by the customer or by SCRAM Systems specialists. The following enhancements have been added to the service:
Notes may be updated to Monitoring Center tickets without closing or suspending the ticket. As many notes as needed may be added to the ticket without changing its status.
The Monitoring Center Dashboard shows the name of the Agent who last updated the ticket. This is useful for follow up with the agent when you have additional questions.
The Monitoring Center now surfaces Neutral Zone Entry and Neutral Zone Exit events.
At 5:00 AM MDT on Thursday, June 27, 2024, SCRAM Systems released an enhancement to the SCRAMNET GPS Suspend Alerts feature.
Suspend Alerts
The Suspend Alerts feature in SCRAMNET GPS is used to suspend alerts from appearing on the Dashboard and to pause notifications from being sent for specific clients during a specified time period. This is useful when you know alerts will be generated and there is no need for supervising authorities to take any action. For example, a client in the hospital might generate ‘No Communication’ and ‘No Location’ events while admitted, due to the hospital building’s impaired environment, but the client’s location and condition is known; so there is no need to take action.
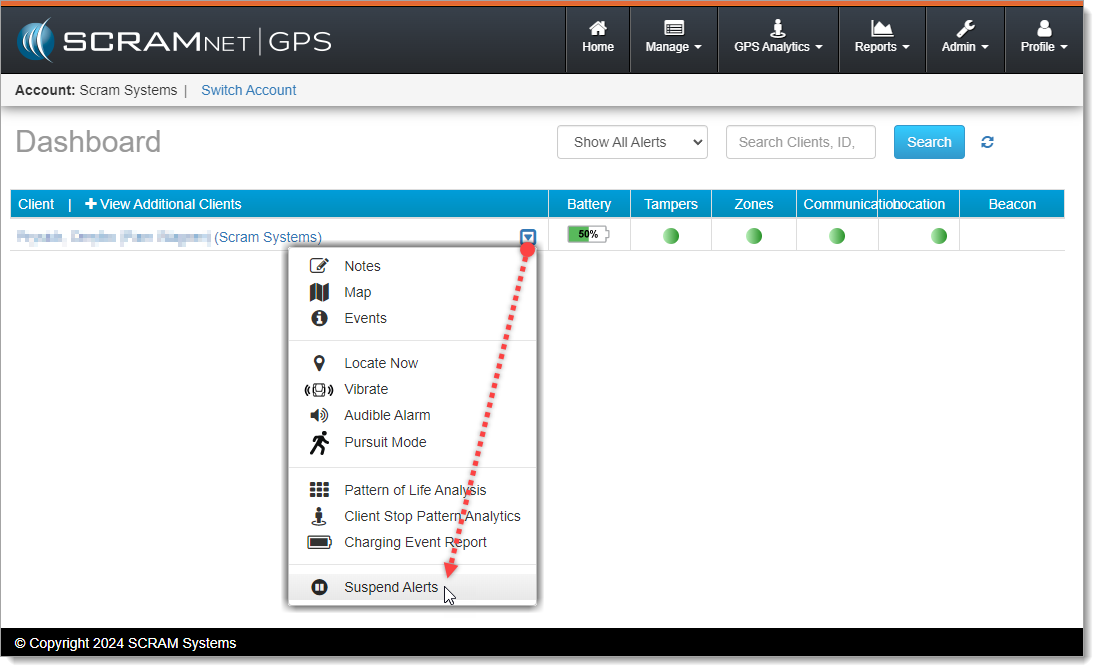
Alerts can be suspended by selecting Suspend Alerts from the context dropdown menu next to the client’s name on the SCRAMNET GPS Dashboard:
Select ‘Suspend Alerts’ from the Dropdown Menu (click to enlarge)
Prior to this release, SCRAMNET GPS offered two options for suspending alerts:
Suspend All Alerts – During the suspension period, alerts do not show on the dashboard, notifications are not sent, and tickets are not generated for the GPS Monitoring Center.
Suspend Alerts to Call Center Only – During the suspension period, tickets will not be generated for the GPS Monitoring Center; however, the alerts are shown on the dashboard, and notifications are still sent.
The ‘Suspend Alerts to Call Center Only’ option is only visible to accounts using the GPS Monitoring Center service.
Simplified Process for Enabling Suspend Alerts
Previously, to suspend alerts users had to first toggle the Enable Suspend Alerts button to ON before selecting the suspension timeframe. With this release, the toggle button has been removed. Users may configure the suspension directly without first setting the button to ON.
The Toggle is Gone, but the Badge Remains
Although the toggle is gone, the ON / OFF badge in the Suspend Alerts tab is still used to indicate at a glance if a suspension is active, without having to click into the tab.
Suspend Alerts by Dashboard Column
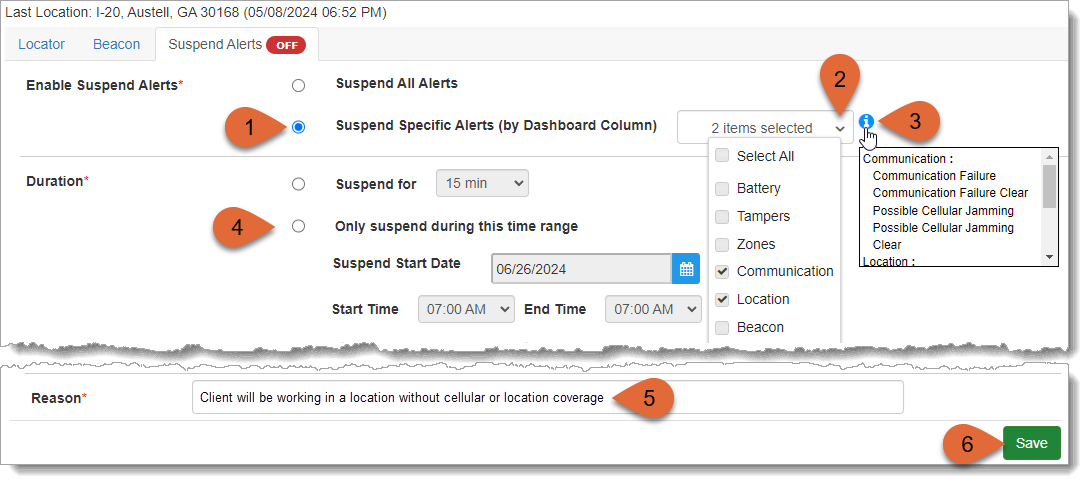
Thursday’s release introduced a third Suspend Alerts option in addition to the two described above: Suspend Specific Alerts (by Dashboard Column). This option supports suspending specific alerts that appear in the columns on the SCRAMNET GPS Dashboard. This is useful when you want to suspend some alerts, but don’t want to suspend all alerts. For example, you could suspend ‘No Communication’ and ‘No Location’ events, but leave ‘Tamper’ events active. To use this new feature:
Select the Suspend Specific Alerts (by Dashboard Column) radio button
Then select the desired Dashboard columns from the dropdown menu
Hover over the Information icon to see which specific alerts apply to the selected columns
Select the appropriate Duration for the alert suspension(s)
Add a Reason for the alert suspension
Save your new alert suspension schedule
New ‘Suspend Specific Alerts’ Feature (click to enlarge)
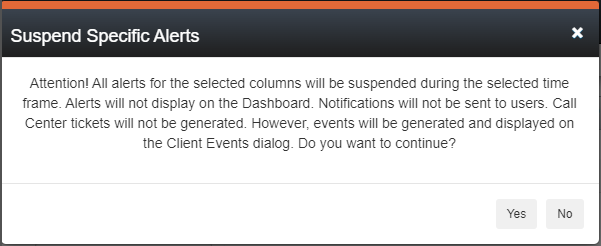
Upon selecting Save, the Suspend Specific Alerts dialog window will appear:
‘Suspend Specific Alerts’ Dialog Window
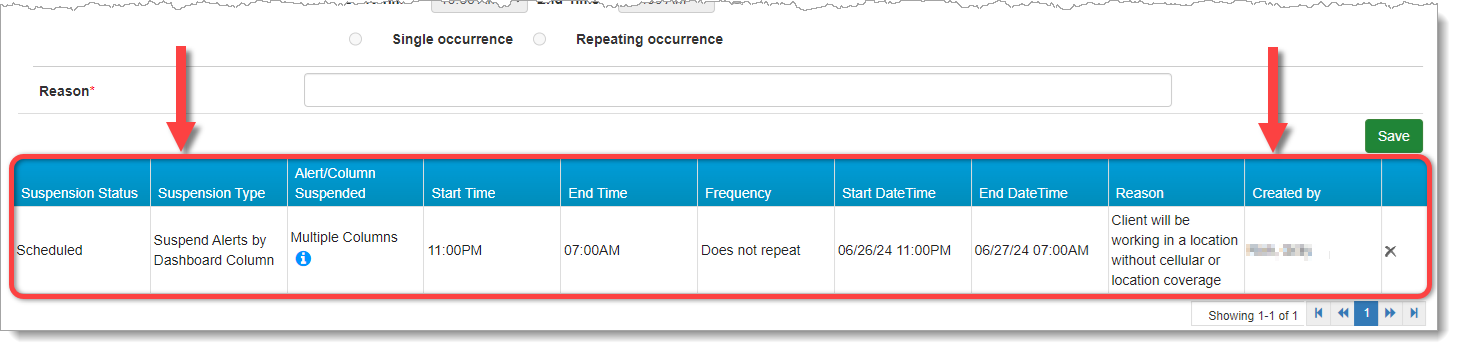
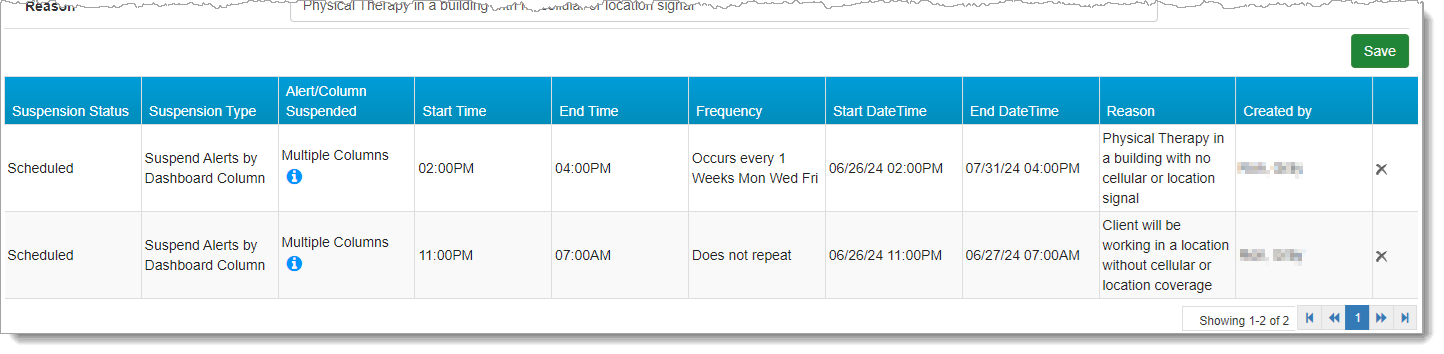
Select Yes on the dialog window to confirm your new alert suspension schedule. It will appear in a table beneath the Save button at the bottom of the page:
GPS Suspension Status: Scheduled (click to enlarge)
Schedule Multiple Suspensions
Additionally, Suspend Alerts by Dashboard Column supports multiple and recurring suspensions. To schedule multiple suspensions:
Select Only suspend during this time range
Set the Suspend Start Date, Start Time, End Time, and Suspend End Date
Then click Save
Schedules may be for overnight, or may last longer than 24 hours. Please note, however, that no part of a scheduled suspension can overlap with any other scheduled suspension. For example:
Start Date
Start Time
End Date
End Time
Result
June 26
11:00 PM
June 27
7:00 AM
This is an overnight schedule and will end the next morning
June 26
11:00 PM
June 30
7:00 AM
The suspension will start June 26 at 11:00 PM and continue until June 30 at 7:00 AM
Schedule Recurring Suspensions
Scheduled suspensions can be recurring. For example, alerts can be suspended every day for the next five days, or every Monday, Wednesday, and Friday. When creating the suspension select the Repeating Occurrence radio button to reveal the Frequency options. Then select the desired Frequency:
Recurring Alert Suspension (click to enlarge)
Once you Save the alert suspension schedule(s) and select Yes to confirm in the dialog window, the recurring suspension(s) will appear the table at the bottom of the page:
Recurring Suspensions Schedule (click to enlarge)
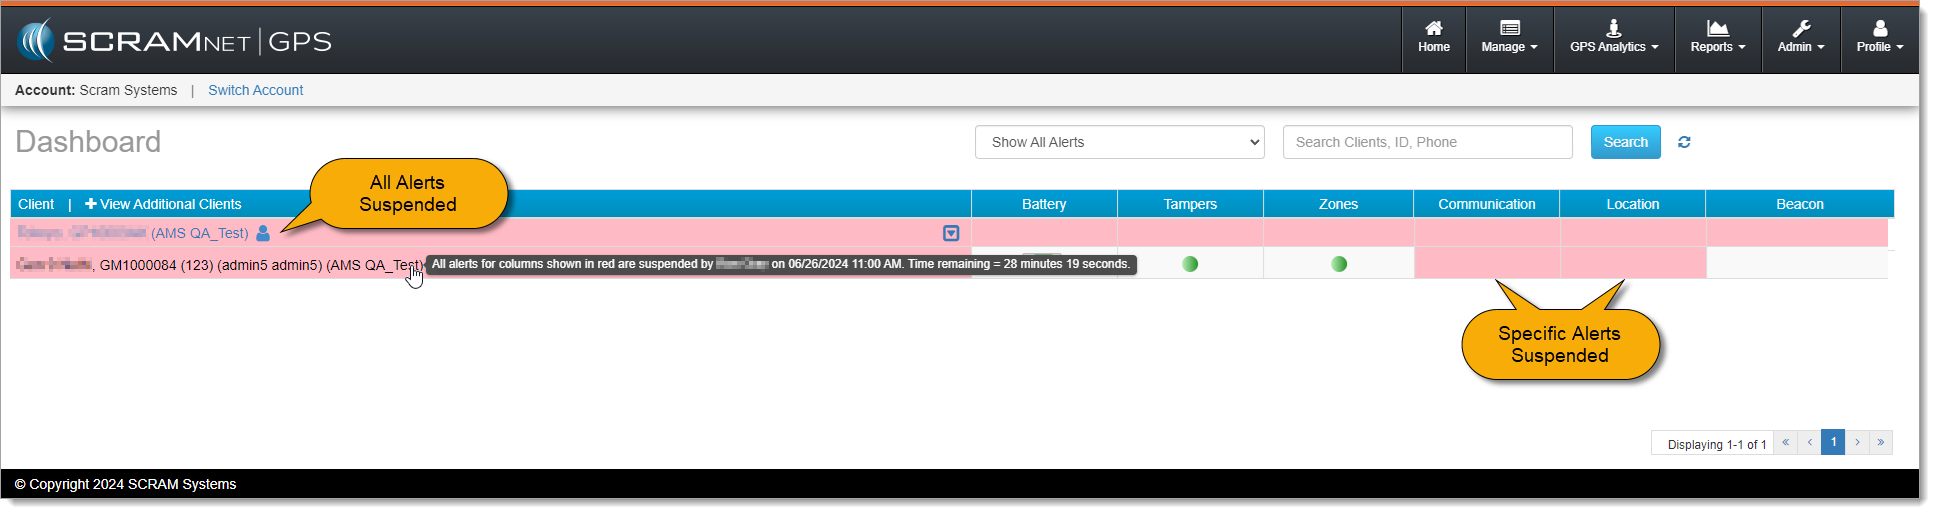
How Suspensions Appear on the Dashboard
The Dashboard visually indicates if all alerts are suspended or if only alerts for specific columns are suspended. Suspended columns are highlighted in red. Alerts for other columns will continue to appear and function normally. Mouse over the client’s name to see details of the alert suspension:
SCRAMNET GPS Dashboard with Suspensions (click to enlarge)
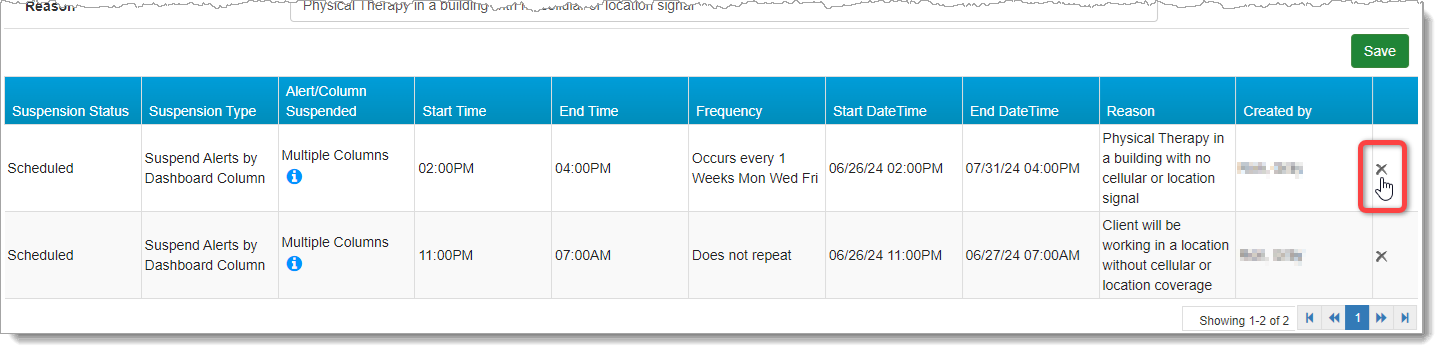
Delete Active or Scheduled Suspensions
To delete an “Active” or “Scheduled” suspension, simply select the Delete (x) icon at the far right of the row you wish to delete:
Delete Suspension (click to enlarge)
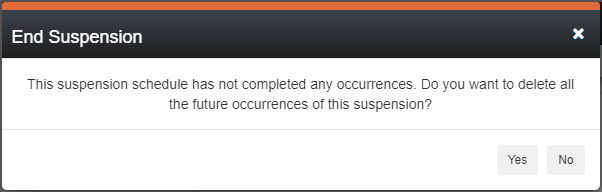
Deleting an active or scheduled suspension deletes the entire series, as indicated in the End Suspension dialog window.
‘End Suspension’ Dialog Window
Select Yes to confirm you wish to end the alert suspension series.
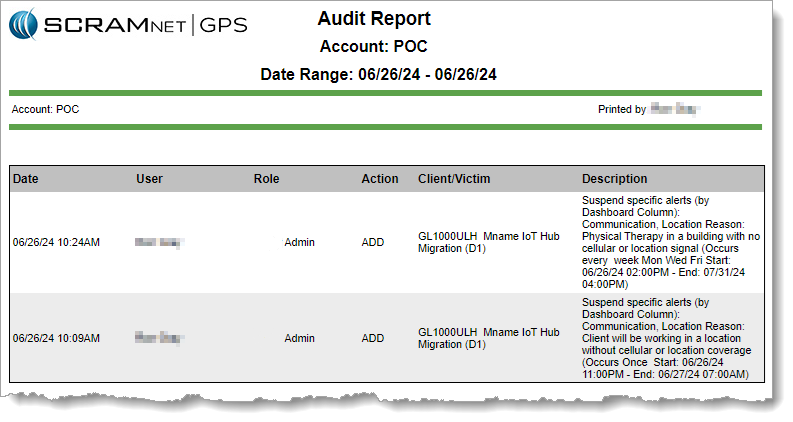
Auditing
Audit entries are added to the Audit Report when schedules are created, deleted, become active, or end.
GPS Audit Report with Suspensions (click to enlarge)
At 5:00 AM MDT on Thursday, May 23, 2024, SCRAM Systems released two enhancements to SCRAMNET GPS:
Two new features that clarify client location points on the map while in Pursuit Mode.
MC Customers Only – A new checkbox added to the Client Profile for future use.
Pursuit Mode Enhancements
While in Pursuit Mode, the SCRAM GPS device acquires and transmits location points every 15 seconds. The high frequency of location point acquisition and transmission during Pursuit Mode can sometimes lead to confusing map results; specifically:
Location points failing to appear on map when expected, or
Multiple location points appearing on the map at the same time.
New features have been added to Pursuit Mode to help clarify each of these two occurrences.
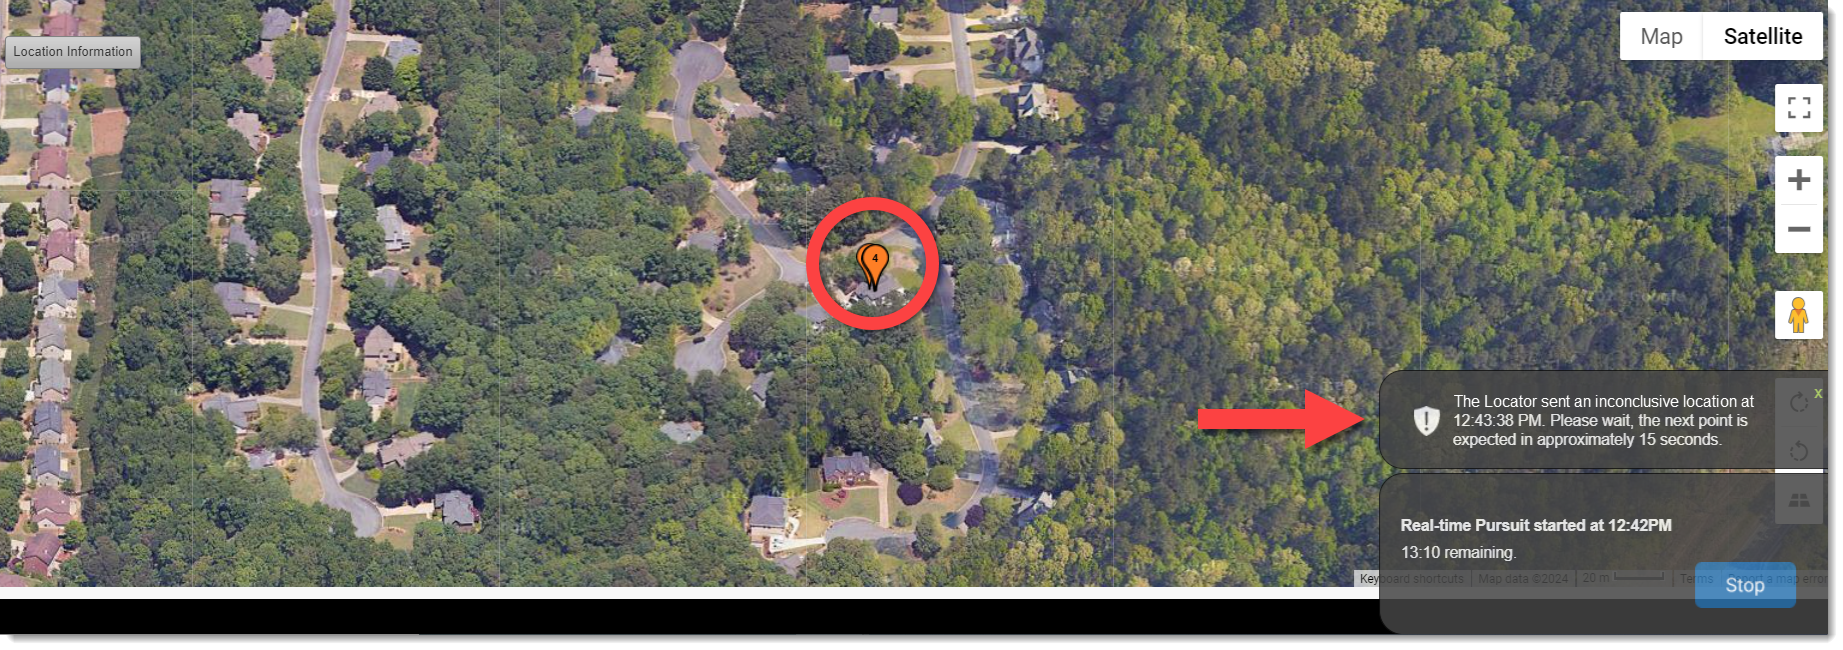
Location Point Message
Due to the rapid acquisition and transmission of location points during Pursuit Mode, there is an increased possibility that the Locator (SCRAM GPS device) will sometimes send a location point to the monitoring system more quickly than it can be verified. When the SCRAMNET GPS monitoring system receives an unverified location point, it labels it as “inconclusive” and cannot display it on the map.
With this release, SCRAMNET GPS will display a 10-second message which explains, “The Locator sent an inconclusive location,” the exact time the inconclusive location was sent, and to expect the next location point in approximately 15 seconds (see arrow below).
SCRAMNET GPS Pursuit Mode Enhancements (click to enlarge)
Location Point Auto-Sequencing
During Pursuit Mode, there is also an increased possibility that the SCRAMNET GPS monitoring system will receive multiple location points at the same time. This can be confusing when viewed on the map because the sequence of the points is unknown.
With this release, when the monitoring system receives multiple location points at once, each point will automatically be sequenced and separated by one second when displayed on the map in SCRAMNET GPS (see circle above).
New Client Profile Checkbox – Future Use
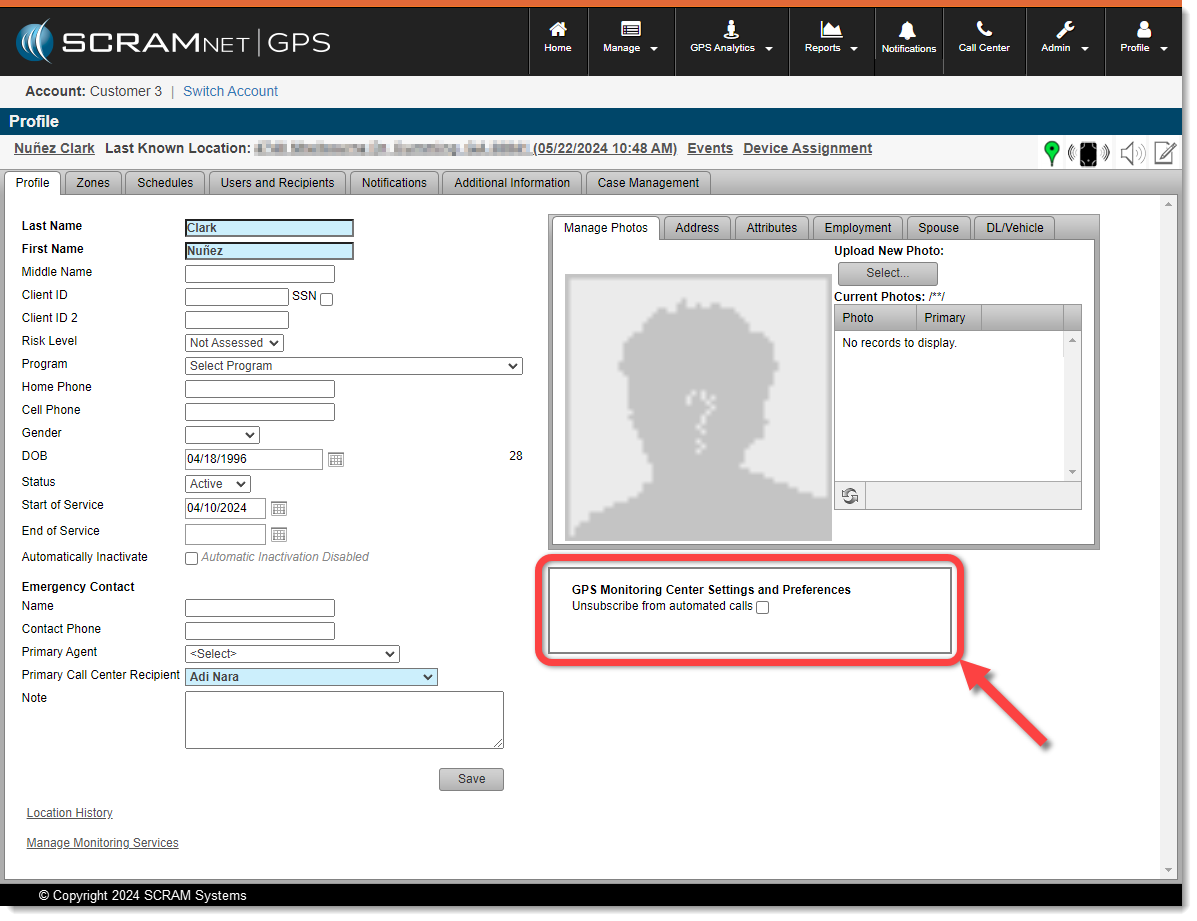
When accessing the Profile tab for clients, SCRAM GPS Monitoring Center customers may notice a new “GPS Monitoring Center Settings and Preferences” section beneath the client photo.
New “GPS Monitoring Center Settings and Preferences” Section (click to enlarge)
This new section and checkbox support a future SCRAM GPS Monitoring Center feature that is currently entering beta testing, and the checkbox does not impact anything at this time.
At 5:00 AM MDT on Thursday, March 21, 2024, SCRAM Systems is introducing an enhancement to SCRAMNET GPS that will allow you automatically center client location points on the map while in Pursuit Mode.
During the 15-minute deployment, you may not be able to access SCRAMNET GPS, but messages from the SCRAM GPS device will continue to be processed uninterrupted.
Center Client Location Points on the Map While in Pursuit Mode
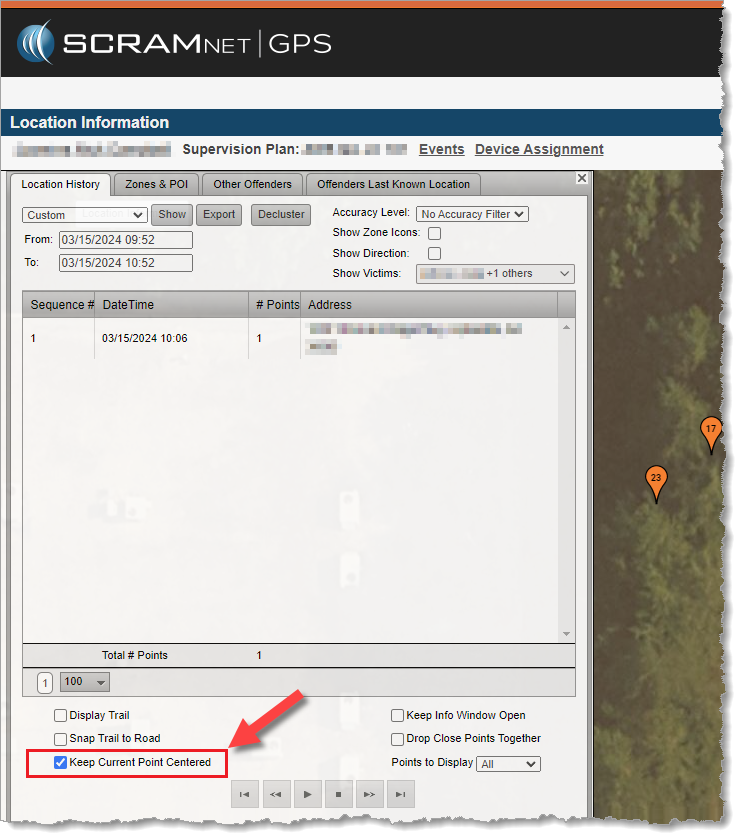
While in Pursuit Mode, location points can sometimes drop outside of the viewable map area and the map must be adjusted to see the point. With this update, each location point is automatically centered on the map. This feature can be toggled on and off as needed. For example, to focus the map on a specific area, the feature can be disabled so that the next point from the locator will not adjust the map.
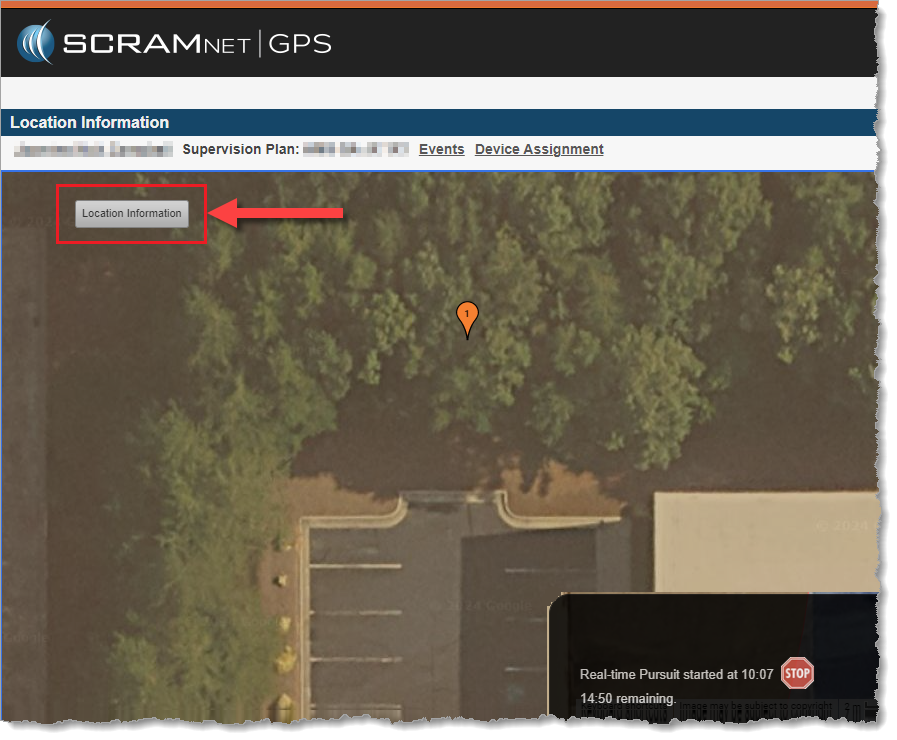
To toggle automatic centering of the map, click the Location Information button on the top left of the map to expand the Location Information dialog window:
Select the Location Information Button
Then uncheck Keep Current Point Centered. When this checkbox is unchecked, the map will remain in its current position and zoom level.
Uncheck the “Keep Current Point Centered” Checkbox
At 5:00 AM MT on Thursday, February 29, 2024, SCRAM Systems® introduced two new device inventory statuses, “Awaiting Return” and “Pending Removal,” in SCRAMNET GPS®.
When to Use the New Statuses
Two new inventory statuses will now be available to help better track device inventory:
Awaiting Return: This status indicates the device has been unassigned and removed from the client’s ankle, but the device must be retrieved from another location (the county jail or a satellite office, e.g.) before it can be placed back into inventory.
Pending Removal: This status indicates the device has been unassigned but is still on the client’s ankle and is pending removal during a future appointment with the client.
Note: Once the GPS device has been unassigned – and before it is placed into either one of these new statuses – billing stops.
Devices in these two statuses cannot be assigned to the next client because they are not yet in inventory. Use the Devices tab in Account Settings to receive these devices into inventory so they can be assigned to a client.
Access the ‘Devices’ Tab from Account Settings (click to enlarge)
How to “Unassign” a SCRAM GPS Device
Devices can be unassigned in the following ways:
Unassign the device from the Device Assignment page
Manually inactivate the client from the Client Profile page
Manually inactivate the client from the Manage Clients dialog
Automatically inactivate the client from the End of Service setting
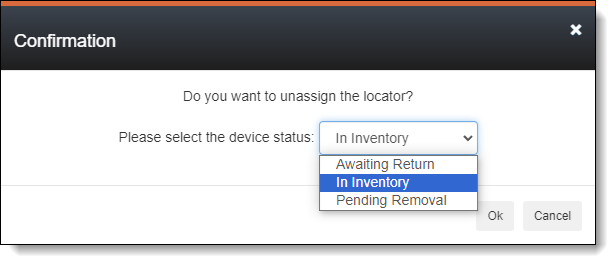
Unassign a Device from the Device Assignment Page
When unassigning a device from the Device Assignment page, a prompt is displayed confirming the unassignment. This prompt has been updated to allow setting the inventory status. The Device Inventory Status dropdown menu defaults to “In Inventory.”
Device Status Dropdown Menu in Unassign Confirmation Dialog (click to enlarge)
Manually Inactivate the Client from the Client Profile Page
Clients can be manually inactivated from the Client Profile page, and this action unassigns the GPS device. The Inactivation Reason confirmation dialog allows you to set the Device Inventory Status.
Manually Inactivate from the Client Profile Page (click to enlarge)
Note: This dialog may look different for you depending on the account-level setting: Allow assignment of inactivation statuses.
Manually Inactivate the Client from the Manage Clients Dialog
Clients can be manually inactivated from the Manage Clients dialog, and this action unassigns the GPS device. The same Inactivation Reason confirmation dialog as above is shown and allows you to set the Device Inventory Status.
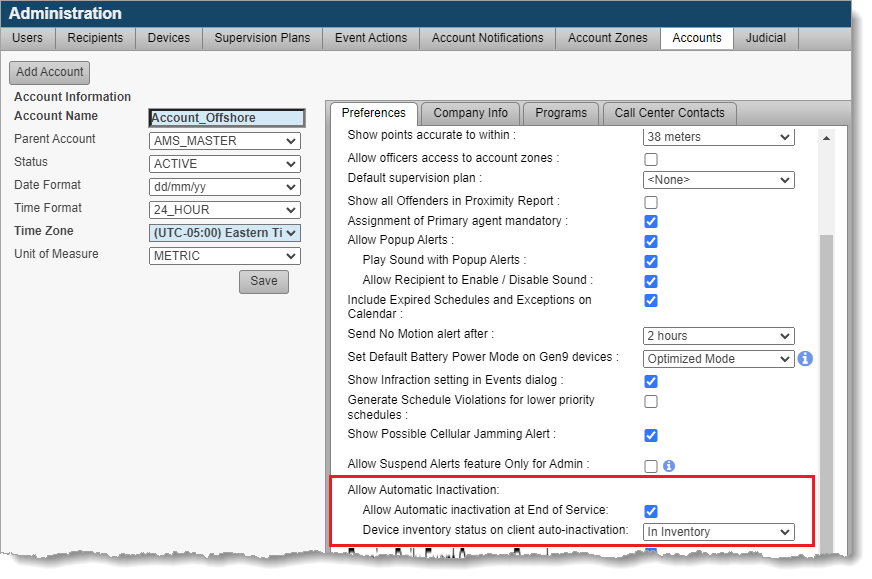
Automatically Inactivate the Client from the End of Service Setting
Clients can automatically be inactivated when their end of service date is reached if this feature is enabled in the Account Settings page. Additionally, the preferred inventory status can be set for clients who are automatically inactivated.
Automatic Inactivation Inventory Status Settings (click to enlarge)
Tracking “Awaiting Return” and “Pending Removal” Inventory Statuses
Use the Admin > Account Settings > Devices tab to track devices Awaiting Return and Pending Removal, and to receive them into inventory.
Access the ‘Devices’ Tab from Account Settings (click to enlarge)
Filter devices using the Inventory Status dropdown menu and, optionally, Print the report. Select the appropriate device and click Device Received to change the device’s inventory status to “In Inventory;” so it can be assigned to another client.
Tracking Awaiting Return and Pending Removal Inventory Statuses (click to enlarge)
Tip: For those devices in Pending Removal status, use the Last Assigned To column to see the name of the client who is still wearing the device.
On February 9, 2024, SCRAM Systems will release Version 6 of its Health and Safety Notice for SCRAM Systems Products. This updated version will automatically append itself to the end of your SCRAM-Approved Participant Agreements (the Agreements you download and print from SCRAMNET), and will also be available separately for download from the SCRAM Systems website.
The SCRAM Systems product line has evolved significantly over the years, and this update brings the Health and Safety Notice up to date with the current line of EM devices. Upon review of the updates by a third-party Human Factors and Safety Evaluation firm, it was determined that the Health and Safety Notice will now be separated into two pages.
Page 1: Participant Warnings and Instructions
The first page will continue to house medical warnings, general safety instructions, and personal hygiene recommendations targeted towards the client, and as before will require the client’s signature:
Health and Safety Notice v6 pg 1 (click to enlarge)
Page 2: Installer Precautions and Instructions
The second page relocates the “PRECAUTIONS AND INSTRUCTIONS FOR INSTALLERS” section from the first page, and adds a new “Agency Representative” signature line to be signed by the installer at the time of installation:
Health and Safety Notice v6 pg 2 (click to enlarge)
This update to the Health and Safety Notice for SCRAM Systems Products provides greater clarity to both your clients and your agents, and provides greater legal protection to your agents and your overall monitoring program.
On Thursday, November 16, 2023, SCRAM Systems introduced the following three new features in SCRAMNET GPS:
New Alert – Possible Cellular Jamming
Client ‘Notes’ Dialog Includes Notes Up to One Year Old
Beacon Schedules Support Schedule Exceptions
New Alert – ‘Possible Cellular Jamming’
The cellular communications module in the SCRAM GPS device can detect the presence of another device that is creating a radio frequency (RF) disturbance in the cellular signal of the SCRAM GPS device. If this RF disturbance in the cellular signal subsequently causes a loss of communication between the SCRAM GPS device, the cell tower it was registered to at the time, and an adjacent cell tower, then a Possible Cellular Jamming alert will generate.
The appearance of a Possible Cellular Jamming alert in SCRAMNET GPS does not necessarily mean the client intentionally blocked the cellular signal. It simply indicates that there was RF interference present, and that interference caused the SCRAM GPS device to lose contact with the cellular network. The RF disturbance could have been created by anything in the surrounding environment that emits radio frequencies.
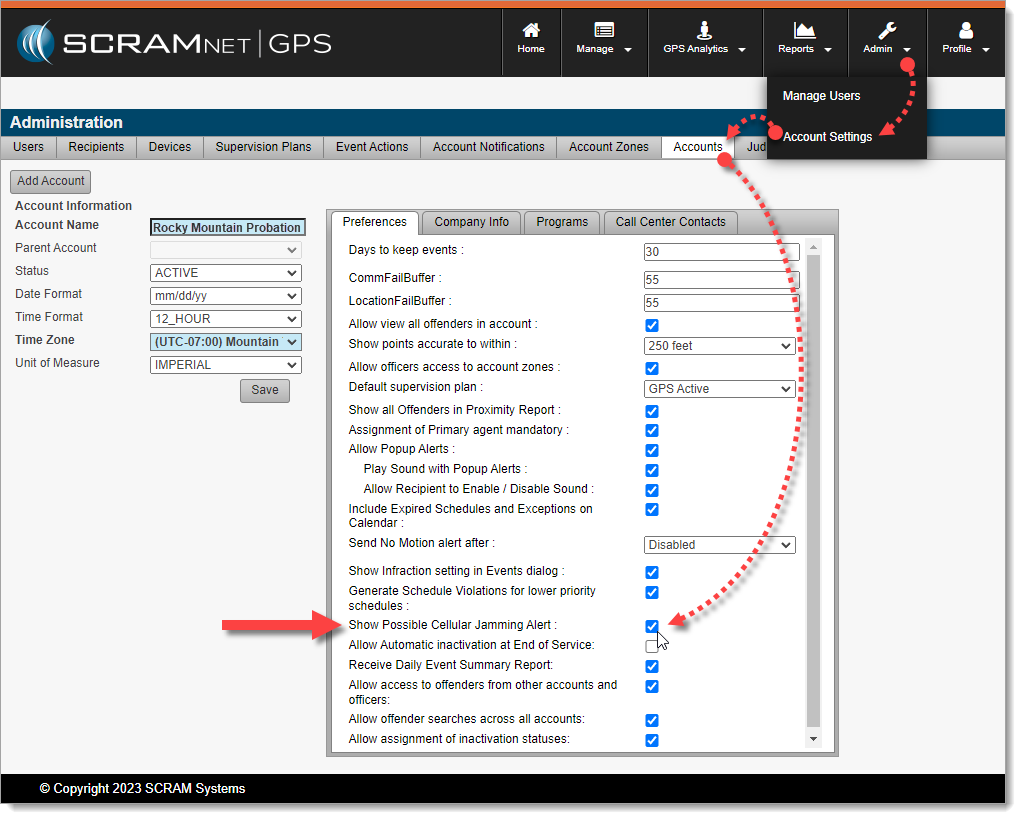
Switching it On and Off
Enable or disable this alert by accessing it in the Account Settings dialog (Admin > Account Settings > Accounts (tab) > Show Possible Cellular Jamming Alert):
Enable/Disable Possible Cellular Jamming Alerts in GPS Administration (click to enlarge)
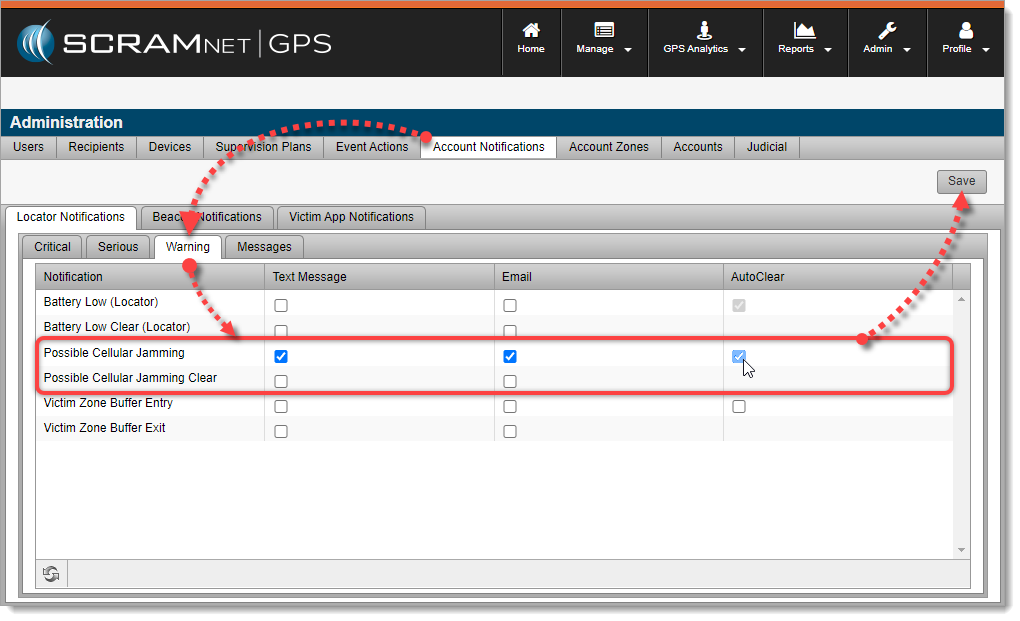
Once enabled, SCRAMNET GPS Account Administrators may configure the AutoClear settings in the Account Notifications dialog (Admin > Account Settings > Account Notifications (tab) > Locator Notifications (tab) > Warning (tab):
Possible Cellular Jamming Alert Notification Settings (click to enlarge)
When AutoClear is checked, the alert will automatically clear when the corresponding clear event is received.
Receiving Client Notifications
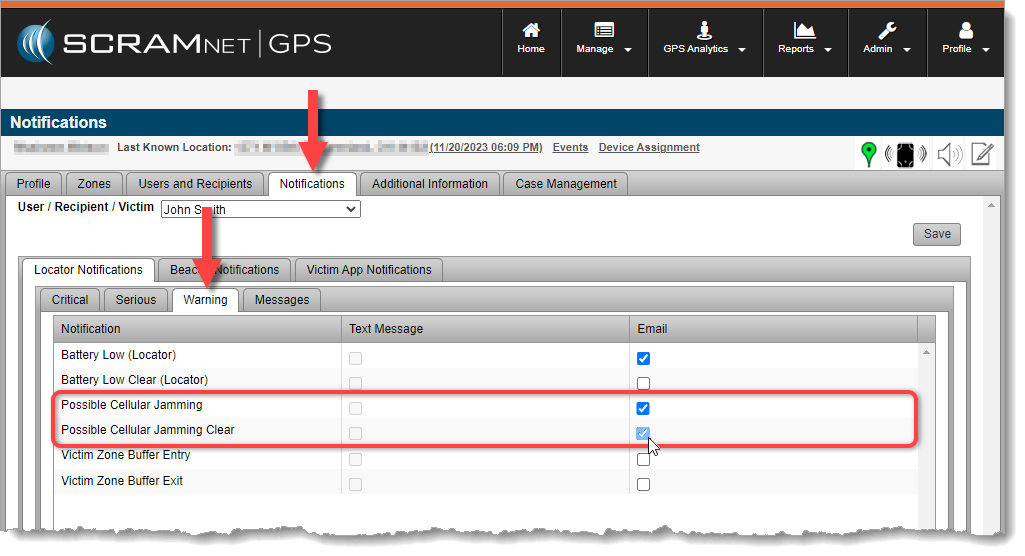
Once the Possible Cellular Jamming alert is enabled, you may subscribe Users, Recipients, and/or Victims to receive notifications by activating them via the Notifications tab on the Client Profile.
Enable Client Notifications for Users, Recipients, and Victims (click to enlarge)
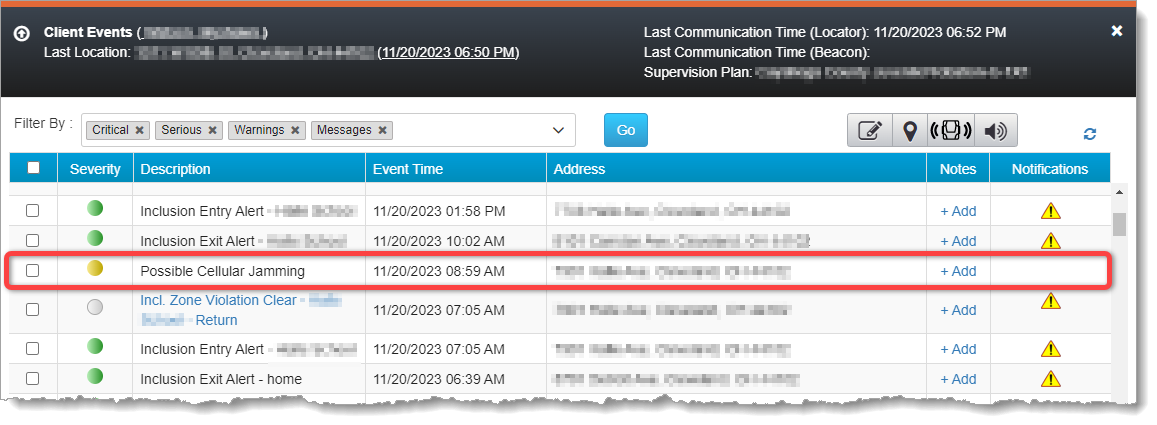
The Possible Cellular Jamming alert will also appear on the Client Events dialog along with all other enabled events and alerts:
Possible Cellular Jamming Alert on the Client Events Dialog (click to enlarge)
The SCRAM GPS device will send a corresponding clear event when the disturbance has cleared, however, Officers & Agents may also manually clear the event.
Troubleshooting
To troubleshoot a Possible Cellular Jamming alert, try calling the client on the client’s mobile phone while the Possible Cellular Jammingalert is still active (red). If the call will not connect (goes immediately to voicemail, e.g.), then it is possible that cellular signals in the client’s vicinity are being blocked and further investigation may be warranted.
If you are able to reach the client, ask the client to move to another position at least 35 feet from their current position. If the alert clears (yellow) and does not re-generate when the client returns to their original position, then it may have been caused by random RF interference. If the alert clears, but then re-generates once the client returns to their original position, then further investigation may be warranted.
If you notice a pattern of the Possible Cellular Jamming alert generating in the same geographical location for a client repeatedly, then – depending on the nature of the location where the alert generates and whether or not you would expect a high level of RF interference in that environment – further investigation may be warranted.
Client ‘Notes’ Dialog Includes Notes Up to One Year Old
The Client Notes dialog includes Event notes up to one year old. Previously, notes only up to three months old were displayed. To access the Client Notes dialog, click the Notes button on the Client Profile Summary dialog:
Access Notes from the Client’s Profile Summary (click to enlarge)
Beacon Schedules Support Schedule Exceptions
Schedule Exceptions can now be created for Beacon Schedules to allow clients outside of beacon range for approved reasons.
On, September 21, 2023, SCRAM Systems will release an enhancement to the SCRAM TouchPoint Documents page for your client’s supervision plan in SCRAMNET GPS . This enhancement enables you to require a client to electronically sign a PDF Document shared with them via their TouchPoint mobile application.
Not seeing the enhancement in SCRAMNET GPS? Clear your cache and cookies and refresh your browser window.
The latest version of the TouchPoint app will be available to clients in the app stores. As a best practice, SCRAM Systems recommends that all TouchPoint app users enable their smartphones for automatic app updates (SCRAM login required) to make this process easier.
Require an eSignature
You may require an eSignature for any PDF document you wish to share with your client’s TouchPoint mobile application. This includes new and previously viewed PDFs.
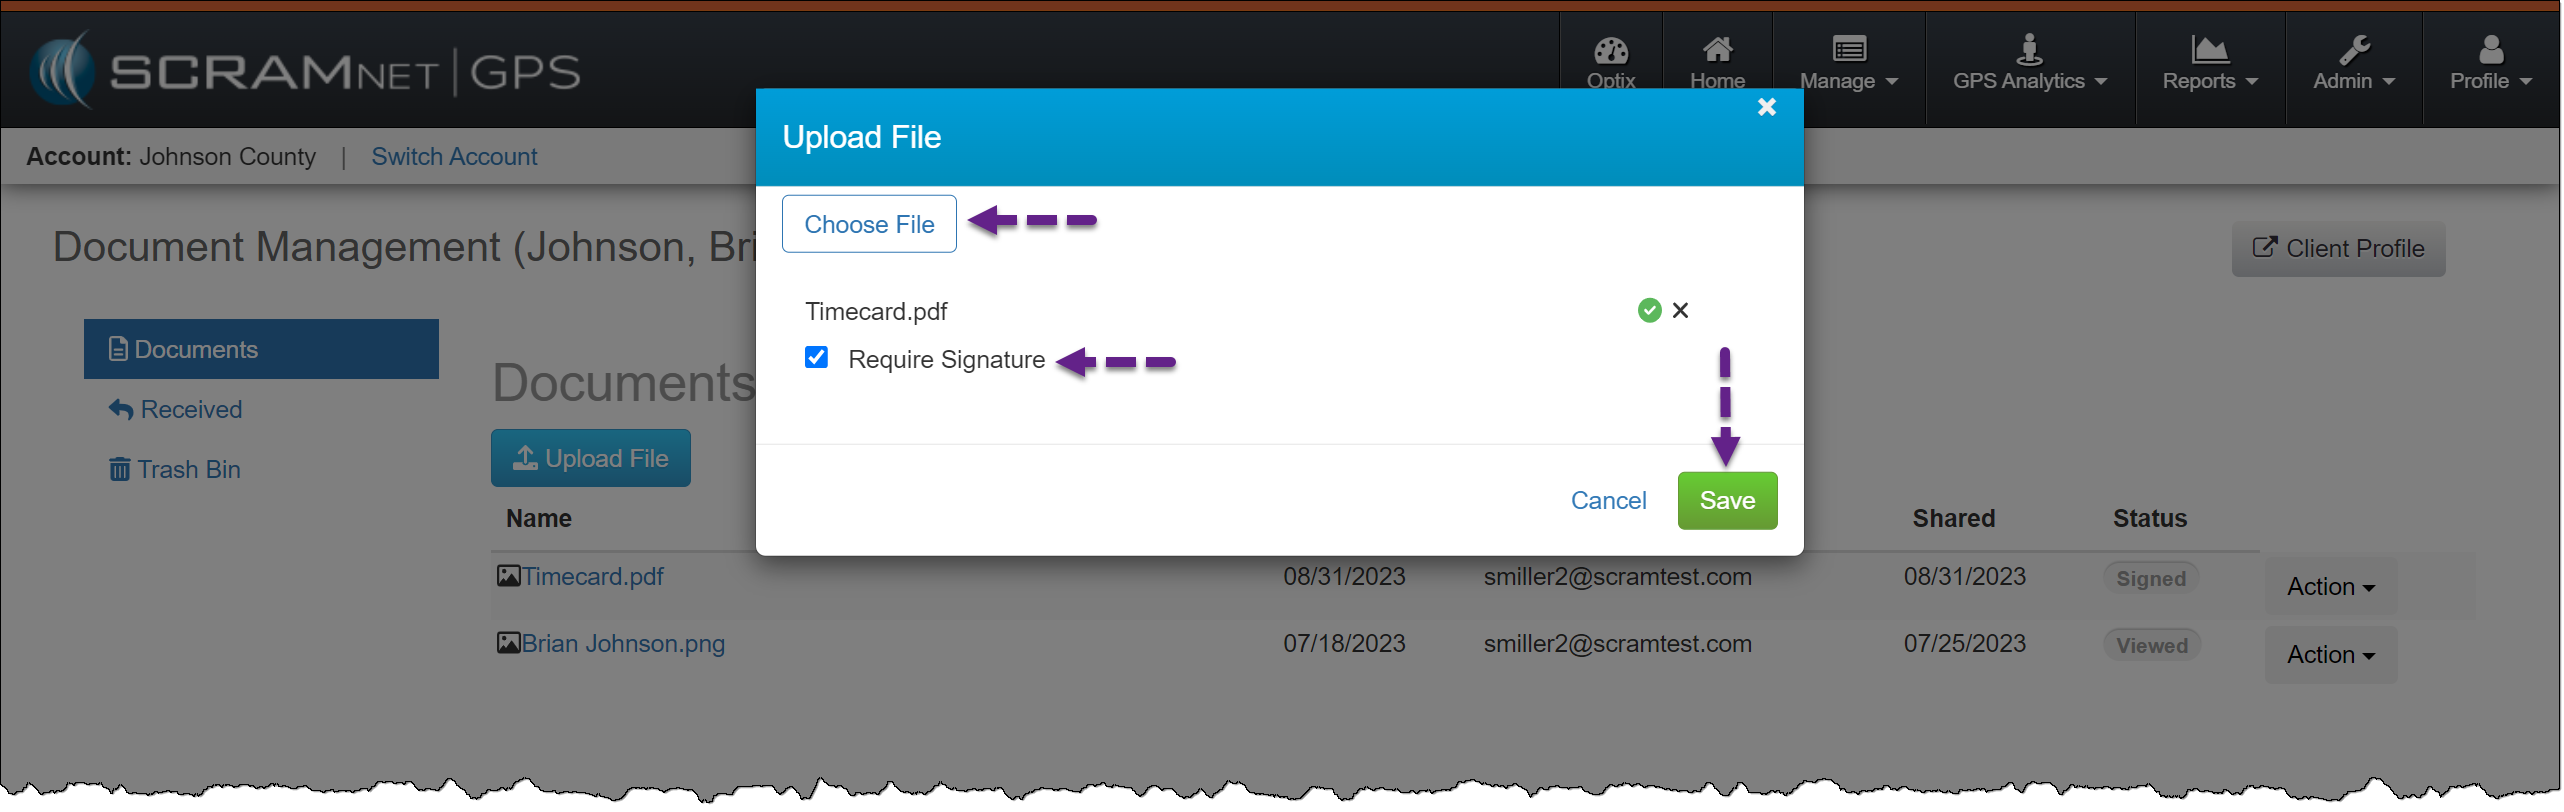
To require an eSignature for a new PDF document:
Select the Upload File button on the client’s Documents page.
On the Upload File pop-up, choose the PDF file.
Select the checkbox to Require Signature.
Select the Save button.
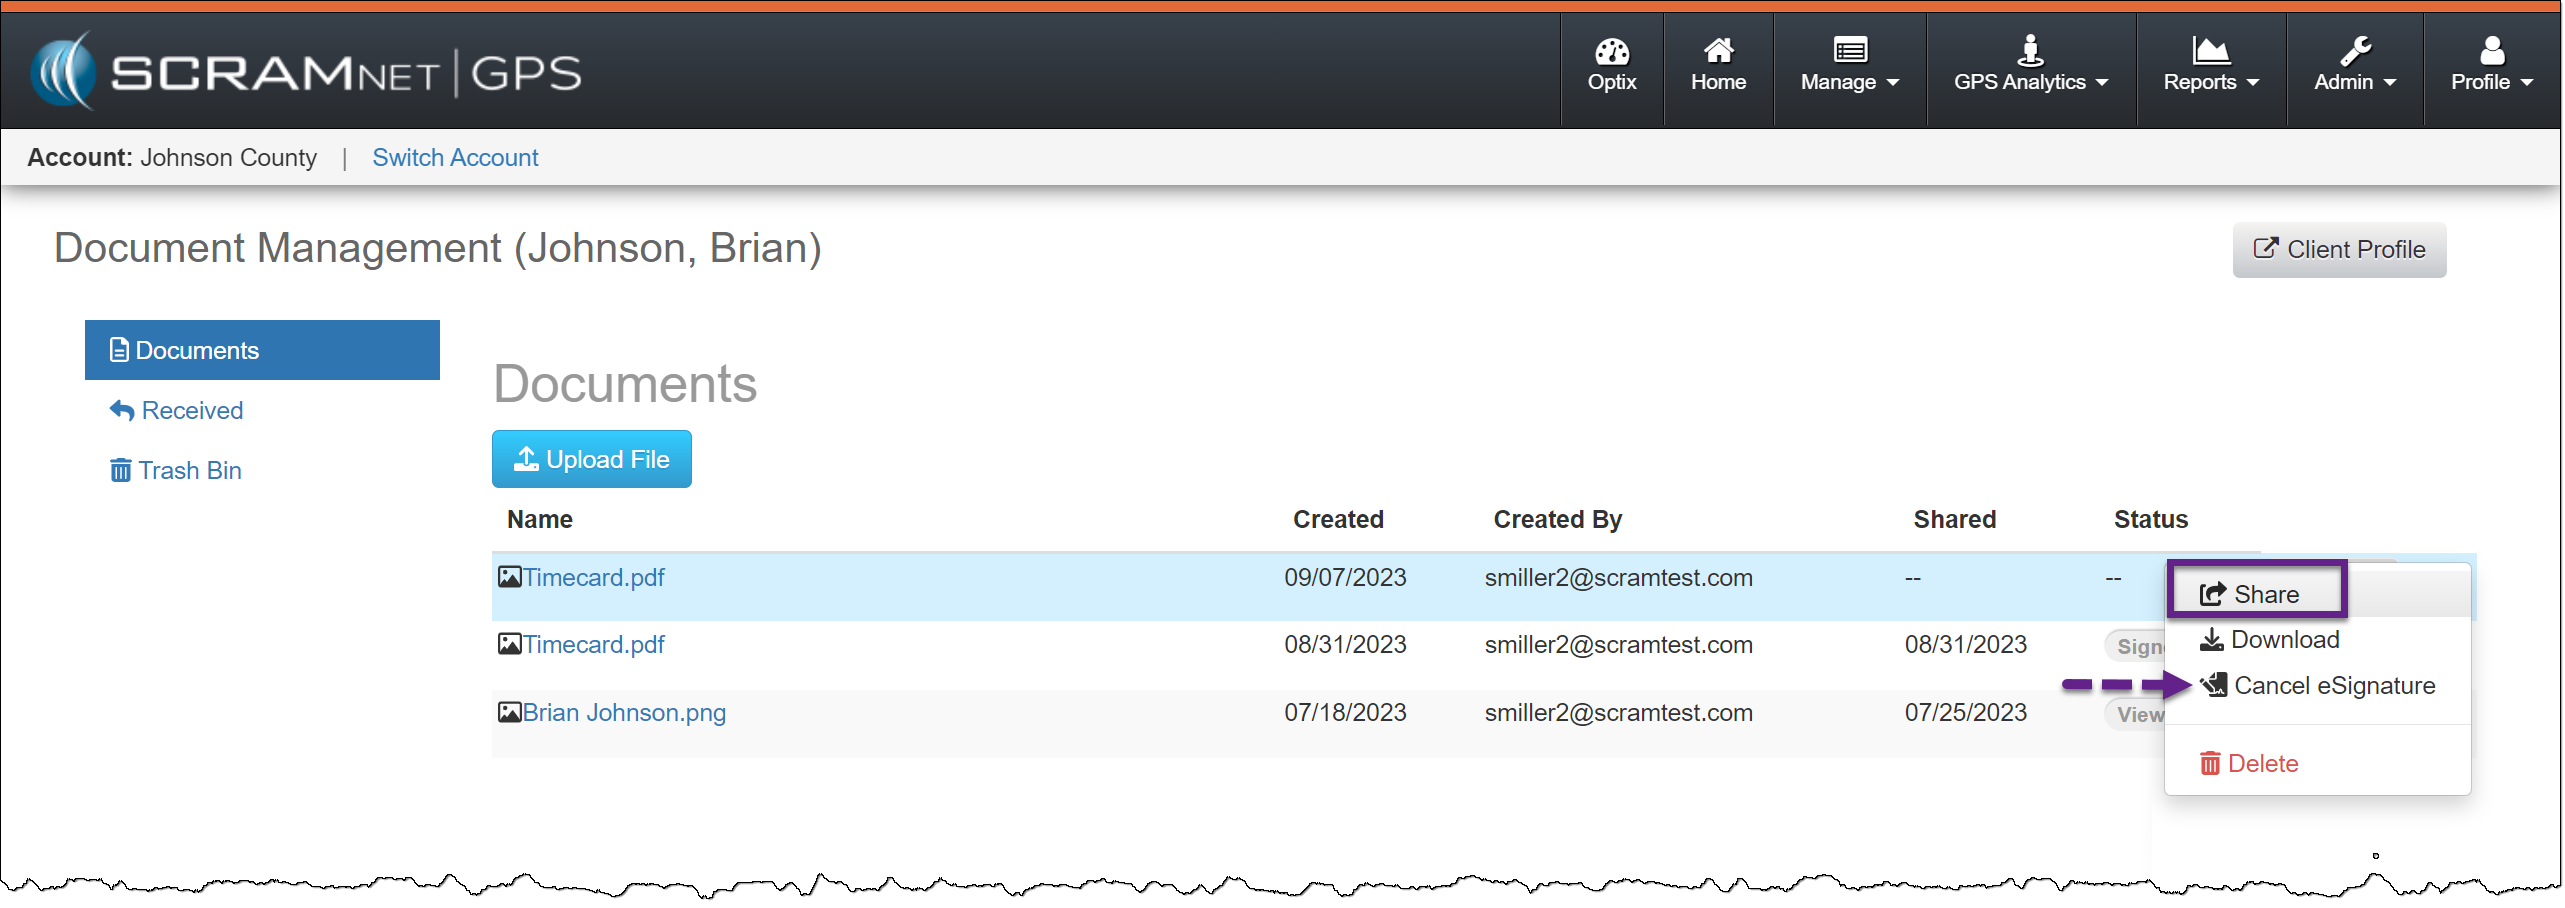
Client Document Management – click to enlarge
Once displayed on the Documents page, Share the PDF with the client’s TouchPoint mobile application.
Document option menu – click to enlarge
If an eSignature is no longer required, you may now select Cancel eSignature.
You may request an eSignature for previously shared and viewed PDFs by selecting the ellipsis and then selecting the Require eSignature option. The client will then be notified that a document requires an eSignature.
SCRAM TouchPoint Mobile Application
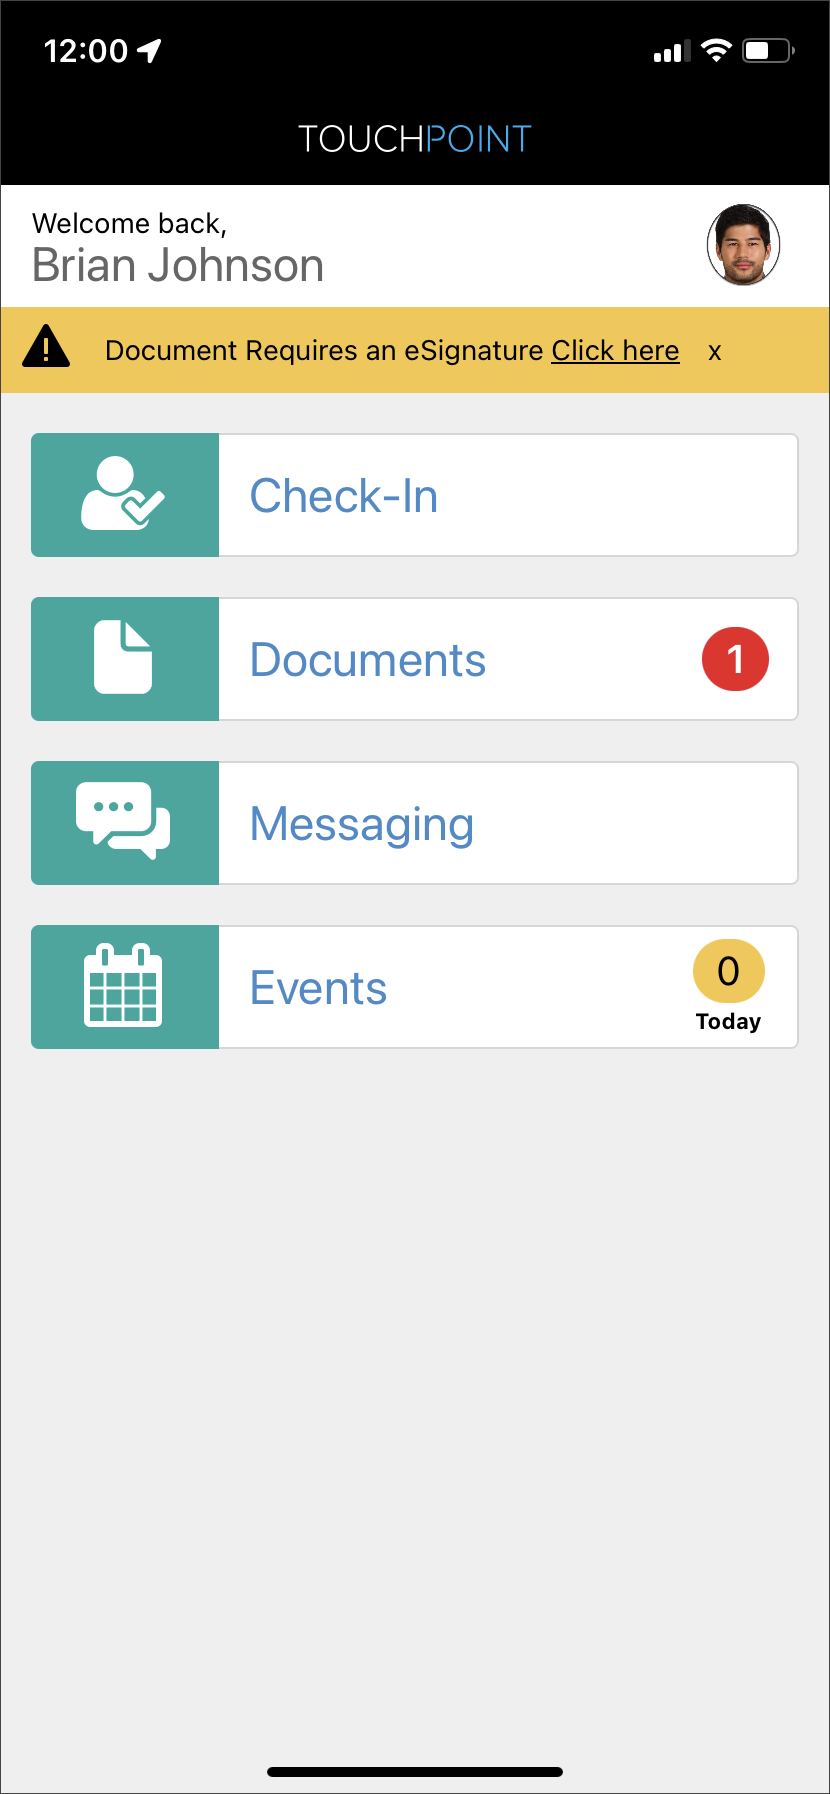
When an eSignature is required for a shared document, the application’s Home screen will display a banner that alerts the client of the necessary eSignature.
TouchPoint mobile application client Home screen – click to enlarge
To complete an eSignature, have the client:
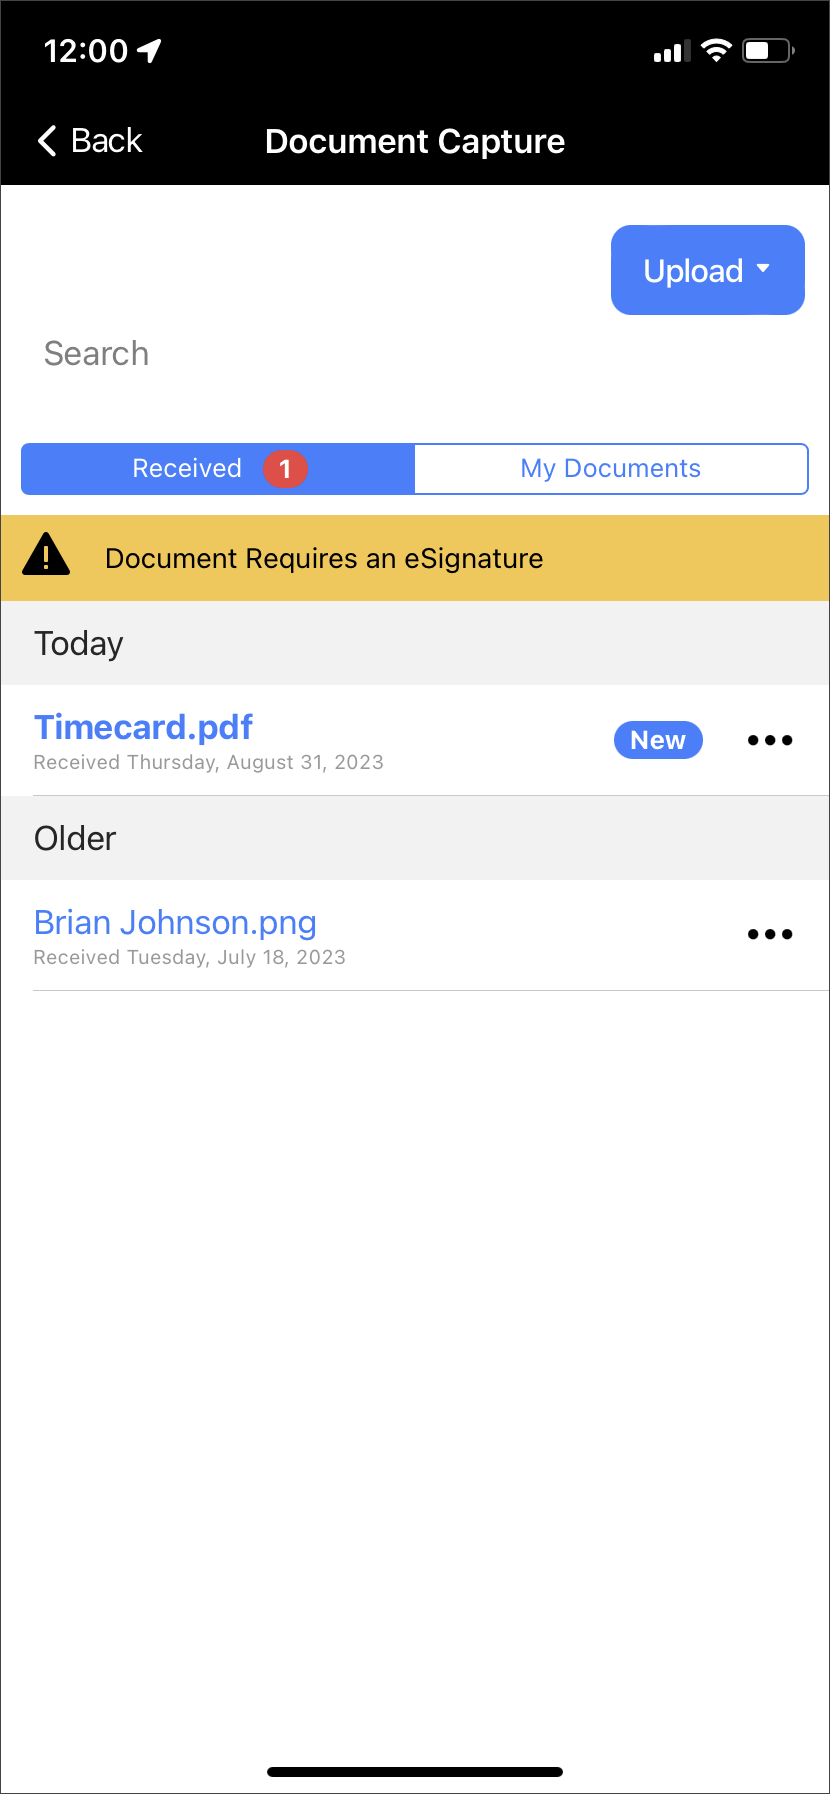
View the PDF within the TouchPoint mobile application by tapping on it.
Client Document Capture screen – click to enlarge
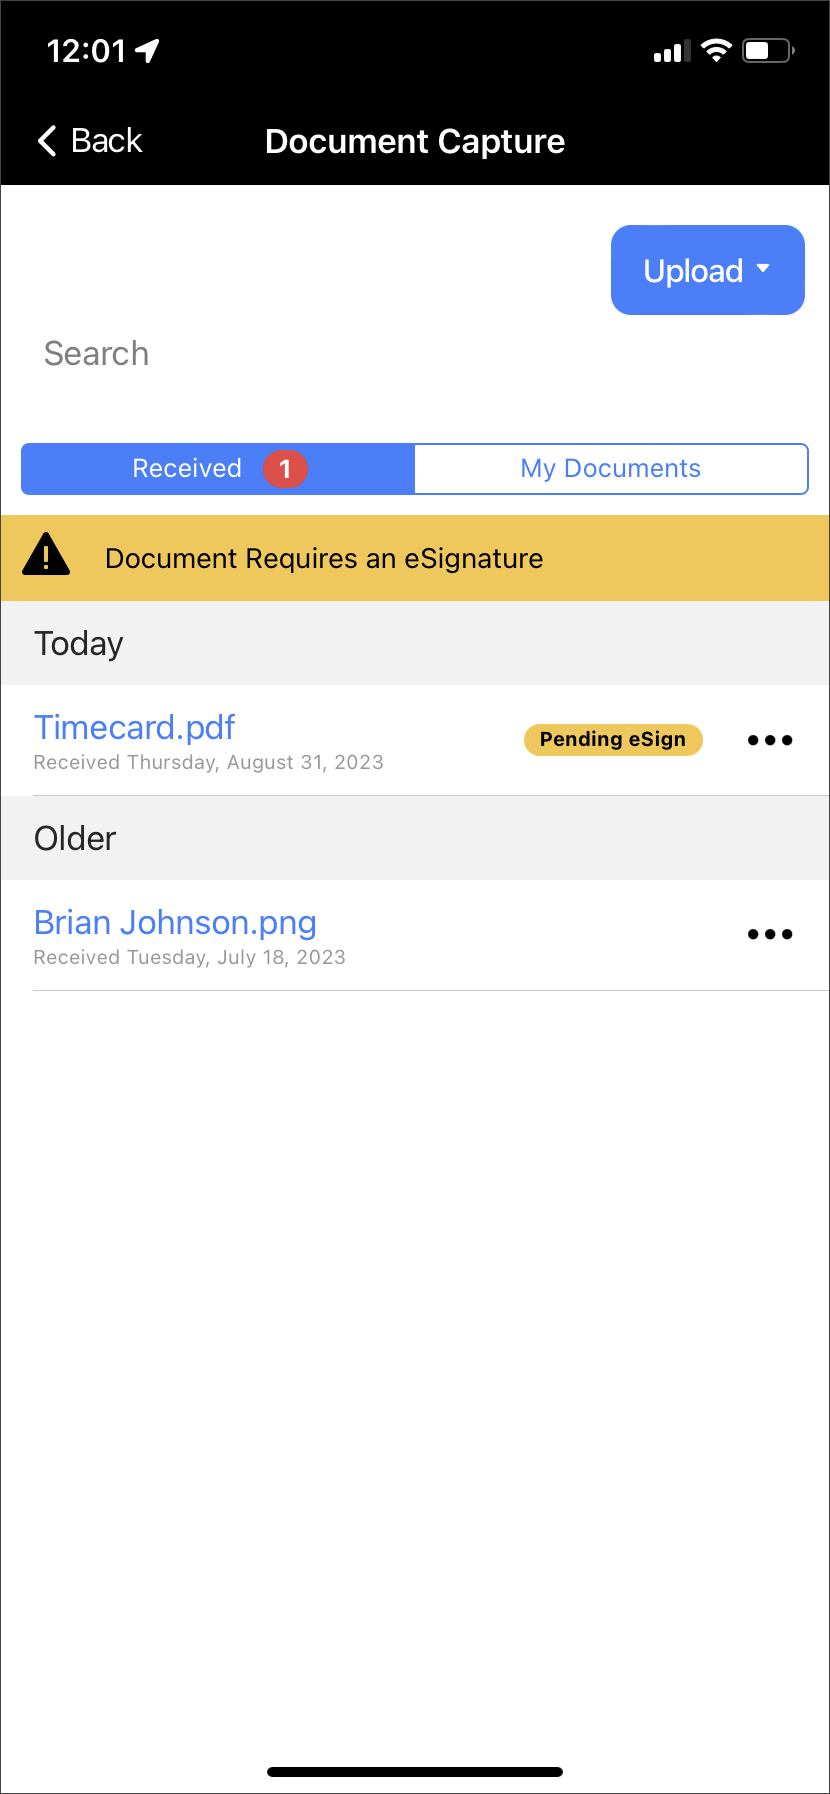
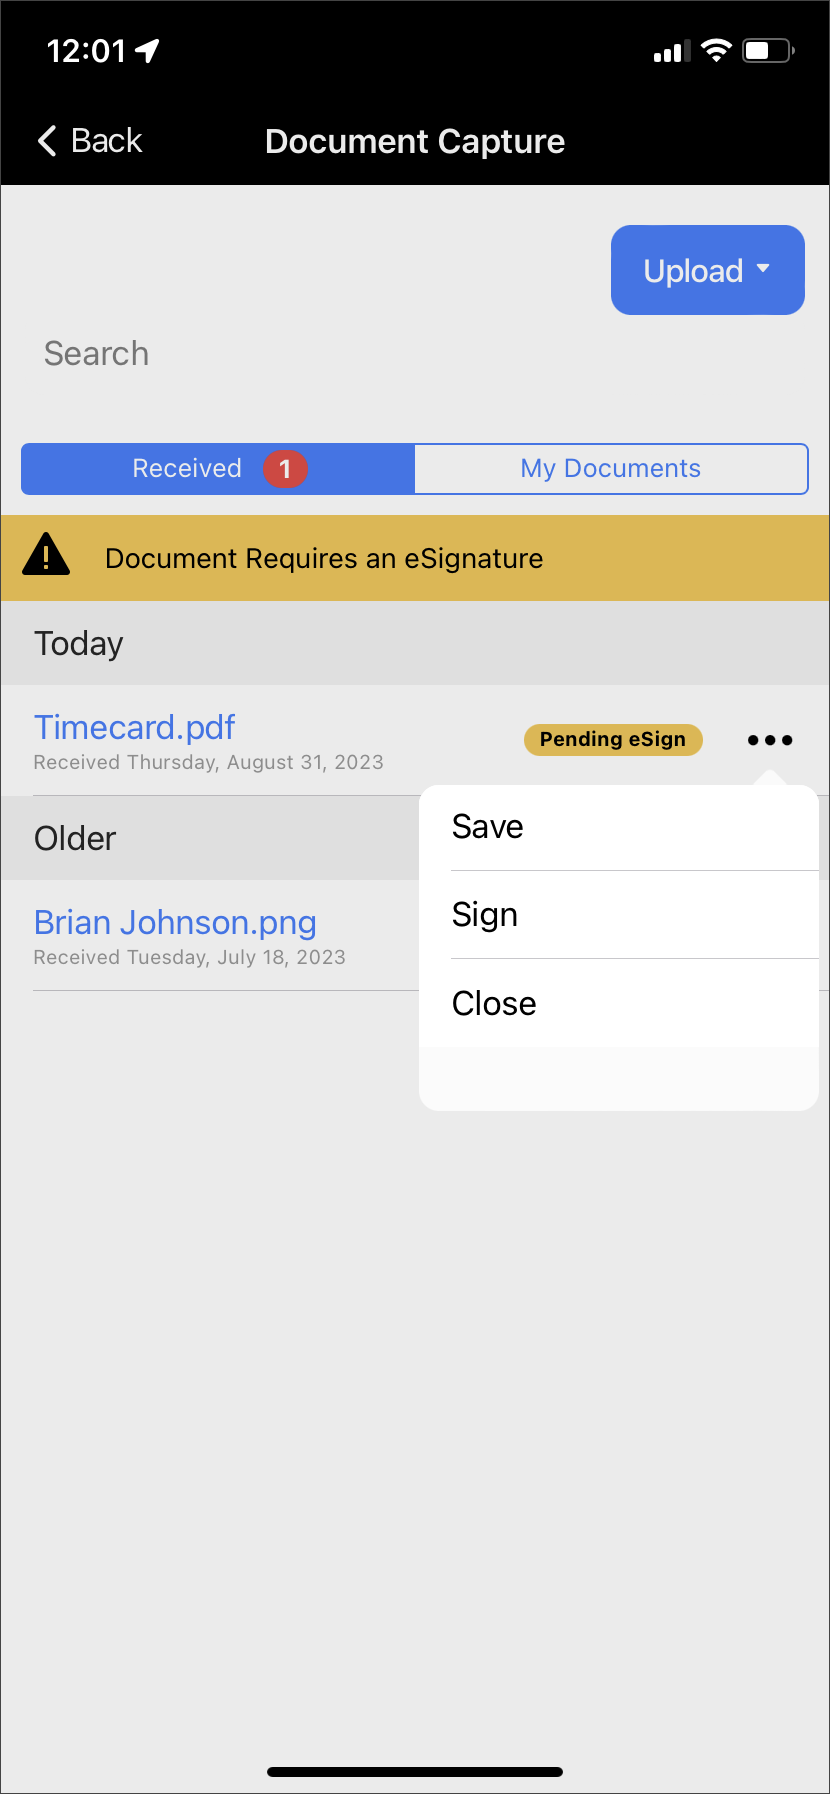
After viewing the document, a “Pending eSign” badge will display next to the ellipsis. Tap the ellipsis and then tap the Sign option.
Document Pending eSign badge – click to enlargeDocument ellipsis dropdown menu – click to enlarge
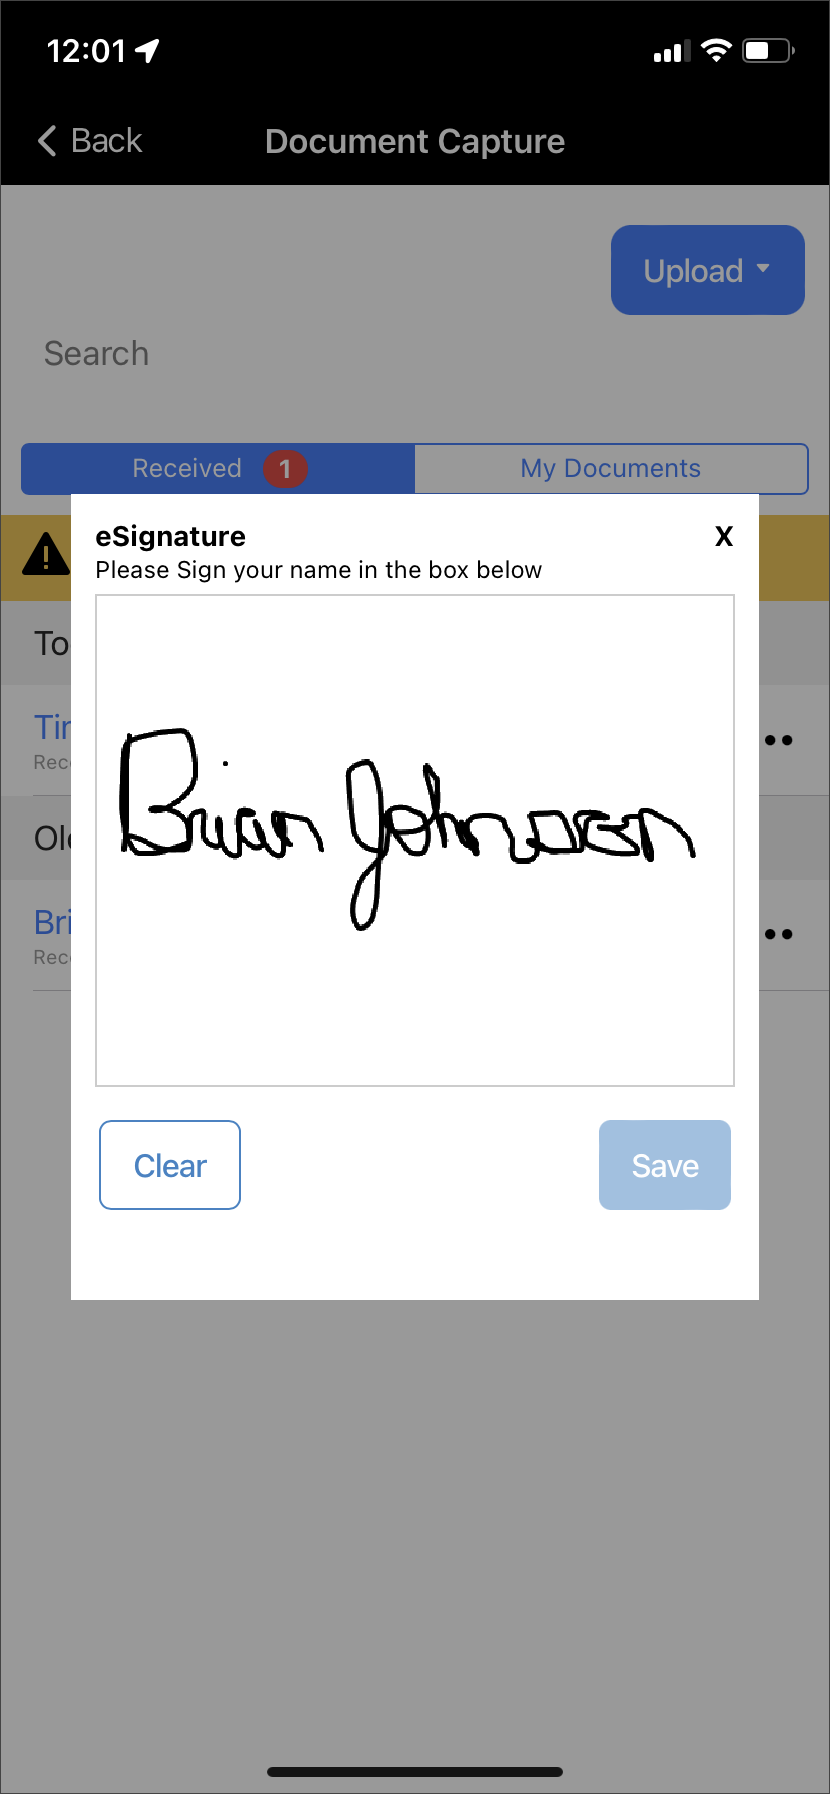
Sign your name on the eSignature pop-up and tap the Save button.
eSignature Capture screen – click to enlarge
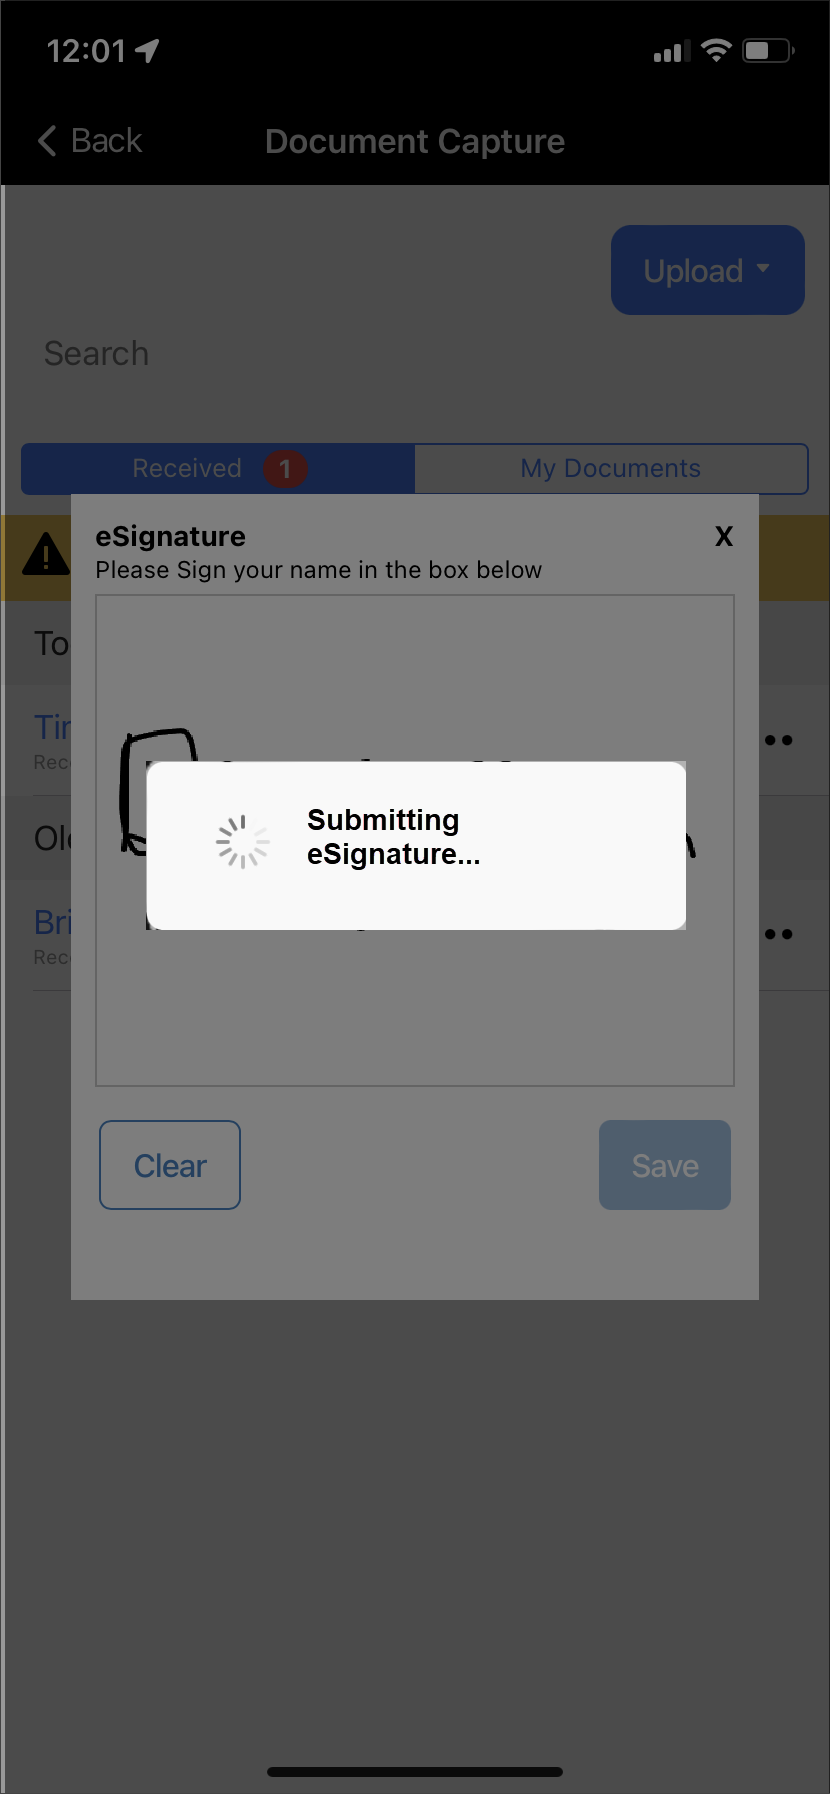
A message of “Submitting eSignature” will display on the screen. Once submitted, an “eSign Completed” badge will display next to the document’s information.
Submitting eSignature banner – click to enlargeeSign Completed badge – click to enlarge
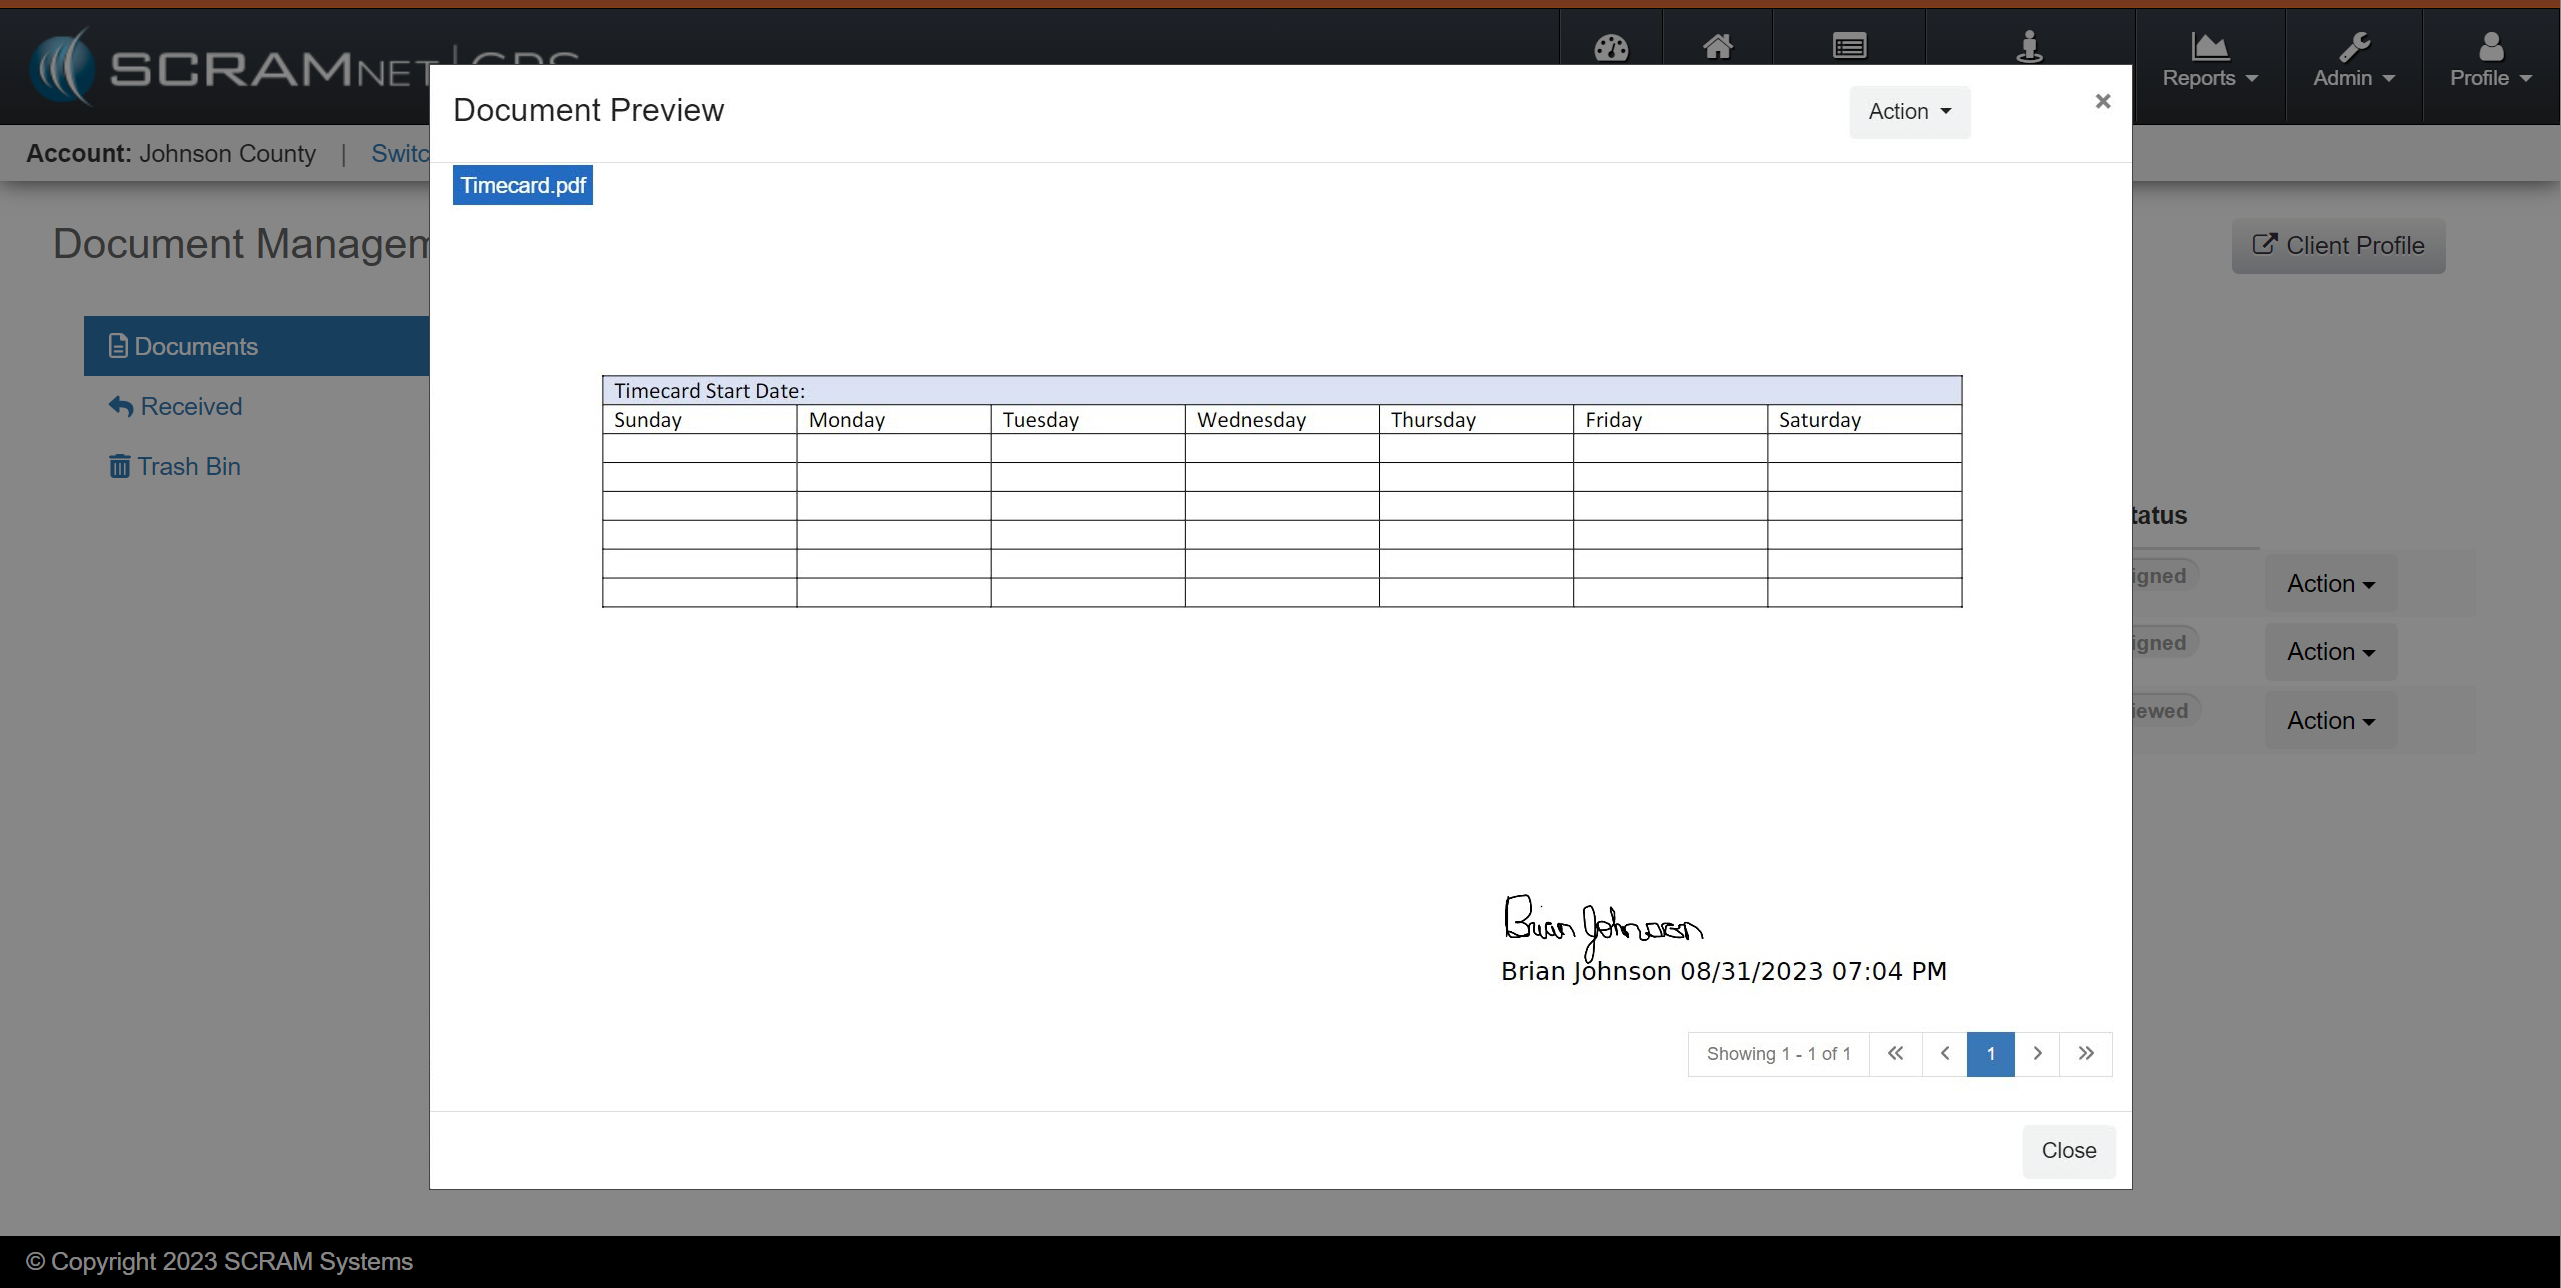
View eSignature
After the client views the document and completes the eSignature on their TouchPoint mobile application, the status for that document will update from “Pending eSignature” to “Signed” on the client’s Documents page.
Following the established process, you may view the eSignature from the Document Preview pop-up or download the document to your computer.