Assigning Equipment for CAM Monitoring
This guide is designed to provide step-by-step instructions on installing and assigning the SCRAM CAM equipment (tag and Wireless Base Station) for alcohol monitoring. This guide will assist field officers in conducting the relevant tasks required for monitoring a subject.
Locate the Subject in SCRAMNET
To begin, log into SCRAMNET.

SCRAMNET Login screen (click to enlarge)
Next, locate the subject’s profile in SCRAMNET. There are two options.
Option One
- Select Search from the top menu bar.
- Input the subject’s information.
- Click the Search button.
- Select the subject’s name from the list.
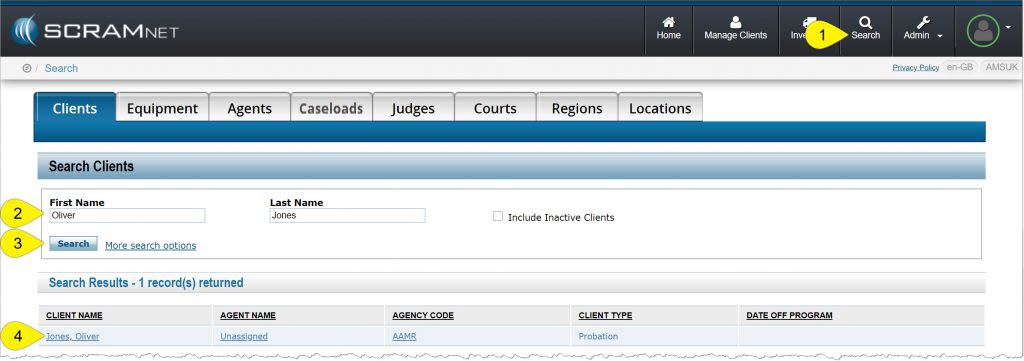
SCRAMNET Client Search page (click to enlarge)
Option Two
- Click the Caseloads tab.
- Select the required Caseload (location).
- Select the subject’s name on the Caseload page.
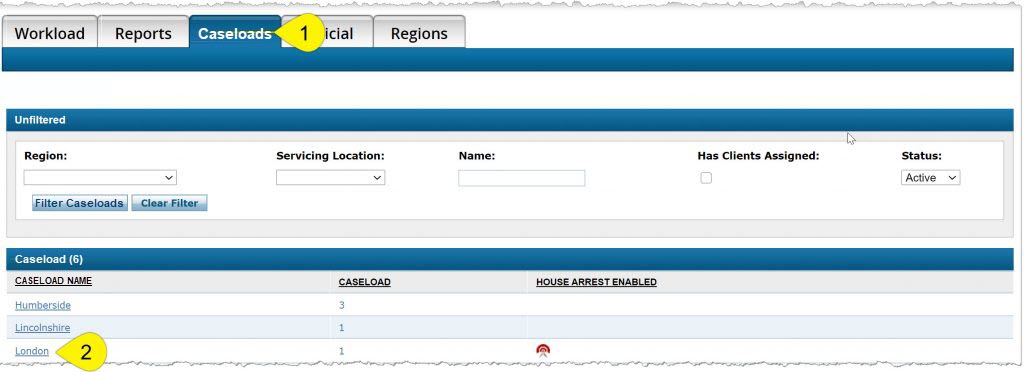
SCRAMNET Caseloads tab (click to enlarge)
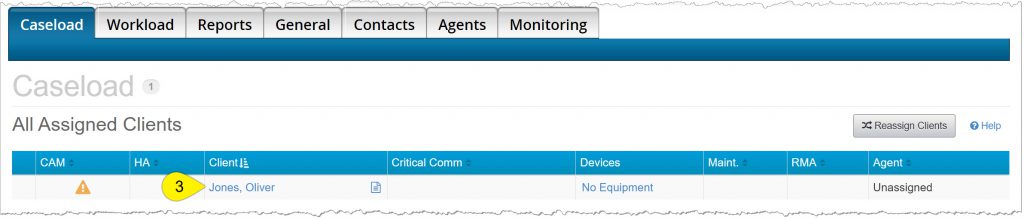
SCRAMNET Caseload page (click to enlarge)
Add CAM Monitoring
To enable the subject for CAM monitoring,
- Navigate to the subject’s Equipment tab.
- Click the Assign Monitoring button.
- Select CAM from the Monitoring Type dropdown menu.
- Click the Complete Change Monitoring button.
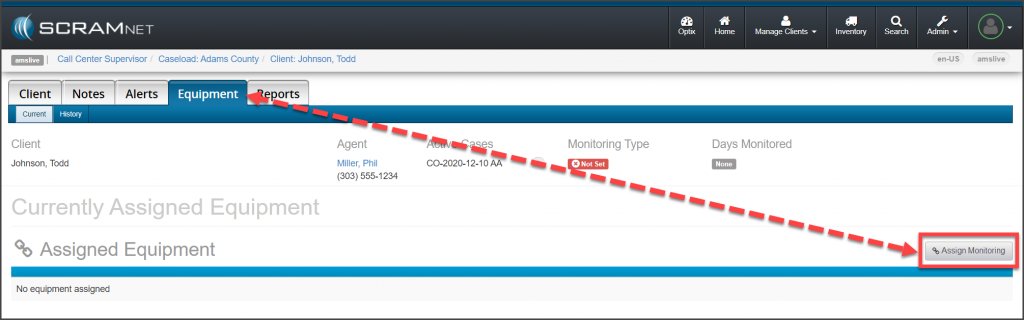
SCRAMNET Subject’s Equipment page: No Monitoring Type Set (click to enlarge)

SCRAMNET Change Monitoring page (click to enlarge)
Add the Monitoring Equipment Information
Add the Equipment Details
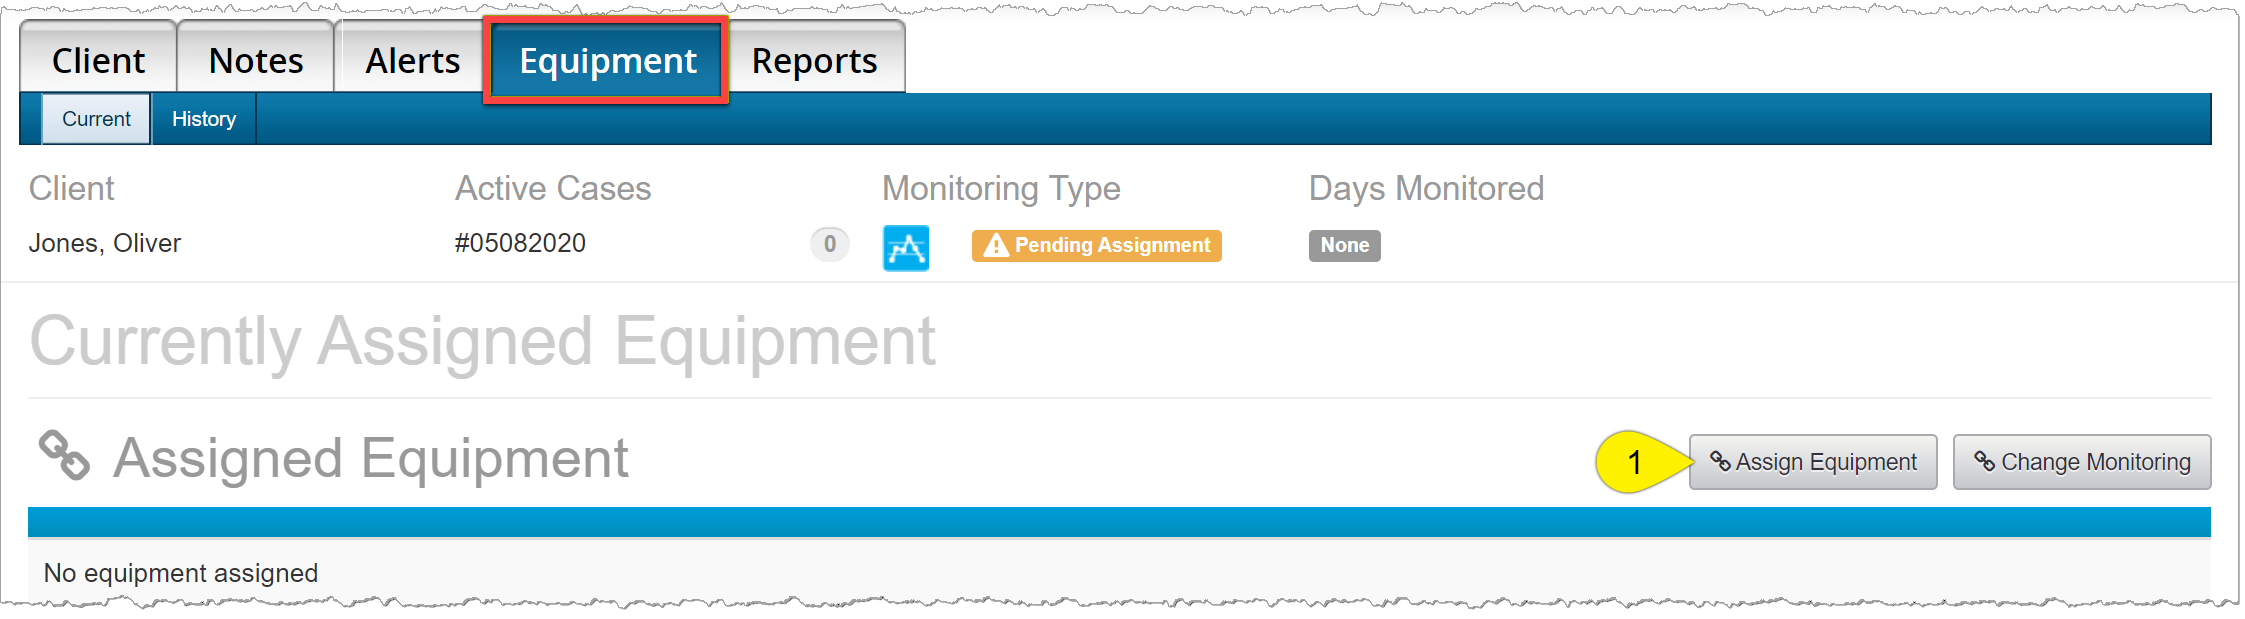
On the Equipment page for the subject,
- Click the Assign Equipment button.
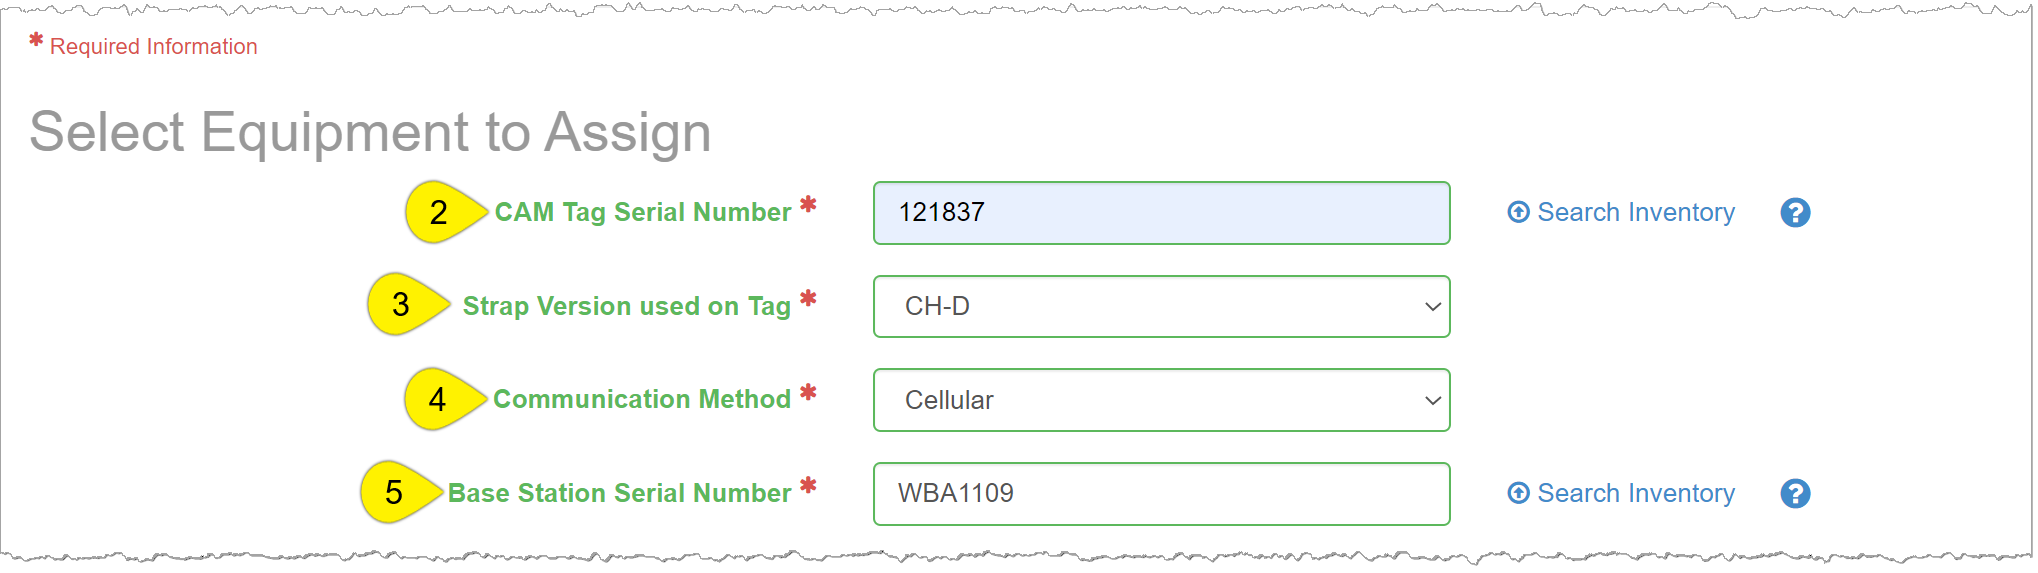
- Enter in the tag serial number.
- Enter the tag’s strap version. The strap version is embossed on the long strap end, or next to the tag on the buckle strap.
- Select the communication method of Cellular.
- Enter in the Wireless Base Station serial number.
SCRAMNET Subject’s Equipment page (click to enlarge)
SCRAMNET Subject’s Equipment page (click to enlarge)
Add the Communication Details
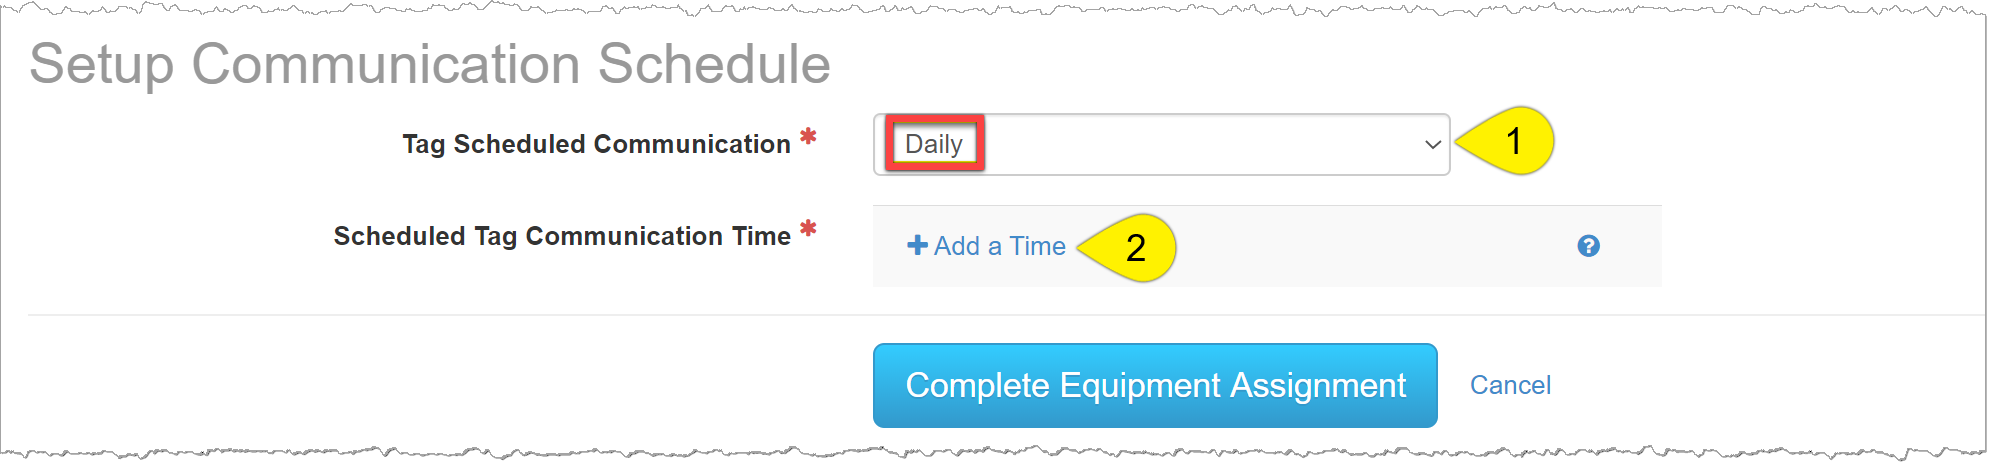
In the Setup Communication Schedule section,
- Select Daily from the Tag Scheduled Communication dropdown menu.
- Click the +Add a Time link.
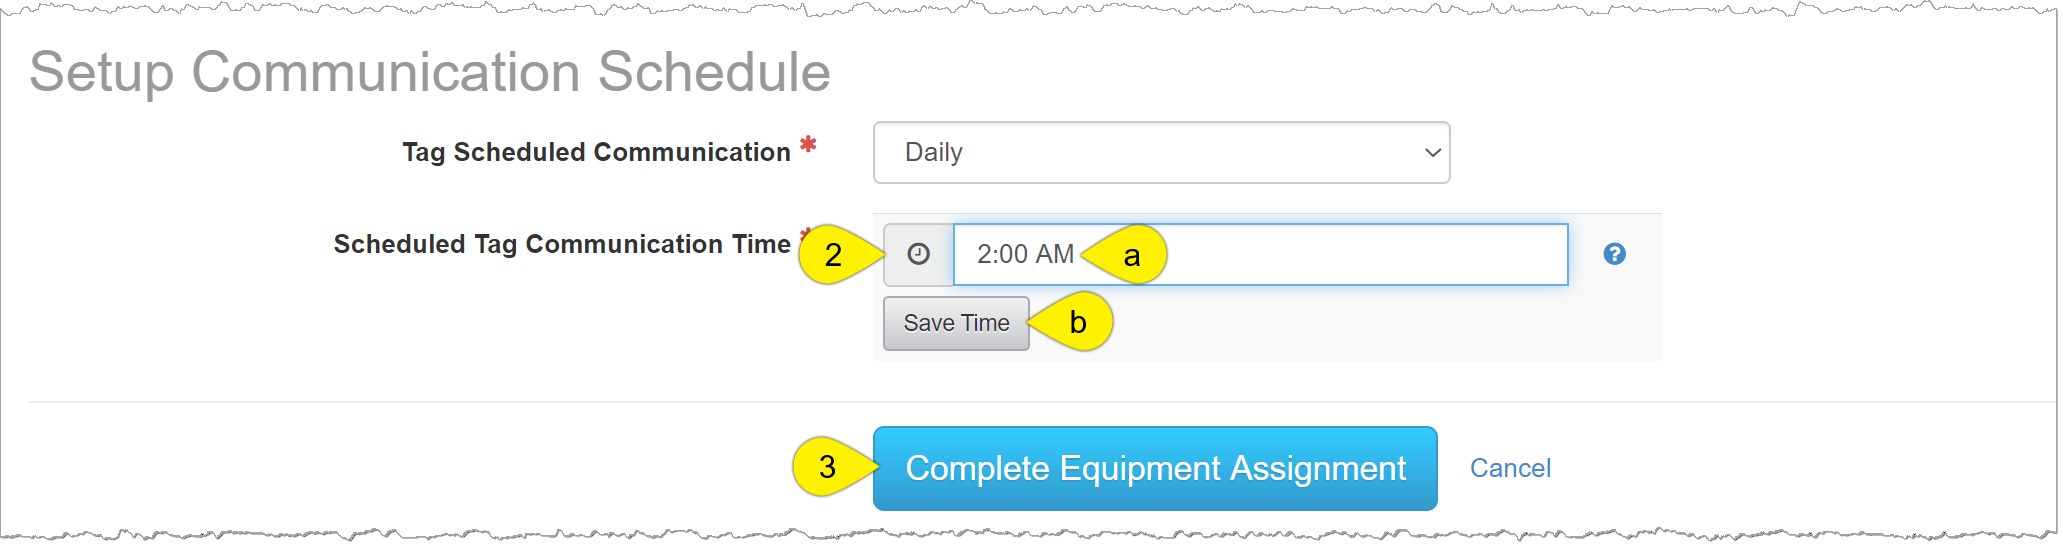
- Input the required communication time(s).
- Click the Save Time button after entering each communication time.
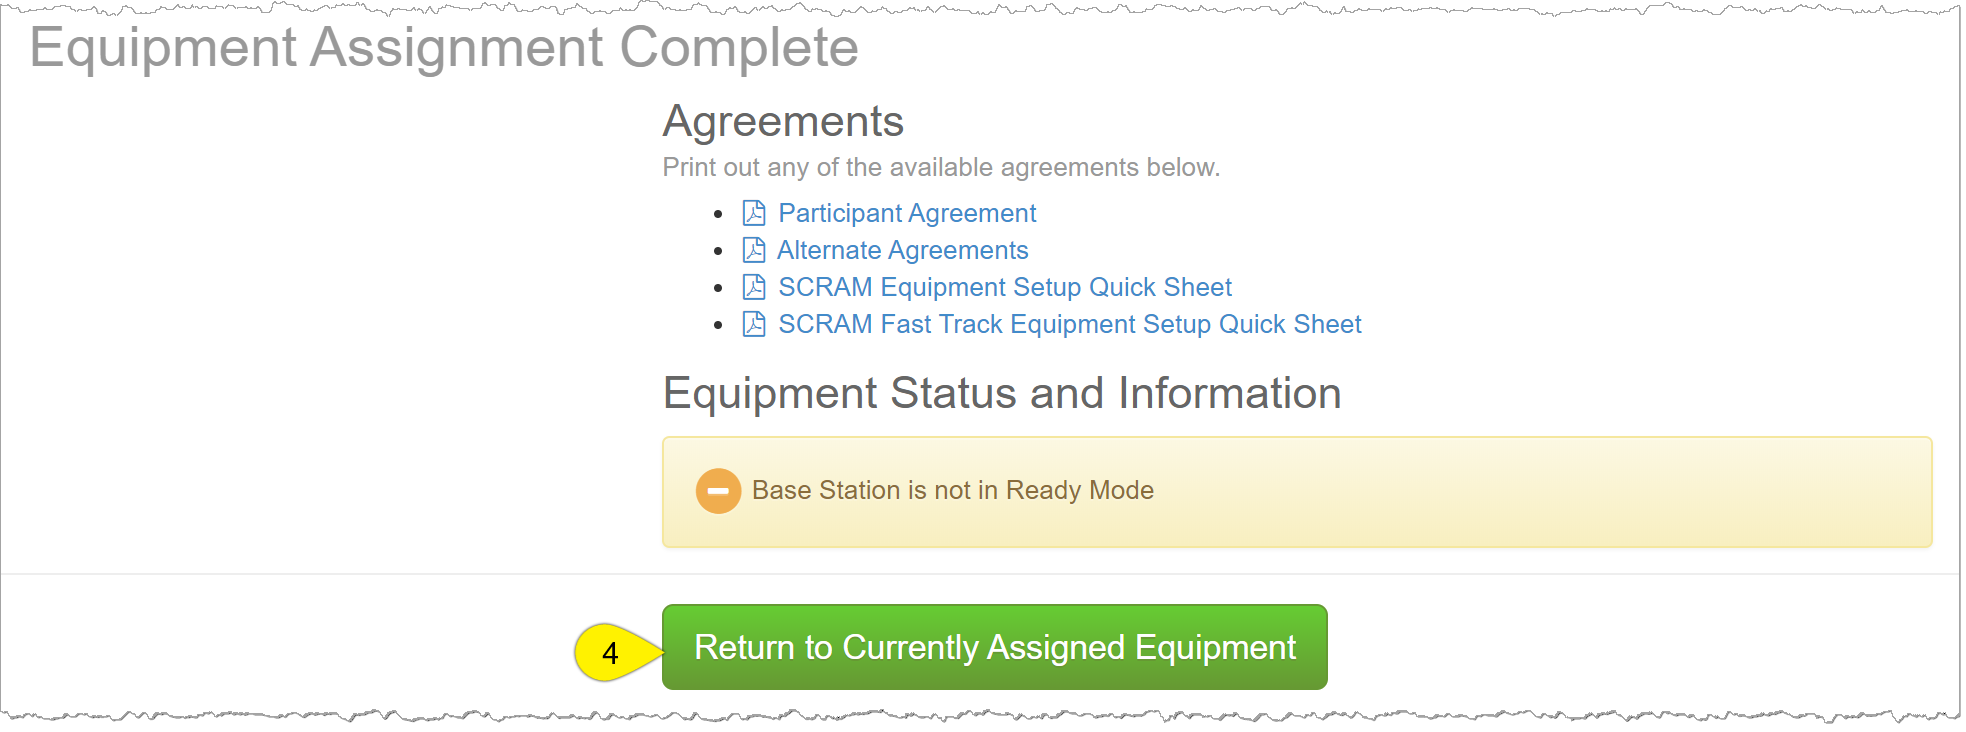
- Click the Complete Equipment Assignment button.
- Click the Return to Currently Assigned Equipment button.
SCRAMNET Subject’s Equipment page (click to enlarge)
SCRAMNET Subject’s Equipment page (click to enlarge)
SCRAMNET Subject’s Equipment page (click to enlarge)
On the Equipment page, the equipment information will now be displayed with a status of Pending Assignment.
Assign the Wireless Base Station
To assign the Wireless Base Station,
- Place the base station in a suitable location.
- Plug the base station into a power socket.
The base station will power up, communicate with the system over the cellular network, and update from Storage Mode to Monitoring.
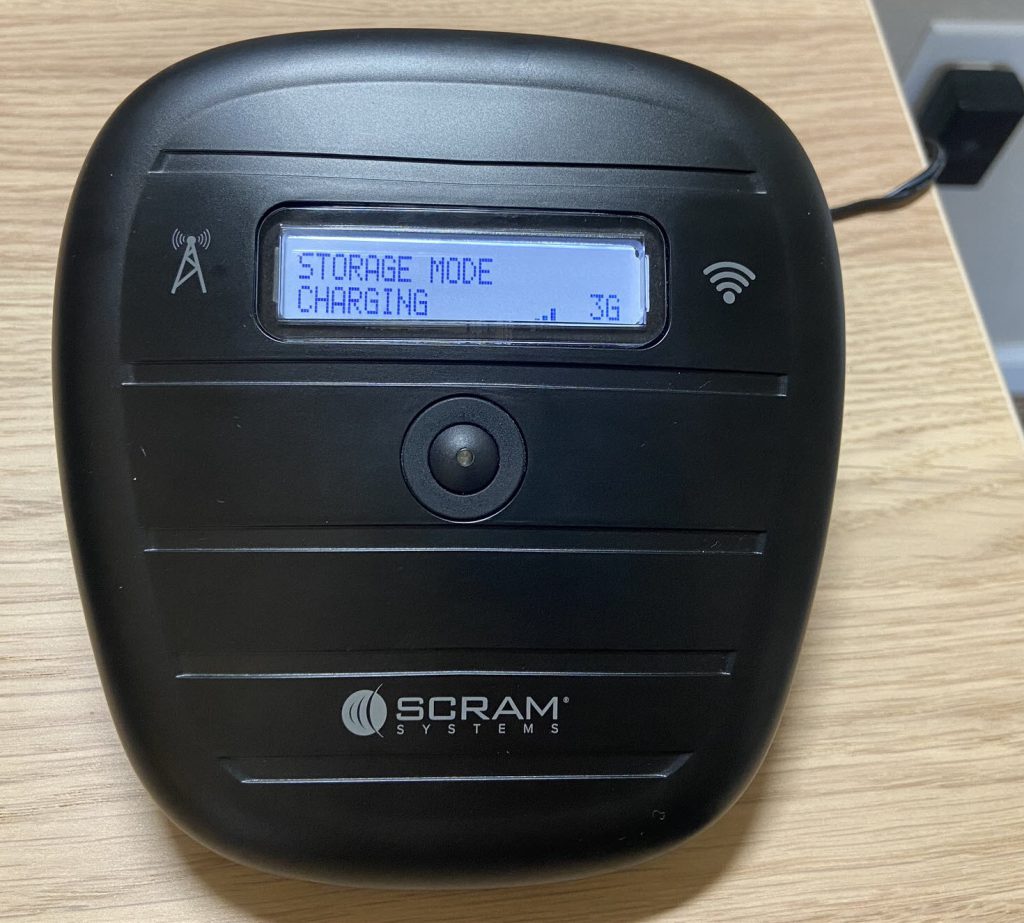
SCRAM Wireless Base Station (click to enlarge)
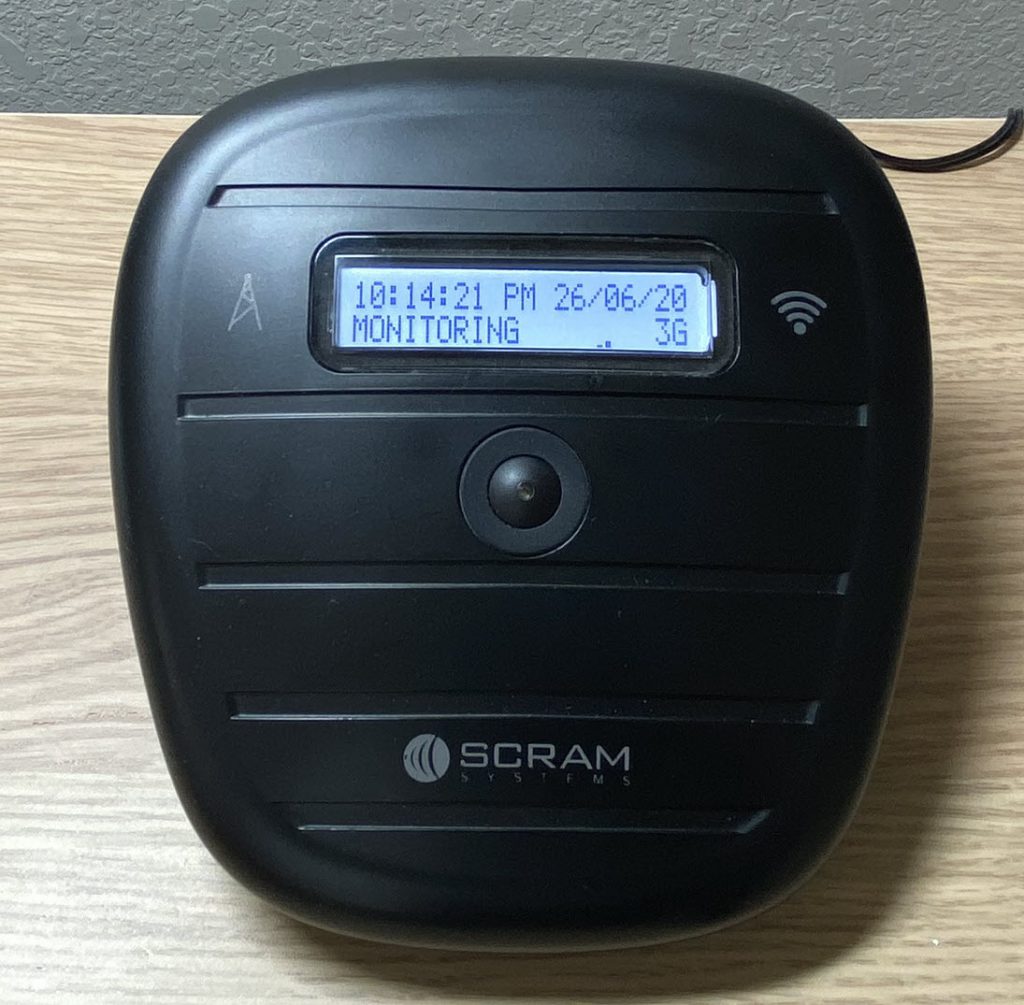
SCRAM Wireless Base Station (click to enlarge)
Assign the Tag
Install the Tag Components
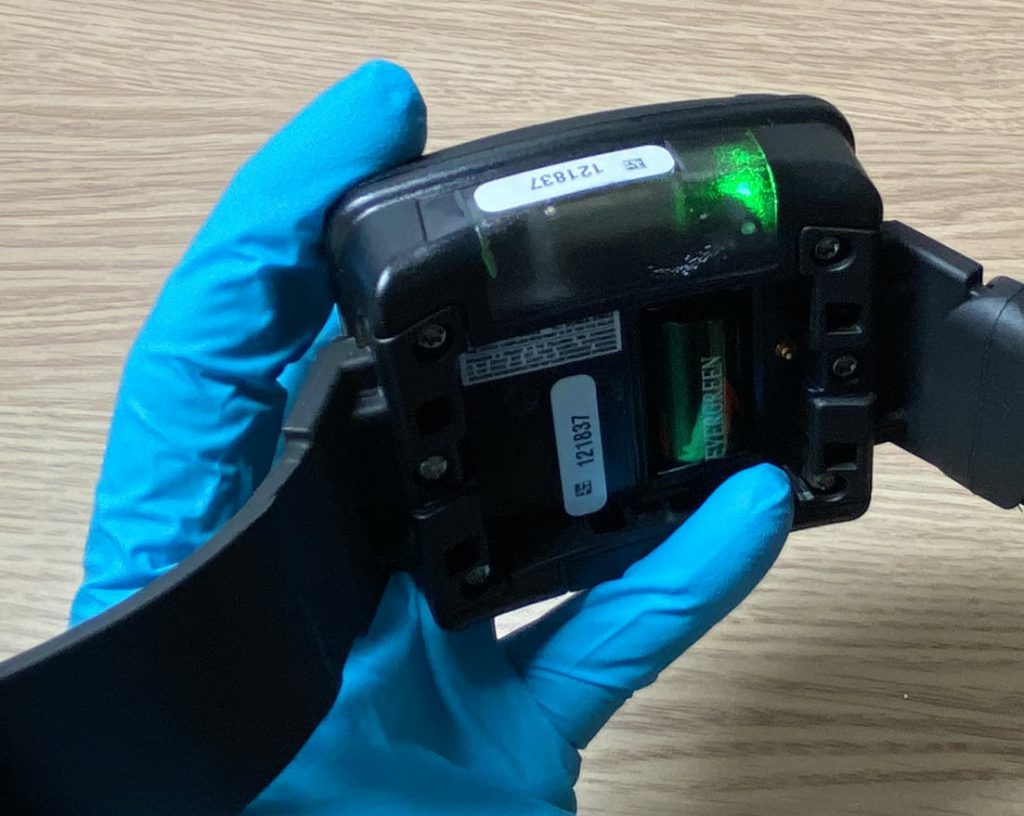
Start by installing the battery and faceplate on the tag.
- Using the wipe provided, clean the battery contacts and dry with a microfiber cloth or dry paper towel.
- Firmly insert the battery into the battery compartment. A green light will illuminate once the battery is installed properly. The green light will turn off after a few seconds.
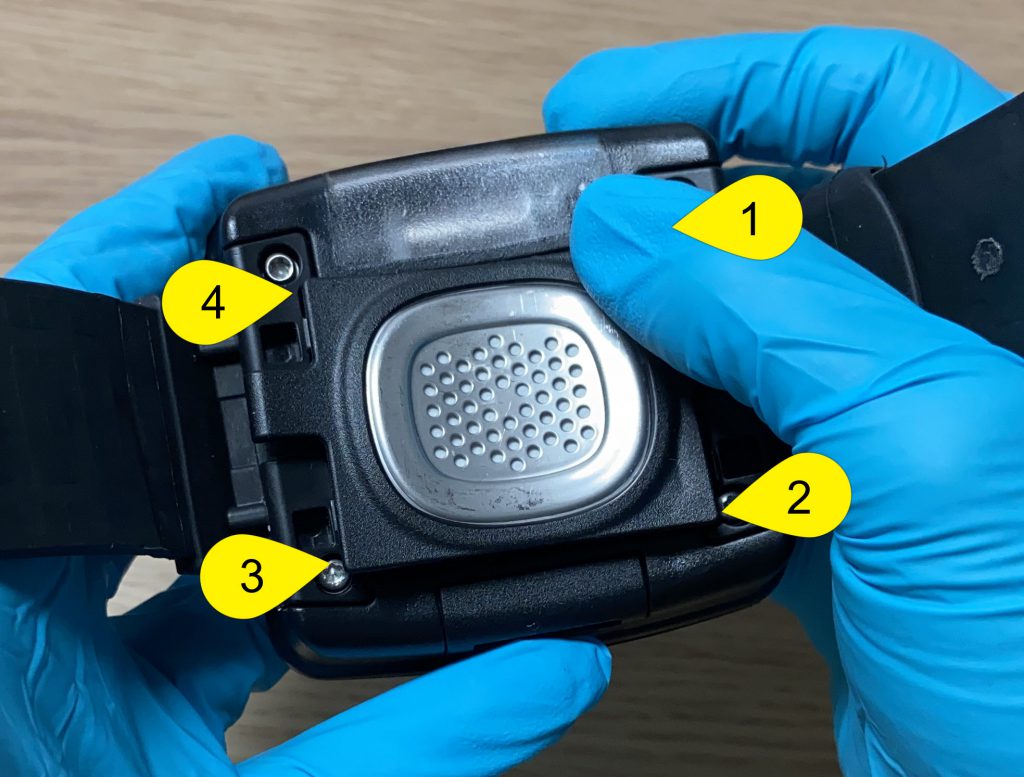
- Place the faceplate on the tag.
- Starting in the upper right corner and working clockwise, press down firmly on each corner of the faceplate until you hear a click.
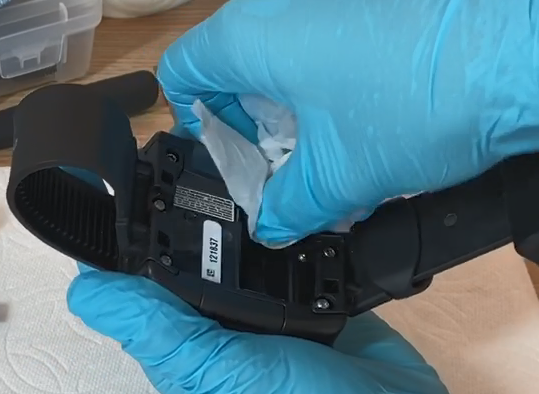
Cleaning SCRAM Tag (click to enlarge)
SCRAM Tag (click to enlarge)
SCRAM Tag (click to enlarge)
Install the Tag on the Subject
Once the tag’s components have been installed, the next step is to attach the tag to the subject’s leg.
- Place the tag on the subject’s leg no more than an index finger above the right or left ankle.
- Ensure the serial number on the top of the tag is facing up, toward the subject’s knee.
- Feed the long strap through the buckle strap.
- The tag should be able to move slightly on the side of the leg without losing contact with the skin.
- The tag should not be able to be moved across the shin bone or the back of the leg.
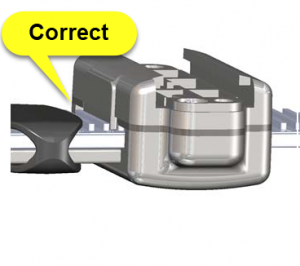
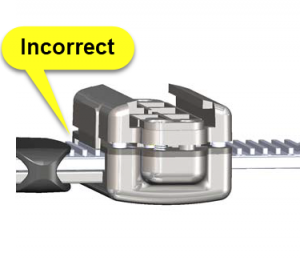
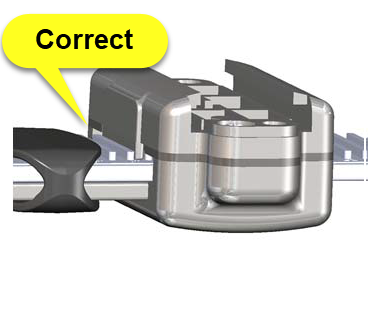
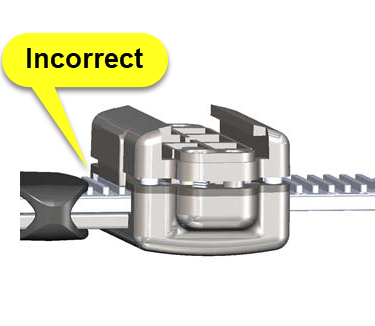
- Check the tag’s strap alignment.
- Ensure the tooth alignment tab is positioned between to teeth of the long strap when the buckle top is tightened. A “Tamper” event will generate if the strap is not properly aligned.
-
SCRAM TAG Straps (click to enlarge)
SCRAM TAG Straps (click to enlarge)
- After verifying the tag is properly fitted on the subject and the straps are aligned correctly, install the tamper clips.
Be aware, a poorly fitted tag could have some impact on the tag’s ability to take accurate readings and may result in unneeded time taken to re-fit the tag.
Assign the Tag
After installing the tag on the subject’s leg, open the Direct Connect application on your computer. On the Direct Connect application, the term Tag and Bracelet are interchangeable.
- Connect the Direct Connect cable and device to the computer.
- Plug the large (A type) USB connector into a USB port on the computer.
- Plug the small (mini B type) USB connector into the device. The red and blue lights will turn solid.
- The Communication Status on the Direct Connect application will now display, “Waiting for Bracelet”.
- Attach the Direct Connect device to the top of the tag.
- Slide the Direct Connect device down the tag, until it clicks into place. The device will fit snug against the tag.
- Place the magnet provided by SCRAM over the Direct Connect device where the word Magnet appears.
- The red light on the device turns off.
- The status on the Direct Connect application updates to, “Communicating”.
- At this time, the initialization process is taking place, and the initial alcohol reading is uploaded to SCRAMNET. The inventory status will display, “Pending Assignment”. Do not disconnect the device from the tag.
- Once the process is complete, the blue light on the device will turn off. After approximately 10 seconds both lights turn back on.
- The status on the Direct Connect application updates to, “Communication Complete” and the inventory status will display, “Assigned to Client”. It is now safe to disconnect the device from the tag.
Verify the Assignment in SCRAMNET
Navigate to SCRAMNET and refresh the Equipment page for the subject. The equipment status should now display, Assigned to Client.
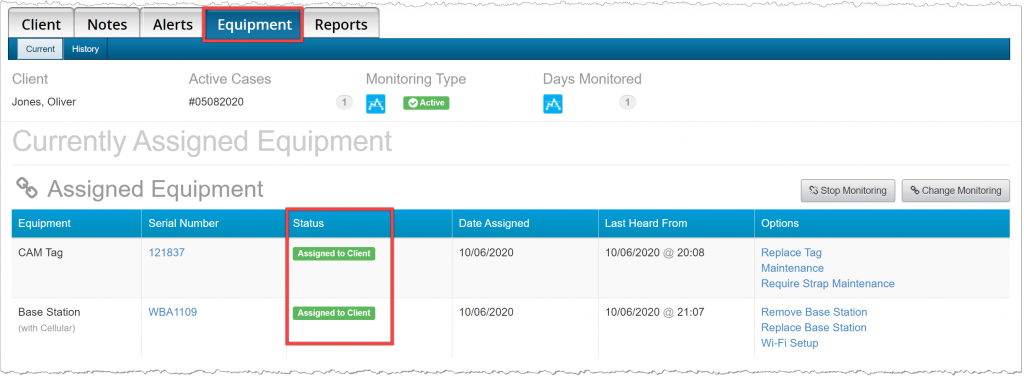
SCRAMNET Subject’s Equipment page (click to enlarge)
Troubleshooting Equipment Assignment
- Ensure the equipment has a status of Pending Assignment in SCRAMNET.
- Verify the battery is installed properly in the tag.
- Ensure the Wireless Base Station is plugged into a power socket.
- Verify you have an active internet connection.
For the Tag,
- Repeat the Direct Connect process.
For the Wireless Base Station,
- Move the base station to a different location in the subject’s home, away from appliances and reflective surfaces.
- Connect to the subject’s WiFi, if available.
Final Checks
Before leaving the subject,
- Ensure the tag is securely fitted to the subject’s leg.
- Ensure the tamper clips are in place.
- Verify all equipment has a status of Assigned to Client in SCRAMNET.
- Verify the Wireless Base Station is plugged in at the subject’s address.