This page explains the steps involved with replacing any version of the bracelet straps. You’ll notice as you follow the steps, the faceplate and battery are also replaced as part of the strap replacement process.
WHAT YOU WILL NEED
The following items are needed to complete a strap maintenance:
- New straps
- CAM/HA Battery and Faceplate Kit
- One of the two SCRAM issued Faceplate Removal Tools
- A Torx Screwdriver
- CAM/HA Bracelet Pogo Pin Cleaning Kit
- Optional: The SCRAM Device Cleaning Supplies
PROCEDURE
- Complete Bracelet Maintenance:
- Access the client’s Equipment page.
- Click the Maintenance link. On the Bracelet Maintenance page,
- Enter today’s date.
- Select the Battery, Faceplate and Exhaust Cap Replaced check box.
- Select the Straps Replaced check box.
- Select the strap version. The strap version is embossed on the end of the long strap and next to the buckle on the short strap. The strap versions should match.
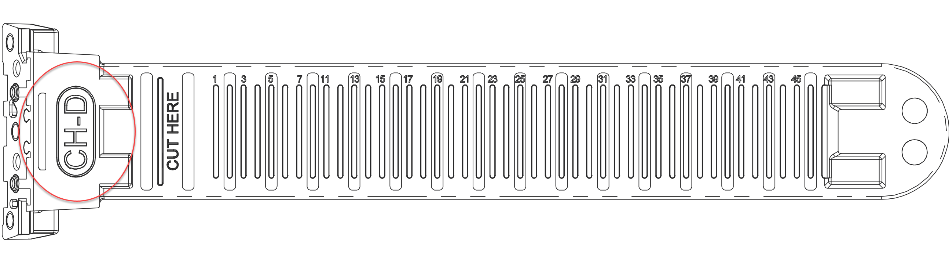
Long Strap
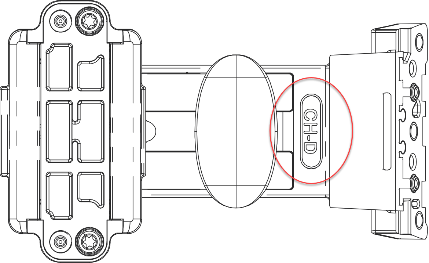
Short Strap
-
-
- Click the Complete Bracelet Maintenance button.
-
The bracelet re-initialization, which must be performed each time the bracelet is removed, will begin the next time the Direct Connect is connected to the bracelet.
- Remove the old faceplate:
- Insert the Faceplate Removal Tool into the slots on the buckle-strap side of the bracelet.
- Lift/Press the tool in until the faceplate disengages.
- Using the curved end of the removal tool, remove the faceplate.
- Remove the old straps:
- With faceplate removed, place the bracelet on a firm surface.
- Using the Torx screwdriver provided by SCRAM Systems®, remove the two outside Torx screws then remove the middle screw. Remove the strap.
- Repeat the process on the second strap and remove it as well.
- Remove the old battery:
- Place your fingertip on the edge of the negative (flat) side of the battery.
- Pull up on the battery and remove it from the bracelet.
- Discard the old faceplate, straps, and battery.
- Clean the bracelet components: The pogo pins and battery contacts should be cleaned any time that the straps are removed. To clean the components:
- Use a dry brush to scrub the pins and battery contacts.
- Use a cloth to wipe away any debris.
- Use the brush and cloth to remove any debris on the strap pads.
 |
Warning: Do NOT use any type of cleaning agent, including water. |
- Install the new straps:
-
- Firmly press the left strap (non-buckle strap) into the slot on the left side of the bracelet,
- The straps are designed to align with only one side of the bracelet. Using the Torx screwdriver provided, start with the center screw and then the tighten the outside screws. If you are using an adjustable-torque Torx screwdriver, set it to 3.5 lb/in (4.0 kg/cm or 0.4 nm) of torque. The SCRAM provided red-handled screwdriver is pre-set to this setting. DO NOT OVER-TIGHTEN
- Repeat the process for the second strap.
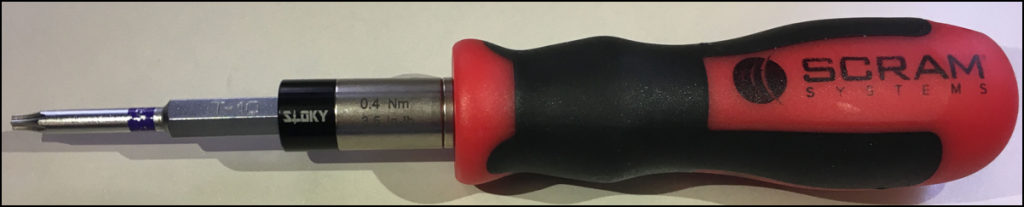
SCRAM red-handled T10 screwdriver (click to enlarge)
-
- Install a new battery and faceplate: Show Me
- Install new battery
- Look closely for the outline of a battery at the bottom of the battery slot and insert the battery, starting with the positive side being pushed against the bottom side of the battery slot and pushing down on the negative (flat) side.
- A small, green light on the bracelet will turn on for five seconds when the battery is properly installed.
- Install a new faceplate:
- Place the faceplate on the bracelet with the battery side flush with the case.
- Starting on the top-right side and going clockwise, press down firmly on each corner of the faceplate with your thumb as shown below. You should hear a pronounced click as you push each corner of the faceplate.
- Install new battery

|
Warning: Moisture may enter under the faceplate if these instructions are NOT followed. |
- Attach the bracelet to the client’s ankle. Show Me
- Direct Connect the bracelet to complete the maintenance. Show Me
*In a scenario where the battery and faceplate have been in use on the current bracelet for less than 30 days, you are able to reinstall those components. In that case, you would not select the Battery, Faceplate and Exhaust Cap Replaced check box on the Maintenance window referenced in step one. The faceplate is designed for single client use only, with a maximum of two installations on the bracelet. After two installations, the retaining tabs are weakened and may not seal properly causing moisture to enter the bracelet body.