Field Maintenance – Battery/Faceplate Replacement
When it is time to complete a battery/faceplate maintenance for a subject, a Scheduled Maintenance alert will display on the Active Workload page, Caseload page, and the subject’s Alert page. The battery and faceplate should be replaced every 90 days.
To complete this task, you will need:
- The SCRAM Tag
- One of the two available SCRAM-issued Faceplate Removal Tools
- A Battery/Faceplate Kit
- Paper towels
- Latex or nitrile gloves
- Eye protection
Optional supplies:
- Cidex OPA® Solution
- SCRAM Device Cleaning Supplies
Clean the Tag
After removing the tag from the subject’s leg, if possible,
- Spray the tag with Cidex OPA solution.
- Scrub the entire tag with a nylon brush to remove any built-up debris.
- Dry the tag with a microfiber towel or paper towel.
Remove the Old Battery and Faceplate
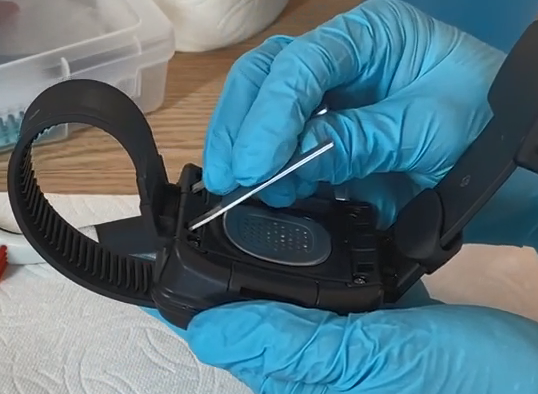
To remove the faceplate,
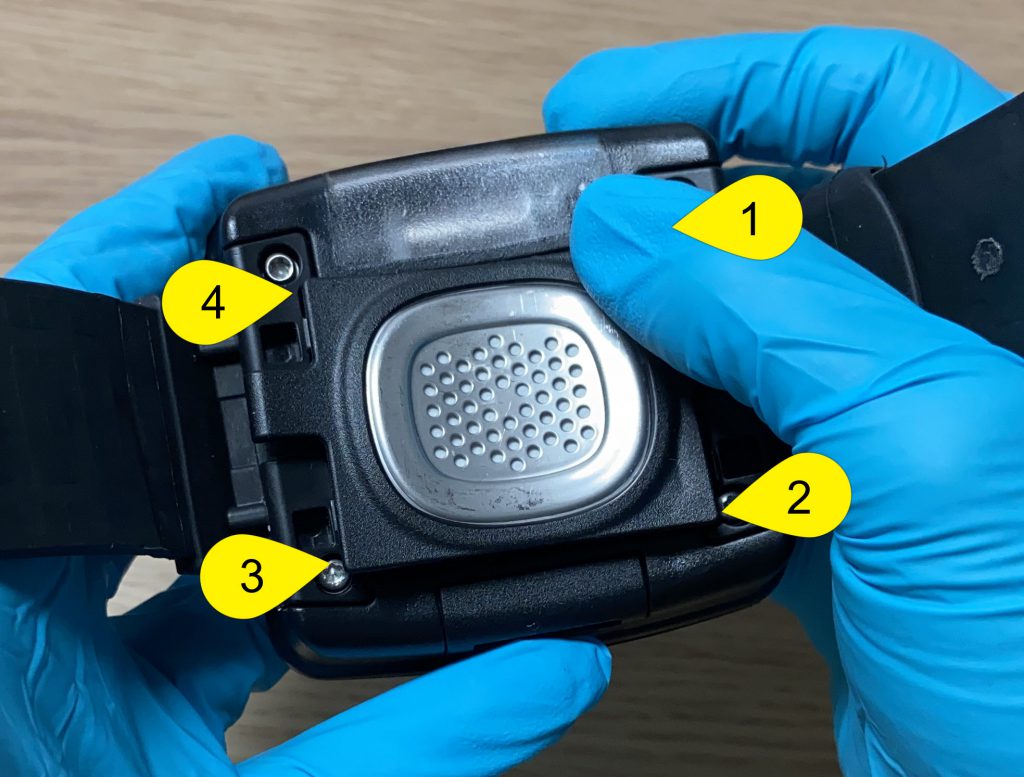
- Insert the curved prongs of the removal tool into the slots on the back of the tag at a 45-degree angle.
- With the prongs in the slots, gently lift the tool to a 90-degree angle. Do not press the tool past 90 degrees, as this will damage the outer casing and allow moisture to get into the tag body and corrode the internal components.
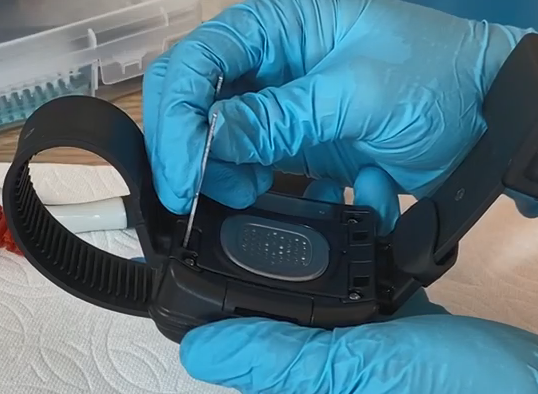
- If the faceplate does not disengage right away, pull the tool toward the middle of the faceplate while continuing to hold it at a 90-degree angle. Doing this should cause the faceplate’s internal retaining tabs to release.
- For CH-D straps, repeat the process in the slots on the other side if needed. You will know it has disengaged when you hear a soft click.
- Once the faceplate has disengaged, remove the tool.
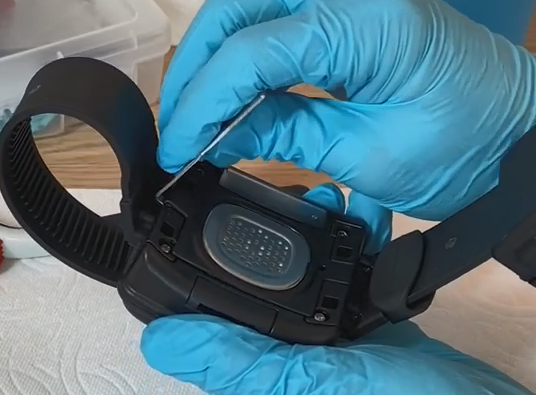
- Use one of the prongs on the removal tool to pull the disengaged faceplate off the tag body. You should be able to remove the faceplate without prying.
SCRAM Tag and Faceplate Removal tool (click to enlarge)
SCRAM Tag and Faceplate Removal tool (click to enlarge)
SCRAM Tag and Faceplate Removal tool (click to enlarge)
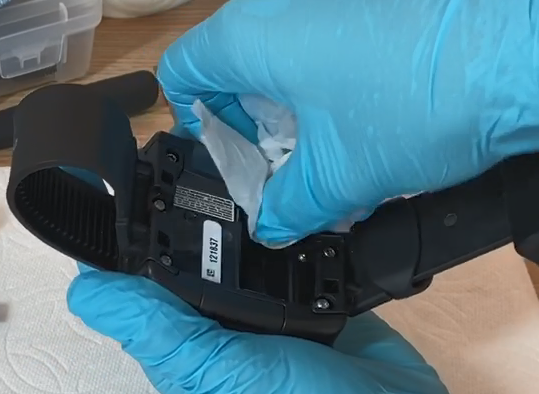
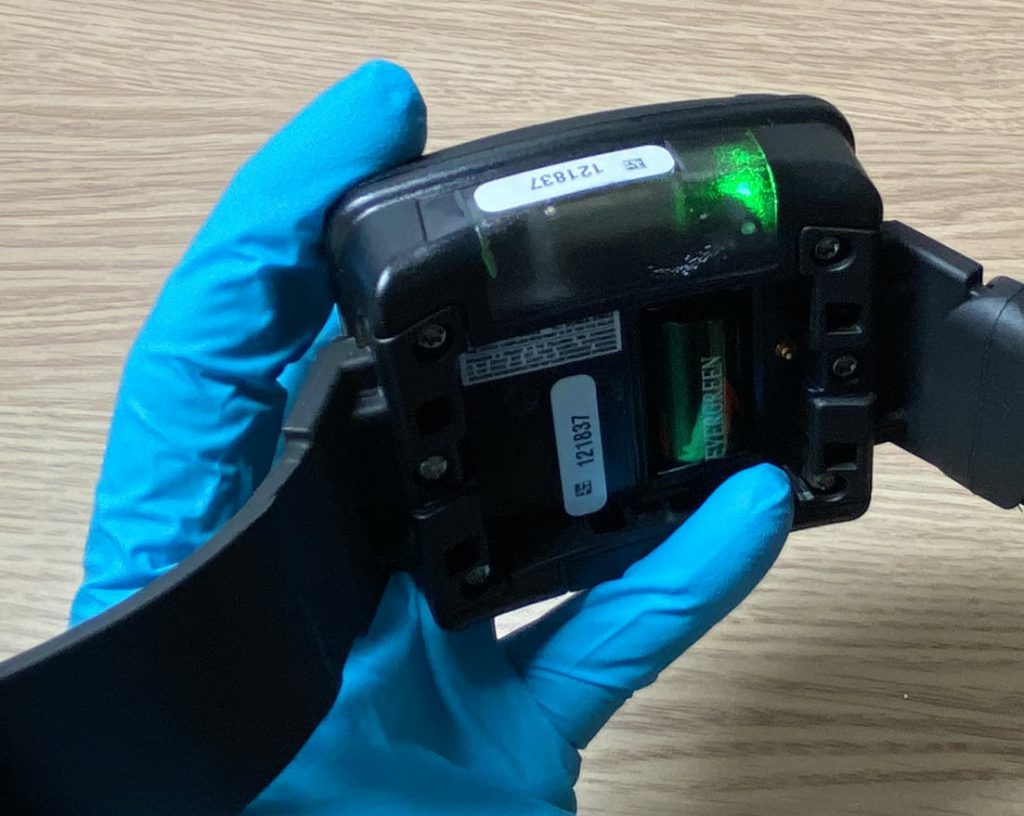
Once the faceplate has been removed, you are able to access the battery compartment and remove the battery.
Dispose of the faceplate and battery.
Install the New Battery and Faceplate
To begin,
- Using the wipe provided, clean the battery contacts and dry with a microfiber cloth or dry paper towel.
- Firmly insert the battery into the battery compartment. A green light will illuminate once the battery is installed properly. The green light will turn off after a few seconds.
- Place the faceplate on the tag.
- Starting in the upper-right corner and working clockwise, press down firmly on each corner of the faceplate until you hear a click.
SCRAM Tag cleaning battery contacts (click to enlarge)
SCRAM Tag (click to enlarge)
SCRAM Tag Installing Faceplate (click to enlarge)
Install the Tag on the Subject
Once the tag’s components have been installed, the next step is to attach the tag to the subject’s leg.
- Place the tag on the subject’s leg no more than an index finger above the right or left ankle.
- Ensure the serial number on the top of the tag is facing up, toward the subject’s knee.
- Feed the long strap through the buckle strap.
- The tag should be able to move slightly on the side of the leg without losing contact with the skin.
- The tag should not be able to be moved across the shin bone or the back of the leg.
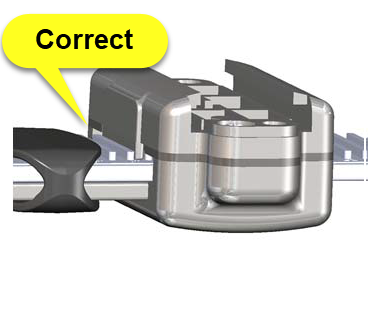
- Check the tag’s strap alignment.
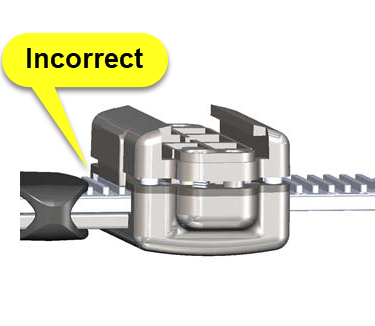
- Ensure the tooth alignment tab is positioned between two teeth of the long strap when the buckle top is tightened. A “Tamper” event will generate if the strap is not properly aligned.
-
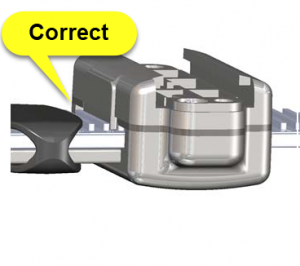
Correct Strap Alignment (click to enlarge)
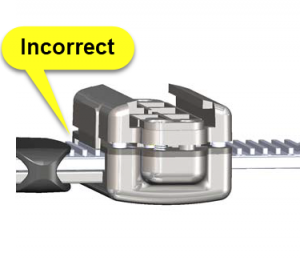
Incorrect Strap Alignment (click to enlarge)
- After verifying the tag is properly fitted on the subject and the straps are aligned correctly, install the tamper clips.
Be aware, a poorly fitted tag could have some impact on the tag’s ability to take accurate readings and may result in unneeded time taken to re-fit the tag.
Maintenance Link
Always follow up any maintenance you perform on the tag by navigating to the Equipment page for the subject in SCRAMNET and clicking the Maintenance link next to the tag’s information.
- Navigate to the subject’s Equipment page.
- Select the Maintenance link next to the tag’s information.
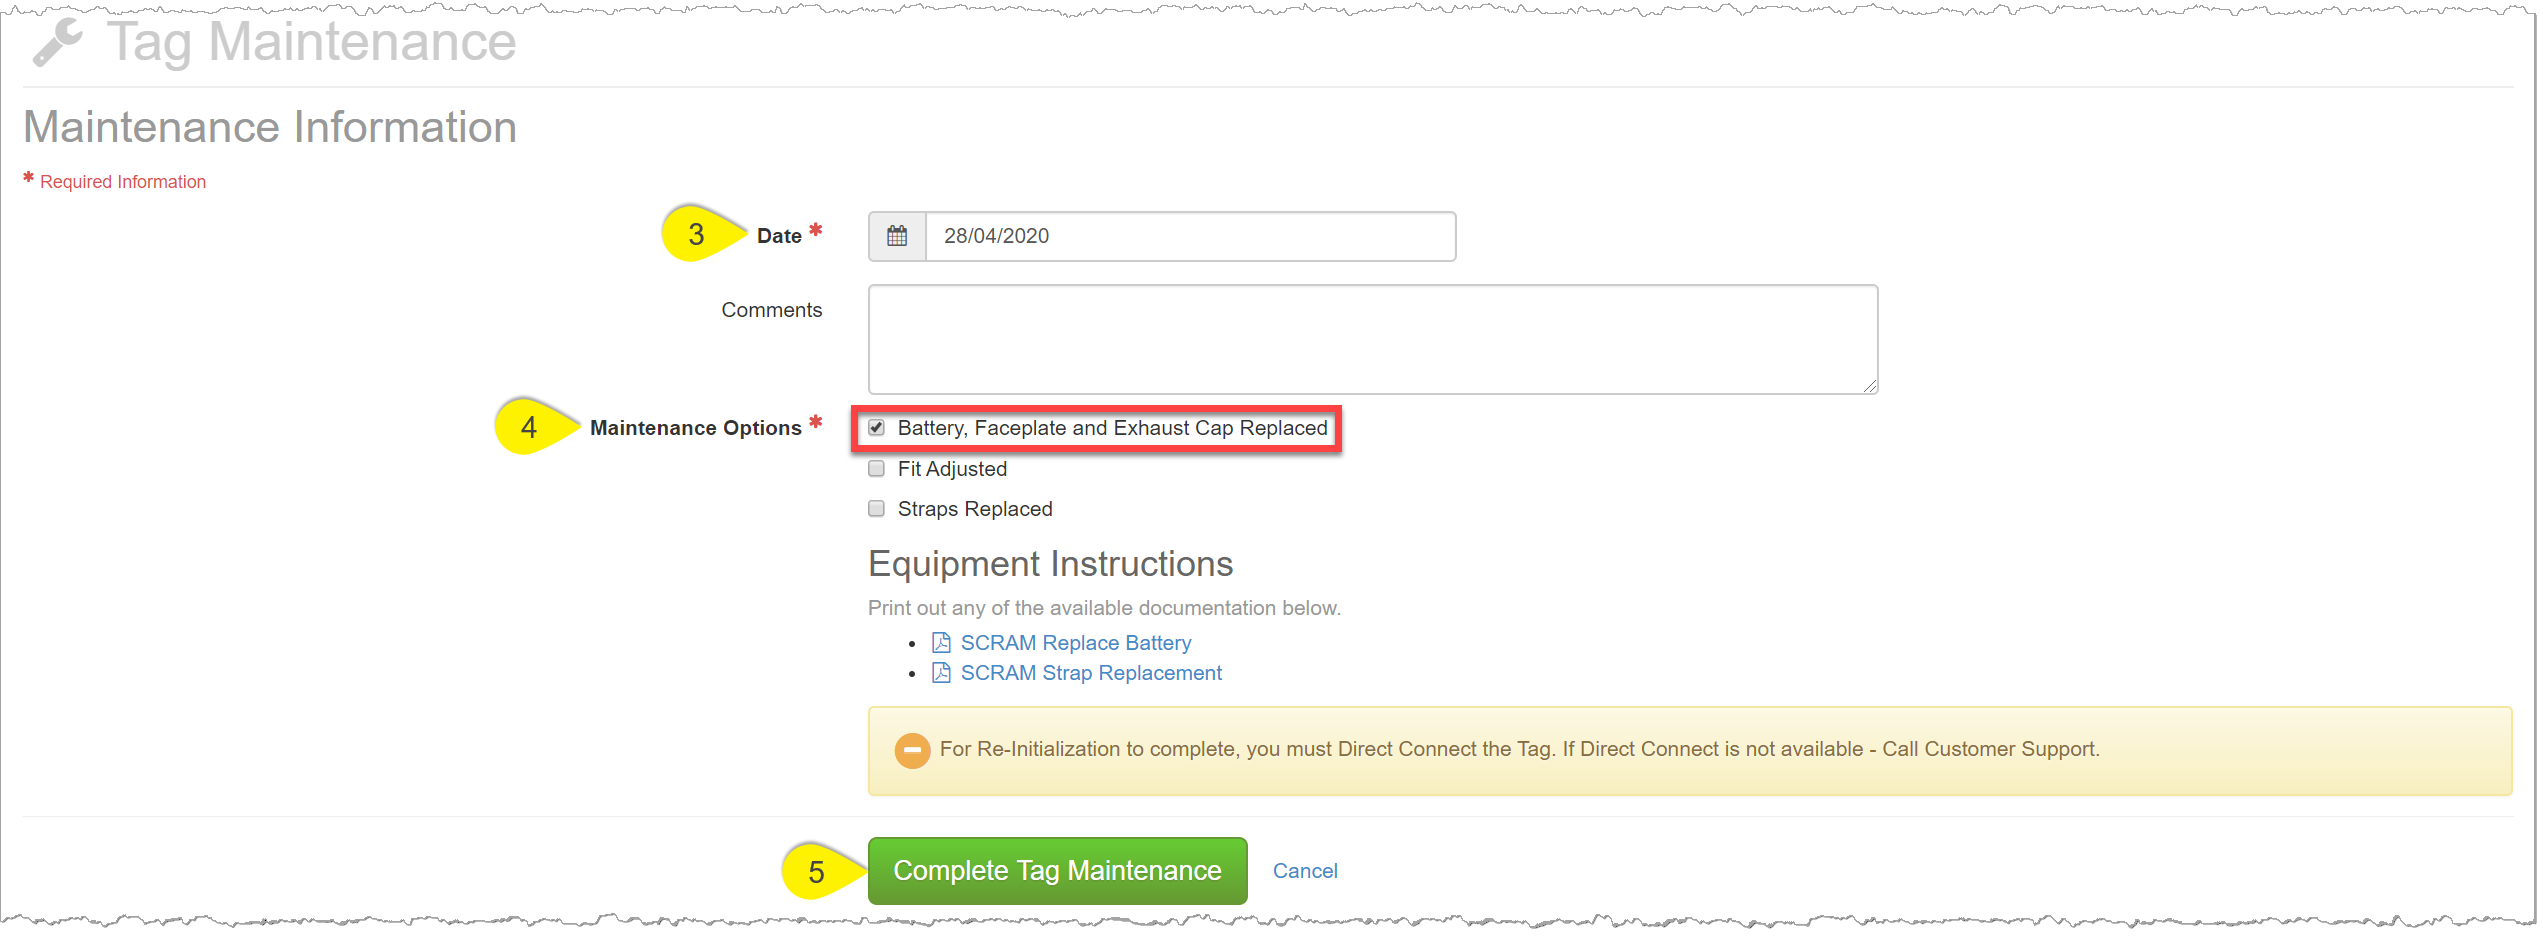
- On the Bracelet Maintenance page, enter today’s date.
- Next to the Maintenance Options, select Battery, Faceplate and Exhaust Cap Replaced check box.
- Click the Complete Tag Maintenance button.

SCRAMNET Subject’s Equipment page (click to enlarge)
SCRAMNET Subject’s Equipment page (click to enlarge)
Direct Connect the Tag
After completing the Tag Maintenance page, Direct Connect the tag. Open the Direct Connect application on your computer. On the Direct Connect application, the term Tag and Bracelet are interchangeable.
- Connect the Direct Connect cable and device to the computer.
- Plug the large (A type) USB connector into a USB port on the computer.
- Plug the small (mini B type) USB connector into the device. The red and blue lights will turn solid.
- The Communication Status on the Direct Connect application will now display, “Waiting for Bracelet”.
- Attach the Direct Connect device to the top of the tag.
- Slide the Direct Connect device down the tag, until it clicks into place. The device will fit snug against the tag.
- Place the magnet provided by SCRAM over the Direct Connect device where the word “Magnet” appears.
- The red light on the device turns off.
- The status on the Direct Connect application updates to, “Communicating”.
- At this time, the initialization process is taking place, and the alert in SCRAMNET is resolved.
- The inventory status will display, “Assigned to Client”. Do not disconnect the device from the tag.
- Once the process is complete, the blue light on the device will turn off. After approximately 10 seconds both lights turn back on.
- The status on the Direct Connect application updates to, “Communication Complete” and the inventory status will display, “Assigned to Client”. It is now safe to disconnect the device from the tag.
Final Checks
Before leaving the subject,
- Ensure the tag is securely fitted to the subject’s leg.
- Ensure the tamper clips are in place.
- Verify the Battery/Faceplate alert is now displaying a status of Resolved.