Click the link for the specific equipment task that you are performing.
Replace SCRAM CAM Bracelet
Purpose
This procedure provides you with all the information that you need to replace a SCRAM CAM Bracelet using Direct Connect.
What you will need:
- Bracelet being assigned including faceplate, battery, and tamper clip (2 pc.)
- Direct Connect device with USB cable
- Shear Cutter
- Torx Screwdriver
- T10 Screwdriver
- Magnet
- Faceplate Removal Tool
- Brush
- Cloth
Procedure
Before Client Arrives
Perform the following steps shortly before meeting with the client.
- Set New Bracelet to Pending Assignment.
To set the new bracelet to Pending Assignment:- Access the client’s Equipment page.
- Click the Replace Bracelet link.
- Select the new bracelet serial number.
- Select the strap version of the device being assigned and click the Complete Equipment Replacement button.
- To print the Participant Agreement Addendum:
Note: The addendum is also available for download at the bottom of this page.- Click the Alternate Agreements button.
- Click the AMS Default Participation Agreement Addendum button to open the addendum.
- Print two copies of the addendum.
- Click the Return to Currently Assigned Equipment button.
The status of the new bracelet is set to Pending Assignment and the status of the old bracelet is set to Pending Removal.
- Install Bracelet Components.
Shortly before meeting with the client, install the battery, faceplate, and exhaust cap in the new bracelet.
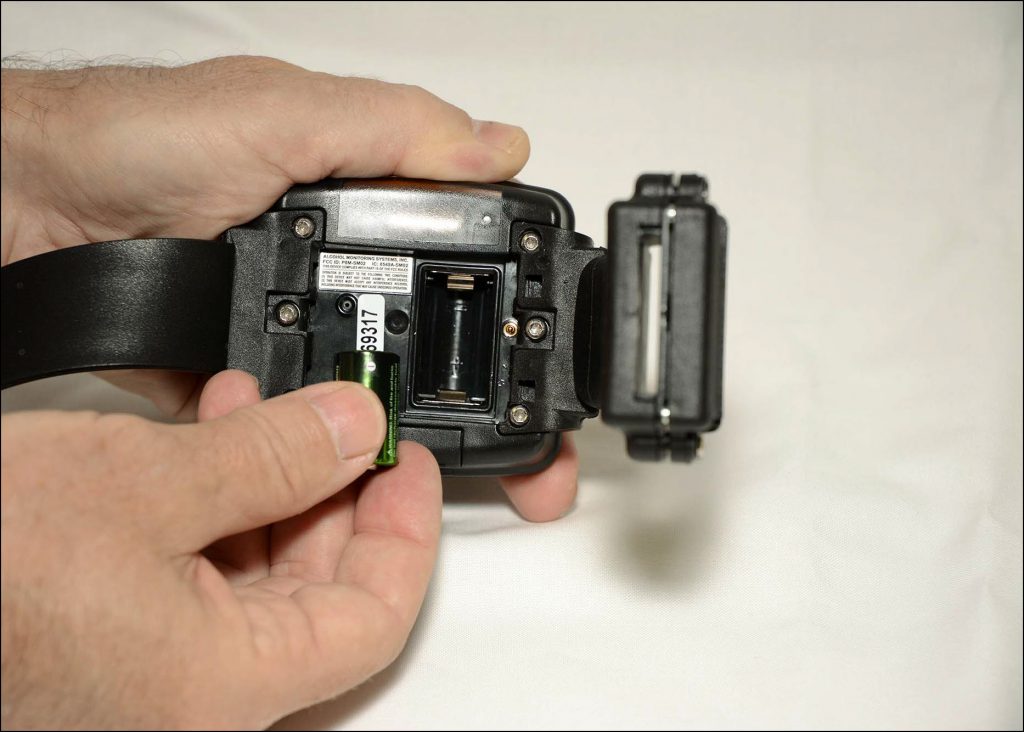
To install the new components:- Look closely for the outline of a battery at the bottom of the battery slot and insert the battery, starting with the positive side being pushed against the bottom side of the battery slot and pushing down on the negative (flat) side.
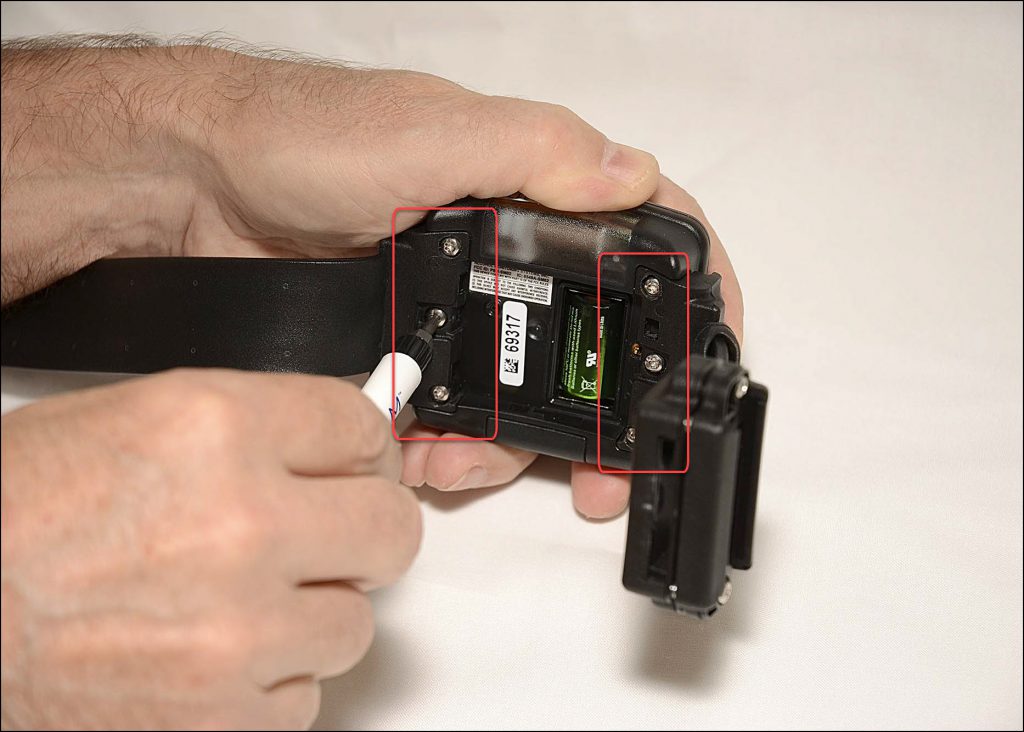
A small, green light on the bracelet will turn on for 5 seconds. - Place the faceplate on the bracelet with the battery side flush with the case.
Note: The faceplate is designed to align in only one direction. - Starting at the faceplate corner shown below and going clockwise, press down firmly on each corner of the faceplate with your thumb. See below.
You should hear a pronounced click as you push each corner of the faceplate.
Warning: Moisture may enter under the faceplate if these instructions are NOT followed.
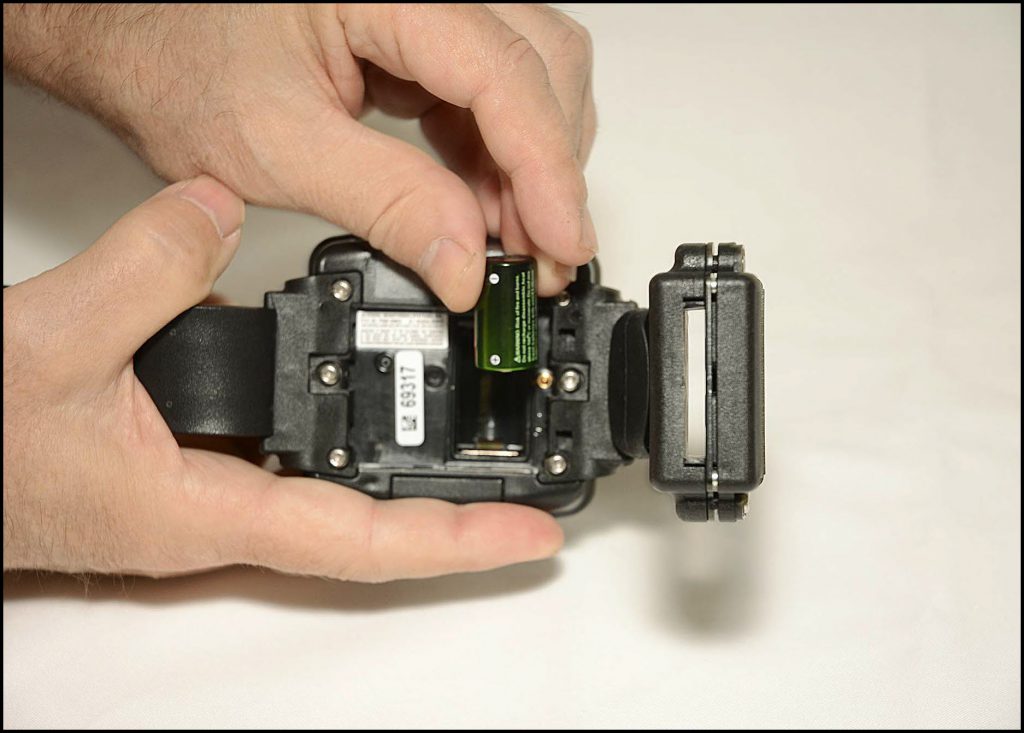
Inserting the Battery
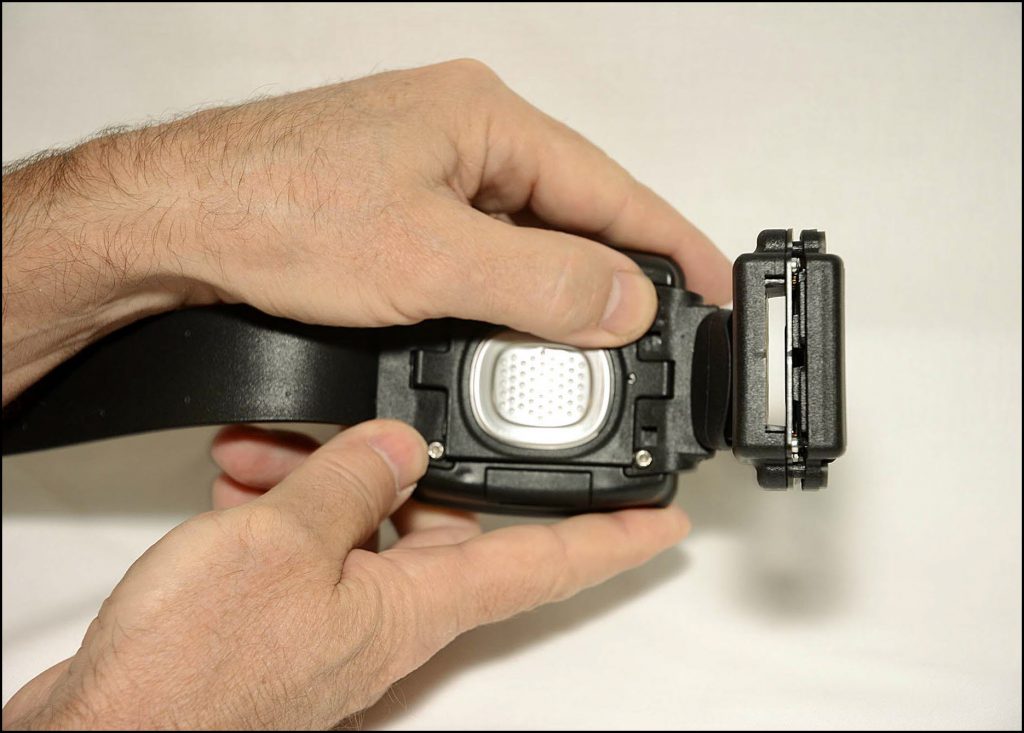
Attaching the Faceplate
- Look closely for the outline of a battery at the bottom of the battery slot and insert the battery, starting with the positive side being pushed against the bottom side of the battery slot and pushing down on the negative (flat) side.
When Client Arrives
-
- Open the Direct Connect application.
- Connect Direct Connect Device with Your Computer.
To connect the Direct Connect device:- Plug the small (mini-B type) USB port into the Direct Connect device.
- Plug the large (A type) USB connection into a USB port on your computer.
The red and blue lights on the Direct Connect device blink for approximately 5 seconds then both remain on.
Bracelet status in Direct Connect Application: Waiting for Bracelet
Connecting USB Cable to Direct Connect Device
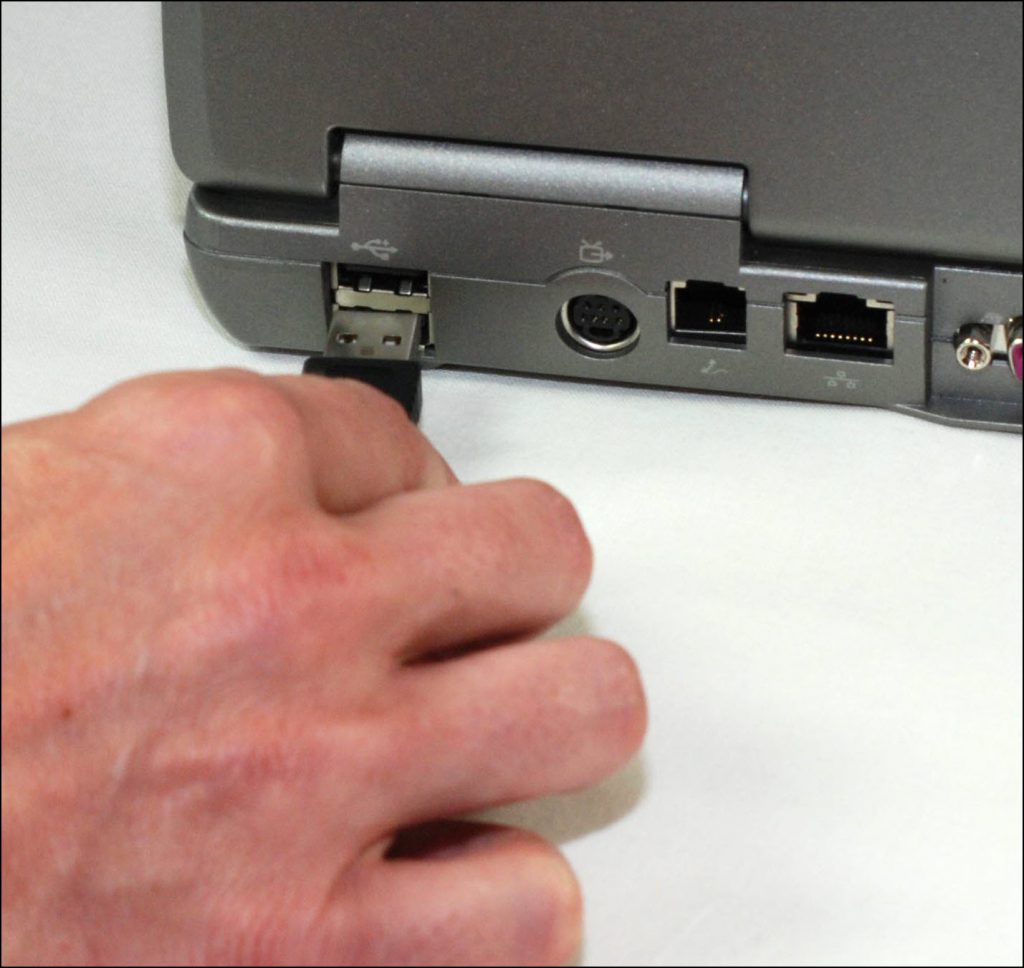
Connecting USB Cable to Your Computer
- Attach Direct Connect Device to Old Bracelet.
To attach the Direct Connect Device:- Align the Direct Connect device with the top of the bracelet.
- Slide the Direct Connect device down over the bracelet.
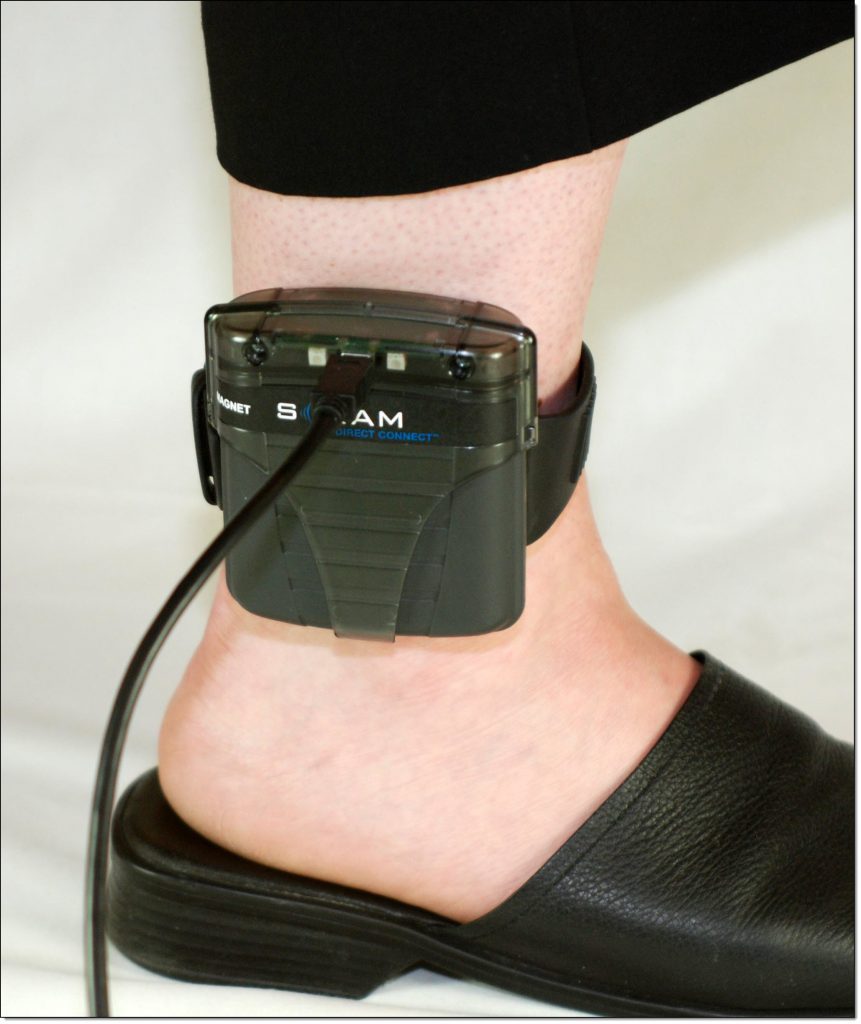
Attaching Direct Connect Device
- Wake Up Old Bracelet.
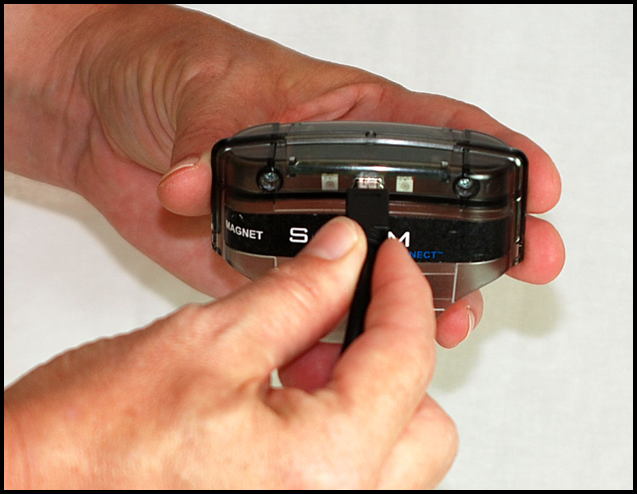
To wake up the old bracelet:- Momentarily place the magnet on the top right side of the bracelet.

Placing Magnet on SCRAM CAM Bracelet
 At this time:
- Bracelet status in Direct Connect Application: Communicating
- On the Direct Connect device, the red light turns off while the blue light remains on.
- Any remaining data is transferred from the bracelet to SCRAMNET.
- The bracelet software is checked and updated, if necessary.
When complete:
After 30 seconds to 2 minutes:- The blue light on the Direct Connect device turns off for approximately 5 seconds then both lights turn back on.
- Bracelet status in Direct Connect Application: Communication Complete
Note: After 1 minute, the status changes to: Waiting for Bracelet
- Remove the Direct Connect device.
- Momentarily place the magnet on the top right side of the bracelet.
- Remove Old Bracelet.
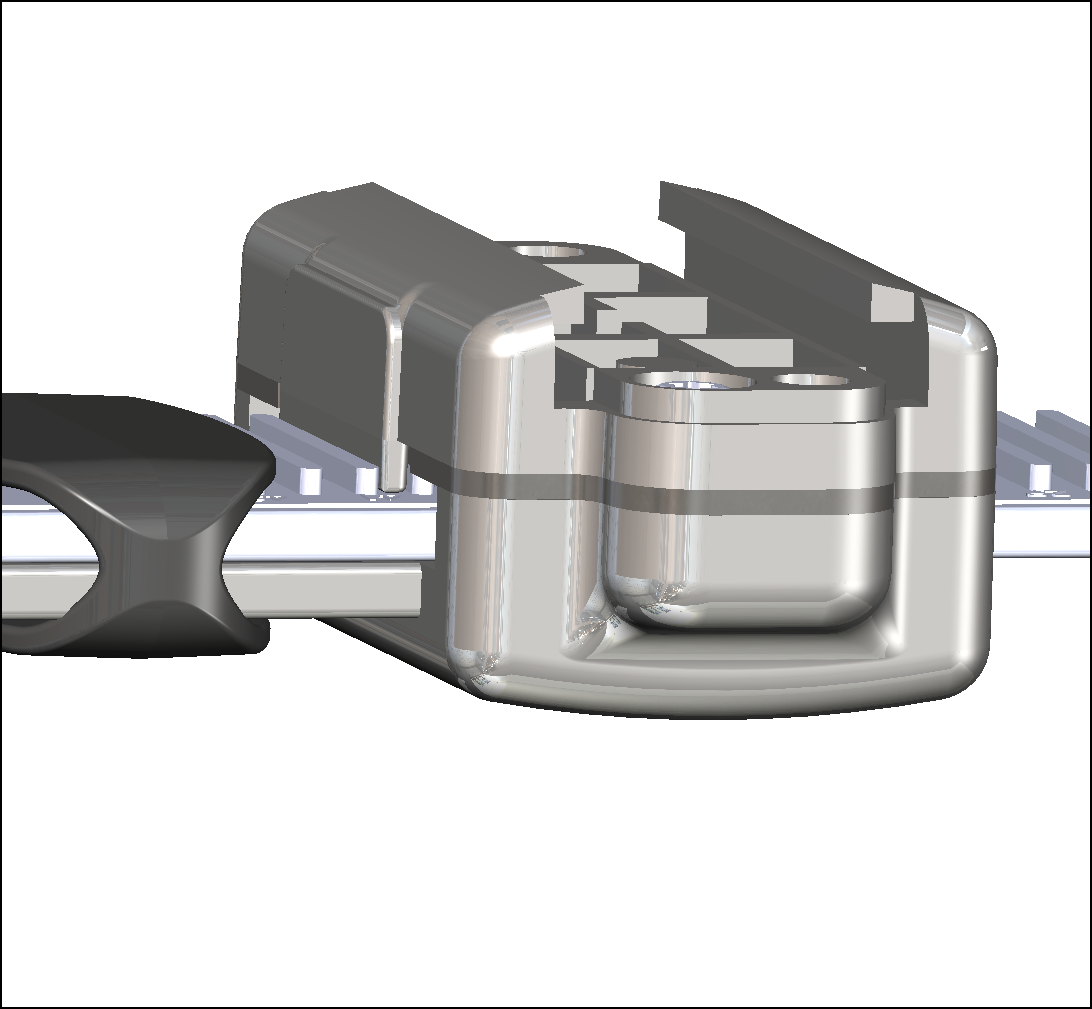
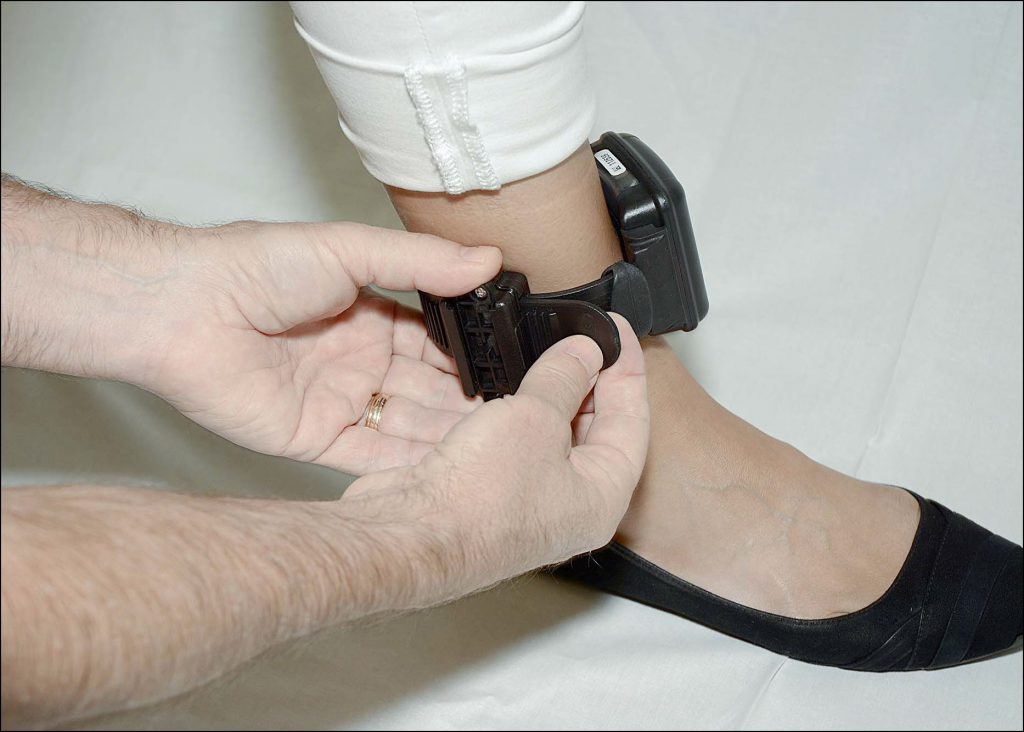
To remove the old bracelet:- Place the shear cutter on the center line where the two pieces of the tamper clip meet.
- Press down firmly with one point of the shear cutter until the point breaks through the plastic.
- Press down firmly with the other point of the shear cutter until that point breaks through the plastic.
- Squeeze the shear-cutter handles until the plastic center breaks and the two pieces separate from the buckle cover.
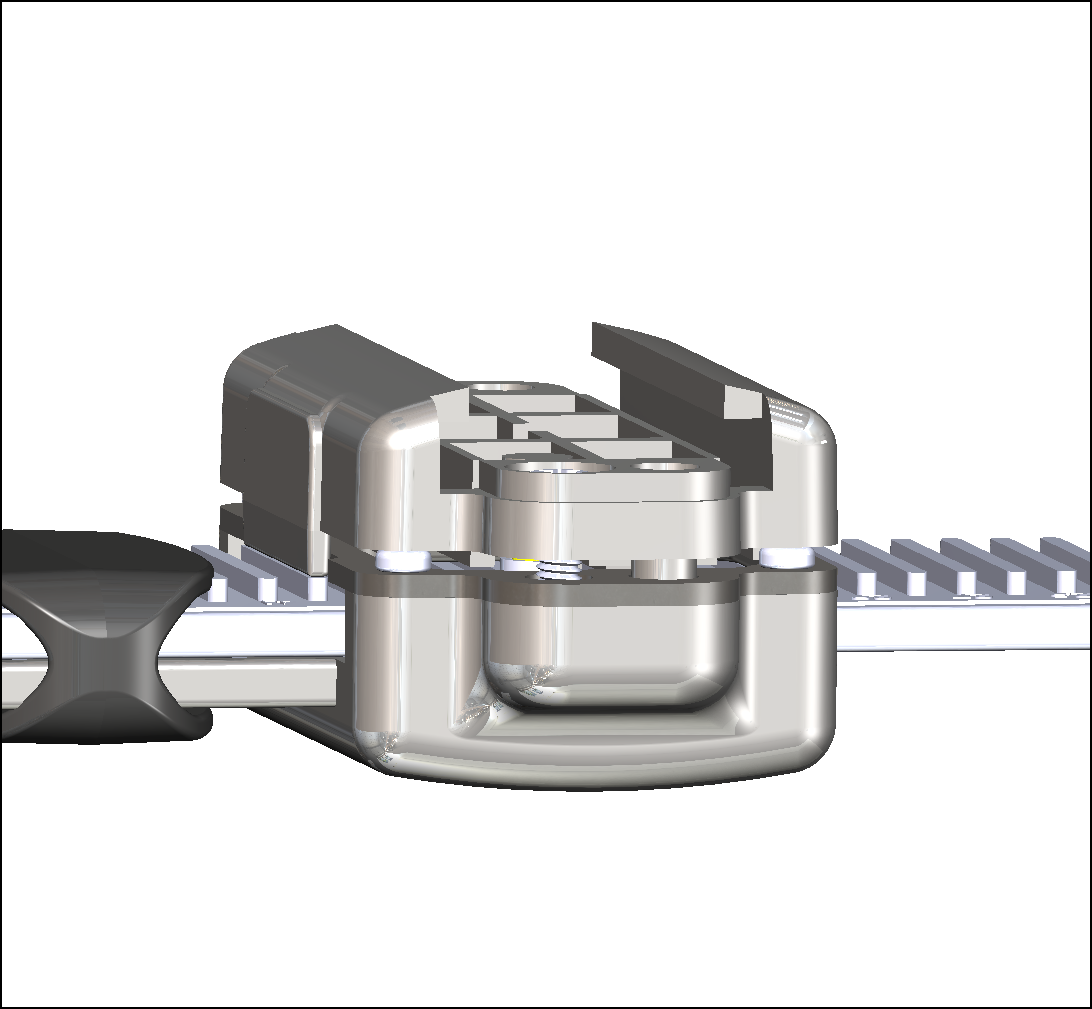
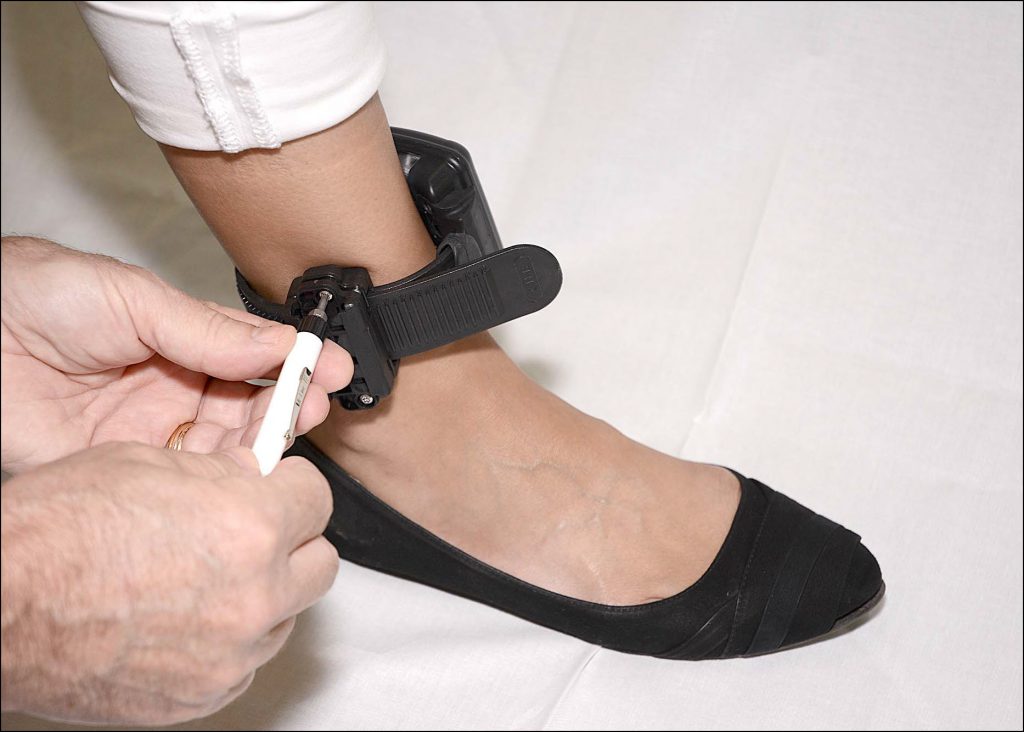
- Using the T10 Screwdriver, loosen the two retaining screws.
- Pull the strap back through the buckle, removing the bracelet from the client’s ankle.
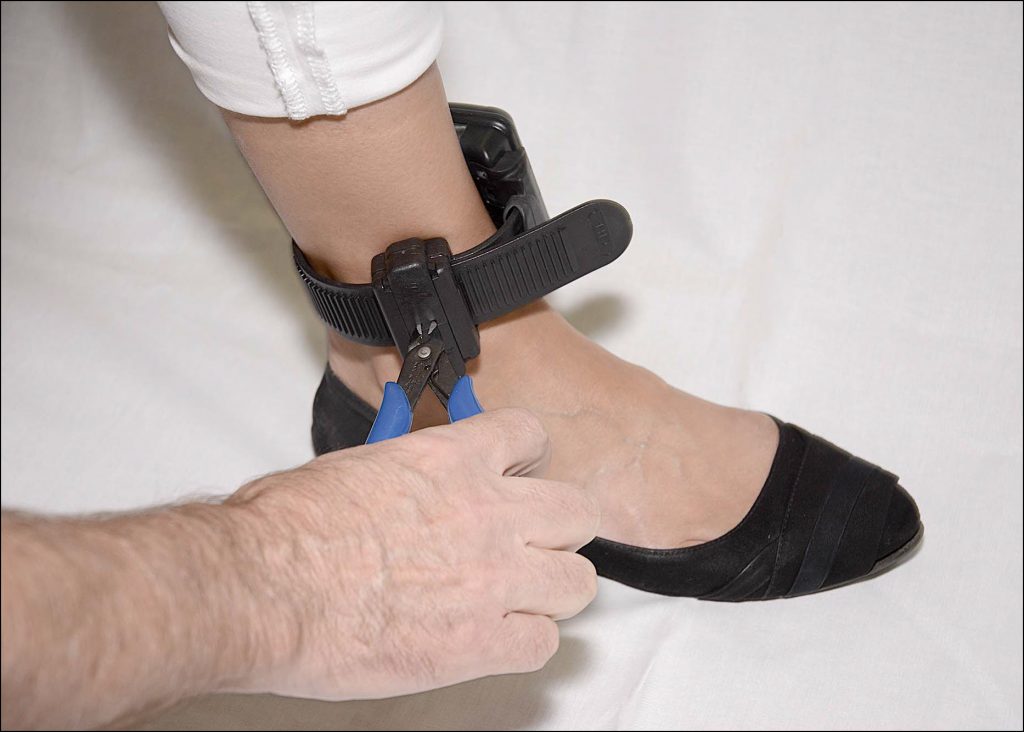
Breaking Through the Tamper Clip Plastic
Buckle with Clip Parts Removed

Loosen the Retaining Screws
Remove SCRAM CAM Bracelet
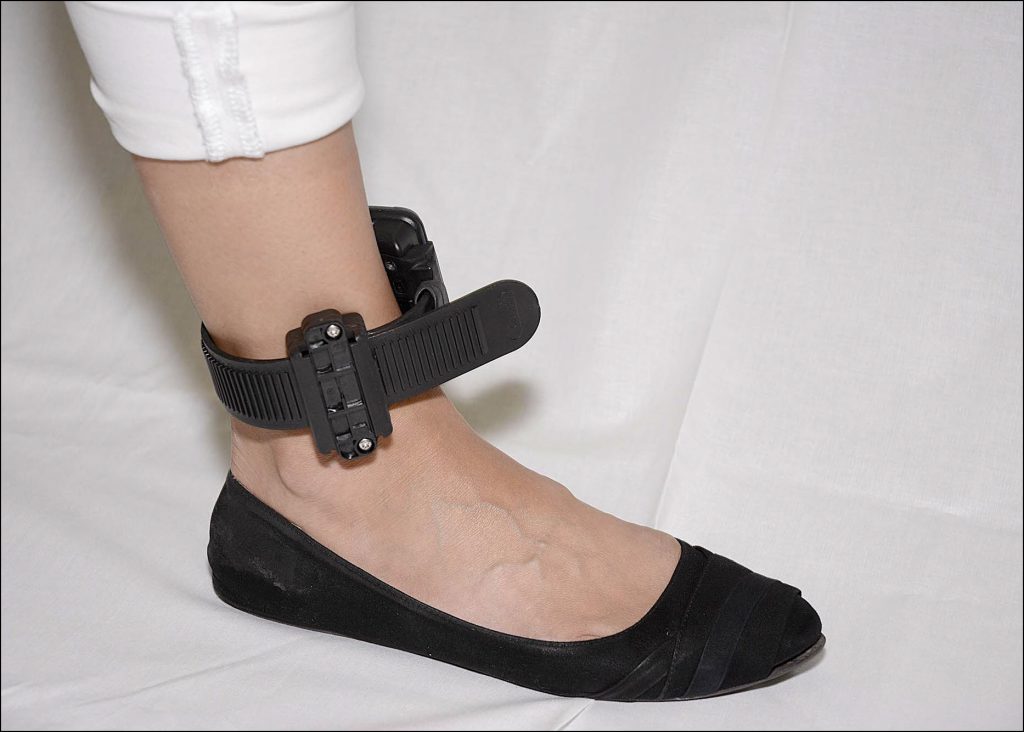
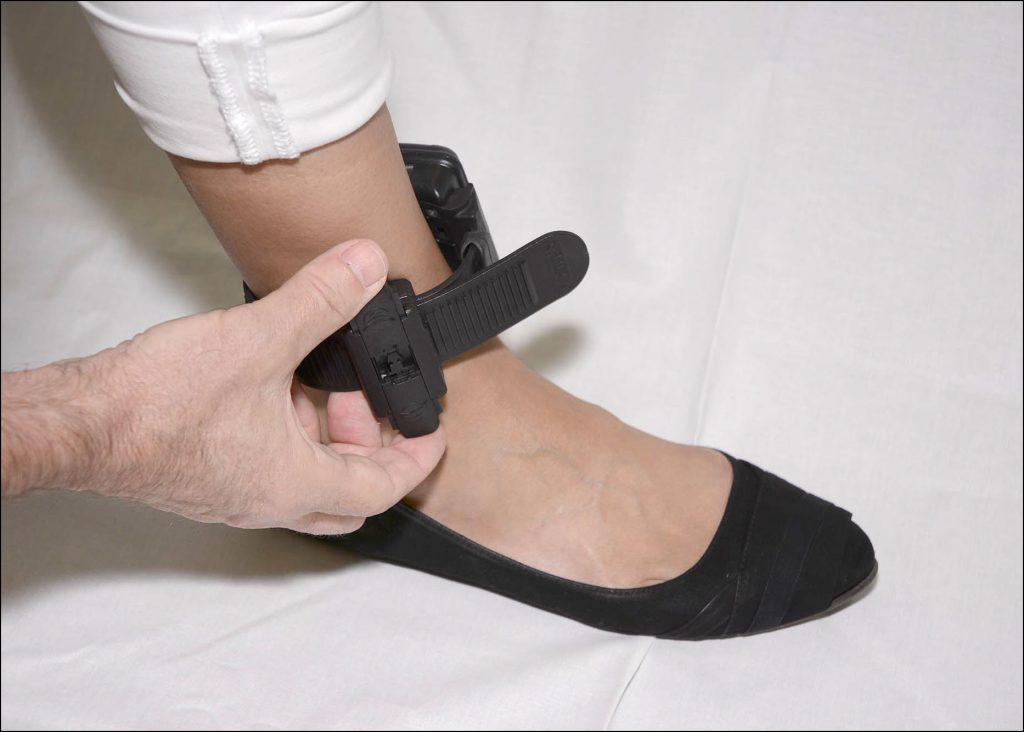
- Attach New Bracelet to Client.
To attach the new bracelet:- Place the bracelet no more than an index finger above the right or left ankle with the SERIAL NUMBER FACING UP.
- Feed the strap through the buckle and completely tighten.
The bracelet should be able to be rotated slightly, but not past the shin bone.
Important Note – To properly align the bracelet strap, ensure that the tooth alignment tab is positioned between two teeth when the buckle is tightened. An “Open Strap Detected” event will be generated if the strap is not properly aligned.
Proper Alignment
Improper Alignment - Tighten the retaining screws until the two sides of the buckle are flush.
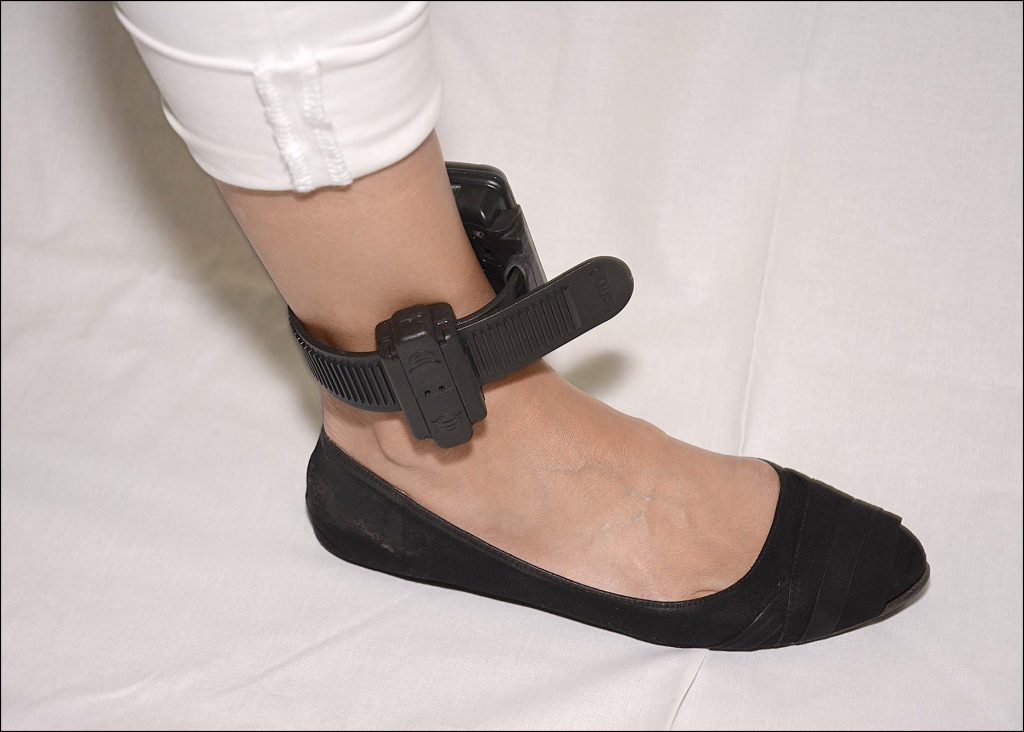
Attaching the SCRAM CAM Bracelet
Tightening the Retaining Screws
- Attach Direct Connect Device to New Bracelet.
To attach the Direct Connect device to the new bracelet:- Align the Direct Connect device with the top of the bracelet.
- Slide the Direct Connect device down over the bracelet.
- Wake Up New Bracelet.
To wake up the new bracelet:- Momentarily place the magnet on the Direct Connect device where the word “magnet” appears.
At this time:- Bracelet status in Direct Connect Application: Communicating
- On the Direct Connect device, the red light turns off while the blue light remains on.
- Any remaining data is transferred from the bracelet to SCRAMNET.
- The bracelet software is checked and updated, if necessary.
- Client data is downloaded to the bracelet.
When complete:
- The blue light turns off for approximately 5 seconds then both lights turn back on.
- Bracelet status in Direct Connect Application: Communication Complete
Note: After 1 minute, the status changes to: Waiting for Bracelet
- Remove the Direct Connect device.
- Momentarily place the magnet on the Direct Connect device where the word “magnet” appears.
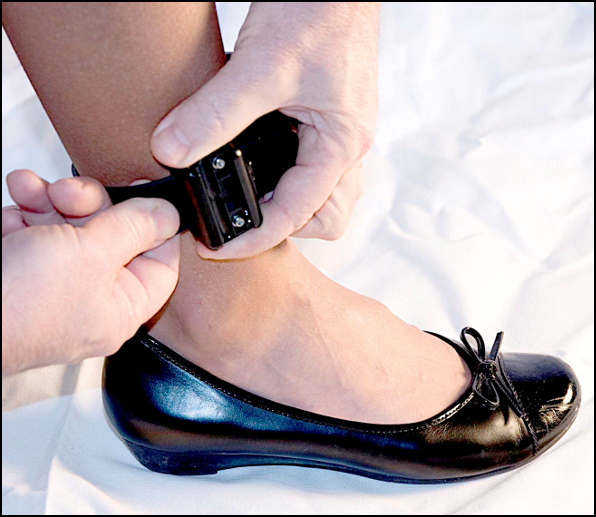
- Install Tamper Clips.
- Ensure that the tamper clip parts being installed are free of cracks or fractures.
Note: Never reuse locking clips! - Insert both tamper clip parts into the buckle slots, squeeze the two parts together, and listen for an initial click followed by a second click.
Note: You may have to press hard to get the second click. You must hear a second click for the snap lock to be engaged. After proper engagement, you should not be able to pull the locking clip apart.
Tamper Clip Being Snapped into Place
When the locking clips are engaged, the two pieces should be against each other as shown below.
Tamper Clip Snapped in Place
- Ensure that the tamper clip parts being installed are free of cracks or fractures.
- Verify Successful Assignment.
Confirm that the status of the new bracelet is Assigned to Client in SCRAMNET. Also, review the communication schedule previously set up with the client and make any changes. Lastly, instruct the client to sign the two copies of the addendum then give one copy to the client and place the other copy in the client’s file.
After Client Leaves
Perform the following tasks on the old bracelet when the client has left the office.
-
- Notify the Agent.
Notify the agent that the removal is complete. - Is the Bracelet Being Shipped back to AMS?
Perform the following steps if the bracelet is being returned to AMS. If not, proceed to step 3.- Contact AMS to obtain an RMA number or complete the RMA Request form that is available on the SCRAMNET Help page.
- Place in box and ship.
- Notify the Agent.
Note: If a suspected health hazard exists, refer to “Cleaning and Disinfecting Instructions for SCRAM Systems products.”
- Disinfect the Bracelet.
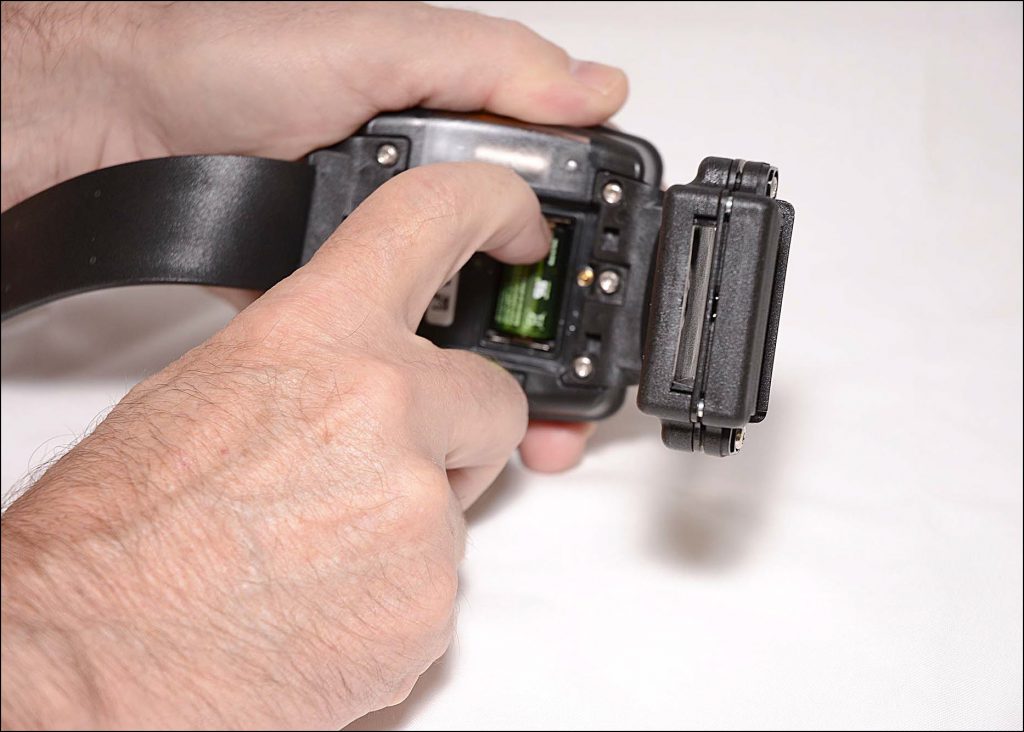
Disinfect the bracelet according to the Bracelet Disinfecting Kit provided by AMS. - Remove Faceplate.
To remove the faceplate:- Insert the Faceplate Removal Tool into the slots on the right side of the bracelet.
- Press the tool in until the faceplate disengages.
- Remove the faceplate.
Note: Discard the faceplate as it is a “single-use-only” component.
Inserting the Faceplate Removal Tool

Faceplate Removed
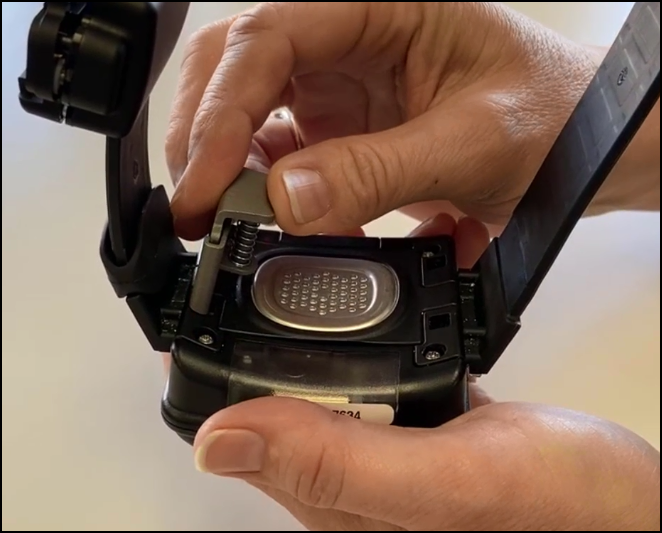
- Remove Battery.
To remove the battery:- Place your finger tip on the edge of the negative side (flat) side of the battery.
- Pull up on the battery, removing it from the bracelet.
Note: Discard the battery.
Removing the Battery
Battery Removed
- Using the Torx screwdriver, unscrew the six retaining screws to remove the straps.
Strap Screws - Use the supplied precision-tip cotton swab to clean the two pogo pins.
Replace SCRAM Standard Base Station
Purpose
Use this procedure to replace a wired or wireless SCRAM Base Station with a wired base station.
What you will need:
- SCRAM Base Station being assigned (including power cord, phone cable, and Direct Connect USB cable)
- Ethernet cable (optional)
Procedure
Before Client Arrives
Ensure that Base Station is Fully Charged.
Plug the power cord into the new base station and into an electrical outlet.
- Base station display if base station IS FULLY CHARGED:
- Line 1 – STORAGE MODE
- Line 2 – BATTERY CHARGED
- Base station display if base station IS NOT FULLY CHARGED:
- Line 1 – STORAGE MODE
- Line 2 – BATTERY CHARGING
- Keep the base station plugged in until the display changes to FULLY CHARGED.
- Base station display if the battery IS NOT FUNCTIONING PROPERLY:
- Line 1 – STORAGE MODE
- Line 2 – CHECK BATTERY
When Client Arrives
Perform the following steps when the client arrives at your office.
-
- Set New Base Station to Pending Assignment.
To set the new base station to Pending Assignment:- Access the client’s Equipment page.
- Click the Replace Base Station link.
- Select an option in the Communication Method drop-down list.
- Enter the new base station serial number.
- Click the Complete Equipment Replacement button.
- Print the Participant Agreement Addendum:
Note: The addendum is also available for download at the bottom of this page.- Click the Alternate Agreements link.
- Click the AMS Default Participation Agreement Addendum button to open the addendum.
- Print two copies of the addendum and have client sign both.
Place one copy in client’s file.
Give client other copy.
- Click the Return to Currently Assigned Equipment button.
The status of the new base station is set to Pending Assignment and the status of the old base station is set to Pending Removal.
- Open the Direct Connect application.
(Wired SCRAM Base Station Only) - Connect Old Base Station with Direct Connect Application.
(Wired SCRAM Base Station Only)
To connect the old base station with the Direct Connect application:- Plug the power cord into the old base station and into an electrical outlet.
- Base station display:
- Line 1 – DATE/TIME
- Line 2 – CHECK PHONE LINE
- Base station display:
- Plug the small (mini-B type) USB connector into the base station.

Connecting USB Cable to SCRAM Base Station
At this time:- Base Station status in Direct Connect Application: Communicating
- Base station display:
- Line 1 – DIRECT CONNECT
- Line 2 – ONLINE
- Any remaining data is transferred from the base station to SCRAMNET.
- The base station software is checked and updated, if necessary.
When complete:
- Base Station status in Direct Connect Application: Communication Complete
- Base station display:
- Line 1 – STORAGE MODE
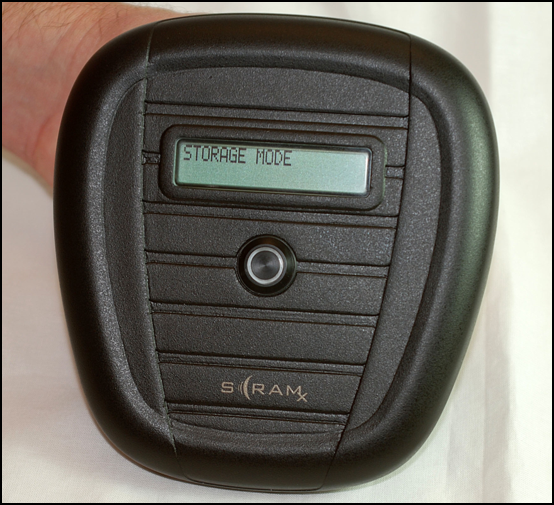
Base Station Display – “STORAGE MODE”

Direct Connect Application – “Communication Complete”
- Line 1 – STORAGE MODE
- Unplug the power cord and USB cable from the base station.
- Plug the power cord into the old base station and into an electrical outlet.
- Connect New Base Station with Your Computer.
To connect the new base station:- Plug the power cord into the new base station and into an electrical outlet.
- Base station display:
- Line 1 – TIME/DATE
- Line 2 – CHECK PHONE LINE
- Base station display:
- Plug the small (mini-B type) USB port into the base station.

Connecting USB Cable to SCRAM Base Station
At this time:- Base Station status in Direct Connect Application: Communicating
- Base station display:
- Line 1 – DIRECT CONNECT
- Line 2 – ONLINE
The new base station assignment process begins.
- Any remaining data is transferred from the base station to SCRAMNET.
- The base station software is checked and updated, if necessary.
- Client parameters are loaded on the base station.
When complete:
- Base Station status in Direct Connect Application: Communication Complete
- Base station display:
- Line 1 – DATE/TIME
- Line 2 – MONITORING
- Unplug the power cord and USB cable from the base station.
- Plug the power cord into the new base station and into an electrical outlet.
- Verify Successful Assignment.
Confirm that the status of the new base station is Assigned to Client in SCRAMNET. - Give the New Base Station to the Client.
Give the base station to the client along with the power cord and phone cable. Remind the client to plug the base station into the most centrally located analog wall jack as soon as they get home. - Client plugs in the Base Station at Home.
Using Internet Service
When the base station is plugged into an AC outlet and Ethernet jack at the client’s home, the base station displays:- Line 1 – NETWORK – CONNECTING
then - Line 1 – NETWORK – CONNECTED
Line 2 – CONTACTING SERVER
then - Line 1 – NETWORK – CONNECTED
Line 2 – SCRAMNET CONTACTED
then - Line 1 – TIME/DATE
Line 2 – MONITORING
- Line 1 – NETWORK – CONNECTING
- Set New Base Station to Pending Assignment.
Using Analog Phone Line
When the base station is plugged into an AC outlet and phone jack at the client’s home, the following occurs:
-
- If not already done, the client is prompted to plug in the phone line.
- Base station display remains at:
- Line 1 – TIME/DATE
- Line 2 – Steps through DIALING -> ONLINE -> MONITORING
- SCRAM House Arrest Only – An “Installation Complete” message appears in the client’s HA Event Log.
- SCRAM House Arrest Only – The phone number that the base station is plugged into is uploaded to SCRAMNET where it is compared to the phone number previously entered in SCRAMNET. If the numbers do NOT match, the “Initialization Complete” message will NOT appear in the client’s HA Event Log.
Replace SCRAM Wireless Base Station
Using Wi-Fi/Cellular
The wireless SCRAM Base Station allows data to be quickly uploaded to SCRAMNET® using either Wi-Fi or cellular services.
Wi-Fi vs. Cellular
Because Wi-Fi services are inherently more reliable than cellular services, Wi-Fi should be used if the client has a router available. Using Wi-Fi as the primary communication method enables the wireless base station to function like a smart phone. Wi-Fi is used when available with the base station automatically switching to cellular services when it is outside of the range of the router.
If Wi-Fi is selected, the wireless base station must be set up to communicate with the client’s router. This can be accomplished in one of two ways:
- During assignment if the client has their router information available.
- By the client at the home after assignment. The client can either:
- Access scramsystems.com/wifisetup and enter the router’s Network ID and Password.
- Press the WPS (Wireless Protective Setup) button on the router.
Refer to “Options for Establishing a Wi-Fi Connection” for more details.
What you will need:
- Base Station being assigned including power cord
Procedure
Before Client Arrives
Ensure that Base Station is Fully Charged.
Plug the power cord into the base station and into an electrical outlet.
-
- Base station display if base station IS FULLY CHARGED:
- Line 1 – STORAGE MODE
- Line 2 – FULLY CHARGED
- Base station display if base station IS NOT FULLY CHARGED:
- Line 1 – STORAGE MODE
- Line 2 – BATT CHARGING
- Base station display if base station IS FULLY CHARGED:
Keep the base station plugged in until the display changes to FULLY CHARGED.
- Base station display if the battery IS NOT FUNCTIONING PROPERLY:
- Line 1 – STORAGE MODE
- Line 2 – CHECK BATTERY
When Client Arrives
Perform the following steps when the client arrives at your office.
-
- Plug in New Base Station.
Plug the power cord into the base station and an electrical outlet.- Base station display if base station IS FULLY CHARGED:
- Line 1 – STORAGE MODE
- Line 2 – FULLY CHARGED
- Base station display if base station IS NOT FULLY CHARGED:
- Line 1 – STORAGE MODE
- Line 2 – BATT CHARGING
- Base station display if base station IS FULLY CHARGED:
- Set New Base Station to Assigned to Client.
To set the new base station to Assigned to Client:- Access the client’s Equipment page.
- Click the Replace Base Station link.
- Enter the new base station serial number.
- Select the “WiFi” option (recommended) in the Communication Method drop-down list.
Note: Use the cellular communication method if the client does NOT have “Wi-Fi.” - Set up Wi-Fi services.
Note: Skip this step if the client will establish a connection with the router at the home. In this case, the base station assignment will be completed using cellular services.- Click the Wi-Fi Setup button to access the WiFi Setup pop up.
- Follow the instructions on the pop up to complete the connection process.
- Click the Send to Base Station button.
The router information is transmitted to the assigned base station and the Wi-Fi SSID will be available for 24 hours to assign to a device(s) message appears on the pop-up. - Close the pop up.
- Click the Complete Equipment Replacement button.
- Print the participant agreement addendum:
Note: The addendum is also available for download at the bottom of this page. -
- Click the Alternate Agreements link.
- Click the AMS Default Participation Agreement Addendum button to open the addendum.
- Print two copies of the addendum and have client sign both.
Place one copy in client’s file.
Give client other copy.
- Click the Return to Currently Assigned Equipment button.
The new base station is displayed with the status set to Assigned to Client.
Base station display:- Line 1 – TIME/DATE
- Line 2 – MONITORING
- Open the Direct Connect application.
(Wired SCRAM Base Station Only) - Connect Old Base Station with Direct Connect Application.
(Wired SCRAM Base Station Only)
To connect the old base station with the Direct Connect application:- Plug the power cord into the old base station and into an electrical outlet.
- Base station display:
- Line 1 – DATE/TIME
- Line 2 – CHECK PHONE LINE
- Base station display:
- Plug the small (mini-B type) USB connector into the base station.
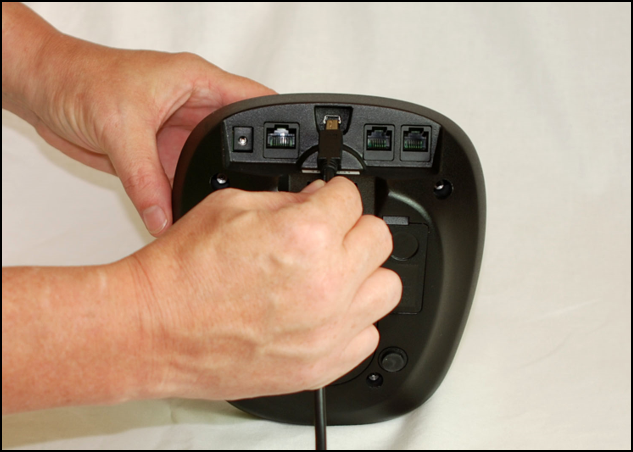
Connecting USB Cable to SCRAM Base Station
At this time:- Base Station status in Direct Connect Application: Communicating
- Base station display:
- Line 1 – DIRECT CONNECT
- Line 2 – ONLINE
- Any remaining data is transferred from the base station to SCRAMNET.
- The base station software is checked and updated, if necessary.
- Plug the power cord into the old base station and into an electrical outlet.
- Plug in New Base Station.
When complete:
-
-
- Base Station status in Direct Connect Application: Communication Complete
- Base station display:
- Line 1 – STORAGE MODE

Base Station Display – “STORAGE MODE”

Direct Connect Application – “Communication Complete”
- Line 1 – STORAGE MODE
- Unplug the power cord and USB cable from the base station.
-
- Give New Base Station to Client.
- Give Client Copy of the “Install Wireless SCRAM Base Station at Monitoring Location” instructions.
Note: Available on the SCRAMNET Help page.