archives

On December 19, 2024, SCRAM Systems released an enhancement for your Nexus caseload. This enhancement will allow you to schedule randomized drug tests for your client.

TipsThe service for the randomized scheduling of drug tests must be enabled for your account before you may utilize it. For more information, contact your SCRAM Systems Account Representative.

Once enabled, you may select the Random schedule option when adding a Drug Test Activity to your client’s supervision plan.

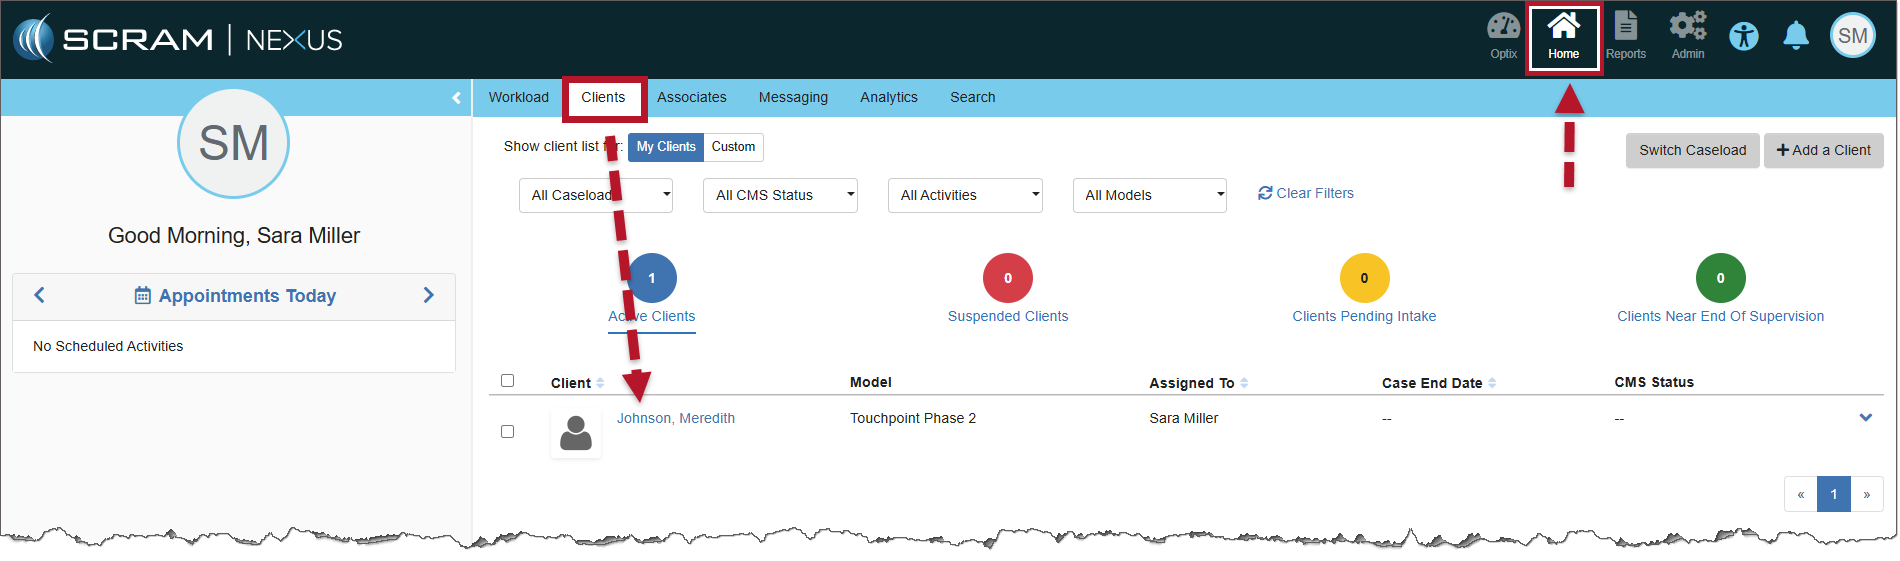
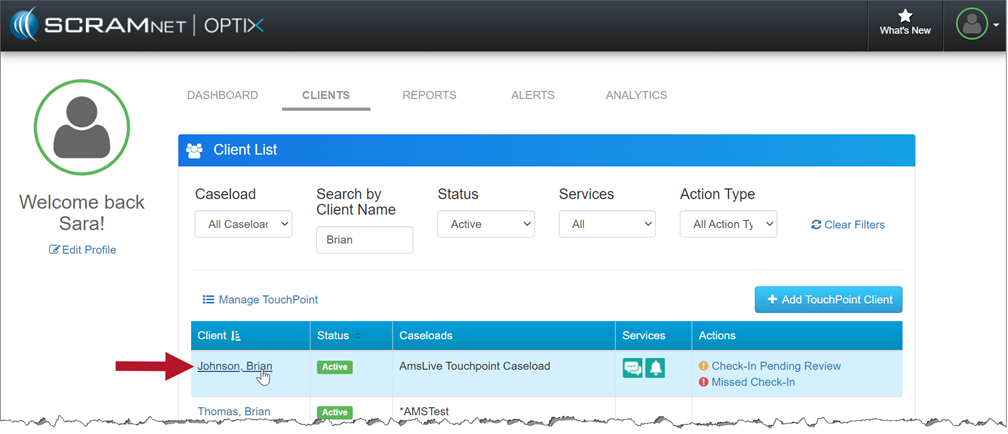
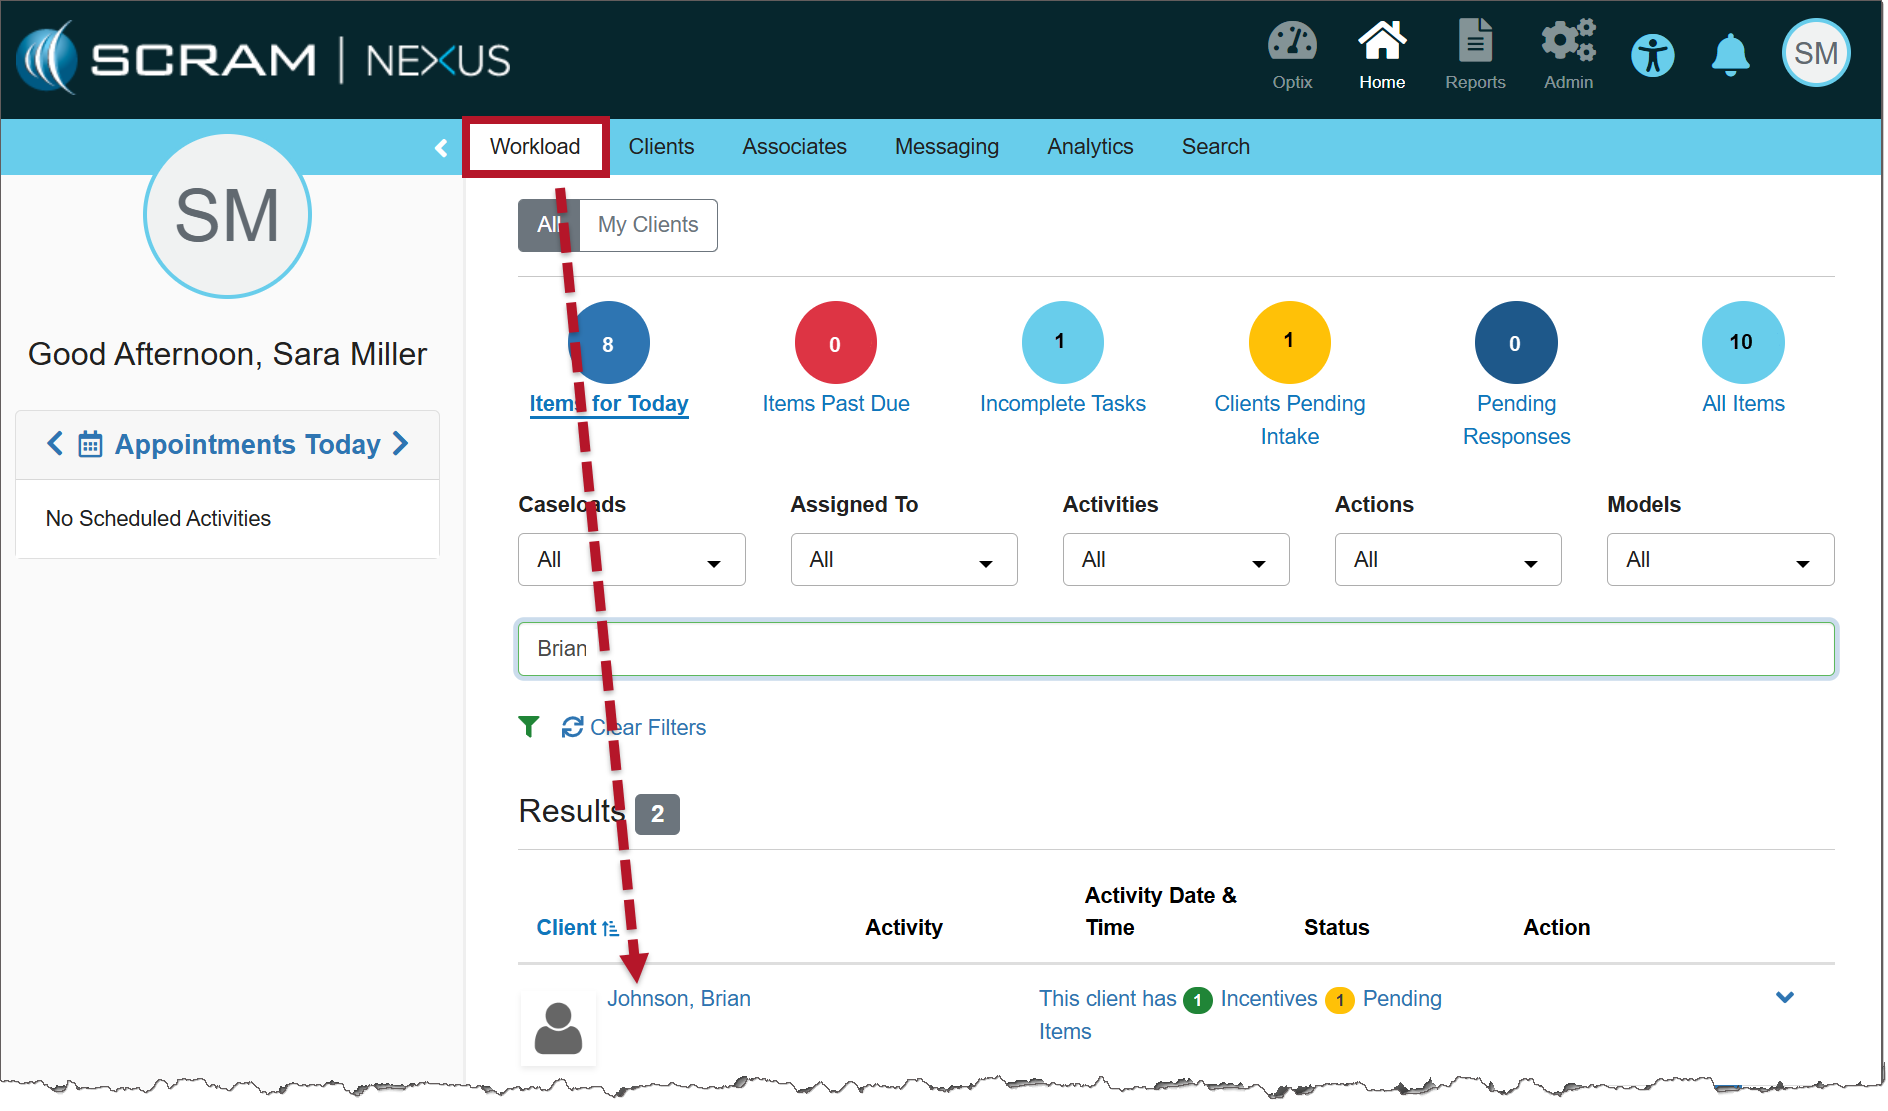
From the Nexus Workload page, select the client’s name hyperlink.

Nexus Clients tab (click to enlarge)

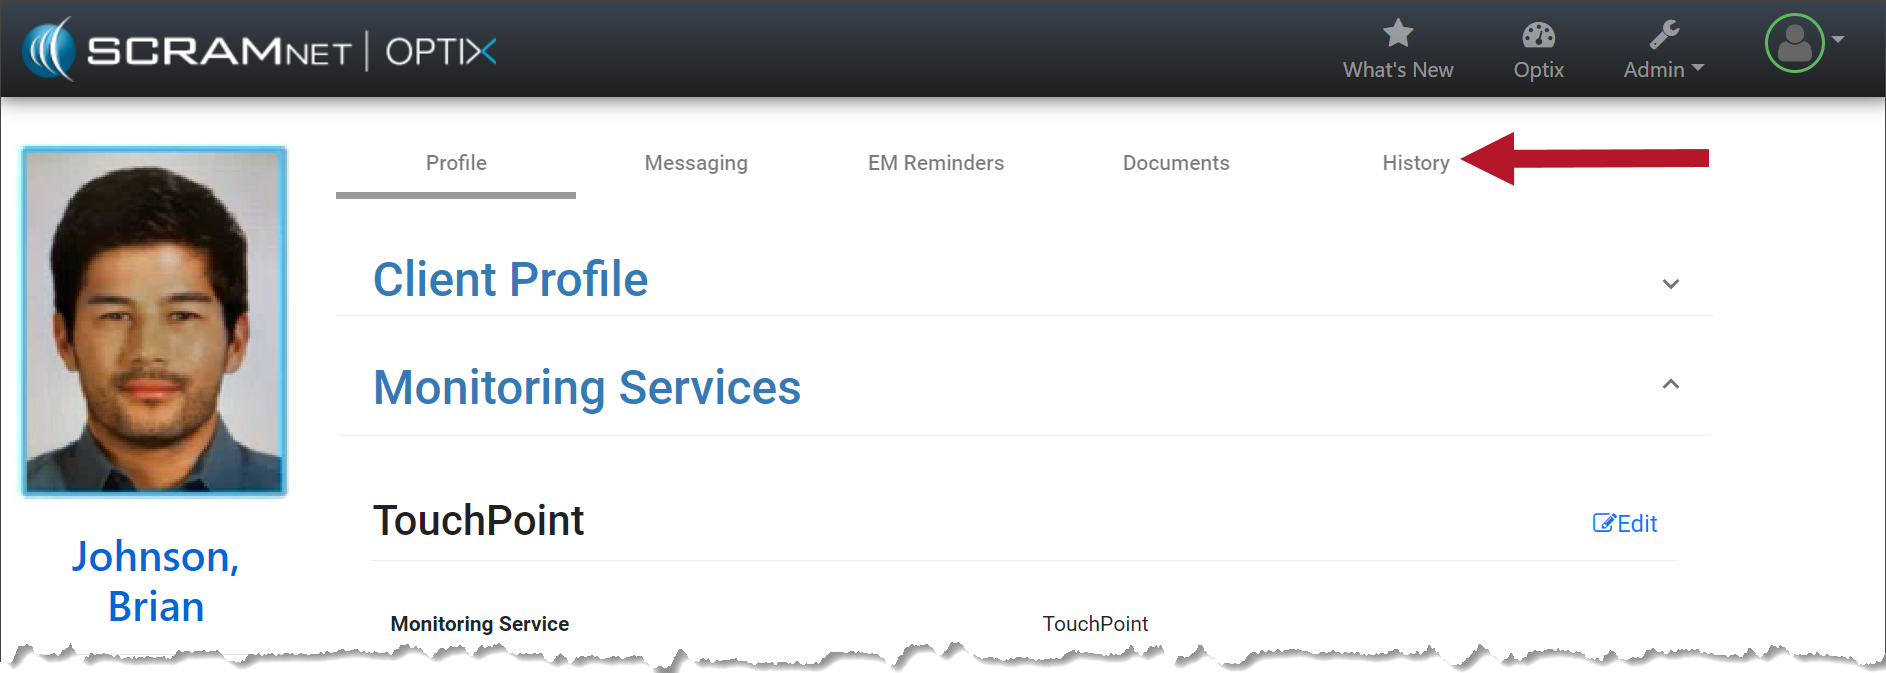
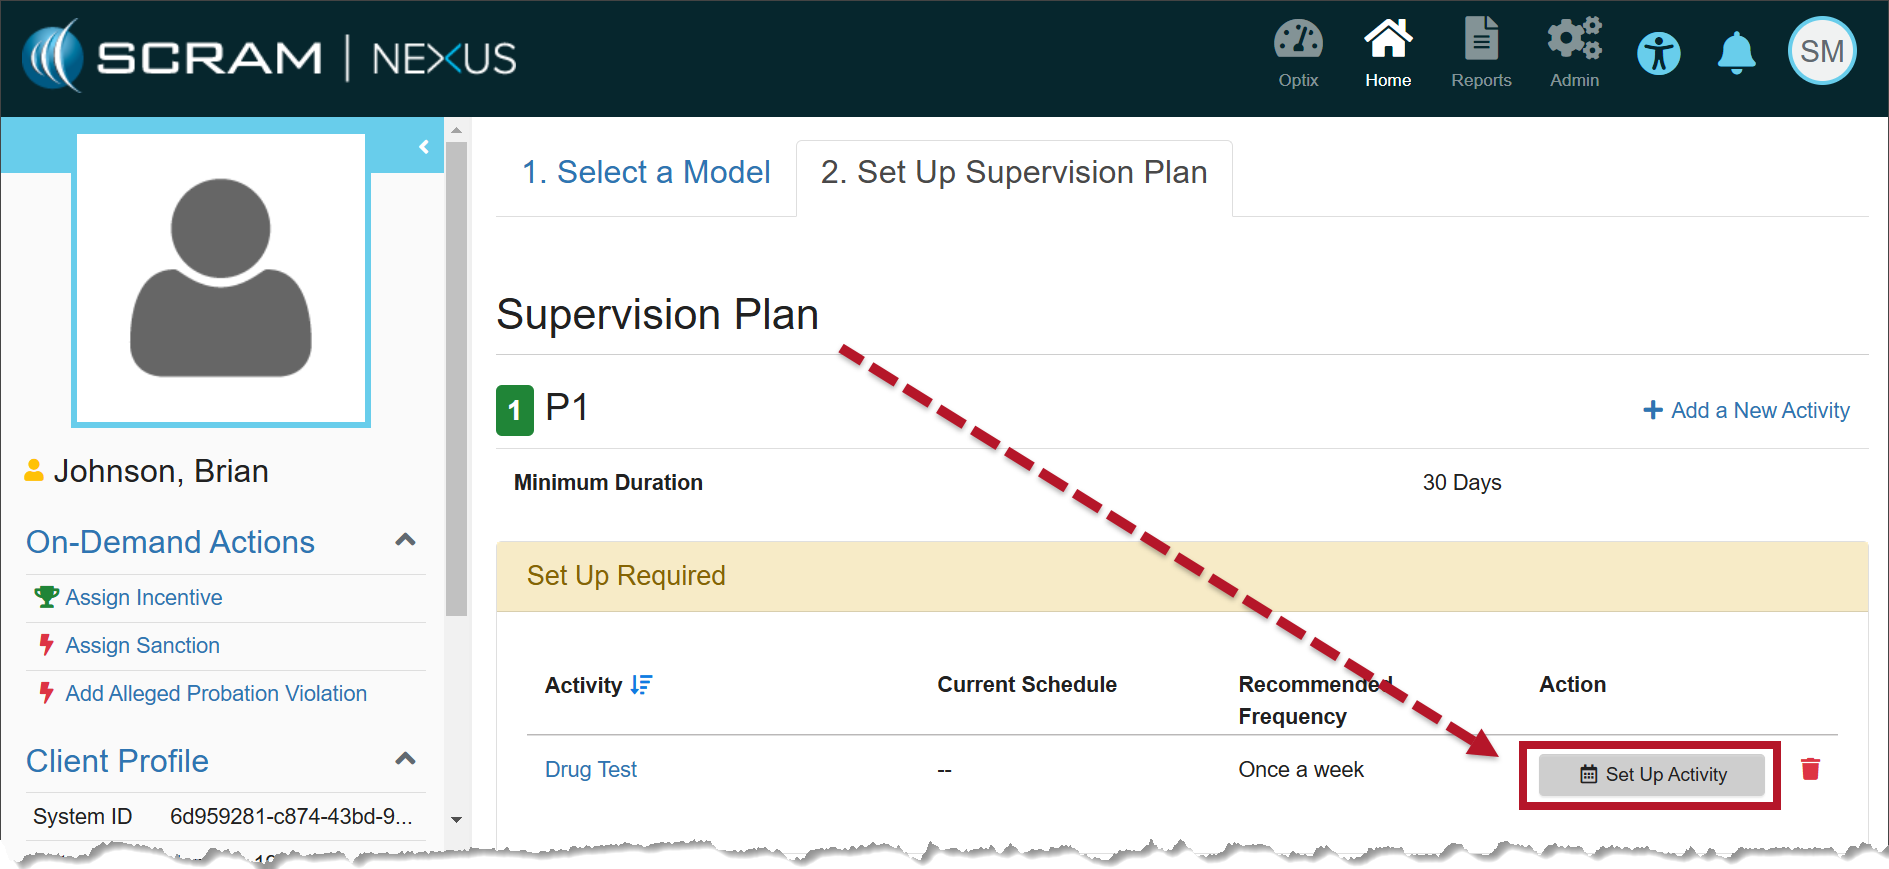
On the client’s Summary page, select the Supervision Plan tab.

In the Supervision Plan section, select the Set Up Activity button.

Supervision Plan information (click to enlarge)

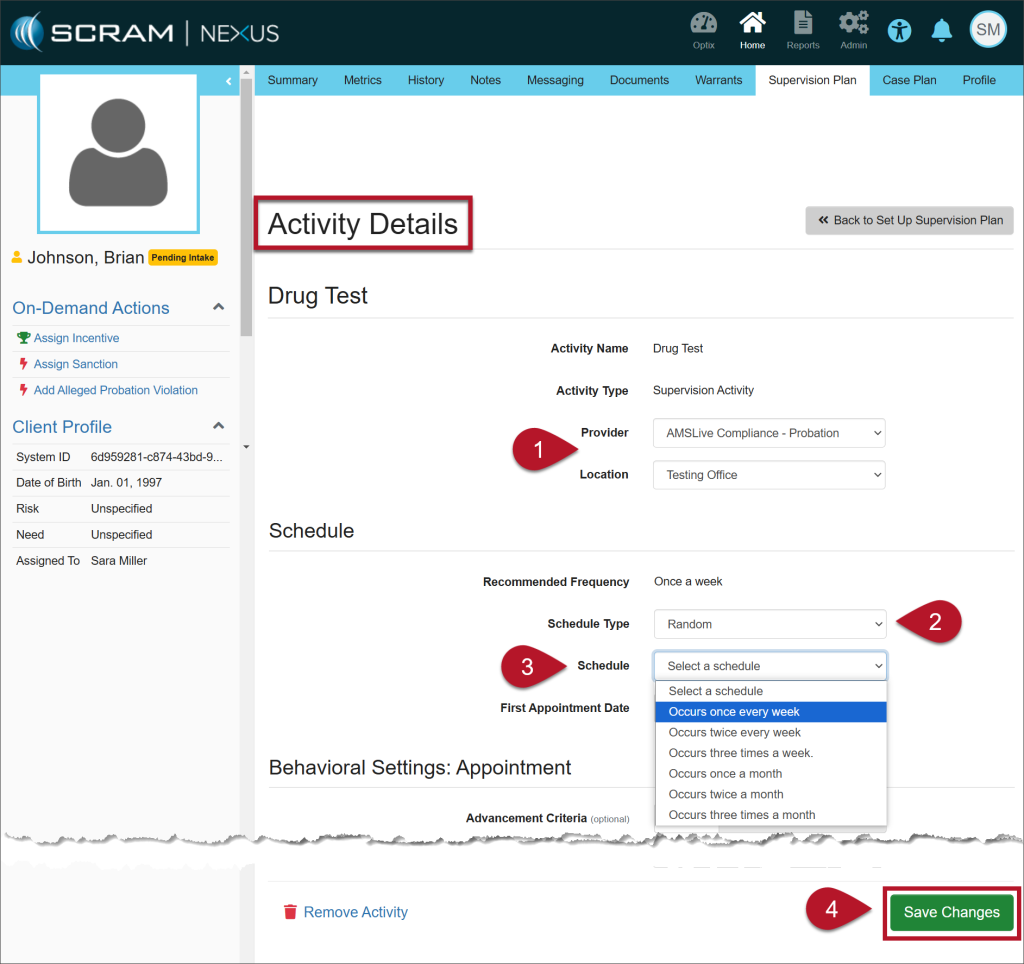
On the Activity Details page, enter the details for the Drug Test Activity: 

  1. Select the Provider and the Location from the dropdown menus. 
  2. On the Schedule Type dropdown menu, select the option of Random.
    • Once selected, the Specific Time field is no longer editable.
  3. The Recommended Frequency is based on the model for the client, but you may choose from the other options in the Schedule dropdown.
  4. Select the Save Changes button.
Activity Details page (click to enlarge)

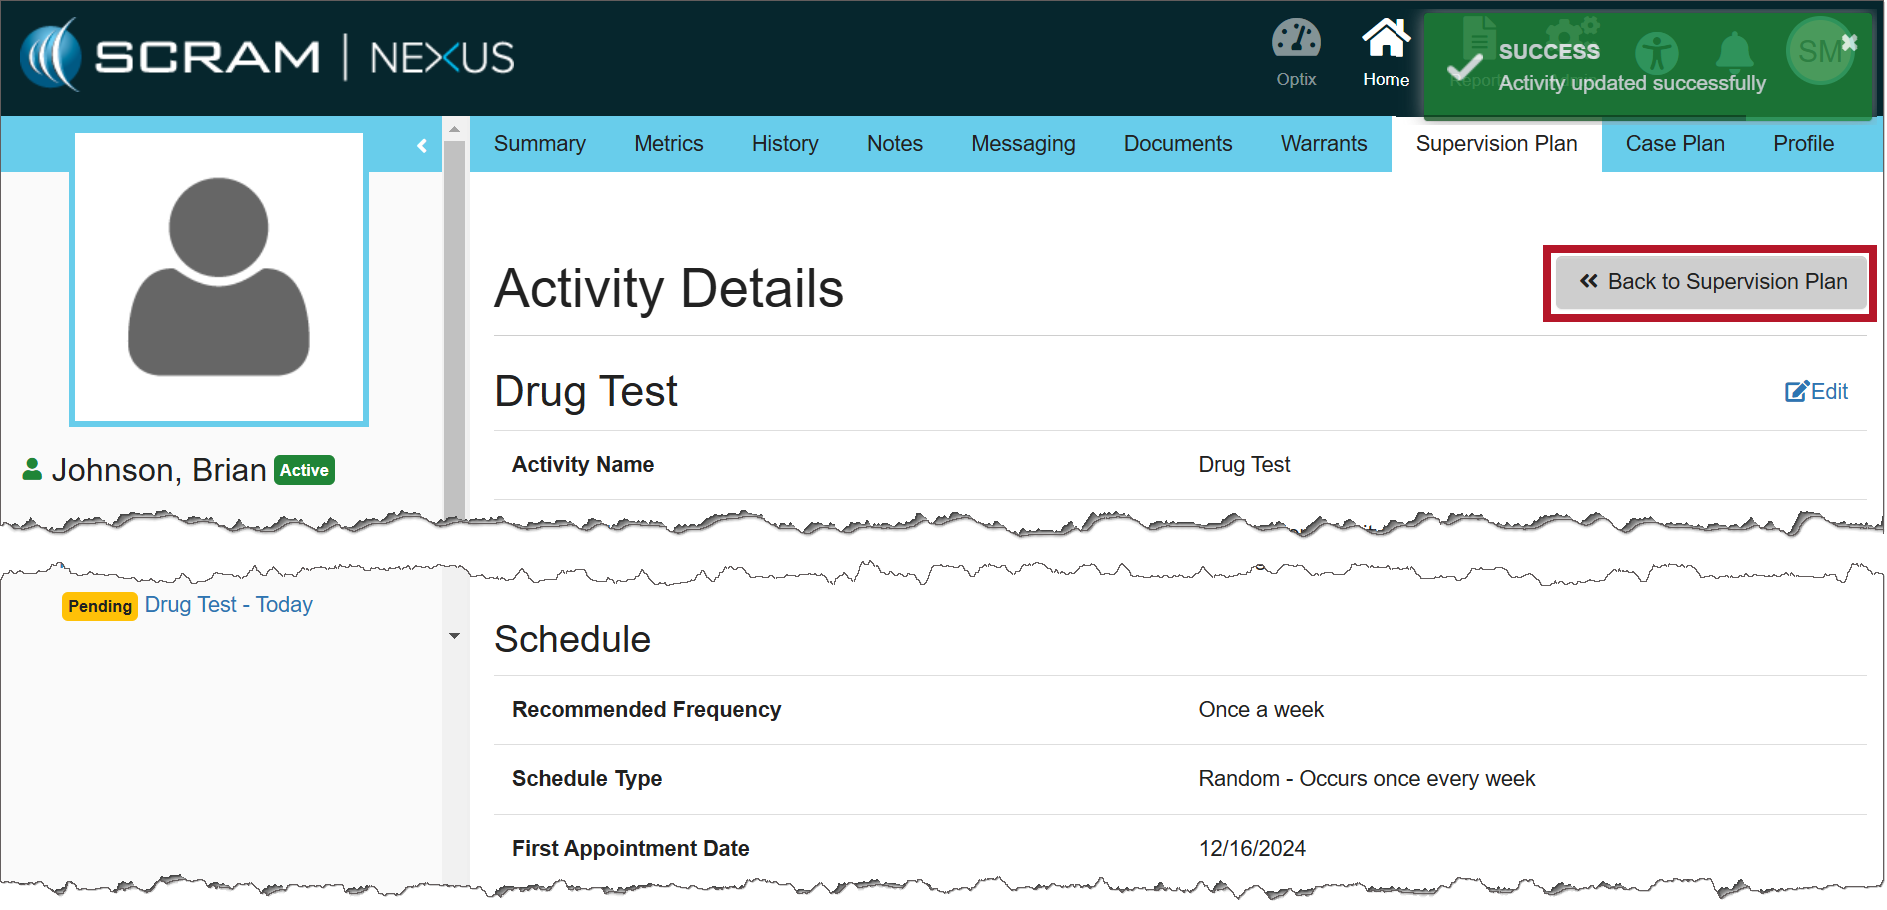
Once saved, a green success banner will display on the page. You may view the details for the Drug Test Activity in the Activity Details section.

To return to the Supervision Plan page, select the >>Back to Supervision Plan button.

Activity Details page (click to enlarge)

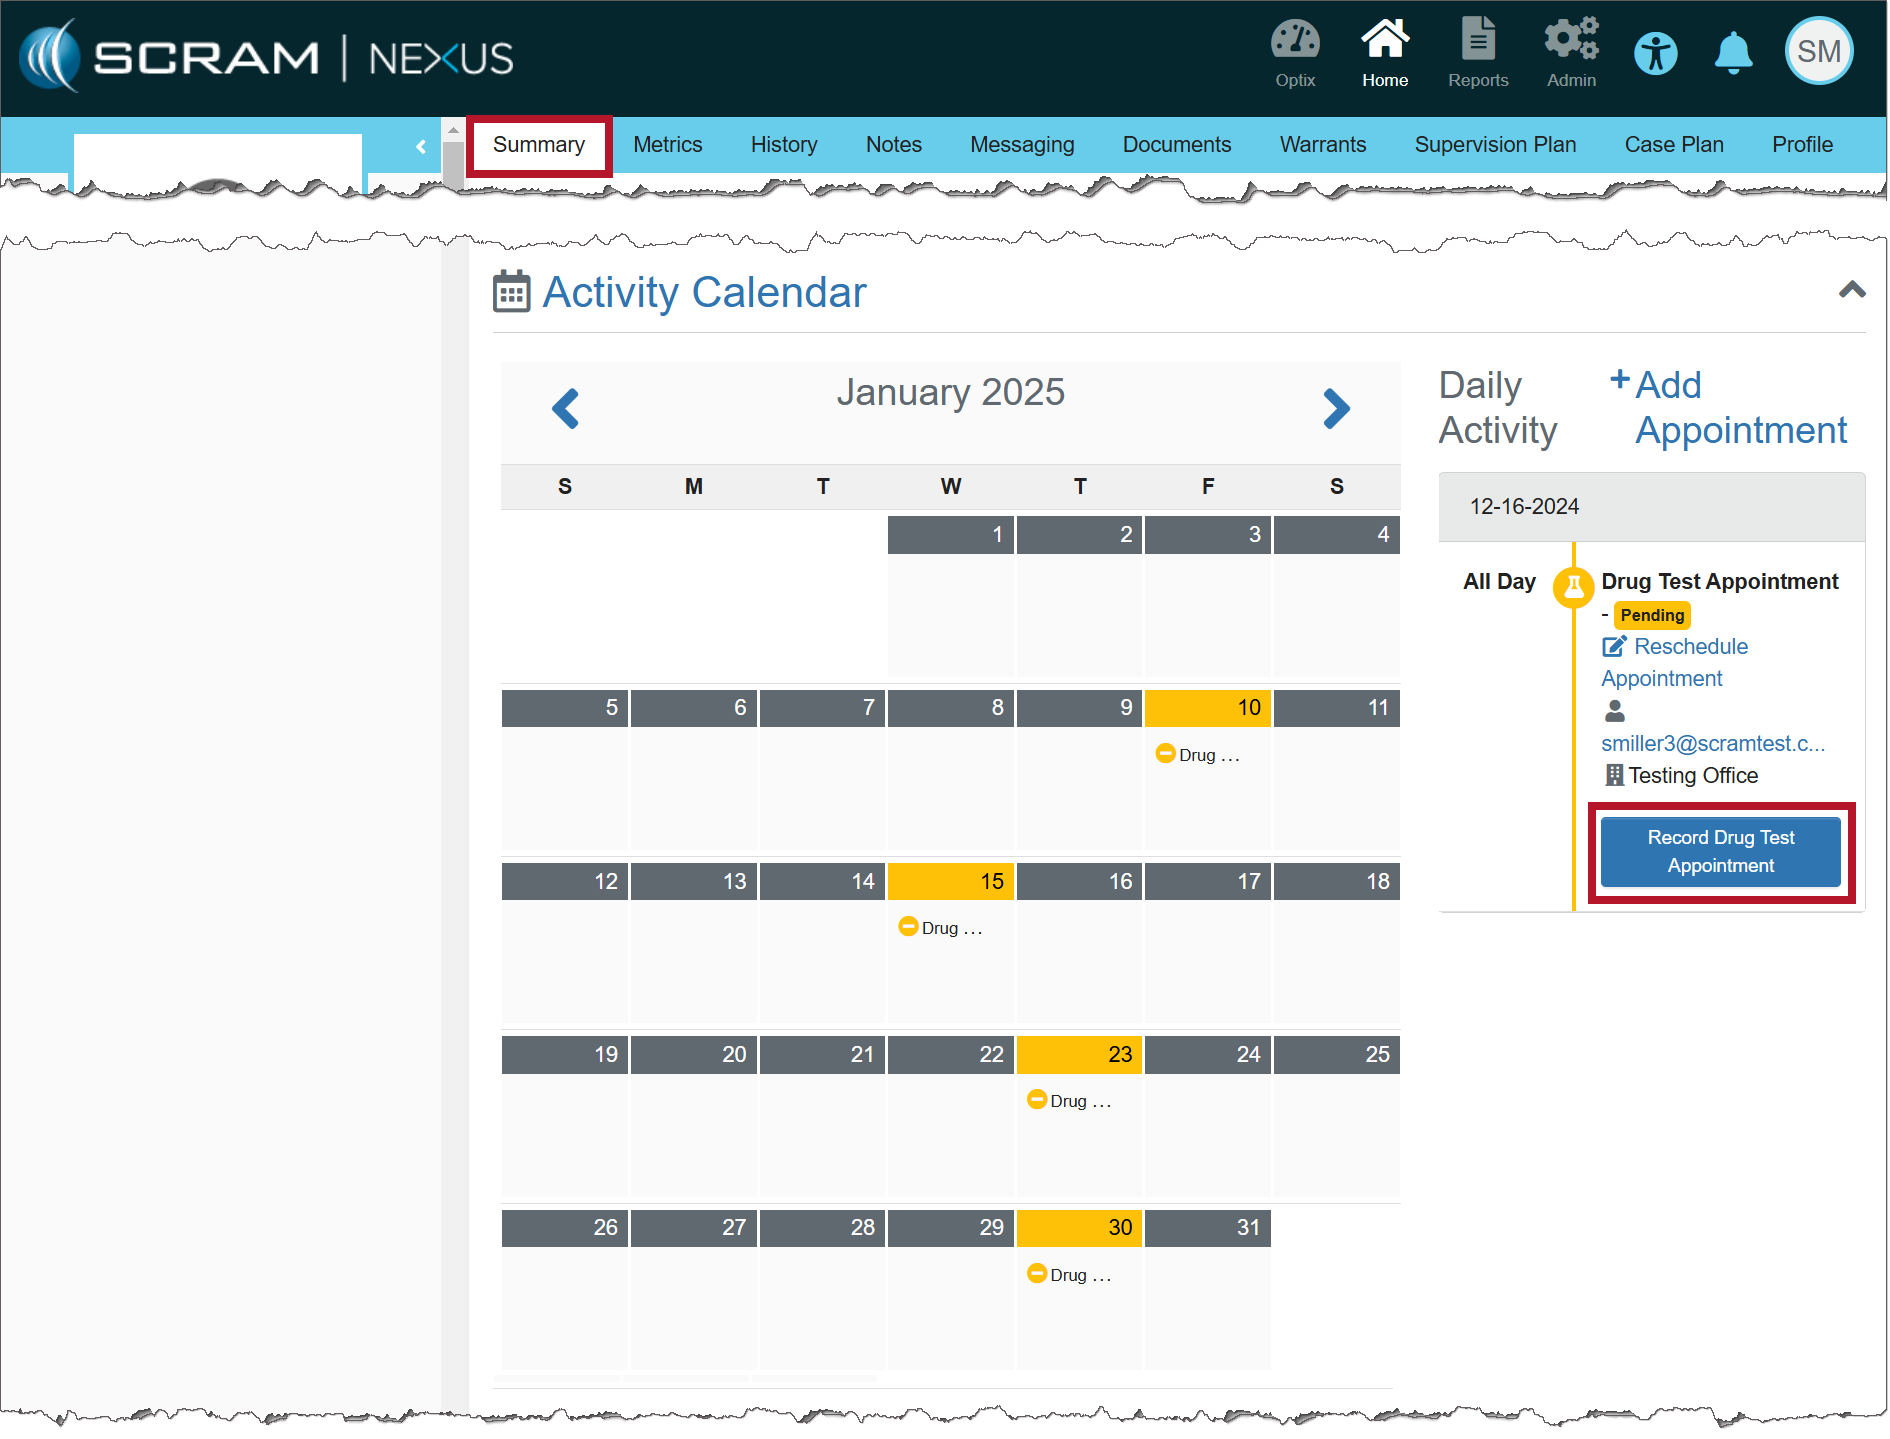
The calendar on the client’s Summary page will display the drug tests interspersed randomly based on the frequency entered.

Activity Calendar (click to enlarge)
NotesImportant Notes:
  • When creating a random Drug Test schedule, appointments are not scheduled on weekends or Federal holidays.
  • The client will receive an automated push notification by 5:00 AM via TouchPoint Messaging that a drug test must be completed that day.
  • You may cancel or reschedule the random Drug Test appointment using the established process.

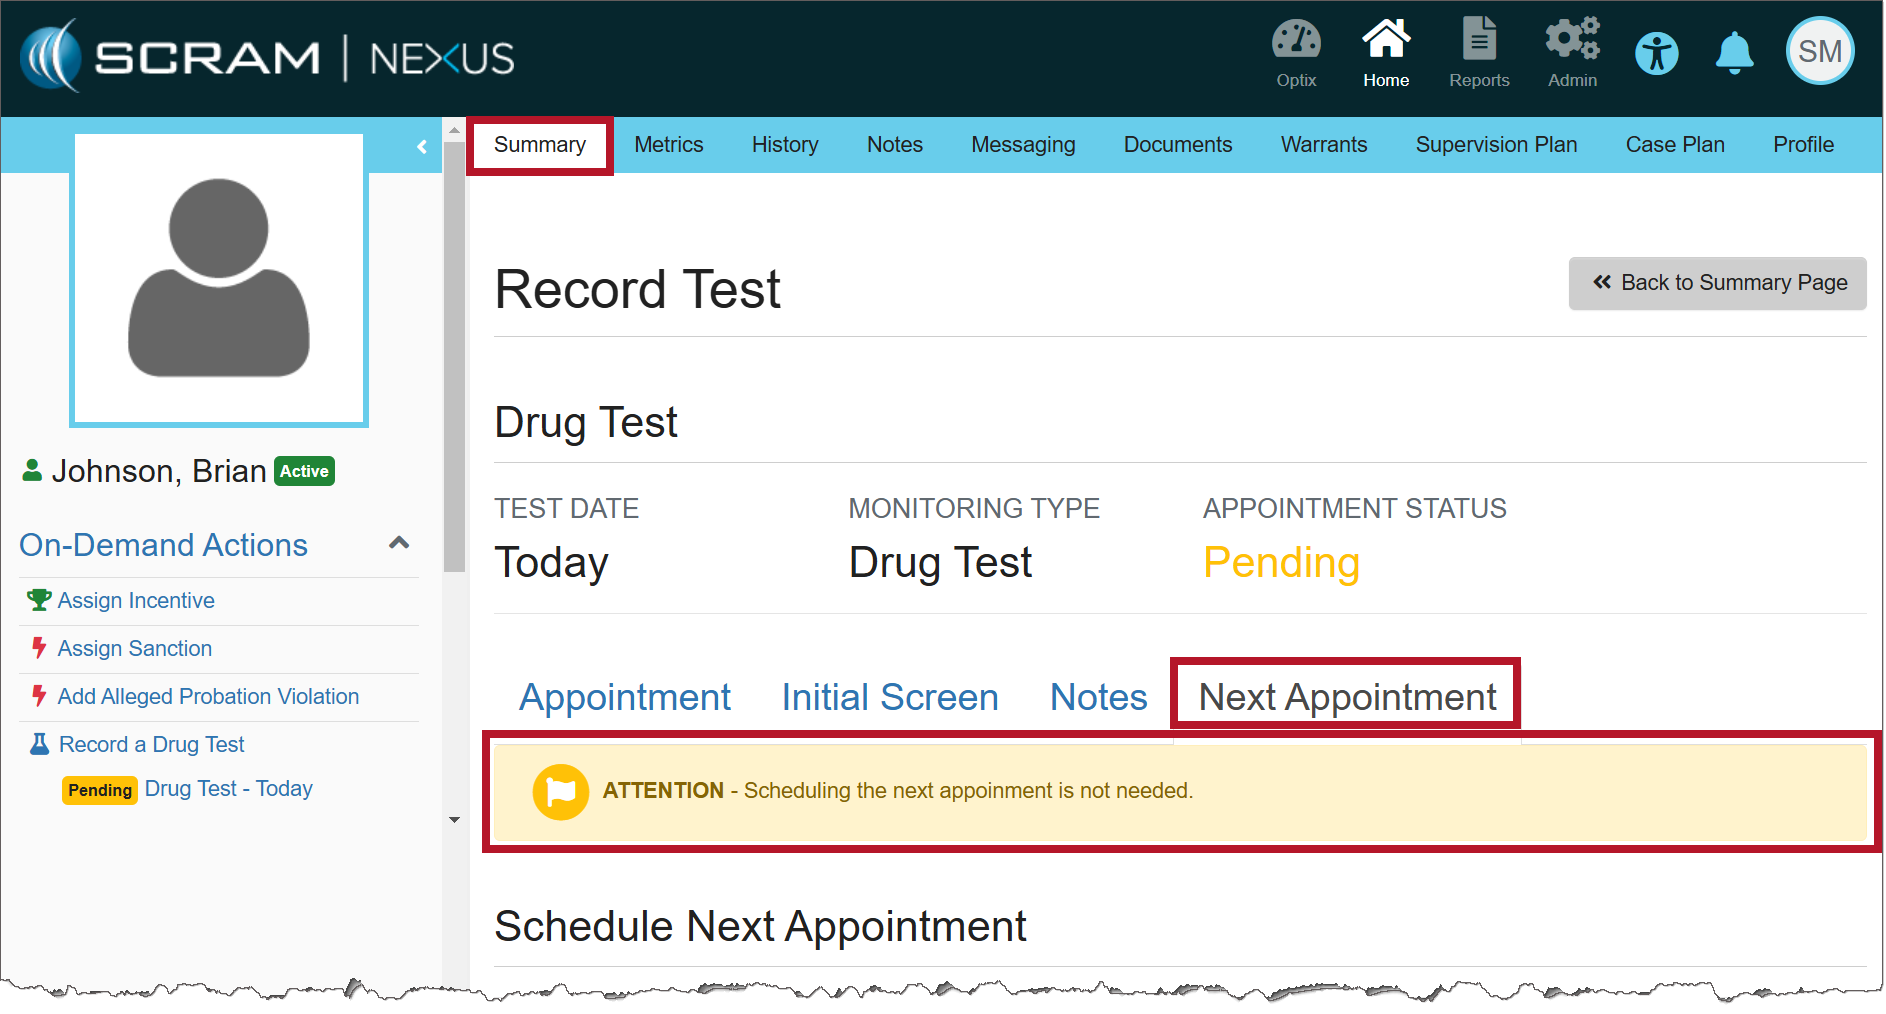
Entering the Results of the Drug Test

When recording the results of the Drug Test Appointment, there is no need to schedule the client’s next appointment because the random schedule has already been established.

Record Test information (click to enlarge)

Continue Reading

Information The services for the mass transfer of clients and for managing fines and fees must be enabled before you may utilize them. For more information, contact your SCRAM Systems Account Representative.

On December 12, 2024, SCRAM Systems released two enhancements for your Nexus caseloads. These enhancements are:

  • SCRAM Nexus Mass Transfer
  • SCRAM Nexus Fines & Fees

Mass Transfer

The first enhancement available is SCRAM Nexus Mass Transfer. Once enabled, you may transfer a caseload or multiple clients in bulk to other officers or caseloads.

  1. Select the Clients tab from the Nexus Workload page.
  2. Select the checkbox next to each of the clients you’d like to transfer, then select the Transfer Caseload button.
Nexus Clients page (click to enlarge)
  1. On the Transfer Caseloads pop-up window, select the Caseload and Officer from the dropdown menus. Both fields are required.
  2. Select the Save button.
Transfer Caseloads pop-up (click to enlarge)
  1. Once saved, a success pop-up banner will display. Additionally, the clients will be displayed on the transferred officer’s Clients page.
The Transferred Officer’s Clients page (click to enlarge)

Fines & Fees

The second enhancement is SCRAM Nexus Fines & Fees. Once enabled, you may add, edit, and record payment for any fines and fees issued for the client.

Navigate to the Fines & Fees Tab

  1. Select the client’s name hyperlink from the Clients tab on the Home page.
Nexus Clients page (click to enlarge)
  1. On the Client Summary page, select the Fines & Fees tab.
The Add Fine/Fee page (click to enlarge)
  1. Enter the details for the fine or fee, on the Add Fine/Fee page. Unless otherwise indicated, all fields are required.
  2. Open the Type dropdown menu and select whether this fine or fee is One Time or Scheduled.
  3. After entering the information, select the Save button.
  4. Once saved, a green “success” banner is displayed.

Record Payment of Fines & Fees

When recording a payment, users have the ability to record complete or partial payments submitted by the client.

  1. On the Open Fines & Fees page, select the Record Payment hyperlink for the fine or fee for which you would like to record payment.
Open Fines & Fees (click to enlarge)
  1. Enter the payment amount and any relevant notes, then select the Record button.
Record Payment page (click to enlarge)

Once a fine or fee has been saved, the Open Fines & Fees section will display the details for each fine or fee with an “open” status.

When payment is made in full, the Balance will show as $0.00. When partial payment is made, the Balance will reflect the amount that remains due.

Fines & Fees (click to enlarge)
Information Once payment has been made in full, you must manually change the status of the fine or fee to “Closed.” If the status is not closed, the fee will appear under Open Fines & Fees with a balance of $0.00.

Edit the Fines/Fees

In some cases, the details of the fine or fee may need to be edited.

  1. Select the Name hyperlink in the Open Fines & Fees section.
Open Fines & Fees (click to enlarge)
  1. Select Edit to make changes to the details of the specific fine or fee.
Fine/Fee page (click to enlarge)
  1. Make any necessary changes to the information.
  2. Once the status has been updated to either ‘Closed’ or ‘Dismissed,’ the fine or fee will be displayed with its details in the Closed Fines & Fees section.
  3. Select the Update button to save your changes.
Fine/Fee page (click to enlarge)

The Change Log will record your changes.

Continue Reading

On October 28, 2024, SCRAM Systems released two enhancements for your SCRAM TouchPoint caseloads. These enhancements include:

  • Your client’s Check-In and Location details are now consolidated under a “History” tab.
  • A new “TouchPoint Change Log” record is available on the History tab detailing all updates made on the client’s Profile page.
To Access the History Tab for the Client:
  1. On the Optix Dashboard, select the Clients tab.
The Clients Tab on the Optix Dashboard (click to enlarge)

2. Once you’ve found your client, select their name hyperlink.

Select Your Client from the Client List (click to enlarge)

3. On the client’s Profile page, select the History tab.

The New History Tab will Appear on the Client’s Page (click to enlarge)

4. On the History page, select the Check-In, Location, and TouchPoint Change Log buttons to view the details.

History tab with Check-In, Location, and TouchPoint Change Log information (click to enlarge)

Check-In

With the Check-In button selected, you will still see the date & time, the results of the Facial Recognition feature, status, and type. No changes have been made to this feature.

Location

With the Location button selected, you may use the filters to customize what is displayed on the page.

Filter your Location Results (click to enlarge)

TouchPoint Change Logs

With the TouchPoint Change Log selected, you may view a record of the changes made on the client’s Profile page, including the user’s information that made the change.

TouchPoint Change Log tab (click to enlarge)

Continue Reading

On July 312024, SCRAM Systems will release an enhancement for your Client Check-In Caseload. Before this release, you would compare the client’s baseline image to their check-in photo for verification. With this release, you may now create a check-in photo gallery to reference while verifying the check-in photo taken by the client during a check-in.  

TipsIf you don’t see the enhancement in SCRAM TouchPoint, please clear your cache and cookies and refresh your browser window.

Client Check-In Details

The client Check-In Details page’s Baseline and Check-In Photo section contains additional navigation and menu options.

Starting with the “magnifying glass” icon: Selecting the icon opens a pop-up window, isolating and enlarging the two photos for your review.

Isolate and Enlarge Photos – click to enlarge
Comparison Photos with “More” (⋮) Option – click to enlarge

The Check-In Photo heading contains a “More” (⋮) option that allows you to Add the current check-in photo to an image gallery. Once added, you may use the arrows below the Baseline Photo to scroll through the gallery. The gallery of comparison photos will hold up to 10 images, including the Baseline Photo.

Add Current Check-In Photo to Image Gallery – click to enlarge

As you scroll through the images, the check-in photos added to the gallery will have a heading labeled “Comparison Photo,” along with their check-in date and time information.

Check-In Details with Pop-up Date & Time – click to enlarge

Select the Menu (⋮) above the image to remove a comparison photo from the gallery and then the Delete option.

Remove Comparison Photo – click to enlarge

Each time you add or remove an image from the gallery, you will note a banner in the upper right corner of the page stating “Image Added” or “Image Deleted.”  Once you have reached the 10-image limit, the system will display a “Couldn’t add image (limit reached)” banner if you try to add additional images.

“Couldn’t add image” Message – click to enlarge

To proceed, you must delete an image from the gallery and add the desired image.

Continue Reading

On July 25, 2024, SCRAM Systems will release an enhancement to help you identify the Active, Successful, and Completed status markers for Activities within a Supervision plan. Currently, all three (3) status markers are green. With this enhancement, the Active marker will now be light blue.

TipsIf you don’t see the enhancement in SCRAM Nexus, please clear your cache and cookies and refresh your browser window.
Nexus Active Status Markers in Green – click to enlarge
New Active status Markers in Blue – click to enlarge

This color enhancement is reflected throughout the SCRAM Nexus software.

Continue Reading