To ensure accurate readings, the SCRAM Remote Breath Pro (RB Pro) breath-alcohol testing device must be calibrated at least once every 12 months. Alcohol Monitoring Systems, Inc. (d/b/a “SCRAM Systems”) will not endorse the breath alcohol test results of a device that was not calibrated at least 12 months prior to the date of a given test result.
Calibrations and calibration checks must be performed by an AMS-certified calibration technician. To become certified, send an e-mail to training@scramsystems.com requesting enrollment in the SCRAM Remote Breath Pro Calibration Certification Training course.
Benefits of calibrating each device yourself include:
- No equipment downtime waiting on a new device or for SCRAM Systems to calibrate the device and return it.
- Able to verify, on the spot, if the device is detecting alcohol correctly when the client disputes the test results.
- Can perform a calibration check at any time to validate that the device is still within established calibration standards.
Key Steps to follow while completing a calibration:
- Ensure nothing obstructs the air vent on the back of the RB Pro device during calibration. For example, do not lay the device flat on any surface or block the vent with your hand while holding the device.
- When the device is in an “In Inventory” status, power up the device and ensure the device can communicate before initiating a calibration.
- When the device is in an “Assigned to Client” status, ensure the device can communicate before initiating a calibration. The device will “wake-up” and begin the calibration process when assigned.
What you will need:
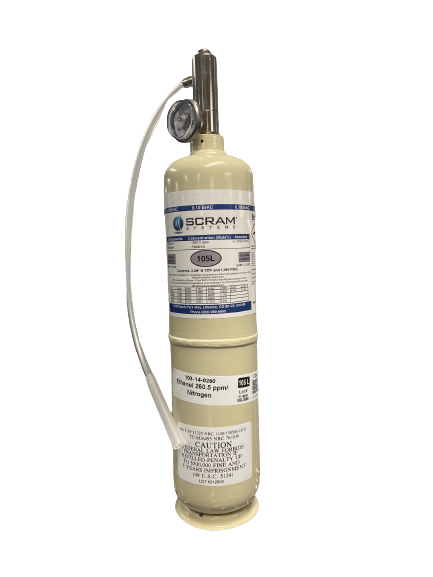
- Gas Canister (0.10% Ethanol dry gas)
- Regulator (4LM)
- Rubber Tubing
- RB Pro Breath Tube
Getting Started
Assemble Remote Breath Pro Calibration Equipment
- Screw the regulator onto the canister by hand until snug.
- You should hear a click as you tighten the regulator.
- The pressure gauge will display the gas pressure in the canister when attached correctly.
- Firmly attach one end of the rubber tubing to the barbed fitting on the regulator.
Initiate the calibration in SCRAMNET
- Select the Inventory button.
- Enter the serial number of the device in the Serial Number field and select the Search button.
- Select the Serial Number hyperlink.
- On the Device Details page, select the Initiate Calibration button. A “Calibration Initiated – Waiting to communicate with the Device” message appears.
- Power on (In Inventory) or wake up (Assigned to Client) the device. The device displays the following steps:
-
- PLEASE WAIT
- SERIAL #[device s/n]
- READY FOR CALIBRATION
- ATTACH EQUIPMENT
- START FLOW OF GAS
In SCRAMNET, the message on the Device Details page changes to “Running Calibration – Attach to the Device to proceed with Calibration.”
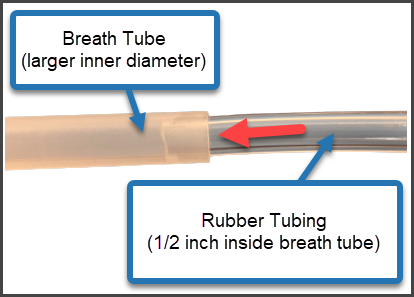
- Connect one end of the rubber tubing to an RB Pro breath tube. The rubber tubing fits inside the end of the breath tube with the larger diameter.
click to enlarge
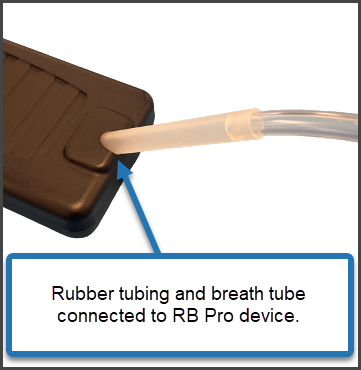
- Connect the breath tube to the RB Pro device.
click to enlarge
- Press and hold the push button on the top of the regulator until the device’s screen displays:
Reminder: Ensure nothing obstructs the air vent on the back of the RB Pro device during calibration. For example, do not lay the device flat on any surface or block the vent with your hand while holding the device.
-
- STOP FLOW OF GAS
- CALIBRATION SUCCESSFUL
- REMOVE EQUIPMENT
- CAL-CHECK PENDING
- PLEASE WAIT
- READY FOR CAL-CHECK
- ATTACH EQUIPMENT
- START FLOW OF GAS
- Press and hold the push button on the top of the regulator again until the device’s screen displays:
-
- STOP FLOW OF GAS
- CAL-CHECK SUCCESSFUL
- REMOVE EQUIPMENT
- CALIBRATION COMPLETE
Once the calibration and cal-check are complete, the device will return to the pre-calibration state. “Device Unassigned” for In Inventory devices, or “Monitoring” for Assigned to Client devices.
- Verify results in SCRAMNET. On the Device Details page select the Refresh Page to Latest Status button. A record of the calibration appears in the Calibration History section.