Use these instructions to replace either type of SCRAM Base Station (Standard or Wireless) with a SCRAM Standard Base Station.
What you will need:
- SCRAM Standard Base Station being assigned (including power cord, phone cable, and Direct Connect USB cable)
- Ethernet cable (optional)
Procedure
Before Client Arrives
Ensure that Base Station is Fully Charged.
Plug the power cord into the new base station and into an electrical outlet.
- Base station display if base station IS FULLY CHARGED:
- Line 1 – STORAGE MODE
- Line 2 – BATTERY CHARGED
- Base station display if base station IS NOT FULLY CHARGED:
- Line 1 – STORAGE MODE
- Line 2 – BATTERY CHARGING
- Keep the base station plugged in until the display changes to FULLY CHARGED.
- Base station display if the battery IS NOT FUNCTIONING PROPERLY:
- Line 1 – STORAGE MODE
- Line 2 – CHECK BATTERY
When Client Arrives
Perform the following steps when the client arrives at your office.
- Set the new Base Station to Pending Assignment status by doing the following:
- Access the client’s Equipment page.
- Click the Replace Base Station link.
- Select an option in the Communication Method drop-down list.
- Enter the new base station serial number.
- Click the Complete Equipment Replacement button.
- Print the Participant Agreement Addendum:
Note: The addendum is also available for download at the bottom of this page.- Click the Alternate Agreements link.
- Click the AMS Default Participation Agreement Addendum button to open the addendum.
- Print two copies of the addendum and have client sign both. Place one copy in client’s file and give client other copy.
- Click the Return to Currently Assigned Equipment button.
The status of the new base station is set to Pending Assignment and the status of the old base station is set to Pending Removal.
- Open the Direct Connect application on your computer. (SCRAM Standard Base Station Only)
- Connect old Base Station with Direct Connect application. (SCRAM Standard Base Station Only) as follows:
- Plug the power cord into the old base station and into an electrical outlet. Base station displays:
- Line 1 – DATE/TIME
- Line 2 – CHECK PHONE LINE
- Plug the power cord into the old base station and into an electrical outlet. Base station displays:
- Plug the small (mini-B type) USB connector into the base station.
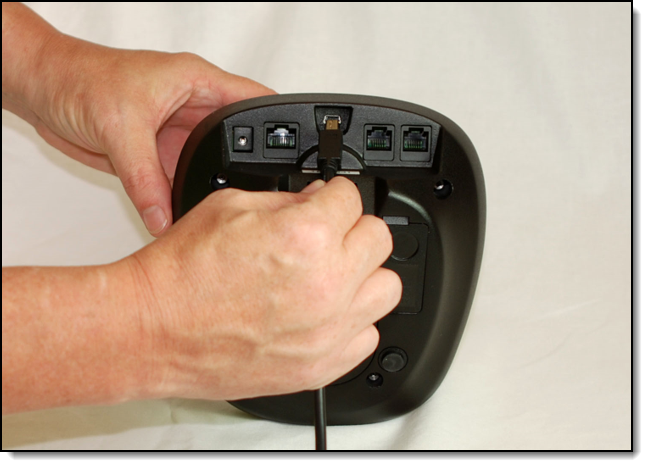
Connecting USB Cable to SCRAM Base Station
At this time:- Base Station status in Direct Connect Application: Communicating
- Base Station display:
- Line 1 – DIRECT CONNECT
- Line 2 – ONLINE
- Any remaining data is transferred from the base station to SCRAMNET.
- The base station software is checked and updated, if necessary.
When complete:
- Base Station status in Direct Connect Application: Communication Complete
- Base station display:
- Line 1 – STORAGE MODE
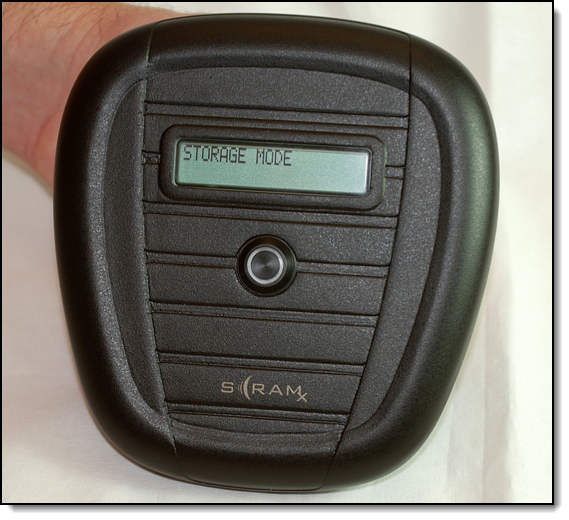
Base Station Display – “STORAGE MODE”
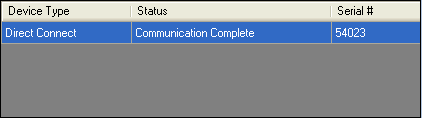
Direct Connect Application – “Communication Complete”
- Unplug the power cord and USB cable from the base station.
- Connect new Base Station to your computer as follows:
- Plug the power cord into the new base station and into an electrical outlet.
Base station displays:- Line 1 – TIME/DATE
- Line 2 – CHECK PHONE LINE
- Plug the small (mini-B type) USB port into the base station.

Connect USB Cable to SCRAM Base Station
- Plug the power cord into the new base station and into an electrical outlet.
At this time:
-
- Base Station status in Direct Connect Application: Communicating
- Base station display:
- Line 1 – DIRECT CONNECT
- Line 2 – ONLINE
- The new base station assignment process begins.
- Any remaining data is transferred from the base station to SCRAMNET.
- The base station software is checked and updated, if necessary.
- Client parameters are loaded on the base station.
When complete:
-
- Base Station status in Direct Connect Application: Communication Complete
- Base station display:
- Line 1 – DATE/TIME
- Line 2 – MONITORING
- Unplug the power cord and USB cable from the base station.
- Confirm that the status of the new base station is Assigned to Client in SCRAMNET.
- Give the base station to the client along with the power cord and phone cable. Remind the client to plug the base station into the most centrally located analog wall jack as soon as they get home.
When Client Plugs in the Base Station at Home
SCRAM Standard Base Station Using Internet Service
When the base station is plugged into an AC outlet and Ethernet jack at the client’s home, the base station displays:
- Line 1 – NETWORK – CONNECTING
then - Line 1 – NETWORK – CONNECTED
Line 2 – CONTACTING SERVER
then - Line 1 – NETWORK – CONNECTED
Line 2 – SCRAMNET CONTACTED
then - Line 1 – TIME/DATE
Line 2 – MONITORING
SCRAM Standard Base Station Using Analog Phone Line
When the base station is plugged into an AC outlet and phone jack at the client’s home, the following occurs:
- If not already done, the client is prompted to plug in the phone line.
- Base station display remains at:
- Line 1 – TIME/DATE
- Line 2 – Steps through DIALING -> ONLINE -> MONITORING
- An “Installation Complete” message appears in the client’s HA Event Log.
- The phone number that the base station is plugged into is uploaded to SCRAMNET where it is compared to the phone number previously entered in SCRAMNET. If the numbers do NOT match, the “Initialization Complete” message will NOT appear in the client’s HA Event Log.
Using SCRAM Wireless Base Station (WBS)
When the WBS is plugged into an AC outlet at the client’s home, the base station displays:
- Line 1 – TIME/DATE
- Line 2 – MONITORING